

Page 1
Quick Guide
You must read the Usage and Safety Precautions before use.
Download the Operation Manual from the ZOOM website (https://www.zoom.jp/docs/h3-vr).
This page has both PDF and ePub format les.
The PDF le format is suitable for printing and viewing on a computer.
The ePub le format is suitable for smartphones and tablets and can be read on electronic book readers.
© 2018 ZOOM CORPORATION
Copying or reprinting this manual in part or in whole without permission is prohibited.
Product names, registered trademarks and company names in this document are the property of their respective companies.
You might need this manual in the future. Always keep it in a place where you can access it easily.
The contents of this manual and the specifications of the product could be changed without notice.
Page 2
Preparations
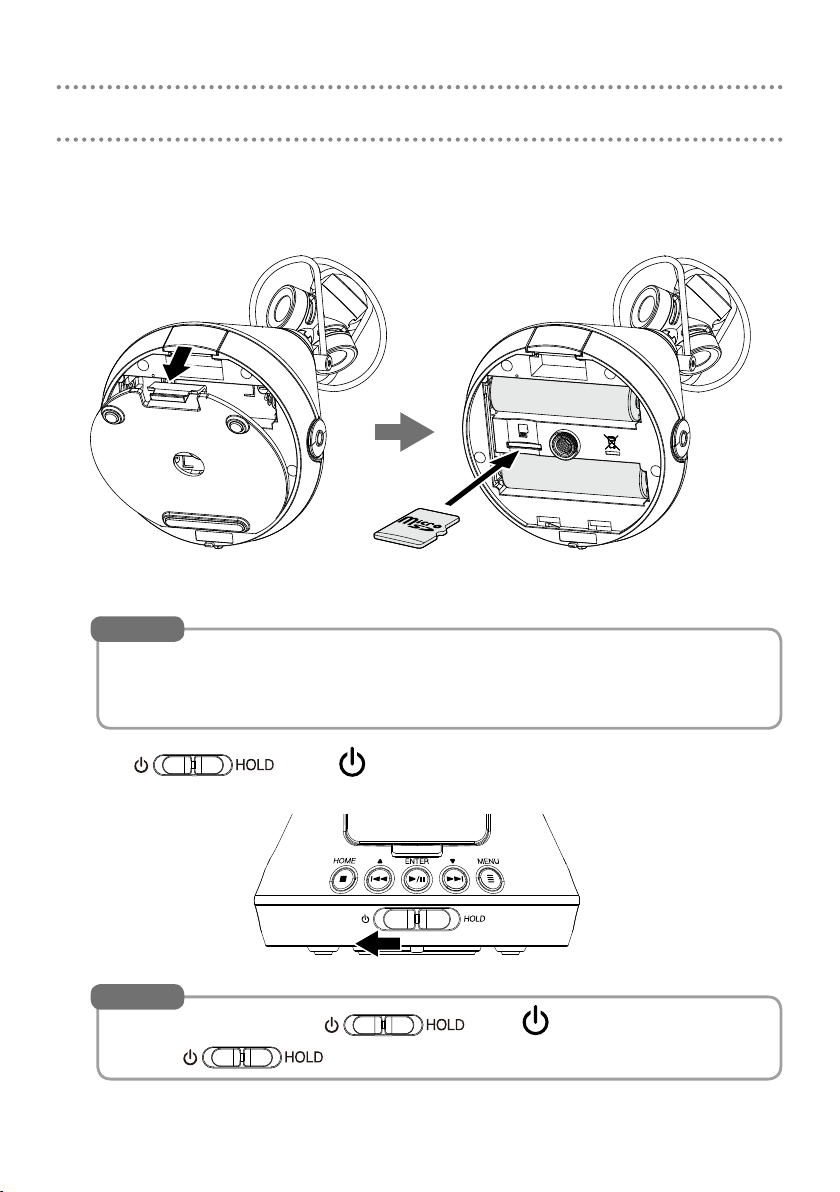
Press the battery/microSD card compartment cover down to open it and insert batter-
1.
ies and a microSD card.
Press down to open
+
+
microSD card
HINT
• An AC adapter (ZOOM AD-17) designed for use with this recorder can also connected to
the USB port to operate it using AC power.
• When connected to a computer, power can be supplied by USB.
Slide toward to turn the power on.
2.
HINT
• To turn the power off, slide toward .
• Sliding
to the HOLD side will disable button operations.
2
Page 3
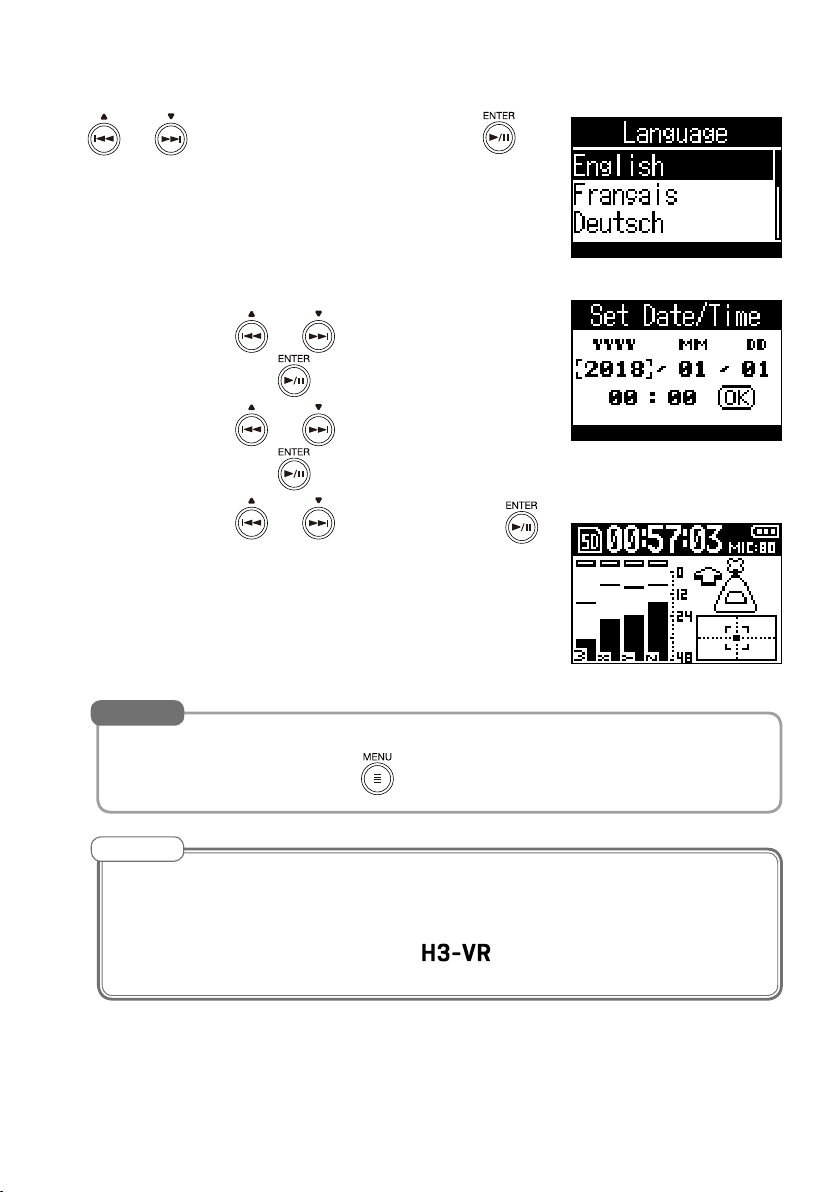
Setting the display language
■
Use and to select the display language, and press .
Setting the date and time
■
Selecting an item:
Setting a value:
Conrming the
date and time:
When setting the date and time is complete, the Home Screen
will appear.
Use
and press
Use
and press
Use
and to select the item to change,
.
and to change a value,
.
and to select OK, and press .
HINT
• Display language and date/time settings can also be changed later from a menu screen.
To open the menu screen, press while the Home Screen is open.
NOTE
• On the Battery menu screen, set the type of battery installed so that the amount of remaining battery charge can be accurately displayed.
• To format a microSD card, select SD card on the menu screen. After purchasing a new
microSD card, always format it using the
to maximize performance.
3
Page 4
Recording
Make recording settings
2, 3
Press when the Home Screen is open.
1.
Use and to select the item to set, and press .
2.
Press
Use and to set each item.
3.
to return to the original screen.
HINT
1
• By combining Ambisonic format les recorded with the with video recorded using a 360° camera you can create videos that allow the audio to follow the visual perspective.
• Using software provided by ZOOM, you can convert les recorded with the
variety of formats, including stereo, 5.1ch surround, and binaural stereo.
to a
4
Page 5
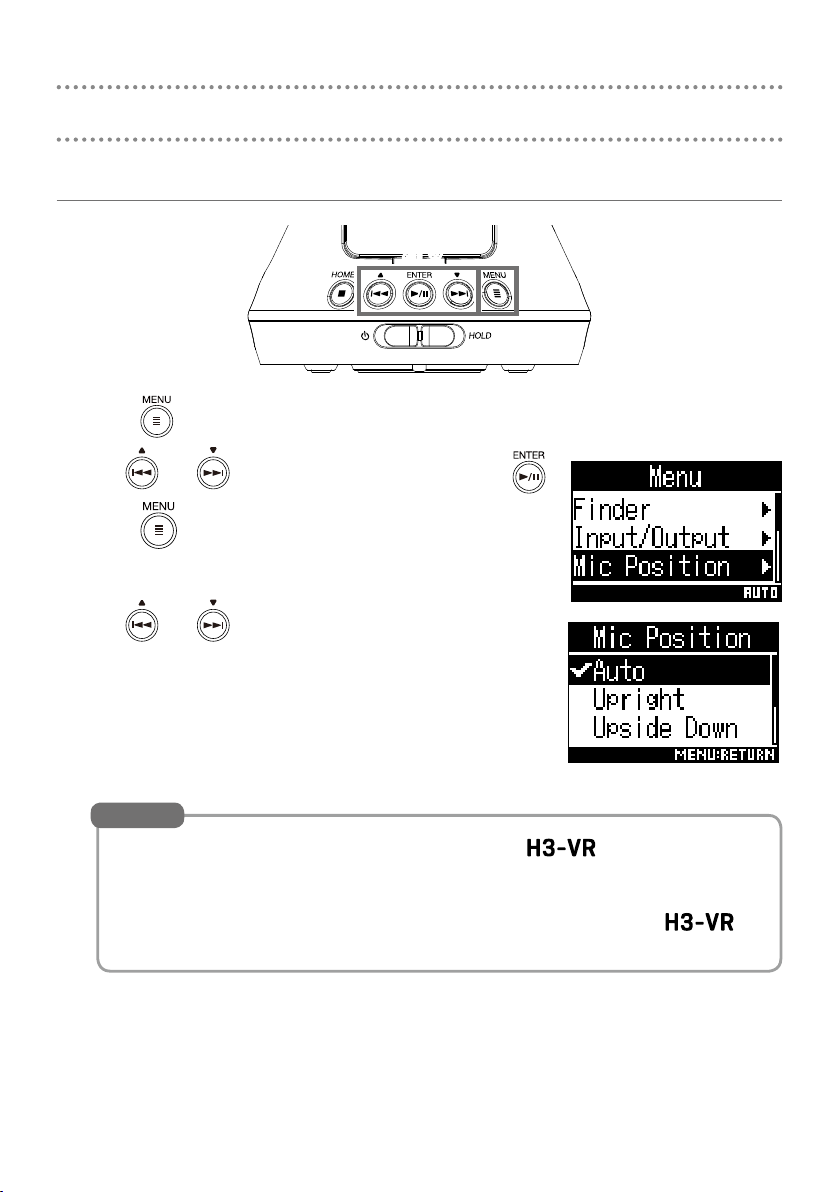
Setting items
■
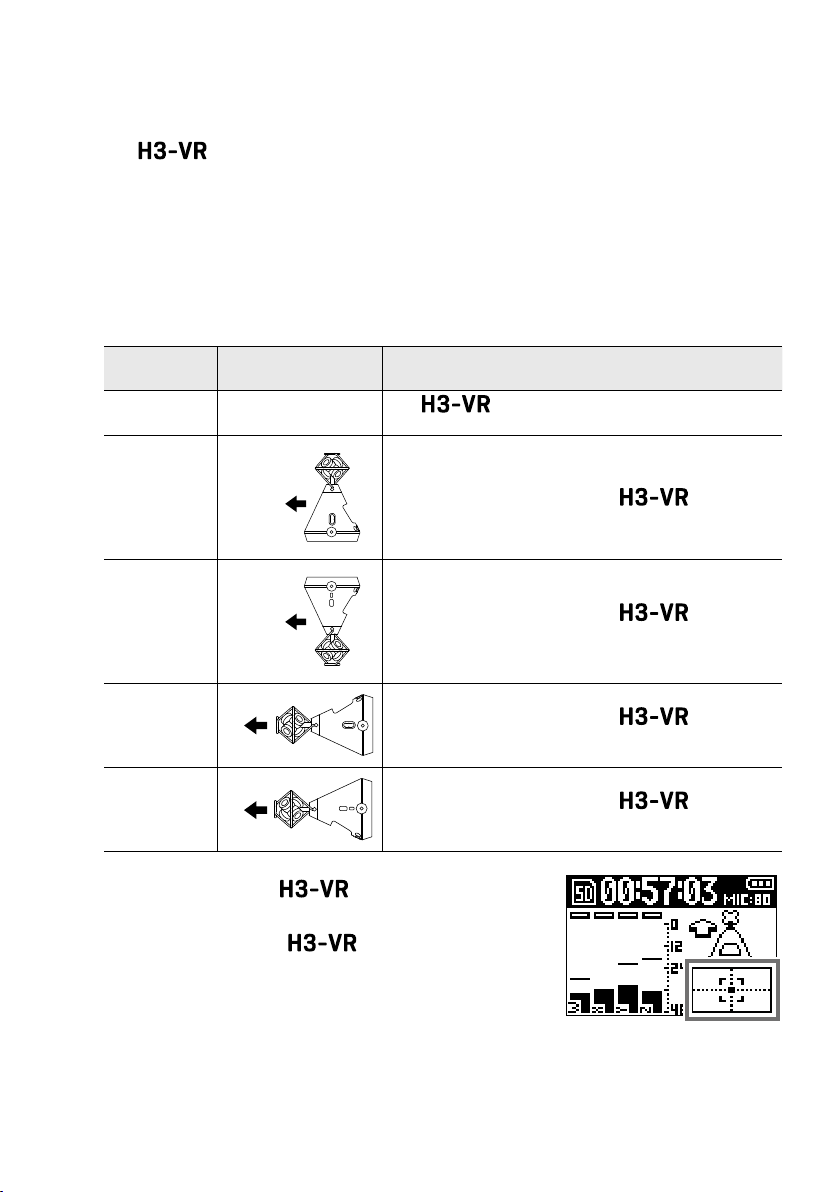
• Setting the mic position: Mic Position
The
can record sound in every direction, including forward, backward, left,
right, up and down.
Use Mic Position to set the orientation of the mics and recorder in relation to the
forward direction.
When Mic Position is kept at its default setting, the built-in motion sensor allows it to
always record with normal forward/backward, left/right and up/down position relationships regardless of whether the mics are oriented up, down or forward.
Setting
Auto −
Upright
Upside Down
Endre
Endre Invert
Mic/recorder
orientation
Forward
Forward
Forward
Forward
Explanation
The
according to its orientation at the start of recording.
Use this setting to record with the upright.
Use this setting to record with the upside
down.
Use this setting to record with the oriented
horizontally with its display up.
Use this setting to record with the oriented
horizontally with its display down.
automatically sets the mic position
The orientation of the is detected by the
motion sensor and shown on the Home Screen.
Adjust the angle of the so that the tilt indicator is centered.
Tilt indicator
5
Page 6

• Setting the recording mode: Rec Settings ➡ Rec Mode
This sets the le format used to record les.
Setting Explanation
FuMa Record as Ambisonics B FuMa format (4-channel).
AmbiX Record as Ambisonics B AmbiX format (4-channel).
Ambisonics A Record as Ambisonics A format (4-channel).
Stereo Record as an ordinary stereo (2-channel) le.
Binaural Record as a stereo (2-channel) le that has been converted to binaural.
• Setting the recording format: Rec Settings ➡ Rec Format
The recording format can be selected in consideration of audio quality and le size.
Settings range from 44.1kHz/16-bit to 96kHz/24-bit.
Higher values provide higher audio quality but also have larger le sizes.
• Setting the Ambisonic monitoring mode: Input/Output ➡ Ambisonic Monitor
This sets the conversion format when outputting Ambisonic input signals from the
PHONE OUT and LINE OUT jacks.
Setting Explanation
Stereo The input sound is converted to ordinary stereo and output.
Binaural The input sound is converted to binaural and output.
HINT
Use to adjust the headphone output volume.
• Setting the low-frequency lter: Input/Output ➡ Lo Cut
This function can reduce low-frequency noise, including air-conditioning, wind and
vocal pops. This can be set from 10 to 240 Hz or Off.
• Setting the limiter: Input/Output ➡ Limiter
The limiter can prevent distortion by reducing loud input signals.
Setting Explanation
On/Off This turns the limiter on and off.
Threshold The threshold for limiter operation can be set from −2 to −16 dBFS.
Attack Time
Release Time
In a range from 1 to 4 ms, this sets the amount of time after the input
signal exceeds the threshold until compression of the output signal is
maximized.
In a range from 1 to 500 ms, this sets the amount of time after the input
signal goes below the threshold until the limiter stops compressing the
signal.
6
Page 7

Adjusting input levels (MIC GAIN)
Turn .
1.
Adjust so that peak levels on the level meters stay
around −12 dBFS.
Recording
1
2
Press when the Home Screen is open.
1.
This shows the name of the recording le and starts
recording.
Press .
2.
This stops recording and opens the Home Screen.
Operations during recording
■
• Pause: Press
This pauses recording. Marks are added automatically at points where recording has
been paused.
• Resume recording: Press
.
again.
1
7
Page 8

Playing recordings
12
Press when the Home Screen is open.
1.
This shows the name of the le and starts playback.
HINT
Use to adjust the headphone output volume.
Press .
2.
This stops playback and opens the Home Screen.
Changing the playback mode
Press during playback.
1.
Press repeatedly until the desired playback mode is
selected.
8
1
Page 9

Tracking playback mode
Stereo audio signals can be extracted according to specic orientations from les
recorded in Ambisonics A and Ambisonics B (FuMa and AmbiX) formats.
The orientation of the extracted audio can be adjusted by changing the orientation of
the .
Orientation of
sound extracted
Horizontal
angle
Vertical
angle
Rotation
angle
Manual playback mode
Stereo audio signals can be extracted according to specic orientations from les
recorded in Ambisonics A and Ambisonics B (FuMa and AmbiX) formats.
The angle of the audio extracted can be adjusted by pressing
for the horizontal
angle and pressing for the vertical angle.
Orientation of
sound extracted
Horizontal
angle
Vertical
angle
Binaural playback mode
Files recorded in Ambisonics A and Ambisonics B (FuMa and AmbiX) formats can be
converted to binaural.
9
Page 10

Operations during playback
• Pause/resume playback: Press
• Search forward: Press and hold
• Search backward: Press and hold
• Move to le beginning: Press
• Play next le: Press
• Play previous le: Press twice
NOTE
When using manual playback mode, only pause and resume playback func-
tions can be used.
HINT
If marks have been added to the le playing back, pressing and will move
to mark positions.
10
Page 11

List of functions and settings
When the home screen is open, press to open the MENU screen where you can use the following
functions and settings.
Item Explanation
Finder This shows the folders and les on the microSD
Input/Output Lo Cut This function can reduce noise, including air-condi-
Limiter The limiter can prevent distortion by reducing loud
Ambisonic Monitor This sets how Ambisonic input sounds are
Line Out level This adjusts the line output level. (−40 dB – 0 dB)
card.
tioning, wind and vocal pops.
(Off/10 – 240 Hz)
input signals.
monitored.
(Stereo/Binaural)
A test tone can be played in order to adjust the level
of a digital SLR camera or other device.
Mic Position This sets the mic orientation during recording.
Rec Settings Rec Mode This sets the le format used to record les.
Rec Format The recording format can be selected in consider-
Rec File Name This sets the le name used for recorded les.
Sound Marker A tone signal (sound marker) can be output from
(Auto/Upright/Upside Down/Endre/Endre Invert)
(FuMa/AmbiX/Ambisonics A/Stereo/Binaural)
ation of audio quality and le size.
(44.1k/16 bit – 96k/24 bit)
(Auto (Date)/User Dened Name)
the PHONE OUT and LINE OUT jacks when recording
starts.
(Off/On)
11
Page 12

Item Explanation
System Date/Time This sets the date/time and date display format.
Time Display Set how the counter appears on the display during
LCD The time until the display backlight turns off and the
Battery Select the type of batteries used in the
SD card The microSD card can be formatted and tested for
Versions The rmware versions can be checked.
Factory Reset The factory default settings can be restored.
Language This sets the language shown on the display.
USB Audio I/F
Card Reader Use a computer to check the les saved on the
BTA-1
(This menu item only appears when a BTA-1 is
connected.)
(YYMMDD/MMDDYY/DDMMYY)
recording and playback.
(During recording: Elapsed Time/Remaining Time)
(During playback: Elapsed Time/Remaining Time)
display contrast can be set.
(Backlight: Off/On/30 sec/1 min/2 min/3 min/4
min/5 min)
(Contrast: 1–10)
(Alkaline/Ni-MH/Lithium)
performance.
input signals can be input directly to a
computer or iOS device, and playback signals on
a computer or iOS device can be output from the
.
microSD card and copy those les to the computer.
Make this setting when a dedicated BTA-1 Bluetooth
adapter is used to enable control of the
from an iOS device.
(Off/On)
.
12
Page 13

Connecting by USB
Using as an SD card reader
Press when the Home Screen is open.
1.
Use and to select “USB”, and press .
2.
Use and to select "Card Reader", and press .
3.
Use a USB cable to connect the and the computer.
4.
When nished, end the USB connection from the computer.
5.
Press when the Home Screen is open.
6.
Use and to select “Exit”, and press .
7.
Disconnect the USB cable from the and the computer.
8.
13
Page 14

Using as an audio interface
Press when the Home Screen is open.
1.
Use and to select “USB”, and press .
2.
Use and to select "Audio I/F", and press .
3.
Use and to select the mode or type of connected device, and press .
4.
Setting Explanation
Stereo This sends a stereo mix of input signals 1–4 to the computer.
4ch Ambisonics
Stereo (iOS) This sends a stereo mix of input signals 1–4 to the iOS device.
Use a USB cable to connect the with the computer or iOS device.
5.
This sends tracks 1–4, which are converted from input signals 1–4, as separate signals to the computer.
When nished with the USB connection, press on the Home Screen.
6.
Use and to select “Exit”, and press .
7.
Use and to select “Execute”, and press .
8.
Disconnect the USB cable from the and the computer or iOS device.
9.
HINT
• When connected to a computer, the recorder will operate on USB bus powered.
• Use batteries when connected to an iOS device.
14
Page 15

Specications
Recording media Cards compatible with microSD/microSDHC/microSDXC specications
Recording formats
Display 1.25" monochrome LCD (96×64)
Motion sensor 6 axes (3-axis gyro, 3-axis acceleration)
Built-in Ambisonic
mic
LINE OUT Connector: 3.5 mm stereo mini
PHONE OUT Connector: 3.5 mm stereo mini
USB
Power 2 AA batteries (alkaline, rechargeable NiMH or lithium)
Estimated
continuous
recording time
using batteries
(Class 4 or higher)
Ambisonics A, Ambisonics B (FuMa/AmbiX)
WAV 4ch poly (supports BWF and iXML): 44.1 kHz/16-bit, 44.1 kHz/24-bit,
48 kHz/16-bit, 48 kHz/24-bit, 96 kHz/16-bit, 96 kHz/24-bit
Stereo
WAV stereo (supports BWF and iXML): 44.1 kHz/16-bit, 44.1 kHz/24-bit, 48 kHz/16-bit,
48 kHz/24-bit, 96 kHz/16-bit, 96 kHz/24-bit
Binaural
WAV stereo (supports BWF and iXML): 44.1 kHz/16-bit, 44.1 kHz/24-bit, 48 kHz/16-bit,
48 kHz/24-bit
4 matched unidirectional condenser mics
Maximum sound pressure input: 120 dB SPL
Mic gain: +18 – +48 dB
Maximum output level: −10 dBu (1 kHz, 10 kΩ load)
Maximum output level: 20 mW + 20 mW (into 32Ω load)
Connector: microUSB
Mass storage operation
USB 2.0 High Speed
Audio interface operation
2 in/2 out (stereo/binaural input), USB 2.0 Full Speed
44.1 kHz/16-bit, 48 kHz/16-bit
4 in/2 out ( Ambisonics A/FuMa/AmbiX input), USB 2.0 High Speed
44.1 kHz/24-bit, 48 kHz/24-bit
AC adapter (ZOOM AD-17): DC 5V/1A (supports USB bus power)
48 kHz/24-bit, FuMa Rec Mode
Alkaline batteries: about 11.5 hours
NiMH batteries (1900 mAh): about 11.5 hours
Lithium batteries: about 24 hours
FR6
(1.5 V)
14500 lithium rechargeable batteries (3.7 V)
cannot be used. They will break the product.
• The above values are approximate.
• Continuous battery operation times were determined using in-house testing methods. They will vary greatly according to use conditions.
External
dimensions
Weight
(main unit only)
Google Spatial Audio HRIRs
Copyright 2016 Google Inc. All Rights Reserved.
This product includes HRTFs (head related impulse responses) developed by Google Inc.
Google Spatial Audio is released under Apache License 2.0.
76 mm (W) × 78 mm (D) × 123 mm (H)
120 g
14500
(3.7 V)
15
Page 16

ZOOM CORPORATION
4-4-3 Kanda-surugadai, Chiyoda-ku, Tokyo 101-0062 Japan
www.zoom.co.jp
Z2I-3423-01
 Loading...