


|
|
|
|
|
|
|
|
|
|
|
|
|
|
|
|
|
|
|
|
|
|
|
|
|
|
|
|
|
|
|
|
|
|
|
|
|
|
|
|
|
|
|
|
|
|
|
|
|
|
|
|
|
|
|
|
|
|
|
|
|
|
|
|
|
|
|
|
|
|
|
|
|
|
|
|
|
|
|
|
|
|
|
|
|
|
|
|
|
|
|
|
|
|
|
|
|
|
|
|
|
|
|
|
|
|
|
|
|
|
|
|
|
|
|
|
|
|
|
|
|
|
|
|
|
|
|
|
|
|
|
|
|
|
|
|
|
|
|
|
|
|
|
|
|
|
|
|
|
|
|
|
|
|
|
|
|
|
|
|
|
|
|
|
|
|
|
|
|
|
|
|
|
|
|
|
|
|
|
|
|
|
|
|
|
|
|
|
|
|
|
|
|
|
|
|
|
|
|
|
|
|
|
|
|
|
|
|
|
|
|
|
|
|
|
|
|
|
|
|
|
|
|
|
|
|
|
|
|
|
|
|
|
|
|
|
|
|
|
|
|
|
|
|
|
|
|
|
|
|
|
|
|
|
|
|
|
|
|
|
|
|
|
|
|
|
|
|
|
|
|
|
|
|
|
|
|
|
|
|
|
|
|
|
|
|
|
|
|
|
|
|
|
|
|
|
|
|
|
|
|
|
|
|
|
|
|
|
|
|
|
|
|
|
|
|
|
|
|
|
|
|
|
|
|
|
|
|
|
|
|
|
|
|
|
|
|
|
|
|
|
|
|
|
|
|
|
|
|
|
|
|
|
|
|
|
|
|
|
|
|
|
|
|
|
|
|
|
|
|
|
|
|
|
|
|
|
|
|
|
|
|
|
|
|
|
|
|
|
|
|
|
|
|
|
|
|
|
|
|
|
|
|
|
|
|
|
|
|
|
|
|
|
|
|
|
|
|
|
|
|
|
|
|
|
|
|
|
|
|
|
|
|
|
|
|
|
|
|
|
|
|
|
|
|
|
|
|
|
|
|
|
|
|
|
|
|
|
|
|
|
|
|
|
|
|
|
|
|
|
|
|
|
|
|
|
|
|
|
|
|
|
|
|
|
|
|
|
|
|
|
|
|
|
|
|
|
|
|
|
|
|
|
|
|
|
|
|
|
|
|
|
|
|
|
|
|
|
|
|
|
|
|
|
|
|
|
|
|
|
|
|
|
|
|
|
|
|
|
|
|
|
|
|
|
|
|
|
|
|
|
|
|
|
|
|
|
|
|
|
|
|
|
|
|
|
|
|
|
|
|
|
|
|
|
|
|
|
|
|
|
|
|
|
|
|
|
|
|
|
|
|
|
|
|
|
|
|
|
|
|
|
|
|
|
|
|
|
|
|
|
|
|
|
|
|
|
|
|
|
|
|
|
|
|
|
|
|
|
|
|
|
|
|
|
|
|
|
|
|
|
|
|
|
|
|
|
|
|
|
|
|
|
|
|
|
|
|
|
|
English |
|
|||||||||||||||||||||||||||||||||
|
|
|
|
|
|
Ow ner ’s Manual |
|
|
|
|
|
|
|
|
|
|
|
|
|
|
|
|
|
|
|
|
|
|
|
|
|
|
||||||||||||||||||||||||||||||||||||||||||||||||||||||||||||||||||||||||||||||||||||||||||||||||||||||||||
|
|
|
|
|
|
|
|
|
|
|
|
|
|
|
|
|
|
|
|
|
|
|
|
|
|
|
|
|
|
|
|
|
|
|
|
|
|
|
|
|
|
|
|
|
|
|
|
|
|
|
|
|
|
|
|
|
|
|
|
|
|
|
|
|
|
|
|
|
|
|
|
|
|
|
|
|
|
|
|
|
|
|
|
|
|
|
|
|
|
|
|
|
|
|
|
|
|
|
|
|
|
|
|
|
|
|
|
|
|
|
|
|
|
|
|
|
|
|
|
|
|
|
|
|
|
|
|
|
|
|
|
|
|
|
|
|
|
|
|
|
|
|
|
|
|
|
|
|
|
|
|
|
|
|
|
|
|
|
|
|
|
|
|
|
|
|
|
|
|
|
|
|
|
|
|
|
|
|
|
|
|
|
|
|
|
|
|
|
|
|
|
|
|
|
|
|
|
|
|
|
|
|
|
|
|
|
|
|
|
|
|
|
|
|
|
|
|
|
|
|
|
|
|
|
|
|
|
|
|
|
|
|
|
|
|
|
|
|
|
|
|
|
|
|
|
|
|
|
|
|
|
|
|
|
|
|
|
|
|
|
|
|
|
|
|
|
|
|
|
|
|
|
|
|
|
|
|
|
Bedienungsanleit ung |
Deutsch |
|
|
|
|
|
|
|
|
|
|
Mode d’emploi |
Français |
|
|
|
|
|
|
|
|
|
Downloaded from: http://www.usersmanualguide.com/

Congr at ulat ions!
You are the proud owner of an extraordinary electronic keyboard. The Yamaha PSR-6000 PortaTone combines the most advanced AWM tone generation technology with state-of-the-art digital electronics and features to give you stunning sound quality with maximum musical enjoyment. The Interactive Accompaniment and One Touch Setting features, in particular, are brilliant examples of how advanced technology can significantly expand your musical horizons. A new large-size graphic display and easy-to-use interface also greatly enhance the operability of this advanced instrument.
In order to make the most of your PortaTone’s features and vast performance potential, we urge you to read the manuals thoroughly while trying out the various features described. Keep the manual in a safe place for later reference.
Cont ent s
Taking Car e of Your Por t aTone |
2 |
Floppy Disks & the Disk Drive .......... |
3 |
Nomenclat ur e |
4 |
Connect ions & Music St and |
6 |
The Demonst r at ion |
8 |
The Demo Play Modes ........................ |
9 |
The PSR-6000 Display & |
|
Help Funct ion |
10 |
The Display & Multi-function |
|
Controls ................................................ |
10 |
■ The [MIXER] Button ........................ |
10 |
■ The [LIST HOLD] Button ................. |
11 |
■ The [CONTRAST] Control ............... |
11 |
The Help Function .............................. |
11 |
Playing t he PSR-6000 |
12 |
Selecting & Playing Voices ............. |
12 |
Keyboard Percussion ....................... |
14 |
USER SET Voice Assignment ......... |
15 |
Changing the Split Point .................. |
16 |
Tr ansposit ion, Tuning, Oct ave |
|
Change, & Key Velocit y |
17 |
TRANSPOSE & TUNE ........................ |
17 |
OCTAVE CHANGE .............................. |
18 |
KEY VELOCITY ................................... |
18 |
Using t he Accompaniment Sect ion |
19 |
■ Accompaniment Volume ................. |
25 |
■ Rhythm-only Accompaniment ......... |
25 |
USER SET Style Assignment .......... |
26 |
Interactive Accompaniment ............ |
27 |
■ Auto Solo ......................................... |
27 |
Using Disk Styles on Optional Data
Disks ...................................................... |
|
28 |
■ Selecting a DISK Style .................... |
|
28 |
One Touch Set t ing |
|
29 |
Expr ession & Effect s |
|
31 |
■ Harmony .......................................... |
|
31 |
■ Sustain ............................................ |
|
31 |
■ Reverb ............................................. |
|
31 |
■ Effects ............................................. |
|
31 |
■ Left Hold .......................................... |
|
32 |
■ Pitch Bend Wheel ............................ |
|
32 |
■ Modulation/Effect Wheel ................. |
|
32 |
Using t he Pads |
|
33 |
The MULTI Mode ................................. |
|
33 |
The PHRASE Pads (pads 1 … |
4) ...... |
33 |
■ Recording Phrases .......................... |
|
34 |
■ Phrase Playback ............................. |
|
34 |
The CHORD Pads (pads 5 … |
8) ....... |
35 |
■ Recording Chords ........................... |
|
35 |
■ Chord Playback ............................... |
|
36 |
■ MULTI Pad Repeat Playback .......... |
36 |
|
The PERC Mode .................................. |
|
37 |
■ Assigning Different Instruments |
|
|
To the PERC Pads .......................... |
|
37 |
■ Playing the Percussion Pads .......... |
38 |
|
■ The PERC BREAK Function |
........... |
38 |
The TEMPO Mode ............................... |
|
39 |
■ The TEMPO SYNCHRO |
|
|
Function .......................................... |
|
40 |
Panel Regist r at ion |
|
41 |
Registering the Panel Settings ........ |
41 |
|
Recall the Registered Panel |
|
|
Settings .............................................. |
|
42 |
The Freeze Function ......................... |
|
42 |
Playing DOC (Disk Or chest r a |
|
Collect ion) & Gener al MIDI |
|
Music Soft w ar e Disks |
43 |
Disk Orchestra Collection Disk |
|
Playback ............................................... |
43 |
■ Volume Control ............................... |
45 |
■ Muting Specific Parts ...................... |
46 |
■ Octave, Transpose, and Tune ........ |
46 |
■ Other Controls That Function |
|
In the DOC Mode ............................ |
46 |
General MIDI Disk Playback ............ |
47 |
■ Volume Control ............................... |
47 |
■ Muting Specific Tracks .................... |
48 |
■ Octave ............................................. |
48 |
■ Other Controls That Function |
|
In the General MIDI Mode ............... |
48 |
The Sequencer |
49 |
Recording ............................................. |
49 |
Deleting Tracks ................................... |
52 |
Playback ............................................... |
53 |
Sequence Editing ............................... |
54 |
■ CONDITION/VOLUME — |
|
CONDITION .................................... |
54 |
● METRONOME ............................ |
54 |
● HARMONY .................................. |
54 |
● RECORDING TYPE .................... |
55 |
■ CONDITION/VOLUME — |
|
TRACK VOLUME ............................ |
55 |
■ EDIT — TRACK COPY/MIX ............ |
56 |
■ REMOVE EVENT ............................ |
57 |
■ DELETE MEASURE ....................... |
58 |
■ CREATE MEASURE ....................... |
58 |
■ QUANTIZE ...................................... |
59 |
■ ERASE ............................................ |
60 |
■ NOTE SHIFT ................................... |
60 |
■ SONG CLEAR ................................. |
61 |
Downloaded from: http://www.usersmanualguide.com/

The Cust om Accompaniment |
|
Pr ogr ammer |
62 |
Basic Programming Procedure |
|
(Normal section) ................................. |
62 |
Creating Intro, Fill-In, & |
|
Ending Sections ................................. |
66 |
Programming a Preset Intro, |
|
Fill-in, or Ending Section .................. |
66 |
Editing a Previously Saved User |
|
Intro, Fill-in, or Ending Section ........ |
67 |
Creating a New Intro, Fill-in, or |
|
Ending Section From Scratch .......... |
67 |
Custom Accompaniment Editing ...... |
68 |
■ RECORD — NAME/SECTION ........ |
68 |
● NAME .......................................... |
68 |
● SECTION .................................... |
68 |
■ RECORD — MEASURE/BEAT ....... |
69 |
■ RECORD — TRACK VOLUME ....... |
69 |
■ RECORD — FADER ASSIGN ........ |
70 |
■ EDIT — QUANTIZE ........................ |
70 |
■ EDIT — COPY ................................ |
71 |
■ EDIT — REMOVE EVENT .............. |
72 |
■ STORE ............................................ |
72 |
■ I/F/E Select ...................................... |
73 |
Exiting From the Custom |
|
Accompaniment Programmer ........ |
74 |
Selecting & Using a Custom |
|
Accompaniment Style ....................... |
74 |
The PSR-6000 “ Funct ions” |
75 |
General Function Selection & |
|
Editing Procedure .............................. |
75 |
■ The [EXIT] Button ............................ |
76 |
F1: Cust om Voice Edit |
77 |
Standard Voice Edit Functions |
|
(voice groups 1 through 10) ............ |
77 |
■ NAME/CONTROL ........................... |
77 |
● NAME .......................................... |
77 |
● CONTROLLER ............................ |
78 |
1 TOUCH SENS. ......................... |
78 |
2 PITCH BEND ............................ |
78 |
■ COMMON ....................................... |
78 |
1 OCTAVE ................................... |
78 |
2 PAN .......................................... |
78 |
● MODULATION ............................ |
79 |
3 DEPTH ..................................... |
79 |
4 SPEED ..................................... |
79 |
● TONE .......................................... |
79 |
5 BRILLIANCE ............................ |
79 |
6 RESONANCE .......................... |
79 |
■ ENVELOPE ..................................... |
80 |
1 ATTACK ................................... |
80 |
2 DECAY ..................................... |
80 |
3 RELEASE ................................. |
80 |
4 SUSTAIN .................................. |
80 |
Dual Voice Edit Functions |
|
(voice group 11) .................................. |
81 |
■ NAME/VOICE .................................. |
81 |
● NAME .......................................... |
81 |
● VOICE ......................................... |
81 |
■ OCT/PAN/VOL./DETUNE ............... |
82 |
● OCTAVE ..................................... |
82 |
● PAN ............................................. |
82 |
● VOLUME ..................................... |
82 |
● DETUNE ..................................... |
82 |
Drum Voice Edit Functions |
|
(Voice group 12) ................................. |
83 |
■ NAME/PAN/PITCH/SOFTNESS ..... |
83 |
● NAME .......................................... |
83 |
● PAN ............................................. |
83 |
● PITCH ......................................... |
83 |
● SOFTNESS ................................. |
83 |
F2: Rever b/Effect |
84 |
■ REVERB TYPE & DEPTH .............. |
84 |
● REVERB TYPE ........................... |
84 |
● REVERB DEPTH ........................ |
84 |
■ EFFECT TYPE & DEPTH ............... |
85 |
● EFFECT TYPE ............................ |
85 |
● EFFECT DEPTH ......................... |
85 |
F3: Cont r oller |
86 |
■ FOOT CONTROLLER ..................... |
86 |
■ MODULATION/EFFECT WHEEL ...... |
86 |
■ SUSTAIN PEDAL & |
|
PITCH BEND WHEEL ..................... |
87 |
● SUSTAIN PEDAL ........................ |
87 |
● PITCH BEND WHEEL ................. |
87 |
■ FOOT SWITCH ............................... |
88 |
F4: One Touch Set t ing/IA |
89 |
■ ONE TOUCH SETTING |
|
SYNCHRO CHANGE ...................... |
89 |
■ INTERACTIVE |
|
ACCOMPANIMENT ........................ |
89 |
F5: Har mony Type |
90 |
F6: Disk |
91 |
■ The [TO DISK] Button ..................... |
91 |
■ The [FROM DISK] Button ................ |
93 |
■ The F6: DISK Functions .................. |
94 |
● 1 FROM DISK ............................. |
94 |
● 2 TO DISK ................................... |
95 |
● 3 RENAME FILE ......................... |
97 |
● 4 DELETE FILE ........................... |
98 |
● 5 FORMAT DISK ......................... |
98 |
● 6 DISK FREE AREA ................... |
99 |
F7: Ut ilit y |
100 |
■ MEMORY BACKUP & |
|
REGISTRATION FREEZE ............ |
100 |
● MEMORY BACKUP .................. |
100 |
● REGISTRATION FREEZE ........ |
101 |
■ RECALL PRESET DATA .............. |
101 |
F8: MIDI |
102 |
■ THE NORMAL PLAY MODE ......... |
102 |
■ THE DOC MODE .......................... |
102 |
■ THE GENERAL MIDI (GM) |
|
MODE ........................................... |
103 |
● Initial General MIDI Mode |
|
Settings ..................................... |
103 |
MIDI Channel & |
|
Multi Part Settings ............................ |
104 |
■ Normal Play Mode ......................... |
104 |
● CH. SETTING ............................ |
104 |
TRANSMIT ................................ |
104 |
RECEIVE ................................... |
104 |
SPLIT TRANSMIT ..................... |
104 |
RHYTHM RECEIVE .................. |
104 |
● SEQ. TRACK CH. ..................... |
105 |
● MULTI PART ............................. |
105 |
■ DOC/GM Mode ............................. |
106 |
● KEYBOARD CHANNEL ............ |
107 |
● LOCAL CONTROL .................... |
107 |
● TRANSPOSE ............................ |
107 |
MIDI Switch, System Settings, & |
|
Data Transmission ........................... |
107 |
■ MIDI SWITCH (Normal Play |
|
Mode Only) .................................... |
107 |
■ MIDI SYSTEM (Normal Play |
|
Mode Only) .................................... |
108 |
● CLOCK ...................................... |
108 |
● LOCAL CONTROL .................... |
108 |
● TRANSPOSE ............................ |
108 |
● SPLIT SEND ............................. |
108 |
■ DATA TRANSMIT (Normal Play |
|
Mode Only) .................................... |
109 |
● MIDI Bulk Dump Reception |
|
(Memory Data Receive) ............ |
110 |
● Receiving MIDI Bulk Dump |
|
Request Messages ................... |
110 |
● Bulk Dump Error Messages ...... |
110 |
Er r or Messages |
111 |
■ Sequencer Errors .......................... |
111 |
■ Custom Accompaniment |
|
Programmer Errors ....................... |
111 |
■ Disk Errors .................................... |
111 |
■ MIDI Errors .................................... |
112 |
■ DOC/GM Mode Errors ................... |
112 |
■ Other Messages ............................ |
112 |
Tr oubleshoot ing |
113 |
Index |
114 |
Voice List ............................................ |
116 |
■ Keyboard Percussion List ............. |
118 |
Style List ............................................. |
119 |
Normal Play Mode |
|
MIDI Percussion Map ...................... |
120 |
GM/DOC Mode |
|
Percussion Map ................................ |
121 |
Fingering Chart ................................. |
122 |
MIDI Function Tree ........................... |
128 |
MIDI Messages .................................. |
133 |
MIDI Implementation Chart ............ |
140 |
Specifications .................................... |
141 |
Downloaded from: http://www.usersmanualguide.com/
Taking Care of Your PortaTone
Your PortaTone will give you years of playing pleasure if you follow the simple rules given below:
■Location
Do not expose the instrument to the following conditions to avoid deformation, discoloration, or more serious damage.
●Direct sunlight (e.g. near a window).
●High temperatures (e.g. near a heat source, outside, or in a car during the daytime).
●Excessive humidity.
●Excessive dust.
●Strong vibration.
■Power Supply
●Turn the power switch OFF when the instrument is not in use.
●The power supply cord should be unplugged from the AC outlet if the instrument is not to be used for an extended period of time.
●Unplug the instrument during electric storms.
●Avoid plugging the instrument into the same AC outlet as appliances with high power consumption, such as electric heaters or ovens. Also avoid using multi-plug adapters since these can result in reduced sound quality, operation errors, and possibly damage.
■Turn Power OFF When Making Connections
●To avoid damage to the instrument and other devices to which it is connected (a sound system, for example), turn the power switches of all related devices OFF prior to connecting or disconnecting audio and MIDI cables.
■Handling and Transport
●Never apply excessive force to the controls, connectors or other parts of the instrument.
●Always unplug cables by gripping the plug firmly, not by pulling on the cable.
●Disconnect all cables before moving the instrument.
●Physical shocks caused by dropping, bumping, or placing heavy objects on the instrument can result in scratches and more serious damage.
■Cleaning
●Clean the cabinet and panel with a dry soft cloth.
●A slightly damp cloth may be used to remove stubborn grime and dirt.
●Never use cleaners such as alcohol or thinner.
●Avoid placing vinyl objects on top of the instrument (vinyl can stick to and discolor the surface).
■Electrical Interference
●This instrument contains digital circuitry and may cause interference if placed too close to radio or television receivers. If this occurs, move the instrument further away from the affected equipment.
■Data Backup
●Internal data (e.g. sequencer data) is retained in memory even if the power switch is turned OFF. If the power is not turned ON for periods longer than about a week, however, memory data will be lost. Save all important data to disk before turning off for longer periods.
●Internal memory data can be corrupted due to incorrect operation. Be sure to “save” important data to a floppy disk frequently so you have a backup to revert to if something happens to damage the data in memory. Also note that magnetic fields can damage data on the disk, so it is advisable to make a second back-up copy of disks that contain very important data, and keep backup disks in a safe place away from stray magnetic fields (i.e. away from speakers, appliances containing motors, etc.).
■Service and Modification
●The PSR-6000 contains no user serviceable parts. Opening it or tampering with it in anyway can lead to irreparable damage and possibly electric shock. Refer all servicing to qualified YAMAHA personnel.
2 |
Downloaded from: http://www.usersmanualguide.com/
Taking Care of Your PortaTone
Floppy Disks & the Disk Drive
■ Type of Disk
Use only 3.5-inch 2DD floppy disks.
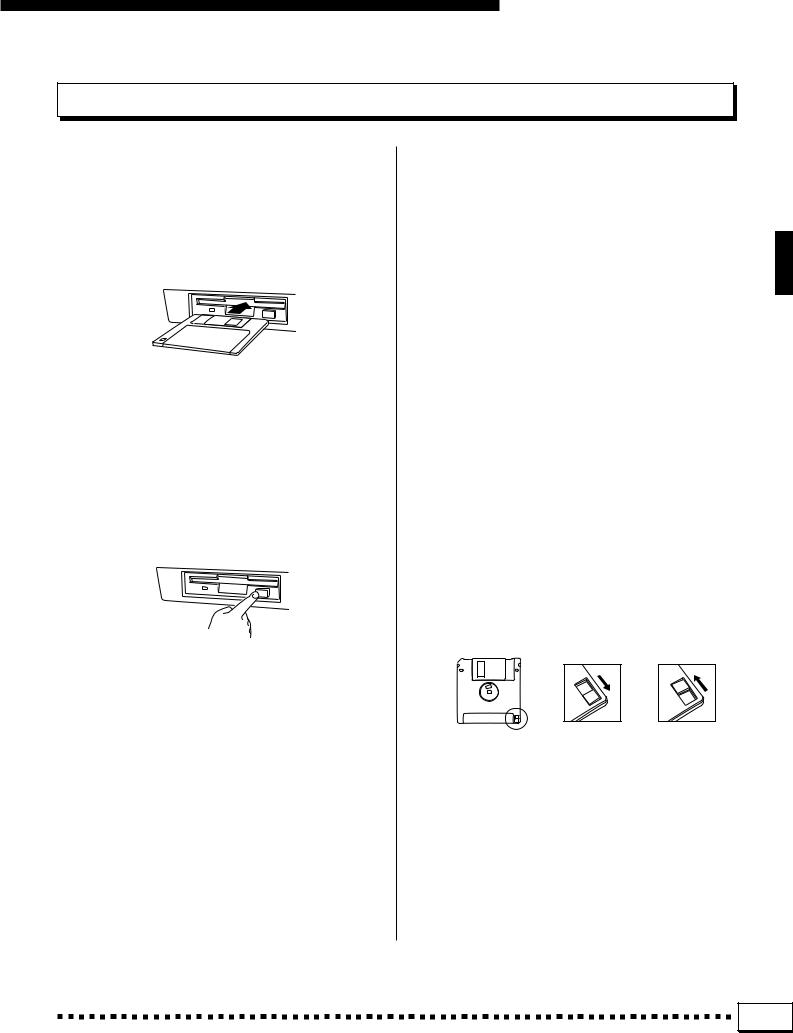
■Disk Insertion & Removal
●To insert a floppy disk in the disk drive, hold the disk with the label side facing up and the sliding shutter facing the disk drive door, then insert carefully until the disk clicks into place.
●To remove a floppy disk from the disk drive, make sure the disk drive “in use” light is not lit and press the disk eject button firmly as far as it will go and then, when the disk is full ejected, remove it by hand.
If the eject button is only partially pressed or pressed too quickly the eject mechanism may not function properly, leaving the disk stuck halfway. Do not attempt to remove the disk forcefully if this happens, since excess force can damage the disk and/or the drive mechanism. Try either pressing the eject button carefully again, or push the disk all the way back into the drive and repeat the eject procedure.
●Never attempt to remove a floppy disk during a record or playback operation!! This can corrupt the data on the disk, and actually damage the disk drive!
●Be sure to remove the floppy disk from the disk drive before turning off the power. A floppy disk left in the drive for extended periods can easily pick up dust and dirt that can cause data read/write errors.
■Clean the Read/Write Head Regularly
This instrument employs a precision magnetic read/ write head which, after an extended period of use, will pick up a layer of magnetic particles from the disks used that will eventually cause read and write errors. To maintain the disk drive in optimum working order we recommend that you use a commercially-available Drytype Head Cleaning Disk to clean the head about once a month. Ask your Yamaha dealer about the available of head-cleaning disks.
■Floppy Disk Handling & Storage
The actual recording medium inside a floppy disk has a fine coating of magnetic particles in which the data is “stored”. To protect this coating as well as the disk drive’s delicate read-write head, please observe the following:
●Always keep floppy disks in their plastic case when they are not in use. Never place heavy objects on a disk or bend the disk in any way. Also keep disks away from liquids and dust.
●Never open the disk’s shutter and touch the exposed surface of the disk.
●Keep floppy disks away from strong magnetic fields such as those produced by television sets, speakers, motors, etc.
●Never leave floppy disks in areas exposed to strong direct sunlight, excessively high or low temperature, or high humidity.
●Never use a floppy disk with a deformed shutter or housing.
●Do not attach anything other than the provided labels to a floppy disk. Also make sure that labels are attached in the proper location.
■Protecting Your data
●To prevent accidental erasure of important data you have saved to floppy disk, be sure to slide the disk’s write-protect tab to the “write protect” position (the tab window should be open). When this is done the disk cannot be written to.
Write protected |
Write enabled |
●Make regular backup copies of important data to a separate floppy disk, and keep your backup disks in a separate, safe place.
●To ensure the safety of your data (and of the disk drive itself) always use floppy disks from a well-known, reliable manufacturer. “No-brand” disks can cause trouble.
YAMAHA is not responsible for damage caused by improper handling or operation.
3 |
Downloaded from: http://www.usersmanualguide.com/
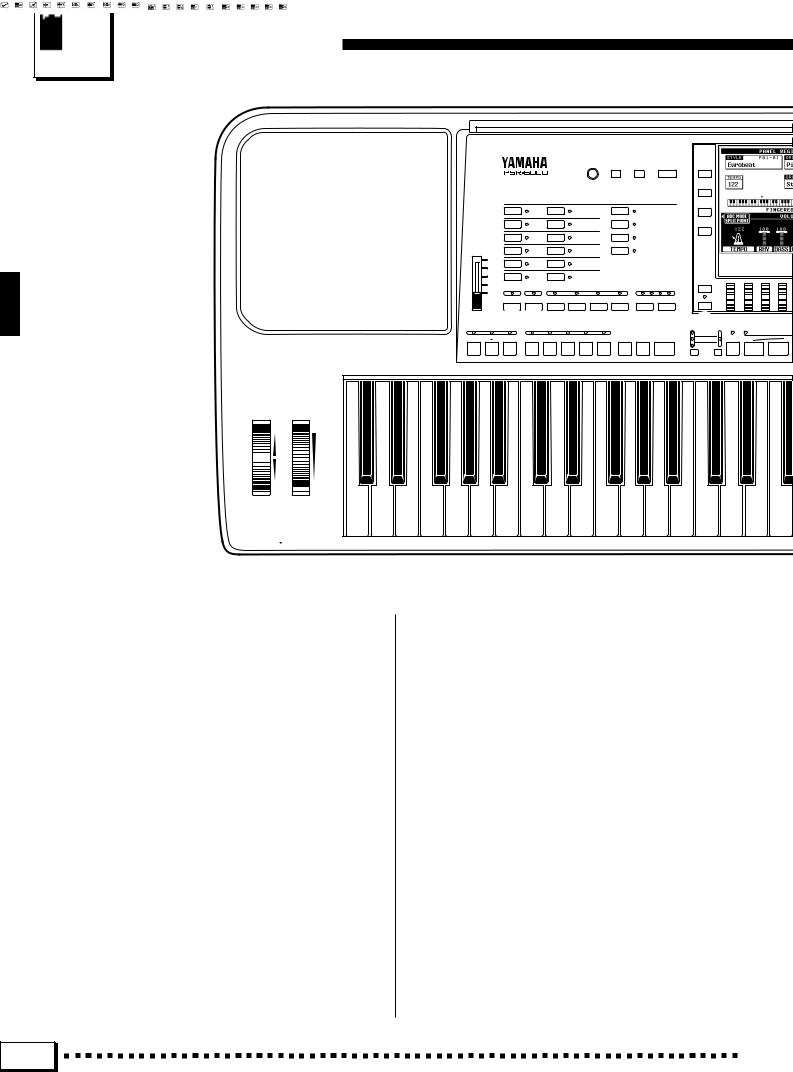
Nomenclature
FOOT CONTROLLER SUSTAIN FOOT SWITCH THRU ––––––––– OUT ––––––––– IN –––– MIDI
5 6 7 8
|
|
|
|
|
|
CONTRAST FUNCTION |
HELP/ |
EXIT |
* |
|
|
||
|
|
|
|
|
|
|
LANGUAGE |
|
|
|
|||
|
|
|
|
|
9 |
|
|
|
|
|
& |
|
|
|
|
|
|
|
|
|
|
|
|
|
|
||
|
|
|
|
|
|
STYLE |
|
|
|
|
|
|
|
|
|
1 |
DANCE |
7 |
LATIN |
|
|
PRESET |
|
|
|
|
|
|
|
2 |
ROCK’N’ |
8 |
LATIN POP |
|
USER SET |
|
|
|
|
|
|
4 |
ROLL |
|
|
|
|
|
|
||||||
3 |
ROCK |
9 |
WALTZ |
|
CUSTOM A |
|
|
|
|
|
|||
MASTER |
|
4 |
POP |
10 |
COUNTRY |
|
CUSTOM B |
|
|
|
|
|
|
VOLUME |
|
|
|
|
|
|
|
||||||
MAX |
|
5 |
|
11 |
|
|
|
|
|
) |
|
|
|
|
|
BALLAD |
TRADITIONAL |
|
|
|
|
|
|||||
|
|
6 |
JAZZ |
12 |
FOR DISK IA |
@ |
# |
|
|
|
|
||
|
|
|
|
|
|
|
MIXER |
|
|
||||
|
|
|
|
|
ONE TOUCH SETTING |
|
|
|
|
||||
MIN |
|
|
|
|
|
|
|
|
|
|
|
|
|
|
|
INTERACTIVE |
AUTO BASS |
VERSE |
VERSE |
CHORUS |
CHORUS |
TEMPO |
LIST HOLD |
|
|
||
|
ACCOMPANIMENT |
CHORD |
A |
B |
A |
B |
|
|
|
|
|||
|
$ 0 ! |
|
|
|
|
– |
+ |
|
|
|
|
||
|
|
% |
|
|
^ |
|
Q |
|
|
||||
|
|
|
|
|
|
|
|
|
MULTI |
REPEAT |
MULTI PLAYING |
||
|
|
|
|
|
|
|
|
|
|
||||
FILL IN |
FILL IN |
ENDING/ |
VERSE |
VERSE |
CHORUS CHORUS SOLO |
SYNCHRO |
START/ |
STOP |
PERC. |
BREAK |
REC / |
PHRA |
|
|
|
rit. |
1 |
2 |
1 |
2 |
START |
RE-START |
|
STOP |
|||
|
|
|
|
|
|
|
|
|
|
TEMPO SYNCHRO |
1 |
2 |
|
|
|
|
|
|
|
|
|
|
|
MODE |
|||
|
|
|
|
|
|
|
|
|
|
SELECT |
|
|
|
INTRO 1 |
INTRO 2 |
INTRO 3 |
|
|
|
|
|
|
|
|
|
Tempo Change |
Tap Start |
ER
PITCH BEND |
MODULATION/ |
|
EFFECT |
UP |
MAX |
DOWN |
MIN |
PHONES
1 POWER Button ........................................ |
|
[page 8] |
2 DEMO Button ........................................... |
|
[page 8] |
3 DISK ORCHESTRA/GENERAL MIDI |
|
|
Button ..................................................... |
|
[page 43] |
4 MASTER VOLUME Control...................... |
[page 8] |
|
5 CONTRAST Control ............................... |
|
[page 11] |
6 FUNCTION Button ................................. |
|
[page 75] |
7 HELP/LANGUAGE Button ..................... |
[page 11] |
|
8 EXIT Button ........................................ |
|
[page 9, 11] |
9 STYLE Buttons .............. |
[page 21, 26, 28, 62, 64] |
|
PRESET, USER SET, CUSTOM A, CUSTOM B, Style Group [1] – [12] Buttons
0 INTERACTIVE ACCOMPANIMENT |
|
Button ..................................................... |
[page 27] |
! AUTO BASS CHORD Button ................. |
[page 19] |
@ ONE TOUCH SETTING Buttons ............ |
[page 29] |
VERSE A, VERSE B, CHORUS A, CHORUS B
# TEMPO [–], [+] Buttons and |
|
Beat Display ........................................... |
[page 22] |
$ Fill-in, Intro, and Ending Buttons |
[page 22, 23, 25] |
FILL INJ (INTRO 1), FILL INN (INTRO 2), |
|
ENDING/rit. (INTRO 3) |
|
% Verse, Chorus, and Solo Buttons ........... |
[page 24] |
VERSE 1, VERSE 2, CHORUS 1,
CHORUS 2, SOLO
^ Accompaniment Control Buttons [page 22, 23, 25]
SYNCHRO START, START/RE-START, STOP
& Liquid Crystal Display (LCD) .............. |
[page 8, 10] |
* LCD Buttons ....................................... |
[page 8, 10] |
( LCD Dials ........................................... |
[page 9, 10] |
) MIXER Button ........................................ |
[page 10] |
Q LIST HOLD Button ................................. |
[page 11] |
W PAD Buttons ........................................... |
[page 33] |
PAD MODE SELECT Buttons, |
|
REC/STOP, 1-8 |
|
4 |
Downloaded from: http://www.usersmanualguide.com/

Nomenclature
L/L+R –– AUX IN –– R L/L+R –– AUX OUT –– R
|
|
|
|
E |
SEQUENCER / CUSTOM ACCOMPANIMENT PROGRAMMER |
|
|
|
2 |
|||||||||
|
|
|
* |
|
|
|
|
|
RECORD |
DELETE |
|
EDIT |
|
|
|
|
|
|
|
|
|
SEQUENCER PLAY/REC |
PLAY/REC |
PLAY/REC |
PLAY/REC |
PLAY/REC |
PLAY/REC |
PLAY/REC |
PLAY/REC |
|
DEMO |
||||||
|
|
|
|
|
|
1 |
|
2 |
3 |
4 |
|
5 |
6 |
7 |
|
ACCOMP. |
|
|
|
|
|
|
CUSTOM ACCOMP. CHORD 1 |
CHORD 2 |
CHORD 3 |
CHORD 4 |
CHORD 5 |
CHORD 6 |
BASS |
|
RHYTHM |
DISK ORCHESTRA/ |
|||||
|
|
|
|
R |
|
|
|
|
|
|
|
|
|
|
|
GENERAL MIDI |
||
|
|
|
|
|
|
|
ORCHESTRA VOICE |
|
|
|
|
|
|
3 |
||||
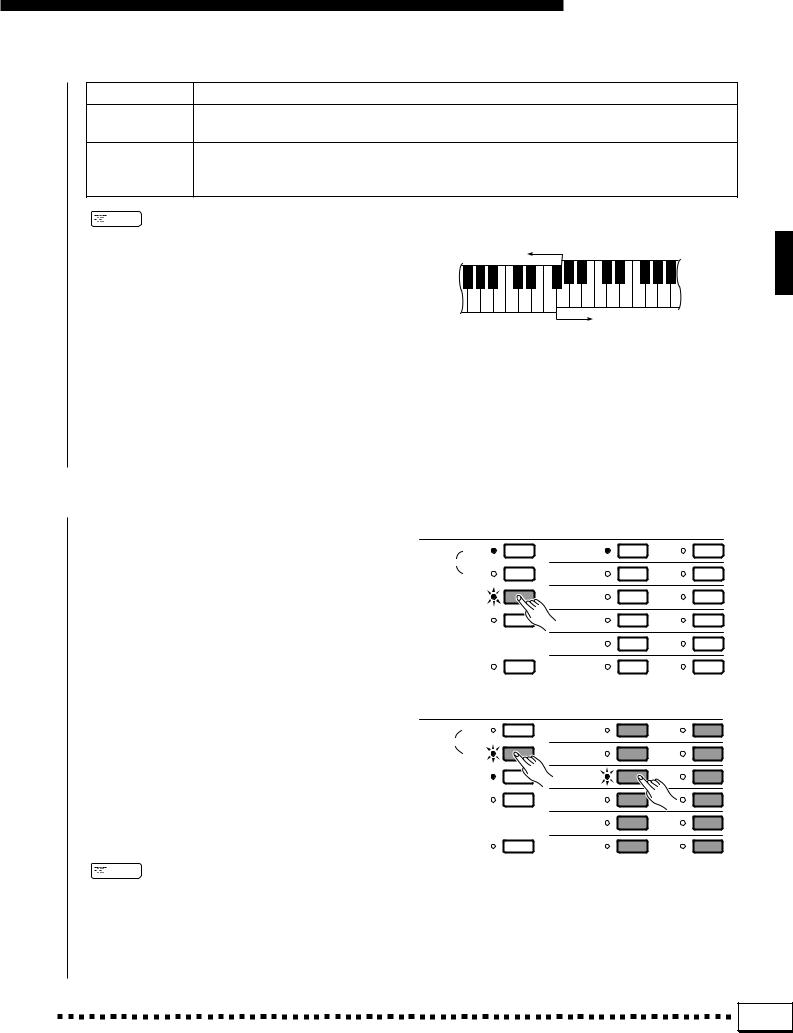
|
|
|
|
|
ORCH. 1 |
|
|
PIANO/E. PIANO |
|
1 |
GUITAR |
|
7 |
|
|
|||
|
|
|
|
VOICE PART |
|
|
|
|
|
|
|
|
|
|
|
|
|
|
|
|
|
|
|
ORCH. 2 |
|
|
|
ORGAN/ |
|
2 |
BASS |
|
8 |
|
|
||
|
|
|
|
|
|
|
ACCORDION |
|
|
|
|
|||||||
|
|
|
|
|
PRESET |
|
|
STRINGS/CHOIR |
|
3 |
SYNTH |
|
9 |
POWER |
||||
|
|
|
|
|
|
|
|
|
|
|
|
|
|
|
|
|
||
|
|
|
|
|
USER SET |
|
|
WOODWIND |
|
4 |
WORLD/ |
|
10 |
|
|
|||
|
|
|
|
|
|
|
|
PERCUSSIVE |
|
|
1 |
|||||||
|
|
|
|
|
|
|
|
|
|
BRASS |
|
5 |
DUAL VOICE/ |
|
11 |
|
||
|
|
|
|
|
|
|
|
|
|
|
SOUND |
|
|
|||||
|
|
|
|
|
|
|
|
|
|
|
|
|
EFFECT |
|
|
|
|
|
|
|
|
|
CUSTOM VOICE |
|
|
|
MALLET |
|
6 |
DRUMS |
|
12 |
|
|
|||
|
|
|
( |
ORCHESTRATION |
|
|
|
|
|
|
|
|
DISK IN USE |
|||||
|
|
|
ORCH. |
|
ORCH. |
|
ORCH. |
LEFT |
HARMONY |
|
SUSTAIN REVERB |
EFFECT |
FROM |
TO |
||||
|
|
|
1 |
|
2+1 |
|
2 1 |
HOLD |
|
|
|
|
|
|
|
DISK |
DISK |
|
|
|
|
|
|
|
T |
|
|
Y U I O P |
Q |
||||||||
|
|
|
W CHORD |
|
|
|
|
|
|
|
|
|
BANK |
|
|
W |
||
|
PAD |
|
|
|
|
|
|
|
|
A |
B |
C |
D |
|
|
|
||
E |
|
|
|
|
|
FREEZE |
|
PANEL REGISTRATION |
|
|
|
|||||||
3 |
4 |
5 |
6 |
7 |
8 |
|
MEMORY |
1 |
2 |
|
3 |
4 |
|
5 |
6 |
7 |
8 |
|
|
|
|
|
|
||||||||||||||
Tempo l |
accel. |
faster |
a tempo |
slower |
rit. |
|
|
|
|
|
|
|
|
|
|
|
|
|
|
> CANCEL |
|
DISK |
|
|
T |
|
|
|
Y |
|
E SEQUENCER/CUSTOM ACCOMPANIMENT |
Y LEFT HOLD Button ................................ [page 32] |
|
PROGRAMMER Buttons ................. [page 49, 62] |
U HARMONY Button ................................. [page 31] |
|
SEQUENCER, CUSTOM ACCOMP. |
||
I SUSTAIN Button .................................... [page 31] |
||
Sequencer Track/Custom Accompaniment |
||
O REVERB Button ..................................... [page 31] |
||
Programmer Track Buttons |
||
|
||
1 through 6/CHORD 1 through 6, 7/BASS, |
P EFFECT Button ...................................... [page 31] |
|
|
||
ACCOMP./RHYTHM |
Q DISK IN USE Buttons ...................... [page 91, 93] |
|
Sequencer/Custom Accompaniment Programmer |
FROM DISK, TO DISK |
|
Control Buttons |
W PANEL REGISTRATION Buttons ........... [page 41] |
|
RECORD, DELETE, EDIT, P (Top), |
||
MEMORY, FREEZE, 1-8, BANK |
||
R (Rewind), F (Forward) |
||
|
||
R ORCHESTRA VOICE Buttons ... [page 13, 15, 77] |
E PITCH BEND Wheel .............................. [page 32] |
|
|
||
VOICE PART ORCH.1, VOICE PART ORCH.2, |
R MODULATION/EFFECT Wheel ............. [page 32] |
|
|
||
PRESET, USER SET, CUSTOM VOICE, |
T Disk Drive ..................................... [page 3, 28, 43] |
|
Voice Group [1] – [12] Buttons |
Y Disk Eject Button ................................ [page 3, 45] |
|
T ORCHESTRATION Buttons ................... [page 12] |
||
|
||
ORCH. 1, ORCH. 2+1, ORCH. 2V1 |
|
5 |
Downloaded from: http://www.usersmanualguide.com/
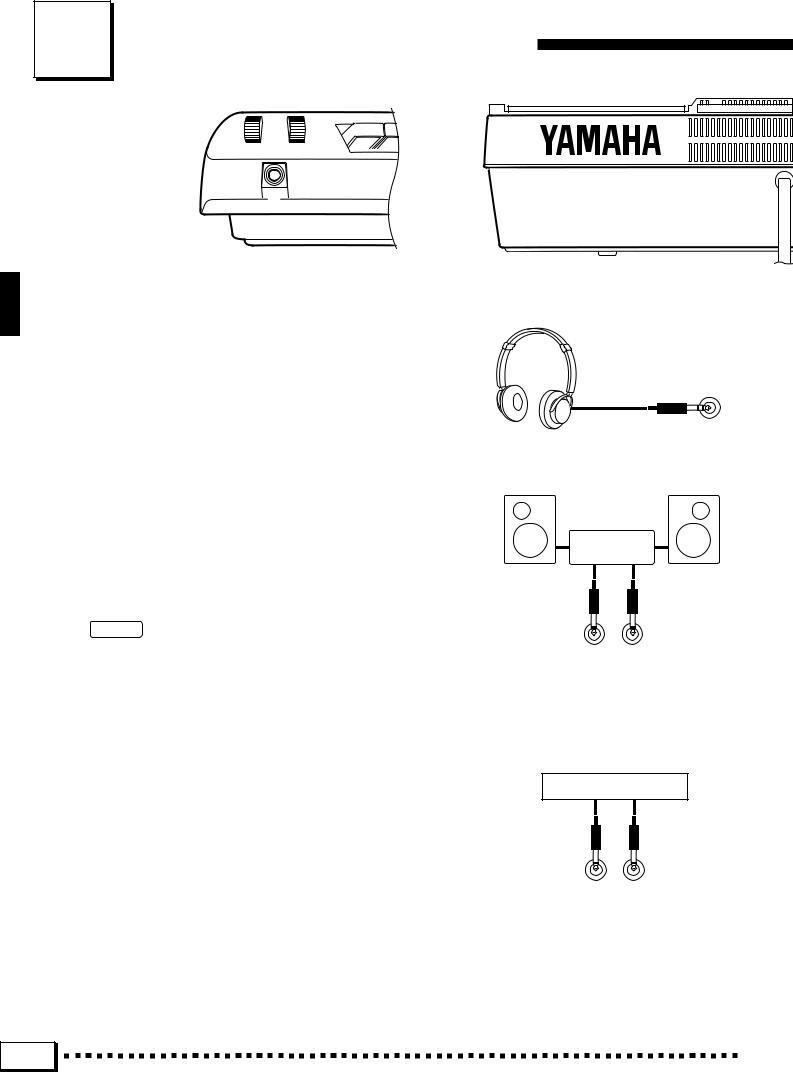
Connections & Music Stand
PHONES
▼
1
1 The PHONES Jack......................................................................................................................................................................
A standard pair of stereo headphones can be plugged in here for private practice or late-night playing. The internal stereo speaker system is automatically shut off when a pair of headphones is plugged into the PHONES jack.
2 The AUX OUT L/L+R and R Jacks .............................................................................................................................
The rear-panel AUX OUT L/L+R and R jacks deliver the output of the PSR-6000 for connection to a keyboard amplifier, stereo sound system, a mixing console, or tape recorder. If you will be connecting the PSR-6000 to a monaural sound system, use only the L/L+R jack. When a plug is inserted into the L/L+R jack only, the leftand rightchannel signals are combined and delivered via the L/L+R jack so you don’t lose any of the PSR-6000 sound.
 CAUTION
•To prevent damage to the internal circuitry, the AUX OUT jack signal must never be returned to the AUX IN jacks, either directly or through external equipment.
Stereo System
AUX OUT
R L/L+R
3 AUX IN L/L+R and R Jacks ................................................................................................................................................
These jacks are intended primarily for use with external audio sources such as tone generators, drum machines, CD players, and similar equipment. The signal received via the AUX IN L and R jacks is reproduced via the PSR-6000’s internal stereo amplifier and speaker system. If you will be connecting a monaural source to the PSR-6000, use only the L/L+R jack. When a plug is inserted into the L/L+R jack only, the monaural input signal is fed to both the left and right channels of the PSR-6000 stereo sound system. Please note that the PSR-6000 MASTER VOLUME control does not affect the level of the signal delivered to external equipment.
Tone Generator
AUX IN
R L/L+R
6 |
Downloaded from: http://www.usersmanualguide.com/
Connections & Music Stand
|
|
MIDI |
|
FOOT |
SUSTAIN |
FOOT |
|
IN |
OUT |
THRU |
SWITCH |
|
CONTROLLER |
AUX OUT |
AUX IN |
|
|
|
|
|
R L/L+R |
R L/L+R |
|
4 5 6 |
2 |
3 |
7 |
|
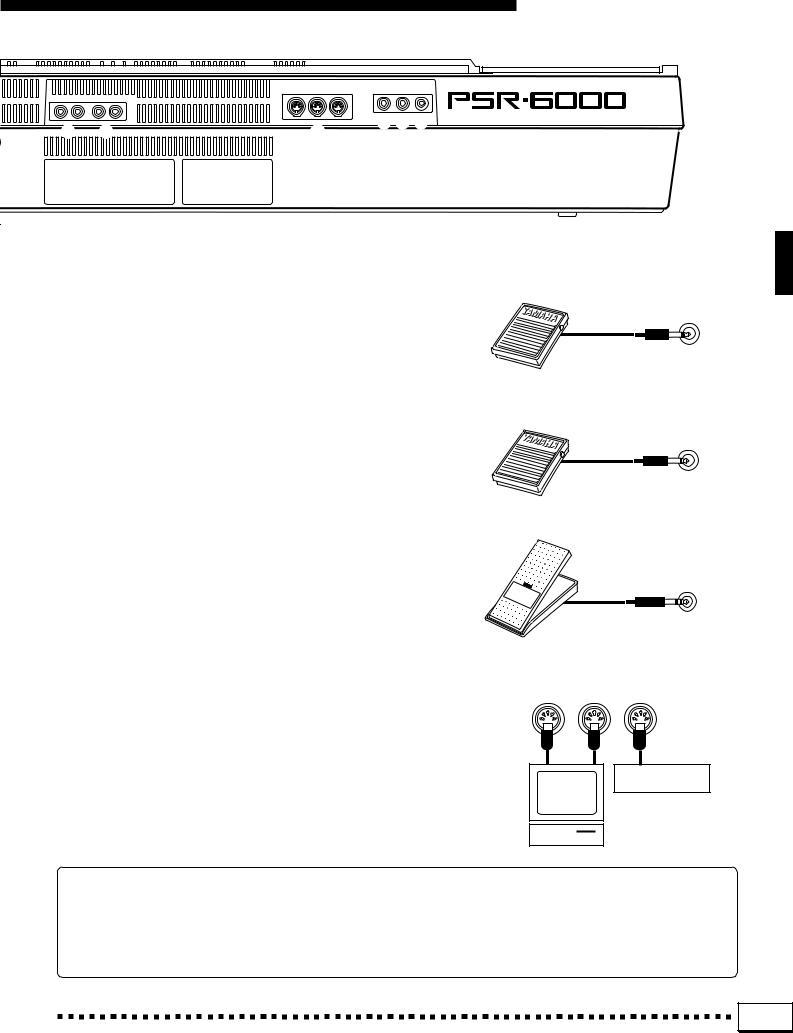
4 FOOT SWITCH Jack ..................................................................................................................................................................
An optional Yamaha FC5 footswitch connected to this jack can be used to control a range of important functions. Refer to the “FOOT SWITCH SELECT” function described on page 86.
FOOT
SWITCH
5 SUSTAIN Jack .................................................................................................................................................................................
An optional FC5 footswitch can be connected here for foot sustain control. The footswitch functions like the damper pedal on a piano — press for sustain, release for normal sound.
SUSTAIN
6 FOOT CONTROLLER Jack ................................................................................................................................................
An optional Yamaha FC7 Foot Controller can be connected to this jack to allow foot expression (swell) or effect control. Please note that when the foot controller is used for expression control, no sound will be produced if it is set to the minimum position.
FOOT
CONTROLLER
7 MIDI IN, THRU and OUT Connectors ......................................................................................................................
The MIDI IN connector receives MIDI data from an external MIDI device (such as a MIDI sequencer) which can be used to control the PSR-6000. The MIDI THRU connector re-transmits any data received at the MIDI IN connector, allowing “chaining” of several MIDI instruments or other devices. The MIDI OUT connector transmits MIDI data generated by the PSR-6000 (e.g. note and velocity data produced by playing the keyboard). More details on MIDI are provided on page 102.
MIDI
IN OUT THRU
Music |
Tone Generator |
|
|
Computer |
|
The Music Stand
The PSR-6000 is supplied with a music stand that can be attached to the instrument by inserting it into the slot at the rear of the control panel.
7 |
Downloaded from: http://www.usersmanualguide.com/
The Demonstration
To give you an idea of the PSR-6000’s sophisticated capabilities, it is programmed with 21 demonstration sequences which can be played in a number of ways.
 NOTES • The demonstration sequences have been specially programmed for demonstration purposes — it is not possible to reproduce the demonstration sequences 100% using the PSR-6000 sequencer functions.
Z Switch ON ............................................................................................................................................................................................
Plug the AC power cord into a convenient AC outlet, then press the [POWER] button to turn the PSR-6000 ON.
POWER
X Set an Initial Volume Level ................................................................................................................................................
Set the [MASTER VOLUME] control to a position about half way toward the highest setting. You can re-adjust the [MASTER VOLUME] control for the most comfortable overall volume level after playback begins.
MASTER
VOLUME
MAX
MIN 

C Press the [DEMO] Button ...................................................................................................................................................
Press the [DEMO] button and the PSR-6000 demo display will appear.
V Start & Stop Playback as Required
Press the START LCD button to start playback of all demo songs. Press the STOP LCD button when you want to stop playback.
 NOTES • The default demo play mode is RANDOM.
•Demo playback can also be started and stopped by using the [START/RE-START] and [STOP] buttons on the PSR-6000 panel.
DEMO
DISK ORCHESTRA/ GENERAL MIDI
B Exit When Done ..........................................................................................................
Press either the [DEMO] button or the [EXIT] button to exit from the demo mode and return to the normal play-mode display when you’ve finished playing the demo songs.
DEMO
EXIT
DISK ORCHESTRA/
GENERAL MIDI
8 |
Downloaded from: http://www.usersmanualguide.com/
The Demonstration
The Demo Play Modes
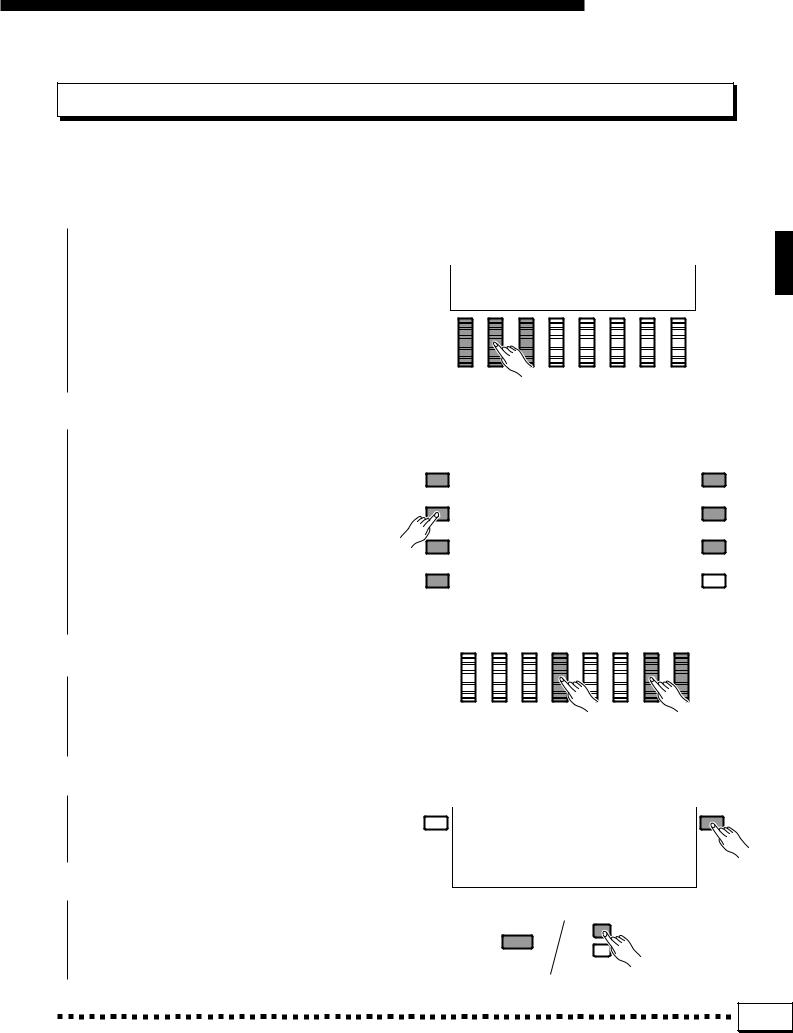
If you play the demo as described above, you’ll hear all 21 demo songs, one after another. Note that the demo songs are arranged into 7 groups of three songs each. By selecting an appropriate play mode, you can also play back all the songs in sequence, in random order, or a single specified song.
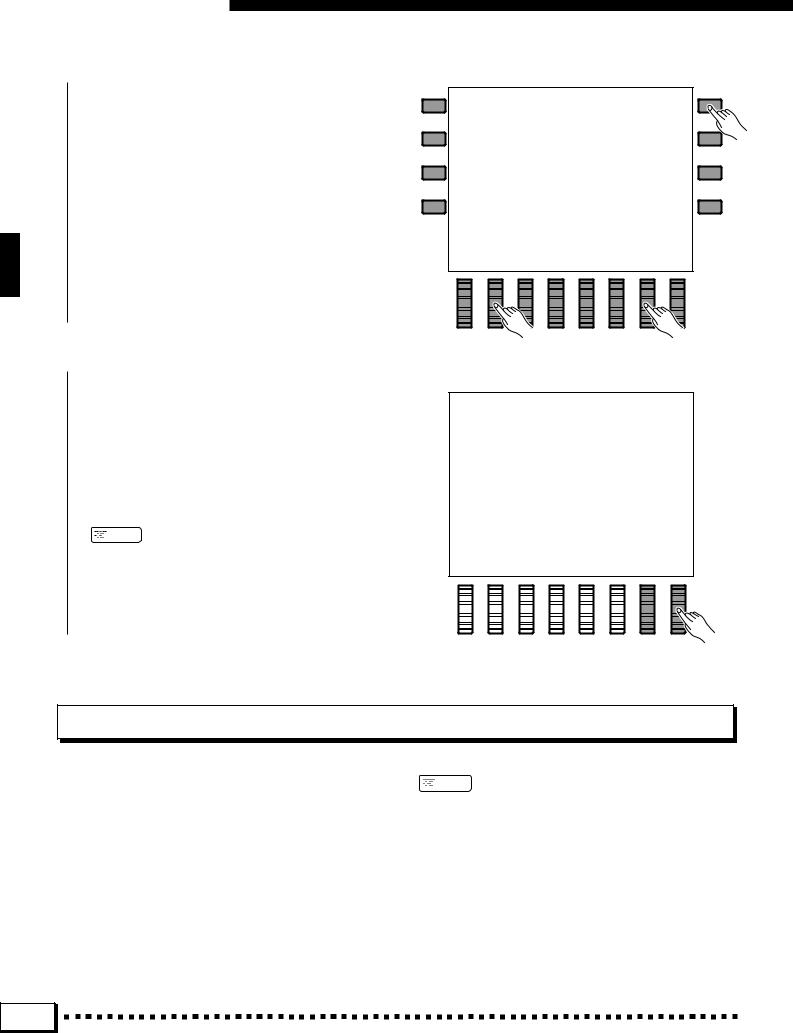
Z Select a Play Mode ....................................................................................................................................................................
With demo playback stopped, use any of the three LCD dials under PLAY MODE on the display to select one of the available play modes.
ALL SONGS All 21 demo songs are played back in sequence.
RANDOM All 21 demo songs are played back in random order. This is the default mode.
SINGLE SONG Only the selected song is played.
X Select a Song ..................................................................................................................................................................................
If you’ve selected the SINGLE SONG play |
|
|
|
|
mode, press the LCD button corresponding to the |
|
|
|
|
|
|
|
|
|
demo group you want to play (DANCE, ROCK, etc.) |
|
|
|
|
and use the same LCD button to select the desired |
|
|
|
|
song (a new song within the group is selected each |
|
|
|
|
time it is pressed). If you’ve selected the ALL |
X |
|
|
|
SONGS or RANDOM play mode, you can use the |
|
|
|
|
|
|
|
|
|
LCD buttons to select the first song to be played |
|
|
|
|
back. You can also use either of the LCD dials under |
|
|
|
|
SONG on the display to select any of the 21 demo |
|
|
|
|
songs. |
|
|
|
|
|
|
|
|
|
|
|
|
|
|
C Turn the Repeat Mode ON or OFF ....
Use the REP. LCD dial to turn repeat playback |
|
|
ON or OFF as required (when ON, the selected song |
C |
X |
|
|
|
or sequence of songs will be repeated until the STOP |
|
|
LCD button is pressed) |
|
|
V Start & Stop Playback as Required ......................................................................................................................... |
|
|
Press the START LCD button to start playback of the selected demo song(s). Press the STOP LCD button when you want to stop playback.
B Exit When Done .............................................................................................................................................................................
Press either the [DEMO] button or the [EXIT] button to exit from the demo mode and return to the normal play-mode display when you’ve finished playing the demo songs.
DEMO
EXIT
DISK ORCHESTRA/
GENERAL MIDI
9 |
Downloaded from: http://www.usersmanualguide.com/

The PSR-6000 Display & Help Function
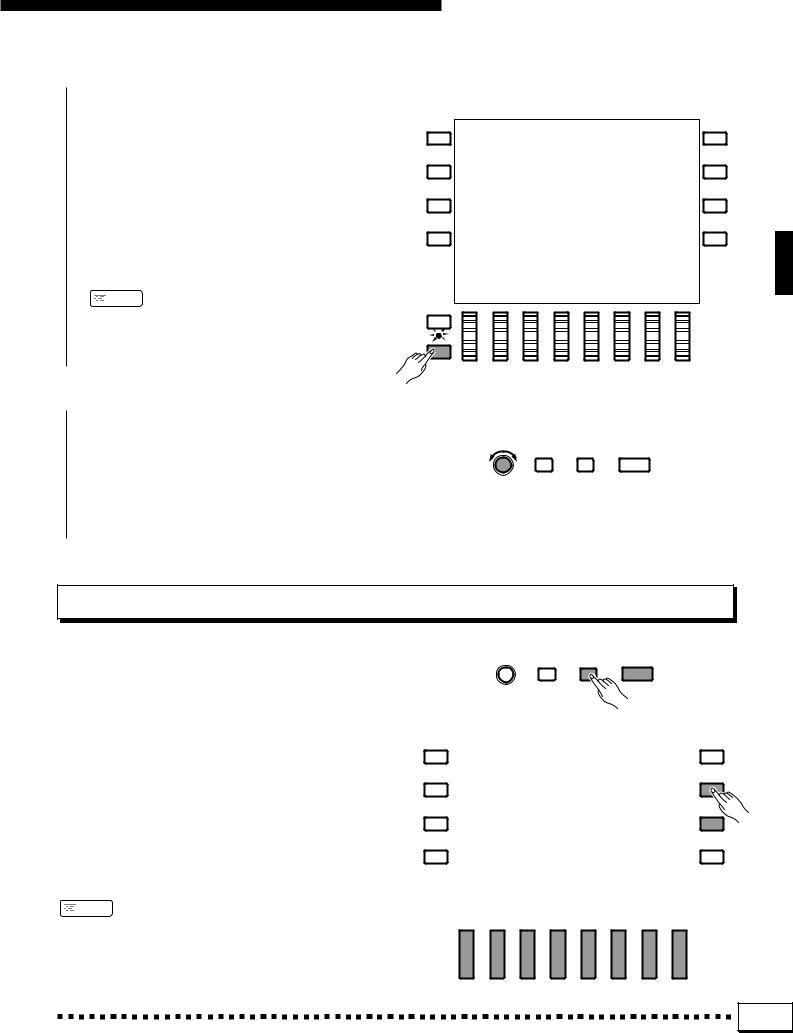
The Display & Multi-function Controls
The PSR-6000 makes general operation and programming easier than ever with a large backlit LCD display panel and multi-function controls. The 8 LCD buttons — four on either side of the display panel — and 8 LCD dials below the display perform the function indicated by the adjacent section of the display. In the example display shown here, for example, the two LCD dials immediately below TEMPO on the display can be used to adjust the tempo (in this case both dials perform the same function). In the same way, the LCD button immediately to the right of KEY VELOCITY on the display is used to turn key velocity ON or OFF.
■ The [MIXER] Button ..................................................................................................................................................................
The lower section of the normal play mode display, shown above, provides individual volume controls for the PSR-6000’s rhythm, bass, chord 1, chord 2, orchestra 1, and orchestra 2 parts. This is essentially a “mixer” that you will use the achieve the best overall balance for your musical needs. The mixer controls will disappear when functions which have different displays are selected, but can be instantly recalled without exiting from the current display mode by pressing the [MIXER] button. Pressing the [MIXER] button a second time (or the [EXIT] button) causes the mixer controls to disappear.
MIXER
LIST HOLD
10 |
Downloaded from: http://www.usersmanualguide.com/
The PSR-6000 Display & Help Function
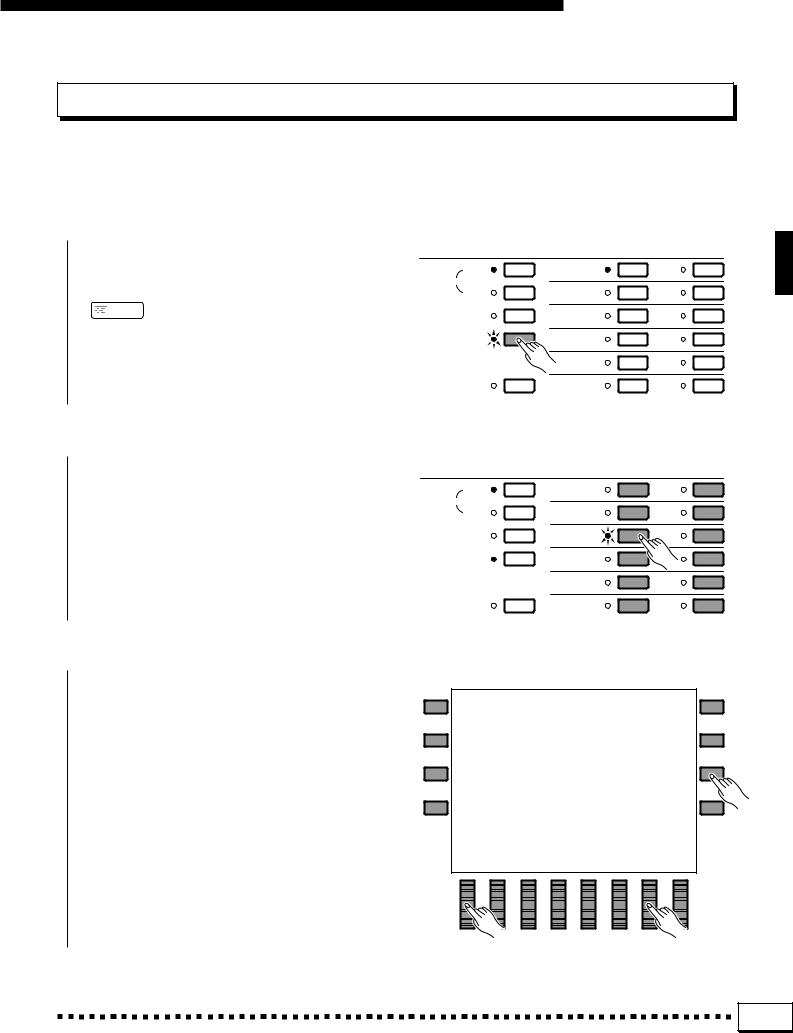
■ The [LIST HOLD] Button......................................................................................................................................................
When selecting voices (page 13) or accompaniment styles (page 21), the voice or style list will appear on the display, but will automatically disappear after a few seconds if no selections are made. The voice/style list can be kept on the display for as long as required by pressing the [LIST HOLD] button so that its LED lights. Press [LIST HOLD] a second time (the LED will go out) to disengage the list hold function.
 NOTES
NOTES
•If the [LIST HOLD] button is engaged when the voice or style list is not showing, the list will not appear even when a voice or style group button is pressed.
MIXER
LIST HOLD
■ The [CONTRAST] Control ..................................................................................................................................................
The PSR-6000 display panel is a liquid-crystal type which can be easier or more difficult to read from different angles. Use the [CONTRAST] control to set the display for optimum legibility at your viewing angle.
CONTRAST FUNCTION |
HELP/ |
EXIT |
|
LANGUAGE |
|
The Help Function
If you’re ever in doubt about a display or button, the PSR-6000 HELP function is available. Simply press the [HELP/LANGUAGE] button to get information about the current display, or press [HELP/LANGUAGE] and then any panel button for information about that button and its function. If more that one help display page is available for the selected topic, use the [ ] and [
 ] LCD buttons to change pages. Help is provided in five languages — English, German, French, Spanish, and Italian — that you can select by using any of the LCD dials.
Exit from the HELP function by pressing either the
[HELP/LANGUAGE] or [EXIT] button.
 NOTES
NOTES
•The HELP function will be automatically exited if a disk is inserted or ejected.
|
|
|
|
CONTRAST FUNCTION |
HELP/ |
|
EXIT |
|||||||||||
|
|
|
|
|
|
|
|
|
LANGUAGE |
|
|
|
|
|
|
|
||
|
|
|
|
|
|
|
|
|
|
|
|
|
|
|
|
|
|
|
|
|
|
|
|
|
|
|
|
|
|
|
|
|
|
|
|
|
|
|
|
|
|
|
|
|
|
|
|
|
|
|
|
|
|
|
|
|
|
|
|
|
|
|
|
|
|
|
|
|
|
|
|
|
|
|
|
|
|
|
|
|
|
|
|
|
|
|
|
|
|
|
|
|
|
|
|
|
|
|
|
|
|
|
|
|
|
|
|
|
|
|
|
|
|
|
|
|
|
|
|
|
|
|
|
|
|
|
|
|
|
|
|
|
|
|
|
|
|
|
|
|
|
|
|
|
|
|
|
|
|
|
|
|
|
|
|
|
|
|
|
|
|
|
|
|
|
|
|
|
|
|
|
|
|
|
|
|
|
|
|
|
|
|
|
|
|
|
|
|
|
|
|
|
|
|
|
|
|
|
|
|
|
|
|
|
|
|
|
|
|
|
|
|
|
|
|
|
|
|
|
|
|
|
|
|
|
|
|
|
|
|
|
|
|
|
|
|
|
|
|
|
|
|
|
|
|
|
11 |
Downloaded from: http://www.usersmanualguide.com/

Playing the PSR-6000
■ Before You Begin
Before playing your PSR-6000 for the first time, it might be a good idea to re-initialize it to the original factory settings just in case these have been changed at some point before you receive the instrument. To do this, turn the [POWER] switch ON while holding the [EXIT] and [DEMO] buttons.
When the display shown to the right appears, use the LCD dials to select the language you want the HELP text and messages to be displayed in, then press the OK LCD button.
EXIT
DEMO
POWER
 CAUTION
• When the above initialization procedure is carried out, all sequencer and custom accompaniment data will also be initialized and therefore lost!
Selecting & Playing Voices
Z Turn Power On and Set Initial Volume Levels...............................................................................................
Press the [POWER] button to turn the power ON, and set the [MASTER VOLUME] control about half way toward its highest setting. Also make sure that the RHY, BASS, CHD2, CHD1, ORC2, and ORC1 volume levels on the LCD are set to their maximum “100” levels (use the corresponding LCD dials to set these volume levels if necessary). You can set the [MASTER VOLUME] control for the most comfortable overall volume level after beginning to play.
 NOTES
NOTES
•No sound will be produced if all volume levels other than the [MASTER VOLUME] control are set to their minimum values.
MASTER
VOLUME
MAX
MIN 

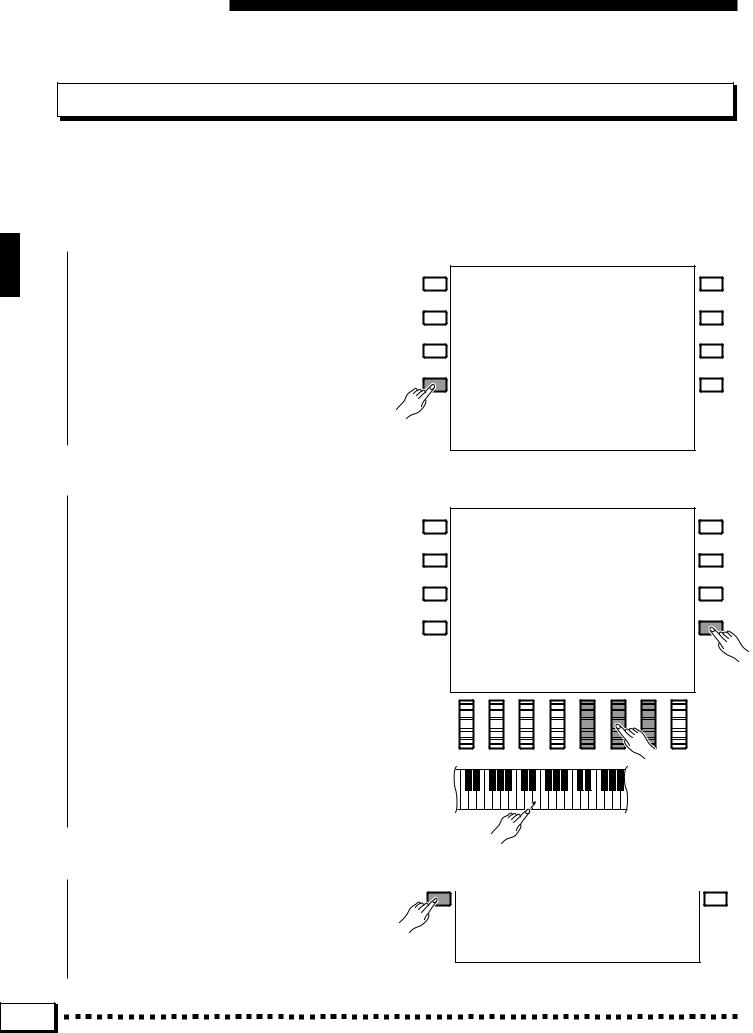
X Select the Orchestration .....................................................................................................................................................
The PSR-6000 has three orchestration modes, selected by the corresponding ORCHESTRATION
ORCHESTRATION
ORCH. |
ORCH. |
ORCH. |
LEFT |
HARMONY SUSTAIN |
REVERB |
EFFECT |
1 |
2+1 |
2 1 |
HOLD |
|
|
|
buttons. The corresponding ORCHESTRATION LED will light.
12 |
Downloaded from: http://www.usersmanualguide.com/
Playing the PSR-6000
ORCH. 1 |
In this mode a single voice — the ORCH. 1 voice — can be played across the entire keyboard. |
ORCH. 2+1 This is a “dual” mode in which two voices — ORCH. 1 and ORCH. 2 — can be played simultaneously across the entire keyboard.
ORCH. 2V1 This is a “split” mode in which the ORCH. 2 voice is played on the left-hand section of the keyboard (to the left of the “split point” — see “NOTES” below), while the ORCH. 1 voice is played on the righthand section of the keyboard.
 NOTES
NOTES
•The split point for the PSR-6000 is initially set at F#2. This means that when the “ORCH. 2V1” mode is selected, the ORCH. 2 voice will be played by all keys to the left of and including F#2, while the ORCH. 1 voice will be played on all keys to the right of F#2. You can change the split point to any key desired as described on page 16.
•Since two voices are played simultaneously in the dual and split modes, the total number of notes that can be played on the keyboard at the same time is reduced.
•When the “ORCH.2+1” mode is selected and the same voice is selected for both ORCH. 1 and ORCH. 2, the sound may be slightly different from the normal voice.
•When the “ORCH.2V1” mode is selected, the ORCH. 2 voice will automatically be transposed up one octave.
Split Point (F#2)
▼
Left-hand Section
C3
Right-hand Section
• The lowest key on the keyboard is C1.
C Select a Voice or Voices........................................................................................................................................................
Before selecting a preset voice, make sure that the ORCHESTRA VOICE control section [PRESET] button LED is lit (if it isn’t press the [PRESET] button so that it does light).
The PSR-6000 has 128 preset voices organized in 12 voice groups (see page 116 for a complete voice list).
Press the [ORCH. 1] or [ORCH. 2] VOICE PART button, depending on which voice you want to select. The corresponding VOICE PART LED will light.
Use the voice group buttons to select the group from which you want to select a voice. The corresponding voice display will appear.
 NOTES
NOTES
•The display will automatically revert to the main display after a few seconds if the [LIST HOLD] button is not engaged (page 11).
ORCHESTRA VOICE
ORCH. 1 |
PIANO/E. PIANO |
1 |
GUITAR |
7 |
|
VOICE PART |
|
|
|
|
|
ORCH. 2 |
ORGAN/ |
2 |
BASS |
8 |
|
ACCORDION |
|||||
|
|
|
|
||
PRESET |
STRINGS/CHOIR |
3 |
SYNTH |
9 |
|
USER SET |
WOODWIND |
4 |
WORLD/ |
10 |
|
PERCUSSIVE |
|||||
|
|
|
|
||
|
BRASS |
5 |
DUAL VOICE/ |
11 |
|
|
SOUND |
||||
|
|
|
EFFECT |
|
|
CUSTOM VOICE |
MALLET |
6 |
DRUMS |
12 |
|
|
ORCHESTRA VOICE |
|
|
|
|
ORCH. 1 |
PIANO/E. PIANO |
1 |
GUITAR |
7 |
|
VOICE PART |
|
|
|
|
|
ORCH. 2 |
ORGAN/ |
2 |
BASS |
8 |
|
ACCORDION |
|||||
|
|
|
|
||
PRESET |
STRINGS/CHOIR |
3 |
SYNTH |
9 |
|
USER SET |
WOODWIND |
4 |
WORLD/ |
10 |
|
PERCUSSIVE |
|||||
|
|
|
|
||
|
BRASS |
5 |
DUAL VOICE/ |
11 |
|
|
SOUND |
||||
|
|
|
EFFECT |
|
|
CUSTOM VOICE |
MALLET |
6 |
DRUMS |
12 |
13 |
Downloaded from: http://www.usersmanualguide.com/
Playing the PSR-6000
Use the PAGE LCD dials the select the page containing the voice you want if more than one page is available, then press the LCD button corresponding to the desired voice. You can also use either of the SELECT LCD dials to select any of the voices within the selected group.
V Play & Adjust Volume .............................................................................................................................................................
You can now play the selected voice or voices with the selected orchestration. Use the [MASTER VOLUME] control to adjust the overall volume level, and the ORC1 and ORC2 LCD dials can be used to set the desired balance between the ORCH. 1 and ORCH. 2 voices when either the dual or split orchestration mode is used.
 NOTES
NOTES
•Voices in the DUAL VOICE/SOUND EFFECT group are actually combinations of two voices, so the total
number of simultaneous notes that can be played when these voices are selected is less than when any of the other voices are selected.
Keyboard Percussion
When either of the DRUMS voices is selected — Drum Kit or Pop Drum Kit, you can play 59 different drums and percussion instruments on the keyboard. The drums and percussion instruments played by the various keys are marked by symbols above the keys. Some of the instruments in the Drum Kit and Pop Drum Kit voices sound different even though they have the same name, while others are essentially the same.
 NOTES
NOTES
•The Transpose, Tune, Sustain, Harmony, Left Hold, Modulation, and Octave Change functions do not affect the keyboard percussion sound.
•The pitch bend wheel can be used to bend the pitch of the keyboard percussion voices to create unique musical effects, but it has little effect on some percussion sounds.
•See page 118 for a complete listing of the keyboard percussion drum instrument assignments.
14 |
Downloaded from: http://www.usersmanualguide.com/
Playing the PSR-6000
USER SET Voice Assignment
The PSR-6000 USER SET voice selection mode lets you assign any 12 voices — preset or custom (page 13, 77)
— to the 12 voice select buttons so you can select them directly without having to select a category, page, and then a voice. This is particularly useful for the performer who want direct access to the voices he needs for a song or set.
Z Select the USER SET Mode .............................................................................................................................................
Press the [USER SET] button so that its indicator lights. The USER SET voice display will appear.
 NOTES
NOTES
•The display will automatically revert to the main display after a few seconds if the [LIST HOLD] button is not engaged (page 11).
ORCHESTRA VOICE
ORCH. 1 |
PIANO/E. PIANO |
1 |
GUITAR |
7 |
|
VOICE PART |
|
|
|
|
|
ORCH. 2 |
ORGAN/ |
2 |
BASS |
8 |
|
ACCORDION |
|||||
|
|
|
|
||
PRESET |
STRINGS/CHOIR |
3 |
SYNTH |
9 |
|
USER SET |
WOODWIND |
4 |
WORLD/ |
10 |
|
PERCUSSIVE |
|||||
|
|
|
|
||
|
BRASS |
5 |
DUAL VOICE/ |
11 |
|
|
SOUND |
||||
|
|
|
EFFECT |
|
|
CUSTOM VOICE |
MALLET |
6 |
DRUMS |
12 |
X Select a Voice Button ..............................................................................................................................................................
Press the voice group button to which you want to assign a voice.
ORCHESTRA VOICE
ORCH. 1 |
PIANO/E. PIANO |
1 |
GUITAR |
7 |
|
VOICE PART |
|
|
|
|
|
ORCH. 2 |
ORGAN/ |
2 |
BASS |
8 |
|
ACCORDION |
|||||
|
|
|
|
||
PRESET |
STRINGS/CHOIR |
3 |
|
9 |
|
USER SET |
WOODWIND |
4 |
|
10 |
|
|
BRASS |
5 |
DUAL VOICE/ |
11 |
|
|
SOUND |
||||
|
|
|
EFFECT |
|
|
CUSTOM VOICE |
MALLET |
6 |
DRUMS |
12 |
C Select a Voice ..................................................................................................................................................................................
Use the PAGE LCD dials, the SELECT LCD dials, and the LCD buttons as required to select the voice you want to assign to the currently selected voice button. To assign a custom voice, press the [CUSTOM VOICE] button so that its indicator lights (when the CUSTOM VOICE LED is off the preset voices are assigned).
That’s all there is to it, now the assigned voice will instantly be recalled anytime you press the same voice button while the USER SET mode is engaged. Voice assignments can be changed at any time in the same way.
15 |
Downloaded from: http://www.usersmanualguide.com/
Playing the PSR-6000
Changing the Split Point
The PSR-6000 split point applies to both the ORCH. 2V1 split play mode, described in this section, and Auto Bass Chord accompaniment described on page 19. The current split point is indicated on the display by the triangular split marker (T) and the “split” in the graphic keyboard when the ORCH. 2 V1 orchestration mode is selected. Here’s how you can change the split point to suit your own playing requirements.
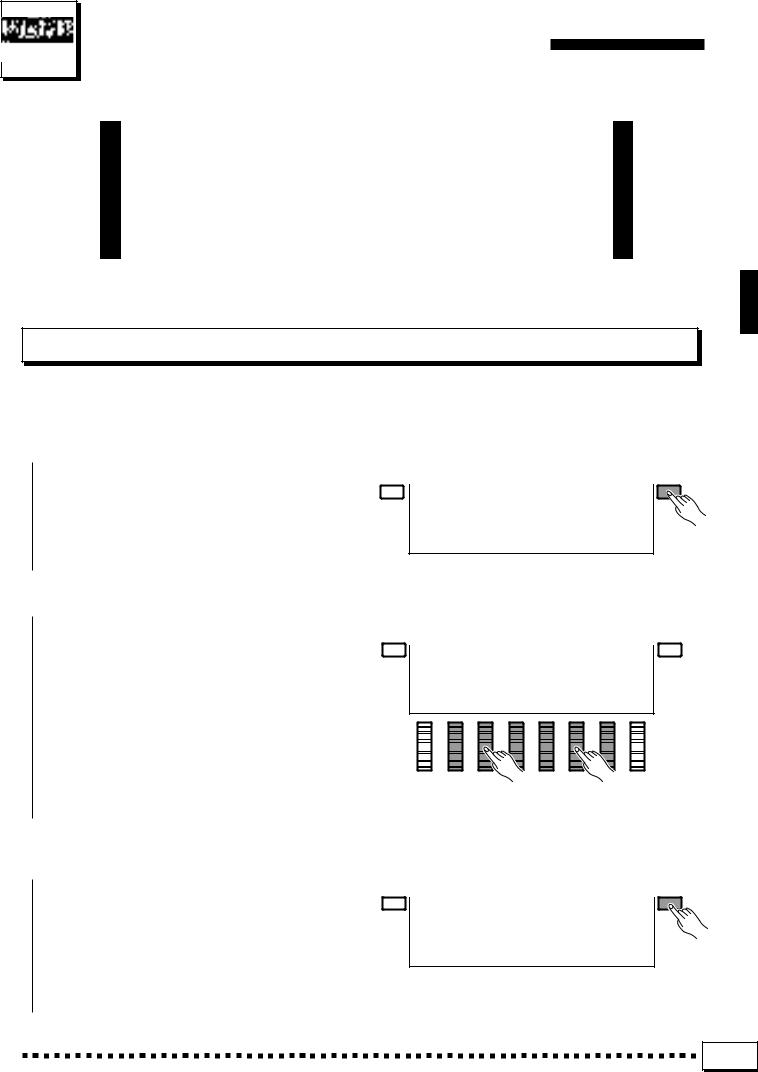
Z Press the ABC MODE/SPLIT POINT LCD Button .....................................................................................
Press the ABC MODE/SPLIT POINT LCD button. The ABC MODE and SPLIT POINT function displays will appear.
X Set the Split Point .......................................................................................................................................................................
The split point can be set in two ways: either use the SPLIT POINT LCD dials, or press the desired key on the keyboard while holding the DIRECT SETTING LCD button (or vice-versa). The new split point will be indicated on the graphic keyboard in the LCD.
Press a key while holding the DIRECT
SETTING LCD button.
C Return to the Main Display When Done ..............................................................................................................
Press the VOLUME LCD button to return to the main display when done.
16 |
Downloaded from: http://www.usersmanualguide.com/
Transposition, Tuning,
Octave Change, & Key Velocity
The most important and fundamental adjustment for any musical instrument is tuning. The TRANSPOSE, TUNING, and OCTAVE CHANGE functions described below let you control the pitch of the PSR-6000 in a number of ways.
The Key Velocity function has also been included in this section because it affects the way the PSR-6000 responds to notes played on the keyboard.
TRANSPOSE & TUNE
These functions allow the overall pitch of the PSR-6000 to be transposed up or down in semitone increments, and fine-tuned in 0.5 Hertz increments.
Z Press the TRANSPOSE/TUNE LCD Button .....................................................................................................
Select the transpose and tune functions from the normal play mode display by pressing the TRANSPOSE/TUNE LCD button.
X Set the Transposition and/or Tuning As Required...................................................................................
Use the TRANSPOSE LCD dials to set the desired degree of transposition, and the TUNE LCD dials to set the desired degree of tuning.
The transpose range is from -6 to +6, allowing a maximum upward or downward transposition of 1/2-octave. A setting of “ 0” produces the normal pitch.
The tuning range is from 427.5 Hertz to 452.5 Hertz, adjustable in 0.5-Hertz increments. A3 = 440.0 Hertz is “normal” pitch.
C Return to the Main Display When Done ..............................................................................................................
Press the VOLUME LCD button to exit from the transpose and tune functions and return to the main display.
17 |
Downloaded from: http://www.usersmanualguide.com/
Transposition, Tuning, Octave Change, & Key Velocity
OCTAVE CHANGE
This function allows the ORCH. 1 and ORCH. 2 voices to be independently transposed up or down by one octave.
The OCTAVE LCD button to the right of the ORCH.1. voice name changes the octave of the ORCH.1. voice, while the OCTAVELCD button to the right of the ORCH.2 voice affects the ORCH.2. voice. Pressing either of these buttons changes the corresponding octave setting to “ +1”,
“-1”, and then “ 0”, in sequence. “ +1” shifts the voice up one octave “ -1” shifts the voice down one octave, and
“0” sets the voice to its normal octave.
 NOTES
NOTES
•Some voices may suddenly shift octaves when played at the extreme ends of the keyboard if they are set to a lower or higher octave than normal. This can also occur when the PITCH BEND wheel is used on extremely low or high notes.
•If you change the transpose, octave change, or tuning settings while playing one or more notes on the keyboard, the new transpose and octave change settings will take effect from the next notes played while tune settings take effect immediately.
KEY VELOCITY
The key velocity function turns the PSR-6000’s keyboard velocity response on or off. Normally, key velocity should be turned ON to allow normal dynamic control via the keyboard (i.e. the harder the keys are played, the louder the sound). In some cases, however, you might want to turn key velocity OFF. For example, most organs have no keyboard velocity response, so key velocity can be turned OFF for greater realism when playing organ type voices. Key Velocity can also be turned off to create a constant-volume sound with any voice.
Use the KEY VELOCITY LCD button to turn key velocity ON or OFF as required.
18 |
Downloaded from: http://www.usersmanualguide.com/
Using the Accompaniment Section
The PSR-6000 has 50+1 different accompaniment “styles” (including preset IA style “New Age (No.12 button)”)that can be used to provide fully-orchestrated or rhythm-only accompaniment. The PSR6000’s sophisticated Auto Bass Chord accompaniment system can provide automated bass and chord backing that is perfectly matched to the selected accompaniment style.
Z Turn ABC ON ....................................................................................................................................................................................
Press the [AUTO BASS CHORD] button so that its indicator lights, thereby turning the ABC mode
INTERACTIVE |
AUTO BASS |
VERSE |
ACCOMPANIMENT |
CHORD |
A |
on.
 NOTES
NOTES
•The maximum number of notes that can be played simultaneously on the PSR-6000 keyboard is reduced when the Auto Bass Chord feature is used.
X Select the Desired ABC Mode .......................................................................................................................................
Press the ABC MODE/SPLIT POINT LCD button to select the ABC MODE and SPLIT POINT display, then use the ABC MODE LCD dials to select the FINGERED CHORD, SINGLE FINGER, or MANUAL BASS mode. If you select the MANUAL BASS mode, the GRP. VOICE # LCD dials can be used to specify the bass voice to be used. Press the VOLUME LCD button to return to the main display when done.
The FINGERED CHORD, SINGLE FINGER, and MANUAL BASS modes function as follows:
● FINGERED CHORD
This is the default ABC mode. The Fingered Chord mode lets you finger your own chords on the left-hand section of the keyboard (i.e. all keys to the left of and including the split-point key — normally F#2), while the PSR-6000 supplies appropriately orchestrated rhythm, bass, and chord accompaniment in the selected style.
The Fingered Chord mode will accept the chord types listed below (notes in parentheses may be omitted).
19 |
Downloaded from: http://www.usersmanualguide.com/
Using the Accompaniment Section
|
Chord Name/[Abbreviation] |
Normal Voicing |
|
Major [M] ............................................................ |
1-3-5* |
|
Minor [m] ........................................................... |
1-B3-5* |
|
Major seventh [M7] ....................................... |
1-3-(5)-7* |
|
Major sixth [6] .................................................... |
1-3-5-6 |
|
Suspended fourth [sus4] .................................... |
1-4-5* |
|
Minor sixth [m6] ............................................... |
1-B3-5-6 |
|
Minor seventh [m7] ..................................... |
1-B3-(5)-B7 |
|
Minor seventh flatted fifth [m7B5] ................ |
1-B3-B5-B7 |
|
Minor major seventh [mM7] ........................ |
1-B3-(5)-7* |
|
||
|
Seventh [7] .................................................. |
1-3-(5)-B7* |
|
Seventh flatted fifth [7B5] .............................. |
1-3-B5-B7 |
|
Seventh augmented [7aug] .......................... |
1-3-#5-B7* |
|
Seventh suspended fourth [7sus4] |
1-4-5-B7* |
|
||
|
Seventh ninth [7(9)] .................................. |
1-2-3-(5)-B7* |
|
Minor ninth [m(9)] ............................................ |
1-2-B3-5 |
|
Minor seventh ninth [m7(9)] ................... |
1-2-B3-(5)-B7* |
|
Major ninth [M(9)] .............................................. |
1-2-3-5 |
|
Major seventh ninth [M7(9)] ....................... |
1-2-3-(5)-7* |
|
Minor major seventh ninth [mM7(9)] ........ |
1-2-B3-(5)-7* |
|
Seventh flatted ninth [7(B9)] ................... |
1-B2-3-(5)-B7* |
|
Major seventh flatted fifth [M7B5] .................. |
1-3-B5-7* |
|
Augmented [aug] ................................................ |
1-3-#5 |
|
Diminished [dim].......................................... |
1-B3-B5-(6) |
*Chords marked with an asterisk (*) can be played in any inversion (i.e. the root of the chord does not have to be the lowest note played).
*If you play any three adjacent keys (including black keys), the chord sound will be cancelled and only the rhythm instruments will continue playing (CHORD CANCEL function).
●SINGLE FINGER
Single-finger accompaniment makes it simple to
produce beautifully orchestrated accompaniment using major, seventh, minor and minor-seventh chords by pressing a minimum number of keys on the lefthand section of the keyboard. The abbreviated chord fingerings described below are used:
■For a major chord, press the root key only.
■For a minor chord, simultaneously press the root key and a black key to its left.
■For a seventh chord, simultaneously press the root key and a white key to its left.
■For a minor-seventh chord, simultaneously press the root key and both a white and black key to its left.
20 |
Example for “C” chords
C |
|
|
|
|
|
|
Cm |
|
|
|
|
CM7 |
|
|
|
|
|
|||||||
|
|
|
|
|
|
|
|
|
|
|
|
|
|
|
|
|
|
|
|
|
|
|
|
|
|
|
|
|
|
|
|
|
|
|
|
|
|
|
|
|
|
|
|
|
|
) |
|
|
|
|
|
|
|
|
|
|
|
|
|
|
|
|
|
|
|
|
|
|
|
|
( |
|
|
|
C 6 |
|
|
|
|
|
|
Csus 4 |
|
|
|
|
Cm6 |
|
|
|
|
|
|||||||
|
|
|
|
|
|
|
|
|
|
|
|
|
|
|
|
|
|
|
|
|
|
|
|
|
|
|
|
|
|
|
|
|
|
|
|
|
|
|
|
|
|
|
|
|
|
|
|
|
|
Cm7 |
|
|
|
|
|
Cm7 B5 |
|
|
|
|
CmM7 |
|||||||||||||
|
|
|
|
|
|
|
|
|
|
|
|
|
|
|
|
|
|
|
|
|
|
|
|
|
|
|
|
|
) |
|
|
|
|
|
|
|
|
|
|
|
|
|
|
|
|
) |
|
|
|
|
|
|
|
( |
|
|
|
|
|
|
|
|
|
|
|
|
|
|
|
|
( |
|
|
|
C7 |
|
|
|
|
|
|
C7 B5 |
|
|
|
|
C7 aug |
||||||||||||
|
|
|
|
|
|
|
|
|
|
|
|
|
|
|
|
|
|
|
|
|
|
|
|
|
|
|
|
|
) |
|
|
|
|
|
|
|
|
|
|
|
|
|
|
|
|
|
|
|
|
|
|
|
|
( |
|
|
|
|
|
|
|
|
|
|
|
|
|
|
|
|
|
|
|
|
C sus |
4 |
|
|
|
|
C |
7 |
(9) |
|
|
|
|
|
Cm (9) |
||||||||||
7 |
|
|
|
|
|
|
|
|
|
|
|
|
|
|
|
|
|
|
|
|
|
|||
|
|
|
|
|
|
|
|
|
|
|
|
|
|
|
|
|
|
|
|
|
|
|
|
|
|
|
|
|
|
|
|
|
|
|
|
|
) |
|
|
|
|
|
|
|
|
|
|
|
|
|
|
|
|
|
|
|
|
|
|
|
|
( |
|
|
|
|
|
|
|
|
|
|
|
|
Cm |
(9) |
|
|
|
|
CM(9) |
|
|
|
|
CM |
7 |
(9) |
|
|
|
||||||||
7 |
|
|
|
|
|
|
|
|
|
|
|
|
|
|
|
|
|
|
|
|
|
|||
|
|
|
|
|
|
|
|
|
|
|
|
|
|
|
|
|
|
|
|
|
|
|
|
|
|
|
|
|
) |
|
|
|
|
|
|
|
|
|
|
|
|
|
|
|
|
) |
|
|
|
|
|
|
|
( |
|
|
|
|
|
|
|
|
|
|
|
|
|
|
|
|
( |
|
|
|
CmM7 (9) |
|
|
C7 (B9) |
|
|
|
|
CM7 B5 |
||||||||||||||||
|
|
|
|
|
|
|
|
|
|
|
|
|
|
|
|
|
|
|
|
|
|
|
|
|
|
|
|
|
) |
|
|
|
|
|
|
|
) |
|
|
|
|
|
|
|
|
|
|
|
|
|
|
|
|
( |
|
|
|
|
|
|
|
( |
|
|
|
|
|
|
|
|
|
|
|
|
|
|
|
|
|
|
|
|
|
|
|
|
|
|
|
|
|
|
|
|
|
|
|
|
|
Caug |
|
|
|
|
|
Cdim |
|
|
|
|
|
|
|
|
|
|
|
|
||||||
|
|
|
|
|
|
|
|
|
|
|
|
|
|
|
|
|
|
|
|
|
|
|
|
|
|
|
|
|
|
|
|
|
|
|
|
|
|
|
|
|
|
|
|
|
|
|
|
|
|
|
|
|
|
|
|
|
|
|
|
|
|
|
) |
|
|
|
|
|
|
|
|
|
|
|
|
|
|
|
|
|
|
|
|
|
|
|
|
( |
|
|
|
|
|
|
|
|
|
|
|
|
|
|
|
|
|
|
|
|
|
|
|
|
|
|
|
|
|
|
|
|
|
|
|
|
C G F
|
|
|
|
|
|
|
|
|
|
|
|
|
|
|
|
|
|
|
|
|
|
|
|
|
|
|
|
|
|
|
|
|
|
|
|
|
|
|
|
|
|
|
|
|
|
|
|
|
|
|
|
|
|
|
|
|
|
|
|
|
|
|
|
|
|
|
|
Cm |
|
|
|
|
|
|
C 7 |
Cm 7 |
|
|
|
|
|
|
|
|
|||||||||||||||||
|
|
|
|
|
|
|
|
|
|
|
|
|
|
|
|
|
|
|
|
|
|
|
|
|
|
|
|
|
|
|
|
|
|
|
|
|
|
|
|
|
|
|
|
|
|
|
|
|
|
|
|
|
|
|
|
|
|
|
|
|
|
|
|
|
|
|
|
Downloaded from: http://www.usersmanualguide.com/
Using the Accompaniment Section
● MANUAL BASS
The Manual Bass mode provides an alternative to the normal split keyboard. The bass voice assigned to the left-hand keyboard section is monophonic, while a polyphonic ORCH. 1 voice is played on the upper section of the keyboard. You can select any of the PSR-6000’s normal voices to play on the lower section of the keyboard — of course, it’s normal to choose a bass voices for the left hand. No automatic bass and chord accompaniment is produced, although the InteractiveAccompaniment feature (page 27) does affect the rhythm sound.
 NOTES
NOTES
•Voices created using the PSR-6000 Custom Voice feature (page 77) can also be selected for use with the Manual Bass mode.
•The ABC mode cannot be changed when the sequencer ACCOMP. track contains data.
C Select a Style ...................................................................................................................................................................................
Before selecting a preset style, make sure that the STYLE control section [PRESET] button indicator is lit (if it isn’t press the [PRESET] button so that it does light).
The PSR-6000 has 50+1 preset styles (including preset IA style “New Age (No.12 button)”) organized in 12 groups (see the “Style List” on page 119).
Use the style group buttons to select the group from which you want to select a style. The corresponding style display will appear.
 NOTES
NOTES
•The display will automatically revert to the main display after a few seconds if the [LIST HOLD] button is not engaged (page 11).
Press the LCD button corresponding to the desired style. You can also use either of the SELECT LCD dials to select any of the styles within the selected group.
Although you can select the ORCH. 1 voice you intend to play on the right-hand section of the keyboard and the ORCH. 2 voice if you use the split mode, the PSR-6000 automatically determines the voices to be used for the accompaniment bass and chords according the accompaniment style you select.
 NOTES
NOTES
•Also see “USER SET Style Assignment” on page 26, and “Custom Style” on page 62.
STYLE
1 |
DANCE |
7 |
LATIN |
PRESET |
2 |
ROCK’N’ |
8 |
LATIN POP |
USER SET |
ROLL |
||||
3 |
ROCK |
9 |
WALTZ |
CUSTOM A |
4 |
POP |
10 |
COUNTRY |
CUSTOM B |
5 |
BALLAD |
11 |
TRADITIONAL |
|
6 |
JAZZ |
12 |
FOR DISK IA |
|
21 |
Downloaded from: http://www.usersmanualguide.com/
Using the Accompaniment Section
V Set the Tempo .................................................................................................................................................................................
When you select a different style while the accompaniment is not playing, the “default” tempo for that style is also selected, and the tempo is displayed on the display in quarter-note beats per minute. If the accompaniment is playing, the same tempo is maintained even if you select a different style.
You can change the tempo to any value between 40 and 280 beats per minute, however, by using the TEMPO [–]and [+] buttons, or the TEMPO LCD dials. This can be done either before the accompaniment is started or while it is playing. To use the [–] and [+] buttons, press either button briefly to decrement or increment the tempo value by one, or hold the button for continuous decrementing or incrementing.
NOTE
•The default tempo for the selected style can be recalled at any time by pressing both the TEMPO [-] and [+] buttons simultaneously.
TEMPO
–+
B Start the Accompaniment ..................................................................................................................................................
There are several ways to start the accompaniment:
●Straight start: Press the [START/RE-START] button. If you press the [START/RE-START] button, the rhythm will begin playing immediately without bass and chord accompaniment.
NOTE
•If you press the [START/RE-START] button while the accompaniment is playing, playback will immediately return to the first beat of the current accompaniment pattern, making it possible to create measures with odd time signatures.
•It is also possible to select one of the several sections available prior to a straight start — refer to “7. Select Sections as Required,” below.
●Start with an introduction followed by the VERSE 1 section: press the [INTRO 1] button.
●Start with an introduction followed by the VERSE 2 section: press the [INTRO 2] button.
SOLO |
SYNCHRO |
START/ |
STOP |
|
START |
RE-START |
|
FILL IN |
FILL IN |
ENDING/ |
VERSE |
VERSE |
CHORUS |
CHORUS |
SOLO |
|
|
rit. |
1 |
2 |
1 |
2 |
|
INTRO 1 |
INTRO 2 |
INTRO 3 |
|
|
|
|
|
FILL IN |
FILL IN |
ENDING/ |
VERSE |
VERSE |
CHORUS |
CHORUS |
SOLO |
|
|
rit. |
1 |
2 |
1 |
2 |
|
INTRO 1 |
INTRO 2 |
INTRO 3 |
|
|
|
|
|
22 |
Downloaded from: http://www.usersmanualguide.com/
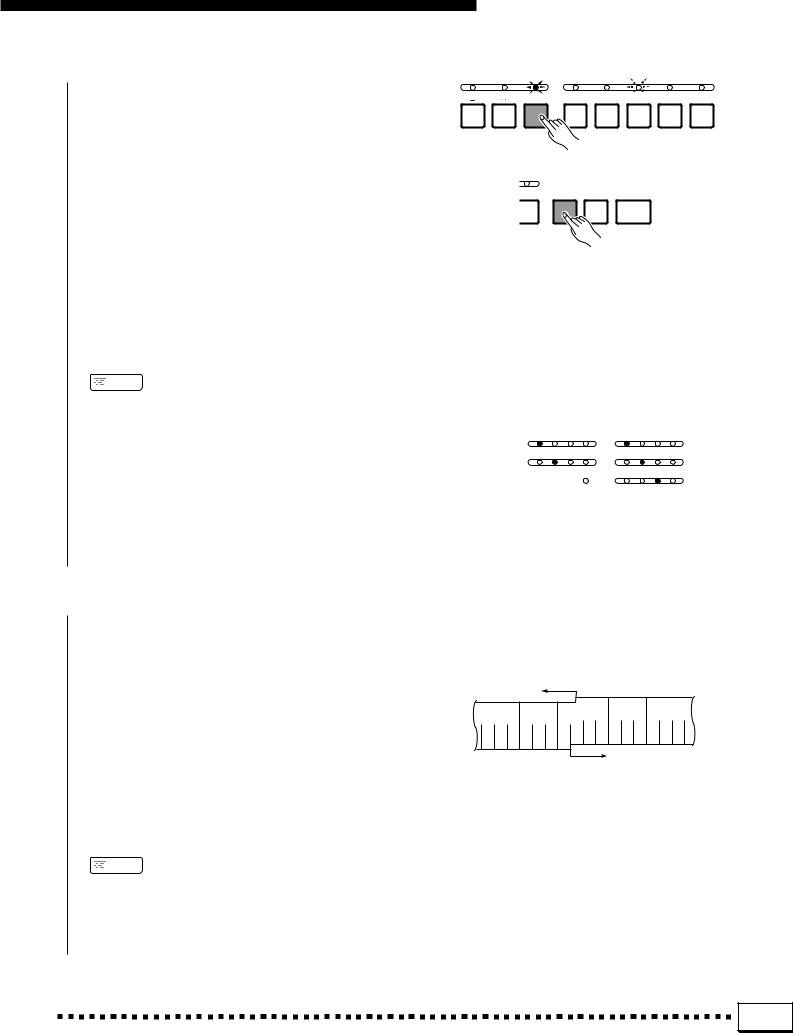
●Start with an introduction followed by the CHORUS 1 section: press the [INTRO 3] button.
●Synchronized start: Any of the above start types can be synchronized to the first note or chord played on the
left-hand section of the keyboard (i.e. keys to the left of and including the split-point key — normally F #2) by first pressing the [SYNCHRO START] button. Pressing the [SYNCHRO START] button alone causes a straight start to occur when the first note or chord is played. Press [SYNCHRO START] and then the appropriate INTRO button for a synchronized introduction start. The first dot of the TEMPO display will flash at the current tempo when a synchronized start mode has been selected.
 NOTES
NOTES
•If you press the [SYNCHRO START] button while the accompaniment is playing, the accompaniment will stop and the synchro start mode will be engaged.
•The four LED dots of the TEMPO display provide a visual indication of the selected tempo as shown to the right. Several LEDs will flash simultaneously on the first beat of oddnumbered measures in all time signatures.
Using the Accompaniment Section
FILL IN |
FILL IN |
ENDING/ |
VERSE |
VERSE |
CHORUS |
CHORUS |
SOLO |
|
|
rit. |
1 |
2 |
1 |
2 |
|
INTRO 1 |
INTRO 2 |
INTRO 3 |
|
|
|
|
|
SOLO |
SYNCHRO |
START/ |
STOP |
|
START |
RE-START |
|
4/4 Time |
3/4 Time |
|
|
1st Beat
2nd Beat
3rd Beat 
TEMPO
4th Beat 
TEMPO
•A Yamaha FC5 footswitch plugged into the rear panel FOOT SWITCH jack can also be used to start the accompaniment if the appropriate function is assigned to the footswitch using the FOOT SWITCH SELECT function described on page 88.
N Play On the Left-hand Section Of the Keyboard .......................................................................................
As soon as you play any chord that the PSR-6000 can “recognize” on the left-hand section of the keyboard in the FINGERED CHORD mode (see fingering chart on page 122) or an abbreviated chord in the SINGLE FINGER mode, the PSR-6000 will automatically begin to play the chord along with the selected rhythm and an appropriate bass line. The accompaniment will continue playing even if you release the left-hand keys.
If the MANUAL BASS mode is selected only the rhythm accompaniment will play automatically, and selected bass voice can be played on the left-hand section of the keyboard.
Split Point
ABC Section |
|
|
|
▼ |
|
|
|
|
|
|
|
|
|
|
|
|
|
||||||||
|
|
|
|
|
|
|
|
|
|
|
|
|
|
|
|
|
|
||||||||
|
|
|
|
|
|
|
|
|
|
|
|
|
|
|
|
|
|
|
|
|
|
|
|
|
|
|
|
|
|
|
|
|
|
|
|
|
|
|
|
|
|
|
|
|
|
|
|
|
|
|
|
|
|
|
|
|
|
|
|
|
|
|
|
|
|
|
|
|
|
|
|
|
|
|
|
|
|
|
|
|
|
|
|
|
|
|
|
|
|
|
|
|
|
|
|
|
|
|
|
|
|
|
|
C3
Melody Section
 NOTES
NOTES
•The appropriate chord and bass note will sound if you play in the left-hand section of the keyboard while the ABC function is on but the accompaniment is stopped. Please note that the Left Hold function (page 11) cannot be applied to these chord and bass notes.
23 |
Downloaded from: http://www.usersmanualguide.com/
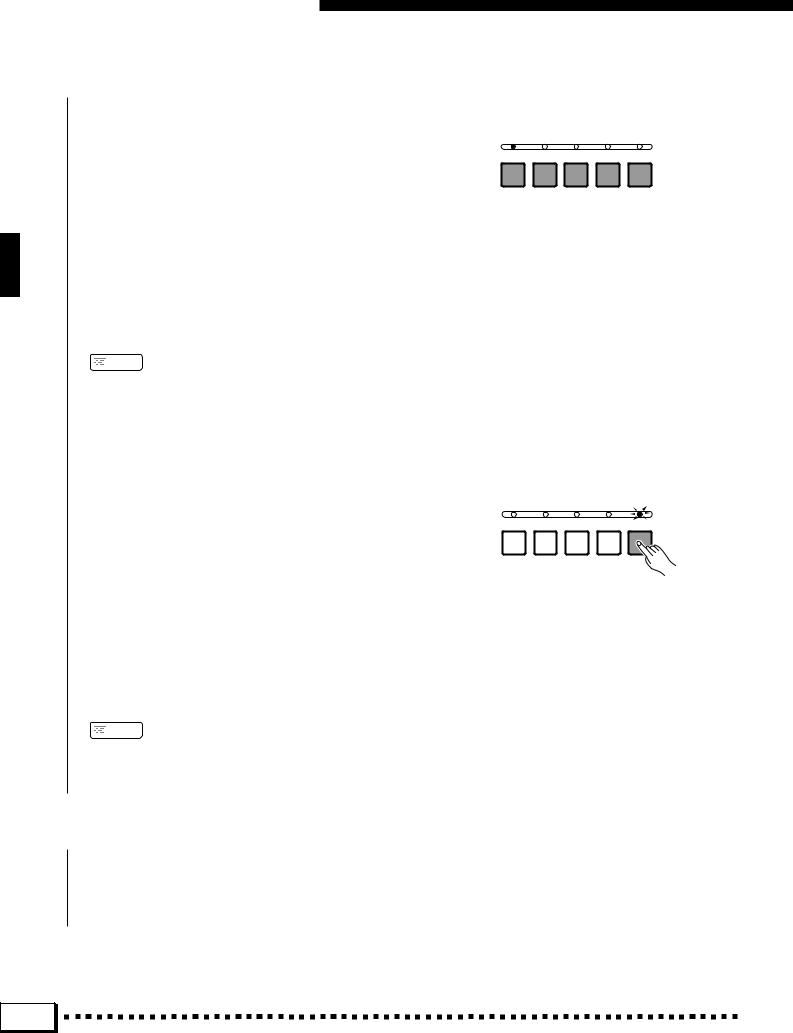
Using the Accompaniment Section
M Select Sections as Required...........................................................................................................................................
Each accompaniment style has a number of sections: VERSE 1, VERSE 2, CHORUS 1, and CHORUS 2. The VERSE and CHORUS sections further have more complex SOLO sections. There is also an ENDING section which is described in step >. The INTRO section can be used to start the accompaniment as described in the preceding step. The remaining sections — VERSE 1, VERSE 2, CHORUS 1, CHORUS 2, and the SOLO sections of these
— can be selected manually by pressing the corresponding section button. It is also possible to select the section that will follow the INTRO by pressing the appropriate section button while the INTRO is playing or while the intro synchro start mode is engaged.
VERSE |
VERSE |
CHORUS |
CHORUS |
SOLO |
1 |
2 |
1 |
2 |
|
 NOTES
NOTES
•Some INTRO, ENDING, and SOLO sections have their own chord progressions which play in the current accompaniment key — the key is shown below the style name in the LCD display.
● The SOLO Sections
Although the SOLO sections can be selected manually, they can also be activated automatically when INTERACTIVE ACCOMPANIMENT is engaged (see page 27). If an accompaniment is playing and nothing is played on the keyboard for several measures, the SOLO mode is automatically engaged to “fill out” the accompaniment. When SOLO is on, not only are the sections more complex, but they will automatically cycle (VERSE 1 M VERSE 2 M CHORUS 1 M CHORUS 2 M VERSE 1, etc.). If the SOLO mode is on, it will be automatically disengaged after you begin playing on the keyboard.
This automatic switching of the solo mode can be turned off via the Auto Solo function described on page 27.
VERSE |
VERSE |
CHORUS |
CHORUS |
SOLO |
1 |
2 |
1 |
2 |
|
 NOTES
NOTES
•The SOLO section will be automatically disengaged if it is turned on prior to starting the accompaniment with an introduction.
<Use Fill-ins ..........................................................................................................................................................................................
The PSR-6000 provides two types of automatic breaks or “fill-ins.”
24 |
Downloaded from: http://www.usersmanualguide.com/
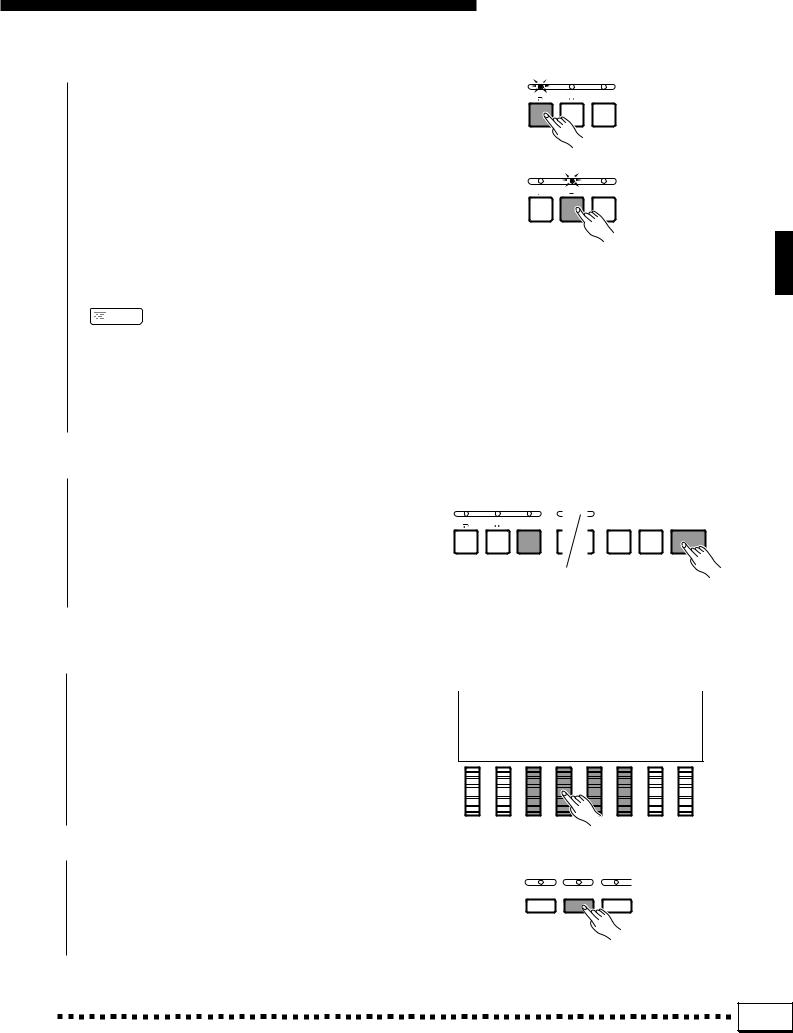
●FILL IN J: Press the [FILL IN J] button to produce a short fill and return to the same section.
Using the Accompaniment Section
FILL IN |
FILL IN |
ENDING/ |
|
|
rit. |
INTRO 1 |
INTRO 2 |
INTRO 3 |
●FILL IN N: Press the [FILL IN N] button to produce a fill and then go to the corresponding chorus or verse:
VERSE 1 N CHORUS 1
VERSE 2 N CHORUS 2
It is possible to change the section that will play after the fill-in by pressing the appropriate section button while the fill-in is playing. If you hold one of the FILL IN buttons, the fill-in will repeat until the button is released.
 NOTES
NOTES
•A Yamaha FC5 footswitch plugged into the rear panel FOOT SWITCH jack can also be used to activate fill-ins if the appropriate function is assigned to the footswitch using the FOOT SWITCH SELECT function described on page 88.
•The transitions between the verse and chorus are different when SOLO is ON.
FILL IN |
FILL IN |
ENDING/ |
|
|
rit. |
INTRO 1 INTRO 2 INTRO 3
> Stop the Accompaniment ..................................................................................................................................................
The accompaniment can be stopped at any time by pressing the [STOP] button. Press the [ENDING/rit.] button if you want to go to the ending section and then stop. Press the [ENDING/rit.] button while the ending section is playing to produce a “ritardando” ending — i.e. the tempo gradually slows down during the ending.
FILL IN |
FILL IN |
ENDING/ |
SYNCHRO |
START/ |
STOP |
|
|
rit. |
START |
RE-START |
|
INTRO 1 |
INTRO 2 |
INTRO 3 |
|
|
|
■ Accompaniment Volume......................................................................................................................................................
Use the RHY, BASS, CHD1, and CHD2 LCD dials controls to set the best balance between the corresponding accompaniment parts, and the optimum volume of the accompaniment parts in relation to the ORCH. 1 and ORCH. 2 voices.
■ Rhythm-only Accompaniment ......................................................................................................................................
The AUTO BASS CHORD mode can be turned off at any time — leaving the rhythm accompaniment only — by pressing the [AUTO BASS CHORD] button so that its indicator goes out.
INTERACTIVE |
AUTO BASS |
VERSE |
ACCOMPANIMENT |
CHORD |
A |
25 |
Downloaded from: http://www.usersmanualguide.com/
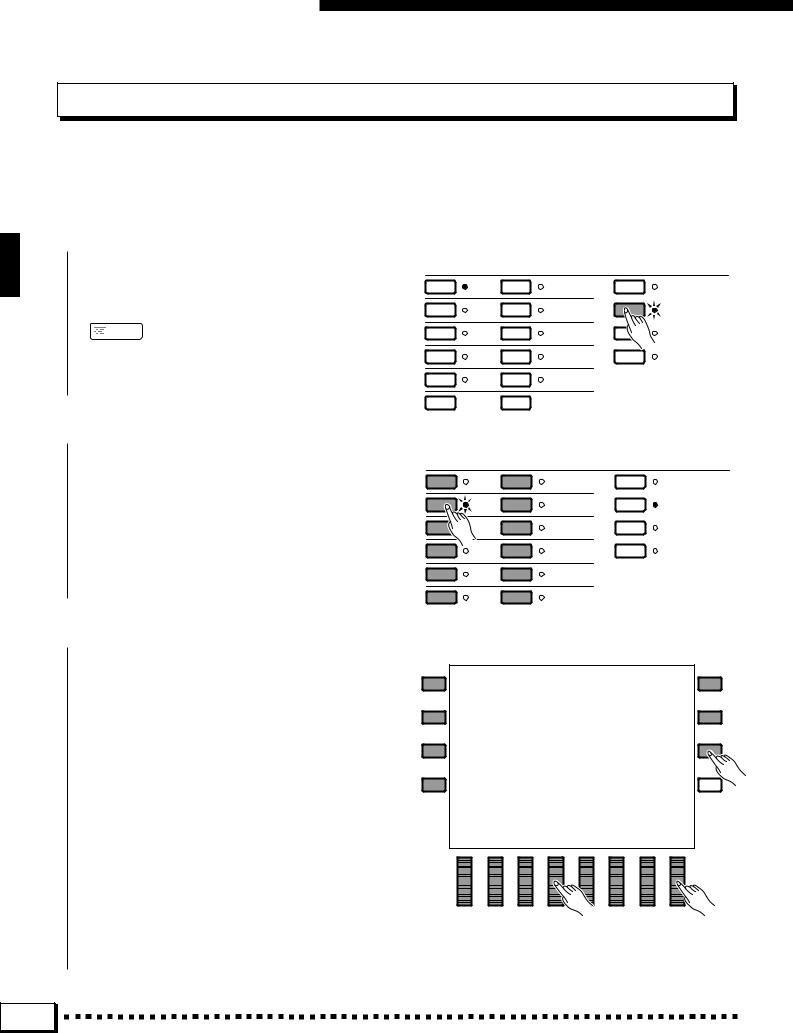
Using the Accompaniment Section
USER SET Style Assignment
The PSR-6000 USER SET style selection mode lets you assign any 12 styles to the 12 style group buttons so you can select them directly without having to select a category, page, and then a style. This is particularly useful for the performer who want direct access to the styles he needs for a song or set.
Z Select the USER SET Mode .............................................................................................................................................
Press the STYLE control section [USER SET] button so that its indicator lights. The USER SET style display will appear.
 NOTES
NOTES
•The display will automatically revert to the main display after a few seconds if the [LIST HOLD] button is not engaged (page 11).
STYLE
1 |
DANCE |
7 |
LATIN |
PRESET |
2 |
ROCK’N’ |
8 |
LATIN POP |
USER SET |
ROLL |
||||
3 |
ROCK |
9 |
WALTZ |
CUSTOM A |
4 |
POP |
10 |
COUNTRY |
CUSTOM B |
5 |
BALLAD |
11 |
TRADITIONAL |
|
6  JAZZ 12
  FOR DISK IA
X Select a Style Button ...............................................................................................................................................................
Press the style group button to which you want to assign a style.
STYLE
1 |
DANCE |
7 |
LATIN |
PRESET |
2 |
ROCK’N’ |
8 |
LATIN POP |
USER SET |
ROLL |
||||
3 |
ROCK |
9 |
WALTZ |
CUSTOM A |
4 |
POP |
10 |
COUNTRY |
CUSTOM B |
5 |
BALLAD |
11 |
TRADITIONAL |
|
6 |
JAZZ |
12 |
FOR DISK IA |
|
C Select a Style ...................................................................................................................................................................................
Use the PAGE LCD dials, the SELECT LCD dials, and the LCD buttons as required to select the style you want to assign to the currently selected style button.
Now the assigned style will instantly be recalled anytime you press the same style button while the USER SET mode is engaged. Style assignments can be changed at any time in the same way.
26 |
Downloaded from: http://www.usersmanualguide.com/
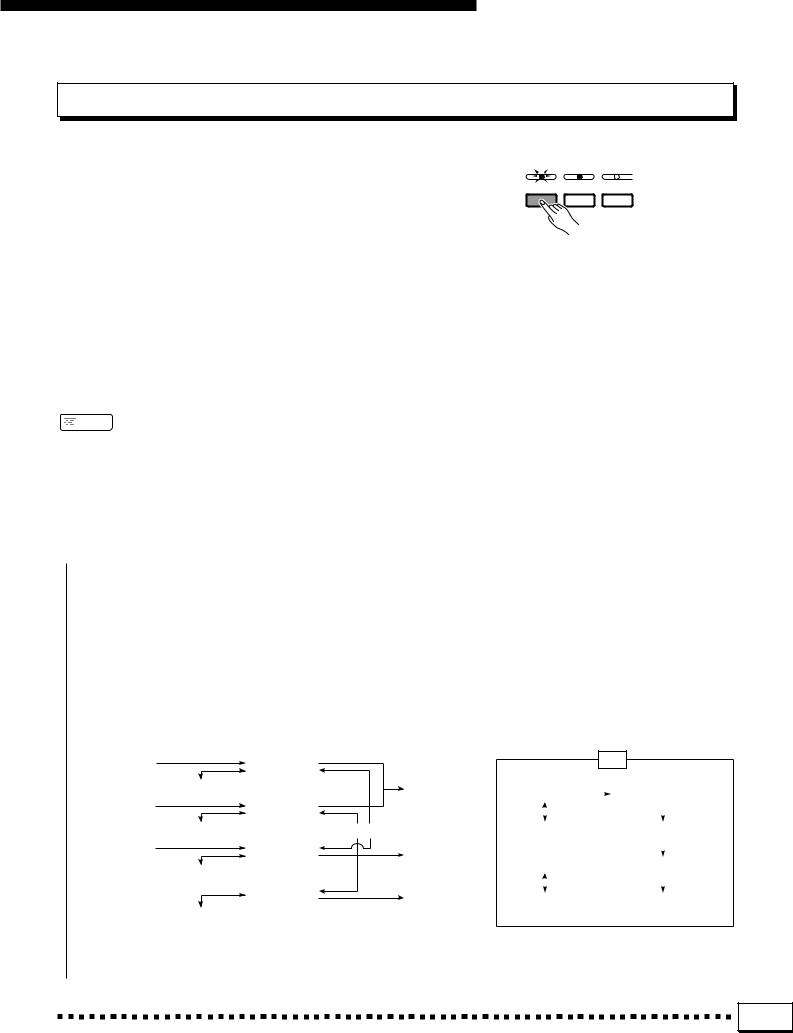
Using the Accompaniment Section
Interactive Accompaniment
Press the [INTERACTIVE ACCOMPANIMENT] button so that its indicator lights to activate the Interactive Accompaniment mode. In this mode the PSR-6000 uses advanced technology to monitor the way you are playing on the keyboard and automatically varies the rhythm or ABC accompaniment accordingly.
If you are playing with the VERSE 1 section, for example, and you begin to build up the musical excitement on the keyboard (i.e. play more notes, faster, and/or harder) the PSR-6000 will automatically switch to the VERSE 2 section to better support what you are playing. On the other hand, if you play more mellow right-hand lines the PSR-6000 will automatically “shift down” to the VERSE 1 section. The same applies to the CHORUS 1 and CHORUS 2 sections.
 NOTES
NOTES
•The “sensitivity” of the Interactive Accompaniment mode can be adjusted via the INTERACTIVE ACCOMPANIMENT Sensitivity function described on page 89. Also note that automatic switching between VERSE 1 and VERSE 2 or CHORUS 1 and CHORUS 2 will not occur if the Interactive Accompaniment MUTE mode is selected
— see page 89.
INTERACTIVE |
AUTO BASS |
VERSE |
|
ACCOMPANIMENT |
CHORD |
A |
|
|
|
|
|
|
|
|
|
■ Auto Solo .............................................................................................................................................................................................
When the AUTO SOLO function is turned ON (ON is the default setting — see page 89), the SOLO accompaniment sections will automatically be activated if nothing is played on the keyboard for a few measures. Further, the solo sections will automatically be de-activated from the end of the current phrase after keyboard performance is resumed.
ABC/IA Accompaniment Flow Diagram
INTRO 1 |
|
VERSE 1 |
|
|
|
|
|
||
|
|
|
|
|
|
|
|
|
|
|
|
FILL IN J |
|
|
|
|
|
ENDING |
|
|
|
|
|
|
|
|
(ENDING 1) |
||
INTRO 2 |
|
|
|
VERSE 2 |
|||||
|
|
|
|
|
|
||||
|
|
|
|
|
|
|
|
||
|
|
FILL IN J |
|
|
|
FILL IN N |
|
||
|
|
|
|
|
|
|
|
|
|
INTRO 3 |
|
CHORUS 1 |
|
|
|
ENDING |
|
||
|
|
|
|
|
|
|
(ENDING 2) |
||
|
|
FILL IN J |
|
|
|||||
|
|
|
|
|
|
|
|
|
|
|
|
|
|
|
|
|
|
|
|
|
|
|
|
CHORUS 2 |
|
|
|
ENDING |
|
|
|
|
|
|
|
|
(ENDING 3) |
||
|
|
FILL IN J |
|
|
|
|
|||
|
|
|
|
|
|
|
|
|
|
IA
VERSE 1 |
|
|
|
VERSE 1 |
SOLO |
||
|
|
|
|||||
|
|
|
|
|
|
|
|
|
|
|
|
|
|
|
|
VERSE 2 |
|
|
|
VERSE 2 |
SOLO |
||
|
|
|
|
|
|
|
|
|
|
|
|
|
|
|
|
CHORUS 1 |
|
|
|
CHORUS 1 |
SOLO |
||
|
|
|
|
|
|
|
|
|
|
|
|
|
|
|
|
CHORUS 2 |
|
|
|
CHORUS 2 |
SOLO |
||
|
|
|
|||||
27 |
Downloaded from: http://www.usersmanualguide.com/
 Loading...