


RX21
YAMAHA
AUTHORIZED
PRODUCT MANUAL
DIGITAL RHYTHM PROGRAMMER

YAMAHA
DIGITAL RHYTHM PROGRAMMER
OWNER’S MANUAL
INTRODUCTION
Congratulations on your purchase of a Yamaha RX21 Digital Rhythm Programmer!
Your RX21 represents the crystallization of the most sophisticated electronic music
technology, combining advanced microcomputer control with a top-quality digital PCM
sound storage and reproduction system. With the RX21 you will be able to program
virtually any type of rhythm pattern, and since the instrument sounds are digitally recorded
they are indistinguishable from live percussion instruments.
To ensure that the RX21 will give you maximum performance and versatility, we urge
you to read this operation manual carefully before attempting to operate the unit. A handy
fold-out diagram of the RX21 control panel allows you to instantly locate any controls
mentioned in the text, so that you can familiarize yourself with the operations as easily
and effortlessly as possible.
The 44 preset patterns stored in the RX21’s memory are detailed in the accompanying
RX21 PATTERN BOOK. It also contains other rhythm patterns for you to try out, a pattern
chart in which you can note down your own personally programmed patterns, and a
song chart.
CONTROL PANEL
CONNECTIONS
PRECAUTIONS
SETTING UP
THE INSTRUMENTS
Getting to Know the RX21
RX21Instrument
Total
Level
Instrument Level
Stereo
Positioning
Accents
Setting
PATTERN
Pattern Selection
PlaybackofPatterns
Pattern
Tempo
Step-Write
Quantize
The Step Write Dot
Click Level
Accent
OPERATIONS
Change
Control
Real-Time Pattern
Beat Exchange
Pattern Clear
Instrument Clear
Pattern Copy
Chart
Levels
During
Pattern
Instruments
Playback
Programming
Programming
Display
CONTENTS
SONG
2
3
5
6
7
7
7
7
8
8
8
9
10
10
10
10
11
11
14
17
18
20
22
22
23
24
OPERATIONS
Song Playback
Repeat Playback of Songs
Editing (Assembling
Break Patterns
The Insert
The Delete
Repeats
Deleting Repeats
Song Clear
CASSETTE
Save/Verify
Load
MIDI
Clock Modes
MIDI Parameters
Tape Sync
PROGRAMMING
Instrument
Pattern Operations
Song Operations
Cassette Operations
MIDI Functions
ERROR
SPECIFICATIONS
BLOCK
OPERATIONS
FUNCTIONS
MESSAGES
DIAGRAM
Function
Function
with the
REFERENCE
Operations
A
Song)
RX21
GUIDE
26
26
26
27
28
29
30
30
31
32
34
34
35
37
39
40
42
43
43
44
48
51
52
53
55
56
1
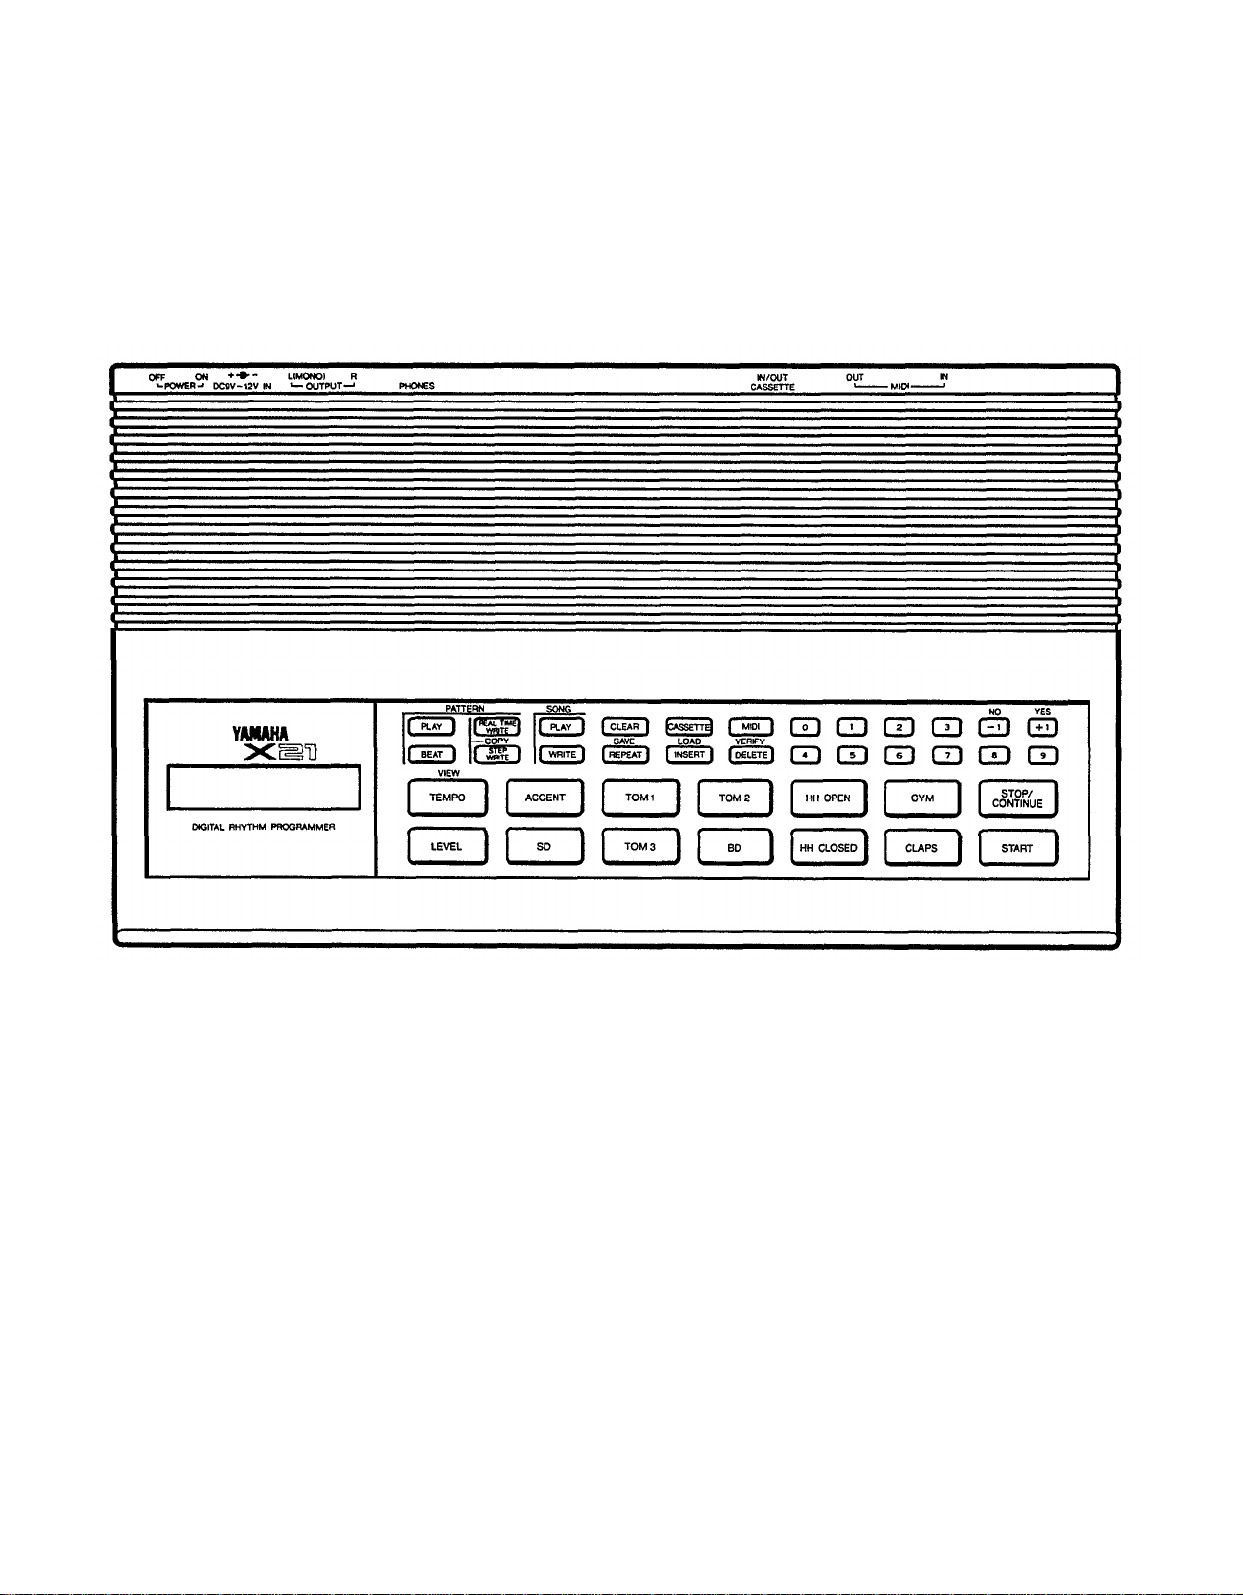
CONTROL PANEL
2
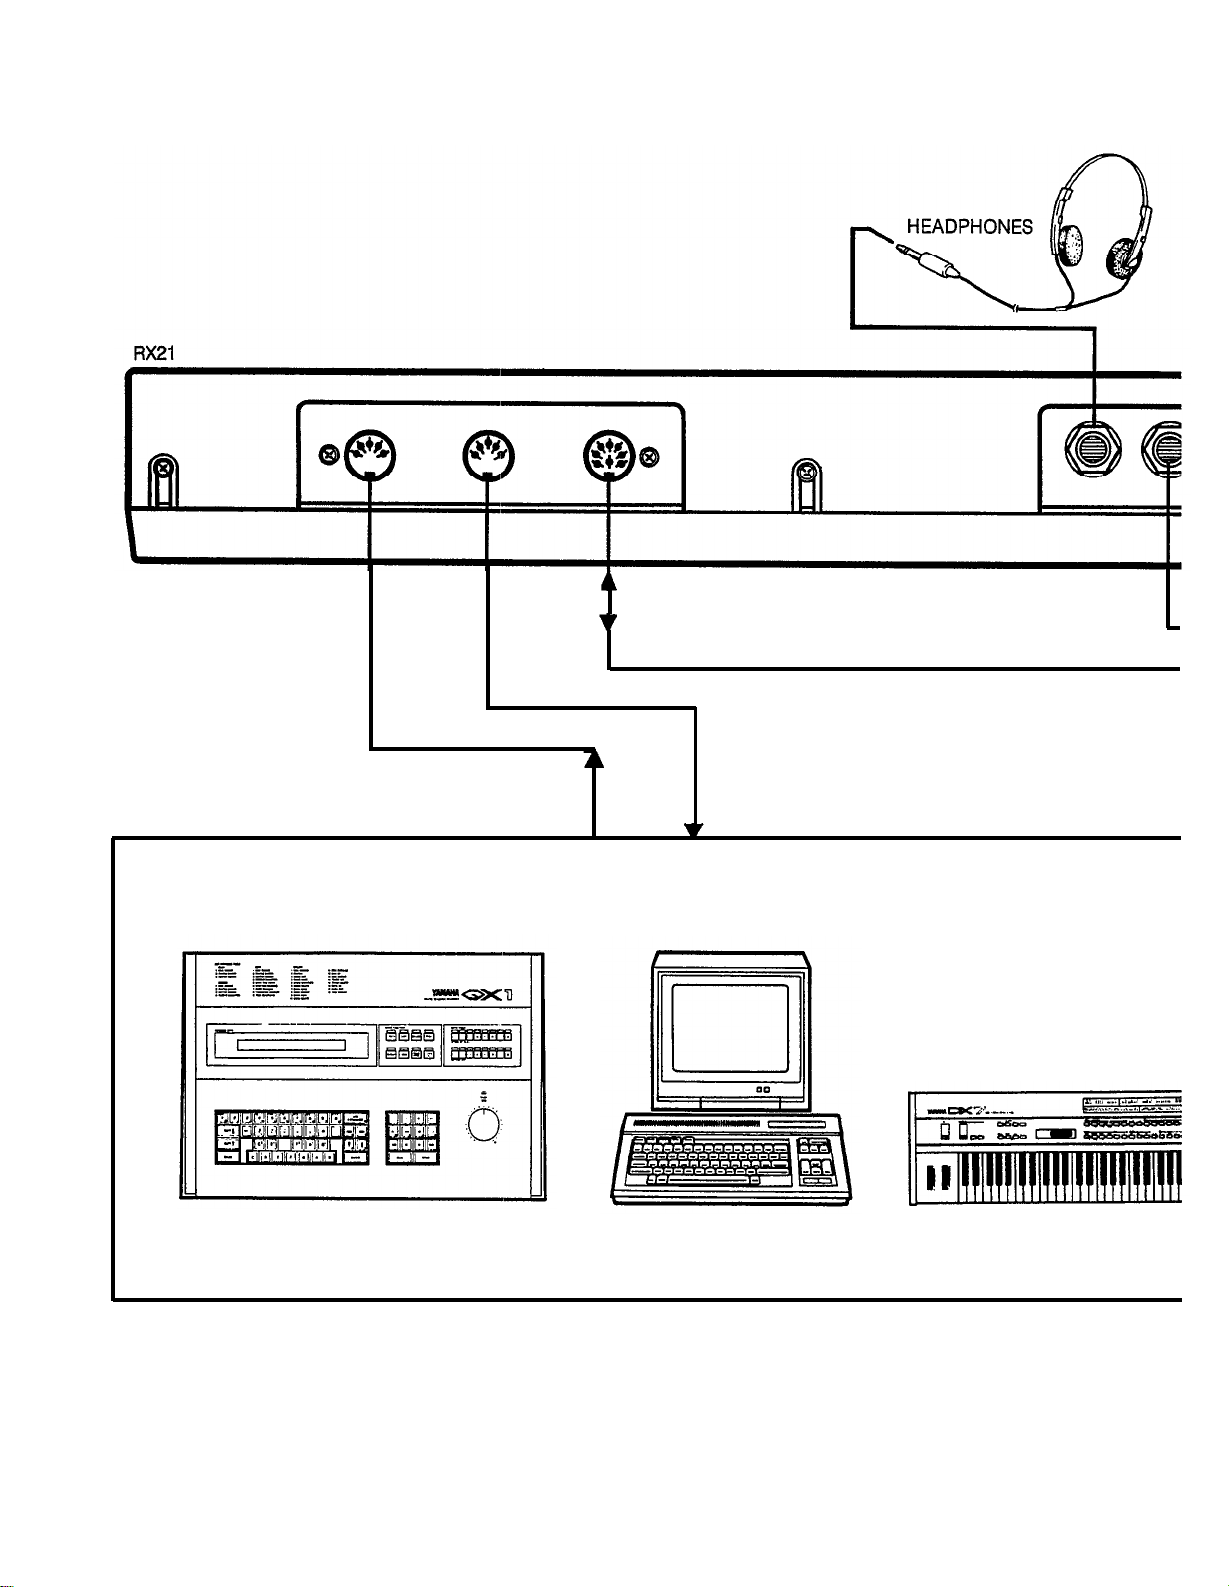
CONNECTIONS
MIDI IN
MIDI OUT
CASSETTE
IN/OUT
MIDI EQUIPMENT
PHONES
A wide variety of MIDI compatible equipment may
be used. These are just a few examples.
OUT R
QX SEQUENCER
3
CX5M MUSIC COMPUTER
DX SYNTHESIZER
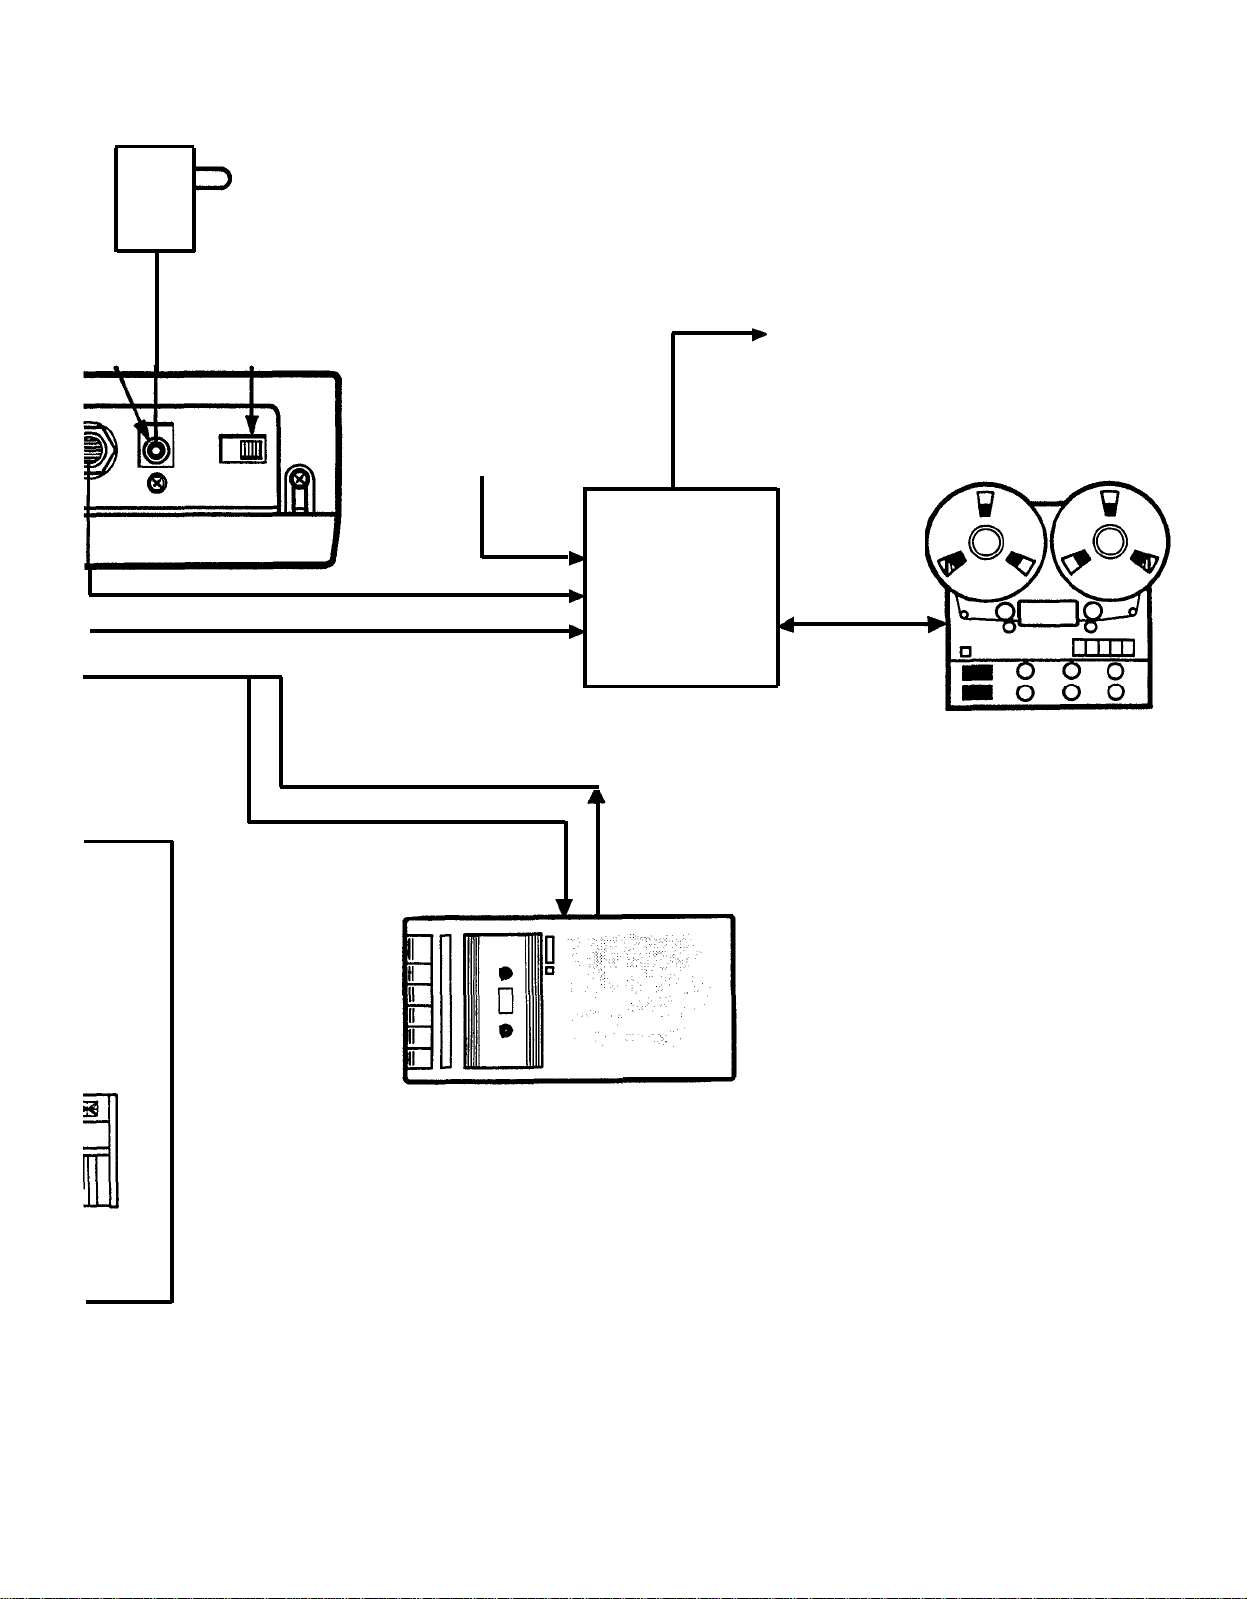
PA-1 POWER SUPPY
DC9V~
12V IN POWER ON/OFF
OUT L
CASSETTE "IN" OR "MIC" JACK
OTHER
SOURCES
OUTPUT TO SOUND/MONITOR SYSTEM
MULTITRACK RECORDER
PA OR
RECORDING MIXER
CASSETTE "OUT" OR "EAR" JACK
DATA CASSETTE RECORDER
4

PRECAUTIONS
Avoid placing the RX21 in locations exposed to direct sunlight or high temperatures,
excessively high or low humidity, high dust concentration, or vibration.
Be sure to connect the RX21 to an AC power supply that meets the power supply
specifications listed on the rear of the unit. Ideally, you should use the PA-1 power
supply unit supplied with the RX21.
If there is any danger of lightning occurring nearby, remove the power plug from the
wall socket in advance.
Be sure to make all connections properly, as illustrated in the CONNECTIONS diagram.
To avoid damaging your speakers and other playback equipment, turn off the power
of all related equipment before making connections.
Do not use excessive force in handling control switches and knobs.
To avoid broken cords and short circuits, be sure to unplug all connectors by grasping
the respective plugs-NOT the cords.
Remove the power plug from the AC mains socket if the unit is not to be used for an
extended period of time.
Remove all plugs and connections if the unit is to be transported, to prevent damage
to the cords and jacks.
Do not use solvents such as benzene or paint thinner to clean the unit. Do not use
insecticides or other pressurized spray products in proximity to the unit. Wipe off the
exterior with a soft cloth.
The RX21 memory has a Lithium backup battery so that patterns and songs are not lost
when you turn the power off. This battery has a life of about 5 years. When its voltage
level starts to fall below a usable level, the RX21’s LCD will display an Error Message
when you turn it on (see the ERROR MESSAGES section of this manual). In this case,
replacement will be imminent, and you should contact your local Yamaha dealer.
EFFECTS ON OTHER ELECTRONIC EQUIPMENT:
Since this unit incorporates digital circuitry, simultaneous use of other equipment
such as TVs, radios, etc. in close proximity may cause noise and erroneous operation.
If this occurs, separate the affected units sufficiently to eliminate the problem. It
is also a good idea to use separate line filters on each piece of equipment.
5

SETTING UP
Please read the PRECAUTIONS section of this manual before setting up your RX21.
The CONNECTIONS diagram which folds out at the front of this manual shows you how to make the simple
connections necessary to set up your RX21. Use the PA-1 power supply, or any similar power supply to convert
the AC voltage to the voltage required to power the RX21 (9 to 12 V).
A brief output pulse appears at the RX21 outputs when the power is initially turned on. To prevent this from possibly
damaging your speaker system, make sure the master volume control of your sound system, or the volume of the
mixer channel to which the RX21 is connected, is set to minimum before the RX21 is turned on. Better yet, turn
on the RX21 first, then your sound system.
The RX21 has an LCD (Liquid Crystal Display) panel that keeps you informed of what is happening at any moment
(for example, which pattern is playing, or what editing operation you are carrying out). When you turn on the
RX21, the LCD shows “YAMAHA RX21” for about a second, then switches to the “SELECT PTN 00”, the basic
select pattern mode display which prompts you to select any pattern and then play it back. (The LCD also displays
Error Messages to indicate any faults or operating errors: see the ERROR MESSAGES section of this manual).
Without any further operations, the RX21 is now ready for you to play.
6

Getting to Know the
RX21 Instruments
THE INSTRUMENTS
The RX21 contains nine superb percussion instrument sounds. Because they are
digitally recorded, they are indistinguishable from the real thing, and allow you to
create totally authentic drum rhythms. The RX21 instruments can be played in
real-time (without programming patterns or songs) by tapping on the black in-
strument buttons.
Using either a pair of headphones plugged into the RX21 PHONES jack, or a sound
system fed from the RX21 L and R OUTPUT jacks, turn the RX21 on and repeatedly
tap any of the black instrument buttons (SD, TOM1, TOM2, etc.). You can now
“play” all the instrument buttons to become familiar with their sound.
INSTRUMENT BUTTONS
RX21 INSTRUMENT
CHART
The following chart
Instrument Button
SD
TOM 1
TOM 2
TOM 3
BD
HH OPEN
HH CLOSED
CYM
CLAPS
NOTE:
Although HH OPEN and HH CLOSED can be used together in the same pattern,
they cannot be used on the same beat (this is obviously also true in a live
drum kit). If you have programmed in an HH CLOSED note, programming
in an HH OPEN note on the same beat will clear the HH CLOSED note and
replace it with an HH OPEN note, and vice versa.
lists
all the instruments available:
Instruments
Medium-tuned snare
10” deep-body tom-tom
12” deep-body tom-tom
14” floor tom-tom
Bass drum
Open hi-hat
Closed hi-hat
Crash cymbal
Hand claps
Total Level
The RX21 lets you adjust both the total level (volume) of all the instruments
combined and individually adjust the level of each instrument so you can achieve
the best overall balance or “drum mix".
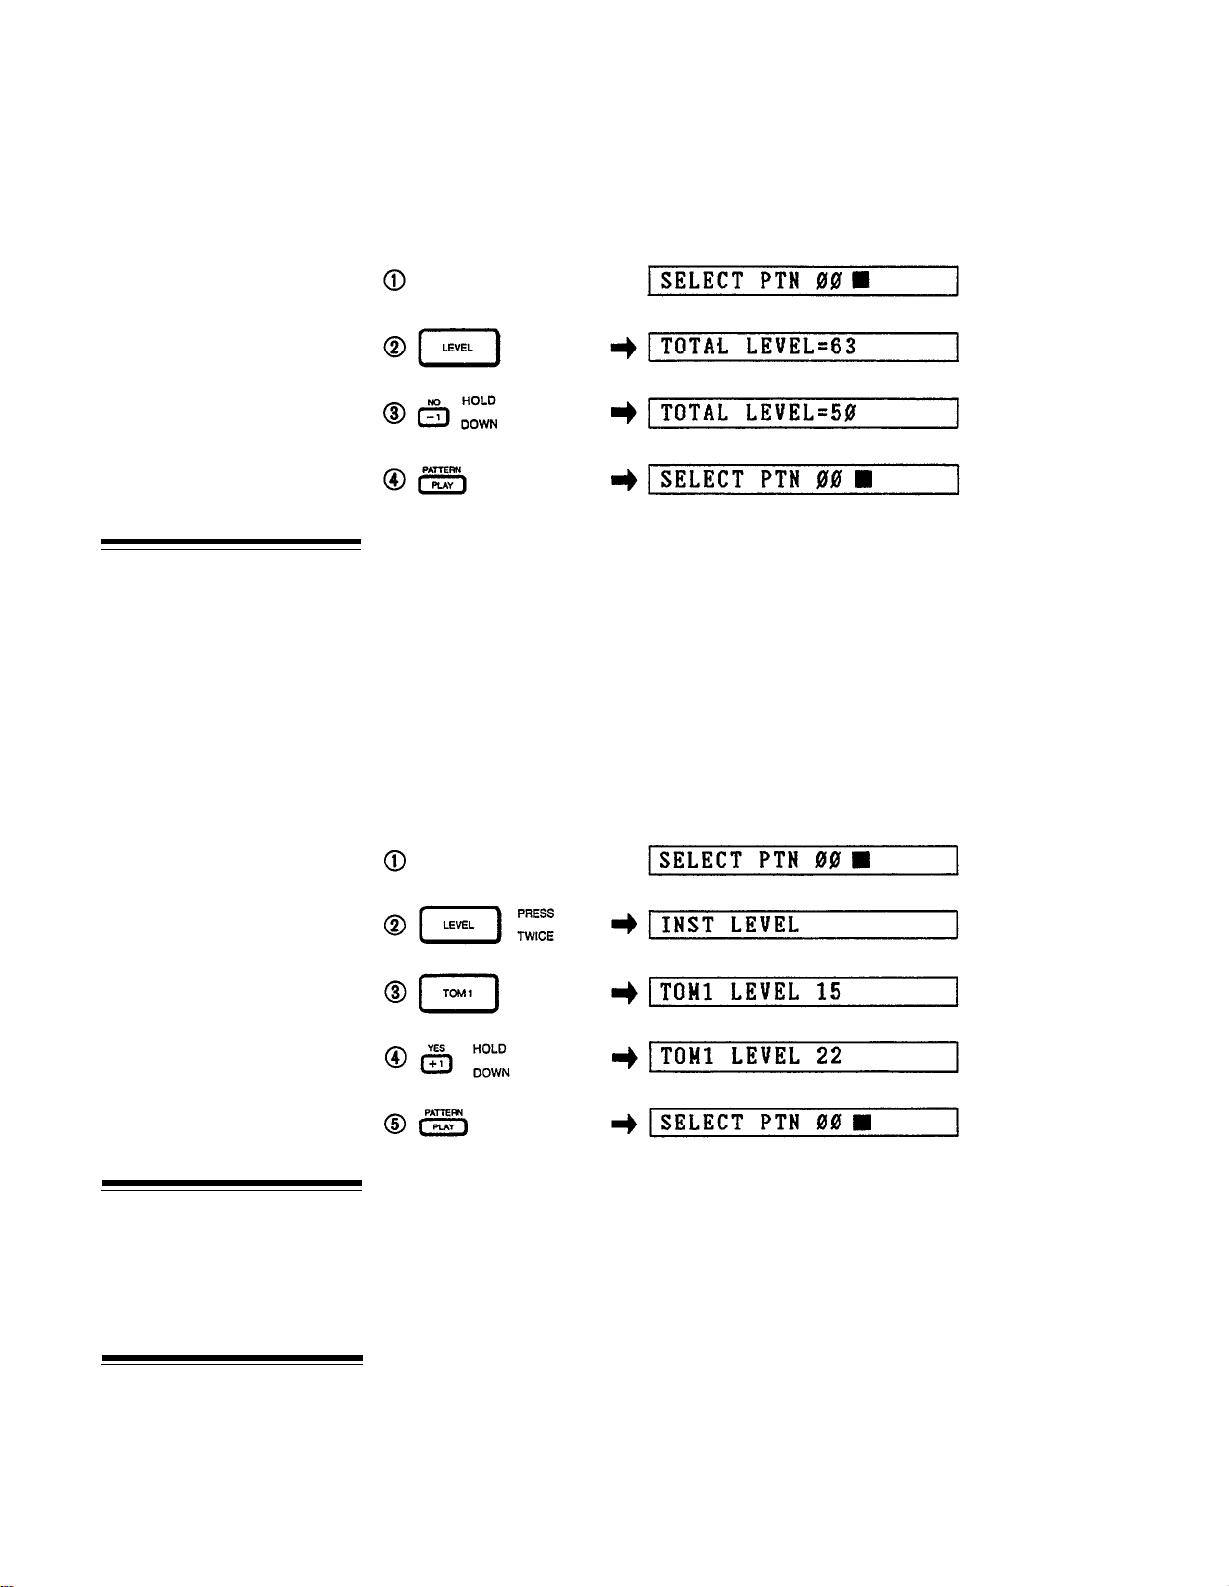
The total level mode is entered simply by pressing the blue LEVEL button. The LCD
will read “TOTAL LEVEL=nn” (nn being the volume level).
The total level is adjustable from 00 (silence) to 63. Pressing the +1/YES or -1/NO
7
Instrument Level
buttons increases or decreases the volume by one, respectively. Holding either
button down will cause the numbers to change continuously and rapidly. The total
level, once set, remains at the selected value even after turning off the RX21.
Press PATTERN PLAY to exit the total level mode.
Total Level (Example: reducing total level from 63 to 50)
To set the individual instrument level, press the LEVEL button twice. The LCD
will read INST LEVEL to indicate that the individual instrument level mode is now
active. Pressing any black instrument button then permits adjustment of that
instrument’s level via the +1/YES or -1/NO keys. The LCD panel will indicate the
selected instrument followed by the currently set level–e.g. “SNARE LEVEL 15”.
The level is adjustable from 00 to 31. It’s good practice to set the individual instrument levels at 15, then adjust each instrument up or down to get your desired
mix. The instruments can be adjusted in any sequence.
Press the PATTERN PLAY button to exit the instrument level mode.
Stereo Positioning
Accents
Instrument Level (Example: Increase TOM 1 level from 15 to 22)
Output from the RX21 can be either in STEREO (connect cables to both L and R
outputs), or MONO (connect to L output ONLY). When using the stereo outputs,
instruments are arranged as follows.
Left of center:
Center:
Right of center:
When you’re playing on the instrument keys, as described in the “GETTING TO
KNOW THE RX21 INSTRUMENTS” section, holding down the green ACCENT
key while tapping an instrument key will cause that instrument to play louder, just
as if a drum has been hit harder. If you happen to simultaneously tap more than
one instrument key while holding down the ACCENT key, all the instruments played
will sound louder.
HH OPEN, HH CLOSED, TOM 1
SD, BD, TOM 2
CLAPS, CYM, TOM 3
8
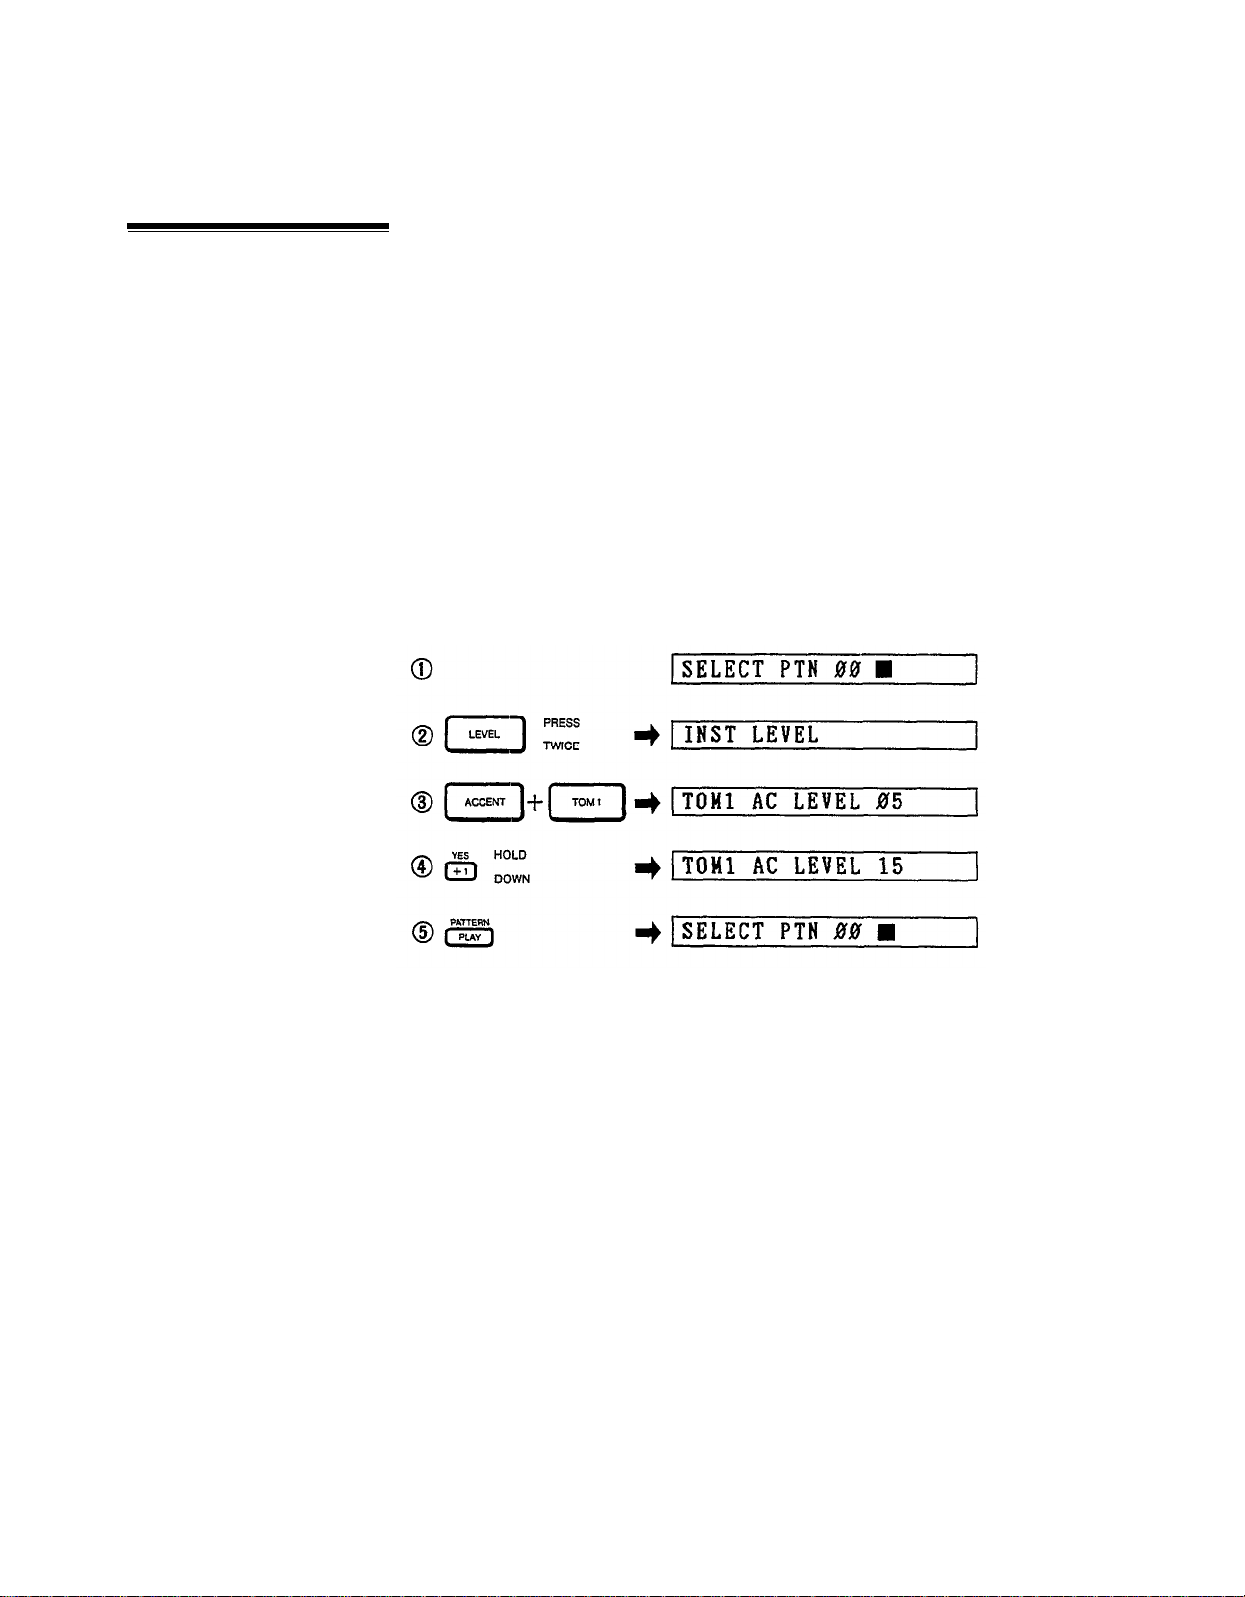
Setting Accent Levels
When you record a pattern, pressing the ACCENT key to add an accent to a beat
(no need to press an instrument key at the same time) will affect ALL instruments
sounding on that beat, according to their individual accent levels. For instruments
which are not to be accented, simply set their accent level to zero.
The accent level for each instrument can be set independently, making it possible
to set the most natural level in relation to the instrument’s normal level. To enter
the accent level mode, press the LEVEL button twice, then press an INST button
while holding down the ACCENT button. The LCD will read “XXXX AC
LEVEL=
The accent level can then be adjusted by the +1/YES or -1/NO keys. The accent
level range is the same as the instrument level range: 00-31. The accent level setting,
however, is added to the instrument level setting to produce the actual accent level.
For example, if the instrument level is set at 15 and the accent level for that instrument
is set at 05, then the actual accent level will be 20. The actual accent level cannot
exceed 31, so if the instrument level of an instrument is set to the maximum 31
setting, no accenting of notes for that instrument is possible. Once the accent level
mode is active, instruments can be selected and adjusted in any sequence. Press
the PATTERN PLAY button to exit the accent level mode.
nn” ("XXXX” being the instrument and "nn" the accent level).
Accent Level (Example: increase TOM 1 accent level from 5 to 15)
9
Pattern Selection
PATTERN OPERATIONS
With the RX21, a "pattern" denotes a one bar (one measure) drum sequence, which
repeats when you play it back. The RX21 is capable of storing a total of 100 different
patterns in its internal pattern memory. Pattern memories 56 through 99 contain
44 preset patterns that provide a variety of exciting and usable drum patterns that
you can play immediately. These are listed in the RX21 PATTERN BOOK accompanying this manual. Preset patterns 56 through 59 contain blank patterns of different lengths which are useful as rests or breaks in a song program. Pattern memories 0 through 55 enable you to store up to 56 of your own personally programmed
drum patterns.
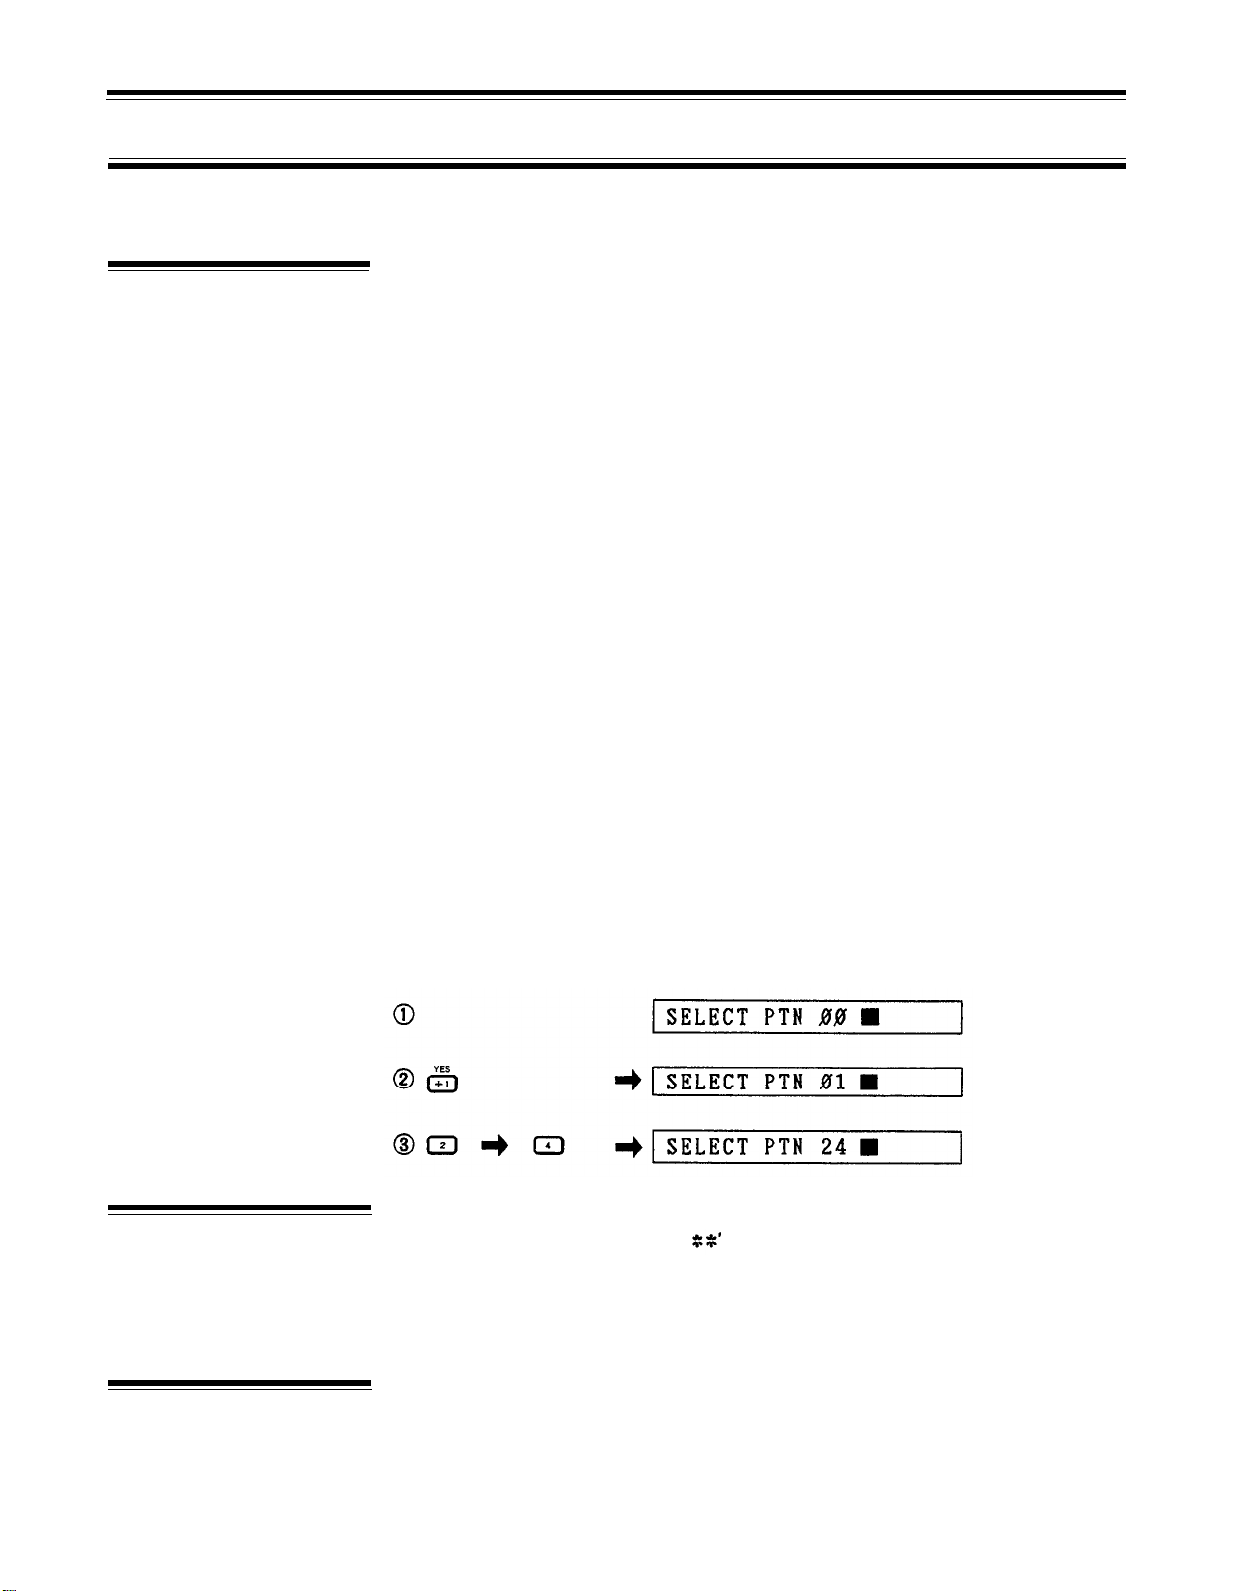
To select a pattern the RX21 must be in the pattern mode-this is the mode that
is active when the RX21 is initially turned on. The LCD panel will show “SELECT
PTN 00”. A rectangular “cursor” will be flashing on the right side of the display,
prompting you to enter a pattern number. This cursor will normally appear in any
display where data can be entered.
Two methods of pattern selection are available:
1) Selecting Patterns Using the – 1/NO and + 1/YES Buttons
Pressing the -1/NO or +1/YES buttons decreases or increases the pattern number
by one, respectively. This method of selection is easy when going to an adjacent
or nearby pattern number, but when selecting a pattern in a distant number range,
the direct numeric selection method is quicker.
Playback of Patterns
Pattern Change
During Playback
2) Selecting Patterns Using the Numeric Buttons
The two rows of grey numbered buttons may be used for pattern selection. Entering
the desired pattern number using these buttons immediately selects that pattern.
You must input two digits: e.g. for pattern number 7 you must press 07.
Selecting Patterns (Example: patterns 00, 01, 24)
To play back the selected pattern, simply press the red START button. The LCD
PTN
will switch to “PLAY
stop pattern playback press the blue STOP/CONTINUE button. The pattern can
be restarted by pressing the STOP/CONTINUE button again. In this case the pattern
continues from the exact point at which it was stopped, rather than starting from
the first beat of the pattern. To start from the first beat of the pattern, press START.
While a pattern is playing, you can select a new pattern, either by using the -1/NO
or +1/YES buttons (to select the next lowest or highest pattern number, respectively) or the numerical buttons (enter two digits: for example, “08” for pattern
8). The newly entered pattern number will be displayed at the right hand side of
pp;nxt
” (pp being the selected pattern number). To
10
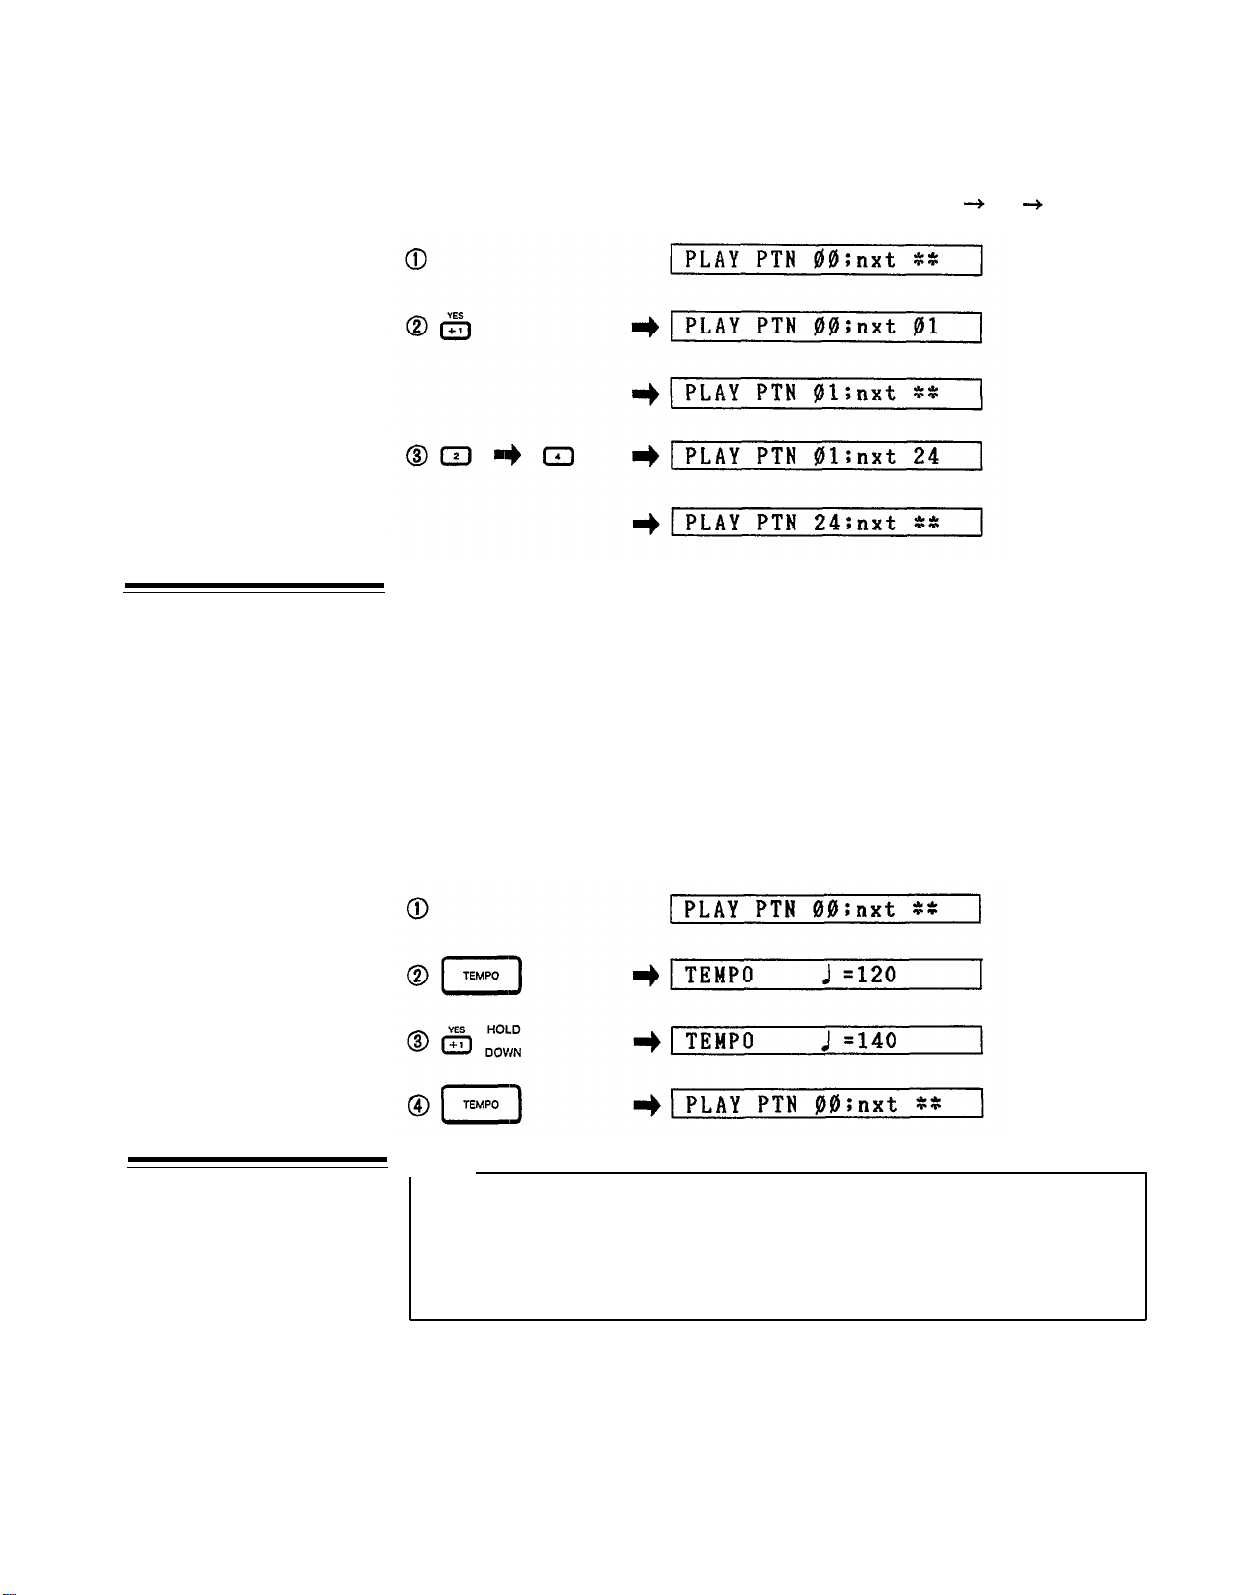
the LCD, and the RX21 will switch to the new pattern at the end of the pattern
that is presently playing (i.e. at the end of the measure). The LCD will then display
only the new pattern number.
Tempo Control
Pattern Change During Playback (Example: Patterns 00
The pattern tempo can be adjusted at any time (even while playing back or recording) by pressing the blue TEMPO button. The LCD will display the last tempo
that was set (even if the RX21 has been turned off since then) in quarter notes
per minute. You can then adjust the tempo by using the -1/NO and +1/YES buttons.
Pressing and releasing these buttons decreases or increases the tempo by one;
holding them down permits rapid continuous decrease or increase, respectively.
The range available is 40 to 250 quarter notes per minute. Pressing the TEMPO
button again returns the RX21 to the mode it was in before tempo setting.
01 24)
Real Time Pattern
Programming
TEMPO Function (Example: Change tempo from 120 to 140 during playback
of pattern 00)
NOTE:
An understanding of the QUANTIZE function, described later in this chapter,
is essential for effective use of the real time write function. We recommend
that before actually trying out the real time write function you should read
through the QUANTIZE section (on the page 17). Then come back to this
section and try out the function.
The RX21 permits pattern programming using two different methods: REAL TIME
WRITE and STEP WRITE. The most direct of these is REAL TIME WRITE. This
function lets you "play” your rhythm on the instrument keys, adding new instruments
and rhythm lines until the pattern is complete.
11

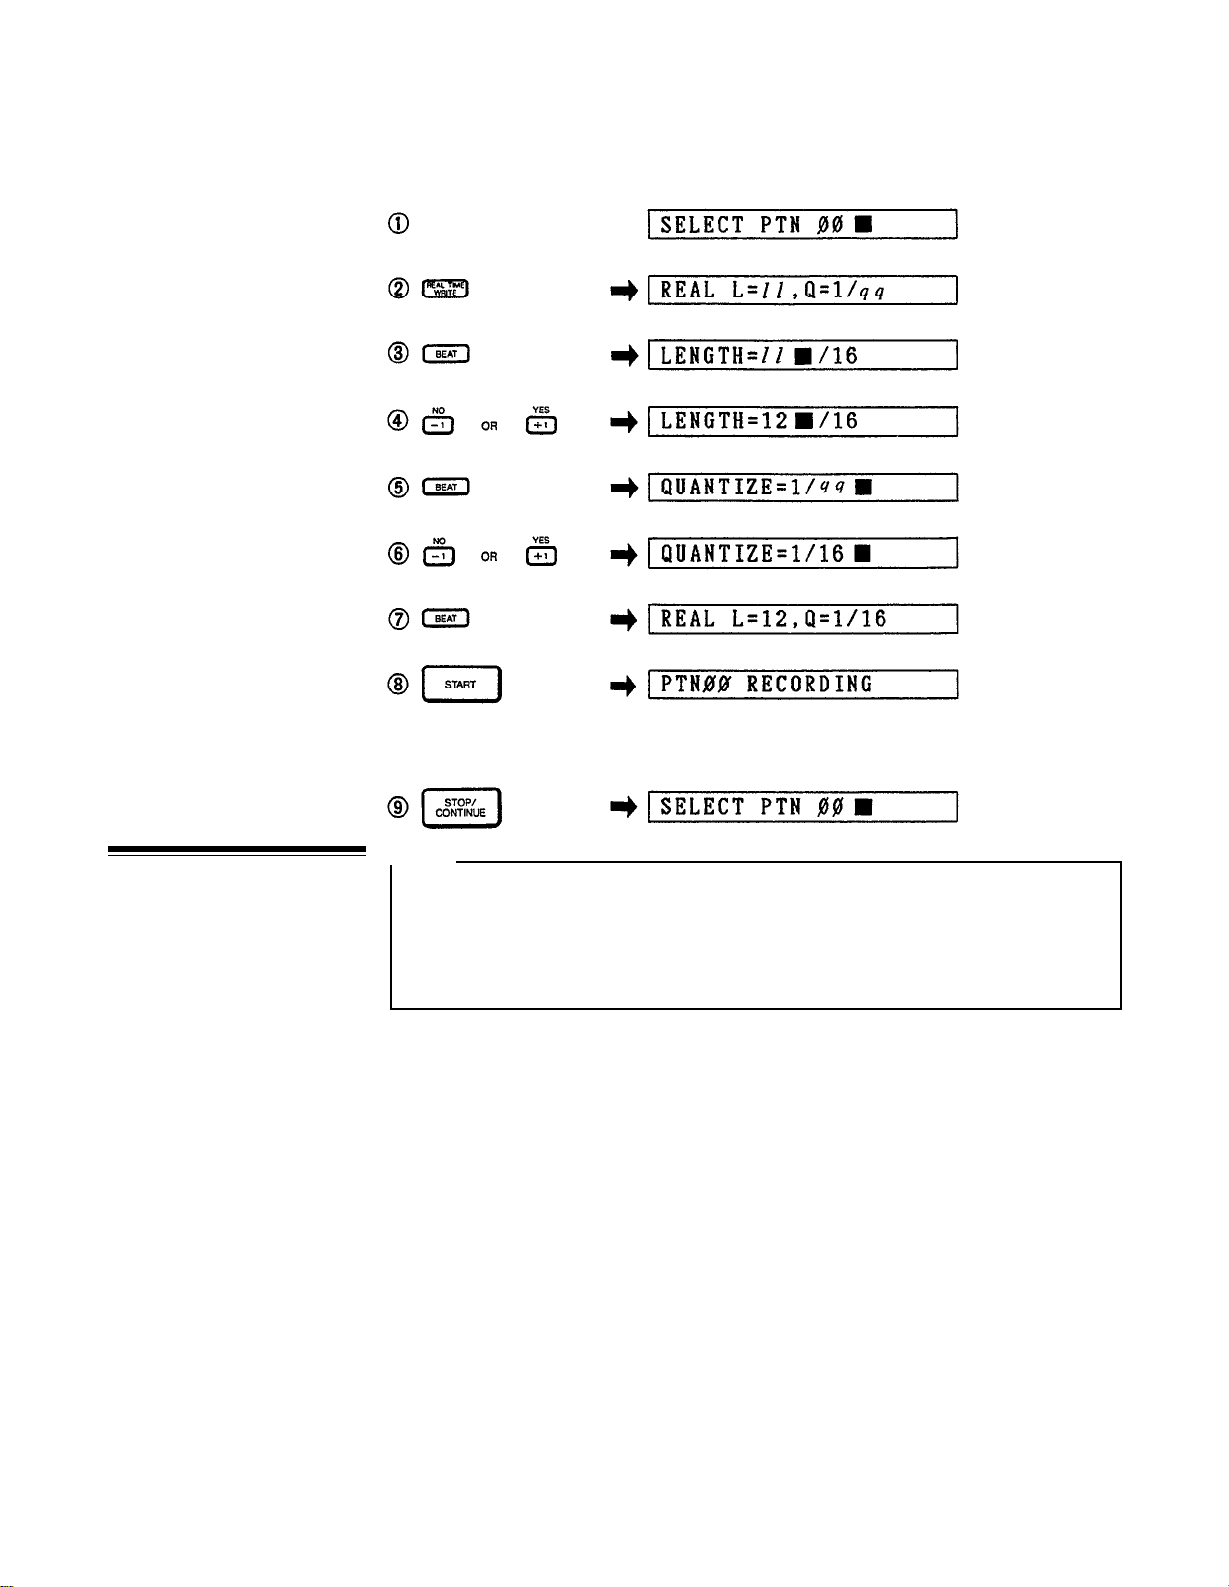
First, select the pattern number you wish to program (numbers 00 through 55 only:
patterns 56 through 99 are permanent preset patterns and cannot be re-programmed,
although you can edit the preset patterns to produce new patterns, as we’ll explain
in the PATTERN COPY SECTION later in this chapter).
Also, ensure (by playing back if necessary) that the selected pattern number does
not contain a pattern, if you want to avoid losing an existing pattern. Enter the
real time write mode by pressing the REAL TIME WRITE button. The LCD will give
the following indication: “REAL L=//,Q=1/qq” (// being the pattern length, and
qq being the quantize rate-we’ll explain these terms later). If you have selected
a pattern number that already contains data, a square black cursor will flash at the
left side of the LCD. If you have selected a preset pattern number, the cursor will
flash in the center of the LCD. In the latter case you should press PLAY again and
select another pattern number.
For this initial explanation, we’ll assume that you’ve selected a pattern number that
is empty of data. You can now set the length and quantize rate of your pattern.
Press the BEAT button. If, by mistake, you have selected a pre- programmed pattern,
the LCD will show the error message “PRESET PTN AREA!” then revert to the
“SELECT PTN” display. You should now select another pattern number.
Normally, the LCD will switch to “LENGTH=// /16” (// is the pattern length) with
the cursor flashing to the right of the length number. The RX21 measures patterns
in sixteenth notes, so for example a bar of 4/4 time (four quarter notes per bar)
would be indicated by the setting “16/16” (sixteen sixteenth notes per bar); a bar
of 3/4 time (three quarter notes per bar) would be “12/16” (twelve sixteenth notes
per bar), and so on. The following chart indicates the relationship between Length
settings and time signatures.
LENGTH SETTlNG (II/16) TIME SIGNATURE
16
15
14
13
12
11
10
9 9/16
8
7
6
5
4
3
2
1
Use the -1/NO and +1/YES buttons to input the length setting. Press BEAT again
to enter the Quantize rate. The LCD will switch to “QUANTIZE=1/
= the quantize rate) with the cursor flashing to the right of the quantize number.
You can now use the -1/NO or +1/YES buttons to “scroll through” the available
quantize numbers (12, 24,16, 32) until you reach the desired setting. Press BEAT
again to return the LCD to the previous real time write mode display.
To review, the real time write setting procedure is as follows:
4/4
15/16
7/8
13/16
3/4 or 6/8
11/16
5/8
2/4
7/16
3/8
5/16
1/4
3/16
1/8
1/16
qq
” (where qq
Press REAL TIME WRITE to enter the real time write mode.
1.
Press BEAT, then enter pattern length setting with -1/NO or +1/YES buttons.
2.
Press BEAT again, then enter quantize rate with -1/NO or +1/YES buttons.
3.
12
4.
Press BEAT a third time, to return the RX21 to the real time write mode.
You are now ready to program your pattern. Tap the red START button, and you’ll
hear the “click track” rhythm accents. If, by mistake, you have selected a preset,
there will be no click track. Instead, the LCD will show “PRESET PTN AREA!”, then
revert to the “SELECT PTN pp" display, and you should select another pattern and
repeat the real time write setting procedure.
If you have selected pattern 00, the LCD will switch to “PTN 00 RECORDING",
and you’ll see the cursor moving from left to right once every measure. Regardless
of the length of the pattern, the click will be heard at the start of each group of
four sixteenth notes. In other words, on every quarter note beat. Also, the first beat
of each bar will be accented. The RX21 will continue cycling through the full length
of the pattern while you record. You can now set your tempo, as previously described, and start playing.
In the real time record mode, everything you play will be entered into the pattern,
and you’ll hear it replayed every time the pattern is repeated. There’s no need to
try and input all the instruments at once: you can input one instrument at a time,
and gradually build up a pattern. Enter accented beats by tapping the ACCENT
button (see “Accents” in the section entitled THE INSTRUMENTS). Here’s an
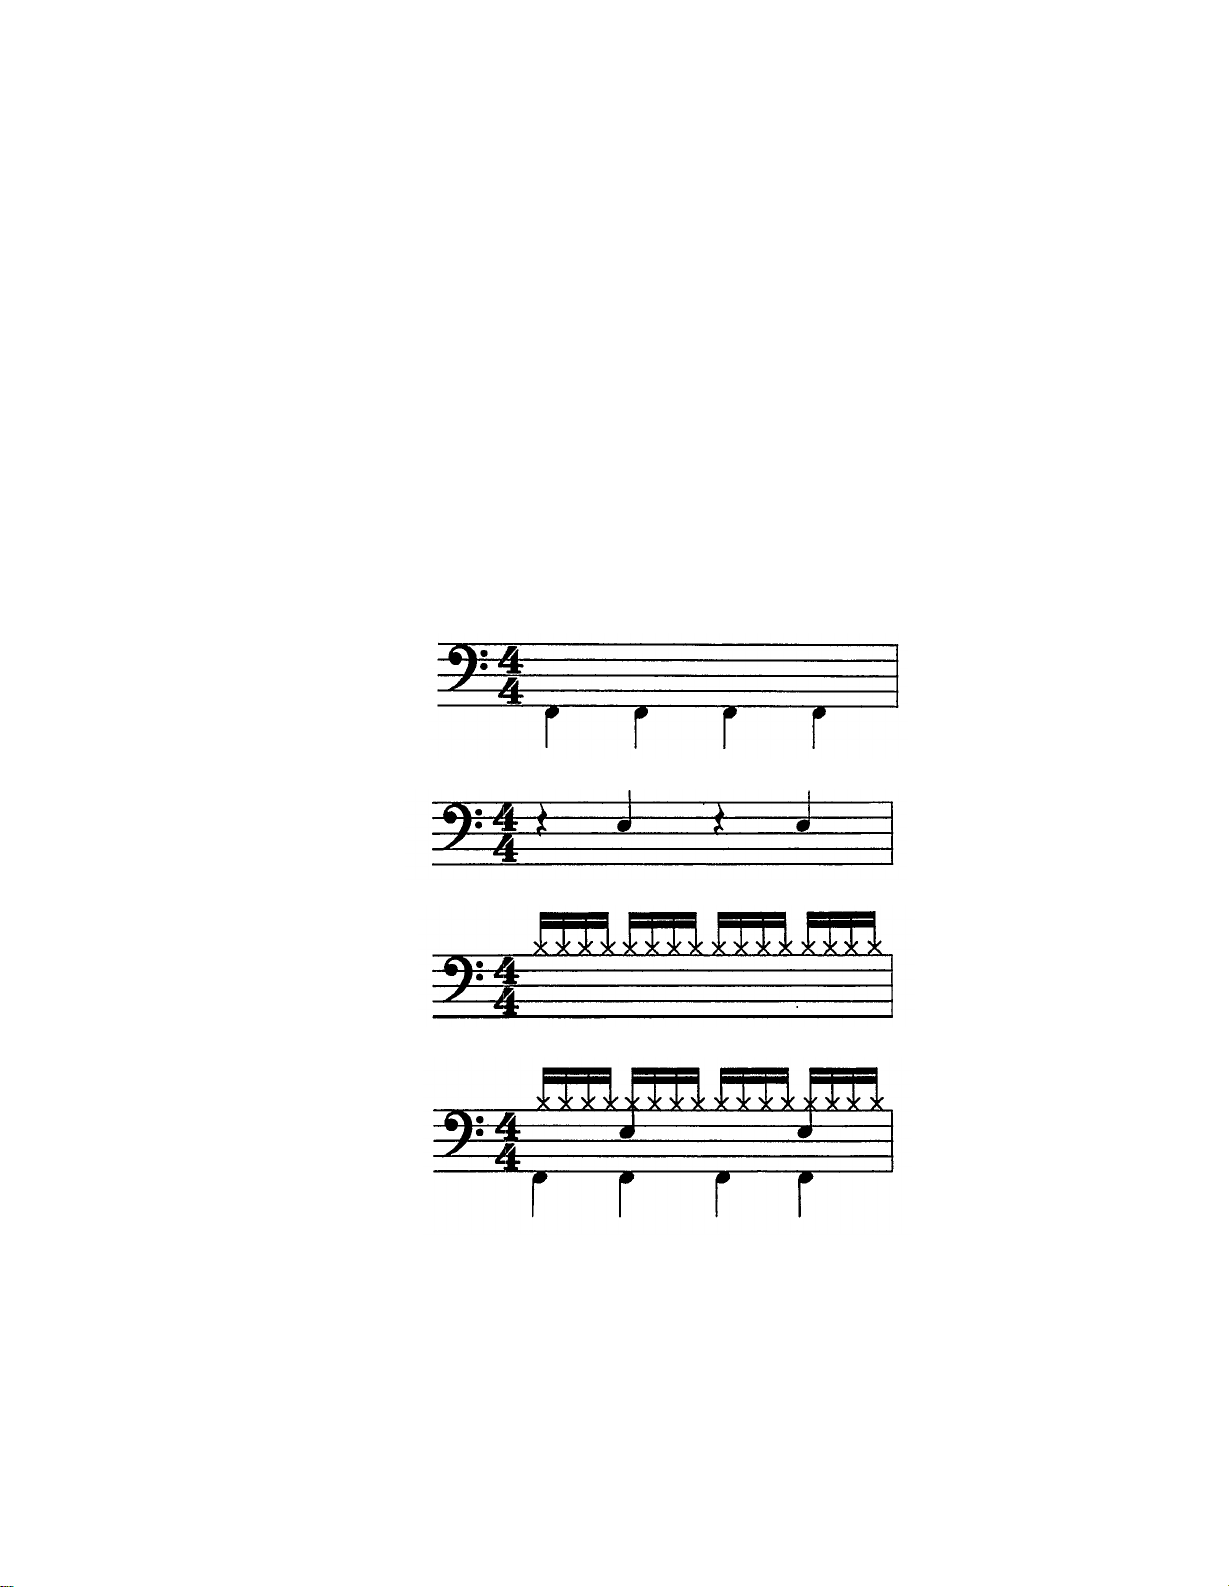
example of how a basic 4/4 time pattern is built up:
PLAY BASS DRUM (4 beats to a bar)
THEN PLAY SNARE DRUM (on the ‘off beats’)
THEN PLAY HI HAT CLOSED (16th notes)
TO MAKE THE FOLLOWING PATTERN:
Made a mistake, or want to change a part? It’s easy-single notes can be cleared
by holding down the CLEAR button (top row) and tapping the appropriate instrument button at the timing of the note that is to be cleared. You can even clear
accents in this way. You can clear the entire part of an instrument by holding down
its button together with the CLEAR button, for the entire length of the pattern.
Once you’ve completed your pattern, simply press STOP/CONTINUE, and recording
will cease. The LCD will revert to the “SELECT PTN pp" display.
You can modify the pattern at any time (add new instruments or accents, clear some
parts, etc.) simply by selecting the pattern, entering the real time write mode,
pressing the START button and writing/clearing as usual. The length of a pro-
13
grammed pattern CANNOT be changed. The quantize rate can only be changed
by using the Beat Exchange function (this is described later in this chapter).
Real Time Write (Example:
PLAY INSTRUMENT KEYS TO ENTER PATTERN. USE ACCENT KEY
TO ENTER ACCENTS, CLEAR KEY PLUS INSTRUMENT KEY TO CLEAR
MISTAKES.
3/4 time, Quantize Rate 1/16, on pattern 00)
Step Write Pattern
Programming
NOTE:
An understanding of the QUANTIZE function, described later in this chapter,
is essential for effective use of the step write function. We recommend that
before actually trying out the step write function you should read through the
QUANTIZE section (on the page 17). Then come back to this section and
try out the function.
While the Real Time Write function, described above, lets you input rhythm patterns
in real time by playing on the instrument keys, the Step Write function is used to
input notes one at a time. This method is ideal for programming rhythm patterns
from written scores, or from the pattern charts provided in the RX21 PATTERN
BOOK accompanying this manual. It also makes it possible to input complex rhythm
patterns that would be extremely difficult to program using the real time method.
First, select the pattern number you wish to program (numbers 00 through 55 only:
patterns 56 through 99 are permanent preset patterns and cannot be re-programmed,
although you can edit the preset patterns to produce new patterns, as we’ll explain
in the PATTERN COPY section later in this chapter).
Also, ensure (by playing back if necessary) that the selected pattern number does
not contain a pattern, if you want to avoid losing an existing pattern.
Enter the step write mode by pressing the STEP WRITE button. The LCD will give
the following indication: “STEP L=//,Q=1/qq” (// being the pattern length, and
qq being the quantize rate). If you have selected a pattern number that already
contains data, a square black cursor will flash at the left side of the LCD. If you
have selected a preset pattern number, the cursor will flash in the center of the
LCD. In the latter case you should press PLAY again and select another pattern
number.
14

For this initial explanation, we’ll assume that you’ve selected a pattern number that
is empty of data. You can now set the length and quantize rate of your pattern.
Press the BEAT button. If, by mistake, you have selected a pre-programmed pattern,
the LCD will show the error message "PRESET PTN AREA!" then revert to the
"SELECT PTN” display.
Normally, the LCD will switch to “LENGTH=// /16” (// is the pattern length) with
the cursor flashing to the right of the length number. The RX21 measures patterns
in sixteenth notes, so for example a bar of 4/4 time (four quarter notes per bar)
would be indicated by the setting “16/16” (sixteen sixteenth notes per bar); a bar
of 3/4 time (three quarter notes per bar) would be “12/16” (twelve sixteenth notes
per bar), and soon. The chart in the REAL TlME PATTERN PROGRAMMING section
indicates the relationship between Length settings and time signatures.
Use the -1/NO and +1/YES buttons to input the length setting.
Press BEAT again to enter the Quantize rate. The LCD will switch to
“QUANTIZE=1/qq” (where qq = the quantize rate) with the cursor flashing to the
right of the quantize number. You can now use the -1/NO or +1/YES buttons to
“scroll through” the available quantize numbers (12, 24, 16, 32) until you reach
the desired setting. Press BEAT again to return the LCD to the previous step write
mode display.
To review, the step write setting procedure is as follows:
1.
Press STEP WRITE to enter the step write mode.
Press BEAT, then enter pattern length setting with -1/NO or +1/YES buttons.
2.
3.
Press BEAT again, then enter quantize rate with -1/NO or +1/YES buttons.
4.
Press BEAT a third time, to return the RX21 to the step write mode.
You are now ready to program your pattern. Tap the red START button. If, by
mistake, you have selected a preset, the LCD will show “PRESET PTN AREA!”,
then revert to the “SELECT PTN pp” display, and you should select another pattern
and repeat the step write setting procedure.
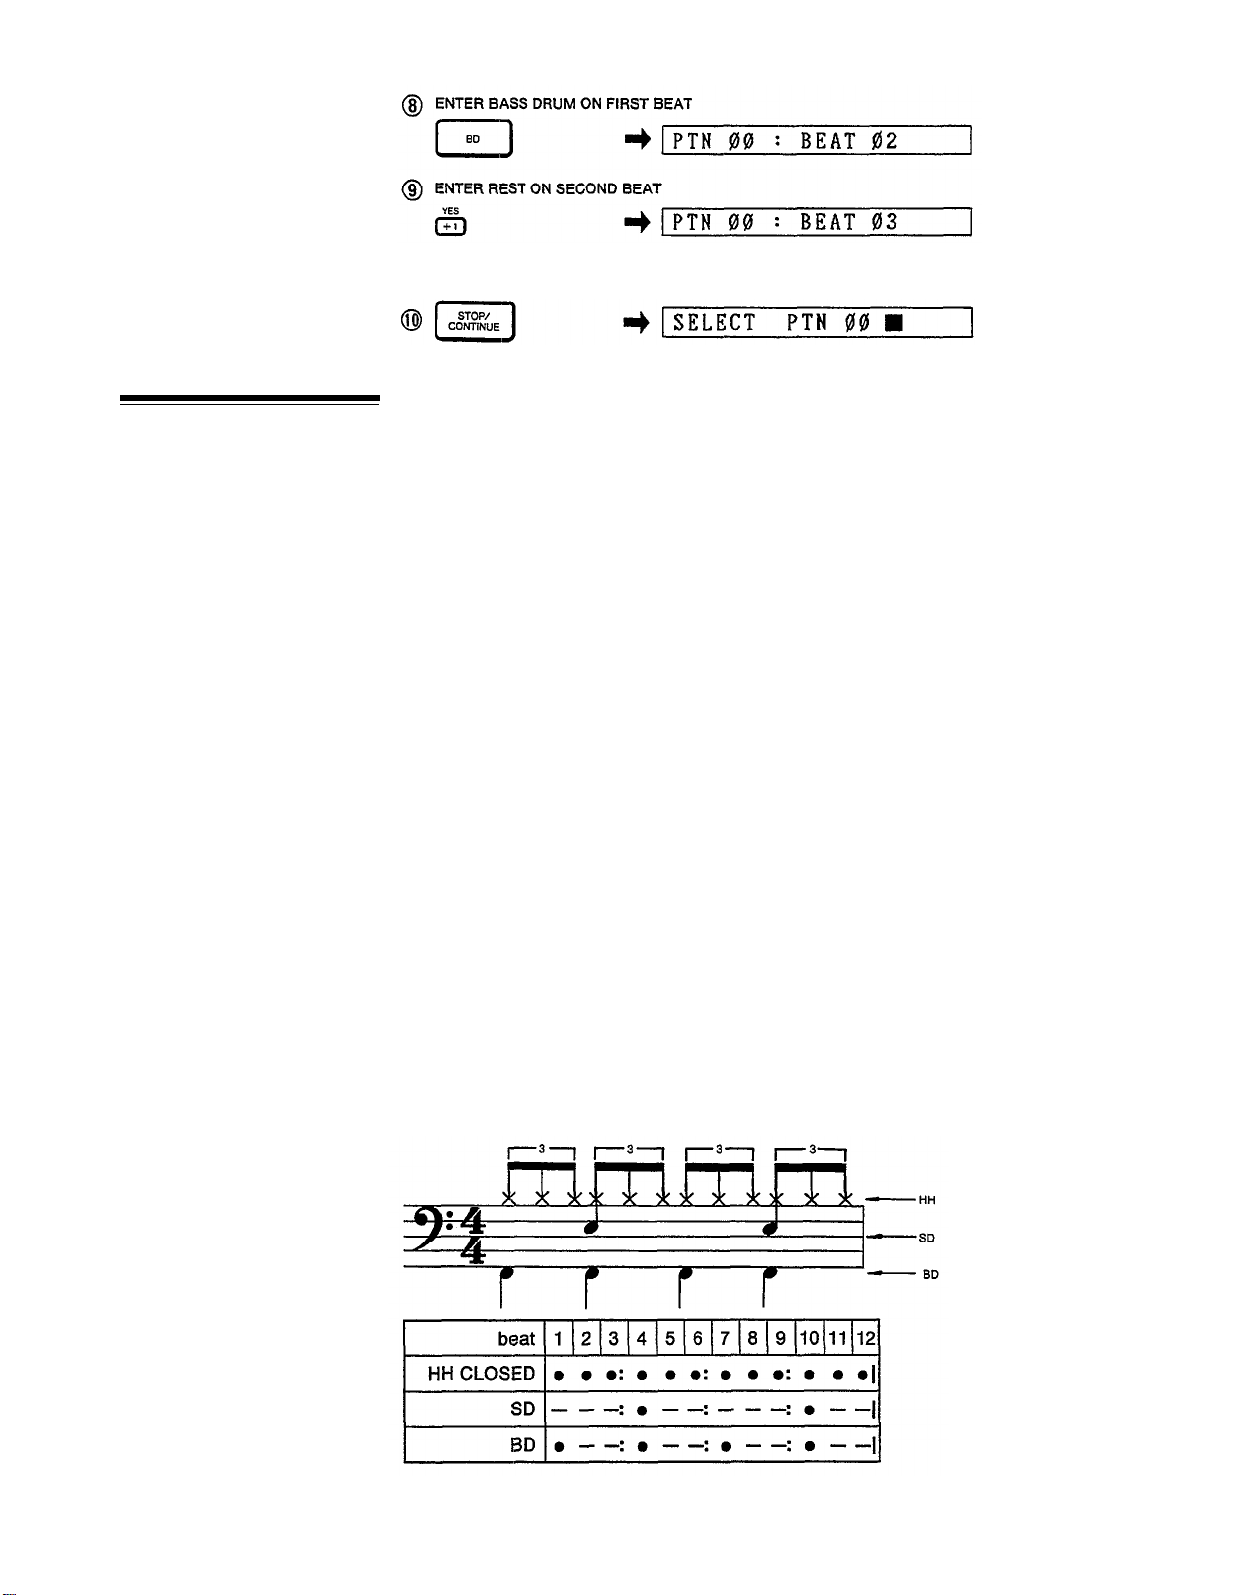
Normally, the LCD will switch to “PTN pp : BEAT 01 ”, prompting you to input the
first beat of the pattern. You can now enter an instrument on beat one by pressing
the appropriate instrument button, or a rest by pressing the +1/YES button. In either
case, the beat will advance one count and you are then ready to enter the next
instrument or rest. The LCD will indicate the new beat count, and the cursor (a
small horizontal dash at the bottom of the display) will move one position to the
right. This process is continued until the last beat of the bar (the number of beats
per bar is determined by the setting of the QUANTIZE function, described later in
this chapter).
The RX21 will then cycle back to the first beat of the bar, allowing you to continue
to add new instruments. In the step write mode, only one instrument (or accent)
can be entered at a time. If more than one instrument is to be entered on a beat,
you can enter instruments one at a time on successive cycles through the pattern.
Another method is to use the -1/NO button to cycle backwards through the bar,
so that you can keep returning to the same beat and add more instruments, if desired.
NOTE:
Each time you move through the bar using the -1/NO or +1/YES keys, you’ll
hear whatever has been programmed into each beat. It’s rather like moving
through a video or movie frame by frame. Also, you can hold down a -1/NO
or +1/YES key and move rapidly through the bar, which will speed up your
step write ability tremendously, once you learn to release the -1/NO or +1/YES
key on the right beat.
[Exit the step write mode by pressing the STOP/CONTINUE button.]
15
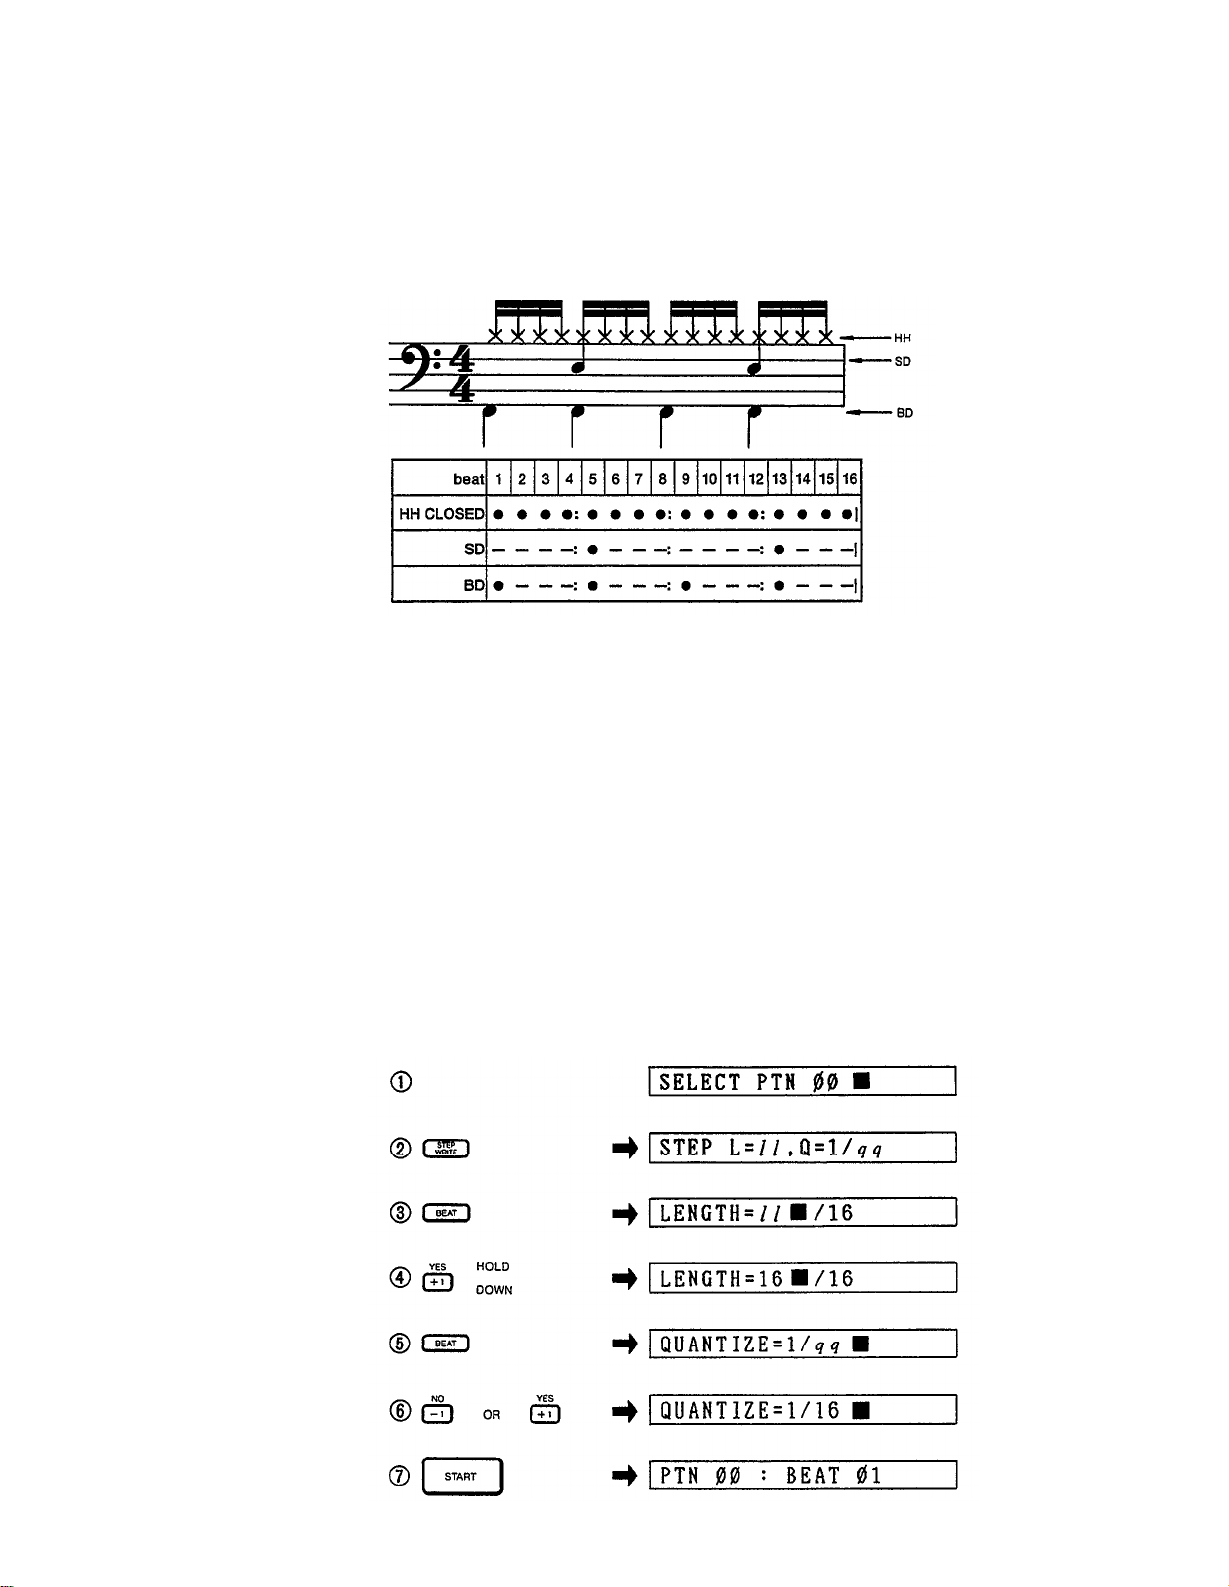
Here’s a simple example of a rhythm pattern programmed in the Step Write Mode,
using a quantize rate of 1/16 (this pattern is the same as the one you entered in
the real time mode). It’s shown here in regular music notation, and underneath the
part of each instrument is shown in the form of a Dot Display. You can call up a
Dot Display on the RX21’s LCD, as described in the STEP WRITE DOT DISPLAY
section later in this chapter. Each dot represents a note (entered by pressing an
instrument key) and each dash represents a rest (entered by pressing the +1/YES
key).
You’ll notice that the snare drum part has a lot of rests. These can be rapidly entered
by holding down the +1/YES key until you reach the next snare beat.
STEP WRITE mistakes can be corrected in the same way as REAL TIME mistakes:
when you reach the beat at which the erroneous entry was made, simply hold down
the CLEAR button and press the instrument button corresponding to the instrument
to be cleared. Patterns (including, of course, those you created in the REAL TIME
mode) can be edited by adding new parts and deleting unwanted parts simply by
re-entering the step write mode and stepping through the pattern using the +1/YES
button (or the -1/NO button, if the error is near the end of the pattern) until the
edit point is located. The addition of new parts and deletion of unwanted parts
is carried out as described above.
The length of a programmed pattern CANNOT be changed. The quantize rate can
only be changed by using the Beat Exchange function (this is described later in
this chapter).
Step Write (Example: 4/4 Time, Quantize Rate 16, on pattern 00)
16
Quantize
PLAY INSTRUMENT KEYS TO ENTER MORE NOTES. USE ACCENT KEY TO
ENTER ACCENTS, +1/YES KEY TO ENTER RESTS, CLEAR KEY PLUS INSTRUMENT KEY TO CLEAR MISTAKES.
You can now playback your pattern in the usual way, adjusting the tempo as desired.
Basically, quantize determines the smallest note-increments which can be programmed. The available quantize values are 1/12, 1/24, 1/16, and 1/32. This is
the order in which the values appear when you “scroll through” the quantize values
with the +1/YES key.
When you set the quantize rate to 1/16, the shortest notes that can be entered in
either the real time or the step write modes are 1/16th notes–i.e., the maximum
number of notes that can be entered in one 4/4 bar is 16.
QUANTlZE Applied to the Real Time Write Mode
In the real time write mode, this has an “error correcting” function. In other words,
if your timing while playing on the instrument keys is a little off, the off-time beats
will be recorded at the nearest quantized beat. Thus, for more subtle rhythms, it
is best to select a higher quantize rate (1/32 or 1/24) while simpler rhythms can
be entered more accurately and rapidly, using the lower quantize rates (1/12 or
1/16).
QUANTIZE Applied to the Step Write Mode
In the step write mode, the quantize function can save time by minimizing the number
of steps required to enter each part. If, for example, the quantize rate is set to 1/32,
the beat count will proceed from 1 to 32 per bar. This is fine if 32nd notes are to
be entered, but a regular 8-beat bass drum line would require the entry of three
rests between each drum beat. Generally, then, it is better to use a lower quantize
rate, and enter the simpler rhythms (say, bass drum and snare). You can then switch
to a higher quantize rate using the BEAT EXCHANGE function (described later in
this chapter) and enter more subtle or complex rhythms (for example, a syncopated
hi-hat part).
For entering triplet patterns, you’ll need to use the 1/12 or 1/24 quantize rates.
Here’s our basic 4/4 time pattern, using the 1/12 quantize rate to program 1/12th
notes (quarter note triplets) and create a slow blues pattern.
17
 Loading...