


FCC INFORMATION (U.S.A)
1.IMPORTANT NOTICE : DO NOT MODIFY THIS UNIT!
This product, when installed as indicated in the instructions contained in this manual, meets FCC requirements. Modifications not expressly approved by Yamaha may void your authority, granted by the FCC, to use the product.
2.IMPORTANT: When connecting this product to accessories and/or another product use only high quality shielded cables. Cable/s supplied with this product MUST be used. Follow all installation instructions. Failure to follow instructions could void your FCC authorization to use this product in the USA.
3.NOTE: This product has been tested and found to comply with the requirements listed in FCC Regulations, Part 15 for Class “B” digita l devices. Compliance with these requirements provides a reasonable level of assurance that your use of this product in a residential environment will not result in harmful interference with other electronic devices. This equipment generates/uses radio frequencies and, if
not installed and used according to the instructions found in the user’s manual, may cause interference harmful to the operation of other electronic devices. Compliance with FCC regulations does not guarantee that interference will not occur in all installations. If this product is found to be the source of interference, which can be determined by turning the unit “OFF” and “ON”, please try to eliminate the problem by using one of the following measures:
Relocate either this product or the device that is being affected by the interference.
Utilize power outlets that are on different branch (circuit breaker or fuse) circuits or install AC line filter/s.
In the case of radio or TV interference, relocate/reorient the antenna. If the antenna lead-in is 300 ohm ribbon lead, change the lead-in to co-axial type cable.
If these corrective measures do not produce satisfactory results, please contact the your local retailer authorized to distribute this type of product. If you can not locate the appropriate retailer, please contact Yamaha Corporation of America, Electronic Service Division, 6600 Orangethorpe Ave, Buena Park, CA 90620
* The above statements apply ONLY to those products distributed by Yamaha Corporation of America or its subsidiaries.
ADVARSEL!
Lithiumbatteri—Eksplosionsfare ved fejlagtig håndtering. Udskiftning må kun ske med batteri af samme fabrikat og type. Levér det brugte batteri tilbage til leverandoren.
VARNING
Explosionsfara vid felaktigt batteribyte. Använd samma batterityp eller en ekvivalent typ som rekommenderas av apparattillverkaren. Kassera använt batteri enligt fabrikantens instruktion.
VAROITUS
Paristo voi räjähtää, jos se on virheellisesti asennettu. Vaihda paristo ainoastaan laitevalmistajan suosittelemaan tyyppiin. Hävitä käytetty paristo valmistajan ohjeiden mukaisesti.
NEDERLAND
NETHERLAND
●Dit apparaat bevat een lithium batterij voor geheugen back-up.
●This apparatus contains a lithium battery for memory back-up.
●Raadpleeg uw leverancier over de verwijdering van de batterij op het moment dat u het apparaat aan het einde van de levensduur afdankt of de volgende Yamaha Service Afdeiing:
Yamaha Music Nederland Service Afdeiing Kanaalweg 18-G, 3526 KL UTRECHT
Tel. 030-2828425
●For the removal of the battery at the moment of the disposal at the end of the service life please consult your retailer or Yamaha
Service Center as follows:
Yamaha Music Nederland Service Center
Address |
: |
Kanaalweg 18-G, 3526 KL UTRECHT |
Tel |
: |
030-2828425 |
●Gooi de batterij niet weg, maar lever hem in als KCA.
●Do not throw away the battery. Instead, hand it in as small chemical waste.

SPECIAL MESSAGE SECTION
This product utilizes batteries or an external power supply (adapter). DO NOT connect this product to any power supply or adapter other than one described in the manual, on the name plate, or specifically recommended by Yamaha.
WARNING: Do not place this product in a position where anyone could walk on, trip over, or roll anything over power or connecting cords of any kind. The use of an extension cord is not recommended! If you must use an extension cord, the minimum wire size for a 25' cord (or less ) is 18 AWG. NOTE: The smaller the AWG number, the larger the current handling capacity. For longer extension cords, consult a local electrician.
This Product should be used only with the components supplied or; a cart, rack, or stand that is recommended by Yamaha. If a cart, etc., is used, please observe all safety markings and instructions that accompany the accessory product.
SPECIFICATIONS SUBJECT TO CHANGE: The information contained in this manual is believed to be correct at the time of printing. However, Yamaha reserves the right to change or modify any of the specifications without notice or obligation to update existing units.
This product, either alone or in combination with an amplifier and headphones or speaker/s, may be capable of producing sound levels that could cause permanent hearing loss. DO NOT operate for long periods of time at a high volume level or at a level that is uncomfortable. If you experience any hearing loss or ringing in the ears, you should consult an audiologist. IMPORTANT: The louder the sound, the shorter the time period before damage occurs.
Some Yamaha products may have benches and/or accessory mounting fixtures that are either supplied with the product or as optional accessories. Some of these items are designed to be dealer assembled or installed. Please make sure that benches are stable and any optional fixtures (where applicable) are well secured BEFORE using. Benches supplied by Yamaha are designed for seating only. No other uses are recommended.
NOTICE: Service charges incurred due to lack of knowledge relating to how a function or effect works (when the unit is operating as designed) are not covered by the manufacturer’s warranty, and are therefore the owners responsibility. Please study this manual carefully and consult your dealer before requesting service.
ENVIRONMENTAL ISSUES: Yamaha strives to produce products that are both user safe and environmentally friendly. We sincerely believe that our products and the production methods used to produce them, meet these
goals. In keeping with both the letter and the spirit of the law, we want you to be aware of the following:
Battery Notice: This product MAY contain a small nonrechargeable battery which (if applicable) is soldered in place. The average life span of this type of battery is approximately five years. When replacement becomes necessary, contact a qualified service representative to perform the replacement.
This Product may also use “household” type batteries. Some of these may be rechargeable. Make sure that the battery being charged is a rechargeable type and that the charger is intended for the battery being charged.
When installing batteries, do not mix old batteries with new, or with batteries of a different type. Batteries MUST be installed correctly. Mismatches or incorrect installation may result in overheating and battery case rupture.
Warning: Do not attempt to disassemble, or incinerate any battery. Keep all batteries away from children. Dispose of used batteries promptly and as regulated by the laws in your area.
Note: Check with any retailer of household type batteries in your area for battery disposal information.
Disposal Notice: Should this Product become damaged beyond repair, or for some reason its useful life is considered to be at an end, please observe all local, state, and federal regulations that relate to the disposal of products that contain lead, batteries, plastics, etc. If your dealer is unable to assist you, Please contact Yamaha directly.
NAME PLATE LOCATION: The name Plate is located on the top of the product. The model number, serial number, power requirements, etc., are located on this plate. You should record the model number, serial number, and the date of purchase in the spaces provided below and retain this manual as a permanent record of your purchase.
Model
Serial No.
Purchase Date
PLEASEKEEPTHISMANUAL
92-BP

Welcome to the P50-m
Congratulations and thank you for purchasing the Yamaha P50-m Piano Tone Generator!
The P50-m is an advanced tone generator with piano and other keyboard Voices. It provides exceptionally realistic and high-quality piano Voices — with complete 32-note polyphony — when connected to a MIDI keyboard or when used with a sequencer or computer. Reverb and Chorus effects are also built into the Voices for a rich, natural sound.
The P50-m gives you easy and intuitive control over the sound, including Brightness, Reverb Send, fine and coarse tuning, and touch sensitivity. Convenient EQ sliders on the panel let you adjust the timbre in real time. Other special controls such as Program Change Table and MIDI OUT ensure easy and trouble free operation when using the P50-m in General MIDI applications and with additional tone generators. What’s more, you can combine two P50-m units together (using the Receive Mode control) for full 64-note polyphony.
i
WELCOME TO THE P50-m

Unpacking
Your P50-m package should include the items listed below. Make sure that you have them all. Also, write down the serial number of your P50-m in the box below, for future reference.
•P50-m Serial No.:
•PA-3B AC Adaptor
•Owner’s Manual
ii
UNPACKING

Table of Contents |
|
Welcome to the P50-m ......................................................................................................... |
i |
Unpacking ............................................................................................................................... |
ii |
Table of Contents ................................................................................................................. |
iii |
How to Use This Manual ..................................................................................................... |
iv |
Precautions ............................................................................................................................ |
v |
The Controls of the P50-m ................................................................................................. |
1 |
Front Panel .......................................................................................................................... |
1 |
Rear Panel ........................................................................................................................... |
3 |
Setting Up and Playing Your P50-m ................................................................................. |
4 |
What You’ll Need ........................................................................................................... |
4 |
Making the Connections ................................................................................................ |
4 |
Using in Larger MIDI Systems ....................................................................................... |
6 |
Powering Up and Playing the Demo Song .................................................................... |
6 |
Powering Up ............................................................................................................ |
7 |
Playing the Demo Song ........................................................................................... |
7 |
Playing all Demo Songs ........................................................................................... |
8 |
OPERATION GUIDE |
|
Voice Controls ..................................................................................................................... |
9 |
Selecting a Voice ........................................................................................................... |
9 |
Selecting Voices From Your MIDI Keyboard ............................................................... |
10 |
Tone Controls .................................................................................................................... |
11 |
Changing the Brightness of a Voice ............................................................................ |
11 |
Changing the Reverb Send for a Voice ........................................................................ |
12 |
3-Band EQ Sliders ............................................................................................................. |
13 |
Tune Controls .................................................................................................................... |
14 |
Changing the Master Tune Setting .............................................................................. |
14 |
Changing the Note Shift Setting .................................................................................. |
15 |
Utility Controls .................................................................................................................. |
16 |
Changing the Touch Sensitivity ................................................................................... |
16 |
Changing the MIDI Receive Channel ........................................................................... |
17 |
Advanced Functions .......................................................................................................... |
18 |
Program Change Table ................................................................................................ |
18 |
Changing the Device Number ...................................................................................... |
19 |
Receive Mode .............................................................................................................. |
20 |
Changing the MIDI OUT Setting ................................................................................. |
21 |
Factory Set .................................................................................................................. |
22 |
APPENDIX |
|
Troubleshooting ................................................................................................................. |
23 |
Error Messages .................................................................................................................. |
25 |
Specifications .................................................................................................................... |
26 |
Index ................................................................................................................................. |
27 |
SOUND LISTS & MIDI DATA |
|
Voice List ........................................................................................................................... |
30 |
Effect Lists ......................................................................................................................... |
31 |
MIDI Data Format ............................................................................................................. |
33 |
MIDI Implementation Chart ............................................................................................... |
42 |
|
iii |
TABLE OF CONTENTS

How to Use This Manual
You are probably eager to play your new P50-m Piano Tone Generator right away, rather than have to read through a lot of instructions before you can even get a sound out of it.
However, to get the most out of your P50-m, we strongly suggest that you read the following sections in the order given:
1)Precautions
This gives you important information on how to care for your new P50-m, how to avoid damaging it, and how to ensure long-term, reliable operation.
2)The Controls of the P50-m
This section introduces you to the panel controls and connectors.
3)Setting Up and Playing Your P50-m
This very important section gets you started using your P50-m. It guides you in connecting and setting up the instrument for different example systems, and shows you how to play the special Demo song.
4)Operation Guide
Once you’re familiar with everything above, go over this comprehensive guide to all P50-m functions. You won’t need (or want) to read everything at once, but it is there for you to refer to when you need information about a certain feature or function.
5)Appendix
Finally, use the sections in the Appendix as necessary. Specifically, if you run into some problem or difficulty, refer to the Troubleshooting section for help.
iv
HOW TO USE THIS MANUAL

Precautions
Your P50-m will give you years of reliable service if you follow the simple precautions below:
■ LOCATION
Keep the instrument away from locations where it is likely to be exposed to high temperatures (such as direct sunlight) or humidity. Also avoid locations which are subject to excessive dust accumulation or vibration which could cause mechanical damage.
■ USE THE CORRECT POWER ADAPTOR
Use only the recommended PA-3B or PA-1207 Power Adaptor for supplying power to the instrument. Use of another adaptor may cause serious damage to the instrument or the adaptor itself.
■MAKE SURE POWER IS OFF WHEN MAKING OR REMOVING CONNECTIONS
To prevent damage to the instrument and other connected equipment, always turn off the power prior to connecting or disconnecting cables. Also, turn the power off when the instrument is not in use, and disconnect the power adaptor during electric storms.
■ HANDLE THE INSTRUMENT WITH CARE
Although the instrument has been constructed to withstand the rigors of normal use for optimum sturdiness and reliability, avoid subjecting it to strong physical shocks (such as dropping or hitting it). Since the P50-m is a precision-made electronic device, also avoid applying excessive force to the various controls. When moving the instrument, first unplug the power adaptor and all other cables to prevent damage to cords and jacks. Always unplug cables by gripping the plug firmly, not by pulling on the cable.
■ CLEAN WITH A SOFT, DRY CLOTH
Never use solvents such as benzine or thinner to clean the instrument, since these will damage the panel finish. Wipe clean with a soft, dry cloth. If necessary, use a soft, clean, slightly moistened cloth — making sure to wipe the case off again with a dry cloth.
v
PRECAUTIONS

■ ELECTROMAGNETICINTERFERENCE
Avoid using the unit near televisions, radios or other equipment generating electromagnetic fields. Proximity to such equipment may cause the unit to malfunction, and may generate interference noise in the other appliance as well.
■ DO NOT OPEN THE CASE OR TRY REPAIRING THE INSTRUMENT
YOURSELF
The instrument contains no user-serviceable parts. Never open the case or tamper with the internal circuitry in any way, since doing so may result in damage to the instrument. Refer all servicing to qualified Yamaha service personnel.
■ MIDI CABLES
When connecting the instrument to other MIDI equipment, be sure to use only high-quality cables made especially for MIDI data transmission. Also, avoid using cables longer than 15 meters, since long cables can result in data errors.
Yamaha is not responsible for damage caused by improper handling or operation.
vi
PRECAUTIONS
The Controls of the P50-m
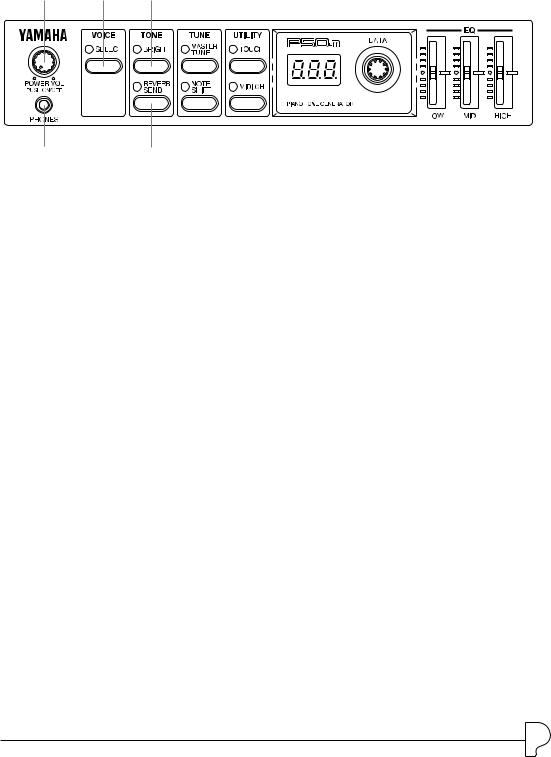
Front Panel
1 3 4
25
1POWER/VOL control
Pressing this turns the power on and off. Turning it adjusts the overall volume of the P50-m.
2PHONES jack
For connection to a set of stereo headphones (mini-pin).
3VOICE SELECT button
For selection of the internal Voices. (See page 9.) Also for changing the Program Change Table setting. (See page 18.)
TONE Controls
4 BRIGHT button
For adjusting the brightness of the selected Voice. (See page 11.)
5 REVERB SEND button
For adjusting the amount of sound processed with the Reverb effect. (See page 12.)
1
THE CONTROLS OF THE P50-m
6 |
8 |
10 |
11 |
12 |
7 9
TUNE Controls
6 MASTER TUNE button
For adjusting the overall fine tuning of the instrument. (See page 14.) Also used with the NOTE SHIFT button for playing the Demo song. (See page 7.)
7 NOTE SHIFT button
For changing the key transposition setting of the instrument. (See page 15.) Also used with the MASTER TUNE button for playing the Demo song. (See page 7.)
UTILITY Controls
8 TOUCH button
For changing the touch (velocity) response of the instrument. (See page 16.) Also for changing the Device Number setting. (See page 19.) Also used with the MIDI CH button for changing the Receive Mode of the instrument. (See page 20.)
9 MIDI CH (Channel) button
For setting the MIDI Receive channel for the instrument. (See page 17.) Also for setting the MIDI OUT setting. (See page 21.) Also used with the TOUCH button for changing the Receive Mode of the instrument. (See page 20.)
10LED display
11DATA dial
For adjusting values or changing settings of the various parameters.
12 EQ sliders (LOW, MID, HIGH)
For making fine changes to the tonal quality of the sound. (See page 13.)
2
THE CONTROLS OF THE P50-m
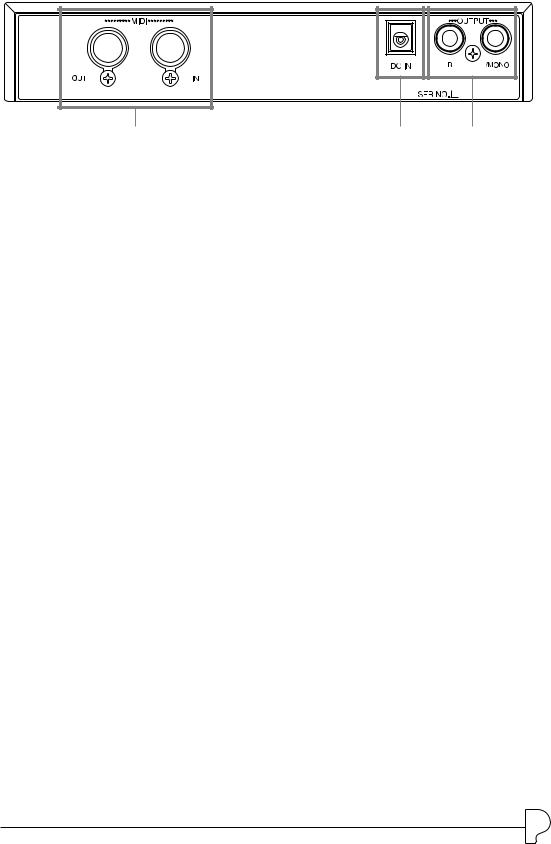
Rear Panel
1 |
2 |
3 |
1 MIDI OUT/IN terminals
For connection to other MIDI devices, such as a MIDI keyboard, tone generator, sequencer, or to a computer that has a MIDI interface. (See pages 4–6 for more information on MIDI connections.)
2DC IN jack
For connection to the PA-3B AC power adaptor.
3OUTPUT R, L/MONO jacks (Right, Left/Mono)
For connection to a stereo amplifier/speaker system. When using a mono system, connect it to the L/MONO jack.
3
THE CONTROLS OF THE P50-m

Setting Up and Playing Your
P 5 0 - m
In this section, you’ll learn how to set up the P50-m for use with a MIDI keyboard. You’ll also learn how to set it up for use with a computer or sequencer and a second tone generator. Finally, you’ll learn how to play the Demo song and hear the realistic and dynamic Voices of the P50-m.
What You’ll Need
The P50-m and the included power adaptor.
A MIDI keyboard, electronic piano, or any instrument that can output MIDI data.
An amplifier/speaker system, preferably stereo. Alternately, you can use a set of stereo headphones.
Audio connecting cables.
A MIDI cable.
Making the Connections
Before making any connections, make sure that all equipment to be connected is turned off, and that the P50-m power adaptor is not connected to an electrical outlet.
1. Connect one end of the MIDI cable to the MIDI OUT terminal of the MIDI keyboard and the other to the MIDI IN terminal of the P50-m (as shown in the illustration below).
Also, make sure that the MIDI send channel on the keyboard and the MIDI Receive Channel on the P50-m (see page 17) are set to the same value. (Refer to the owner’s manual of the MIDI keyboard if necessary.)
2. Connect the audio cables from the R and L/MONO OUTPUT jacks of the P50-m to the appropriate inputs on the amplifier speaker system (as shown in the illustration below).
If the amplifier has only one input, use the L/MONO jack on the P50-m. If you are using stereo headphones, connect them to the front panel PHONES jack.
3. Connect the power adaptor to the DC IN terminal on the P50-m and plug the adaptor into an appropriate electrical outlet.
4
SETTINGUPANDPLAYINGYOURP50-m
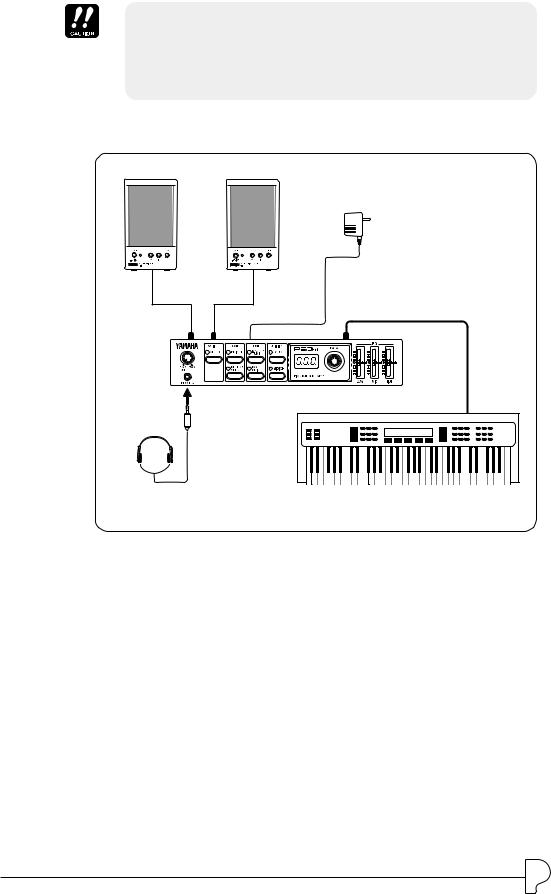
•Do not attempt to use an AC adaptor other than the PA-3B or PA-1207. The use of an incompatible adaptor may result in irreparable damage to the P50-m, and even pose a serious shock hazard.
•Be sure to disconnect the power adaptor from the outlet when the P50-m is not in use.
Power
Adaptor
Amplifier
Speaker System
L/MONO |
R |
DC IN |
MIDI IN |
MIDI CABLE
PHONES
MIDI OUT
MIDI Keyboard
5
SETTINGUPANDPLAYINGYOURP50-m

Using in Larger MIDI Systems
The P50-m is equipped with MIDI IN and OUT terminals, allowing you to use it in any MIDI system. In the system example shown below, the P50-m is connected to both a computer and another tone generator. Here, the computer (with sequencer or other music software) plays back song data using the Voices of the P50-m and the connected tone generator.
MIDI Interface
|
|
|
|
|
|
|
|
|
|
|
|
|
|
|
|
|
|
|
|
|
|
|
|
|
|
|
|
|
|
|
|
|
|
|
|
|
|
|
|
|
|
|
|
|
|
|
|
|
|
|
|
|
|
|
|
|
|
|
|
Computer |
|
|
|
|
|
|
|
|
|
|
|
|
P50-m |
|
|
|
|
Tone Generator |
|||||
In systems such as this, you should make sure that:
•The MIDI Receive Channel on the P50-m (see page 17) is set to the same channel as that for the piano part (or track) on the software.
•The MIDI OUT Mode is set to “ot2.” (See page 21.) This ensures that the piano part data will play the Voices of the P50-m, and not the other tone generator.
Also, if you are using General MIDI (GM) compatible software, set the Program Change Table to “on.” (See page 18.) This ensures that the Voices on the P50-m will match the intended program changes in the software.
Powering Up and Playing the
Demo Song
Once you’ve connected everything properly, you’re ready to turn the P50-m on and start playing it. However, a small word of caution before you begin: Follow the instructions given below to avoid possible damage to your equipment and speakers.
6
SETTINGUPANDPLAYINGYOURP50-m
Powering Up
1. If you haven’t done so already, press the POWER/VOL control on the P50-m.
2. Turn on the power of your MIDI keyboard.
3. Make sure that all volume controls (on the P50-m and the connected amplifier) are turned down. Then, turn on the power of your amplifier speaker system.
4. Finally, set the volume control on the P50-m to about the midway position initially (you can raise it later if needed), and set the volume on the amplifier to a suitable level.
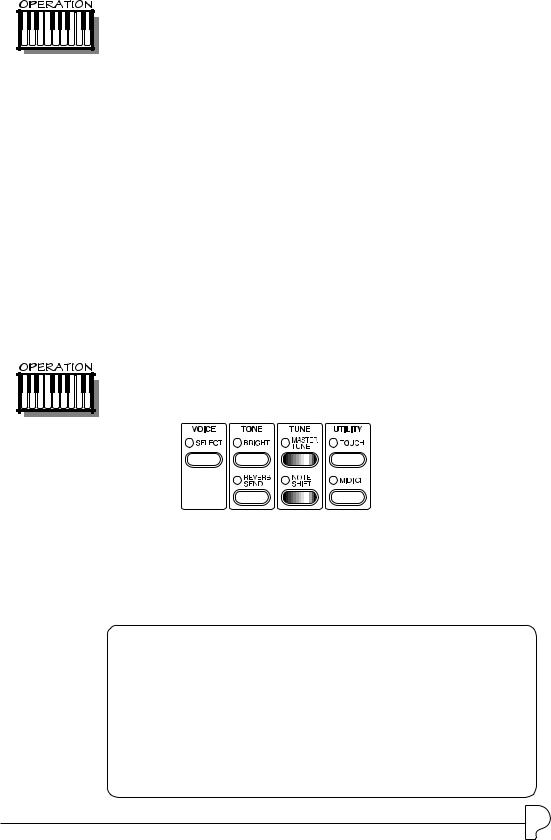
Playing the Demo Song
Now that you’ve set everything up properly, try playing the builtin Demo Song. This showcases the high-quality Voices and the AWM2 tone generation system of the P50-m.
Simultaneously press the MASTER TUNE and NOTE SHIFT buttons.
The Demo song for the selected Voice starts playing immediately and repeats indefinitely until stopped (by pressing any panel button). (The LEDs and lamps flash in a pattern during playback.)
More about Demo Song
There are actually two Demo Song modes. In the Single Demo Play mode (described above), the currently selected Voice is used for the Demo song. Each Voice has its own Demo song, specially programmed to suit and showcase that particular Voice.
In the All Demo Play mode (described below), all Demo songs can be played back in succession.
7
SETTINGUPANDPLAYINGYOURP50-m
 Loading...