


NS-PB120
Table of contents
 Loading...
(NS-PB120: NS-B120 + NS-C120)
G
SPEAKER PACKAGE
PACKAGE ENCEINTES
OWNER'S MANUAL
MODE D'EMPLOI
MANUAL DE INSTRUCCIONES
ИНСТРУКЦИЯ ПО ЭКСПЛУАТАЦИИ
1 En
Please read the following operating precautions before use. Yamaha will not be held responsible for any damage and/or
injury caused by not following the cautions below.
1. To assure the finest performance, please read this manual
carefully. Keep it in a safe place for future reference.
2. Install the speakers in a cool, dry, clean place – away
from windows, sources of heat, sources of excessive
vibration, dust, moisture or cold. Avoid sources of
electrical humming (e.g., transformers and motors). To
prevent fire or electric shock, do not expose the speakers
to rain or water.
3. To prevent the enclosure from warping or discoloring, do
not expose the speakers to direct sunlight or excessive
humidity.
4. Avoid installing the speakers where foreign objects may
fall onto them and/or where they may be exposed to
liquid dripping or splashing.
5. Do not place the following objects on top of the
speakers:
– Other components, as they might damage or discolor
the surface of the speakers.
– Burning objects (e.g., candles), as they might cause
fire, damage to the speakers or personal injury.
– Containers of liquid, as they might spill and cause
electric shock to the user or damage to the speakers.
6. Do not place the speakers where they are liable to be
knocked over or struck by falling objects. Stable
placement will also ensure better sound performance.
7. Placing the speakers on the same shelf or rack as the
turntable can result in feedback.
8. Any time you note distortion, reduce the volume control
on your amplifier to lower setting. Never allow your
amplifier to be driven into “clipping”. Otherwise, the
speakers may be damaged.
9. When using an amplifier with a rated output power
higher than the nominal input power of the speakers,
care should be taken not to exceed the maximum input of
the speakers.
10. Do not attempt to clean the speakers with chemical
solvents as this might damage the finish. Use a clean, dry
cloth.
11. Do not attempt to modify or fix the speakers. Contact
qualified Yamaha service personnel when service is
needed. The cabinet should never be opened for any
reason.
12. Secure placement or installation is the owner’s
responsibility. Yamaha is not liable for accidents
caused by improper placement or installation of
speakers.
Precautions
Contents
Package contents .................................................. 2
Installing the speakers ......................................... 2
Installing the center speaker.................................. 3
Installing the front/surround speakers ................ 3
Wall-mounting the speakers ................................. 4
Connecting the speakers ..................................... 5
Connection diagram............................................... 5
Specifications ......................................................... 6
Information for Users on Collection and Disposal of
Old Equipment
This symbol on the products, packaging,
and/or accompanying documents means
that used electrical and electronic
products should not be mixed with
general household waste.
For proper treatment, recovery and
recycling of old products, please take
them to applicable collection points, in
accordance with your national
legislation and the Directives
2002/96/EC.
By disposing of these products correctly,
you will help to save valuable resources
and prevent any potential negative
effects on human health and the
environment which could otherwise
arise from inappropriate waste handling.
For more information about collection
and recycling of old products, please
contact your local municipality, your
waste disposal service or the point of
sale where you purchased the items.
[Information on Disposal in other
Countries outside the European Union]
This symbol is only valid in the
European Union. If you wish to discard
these items, please contact your local
authorities or dealer and ask for the
correct method of disposal.
2 En
English
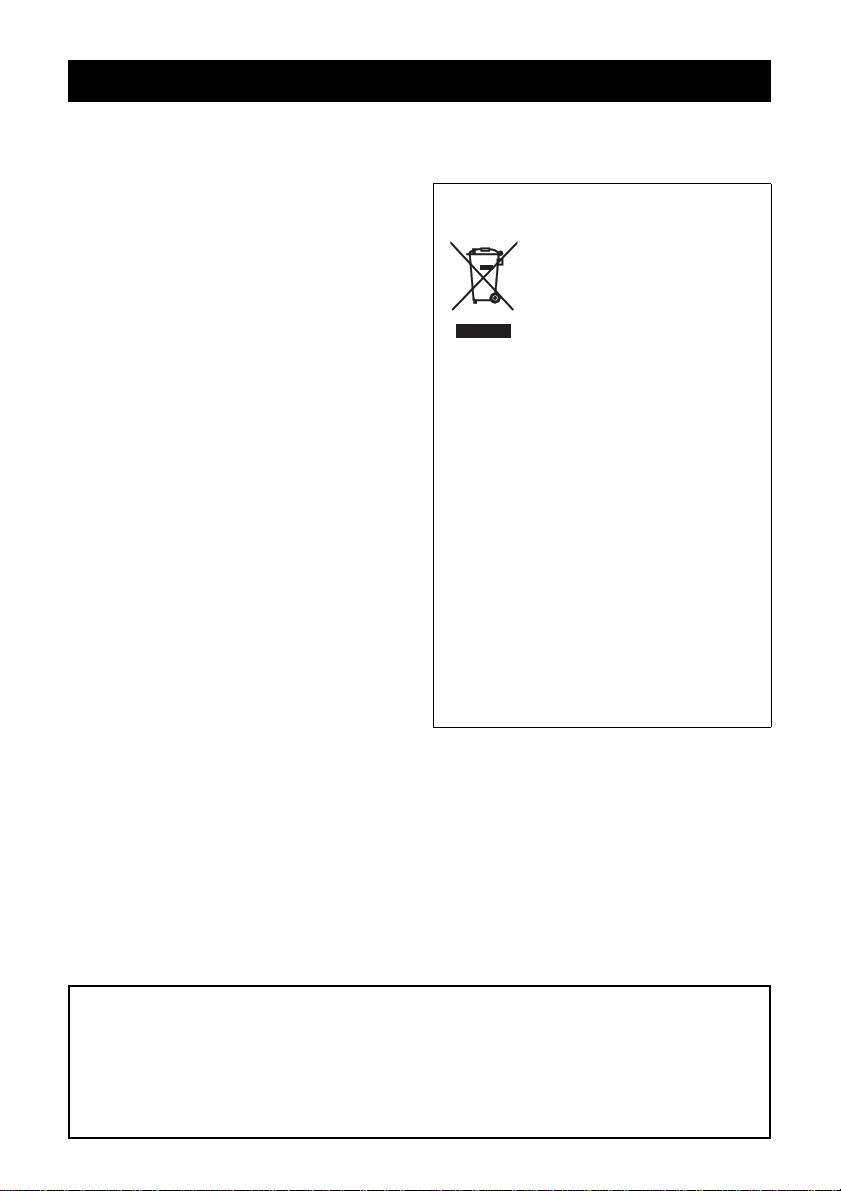
Thank you for choosing the Yamaha NS-PB120 Speaker Package.
Make sure the package contains the following items.
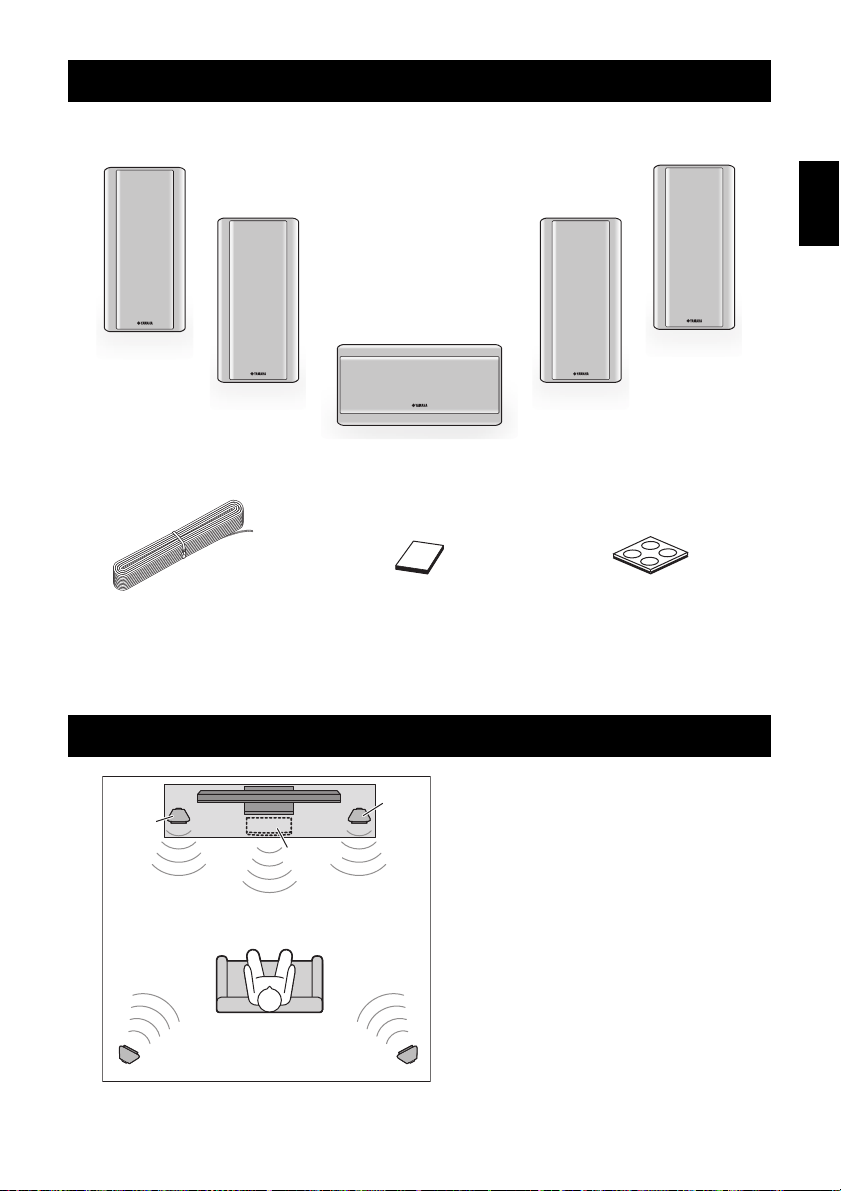
Before you connect the speakers, place each
speaker in its respective location. Speaker
positioning is very important as it affects the
overall sound quality of the system. Place the
speakers in locations that will optimize the
sound quality at your listening position. Refer
to the illustration.
Note
• The speakers feature a magnetically
shielded design. However, there is still a
chance that placing them too close to a
CRT-type TV set might impair picture
color. Should this happen, move the
speakers away from the TV set.
Package contents
Installing the speakers
Front and surround speakers (NS-B120) x 4
Center speaker (NS-C120) x 1
Non-skid pads (4 pcs) x 4
(for front and surround speakers)
Fastener x 2
(for center speaker)
Speaker cable 24.5 m (80 ft.) x1
Center
Front
right
Surround left
Front
left
Surround right
Installing the speakers
3 En
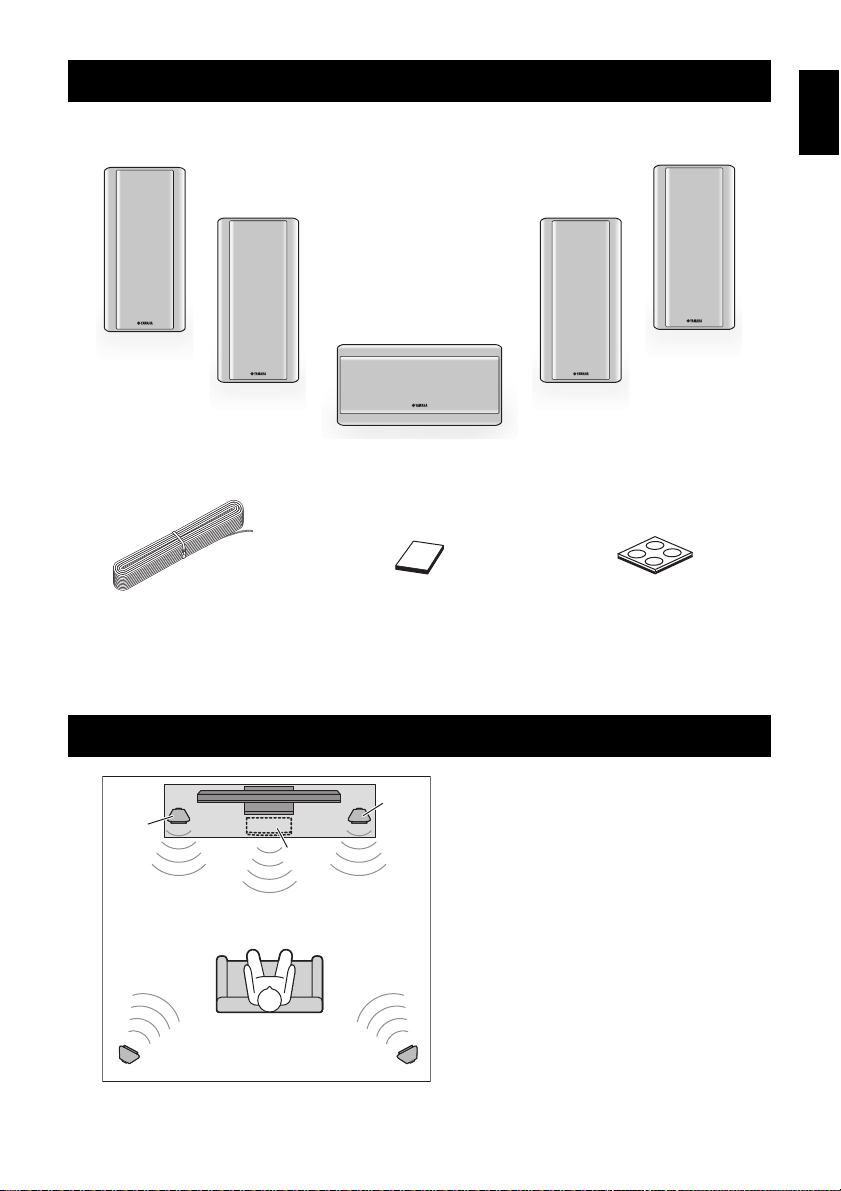
Installing the center speaker
Place the center speaker centrally between the
front speakers, facing directly forward.
When placing it on a flat surface (TV rack,
etc), affix the supplied fasteners to bottom of
the speaker as shown left.
When wall-mounting it, see “Wall-mounting
the speakers” (page 4).
Note
• Wipe the surface clean before affixing the
fasteners. If the surface is dirty, oily or wet,
adhesive strength is weakened and the
speaker may fall.
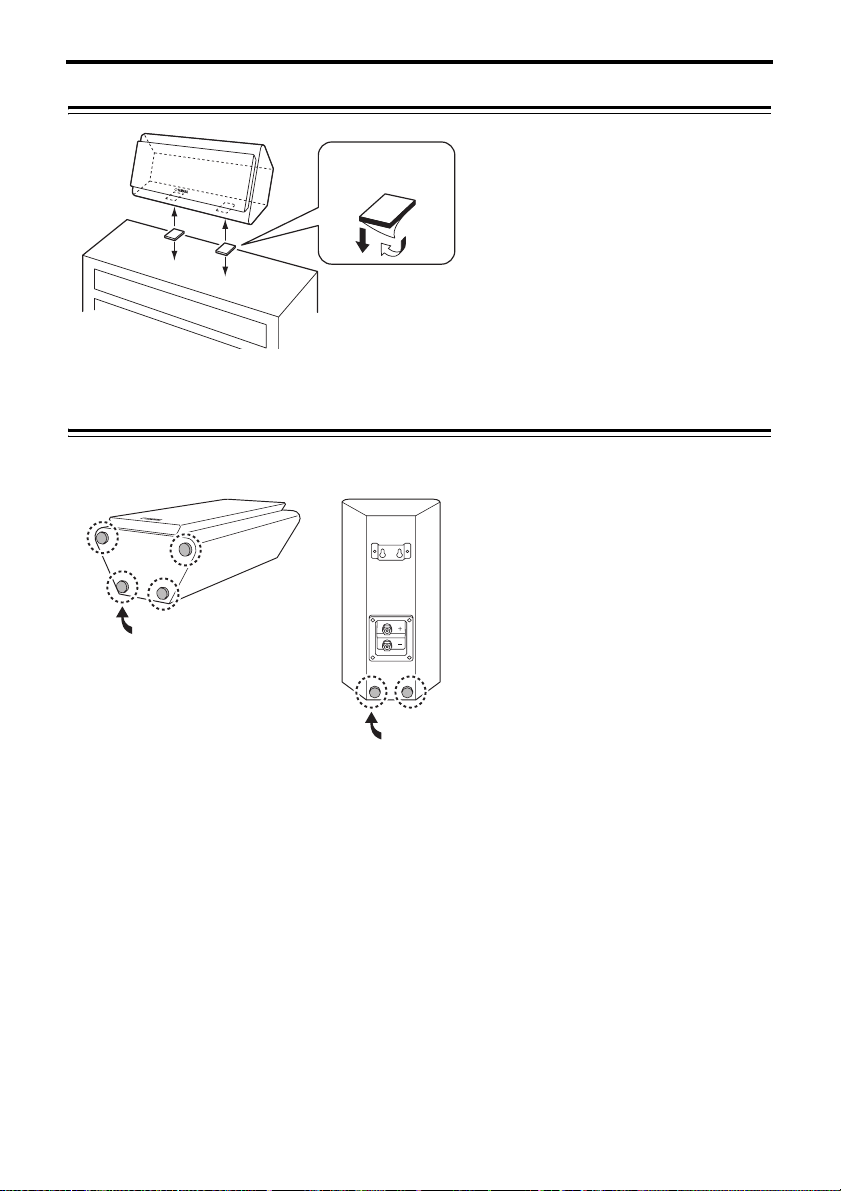
Installing the front/surround speakers
Front speakers:
Place the two front speakers on the left and
right sides of the TV, at approximately the
same height as the TV, facing directly forward.
Surround speakers:
Place the left and right surround speakers
behind your listening position, facing slightly
inward.
When placing them on a flat surface (hard
floor, etc), affix the supplied non-skid pads to
the corners of the bottom of the speaker as
shown left (Fig. A). The pads will prevent the
speaker from moving around.
When wall-mounting them, affix the supplied
non-skid pads to the lower corners of the back
of the speaker as shown left (Fig. B). For
details, see “Wall-mounting the speakers”
(page 4).
Fastener
Peel of the seal.
TV rack, etc
Non-skid pad
Non-skid
pad
(A) Bottom
(B) Back
Installing the speakers
4 En
English
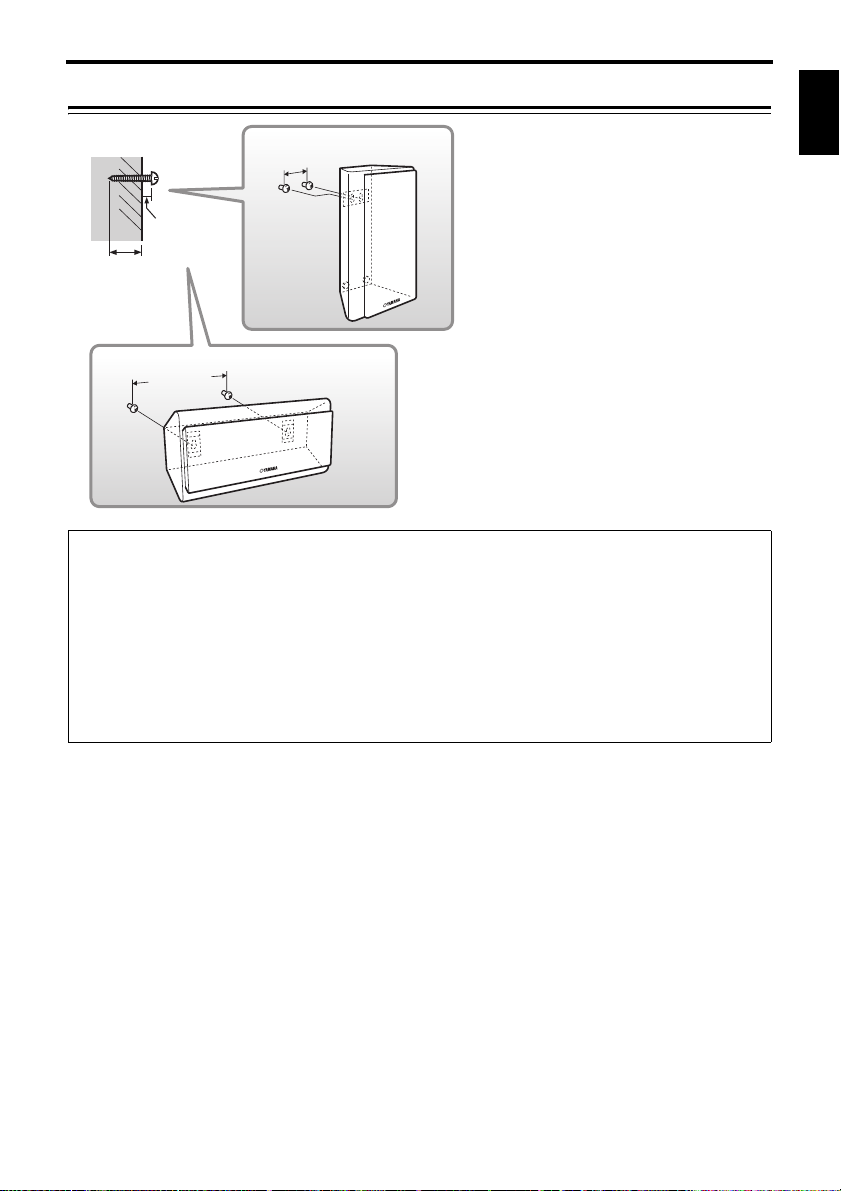
Wall-mounting the speakers
You can mount the speakers on the wall as
follows.
1 Install screws into a solid wall or wall
support as shown left. Use 3.5 to 4 mm
(1/8") diameter self-tapping screws.
2 Hang each speaker by its keyhole slots
onto the protruding screws.
Note
• Make sure the shaft of the screw is seated in
the narrow part of the keyhole slot.
Otherwise, the speaker may fall.
Warnings
• Each speaker weighs 1.8 kg (4.0 lbs.). Do not mount the speakers on thin plywood or on a wall with a soft surface
material. Otherw ise, the screws may pull out of th e surface and the speakers may fa ll, possibly damaging the spea kers
or causing personal injury.
• Do not affix the speakers to a wall using nails, adhesives, or unstable hardware. Long-term use and vibration may
cause the speakers to fall.
• To avoid accidents resulting from tripping over loose speaker cables, affix the cables to the wall.
• Mount the speakers in a wall location that will be unlikely to result in injury to an individual’s head.
• When using speaker brackets (commercially available) to mount the speakers on the wall or ceiling, we strongly
recommend using safety wire (may be supplied with the bracket) between the speaker and bracket to prevent the
speaker from falling.
• If you are not sure of a safe way to install these speakers, consult a professional installer or a building contractor.
26 mm (1")
Wall/wall support
3 mm
(1/8")
Minimum
20 mm (3/4")
Surround speaker
Center speaker
245 mm
(9-5/8")
5 En
Caution: Make sure the power cables for your AV components are disconnected from the AC wall outlets before
making any connections.
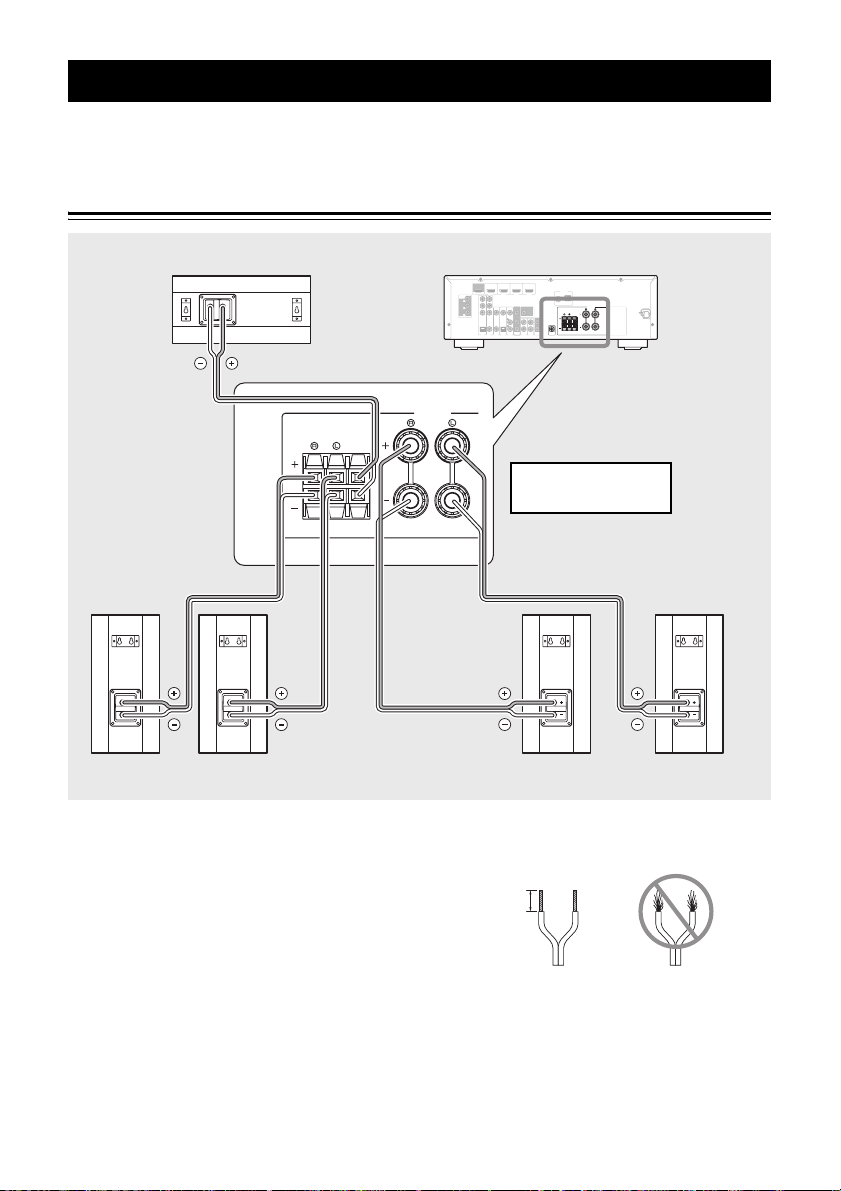
Connection diagram
■ Preparing the speaker cables
Once you have positioned the speakers, cut the 24.5-
meter (80 ft.) speaker cable into five cables for
connecting the front right/left speakers, center speaker
and surround right/left speakers.
1 Cut the supplied speaker cable to suitable
length for each speaker.
2 Remove about 15 mm (5/8") of insulation from
the end of each speaker cable.
3 Twist the bare wires tightly so the individual
strands are not splayed.
Notes
• Make the speaker cables as short as possible. Do not
bundle or roll up excess cable.
• Be careful not to injure yourself while preparing the
speaker cables.
Connecting the speakers
ANTENNA
FM
GND
AM
COMPONENT
VIDEO
P
R
P
B
Y
OPTICAL
(
TV
)
AV 1
AV 2
AV 3
AV 4
AV 5
AUDIO 1
AUDIO 2
COAXIAL
(
CD
)
COAXIAL
OPTICAL
VIDEO
CENTER
SURROUND
HDMI 1
(
BD/DVD
)
HDMI 2 HDMI 3
HDMI 4
FRONT
COMPONENT
VIDEO
MONITOR OUT
P
R
P
B
Y
HDMI
OUT
MONITOR OUT
AV
OUT
SUBWOOFER
AUDIO
OUT
SPEAKERS
CENTER
SURROUND
FRONT
SPEAKERS
Center speaker Amplifier
Front speakers
Right Left
Surround speakers
Right Left
Note: The exact layout of the
speaker terminals depends
on your amplifier.
Good No Good
15 mm (5/8")
Specifications
6 En
English
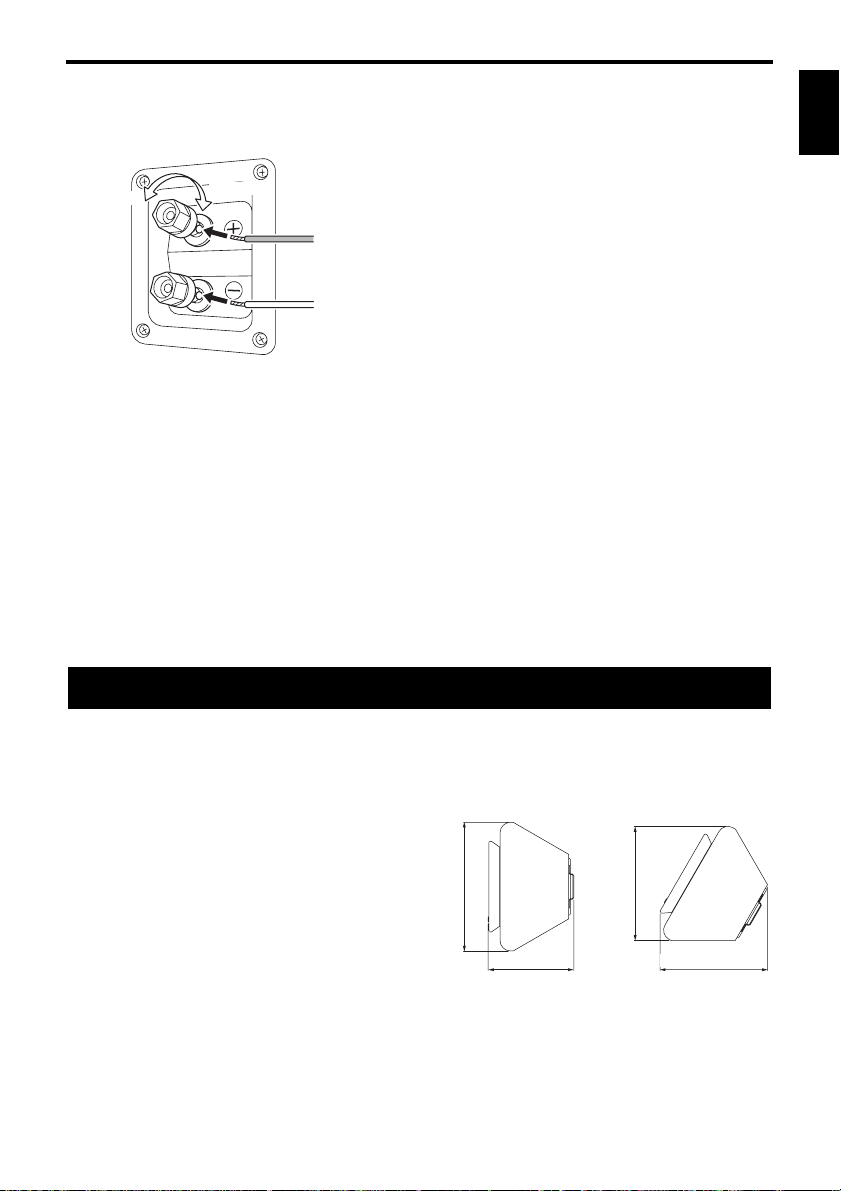
■ Operating the speaker terminals
1 Rotate the speaker terminal counterclockwise to
loosen it.
2 Insert the bare wire.
3 Rotate the speaker terminal clockwise to tighten
it.
4 Test the security of the connection by pulling
gently on the cable.
Notes
• Make sure the terminal is gripping the bare wire, not
the insulation.
• Make sure the bare wires do not touch each other, as
this could damage the speaker or amplifier.
• If the connections are faulty, you will hear no sound
from the speakers.
■ Connecting to an amplifier
Connect each speaker to the appropriate speaker terminals on your amplifier by using the cables you prepared earlier.
For details, see “Connection diagram” (page 5).
Make sure you connect the speakers with the correct polarity—positive (+) terminals to positive (+) terminals, and
negative (–) terminals to negative (–) terminals. If you get them crossed over, the sound will be unnatural and lack bass.
In your AV receiver’s speaker size settings, specify small (or “S”) for all of the NS-PB120 speakers.
Once you have connected all of the speakers, plug the amplifier and other AV components into suitable AC wall outlets.
Typ e................2-way acoustic suspension magnetic shielding type
Driver ................................... Woofer: 6.5 cm (2-1/2") cone type x 2
Tweeter: 2 cm (3/4") silk dome type
Nomina l input power ................................................................30 W
Maximum input power ...........................................................100 W
Impeda nce...................................................................................... 6 Ω
Frequency resp onse ................................110 Hz – 46 kHz (-10 dB)
– 100 kHz (-30 dB)
Sensitivity ...............................................................82 dB/2.83 V, 1 m
Dimensions (W x H x D)
NS-B120 ........................150 x 305 x 99 mm (5-7/8 x 12 x 3-7/8")
NS-C120...................305 x 150 x 99 mm (12 x 5-7/8 x 3-7/8") *1
305 x 133 x 125 mm (12 x 5-1/4 x 4-1/2") *2
NS-C120
Wei g ht ...........................................................................1.8 kg (4.0 lbs)
Specifications are subject to change without notice.
Positive (+)
Negative (–)
Loosen
Tighten
Specifications
*1 *2
H
D
H
D
1 Fr
Lisez attentivement les précautions d’utilisation suivantes. Yamaha décline toute responsabilité en cas de dommages
et/ou de blessures découlant du non respect de ces consignes.
1. Pour profiter au mieux de votre acquisition, lisez
attentivement ce mode d’emploi. Conservez-le
soigneusement pour référence.
2. Installez les enceintes dans un endroit frais, sec, loin des
fenêtres et des sources de chaleur et de vibration, des
poussières, de l’humidité et du froid. Évitez les sources
de ronflements électriques (transformateurs et moteurs,
par exemple). Pour éviter les risques d’incendie et de
secousses électriques, n’exposez pas les enceintes à la
pluie ni à l’humidité.
3. Pour éviter que la menuiserie des enceintes ne se
déforme ou ne se décolore, n’exposez pas les enceintes à
la lumière directe du soleil ni à une humidité excessive.
4. Évitez d’installer les enceintes dans un endroit exposé à
la chute d’objets ou encore à l’écoulement ou aux
éclaboussures de liquides.
5. Ne posez pas les objets suivants sur le dessus des
enceintes:
– D’autres appareils qui pourraient endommager ou
décolorer la menuiserie des enceintes;
– Des objets enflammés (par exemple, des bougies) qui
pourraient endommager les enceintes, provoquer une
blessure, voire un incendie;
– Des récipients contenant des liquides qui pourraient se
renverser, endommager les enceintes ou être à
l’origine d’une secousse électrique.
6. Ne placez pas les enceintes dans un endroit où elles
peuvent être heurtées, directement ou par la chute
d’objets. Un emplacement stable garantit l’obtention de
meilleures sonorités.
7. Placer les enceintes sur des étagères ou dans un meuble
qui contient également la platine de lecture, peut
entraîner un phénomène de bouclage.
8. En cas de “saturation”, réduisez le niveau de sortie de
l’amplificateur. N’excitez pas l’amplificateur au point
qu’il écrête. Dans ce cas en effet, les enceintes pourraient
être endommagées.
9. Vous devez être très attentif, si l’amplificateur peut
délivrer une puissance supérieure à la puissance
maximale admissible par les enceintes, à ce que cela ne
se produise pas.
10. Ne nettoyez pas la menuiserie des enceintes avec un
produit chimique qui peut endommager leur finition.
Utilisez un chiffon sec et propre.
11. Ne tentez pas de modifier les enceintes ni de les réparer.
Consultez le service Yamaha compétent si une réparation
est nécessaire. Pour quelque raison que ce soit, ne
démontez pas la menuiserie des enceintes.
12. La détermination d’un endroit convenable est de
votre responsabilité. Yamaha ne saurait être
responsable des accidents provoqués par le choix
d’un emplacement qui ne conviendrait pas, ni par
l’installation incorrecte des enceintes.
Précautions
Information concernant la Collecte et le Traitement
des déchets d’équipements électr iques et électroniques.
Le symbole sur les produits, l’emballage
et/ou les documents joints signifie que
les produits électriques ou électroniques
usagés ne doivent pas être mélangés
avec les déchets domestiques habituels.
Pour un traitement, une récupération et
un recyclage appropriés des déchets
d’équipements électriques et
électroniques, veuillez les déposer aux
points de collecte prévus à cet effet,
conformément à la réglementation
nationale et aux Directives 2002/96/EC.
En vous débarrassant correctement des
déchets d’équipements électriques et
électroniques, vous contribuerez à la
sauvegarde de précieuses ressources et à
la prévention de potentiels effets
négatifs sur la santé humaine qui
pourraient advenir lors d’un traitement
inapproprié des déchets.
Pour plus d’informations à propos de la
collecte et du recyclage des déchets
d’équipements électriques et
électroniques, veuillez contacter votre
municipalité, votre service de traitement
des déchets ou le point de vente où vous
avez acheté les produits.
[Information sur le traitement dans
d’autres pays en dehors de l’Union
Européenne]
Ce symbole est seulement valables dans
l’Union Européenne. Si vous souhaitez
vous débarrasser de déchets
d’équipements électriques et
électroniques, veuillez contacter les
autorités locales ou votre fournisseur et
demander la méthode de traitement
appropriée.
Sommaire
Contenu de l’emballage ....................................... 2
Installation des enceintes ....................................2
Installation de l’enceinte centrale.......................... 3
Installation des enceintes avant/surround........... 3
Suspension murale des enceintes.......................... 4
Connexion des enceintes ..................................... 5
Schéma des connexions.......................................... 5
Fiche technique......................................................6
2 Fr
Français
Nous vous remercions d’avoir opté pour le système d’enceintes Yamaha NS-PB120.
Vérifiez que l’emballage contient les éléments suivants :
Avant de raccorder les enceintes, placez
chacune d’elles à l’emplacement approprié. Le
positionnement des enceintes est un facteur
très important car il influence le son général du
système. Placez donc chaque enceinte à un
endroit produisant un son de qualité optimale
à la position d’écoute. Référez-vous à
l’illustrati on.
Remarque
• Ces enceintes sont dotées d’un blindage
magnétique. Toutefois, installées trop près
d’un téléviseur CRT (cathodique), ces
enceintes pourraient provoquer une
dégradation des couleurs. Eloignez les
enceintes du téléviseur si vous rencontrez ce
problème.
Contenu de l’emballage
Installation des enceintes
Enceintes avant et surround (NS-B120) x 4
Enceinte centrale (NS-C120) x 1
Patins antidérapants (4 pcs.) x 4
(pour enceintes avant et surround)
Fixation x 2
(pour enceinte centrale)
Câble d’enceinte (24,5m) x1
Centrale
Avant
droite
Surround gauche
Avant
gauche
Surround droite
Loading...