


DEFINITION OF USE
This appliance is exclusively destined to wash and spin machine washable laundry in quantities which are usual for private households.
•Observe the instructions given in these Instructions for Use and in the separate Programme Chart when using the washing machine.
•Keep these Instructions for Use and the Programme Chart; if you pass on the washing machine to another person, also give him/her the Instructions for Use and the Programme Chart.
BEFORE USING THE WASHING MACHINE
1.Remove the packaging and check
•After unpacking, make sure that the washing machine is undamaged. If in doubt, do not use the washing machine. Contact After-Sales Service or your local dealer.
•Keep the packaging materials (plastic bags, polystyrene parts, etc.) out of reach of children, since it is a possible source of danger.
•If the appliance was exposed to the cold prior to delivery, keep it at room temperature for a few hours before operating.
2.Remove the transit bolts
•The appliance is fitted with transit bolts to prevent internal damage during transport.
Before using the washing machine you must remove the transit bolts (see “Installation”/ ”Remove the transit bolts”).
3.Install the washing machine
•Install the appliance on a solid and level floor surface. In the case of a yielding sub-floor, the appliance should be installed in the corner of a room.
•Adjust the feet to ensure that the machine is stable and level on the floor (see “Installation”/ ”Adjust the feet”).
•In case of wooden or so-called “floating floors” (for instance certain parquet or laminate floors), place the appliance on a 70 x 70 cm sheet of plywood at least 3 cm in thickness. The plywood sheet must be screwed to the floor.
•Make sure that the ventilation openings in the base of your washing machine (if available on your washer) are not obstructed by a carpet or other material.
4.Water inlet
•Connect the water supply inlet hose in accordance with the regulations of your local water company (see “Installation”/”Connect the water supply hose(s) (A or B, depending on the model)” and instructions on the hose bag).
•Water supply
-for models with one inlet valve: cold water.
-for models with two inlet valves: cold and hot water, or cold water only (see also instructions on separate programme chart).
• Tap: |
3/4” threaded hose connection |
• Pressure: |
100-1000 kPa (1-10 bar). |
•Use only new hoses to connect the washing machine to the water supply. Used hoses must not be used and should be discarded.
5.Drain hose
•Connect the drain hose to the ventilated siphon or hook it over the edge of a sink by means of the “U” bend and secure it against falling down (see “Installation”/“Connect the water drain hose”).
6.Electrical connections
•Electrical connections must be carried out by a qualified electrician in compliance with the manufacturer's instructions and local safety regulations.
•Voltage information, power consumption and electrical fusing data are supplied on the front panel behind the door frame.
•The appliance must be connected to the mains exclusively by means of a socket with an earth connection in accordance with established regulations. The appliance must be earthed by law. The manufacturer declines all liability for possible damage to property or injury to persons or pets deriving from failure to observe the a/m directions.
•Do not use extension leads or multi sockets.
•Before any maintenance on the washing machine disconnect the power plug or switch off the power supply.
•Access to the mains plug or to disconnection from mains supply via a double-pole switch must be ensured at all times following the installation.
•Do not operate the washing machine if it has been damaged during transport. Inform the After-Sales Service.
•Mains cable replacement is only to be carried out by After-Sales Service.

FIRST WASH CYCLE
We recommend that the first wash cycle be made without laundry.
This will remove any residual water used by the manufacturer in testing your washing machine.
1.Turn on the tap.
2.Close the appliance door.
3.Add a small amount of detergent (maximum 1/3 of the quantity the detergent manufacturer recommends for lightly soiled laundry) to the main wash chamber  of the detergent dispenser.
4.Select and start programme “Synthetics” at 60°C (see separate programme chart).
5.Press the “Start (Pause)” button.
PRECAUTIONS AND GENERAL RECOMMENDATIONS
1.Safety Instructions
•This washing machine is not intended for use by persons (including children) with reduced physical, sensory or mental capabilities, or lack of experience and knowledge, unless they have been given supervision or instruction concerning use of the appliance by a person responsible for their safety.
•Children must not be allowed to play with the washing machine or climb into the drum (see also following chapter “Child Safety”).
•Other appliances must NOT be placed on the washing machine’s worktop (e.g. tumble dryer, water heater etc.).
•The washing machine is appropriate for indoor use only.
•Do not operate the washing machine at temperatures below 5°C.
•Do not leave the appliance plugged in when not in use.
•Turn off the tap when not in use.
•Before any cleaning and maintenance, switch off the machine and disconnect it from the mains.
•Never open the door forcibly or use it as a step.
•Do not store or use flammable fluids near the washing machine.
•Never use the filter cover, the front panel or the detergent dispenser to lift the appliance.
•If necessary, the power cable may be replaced with an identical one obtained from our AfterSales Service. The power cable must only be replaced by a qualified technician.
2.Packaging
•The packaging is 100% recyclable and is marked with the recycling symbol  . Adhere to current local regulations when disposing of packaging material.
3.Disposing of packaging and old appliances
•This appliance is marked according to the European directive 2002/96/EC on Waste Electrical and Electronic Equipment (WEEE).
By ensuring this product is disposed of correctly, you will help prevent potential negative consequences for the environment and human health, which could otherwise be caused by inappropriate waste handling of this product.
The symbol on the product, or on the documents accompanying the product, indicates that this appliance may not be treated as household waste. Instead it shall be handed over to the applicable collection point for the recycling of electrical and electronic equipment. Disposal must be carried out in accordance with local environmental regulations for waste disposal. For more detailed information about treatment, recovery and recycling of this product, please contact your local city office, your household waste disposal service or the shop where you purchased the product.
•Before scrapping, pull out the mains plug and cut off the power cable so that the washing machine becomes unusable.
•The detergent residues should also be removed from the detergent dispenser, the drum, the water drain hose and pump before the washing machine is scrapped. The detergent residues might otherwise get into the groundwater during the disposal process and contaminate it.
4.Frost
•Do not place the washing machine in a room prone to frost. If you must, make sure that the washing machine is completely drained after each wash:
•Remove inlet hose(s) from water tap and let the water flow out completely.
•Remove drain hose from siphon or handwash basin and let the water flow out completely.
•Empty residual water inside the machine by following the instructions in the chapter “Draining Residual Water”.
5.EC Declaration of Conformity
•This washing machine has been designed, constructed and distributed in compliance with EC safety requirements:
2006/95 EC Low Voltage Directive 2004/108/EC Electromagnetic Compatibility Directive
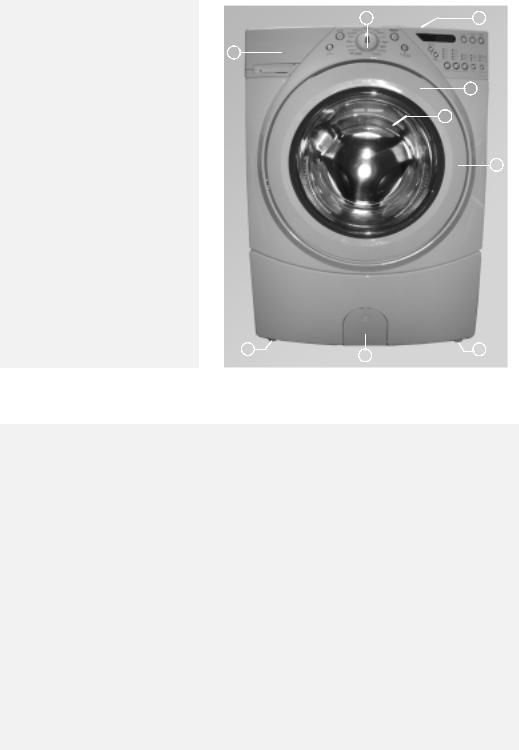
DESCRIPTION OF THE WASHING MACHINE
1. |
Worktop |
2 |
1 |
|
2. |
Control panel |
|||
|
|
|||
3. |
Detergent dispenser |
3 |
|
|
4. |
After-Sales Service sticker |
|
||
|
|
|||
|
(on the front panel behind the |
|
4 |
|
|
door frame) |
|
||
|
|
|
||
5. |
Door |
|
5 |
|
6. |
Door handle |
|
||
|
|
•To open the door pull the handle
• Close the door by pushing it |
6 |
firmly (the lock will click into place)
7.Adjustable feet
8.Filter behind the cover
7 |
8 |
7 |
|
|
CHILD SAFETY
We are pleased that you have chosen our washing machine with the extra-large capacity drum and wide door. They may also appeal to your young children, so we have taken special measures to protect youngsters who decide to play in or around the machine. These measures are intended to help busy parents, but remember that children should never play with the machine, whether it is running or not.
Door Opening
The door has NO special interlock, so it can be opened from inside without much force by a small child if the machine is not in operation. If the machine is switched on, the door is locked so that hot water or laundry cannot be thrown out.
Door lock 
After having started the programme, the door is locked and the drum turns once; the door is then unlocked again for a few seconds. Afterwards it remains locked until the end of the programme.
The “Door Locked” warning light goes on if the door is locked. If the door has to be opened during a programme, press the “Start (Pause)” button. The “Door Locked” warning light goes out and the “Start (Pause)” indicator blinks. The door can now be opened. The machine can be started again by shutting the door and pressing the “Start (Pause)” button.
In certain stages of the wash cycle, the door can never be openend, e.g. when the water is very hot or could run out. In such cases the door remains locked and the “Door Locked” warning light goes on again after the “Start (Pause)” button has been pressed. If you have an urgent need to open the machine, do not pull the plug out but press and hold the “Reset/Drain” button for a few seconds. This drains all the water out, and the door can then be opened.

DETERGENTS AND ADDITIVES
Pouring in detergents and additives
Pull out the detergent dispenser to its full extent.
Pour in detergent:
Chamber
• Detergent for the pre-wash
Chamber
•Detergent for the main wash
•Stain remover
•Water softener
For use of powder detergent  :
:
Push the grey slider of the divider insert to the left (picture 2); a gap remains between the divider insert and the bottom of the main wash chamber.
For use of liquid detergent  :
:
Push the slider of the divider insert to the right (picture 3); the divider insert touches the bottom of the main wash chamber.
Chamber
•Fabric Softener
•Liquid starch
Only add fabric softeners and conditioners up to the “Max” mark.
Slide the detergent dispenser in until it clicks shut.
Using chlorine bleach
•Wash your laundry in the desired programme (Cotton, Synthetics), adding an appropriate amount of chlorine bleach to the SOFTENER chamber (close the detergent dispenser carefully).
•Immediately after end of programme, start the “Rinse and Spin” programme to eliminate any residual bleach smell; if you want, you can add softener.
1
Divider insert
2
powder detergent - push slider to the left 
3 |
Divider insert |
|
liquid detergent - push slider to the right 

Notes:
•Keep detergents and additives in a dry place and out of reach of children.
•If you use descaling agents, dyes or bleaches, make sure they are suitable for washing machine use. Descaler could contain components that can damage parts of your washing machine.
•Do not use solvents (turpentine, benzine, etc.)
Do not machine wash fabrics that have been treated with solvents or flammable liquids.
•You can use liquid detergent in the “Prewash” phase for programmes with this option. In this case put only powder detergents in the compartment for the main wash  .
.
•When using concentrated fabric softeners, dilute with water in the detergent dispenser up to “MAX” level mark.
•To prevent dispensing problems when using highly concentrated powder and liquid detergents, use the special detergent ball or bag supplied with the detergent and place it directly inside the drum. If you use gel-type detergent, please use the powder detergent insert setting.
•For “Start delay”, only use powder detergent. Powder detergent remains in the detergent dispenser until the programme starts, but liquid detergents might run out of the detergent dispenser.
•If you use powder starch, observe the starch manufacturer’s information and proceed as follows:
1.Wash your laundry using the desired wash programme.
2.Next mix the starch according to the starch manufacturer’s instructions.
3.Set the “Rinse and Spin” programme, reduce the spin speed to maximum 800 rpm and start the programme.
4.Pull the detergent dispenser out until you can see about 3 cm of the main wash chamber  .
.
5.While the water is running into the detergent dispenser, pour the starch solution into the main wash chamber  .
.
6.If there are starch residues in the detergent dispenser after the end of the programme, clean it (see “Care And Maintenance”).
 Loading...