


Use and Care Guide and Installation Instructions
Guide d’utilisation et d’entretien et Instructions d’installation
Smart All-In-One Washer and Dryer
Laveuse et sécheuse intelligente combinées
Para obtener acceso al Manual de uso y
cuidado en español, o para obtener información adicional acerca de su producto, visite: www.whirlpool.com
If you have any problems or questions, visit us at www.whirlpool.com. Pour tout problème ou toute question, consulter www.whirlpool.ca.
Connect your Smart All-In-One Washer and Dryer with your mobile device at www.whirlpool.com/connect (in Canada, www.whirlpool.ca/en_ca.html)
Connecter votre laveuse et sécheuse intelligente combinées avec votre appareil mobile à www.whirlpool.ca/fr_ca.html)
Designed to use only HE High Efficiency detergents.
Conçue pour l’utilisation
d’un détergent haute W11114293A 
 efficacité seulement.
W11132621A–SP

Table of Contents |
|
|
ALL-IN-ONE WASHER/DRYER SAFETY............................... |
|
2 |
ACCESSORIES....................................................................... |
|
4 |
OPERATING INSTRUCTIONS................................................ |
|
5 |
Control Panel and Features............................................. |
|
5 |
Cycle Guides.................................................................... |
|
6 |
Choosing the Right Detergent.......................................... |
|
9 |
Using the Load & Go™ Bulk Dispenser............................. |
|
9 |
Using the All-In-One Washer/Dryer................................. |
|
10 |
All-In-One Washer/Dryer Maintenance........................... |
|
15 |
INSTALLATION INSTRUCTIONS......................................... |
|
19 |
Installation Requirements............................................... |
|
19 |
Location Requirements.................................................. |
|
20 |
Drain System.................................................................. |
|
22 |
Unpacking Washer/Dryer................................................ |
|
23 |
Electrical Requirements – U.S.A Only............................. |
|
24 |
Electrical Requirements – Canada Only.......................... |
|
25 |
Electrical Installation – U.S.A. Only................................. |
|
25 |
Route Drain Hose............................................................ |
|
29 |
Connect Inlet Hose......................................................... |
|
29 |
Level Washer/Dryer......................................................... |
|
30 |
Plug in Washer/Dryer...................................................... |
|
31 |
Complete Installation Checklist...................................... |
|
32 |
Internet Connectivity Guide............................................ |
|
32 |
TROUBLESHOOTING............................................................ |
|
33 |
Manually Unlocking the Door.......................................... |
|
44 |
CONNECTED APPLIANCE REGULATORY NOTICES......... |
45 |
|
WARRANTY........................................................................... |
|
47 |
ASSISTANCE OR SERVICE................................... |
Back Cover |
|
Table des matières |
|
|
SÉCURITÉ DE LA LAVEUSE/SÉCHEUSE........................... |
|
48 |
ACCESSOIRES..................................................................... |
|
50 |
INSTRUCTIONS D'UTILISATION......................................... |
|
51 |
Tableau de commande et caractéristiques.................... |
51 |
|
Guide des programmes................................................. |
|
52 |
Choix du détergent approprié......................................... |
|
55 |
Utilisation du distributeur Load & Go™............................ |
|
55 |
Utilisation de la laveuse/sécheuse combinée................. |
56 |
|
Entretien de la laveuse/sécheuse combinée................... |
61 |
|
INSTRUCTIONS D’INSTALLATION...................................... |
|
65 |
Exigences d’installation................................................. |
|
65 |
Exigences d’emplacement............................................. |
|
66 |
Système de vidange...................................................... |
|
68 |
Déballage de la laveuse/sécheuse................................. |
|
69 |
Spécifications électriques............................................... |
|
70 |
Acheminer le tuyau de vidange....................................... |
|
71 |
Raccorder le tuyau d’arrivée........................................... |
|
71 |
Réglage de l’aplomb de la laveuse/sécheuse................ |
72 |
|
Brancher la laveuse/sécheuse........................................ |
|
73 |
Liste de vérification pour installation terminée............... |
74 |
|
Guide de connexion Internet........................................... |
|
74 |
DÉPANNAGE.......................................................................... |
|
75 |
Déverrouillage manuel de la porte.................................. |
|
87 |
AVIS D’APPLICATION DE LA RÉGLEMENTATION |
|
|
DE LA CONNEXION DES ÉLECTROMÉNAGERS............... |
88 |
|
GARANTIE.............................................................................. |
|
90 |
ASSISTANCE OU SERVICE...................... |
Couverture arrière |
|
ALL-IN-ONE WASHER/DRYER SAFETY
2

3

ACCESSORIES
INSTALLATION & MAINTENANCE
ACCESSORIES
FACTORY CERTIFIED PARTS – these three words represent quality parts and accessories designed specifically for your appliance.
Time tested engineering that meets our strict quality specifications.
FACTORY CERTIFIED PARTS
Accessories designed for your appliance:
Customize your new washer/dryer with the following genuine Whirlpool accessory. For more information on options and ordering, call 1-866-698-2538 or visit us at: www.whirlpool.com. In Canada, call 1-800-688-2002 or visit us at www.whirlpool.ca.
12" Pedestal
Color-matched pedestal raises the washer/dryer to a more comfortable working height.
4
OPERATING INSTRUCTIONS
Control Panel and Features
2 |
5 |
4:28
3:15
What to Wash How to Wash
REGULAR NORMAL
Temperature |
|
Spin Speed |
|
Auto Dry |
WARM |
|
EXTRA FAST |
|
Dry |
1 |
3 |
|
|
6 |
7 |
4 |
|||||
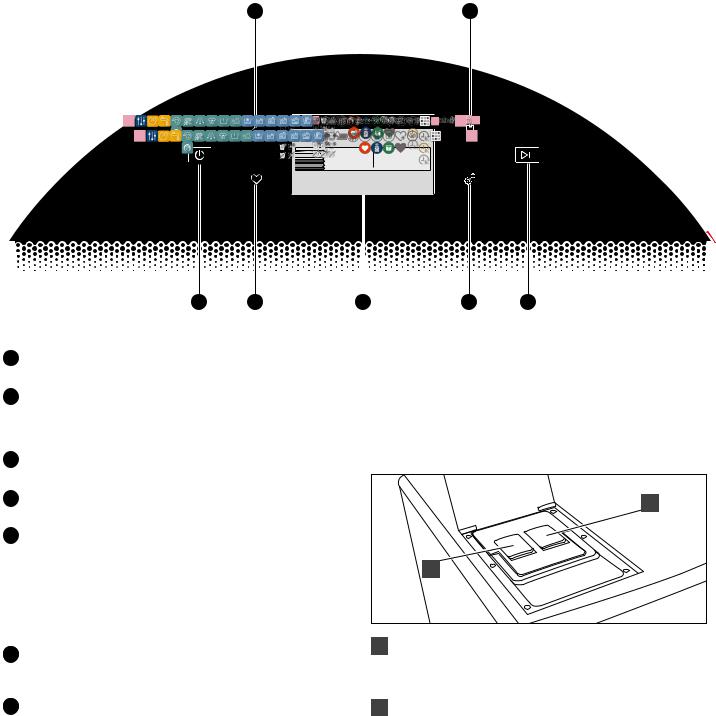
1POWER BUTTON
Touch to power up the washer/dryer.
2HOME BUTTON
Touch this button and the LCD screen will show the home screen, where you can select your cycle, settings, and options.
3FAVORITES BUTTON
Stores and accesses your favorite cycles.
4LCD SCREEN
Use this screen to select cycle, settings, options, etc.
5REMOTE ENABLE BUTTON
Touch this button to be able to use the Whirlpool™ app
to control the washer/dryer. Download the Whirlpool™ app and follow the instructions to connect your washer/dryer to your home Wi-Fi network. You may also visit www.whirlpool.com/connect. In Canada, visit www.whirlpool.ca/en_ca.html and click on the Whirlpool® Connected Appliances link.
6TOOLS BUTTON
Touch this button to access the tools screen. For more information, see page 13.
7START/PAUSE BUTTON
Touch to start, or touch to pause a cycle. When you start a cycle, the door will lock, the washer/dryer will sense the load size, and the wash or dry cycle will begin.
Load & Go™ Bulk Dispenser
The Load & Go™ bulk dispenser holds up to 33.8 oz. (1000 mL) of liquid HE detergent (Dispenser 1) and 16.9 oz. (500 mL) of liquid fabric softener or liquid HE detergent (Dispenser 2), enough for multiple loads of laundry. It adds the appropriate quantity of HE detergent and liquid fabric softener to the wash load at the proper time. See “Using the Load & Go™ Bulk Dispenser” for information on using the dispenser.
B
A
ADispenser 1
This dispenser holds 33.8 oz (1000 mL) of liquid HE detergent for your main wash cycle, and automatically dispenses liquid detergent at the optimum time in the cycle.
BDispenser 2
This dispenser holds 16.9 oz (500 mL) of liquid fabric softener. It automatically dispenses liquid fabric softener at the optimum time in the cycle. This dispenser may
instead be used as a second liquid HE detergent dispenser. See Step 11 on page 13 for information.
IMPORTANT: Do not use chlorine bleach in this washer/dryer, and do not use powdered detergent in the Load & Go™ bulk dispenser. Powdered detergent must be added to the drum prior to adding laundry. See “Using the All-In-One Washer/Dryer.”
5
Cycle Guides
You can use this washer/dryer to wash only, dry only, or wash and dry. This washer/dryer has a unique user interface to help you select the best wash cycle for your load. The “What to Wash/How to Wash” layout guides you to the optimal cycle in two easy steps:
First determine what items are in the load that you are trying to wash. Use that to guide your “What to Wash” selection. Then determine how you want the washer to wash them and select the appropriate “How to Wash” selection. Selecting “What to Wash” will automatically select a default “How to Wash selection,” so selecting a “How to Wash” is optional. See chart below for more details.
|
“What to Wash” |
What Items Do You Want to Wash? |
Cycle Selection: |
|
|
Cottons, linens, and mixed garment loads |
Regular |
|
|
Bright or darkly colored cottons, linens, and mixed loads |
Colors |
|
|
No-iron fabrics, dress shirts/pants, synthetics, sheer/lacy garments |
Delicates |
White fabrics/garments |
Whites |
|
|
Sturdy towels and washcloths |
Towels |
|
|
Large items such as small comforters, sleeping bags, jackets, and washable rugs |
Bulky Items |
|
|
|
|
|
“How to Wash” |
How Do You Want to Wash Them? |
Cycle Selection: |
Regular/normal |
Normal |
|
|
Fast |
Quick |
|
|
Gentle cleaning with cold water |
Cold Wash |
|
|
Powerful cleaning |
Heavy Duty |
|
|
Kill 99% of three common household bacteria |
Sanitize |
|
|
Settings and options shown in bold are default settings for that wash cycle. For best fabric care, choose the cycle, options, and settings that best fit the load being washed. Always read and follow fabric care labels and laundry product instructions. Avoid tightly packing the washer/dryer. The washer/dryer will not rinse well or spin correctly if tightly packed. Loading the drum half full or less will improve washing and drying performance and cycle time. Not all settings are available with each cycle, and some options cannot be used together.
What |
How |
Basic Settings |
|
|
|
Additional Options |
|
|||
|
|
|
|
|
|
|
|
|
||
Temperature |
Spin Speed |
Dry Mode |
Set Soil Level |
Rinses |
|
Pre-Soak |
Tumble Fresh™ |
Wrinkle Shield™ |
||
|
|
|
||||||||
Regular |
Normal |
Extra Hot |
Extra Fast |
Auto |
Light |
2 |
|
X |
X |
X |
|
|
Hot |
Fast |
Timed |
Normal |
3 |
|
|
|
|
|
|
Warm |
Medium |
|
Heavy |
4 |
|
|
|
|
|
|
Cool |
|
|
|
5 |
|
|
|
|
|
|
Cold |
|
|
|
|
|
|
|
|
|
|
|
|
|
|
|
|
|
|
|
|
Quick |
Extra Hot |
Extra Fast |
Auto |
Light |
2 |
|
X |
X |
X |
|
|
Hot |
Fast |
Timed |
Normal |
3 |
|
|
|
|
|
|
Warm |
Medium |
|
Heavy |
|
|
|
|
|
|
|
Cool |
Slow |
|
|
|
|
|
|
|
|
|
Cold |
Off |
|
|
|
|
|
|
|
|
|
|
|
|
|
|
|
|
|
|
|
Cold Wash |
Cool |
Extra Fast |
Auto |
Light |
2 |
|
X |
X |
X |
|
|
Cold |
Fast |
Timed |
Normal |
3 |
|
|
|
|
|
|
|
Medium |
|
Heavy |
4 |
|
|
|
|
|
|
|
Slow |
|
|
5 |
|
|
|
|
|
|
|
Off |
|
|
|
|
|
|
|
|
|
|
|
|
|
|
|
|
|
|
|
Heavy Duty |
Extra Hot |
Extra Fast |
Auto |
Light |
2 |
|
X |
X |
X |
|
|
Hot |
Fast |
Timed |
Normal |
3 |
|
|
|
|
|
|
Warm |
Medium |
|
Heavy |
4 |
|
|
|
|
|
|
Cool |
Slow |
|
|
5 |
|
|
|
|
|
|
Cold |
Off |
|
|
|
|
|
|
|
|
|
|
|
|
|
|
|
|
|
|
|
Sanitize |
Extra Hot |
Extra Fast |
Auto |
Light |
2 |
|
|
X |
X |
|
|
|
Fast |
Timed |
Normal |
3 |
|
|
|
|
|
|
|
Medium |
|
Heavy |
4 |
|
|
|
|
|
|
|
|
|
|
5 |
|
|
|
|
|
|
|
|
|
|
|
|
|
|
|
6
What |
How |
Basic Settings |
|
|
|
Additional Options |
|
|||
|
|
|
|
|
|
|
|
|
||
Temperature |
Spin Speed |
Dry Mode |
Set Soil Level |
Rinses |
|
Pre-Soak |
Tumble Fresh™ |
Wrinkle Shield™ |
||
|
|
|
||||||||
Colors |
Normal |
Warm |
Extra Fast |
Auto |
Light |
2 |
|
X |
X |
X |
|
|
Cool |
Fast |
Timed |
Normal |
3 |
|
|
|
|
|
|
Cold |
Medium |
|
Heavy |
4 |
|
|
|
|
|
|
|
Slow |
|
|
5 |
|
|
|
|
|
|
|
Off |
|
|
|
|
|
|
|
|
|
|
|
|
|
|
|
|
|
|
|
Quick |
Warm |
Extra Fast |
Auto |
Light |
2 |
|
X |
X |
X |
|
|
Cool |
Fast |
Timed |
Normal |
3 |
|
|
|
|
|
|
Cold |
Medium |
|
Heavy |
|
|
|
|
|
|
|
|
Slow |
|
|
|
|
|
|
|
|
|
|
Off |
|
|
|
|
|
|
|
|
|
|
|
|
|
|
|
|
|
|
|
Cold Wash |
Cool |
Extra Fast |
Auto |
Light |
2 |
|
X |
X |
X |
|
|
Cold |
Fast |
Timed |
Normal |
3 |
|
|
|
|
|
|
|
Medium |
|
Heavy |
4 |
|
|
|
|
|
|
|
Slow |
|
|
5 |
|
|
|
|
|
|
|
Off |
|
|
|
|
|
|
|
|
|
|
|
|
|
|
|
|
|
|
Delicates |
Normal |
Warm |
Medium |
Auto |
Light |
2 |
|
X |
X |
X |
|
|
Cool |
Slow |
Timed |
Normal |
3 |
|
|
|
|
|
|
Cold |
Off |
|
Heavy |
4 |
|
|
|
|
|
|
|
|
|
|
5 |
|
|
|
|
|
|
|
|
|
|
|
|
|
|
|
|
Quick |
Warm |
Medium |
Auto |
Light |
2 |
|
X |
X |
X |
|
|
Cool |
Slow |
Timed |
Normal |
3 |
|
|
|
|
|
|
Cold |
Off |
|
Heavy |
|
|
|
|
|
|
|
|
|
|
|
|
|
|
|
|
|
Cold Wash |
Cool |
Medium |
Auto |
Light |
2 |
|
X |
X |
X |
|
|
Cold |
Slow |
Timed |
Normal |
3 |
|
|
|
|
|
|
|
Off |
|
Heavy |
4 |
|
|
|
|
|
|
|
|
|
|
5 |
|
|
|
|
|
|
|
|
|
|
|
|
|
|
|
Whites |
Normal |
Extra Hot |
Extra Fast |
Auto |
Light |
2 |
|
X |
X |
X |
|
|
Hot |
Fast |
Timed |
Normal |
3 |
|
|
|
|
|
|
Warm |
Medium |
|
Heavy |
4 |
|
|
|
|
|
|
Cool |
Slow |
|
|
5 |
|
|
|
|
|
|
Cold |
Off |
|
|
|
|
|
|
|
|
|
|
|
|
|
|
|
|
|
|
|
Quick |
Extra Hot |
Extra Fast |
Auto |
Light |
2 |
|
X |
X |
X |
|
|
Hot |
Fast |
Timed |
Normal |
3 |
|
|
|
|
|
|
Warm |
Medium |
|
Heavy |
|
|
|
|
|
|
|
Cool |
Slow |
|
|
|
|
|
|
|
|
|
Cold |
Off |
|
|
|
|
|
|
|
|
|
|
|
|
|
|
|
|
|
|
|
Heavy Duty |
Extra Hot |
Extra Fast |
Auto |
Light |
2 |
|
X |
X |
X |
|
|
Hot |
Fast |
Timed |
Normal |
3 |
|
|
|
|
|
|
Warm |
Medium |
|
Heavy |
4 |
|
|
|
|
|
|
Cool |
Slow |
|
|
5 |
|
|
|
|
|
|
Cold |
Off |
|
|
|
|
|
|
|
|
|
|
|
|
|
|
|
|
|
|
|
Sanitize |
Extra Hot |
Extra Fast |
Auto |
Light |
2 |
|
|
X |
X |
|
|
|
Fast |
Timed |
Normal |
3 |
|
|
|
|
|
|
|
Medium |
|
Heavy |
4 |
|
|
|
|
|
|
|
|
|
|
5 |
|
|
|
|
|
|
|
|
|
|
|
|
|
|
|
Towels |
Normal |
Extra Hot |
Extra Fast |
Auto |
Light |
2 |
|
X |
X |
X |
|
|
Hot |
Fast |
Timed |
Normal |
3 |
|
|
|
|
|
|
Warm |
Medium |
|
Heavy |
4 |
|
|
|
|
|
|
Cool |
Slow |
|
|
5 |
|
|
|
|
|
|
Cold |
Off |
|
|
|
|
|
|
|
|
|
|
|
|
|
|
|
|
|
|
|
Quick |
Extra Hot |
Extra Fast |
Auto |
Light |
2 |
|
X |
X |
X |
|
|
Hot |
Fast |
Timed |
Normal |
3 |
|
|
|
|
|
|
Warm |
Medium |
|
Heavy |
|
|
|
|
|
|
|
Cool |
Slow |
|
|
|
|
|
|
|
|
|
Cold |
Off |
|
|
|
|
|
|
|
|
|
|
|
|
|
|
|
|
|
|
|
Heavy Duty |
Extra Hot |
Extra Fast |
Auto |
Light |
2 |
|
X |
X |
X |
|
|
Hot |
Fast |
Timed |
Normal |
3 |
|
|
|
|
|
|
Warm |
Medium |
|
Heavy |
4 |
|
|
|
|
|
|
Cool |
Slow |
|
|
5 |
|
|
|
|
|
|
Cold |
Off |
|
|
|
|
|
|
|
|
|
|
|
|
|
|
|
|
|
|
|
Sanitize |
Extra Hot |
Extra Fast |
Auto |
Light |
2 |
|
|
X |
X |
|
|
|
Fast |
Timed |
Normal |
3 |
|
|
|
|
|
|
|
Medium |
|
Heavy |
4 |
|
|
|
|
|
|
|
|
|
|
5 |
|
|
|
|
|
|
|
|
|
|
|
|
|
|
|
7
What |
How |
Basic Settings |
|
|
|
Additional Options |
|
|||
|
|
|
|
|
|
|
|
|
||
Temperature |
Spin Speed |
Dry Mode |
Set Soil Level |
Rinses |
|
Pre-Soak |
Tumble Fresh™ |
Wrinkle Shield™ |
||
|
|
|
||||||||
Bulky Items |
Normal |
Extra Hot |
Medium |
Auto |
Light |
2 |
|
X |
X |
X |
|
|
Hot |
Slow |
Timed |
Normal |
3 |
|
|
|
|
|
|
Warm |
Off |
|
Heavy |
4 |
|
|
|
|
|
|
Cool |
|
|
|
5 |
|
|
|
|
|
|
Cold |
|
|
|
|
|
|
|
|
|
|
|
|
|
|
|
|
|
|
|
|
Quick |
Extra Hot |
Medium |
Auto |
Light |
2 |
|
X |
X |
X |
|
|
Hot |
Slow |
Timed |
Normal |
3 |
|
|
|
|
|
|
Warm |
Off |
|
Heavy |
|
|
|
|
|
|
|
Cool |
|
|
|
|
|
|
|
|
|
|
Cold |
|
|
|
|
|
|
|
|
|
|
|
|
|
|
|
|
|
|
|
|
Heavy Duty |
Extra Hot |
Medium |
Auto |
Light |
2 |
|
X |
X |
X |
|
|
Hot |
Slow |
Timed |
Normal |
3 |
|
|
|
|
|
|
Warm |
Off |
|
Heavy |
4 |
|
|
|
|
|
|
Cool |
|
|
|
5 |
|
|
|
|
|
|
Cold |
|
|
|
|
|
|
|
|
|
|
|
|
|
|
|
|
|
|
|
Government energy certifications for this model were based on the REGULAR (WHAT TO WASH), NORMAL (HOW TO WASH), DRYING MODE – AUTO DRYING OFF, TIMED DRYING 4 HOURS, DRYING ONLY ON CYCLE WITH THE MAXIMUM DRYING TEMPERATURE SETTING. The as-shipped defaults of REGULAR (WHAT TO WASH), NORMAL (HOW TO WASH), WARM TEMP, SPIN SPEED EXTRA FAST, DRYING MODE – AUTO DRYING OFF, TIMED DRYING OFF, DRYING ONLY OFF were not used.
8

Choosing the Right Detergent
Use only High Efficiency detergents. The package will be marked “HE” or “High Efficiency.” Low-water washing creates excessive sudsing with a non-HE detergent. Using non-HE detergent
will likely result in longer cycle times and reduced rinsing performance. It may also result in component malfunction and, over time, buildup of mold or mildew. HE detergents should be low-sudsing and quick-dispersing to produce the right amount of suds for the best performance. They should hold soil in suspension so it is not redeposited onto clean clothes. Not all detergents labeled as High Efficiency are identical in formulation and their ability to reduce suds. For example, natural, organic, or homemade HE detergents may generate a high level of suds. Always follow the detergent manufacturer’s instructions to determine the amount of detergent to use.
Use only High Efficiency (HE) detergent.
About Detergent Concentration
Today’s liquid HE detergents are concentrated. Most brands of concentrated HE detergent will show the level of concentration on the bottle.
However, if the detergent bottle does not give the concentration, it can be easily calculated. Just divide the package size in fluid ounces by the number of loads. Then refer to the chart below to find the concentration.
Set the concentration level setting on the washer by using the Tools button (see Step 11 on page 13). If you do not get your desired cleaning results, set the concentration level to a lower concentration number. If you have excess suds, set the concentration level to a higher concentration number.
Concentration |
Number of ounces ÷ number of loads |
2X |
1.5–2.49 (44.4 ml–73.6 ml) |
3X |
0.9–1.49 (26.6 ml–44.1 ml) |
4X |
0.7–0.89 (20.7 ml–26.3 ml) |
5X |
0.5–0.69 (14.8 ml–20.4 ml) |
6X |
0.3–0.49 (8.9 ml–14.5 ml) |
Using the Load & Go™ Bulk Dispenser
Follow the steps below to fill the Load & Go™ bulk dispenser when using the washer for the first time, or when the low detergent icon or low fabric softener icon on the display indicate that the detergent or fabric softener level is running low.
1. Open the bulk container lid on the top of the washer/dryer.
2.Lift the fill door on the Liquid Detergent dispenser (Dispenser 1). Add liquid HE detergent up to the “MAX”
line. Do not overfill. Close the fill door. It will click into place. NOTE: If Dispenser 1 is empty, you may choose to add only enough liquid HE detergent for one load.
3.Lift the fill door on the Liquid Fabric Softener dispenser (Dispenser 2). Add liquid fabric softener up to the “MAX” line. Do not overfill. Close the fill door. It will click into place. NOTE: If Dispenser 2 is empty, you may choose to add only enough liquid fabric softener for one load.
4.Slowly close the bulk container lid. Make sure it is completely closed.
5.Make sure that the bulk dispenser is active. Use
the Tools button to make sure that both Dispenser 1 and Dispenser 2 are active and that the detergent concentration is correct. See Step 11 on page 13.
NOTES:
Use only High Efficiency (HE) detergent.
nDispenser 2 may be used as a second Liquid HE Detergent dispenser. Use the Tools button (go to “Load & Go™ Dispenser 2”) to change the content in Dispenser 2 and set the detergent concentration. Make sure that the other dispenser is disabled.
nThe entire Load & Go™ bulk container can be easily removed for ease of cleaning.
nThoroughly clean the Liquid Detergent dispenser (Dispenser 1) before switching to a different brand of detergent.
nThoroughly clean the Liquid Fabric Softener dispenser (Dispenser 2) before switching from liquid fabric softener to liquid detergent, before switching back from liquid detergent to liquid fabric softener, or before switching to a different brand of detergent.
IMPORTANT: |
|
|
n Do not use chlorine bleach in this |
Chlorine |
|
washer/dryer. Chlorine bleach will |
Bleach |
|
damage it. |
||
|
nDo not add a single-dose laundry packet to the bulk dispenser.
nDo not use powdered HE detergent in the bulk dispenser.
9
Using the All-In-One Washer/Dryer
First wash cycle without laundry
Before washing clothes for the first time, set up the Load & Go™ bulk dispenser (see page 9). Choose the Regular (What to Wash) and Quick (How to Wash) cycle and run it without clothes. Use only HE detergent. This initial cycle serves to ensure the interior is clean and the bulk dispenser is primed and ready for use before washing clothes.
If using liquid HE detergent in both Dispenser 1 and Dispenser 2, you will need to run a second cycle without laundry as indicated above to prime Dispenser 2 and clean the interior. Using the Tools button, make sure that Dispenser 1 is disabled when priming Dispenser 2 for detergent.
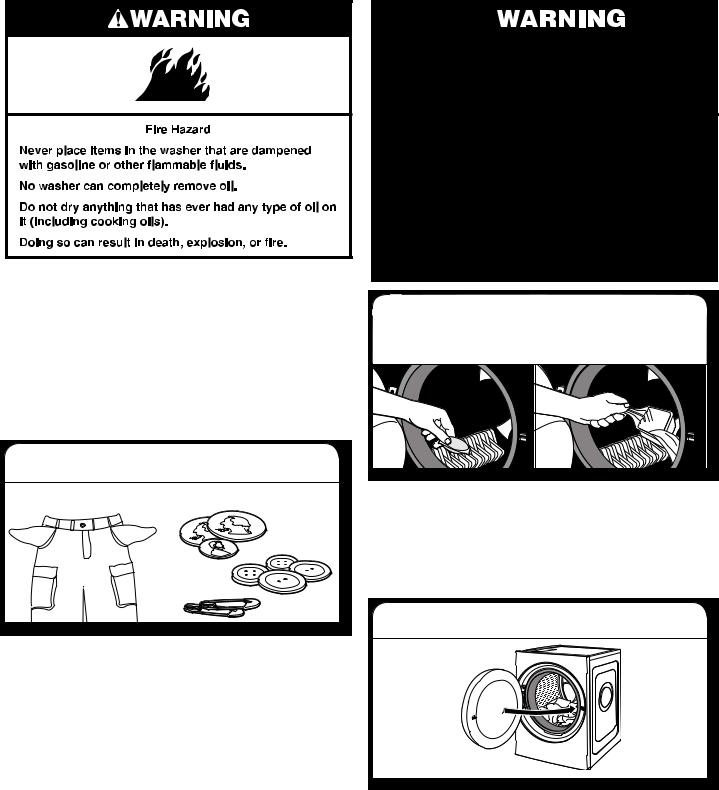
1. Sort and prepare your laundry
Sort items by recommended cycle, water temperature,
and colorfastness. Separate heavily soiled items from lightly soiled. Separate delicate items from sturdy fabrics. Treat stains promptly and check for colorfastness by testing stain remover products on an inside seam.
IMPORTANT:
nEmpty pockets. Loose change, buttons, or any small object can plug pumps and may require a service call.
nClose zippers, fasten hooks, tie strings and sashes, and remove non-washable trim and ornaments.
nMend rips and tears to avoid further damage to items during washing.
nTurn knits inside out to prevent pilling. Separate lint-takers from lint-givers. Synthetics, knits, and corduroy fabrics will pick up lint from towels, rugs, and chenille fabrics.
nDo not dry garments if stains remain after washing, because heat can set stains into fabric.
nAlways read and follow fabric care labels and laundry product instructions. Improper usage may cause damage to your garments.
2. If desired, instead of liquid detergent, add powdered HE detergent and/or laundry products
Powdered HE detergent, single-dose laundry packets, Oxi-type boosters, or scented crystals can be added to the drum prior to adding laundry. Make sure that the Load & Go™ bulk dispenser is disabled or off (see Step 11 on page 13), and skip Step 4 when using powdered HE detergent or single-dose laundry packets.
NOTES:
nAlways follow manufacturer’s instructions.
nDo not use chlorine bleach.
3.Load laundry into washer/dryer
Place a load of sorted items loosely in the washer/dryer. Items need to move freely for best cleaning and to reduce wrinkling and tangling. If using the drying option, loading the drum half full or less and not interrupting the drying cycle by opening the door will improve drying performance and cycle time. Close the washer/dryer door by pushing it firmly until the latch clicks.
nMix large and small items and avoid washing single items. Load evenly.
nWash small items in mesh garment bags. For multiple items, use more than one bag and fill bags equally.
10
4. Add liquid HE detergent to Load & Go™ bulk dispenser (if bulk dispenser is not already loaded or if low detergent icon 
 on display is lit), if desired
6. Touch POWER button to turn on washer/dryer
See page 9 for instructions on how to fill the liquid detergent bulk dispenser (Dispenser 1). Press the TOOLS button and make sure that the bulk dispenser is active. See Step 11 on page 13.
NOTE: Do not add powdered HE detergent, single-dose laundry packets, Oxi-type boosters, or scented crystals to the bulk dispenser. They will not dispense correctly.
5. Add liquid fabric softener to Load & Go™ bulk dispenser (if bulk dispenser is not already loaded or if low fabric softener icon 
 on display is lit), if desired
See page 9 for instructions on how to fill the fabric softener bulk dispenser (Dispenser 2). Press the TOOLS button and make sure that the bulk dispenser is active. See Step 11 on page 13.
IMPORTANT:
nDo not overfill or dilute fabric softener.
nDo not spill or drip any fabric softener onto the clothes.
nDo not use scented crystals in the bulk dispenser. They will not dispense correctly.
nDo not mix fabric softener and detergent in Dispenser 2 at the same time.
Touch until the indicators turn on.
7. Select wash program/cycle
4:28
3:15
What to Wash How to Wash
REGULAR NORMAL
Temperature |
Spin Speed |
Auto Dry |
WARM |
EXTRA FAST |
Dry |
From the home screen, touch the “What to Wash” area of the screen to select the program that best matches the items you want to wash. You may need to scroll down with your finger to see all of the selections. Touch the desired program to return to the home screen.
Touch the “How to Wash” area of the screen to select the program that best matches the method that you would like to wash those items. You may need to scroll down with your finger to see all of the selections. Touch the desired program to return to the home screen.
11

8. Select temperature and spin speed†
4:28
3:15
What to Wash How to Wash
REGULAR NORMAL
|
|
|
|
|
|
|
|
Temperature |
|
Spin Speed |
|
|
Auto Dry |
|
WARM |
|
EXTRA FAST |
|
|
Dry |
|
|
|
|
|
|
|
From the home screen, touch the “Temperature” area of the screen to show the Temperature settings available for the cycle/program chosen in Step 7. Touch the desired setting and touch OKAY to confirm that setting.
The recommended wash temperature is preset for each cycle. Some preset temperatures can be changed. You may select a different wash temperature based on the level of soil and
type of fabric being washed. For best results, use the warmest wash water safe for your fabric, following the garment label instructions. All wash temperatures feature a cold rinse.
Touch the “Spin Speed” area of the screen to show the Spin Speed settings available for the cycle/program chosen in Step 7. Touch the desired setting and touch OKAY to confirm that setting.
The recommended spin speed is preset for each cycle. Some preset speeds can be changed.
nFaster spin speeds mean shorter dry times, but may increase wrinkling in your load.
nSlower spin speeds reduce wrinkling, but will leave your load more damp.
Drying Function (Step 9)
9. Select drying function, if desired†
4:28
3:15
What to Wash How to Wash
REGULAR NORMAL
|
|
|
|
|
|
Temperature |
|
Spin Speed |
|
Auto Dry |
|
WARM |
|
EXTRA FAST |
|
Dry |
|
|
|
|
|
|
|
From the home screen, touch the “Drying Mode” area of the screen to show the available Drying Mode settings.
From the Drying Mode screen, choose between Auto-Drying and Timed-Drying. For Auto-Drying, touch Auto-Drying and then touch the screen to choose between Damp Dry, Dry, and Extra Dry. For Timed-Drying, touch Timed-Drying and then touch the screen to choose between :30 HR, 1:00 HR, 1:30 HR, 2:00 HR, 3:00 HR, and 4:00 HR. Expect longer drying times than with traditional vented dryers.
To run a dry cycle only:
Load the drum half full or less for optimal drying performance and cycle time. From the home screen, touch the “Drying Mode” area of the screen to show the available Drying Mode settings, and from the Drying Mode screen, after making the Auto-Drying or Timed-Drying choices as mentioned above, touch “DRYING ONLY ON.” Do not open the door during the drying cycle.
NOTE: If items to dry are highly saturated, run a high speed Spin cycle prior to running the Dry cycle.
IMPORTANT:
nDo not use dryer sheets.
nDo not dry comforters or large blankets.
†Not all options and settings are available with all programs/cycles. See “Cycle Guides” for available options and settings.
12

10. Select options, if desired†
From the home screen, touch the Options icon (at upper right of screen) and the Options screen will show Soil Level, Extra Rinses, Pre-Soak, Tumble Fresh,™ and Wrinkle Shield™ selections. Previously selected “What to Wash” and “How to Wash” options will be shown on the screen. Touch the screen for each option to change its setting.
Soil Level Option
The Soil Level option allows you to select a Light, Normal, or Heavy soil level setting. The recommended soil level is preset for each cycle. Some preset soil levels can be changed. For heavily soiled and sturdy fabrics, select the Heavy soil level setting. For lightly soiled and delicate fabrics, select the Light soil level setting. Lower soil level settings will help reduce tangling and wrinkling.
Extra Rinses Option
The Extra Rinses option provides one or more additional rinses to the selected cycle. The extra rinses can be canceled at any time by touching the “X” on the touch screen to the right of the estimated time remaining.
Pre-Soak Option
The Pre-Soak option can be set either on or off. Pre-Soak may be ended at any time by touching the “X” on the touch screen to the right of the estimated time remaining.
Tumble Fresh™ Option 

The Tumble Fresh™ option will periodically tumble the load after the end of the cycle for up to 12 hours. Touch TUMBLE FRESH to activate this option. This option is not available when a drying mode is selected. Tumble Fresh™ may be ended at any time by touching the “X” on the touch screen to the right of the estimated time remaining.
Wrinkle Shield™ Option 

The Wrinkle Shield™ option is only available when a drying mode is selected, and will periodically tumble the load after the end of the cycle for up to 12 hours. Wrinkle Shield™ may be ended at any time by touching the “X” on the touch screen to the right of the estimated time remaining.
†Not all options and settings are available with all programs/cycles. See “Cycle Guides” for available options and settings.
11. Use Tools button to change other settings, if desired
The Tools button gives access to many other settings, utility cycles, preferences, and information. Touch the TOOLS button to access the Tools screen, which contains the following
(you will need to scroll down with your finger to access all of the selections).
Load & Go™ Dispenser 1
Press this icon to access:
Load & Go™ Status Dispenser 1 and choose between:
nActive
nDisabled (1 Cycle)
nOff (Permanently)
Detergent Concentration Dispenser 1 and choose between:
n2X
n4X
n6X
n8X
Load & Go™ Dispenser 2
Press this icon to access:
Load & Go™ Status Dispenser 2 and choose between:
nActive
nDisabled (1 Cycle)
nOff (Permanently)
Load & Go™ Content Dispenser 2 and choose between:
nSoftener
nDetergent
Once set at Detergent:
Set Concentration Dispenser 2 and choose between:
n2X
n4X
n6X
n8X
Control Lock
Press this icon to lock the controls. Swipe up to unlock.
Mute
Press this icon to mute or unmute sounds.
Utility Cycles
Press this icon to access the following utility cycles: Spin, Drain, Rinse & Spin, and Clean Washer with affresh® cycle. Touch the utility cycle you wish to use and follow the screen prompts.
Preferences
Press to access Times and Dates, Sound Volume, Display Settings, and Regional. Follow the screen prompts.
WiFi
Press to access Connect to Network, SAID (Smart Appliance ID) Codes, Mac Address, and WiFi. Follow the screen prompts.
Info
Press to access Service & Support, Store Demo Mode, Restore Factory, WiFi Terms and Conditions, and Software Terms and Conditions. Follow the screen prompts.
13
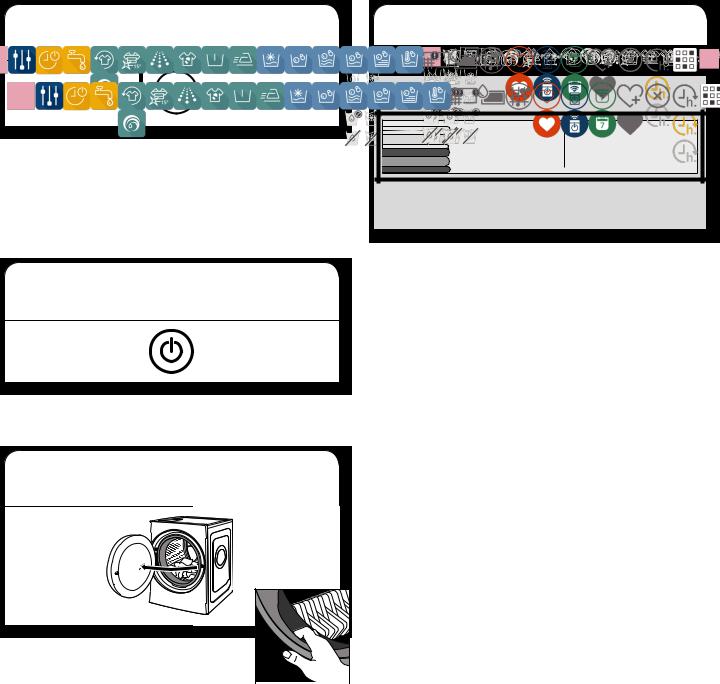
12. Touch START/PAUSE button to begin cycle
Touch the START/PAUSE button to start the cycle.
To pause a cycle in progress, touch the START/PAUSE button once, then touch again to continue the cycle. To cancel a cycle, touch the “X” on the touch screen to the right of the estimated time remaining.
Once you touch the START/PAUSE button, you will hear the door lock. The washer/dryer door will remain locked during a wash cycle.
13. Touch POWER button to turn off washer/dryer after cycle ends
Touch the POWER button to turn off the washer/dryer at the end of a cycle. The Power button is also used to turn on the washer/dryer before use.
14. Remove garments promptly after cycle is finished
After a wash-only cycle, promptly remove
garments after cycle has completed to avoid odor and rusting of metal objects on
garments. When unloading garments, pull  back the door seal and check for small items between the tub and the washer/dryer drum.
If you will be unable to remove the load promptly after a washonly cycle, use the Tumble Fresh™ option (see Step 10, page 13).
After a wash and dry cycle or a dry-only cycle, promptly remove garments after cycle has completed to reduce wrinkling. If you will be unable to remove a load promptly, use the Wrinkle Shield™ option (see Step 10, page 13).
NOTES:
nThe door will remain locked while the Tumble Fresh™ option is active after a wash-only cycle. To cancel the Tumble Fresh™ option and unlock the door, touch the “X” on the touch screen to the right of the estimated time remaining.
nThis washer/dryer has a tight seal to avoid water leaks.
To avoid odors, leave the door open to allow the washer/dryer to dry between uses.
nIf a dry cycle is interrupted and the load removed before the cool-down period at the end of the cycle, the load will be very hot.
Setting a delayed start
4:28
3:15
What to Wash How to Wash
REGULAR NORMAL
Temperature |
|
Spin Speed |
|
Auto Dry |
WARM |
|
EXTRA FAST |
|
Dry |
|
|
|
|
|
Touch POWER until the indicators turn on. From the home screen, make sure the washer/dryer is set to the correct time and date (if it is not, see Step 11 on page 13 for instructions on how to set the time and date).
Touch the clock icon on the far right portion of the touch screen. The “Select a start time” screen will show on the display. Scroll horizontally to select a preferred start time for your wash or dry cycle. The times will display in 15-minute increments. Press OKAY to set the start time. The display will return to the home screen and the clock icon will turn brown.
To delete or modify the delayed start, press the clock icon again and follow the screen prompts.
14
All-In-One Washer/Dryer Maintenance
CLEANING THE WASHER/DRYER LOCATION
Keep washer/dryer area clear and free from items that would block the airflow for proper dryer operation. This includes clearing piles of laundry in front of the washer/dryer.
WASHER/DRYER CARE
Recommendations to Help Keep Your Washer/Dryer Clean and Performing at its Best
1.Always use High Efficiency (HE) detergents and follow the HE detergent manufacturer’s instructions regarding the amount of HE detergent to use. Never use more than the recommended amount because that may increase the rate at which detergent and soil residue accumulate inside your washer, which in turn may result in undesirable odor.
2.Use warm or hot water washes sometimes (not exclusively cold water washes), because they do a better job of controlling the rate at which soils and detergent accumulate.
3.Always leave the washer/dryer door slightly ajar between uses to help dry out the washer/dryer and avoid the buildup of odor-causing residue.
4.Periodically clean residue from all interior surfaces of the glass window. For better care, wipe the entire inside of the glass door with a damp cloth.
Cleaning Your Front-Loading Washer/Dryer
Read these instructions completely before beginning the routine cleaning processes recommended below. This Washer Maintenance Procedure should be performed, at a minimum, once per month or every 30 wash cycles, whichever occurs sooner, to control the rate at which soils and detergent may otherwise accumulate in your washer/dryer.
Cleaning the Door Seal
1.Open the washer/dryer door and remove any clothing or items from the washer/dryer.
2.Inspect the seal between the door opening and the drum for stained areas or soil buildup. Pull back the seal to inspect all areas under the seal and to check for foreign objects.
3.If stained areas or soil buildup are found, wipe down these areas of the seal using the following procedure:
When the cycle is complete, gently pull back the rubber door seal and clean the entire surface with the textured side of an affresh® Machine Cleaning Wipe.
WASHER/DRYER CARE (cont.)
Cleaning the Inside of the Washer/Dryer
This washer/dryer has a special cycle that uses higher water volumes in combination with affresh® Washer Cleaner to thoroughly clean the inside of the washer/dryer.
NOTE: Read these instructions completely before beginning the cleaning process.
Begin procedure
Clean Washer with affresh® Cycle Procedure (Recommended for Best Performance):
a.Open the washer/dryer door and remove any clothing or items.
b.Use an affresh® Machine Cleaning Wipe or a soft, damp cloth or sponge to clean the inside door glass.
c.Add an affresh® Washer Cleaner tablet to the washer drum.
d.Do not add the affresh® Washer Cleaner tablet to the bulk dispenser.
e.Do not add any detergent or other chemical to the washer/dryer when following this procedure.
f.Close the washer/dryer door.
g.Select the Clean Washer with affresh® cycle.
h.Select the Tumble Fresh™ option to help dry the washer/dryer interior after the cycle is complete. NOTE: The washer/dryer remembers your last option selection and will use it for future wash cycles until you deselect that option.
i.Touch the START/PAUSE button to begin the cycle. The Clean Washer with affresh® cycle operation is described below.
Description of Clean Washer with affresh® Cycle Operation:
1.Do not run this cycle with a load. Doing so could damage the items.
2.After the cycle is complete, leave the door open slightly to allow for better ventilation and drying of the washer/ dryer interior.
Cleaning the Load & Go™ Bulk Dispenser
After a period of using your washer/dryer, you may find some residue buildup in the Load & Go™ bulk dispenser. To remove residue from the dispensers, lift the handle on the dispenser container housing to remove it from the washer/ dryer cabinet, then rinse the two dispensers thoroughly with running water. Wipe the outside dispenser container surfaces with an affresh® Machine Cleaning Wipe or a damp cloth and towel dry. Use an all-purpose surface cleaner, if needed. Replace the dispenser container in the washer/dryer cabinet and make sure that it is seated.
IMPORTANT: Load & Go™ bulk dispenser container is not dishwasher-safe.
Cleaning the Outside of the Washer/Dryer
Use an affresh® Machine Cleaning Wipe or a soft, damp cloth or sponge to wipe up any spills. Occasionally wipe the outside of your washer/dryer to help keep it looking new. Use an affresh® Machine Cleaning Wipe or mild soap and water.
IMPORTANT: To avoid damaging the washer/dryer finish, do not use abrasive products.
15
CLEAN WASHER CYCLE REMINDER
The Clean Washer with affresh® message will flash at the end of a wash cycle when the washer has run 30 wash cycles. This is a reminder to run the Clean Washer with affresh® cycle.
If the Clean Washer with affresh® cycle is not run, the message will stop flashing at the end of a wash cycle after running three more regular wash cycles. After 30 more wash cycles are completed, the Clean Washer with affresh® message will again flash at the end of a wash cycle as a reminder.
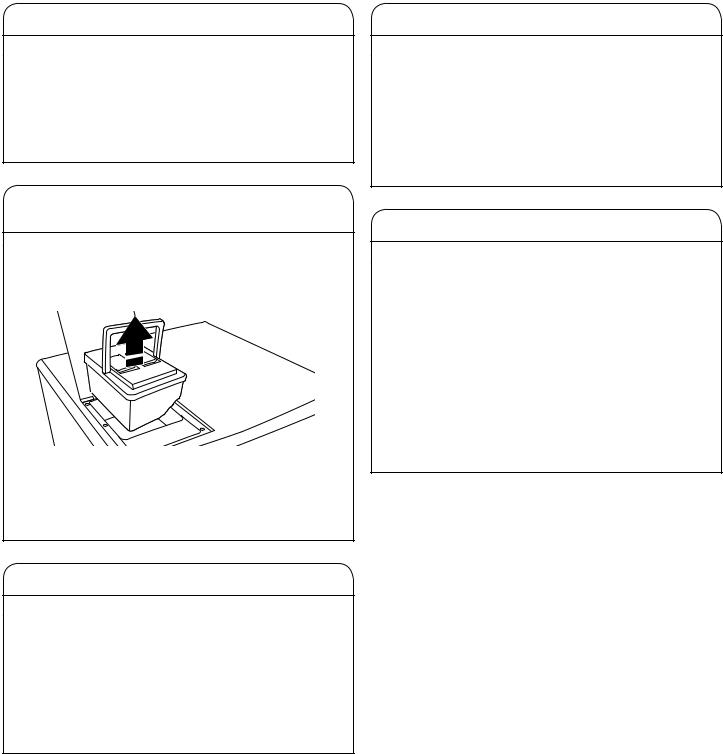
REMOVING THE LOAD & GO™
BULK CONTAINER
To remove:
1.Lift the bulk container lid on the top of the washer/dryer.
2.Lift up on the bulk container handle and pull straight up and out of the washer/dryer.
To replace:
1.Place the bulk container back into the bulk container cavity on the top of the washer/dryer and make sure that it is seated.
2.Close the bulk container lid.
WATER INLET HOSE
Replace inlet hose after 5 years of use to reduce the risk of hose failure. Periodically inspect and replace inlet hose if bulges, kinks, cuts, wear, or leaks are found.
When replacing your inlet hose:
■■ Mark the date of replacement on the label with a permanent marker.
■■ Check that the old washer is not stuck on the washer inlet valve.
■■ Use a new washer in the new inlet hose to ensure a proper seal.
NON-USE AND VACATION CARE
If moving, or not using your washer/dryer for a period of time, follow these steps:
1.Unplug or disconnect power to washer/dryer.
2.Turn off water supply to washer/dryer to avoid flooding due to water pressure surges.
HELPFUL TIP: Attach a reminder note to the washer/ dryer to turn the water back on before washer’s next use.
3.Clean the bulk dispenser. See “Cleaning the Load & Go™ Bulk Dispenser.”
WINTER STORAGE CARE
IMPORTANT: To avoid damage, install and store washer/ dryer where it will not freeze. Because some water may stay in hoses, freezing can damage washer/dryer. If storing or moving during freezing weather, winterize your washer/dryer.
To winterize washer/dryer:
1.Shut off water faucet, disconnect and drain water inlet hose.
HELPFUL TIP: Attach a reminder note to the washer/ dryer to turn the water back on before washer’s next use.
2.Remove drain pump filter.
3.Put 1 qt. (1 L) of R.V.-type antifreeze in drum and run washer on Normal cycle for about 2 minutes to mix antifreeze and remaining water.
4.Unplug washer/dryer or disconnect power.
16
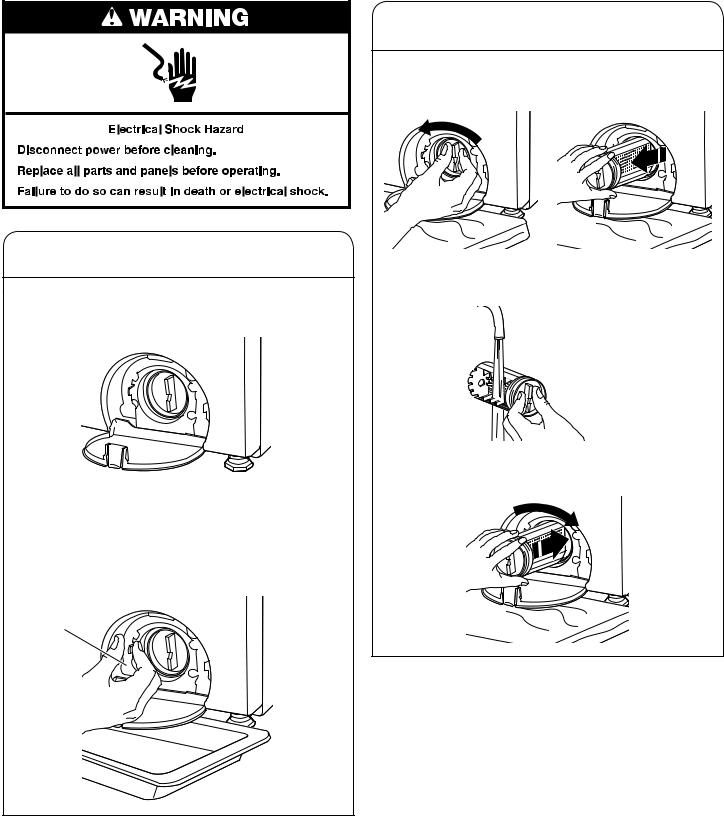
CLEANING THE DRAIN PUMP FILTER/ DRAINING RESIDUAL WATER
NOTE: Perform the following procedure every 6 months.
1.Open the drain pump filter access door at the bottom right corner at the front of the washer/dryer.
2.Place a broad, flat pan beneath the drain pump filter to collect the drain water. Pull out the black hose, remove the plug, and drain the hose into the pan. Empty the pan. Replace the drain hose plug and put the hose back into place. Repeat this procedure if necessary until all the water has drained. Make sure that the black hose is completely dry.
Black hose |
CLEANING THE DRAIN PUMP FILTER/
DRAINING RESIDUAL WATER (cont.)
3.Lay a cotton cloth beneath the drain pump filter to absorb any water still in it. Then remove the drain pump filter by turning it counterclockwise.
4.Remove large clumps of lint by hand from the filter and place lint in a suitable waste container. Remove remaining residue from the filter by rinsing with water.
5.Reinsert the drain  pump filter by turning it clockwise. Make sure to turn it in as far as it will go, with the filter handle left in a vertical position.
17

TRANSPORTING YOUR WASHER/DRYER
1.Shut off water faucet. Disconnect and drain water inlet hose.
2.If washer/dryer will be moved during freezing weather, follow “Winter Storage Care” directions before moving.
3.Disconnect drain hose from drain system and from back of washer/dryer.
4. Unplug power cord.
5.Place inlet hose and drain hose inside drum.
6.Bundle power cord with a rubber band or cable tie
to keep it from hanging onto the ground.
IMPORTANT: Call for service to install new transport bolts. Do not reuse transport bolts. Washer/dryer must be transported in the upright position. To avoid structural damage to your washer/dryer, it must be properly set up for relocation by a certified technician.
REINSTALLING/USING
WASHER/DRYER AGAIN
To reinstall washer/dryer after non-use, vacation, winter storage, or moving:
1. Refer to “Installation Instructions” to locate, level, and connect washer/dryer.
2. Before using again, run washer/dryer through the following recommended procedure:
To use washer/dryer again:
1. Flush water pipes and hose. Reconnect water inlet hose. Turn on water faucet.
2. Plug in washer/dryer or reconnect power.
3. Run washer/dryer through Heavy Duty wash cycle to clean washer/dryer and remove antifreeze, if used. Use only HE detergent. Use half the manufacturer’s recommended amount for a medium-size load.
18

INSTALLATION INSTRUCTIONS
Installation Requirements
Tools and Parts
Gather required tools and parts before starting installation.
Tools needed:
Adjustable or open-end wrenches 3/8" (10 mm) and 1/2" (13 mm)
Ruler or measuring tape
3/8" (10 mm) socket wrench
Parts supplied:
Level
Pliers that open to 19⁄16" (39.5 mm)
NOTE: All parts supplied for installation are in the washer/ dryer drum. Inlet hoses and washers are not included.
Optional tools:
|
|
|
Flashlight |
|
Bucket |
Alternate parts: (Not supplied with washer/dryer)
Your installation may require additional parts. To order, please refer to toll-free numbers on the back page of this manual.
Available accessory:
nAn optional matching pedestal is available to raise your washer/dryer to a more comfortable working height.
To order, see the “Accessories” section on page 4, call the dealer from whom you purchased your washer/dryer, or refer to the “Assistance or Service” section.
|
|
|
Cable tie |
|
U-shaped hose form |
19
Location Requirements
Proper installation is your responsibility. Check code requirements. Some codes limit, or do not permit, installing washer/dryer in garages, closets, mobile homes, or sleeping
quarters. Contact your local building inspector.
24" (610 mm)
331/4" Min.
(845 mm)
333/4" Max.
(857 mm)
You will need:
nA separate 30 amp circuit.
nA grounded electrical outlet located within 2 ft. (610 mm)
of either side of washer/dryer. See “Electrical Requirements.”
nWater faucet located within 4 ft (1.2 m) of water fill valve on washer/dryer, and water pressure of 20–100 psi (137.9–689.6 kPa).
nA level floor with maximum slope of 1" (25 mm) under entire washer/dryer. Installing on carpet or surfaces with foam backing is not recommended.
nFloor must support washer/dryer’s total weight (with water and load) of 400 lbs (180 kgs).
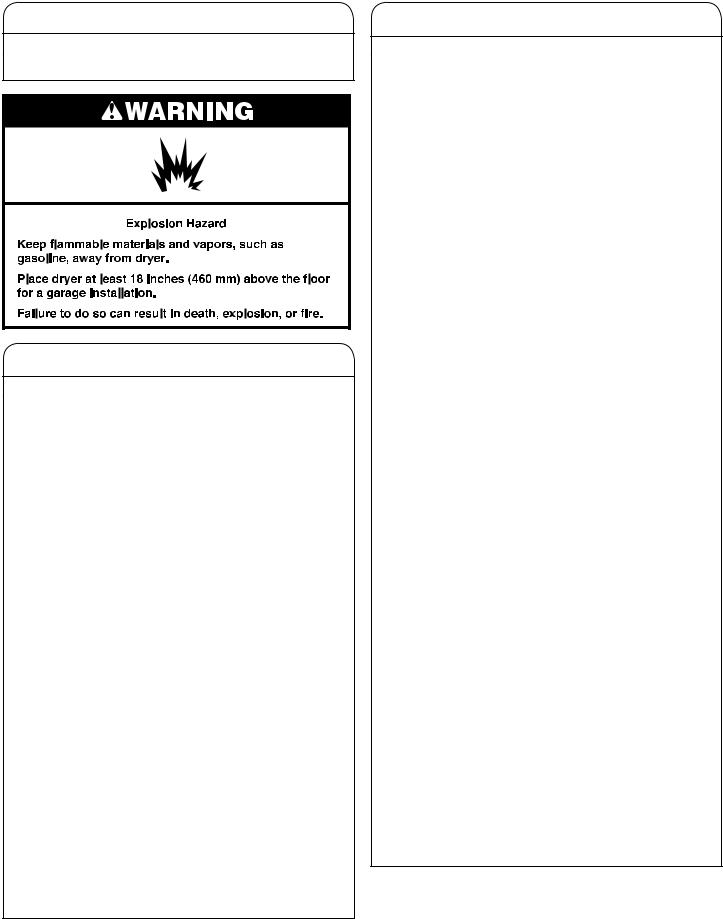
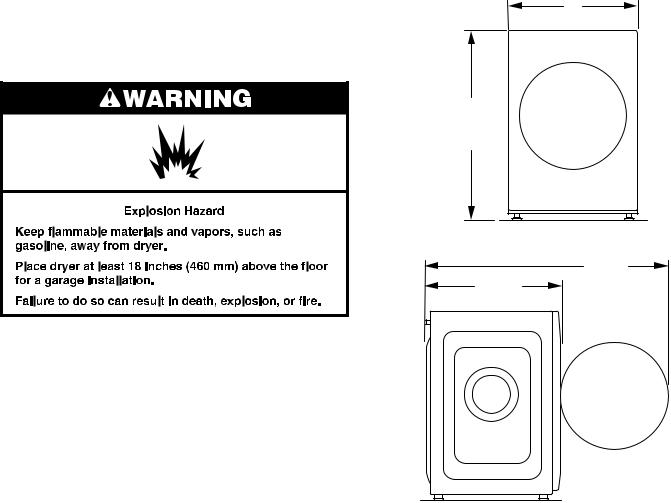
nFor garage installation, place washer/dryer at least 18" (460 mm) above floor. If using a pedestal, you will need 18" (460 mm) to bottom of washer/dryer.
IMPORTANT: Do not install, store, or operate washer/dryer where it will be exposed to weather or in temperatures below 32°F (0°C). Water remaining in washer/dryer after use may cause damage in low temperatures. See “All-In-One Washer/Dryer Maintenance” for winterizing information.
4815/16"
(1243 mm)
28" (675 mm)
All dimensions show recommended spacing allowed, except for closet door ventilation openings which are the minimum required.
For each arrangement, consider allowing more space for ease of installation and servicing, and spacing for companion appliances and clearances for walls, doors, and floor moldings.
Space must be large enough to allow door to fully open. Add spacing of 1" (25 mm) on all sides of washer/dryer to reduce noise transfer. If a closet door or louvered door is installed, top and bottom air openings in door are required.
20
Location Requirements (cont.)
Custom cabinet installation: |
Closet installation: |
|
3" |
|
12" |
(76 mm) |
48 in.2 min. |
(305 mm) |
|
|
|
(310 cm2) |
12"9" (229305 mm)
24 in.2 min.
(155 cm2)
|
|
|
3" |
4" |
|
4" |
(76 mm) |
|
(102 mm) |
|
|
(102 mm) |
|
1" |
|
|
|
3" |
|
1" |
3" |
(25 mm) |
(76 mm) |
(25 mm) |
(76 mm) |
|
|
NOTE: The 12" minimum space above the washer/dryer NOTE: The 12" minimum space above the washer/dryer is required for use of the Load & Go™ bulk dispenser.
is required for use of the Load & Go™ bulk dispenser.
21

Drain System
Drain system can be installed using a floor drain, wall standpipe, floor standpipe, or laundry tub. Select method you need.
IMPORTANT: To avoid siphoning, only 41⁄2" (114 mm) of drain hose should be inside standpipe. Always secure drain hose with cable tie.
Floor standpipe drain system
41./52" |
mMax. 489" |
|
(114 mm) |
||
(1219(125 cm)mm) |
||
|
||
|
mMin. 3024" |
|
|
(7602 cm)mm) |
Minimum diameter for a standpipe drain: 2" (51 mm). Minimum carry-away capacity: 17 gal. (64 L) per minute. A 2" (51 mm) diameter to 1" (25 mm) diameter Standpipe Adapter Kit is available. Top of standpipe must be at least 24" (60 cm) high; install no higher than 49" (125 cm) from bottom of washer/dryer. If you have an overhead sewer and need to pump higher than 96 inches, a sump pump and associated hardware are needed. See “Assistance or Service.”
Wall standpipe drain system
Laundry tub drain system
41/2"
(114 mm)
Mmax. 49"
(1250 cm)mm)
Mmin. 24"
((60 cm))
Minimum capacity: 20 gal. (76 L). Top of laundry tub must be at least 24" (60 cm) above floor; install no higher than 49" (125 cm) from bottom of washer/dryer.
Floor drain system
41/2"
(114 mm)
mMax. 49" |
(1250 cm)mm) |
mMin. 24" |
(60mcm)) |
Floor drain system requires a Siphon Break Kit, two Connector Kits, and an Extension Drain Hose that may be purchased separately. See “Assistance or Service.” Minimum siphon break height: 28" (710 mm) from bottom of washer/dryer (additional hoses may be needed).
See requirements for floor standpipe drain system.
22

Unpacking Washer/Dryer |
2. Remove four transport bolts |
|
from washer/dryer |
NOTE: To avoid floor damage, set washer/dryer onto cardboard before moving it.
1. Move washer/dryer |
48" |
(1.2 m) |
IMPORTANT: It is necessary to remove all shipping materials for proper operation and to avoid excessive noise from washer/dryer.
Move washer/dryer to within 48" (1.2 m) of its final location. It must be in a fully upright position.
Loosen the four transport bolts with a 3/8" (10 mm) wrench. Once each bolt is loose, wiggle and completely pull them out of the washer/dryer, along with all four shipping plugs.
Transport bolt
Shipping plug
IMPORTANT: It is necessary to remove transport bolts and shipping plugs for proper operation and to avoid excessive noise from washer/dryer.
23
Electrical Requirements – U.S.A. Only
It is your responsibility:
■■ To contact a qualified electrical installer.
■■ To be sure that the electrical connection is adequate and in conformance with the National Electrical Code, ANSI/
NFPA 70 – latest edition and all local codes and ordinances.
The National Electrical Code requires a 4-wire power supply connection for homes built after 1996, dryer circuits involved in remodeling after 1996, and all mobile home installations.
A copy of the above code standards can be obtained from: National Fire Protection Association, One Batterymarch Park, Quincy, MA 02269.
■■ To supply the required 3- or 4-wire, single-phase, 120/240 volt, 60 Hz, AC only electrical supply (or 3- or 4-wire, 120/208 volt electrical supply, if specified on the serial/rating plate) on a separate 30 amp circuit, fused on both sides of the line. Connect to an individual branch
circuit. Do not have a fuse in the neutral or grounding circuit. ■■ Do not use an extension cord.
■■ If codes permit and a separate ground wire is used, it is recommended that a qualified electrician determine that the ground path is adequate.
Electrical Connection
To properly install your washer/dryer, you must determine the type of electrical connection you will be using and follow the instructions provided for it here.
■■ This washer/dryer is manufactured ready to install with a 3-wire electrical supply connection. A neutral ground
conductor (white wire) is provided between the power supply neutral connection (center terminal) and the washer/dryer external grounding point (green screw). If the washer/dryer is installed with a 4-wire electrical supply connection, one end of the neutral ground conductor must be removed from the external ground connector (green screw), and secured under the neutral terminal (center screw) of the terminal block. When both ends of the neutral ground conductor are secured under the neutral terminal (center or white wire) of the terminal block, the washer/dryer cabinet is isolated from the neutral conductor. The green ground wire of the 4-wire power cord must be secured to the washer/dryer cabinet with the green ground screw.
■■ If local codes do not permit the connection of a neutral ground wire to the neutral wire, see “Optional External Ground 3-wire connection.”
■■ A 4-wire power supply connection must be used when the appliance is installed in a location where grounding through the neutral conductor is prohibited. Grounding through the neutral is prohibited for (1) new branch-circuit installations after 1996, (2) mobile homes, (3) recreational vehicles, and
(4) areas where local codes prohibit grounding through the neutral conductors.
Power supply cord
Use a UL Listed power supply cord kit marked for use with clothes dryers. The kit should contain:
■■ A UL Listed 30 amp power supply cord, rated 120/240 volt minimum. The cord should be type SRD or SRDT and be at least 5 ft. (1.5 m) long. The wires that connect to
the washer/dryer must end in ring terminals or spade terminals with upturned ends.
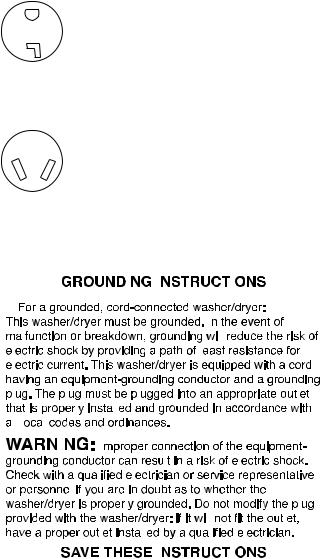
If your outlet looks like this:
|
|
|
|
|
|
|
|
|
|
|
|
|
|
Then choose a 4-wire power supply cord with |
||||||||||||||||
|
|
|
|
|
|
|
|
|
|
|
|
|
|
ring or spade terminals and UL Listed strain |
||||||||||||||||
|
|
|
|
|
|
|
|
|
|
|
|
|
|
relief. The 4-wire power supply cord, at least |
||||||||||||||||
|
|
|
|
|
|
|
|
|
|
|
|
|||||||||||||||||||
|
|
|
|
|
|
|
|
|
|
|
|
|
|
5 ft. (1.5 m) long, must have four 10-gauge |
||||||||||||||||
|
|
|
|
|
|
|
|
|
|
|
|
|
|
copper wires and match a 4-wire receptacle |
||||||||||||||||
|
|
|
|
|
|
|
|
|
|
|
|
|
|
of NEMA-Type 14-30R. The ground wire |
||||||||||||||||
|
|
4-wire |
|
|
(ground conductor) may be either green |
|||||||||||||||||||||||||
receptacle |
|
|
or bare. The neutral conductor must be |
|||||||||||||||||||||||||||
|
(14-30R) |
|
|
identified by a white cover. |
||||||||||||||||||||||||||
|
|
|
|
|
|
|
|
|
|
|
|
|
|
Then choose a 3-wire power supply cord with |
||||||||||||||||
|
|
|
|
|
|
|
|
|
|
|
|
|
|
ring or spade terminals and UL Listed strain |
||||||||||||||||
|
|
|
|
|
|
|
|
|
|
|
|
|
|
relief. The 3-wire power supply cord, at least |
||||||||||||||||
|
|
|
|
|
|
|
|
|
|
|
|
|
|
5 ft. (1.5 m) long, must have three 10-gauge |
||||||||||||||||
|
|
|
|
|
|
|
|
|
|
|
|
|
|
copper wires and match a 3-wire receptacle |
||||||||||||||||
|
|
|
3-wire |
|
|
of NEMA-Type 10-30R. |
||||||||||||||||||||||||
|
|
|
|
|
|
|
|
|
|
|
|
|
|
|
|
|
|
|
|
|
|
|||||||||
receptacle |
|
|
|
|
|
|
|
|
|
|
|
|
|
|
|
|
|
|
|
|||||||||||
|
(10-30R) |
|
|
|
|
|
|
|
|
|
|
|
|
|
|
|
|
|
|
|
||||||||||
|
|
|
|
|
|
|
|
|
|
|
|
|
|
|
|
|
|
|
|
|
|
|
|
|
|
|
|
|
|
|
|
|
|
|
|
|
|
|
|
|
|
|
|
|
|
|
|
|
|
|
|
|
|
|
|
|
|
|
|
|
|
|
|
|
|
|
|
|
|
|
|
|
|
|
|
|
|
|
|
|
|
|
|
|
|
|
|
|
|
|
|
|
|
|
|
|
|
|
|
|
|
|
|
|
|
|
|
|
|
|
|
|
|
|
|
|
|
|
|
|
|
|
|
|
|
|
|
|
|
|
|
|
|
|
|
|
|
|
|
|
|
|
|
|
|
|
|
|
|
|
|
|
|
|
|
|
|
|
|
|
|
|
|
|
|
|
|
|
|
|
|
|
|
|
|
|
|
|
|
|
|
|
|
|
|
|
|
|
|
|
|
|
|
|
|
|
|
|
|
|
|
|
|
|
|
|
|
|
|
|
|
|
|
|
|
|
|
|
|
|
|
|
|
|
|
|
|
|
|
|
|
|
|
|
|
|
|
|
|
|
|
|
|
|
|
|
|
|
|
|
|
|
|
|
|
|
|
|
|
|
|
|
|
|
|
|
|
|
|
|
|
|
|
|
|
|
|
|
|
|
|
|
|
|
|
|
|
|
|
|
|
|
|
|
|
|
|
|
|
|
|
|
|
|
|
|
|
|
|
|
|
|
|
|
|
|
|
|
|
|
|
|
|
|
|
|
|
|
|
|
|
|
|
|
|
|
|
|
|
|
|
|
|
|
|
|
|
|
|
|
|
|
|
|
|
|
|
|
|
|
|
|
|
|
|
|
|
|
|
|
|
|
|
|
|
|
|
|
|
|
|
|
|
|
|
|
|
|
|
|
|
|
|
|
|
|
|
|
|
|
|
|
|
|
|
|
|
|
|
|
|
|
|
|
|
|
|
|
|
|
|
|
|
|
|
|
|
|
|
|
|
|
|
|
|
|
|
|
|
|
|
|
|
|
|
|
|
|
|
|
|
|
|
|
|
|
|
|
|
|
|
|
|
|
|
|
|
|
|
|
|
|
|
|
|
|
|
|
|
|
|
|
|
|
|
|
|
|
|
|
|
|
|
|
|
|
|
|
|
|
|
|
|
|
|
|
|
|
|
|
|
|
|
|
|
|
|
|
|
|
|
|
|
|
|
|
|
|
|
|
|
|
|
|
|
|
|
|
|
|
|
|
|
|
|
|
|
|
|
|
|
|
|
|
|
|
|
|
|
|
|
|
|
|
|
|
|
|
|
|
|
|
|
|
|
|
|
|
|
|
|
|
|
|
|
|
|
|
|
|
|
|
|
|
|
|
|
|
|
|
|
|
|
|
|
|
|
|
|
|
|
|
|
|
|
|
|
|
|
|
|
|
|
|
|
|
|
|
|
|
|
|
|
|
|
|
|
|
|
|
|
|
|
|
|
|
|
|
|
|
|
|
|
|
|
|
|
|
|
|
|
|
|
|
|
|
|
|
|
|
|
|
|
|
|
|
|
|
|
|
|
|
|
|
|
|
|
|
|
|
|
|
|
|
|
|
|
|
|
|
|
|
|
|
|
|
|
|
|
|
|
|
|
|
|
|
|
|
|
|
|
|
|
|
|
|
|
|
|
|
|
|
|
|
|
|
|
|
|
|
|
|
|
|
|
|
|
|
|
|
|
|
|
|
|
|
|
|
|
|
|
|
|
|
|
|
|
|
|
|
|
|
|
|
|
|
|
|
|
|
|
|
|
|
|
|
|
|
|
|
|
|
|
|
|
|
|
|
|
|
|
|
|
|
|
|
|
|
|
|
|
|
|
|
|
|
|
|
|
|
|
|
|
|
|
|
|
|
|
|
|
|
|
|
|
|
|
|
|
|
|
|
|
|
|
|
|
|
|
|
|
|
|
|
|
|
|
|
|
|
|
|
|
|
|
|
|
|
|
|
|
|
|
|
|
|
|
|
|
|
|
|
|
|
|
|
|
|
|
|
|
|
|
|
|
|
|
|
|
|
|
|
|
|
|
|
|
|
|
|
|
|
|
|
|
|
|
|
|
|
|
|
|
|
|
|
|
|
|
|
|
|
|
|
|
|
|
|
|
|
|
|
|
|
|
|
|
|
|
|
|
|
|
|
|
|
|
|
|
|
|
|
|
|
|
|
|
|
|
|
|
|
|
|
|
|
|
|
|
|
|
|
|
|
|
|
|
|
|
|
|
|
|
|
|
|
|
|
|
|
|
|
|
|
|
|
|
|
|
|
|
|
|
|
|
|
|
|
|
|
|
|
|
|
|
|
|
|
|
|
|
|
|
|
|
|
|
|
|
|
|
|
|
|
|
|
|
|
|
|
|
|
|
|
|
|
|
|
|
|
|
|
|
|
|
|
|
|
|
|
|
|
|
|
|
|
|
|
|
|
|
|
|
|
|
|
|
|
|
|
|
|
|
|
|
|
|
|
|
|
|
|
|
|
|
|
|
|
|
|
|
|
|
|
|
24
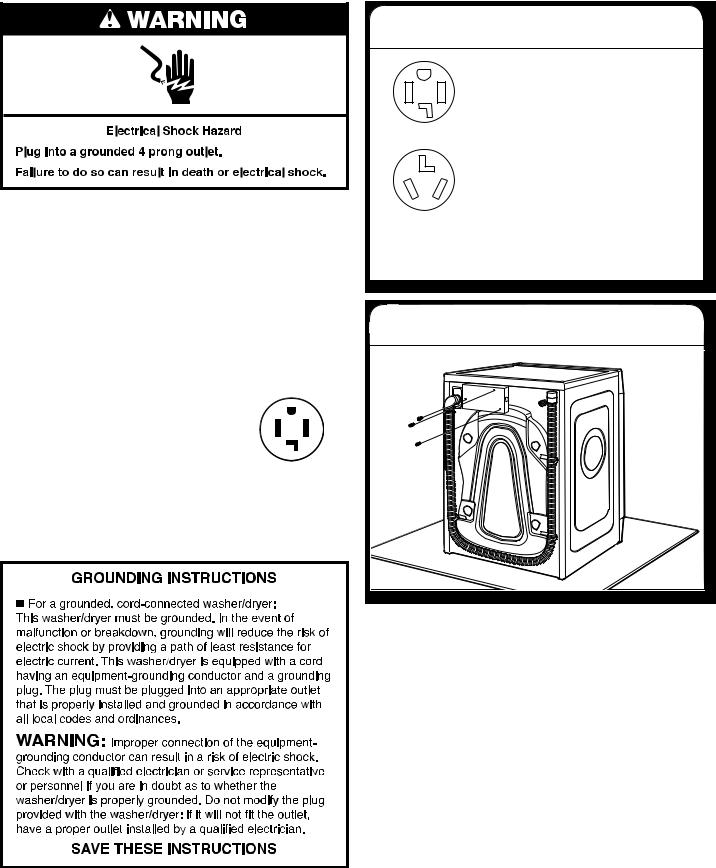
Electrical Requirements –
Canada Only
It is your responsibility:
■■ To contact a qualified electrical installer.
■■ To be sure that the electrical connection is adequate and in conformance with the Canadian Electrical Code, C22.1 – latest edition and all local codes. A copy of the above codes standard may be obtained from: Canadian Standards Association, 178 Rexdale Blvd., Toronto, ON M9W 1R3 CANADA.
■■ To supply the required 4-wire, single-phase, 120/240 volt, 60 Hz., AC only electrical supply on a separate 30 amp circuit, fused on both sides of the line. A time-delay fuse
or circuit breaker is recommended. Connect to an individual branch circuit.
■■ This washer/dryer is equipped with a CSA International Certified Power Cord intended to be plugged into a standard 14-30R wall receptacle. The cord is 5 ft. (1.5 m) in length. Be sure wall receptacle is within reach of washer/dryer’s final location.
■■ Do not use an extension cord.
If using a replacement power supply cord, it is recommended that you use Power Supply Cord Replacement Part Number 8579325. For further information, please reference the “Assistance or Service” section.
Electrical Installation – U.S.A. Only
Before you start: disconnect power.
1. Choose electrical connection type
Power supply cord 4-wire receptacle (NEMA-Type 14-30R):
Go to “Power Supply Cord Connection.”
Power supply cord 3-wire receptacle (NEMA Type 10-30R):
Go to “Power Supply Cord Connection.”
NOTE: If local codes do not permit connection of a cabinet-ground conductor to neutral wire, go to “Optional External Ground for 3-Wire Connection.”
2. Remove terminal block cover
Remove hold-down screws and terminal block cover.
25

Power Supply Cord Connection
 WARNING
Fire Hazard
Use a new UL listed 30 amp power supply cord. Use a UL listed strain relief.
Disconnect power before making electrical connections.
Connect neutral wire (white or center wire) to center terminal.
Ground wire (green or bare wire) must be connected to green ground connector.
Connect remaining 2 supply wires to remaining 2 terminals.
Securely tighten all electrical connections.
Failure to do so can result in death, fire, or electrical shock.
4-Wire Power Supply Cord Strain Relief:
IMPORTANT: Use the strain relief supplied with the washer/dryer.
Attach power supply cord to strain relief
Put power supply cord through the strain relief. Be sure that the wire insulation on the power supply cord is inside the strain relief. Do not further tighten strain relief screws at this point.
If your outlet looks like this:
Power supply cord 4-wire receptacle (NEMA-Type 14-30R):
Go to “4-Wire Power Supply Cord Connection.”
Power supply cord 3-wire receptacle (NEMA-Type 10-30R):
Go to “3-Wire Power Supply Cord Connection.”
4-Wire Power Supply Cord Connection
IMPORTANT: A 4-wire connection is required for mobile homes and where local codes do not permit the use
of 3-wire connections.
4-wire receptacle (NEMA-type 14-30R)
Spade terminals with upturned ends
4 prong plug
Ring terminals
1. Prepare to connect neutral wire
A |
B |
Remove center terminal block screw (A) and green external ground conductor screw (B).
2. Connect neutral wire
A |
C |
Loop white ground jumper wire back on itself and connect it and neutral wire (white or center) (C) of power supply cord under center terminal block screw (A). Tighten screw.
26
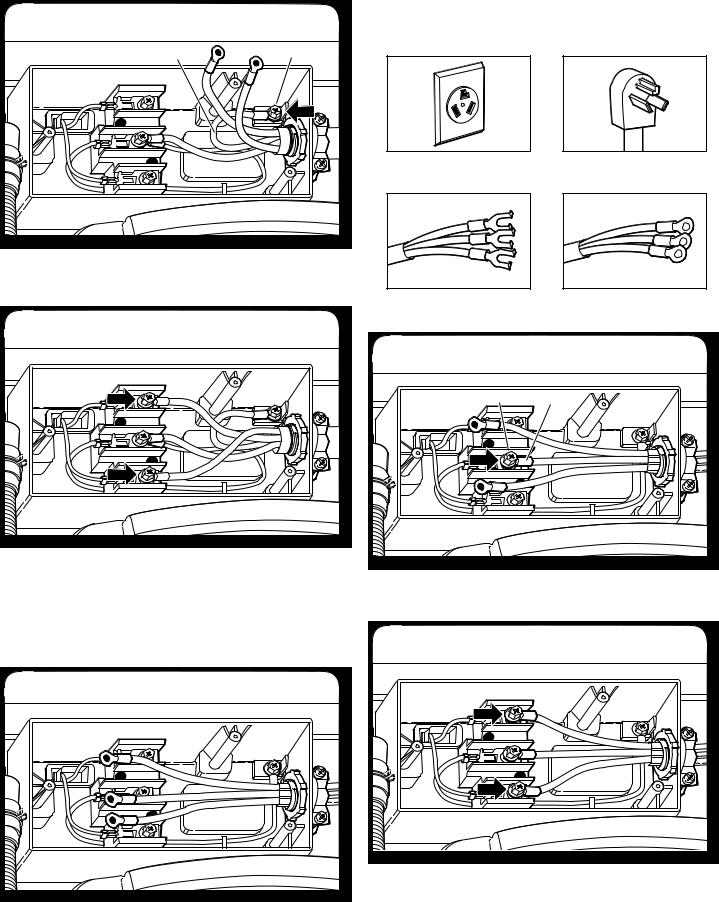
3. Connect ground wire
D |
B |
Connect ground wire (D) (green or bare) of power supply cord under green external ground conductor screw (B). Tighten screw.
4. Connect remaining wires
Connect remaining wires under outer terminal block screws. Tighten screws and also tighten strain relief screws. Finally, install terminal box cover and secure with the three screws. Now, go to “Route Drain Hose.”
3-Wire Power Supply Cord Connection
Use where local codes permit connecting cabinet-ground conductor to neutral wire.
3-wire receptacle (NEMA-type 10-30R)
Spade terminals with upturned ends
3 prong plug
Ring terminals
1. Connect neutral (center) wire
A |
C |
Connect neutral (center) wire (C) of power supply cord under center terminal block screw (A). Tighten screw.
3-Wire Power Supply Cord Strain Relief:
IMPORTANT: Use the strain relief supplied with the washer/dryer.
Attach power supply cord to strain relief
Put power supply cord through the strain relief. Be sure that the wire insulation on the power supply cord is inside the strain relief. Do not further tighten strain relief screws at this point.
2. Connect remaining wires
Connect remaining wires under outer terminal block screws. Tighten screws and also tighten strain relief screws. Finally, install terminal block cover and secure with the three screws. Now, go to “Route Drain Hose.”
27
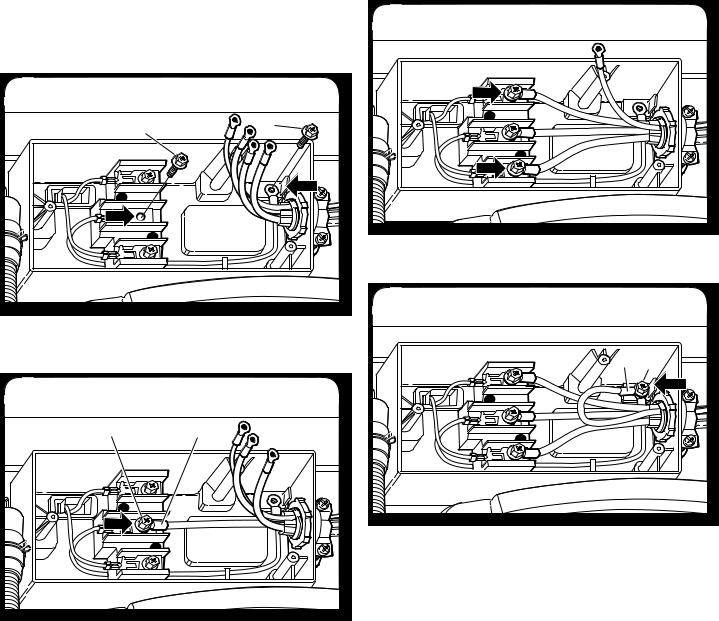
Optional External Ground for 3-Wire Connection
IMPORTANT: You must verify with a qualified electrician that this grounding method is acceptable before connecting.
1. Prepare to connect neutral wire
A |
B |
Remove center terminal block screw (A) and green external ground conductor screw (B).
2. Connect neutral wire
A |
C |
Connect neutral wire (white or center) (C) of power supply cord or cable under center terminal block screw (A). Tighten screw.
3. Connect remaining wires
Place ends of remaining wires under outer terminal block screws. Tighten screws and tighten strain relief.
4. Connect external ground wire
D |
B |
Connect a separate copper ground wire (D) under the green external ground conductor screw (B) to an adequate ground. Finally, install terminal block cover and secure with the three screws. Now, go to “Route Drain Hose.”
28
 Loading...