


Whirlpool WF7008D01, WF7010S00, WF9600S00, WF5905D00, WF7000Q00 User Manual
...ESTUFAS A GAS 30”
Instructivo de Instalación, Uso y
Cuidado
30” FS GAS RANGE
Installation, Use and Care guide
Ampara los siguientes modelos:
Covers the next models:
WF5905
WF7000
WF7008
WF7010
WF9600
SWF7000
No. Parte W10235308 Rev. B |
STM02621 Rev. B |
48
ÍNDICE
Bienvenida . |
. |
. |
. |
. |
. |
. |
3 |
|
Partes y características . |
. |
. |
. |
. |
4 |
|||
Instalación . |
. |
. |
. |
. |
. |
. |
6 |
|
Conexión |
. |
. |
. |
. |
. |
. |
. |
7 |
Verificación de funcionamiento . |
. |
. |
. |
8 |
||||
Ajuste de flamas . |
. |
. |
. |
. |
. |
11 |
||
Uso de los accesorios y características . |
. |
. |
15 |
|||||
Cuidado de la estufa |
. |
. |
. |
. |
. |
20 |
||
Diagramas eléctricos |
. |
. |
. |
. |
. |
22 |
||
Póliza de garantía . |
. |
. |
. |
. |
. |
24 |
||
Formato de identificación . |
. |
. |
. |
. |
24 |
|||
Ayuda o servicio técnico . |
. |
. |
. |
. |
26 |
|||
TABLE OF CONTENTS
Welcome |
. |
. |
. |
. |
. |
. |
. |
27 |
Parts and features . |
. |
. |
. |
. |
. |
28 |
||
Installation . |
. |
. |
. |
. |
. |
. |
30 |
|
Connection . |
. |
. |
. |
. |
. |
. |
31 |
|
Verify operation |
. |
. |
. |
. |
. |
. |
32 |
|
Flame adjustment . |
. |
. |
. |
. |
. |
34 |
||
Use of features and accessories . |
. |
. |
. |
38 |
||||
Range care . |
. |
. |
. |
. |
. |
. |
43 |
|
Electric diagrams . |
. |
. |
. |
. |
. |
45 |
||
Warranty |
. |
. |
. |
. |
. |
. |
. |
46 |
Identification format |
|
. |
. |
. |
. |
. |
46 |
|
Assistance or service |
. |
. |
. |
. |
. |
48 |
||
|
|
|
|
|
|
|
|
|
2 |
47 |

¡Felicidades por la compra de su nueva estufa!
Acaba de adquirir un producto desarrollado con las más avanzadas técnicas de diseño y fabricación.
Le sugerimos que antes de usar su estufa lea cuidadosamente las instrucciones de este manual. Consérvelo, ya que la información contenida en el mismo será importante para el buen funcionamiento de su estufa durante muchos años.
46 |
3 |

PARTES Y CARACTERÍSTICAS |
|
ELECTRIC DIAGRAMS |
A.Respaldo
B.Parrillas superiores
C.Quemadores súper
D.Quemadores estándar
E.Encendido electrónico para quemadores superiores
F.Perillas
G.Puerta de horno con ventana extra grande
H.Termostato controlado por perilla
I.Reloj y temporizador
J.Cavidad para asar
K.Luz en el horno.
L.Parrillas deslizables
PRODUCT MANUFACTURED BY:
Industrias Acros Whirlpool S.A. de C.V., Unidad Celaya
Carretera Panamericana Km. 280 C.P. 38020, Celaya, GTO
Phone: 01 (461) 6 18 55 00
4 |
45 |

Surface burners
To keep the surface burners in food conditions, some periodical cleaning is needed. Follow these steps to do it:
1.Remove the surface grates.
2.Take off the cap and the burner, wash them with soapy water and rinse them thoroughly. Let them dry completely.
3.Replace the surface burners on their original position and place the caps, making sure the alignment pins are properly aligned with the burner cap.
Auto-slide out oven racks
A.Incorrect
B.Correct
If the range has auto-slide out oven racks, they can be removed completely together with the side supports and can be cleaned easily. Follow the steps on next page to remove them and replace them:
1. Open the oven door and remove the oven racks, the racks supports can be removed separately.
2. Release the end of the movement rod that is hooked on the oven door.
3. Slide out, one at a time, the racks supports passing the metal rollers through the opening on the side rail.
4.Remove the movement rod from the rack supports. Identify which support is right side and which support is left side.
5.When the supports need to be placed again, insert the movement rod on the racks support.
6.Install, one at a time, the racks support passing the metal rollers through the opening on the side rail and push it back.
7.Pull the movement rods until their end can be hooked on the oven door.
8.Place the oven racks on the desired level beginning with the rear edge and finishing with the front edge. Close the oven door.
44
PARTES Y CARACTERÍSTICAS
A.Capelo
B.Parrillas superiores
C.Quemadores súper
D.Quemadores estándar
E.Quemador “Multiflame3” (algunos modelos)
F.Encendido electrónico para quemadores superiores
G.Perillas
H.Puerta de horno con ventana extra grande
I.Termostato controlado por perilla
J.Parrillas de horno autodeslizables
K.Reloj y temporizador, con control de asador (algunos modelos)
L.Asador eléctrico alto (algunos modelos)
M.Cavidad para asar (modelos sin asador eléctrico alto)
N.Luz en el horno
O.Válvula de corte de gas (algunos modelos)
5
Características eléctricas nominales para modelos SIN asador eléctrico
Voltaje: 127 V ~ ± 10% Frecuencia: 50/60 Hz |
Corriente: 1,0 A Max |
Características eléctricas nominales para modelos CON asador eléctrico
Voltaje: 127 V ~ ± 10% Frecuencia: 50/60 Hz |
Corriente: 15,0 A Max |
Recomendaciones:
•Instale su estufa en un lugar protegido de las inclemencias del tiempo y sobre una superficie plana y resistente para soportar su peso.
•No instale su estufa sobre alfombra o algún material inflamable. Si el piso es sintético, verifique que éste material soporte una temperatura de al menos 95°C sin deformarse.
•No permita que la usen niños o personas que no conozcan su funcionamiento.
•Proporciónele el mantenimiento adecuado.
•Utilice la estufa sólo en labores del hogar. No es un aparato de uso comercial.
INSTALACIÓN
•La instalación apropiada es su responsabilidad, por lo cual es recomendable que sea realizada por un técnico calificado o un técnico de Whirlpool Service.
•Retire todos los elementos de empaque y coloque los accesorios de la estufa.
•Seleccione la mejor ubicación para su estufa, no debe quedar expuesta a corrientes de aire y debe tener espacio suficiente para abrir la puerta del horno.
•No instale gabinetes o muebles de cocina encima de la estufa.
•Si instala campana extractora, colóquela a 61 cm como mínimo desde la cubierta de la estufa.
•Si su estufa cuenta con accesorios eléctricos, colóquela cerca de un tomacorriente de pared.
•Esta estufa de gas está equipada con un enchufe de tres puntas con contacto a tierra para protección contra riesgo de electrocución. Debe enchufarse directamente a un tomacorriente debidamente aterrizado.
•No corte ni quite la punta para conexión a tierra del enchufe. No utilice extensiones eléctricas o contactos múltiples.
6
6.To cancel the function press the ADJUST pads until the OFF word is shown in the display. Another option for cancelling is to press the BROIL pad while in the display is shown the function, the remaining time will appear; press again the BROIL pad to enter the “time set up” function and press again the BROIL pad until the display shows 0:00, meaning with this that the function has been cancelled.
The BROIL function can be protected from an unwanted start or program changes. After the broil function has been defined, press the CLOCK pad for more than 3 seconds. This is the “Lock” set and allows the function to finish the cycle without interruptions. To unlock the control, press again the CLOCK pad for more than 3 seconds.
Lower drawer (models WITH electric broil element)
When the range is equipped with an electric broil element, the lower cavity will be available only for keeping accessories and these must be taken out before using the oven.
Lower broiler (models WITHOUT electric broil element)
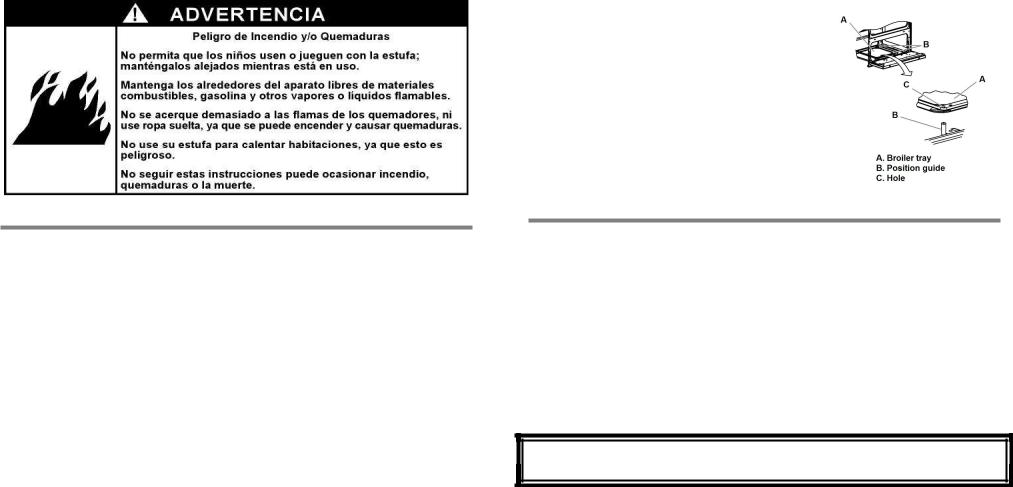
When your range DOES NOT HAS an electric broil element, it will be equipped with broiler below the oven door. Before using it, place the broiler tray on the 2 pins, as shown in the pictures.
For the broil feature to work, the oven burner should be turned on according to the instructions on “Verify operation”, “Oven burner” section.
When the oven burner is lit, turn the “Oven control” knob to its maximum flame position which is 235°C for ranges with electronic ignition thermostat or 260°C for ranges with manual ignition thermostat.
RANGE CARE
To keep the range in good performance conditions, it is needed to conduct cleaning procedures using water, soap and a soft cloth or sponge. Do not use wire fiber as it could permanently scratch the enamel of the range.
Before cleaning the range, make sure all knobs are off and unplug the power cord from the electrical wall outlet. Assure the oven and cooktop are cool.
On a regular basis, clean the gap between the manifold panel and the cooktop. The surface grates, as well as the burners and burner caps, can be cleaned with soap and water.
The range has the Continuous Cleaning System in the oven (rough finish inside the oven cavity) which burns out the grease spills on the walls every time the baking feature is used.
IMPORTANT
Do not use caustic soda or clearing agents which contain it to clean the range.
Failure on following the above will permanently damage the surface where it is applied.
43
When the timer finalizes the cycle, the control will sound with long spaced beeps, press any pad to stop the beeping and the display will show the time of day.
Electric broiler function (BROIL) (some models)
This function has 4 functions:
•dES – defrost
•PLA – warm dished/plates
•CAL – keep dishes warm
•GrA – browning and/or melting
•OFF – Off
The legend “End” will appear on the display when either the BROIL or TIMER functions have ended. To program the broil function, follow these steps:
1.Open the oven door and place the oven rack on the suggested position (see table), considering level 1 is the highest position. Place the dish over the rack and close the oven door.
2.Push the BROIL pad, the control will show OFF on the display and the indicator light will turn on (listed H).
3.Press the ADJUST pads to select one of the 4 functions.
4.When the function has been defined, press again the BROIL pad and proceed to establish the time for the function (each function has a maximum programming time, if you wish to set the function for a larger period of time, the function needs o be set up again):
Function |
Food |
Recommended |
Oven rack |
|
time |
position |
|
||
|
|
|
||
|
Chicken breast (500 to 600 g) |
2 – 2:15 hr |
Level 3 |
|
Defrosting |
Raw meat (400 to 500 g) |
1 – 1:30 hr |
Level 3 |
|
|
Fish scallops (350 to 450 g) |
45 min – 1hr |
Level 3 |
|
|
|
|
|
|
Keep dishes |
Crunch “tacos” |
30 – 45 min |
Level 2 |
|
Poultry stews |
45 min |
Level 2 |
|
|
warm |
|
|||
Pasta |
35 min |
Level 2 |
|
|
|
|
|||
|
|
|
|
|
Browning |
Melting cheese on dishes |
9 min |
Level 3 |
|
and/or |
Melting cheese on bread |
8 – 12 min |
Level 2 |
|
|
||||
|
||||
meeting |
Pizza |
6 – 10 min |
Level 2 |
|
|
|
|
|
|
|
|
|
|
|
|
|
|
|
|
5.Use the ADJUST pads to select the time and wait for 5 seconds, the function will begin working and will be showed in the display. When the function is in progress, the remaining time can be verified by pressing the BROIL pad.
a.IMPORTANT: Cook the meat or poultry immediately alter defrosting.
b.The function PLA allows keep dishes warm before serving them and helps keep them warm a longer time. The dishes are adequately heated up after 30 or 40 minutes. IMPORTANT: Do not use plastic or carton plates, use only plates that resist high temperatures (glass, ceramic, etc.). Use as oven racks as you need to warm all the plates at once.
c.When using the function CAL for gravies or juicy stews, cover the dish with aluminum foil to avoid dryness. IMPORTANT: Do not use this function for out of the fridge dishes, as they might not warm correctly.
d.When using a function more than one time, the recommended times might be reduced, as the oven will be preheated.
42
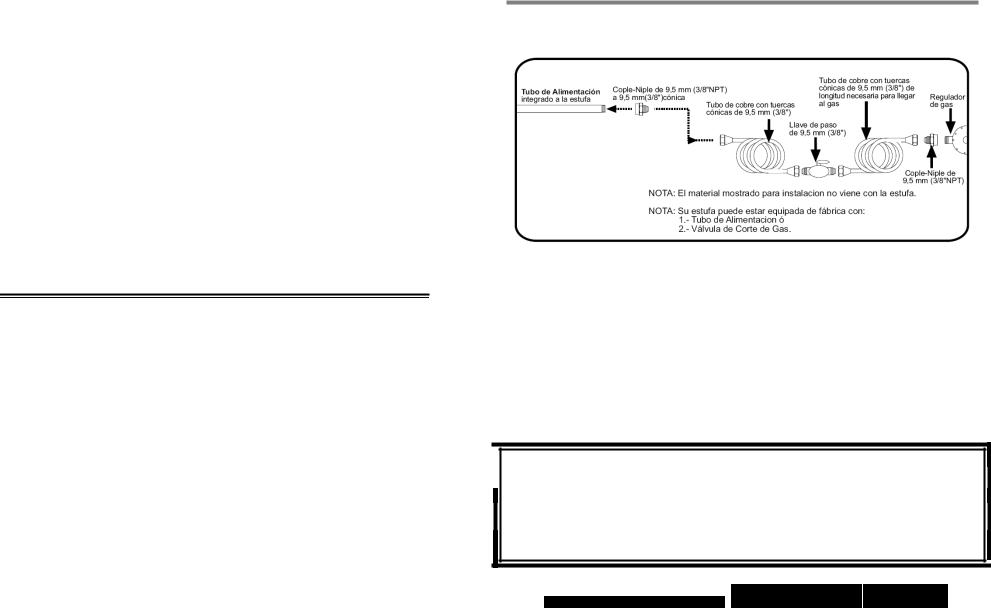
CONEXIÓN
Conexión de la estufa a la línea de gas
1.Para conectar su estufa utilice el material especificado en la figura de abajo:
2.Verifique que no existan fugas vertiendo espuma de jabón en las conexiones y curvas de los tubos.
Recomendaciones:
•Si la instalación no es nueva, limpie los tubos para evitar que se tapen las espreas o los pilotos.
•Con el fin de facilitar el movimiento del aparato, el instalador debe hacer una espiral con el tubo flexible de cobre e instalar una llave de paso en la línea de suministro de gas. Esta llave debe estar fuera de la estufa y accesible a las personas que la usan.
IMPORTANTE
•Esta estufa está preparada para funcionar con gas L.P. de tanque móvil o estacionario.
•Para usarse con gas Natural (tubería) debe llamar a Whirlpool Service para cambiar las espreas y hacer los ajustes necesarios. El número telefónico aparece en la página 26. El técnico calificado debe cerciorarse que la conexión no tiene fugas y que la presión de gas en la estufa es la que aparece en las tablas siguientes:
|
|
|
|
|
|
|
|
|
|
|
|
|
GAS LP PRESIÓN DE OPERACIÓN |
ESPREA |
DIAM |
CAPACIDAD |
|
|
2,75 kPa (28 cm Col. agua) |
ESPREA |
TÉRMICA |
|
|
|
|
|
|||
|
QUEMADOR |
NÚMERO |
mm |
kJ/h |
|
|
SUPERIOR ESTÁNDAR ALUMINIO |
78 |
0,78 |
7 000 |
|
|
SUPERIOR SÚPER ALUMINIO |
86 |
0,86 |
7 500 |
|
|
SUPERIOR TRIPLE CORONA |
93 |
0,93 |
10 000 |
|
|
HORNO |
57 |
1,092 |
13 600 |
|
7
|
GAS NATURAL PRESIÓN DE OPERACIÓN |
ESPREA |
DIAM |
CAPACIDAD |
|
1,76 kPa (18 cm Col. agua) |
ESPREA |
TÉRMICA |
|
|
|
|||
|
QUEMADOR |
NÚMERO |
mm |
kJ/h |
|
SUPERIOR ESTÁNDAR ALUMINIO |
115 |
1,15 |
7 000 |
|
SUPERIOR SÚPER ALUMINIO |
118 |
1,18 |
7 500 |
|
SUPERIOR TRIPLE CORONA |
133 |
1,33 |
10 000 |
|
HORNO |
52 |
1,613 |
13 600 |
NOTA: Para operar esta estufa con gas natural, se requiere el juego de conversión de acuerdo con la siguiente tabla y puede solicitarlo en su Centro de Servicio Autorizado:
Modelo |
Gas LP a gas Natural |
WF5905 |
W10239488 |
WF7000 |
W10239490 |
WF7010 |
W10239490 |
WF7008 |
W10239490 |
WF9600 |
W10239492 |
Conexión de la estufa a la corriente eléctrica
Terminada la conexión a la línea de gas, conecte la estufa a la corriente eléctrica.
El cable tomacorriente debe conectarse a una toma de corriente con un voltaje de 127 V ~ ± 10%. Cerciórese de que la instalación está apropiadamente aterrizada.
VERIFICACIÓN DE FUNCIONAMIENTO
Ya que la estufa fue instalada es necesario verificar que la conexión de gas y eléctrica hayan sido realizadas con éxito. Para esta actividad, coloque la estufa en su posición final y proceda a iniciar el funcionamiento de los quemadores superiores y del horno.
Quemadores superiores
De acuerdo con el modelo, su estufa puede tener encendido electrónico de uno o dos pasos. Siga esta secuencia para corroborar el funcionamiento:
Para estufas con encendido electrónico de dos pasos:
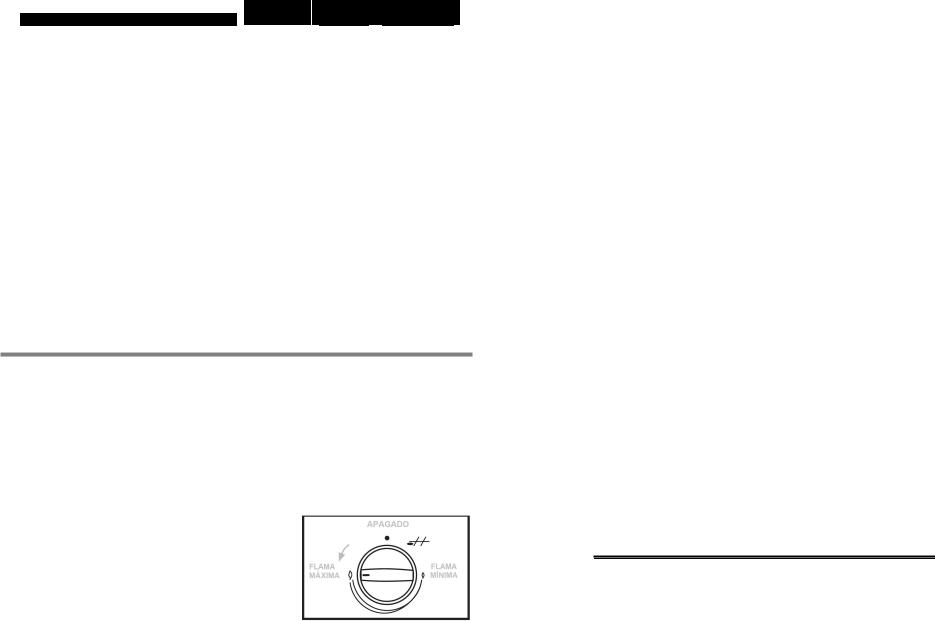
1.Presione, y mantenga así, el interruptor
localizado junto a la perilla de extrema izquierda identificado con este símbolo  y gire cualquiera de las perillas de quemadores superiores hasta la posición de flama máxima (ver figura derecha). Escuchará el sonido de la chispa de la bujía y se encenderá la flama, proceda al paso 6. Si la flama no enciende o la chispa no se oye, realice los pasos 2 al 5.
2.Retorne la perilla a la posición de apagado y suelte el interruptor.
3.Cuando la chispa no se genere, asegúrese de haber conectado el cable tomacorriente, sin él, el interruptor y las bujías no pueden trabajar.
4.Verifique que haya suministro de gas, ya sea en el tanque o en la línea. También revise las conexiones y tubos, podrían estar doblados o bloqueados.
8
The indicator light located on the left upper side of the display (listed I) will be on when the TIMER function is working and will blink when the TIMER is programmed but the display is showing other information (CLOCK or BROIL).
When an electrical failure occurs for less than 30 seconds, the control will return to the set up that was running before the fail. The functions will need to be reprogrammed if electricity takes more than 30 seconds to restore and the display will show 12:00 blinking.
Clock function (CLOCK)
The clock has a 12 hour format. To set time after plugging in the range, push any pad and the 12:00 will stop blinking except for the colon located between the hours and minutes. When the colon is blinking it means that is possible to set the hour. If the colon stops flashing, push the CLOCK pad and then press one of the ADJUST buttons to increase or decrease the time.
For a faster set up, keep one of the ADJUST pads pressed and the changing steps will be of 5 minutes intervals; once the hour is set up, press the CLOCK pad again or wait 5 seconds, this will make the control define as valid the hour in the display.
Oven light function (LIGHT)
This function activates or turns off the oven light by pressing the LIGTH pad. If the bulb remains turned on for more than 1 minute, the control will deactivate it automatically or you can turn it off manually by pressing LIGHT pad again. If the bulb does not work, replace it by following this sequence:
1.Unplug the range from the electrical wall outlet.
2.Remove the bulb twisting it counterclockwise.
3.Place a new 40 Watts bulb, designed for home appliances.
4.Plug the power cord of the range into the electrical wall outlet.
Timer function (TIMER)
For setting the timer, press the TIMER pad and the indicator light will turn on; the display will show 0:00 with the middle colon flashing, indicating with this that the timer can be adjusted. At this moment, push any of the ADJUST buttons and introduce the time to be counted.
The timer can be programmed with as much as 10 hours. This feature counts down the time considering minutes and seconds, when minutes are programmed, or hours and minutes, when hours are programmed. For example:
Time set with the |
|
Time to be |
|
Time displayed |
counted |
||
ADJUST pads |
|||
|
down |
||
|
|
||
|
|
|
|
0:05 |
4:59 |
5 minutes |
|
|
|
|
|
0:10 |
9:59 |
10 minutes |
|
|
|
|
|
1:00 |
0:59 |
1 hour |
|
|
|
|
|
10:00 |
9:59 |
10 hours |
|
|
|
|
|
|
|
|
Once the time period has been selected, wait 5 seconds for the function to be programmed and the colon stops flashing. If the function needs to be cancelled, push the TIMER pad to access the “set up” function and press again the same pad to reset the display to 0:00.
41
 Loading...