

Page 1

Page 2

SIP-Phone 302 Administration Guide SIP-Phone 302 Ver:
1
Chapter 1 Overview of the SIP-Phone 302..........................................................................4
1. Hardware Overview...........................................................................................5
2. Software Features and Specification.................................................................8
Chapter 2 Configuring the SIP-Phone 302 through LCD Phone menu..............................10
1. Initialize SIP-Phone 302.........................................................................................10
2. LCD Menu Configuration........................................................................................12
Chapter 3 Configuring the SIP-Phone 302 through Web Pages........................................18
Step 1. Browse the IP Address predefined via Keypad ...............................................19
Step 2. Input the login name and password................................................................20
Step 3. Enter the web interface main screen..............................................................21
Step 4. Start to con figu re............................................................................................21
1. Network Interface............................................................................................22
2. SIP Information................................................................................................24
3. System Configuration......................................................................................26
4. PPPoE Configure............................................................................................27
5. Voice Setting....................................................................................................28
6. Phone Book.....................................................................................................29
7. DSCP Configuration........................................................................................30
8. Password.........................................................................................................32
9. Rom Configuration...........................................................................................33
10. Flash Clean...................................................................................................34
12. Reboot System..............................................................................................35
Chapter 4 Configuring the SIP-Phone 302 through Telnet command lines........................36
1. [help] command......................................................................................................36
2. [quit] command.......................................................................................................37
3. [debug] command...................................................................................................37
4. [reboot] command...................................................................................................37
5. [pbook] command...................................................................................................37
6. [commit] command.................................................................................................38
7. [ping] command......................................................................................................38
8. [time] command......................................................................................................39
9. [ifaddr] command....................................................................................................39
10. [pppoe] command.................................................................................................40
11. [flash] command....................................................................................................41
12. [sysconf] command...............................................................................................41
13. [sip] command......................................................................................................42
14. [security] command...............................................................................................43
15. [voice] command...................................................................................................43
Page 3

SIP-Phone 302 Administration Guide SIP-Phone 302 Ver:
2
16. [tos] command......................................................................................................45
17. [bureau] command................................................................................................46
18. [rom] command.....................................................................................................46
19. [passwd] command...............................................................................................47
Chapter 5 Upgrading Software on the SIP-Phone 302......................................................49
1.From LCD Phone Menu...........................................................................................49
2. Web Management ..................................................................................................50
3. Telnet command lines.............................................................................................51
Page 4

SIP-Phone 302 Administration Guide SIP-Phone 302 Ver:
3
Reversion History:
Version Date Author Modified Contents
1.0 Aug., 22nd, 2004 Sabrina 1st Revision for IAD 161 162 SIP Gateway.
1.a Sep., 9th, 2004 Sabrina Modify typo error of Power supply and change
picture of back view.
Page 5

SIP-Phone 302 Administration Guide SIP-Phone 302 Ver:
4
Chapter 1 Overview of the SIP-Phone 302
SIP-Phone 302 is a full-featured IP-based telephone set for home telephony via Ethernet
base communication. It supports SIP RFC3261 protocol. Two 10/100BaseT embedded
switch/hub RJ-45 ports allow connect to office LAN and PC on your table. It is easily
interface with ADSL/Cable Modem that is provided by ITSP, ISP or Carrier company to
provide VoIP services to residential and SOHO application.
SIP-Phone 302 provides two 10/100BaseT switch/hub RJ-45 ports. The internal two-port
Ethernet switch allows for a direct connection to a 10/100BaseT Ethernet network via an
RJ-45 interface with single LAN connectivity for both the phone and a co-located PC.
Page 6
SIP-Phone 302 Administration Guide SIP-Phone 302 Ver:
5
Note:
Marked with (**): May be not available yet, please contact with your distributor.
1. Hardware Overview
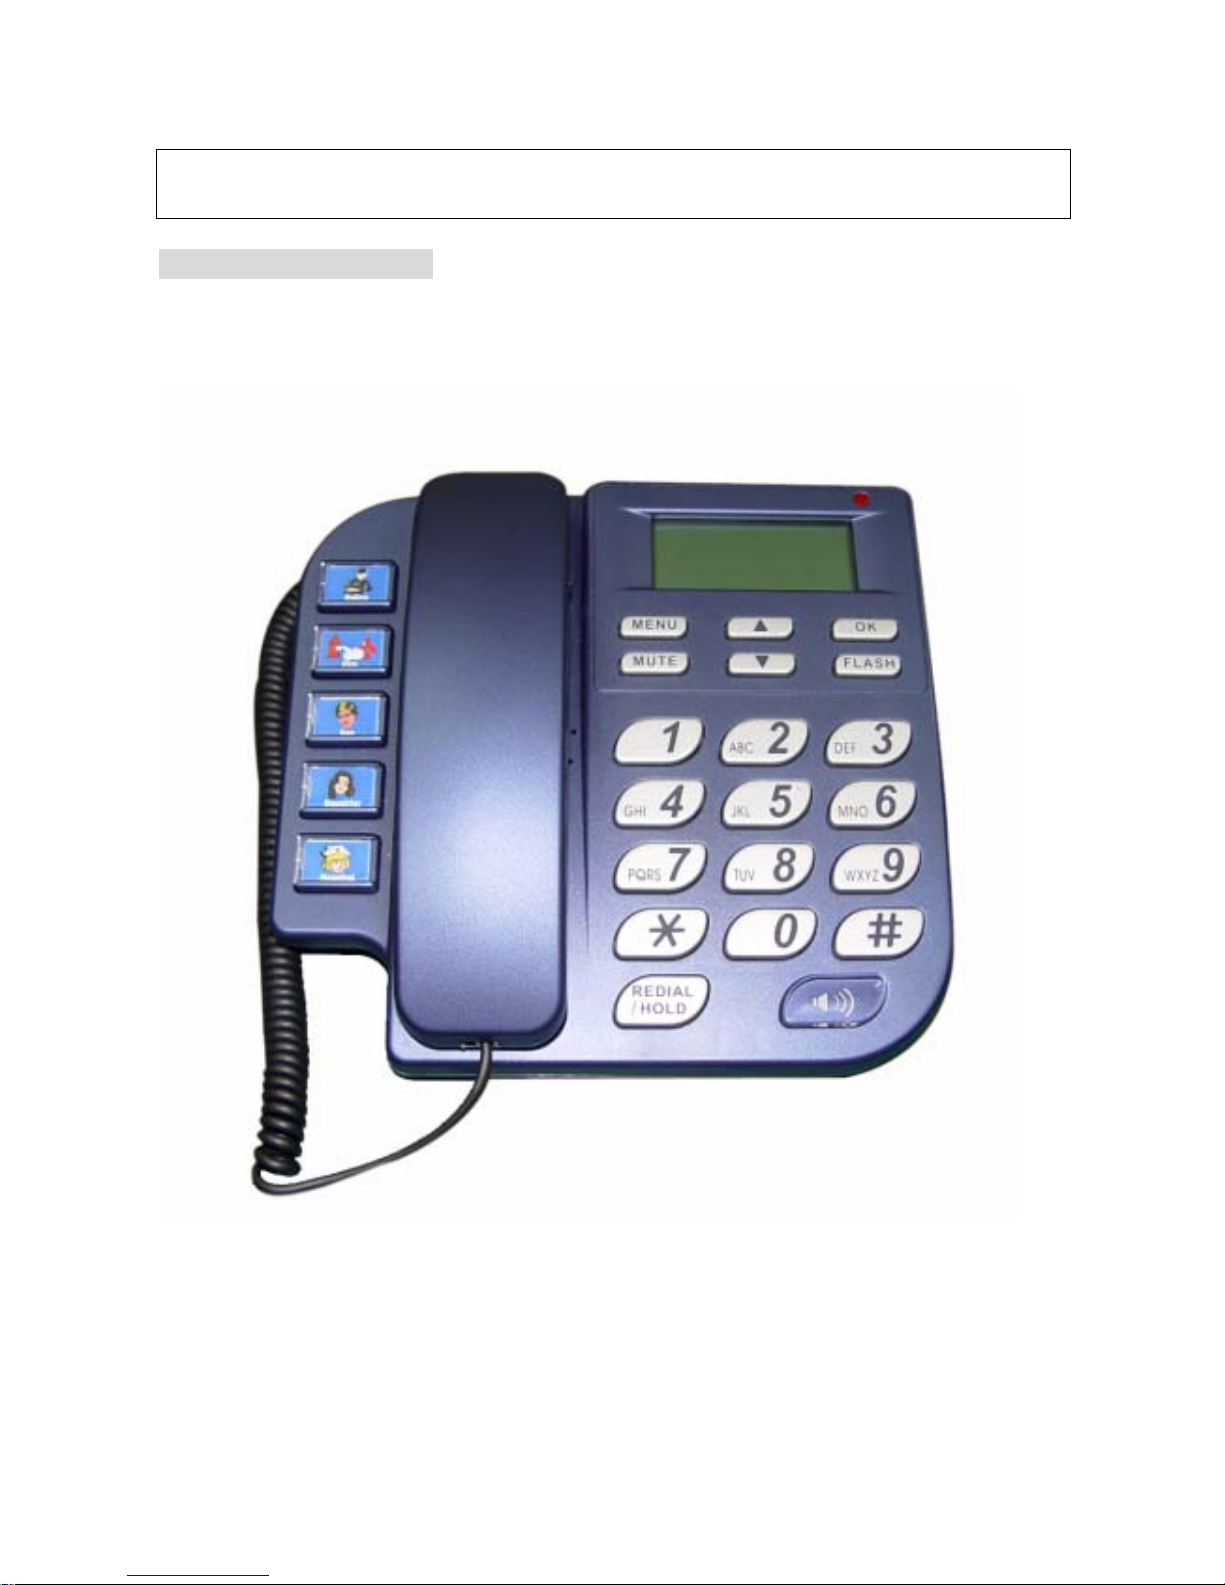
1.Front View and Keypad function
♦ System Indication LED: When SIP-Phone didn’t register to Proxy server or having
incoming call, system indication LED will be blinking.
♦ MENU: Press to enter LCD Menu when in standby mode; if already in LCD Menu,
press this button can return to standby mode
Page 7

SIP-Phone 302 Administration Guide SIP-Phone 302 Ver:
6
♦ MUTE:
1. Mute the voice o f Microphone and let ot her s can’ t hear from user in com mu nicati on .
2. Change input mode t o be di git or char acter mode: When configurati on in LC D me nu
can change input mode to be input digit only or input character.
♦ ▲▼: Move to up/down, left/right ; increase/decrease value.
♦ OK: Press OK to confirm the modification.
♦ Flash:
1. Transfer a call. User A can press FLASH b utt on when in communica ti on with user B,
then input phone number can make call to User C, after talk with C, A can hang up,
User B and User C can communicate.
2. Back to upper level of menu: when in LCD Menu, press FLASH button can jump to
upper level of menu.
♦ REDIAL / HOLD:
1. Redial the last outgoing call or hold one call in communication.
2. Upper-case/Lower-case character: change input character mode to be upper-case
or lower-case.
♦ SPEAKER: Speaking without picking up handset.
♦ 5 Graphic Memory key: User press these keys to do speed dial according to phone
book data 1-5 (please refer to LCD configur at i on- Pho ne Book, Configuring the
SIP-Phone 302 through Telnet command lines - [pbook] command, or Web
Configuration-Phone Book chapter).
♦ Number 1 –10, * and #: The function is as the same as the general phone set.
Corresponding list of keypad and symbol:
1 “1”
2 “a” ; “ b” ; “c” ; “2”
3 “d” ; “e” ; “f” ; “3”
4 “g” ; “h” ; “i” ; “4”
5 “j” ; “k” ; “l” ; “5”
6 “m” ; “n” ; “o” ; “6”
7 “p” ; “q” ; “r” ; “s” ; “7”
8 “t” ; “u” ; “v” ; “8”
9 “w” ; “x” ; “y” ; “z” ; “9”
* “.” ; “@” ; “_” ; ”-“ ; “,” ; “!” ; “?” ; “’” ; “+” ; “$” ; “*”
0 “Space” ; “0”
# “#”
Page 8
SIP-Phone 302 Administration Guide SIP-Phone 302 Ver:
7
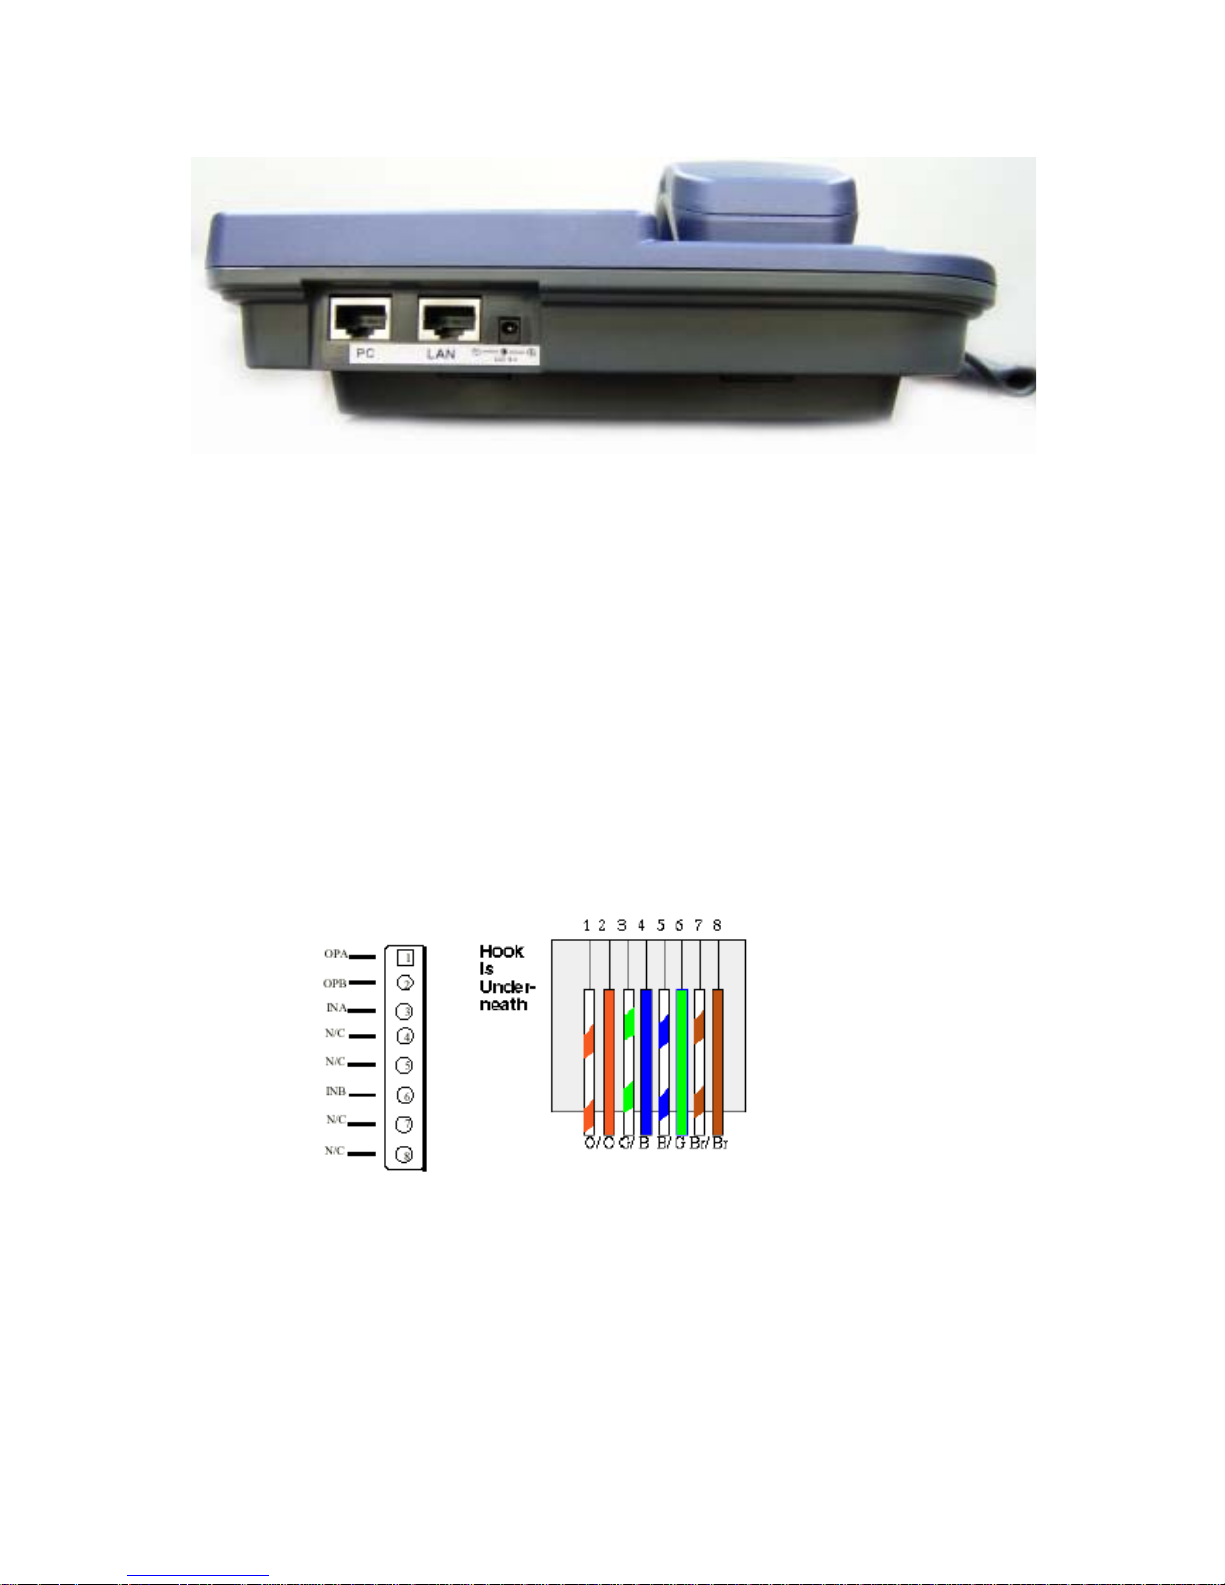
2.Back View
♦ DC 5V: DC 5V power input outlet
♦ LAN: 10/100 Base-T RJ-45 connector, connected directly to the Hub through the
straight CAT-5 cable.
♦ PC: 10/100 Base-T RJ-45 con nect or, connected directly to the PC through the straight
CAT-5 cable
3.Specification
1. Ethernet Port:
Ethernet port is for connecting SIP-Phone to network, transmit rate supports 10/100
Base-T.
Ethernet connector(LAN)
2. Dimension: 200mm(W) x 79mm(H) x 210mm(D)
3. Weight: 830g
Page 9

SIP-Phone 302 Administration Guide SIP-Phone 302 Ver:
8
2. Software Features and Specification
Application:
ISP/ITSP (Internet Telephony Service Provider)
IP-PBX with office telephony services
Multi-nation enterprise communicati on
SOHO Telephony
Calling Features
Call Hold
Call Transfer
Call Forward
5 configurable speed dials
Network Supported
Fixed IP
Dynamic Host Configuration Protocol (DHCP)
PPPoE connection (When PPPoE disconnect, SIP-Phone 302 can automatically
re-connect)
Behind NAT IP Sharing Device
Support QOS by setting DSCP (Differentiated Service Code Point) parameters of VoIP
packet
Audio Features
G.711 a/µ-Law, G.723.1, G.729, G.729a
VAD, CNG
G.165/G.168 compliant echo cancellation
Programmable Dynamic Jitter Buffer
Bad Frame Interpolation
Gain/Attenuation Settings
Provisioning and Configuration
SIP (RFC3261) compliance
LCD configuration password protection
Provide Proxy Mode or Peer-to-Peer Mode (Non Proxy Server needed) selection
Ring tone, Speaker and Handset volume adjustable
Support DNS server inquiry
Page 10

SIP-Phone 302 Administration Guide SIP-Phone 302 Ver:
9
Management Features:
Software Upgrade: TFTP/FTP download
Three easy ways for system configuration
- LCD Front Panel
- Web Browser
- TELNET
Environmental
Operating and storage Humidity: 10 to 95 % (Non-condensing)
Operational Temperature: 0 to +40 °C
Storage Temperature: -10 to 60℃
Certification
CE
Page 11

SIP-Phone 302 Administration Guide SIP-Phone 302 Ver:
10
Chapter 2 Configuring the SIP-Phone 302 through LCD Phone
menu
Note:
1. Items marked with (**): May be not available yet, please contact with your distributor.
2. After any configuration has changed for the SIP-Phone 302, user has to do Reboot in
the selection 7 “Reboot”.
3. We suggest user to set IP address via LCD menu 5→2.3.4.5 first, then go to
chapter 3 to do other configurations via web browser. If user need to do more
detail or advanced configurations, please refer to chapter 4 and use Telnet
command lines.
4. User can also try to enter web configuration via default IP address of SIP-Phone 302:
10.1.1.3
1. Initialize SIP-Phone 302
1. After SIP-Phone 302 finish initializing, it will ge t into standby mode:
The main LCD screen would be shown as similar as above. “Proxy” means the
SIP-Phone 302 is in Proxy Mode.
Note:
If SIP-Phone didn’t register to Proxy server, when SIP-Phone 302 been off-hook, user
will hear busy tone instead of dial tone, also system LED indication will be blinking.
2. When SIP-Phone 302 is under peer-to-peer mode, on LCD will show “P2P” instead
of “Proxy”.
SIP-Phone
Proxy
SIP-Phone
P2P
Page 12

SIP-Phone 302 Administration Guide SIP-Phone 302 Ver:
11
3. Press MENU to enter configuration mode then press OK to enter sub menus; press
FLASH can jump out current menu to previous level.
1. Call List (**)
2. Forward
3. Phone Book
4. Ringer
5. Network
6. Advanced Set (can be protected by password)
7. Reboot
Page 13

SIP-Phone 302 Administration Guide SIP-Phone 302 Ver:
12
2. LCD Menu Configuration
User can set the following configurations via LCD keypad.
Note:
1. Press REDIAL/HOLD before input data can switch characters to be capital or
lowercase.
2. Press MUTE before input data can switch input mode to be character mode or
IP mode; for example, user wants to enter IP address, after pressing SPEED
can enter digits directly.
3. When user is inputting data, pr ess ▲ will clear previous inp ut da ta.
1. Call List (**)
User can check all call records in this call list menu.
(1) Missed Calls:to see all missed calls in message box.
(2) Received:to see all received calls in message box.
(3) Dialed No.: to see all dialed numbers in message box.
(4) Exit: return to upper level of LCD Menu
2. Forward
There are 3 selections in Forward type, user must select under which condition to
forward calls.
(1) Busy
When SIP-Phone 302 is in busy status, the incoming call will be
forwarded to the assigned phone numb er.
A. Activate
Enter a forwarded phone number to activate busy forward function.
B. Deactivate
Deactivate Busy Forward function.
C. Exit
Return to upper level of LCD Menu
(2) No Answer
When SIP-Phone 302 has incoming call and hasn’t been picked up
for around 10 seconds, the incoming call will be forwarded to the
assigned phone number.
A. Activate
Enter a forwarded phone number to activate No Answer Forward
function.
Page 14

SIP-Phone 302 Administration Guide SIP-Phone 302 Ver:
13
B. Deactivate
Deactivate No Answer Forward function.
C. Exit
Return to upper level of LCD Menu
(3) Uncondition (Unconditional Forward)
It is included the above two types. Whether the SIP-Phone is in
which status, calls will be automatically forwarded to the assigned
phone number.
A. Activate
Enter a forwarded phone number to activate Unconditional Forward
function.
B. Deactivate
Deactivate Unconditional Forward function.
C. Exit
Return to upper level of LCD Menu
(4) Delete All: Delete all forward activated data.
(5) Exit: Return to upper level of LCD Menu.
3. Phone Book
1. List
List all records of name, telephone number, and IP address in the phone
address book.
2. Edit/Del
Edit or delete a record of name, telephone number, and IP address of the
phone address book.
3. New
Add a new record of name, telephone number, and IP address of the phone
address book.
4. Exit
Return to upper level of LCD Menu
4. Ringer
1. Volume
User can adjust ring volume by press ▼ or ▲ on the keypad to decrease or
increase ringer volume.
Page 15

SIP-Phone 302 Administration Guide SIP-Phone 302 Ver:
14
2. Style
There are three tone styles for SIP-Phone 302. Move the “>” symbol by press
▼ or ▲ on the keypad to select the tone style preferred, then press OK to
confirm it.
3. Exit
Return to upper level of LCD Menu
5. Network
1. Information
User can press ▼ or ▲ to check current network status:
(1) Mode: Display current network connection mode of SIP-Phone to be
Static (Fixed IP), DHCP, or PPPoE.
(2) IP, Mask, Gateway: display current IP information.
2. Get IP Mode
Set network mode of SIP-Phone to be Fix (Fixed IP), DHCP, or PoE (PPPoE).
3. IP address
Set IP address of SIP-Phone 302.
4. Subnet Mask:
Set subnet mask address of SIP-Phone 302.
5. Default GW
Set default gateway addr ess of SIP- Phone 302.
6. DNS (Domain Name Server)
Set IP address of Domain Name Server. Once SIP-Phone can connect to
DNS server, user can set URL address for Proxy server or Phone book
instead of IP address.
(1) Primary
Set Primary DNS server IP address
(2) Secondary
Set Secondary DNS server IP address
(3) Exit
Return to upper level of LCD Menu
Page 16

SIP-Phone 302 Administration Guide SIP-Phone 302 Ver:
15
7. PoE Config (PPPoE Configuration)
(1) User Name
Set PPPoE connection authentication user name.
(2) Password
Set PPPoE connection authentication password.
(3) Reconnect
Select ON or OFF to enable or disable this function. If user enables this
function, after PPPoE disconnected, SIP-Phone will automatically reboot
to re-connect, and after reboot, if SIP-Phone still can’t connect with server,
SIP-Phone will keep trying to connect. On the other hand, if user disables
this function, SIP-Phone won’t reboot and keep trying to connect.
(4) Exit
Return to upper level of LCD Menu
8. IP-Sharing
(1) If SIP-Phone is behind IP sharing or NAT device, and SIP-Phone is
under Peer-to-Peer mode or Proxy mode (doesn’t support endpoint
behind NAT function), on IP sharing must enable “DMZ” function or
set “Virtual Server” to ope n por ts ( UDP por t: 506 0 and 1638 4, 163 85) .
SIP-Phone must enable this IP sharing function.
(2) User must enter public IP address of IP sharing.
9. Exit: Return to upper level of LCD Menu
6. Advanced Set (can be protected by password)
Password:
User must key in pass wor d to enter t his men u if p assw ord has bee n set, i tems
under this command are all important ones, which can only be conf igured by
advanced users. If password hasn’t been set, user can enter this menu
directly without entering password.
Note:
1. If user forget password, please contact with your distributor, we will
generate a specific password according to your MAC address of
SIP-Phone.
2. User can also try to configure SIP-Phone via Telnet or Web browser with
default IP address: 10.1.1.3. (If IP haven’t been changed)
Page 17

SIP-Phone 302 Administration Guide SIP-Phone 302 Ver:
16
1. SIP
(1) Mode
Select SIP connection mode to be peer-to-peer mode or Proxy mode.
(2) Proxy
A. Proxy
Set Proxy IP address or Domain Name.
B. Outbound
Set Outbound Proxy IP address or Domain Name.
C. Px port
Set Proxy port for SIP-Phone to send messages.
D. Expire (in seconds)
Set expire time of registration, in the duration of 2/3 expire time,
SIP-Phone will re-register to Proxy Server again.
E. Exit
Return to upper level of LCD Menu
(3) User Info
A. User Name (Mandatory)
Set User Name of SIP-Phone to reg ister to Proxy Server. If Proxy
server doesn’t request specific User name, please enter Line
number here.
B. Line No.
Set Line Number of SIP-Phone to register to Proxy Server.
C. Password
Set User Password of SIP-Phone to register to Proxy Server.
This configuration is not necessary, if Proxy server doesn’t
request client to set password, user only has to set User Name
the same as Line Number.
D. Exit
Return to upper level of LCD Menu
(4) Exit
Return to upper level of LCD Menu
2. SW Update
(1) Method
There are two methods to download new version file, please move the
“>“ symbol by press ▲or ▼ on the keypad to select TFTP or FTP
method, then press OK to confirm it.
Page 18

SIP-Phone 302 Administration Guide SIP-Phone 302 Ver:
17
(2) Sever
User has to offer one TFTP/FTP server IP Address and set this IP
Address via keypad. The IP Address is necessary for upgrading
SIP-Phone new application rom file.
(3) Account
User has to input user name for FTP server login .It is necessary for
upgrading SIP-Phone new application rom file via FTP method.
(4) Password
User has to input user password for FTP server login .It is necessary for
upgrading SIP-Phone new application rom file via FTP method.
(5) File Name
User has to press the file name of new application rom file prepared for
upgrading
(6) Version
Show versions of all software and hardware. (**)
(7) Upgrade
Select YES or NO to start upgrade.
(8) Exit
Return to upper level of LCD Menu
Note:
Download via LCD command can only upgrade new application rom file.
3. Menu Password
Set entry password of phone LCD menu.
4. Exit
Return to upper level of LCD Menu
7. Reboot
Reboot machine. It is necessary and important for user to reboot SIP-Phone
302 after any configurations has been made. SIP-Phone will ask user again
before reboot.
Page 19

SIP-Phone 302 Administration Guide SIP-Phone 302 Ver:
18
Chapter 3 Configuring the SIP-Phone 302 through Web Pages
The HTTPD web management interface provides user an easier way to configure rather
than command line method through TELNET.
The configuration funct ion a nd ste ps are si mi lar w ith the w ay throug h co mman d line . Pl ease
refer to the chapter 4-Configuring the SIP-Phone 302 through Telnet command lines for
more detail information. Below is a guide for user to conf igure via web interface.
Page 20

SIP-Phone 302 Administration Guide SIP-Phone 302 Ver:
19
Step 1. Browse the IP Address predefined via Keypad
Please enter IP ad dres s (user hav e to set v ia LCD menu first) o f SIP- Phone in w eb br ow ser.
If user failed to set IP address via LCD menu, the default IP address of SIP-Phone is
10.1.1.3, user can also try to connect to SIP-Phone with this default IP via web interface.
Page 21
SIP-Phone 302 Administration Guide SIP-Phone 302 Ver:
20
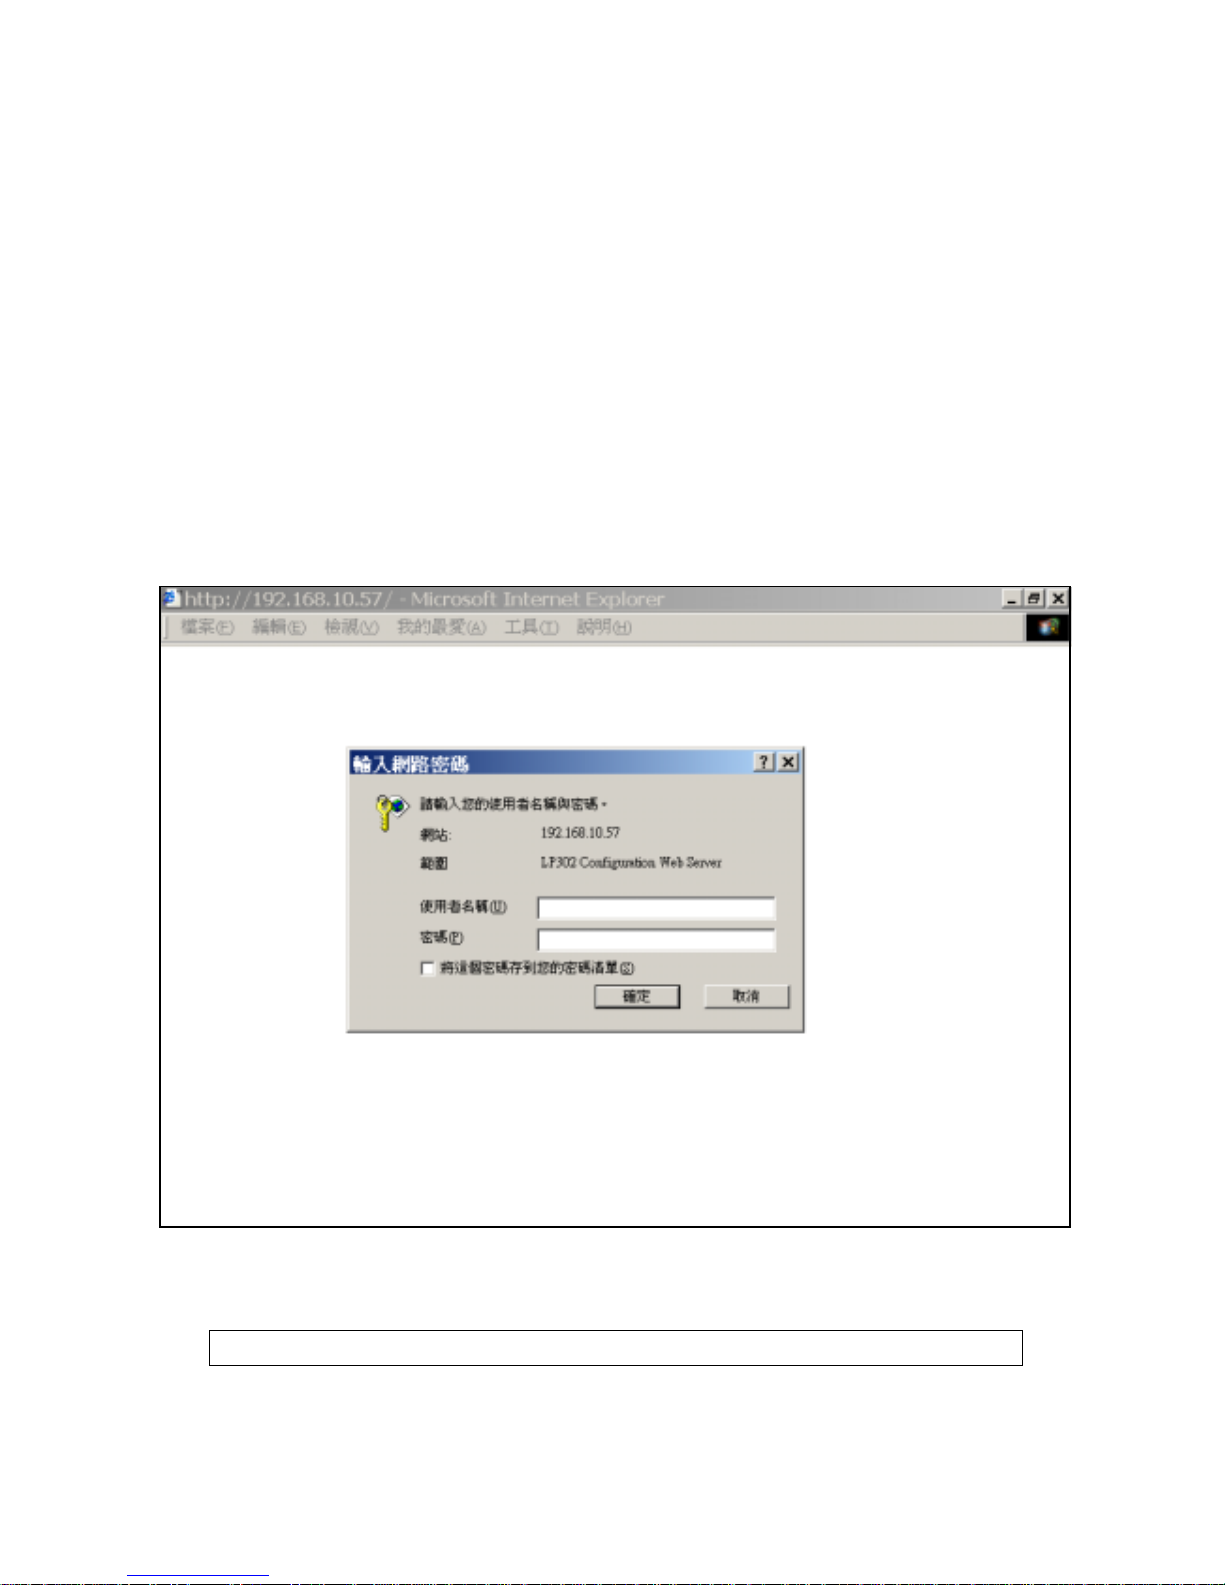
Step 2. Input the login name and password
Login name: root or administrator
User who requests aut hor i zation to execute all configuration commands needs to
login with “root”. If a user login with “administrator”, commands below are not
functional:
1. Password: set password of login: “root” users.
2. Flash clean: clean all current configurations
3. Rom configuration: upgrade boot sector
4. Rom configuration: upgrade whole 2m software file
Password (The same with TELNET): Null (just press confirm, no need to key in
password in def ault value)
Note: User can set password later in 8.PASSWORD via web interface.
Page 22
SIP-Phone 302 Administration Guide SIP-Phone 302 Ver:
21
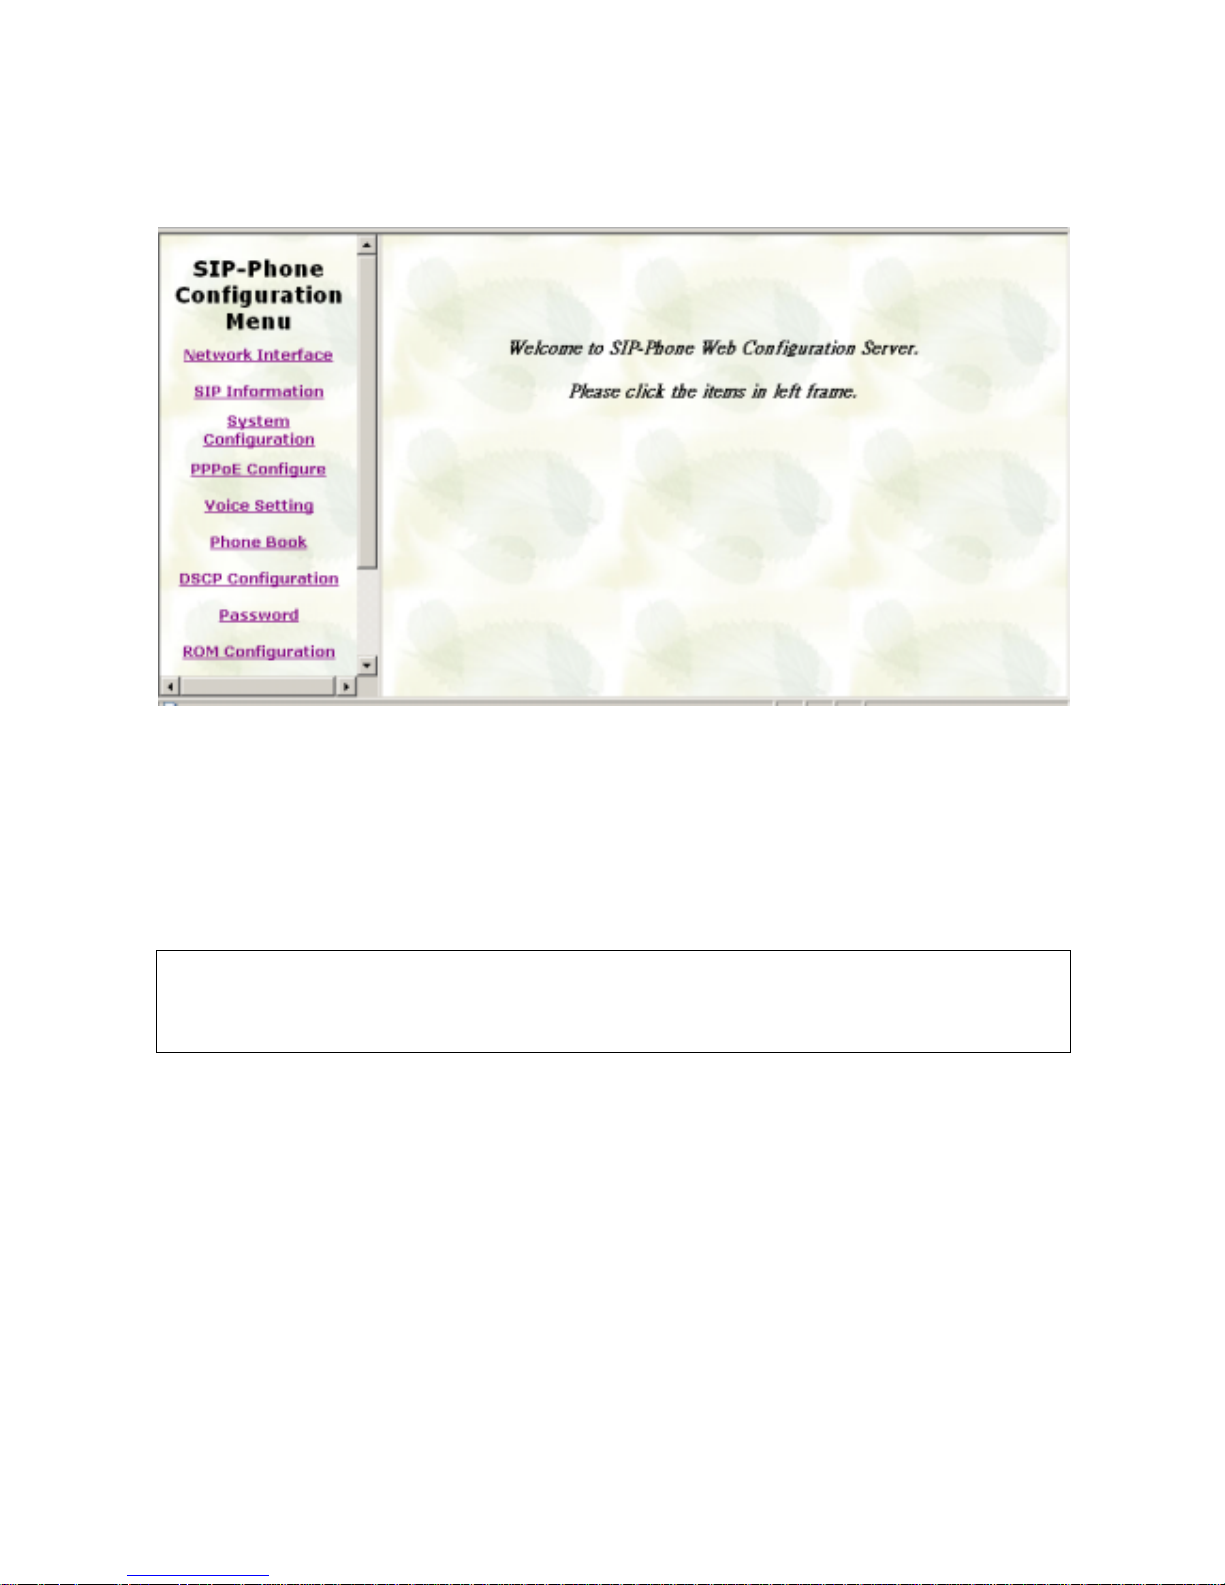
Step 3. Enter the web interface main screen
After enter login name and password, user can see web interface main screen as below.
Step 4. Start to configure
Most important items are Network Interface, SIP Information, and Phone Book (in
Peer-to-Peer mode). Please remember to configure these commands before start to work
with SIP-Phone.
Note:
After change any settings, please remember to reboot (in Reboot System) SIP-Phone so
that changes can take effect.
Page 23
SIP-Phone 302 Administration Guide SIP-Phone 302 Ver:
22
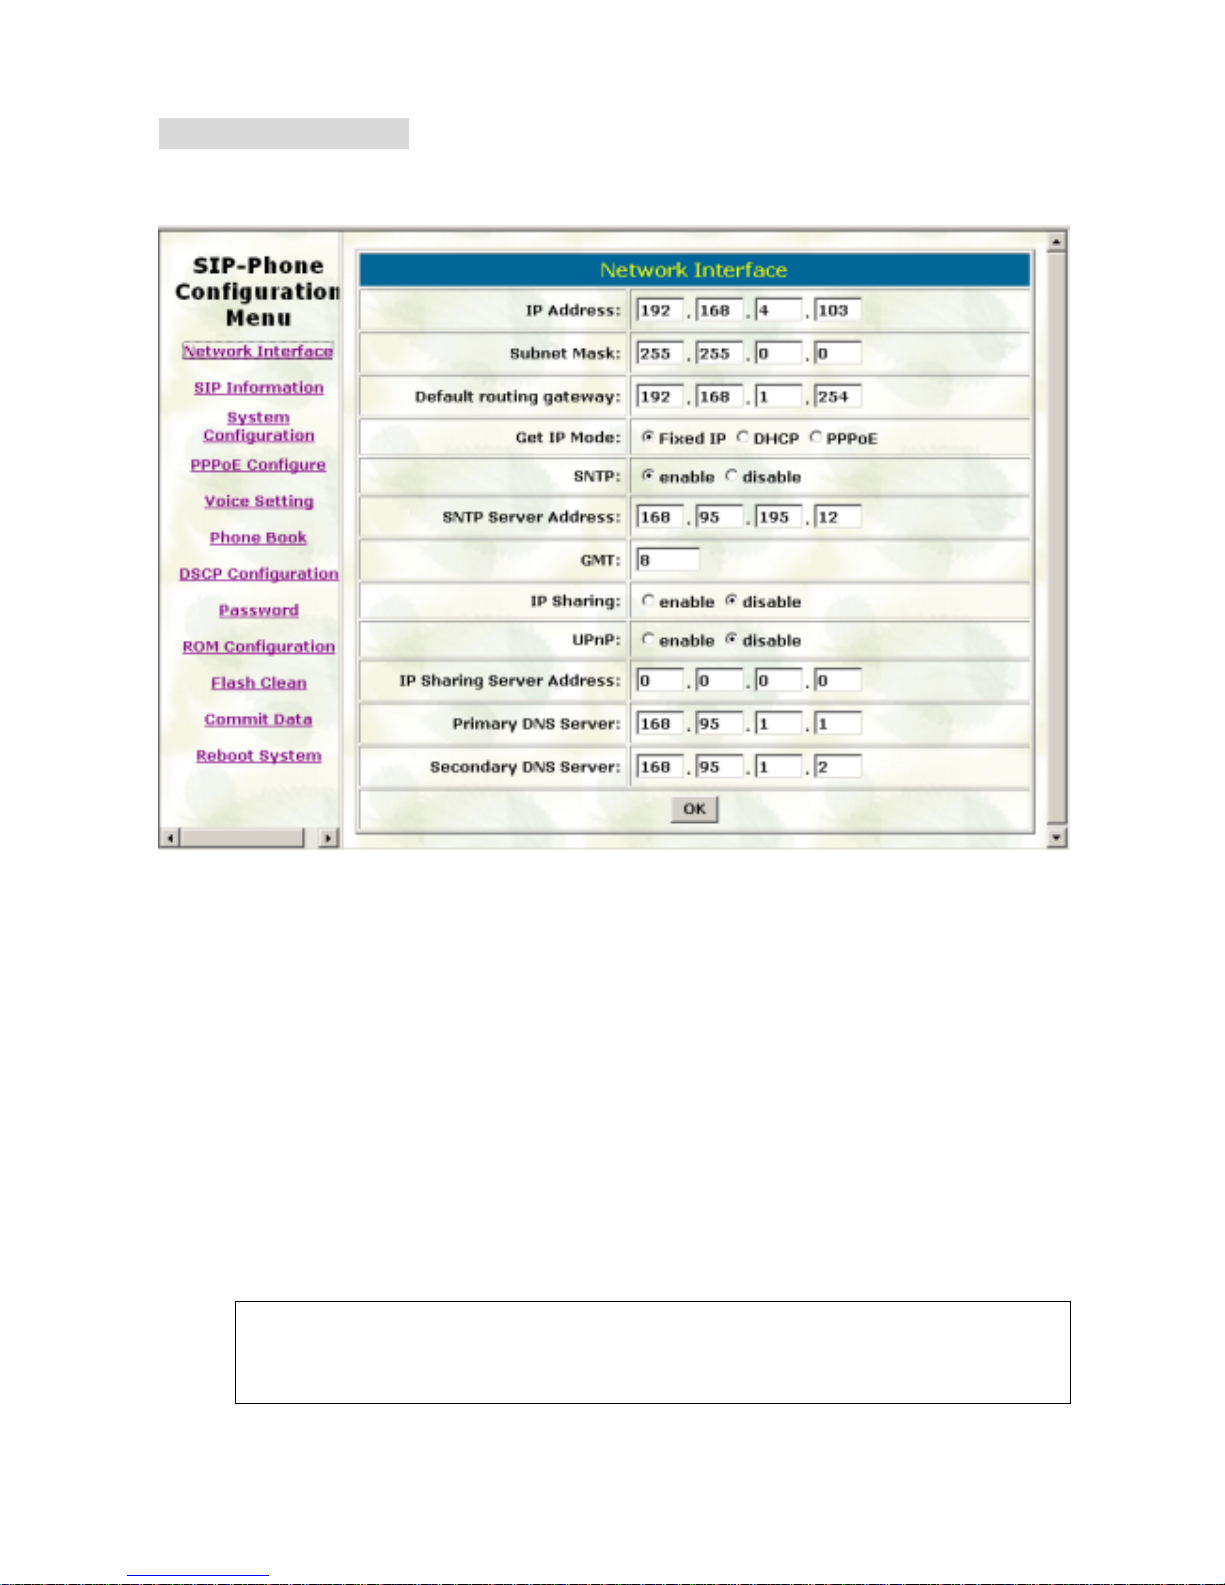
1. Network Interface
Please refer to chapter 4.9 [ifaddr] command.
- IP Address: Set IP Address of SIP-Phone
- Subnet Mask: Set the Subnet Mask of SIP-Phone
- Default routing gateway: Set Default routing gateway of SIP-Phone
- Get IP Mode: User has to set SIP-Phone to use which network mode.
1. Fixed IP: User has to assign a fixed IP to SIP-Phone.
2. DHCP: When DHCP function enables, SIP-Phone 302 will automatically
search DHCP server after reboot.
3. PPPoE: If SIP-Phone is working with PPPoE connection, user have to set
related parameters in “PPPoE Configure “page.
Note:
If User set “Get IP mode” as DHCP or PPPoE, IP address, Subnet Mask, and
Default routing gateway will become 10.1.1.3 and not allow to be configured.
Page 24

SIP-Phone 302 Administration Guide SIP-Phone 302 Ver:
23
- SNTP: Enable / Disable the Simple Network Time Protocol function
- SNTP Server Addr ess: Set SNTP Server Address
When SNTP server is available, enab le SIP-Phone 302 SNTP function to point to
SNTP server IP address so that SIP-Phone can get correct current time.
- GMT: Set time zone for SNTP Server time
User can set different time zone according to the location of SIP-Phone. For
example, in Taiwan the time zone should be set as 8,which means GMT+8.
- IP Sharing: Enable it if SIP-Phone is behind IP Sharing router.
- UPnP: Enable it if IP sharing or NAT device suppor ts UPnP functi on so tha t no nee d
to configure IP sharing or SIP-Phone when SIP-Phone is behind NAT device.
- IP Sharing Server Address: Set Public IP Address of IP Sharing router for
SIP-Phone to work behind IP sharing.
- Primary DNS Server: Set Primary Domain Name Server IP address.
User can set Domain Name Server IP address. Once SIP-Phone can connect with
DNS server, user can specify URL address instead of IP address for Proxy and
phone book IP address.
- Secondary DNS Server: Set Secondary Domain Name Server IP address.
Page 25

SIP-Phone 302 Administration Guide SIP-Phone 302 Ver:
24
2. SIP Information
Please refer to chapter 4.13 [SIP] command
- Run Mode: Select SIP-Phone to work under Peer-to-Peer mode or Proxy mode.
- Proxy IP Address: Set Proxy IP Address or URL address (Domain Name Server
must be configured. Please refer to Network Interface).
- Outbound Proxy: Set IP Address or URL address (Domain Name Server must be
configured. Please refer to Network Configure) of outbound Proxy server.
- Proxy port: Set Proxy port for SIP-Phone to send message, default value is 5060, if
there is no special request of Proxy server, please don’t change this value.
- Phone Book Search: enable/disable phone book search function. If user enabled
this function, SIP-Phone will search d ialed number in phone book to see if the re is
any matched table before send to Proxy server, and if there is a matched data in
phone book, SIP-Phone will make call to related IP address.
- Prefix String: set prefix string. If user ID contains alphabets, user can set it as prefix
Page 26

SIP-Phone 302 Administration Guide SIP-Phone 302 Ver:
25
string here. For example, if Account Name is 123, SIP-Phone will sent out
messages as Account Name @”IP address of Proxy”, if user set prefix as abc,
SIP-Phone will set out as abc123@”IP address of Proxy”. This function is for special
proxy server.
- Line Number: identify one number for the SIP-Phone 302 to register to the Proxy.
- Line Account: set user name of SIP-Phone 302 for registering. User can set user
name and password for registering. If password is no need, please set user name
the same as line number or SIP-Phone won’t register successfully.
- Line Password: set password for registering.
- SIP Port: set SIP UDP port.
- RTP Port: set RTP port for sending voice data.
- Expire: set expire time of registration. SIP-Phone will keep re-registering to proxy
server before expire timed out
Page 27
SIP-Phone 302 Administration Guide SIP-Phone 302 Ver:
26
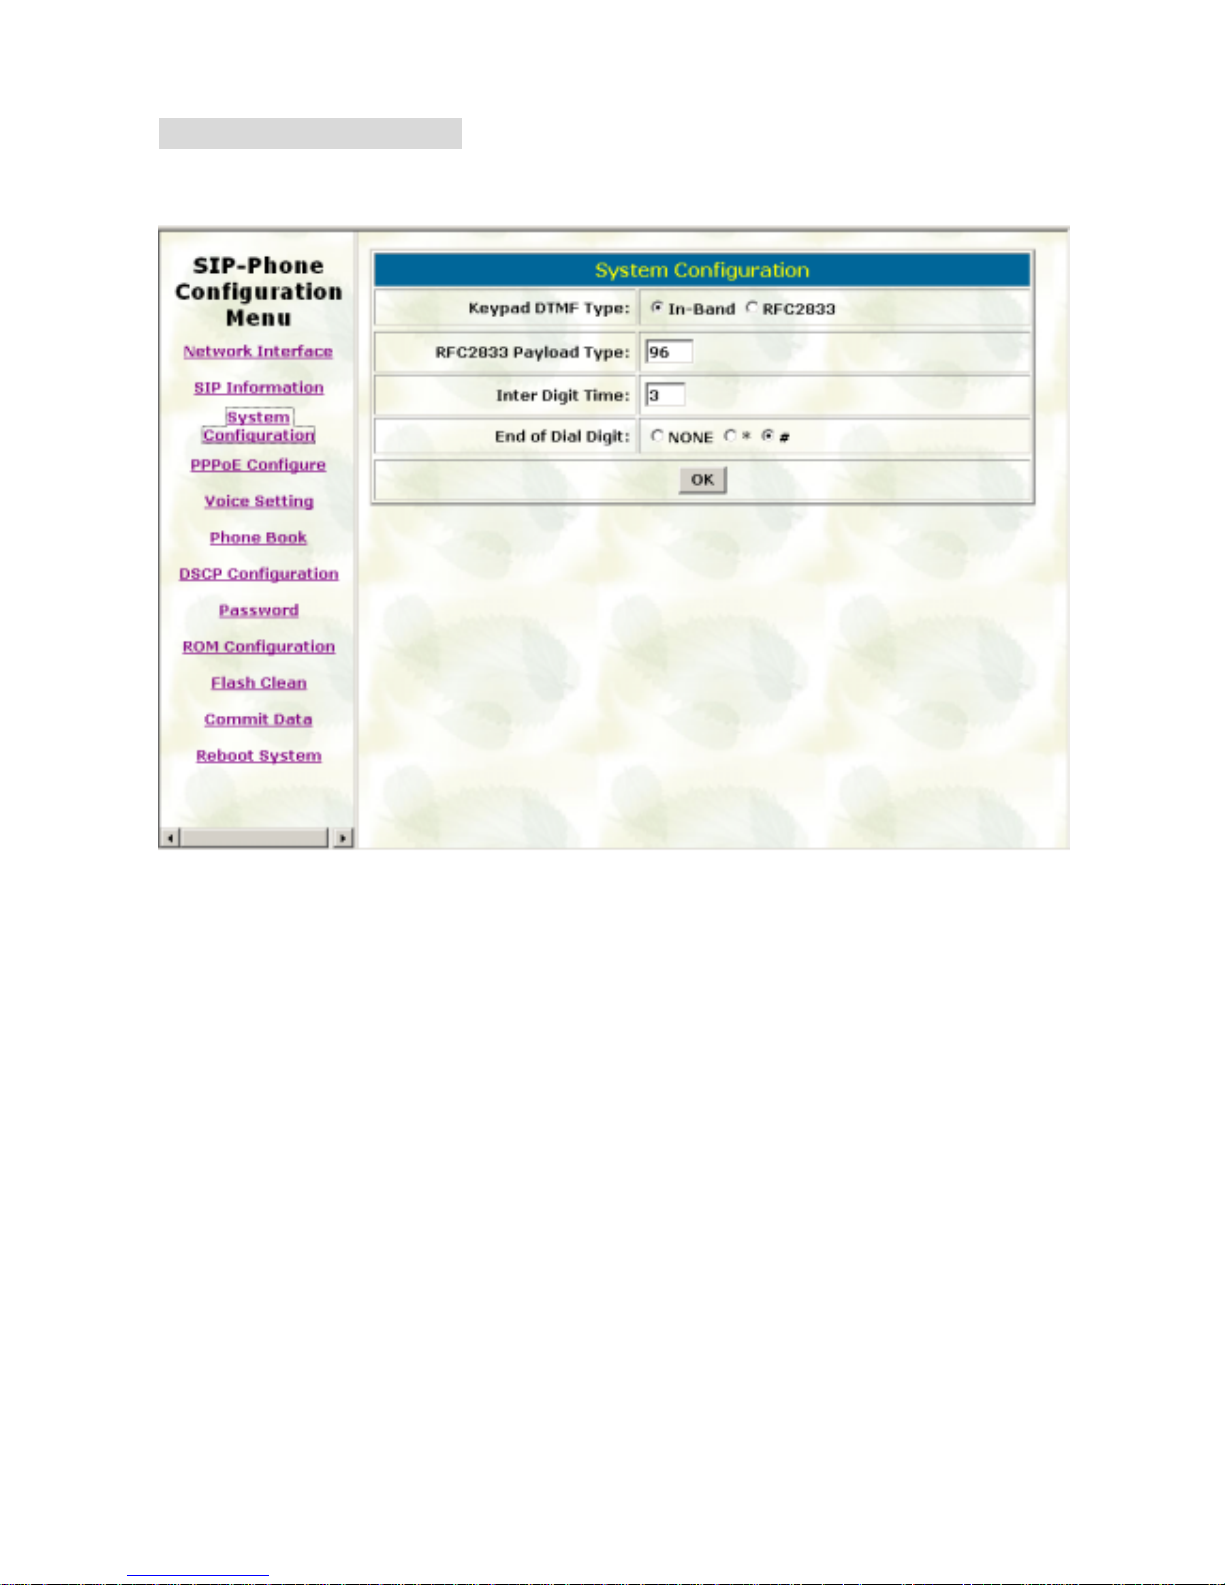
3. System Configuration
Please refer to chapter 4.12 [sysconf] command
- Keypad DTMF Type: set DTMF type. User can select DTMF type SIP-Phone
transmits.
- RFC2833 Payload T y pe: chang e RFC2833 Pay load ty pe. This i s for speci al req uest
from the other site, if RFC2833 payload type of 2 sites are different, it may cause
some problem of connection.
- Inter Digit Time: Set the DTMF inter digit time (second)
To set the duration (in second) of two pressed digits in dial mode as timed out. If
after the duration user hasn’t pressed next number, SIP-Phone will dial out all
number pressed.
- End of Dial Digit: sele ct en d of di alin g key, e.g. set end of dia l key as * button, after
finished pressing dialing number then press * will dial out.
Page 28

SIP-Phone 302 Administration Guide SIP-Phone 302 Ver:
27
4. PPPoE Configure
Please refer to chapter 4.10 [pppoe] command
- User Name: Set PPPoE authentication User Name.
- Password: Set PPPoE authentication password.
- Reboot After Remote Host Disconnection: Enable/Disable auto reboot after PPPoE
disconnection
If user enables this function, after PPPoE being disconnected, SIP-Phone will
automatically reboot to re-connect, and after reboot, if SIP-Phone still can’t get
contact with server, SIP-Phone will keep trying to connect. After re-connected,
SIP-Phone will also restart system. On the ot her ha nd, if user disables this function,
SIP-Phone won’t reboot and keep trying to connect.
- Other items: for reference only, cannot allow to be configured.
Page 29

SIP-Phone 302 Administration Guide SIP-Phone 302 Ver:
28
5. Voice Settin g
Please refer to chapter 4.15 [voice] command
- Codec Priority: set codecs priority in ord er. Please notice that user can set from 1 to
5 codecs as their need. For example, user can only set first priority as G.723.1, and
set the others as x, that means only G.723.1 is available.
- Frame Size: User can set different packet size for each codec.
- G .723 Si lence Suppres sion: En able / Di sable soun d com pression an d comfor t noi se
generation. It is only for codec G.723.1
- Volume: Adjust the volume in “Voice” (sending out); “Input” (receiving); “ DTMF”
(DTMF sending out).
- Echo Cancelor: Enable / Disable (suggested always Enable this function).
- Jitter Buffer: Set Min. Delay and Max. Delay of Jitter Buffer for voice pa ckets.
- Optimized Factor (Jitter): Set Optimized Factor of voice, this is for advanced user
only, please contact with your distributor before making any change.
Page 30

SIP-Phone 302 Administration Guide SIP-Phone 302 Ver:
29
6. Phone Book
Please refer to chapter 4.5 [pbook] command
- Add Data: User can specify only 10 sets of phone book via web interface. Please
input index, Name, IP Address and E.164 number of the destination device. From
Telnet command line can set up to 100 sets of phone book data.
- Delete Date: User can delete any configured phone book data by assign index.
Page 31

SIP-Phone 302 Administration Guide SIP-Phone 302 Ver:
30
7. DSCP Configuration
Please refer to chapter 4.16 [tos] command
Set Signal or RTP Packet DSCP value:
- Assured Forwarding (AF) PHB: Select Delay priority and Drop Precedence
- Expedited Forwarding (EF) PHB: Select TOS value as EF
- Default: Select TOS va lue as 0
- User Assign Special DSCP Code: User can set other unspecif ied value here.
TOS/DiffServ (DS) priority function can discriminate the Differentiated Service
Codepoint (DSCP) of the DS field in the IP packet header, and map each Codepoint to
a corresponding egress traffic priority. As per the definition in RFC2474, the DS field is
Type-of-Service (TOS) octet in IPv4. The recommended DiffServ Codepoint is defined
in RFC2597 to classify the traffic into different service classes. The mapping of
Codepoint value of DS-field to egress traff ic priorities is shown as follows.
Page 32

SIP-Phone 302 Administration Guide SIP-Phone 302 Ver:
31
DROP Precedence Class #1 Class #2 Class #3 Class #4
Low Drop Precedence
(AF11)
001010
(AF21)
010010
(AF31)
011010
(AF41)
100010
Medium Drop Precedence
(AF12)
001100
(AF22)
010100
(AF32)
011100
(AF42)
100100
High Drop Precedence
(AF13)
001110
(AF23)
010110
(AF33)
011110
(AF43)
100110
1. High priority with DS-field.
(1) Expected Forwarding (EF) 101110 ====> 46 (Decimal System)
(2) Assured Forwarding (AF) 001010 ====> 10 (Decimal System)
010010 ====> 18 (Decimal System)
011010 ====> 26 (Decimal System)
100010 ====> 34 (Decimal System)
2. Low Priority with DS-field:
Assured Forwarding (AF) 001100 ====> 12 (Decimal System)
010100 ====> 20 (Decimal System)
011100 ====> 28 (Decimal System)
100100 ====> 36 (Decimal System)
001110 ====> 14 (Decimal System)
010110 ====> 22 (Decimal System)
011110 ====> 30 (Decimal System)
100110 ====> 38 (Decimal System)
000000 ====> 0 (Decimal System)
Please refer to RFC standard documents for more information about what is DSCP.
Page 33
SIP-Phone 302 Administration Guide SIP-Phone 302 Ver:
32
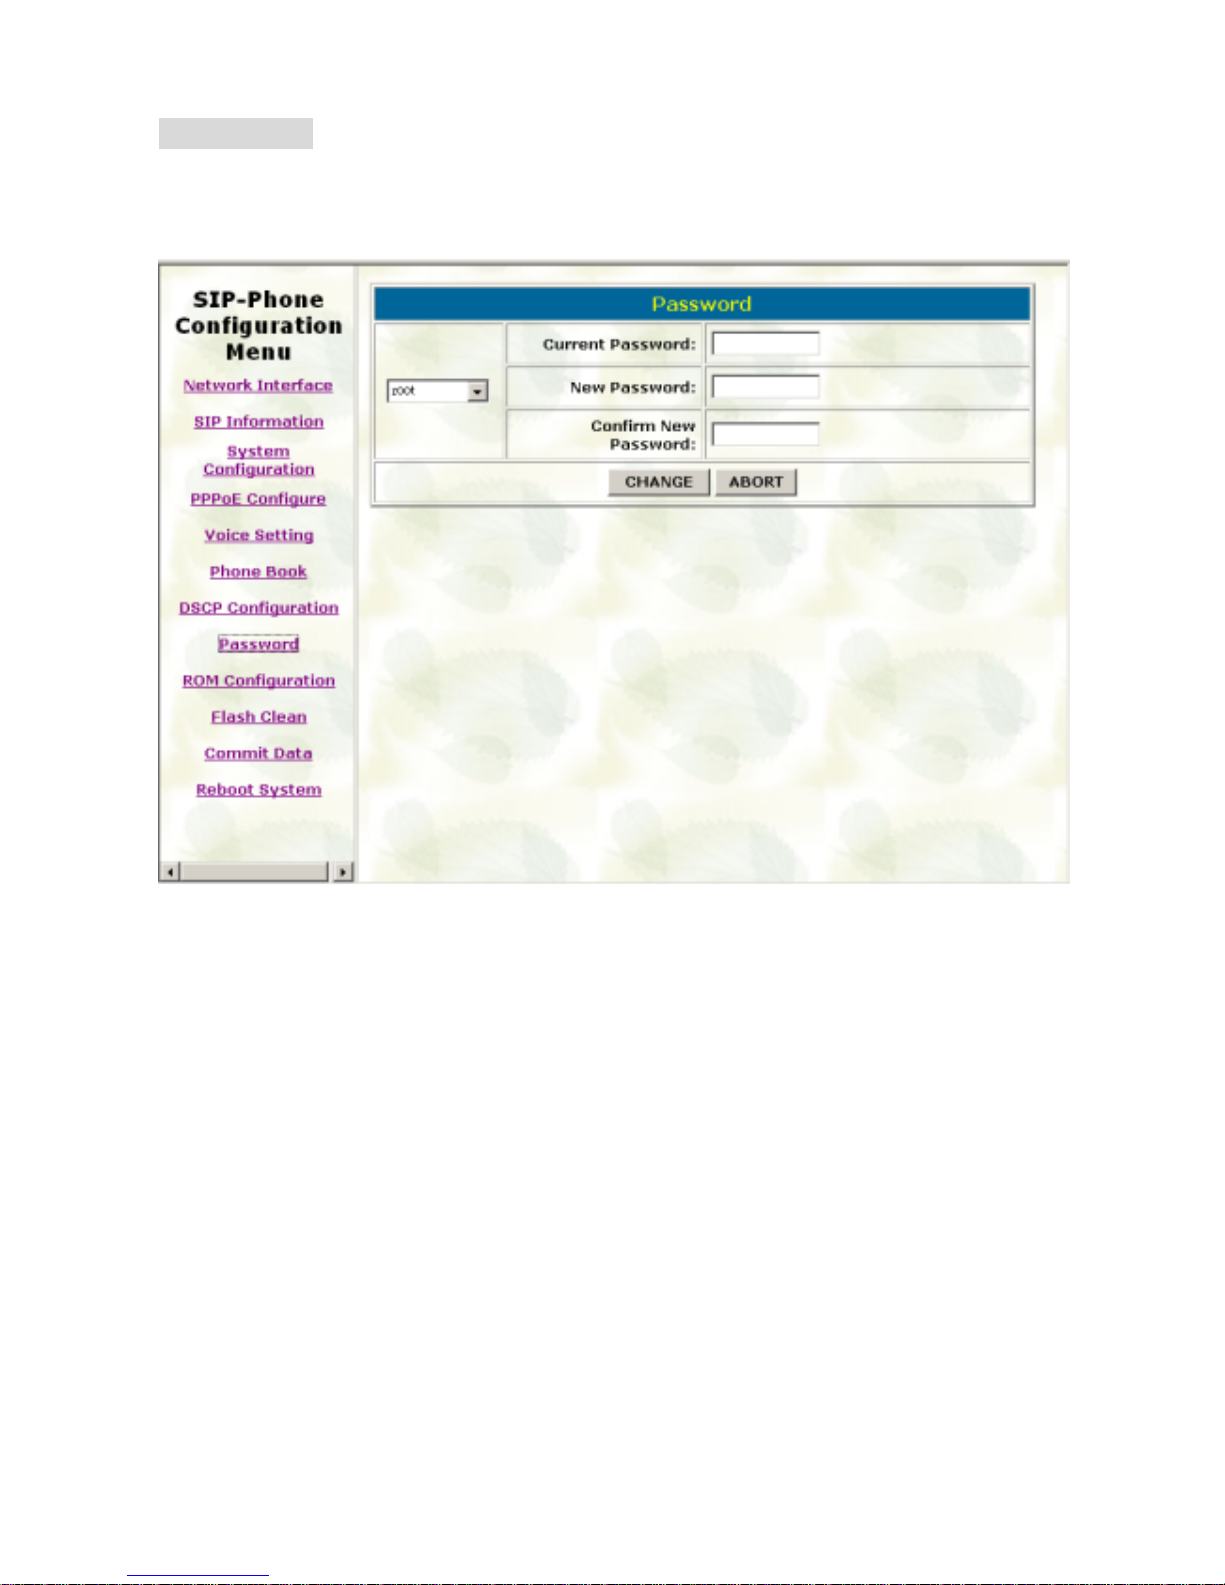
8. Password
Please refer to chapter 4.19 [password] command
- Change: First select login name as root or administrator, then enter current
password, new password and confirm new password again to set new password.
- Abort: Press abort will clean all inputs.
User who requests aut hor i zation to execute all configuration commands needs to
login with “root”. If a user login with “administrator”, commands below are not
functional:
1. Password: set pa ssword of login: “root” users.
2. Flash clean: clean all current configurations
3. Rom configuration: upgrade boot sector
4. Rom configuration: upgrade whole 2m software file
Page 34
SIP-Phone 302 Administration Guide SIP-Phone 302 Ver:
33
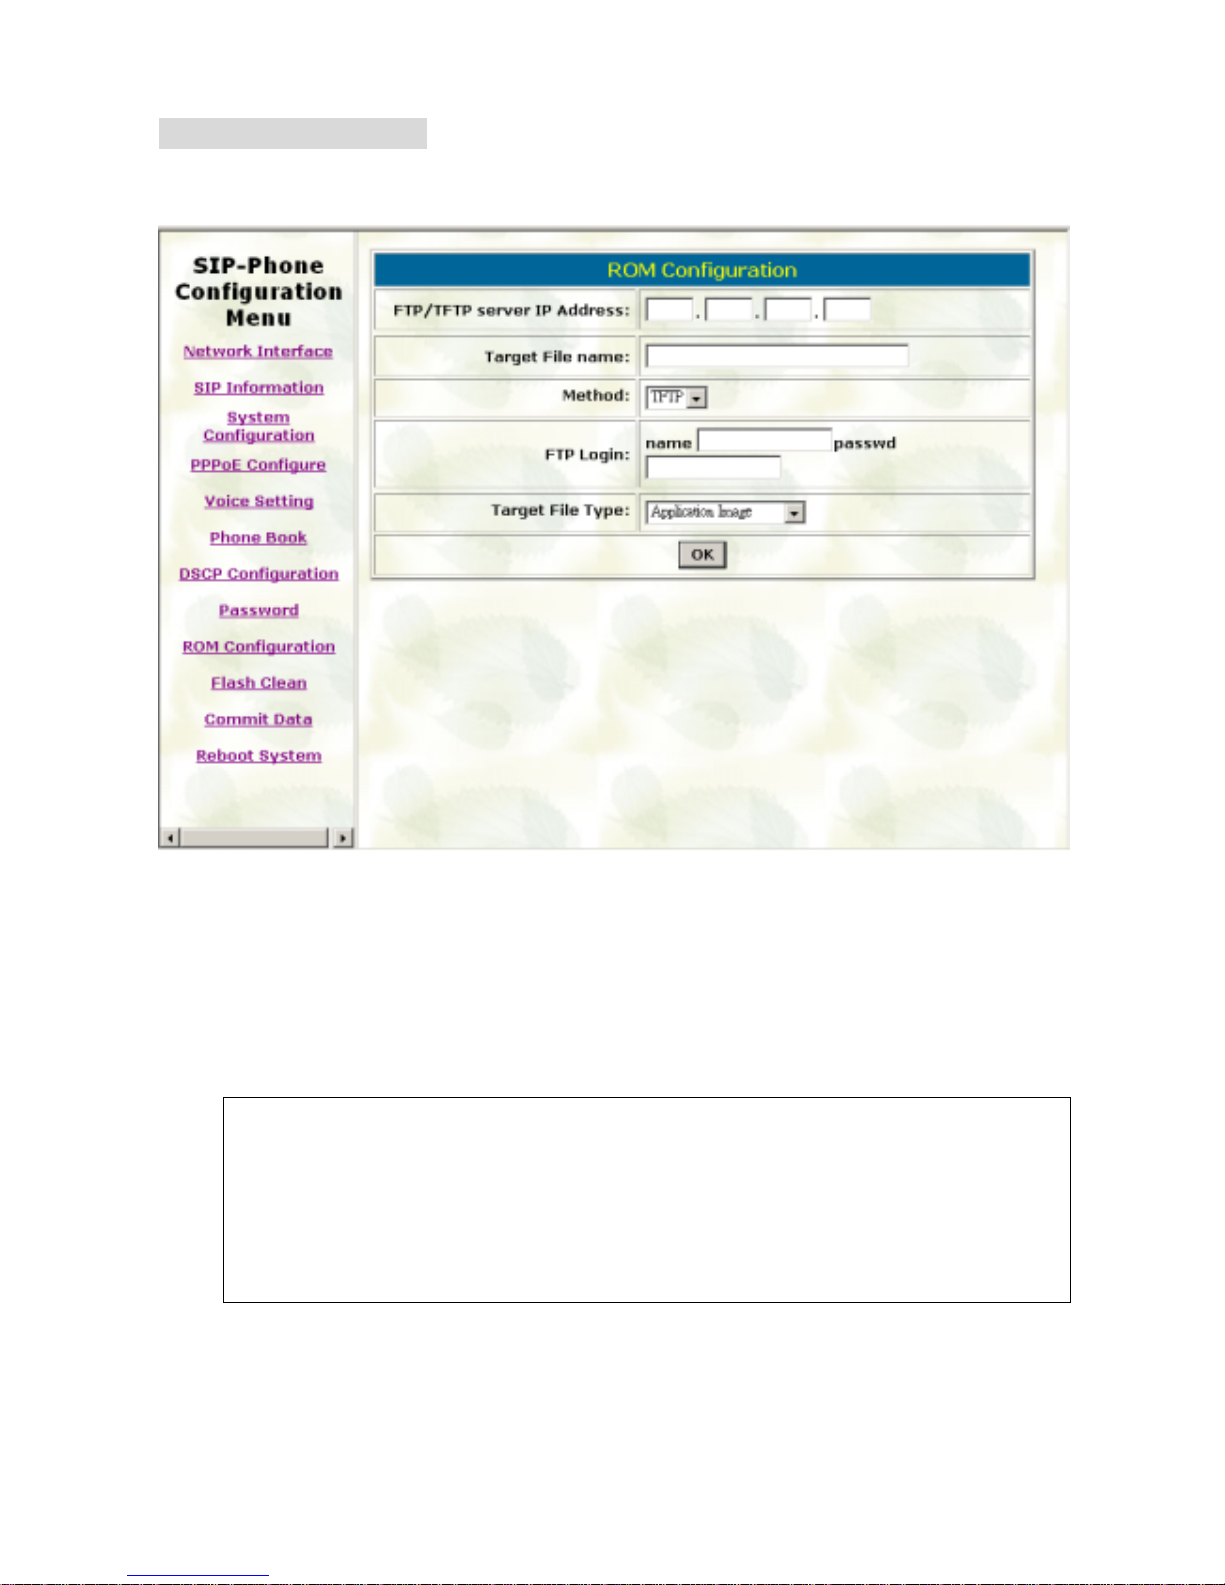
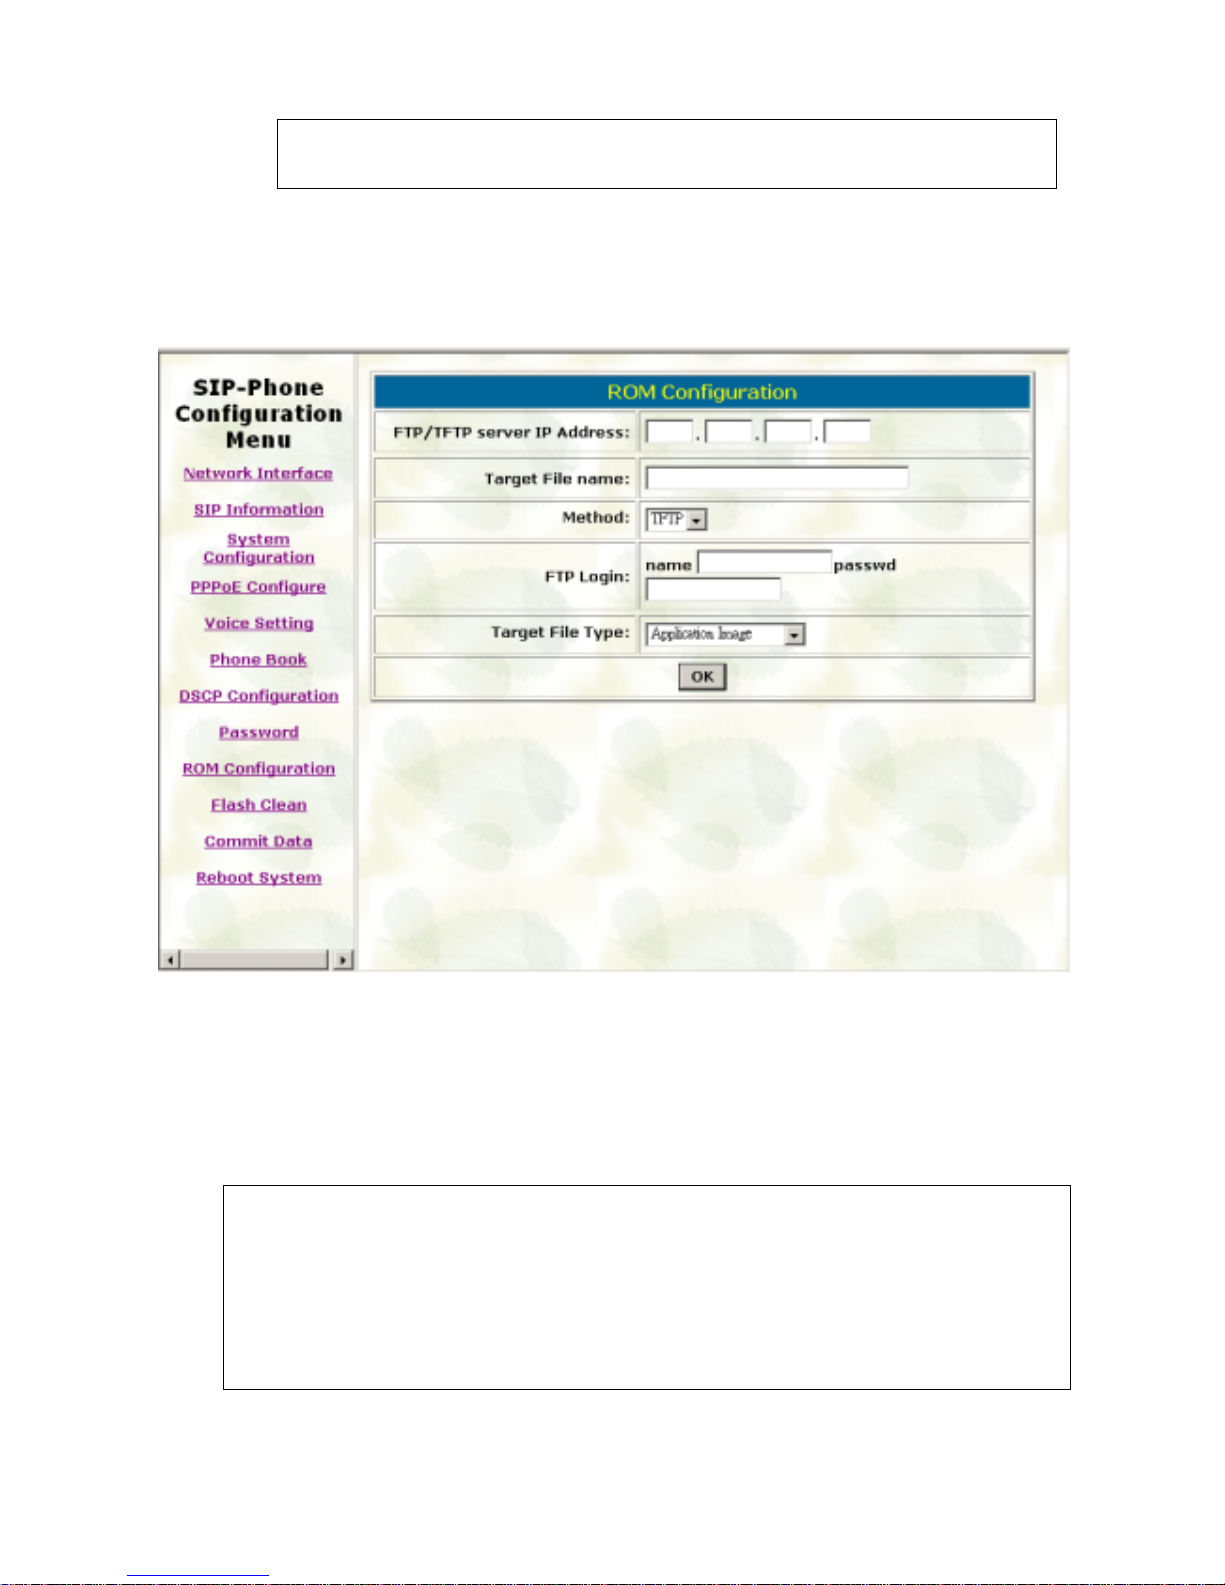
9. Rom Configuration
Please refer to chapter 4.18 [rom] command
- FTP/TFTP Server IP Address: Set TFTP server IP address
- Target File name: Set file name prepared to upgrade
- Method: Select download method as TFTP or FTP
- FTP Login: Set FTP login name and password
- Target File Type: Select which sector of SIP-Phone to upgrade
Note:
1. After 2mb file download is finished, all configurations except IP address
will change to default values, user has to configure again.
2. After upgrade Application, please remember to execute Flash Clean,
which will clean all configurations become factory values except IP
address.
Page 35
SIP-Phone 302 Administration Guide SIP-Phone 302 Ver:
34
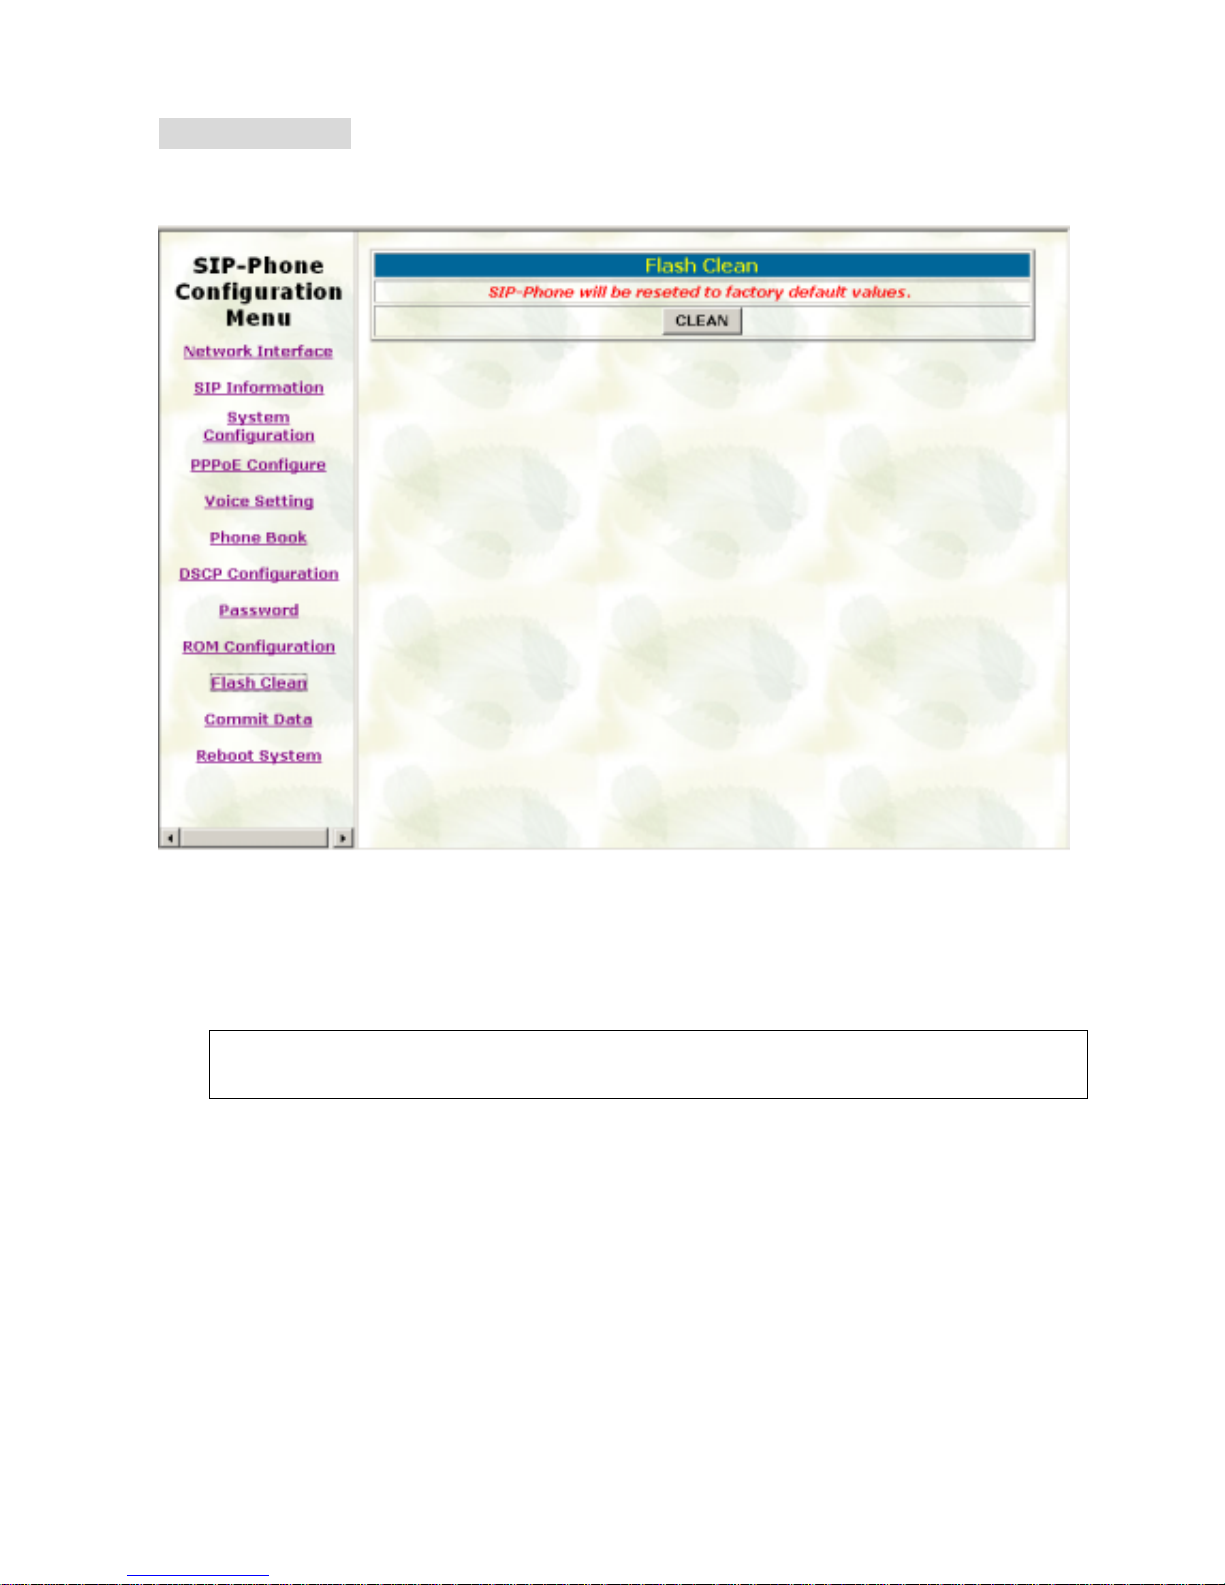
10. Flash Clean
Please refer to chapter 4.11 [flash] command
- Press CLEAN will clean all configurations of SIP-Phone and reset to factory default
value. Please reboot after flash clean.
Note: User must re-configure all commands all over again (except Network Conf igure)
once execute this function,
Page 36
SIP-Phone 302 Administration Guide SIP-Phone 302 Ver:
35
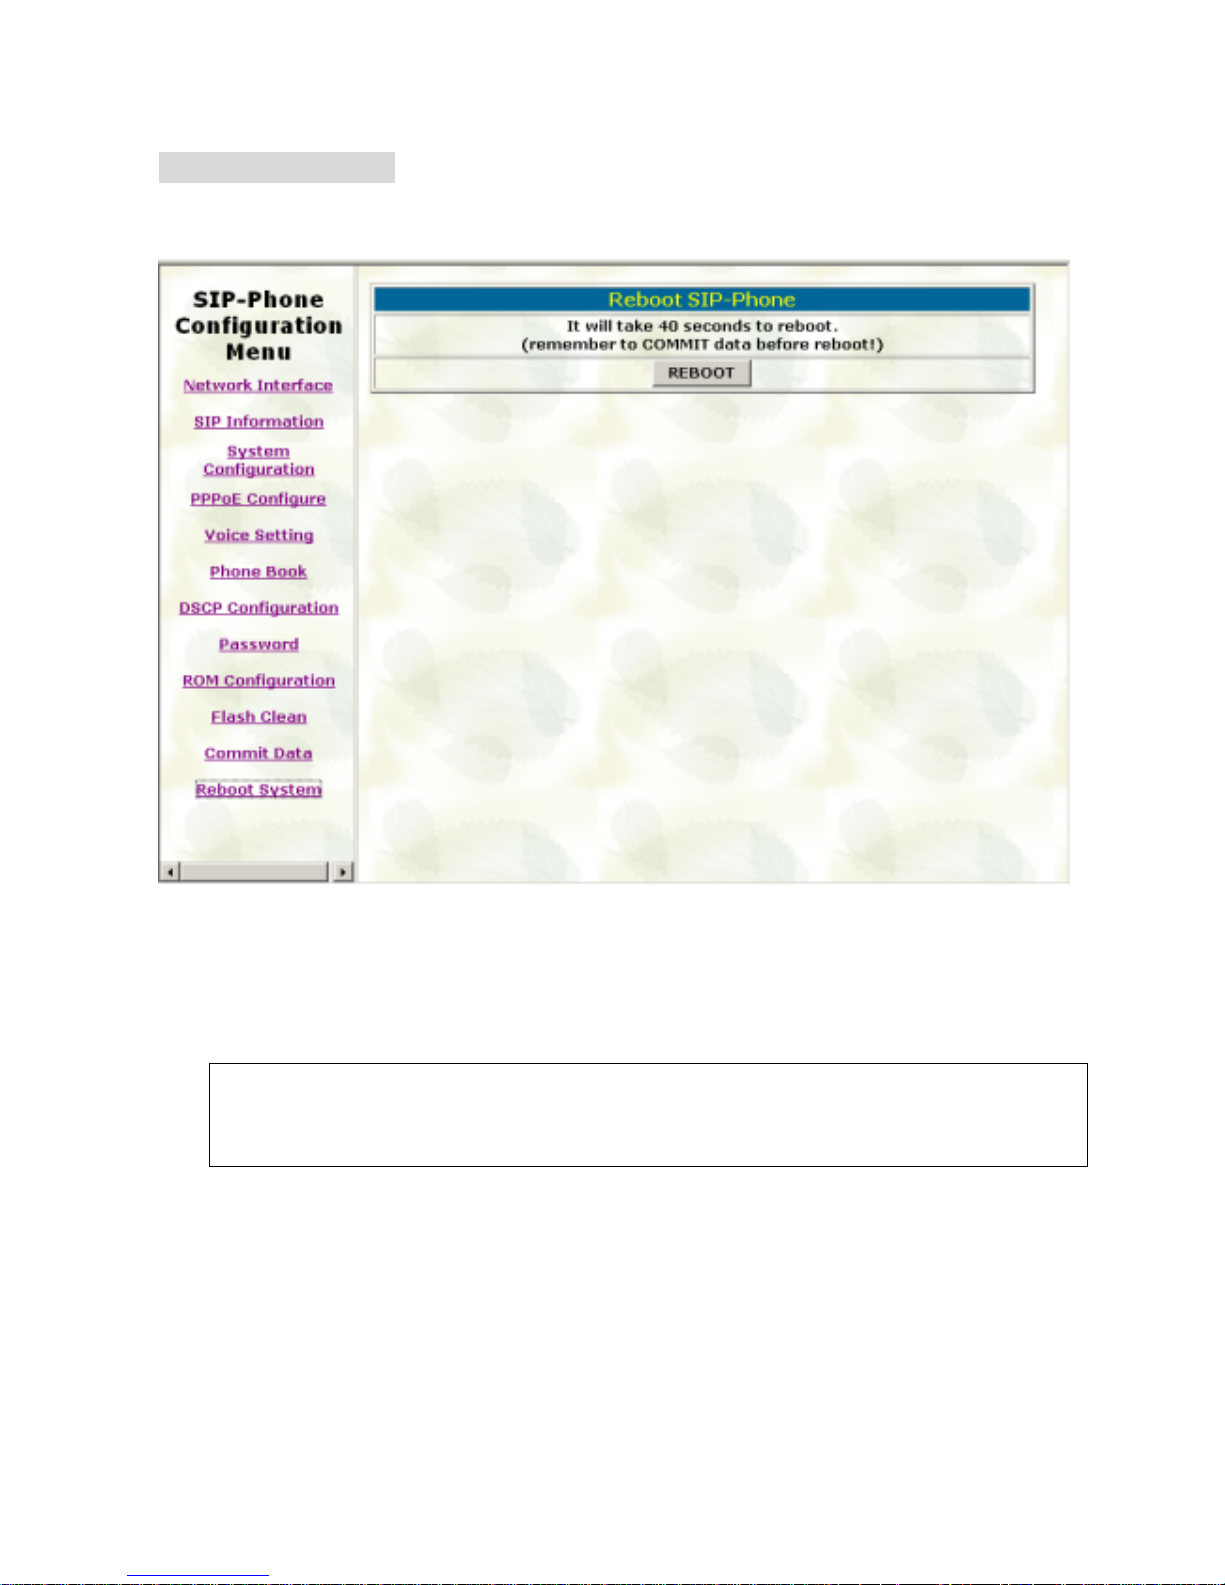
12. Reboot System
Please refer to chapter 4.4 [reboot] command
- Press reboot will reset SIP-Phone.
Note: To execute reboot via web browser, SIP-Phone will automatically save all data
before reboot. To execute reboot via TELNET command, please remember to do
commit before reboot.
Page 37
SIP-Phone 302 Administration Guide SIP-Phone 302 Ver:
36
Chapter 4 Configuring the SIP-Phone 302 through Telnet
command lines
After setting the IP Address of SIP-Phone 302 and reboot, (please refer to LCD Menu:
5-3.4.5), user can enter into Telnet command lines.
Note:
1. After user enter SIP-Phone configuration via telnet, please use login: ”root”,
password: null, press enter to enter command lines.
2. User must input lower-case com mand, but co ntent s of con figuration s such as SIP
alias or user name etc, user can set as capital case.
3. After any change of configuration, please remember to do commit command to
save changes and then reboot command to reboot system.
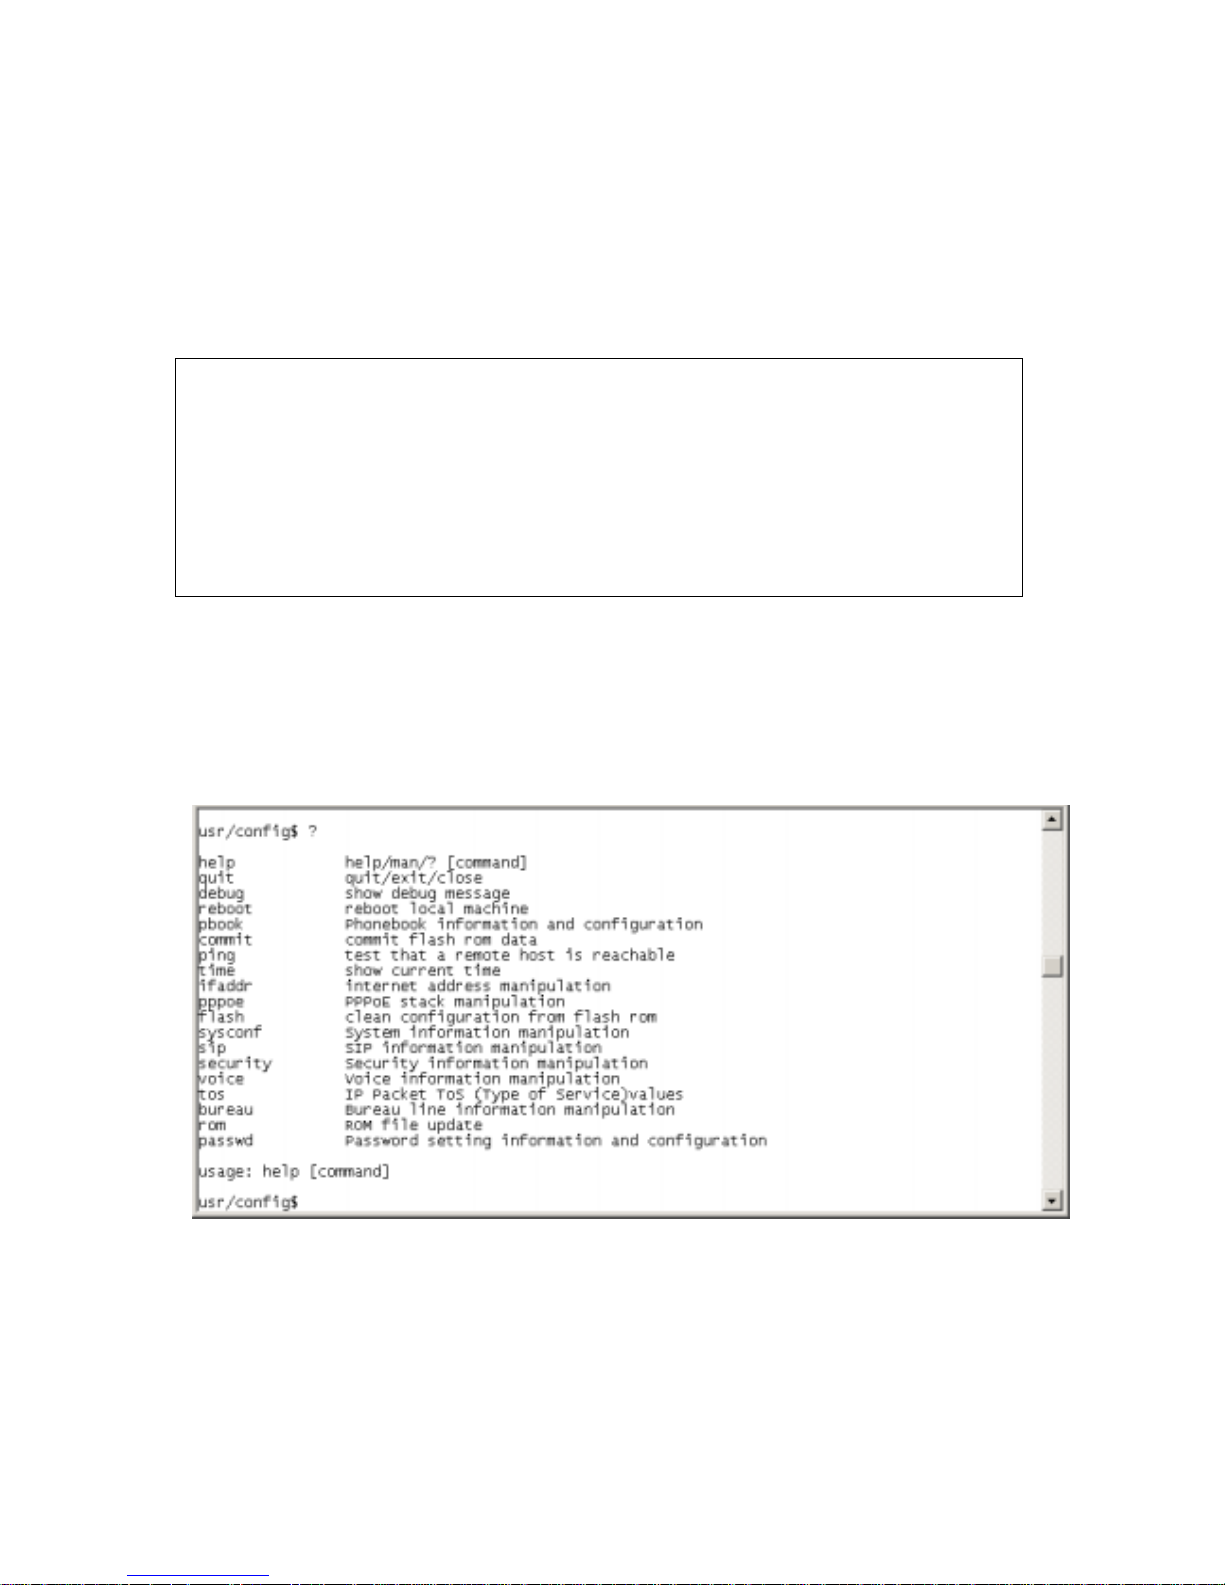
1. [help] command
Type help or man or ? to display all the command lists. The following figure is shown
all commands of SIP-Phone 302.
Page 38
SIP-Phone 302 Administration Guide SIP-Phone 302 Ver:
37
2. [quit] command
Type quit/exit/close will logout SIP-Phone 302 and Telnet Program.
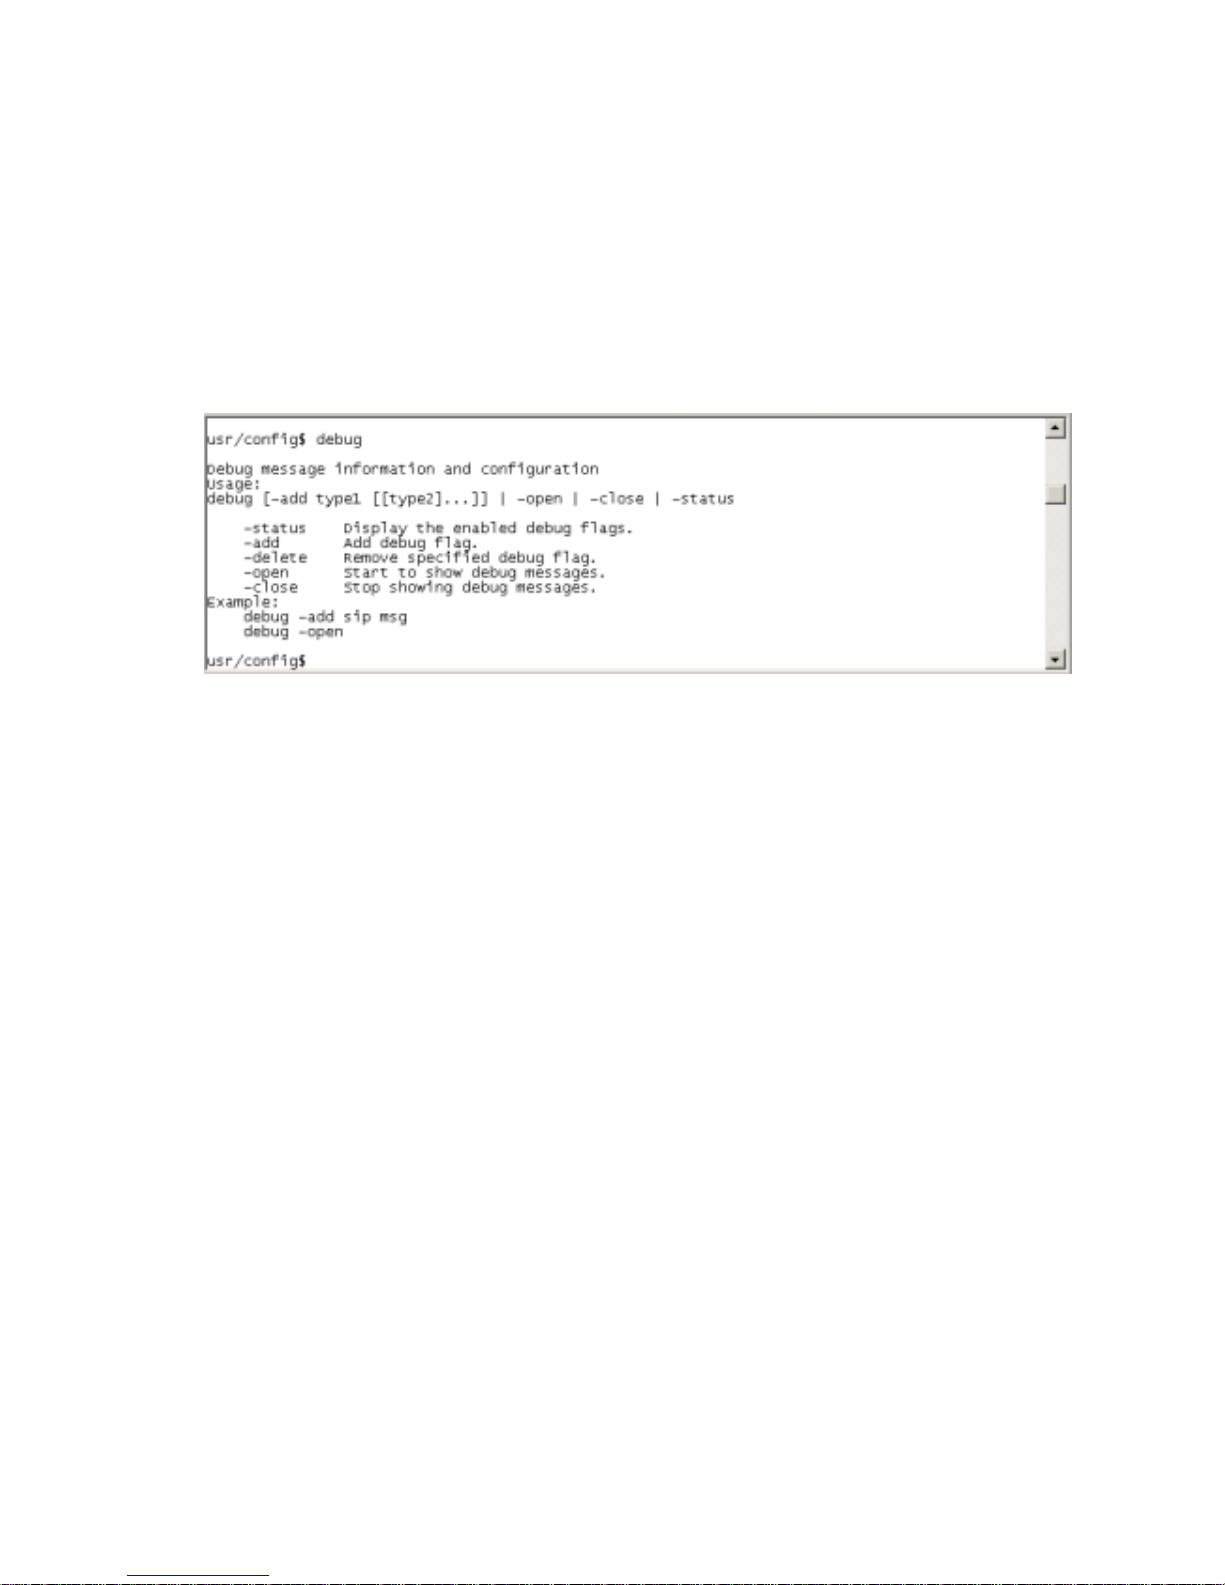
3. [debug] command
This command is for engineers to debug system of SIP-Phone 302. User can add
debug flag via command debug –add “debug flags”, and then start debug function
via command debug –open. When SIP-Phone 302 is working on screen will display
related debug messages. Most frequently used debug flag are “sip”, “fsm”, “msg”…etc.
4. [reboot] command
After typing commit command, type reboot to restart the SIP-Phone 302.
Sometimes after user type reboot, on terminal screen will display: "Data modified,
commit to flash rom?” which means SIP-Phone will record call history or not. (Ex.
REDIAL, outgoing and incoming call data)
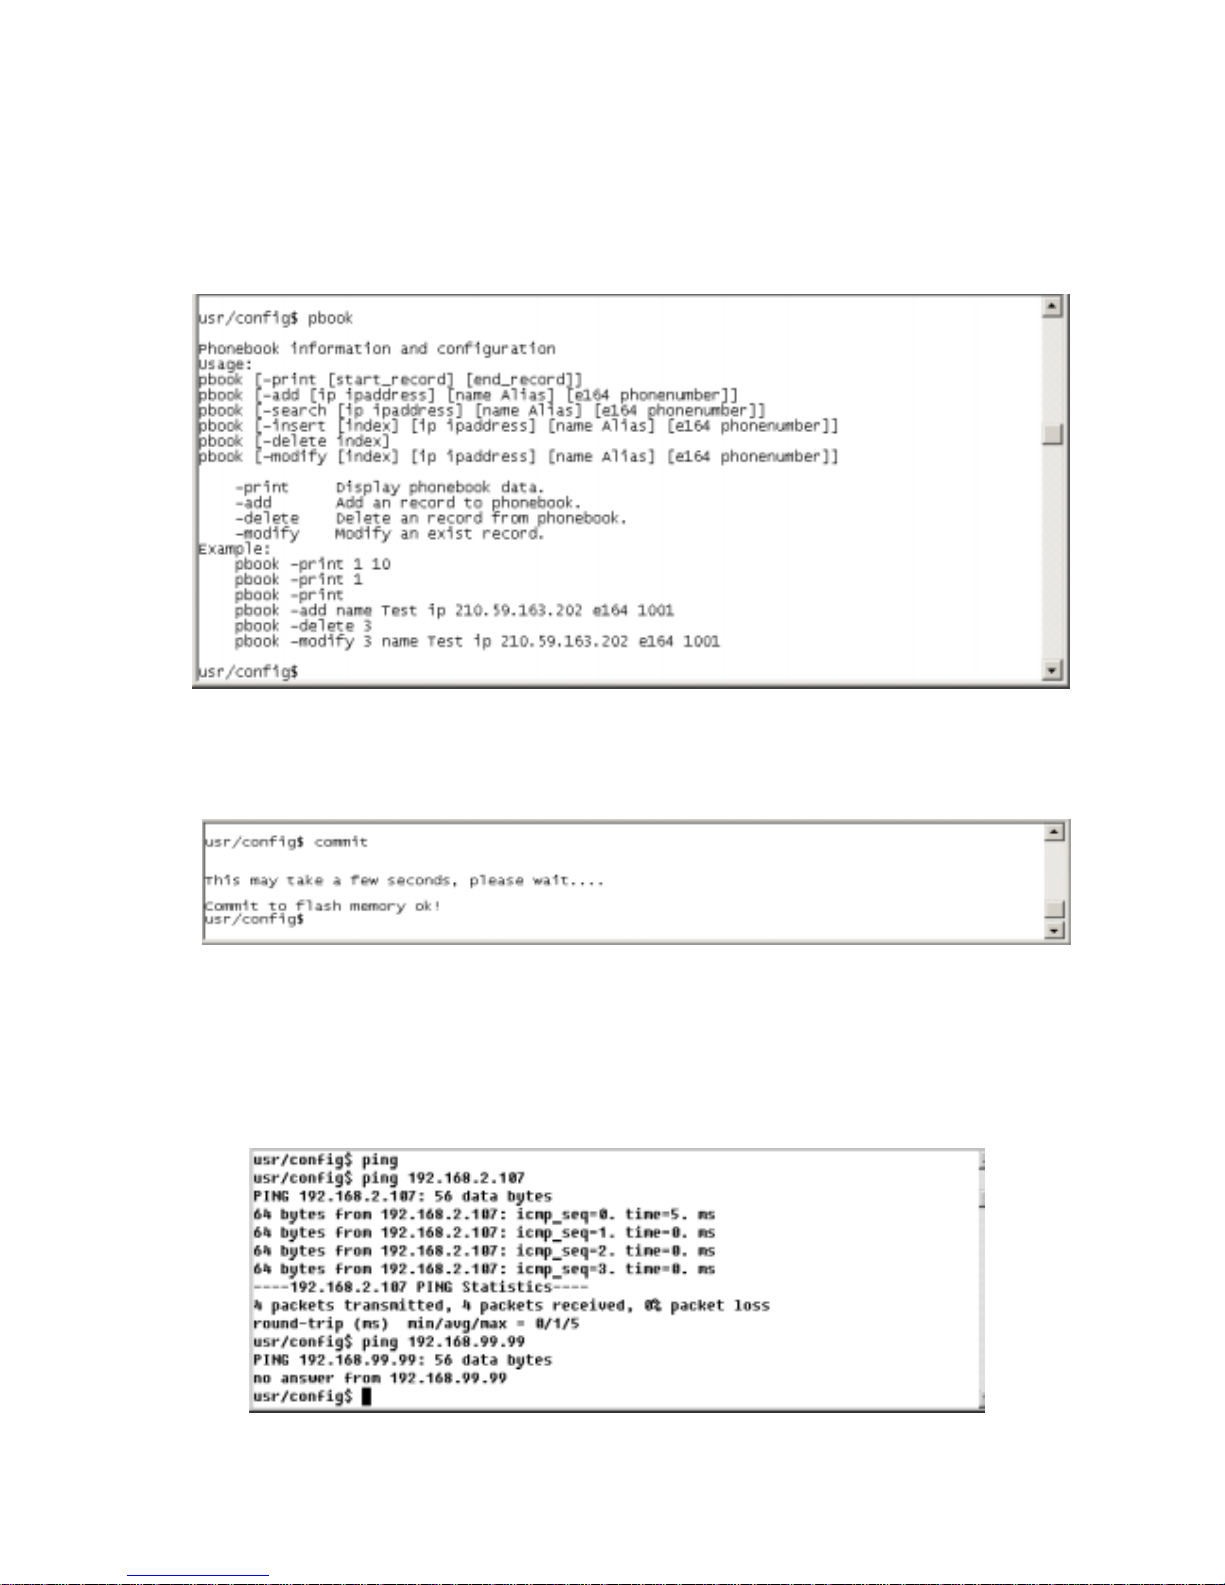
5. [pbook] command
This command is functi onal both in Proxy mode and Peer -to-Peer mode. I n prox y mode,
use speed dial or 10 DL button will dial out e.164 number in phone book. In the other
hand, in peer-to-peer mode, SIP-Phone will dial out IP address.
1. -print: display phone book data. User can print all data in phone book by command
(pbook –print). Furthermore, user can also print only a section of data by indicate
parameter “start index” and “end index” (pbook –print “start index” “end index”).
If parameter “end index” is omitted, only record “start index” will be displayed.
(pbook –print “start prefix”).
2. -add: add a new record in phone book table by giving name, IP address, and e.164
number of callee endpoint.
(pbook –add name “X” ip “xxx.xxx.xxx.xxx” e164 “X”)
3. -delete: delete a record of certain listed index in phone book table. (pbook –delete
“index number”)
Page 39
SIP-Phone 302 Administration Guide SIP-Phone 302 Ver:
38
4. -modify: modify record of a certain index in phone book . Please notice that the
name, IP address and e164 number must be modified together; user cannot just
modify one parame ter onl y.
(pbook –modify “index” name “X” ip “xxx.xxx.xxx.xxx” e164 “X”)
6. [commit] command
Save any changes after configuring the SIP-Phone 302.
7. [ping] command
Command ping can test which the IP address is reachable or not.
Usage: ping “IP address”
The message will display packets transmitting condition or no answer from the IP
address.
Page 40
SIP-Phone 302 Administration Guide SIP-Phone 302 Ver:
39
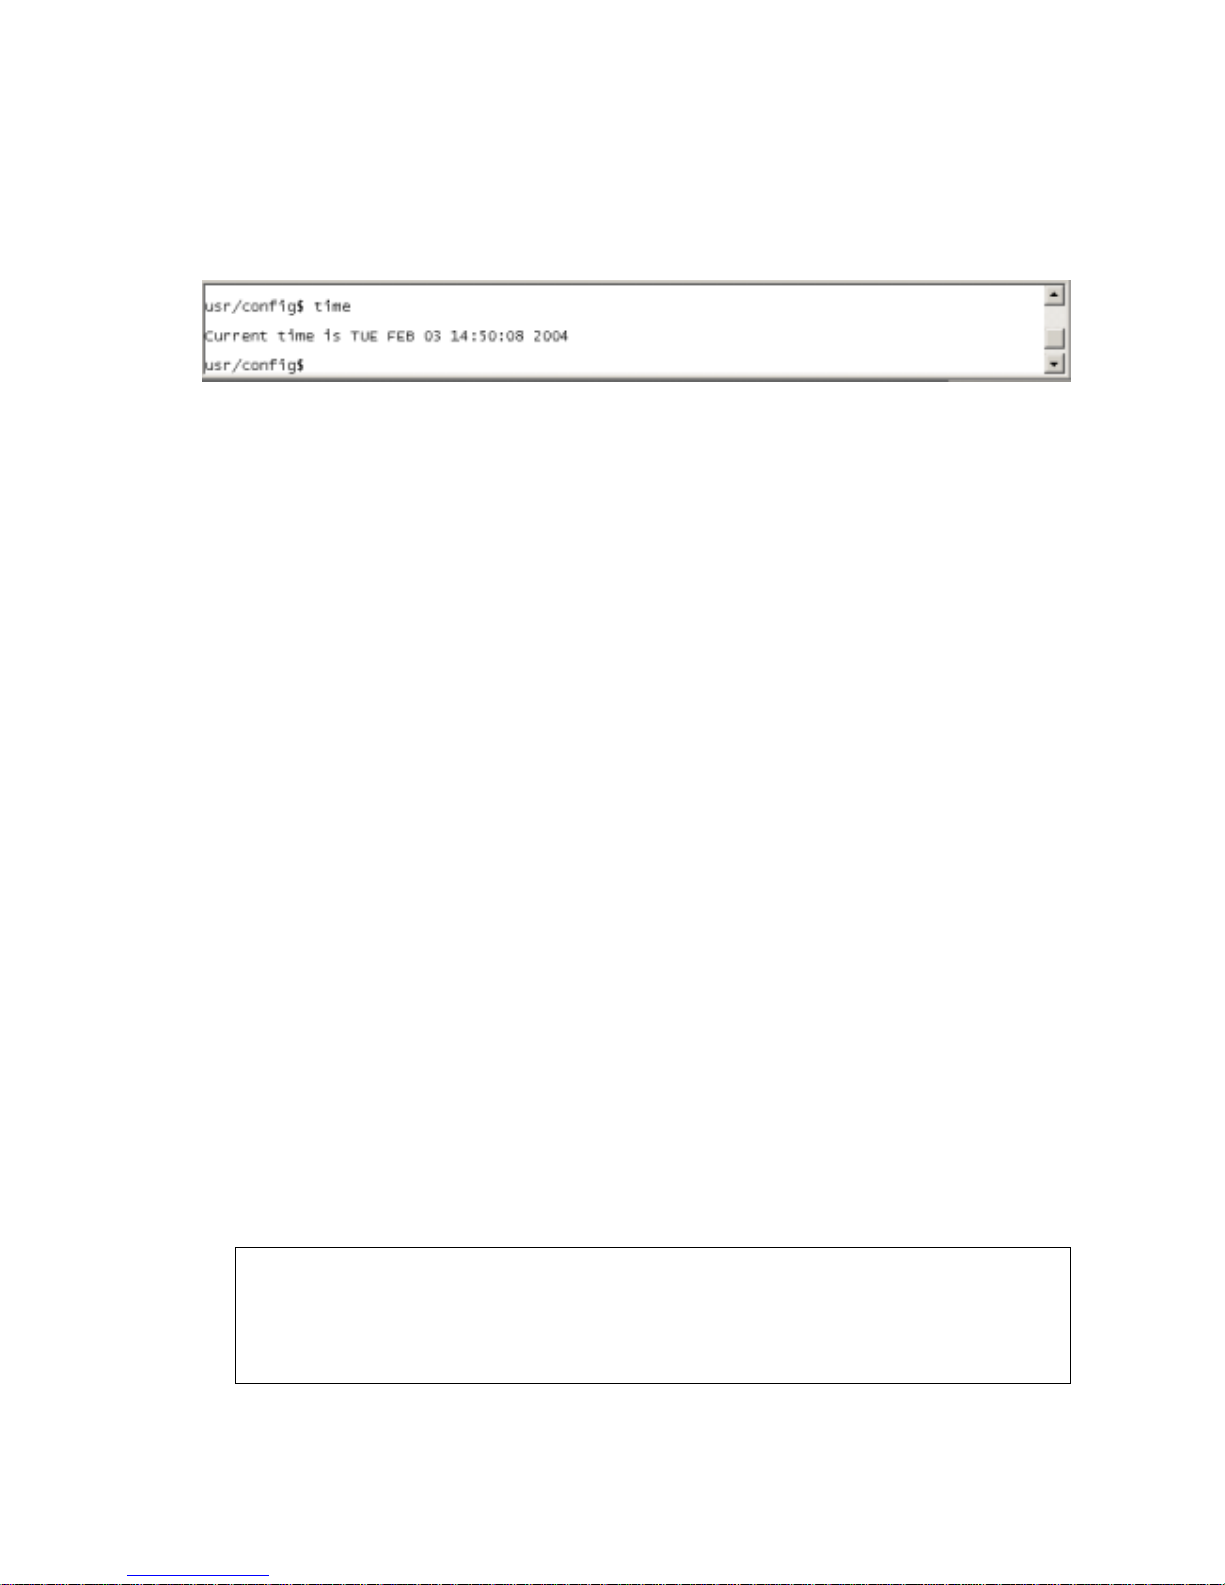
8. [time] command
When SIP-Phone 302 enable SNTP function and be able to connect with SNTP server,
type time command will show the current time retrieved from SNTP server.
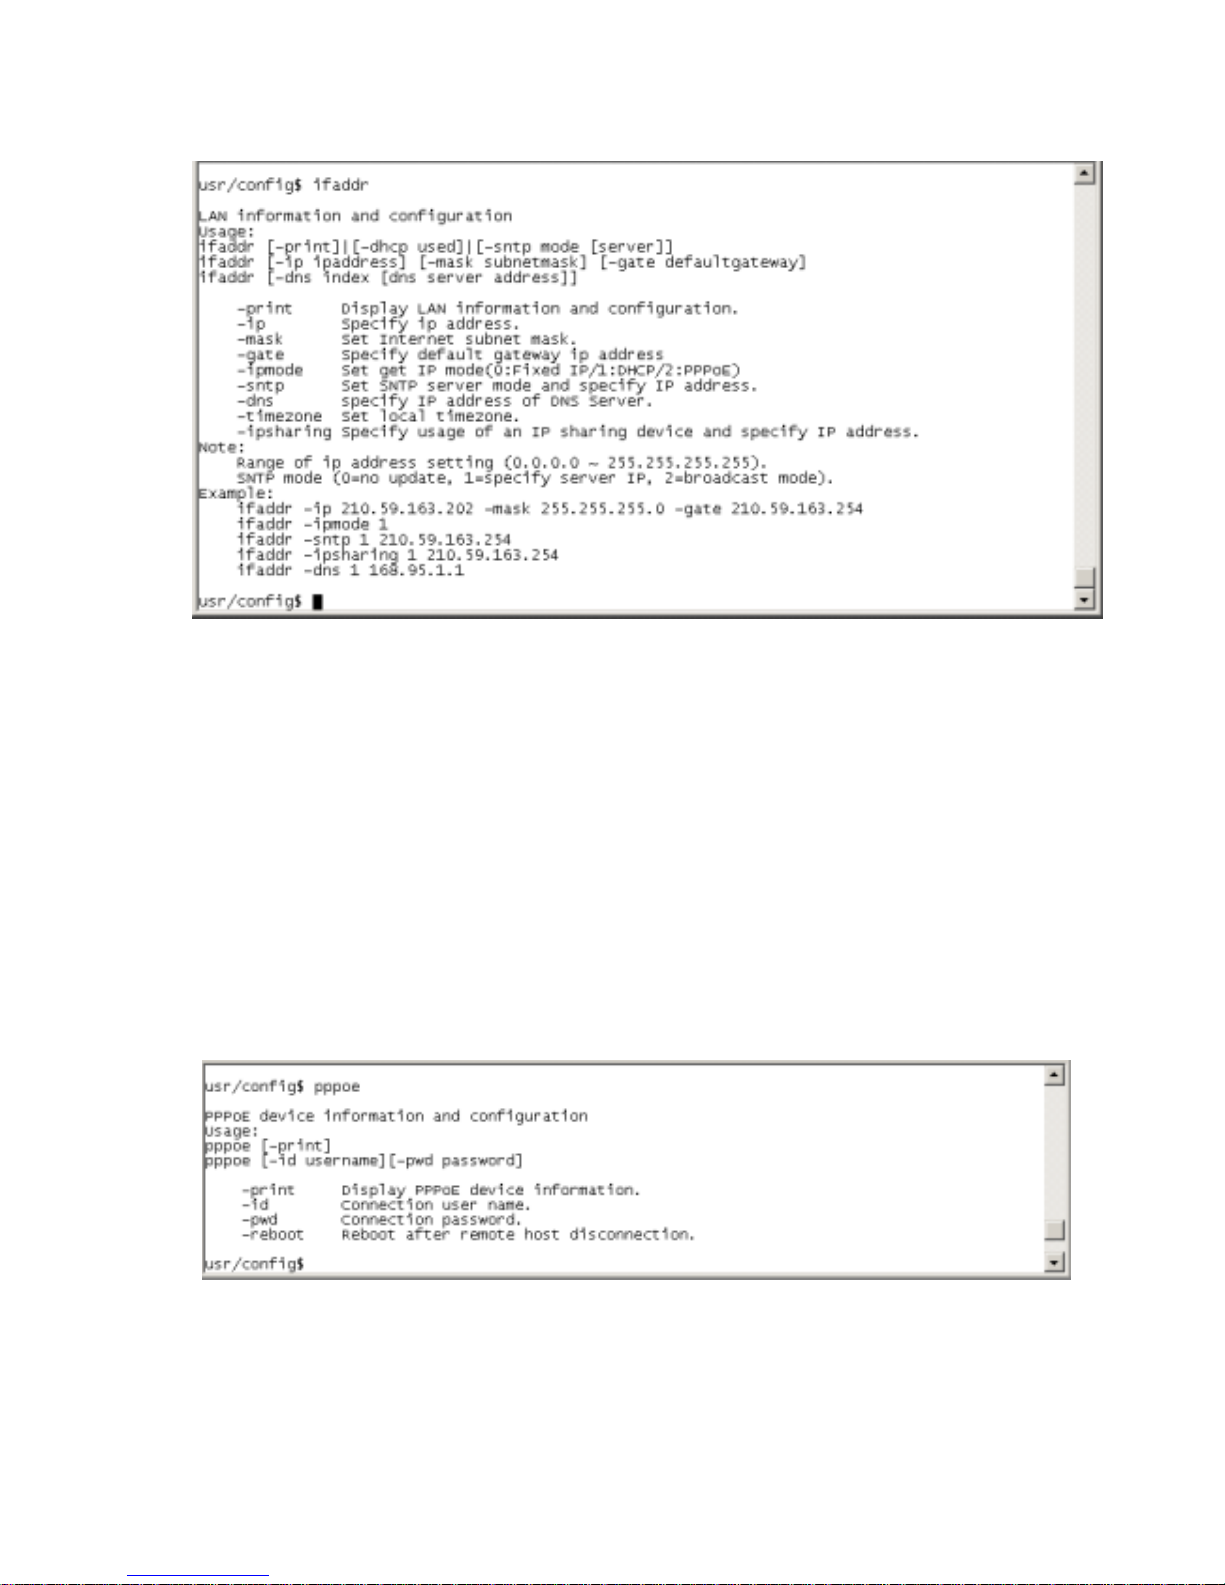
9. [ifaddr] command
Configure and display the SIP-Phone 302 IP information.
1. –print: print out all current configurations of ifaddr command.
2. -ip, -mask, - gat e: S et SIP- Ph one 302 IP Address, sub net mask and default gateway
respectively.
1. -ipmode: Set SIP-Phone network mode to be Fixed IP, DHCP or PPPoE.
When User set IP mode to be fixed IP, please s et IP, subnet Mask, default gateway
as mentioned in item 2.
If User set IP mode to be DHCP, SIP-Phone will search for DHCP server to capture
IP address after reboot.
If user set IP mo de t o be PPPoE, please remember to set rel ated parameters under
[pppoe] command.
2. -sntp: When SNTP server is available, enable SIP-Phone 302 SNTP function and
assign SNTP server IP address so that SIP-Phone can capture current time from
SNTP server. (ifaddr –sntp 1 “xxx.xxx.xxx.xxx”)
3. -dns: User can set primary and secondary Domain Name Server IP address. Once
SIP-Phone can connect with DNS server, user can specify URL address instead of
IP address for Proxy Server and phone book IP address...etc. (ifaddr –dns 1
“primary DNS server address” –dns 2 “secondary DNS server address”)
4. –timezone: User can set dif f ere nt ti m e zone accor ding t o the loc ati on SIP- P hone is.
For example, in Taiwan the time zone should be set as 8,wh ich means GMT+8.
(GMT-8: ifaddr –timezone -8)
5. -ipsharing: If SIP-Phone 302 is behind a IP-sharing , user must enable IP sharing
function and specify public IP address.(ifaddr –ipsharing 0/1 “public IP address
of IP sharing” , 0 for disable and 1 for enable )
Note:
Some Proxy servers support endpoint behind NAT function, in this case SIP-Phone
doesn’t have to enable IP sharing function, please contact with your Proxy Server
vendor for detail information.
Page 41
SIP-Phone 302 Administration Guide SIP-Phone 302 Ver:
40
10. [pppoe] command
1. -print: display all current configurations and information.
2. –id: to set PPPoE authentication user name.
3. –pwd: to set PPPoE authentication password.
4. –reboot: Select enable or disable this function. If user enables this function, after
PPPoE disconnected, SIP-Phone will automatically reboot to re-connect, and after
reboot, if SIP-Phone still can’t connect with server, SIP-Phone will keep trying to
connect. On the other hand, if user disables this function, SIP-Phone won’t reboot
and keep trying to connect. (pppoe –reboot 0/1)
Page 42

SIP-Phone 302 Administration Guide SIP-Phone 302 Ver:
41
11. [flash] command
This command will clean the configuration stored in the flash rom to default value and
reboot the SIP-Phone 302.
Note:
1. After user upgrade new software version, suggested to execute this command
to make sure new software work well on SIP-Phone 302.
2. To execute the command flash –clean, all configuration of SIP-Phone 302
stored in flash will be cleaned. It is authorized for the user whose login name is
“root” only.
12. [sysconf] command
1. -print: display all current configurations.
2. -idtime: set the duration(in second) of two pressed digits in dial mode as timed out.
If after the duration user hasn’t pressed next number, SIP-Phone will dial out all
number pressed.
3. -keypad: set DTMF type .User can select DTMF type SIP-Phone receive and
transmit.(sysconf –keypad 0/1 , 0 for in band ,1 for RFC2833.)
4. -2833type: change RFC2833 Payload type.
5. -eod: select end of dialing key, e.g. set end of dial key as “*” button , after finished
pressing dialing number then press “*” will dial out. (sysconf –eod 0/1/2 , 0 for no
end of dial key , 1 for “*” button, 2 for “#” button )
Page 43

SIP-Phone 302 Administration Guide SIP-Phone 302 Ver:
42
13. [sip] command
1. –print: display all current co nfigurations.
2. –mode: configure SIP-Phone 302 as Proxy or Peer-to-Peer Mode.
Usage: sip –mode 0/1(1 for Proxy mode, 0 for Peer-to-Peer mode)
3. –px: set proxy server IP address or URL address (sip –px “IP address or URL of
Proxy server”).
4. –pxport: set listening port of Proxy server.
5. –outpx: set IP address of outbound proxy server. After user set outbound proxy, all
packets form SIP-Phone will be sent to outbound proxy server.
6. –prefix: set prefix string. If user ID contains alphabets, user can set it as prefix
string here. For example, if Account Name is 123, SIP-Phone will sent out
messages as Account Name @”IP address of Proxy”, if user set prefix as abc,
SIP-Phone will set out as abc123@”IP address of Proxy”. This function is for special
proxy server.
7. –line: identify one number for the SIP-Phone 302 to register to the Proxy
(SIP –line “line number”).
Note: In proxy mode please remember to set user account information under
security command.
8. –pbsearch: enable/disable phone book search function under Proxy Mode. If user
enabled this function, SIP-Phone will search dialed number in phone book to see if
there is any matched table before send to Proxy serve r, and if there is a matched
data in phone book, SIP-Phone will make call to related IP address.
9. –expire: set expire time of registration. SIP-Phone will keep re-registering to proxy
server before expire timed out.
10. –port: set listening UDP port or SIP-Phone.
11. –rtp: set RTP port number. SIP-Phone will use this port to send and receive voice.
Page 44

SIP-Phone 302 Administration Guide SIP-Phone 302 Ver:
43
14. [security] command
1. –print: display all current configurations.
2. -name: set user ID of SIP-Phone 302 for registering. User can set user name and
password for registeri ng . If p assw ord is no ne ed, please set user n ame t he sam e as
line number or SIP-Phone won’t register successfully.
3. –pwd: set account password for registering.
15. [voice] command
The voice command is associated with the voice codec setting information.
1. -print: display voice codec inform ation and configuration.
2. -send: three voice packet size can be config u r ed as 20 ms, 40 ms or 60 ms.(only
30 and 60 ms for G..723.1)
Page 45

SIP-Phone 302 Administration Guide SIP-Phone 302 Ver:
44
3. -priority: set codecs priority in order. Please notice that user can set from 1 to 5
codecs as their need, for example, voice –priority g723 or voice –priority g723
711a g711u g729 g729a means SIP-Phone can support only one codec or four
codecs.
4. -volume: There are three types can be adjustable, voice volume, input gain and
DTMF volume. Voice volume means the volume user can hear, input gain means
the volume the other side can hear from SIP-Phone, DTMF means DTMF
transmitting volume. (voice –volume voice “value of volume”, voice –volume
input “value of volume”, voice –volume dfmt “value of volume”)
Note:
If value of volume set as 0 means –32db, 1 means –31db…etc.
5. -nscng: enable or disable sound compression and comfort noise generation. It is
only for codec G.723.1. (0 for off, 1 for on)
6. -echo: enable or disable echo cancellation function .
7. -mindelay: set minimum delay of jitter buffer(0~150)
8. -maxdealy: set maximum delay of jitter buffer(0~150)
Note: It is for advanced administrator use only. Please ask your distributor
before changing any settings of this command.
Page 46

SIP-Phone 302 Administration Guide SIP-Phone 302 Ver:
45
16. [tos] command
TOS/DiffServ (DS) priority function can discriminate the Differentiated Service Code
Point (DSCP) of the DS field in the IP packet header, and map each Code Point to a
corresponding egress traffic priority. As per the definition in RFC2474, the DS field is
Ty pe-of-Ser vice (T OS) octet in I Pv4. The reco mmended D if fServ Code Point is de fined
in RFC2597 to classify the traffic into different service classes. The mapping of Code
Point value of DS-field to egress traffic priorities is shown as follo ws.
1. High priority with DS-field.
Expected Forwarding (EF) 101110 ====> 46 (Decimal System)
Assured Forwarding (AF) 001010 ====> 10 (Decimal System)
010010 ====> 18 (Decimal System)
011010 ====> 26 (Decimal System)
100010 ====> 34 (Decimal System)
2. Low Priority with DS-field:
Assured Forwarding (AF) 001100 ====> 12 (Decimal System)
010100 ====> 20 (Decimal System)
011100 ====> 28 (Decimal System)
100100 ====> 36 (Decimal System)
001110 ====> 14 (Decimal System)
010110 ====> 22 (Decimal System)
011110 ====> 30 (Decimal System)
100110 ====> 38 (Decimal System)
000000 ====> 0 (Decimal System)
1. -print : display all current configurations.
2. –rtptype: set DSCP value of signalin g packets from 0 to 63
3. –siptype: set DSCP value of RTP packets from 0 to 63
Note:
This command won’t be functional until whole network environment support
DSCP function, e.g. all routers or switches in your network have enabled DSCP
feature.
Page 47

SIP-Phone 302 Administration Guide SIP-Phone 302 Ver:
46
17. [bureau] command
1. -print: display all current configurations.
2. –hotline: set hotline IP and remote phone number. If user has enable Hotline
function, once SIP-Phone 30 2 been off-hook, it will automatically dial out to
assigned IP and phone number.
(bureau –hotline “IP of destination” “Phone number of destination”)
Note:
To set SIP-Phone 302 under hotline mode must set follow i ng configu r ations:
1. Peer-to-Peer mode: sip –mode 0
2. Hotline service: sysconf –service 1
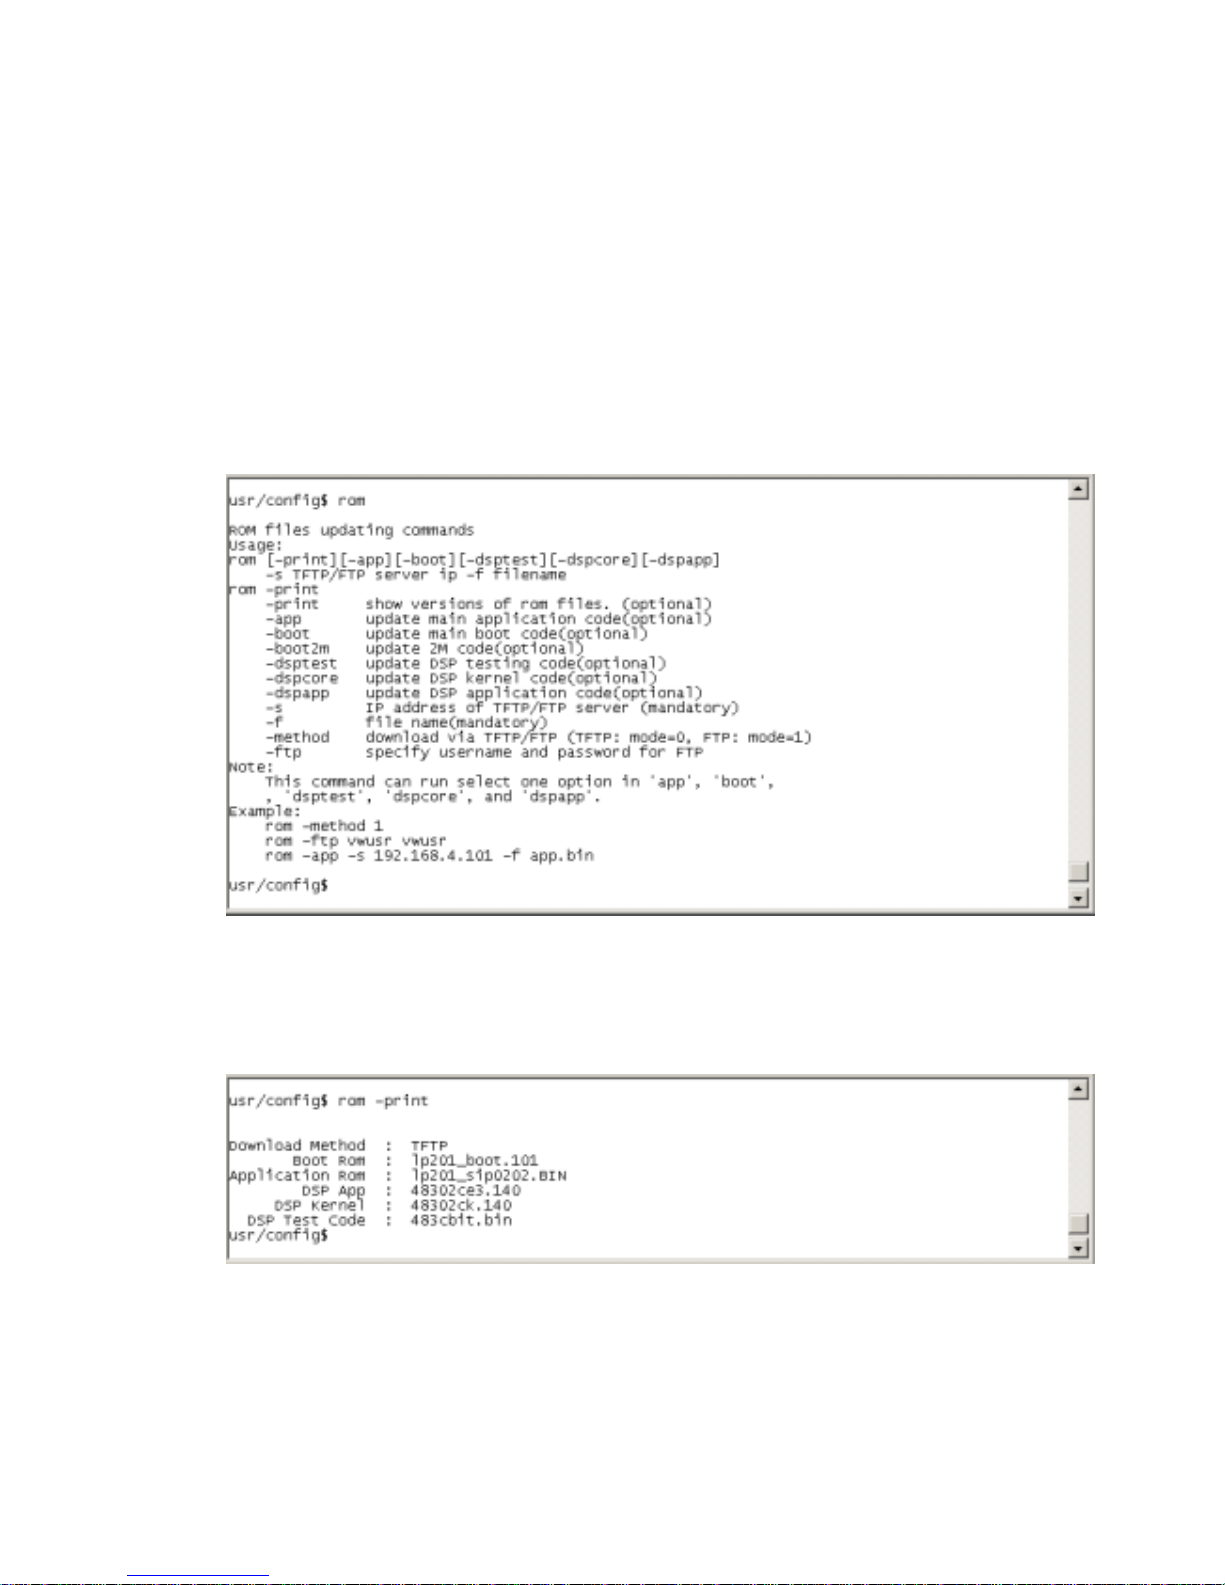
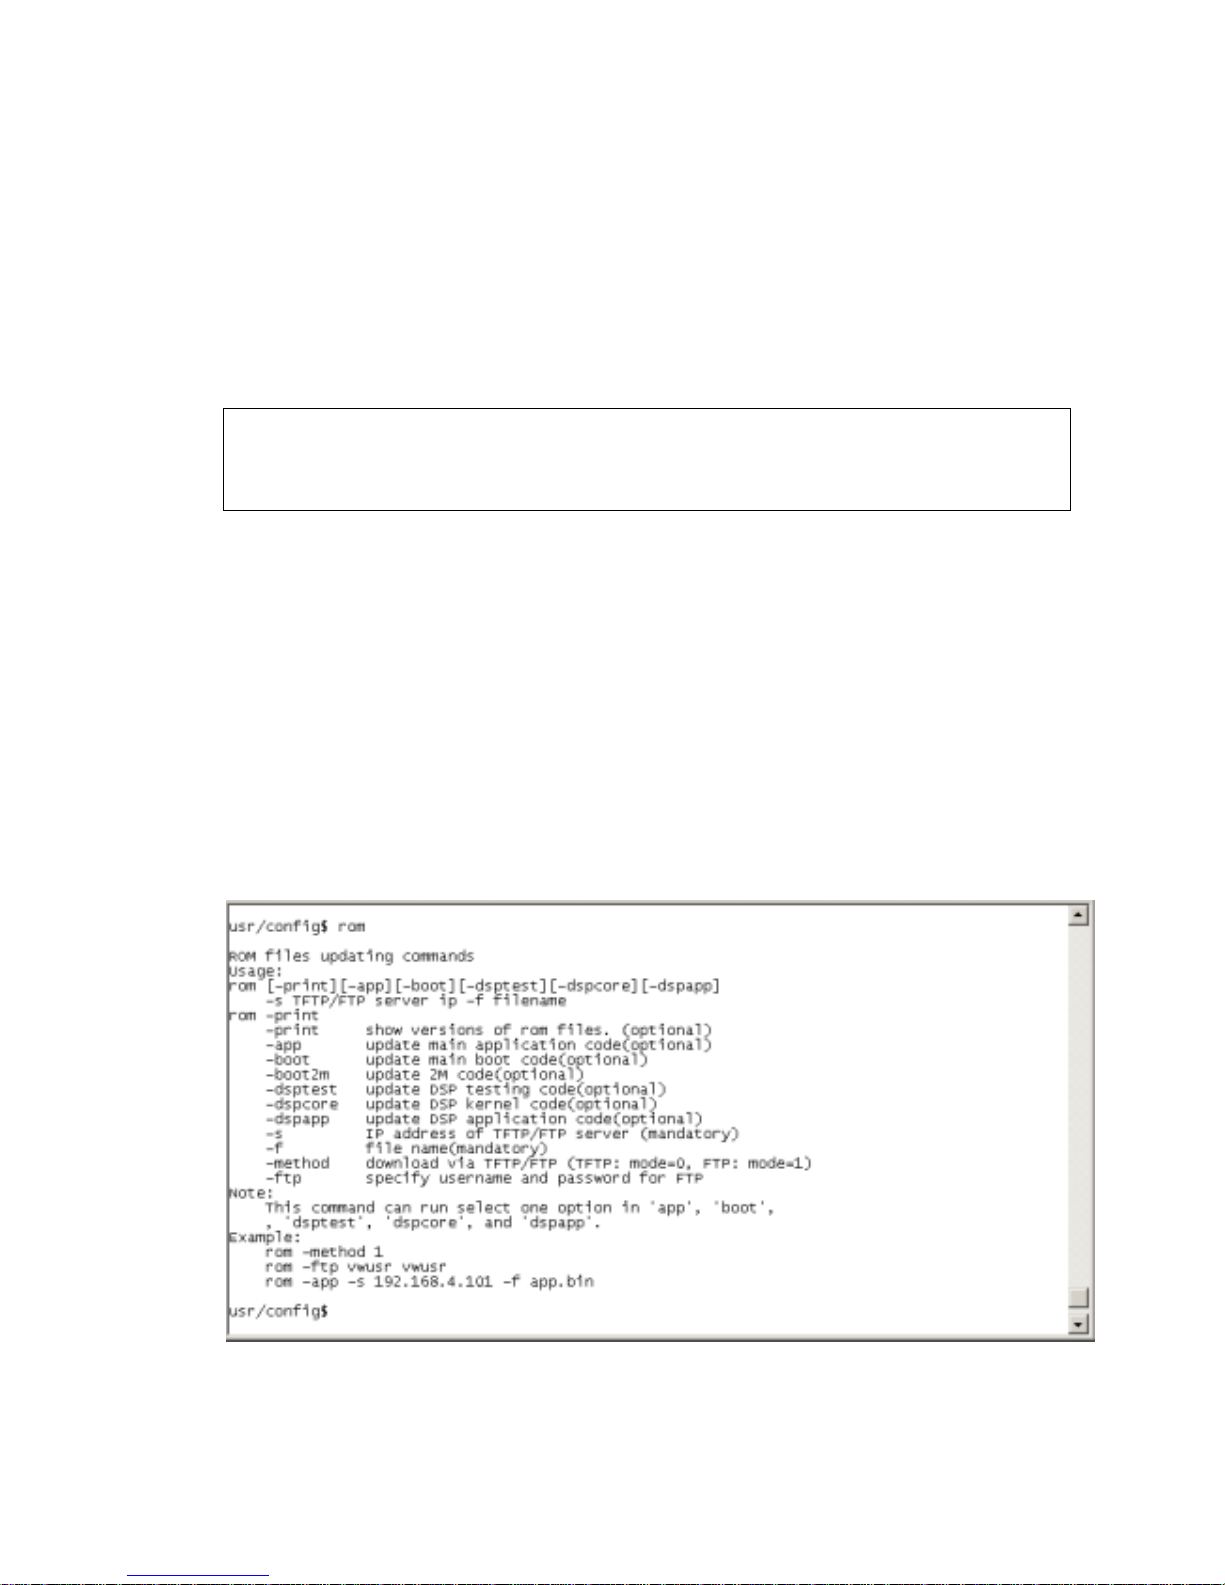
18. [rom] command
1. -print: show all current configurations and version information.
2. -app,-boot, -dsptest, -dspcore, -dspapp,: upgrade main boot code, main
application code, DSP testing code, DSP kernel code, DSP application code, Ring
Back Tone PCM file and Hold Tone .
Note:
After upgrade Application, please remember to execute flash –clean command,
which will clean all configurations become factory values except IP address.
Page 48
SIP-Phone 302 Administration Guide SIP-Phone 302 Ver:
47
3. -boot2m: to upgrade 2mb rom file, which includes all firmware file mentioned in
item 2.
4. -s: it is necessary to prepare TFTP/FTP server IP address for upgrading firmware
rom file.
5. -f: the file name prepared for upgrading is necessary as well.
6. –method: specify download method to be TFTP or FTP(0 for TFTP.1 for FTP)
7. –ftp: specify user name and password for FTP download method.
For example: User prep ares to upg rade the la test app rom file – lp sip.100 , the TFTP
server is 192.168.1.1, User has to input command as below:
rom –app –s 192.168.1.1 –f lpsip.100
Command rom –print can show current version installed in SIP-Phone 302. (**)
19. [passwd] command
For security protection, user has to input the password before entering application
user/config mode. Two configurations of login name/password are supported by the
system.
Page 49

SIP-Phone 302 Administration Guide SIP-Phone 302 Ver:
48
1. –set: set password of “root” users or “administrator” users.
(passwd –set root/administrator “password”)
2. –clean: clean up password restored before, and user can login :”root/administrator”,
password: ”press enter”.
User who requests authorization to execute all configuration commands needs to
login with “root”. If a user login with “administrator”, commands below are not
functional:
B. password –set root: set password of login : “root”.
C. passwd –clean: clean up password restored before, and user can
login :”root/adm inistrator”, password: ”press enter”.
D. flash –clean: clean all current configurations
E. rom –boot: upgrade boot sector
F. rom –boot2m: upgrade whole software file
Page 50

SIP-Phone 302 Administration Guide SIP-Phone 302 Ver:
49
Chapter 5 Upgrading Software on the SIP-Phone 302
SIP-Phone 302 supports three methods to upgrade the new version. All methods are
necessary to prepare the TFTP or FTP program on the host PC as TFTP/FTP server. After
installing TFTP/FTP program on one PC and connecting to network, SIP-Phone 302 is
ready to be upgraded.
1. LCD Panel Cont rol
2. Remote Control: Telnet
3. Web Management
1.From LCD Phone Menu
Please select the 6→2 selection-SW Upgrade. Press OK to enter into the
sub-selection as below.
1. SW Update
(1) Method
There are two methods to download new version file, please move the
“>“ symbol by press ▲or ▼ on the keypad to select TFTP or FTP
method, then press OK to confirm it.
(2) Sever
User has to offer one TFTP/FTP server IP Address and set this IP
Address via keypad. The IP Address is necessary for upgrading
SIP-Phone new application rom file.
(3) Account
User has to input user name for FTP server login .It is necessary for
upgrading SIP-Phone new application rom file via FTP method.
(4) Password
User has to input user password for FTP server login .It is necessary for
upgrading SIP-Phone new application rom file via FTP method.
(5) File Name
User has to press the file name of new application rom file prepared for
upgrading
(6) Version
Show versions of all software and hardware. (**)
(7) Upgrade
Select YES or NO to start upgrade.
(8) Exit
Return to upper level of LCD Menu
Page 51
SIP-Phone 302 Administration Guide SIP-Phone 302 Ver:
50
Note:
Download via LCD command can only upgrade new application rom file.
2. Web Management
Please refer to chapter 4.18 [rom] command
- FTP/TFTP Server IP Address: Set TFTP server IP address
- Target File name: Set file name prepared to upgrade
- Method: Select download method as TFTP or FTP
- FTP Login: Set FTP login name and password
- Target File Type: Select which sector of SIP-Phone to upgrade
Note:
1. After 2mb file download is finished, all configurations might change to
default values, user has to configure again.
2. After upgrade Application, please remember to execute Flash Clean,
which will clean all configurations become factory values except IP
address.
Page 52
SIP-Phone 302 Administration Guide SIP-Phone 302 Ver:
51
3. Telnet command lines
Please refer to chapter 4.17 [rom] command
1. -print: show all current configurations and version information.
2. -app,-boot, -dsptest, -dspcore, -dspapp,: upgrade main boot code, main
application code, DSP testing code, DSP kernel code, DSP application code, Ring
Back Tone PCM file and Hold Tone .
Note:
After upgrade Application, please remember to execute flash –clean command,
which will clean all configurations become factory values except IP address.
3. -boot2m: to upgrade 2mb rom file, which includes all firmware file mentioned in
item 2.
4. -s: it is necessary to prepare TFTP/FTP server IP address for upgrading firmware
rom file.
5. -f: the file name prepared for upgrading is necessary as well.
6. –method: specify download method to be TFTP or FTP(0 for TFTP.1 for FTP)
7. –ftp: specify user name and password for FTP download method.
For example: User prep ares to upg rade the la test app rom file – lp sip.100 , the TFTP
server is 192.168.1.1, User has to input command as below:
rom –app –s 192.168.1.1 –f lpsip.100
 Loading...