

Page 1

LAN Phone 399
User Manual
Welltech Technology Co., Ltd.
1 / 89 2014/02/11
IP Phone
User Manual
Version: V1.0
Page 2

LAN Phone 399
User Manual
Welltech Technology Co., Ltd.
2 / 89 2014/02/11
Version directions:
Version
date Modify content
1.0 2014/02/11 First release of New v3.0 web page user operation.
Page 3

LAN Phone 399
User Manual
Welltech Technology Co., Ltd.
3 / 89 2014/02/11
Directory
1. Brief Introduction ............................................................................................................... 5
1.1.Product Introduction ................................................................................................... 5
1.2.Hardware Function Introduction ............................................................................. 5
1.3.Software Function Introduction .............................................................................. 5
1.4.Rear Interface Description ........................................................................................ 6
1.5.Hardware Installation ................................................................................................. 6
1.5.1.Network Environment Setting ..................................................................... 7
1.5.2.Connection .......................................................................................................... 7
1.6.Basic Operations ........................................................................................................... 7
1.6.1.Phone function ................................................................................................... 7
1.6.2.Dial function Introduction ........................................................................... 14
2. Web Page .................................................................................................................................... 16
2.1.Web Login Level Table .............................................................................................. 16
2.2.Login LP399 Web Page ............................................................................................. 16
2.2.1.Functions ............................................................................................................ 16
2.2.2.Instruction ......................................................................................................... 17
2.3.VoIP Setup Manu ........................................................................................................ 17
2.3.1.Functions ............................................................................................................ 17
2.3.2.Instruction ......................................................................................................... 17
2.4.Status (System Information) ................................................................................. 18
2.4.1.Functions ............................................................................................................ 18
2.4.2.Instruction ......................................................................................................... 18
2.5. Phone (Telephony environment) .......................................................................... 23
2.5.1. Phone Book ....................................................................................................... 23
2.5.2. Speed Dial ......................................................................................................... 27
2.5.3. Dial Plan - Basic .............................................................................................. 28
2.5.4. Dial Plan – Advanced .................................................................................... 31
2.5.5. Call Service (Phone Feature) ..................................................................... 33
2.5.6. General (Normal Setting) ........................................................................... 36
2.5.7. Volume ............................................................................................................... 37
2.6. Network ......................................................................................................................... 38
2.6.1.WAN ...................................................................................................................... 38
2.6.2. DDNS (Dynamic DNS Settings) ................................................................ 40
2.6.3. VLAN (VLAN Environment Settings) ....................................................... 41
2.6.4. VPN (PPTP/L2TP Link Type) ........................................................................ 42
2.6.5. NTP (Time Environment) ............................................................................. 44
2.7. NAT (NAT Environment) .......................................................................................... 48
2.7.1. LAN (LAN Network Setting) ....................................................................... 48
2.7.2. DMZ & MAC Clone (DMZ & MAC Setting) ............................................. 49
2.7.3. Virtual Server .................................................................................................. 50
2.8.SIP Setting (Register Environment) .................................................................... 52
2.8.1.Service (SIP Register Setting) .................................................................. 52
2.8.2.Codec (Voice Format) ................................................................................... 54
2.8.3.Advanced (Other Setting) ........................................................................... 56
2.8.4.STUN (STUN & Force Setting) ................................................................... 62
Page 4

LAN Phone 399
User Manual
Welltech Technology Co., Ltd.
4 / 89 2014/02/11
2.9.Management (Advanced Settings) ...................................................................... 64
2.9.1.Status Log (System Status) ....................................................................... 64
2.9.2.Auto Provision (Configuration Automatically) ..................................... 66
2.9.3.Auto Update (Firmware Auto Upgrade) ................................................. 73
2.9.4.Firmware (Firmware Upgrade) .................................................................. 77
2.9.5.Advanced (Advanced Settings) ................................................................. 78
2.9.6.Password (Change Login Account) .......................................................... 82
2.9.7.Tones (Audio Frequency Set up) .............................................................. 83
2.9.8.Default (Reset to Default) ........................................................................... 87
2.9.9.Language ........................................................................................................... 88
2.10.Save & Reboot ........................................................................................................... 89
2.10.1. Functions ........................................................................................................ 89
2.10.2. Instruction ...................................................................................................... 89
2.11.Logout (Logout System) ....................................................................................... 89
2.11.1. Functions ........................................................................................................ 89
2.11.2. Instruction ...................................................................................................... 89
Page 5

LAN Phone 399
User Manual
Welltech Technology Co., Ltd.
5 / 89 2014/02/11
1. Brief Introduction
1.1. Product Introduction
This user manual is applicable for LP399 series VoIP phone device. The chapter will be
targeted device detailed function and web page configuration introduction.
1.2. Hardware Function Introduction
LP399 provided interface: RJ-45 Ethernet port, RJ-9 handset port, LED indication and AC/DC
power adaptor connecting seat.
Provided two RJ-45 Ethernet interface, they support 10/100MB Ethernet speed. Y ou can use
WAN port to connect ADSL or router; LAN port connects your computer.
1.3. Software Function Introduction
Network Protocol Tone
SIP v1 (RFC2543), v2(RFC3261)
IP/TCP/UDP/RTP/RTCP
IP/ICMP/ARP/RARP/SNTP
TFTP Client/DHCP Client/ PPPoE Client
Telnet/HTTP Server
DNS Client
IPv4
Ring Tone
Ring Back Tone
Dial Tone
Busy Tone
User Programming Tone
Codec
Voice Quality
G.711: 64k bit/s (PCM)
iLBC,GSM
G.726: 16k / 24k / 32k / 40k bit/s
(ADPCM)
G.729A: 8k bit/s (CS-ACELP)
G.729B: adds VAD & CNG to G.729
VAD: Voice activity detection
CNG: Comfortable noise generator
LEC: Line echo canceller
Packet Loss Compensation
Adaptive Jitter Buffer
Call Phone Function
Call Hold
Call Waiting
Call Forward
Caller ID
3-way conference
Volume Adjustment
Speed dial, Phone book
Flash
Full-Duplex Speaker Phone
DTMF Function
Seconds
urity
In-Band DTMF
Out-of Band DTMF
SIP Info
HTTP 1.1 basic/digest authentication for
Web Setup
MD5 for SIP authentication (RFC2069/
RFC 2617)
SIP Server
Configuration
Registrar Server (three SIP account)
Web Browser
Console/Telnet
Keypad
IP Assignment
Firmware Upgrade
Static IP
DHCP
PPPoE
TFTP
Console
HTTP
FTP
QoS
NAT Traversal
ToS field
VLAN
STUN
VPN
PPTP
L2TP
Page 6

LAN Phone 399
User Manual
Welltech Technology Co., Ltd.
6 / 89 2014/02/11
1.4. Rear Interface Description
Interface
Explanation
DC 9~12V
(Internal-Positive;
External-Negative)
Connect AC/DC power adaptor.
LAN Connect personal computer.
WAN
Connect ADSL or Cable Modem device.
Handset
Handset connection.
1.5. Hardware Installation
After set up the LP399 device, please follow these steps to connect LP399 accordingly.
1. One of the power cord connected to the LP399 AC/DC power adaptor connecting seat, the AC
outlet connected to the wall electric outlet.
2. Use LAN port through RJ-45 Ethernet line to connect personal computer.
3. Use RJ-45 Ethernet line to connect LP399 WAN port and ADSL/Cable modem、Router or other
switch.
4. The RJ-9 handset line connect LP399 handset.
5. Once the phone power on, the LCD monitor will show the booting word. Wait a few minutes,
the LP399 boot completely then you can use LCD or web page to configure your account and
phone number.
Page 7

LAN Phone 399
User Manual
Welltech Technology Co., Ltd.
7 / 89 2014/02/11
1.5.1. Network Environment Setting
Netwrok Mode: Default NAT Mode
WAN Port: DHCP Client Mode
LAN Port: DHCP Server Enable, IP Address: 192.168.123.1, Mask: 255.255.255.0
1.5.2. Connection
Please connect the personal computer to LP399 LAN port, then set up computer Ethernet to
configure DHCP mode. The computer will get DHCP IP address. (ex. 192.168.123.150). Use Web
browser at your computer at http://192.168.123.1:9999 to enter webpage setup mode of LP399.
1.6. Basic Operations
1.6.1. Phone function
1.6.1.1. Key function
Key Explanation Remark
1
“1”,“-“,“٫”,“!”,“?”,“"”,“@”
2
“2”,“a”,“b”,“c”,“A”,“B”,“C”
3
“3”,“d”,“e”,”f”,“D”,“E”,“F”
4
“4”,“g”,“h”,“I”,“G”,“H”,“I”
5
“5”,“j”,“k”,“l”,“J”,“K”,“L”
6
“6”,“m”,“n”,“o”,“M”,“N”,“O”
7
“7”,“p”,“q”,“r”,“s”,“P”,“Q”,“R”,‘S”
8
“8”,“t”,“u”,“v”,“T”,“U”,“V”
9
“9”,“w”,“x”,“y”,“z”,“W”,“X”,“Y”,“Z”
0
“0”,“space”
*
“*”,“•”,“:”,“+”
# Start the dialing process.
A/a/1 change English
Letter upper/lower
Case and number.
Conf a. In talk time, press “Hold” key can retain
the phone call immediately. At the
same time will hear Dial Tone, User can
call to other extension to join 3-party
meeting. The third party answers the
phone call and press “CONF” key to join
3-way conference call immediately.
b. Once caller(LP399) disconnect, the 3
rd
party call was disconnect either.
c. In addition to the caller, any one
disconnect and quit 3-party conference
call, the caller(LP399) with online
people can remain talking.
Three party
conference meeting
Pick a. User hear the nearby phone incoming
ringing and press “Pick” key to answer
this call from nearby phone.
b. Or Off-Hook first, choose talk mode
then press “Pick” key to pick up nearby
incoming phone call.
Pickup call group
Page 8

LAN Phone 399
User Manual
Welltech Technology Co., Ltd.
8 / 89 2014/02/11
Key Explanation Remark
Trans a. In a talking line, press “Trans” key and
dial the transferee number to transfer
this call.
b. If the transferee number does not
answer this call, user can press “Trans”
key again to retrieve this call.
Transfer
Redial a. Press this key to dial the last dialed
number automatically.
b. In LCD screen, User can use navigation
keys to choose a phone number in the
dialed list and press “Redial” key to dial
out automatically.
Redial the last dial
phone number
Hold In the talk time, press this key to make the
call on hold. Then press this key again will
unhold or press L1~L3 key unhold this call.
Retention
,,
,,
,
a. According to LCD screen’s state, use
“up、down、left、right” navigation key to
move.
b. Press “OK” key to select menu and save
Setting.
c. Press “C” key to give up this options
and don’t saving. Or return to upper
layer of the option.
Navigation
keys(the arrow
keys)
L1, L2, L3 L1, L2, L3 can be registered at different
SIP Server or IP-PBX.
Support three lines
for SIP account
registration.
MENU Press “MENU” key to enter Menu mode of
LCD control display. If you back to
previous LCD menu page, Please press
“MENU” key again.
VMS
This function shall cooperate with the
SIP Server or IP-PBX. Before use the VMS
function, need to Setup IP phone’s VMS
dial code. Press this button can enter SIP
server VMS and hear voice message.
Vocie Mail Service
CALL IN Show all incoming call’s nember list.
CALL OUT Show all outgoing call’s nember list.
DND a. Press this key then LCD will show
#DND#, Any incoming call is denied,
but call can be dialed out.
b. Press this key again, the phone will
cancel DND state.
Do Not Disturb
FORWARD
This is the “Forward” function. Forwarding
options can be configured here.
SPEED This is the “Speed Dial” function.
PHONE BOOK This is the “Phone Book” function.
MUTE Pess this key at talk time, Phone’s MIC will Mute(Close the
Page 9

LAN Phone 399
User Manual
Welltech Technology Co., Ltd.
9 / 89 2014/02/11
Key Explanation Remark
disabeled.
Microphone during
the phone call.)
Press this key can enable “Handfree”
function (In the “Headset” mode can use
this key to “Handfree” mode).
Handfree
Volume -/+ a. Press upper position to increase the
volume, or press below to reduce the
receiving volume.
b. During talk time, the key can adjust the
volume.
c. With the LCD options, press this key to
adjust “Ring Tone” volume.
Volume adjustment
1.6.1.2. LP399 LCD Menu Item
First Layer Secondsond
Layer
Third Layer Fourth Layer Explanation
1. Phone Book 1. Search Search phone
book list
2. Add entry Add new phone
number
3. Speed Dial Add new speed
dial data
4. Erase all Delete all phone
book data
2. Call history 1. Incoming
Calls
Show all missed
call
2. Dialed
numbers
Show all dialed
call number
3. Erase
record
1. All Delete all call
records
2. Incoming Delete all
incoming call
records
3. Dialed Delete all dialed
call number
3. Phone
Setting
1.Call forward All forward Activation
(Enable/Disable)
Start/Stop
unconditional
forward feature
Number Set up forward
number
Busy forward Activation
(Enable/Disable)
Start/Stop busy
forward feature
Number Set up forward
number
No answer fwd Activation
(Enable/Disable)
Start/Stop no
answer feature
Number Set up forward
number
Page 10

LAN Phone 399
User Manual
Welltech Technology Co., Ltd.
10 / 89 2014/02/11
First Layer Secondsond
Layer
Third Layer Fourth Layer Explanation
Ring Timeout Set up no answer
timeout
2.Do not
Disturb
1.Always 1.Enable
2.Disable
Start/Stop DND
incoming call
feature
2.By Period 1.Enable
2.Disable
Start/Stop at the
time enable DND
feature
3.Period Time Set up DND
enable time
3.Alarm
Setting
1.Activation 1. Enable
2. Disable
Start/Stop alarm
feature
2.Alarm time Set up alarm
time
4.Date/Time
Setting
1.Date & Time Set up device
time manually
2.SNTP
Setting
1.SNTP Start/Stop
device regulate
time automatic
2.Primary SNTP Set up first time
server location
3.Secondsondary
SNTP
Set up
secondsond time
server location
4.Time zone Set up time zone
5.Adjustment
Time
Set up how often
to check time
5.Volume &
Gain,
1.Handset
volume
Set up Handset
receiving volume
2.Speaker
volume
Set up Speaker
volume
3.Handset
gain
Set up Hand
set
microphone gain
4.Speaker
gain
Set up speaker
Phone mode
microphone gain
6.Ringer 1. Ringer
Volume
Set up “Ring
Tone” volume
2. Ring Type Set up “Ring
Tone” type
7.Auto dial Set up auto dial
time
4. Network 1.WAN set up 1.IP Type 1.Fixed IP client Set up fixed IP
address
manually
2.DHCP client Set up IP
address
automatically
3.PPPoE client Use PPPoE
feature
Page 11

LAN Phone 399
User Manual
Welltech Technology Co., Ltd.
11 / 89 2014/02/11
First Layer Secondsond
Layer
Third Layer Fourth Layer Explanation
2.Fixed IP
Setting
1.IP Address Set up IP
address
2.Subnet mask Set up network
mask
3.Default
Gateway
Set up network
gateway
3.PPPoE
Setting
1.User name Set up PPPoE
user name
2.Password Set up PPPoE
password
2.LAN set up 1.Bridge Set up bridge
mode
2.NAT Set up NAT mode
3.DNS 1.Primary DNS Set up the first
DNS server
location
2.Secondary
DNS
Set up secondary
DNS server
location
4.VLAN 1.Activation 1. Enable
2. Disable
Start/Stop VLAN
feature
2. VID Setup VLAN ID
5.Status Show network
state
6.NETWORK
Speed
1.Auto
Set up network
speed
automatically
2.100M Full Set up network
speed 100M
Full-duplex
automatically
3.100M Half, Set up network
speed 100M
Half-duplex
automatically
4.10M Full Set up network
speed 10M
Full-duplex
automatically
5.10M Half Set up network
speed 10M
Half-duplex
automatically
5. SIP Setting
*Admin Use
1.Service
domain
1.First realm Activation
(Enable/Disable)
First SIP account
activation
Display name Set up account
display name
Phone number Set up SIP
account phone
number
Page 12

LAN Phone 399
User Manual
Welltech Technology Co., Ltd.
12 / 89 2014/02/11
First Layer Secondsond
Layer
Third Layer Fourth Layer Explanation
Auth. name Set up SIP
account register
name
Auth. password Set up SIP
account register
password
Proxy server Set up Proxy
server address
Domain server Set up Domain
server address
2.Second
realm
Activation
(Enable/Disable)
Second SIP
account
activation
Display name Set up account
display name
Phone number Set up SIP
account phone
number
Auth. name Set up SIP
account register
name
Auth. password Set up SIP
account register
password
Proxy server Set up Proxy
server address
Domain server Set up Domain
server address
3.Third realm Activation
(Enable/Disable)
Third SIP
account
activation
Display name Set up account
display name
Phone number Set up SIP
account phone
number
Auth. name Set up SIP
account register
name
Auth. password Set up SIP
account register
password
Proxy server Set up Proxy
server address
Domain server Set up Domain
server address
2.Status
First realm First register
account state
Second realm Second register
account state
Page 13

LAN Phone 399
User Manual
Welltech Technology Co., Ltd.
13 / 89 2014/02/11
First Layer Secondsond
Layer
Third Layer Fourth Layer Explanation
Third realm Third register
account state
6.
Administrator
1.Auto config
*Admin Use
1.Disable Disable provision
update
automatically
2.TFTP Use TFTP mode
3.FTP Use FTP mode
4.HTTP Use HTTP mode
2.Upgrade
system
1.Upgrade
Now
1. Y es
2. No
Execute/Cancel
upgrade
automatic
2.Upgrade via
*Admin Use
1.Disable Stop upgrade
automatically
feature
2.TFTP Use TFTP mode
3.FTP Use FTP mode
4.HTTP Use HTTP mode
3.Status No new s/w
Next=xx-xx
xx:xx
Show state and
next upgrade
time
4.Reset Time 1. Y es
2. No
Reset/Stop
upgrade time
automatically
3.Default
Setting
1.Load default Start reset to
default
configuration
2.Abort Stop reset to
default
configuration
4.System
Authent
Set up system
permissions
5.Version Device version
information
6.LCD
Language
1.English LCD English
interface
2.Portugal LCD Portugal
interface
7.Restart Restart device
8.Auto Reboot 1. Enable Enable auto
reboot feature
2. Disable Disable auto
reboot feature
*Admin Use: Enter LCD menu 6.Administrator > 4.System Authent, Then use the LP399
administrator’s password to login. After login, You can enter this option and modify
settings.
Page 14

LAN Phone 399
User Manual
Welltech Technology Co., Ltd.
14 / 89 2014/02/11
1.6.2. Dial function Introduction
1.6.2.1. LP399 Dial Feature
There are three ways to dial number:
1. Select L1~L3 line, After dial number direct, press “#” key to dial out immediately.
2. Select L1~L3 line. Enter phone number and wait for 3 seconds to dial out automatically.
(Default)
3. In ON-Hook state, Dial number and use C key to modify wrong number. After checking
correct number, press # key to dial out.
Example:
Dial other extension number at the same proxy server , for instance, 1008. Just pick up the
phone and dial number 1008, than press “#” key or wait 3 seconds to dial out.
Dial a PSTN number, ex. 0800024365, maybe need to add prefix code before the phone
number.
Remar k:
In the LP399 web management system “Phone” -> “Dial Plan - Basic” web page, check
[Dial Plan - Basic] page parameter [Key As Send #], the Settings is Enable or not.
1.6.2.2. Point-to-Point(P2P) Dial Feature
Two LP399 IP-Phone devices can call directly without SIP proxy server registration mode.
Environmental requirements:
Both LP399 IP-Phone device need to use physical static network IP address ; or at the same
private LAN network environment, or in a same VPN network.
Example:
If the called LP399 IP address is 192.168.0.160, dial number as follows:
Pick up the phone, dial “192*168*0*160”, then press “#” or wait 3 seconds to finish the
P2P call.
If the called LP399 IP address is 192.168.1.20 and port is 5062, dial number as follows:
Pick up the phone, dial “192*168*1*20**5062” , then press “#” or wait 3 seconds to finish
the P2P call.
1.6.2.3. Hold Call
In the talking state, press [Hold] key, the phone call will retain immediately. Then, user can
select other line to make a new call.
1.6.2.4. Call Waiting
In the talking state, If user hear a call waiting tones and LP399 LCD show a new incoming call
number at the same time. User can press [Hold] key to retain original call and answer waiting
call. During the talking state, User can press [Hold] key again, the original call will be connected.
1.6.2.5. Blind Transfer
If user 『A』 and 『B』 are in a phone call, 『A』 will transfer this phone to user 『C』:
1. 『A』 press [Trans] on LP399 device, then 『A』 can hear dial tone.
2. 『A』 enter user 『C』 phone number and press “#” Key (Or wait for 3 seconds).
3. 『A』 can hand up the phone.
1.6.2.6. Attendant Transfer (Answer then Transfer)
If user 『A』 and 『B』 are in a phone call, 『A』 will transfer this phone call and talk to user 『C』:
1. 『A』 press [Hold] key, then hear dial tone.
2. 『A』 dial 『C』 phone number and press “#” key (Or wait for 3 seconds).
3. The user 『C』 answer the call and after talk was finished. Then 『A』 press [Transfer] key
to complete the transfer feature.
4. If the user 『C』 doesn’t answer, 『A』 can press [Hold] key to return the phone call, then talk
Page 15

LAN Phone 399
User Manual
Welltech Technology Co., Ltd.
15 / 89 2014/02/11
『B』.
1.6.2.7. Conference Call (3-way calling)
If user 『A』 and 『B』 are in a phone call, 『A』 want 『C』 to join this meeting:
1. 『A』 press [Hold] key, and hear dial tone.
2. 『A』 dial 『C』 phone number and press “#” key (Or wait for 3 seconds).
3. The user 『C』 answer the call and talk. Then 『A』 press [Conf] key to complete the 3-party
conference feature. Now 『A』、『B』、『C』 can talk in a 3-party conference room.
4. If the user 『C』 does not answer , 『A』 can press [Hold] key to return the phone call, then
talk to『B』.
5. During the conference call, If 『A』 hand up the phone call, the conference feature will be
canceled, the 『B』、『C』 disconnected immediately.
Page 16

LAN Phone 399
User Manual
Welltech Technology Co., Ltd.
16 / 89 2014/02/11
2. Web Page
2.1. Web Login Level Table
Web Page Menu
Administrator
System
Normal
Status
Yes Yes Yes Phone
Phone Book
Yes Yes Yes
Speed Dial
Yes Yes Yes
Dial Plan
– Basic
Yes Yes No
Dial
Plan
– Advanced
Yes Yes No
Call Service (
Phone Feature
) Yes Yes Yes
General (
Normal
Setting
) Yes Yes Yes
Volume (
Volume
Setting
) Yes Yes Yes Network
WAN (
Public Ethernet
) Yes Yes Yes
DDNS (
Dynamic
DNS)
Yes Yes Yes
VLAN (VLAN
Environment
) Yes Yes No
VPN (PPTP/L2TP
Link)
Yes Yes No
NTP (
Time Environment
) Yes Yes No NAT
LAN (LAN
Network
) Yes Yes Yes
DMZ & Mac Clone (DMZ
and
MAC
Setting)
Yes Yes Yes
Virtual Server (
Virtual Proxy Server
) Yes Yes Yes SIP
Service (SIP
Register
) Yes Yes No
Code
c (
Voice Format
) Yes Yes No
Advanced (
Other Setting
) Yes No No
STUN (STUN
& Fource
Setting
) Yes Yes No Management
Status Log
(System State
) Yes Yes Yes
Auto
Provision
(Auto Config Setting
) Yes Yes No
Auto Update (
Auto Upgrade Firmware
) Yes Yes No
Firmware (
Firmware Upgrade
) Yes Yes No
Advanced (
Advance Setting
) Yes No No
Password (
Login User/Password
) Yes Yes No
Tones (
Frequency Setting
) Yes No No
Default (
Reset To Default
) Yes Yes No
Language
(Language Setting
) Yes Yes Yes Save
& Reboot
Yes Yes Yes Logout
Yes Yes Yes Engineer
Yes No No Update
Yes No No
2.2. Login LP399 Web Page
LP399 Web Login IP address from LAN port default value is, http://192.168.123.1:9999
Login Accout:
Administrator account: root, password: test
System account: system, password: test
Normal account: user, password: test
2.2.1. Functions
Provide login LP399 system management page.
Page 17

LAN Phone 399
User Manual
Welltech Technology Co., Ltd.
17 / 89 2014/02/11
2.2.2. Instruction
User
Name
Enter
user
name
,
can be
numeral
or letters.
Password
Enter
password,
can be
numeral
or letters.
Login [
Button
] Login
LP399
system web page.
Clear [Button]
Clear all
information
.
2.3. VoIP Setup Manu
2.3.1. Functions
Provide functions menu [Status (System information), Phone (Telephony environment),
Network (Network environment), NAT (Network Address Translation), SIP (Register
environment), Management (Advance Setting), Save & Reboot (Configuration save and reboot
device), Logout (Logout web page)].
2.3.2. Instruction
Item
Explanation
Phone
Shows
device type.
Status
Provide
status
of the System.
Phone
Phone (
Telephony environment
) Provide
function menu
[
Phone Book
,
Speed Dial, Dial Plan – Basic, Dial Plan – Advanced, Call Service (Phone
function), General (Normal Setting), Volume (Volume Setting)].
Network
Provide
[WAN, DDNS
, VLAN
, VPN(PPTP/L2TP)
, SNTP
] functions.
Page 18

LAN Phone 399
User Manual
Welltech Technology Co., Ltd.
18 / 89 2014/02/11
Item
Explanation
NAT Provide
[LAN,
DMZ & Mac Clone
, Virtual Server
] functions
.
SIP Provide
[Service
, C
ode,
Advanced, STUN (STUN
& Fo
rce
Setting
)
]
functions.
Management
Provide
[Status Log
, Auto Config
,
Auto Update
, N
ew Firmware ,
Advanced, Password, Tones, Default, Language] functions.
Save
& Reboot
Provide
[Save
, Reboot] functions.
Logout
Logou
t the system.
2.4. Status (System Information)
2.4.1. Functions
Show status of Network, Firmware Version and SIP registration.
2.4.2. Instruction
Figure 1: LAN Port Device Active: Bridge
(Figure 1)
Item
Explanation
WAN Information
Shows the status
of WAN Port.
Link Status
Shows
the network connected Speed.
Active
Shows
the network connected type.
IP
Address
Shows
IP address of the device.
Subnet
Mask
Shows
the
subnet mask.
Default
Gateway
Shows
the
default gateway.
Primary DNS
Shows the primary D
NS server.
Seconds
ond DNS
Shows the
seconds
ondary
DNS
server.
MAC Address
Shows
the
MAC I
D. System
Information
Shows the status
of System.
Model Name
Show LP399 model name.
Version
Show LP399 firmware version.
Firmware Version
Shows the firmware version
for software control
. DSP Version
Shows the
DSP version.
AC: AC97
WM: Winbound
LE: Legeeity
NV:Nuvoton
Current Time
Shows the current time.
Page 19

LAN Phone 399
User Manual
Welltech Technology Co., Ltd.
19 / 89 2014/02/11
Item
Explanation
Update Date
Shows the date of updating system.
System Up Time
Shows the system
running
time.
Netwrk Link Up
Time
Shows the network
running
time.
Register
Information
Shows the status
of
SIP register.
Realm 1 Status
Shows the line 1 register state.
Display Name
Shows the line 1 register number.
Realm 2 Status
Shows
the line 2
register state.
Display Name
Shows
the line 2
register number.
Realm 3 Status
Shows
the line 3
register state.
Display Name
Shows
the line 3
register number.
Figure 2: LAN Port Device Active: Bridge + VPN
(Figure 2)
Item
Explanation
WAN Information
Shows the statuses of WAN Port.
Link Status
Shows
the network connected Speed.
Active
Shows
the network connected type.
IP
Address
Shows IP address of the device.
Subnet
Mask
Shows
the
subnet mask.
Default
Gateway
Shows
the
default gateway.
Primary DNS
Shows the primary D
NS server.
Seconds
ond DNS
Shows the
seconds
ondary
DNS
server.
MAC Address
Shows
the
MAC I
D. VPN
Information
Shows
the status
of
VPN (PPTP/L2TP)
Active
Shows
the VPN connected type.
IP
Address
Shows
the VPN IP address.
System
Information
Shows the status
of System.
Model Name
Show LP399 model name.
Version
Show LP399 firmware version.
Firmware
Version
Shows the firmware version
for software control
. DSP Version
Shows the
DSP version.
Page 20

LAN Phone 399
User Manual
Welltech Technology Co., Ltd.
20 / 89 2014/02/11
AC: AC97
WM: Winbound
LE: Legeeity
NV:Nuvoton
Current Time
Shows the current time.
Update Date
Shows the date of updating system.
System Up Time
Shows the system
running
time.
Netw
o
rk Link Up
Time
Shows the network
running
time.
Register
Information
Shows the status
of
SIP register.
Realm 1 Status
Shows the line 1 register state.
Number
Shows the line 1 register number.
Realm 2 Status
Shows
the line 2
register state.
Number
Shows
the line 2
register number.
Realm 3 Status
Shows
the line 3
register state.
Number
Shows
the line 3
register number.
Figure 3: LAN Port Device Active: Router
(Figure 3)
Item
Explanation
WAN Information
Shows the statuses of WAN Port.
Link Status
Shows
the network connected Speed.
Active
Shows
the network connected type.
IP
Address
Shows IP address of the device.
Subnet
Mask
Shows
the
subnet mask.
Default
Gateway
Shows
the
default gateway.
Primary
DNS
Shows the primary D
NS server.
Seconds
ond DNS
Shows the
seconds
ondary
DNS
server.
MAC Address
Shows
the
MAC I
D. LAN Information
Shows the status
of LAN Port.
IP
Address
Shows
the LAN IP address.
MAC Address
Shows
the LAN MAC ID.
System
Shows the status
of System.
Page 21

LAN Phone 399
User Manual
Welltech Technology Co., Ltd.
21 / 89 2014/02/11
Item
Explanation
Information
Model Name
Show LP399 model name.
Version
Show LP399 firmware version.
Firmware Version
Shows the firmware version
for software control
. DSP Version
Shows the
DSPversion.
AC: AC97
WM: Winbound
LE: Legeeity
NV:Nuvoton
Current Time
Shows the current time.
Update Date
Shows the date of updating system.
System Up Time
Shows the system
running
time.
Netwrk Link Up
Time
Shows the network
running
time.
Register
Information
Shows the statuses of
SIP register.
Realm 1
Status
Shows the line 1 register state.
Number
Shows the line 1 register number.
Realm 2 Status
Shows
the line 2
register state.
Number
Shows
the line 2
register number.
Realm 3 Status
Shows
the line 3
register state.
Number
Shows
the line 3
register number.
Figure 4: LAN Port Device Active: Router + VPN
(Figure 4)
Item
Explanation
WAN Information
Shows the statuses of WAN Port.
Link Status
Shows
the network connected Speed.
Active
Shows
the network connected type.
Page 22

LAN Phone 399
User Manual
Welltech Technology Co., Ltd.
22 / 89 2014/02/11
Item
Explanation
IP
Address
Shows IP address of the device.
Subnet
Mask
Shows
the
subnet mask.
Default
Gateway
Shows
the
default gateway.
Primary DNS
Shows the primary D
NS server.
Seconds
ond DNS
Shows the
seconds
ondary
DNS
server.
MAC Address
Shows
the
MAC I
D.
LAN Information
Shows the statuses of LAN Port.
IP
Address
Shows
the LAN IP address.
MAC Address
Shows
the LAN MAC ID.
VPN Information
Shows
the statuses of
VPN (PPTP/L2TP)
Active
Shows
the VPN connected type.
IP
Address
Shows
the VPN IP address.
System
Information
Shows the statuses of System.
Model Name
Show LP399 model name.
Version
Show LP399 firmware version.
Firmware Version
Shows the firmware version
for software control
. DSP Version
Shows the
DSP version.
AC: AC97
WM: Winbound
LE: Legeeity
NV:Nuvoton
Current Time
Shows the current time.
Update Date
Shows the date of updating system.
System Up Time
Shows the system
running
time.
Netwrk Link Up
Time
Shows the network
running
time.
Register
Information
Shows the statuses of
SIP register.
Realm 1
Status
Shows the line 1 register state.
Number
Shows the line 1 register number.
Realm 2 Status
Shows
the line 2
register state.
Number
Shows
the line 2
register number.
Realm 3 Status
Shows
the line 3
register state.
Number
Shows
the line 3
register number.
Page 23

LAN Phone 399
User Manual
Welltech Technology Co., Ltd.
23 / 89 2014/02/11
2.5. Phone (Telephony environment)
Provide functions of [Phone Book, Speed Dial, Dial Plan – Basic, Dial Plan – Advanced, Call
Service, Genereal, Volume].
2.5.1. Phone Book
2.5.1.1. Functions
Phone Book can provide 140 entries; Export/Import feature, the file format is csv.
When user A dials a [Name], Phone Book will check it on Phone Book. If system finds
it, it will dial the [Number] of [Name]. If the [Name] is not on Phone Book, system will
dial the number you have dialed.
2.5.1.2. Instruction
Item
Explanation
Page
Default: Page 1. Select the page, from Page1~Page
7.
Index
Shows the serial number. 140 entries in total, from Phone
0~139
.
One
page has 20 entries.
Name
Set up
the user’s name.
These columns provide the function of speed
dial by only enter numbers; maximum length is 31 bytes.
Number/URL
Set up
the
user’s number
. These columns can
enter
numbers and
strings; maximum length is 63 bytes. Ex: 0212345678, 0800024365,
www.dyndns.info
Action
Provide
[Delete] button to erase the datas.
Submit [
Button
] Save the
Setting
s. Delete All
Reset
all data
. Acess Phone Book
Enter
“
Remote Phone Book Setting
” web page.
Export csv [
Button
] Export [Phone Book]
data
,
the file format is
『
.csv』. Import csv
[Button]
Import [Phone Book] data, the file format is
『
.csv』.
Page 24

LAN Phone 399
User Manual
Welltech Technology Co., Ltd.
24 / 89 2014/02/11
Item
Explanation
Export csv [
Button
] Export [Phone Book] data, the file format is
『
.csv』. Import csv
[Button]
Import [Phone Book] data, the file format is
『
.csv』. HTTP or TFTP
Server Address
Use HTTP or TFTP server to upgrade LP399
’
s phone book data.
Synchronlzation
period
The LP399 will reference this time to upgrade phone book data at HTTP
or TFTP server by itself.
Submit [
Button
] Save the
Setting
s.
2.5.1.3. Operate Instruction
Example 1: Setup [Phone Book] data
Step 1: On the [Phone Book Setting] page, Setup [Index: 1, Name: 301, Number:
301@192.168.1.2; Index: 2, Name: 206, Number: 1747643364; Index: 3, Name: test,
Number: 8123478944566] (See Figure 1).
(Figure 1)
Instruction 1: Dial [301], system find the [301] on Index 1, then system dial Name’s
Number of Index 1. System will dial [192.168.1.2]
Instruction 2: Dial [206], system find the [206] on Index 2, then system dial Name’s
Number of Index 2. System will dial [17476433364].
Instruction 3: Because Index 3’s Name is a string, so the speed dial function can not
be used, you can just check the Index 3’ Name and Number.
Example 2: Export / Import [Phone Book] data
Export Feature
Step 1: In [Phone Book Setting] web page, the page have two numbers data. (See Figure 2).
Page 25

LAN Phone 399
User Manual
Welltech Technology Co., Ltd.
25 / 89 2014/02/11
(Figure 2)
Step 2: To perform the export function, please press [Export csv] button (See Figure 3).
(Figure 3)
Step 3: Monitor show [File Download] page, default file name is phbook.csv , select [Save] button,
LP399 parameter will save to 『.csv』file format (See Figure 4).
(Figure 4)
Step 4: Open the file, then check [Phone Book] number data (See Figure 5).
(Figure 5)
Import Featuer
Step 1: Set up 『.csv』 format for [Phone Book] data (See Figure 6).
Page 26

LAN Phone 399
User Manual
Welltech Technology Co., Ltd.
26 / 89 2014/02/11
(Figure 6)
Step 2: In [Phone Book Setting] web page, choose the phone book file data to load [example:
F:\Test\phbook.csv], press [Import csv)] button (See Figure 7).
(Figure 7)
Step 3: Load data finish, [Index: 1 and 2] will show phone book data (See Figure 8).
(Figure 8)
Example 3: LP399 LCD Monitor Function
Step 1: In [Phone Book Setting] web page, Setup [Index: 1, Name: Cat 1, Number/URL: 102,
Index: 2, Name: Me To, Number/URL: 103] (See Figure 9).
(Figure 9)
Step 2: In [Service Domain Setting] web page, Setup [Realm Active: Enable, Display Name: 102,
Phoner Number: 102, Authentication ID: 102, Authentication Password: test, Domain
Server: 192.168.68.150, Proxy Server: 192.168.68.150] (See Figure 10)。
Note : Both registered account [Display Name] and [Authentication ID] must be the same
(See Figure 10) to take effect.
(Figure 10)
Page 27

LAN Phone 399
User Manual
Welltech Technology Co., Ltd.
27 / 89 2014/02/11
Step 3: When LP399 receives 102 incoming call, LCD can show [Me To, 102] incoming call
message automatically.
2.5.2. Speed Dial
2.5.2.1. Functions
Provide to Set [Pick-up] and [V oice Mail] key code. If there is no function key corresponding,
The service can’t take effect.
2.5.2.2. Instruction
Item
Explanation
Index
This Index number is the one on LCD icon number.
Name
Set up
extension account data.
These columns can
enter
numbers and
strings; maximum length is 31 bytes.
Number
/URL
Set up the
user’s number
. These columns can
enter
numbers and
strings; maximum length is 63 bytes.
Action
Provide
[Delete]
button
to
clear
Setting
data.
Pick Up
Setup
[Pick Up] feature code
. This code must
be compatible with
IP-PBX server Pick-Up code. These columns can enter numbers and
strings (*#), maximum length is 15 bytes.
Voice Mail
Set up
[Voice Mail] feature code.
This code must be compatible with
IP-PBX server [Voice Mail] service code. These columns can enter
numbers and strings (*#), maximum length is 15 bytes.
Submit [
Button
] Save the
Setting
s. Delete All
[Button
] Reset
all data
.
2.5.2.3. Operate Instruction
Example 1: [Pick Up & Voice mail] Button
Step 1: In [Speed Dial Setting] web page, Setup [Pick up: *98, Voice Mail: *97] (See Figure 1).
Page 28

LAN Phone 399
User Manual
Welltech Technology Co., Ltd.
28 / 89 2014/02/11
(Figure 1)
Description 1: Need to pick up nearby ring phone call, please press LP399 [Pick] key , LP399 will
pick up nearby ringing phone (This phone must stay at the same pick up group).
Description 2: Execution and listen voice mail messages, press [VMS] key to enter voice mail
process.
2.5.3. Dial Plan - Basic
2.5.3.1. Functions
Dial Plan Provide Dial Now, Realm Prefix, Auto Dial Time, Use # as send Key.
2.5.3.2. Instruction
Figure 1: LP399 device
(Figure 1)
Item
Explanation
Use Dial Plan
Default is Basic dial plan Setting. Select dial function mode. When
select Advanced, the dial function will use Dial Plan - Advanced web
page Setting. Provide drop-down options: Basic, Advanced.
Basic: Use basic web page Dial Plan and Dial Now rules.
Advanced: Use Dial Plan - Advanced rules; Disabled [Dial Plan & Dial
Now] Setting field automatically.
Dial Plan Setup dialing properties to add number or Replace Number.
Index Shows the serial number. Provide 4 sets to add numbers or drop
numbers.
Page 29

LAN Phone 399
User Manual
Welltech Technology Co., Ltd.
29 / 89 2014/02/11
Item
Explanation
Drop Prefix Default: Disable。 When Setting up Enable and encountering the
matched rule, the [Prefix] will be replaced by the dialing number。
When Setting up Disable, and encountering the matched rule, the
[Pefix] will be added in front of the dialing number.
Prefix Setup the number to add or drop. These clolumes can enter numbers;
maximum length is 8 bytes.
Replace Rule Setup the matched rule. This column can enter numbers or signs;
maximum length is 40 bytes.
Sign: [+, x].
+ represents “or”. For example: 123+456+334+5xx, it represents
“123” or “456” or “334” or “5xx”.
x: 0~9, for example: 5xx,if the first dialing number is “5” , [Prefix] will
replace or add it.
Note: This dial rule is 『x+number』combination. If the dial number is
fully compliance with the code length, the dial replace rule does not
running.
Dial Now Setup speed dial specification rules.
Index Shows the serial number. Provide 8 sets for Dial Plan.
Dial Now Rule Provide the rules for dialing at once. When encountering the matched
rule, system will dial number at once without receiving “#” or waiting
past [Auto Dial Time].
This column can enter numbers or signs; maximum length is 80 bytes.
Sign: [*, #, +, x].
+ represent “or”.
x: 0~9.
Realm 1 Area Code Deafult: 1*; Change to use first [Realm] account.
Realm 2 Area Code Deafult: 2*; Change to use second [Realm] account.
Realm 3 Area Code Deafult: 3*; Change to use third [Realm] account.
Realm 4 Area Code Deafult: 4*; Change to use fourth [Realm] account.
Realm 5 Area Code Deafult: 5*; Change to use fifth [Realm] account.
Inter Digit Time Default: 3 seconds.
After waiting for a while, but didn’t enter any number , Auto Dial will run
automatically.
Inter Digit Time period: (3~9 seconds). Provide option 3~9.
Key As Send# Default: Enable.
Configure # key as Send Out command key after dial number. If you
select Disable at this option, The dial number will wait for your desire
Inter Digit Time to send out.
# Format is %23 Default is Disable; Use [#] word to send %23 singal. Provide
drop-down options: Disable, Enable.
Enable: Use [#] word to send %23 singal.
Submit [Button] Save the Settings.
2.5.3.3. Operate Instruction
Page 30
LAN Phone 399
User Manual
Welltech Technology Co., Ltd.
30 / 89 2014/02/11
Example 1: Drop Prefix & Dial Now Function
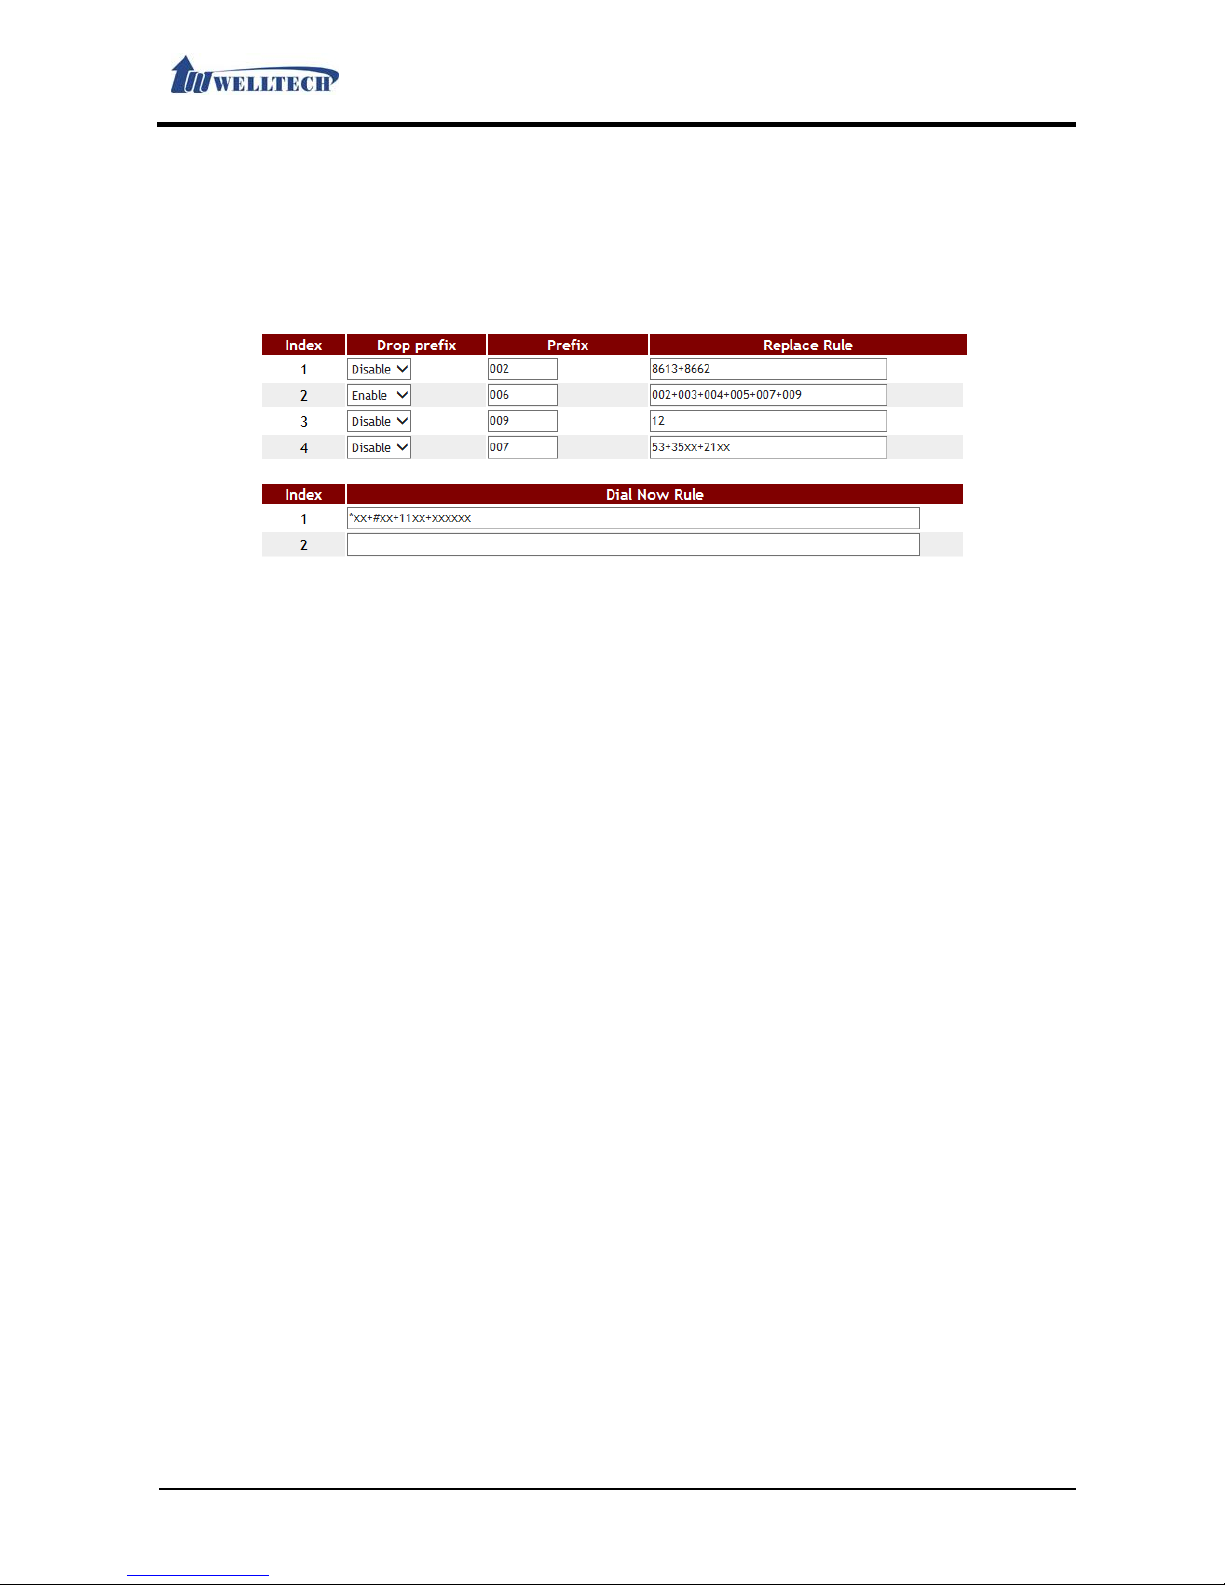
Step 1: In [Dial Plan Setting] web page, Setup [Use Dial Plan: Basic, Index: 1, Drop prefix:
Disable, Prefix: 002, Rule: 8613+8662; Index: 2, Drop prefix: Enable, Prefix: 006, Rule:
002+003+004+005+007+009; Index: 3, Drop prefix: Disable, Prefix: Replace: 009, Rule:
12; Index: 4, Drop prefix: Disable, Prefix: 007, Rule: 53+35xx +21xx.
Index: 1, Dial Now Rule: *xx +#xx+11x +xxxxxxxx] (See Figure 1).
(Figure 1)
Instruction 1:
Application 1: When dialing [8613xxxx], all numbers that begin with 8613, will be added
with 002, so actually the dialing number is [002+8613+xxx].
Application 2: When dialing [8662xxxx], all numbers that begin with 8662, will be added
with 002, so actually the dialing number is [002+8662+xxx].
Instruction 2:
Application 1: When enter [002+86xxxx] and all numbers that begin with 002 will be
replaced by 006; so actually the dialing number is [006+86xxx].
Application 2: When enter [003+77xxxx] and all numbers that begin with 003 will be
replaced by 006; so actually the dialing number is [006+77xxx].
Instruction 3: Drop prefix: Disable, Replace rule: 009, Rule: 12。
Application 1: When enter [12xxxx], and all numbers that begin with 12, will be added with
009; so actually the dialing number is [009+12+xxx].
Instruction 4:
Application 1: When enter [53789], and all numbers that begin with 53, will be added with
007; so actually the dialing number is [007+53789].
Application 2: When enter [3507], and all numbers that begin with 35, will be added with
007; so actually the dialing number is [007+3507].
Application 3: When enter [2199], and all numbers that begin with 21, will be added with
007; so actually the dialing number is [007+2199].
Instruction 5:
Application 1: Any information that meet the condition “*xx” will be sent out immediately,
like [*00, *01, *02… *99].
Application 2: Any information that meet the condition” #xx” will be sent out immediately,
like [#00, #01, #02…#99].
Application 3: Any information that meet the condition ”11x” will be sent out immediately,
like [110, 111, 112 … 119].
Application 4: If enter 8 digit numbers, the system will send out the number immediately.
E.g.: 12345678.
Example 2: # Format is %23 Function
Step 1: In [Dial Plan Setting] web page, Setup [Key As Send#: Disalbe, # Format is %23: Enable]
(See Figure4).
Page 31

LAN Phone 399
User Manual
Welltech Technology Co., Ltd.
31 / 89 2014/02/11
(Figure 4)
Step 2: Pick up the handset, Dial [123#], the correct dialing content is [123%23].
2.5.4.Dial Plan – Advanced
2.5.4.1. Functions
Provide advanced Setting: Add number and Drop number or Speed Dial function rules.
2.5.4.2. Instruction
(Figure 1)
Item
Explanation
Use Dial Plan
Default is
Basic
; Select dial function mode. When select Advanced, the
dial function will use Dial Plan - Advanced web page Setting. Provides
drop-down options: Basic, Advanced.
Basic: Use basic web page Dial Plan & Dial Now rules.
Advanced: Use Dial Plan - Advanced rules; Disabled [Dial Plan & Dial
Now] Setting field automatically.
Page 32

LAN Phone 399
User Manual
Welltech Technology Co., Ltd.
32 / 89 2014/02/11
Item
Explanation
Page
Default is 1. Select pages,
Provide
drop
-
down options
: 1~5.
Index
Shows the serial number.
20
0 entries in total, from Phone
0~139
. A
page have 40 entries.
Rule
Setup
Add
/ Drop
code or Speed Dial rules.
User can enter numbers or
symbols (only support: 0~9, *, #, -, x, [, ], ; ). Maximum length is 32
bytes.
Data format: PA TTERN;PREFIX;DIALCUT; The “;” is entered as location
separator. It is always needed in this rule.
PATTERN: Enter Add / Drop code or Speed Dial rules (only support:
0~9, *, #, -, x, [, ], ; ); maximum length is 20 bytes. When the dial
number meet dialing rules field, user don’t use the [#] key , the device
will dial the phone number automatically.
PREFIX: Enter the phone number user need to Add code, (only
support: 0~9, *, #), or keep null; maximum length is 20 bytes.
DIALCUT: Enter the phone number user need to drop code 『quantity』,
(only support: 0~9), or keep null; maximum length is 2 bytes.
Example 1: Rule: [2345679]xxxxxx;02;; 。
Example 2: Rule: 800[0-9]xxxx;;;
Example 3: Rule: #88;0427121234;3;
Submit [
Button
] S
ave the
Setting
s.
2.5.4.3. Operate Instruction
Example 1: Index: 1, Rule: [2345679]xxxxxx;02;;
Step 1: In [Dial Plan Setting - Advanced] web page, Setup [Use Dial Plan: Advanced, Index: 1,
Rule: [2345679]xxxxxx;02;;] (See Figure 1).
(Figure 1)
Instruction 1: When dial number is [2+123456], Meet [Rule] field parameter [2345679]xxxxxx
rules, Stop to receive number immediately; Add prefix code [02] before [2+123456]
automatically. Actually sending number is [02+2+123456] (See Figure 1)。
Instruction 2: When dialing content [3+123456] at the beginning, Meet [Rule] field
[2345679]xxxxxx rules, Stop to receive number immediately. Add prefix code [02]
before [3+123456]. Actually send number is [02+3+123456].
Example 2: Index: 2, Rule: 800[0-9]xxxx;;;
Step 1: In [Dial Plan Setting - Advanced] web page, Setup [Index: 2, Rule: 800[0-9]xxxx;;;]
(See Figure 1).
Instruction 1: When dial number is [800+1+2345], Meet [Rule] field 800[0-9]xxxx rules, Stop to
receive number immediately . The device dials phone number [800+1+2345] automatically .
Instruction 2: When dial number is [800+7+2345], Meet [Rule] field 800[0-9]xxxx rules, Stop to
receive number immediately . The device dials phone number [800+7+2345] automatically .
Example 3: Index: 3, Rule: #88;0427121234;3;
Step 1: In [Dial Plan Setting - Advanced] web page, Set up [Index: 3, Rule: #88;0427121234;3;]
(See Figure 2).
(Figure 2)
Page 33

LAN Phone 399
User Manual
Welltech Technology Co., Ltd.
33 / 89 2014/02/11
Instruction 1: When dial number is [#88], Meet [Rule] field #88 rules, Stop to receive number
immediately. Delete 3 numbers (#88). Then add number [0427121234], Actually sending
number is [0427121234].
Example 4: Index: 4, Rule: #87;0427121234;2;
Step 1: In [Dial Plan Setting - Advanced] web page, Setup [Index: 4, Rule: #87;0427121234;2;]
(See Figure 2).
Instruction 1: When dialing number is [#87] , meet [Rule] field #87 rules. Stop to receive
number immediately. Delete 2 numbers (#8). Then add prefix number [0427121234]
before [7], Actually sending number is [0427121234+7].
2.5.5. Call Service (Phone Feature)
2.5.5.1. Functions
Provide Forward (Transfer), Hotline, DND (Do Not Disturb) and Alarm.
2.5.5.2. Instruction
Figure 1: LP399 Device
(Figure 1)
Item
Explanation
Forward Type Default: Disable.
Provide option: Disable, All, Busy, No Answer, Busy or No Answer.
*Please check the Forward function supported by IP-PBX or SIP Server.
Forward Number These columns can enter numbers or strings. Maximum length is 63
bytes.
Rings Default: 3 Rings. When ringing 3 ring cycles and no one answers. It
was regarded as no one answers the call.
Provide option 2~8 Rings.
This function only support No Answer or Busy functions.
Hotline Type Default: Disable. When Setting Enable, once pick up the phone, it dials
the pre-defined phone number automatically.
Hotline Number Setup Hotline Number, it can be numbers or address.
This column can enter numbers or string. Maximum length is 63 bytes.
For Example, IP address: 192.168.1.23, or phone number:
Page 34

LAN Phone 399
User Manual
Welltech Technology Co., Ltd.
34 / 89 2014/02/11
Item
Explanation
0800024365.
Delay Default time is 3 seconds. When picking up the phone handset, LP399
dials the Hotline Number automatically after delay predefined seconds
was expired.
Provide option 0~6 seconds.
DND Type Default: Disable.
DND Setting allows denying all incoming calls (SIP Status: 486 Busy
Here) or denies all incoming calls in a certain time period.
Provide option: Disable, Always, Period (by Setting time).
During the DND
(Do Not Disturb)
Default: From 0:0 (start) To 0:0 (end).
These 4 columns can only enter numbers. Maximum length is 2 bytes
respectively.
Alarm Type Default: Disable.
When Setting Enable, alarm function will be executed. Duration is 1
minute. Stop the alarm by picking up the handset.
Provide option: Disable, Enable.
Alarm Time Default: 0:0 (hh:mm).
These 2 columns can only enter numbers. Maximum length is 2 bytes
respectively.
Submit [Button] Save the settings.
2.5.5.3. Operate Instruction
Example 1: Forward Feature
All (Unconditional Forward)
Step 1: In [Call Service Setting] web page, Setup [ Forward Type: All, Forward Number:
812345678] (See Figure 1).
(Figure 1)
Step 2: When receiving a new incoming call, LP399 will forward to this number [Forward Number:
812345678] automatically.
Busy (Busy Forward)
Step 1: In [Call Service Setting] web page, Setup [Forward Type: Busy, Forward Number: 405]
(See Figure 2).
(Figure 2)
Step 2: When LP399 is busy, it will forward to [Forward Number: 405] automatically.
No Answer (No Answer Forward)
Step 1: In [Call Service Setting] web page, Setup [Forward Type: No Answer, Forward Number:
031237788, Rings: 3] (See Figure 3).
Page 35

LAN Phone 399
User Manual
Welltech Technology Co., Ltd.
35 / 89 2014/02/11
(Figure 3)
Step 2: When LP399 rings 3 times and nobody answer the phone, it will forward to [Forward
Number: 031237788].
Busy or No Answer (Busy Forward & No Answer Forward)
Step 1: In [Call Service Setting] web page, Setup [Forward Type: Busy or No Answer, Forward
Number: 0800024365, Rings: 3] (See Figure 4).
(Figure 4)
Step 2: When LP399 rings 3 times and if nobody answer the phone or the phone is busy, it will
forward to [Forward Number: 0800024365].
Example 2: Hotline Feature
Dial SIP Account
Step 1: In [Call Service Setting] web page, Setup [Hotline Type: Enable, Hot Line number:
82341234, Delay: 3] (See Figure 6).
(Figure 6)
Step 2: When picking up LP399 phone and wait for 3 seconds delay time, it will dial to [Hot Line
number: 82341234] automatically.
Dial IP Address
Step 1: In [Call Service Setting] web page, Setup [Hotline Type: Enable, Hot Line number:
192.168.50.4, Delay: 3] (See Figure 7).
(Figure 7)
Step 2: When picking up LP399 phone and wait for 3 seconds delay time, it will dial to [Hot Line
number: 192.168.50.4] automatically.
Example 3: DND Feature
Period
Step 1: In [Call Service Setting] web page, Setup [DND Type: Period, During the DND From:
18:15, To: 22:20] (See Figure 8).
(Figure 8)
Step 2: When receiving a new call during DND time period, the caller will hear “busy tone”.
Always
Step 1: In [Call Service Setting] web page, Setup [DND Type: Always] (See Figure 9).
(Figure 9)
Step 2: When receiving a new call, the caller will hear “busy tone”.
Example 4: Alarm Feature
Page 36

LAN Phone 399
User Manual
Welltech Technology Co., Ltd.
36 / 89 2014/02/11
Step 1: In [Call Service Setting] web page, Setup [Alarm T ype: Enable, Alarm Time: 21:00] (See
Figure 10).
(Figure 10)
Step 2: At 21:00 everyday, the alarm will start to work and last for 1 minute. After 1 minute, the
alarm will stop. During ringing and pick up the phone, the alarm will stop automatically.
2.5.6. General (Normal Setting)
2.5.6.1. Functions
General Provide Caller ID, Call Waiting, Auto Answer and etc.
2.5.6.2. Instruction
Figure 1: LP399 Device
(Figure 1)
Item
Explanation
Call Waiting
Default:
Enable
.
When Setting up Call Waiting Enable and an incoming call arrives, you
will hear a waiting tone. If you want to answer this waiting call, you
need to press the key [Hold] to hold existing call and answer incoming
call.
Provide options: Disable, Enable.
Ring Timeout
Default:
60
seconds
.
LP399 Phone will send a stop message to the caller when the Ring
Timeout was expired.
Provide options: 20, 40, 60, 80, 120, 180 and 240.
Auto Anwser Call
Default:
Dis
able.
If you Enable this function and when receiving an incoming call, LP399
phone will answer the call automatically and enable Loud Speaker
Phone feature.
Provide options: Disable, No Ring (auto answer), or 1,2,3,4,5 rings.
Auto On
-
Hook
After Bye
Default:
30 (seconds
).
LP399 phone will auto On-hook (drop this call) when it received a bye
message after configured time was expired.
Provide options: 0, 5, 10, 20, 30.
Mute After Auto
Answer
Default:
Disable.
If you Enable this function, LP399 phone will activate mute feature
after it answer a call automatically.
Provide options: Disable, Enable.
Submit [
Button
] S
ave the
s
etting
s.
Page 37

LAN Phone 399
User Manual
Welltech Technology Co., Ltd.
37 / 89 2014/02/11
2.5.7. Volume
2.5.7.1. Functions
Volume can setup received volume and tr ansmitted gain and ring type of this LP399 IP Phone.
2.5.7.2. Instruction
Figure 1: LP399 Device
(Figure 1)
Item
Explanation
Handset
Volume
Default:
10.
Setup
your
handset
receiving
volume.
Provide
options:
0~14.
Handset
Gain
Default:
10.
Setup
the handset
microphone gain.
Provide
options:
0~14.
Speaker Volume
Default:
10.
Setup
Spearker volume at Loud Speaker phone mode
.
Provide options: 0~14.
Speaker Gain
Default:
10.
Setup
the microphone gain at Loud Speaker phone mode
.
Provide options: 0~14.
Ringer Volume
Default:
6.
Setup
incoming Ring volume.
Provide
options:
0~10. Ring Type
Default:
Ring Tone
. Provide
options:
Ring Tone, Melody 1, Melody 2,
Melody 3.
Ring Tone: Refer to Tones setting argument [Ring Tone].
Submit [
Button
] S
ave the
s
etting
s.
2.5.7.3. Operate Instruction
Example 1: Ring Type
Step 1: In [Genereal Setting] web page, Set up [Ringer Type: Melody 3] (See Figure 1).
(Figure 1)
Step 2: When receiving an incoming call, you will listen a different ring.
Page 38

LAN Phone 399
User Manual
Welltech Technology Co., Ltd.
38 / 89 2014/02/11
2.6. Network
Provide functions of [WAN, DDNS, VLAN, VPN, NTP].
2.6.1 WAN
2.6.1.1. Functions
WAN provides function to set up WAN port network IP address with fixed IP, DHCP Client and
PPPoE.
2.6.1.2. Instruction
Item
Explanation
WAN Active Default: DHCP Client. Setup the network connecting type including
fixed IP, DHCP Client and PPPoE.
Fixed IP: Enter a static IP address.
DHCP Client: Get IP address from DHCP server.
PPPoE: Uses PPPoE to connect IP network.
Provide options: Fixed IP, DHCP Client, and PPPoE.
IP Address Show the current IP address, enter type is xxx.xxx.xxx.xxx of 15
bytes.
*If you want to setup the IP address, please Setup [TYPE] to [Fixed IP]
first. Then you can enter IP address.
Subnet Mask Shows the current Subnet Mask IP Address, the enter type is
xxx.xxx.xxx.xxx of 15 bytes.
Default Gateway Shows current Default Gateway IP Address, the enter type is
xxx.xxx.xxx.xxx of 15 bytes.
DNS Active Default: Auto.
Fixed: Setup DNS Server address.
Auto: Get DNS Server address from DHCP Server and this option only
supports DHCP Client and PPPoE.
Provide options: Fixed, Auto.
Primary DNS Default: 168.95.192.1.
The enter type is xxx.xxx.xxx.xxx of 15 bytes.
Secondsond DNS Default: 168.95.1.1.
The enter type is xxx.xxx.xxx.xxx of 15 bytes.
MAC Address Shows the MAC ID address.
System Name Default: VOIP_Phone.
Page 39

LAN Phone 399
User Manual
Welltech Technology Co., Ltd.
39 / 89 2014/02/11
Item
Explanation
This column can enter numbers and strings; maximum length is 15
bytes.
PPPoE User
This column can enter
numbers and strings;
maximum length is
32
bytes.
PPPoE Password
This column can enter
numbers and strings;
maximum length is
32
bytes.
PPPoE Service
Name
This column can enter
numbers and strings;
maximum length is
32
bytes.
*The information of this column is provided by ISP, if you don’t known
what is the data, do not Setup it.
PPPoE AC Name
This column can enter
numbers and strings;
maximum length is
32
bytes.
*The data of this column is provided by ISP, if you don’t known what is
the data, do not setup it.
Submit [
Button
] S
ave the
s
etting
s.
2.6.1.3. Operate Instruction
Example 1: Check Host Name
Step 1: In [WAN Setting] web page, Setup [WAN Active: DHCP, System Name: VOIP_PHONE]
(See Figure 1).
(Figure 1)
Step 2: In [System Status] web page, User can view [WAN] port network status (See Figure 2).
(Figure 2)
Example 2: Check PPPoE Service Name & AC Name
Step 1: In [WAN Setting] web page, Setup [WAN Active: PPPoE, PPPoE User: test@hinet.net,
PPPoE Password: test] (See Figure 3).
Page 40

LAN Phone 399
User Manual
Welltech Technology Co., Ltd.
40 / 89 2014/02/11
(Figure 3)
Step 2: In [System Status] web page, User can view [WAN] port network status [Type: PPPoE
Client] (See Figure 4).
(Figure 4)
2.6.2. DDNS (Dynamic DNS Settings)
2.6.2.1. Function
DDNS Provide functions to Setup DDNS client.
2.6.2.2. Instruction
Item
Explanation
DDNS Active
Default:
Disabl
e.
Page 41

LAN Phone 399
User Manual
Welltech Technology Co., Ltd.
41 / 89 2014/02/11
Item
Explanation
Provide
options
: Disable
, Enable
.
Host Name
Host name
can be IP Address or Domain Name.
This column can enter numbers and strings; maximum length is 63
bytes.
User Name
Enter
user
’
s name for register
ing DDNS Server.
This column can enter numbers and strings; maximum length is 63
bytes.
Password
Enter
user
’s password
to
register DDNS Server.
This column can enter numbers and strings; maximum length is 63
bytes.
E-mail Address
Enter
E-
mail address.
This column can enter
numbers and strings;
maximum length is 63 bytes.
DDNS Server List
Default:
members.dyndns.org.
Display DDNS server’s name list information.
Provide options: Custom (user enter), members.dyndns.rog,
www.dtdns.com.
DDNS Server
DDNS Server
can be IP Address or Domain Name.
This column can be
numbers and strings; maximum length is 63 bytes.
Dynamic DNS Type
Default: dyndns.
Provide options: dyndns, statdns and Custom.
If you choose Custom, you can change the type information.*
Wild Card
Default:
Enable
.
Provide: Disable, Enable, nochg.*
BACKMX
Default:
Enable
.
Provide: Disable, Enable.*
Off Line
Default:
Enable
.
Provide: Disable, Enable.*
Submit [
Button
] S
ave the
Setting
s.
*: 1.Not all DNS providers can support this function. If you want to use this function, please contact
with your provider.
2.Query DNS data did not update in real time because of the DNS server updated cycle time.
Please make sure the DNS server updated correct time or login DNS server to check if the IP
address is correct or not.
2.6.3. VLAN (VLAN Environment Settings)
2.6.3.1. Functions
VLAN Provides functions to Setup VLAN including Network, SIP and RTP. These functions must
work with a VLAN Router.
2.6.3.2. Instruction
Page 42

LAN Phone 399
User Manual
Welltech Technology Co., Ltd.
42 / 89 2014/02/11
Item
Explanation
Network (Both
WAN & LAN)
Set up
VLAN functions.
VLAN Active
Default:
Disable
;
When
Enabling this function
, receiving
VALN Packet
s
function will be started.
Provide: Disable, Enable.
VID (802.1Q/ TAG)
Default: 136
;
Provide
Virtual LAN
ID (
VLAN or VID) for VLAN Server.
This column can only be numbers; maximum length is 4 bytes with the
range 3~4094.
User Priority
(802.1P)
Default: 0
;
This column can only be
number;
maximum length is
1
bytes with the range 0~7.
SIP & RTP
Setup
the VLAN function
of SIP & RTP
SIP VID
Default:
0; If you Enable this function, SIP e
thereal packages will
contain VLAN ID instead of Enabling VLAN Packets.
This column can only be numbers; maximum length is 4 bytes with the
range 3~4094, and 0 is Disable.
SIP User Priority
(802.1P)
Default:
0.
Provide options: 0~7.
RTP VID
Default:
0; If you Enable this function, RTP e
thereal packages will
contain VLAN ID instead of Enabling VLAN Packets.
This column can only enter numbers; maximum length is 4 bytes with
the range 3~4094, and 0 is Disable.
RTP
User Priority
(802.1P)
Default:
0.
Provide options: 0~7.
Submit [
Button
] S
ave the
Setting
s.
2.6.4. VPN (PPTP/L2TP Link Type)
2.6.4.1. Functions
VPN Provide functions to Setup PPTP/L2TP. Note: After you hav e enabled the VPN functions,
you could login in LP399 to configure via LAN port.
2.6.4.2. Instruction
Page 43

LAN Phone 399
User Manual
Welltech Technology Co., Ltd.
43 / 89 2014/02/11
Item
Explanation
VPN Active
Default:
Disable
;
Setup
the network connecting type of
PTP/L2TP
.
Provide options: Disable, PPTP, L2TP.
Server Name
Enter
connecting
VPN Server
address. This column can enter
IP or
Domain Name with the format at xxx.xxx.xxx.xxx; maximum length is
63 bytes.
User Name
This is
user
’
s name
. This column can be
numbers of strings;
maximum
length is 63 bytes.
Password
This is
user
’
s password
. This column can be
numbers of strings;
maximum length is 63 bytes.
Port
Default:
Disable, Port: 1723
.
Setup the Port Number of PPTP. When you select Custom, you can
enter the Port Number of PPTP by yourself.
This column can only enter numbers; maximum length is 5 bytes with
the range 1024~65535.
Provide options: Default, Custom.
Submit [
Button
] S
ave the
Setting
s.
2.6.4.3. Special Instruction
PPTP or L2TP don’t support CCP compression and IPSEC encryption.
Description: If it is not successfully to dial-up, please disable [CCP] function because LP399 don’t
support [CCP] function. If you are using Ubuntu Linux platform, Please modify the
following instructions.
Modify pptpd-options
Use vim edit pptpd.options, Command:
sudo vim /etc/
ppp/pptpd.options
pptpd.options file contents:
# Network and Routing
# If pppd is acting as a server for Microsoft Windows clients, this
# option allows pppd to supply one or two DNS (Domain Name Server)
# addresses to the clients. The first instance of this option
# specifies the primary DNS address; the secondsond instance (if given)
# specifies the secondsondary DNS address.
# Attention! This information may not be taken into account by a Windows
# client. See KB311218 in Microsoft's knowledge base for more information.
ms-dns 168.95.192.1
ms-dns 168.95.1.1
noccp
About the middle of the file content, Please find a parameter #ms-dns, delete #. Then
assign VPN users DNS Server address. For example is Chunghwa telecom DNS, ms-dns
168.95.192.1.
Page 44

LAN Phone 399
User Manual
Welltech Technology Co., Ltd.
44 / 89 2014/02/11
The first #ms-dns, there is another #ms-dns in next line, If you want to use one DNS only ,
you don’t care this line. Instead, please remove the #, Fill secondsond DNS Server
address. For example is Chunghwa telecom DNS, ms-dns 168.95.1.1.
And then add this command noccp on the next line, Because CPU of LP399 do not support
VPN IPSEC file compression. If the file does not add this line, the deivce can not get VPN
IP address.
Example 1: VPN Disable IPSEC Feature
Edit xl2tpd.conf file
Use vim edit xl2tpd.conf, Command:
sudo vim /etc/
xl2tpd
.conf
[global]
ipseconds saref = no
[lns default]
ip range = 192.168.50.136-192.168.50.140
local ip = 192.168.50.120
require chap = yes
require authentication = yes
pppoptfile = /etc/ppp/options.xl2tpd
ppp debug = yes
Do not support IPSEC. Please enter this command [ipsec saref = no] to disable this
function. Because CPU do not support VPN IPSEC encryption function. If the file does not
add this line, LP399 IP Phone can not get VPN IP address.
2.6.5. NTP (Time Environment)
2.6.5.1. Functions
NTP Provide functions to Setup Time and Daylight Saving.
2.6.5.2. Instruction
Item
Explanation
NTP Active
Default:
Enable
;
When
Enable this function
, the SNTP is on
.
Page 45

LAN Phone 399
User Manual
Welltech Technology Co., Ltd.
45 / 89 2014/02/11
Item
Explanation
Provide
options: Disable, Enable.
Primary
NTP Default:
north
-
america.pool.ntp.org
.
This column can enter IP or Domain Name with the format of
xxx.xxx.xxx.xxx; maximum length is 63 bytes.
Seconds
ondary
NTP
Default:
asia.pool.ntp.org
.
This column can enter IP or Domain Name with the format of
xxx.xxx.xxx.xxx; maximum length is 63 bytes.
Time Zone
Default:
GMT + 08:00 (hh:mm)
and the format is
(+/-, hh:mm
).
Provide options: +/-, 0~13(hh), 00, 15, 30, 45(mm).
Update Interval
Default:
6; Sync. Ti me
will
be
check
ed with
NTP Server
according to
the interval you have setup.
Provide options: 1 min., 5 min. , 30 min. , 1 hour , 3 hour, 6 hour , 12 hour ,
24 hour.
Manually Time
When enable this
time function
manually
,
Daylight Saving Time
function will be disabled.
Note: If LP399 electric power was removed, this time will be lost.
Date & Time
Year;
Setup
the Year; Only use number, Data
Setting
s
seconds
tion is
2011~2022, maximum length is 4 bytes.
Month; Setup the Month; Only use number, Data Settings secondstion
is 1~12, maximum length is 2 bytes.
Date; Setup Date; Only use number, Data Settings secondstion is
1~31, maximum length is 2 bytes.
Hour; Setup Hour; Only use number, Data Settings secondstion is
0~23, maximum length is 2 bytes.
Minute; Setup Minute; Only use number, Data Settings secondstion is
0~59, maximum length is 2 bytes.
Secondsond; Setup Secondsond; Only use number, Data Settings
secondstion is 0~59, maximum length is 2 bytes.
Get PC Time
[Button]
Get loca
l personal computer date and time information.
Daylight Saving
Time
Default:
Disable.
When
Enable this function
, the
Daylight Saving
is on
.
Provide options: Disable, Enable.
Off
Set up
Default:
+2 Hour.
Set up the Daylight Saving Time difference.
Provide options: -2 hour, -1 hour, +1 hour, +2 hour.
Start Time
Setup
Daylight Saving Time. You can select the start date by day or
week.
Setup beginning month: Default Setting is January . Here offers options
from January to December.
Day of Month:Default Setting is 01. Here Provide options from 1th to
31th.
Week of Month: Selects the effective week. Here Provide options for
Last Week, Last Secondsond Week, Week1, Week2 and Week3。
Day:Provide options: Sun, Mon, Tue, Wed, Thu, Fri, Sat.
Start Time:00~23.
End Time
Stop Daylight Saving Time
Setting
. You can sel
ect the end date by day
or week.
Setup ending month: Default Setting is January. Here offer options
froms Jan to Dec.
Day of Month:Default Setting is 01. Here Provide options from 1th to
31th.
Week of Month: Selects the effective week. Here Provide options for
Last Week, Last Secondsond Week, Week1, Week2 and Week3。
Day:Provide options: Sun, Mon, Tue, Wed, Thu, Fri, Sat.
Start Time:00~23.
Submit [
Button
] S
ave the
Setting
s.
Page 46

LAN Phone 399
User Manual
Welltech Technology Co., Ltd.
46 / 89 2014/02/11
2.6.5.3 Operate Instruction
Example 1: NTP Setting
Step 1: In [NTP Setting] web page, Setup [NTP Active: Auto, Primary NTP:
north-america.pool.ntp.org, Secondsondary NTP: asia.pool.ntp.org, Time Zone: GMT+
08:00, Update Interval: 6 Hour] (See Figure 1).
(Figure 1)
Step 2: In [System Status] web page, View the [Current Time] field, The field show time
information now (See Figure 2).
(Figure 2)
Example 2: DST Setting (Daylight Saving Time)
Step 1: In [NTP Setting] web page, Setup [NTP Active: Auto, Primary NTP:
north-america.pool.ntp.org, Secondsondary NTP: asia.pool.ntp.org, Time Zone: GMT+
08:00, Update Interval: 6 Hour, Daylight Sa ving Time: Enable, OffSet up: +1 Hour, Start
Time: Aug, By Week, Last Week, Mon, 01, End Time: Oct, By Week, Last Week, Fri, 18]
(See Figure 3).
(Figure 3)
Step 2: In [System Status] web page, View the [Current Time] field, The field show [Daylight
Saving Time] time information.
Example 3: Manually Setup NTP
Step 1: In [NTP Setting] web page, Setup [NTP Active: Manual] , Press [Get PC Time] button to
get personal computer’s date and time (For example : Date & Time: 2005 Year, 1 Month,
Page 47

LAN Phone 399
User Manual
Welltech Technology Co., Ltd.
47 / 89 2014/02/11
1 Date, 0 Hour, 0 Min, 23 secondsond) (See Figure4).
(Figure 4)
Step 2: In [System Status] web page, View the [Current Time] field, The field show [Manually
Time] time information (See Figure 5).
(Figure 5)
Page 48

LAN Phone 399
User Manual
Welltech Technology Co., Ltd.
48 / 89 2014/02/11
2.7. NAT (NAT Environment)
Provide function of [LAN, DMZ & MAC Clone, Virtual Server].
2.7.1. LAN (LAN Network Setting)
2.7.1.1. Functions
LAN Provides functions including DHCP Server.
2.7.1.2. Instruction
Item
Explanation
Device Active
Default:
NAT.
Setup the routing function of LAN Port.
Provide options: Bridge, NAT.
Bridge: When you Setup Bridge, [WAN & LAN] Port are all in the same
IP domain, just like in the same network switch.
NAT: When you Setup NAT, [WAN & LAN] Port are in the different IP
domain. LAN Port work as DHCP server when you Enable DHCP Server
Active function.
LAN IP Address
Default:
192.168.123.1
.
The type is xxx.xxx.xxx.xxx of 15 bytes.
LAN MAC Address
Show
LAN
MAD ID
address
. Enable DHCP
Server
Default:
Enable; When you Disable this function, LAN Port will not be a
DHCP Server.
Provide options: Enable, Disable.
IP Address
Default:
150
~200;
Setup
the IP address range
of DHCP Server.
This
column can only be numbers; maximum length is 3 bytes with the
range of 1~254.
Lease Time
Default is 1440 (min),
IP
address rented deadline.
Only use number,
Data setting range is 10~17820, maximum length is 5 bytes.
Submit [
Button
] S
ave the
Setting
s. Index
Shows the serial number.
Page 49

LAN Phone 399
User Manual
Welltech Technology Co., Ltd.
49 / 89 2014/02/11
Assign IP Address
LP399 DHCP server appoint IP address.
MAC Address
Connect LP399 LAN port device
’
s MAC address.
Lease Time(sec)
LAN port device connection time.
Refresh [Button]
Reload DHCP device status.
2.7.1.3. Operate Instruction
Example 1: LAN Mode: Bridge
Step 1: In [LAN Setting] web page, Setup [Device Active: Bridge] (See Figure 3).
(Figure 3)
Step 2: In [System Status] web page, [LAN Inofrmation] was no show. (See Figure 4).
(Figure 4)
2.7.2. DMZ & MAC Clone (DMZ & MAC Setting)
2.7.2.1. Functions
DMZ & MAC Clone Provide functions to Setup DMZ and MAC Clone.
2.7.2.2. Instruction
Item
Explanation
Page 50

LAN Phone 399
User Manual
Welltech Technology Co., Ltd.
50 / 89 2014/02/11
DMZ
Active
Defualt: Disable; When you Enable this func
tion, all the incoming
packages will transfer to the assigned IP address.
Provide options: Disable, Enable.
DMZ IP Address
Default:
0.0.0.0.
The assigned IP address type is xxx.xxx.xxx.xxx of maximum 15
bytes.
MAC Clone
Active
Default: Disable; When you
Enable this function,
LP399
will
provide
MAC ID Clone of PC through LAN Port.
Provide options: Disable, Enable.
Note:
1. MAC Clone function: Must use “Device Active” to Setup “Router”
mode, then enable to get IP address automatically.
2. Connect PC to LAN port of LP399, After PC get the IP address and
use LAN port login web page. Be able to Setup this function to
configure.
Submit [
Button
] Save the
Setting
s.
2.7.2.3. Special Considerations
If MAC Clone want to retrieve LP399 originally MAC address, Please reset to default Setting
(Restore Default Setting).
2.7.3. Virtual Server
2.7.3.1. Functions
Virtual Server Provides 12 sets of Virtual Server information.
2.7.3.2. Instruction
Item
Explanation
Index
Show
the number.
Active
Default: Not use.
If you select it, the setup will be started.
Protocol
Default:
TCP.
Select the Protocol: TCP or UDP.
Internet Port
Show
the address of In
ternet
Port.
Setup the Internet Port address of Start and End.
Page 51

LAN Phone 399
User Manual
Welltech Technology Co., Ltd.
51 / 89 2014/02/11
This column can only enter
numbers;
maximum length is
5 bytes
with
the range of 1~65533.
If you want to Setup fixed Port, you should enter the same number for
the two columns.
If you want to Set up a period of Ports, the left column is Start Port and
the right column is End Port.
Extranet Port
Show
the address of
Extranet
Port.
Setup the Extranet Port address of Start and End.
This column can only enter numbers; maximum length is 5 bytes with
the range of 1~65533.
If you want to Setup fixed Port, you should enter the same number for
the two columns.
If you want to Setup a range of Ports, the left column is Start P ort and
the right column is End Port.
Server IP Address
Setup
the Internal Server
IP address.
The type is xxx.xxx.xxx.xxx of 15 bytes.
Action
Provide
[Delete]
button to erase the data
. Submit [
Button
] S
ave the
Setting
s. Delete All [
Button
] Reset
all data
.
Note: 1. Internet & Extranet Port parameter, Please remember to avoid the local LP399 default
port, Example: 5060, 9999, 20000, other ports can refer to documents.
2.7.3.3. Operate Instruction
Step 1: In [Vitrual Server Setting] web page, Setup [Index: 1, Active :select, Protocol: TCP,
Internet Port: 80~80, Extranet Port: 8080~8080, Server IP Address: 192.168.123.150;
Index: 2, Active:select, Protocol: TCP, Internet Port: 600~600, Extranet Port: 600~600,
Server IP Address: 192.168.123.15] (See Figure 1).
(Figure 1)
Step 2: Use other personal computer to Setup IP 192.168.123.150, Then connect LP399’s LAN
port, Start personal computer Web Server function.
Step 3: Link to [http://192.168.123.150:8080], Show [Web Function Testing] web page.
Page 52

LAN Phone 399
User Manual
Welltech Technology Co., Ltd.
52 / 89 2014/02/11
2.8. SIP Setting (Register Environment)
Provide functions of [Service, Codec, Advanced, STUN].
2.8.1. Service (SIP Register Setting)
2.8.1.1. Functions
Provide 5 SIP register accounts to register 5 different SIP Server or IP-PBX.
2.8.1.2. Instruction
Item
Explanation
Realm
Default: Realm
1.
Provide
options: 1~5
. Realm is, in other words, SIP
Server or IP-PBX Server. There 5 realm can be the same one.
Realm
Active
Default:
Disable
; When you E
nable
this function,
LP399
will start to
register the SIP Register Server or IP-PBX server.
Provide options: Disable, Enable.
Display Name
Display name
will be show
n on LCD of your
LP399
.
This column can enter numbers and strings (support: 0~9, a~z, @, _,
-, *, #, ., +, :); maximum length is 31 bytes.
Phone Number
Setup
assigned Phone Number from SIP Register Server
or IP
-
PBX
server.
This column can be numbers and strings (support: 0~9, a~z, @, _, -,
*, #, ., +, :); maximum length is 31 bytes.
Authentication ID
Setup
the SIP Register ID.
This column can be numbers and strings(support: 0~9, a~z, @, _, -, *,
#, ., +, :); maximum length is 47 bytes.
Authentication
Password
Setup
SIP Registration
Password.
This column can be numbers and strings; maximum length is 31 bytes.
Domain Server
Setup
Domain Server
.
This column can enter IP or Domain Name with the format of
xxx.xxx.xxx.xxx; maximum length is 63 bytes. If the Domain Server
has Port Number, please add it at the end of Domain Name, for
instance: nat.voiptalk.org:5065.
Proxy Server
Set up
Proxy Server
or IP
-
PBX Server
.
This column can enter IP or Domain Name with the format of
xxx.xxx.xxx.xxx; maximum length is 63 bytes. If the Domain Server
has Port Number, please add it at the end of Domain Name, ex:
nat.voiptalk.org:5065.
Subscribe for MWI
Default: Disable.
When Enable this function, system will send [Subscribe of MVI]
Page 53

LAN Phone 399
User Manual
Welltech Technology Co., Ltd.
53 / 89 2014/02/11
Item
Explanation
message.
Please confirm this function supported by your SIP Register Server or
IP-PBX server.
Submit [
Button
] S
ave the
Setting
s.
2.8.1.3. Operate Instruction
Example 1: Register at port other than 5060
Step 1: In [Service Domain Setting] web page, Set up [Realm Active: Enable, Display Name:
22061, Phoner Number: 22061, Authentication ID: 22061, Authentication Password: test,
Domain Server: 61.62.236.71:6000, Proxy Server: 61.62.236.71:6000, Subscribe for
MWI: Disable] (See Figure 1).
Since port 5060 is widely used in VoIP SIP port, hacker is easily to detect your device is an
VoIP device (via port 5060) and invade your device to make expensive call. We strongly
suggest not to use port 5060. Use another port to avoid this issue happening. In this
example, We use SIP port 6000 instead. However, your registration SIP Server or IP-PBX
Server should be able to acceport SIP port other than 5060.
(Figure 1)
Step 2: In [Service Domain Setting] web page (See Figure 2), the register status of that account
is [System Status].
(Figure 2)
Example 2: Enalbe Subscribe For MWI
Step 1: In [Service Domain Setting] web page, Setup [Realm Active: Enable, Display Name:
22061, Phoner Number: 22061, Authentication ID: 22061, Authentication Password: test,
Domain Server: 61.62.236.71:6000, Proxy Server: 61.62.236.71:6000, Subscribe for
MWI: Enable ] (See Figure 3).
Page 54

LAN Phone 399
User Manual
Welltech Technology Co., Ltd.
54 / 89 2014/02/11
(Figure 3)
2.8.2. Codec (Voice Format)
2.8.2.1. Functions
Codec Provide function to Setup priority of codec when call was established between two
parties, RTP Package Length, and Codec ID Value.
2.8.2.2. Instruction
Figure 1: Codecs Setting
(
Figure 1)
Item
Explanation
Disabled Codecs
Default:
G.726.16, G.726.24, G.726.32, G.726.40
, GSM.
Disable these voice Codecs.
>>
<<
>>:
Move to Enable
Codec
area.
<<: Move to Disable Codec area.
Page 55

LAN Phone 399
User Manual
Welltech Technology Co., Ltd.
55 / 89 2014/02/11
Item
Explanation
Enabled Codec
Default:
G.729,
G.711 u
-
law, G.711 a
-
law, iLBC.
Provide using Codec items.
The priority is according to the order of the screen. The default Setting
of the first priority is G.729.
Move >>: Select [Disable Codecs] item, press [>>] button, can move to
Enable Codec area.
>>: Select [Enable Codecs] item, press [<<] button, can move to
Disable Codec area.
Up [Button] Select [Endble Codec] item, press [Up] button, can move up the codec
priority.
Down [Button] Select [Endble Codec] item, press [Down] button, can move down the
codec priority.
G.711 and G.729 Default: 20 ms; Set up the RTP Package Length of G.711 & G.729.
Provide options: 10, 20, 30, 40, 50, 60, 70, 80, 90(ms).
iLBC Default: 30 ms; Set up the RTP Package Length of iLBC.
Provide options: 20, 30(ms).
Silence
Suppression (VAD)
Default: Disable; Set up Silence Suppression (VAD).
Provide options: Disable, Enable.
When VAD detects that the users are in talking , Codec will send out
messages to network. Theoretically , there is only one user talking and
another one is listening in the same time, the listening one don’t send
out any voice, so VAD will send the messages of the talking one to
network, therefore, VAD can lower amount of message about 30%.
Echo Canceller Default: Disable; Setup Echo Cancel.
Provide options: Disable, Enable.
Codec Type Setup the information of Codec ID.
G726-16 Default: 23; When you Setup Custom, you can modify the Codec ID
Value. This column can only be numbers; maximum length is 3 bytes
with the range of 95~127.
Provide options: Default, Custom.
*: Please select Custom, before you modify Codec ID Value.
G726-24 Default: 22; This column can only be numbers; maximum length is 3
bytes with the range of 95~127.
Provide options: Default, Custom.
G726-32 Default: 2; This column can only be numbers; maximum length is 3
bytes with the range of 95~127.
Provide options: Default, Custom.
G726-40 Default is 21; This column can only be numbers; maximum length is 3
bytes with the range of 95~127.
Provide options: Default, Custom.
RFC 2833 Default is 101; This column can only be numbers; maximum length is
3 bytes with the range of 95~127.
Provide options: Default, Custom.
Submit [Button] Save the Settings.
Page 56

LAN Phone 399
User Manual
Welltech Technology Co., Ltd.
56 / 89 2014/02/11
2.8.2.3. Operate Instruction
Example 1: Adjust Codec Order
Step 1: In [Code Setting] web page, Setup G.726 - 16 enable, move mouse on [Disabled Codecs:
G.726 -16], then press [>>] button, can move to [Enabled Codecs] area, move mouse on
this Codec, can use [Up] or [Down] button, adjust codec negotiation priority during call
was established (See Figure 1).
(Figure 1)
Step 2: The other site makes a call to you, when you pick up the call, LP399 will use this codec as
the first priority to talk.
Example 2: Change Codec ID
Step 1: In [Code Setting] web page, Setup [RFC2833, Custom: 100] (See Figure 2).
(Figure 2)
Note: If the other side sends you RFC-2833 not 100, LP399 will modify it to adjust the other side
to communicate.
2.8.3. Advanced (Other Setting)
2.8.3.1. Functions
Provide Setting [SIP Expire Time, SIP/RTP Port, QoS, SIP R egister Retry Time, Use DNS SRV,
DTMF, PRACK] and etc.
Page 57

LAN Phone 399
User Manual
Welltech Technology Co., Ltd.
57 / 89 2014/02/11
2.8.3.2. Instruction
Item
Explanation
SIP Expire Time Default is 60; When this function is Set up to 0, the SIP Expire Time is
according to the default value of Server.
This column can only be numbers; maximum length is 5 bytes with the
range of 60~86400 (seconds).
SIP Expire Time
Type
Default: General.
Provide options: General, 1/2, 2/3, 3/4, 4/5, 5/6, 6/7, 7/8, 8/9, 9/10.
*This function must be supported by SIP Server or IP-PBX Server.
The count formula of SIP Expire Time:
General: SIP Expire Time-[(SIP Expire Time/30)*6] as SIP Expire Time
> 60 seconds, if SIP Expire Time < 60 seconds, the SIP Expire Time
subtract 5 seconds uniformly.
1/2: SIP Expire Time * 1/2.
2/3: SIP Expire Time * 2/3.
3/4: SIP Expire Time * 3/4.
4/5: SIP Expire Time * 4/5.
5/6: SIP Expire Time * 5/6.
6/7: SIP Expire Time * 6/7.
7/8: SIP Expire Time * 7/8.
8/9: SIP Expire Time * 8/9.
9/10: SIP Expire Time * 9/10.
SIP Registration
Retry Timer
Default: 64 seconds.
Set up the period of registering SIP Server again if LP399 fails to
Page 58

LAN Phone 399
User Manual
Welltech Technology Co., Ltd.
58 / 89 2014/02/11
Item
Explanation
register SIP Server or IP-PBX server.
This column can only enter numbers; maximum length is 4 bytes with
the range of 5~3600 (seconds).
SIP Session Timer
T1
Default: 1000 ms; Set up round-trip time (RTP) estimate.
This column can only enter numbers; maximum length is 4 bytes with
the range of 500~2000.
*This function must be supported by Server.
SIP Session Timer
T2
Default: 8000 ms.
Set up the maximum retransmit interval for non-INVITE requests and
INVITE responses.
This column can only enter numbers; maximum length is 5 bytes with
the range of 4000~16000.
*This function must be supported by Server.
SIP Session Timer
B, F, H
Default: 32000 ms.
Set up the maximum retransmit interval for non-INVITE requests and
INVITE responses.
This column can only enter numbers; maximum length is 6 bytes with
the range of 8000~128000.
B: 64 * SIP T1; INVITE transaction timeout timer。
F: 64 * SIP T1; non-INVITE transaction timeout timer。
H: 64 * SIP T1, Wait time for ACK receipt.
*This function must be supported by Server.
For example, if T1 is 500 ms, T2 is 4 seconds and B,F,H is 32 seconds,
then non-INVITE retransmissions occur at intervals of 500 ms, 1s, 2s,
4s, 4s, 4s, 4s, 4s, 4s, 4s. This means that retransmissions occur with
an exponentially increasing interval that caps at T2. In this particular
scenario, there are 10 retransmissions which is a total of 11 requests
from UAC.
SIP INVITE
Timeout
Default: 30000 ms; Set up SIP Invite, If how long do not respond,
enter the failed state. This column can only enter numbers; maximum
length is 5 bytes with the range of 8000~64000.
Local SIP Port Default: 5060~5060.
Set up the Start and End SIP Port Range of phone 1.
This column can only enter numbers; maximum length is 5 bytes with
the range of 1024~40000.。
If you want to Set up a fixed port, please Set up the same value of Start
and End Port.
If you want to Set up a range, the left column is Start Port, the right
Port is End Port.
Local RTP Port Default: 20000~21999.
Set up the Start and End RTP Port Range of phone 1.
This column can only enter numbers; maximum length is 5 bytes with
the range of 1024~40000.
If you want to Set up a fixed port, please Set up the same value of Start
and End Port.
If you want to Set up a range, the left column is Start Port, the right
Page 59

LAN Phone 399
User Manual
Welltech Technology Co., Ltd.
59 / 89 2014/02/11
Item
Explanation
Port is End Port.
Hold Type Default: RFC 2543 (0.0.0.0).
Set up Hold (define by RFC).
When this function is on, the information of [Connection Information
(c): IN IP4 xxx.xxx.xxx.xxx] will change IP to the device of executing
the function.
Provide options: RFC2543 (0.0.0.0), Type1 (Send only), Type2
(inactvie).
DTMF Type Default: RFC 2833.
InBand: When you enter key information, the [Ethereal] will not show
it.
RFC2833: When you enter key information, the [Ethereal] will show
[RTP Event].
SIP Info: When you enter key information, the [Ethereal] will show
[Request: Info].
Provide options: InBand, RFC2833, SIP Info.
RFC2833 + Inband: When you enter key information, LP399 sends
Inband message and [RTP Event] message.
SIP Info + Inband: When you enter key information, LP399 sends
Inband message and [Request: Info] message.
RPort Default: Disable; Set up RPort function. When this function is on, the
[Rport] message will add in [Message Header].
Provide options: Disable, Enable.
*This function must be supported by Server.
Voice QoS
(Diff-Serv)
Default: 40; This column can only enter numbers; maximum length is
2 bytes with the range of 0~63.
SIP QoS (Diff-Serv) Default: 40; This column can only enter numbers; maximum length is
2 bytes with the range of 0~63.
Use DNS SRV Default: Disable.
When this function is on, the package will show [DNS, Standard query
SRV_sip_upd.xxx.xxx.xxx].
Provide options: Disable, Enable.
*This function must be supported by Server.
Keep-alive
Message
Default: Disable; When this function is on and system is in NAT, LP399
will send a package to Server periodically according to [Send Keep
Alives Packet].
Provide options: Disable, Send UDP, Send SIP Option.
Send UDP: Use UDP format to send; For example: UDP, Source Port:
sip Destination Port: xxxx.
Send SIP Optoin: Use SIP Option format to send; For example: SIP,
Request-Line: OPTIONS sip:xxx.xxx.xxx.xxx;user=phone SIP/2.0.
Keep-alive Interval Default: 60; This column can only enter numbers; maximum length is
3 bytes with the range of 15~250.
Jitter Buffer Default: 1~64; Set up Jitter Buffer.
In VoIP system, the time of every voice package arriv es destination will
affect by Network Delay. Therefore, Jitter Buffer is used in destination
Page 60

LAN Phone 399
User Manual
Welltech Technology Co., Ltd.
60 / 89 2014/02/11
Item
Explanation
to modify the order of packages and adjust the time of Voice Playout
Delay, this function will raise the voice quality.
This column can only enter numbers; maximum length is 3 bytes with
the range 0~32.
SIP Server Type Default: General.
Set up the type of SIP Server.
In accordance with market available different SIP Servers or IP-PBX
server, LP399 will adjust its configuration to be compatible with these
SIP Server.
Provide options: General, Asterisk, BroadW orks, Nortel, Xener, Vodtel,
SKTelink.
* Please make sure which model of SIP Server or IP-PBX server for
LP399 IP Phone to work with in order to select suitable SIP Server
Type.
Use user=phone
(Register)
Default: Disable; When this function is on, the Register Header will
add ”user=phone” message in Register packages.
Provide options: Disable, Enable.
*This function must be supported from SIP Server.
Use user=phone
(Invite)
Default: Disable; When this function is on, the Invite Header will
add ”user=phone” message in Invite packages.
Provide options: Disable, Enable.
*This function must be supported from SIP Server.
Send SIP PRACK of
Proxy
Default: Disable; When this function is on, there will add “PRACK
Header” messages.
Provide options: Disable, Enable.
*This function must be supported from SIP Server.
Only Accept
Trusted Certificates
Default: Disable; Set up call from platform to accept only , don’t accept
IP call. When enable, Receive calls from non-platform, then device
does not respond. Provide drop-down options: Disable, Enable.
Set up User Agent
Content
Default: (null); When send SIP packets, the packets header
“User-Agent” message will join this word. This column can enter
numbers and strings (support: 0~9, a~z, @, _, -, *, #, ., +, :, () [, ]
and blank); maximum length is 46 bytes.
Example: User-Agent: LP399
Submit [Button] Save the Settings.
2.8.3.3. Operate Instuction
Example 1: SIP Expire Time
SIP Expire Time: 60
Step 1: In [Service Domain Setting] web page, Set up [Realm Active: Enable, Display Name:
22061, Phoner Number: 22061, Authentication ID: 22061, Authentication Password: test,
Domain Server: 61.62.236.71:6000, Proxy Server: 61.62.236.71:6000, Subscribe for
MWI: Disable] (See Figure 1).
Page 61

LAN Phone 399
User Manual
Welltech Technology Co., Ltd.
61 / 89 2014/02/11
(Figure 1)
Step 2: In [SIP – Advanced Setting] web page, Set up [SIP Expire Time: 60] (See Figure 2).
(Figure 2)
Step 3: When registering to Server successfully, LP399 will send a register package every 55
seconds.
SIP Expire Time: 0 (by server)
Step 1: In [Service Domain Setting] web page, Set up [Realm Active: Enable, Display Name:
22061, Phoner Number: 22061, Authentication ID: 22061, Authentication Password: test,
Domain Server: 61.62.236.71:6000, Proxy Server: 61.62.236.71:6000, Subscribe for
MWI: Disable] (See Figure 1).
Step 2: In [SIP – Advanced Setting] web page, Set up [SIP Expire Time: 0 (the register time is
defined by Server)] (See Figure 3).
(Figure 3)
Step 3: System will register to Server according to the period that defined by Server.
Example 2: Use DNS SRV
Use DNS SRV: Enable
Step 1: Set up register SIP account Settings first, then use [Domain] to register SIP Server. (See
Figure 4).
(Figure 4)
Step 2: In [SIP – Advanced Setting] web page, Set up [Use DNS SRV: Enable] (See Figure 5)
Page 62

LAN Phone 399
User Manual
Welltech Technology Co., Ltd.
62 / 89 2014/02/11
(Figure 5)
Example 3: Keep Alives Message
Keep Alives Message: Send UDP
Step 1: Set up register SIP account settings (See Figure 6).
(Figure 6)
Step 2: In [SIP – Advanced Setting] web page, Set up [Keep Alives Message: Send UDP, Keep
Alives Interval: 150] (See Figure 7).
(Figure 7)
Keep Alives Message: Send SIP Info
Step 1: Set up register SIP account Settings (See Figure 6).
Step 2: In [SIP – Advanced Setting] web page, Set up [Keep Alives Message: Send SIP Option,
Keep Alives Interval: 150] (See Figure 8).
(Figure 8)
2.8.4. STUN (STUN & Force Setting)
2.8.4.1. Functions
STUN Provides function to set up STUN and Force feature.
2.8.4.2. Instruction
Item
Explanation
Page 63

LAN Phone 399
User Manual
Welltech Technology Co., Ltd.
63 / 89 2014/02/11
STUN Active
Default:
Disable
;
When this function is on, S
TUN functions Enable.
Provide options: Disable, Enable.
STUN Server Name
Default:
stun.xten.com
;
This
column
can
enter
IP or
Domain Name
with the format of xxx.xxx.xxx.xxx; maximum length is 63 bytes.
STUN Port
Default:
3478
;
This
column
can only
enter
numbers;
maximum length
is 5 bytes with the range 80~65535.
Force Active
Default:
Disable
;
When this function is on, the IP of [
SIP infor] in
[Ethereal] will replace by the assigned IP address.
Provide options: Disable, Enable.
Public IP Address
Set up
Router’
s public IP address
;
This
column
can only
enter
IP with
the format of xxx.xxx.xxx.xxx; maximum length is 63 bytes.
Public Port
Default:
5060;
Set up
Router’
s public Port.
This column can only enter numbers; maximum length is 5 bytes with
the range of 80~65535.
Submit [
Button
] S
ave the
settings.
2.8.4.3. Operate Instruction
Example 1: STUN
Step 1: Please Set up the SIP account first.
Step 2: In [STUN Setting] web page, Set up [STUN Active: Enable, STUN Server Name:
stun.xten.com, SUTN Port: 3478] (See Figure 1).
(Figure 1)
Example 2: Force
The structure figure (See Figure 2):
(Figure 2)
Step 1: Please set up the SIP account first.
Step 2: In [STUN Setting] web page, set up [Force Active: Enable, Public IP Address:
118.169.209.251, Public Port: 7777] (See Figure 3).
(Figure 3)
Page 64

LAN Phone 399
User Manual
Welltech Technology Co., Ltd.
64 / 89 2014/02/11
2.9. Management (Advanced Settings)
Provide [Status Log, Auto Provision, Auto Update, Firmware, Advanced, Passowrd, Tones,
Default, Language].
2.9.1. Status Log (System Status)
2.9.1.1. Functions
Status Log Provide the running status of the system.
2.9.1.2. Instruction
Item
Explanation
Phone Status
Show the
Phone
user status now
;
The status has
: IDLE, Off
-
Hook
.
IDLE: Ready
Off Hook: in use.
Refresh [
Button
] Refresh
the
Phone
s
tatus
. Status Log
System wor
k status message.
Page
Default:
1 (
Page
1),
Select page.
Provide
drop
-
down options:1~xx;
The page increases to next one in accordance with the amount of data
to increase automatically.
Index
Show index number.
Message
Show
the information of the system.
Example:
<2014-02-10 11:49> Get Time from SNTP server, Succeed!
<2014-02-10 11:49>: Show the time of message.
Get Time from SNTP server, Succeed! : Shows the content of message.
Page 65

LAN Phone 399
User Manual
Welltech Technology Co., Ltd.
65 / 89 2014/02/11
Item
Explanation
Export System Log
[Button]
Save
[Stauts Log]
data to log file; System
default
file name is
Syslog.log.
2.9.1.3. Operate Instruction
Example 1: Check Phone Status
Step 1: In [Status Log] web page, When the phone don’t in use, [Phone Status] will show [IDLE]
(See Figure 1).
(Figure 1)
Step 2: When pick up the handset, In [Status Log] web page, Press [Refresh] button, The [Phone
Status] show [Off Hook] (See Figure 2).
(Figure 2)
Example 2: Check System Log
Step 1: In [Status Log] web page, Select web page, the page will show other pages data. (See
Figure 3).
(Figure 3)
Example 2: Save System Log File
Step 1: In [Status Log] web page, press [Export System Log] button, Enter [Save File] menu,
Then press [Save] button (See Figure 4).
(Figure 4)
Step 2: Save file completely, Any text editor can open [SysLog.log] file (See Figure 5).
Page 66

LAN Phone 399
User Manual
Welltech Technology Co., Ltd.
66 / 89 2014/02/11
(Figure 5)
2.9.2. Auto Provision (Configuration Automatically)
2.9.2.1. Functions
Provide the types of HTTP, FTP and TFTP to update the configuration.
2.9.2.2. Instruction
Item
Explanation
Provision Active
Default:
Disable
;
When this function is on,
LP399
will
download
the
MACID.dat from the designated Server.
Provide options: Disable, TFTP, FTP and HTTP.
2 Steps
Configuration
Default:
Disable
;
Set up
2 Steps configuration, get the common
settings first, then get the SIP accounts and passwords secondly.
Provide options: Disable, Enable.
*This function must be supported from SIP Server.
Page 67

LAN Phone 399
User Manual
Welltech Technology Co., Ltd.
67 / 89 2014/02/11
Item
Explanation
Server Auto
Discovery
Default:
Disable
;
DHCP TFTP Option 66
(TFTP)
: DHCP
Server will offer
the Option 66 Server IP address into the column of system [TFTP
Server] when it assigns IP.
Broadcasting: Discovering the Server by broadcasting, the Server will
send the information of Type and Server to LP399, it will fill in these
information to the corresponding columns.
Provide options: Disable, DHCP TFTP Option 66 (TFTP), Broadcasting.
*This function must be supported by Server.
Scheduling
Default:
Disable
; Execute the Configuration regularly.
When this function is on, system will check the Configuration Server by
[Next Config Time].
Provide options: Disable, Enable.
Note: The time parameter use [Auto Update Setting] web page’s
[Scheduling Time & Date].
TFTP Server
This
column
can only
enter
IP with the format of xxx.xxx.xxx.xxx;
maximum length is 15 bytes.
TFTP File Path
This
column
can
enter
numbers or strings;
maximum length is
63
bytes with the “/” in the end, ex: 123/.
HTTP Server
This
column
can
enter
IP or Domain Name;
maximum length is
63
bytes.
HTTP File Path
This
column
can
enter
numbers or strings;
maximum length is
63
bytes with the “/” in the end, ex: 123/.
FTP Server
This
column
can
enter
IP or Domain Name;
maximum length is
63
bytes.
FTP User Name
This
column
can
enter
IP or Domain Name;
maximum length is
63
bytes.
FTP Password
This
column
can
enter
IP or Domain Name;
maximum length is
63
bytes.
File File Path
This
column
can
enter
numbers or strings;
maximum length is
63
bytes with the “/” in the end, ex: 123/.
Next Configuration
Time
System will check the Configuration Server when the
Next config time
is up.
The start counting date is the next day , so the Next configur ation time
will add one day.
Count rule: the next day + days + time period + MACaddress +
random number = Next config time.
Submit [
Button
] S
ave the
settings.
2.9.2.3. Operate Instruction
Example 1: Configuration by HTTP
Step 1: Please complete MACID.dat first, and place it at the path of the designated Server.
Step 2: In [Auto Provision Setting] web page, Set up [Provision Active: HTTP, HTTP Server:
192.168.50.2, HTTP Path: /download/] (See Figure 1).
(Figure 1)
Page 68

LAN Phone 399
User Manual
Welltech Technology Co., Ltd.
68 / 89 2014/02/11
Step 3: In [Service Domain Setting] web page, Check [Realm: 1] Settings, Use [MACID.dat] file
to load configuration (See Figure 2).
(Figure 2)
Example 2: Configuration by FTP
Step 1: Please complete MACID.dat first, and place it at the path of the designated Server.
Step 2: In [Auto Provision Setting] web page, Set up [Provision Active: FTP, FTP Server:
192.168.50.2, FTP User Name: test, FTP Password: test, FTP File Path: download/] (See
Figure 3).
(Figure 3)
Step 3: In [Service Domain Setting] web page, Check [Realm: 1] Settings, Use [MACID.dat] file
to load configuration.
Example 3: Set up 2 Steps configuration (not encryption)
Step 1: Build a common MAC file with name [000000000000.dat], the file does not contain
[$Service Domain Setting] data, (See Figure 4).
Page 69

LAN Phone 399
User Manual
Welltech Technology Co., Ltd.
69 / 89 2014/02/11
(Figure 4)
Step 2. Set up the [$Service Domain Setting] data, and [line0Name=, ph1Realm1Active=1]
cannot be deleted (See Figure 5).
(Figure 5)
Step 3: On [Auto Configuration Setting], Set up [T ype: TFTP, 2 Steps Configuration: Enable, TFTP
Server: 192.168.50.99] (See Figure 6).
(Figure 6)
Page 70

LAN Phone 399
User Manual
Welltech Technology Co., Ltd.
70 / 89 2014/02/11
Step 4: In [Service Domain Setting] web page, Check [Realm: 1] Settings, Use [MACID.dat] file
to load configuration (See Figure 7).
(Figure 7)
Example 4: Server Auto Discover
Broadcasting
Step 1: In [Auto Provision Setting] web page, Set up [Provision Active: TFTP, Server Auto
Discover: Broadcasting] (See Figure 8).
(Figure 8)
Step 2: In [Auto Provision Setting] web page, Check [Provision Active: TFTP, TFTP Server:
192.168.55.91, TFTP File Path: config/] (See Figure 9).
Note:If starts TFTP Server at the same time, this field parameter can’t see data. Because of this
data upload provision function by TFTP Server.
(Figure 9)
Step 3: Enter [Service Domain Setting] web page, check [Realm No.: 1] Settings, Use
[MACID.dat] file to load configuration.
DHCP Option 66 (TFTP) (Please refer to DHCP Turbo and TFTP Turbo documents)
Step 1: Install [DHCP T urbo + TFTPd32] software, then placed [MACID.dat] file into the specified
directory.
Step 2: In [Auto Provision Setting] web page, Set up [Provision Active: TFTP, Server Auto
Discover: DHCP Option 66 (TFTP)] (See Figure 10).
Page 71

LAN Phone 399
User Manual
Welltech Technology Co., Ltd.
71 / 89 2014/02/11
(Figure 10)
Step 3: In [Auto Provision Setting] web page, Check [TFTP Server] field, upload this data (See
Figure 11).
Note:If start TFTP Server at the same time, This field parameter can’t see data, Because this data
upload provision function by TFTP Server.
(Figure 11)
Step 6: Enter [Service Domain Setting] web page, Check [Realm: 1] Setting, Use [MACID.dat]
file to load configuration.
DHCP Option 66 (TFTP)-2 (Please refer to DHCP Turbo document)
Step 1: Install [DHCP Turbo + TFTP Turbo] software, Then placed [MACID.dat] file into the
specified directory.
Step 2: In [Auto Provision Setting] web page, Set up [Provision Active: TFTP, Server Auto
Discover: DHCP Option 66 (TFTP)] (See Figure 12).
(Figure 12)
Step 3: In [Auto Provision Setting] web page, Check [TFTP Server] field, the field will upload this
data (See Figure 13).
Note:If start TFTP Server at the same time, This field parameter can’t see data, Because this data
upload provision function by TFTP Server.
(Figure 13)
Page 72

LAN Phone 399
User Manual
Welltech Technology Co., Ltd.
72 / 89 2014/02/11
Step 4: In [TFTP T urbo Serv er] menu, can check [Download] status, The page can view and the
device will come to download [MACID.dat] file (See Figure 14).
(Figure 14)
Example 5:Auto-Provision By Scheduling
Step 1: In [Auto Update Setting] web page, Set up [Scheduling (Date): 14, Scheduling (Time):
AM 00:00 -5:59 ] (See Figure 15).
(Figure 15)
Step 2: In [Auto Provision Setting] web page, Set up [Provision Active: TFTP, Scheduling: Enable,
TFTP Server: 192.168.50.91] (See Figure 16).
(Figure 16)
Step 3: Return [Auto Update Setting] web page; In [Next Configuration Time] field, the field will
show upgrade date and time at next time (See Figure 17).
Page 73

LAN Phone 399
User Manual
Welltech Technology Co., Ltd.
73 / 89 2014/02/11
(Figure 17)
Note: How to establish MAC File data, Please refer『Auto_provision_1.ppt』file.
2.9.3. Auto Update (Firmware Auto Upgrade)
2.9.3.1. Functions
Provide the types of TFTP, FTP, HTTP to update the firmware in ssh type.
2.9.3.2. Instruction
Item
Explanation
Update Active
Default:
Disable
; When this function is on,
LP399
will update the
firmware from the designate Auto provision Server.
Provide options: Disable, TFTP, FTP and HTTP.
TFTP Server
This
column
can only
enter
IP with the format of xxx.xxx.xxx.xxx;
maximum length is 15 bytes.
TFTP File Path
This
column
can
enter
numbers or strings;
maximum length is
63
bytes with the “/” in the end, for instance: 123/.
HTTP Server
This
column
can
enter
IP or Domain Name;
maximum length is
63
bytes.
HTTP File Path
This
column
can
enter
numbers or strings;
maximum length is
63
bytes with the “/” in the end, ex: 123/.
FTP Server
This
column
can
enter
IP or Domain Name;
maximum length is
63
Page 74

LAN Phone 399
User Manual
Welltech Technology Co., Ltd.
74 / 89 2014/02/11
Item
Explanation
bytes.
FTP User Name
This
column
can
enter
IP or Domain Name;
maximum length is
63
bytes.
FTP Password
This
column
can
enter
IP or Domain Name;
maximum length is
63
bytes.
File File Path
This
column
can
enter
numbers or strings;
maximum length is
63
bytes with the “/” in the end, ex: 123/.
Check new
Firmware Type
Default:
Scheduling
Only.
Set up the type for checking new firmware.
- Power on and Scheduling: Check the new firmware when powers on
and base on Scheduling
- Scheduling: According to [Next Update Time] to check the new
firmware.
Provide options: Power on and Schedule, Scheduling Only.
* Power on and Scheduling: When LP399 discovers a new firmware
which is different with current one, it will not update immediately . But
you will hear a hint tone or see a [Found new s/w] message on LCD.
You should update firmware by your decision.
Scheduling (Date)
Default:
14 (day).
This column can only enter numbers; maximum length is 2 bytes with
a range of 1~30.
Scheduling (Time)
Default:
AM 00:00
– 05:59
.
Provide options: AM 00:00 – 05:59, AM 06:00 – 11:59, AM 12:00 –
17:59, AM 18:00 – 23:59.
Automatic Update
Type
Default:
Notify only
.
Set up the type to update firmware.
Provide option: Notify only, Automatic.
- Notify only: When LP399 discover a new firmware, it will not update
firmware immediately . But y ou will hear a hint tone from LP399 or see
a [Found new s/w] message on LCD display.
- Automatic: Update firmware automatically.
Firmw
are File
Prefix
Default is production model.
This is used to judge which model ask for update, such as Phone or
ATA.
This column can enter numbers or strings; maximum length is 8 bytes.
Next Update Time
LP399
will check the Update Server when the
Next
Update
time
is up.
The start counting date is the next day, so the Next Update time will
add one day.
Count rule: the next day + days + time period + MACaddress +
random number = Next Update time.
Submit [
Button
] S
ave the
Setting
s.
Note: Update By Youself
Step 1: Display [Found new s/w] message on LCD display of LP399.
Step 2: Press the [MENU] key to enter menu, select [6. Administrator 2. Upgrade System1.
Upgrade Now 1. Yes], then LP399 will update firmware automatically.
Special Note:When LP399 IP Phone starts to upgrade firmware, it takes several minutes to
upgrade (about 2~3 minutes). In this duration, it can not dial any call feature.
Don’t remove electric power in upgraded duration. Otherwise, the flash memory
may be damaged permanatly and can not be recovered.
2.9.3.3. Operate Instruction
Example 1: Build an Auto Update File [***_ver.dat]
Page 75

LAN Phone 399
User Manual
Welltech Technology Co., Ltd.
75 / 89 2014/02/11
Step 1: The filename for checking firmware version, the filename is according to [Firmware File
Prefix] on [Auto Update Setting] and adds [_ver.dat ] to be [filename_ver.dat], (See Figure
1).
Ex:Firmware File Prefix: PHONE, the filename for checking firmware version is
TA1S_ver.dat.
Pay attention to [Firmware File Prefix], the name must be the same with ***_ver.dat.
(Figure 1)
Step 2: After build a [PHONE_ver.dat] file, there must have [CPU, CNAME] two data to compare
with updating file in Server. If the Server one is newer than your existing one, then your
LP399 will update firmware, (See Figure 2).
(Figure 2)
Note:
CPU: The date of updating file, it can only enter numbers.
CNAME: The updating filename, please enter a complete name without space or signs.
Step 3: Please place ***_ver.dat and *.ssh files in the designated folder of the Server.
Example 2: Check New Firmware Type
Check New Firmware Type: Scheduling only (Upgrade Automatically)
Step 1: In [Auto Update Setting] web page, Set up [Update Active: HTTP, HTTP Server:
192.168.50.2, HTTP File Path: /HFS/, Check New Firmware Type: Scheduling only,
Scheduling (Date): 14, Scheduling (Time): AM 00:00-05:59, Automatic Update: Automatic,
Firmware File Prefix: PHONEO] (See Figure 3).
Page 76

LAN Phone 399
User Manual
Welltech Technology Co., Ltd.
76 / 89 2014/02/11
(Figure 3)
Step 2: In [Auto Update Setting] web page, Please check [Next Update time] (See Figure 4).
(Figure 4)
Step 3: When [Next Update Time] is arrived, LP399 will connect with HTTP Server to check the
firmware version.
Step 4: When LP399 downloads [PHONEO_ver.dat] file completely, it will compare the [CPU]
information with current version. If the current version is older than server’s one, LP399 will
check [CNAME] parameter and download [PHONEO_1019011.ssh] from the designated
Server.
Check New Firmware Type: Power on and Scheduling (Manually Upgrade)
Step 1: Please build the file of checking firmware version [PHONEO_ver.dat] file and place it in the
folder of designated Server with new *.ssh file.
Step 2: In [Auto Update Setting] web page, Set up [Type: FTP, FTP Server: 192.168.50.2, FTP
User Name: test, FTP Password: test, Check New Firmware T ype: Power on and Scheduling,
Scheduling (Date): 14,Scheduling (Time): AM 00:00-05:59, Automatic Update: Automatic,
Firmware File Prefix: PHONEO] (See Figure 5).
Page 77

LAN Phone 399
User Manual
Welltech Technology Co., Ltd.
77 / 89 2014/02/11
(Figure 5)
Step 3: In [Auto Update Setting] web page, check the next updating time of [Next Update time]
(See Figure 5).
Step 4: When LP399 downloads [phone_ver.dat] file completely, it will compare the [CPU]
information with current version. If the current version is older than Server’s one, there will
display a [Found New S/W] message on LCD from LP399 Phone.
Step 5: If you want to perform upgrade firmware feature directly, Please press [MENU] key to
enter settings menu, Select [6. Administrator 2. Upgrade System1. Upgrade Now 1.
Yes] project and enforcement firmware upgrade.
2.9.4. Firmware (Firmware Upgrade)
2.9.4.1. Functions
Provide type ssh to update.
2.9.4.2. Instruction
Item
Explanation
Update Active
Default:
CPU+DSP xxxx.ssh;
Upgrade file format.
Load From File
The location of the updating file.
Upgrade [
Button
] Execute
updating firmware.
Note:It takes about 2~3 minutes when LP399 is updating firmware. Please do not turn off power
adapter during updating firmware and you can not make any call either.
2.9.4.3. Operate Instruction
Step 1: In [Firmware Upgrade] web page, please press [select] to choose the location of the
updating file, (see Figure 1).
Page 78

LAN Phone 399
User Manual
Welltech Technology Co., Ltd.
78 / 89 2014/02/11
(Figure 1)
Step 2: Enter the page of [select file], select the updating file (Example: voip.ssh), press [open]
button and will go back to [Update Firmware], then press [Update] button, (See Figure 2).
(Figure 2)
Step 3: There will show a [Note], it tells you some messages that you should not do them during
the updating firmware. When you are sure of these notes very clear, please press [OK]
button to close the [Note]. Then LP399 will start to update firmware, (see Figure 3).
(Figure 3)
Step 4: There will show a page of [Note Information], it tells you the system is updating and it will
reboot automatically as updating completely (See Figure 4).
(Figure 4)
2.9.5. Advanced (Advanced Settings)
2.9.5.1. Functions
Provide functions to set up Send Anonymous CID, Billing Signal, Send Flash Event, Encryption
and Syslog.
2.9.5.2. Instruction
Figure 1: LP399 Device
Page 79

LAN Phone 399
User Manual
Welltech Technology Co., Ltd.
79 / 89 2014/02/11
(Figure 1)
Item
Explanation
ICMP Not Echo
Default: Disable
;
When this function
was s
et up
“Enable”
,
LP399
will
not responseto the message of ping.
Provide options: Disable, Enable.
Anonymous Call
Default:
Disable
;
When this function wa
s set up
Type 1/Type 2,
LP399
will use the anonymous Caller ID.
Provide options: Disable, Type 1 (anonymous@anonymous.invalid),
Type 2 (anonymous@x.x.x.x) 。
*This function must be supported from SIP Server.
Management from
WAN
Default: Enable
;
Allow users login system from
WAN
Port.
When this function was set up Disable, users can only login LP399 from
LAN Port.
Provide options: Disable, Enable.
WEB Login Port
Default:
9999;
s
et up
web login port location.
This
column
can only
enter numbers; maximum length is 5 bytes with a range of 1~65535.
Telnet Login
Default:
Enabl
e; Allows using Telnet to login system. If the
set
ting is
disable, User can’t use Telnet to login LP399. Provide drop-down
options: Disable, Enable.
IP Dialing Format
Default: Type 1 (
x@x.x.x.x
)
; When this function wa
s set up
Disable,
LP399 can not dial IP.
Provide options: Disabled, Type 1 (x@x.x.x.x.), Type 2 (x.x.x.x).
Send Flash event
Default: Disable
;
Send the type of call
waiting.
When a user presses [Hook/Flash (T ransfer)] on LP399, it will send out
event messages depending on the type of user selected to the other
side.
Provide options: Disable, DTMF Event, SIP Info.
Disable: Send out [SIP/DSP, Content-Type=applicatio-sdp].
DTMF Event: Send out [RTP event, Payload type=RTP event Flash].
SIP Info: Send out [SIP, Request: INFO sip:xxx@xxxx], [Message
Body Signal=16, Duration=250].
Transfer Key Mode
Default: Attend Transfer; The settings
have two method that
can
support server or other IP-phone for transfer action.
Encrypt Type
Default: Disable
;
Set up
SIP encrption type.
When this function is on, system will send out encryption information
according to encryption type.
Page 80

LAN Phone 399
User Manual
Welltech Technology Co., Ltd.
80 / 89 2014/02/11
Item
Explanation
Provide
options: D
isable
,
Welltech
,
AVS, WALKERSUN1
,
WALKERSUN2, CSF1, CSF2, GX, VGX, RC4, VOS_R, VGCP.
*This function must be supported by SIP Server.
Encrypt Key
Set up
encryption key.
Some encryption type will ask you to enter the keys to encrypt the
information.
This column can enter numbers or strings; maximum length is 63
bytes.
*This function must be supported by SIP Server.
PPPoE Retry Period
Default: 5
;
When
LP399
fail
ed to connect PPPoE, it
will wait
for several
seconds and try to connect PPPoE again.
This column can only enter numbers; maximum length is 3 bytes with
a range of 5~255(seconds).
DHCP Gateway ARP
Check Period
Default:
0;
When use DHCP mode to get IP address, How often to
check default gateway there. This column can only enter numbers; If
the parameter is 0, that mean disable this feature. Maximum length is
3 bytes with a range of 30~300(seconds).
Syslog Server IP
Address
Set up
Syslog
address
;
The Syslog Server wi
ll receive Debug Log from
LP399. This column can enter numbers or strings with the type of
xxx.xxx.xxx.xxx; maximum length is 63 bytes.
System Log
Default: Disable
;
Provide
options: Disable,
Call Statistics
,
General
Debug, Call Statistics, General Debug, SIP Debug, Call Statistics + SIP
Debug, General Debug + SIP Debug, All.
NET Bandwidth
Limit
Default: Disable; Set up the transmission limit through LAN Port.
When this function is on, LP399 will limit the transmission through LAN
Port according to the option.
Provide options: Disable, 128, 256, 512, 1024, 2048, 4096,
8192(Kbps).
Submit [
Button
] S
ave the
s
etting
s.
2.9.5.3. Operate Instruction
Example 1: System Log (Please Start TFTP or System Log Server)
System Log Type: All
Step 1: In [Management - Advanced Setting] web page, Set up [System Log Server:
192.168.50,99, System Log Type: All] (See Figure 1).
(Figure 1)
Step 2: In [TFTP]’s [Syslog server] web page, this page show log message data (See Figure 2).
Page 81

LAN Phone 399
User Manual
Welltech Technology Co., Ltd.
81 / 89 2014/02/11
(Figure 2)
Note: User can use ethereal capture to check syslog data.
Example 2: DHCP Gateway ARP Check Period
Step 1: In [WAN Setting] web page, Set up [WAN Active: DHCP] (See Figure3).
(Figure 3)
Step 2: In [Management - Advanced Setting] web page, Set up [DHCP Gateway ARP Check Period:
30] (See Figure 4).
(Figure 4)
Page 82

LAN Phone 399
User Manual
Welltech Technology Co., Ltd.
82 / 89 2014/02/11
2.9.6. Password (Change Login Account)
2.9.6.1. Functions
Password Provides 3 Authority functions to change their User name and Password,
respectively.
2.9.6.2. Instruction
Figure 1: Admin
(Figure 1)
Item
Explanation
Admin
Administrator (the highest authority): it can only Set up an
Administrator account.
Default Username: admin, default password: admin
New User Name
Enter new user name, This column can enter numbers or strings
(support: 0~9, a~z, @, _, -, *, #, .); maximum length is 32 bytes.
New Password
Enter new user password
,
This
column
can
enter
numbers or strings
(support: 0~9, a~z, @, _, -, ., +, :, [, ], *, #, !, %); maximum length
is 32 bytes.
Confirmed
Password
Confirm new user
password
,
This
column
can
enter
numbers or strings
(support: 0~9, a~z, @, _, -, ., +, :, [, ], *, #, !, %); maximum length
is 32 bytes.
System
System (
the middle authority
):
it can only
Set up
a System
account.
Default Username: system, default password: system
New User Name
Enter new user name
,
This
column
can
enter
numbers or strings
(support: 0~9, a~z, @, _, -, *, #, .); maximum length is 32 bytes.
New Password
Enter new user password
,
This
column
can
enter
numbers or strings
(support: 0~9, a~z, @, _, -, ., +, :, [, ], *, #, !, %); maximum length
is 32 bytes.
Confirmed
Password
Confirm new user password
,
This
column
can
enter
numbers or strings
(support: 0~9, a~z, @, _, -, ., +, :, [, ], *, #, !, %); maximum length
is 32 bytes.
User
Normal User (
the
lowest authority
):
it can only
Set up
a Normal User
account.
Default Username: user, default password: user
New User Name
Enter new user name
,
This
column
can
enter
numbers or strings
Page 83

LAN Phone 399
User Manual
Welltech Technology Co., Ltd.
83 / 89 2014/02/11
Item
Explanation
(
support
: 0~9, a~z, @, _,
-
, *, #, .)
; maximum length is
32 bytes.
New
Password
Enter new user password
,
This
column
can
enter
numbers or strings
(support: 0~9, a~z, @, _, -, ., +, :, [, ], *, #, !, %); maximum length
is 32 bytes.
Confirmed
Password
Confirm new user password
,
This
column
can
enter
numbers or strings
(support: 0~9, a~z, @, _, -, ., +, :, [, ], *, #, !, %); maximum length
is 32 bytes.
Submit [
Button
] S
ave the
Set
tings.
Figure 2: System
(Figure 2)
Item
Explanation
System
System (
the middle authority
):
it can only
Set up
a System
account.
Default Username: system, default password: system
New User Name
Enter new user name
,
This
column
can
enter
numbers or strings
(support: 0~9, a~z, @, _, -, *, #, .); maximum length is 32 bytes.
New Password
Enter new user password
,
This
column
can
enter
numbers or strings
(support: 0~9, a~z, @, _, -, ., +, :, [, ], *, #, !, %); maximum length
is 32 bytes.
Confirmed
Password
Confirm new user password
,
This
column
can
enter
numbers or strings
(support: 0~9, a~z, @, _, -, ., +, :, [, ], *, #, !, %); maximum length
is 32 bytes.
User
Normal User (
the lowest authority
):
it can only
Set up
a Normal User
account.
Default Username: user, default password: user
New User Name
Enter new user name
,
This
column
can
enter
numbers or strings
(support: 0~9, a~z, @, _, -, *, #, .); maximum length is 32 bytes.
New Password
Enter new user password
,
This
column
can
enter
numbers or strings
(support: 0~9, a~z, @, _, -, ., +, :, [, ], *, #, !, %); maximum length
is 32 bytes.
Confirmed
Password
Confirm new user
password
,
This
column
can
enter
numbers or strings
(support: 0~9, a~z, @, _, -, ., +, :, [, ], *, #, !, %); maximum length
is 32 bytes.
Submit [
Button
] S
ave the
Set
tings.
2.9.7. Tones (Audio Frequency Set up)
2.9.7.1. Functions
Tones Provide functions to set up Dial, Ring Back, Busy , Congestion, Ring, Call Waiting Tone,
Dual Tone, Multi-Frequency.
Page 84

LAN Phone 399
User Manual
Welltech Technology Co., Ltd.
84 / 89 2014/02/11
2.9.7.2. Instruction
Item
Explanation
Dial Tone
Set up
the Dial Tone
Set
tings
. Ca
dence On
Default: Disable
;
When
check the
box, Ca
dence
On will Enable.
Hi-
Tone Freq
Default:
440; This
column
can only
enter
numbers;
maximum length is
4 bytes with a range of 0~4096. This is high frequency tone.
Lo-Tone Freq
Default:
350; This
column
can only
enter
numbers;
maximum length is
4 bytes with a range of 0~4096. This is low frequency tone.
Hi-Tone Gain
Default:
4522
;
This
column
can only
enter
numbers;
maximum length
is 5 bytes with a range of 0~65535.
Lo-Tone Gain
Default:
2261
;
This
column
can only
enter
numbers;
maximum length
is 5 bytes with a range of 0~65535.。
On Time 1
Default: 0
;
Set up
the first category of
ON
time.
This column can only enter numbers; maximum length is 3 bytes with
a range of 0~999 (10ms).。
Off Time 1
Default: 0
;
Set up
the first category of
OFF
time.
This column can only enter numbers; maximum length is 3 bytes with
a range of 0~999 (10ms).
On Time 2
Default: 0
;
Set up
the
second
category of
ON
time.
This column can only enter numbers; maximum length is 3 bytes with
a range of 0~999 (10ms).
Off Time 2
Default: 0
;
Set up
the second
category of
OFF
time.
This column can only enter numbers; maximum length is 3 bytes with
a range of 0~999 (10ms).
On Time 3
Default: 0
;
Set up
the third category of
ON
time.
This column can only enter numbers; maximum length is 3 bytes with
a range of 0~999 (10ms).。
Off Time 3
Default: 0
;
Set up
the third category of
OFF
time.
This column can only enter numbers; maximum length is 3 bytes with
a range of 0~999 (10ms).
Ring Back
Set up
the
Ring Back
Tone
Set
tings
Cadence On
Default: Enable
;
When
check the
box, Ca
dence
On will Enable.
Hi-
Tone Freq
Default:
480; This
column
can only
enter
numbers;
maximum length is
4 bytes with a range of 0~4096.
Lo-Tone Freq
Default: 44
0; This
column
can only
enter
numbers;
maximum length is
4 bytes with a range of 0~4096.
Page 85

LAN Phone 399
User Manual
Welltech Technology Co., Ltd.
85 / 89 2014/02/11
Item
Explanation
Hi-
Tone Gain
Default: 2261
;
This
column
can only
enter
numbers;
maximum length
is 5 bytes with a range of 0~65535.
Lo-Tone Gain
Default:
2261
;
This
column
can only
enter
numbers;
maximum length
is 5 bytes with a range of 0~65535.
On Time 1
Default:
200; Set up
the first category of
ON
time.
This column can only enter numbers; maximum length is 3 bytes with
a range of 0~999 (10ms).
Off Time 1
Default:
400;
Set up
the first category of
OFF
time.
This column can only enter numbers; maximum length is 3 bytes with
a range of 0~999 (10ms).
On Time 2
Default: 0
;
Set up
the
second
category of
ON
time.
This column can only enter numbers; maximum length is 3 bytes with
a range of 0~999 (10ms).
Off Time 2
Default: 0
;
Set up
the
second
category of
OFF
time.
This column can only enter numbers; maximum length is 3 bytes with
a range of 0~999 (10ms).
On Time 3
Default:
0;
Set up
the third category of
ON
time.
This column can only enter numbers; maximum length is 3 bytes with
a range of 0~999 (10ms).
Off Time 3
Default: 0
;
Set up
the third category of
OFF
time.
This column can only enter numbers; maximum length is 3 bytes with
a range of 0~999 (10ms).
Busy
Set up
the
Busy
Tone
Set
tings
Cadence
On
Default: Enable
;
When
check the
box, Cadence
On will Enable.
Hi-
Tone Freq
Default: 62
0; This
column
can only
enter
numbers;
maximum length is
4 bytes with a range of 0~4096.
Lo-Tone Freq
Default: 48
0; This
column
can only
enter
numbers;
maximum length is
4 bytes with a range of 0~4096.
Hi-Tone Gain
Default: 2261
;
This
column
can only
enter
numbers;
maximum length
is 5 bytes with a range of 0~65535.
Lo-Tone Gain
Default:
2261
;
This
column
can only
enter
numbers;
maximum length
is 5 bytes with a range of 0~65535.。
On Time 1
Default:
50; Set up
the first category of
ON
time.
This column can only enter numbers; maximum length is 3 bytes with
a range of 0~ 999 (10ms).
Off Time 1
Default:
50;
Set up
the first category of
OFF
time.
This column can only enter numbers; maximum length is 3 bytes with
a range of 0~ 999 (10ms).
On Time 2
Default: 0
;
Set up
the
second
category of
ON
time.
This column can only enter numbers; maximum length is 3 bytes with
a range of 0~ 999 (10ms).
Off Time 2
Default: 0
;
Set up
the
second
category of
OFF time.
This column can only enter numbers; maximum length is 3 bytes with
a range of 0~ 999 (10ms).
On Time 3
Default: 0
;
Set up
the third category of
ON
time.
This column can only enter numbers; maximum length is 3 bytes with
a range of 0~ 999 (10ms).。
Off Time 3
Default: 0
;
Set up
the third category of
OFF
time.
This column can only enter numbers; maximum length is 3 bytes with
a range of 0~ 999 (10ms).
Congestion
Set up
the
Congestion
Tone
Set
tings
. Cadence
On
Default: Enable
;
When
check the
box, Cadence
On will Enable.
Hi-
Tone Freq
Default: 62
0; This
column
can only
enter
numbers;
maximum length is
4 bytes with a range of 0~4096.
Lo-Tone Freq
Default: 48
0; This
column
can only
enter
numbers;
maximum length is
4 bytes with a range of 0~4096.
Page 86

LAN Phone 399
User Manual
Welltech Technology Co., Ltd.
86 / 89 2014/02/11
Item
Explanation
Hi-
Tone Gain
Default: 2261
;
This
column
can only
enter
numbers;
maximum length
is 5 bytes with a range of 0~65535.
Lo-Tone Gain
Default:
2261
;
This
column
can only
enter
numbers;
maximum length
is 5 bytes with a range of 0~65535.
On Time 1
Default:
30; Set up
the first category of
ON
time.
This column can only enter numbers; maximum length is 3 bytes with
a range of 0~ 999 (10ms).
Off Time 1
Default:
20; Set up
the first category of
OFF
time.
This column can only enter numbers; maximum length is 3 bytes with
a range of 0~ 999 (10ms).
On Time 2
Default: 0
;
Set up
the
seconds
ond category of time start.
This column can only enter numbers; maximum length is 3 bytes with
a range of 0~ 999 (10ms).
Off Time 2
Default: 0
;
Set up
the
second
category of
OFF
time.
This column can only enter numbers; maximum length is 3 bytes with
a range of 0~ 999 (10ms).
On Time 3
Default: 0
;
Set up
the third category of
ON
time.
This column can only enter numbers; maximum length is 3 bytes with
a range of 0~ 999 (10ms).
Off Time 3
Default: 0
;
Set up
the third category of OFF time
.
This column can only enter numbers; maximum length is 3 bytes with
a range of 0~ 999 (10ms).
Ring
Set up
the
Ring
Tone
Set
tings
. Cadence
On
Default: Enable
;
When
check the
box, Cadence
On will Enable.
Hi-
Tone Freq
Default: 480
;
This
column
can only
enter
numbers;
maximum length is
4 bytes with a range of 0~4096.
Lo-Tone Freq
Default: 440
;
This
column
can only
enter
numbers;
maximum length is
4 bytes with a range of 0~4096.
Hi-Tone Gain
Default: 15360
;
This
column
can only
enter
numbers;
maximum
length is 5 bytes with a range of 0~65535.
Lo-Tone Gain
Default: 15360
;
This
column
can only
enter
numbers;
maximum
length is 5 bytes with a range of 0~65535.。
On Time 1
Default:
200; Set up
the first category of ON time
.
This column can only enter numbers; maximum length is 3 bytes with
a range of 0~ 999 (10ms).
Off Time 1
Default:
400;
Set up
the first category of
OFF
time.
This column can only enter numbers; maximum length is 3 bytes with
a range of 0~ 999 (10ms).
On Time 2
Default: 0
;
Set up
the
second category of ON time
.
This column can only enter numbers; maximum length is 3 bytes with
a range of 0~ 999 (10ms).
Off Time 2
Default: 0
;
Set up
the
seconds
ond category of OFF time
.
This column can only enter numbers; maximum length is 3 bytes with
a range of 0~ 999 (10ms).
On Time 3
Default: 0
;
Set up
the third category of ON time
.
This column can only enter numbers; maximum length is 3 bytes with
a range of 0~ 999 (10ms).
Off Time 3
Default: 0
;
Set up
the third category of OFF time
.
This column can only enter numbers; maximum length is 3 bytes with
a range of 0~ 999 (10ms).
Call
Waiting
Set up
the
Call Waiting
Tone
Set
tings
. Cadence
On
Default: Enable
;
When
check the
box, Cadence
On will Enable.
Hi-
Tone Freq
Default: 440
;
This
column
can only
enter
numbers;
maximum length is
4 bytes with a range of 0~4096.
Lo-Tone Freq
Default: 350
;
This
column
can only
enter
numbers;
maximum length is
4 bytes with a range of 0~4096.
Page 87

LAN Phone 399
User Manual
Welltech Technology Co., Ltd.
87 / 89 2014/02/11
Item
Explanation
Hi-
Tone Gain
Default: 2261
;
This
column
can only
enter
numbers;
maximum length
is 5 bytes with a range of 0~65535.
Lo-Tone Gain
Default: 1130
;
This
column
can only
enter
numbers;
maximum length
is 5 bytes with a range of 0~65535.
On Time 1
Default:
30; Set up
the first category of ON time
.
This column can only enter numbers; maximum length is 3 bytes with
a range of 0~ 999 (10ms).
Off Time 1
Default:
20;
Set up
the first category of OFF time
.
This column can only enter numbers; maximum length is 3 bytes with
a range of 0~ 999 (10ms).
On Time 2
Default:
30; Set up
the
seconds
ond category of ON time
.
This column can only enter numbers; maximum length is 3 bytes with
a range of 0~ 999 (10ms).
Off Time 2
Default:
400;
Set up
the
seconds
ond category of OFF time
.
This column can only enter numbers; maximum length is 3 bytes with
a range of 0~ 999 (10ms).
On Time 3
Default: 0
;
Set up
the third category of ON time
.
This column can only enter numbers; maximum length is 3 bytes with
a range of 0~ 999 (10ms).
Off Time 3
Default: 0
;
Set up
the third category of OFF time
.
This column can only enter numbers; maximum length is 3 bytes with
a range of 0~ 999 (10ms).
Submit [
Button
] S
ave the
Set
tings.
2.9.8. Default (Reset to Default)
2.9.8.1. Functions
Default Provides the way of eliminating all Settings and reloading the default Settings except
the data of Phone Book.
2.9.8.2. Instruction
Item
Explanation
Reset [Button
] Clear all
Set
ting and re
set to default, Then reboot system
automatically.
Export
[Button
] [Export]
button
,
Provide
device configuration back up. Default file
name is config.db.
Restore [
Button
] Provide
restore feature, Import file format is
.db.
Note: If user use [Update.htm] web page’s [Restore Configuration] to upload [config.db] file, it
can’t clear configuration from this feature.
2.9.8.3. Operate Instruction
Example 1: Export System Configuration
Step 1: Please finish the Web parameter Set up, Then reboot LP399.
Step 2: In [Reset to Default] web page, Press [Export System Configuration]’s [Export] button
Page 88

LAN Phone 399
User Manual
Welltech Technology Co., Ltd.
88 / 89 2014/02/11
(See Figure 1).
(Figure 1)
Step 3: Enter [Save File] menu, Default file name is config.db, press [Save] button, Save the
system parameter to .db file (See Figure 2).
(Figure 2)
Example 2: Restore Setting
Step 1: In [Reset to Default] web page, Press [Browse] button. After choosing the configuration
file, Press [Open] button. Return [Reset to Default] web page, make sure to perform the
update, Press [Restore] button (See Figure 3).
(Figure 3)
Step 2: Restore complete, Must save setting and reboot system (See Figure 4), Reboot system
can take effect the [config.db] parameter.
(Figure 4)
2.9.9. Language
2.9.9.1. Functions
Provide LP399 web page’s language, When press [Submit] button, Please wait a few seconds
(About 5~10 seconds). LP399 will show your desire language automatically.
2.9.9.2. Instruction
Item
Explanation
Web Language
Default:
English
.
Set up
web page langua
ge, change any language
must wait for a while. Provide drup-down options: English, Chinese,
Simplified Chinese, Portuguese.
Submit [
Button
] S
ave the
Set
tings.
Page 89

LAN Phone 399
User Manual
Welltech Technology Co., Ltd.
89 / 89 2014/02/11
2.10. Save & Reboot
Save & Reboot Provide functions to save all Settings and restart LP399 IP Phone.
2.10.1. Functions
Save Change: Save all Settings and restart LP399.
Reboot System: Restart the system.
2.10.2. Instruction
Item
Explanation
Save [
Button
] Save all
Set
tings and restart
device
. Reboot [
Button
] Restart
device
.
2.11. Logout (Logout System)
2.11.1. Functions
Provide to logout LP399 webpage Settings menu; Return web page login.
2.11.2. Instruction
Item
Explanation
Logout [
Button
] Logout system
Set
tings menu;
Return web page login
.
--- The End ---
 Loading...