


PTK-1240-D
1
Using a pen
Customizing your pen
Troubleshooting
Using a tablet
Customizing your tablet
Digital inking
Using a cordless mouse
Customizing your cordless mouse
Using the Radial Menu
Application-specific settings
User’s manual for
®®
& Macintosh Windows
1
Uživatelská příručka pro
Windows
®
& Macintosh
®
Používání pera
Přizpůsobení pera
Řešení problémů
Používání tabletu
Přizpůsobení tabletu
Digitální inkoust
Používání bezdrátové myši
Přizpůsobení bezdrátové myši
Používání Radial Menu
Nastavení specifické pro aplikaci
2
CONTENTS
About the manual
Customizing the Touch Ring
Customizing the ExpressKeys
Customizing the tablet functions
Customizing the mouse buttons
Customizing the mouse
Customizing tilt sensitivity
Customizing tool buttons
Advanced tip and eraser pressure settings
Adjusting eraser feel
Adjusting tip feel and double-click
Customizing the pen
Navigating the manual
WORKING WITH INTUOS4
Tablet features
Input tools and accessories
Setting up your work area
Using the Grip Pen
Holding the pen
Pointing
Clicking
Dragging
Using the side switch
Drawing with pressure sensitivity
Drawing with tilt
Erasing
Eye-hand coordination exercise
Using the Intuos4 Mouse
Working with the tablet
Configuring the tablet orientation
USB cable installation
Understanding the tablet active area
Using the ExpressKeys
Using the Touch Ring
CUSTOMIZING
Opening the control panel
Control panel overview
Control panel settings 25
26
APPENDIX 67
27
Caring for your tablet and tools 67
28
Replacing the pen tip 68
28
Uninstalling the software 69
29
Managing your tablet preferences 69
30
Changing the tablet mode 70
30
Installing multiple tablets 70
31
Advanced options 71
32
Optimizing the ExpressKeys display 72
33
Using applications integrated for tablet control 72
34
Using the optional Airbrush and Art Pen 73
Obtaining driver downloads 66
Technical support options 65
Macintosh-specific problems 63
15
16
TROUBLESHOOTING 53
16
Testing your tablet 54
17
Testing your tools 55
18
Testing a pen 56
19
Testing the Touch Ring 57
19
Testing the ExpressKeys 57
20
Testing the mouse 58
21
Troubleshooting tables 59
22
General problems 59
Windows-specific problems 62
Removing application-specific settings 52
Changing application-specific settings 52
Creating an application-specific setting 51
Application-specific settings 50
Working with multiple tools 49
Working with Display Toggle 47
Using and customizing the Radial Menu 46
Button functions 41
Mapping to multiple monitors 40
Tablet area 39
Force proportions 38
4
Tablet to screen mapping 35
37
37
Screen area
Orientation
5
6
7
9
10
11
11
12
13
13
14
15
23
23
24
2
Obsah
O příručce
Orientace v příručce
PRÁCE S INTUOS4
Funkce tabletu
Vstupní nástroje a příslušenství
Nastavení pracovní plochy
Používání pera Grip Pen
Držení pera
Pozicování
Klikání
Posouvání
Používání tlačítek pera
Kreslení s rozlišením úrovní přítlaku
Kreslení s náklonem pera
Gumování
Cvičení na koordinaci oka s rukou
Používání myši Intuos4
Práce s tabletem
Nastavení tabletu pro praváka/leváka
Instalace USB kabelu
Pochopení aktivní plochy tabletu
Používání tlačítek ExpressKey
Používání Touch Ringu
PŘIZPŮSOBENÍ
Otevření ovládacího okna
Přehled ovládacího okna
Nastavení ovládacího okna
Přizpůsobení pera
Nastavení hrotu a dvojkliku
Nastavení citlivosti gumy
Pokročilá nastavení citlivosti přítlaku
hrotu a gumy pera
Přizpůsobení tlačítek
Přizpůsobení citlivosti náklonu
Nastavení myši
Nastavení tlačítek myši
Nastavení funkcí tabletu
Nastavení tlačítek ExpressKey
Nastavení Touch Ringu
35
37
37
38
39
40
41
46
47
49
50
51
52
52
53
54
55
56
57
57
58
59
59
62
63
65
66
67
67
68
69
69
70
70
71
72
72
73
Tablet to screen mapping
Orientace
Plocha monitoru
Potlačení poměrů stran
Plocha tabletu
Mapování na více monitorů
Button functions
Using and customizing the Radial Menu
Working with Display Toggle
Working with multiple tools
Application-specific settings
Creating an application-specific setting
Changing application-specific settings
Removing application-specific settings
TROUBLESHOOTING
Testing your tablet
Testing your tools
Testing a pen
Testing the Touch Ring
Testing the ExpressKeys
Testing the mouse
Troubleshooting tables
General problems
Windows-specific problems
Macintosh-specific problems
Technical support options
Obtaining driver downloads
APPENDIX
Caring for your tablet and tools
Replacing the pen tip
Uninstalling the software
Managing your tablet preferences
Changing the tablet mode
Installing multiple tablets
Advanced options
Optimizing the ExpressKeys display
Using applications integrated for tablet
control
Using the optional Airbrush and Art Pen
4
5
6
7
9
10
11
11
12
13
13
14
15
15
16
16
17
18
19
19
20
21
22
23
23
24
25
26
27
28
28
29
30
30
31
32
33
34
3
screen pointing areas in AutoCAD 77
Calibrating Intuos4 for AutoCAD 78
Pen and digital ink capabilities in Windows Vista 79
About the Windows Vista Tablet PC Input Panel 80
Product specifications 81
General specifications for all Intuos4 tablets 81
Intuos4 S tablet (model PTK-440) 81
Intuos4 M tablet (model PTK-640) 81
Intuos4 L tablet (model PTK-840) 82
Intuos4 XL tablet (model PTK-1240) 82
Intuos4 Grip Pen (model KP-501E) 82
Intuos4 Mouse (model KC-100) 82
Intuos4 Airbrush (model KP-400E) 82
Intuos4 Inking Pen (model KP-130) 83
Intuos4 Art Pen (model KP-701E) 83
Intuos4 Classic Pen (model KP-300E) 83
Intuos4 Lens Cursor (model KC-210) 83
Configuring AutoCAD for
a Wintab compatible digitizer 76
Configuring tablet menus and
Working with AutoCAD 76
Intuos4 Lens Cursor 74
75
75
Testing the lens cursor
Customizing the lens cursor
Your authorised Wacom distributor 96
(Europe, Africa and Middle East) 92
Software Licence Agreement 92
Limited Warranty 93
Licence warranty conditions
Radio and television interference 88
FCC notice 88
CE declaration 88
Precautions 87
Warnings 87
Cautions 87
Available parts and accessories 85
Ordering parts and accessories 84
Product information 84
3
74
75
75
76
77
78
79
80
81
81
81
81
82
82
82
82
82
83
83
83
83
Intuos4 Lens Cursor
Customizing the lens cursor
Testing the lens cursor
Working with AutoCAD
Configuring AutoCAD for
a Wintab compatible digitizer
Configuring tablet menus and
screen pointing areas in AutoCAD
Calibrating Intuos4 for AutoCAD
Pen and digital ink capabilities in Windows
Vista
About the Windows Vista Tablet PC Input
Panel
Product specifications
General specifications for all Intuos4 tablets
Intuos4 S tablet (model PTK-440)
Intuos4 M tablet (model PTK-640)
Intuos4 L tablet (model PTK-840)
Intuos4 XL tablet (model PTK-1240)
Intuos4 Grip Pen (model KP-501E)
Intuos4 Mouse (model KC-100)
Intuos4 Airbrush (model KP-400E)
Intuos4 Inking Pen (model KP-130)
Intuos4 Art Pen (model KP-701E)
84
84
85
87
87
87
88
88
88
92
92
93
96
Product information
Ordering parts and accessories
Available parts and accessories
Precautions
Warnings
Cautions
Radio and television interference
FCC notice
CE declaration
Licence warranty conditions
(Europe, Africa and Middle East)
Software Licence Agreement
Limited Warranty
Your authorised Wacom distributor
4
This manual provides quick access to information about Intuos4. The information is common to Windows
and Macintosh computers and Windows screen captures are shown, unless otherwise noted.
ABOUT THE MANUAL
Note: This manual does not describe how to install your Wacom tablet. Please refer to your product Quick
Start Guide and to the automated software installer (located on the Intuos installation CD) for details.
If you are new to electronic documentation, read navigating the manual.
•The appendix includes tips on caring for your tablet and tools, a how-to on uninstalling the software, your
license and warranty, and more. Also included are tips on working with AutoCAD, as well as an overview
of the pen and digital inking capabilities found in Microsoft Windows Vista.
• Want to test your tablet and tools? Need troubleshooting guidelines? Troubleshooting is where you will
find the answers to most common questions.
• Customizing describes how you can change the control panel settings to optimize your Intuos4 tablet and
tools for the way you like to work.
• Working with Intuos4 is the learning chapter. It describes the various tablet features and functions of
each Intuos4 tool, and includes exercises for new users.
• Go directly to a contents by clicking on it.
• S
MALL CAPITAL LETTERS are used to identify the names of keyboard keys, dialog boxes, and control panel
options.
• You can use your viewer zoom-in tool to increase the size of the manual on your display screen.
• The following information is not included with this product: information about your specific computer
hardware or operating system, or information about your application software. Your best source for this
information is the set of manuals and discs that came with your hardware, operating system, or
application.
• Many applications have built-in support for Intuos4 features (such as pressure sensitivity, tilt, and the pen
eraser). For information on how best to use these and other Intuos4 features within a specific application,
see the instructions in that application’s manuals. See also product information.
Wacom’s philosophy is to continually improve all of its products. As a result, engineering changes and
improvements are made from time to time. Therefore, some changes, modifications, and improvements may
not be covered in this manual.
4
O PŘÍRUČCE
Tato příručka nabízí rychlý přístup k informacím o Intuos4. Informace platí pro počítače s nainstalovaným
systémem Windows anebo Macintosh. Zobrazeny jsou informace z Windows , pokud není uvedeno jinak.
•
•
•
•
MALÁ TISKACÍ PÍSMA jsou použita pro identifikaci názvů kláves, dialogových políček, a voleb
ovládacího panelu..
Pomocí nástroje Lupa můžete zobrazení příručky na obrazovce Vašeho počítače zvětšit..
Následující informace nejsou součástí této příručky: informace o specifikacích Vašeho počítačového
hardware nebo operačního systému, nebo informace o jiných aplikacích na Vašem počítači. Tyto
informace jsou v manuálech, které jste obdrželi zároveň s příslušným hardwarem, operačním
systémem anebo aplikací.
Mnoho aplikací rovněž zahrnuje podporu funkcí Intuos4 features (například rozlišení úrovní přítlaku,
náklonu a gumy na peru). Informace o nejlepším využití těchto a dalších funkcí Intuos4 v konkrétní
aplikaci, najdete v manuálu příslušné aplikace. Viz. také produktové informace.
Filozofií Wacomu je neustálé zlepšování jeho výrobků. Výsledkem je, že občas dojde ke změnám a
vylepšením téhož produktu. Proto nejsou některé změny, modifikace a vylepšení produktu uvedeny v této
příručce.
Pozn: tato příručka nepopisuje, jak tablet Wacom nainstalovat. Tyto informace jsou uvedeny v Rychlém
průvodci instalací, který je umístěný na instalačním CD a je součástí balení tabletu Intuos4.
Pokud jste doposud nepracovali s elektronickou příručkou, přečtěte si část orientace v manuálu.
•
•
•
•
•
Kliknutím na obsah přejdete přímo k zobrazení seznamu kapitol.
Práce s Intuos4 je výukovou kapitolou. Popisuje různé vlastnosti tabletu a funkce nástrojů Intuos4, a
obsahuje cvičení pro nové uživatele.
Přizpůsobení popisuje změnu nastavení tabletu Intuos4 a nástrojů v ovládacím okně tabletu, podle
Vašich přání.
Chcete otestovat tablet a nástroje? Potřebujete průvodce řešením problémů? Řešení problémů je
místo, kde najdete odpovědti na nejčastější otázky.
Příloha zahrnuje tipy na péči o tablet a nástroje, jak odinstalovat software, Vaši licenci a záruku, a
mnohem více. Také obsahuje tipy na práci s AutoCAD, stejně tak přehled možností pera a digitálního
inkoustu, které jsou k dispozici v Microsoft Windows Vista.
5
Use the navigation controls to move through the manual.
NAVIGATING THE MANUAL
Go to front page.
Go back to previous view.
Page back, or page forward.
Topic continued.
Adobe
®
Reader
®
provides additional tools for using and printing the manual. See the Adobe Reader help for
more information.
5
Pro pohyb v příručce používejte následující ovládací prvky.
Zobrazení titulní
Zpátky k předchozímu
O stranu zpět, nebo o stranu vpřed.
Téma pokračuje.
Adobe
®
Reader
®
nabízí další nástroje pro používání a vytištění manuálu. Viz. nápověda aplikace Adobe
Reader.
ORIENTACE V PŘÍRUČCE
Zobrazení titulní strany.
Zpátky k předchozímu zobrazení.
6
Tablet features
Input tools and accessories
Setting up your work area
Using the Grip Pen
Using the Intuos4 Mouse
Working with the tablet
If you are new to using a pen tablet and tablet input tools, read the following sections.
This section introduces you to the Intuos4 professional pen tablet. Intuos4 consists of two basic elements:
a tablet that serves as your work area, and the input tools you use on the tablet.
WORKING WITH INTUOS4
6
PRÁCE S INTUOS4
Tato kapitola vás seznámí s profesionálním tabletem Intuos4. Intuos4 se skládá ze dvou základních
částí: tablet, který slouží jako pracovní plocha a vstupní nástroje, které používáte na tabletu.
Pokud jste tablet a jeho vstupní nástroje nepoužívali, projděte si následující části.
Funkce tabletu
Vstupní nástroje a příslušenství
Nastavení pracovní plochy
Používání pera Grip Pen
Používání Intuos4 Mouse
Práce s tabletem
7
TABLET FEATURES
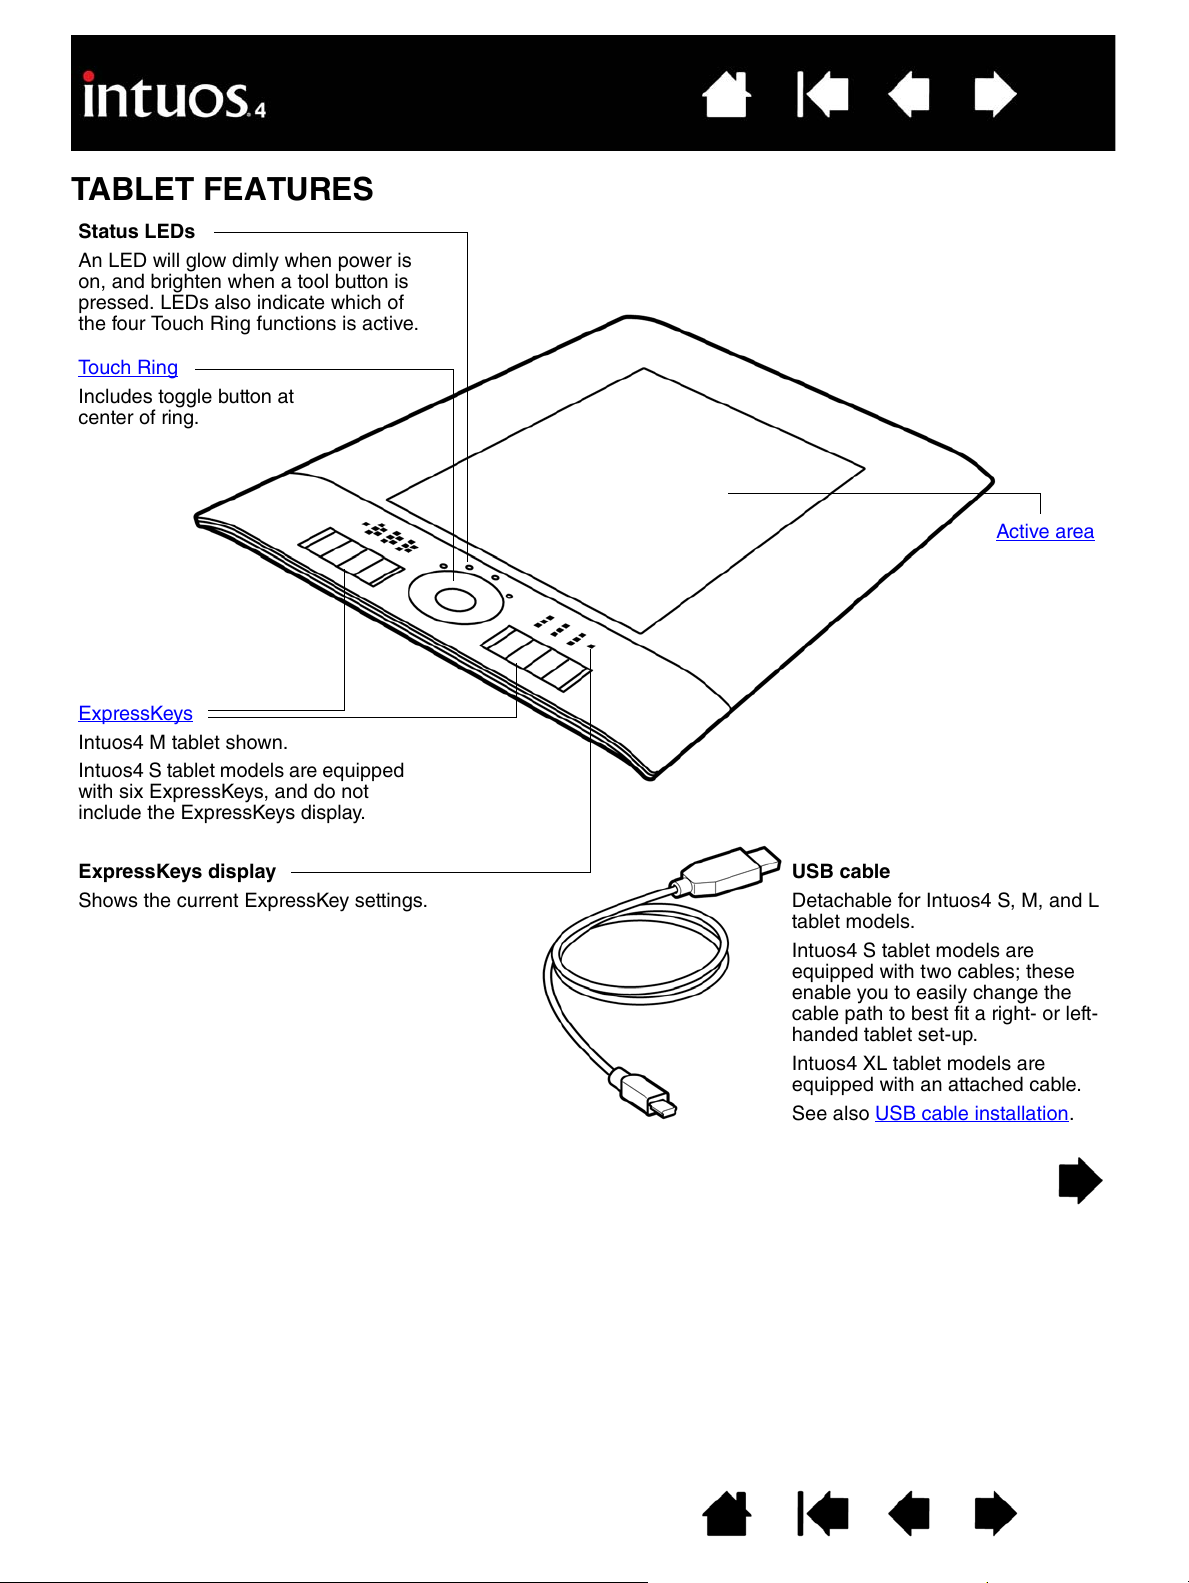
Shows the current ExpressKey settings.
ExpressKeys display
Status LEDs
See also USB cable installation.
Intuos4 XL tablet models are
equ
ipped w
ith an attached cable.
Intuos4 S tablet models are
equipped w
ith two cables; these
enable you to easily change the
cable path to best fit a right- or left-
handed tablet set-up.
Detachable for Intuos4 S, M, and L
tabl
et models.
USB cable
Active area
An LED will glow dimly when power is
on, and brighten when a tool button is
pressed. LEDs also indicate which of
the four Touch Ring functions is active.
Touch Ring
Includes toggle button at
center of ring.
ExpressKeys
Intuos4 M tablet shown.
Intuos4 S tablet models are equipped
with six ExpressKeys, and do not
include the ExpressKeys display.
7
FUNKCE TABLETU
Stavová LED
ExpressKey displej
Zobrazuje aktuální nastavení tlačítek ExpressKey.
Aktivní plocha
USB kabel
Odnímatelný u modelů Intuos4 S, M, a
L.
Tablety Intuos4 S jsou vybaveny
dvěma kabely; umožňuje to vybrat
vhodný kabel pro praváka anebo
leváka.
Modely Intuos4 XL jsou vybaveny
neodnímatelným kabelem.
Viz. také instalace USB kabelu.
Obsahuje přepínací tlačítko
uprostřed kolečka.
LED se po připojení tlumeně rozsvítí a rozzáří,
když stisknete tlačítko. LED také indikuje, která
ze čtyř funkcí Touch Ringu je aktivní.
Touch Ring
ExpressKeys
Na obrázku je model Intuos4 M.
Tablety Intuos4 S jsou vybaveny šesti
tlačítky ExpressKey a nezahrnují
ExpressKey displej.
8
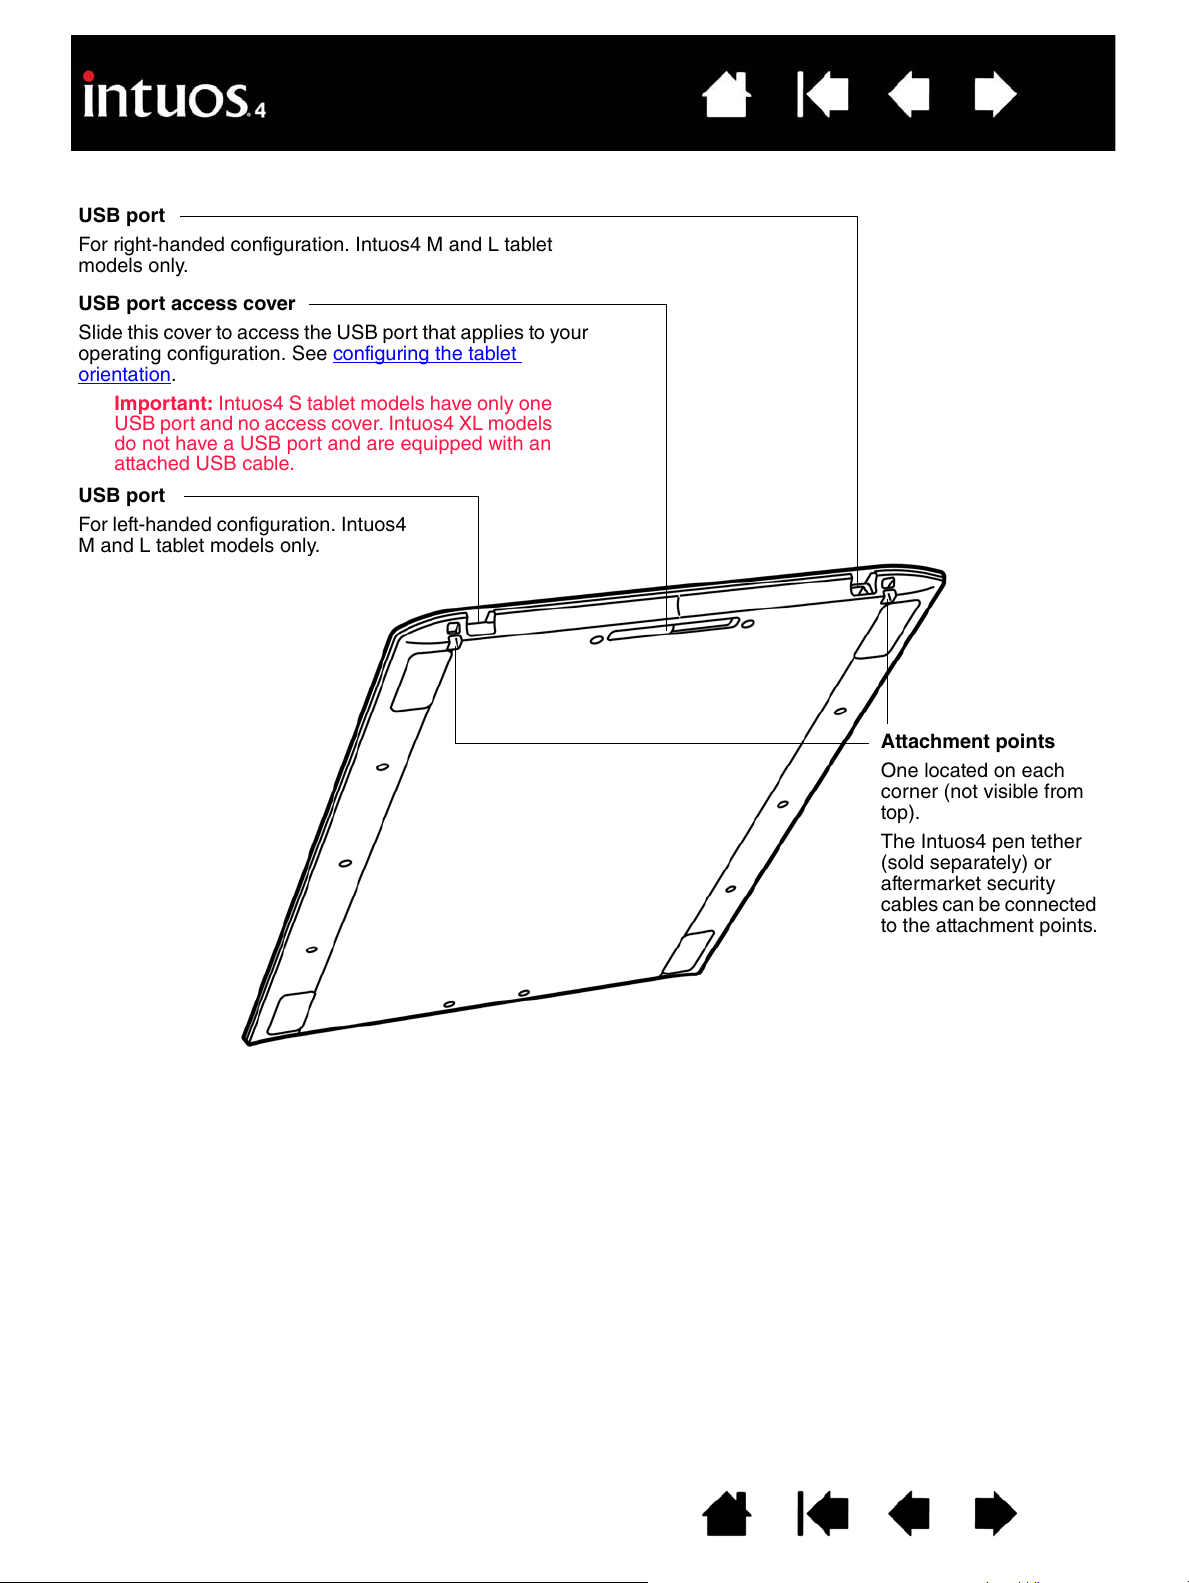
USB port access cover
Slide this cover to access the USB port that applies to your
operating configuration. See configuring the tablet
orientation.
USB port
For left-handed configuration. Intuos4
M and L ta
blet models only.
Attachment points
The Intuos4 pen tether
(sold separately) or
aftermarket security
cables can be connected
to the attachment points.
One located on each
corner (not v
isible from
Important: Intuos4
S tablet models have only one
USB port and no access cover. Intuos4 XL models
do not have a USB port and are equipped with an
attached USB cable.
For right-handed configuration. Intuos4 M and L tablet
models on
ly.
USB port
top).
8
USB port
Konfigurace pro praváka. Pouze u modelů Intuos4 M a L.
Kryt USB portu
Slide this cover to access the USB port that applies to your
operating configuration. See configuring the tablet orientation.
Důležité: Intuos4 S modely mají pouze jeden USB port a
nemají kryt USB portu. Intuos4 XL modely nemají USB port
a jsou vybaveny neodnímatelným USB kabelem.
USB port
Konfigurace pro leváka. Pouze u modelů
Intuos4 M a L.
Úchytka kabelu
V každém rohu jedna (nejsou
viditelné při pohledu seshora).
K úchytkám může být
připojen provázek Intuos4
pera (prodávaný zvlášť) nebo
doplňkový bezpečnostní
kabel.
9
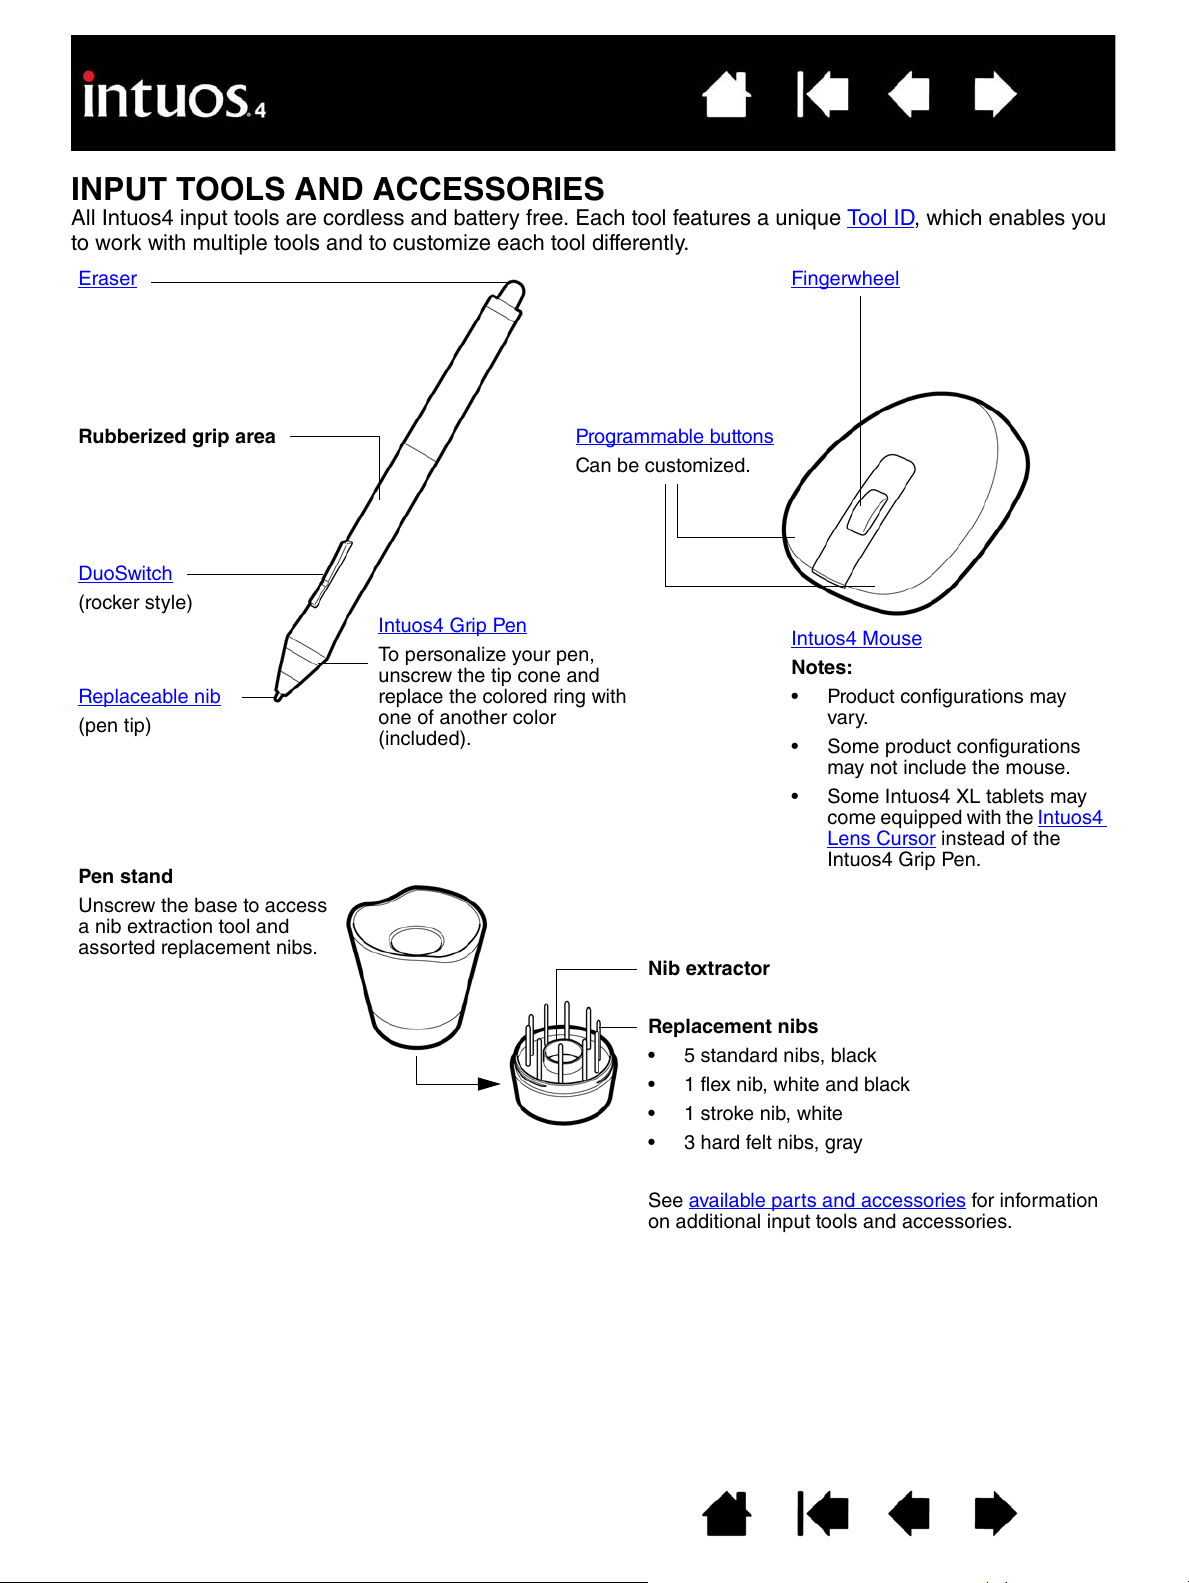
INPUT TOOLS AND ACCESSORIES
All Intuos4 input tools are cordless and battery free. Each tool features a unique Tool ID, which enables you
to work with multiple tools and to customize each tool differently.
Rubberized grip area
Eraser
DuoSwitch
Replaceable nib
(pen tip)
Pen stand
Unscrew the base to access
a nib e
xtraction tool and
assorted replacement nibs.
(rocker style)
Fingerwheel
Programmable buttons
Can be customized.
Notes:
• Product configurations may
va
ry
.
Intuos4 Mouse
• Some product configurations
may not in
clude the mouse.
Nib extractor
Replacement nibs
• 5 standard nibs, black
• 3 hard felt nibs, gray
• Some Intuos4 XL tablets may
come equippe
d with the Intuos4
Lens Cursor instead of the
In
tuos
4 Grip Pen.
See available parts and accessories for information
on
additio
nal input tools and accessories.
• 1 stroke nib, white
• 1 flex nib, white and black
Intuos4 Grip Pen
To personalize your pen,
unscrew the tip cone and
replace the colored ring with
one of another color
(included).
9
VSTUPNÍ NÁSTROJE A PŘÍSLUŠENSTVÍ
Všechny vstupní nástroje Intuos4 jsou bezdrátové a bez baterie. Každý nástroj zahrnuje unikátní Tool ID, které umožňuje
pracovat s větším množstvím nástrojů a přitom nastavit každý nástroj jinak.
Guma
Gumová část pro
uchopení pera
Dvojtlačítko
(typ kolébka)
Vyměnitelný hrot
(hrot pera)
Stojánek pera
Odšroubujte základnu. Uvnitř
jsou náhradní hroty a nástroj
pro jejich výměnu.
Scroll kolečko
Programovatelná tlačítka
Mohou být nastavena.
Intuos4 Mouse
Poznámky:
•
•
•
Konfigurace produktů se mohou lišit.
Některé produktové konfigurace nemusí
obsahovat myš.
Některé tablety Intuos4 XL mohou být
vybaveny nástrojem Intuos4 Lens Cursor
namísto pera Intuos4 Grip Pen.
Informace o doplňkových vstupních nástrojích a
příslušenství najdete v sekci dostupné části a
příslušenství.
Nástroj pro výmě
Náhradní hroty
5 standardních hrotů, černých
1 flex hrot, bíločerný
1 stroke hrot, bílý
3 tvrdé pryžové hroty, šedé
•
•
•
•
Intuos4 Grip Pen
Personalizace pera: stačí
odšroubovat kužel hrotu a
vyměnit barevný kroužek za
jiný (je v balení tabletu).
10
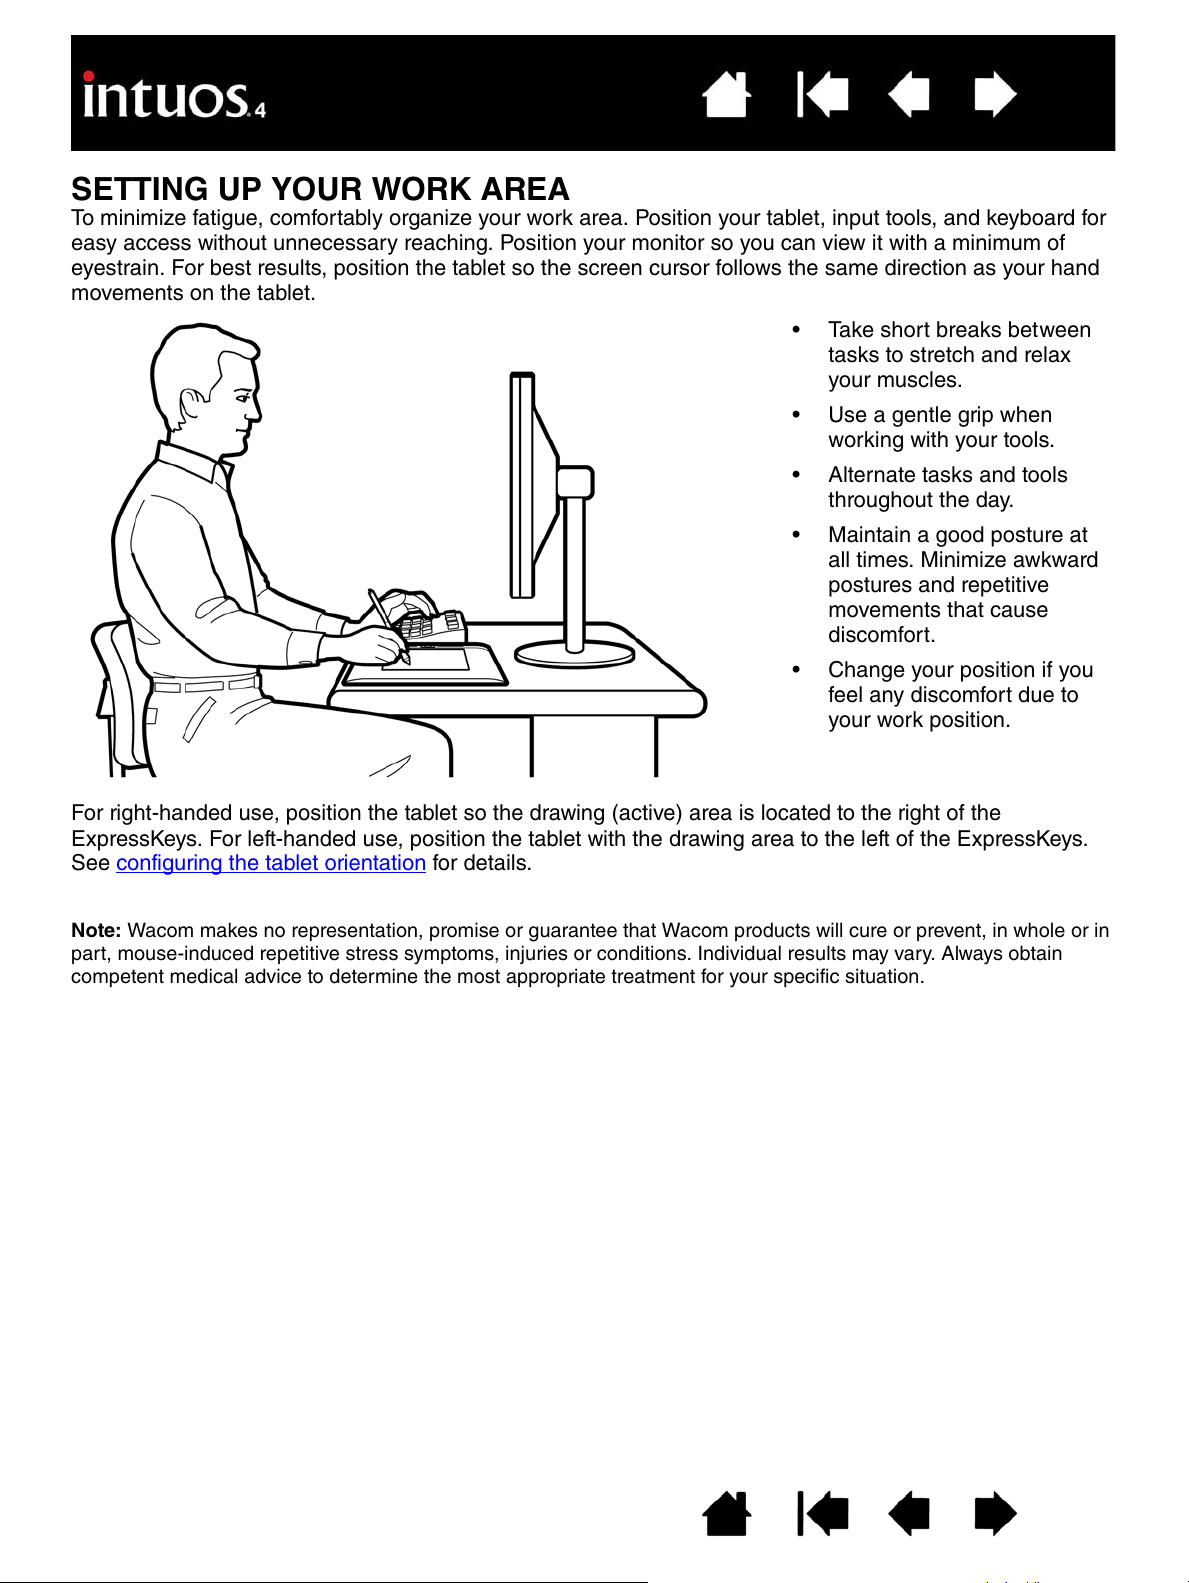
SETTING UP YOUR WORK AREA
To minimize fatigue, comfortably organize your work area. Position your tablet, input tools, and keyboard for
movements on the tablet.
eyestrain. For best results, position the tablet so the screen cursor follows the same direction as your hand
easy access without unnecessary reaching. Position your monitor so you can view it with a minimum of
• Change your position if you
feel any discomfort due to
your work position.
• Maintain a good posture at
all times
.
Minim
ize awkward
postures and repetitive
movements that cause
discomfort.
• Alternate tasks and tools
throughout the day.
• Use a gentle grip when
working with your tools.
• Take short breaks between
tasks to stretch and relax
your muscles.
Note: Wacom makes no representation, promise or guarantee that Wacom products will cure or prevent, in whole or in
part, mouse-induced repetitive stress symptoms, injuries or conditions. Individual results may vary. Always obtain
competent medical advice to determine the most appropriate treatment for your specific situation.
For right-handed use, position the tablet so the drawing (active) area is located to the right of the
for details. configuring the tablet orientationSee
ExpressKeys. For left-handed use, position the tablet with the drawing area to the left of the ExpressKeys.
10
NASTAVENÍ PRACOVNÍ PLOCHY
Zorganizováním pracovní plochy, minimalizujete únavu. Umístěte tablet, pero (pokud je v balení) a klávesnici tak, aby
byly snadno dostupné bez zbytečného natahování se. Nastavte si monitor tak, aby byl pohodlně v úrovni očí. V
ideálním případě položte tablet na stůl tak, aby kurzor na obrazovce následoval pohyb ruky s perem na tabletu ve
stejném směru.
Mezi jednotlivými úkoly si
dělejte krátké přestávky na
protažení a uvolnění svalů.
Při práci se snažte nástroje
uchopit jemně.
Během dne střídejte úlohy a
nástroje.
Pamatujte na správné držení
těla během celé práce.
Minimalizujte nepříjemné
polohy a monotónní pohyby,
které způsobují nepohodlí.
Změňte polohu, jakmile ucítíte
náznak nepohodlí, způsobený
špatným držením těla.
•
•
•
•
•
Pokud jste pravák, položte tablet tak, aby byla aktivní plocha tabletu vpravo od tlačítek ExpressKey. Pro leváky
potom platí opačné nastavení, tedy s aktivní plochou vlevo od tlačítek ExpressKey.
Detaily také v sekci nastavení tabletu pro praváka/leváka.
Poznámka: Wacom neprohlašuje, neslibuje nebo negarantuje, že Wacom produkty vyléčí, nebo zcela anebo částečně zabrání
nesprávným používáním myši způsobenému přetížení ruky, zraněním anebo potížím. Individuální výsledky
se mohou lišit. Vždy se obraťte na lékaře pro stanovení nejvhodnějšího způsobu léčby právě pro váš specifický problém.
11
There are four basic techniques for using the pressure-sensitive pen on the active area of the tablet: pointing,
clicking, double-clicking, and dragging. If you are unfamiliar with using the pen, try the exercises on the
following pages.
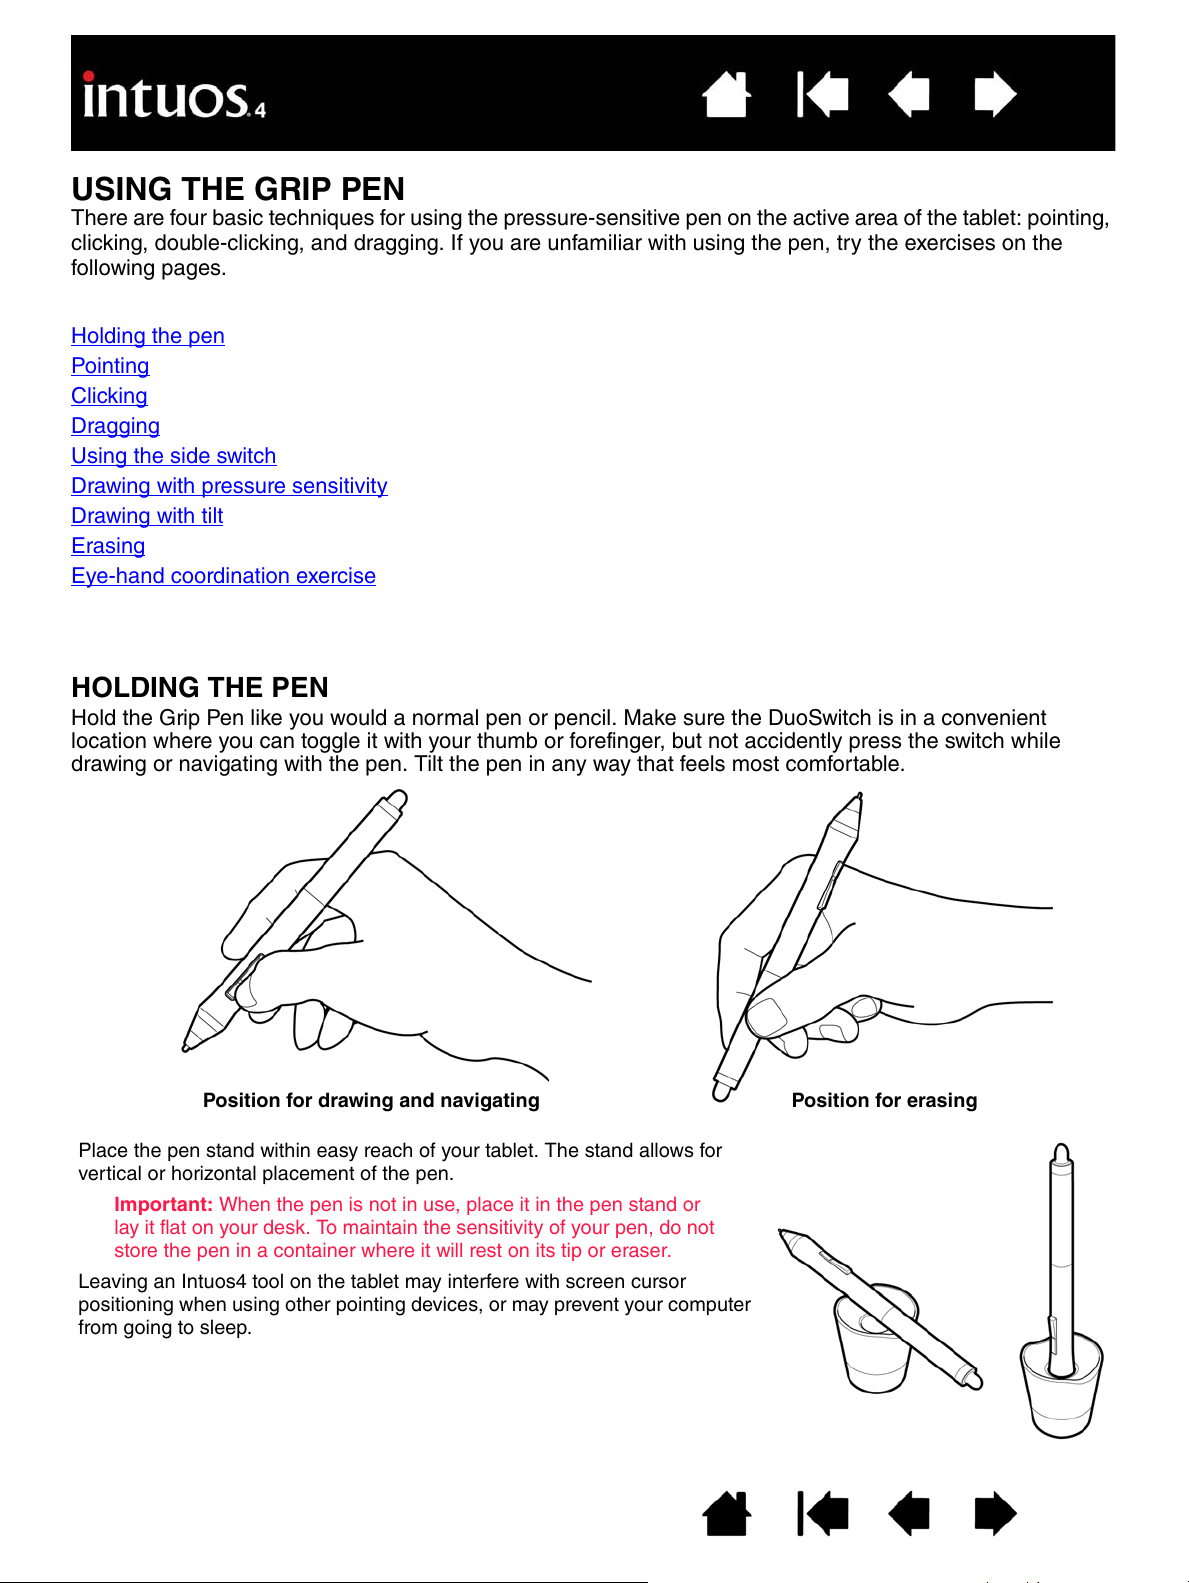
USING THE GRIP PEN
HOLDING THE PEN
Holding the pen
Eye-hand coordination exercise
Erasing
Drawing with tilt
Drawing with pressure sensitivity
Using the side switch
Dragging
Clicking
Pointing
Hold the Grip Pen like you would a normal pen or pencil. Make sure the DuoSwitch is in a convenient
location where you can toggle it with your thumb or forefinger, but not accidently press the switch while
drawing or navigating with the pen. Tilt the pen in any way that feels most comfortable.
Place the pen stand within easy reach of your tablet. The stand allows for
vertical or horizontal placement of the pen.
Important: When the pen is not in use, place it in the pen stand or
lay it flat on your desk. To maintain the sensitivity of your pen, do not
store the pen in a container where it will rest on its tip or eraser.
Leaving an Intuos4 tool on the tablet may interfere with screen cursor
p
ositio
ning when using other pointing devices, or may prevent your computer
from going to sleep.
Position for drawing and navigating Position for erasing
11
POUŽÍVÁNÍ PERA GRIP PEN
Existují 4 základní techniky pro používání tlakově citlivého pera na ploše tabletu: pozicování, klikání, dvojklik a
posouvání. Pokud jste ještě nepoužívali pero, zkuste si projít cvičení na následujících stranách.
Uchopte pero stejně jako běžné pero nebo tužku. Ujistěte se, že jsou tlačítka pera v pohodlné poloze, tedy tak,
abyste je mohli ovládat prstem nebo ukazováčkem, a zároveň aby nedocházelo k náhodnému stisknutí během
kreslení nebo jiné činnosti. Nakloňte pero libovolným způsobem, opět je na prvním místě vaše pohodlí.
Držení pera
Pozicování
Klikání
Posouvání
Používání tlačítek pera
Kreslení s rozpoznáním úrovní přítlaku
Kreslení s náklonem pera
Gumování
Cvičení na koordinaci oka s rukou
DRŽENÍ PERA
Poloha pro gumování
Poloha pro kreslení a navigaci
Umístěte stojánek pera v blízkosti tabletu. Stojánek umožňuje vertikální nebo
horizontální umístění pera.
Důležité: pokud pero nepoužíváte, umístěte je do stojánku nebo jej odložte na
stůl. Pro zachování citlivosti pera nesmí být pero skladováno v poloze, kdy bude
stát na hrotu anebo gumě.
Zanechání nástroje Intuos4 na tabletu může vést k rušení ovládání pohybu
kurzoru na obrazovce při používání jiných vstupních zařízení, anebo může
zabránit počítači přejít do režimu spánku.
12
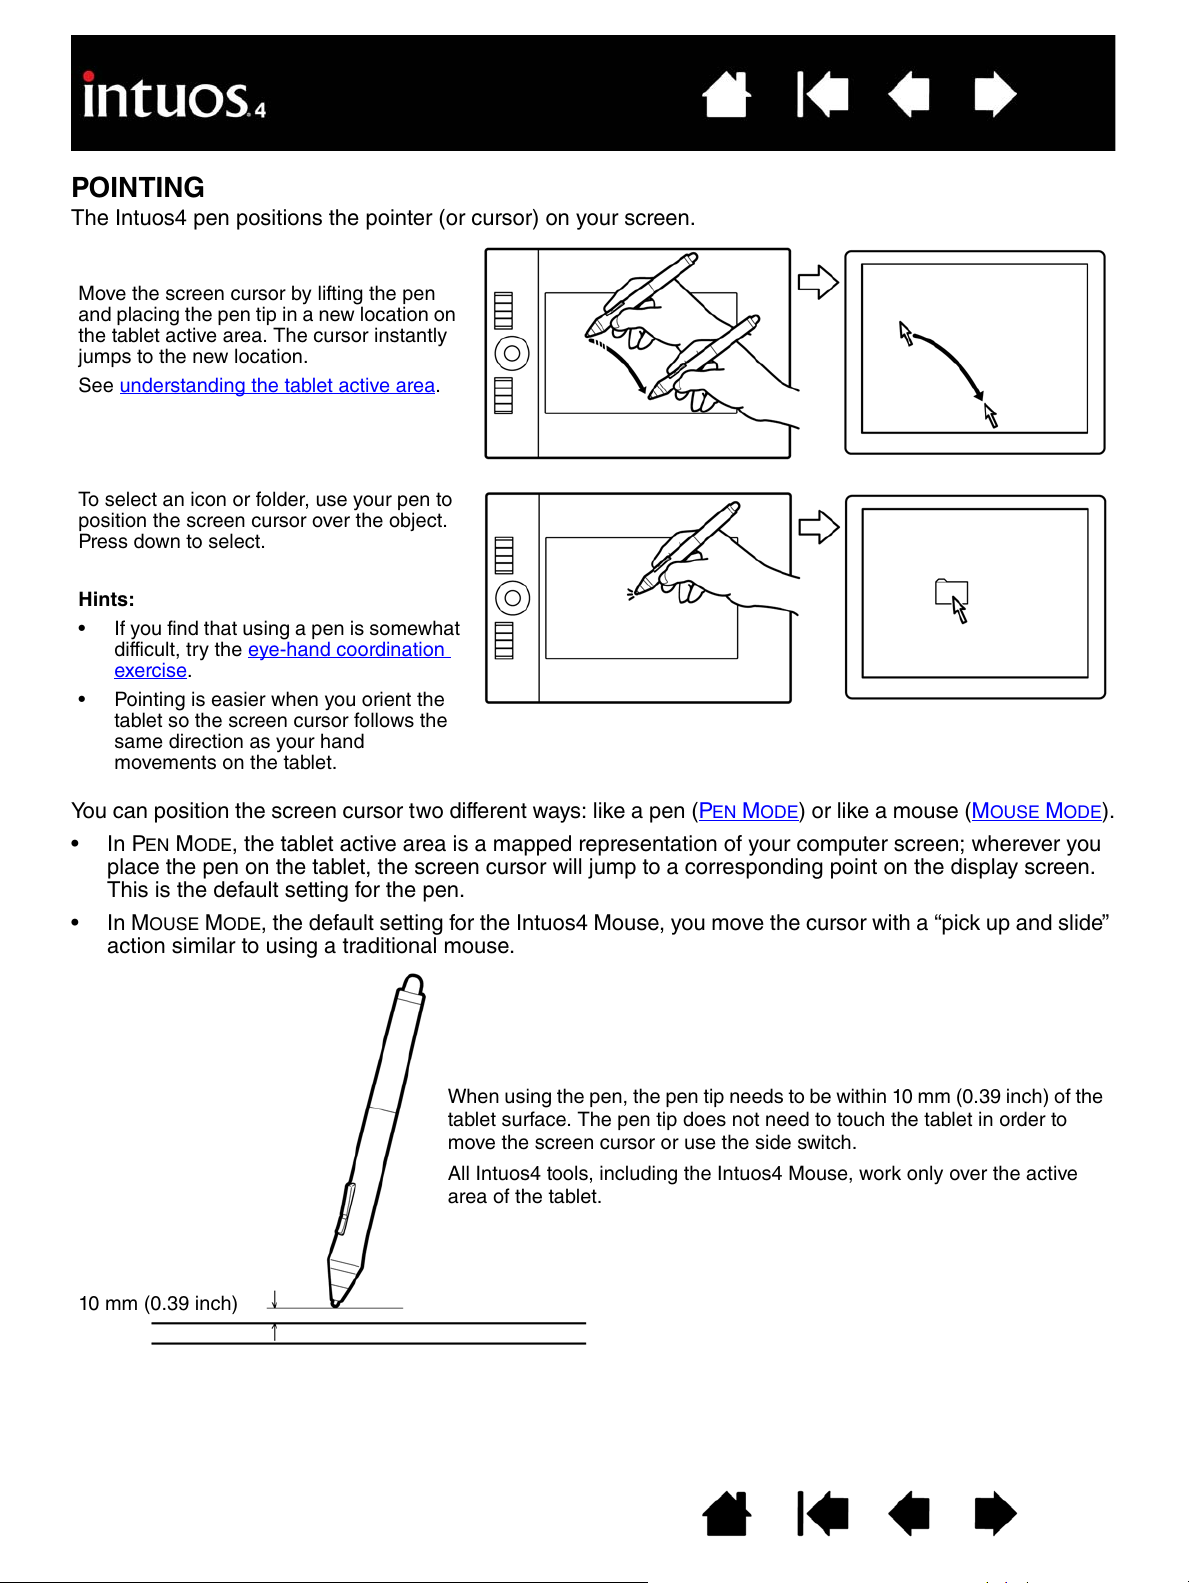
The Intuos4 pen positions the pointer (or cursor) on your screen.
POINTING
See understanding the tablet active area.
To select an icon or folder, use your pen to
position the screen cursor over the object.
Press down to select.
Hints:
• If you find that using a pen is somewhat
difficult, try the eye-hand coordination
exercise.
• Pointing is easier when you orient the
tablet so the screen cursor follows the
same direction as your hand
movements on the tablet.
You can position the screen cursor two different ways: like a pen (PEN MODE) or like a mouse (MOUSE MODE).
•In P
EN MODE, the tablet active area is a mapped representation of your computer screen; wherever you
place the pen on the tablet, the screen cursor will jump to a corresponding point on the display screen.
This is the default setting for the pen.
•In M
OUSE MODE, the default setting for the Intuos4 Mouse, you move the cursor with a “pick up and slide”
action similar to using a traditional mouse.
Move the screen cursor by lifting the pen
jumps to the new location.
the tablet active area. The cursor instantly
and placing the pen tip in a new location on
All Intuos4 tools, including the Intuos4 Mouse, work only over the active
When using the pen, the pen tip needs to be within 10 mm (0.39 inch) of the
move the screen cursor or use the side switch.
tablet surface. The pen tip does not need to touch the tablet in order to
10 mm (0.39 inch)
area of the tablet.
12
POZICOVÁNÍ
Pero Intuos4 ovládá pozici kurzoru na obrazovce.
Zvednutím pera a jeho umístěním na jiné místo
tabletu posunete rovněž kurzorem. Ten
okamžitě skočí na nové místo odpovídající
poloze pera.
Viz. pochopení aktivní plochy tabletu
Výběr ikony nebo složky provedete posunutím
pera nad ikonu a dotykem hrotu pera plochy
tabletu.
Tipy:
•
•
Pokud se vám zdá používání pera složité,
zkuste cvičení pro koordinaci oka s rukou.
Pozicování je jednodušší, když je tablet
umístěný tak, že se kurzor na obrazovce
pohybuje ve stejném směru jako ruka na
tabletu.
Pozicování kurzoru na obrazovce probíhá dvěma způsoby: jako pero (REŽIM PERA) nebo jako myš (REŽIM MYŠI).
•
•
V REŽIMU PERA, reprezentuje aktivní plocha tabletu plochu obrazovky počítače; při umístění pera na tablet, skočí kurzor na
odpovídající místo na obrazovce. Jedná se o výchozí nastavení pera.
V REŽIMU MYŠI, výchozím nastavení pro myš Intuos4 Mouse, pohybujete kurzorem zvedáním a posouváním myši, typickým
rovněž pro tradiční myš.
Při používání pera musí být hrot pera nejvíce 10 mm od povrchu tabletu. Pro
ovládání pohybu kurzoru se hrot pera nemusí dotýkat povrchu tabletu, není to nutné
ani při využití bočního tlačítka.
Všechny nástroje Intuos4, včetně myši Intuos4 Mouse, fungují pouze nad aktivní
plochou tabletu.
10 mm
 Loading...