


DTF-521
interactive pen display
Installation Guide & User’s Manual Installationsund Benutzerhandbuch Guide d'installation et Manuel d'utilisation

Wacom DTF-521 interactive pen display
Installation Guide & User’s Manual English version 2.1 July 23, 2009
Copyright ♥ Wacom Co., Ltd., 2009
All rights reserved. No part of this manual may be reproduced except for your express personal use. Wacom reserves the right to revise this publication without obligation to provide notification of such changes. Wacom does its best to provide current and accurate information in this manual. However, Wacom reserves the right to change any specifications and product configurations at its discretion, without prior notice and without obligation to include such changes in this manual.
DuoSwitch is a trademark, and Wacom is a registered trademark of Wacom Co., Ltd.
Microsoft, Windows, and Vista are either registered trademarks or trademarks of Microsoft Corporation in the United States and/or other countries. Apple, the Apple logo, and Macintosh are trademarks of Apple Computer, Inc., registered in the U.S. and other countries.
Any additional company and product names mentioned in this documentation may be trademarked and/or registered as trademarks. Mention of third-party products is for informational purposes only and constitutes neither an endorsement nor a recommendation. Wacom assumes no responsibility with regard to the performance or use of these products.
DTF-521 Interactive Pen Display de Wacom Guide d'installation et Manuel d'utilisation Version française 2.1, 23 juillet 2009
Copyright ♥ Wacom Co., Ltd., 2009
Tous droits réservés. La reproduction totale ou partielle du présent manuel est interdite, sauf pour votre usage personnel. Wacom se réserve le droit de modifier la présente publication sans avertissement préalable. Wacom tente, dans la mesure du possible, de fournir des informations à jour et précises dans le présent manuel. Toutefois, Wacom se réserve le droit de modifier toute caractéristique et configuration du produit, sans avertissement préalable et sans obligation d'intégrer ces modifications dans le présent manuel.
DuoSwitch est une marque commerciale et Wacom est une marque déposée de Wacom Co., Ltd.
Microsoft, Windows et Vista sont des marques commerciales, déposées ou non, de Microsoft Corporation aux ÉtatsUnis et/ou dans d'autres pays. Apple, le logo Apple et Macintosh sont des marques commerciales d'Apple Computer, Inc., déposées aux États-Unis et dans d'autres pays.
Tout autre nom de société et de produit mentionné dans la présente documentation peut être une marque commerciale, déposée ou non. Les produits de fabricants tiers ne sont mentionnés qu'à titre d'information et ne constituent en aucun cas un engagement ou une recommandation de notre part. Wacom décline toute responsabilité quant aux performances ou à l'utilisation de ces produits.
Wacom DTF-521 Interactive Pen Display Installationsund Benutzerhandbuch Deutsche Version 2.1, 23. Juli 2009
Copyright ♥ Wacom Co., Ltd., 2009
Alle Rechte vorbehalten. Kein Teil dieses Handbuchs darf außer für Ihren eigenen Bedarf vervielfältigt werden. Wacom behält sich das Recht vor, ohne vorherige Ankündigung Änderungen an diesem Dokument durchzuführen. Wacom ist stets bestrebt, in diesem Handbuch nur aktuelle und exakte Informationen zu veröffentlichen. Dennoch behält sich Wacom das Recht vor, Spezifikationen und Produktkonfigurationen nach eigenem Ermessen ohne vorherige Mitteilung und ohne Aufnahme in dieses Handbuch zu ändern.
DuoSwitch ist eine Marke und Wacom ist eine eingetragene Marke von Wacom Co., Ltd.
Microsoft, Windows und Vista sind eingetragene Marken oder Marken der Microsoft Corporation in den USA und/oder anderen Ländern. Apple, das Apple-Logo und Macintosh sind Marken von Apple Computer, Inc. in den USA und anderen Ländern.
Alle weiteren in diesem Handbuch erwähnten Firmenund Produktnamen können Marken und/oder eingetragene Marken sein. Die Erwähnung von Produkten von Drittherstellern dient Informationszwecken und stellt weder eine Billigung noch eine Empfehlung dar. Wacom übernimmt keinerlei Verantwortung hinsichtlich der Leistung und der Verwendung dieser Produkte.

DTF-521
interactive pen display
Installation Guide & User’s Manual


INTRODUCTION AND OVERVIEW
The Wacom® DTF-521 interactive pen display combines the benefits of a Liquid Crystal Display (LCD) with the control, comfort, and productivity of Wacom’s cordless, battery-free pen technology. This gives you a direct pen-on-screen interface for your computer.
The basic components of the DTF-521 include a Wacom pen tablet internally mounted behind a 15.0" diagonal TFT color display, and a Wacom pen.
The DTF-521 also comes equipped with a VGA pass-thru (ANALOG RGB OUT) port, enabling you to simultaneously connect a VGA monitor or projector to the pen display.
This manual describes how to install the DTF-521 hardware and software. It also describes how to use the DTF-521 and pen. Please follow all instructions carefully.
The computer treats the DTF-521 as two separate devices (the display and the pen tablet).
Therefore, the installation process is completed in two stages:
•First install the DTF-521 as a display.
•Then install the DTF-521 as a pen tablet.
Both stages require hardware and software installations and adjustments. Please follow all instructions carefully.
IMPORTANT:You MUST install the Wacom pen tablet driver software for correct pen-on-screen functionality.
To learn about using the Pen Tablet control panel to customize your pen display tablet and pen settings on Windows or Macintosh computers, see Customizing on page 19.
The following kinds of information are not included with this product: information about your specific computer hardware or operating system, or information about your application software.Your best source for this information is the set of manuals and discs that came with your hardware, operating system, or application.
Introduction and overview
Page 1
PRECAUTIONS
To ensure the safe usage of your product, be sure to follow all instructions, cautions, and warnings found within this manual. Failure to do so could cause the loss of data or damage to your computer. Failure to do so could also void your warranty, in which case Wacom shall have no responsibility to repair or replace the product.
WARNING This symbol indicates an item that, if disregarded, may lead to loss of human life or serious injury.
CAUTION This symbol indicates an item that, if disregarded, may lead to human injury or damage to personal property.
Exercise due care and diligence whenever engaging in a described action.
PHYSICAL LOCATION
WARNING Do not use the DTF-521 pen display in a facility control system that requires extremely high reliability; it may cause other electronic devices to malfunction, or other devices may cause the pen display tablet to malfunction. Where use is prohibited, power off theDTF-521 to prevent the possibility of it causing other electronic devices to malfunction. Wacom does not accept any liability for direct or consequential damages. For details, please refer to your Warranty located at the end of this manual.
ENVIRONMENT
Temperature and humidity
•Operating temperature and humidity: 5˚ to 35˚C, 20 to 80% RH
•Storage temperature and humidity: -10˚ to 60˚C, 20 to 90% RH
CAUTION Do not use or store the pen display where:
• Temperature changes are severe or exceed specifications (e.g., outdoors or inside a vehicle).
•The pen display and pen are exposed to direct sunlight or heat from an appliance, or are exposed to water or any other kind of liquid.
 CAUTION Do not use the pen display in a dusty environment; this may damage the unit.
Precautions
Page 2
USAGE
WARNING Only use the power adapter that came with the DTF-521. If a different type of power adapter is used, the DTF-521 will not work properly or may be damaged. Using a different type of power adapter also has the potential to result in fire. Use of a different power adapter will void your warranty.
 CAUTION Be sure to use a grounded power source when applying power to the DTF-521.
 CAUTION Do not connect or disconnect the video or power cables while the DTF-521 or your
 computer are turned on; this may damage the display or computer video card. In this case, Wacom shall have no responsibility to repair or replace the product.
CAUTION This product is for use with a VGA video card; using an inappropriate video card may damage the DTF-521.
 CAUTION Do not block the rear panel ventilation holes; this may overheat and damage the unit.
When not using the DTF-521 for long periods of time, unplug the power adapter from the AC outlet.
HANDLING
WARNING High Voltage. Do not open or disassemble the DTF-521 pen display. There is a risk of electrical shock when the casing is open. This will also void your warranty and Wacom shall have no responsibility to repair or replace the product.
WARNING If the LCD screen has been damaged, DO NOT touch any liquid that may be leaking from it; this liquid is an irritant. In case of contact with skin, eyes, or mouth, rinse immediately with running water for at least 15 minutes or more. If contact is made with the eyes or mouth, also consult a physician.
WARNING
Hg – LAMP(S) INSIDE THIS PRODUCT CONTAIN MERCURY AND MUST BE RECYCLED OR DISPOSED OF ACCORDING TO LOCAL, STATE OR FEDERAL LAWS.
The DTF-521 pen display has a backlight which contains mercury (Hg). Be sure to dispose of properly, and to manage any disposal of this unit in accordance with your local ordinances and laws.
WARNING Prevent children from swallowing the pen tip or side switch. The pen tip or side switch may accidentally be pulled out if children are biting on them.
CAUTION Do not disassemble the pen. This may cause the device to malfunction. In this case, Wacom shall have no responsibility to repair or replace the product.
CAUTION Do not scratch the display screen. Avoid placing sharp objects on the display screen surface.
CAUTION When adjusting the tilt angle of the pen display, be careful to avoid catching your finger in the gap of the movable portion of the stand.
CAUTION Do not lift the DTF-521 by the stand; this may damage the stand mechanism. When lifting or moving the pen display, always do so by grasping the main body casing.
CAUTION Avoid intensive shock or vibration to the DTF-521 or the pen. Hitting or dropping the pen display may damage the display screen or other components.
Precautions
Page 3
CAUTION Do not put heavy articles on the pen display or push against it with a strong force; this may damage the display screen or bend the stand.
CAUTION Do not place heavy articles on the DTF-521 cabling, repeatedly bend the cables sharply, or apply heavy stress to the cable connectors; this may damage the unit or cabling.
CAUTION If the pen tip becomes sharp or angular, it may damage the coating on the display screen. Please replace the pen tip if necessary.
CAUTION Do not use any organic solvent (e.g., alcohol) or even mild detergent to clean the display screen. Use of these cleaners can damage the coating on the screen. Please note that damage of this kind is not covered by the manufacturer's warranty.
•To clean the display screen, use an anti-static cloth or a slightly damp cloth. When cleaning, apply only a light amount of pressure to the display screen and do not make the surface wet.
•To clean the pen display casing or pen, use a soft cloth with mild detergent (such as dish washing liquid) diluted with water.
•Before cleaning, always disconnect your product from the AC power source.
CAUTION Do not expose the DTF-521 to high voltage electrostatic discharges or to a build-up of an electrostatic charge on the LCD screen. This may result in a temporary discoloration and blotching of the display. If discolorations occur, leave the display on and the discolorations should disappear within a few hours.
Reuse, recycling and recovery. You are urged to recycle this product when replacing it with a newer product or when it has outlived its useful life by bringing it to an appropriate collection point for recyclable materials in your community or region. By doing this, you can help improve the environment of your community as well as minimize the potential negative effects created, should any hazardous substance that may possibly be present within waste material reach the environment during the disposal process.
Within the European Union, users are required not to dispose of Waste Electrical and Electronic Equipment (WEEE) as unsorted municipal waste, according to the
Directive 2002/96/EC of the European Parliament and of the Council of 27 January 2003, or the corresponding local laws of the Member States. Products for which this is applicable will be marked with the WEEE symbol shown at the beginning of this note unless this is not feasible because of the size or the function of the product. Wacom products are subject to the Directive 2002/96/EC and therefore you should always collect them separately and bring them to the appropriate collection point in your community or region.
Wacom pen display products comply with the European Union RoHS Directive 2002/95/EC (RoHS Directive).
Precautions
Page 4

CONTENTS
Introduction and overview . . . . . . . . . . . . . . . . . . . . . . . . . . . . . . . . . . . . . . . . 1 Precautions . . . . . . . . . . . . . . . . . . . . . . . . . . . . . . . . . . . . . . . . . . . . . . . . . . . . 2
Physical location . . . . . . . . . . . . . . . . . . . . . . . . . . . . . . . . . . . . . . . . . . . . . . 2 Environment . . . . . . . . . . . . . . . . . . . . . . . . . . . . . . . . . . . . . . . . . . . . . . . . . 2 Usage . . . . . . . . . . . . . . . . . . . . . . . . . . . . . . . . . . . . . . . . . . . . . . . . . . . . . . 3 Handling . . . . . . . . . . . . . . . . . . . . . . . . . . . . . . . . . . . . . . . . . . . . . . . . . . . . 3
Your new DTF-521 . . . . . . . . . . . . . . . . . . . . . . . . . . . . . . . . . . . . . . . . . . . . . . . 7
Package contents . . . . . . . . . . . . . . . . . . . . . . . . . . . . . . . . . . . . . . . . . . . . . 7 Interactive pen display components . . . . . . . . . . . . . . . . . . . . . . . . . . . . . . . 8 Front view . . . . . . . . . . . . . . . . . . . . . . . . . . . . . . . . . . . . . . . . . . . . . . . 8 Rear view . . . . . . . . . . . . . . . . . . . . . . . . . . . . . . . . . . . . . . . . . . . . . . . 9
Installation . . . . . . . . . . . . . . . . . . . . . . . . . . . . . . . . . . . . . . . . . . . . . . . . . . . . 10
System requirements . . . . . . . . . . . . . . . . . . . . . . . . . . . . . . . . . . . . . . . . . 10 Step 1: LCD monitor installation . . . . . . . . . . . . . . . . . . . . . . . . . . . . . . . . . 11 LCD monitor cabling diagram . . . . . . . . . . . . . . . . . . . . . . . . . . . . . . . 12 Step 2: Pen tablet installation . . . . . . . . . . . . . . . . . . . . . . . . . . . . . . . . . . . 14 USB cable installation . . . . . . . . . . . . . . . . . . . . . . . . . . . . . . . . . . . . 14 Pen tablet cabling diagram . . . . . . . . . . . . . . . . . . . . . . . . . . . . . . . . . 14 Software installation . . . . . . . . . . . . . . . . . . . . . . . . . . . . . . . . . . . . . . 15
Working with your DTF-521 . . . . . . . . . . . . . . . . . . . . . . . . . . . . . . . . . . . . . . 16
Setting up your work area . . . . . . . . . . . . . . . . . . . . . . . . . . . . . . . . . . . . . |
16 |
Using the pen . . . . . . . . . . . . . . . . . . . . . . . . . . . . . . . . . . . . . . . . . . . . . . . |
17 |
Pen components . . . . . . . . . . . . . . . . . . . . . . . . . . . . . . . . . . . . . . . . . |
17 |
Pen operations . . . . . . . . . . . . . . . . . . . . . . . . . . . . . . . . . . . . . . . . . . . . . . |
18 |
Customizing . . . . . . . . . . . . . . . . . . . . . . . . . . . . . . . . . . . . . . . . . . . . . . . . . . . 19
Opening the control panel . . . . . . . . . . . . . . . . . . . . . . . . . . . . . . . . . . . . . 19 Control panel overview . . . . . . . . . . . . . . . . . . . . . . . . . . . . . . . . . . . . . . . . 20 Customizing the pen . . . . . . . . . . . . . . . . . . . . . . . . . . . . . . . . . . . . . . 20 Calibrating the DTF-521 . . . . . . . . . . . . . . . . . . . . . . . . . . . . . . . . . . . 22 Customizing the Pop-up Menu . . . . . . . . . . . . . . . . . . . . . . . . . . . . . . 23 Control panel details . . . . . . . . . . . . . . . . . . . . . . . . . . . . . . . . . . . . . . . . . . 24 Adjusting double-click . . . . . . . . . . . . . . . . . . . . . . . . . . . . . . . . . . . . . 24 Customizing the side switch button functions . . . . . . . . . . . . . . . . . . . 24 Adjusting the display . . . . . . . . . . . . . . . . . . . . . . . . . . . . . . . . . . . . . . . . . 27 Factory presets, auto-sync, and user settings . . . . . . . . . . . . . . . . . . . 27 On Screen Display (OSD) settings . . . . . . . . . . . . . . . . . . . . . . . . . . . 27 Adjusting pitch and phase . . . . . . . . . . . . . . . . . . . . . . . . . . . . . . . . . . 30 Power saving . . . . . . . . . . . . . . . . . . . . . . . . . . . . . . . . . . . . . . . . . . . . 31
Contents
Page 5

Troubleshooting . . . . . . . . . . . . . . . . . . . . . . . . . . . . . . . . . . . . . . . . . . . . . . . 32
Testing the DTF-521 . . . . . . . . . . . . . . . . . . . . . . . . . . . . . . . . . . . . . . . . . . 32 Display troubleshooting . . . . . . . . . . . . . . . . . . . . . . . . . . . . . . . . . . . . . . . 34 General display problems . . . . . . . . . . . . . . . . . . . . . . . . . . . . . . . . . . 34 VGA problems . . . . . . . . . . . . . . . . . . . . . . . . . . . . . . . . . . . . . . . . . . . 35 Pen tablet troubleshooting . . . . . . . . . . . . . . . . . . . . . . . . . . . . . . . . . . . . . 36 General problems . . . . . . . . . . . . . . . . . . . . . . . . . . . . . . . . . . . . . . . . 36 Windows-specific problems . . . . . . . . . . . . . . . . . . . . . . . . . . . . . . . . 40 Macintosh-specific problems . . . . . . . . . . . . . . . . . . . . . . . . . . . . . . . . 40 Technical support options . . . . . . . . . . . . . . . . . . . . . . . . . . . . . . . . . . . . . 41 Obtaining driver downloads . . . . . . . . . . . . . . . . . . . . . . . . . . . . . . . . . . . . 42
Appendix . . . . . . . . . . . . . . . . . . . . . . . . . . . . . . . . . . . . . . . . . . . . . . . . . . . . . 43
Caring for the DTF-521 . . . . . . . . . . . . . . . . . . . . . . . . . . . . . . . . . . . . . . . 43 Cleaning . . . . . . . . . . . . . . . . . . . . . . . . . . . . . . . . . . . . . . . . . . . . . . . 43 Replacing the pen tip . . . . . . . . . . . . . . . . . . . . . . . . . . . . . . . . . . . . . 44 Using an alternate mount or stand . . . . . . . . . . . . . . . . . . . . . . . . . . . . . . . 45 Pen and digital ink capabilities in Windows Vista . . . . . . . . . . . . . . . . . . . . 46 About the Windows Vista Tablet PC Input Panel . . . . . . . . . . . . . . . . . 47 Uninstalling the DTF-521 . . . . . . . . . . . . . . . . . . . . . . . . . . . . . . . . . . . . . . 48 Product specifications . . . . . . . . . . . . . . . . . . . . . . . . . . . . . . . . . . . . . . . . 49 General specifications . . . . . . . . . . . . . . . . . . . . . . . . . . . . . . . . . . . . . 49 Display . . . . . . . . . . . . . . . . . . . . . . . . . . . . . . . . . . . . . . . . . . . . . . . . 49 Pen tablet . . . . . . . . . . . . . . . . . . . . . . . . . . . . . . . . . . . . . . . . . . . . . . 50 Power adapter . . . . . . . . . . . . . . . . . . . . . . . . . . . . . . . . . . . . . . . . . . . 50 Pen (model FP-320) . . . . . . . . . . . . . . . . . . . . . . . . . . . . . . . . . . . . . . 50 Ordering parts and accessories . . . . . . . . . . . . . . . . . . . . . . . . . . . . . . . . . 50 Radio and television interference . . . . . . . . . . . . . . . . . . . . . . . . . . . . . . . . 51 Federal Communications Commission (FCC) notice . . . . . . . . . . . . . 51 Industry Canada (Canada only) . . . . . . . . . . . . . . . . . . . . . . . . . . . . . 52 CE declaration . . . . . . . . . . . . . . . . . . . . . . . . . . . . . . . . . . . . . . . . . . 52 Warranty (Worldwide, Except for Europe, Africa and Middle East) . . . . . . 53 Warranty (Europe, Africa and Middle East) . . . . . . . . . . . . . . . . . . . . . . . . 55
Contents
Page 6

YOUR NEW DTF-521
PACKAGE CONTENTS
Carefully unpack all items and place them on a desktop or stable work surface.Verify that your package contents are complete.
DTF-521 interactive pen display, main unit
Pen with replacement nibs, pen tether, tether connection ring, and attachment screw (FP-320, PKB-A016, MHO-A052, and MNE-A061)
Installation Guide & User’s Manual
(this manual)
Wacom Pen Tablet Driver CD
(contains the driver software)
Power adapter and power cable (POW-A096 and SCD-A039-01 for USA) (POW-A096 and SCD-A038-01
or SCD-A040-01 for Europe)
USB cable (STJ-A250)
VGA to VGA cable (STJ-A228)
Note: Images not shown to scale. Some product configurations may come with different pens having no side switches. Some configurations may include additional CDs or DVDs containing application software. To install these applications, review the instructions that came with those CDs or DVDs. Retain the package box for use when storing or shipping the DTF-521.
Your new DTF-521
Page 7
INTERACTIVE PEN DISPLAY COMPONENTS
Your product has many features and components with which you will want to become familiar.
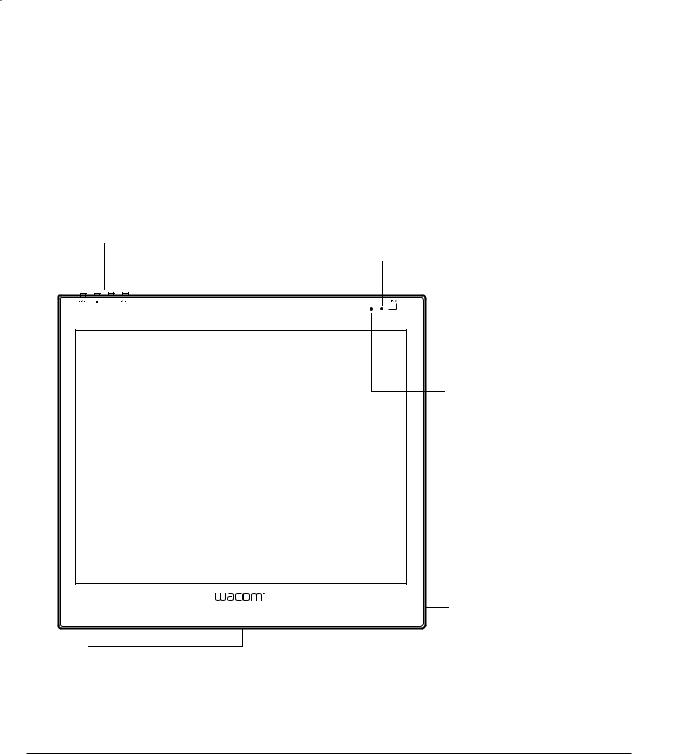
FRONT VIEW
The display and tablet sensor function as an integrated output and input device. The display supports resolutions up to 1024 x 768 pixels at 16.2 million colors. The tablet sensor reports pen coordinates, pressure, and switch information.
On Screen Display (OSD) controls
These controls, located on the upper edge of the tablet, enable you to adjust a variety of display settings. See
Adjusting the display on page 27 for more information.
Power LED
Lights blue when power has been supplied to the DTF521 and a video signal is present.
Glows orange when no video signal is detected by the DTF-521. (e.g., Your computer is turned off, starting up, or has entered a power management mode in which video signals are not sent.)

 Power switch
Turns power to the unit on or off.
Integrated display and tablet
Pen tray
Provides a convenient resting place for the pen. When the display stand is set to its lowest position, place your fingers beneath the tray (located on the bottom front edge) and slide it out.
Status LED
Lights blue when the pen is in the active area of the pen display tablet and the pen tip is pressed. Note that the USB cable must also be plugged into an active USB port before the LED will light.
Use the integrated USB ports (one located on each side of the unit) to connect a USB device (e.g., a USB Flash Drive or a USB remote controller).
Be sure to fully install the DTF-521 hardware and software before connecting any other devices to the unit.
Your new DTF-521 Page 8
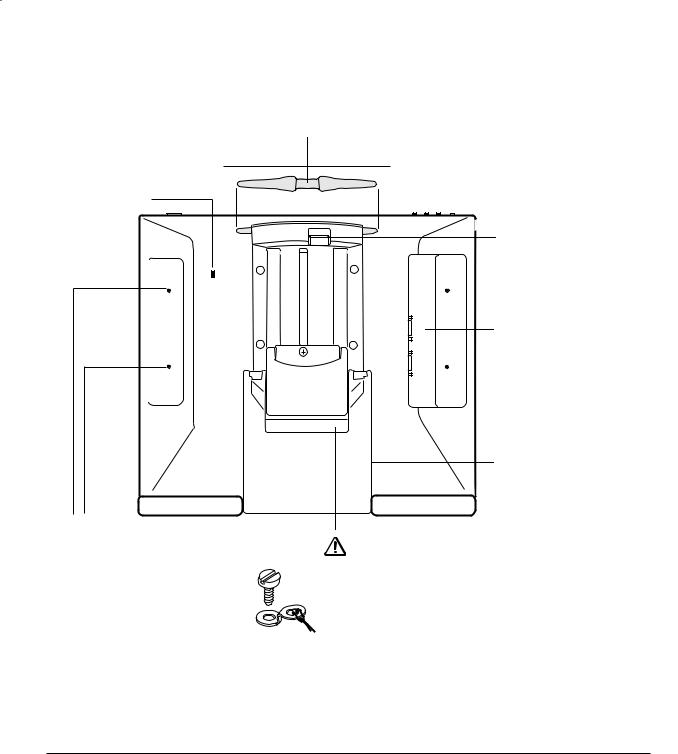
REAR VIEW
Pen storage compartment
For storage, insert one end of the pen into either side of the storage compartment. Then gently press the other end of the pen into the compartment.
For removal, press in on either end of the pen. This will pop the opposite end of the pen out of the compartment.You can then remove the pen.
Kensington security slot
Allows easy attachment of a security cable.
Pen tether attachment points
If you will be using the pen tether, use the tether attachment ring and small thumb screw to connect it to one of four attachment points located on the back of the unit.
Stand adjustment lever
Pull this lever up to adjust the stand. Release the lever to lock the stand in place.
Video, USB, and power connectors
Stand
The stand can be used to adjust the tilt angle of the unit.
CAUTION Be careful to avoid catching your finger in the gap of the movable portion of the stand.
Important: Always store the pen display on a stable surface or in its original packing carton when not in use. Be sure to adjust the stand to the low tilt position before packaging the DTF-521. If you do not close the stand, the notched mechanism may be damaged during transportation and storage.
Do not lift the unit by the stand; this may damage the stand mechanism. When lifting or moving the DTF-521, always do so by grasping the main body casing.
Your new DTF-521
Page 9

INSTALLATION
SYSTEM REQUIREMENTS
Before installing the DTF-521, make sure your computer meets the following minimum system requirements:
•PC. Windows Vista™, Vista X64, XP, XP x64, or 2000. VGA video connector, available USB port, and CD-ROM drive.
•Macintosh. OS X, v10.3.9 or greater. VGA video connector, available USB port, and CD-ROM drive.
Notes: The DTF-521 can be used alone or with another display.You may connect a second VGA device such as a monitor or LCD projector to the DTF-521 ANALOG RGB OUT port. When using this port, the second device will mirror the image on the DTF-521. Complete the DTF-521 installation before connecting a projection device to the unit.
Depending on the capabilities of your video card and operating system, you may be able to set up the DTF-521 as a mirrored, extended, or independent display. Refer to your video card documentation for more information on its capabilities.
When you are working with more than one monitor, the DTF-521 will map to the monitors based upon how your system is configured. By default, if you are in mirror mode, the pen tablet will map to the entire space on each display or monitor. Please refer to your hardware and operating system documentation for details on configuring your computer and operating system for use with multiple monitors.
There are two primary steps to the installation process:
•Step 1: LCD monitor installation
•Step 2: Pen tablet installation
Be sure to follow ALL instructions carefully.
Installation
Page 10

STEP 1: LCD MONITOR INSTALLATION
In the first stage of the installation process, the DTF-521 is installed as a monitor on your system. As you work through the first stage of the installation process, please refer to the LCD monitor cabling diagram on the following page when making cable connections.
Important: Do not connect the USB data cable until instructed to do so.
•Turn off your computer.
Caution: Never connect or disconnect the video or power cables while your computer or DTF-521 are powered on – this can damage the display or video card.
•If your computer has only one analog (VGA) video connector, you will need to unplug your previous monitor or add a second VGA card.
•Plug one end of the VGA cable into the DTF-521. Plug the other end of
the cable into the VGA connector on your computer’s video card. See – A – in the connection diagram on page 12. Be sure to tighten the
thumbscrews on the connectors. |
VGA connector |
|
•Connect the power adapter to the DTF-521. Then connect the adapter’s power cable and plug the
adapter into an AC outlet. See – B – and – C –
• Turn on the DTF-521. The power LED will light orange.
Installation
Page 11
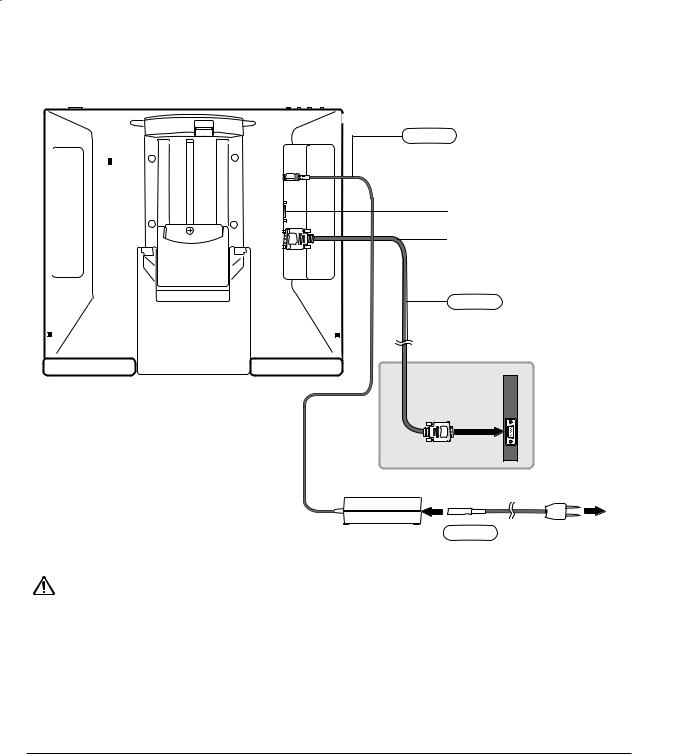
LCD MONITOR CABLING DIAGRAM
Do not attach the USB data cable until instructed to do so.
DTF-521, rear view
The ANALOG RGB OUT port is used to connect a second VGA device such as a projector or monitor that mirrors the pen display. Be sure to fully install the DTF-521 hardware and software before connecting a projection device to the unit. Do not connect or disconnect any cable while the DTF-521 or your computer are turned on.
– B –
DC IN (12V)
ANALOG RGB OUT
ANALOG RGB IN
– A –
VGA cable
Video card
VGA port
Rear panel of your computer
Power adapter |
– C – |
To AC outlet |
CAUTION Use only the power adapter that came with the DTF-521; use of an improper power
adapter may damage the unit.
Do not connect or disconnect the video or power cables while the DTF-521 or your computer are turned on – this can damage the display or computer video card.
Make sure that the display refresh rate does not exceed 70 Hz for XGA mode, or 75 Hz for other modes.
Installation
Page 12

•Next, turn on your computer.
For Windows systems: The DTF-521 will automatically install as a default monitor.
•As necessary, configure the display control panel settings for the proper size and color resolution. The maximum (native) resolution of the DTF-521 is 1024 x 768 pixels. The display size and color resolution may be constrained by the capabilities of your video card. See the video card manufacturer’s documentation for details.
Windows: If you are using the DTF-521 as a secondary display, you may first need to enable the DTF-521 in your Display Properties control panel.
•To fine-tune the display, please refer to Adjusting the display, beginning on page 27 for more information.
•After the LCD monitor portion of the DTF-521 is working to your satisfaction, move on to Step 2: Pen tablet installation to install the pen tablet portion of the DTF-521. For troubleshooting tips, see page 32.
Notes:
Each DTF-521 LCD panel is produced under very stringent quality standards. Production techniques cannot guarantee an absolutely perfect TFT display, and some panels may exhibit a certain number of pixels that show an incorrect color. See the specifications on page 49 for more information.
If an image has fine striping (such as screen stripes), it may appear to flicker or display a moiré pattern.
Do not apply excessive pressure on the display surface, it may cause the appearance of a moiré or pooling pattern. If this occurs, use less pressure on the display screen when working with the pen.
When a still image is displayed for a long period of time, an after-image may remain for a short time.To prevent this, Wacom recommends using a screen saver or other power management feature.
Important: To extend the life of the backlight, set your computer’s power management to turn off the display when it is not in use for extended periods of time.
Installation
Page 13
STEP 2: PEN TABLET INSTALLATION
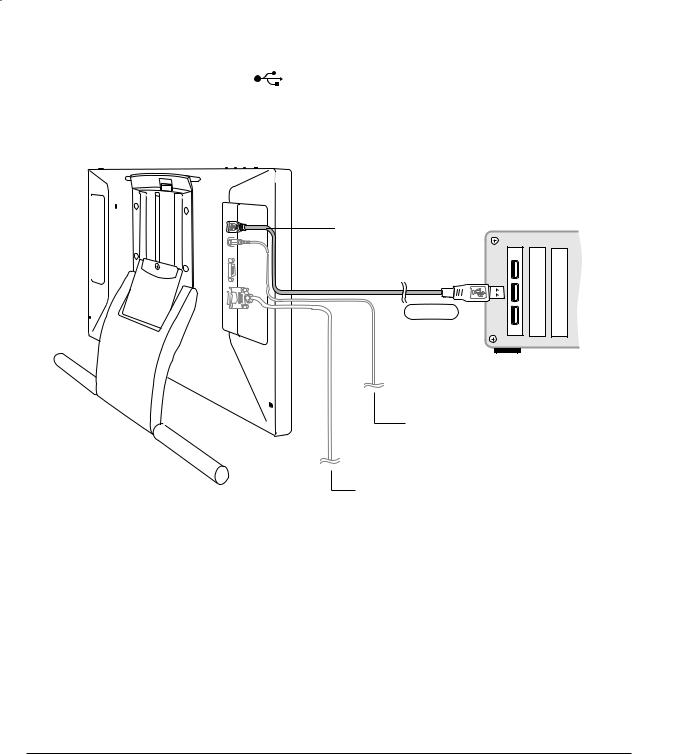
USB CABLE INSTALLATION
Plug the square end of the USB cable into the DTF-521 port labeled USB. Plug the other end into an available USB port on your computer or on a USB hub attached to your computer. See – D – in the diagram below.
PEN TABLET CABLING DIAGRAM
USB port
– D –
To USB port
Your computer
To power adapter. See page 12.
DTF-521, rear view
To video connection. See page 12.
Installation
Page 14

SOFTWARE INSTALLATION
IMPORTANT:You MUST install the Wacom pen tablet driver software for correct pen-on-screen functionality.
To install the tablet software:
•Save your work and close all open applications. Temporarily disable any virus protection programs.
•Insert the Wacom Pen Tablet Driver CD into your computer’s CD-ROM drive. If the software installer menu does not automatically display, double-click on the INSTALL icon located on the CD.
•Click on the INSTALL TABLET link and follow the prompts to install the driver software.
•Reactivate your virus protection program.
•After the software installation has been completed, make sure you can use your pen on the DTF-521 display to move the screen cursor.
When you place the pen tip on the display screen, the screen cursor should immediately jump to a corresponding position approximately beneath the pen tip. Lift the pen tip and place it on the display screen surface in a different location – the screen cursor should again jump to the new position.
This is known as absolute positioning, and enables you to position the screen cursor without having to drag your pen across the display screen surface.
•Be sure to check the Read Me file for updated information. If you have trouble installing the DTF-521, see the Troubleshooting section beginning on page 32.
Notes:
For Windows Vista, driver installation automatically activates the new pen input functions available within Windows Vista and Office 2007 (except for Windows Vista Home Basic).
For Windows Vista, XP, and Macintosh OS X, user-specific preferences are supported. After logging in, each user can customize their personal settings in the Pen Tablet control panel. Switching to another user will automatically load the settings for that user.
To uninstall the tablet driver, see Uninstalling the DTF-521 on page 48.
Next, adjust the pen display tablet calibration to precisely align the screen cursor to the pen tip. See
Calibrating the DTF-521 on page 22.
Installation
Page 15

WORKING WITH YOUR DTF-521
As you work with the DTF-521 interactive pen display you can rest your hand lightly on the display screen, just as if it were a drawing board or sheet of paper.
Because the DTF-521 surface will be a little higher than your desk, consider adjusting the height of your desk or chair to assure comfortable use of the device.
SETTING UP YOUR WORK AREA
To minimize fatigue, organize your work area so you can work comfortably. Position the DTF-521, the pen, and your keyboard so they are easily accessible without unnecessary reaching. The pen display and any other displays should be positioned so you can view them comfortably with a minimum of eyestrain.
Here are some other points to keep in mind:
•Take short breaks between tasks to stretch and relax your muscles.
•Use a gentle grip when working with the pen.
•Alternate tasks throughout the day.
•Maintain a good posture at all times. Minimize awkward postures and repetitive movements that cause discomfort. Change your position if you feel any discomfort due to your work position.
•Alternate between different modes of use.
Note: Wacom makes no representation, promise or guarantee that Wacom products will cure or prevent, in whole or in part, mouse-induced repetitive stress symptoms, injuries or conditions. Individual results may vary. Always obtain competent medical advice to determine the most appropriate treatment for your specific situation.
Tips:
•Be careful that you do not pull the cables out of their connections by accidentally moving the DTF-521 too far from the computer.
•The pen tether can be used to ensure your pen stays with your pen display. Simply loop one end of the tether through the tether hole located on the pen, and the other end of the tether through the tether connection ring. Then use the small thumb screw to attach the tether ring to one of the four attachment points located on the back of the unit.
•The DTF-521 can also be mounted to articulated arms or other third-party stands meeting the VESA 75 specification for display stands. For details, see Using an alternate mount or stand on page 45.
Working with your DTF-521
Page 16
USING THE PEN
The Wacom pen is cordless, battery-free, and senses the amount of pressure you apply to the tip. Hold the pen like you would a normal pen or pencil. Make sure the programmable DuoSwitch is in a convenient location where you can toggle it with your thumb or forefinger, but not accidentally press it while writing or drawing. As you work, you can rest your hand lightly on the DTF-521 display screen, just as if it were a drawing board or sheet of paper.You can tilt the pen in any way that feels most comfortable for drawing.
Pen tether connection point
DuoSwitch (side switch)
Some product configurations may come with a pen that has no DuoSwitch. In that case, you can ignore all explanations within this guide regarding the side switch.
Tip switch (replaceable nib)
PEN COMPONENTS
The components of your pen function in the following manner:
Note: When the pen is not in use, place it in the pen tray, the pen storage compartment, or lay it flat on your desk. To maintain the sensitivity of your pen, do not store the pen in a container where it will rest on its tip.
Pen tip: The pen is activated as soon as it is brought within 5 mm (0.2 inch) of the pen display screen. This allows you to position the screen cursor without touching the pen tip to the display screen. When pressure is applied to the pen tip, the tip switch is turned on and the pen simulates a primary mouse button click. The tip click pressure can be adjusted in the Pen Tablet control panel.
DuoSwitch: The DuoSwitch is programmable, and can be used to perform the same click and doubleclick functions as the tip switch. Toggle the DuoSwitch in either direction to activate the upper or lower button functions.You can use the DuoSwitch whenever the pen tip is within 5 mm (0.2 inch) of the display screen surface; you do not need to touch the pen tip to the display surface in order to use the switch. By default, the upper switch is set to DOUBLE CLICK and the lower switch is set to RIGHT CLICK.
Important: Use only the pen that came with your DTF-521 pen display. Other pens may not function properly. Also, the DTF-521 pen tip is specifically designed for use with the DTF-521 pen display – the tips on other pens could damage the protective coating on the DTF-521 display screen.
See Customizing the pen on page 20 for information on customizing the pen settings.
Working with your DTF-521
Page 17

PEN OPERATIONS
Pointing and selecting: Move the pen above the DTF-521 display screen to position the screen cursor. The pen tip needs to be within 5 mm (0.2 inch) of the display screen surface; you do not need to touch the display surface to move the screen cursor. The cursor jumps to the location where you place the pen (absolute positioning). Press the pen tip on the display screen to make a selection.
Note: You must calibrate the pen display tablet to correctly align the screen cursor with the pen tip. (See Calibrating the DTF-521 on page 22.) If the screen cursor does not jump to a position close to the pen tip when you place the pen on the display screen, then the pen tablet driver may not be installed or is not loading. Install the pen tablet driver software if necessary. Otherwise, see Troubleshooting, beginning on page 32.
Clicking: Tap the display screen once with the pen tip, or touch the pen to the display screen with enough pressure to register a click.
Windows tip: You can make navigating with the pen easier by configuring Windows to select when the pen is over an icon and to launch the icon with a single click. To turn on this feature, first open a folder.
For Windows Vista, From the ORGANIZE pull-down menu choose FOLDER AND SEARCH OPTIONS. From the GENERAL tab select SINGLE-CLICK TO OPEN AN ITEM (POINT TO SELECT).
For other Windows versions, from the TOOLS pull-down menu choose FOLDER OPTIONS.... From the GENERAL tab select SINGLE-CLICK TO OPEN AN ITEM (POINT TO SELECT).
Double-clicking: Press the upper side switch, or quickly tap the display screen twice in the same place with the pen tip. Double-clicking is easier when the pen is perpendicular to the tablet screen. To finetune the double-click area, see Adjusting double-click on page 24.
Dragging: Select an object, then slide the pen tip across the display screen to move the object.
Using the side switch: The pen is equipped with a DuoSwitch. This switch has two programmable functions that can be selected by rocking the switch in either direction.You can use the DuoSwitch whenever the pen tip is within 5 mm (0.2 inch) of the display screen surface; you do not need to touch the pen tip to the display surface in order to use the switch. The upper switch is set to DOUBLE CLICK, and the lower switch is set to RIGHT CLICK by default.
Drawing and writing with pressure sensitivity: The pen responds to the nuance and inflection of your hand movements, enabling you to create natural-looking pen and brush strokes within applications that support this feature. To draw and write with pressure, select a pressure-sensitive tool from your application’s tool palette. As you work on the screen surface, use various amounts of downward pressure on the tip of the pen. Press lightly for thin lines or softer color. Press harder for thick lines or dense color.
Working with your DTF-521
Page 18

CUSTOMIZING
After you master the basics of using your pen on the DTF-521 interactive pen display, you may want to customize the way the pen works. The Pen Tablet control panel makes it easy to customize the DTF-521 and pen.
OPENING THE CONTROL PANEL
To open the control panel, use the DTF-521 pen on the pen display:
Windows. Click on the Windows START button and choose ALL PROGRAMS. (For Windows 2000, choose the PROGRAMS group.) Then select TABLET and choose the PEN TABLET PROPERTIES option.
Macintosh. Open SYSTEM PREFERENCES from either the Dock, the Apple menu, or from the APPLICATIONS folder. Then click on the PEN TABLET icon.
After opening the control panel, see Control panel overview on page 20.
Notes:
For Windows Vista, XP, and Macintosh OS X, user-specific preferences are supported. After logging in, each user can customize their personal settings in the Pen Tablet control panel. Switching to another user will automatically load the settings for that user.
When more than one Wacom tablet is installed on a single computer, any changes made in the Pen Tablet control panel will be applied only to the tablet that was last used before opening the control panel.
Customizing
Page 19

CONTROL PANEL OVERVIEW
Use the Pen Tablet control panel to customize your product. Experiment with different settings to find what works best for you. Any changes you make will take effect immediately, but you can always click DEFAULT to return to the factory settings.
Tool tips are available for most control panel items. Position the screen cursor over an item and let it rest there; in a few moments the Tool Tip will pop up.
Additionally, your keyboard tab and arrow keys can be used to navigate the control panel.
CUSTOMIZING THE PEN
Customizes the amount of pressure needed to click or draw with the pen.
Adjusts the size of the double-click area. See page 24.
Selects the pen side switch button functions. See page 24.
Closes the control panel.
When checked, an audible “click” sound will be heard whenever a pen click occurs and your computer speakers are turned on.
Displays information about |
Returns the PEN tab settings to |
the control panel and driver. |
their factory defaults. |
Hint: To create broad brush strokes or to click with a light touch, use a soft tip setting. A soft setting provides a wider range of pressure values with most pressure-sensitive
applications. In some applications, a soft pressure setting can make the pen overreact – any small press on the pen is magnified on the screen. If you experience this, try a firmer tip setting. A firm tip setting will give you maximum control while drawing thin lines.
Note: When customizing your pen, choose those options that match the buttons on the pen with which you are working.
Customizing
Page 20
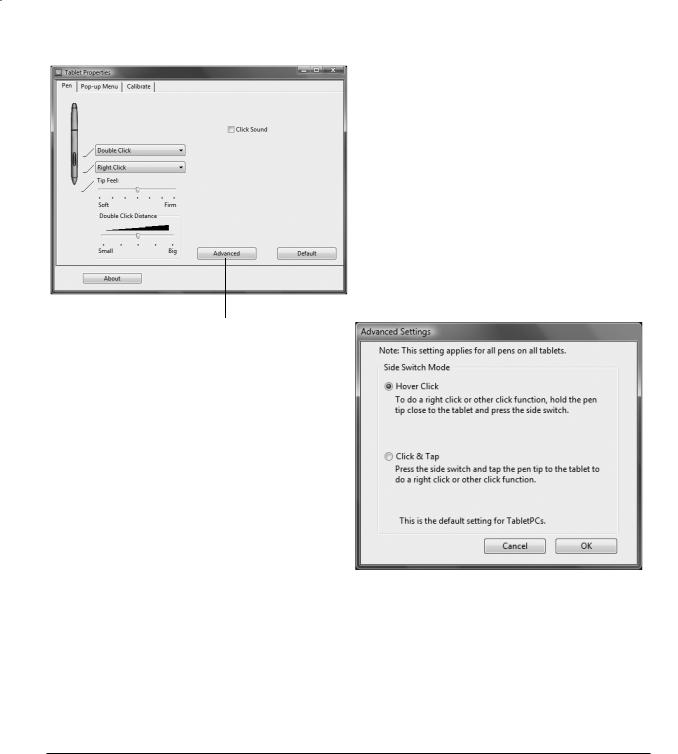
You can change the SIDE SWITCH MODE for the way you like to use the pen when making right-clicks or other click functions. Click on the ADVANCED button. In the dialog box that appears:
•Select HOVER CLICK to perform click functions without touching the pen tip to the tablet surface.
•When CLICK & TAP is selected, you must first press the pen button and then touch the pen tip to the tablet surface in order to perform a click function. CLICK & TAP enables the precise placement of your click functions.
Customizing
Page 21
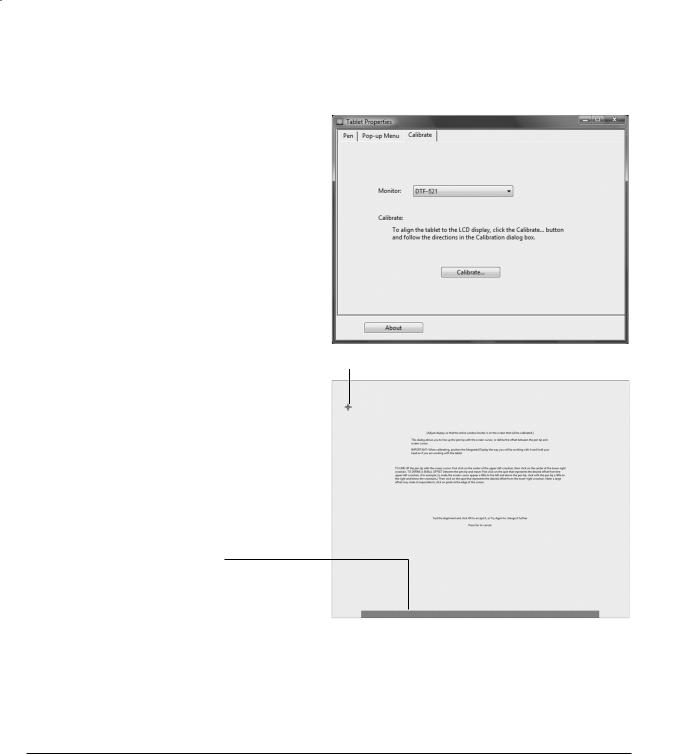
CALIBRATING THE DTF-521
You must calibrate the pen display tablet in order to align the screen cursor position with the position of the pen on the display screen. This is required to adjust for parallax caused by the display screen cover glass and coating. Set the DTF-521 in its working position, then follow the procedure below.
Important: Make sure the display is properly adjusted before calibrating the tablet.
See Adjusting pitch and phase on page 30, and Adjusting the display beginning on page 27.
•In the Pen Tablet control panel, select the CALIBRATE tab.
•If you are working with multiple monitors, select the MONITOR corresponding to the DTF-521 display. (Only monitors that are set to one of the resolutions supported by the DTF-521 will appear in the list.)
•Click on the CALIBRATE... button to activate the calibration screen.
•Hold the pen and position your head as you normally do when working with the pen display. Use the pen tip to click on the center of the
crosshairs in the upper-left corner. |
Crosshairs |
•Then click on the center of the crosshairs that are displayed in the lower-right corner.
•Test the alignment by positioning the pen at a few different points on the display. Click OK to accept the calibration. Click TRY AGAIN to recalibrate.
Be sure to read the directions in the calibration screen for detailed instructions and additional options. The calibration setting applies to all applications.
Adjustment pattern for pitch and phase. See Adjusting pitch and phase on page 30 for details.
Notes:
If you prefer to see the screen cursor slightly offset from the actual position of the pen tip,
calibrate by clicking on a spot showing that offset from the crosshairs. For example, to have the screen cursor appear 1/10th of an inch above and to the left of the pen tip, calibrate by clicking on a spot 1/10th of an inch below and to the right of the crosshairs.
To calibrate two pen displays, first touch the pen to pen display #1 and open the control panel without touching the pen to pen display #2. In the control panel, select the correct monitor and calibrate pen display #1. Close the control panel, touch the pen to pen display #2, and again open the control panel without touching the pen to pen display #1. Select the correct monitor and calibrate pen display #2.
Customizing
Page 22
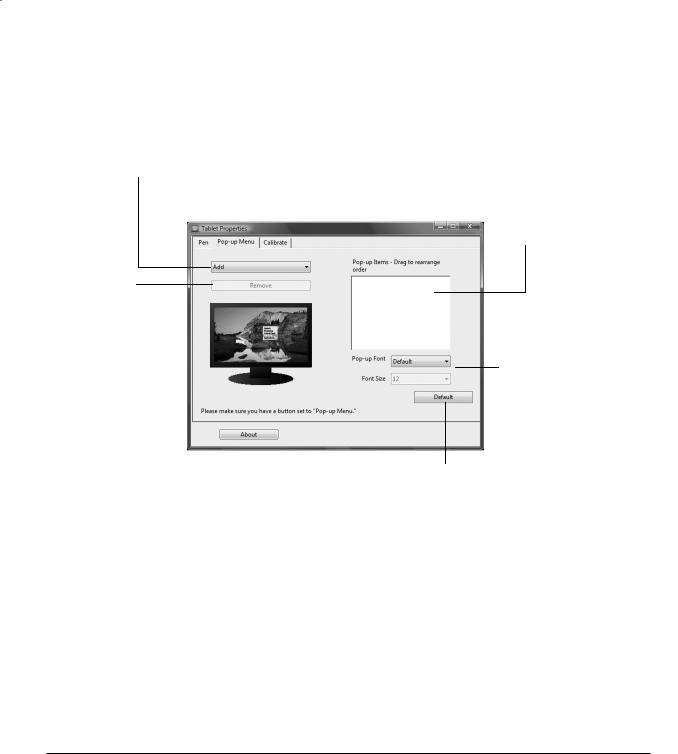
CUSTOMIZING THE POP-UP MENU
Use the POP-UP MENU tab to define the available functions on the Pop-up Menu list.
To display the Pop-up Menu, set a pen button to the POP-UP MENU function. Whenever you press that button, the Pop-up Menu is displayed. Select from available items in the Pop-up Menu by clicking on them. To close the Pop-up Menu without making a selection, click outside of the Pop-up Menu.
Select a button function to add to the Pop-up Menu list. See page 24.
Removes the selected item from the list.
Displays a list of functions that have been added to the Pop-up Menu.
To change the order of an item, drag it to a new location. Double-click on an item to make edits.
Sets the FONT and
FONT SIZE of the
Pop-up Menu.
Returns all tab settings to their default values.
Important: This action will delete all Pop-up Menu items that have been defined.
Customizing
Page 23
CONTROL PANEL DETAILS
ADJUSTING DOUBLE-CLICK
Double-clicking with the pen tip can be made easier by expanding the tap area that accepts a doubleclick (the double-click distance), or by using the pen’s side switch to automatically double-click when pressed. A large double-click distance may cause a delay at the beginning of your brushstrokes in some drawing applications. If you notice such effects, try setting a smaller double-click distance and using the side switch to double-click.
Hint: Press the upper switch to double-click. This is easier than tapping twice with the pen tip.
CUSTOMIZING THE SIDE SWITCH BUTTON FUNCTIONS
You can set the pen’s DuoSwitch to simulate a variety of functions. Just select an option from the pulldown menu for either the upper or lower side switch.Your changes take effect immediately. When you bring the pen tip within 5 mm (0.2 inch) of the pen display tablet surface without touching the tablet and press the side switch, the selected function occurs. The following list describes the available options.
CLICK. Default setting for the pen tip. Simulates a primary mouse button click.
DOUBLE CLICK. Default setting for the upper position of the side switch. Simulates a double-click. For easier double-clicking, use this function instead of tapping twice with your pen tip.
MIDDLE CLICK. Simulates a middle mouse button click.
RIGHT CLICK. Default setting for the lower position of the side switch. Simulates a right mouse button click, which displays a context menu.
CLICK LOCK. Simulates holding down the primary mouse button. Press the side switch once to initiate click lock. Press the switch again to release click lock. Click lock is useful for dragging objects or selecting blocks of text.
4TH CLICK (BACK). Simulates a 4th mouse button click, which on Windows systems typically issues the BACK command in browser applications.
5TH CLICK (FORWARD). Simulates a 5th mouse button click, which typically issues the FORWARD command in browser applications.
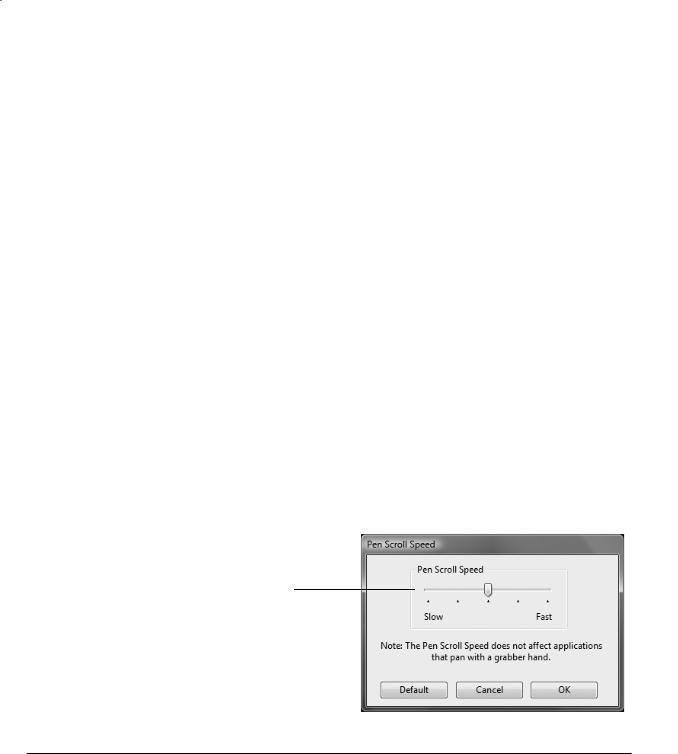
PAN/SCROLL. Enables you to position a document or image in any direction within the active pane by pressing a pen switch set for PAN/SCROLL and then sliding the pen tip across the DTF-521 display screen.
When you select PAN/SCROLL, you are prompted to set a scrolling speed that will be used in applications that do not support grabber hand (pixel-level) panning within a document or image.
A slower setting reduces the scroll rate and is useful for close-up and detail work where you need precise control of the image.
Customizing
Page 24
TABLET PC INPUT PANEL. (Tablet PCs and Windows Vista systems that support the Tablet PC Input Panel.) Opens the Tablet PC Input Panel when you press a tool button set to this function.
JOURNAL. (Windows Vista and Tablet PC systems that include Microsoft Journal.) Opens Microsoft Journal.
POP-UP MENU. Displays a Pop-up Menu on your screen. See Customizing the Pop-up Menu on page 23 for more information.
ERASE. Sets a button so that when the button is pressed, the pen tip will act like an eraser in applications that support the ERASE function.
INK TOGGLE. (Macintosh.) Toggles the Ink ANYWHERE function of Inkwell on and off. Inkwell automatically recognizes and converts your handwriting into text and inserts it into a document. Note that Ink must be turned on for this button function to work. See your Macintosh help for information on working with Inkwell.
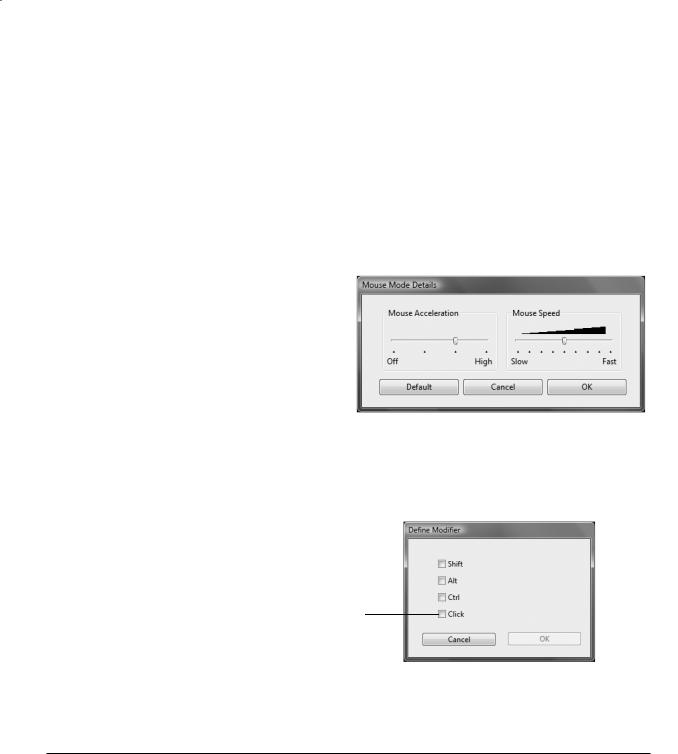
MODE TOGGLE.... Toggles between the pen tracking mode (pen mode) and mouse mode. The tracking mode you select determines the relationship between pen movement and cursor movement.
The Mouse Mode Details dialog box will appear when
you first set a tool button to MODE TOGGLE....
•With the pen display tablet correctly calibrated in pen mode, the screen cursor should always follow the physical pen tip on the screen. This is the default setting.
•When toggled to your computer’s mouse settings (mouse mode), the screen cursor is not directly “linked” to the pen tip and is positioned like a mouse, requiring a “pick up and slide” motion to move the cursor on the screen. On multiple display systems, mouse mode will allow you to access the other display(s) with your pen.
MODIFIER.... Enables you to assign modifier key(s) (such as SHIFT, ALT, or CTRL for Windows, or SHIFT, OPTION, COMMAND, and CONTROL for Macintosh). Many applications use modifier keys to constrain the size or placement of objects.
In addition to choosing one or more modifier key options, you can select the CLICK box if you want a mouse click to occur whenever you press the tool button.
Customizing
Page 25
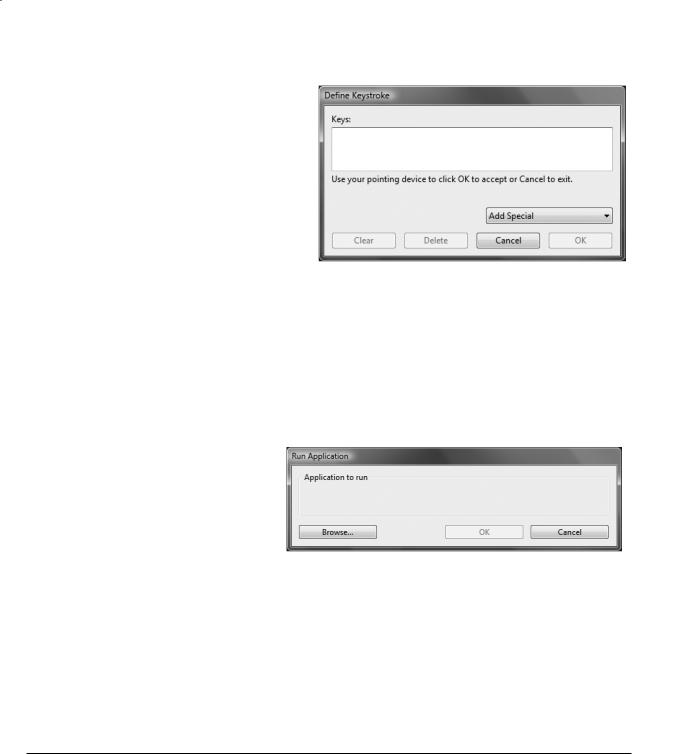
KEYSTROKE.... Enables you to simulate keystrokes. Selecting this option displays the DEFINE KEYSTROKE dialog box where you can enter a keystroke or keystroke sequence to play back.
You can manually enter a keystroke or keystroke combination in the KEYS entry box. Keystroke combinations can include letters, numbers, function keys (such as F3) and modifier keys (such as SHIFT, ALT, or CTRL for Windows, or SHIFT, OPTION, COMMAND, and CONTROL for Macintosh).
You can also select special keystrokes or keystroke combinations from the ADD SPECIAL drop-down menu.
After defining a keystroke sequence, click OK.
Important: Because the ENTER (Windows) and RETURN (Macintosh) keys can be selected as a defined keystroke, they cannot be used to select OK.You must use your pen to click on the OK button.
If prompted, enter a name for the keystroke definition. the name will be displayed with the respective control or in the Pop-up Menu list, as applicable.
|
|
|
|
Clears the |
|
Deletes only the last entry |
|
|
|||
keystroke |
|
in the keystroke entry box. |
|
entry box. |
|
|
|
OPEN/RUN.... Opens a dialog box where you can select a specific application, file, or script to launch.
Click BROWSE... to locate an application, file, or script to launch. The selection you make appears in the APPLICATION TO RUN box.
Click OK to accept the selection. The dialog box will close and the OPEN/RUN... option will be assigned as your pen button option. If your selection is for the Pop-up Menu, it will be displayed in the Pop-up Menu list.
PRESSURE HOLD. Locks the pressure at the current pressure level until the side switch is released. For example, you can paint with pressure sensitivity until you reach the brush size that you like.You can then press the switch and continue painting with the same size brush until the switch is released.
EXPOSÉ. (Macintosh.) Tiles all open windows.
DISABLED. Disables the button function.
DEFAULT. Returns a button to its default setting.
Customizing
Page 26
 Loading...