


 Loading...
Contents Index
1
USER’S MANUAL
Interactive Pen Display
Model:
DTU-1031and DTU-1031X Interactive Pen Display
Installation
Using the pen
Using and customizing the Radial Menu
Customizing the ExpressKeys
Application-specific settings
Troubleshooting
Technical support options
Contents Index
1

Interactive pen display
Contents Index
2
Interactive pen display
User’s Manual
Version 2.0, H1914
Copyright © Wacom Co., Ltd., 2014
All rights reserved. No part of this manual may be reproduced except for your express personal use.
Wacom reserves the right to revise this publication without obligation to provide notification of such changes. Wacom does its best to provide current and accurate information in this manual. However, Wacom reserves the right to change any specifications and product configurations at its discretion, without prior notice and without obligation to include such changes in this manual.
The above year indicates when this manual was prepared. However, the date of release to the users of the manual is simultaneous with the introduction into the market of the applicable Wacom product.
Wacom is a registered trademark of Wacom Co., Ltd.
Adobe and Reader are either registered trademarks or trademarks of Adobe Systems Incorporated in the United States and/or other countries. Microsoft, Windows, and Vista are either registered trademarks or trademarks of Microsoft Corporation in the United States and/or other countries. Apple, the Apple logo, and Macintosh are trademarks of Apple Computer, Inc., registered in the U.S. and other countries.
Any additional company and product names mentioned in this documentation may be trademarked and/or registered as trademarks. Mention of third-party products is for informational purposes only and constitutes neither an endorsement nor a recommendation. Wacom assumes no responsibility with regard to the performance or use of these products.
Contents Index
2

Interactive pen display
Contents Index
3
CONTENTS
About the manual
Navigating the manual
YOUR INTERACTIVE PEN DISPLAY
Pen display features
Front view
Rear view
Pen display incline options
Pen features
Pen Tether
INSTALLATION
System requirements
Step 1: Pen display installation
Step 2: Pen tablet installation
USB cable installation
Adding other display devices
WORKING WITH THE INTERACTIVE PEN DISPLAY Ergonomics
Pen display orientation Using the pen
Holding the pen Positioning Clicking Dragging
Using the pen switch
Working with pressure sensitivity Working with multiple monitors
Using the ExpressKeys
CUSTOMIZING
Opening the control panel Control panel overview
Calibrating and adjusting the pen display Customizing the pen
Adjusting tip feel and double-click Advanced tip pressure settings Customizing Pen mode and options
Customizing the ExpressKeys Function settings
Using and customizing the Radial Menu Working with Display Toggle Application-specific settings
Creating an application-specific setting Changing application-specific settings
|
Removing application-specific settings |
36 |
|
4 |
TROUBLESHOOTING |
37 |
|
5 |
|||
Testing the interactive pen display |
38 |
||
|
|||
6 |
Testing your pen |
39 |
|
7 |
Display troubleshooting |
40 |
|
7 |
General display problems |
40 |
|
8 |
Pen tablet troubleshooting |
41 |
|
9 |
General problems |
41 |
|
10 |
Windows-specific problems |
44 |
|
10 |
Macintosh-specific problems |
45 |
|
11 |
Technical support options |
47 |
|
Obtaining driver downloads |
48 |
||
11 |
|||
|
|
||
12 |
APPENDIX |
49 |
|
13 |
Caring for the interactive pen display |
49 |
|
13 |
Replacing the pen tip |
50 |
|
14 |
Using an alternate mount or stand |
51 |
|
15 |
Uninstalling the interactive pen display |
52 |
|
Managing preferences |
53 |
||
15 |
|||
Installing multiple tablets |
54 |
||
15 |
|||
Pen and digital ink capabilities in Windows |
55 |
||
16 |
|||
About the Windows Tablet PC Input Panel |
56 |
||
16 |
|||
Product information |
57 |
||
16 |
|||
Ordering parts and accessories |
57 |
||
17 |
|||
Warranty Service in the U.S.A. and Canada |
58 |
||
17 |
|||
Warranty Service Outside of the U.S.A. |
|
||
18 |
|
||
and Canada |
58 |
||
18 |
|||
GLOSSARY |
59 |
||
18 |
|||
|
|
||
19 |
|
|
Contents
3

Interactive pen display
Contents Index
4
ABOUT THE MANUAL
This document provides quick access to information about your interactive pen display. Click on a navigation button or highlighted word to move through the document. The information is common to Windows and Macintosh computers. Windows screen captures are shown, unless otherwise noted.
If you are new to electronic documentation, read navigating the manual.
•Go directly to Contents or Index topics by clicking on them.
•SMALL CAPITAL LETTERS identify the names of keyboard keys, dialog boxes, and Control Panel options.
•You can use your viewer zoom-in tool to increase the size of the page on your display screen.
•The following information is not included with this product: information about your specific computer hardware or operating system, or information about your application software. Your best source for this information is the set of manuals and discs that came with your hardware, operating system, or application.
•Many applications have built-in support for pen display features (such as pressure sensitivity). Visit Wacom’s web site to find a listing of applications that support these features (see product information).
•For information on how best to use pen display features within a specific application, see the instructions in that application’s manuals.
Wacom’s philosophy is to continually improve all of its products. As a result, engineering changes and improvements are made from time to time. Therefore, some changes, modifications, and improvements may not be covered in this document.
Contents Index
4
Interactive pen display
Contents Index
5
NAVIGATING THE MANUAL
Use the navigation controls to move through the manual:
|
Go to front page. |
Contents |
Go to table of contents. |
Index |
Go to index. |
|
Go back to previous view. |
|
Page back, or page forward. |
Adobe® Reader® provides additional tools for using and printing the manual. See the Adobe Reader help for more information.
Contents Index
5

Interactive pen display
Contents Index
6
YOUR INTERACTIVE PEN DISPLAY
This manual describes the installation and use of interactive pen display DTU-1031 or DTU-1031X.
The Wacom Control Panel enables you to customize your pen and pen display settings. To learn more, see customizing.
Pen display features
Pen display incline options
Pen features
The following information is not included with this product: information about your specific computer hardware or operating system, or information about your application software. Your best source for this information is the set of manuals and discs that came with your hardware, operating system, or application.
Note: Not all product models are available in all regions.
For illustrations of the items included with your pen display, see the Quick Start Guide included in the product box.
Contents Index
6
Interactive pen display
Contents Index
7
PEN DISPLAY FEATURES
Familiarize yourself with the features and components of your product.
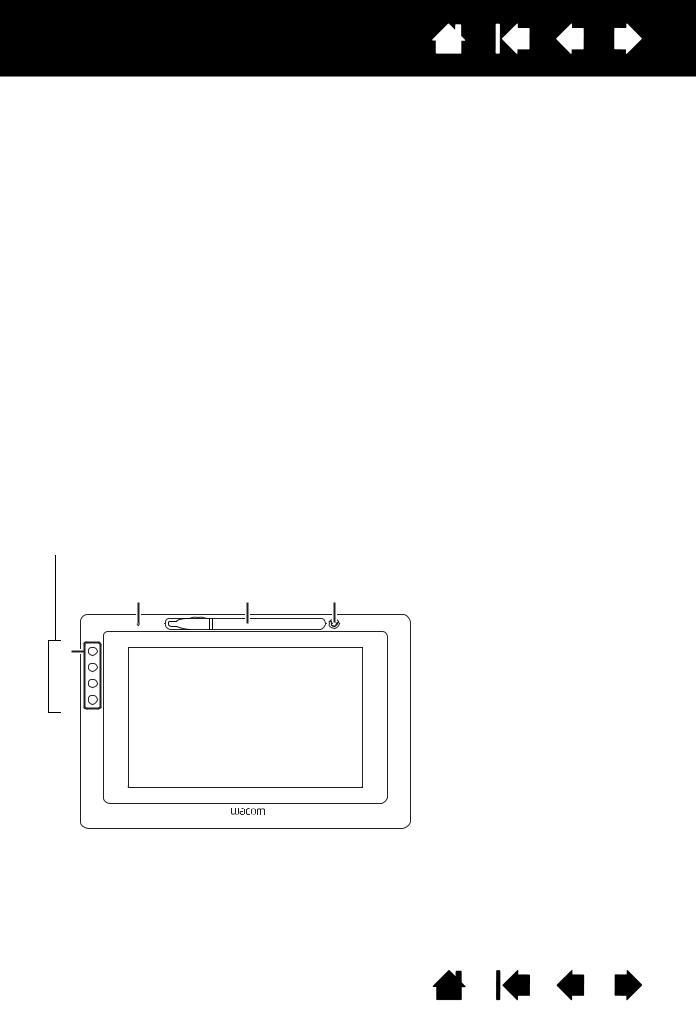
FRONT VIEW
The features of the DTU-1031 pen display are illustrated below and listed in the Pen Display Features box. See Using the ExpressKeys for descriptions and a table of default ExpressKey functions.
Note: The DTU-1031X does not have ExpressKeys.
Place the pen into the storage compartment by inserting the nib end of the pen into the left side of the compartment with the side switch up. Gently press the pen into the compartment. Take care not to damage the pen nib.
Note: The DTU-1031 pen has a side switch, and the DTU-1031X pen does not. The DTU-1031 pen can be used with the DTU-1031X. To obtain a DTU-1031 pen, please contact your Wacom representative.
To place the cover on the pen compartment, position the cover with the pen nib outline facing to the left. Align the cover with the top of the pen compartment and press the cover into place.
Remove the pen by pressing on the pen tip side near the top notch to eject the opposite end from the compartment, being careful not to damage the pen nib. Grasp the pen and remove.
The pen can also be placed upright in the pen stand, or secured to the pen display with the pen tether provided (see Pen Tether).
DTU-1031 ExpressKeys are shown as 1 through 4, from top to bottom (standard Landscape mode)
|
1 |
2 |
3 |
Pen Display Features |
|
|
|
|
|
1 |
- Status LED |
1 |
4 |
|
|
2 |
- Pen storage compartment |
|
|
3 |
- Pen stand |
||
2 |
|
|
|
||
|
|
|
4 |
- ExpressKeys |
|
3 |
|
|
|
||
4 |
|
|
|
|
|
Pen Display Orientation Options
• Landscape (shown) - ExpressKeys left
• Landscape Flip - ExpressKeys right
• Portrait - ExpressKeys top
• Portrait Flip - ExpressKeys bottom
Contents Index
7
Interactive pen display
Contents Index
8
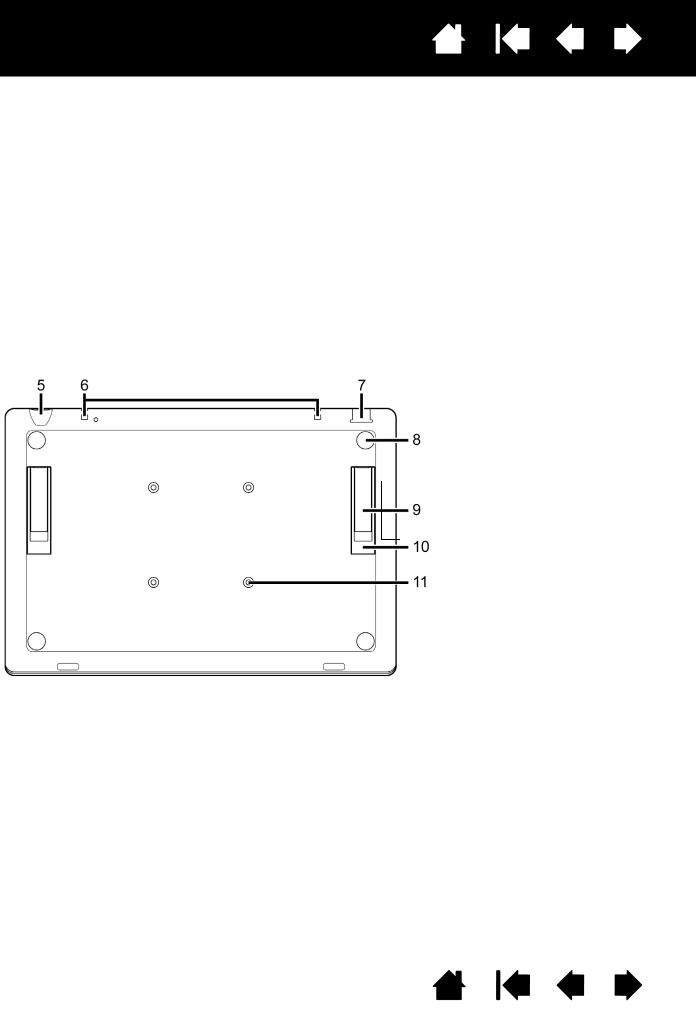
REAR VIEW
The features of your pen display are illustrated below and listed in the Pen Display Features box.
You can connect a security cable to the Security slot to prevent theft.
The pen can be secured to the pen display through the pen tether holes with the pen tether provided (see Pen Tether).
The USB port is used to connect the pen display to your computer. See Step 2: Pen tablet installation.
The leg stands can be used to incline the pen display. See Pen display incline options.
The pen display can be mounted to articulated arms or other third-party stands meeting the VESA specification for display stands. For details, see Using an alternate mount or stand.
Pen Display Features
5 - Security lock slot
6 - Pen tether holes
7 - USB port
8 - Rubber foot
9 - Short leg stand, 15 degrees (DTU-1031)
10 - Long leg stand, 20 degrees (DTU-1031)
11 - VESA mount holes
Note: The DTU-1031X has one leg stand, 18 degrees
Contents Index
8

Interactive pen display
Contents Index
9
PEN DISPLAY INCLINE OPTIONS
You may want to place the pen display flat on your desk while you work. However, stand legs recessed into the back allow you to adjust your pen display to two different angles for working and viewing. The diagram shows the location of the stand legs for the DTU-1031.
DTU-1031:
•To set the pen display to a 15-degree angle, pull out the two shorter legs.
•To set the pen display to a 20-degree angle, pull out the two longer legs. DTU-1031X: Pull out the stand legs to set the pen display to an 18-degree angle.
15° |
20° |
Contents Index
9
Interactive pen display
Contents Index
10
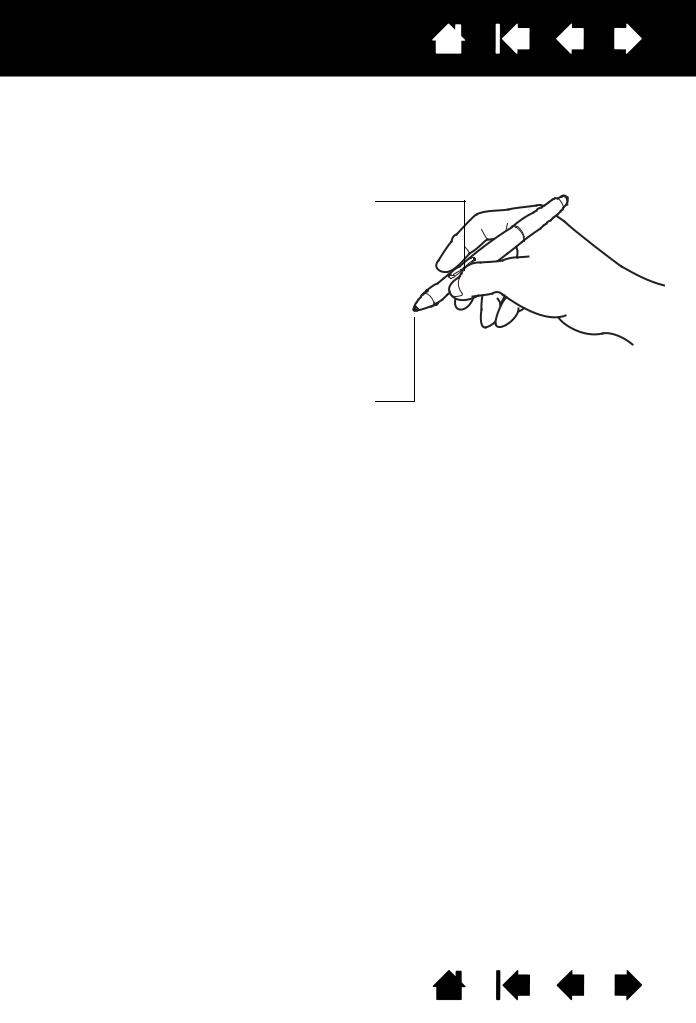
PEN FEATURES
Pen switch): Be sure the pen’s programmable switch is in a convenient location where you can toggle it with your thumb or forefinger but not accidentally press it while using the pen. You can use the switch whenever the pen tip is within proximity of the display screen surface; you do not need to touch the pen tip to the display surface.
Note: The DTU-1031 pen has a side switch, and the DTU1031X pen does not. The DTU-1031 pen can be used with the DTU-1031X. To obtain a DTU-1031 pen, please contact your Wacom representative.
Pen tip (replaceable nib): The pen is activated as soon as it is brought within proximity (5 mm/.2 inch) of the pen display screen. This allows you to position the screen cursor without touching the pen tip to the display screen.
When pressure is applied to the pen tip, the pen simulates a primary mouse button click. Tip click pressure can be adjusted in the Wacom Control Panel.
Notes:
When not in use, place the pen in the pen storage compartment or the pen stand, or lay it flat on your desk. To maintain the sensitivity of your pen, do not store it in a position where it will rest on its tip.
Place the pen into the storage compartment by inserting the nib end of the pen into the left side of the compartment with the side switch up. Gently press the pen into the compartment. Take care not to damage the pen nib.
Important: Use only a pen specified for use with your pen display. Other pens may not function properly. Also, the pen tip is specifically designed for use with the pen display. If your pen display has a coated surface, the tips on other pens could damage the pen display screen.
PEN TETHER
A pen tether to secure the pen to the pen display is provided. The pen is secured by threading the tether through the hole at the end of the pen and one of the tether holes at the top of the pen display. The attachment holes for the tether are shown in the Rear view.
Contents Index
10
Interactive pen display
Contents Index
11
INSTALLATION
The computer treats the interactive pen display as two separate devices (the display and the pen tablet). Therefore, the installation process is completed in two stages:
•First install as a display.
•Then install as a pen tablet.
Both stages require hardware and software installations and adjustments. Carefully follow ALL instructions. Important: You MUST install the Wacom driver software for correct pen-on-screen functionality.
System requirements
Step 1: Pen display installation
Step 2: Pen tablet installation
SYSTEM REQUIREMENTS
Make sure your computer meets the following minimum system requirements.
DTU-1031:
•PC. Windows 8, Windows 7, Vista™, or XP (32-bit). Available USB port and CD-ROM drive.
•Macintosh. OS X, v10.7 or greater. Available USB port, and CD-ROM drive.
DTU-1031X:
•PC. Windows 8, Windows 7, or XP (32-bit and 64-bit). Available USB port and CD-ROM drive.
•Macintosh. OS X, v10.7 or greater. Available USB port, and CD-ROM drive.
Note: Wacom recommends that you use both USB connectors to ensure adequate power for the pen display. However, your system may operate satisfactorily with just one USB connector attached to your computer.
Contents Index
11

Interactive pen display
Contents Index
12
STEP 1: PEN DISPLAY INSTALLATION
In this step, the interactive pen display is installed as a monitor on your system. In addition, a second software application will be installed to allow the pen display to work properly. The additional applications are DisplayLink for the DTU-1031, and Magic Control Technology (MCT) for the DTU-1031X.
Begin the installation by completing the first two steps below. Then follow the directions for the DTU-1031 or DTU-1031X section to install the additional application.
Important: You MUST install the Wacom software and the DisplayLink (DTU-1031) or MCT (DTU-1031X) software for correct pen-on-screen functionality. You cannot use a DTU-1031 and DTU-1031X connected to the same computer at the same time.
1.Save your work and close all open applications. Temporarily disable any virus protection programs.
2.Insert the Installation CD into your computer’s CD-ROM drive. If the software installer menu does not automatically display, double-click on the INSTALL icon located on the CD. You can also download and install the latest software driver from the Wacom website for your region.
3.Click INSTALL TABLET and follow the prompts to install the drivers for the pen display.
•On Mac OS, the DisplayLink or MCT driver will also be installed during this process.
•On Windows, the DisplayLink or MCT driver will be installed automatically when you connect your pen display to your computer for the first time.
•You can also download and install the DisplayLink driver from www.DisplayLink.com, and the MCT driver from www.wacom.com.
•See Notes 3 and 4 below for information on re-installing and uninstalling drivers.
4.Reactivate your virus protection program.
5.If you have trouble installing the pen display, see troubleshooting.
Notes:
1.Driver installation automatically activates the new pen input functions available within Microsoft Windows 8, Windows 7, Vista, and XP (except for Windows Starter and Home Basic, and Windows Vista Home Basic). User-specific preferences are supported. After logging in, each user can customize their personal settings in the Wacom Control Panel. Switching to another user will automatically load the settings for that user.
2.On the Macintosh, you must restart your computer after installing the Wacom driver.
3.If you installing the Wacom and MCT drivers on a DTU-1031X, you must first uninstall any Wacom or DisplayLink drivers already on the system. To uninstall the driver for the tablet, DisplayLink or MCT, see uninstalling the interactive pen display.
4.If you do not use the provided CD for Wacom tablet driver installation, for example if you download the Wacom driver from the Wacom website, DisplayLink or MCT will not install. You will need to download the DisplayLink driver, or the MCT driver, from the websites shown in step 3 of the procedure above, and install it separately. You can also reinstall either driver by using the Wacom Installation CD. However, on the DTU-1031X, you will need to uninstall any Wacom tablet or DisplayLink drivers before reinstalling.
5.DisplayLink does not support 64-bit Windows XP, and MCT does not support Windows Vista.
6.If the pen display does not respond properly or you lose cursor control, the pen display preferences may be corrupted. You can delete the current preference settings and return the pen display to its factory default condition. See managing preferences.
Contents Index
12
Interactive pen display
Contents Index
13
STEP 2: PEN TABLET INSTALLATION
In this step, the interactive pen display is installed as a pen tablet.
USB CABLE INSTALLATION
1.Place your pen display face-down near your computer, using a soft cloth underneath the pen display to protect the surface.
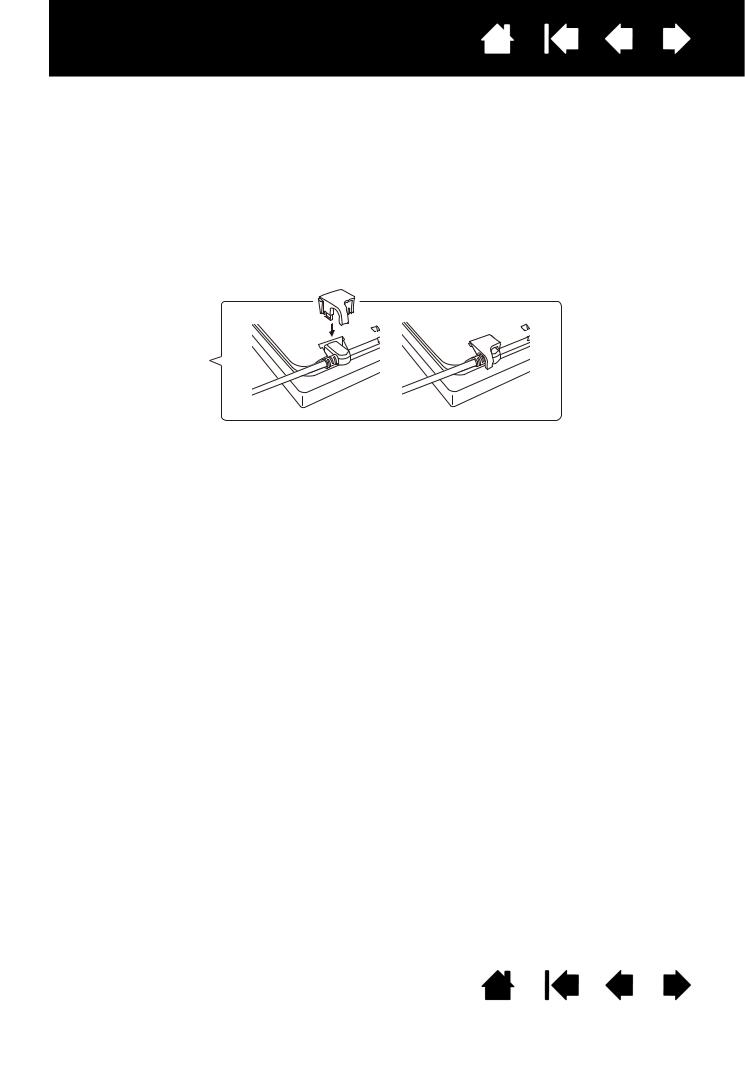
2.Plug the square end of the USB cable into the USB port of the pen display.
3.Place the USB cable attachment on the USB cable as shown, to prevent it from becoming unplugged. If you need to remove the attachment, press in on both sides of the attachment and lift up.
4.Turn the pen display face up.
5.Plug the two connectors at the other end of the USB cable into two available USB ports on your computer.
Note: Wacom recommends that you use both of these USB connectors to ensure adequate power for the pen display. However, your system may operate satisfactorily with just one USB connector attached to your computer.
6.Turn on your computer.
7.Check the status light (LED) on your pen display. When there is a connection between the computer and the pen display, the status light is dimly lit. When the computer and pen display are connected and the pen is in proximity of the display surface, the status light changes to a steady blue.
8.After completing the software installation (Step 1), make sure you can use your pen on the interactive pen display to move the screen cursor.
9.When you place the pen tip on the display screen, the screen cursor should immediately jump to a corresponding position approximately beneath the pen tip. Lift the pen tip and place it on the display screen surface in a different location. The screen cursor should again jump to the new position. This is known as absolute positioning, and enables you to position the screen cursor without having to drag your pen across the display screen surface.
10.See calibrating and adjusting the pen display to precisely align the screen cursor to the pen tip.
11.To change the brightness of the pen display, adjust the Brightness setting in the Wacom Control Panel (see Customizing).
Note: Windows: If you are using the pen display as a secondary display, you may first need to enable the pen display in your display properties Control Panel.
Contents Index
13

Interactive pen display
Contents Index
14
ADDING OTHER DISPLAY DEVICES
You can connect another display device to your computer’s VGA or DVI connector for use with the pen display. When working with more than one monitor, the pen display will map to the monitors based on how your system is configured. By default, if you are in mirror mode, the pen display will map to the entire space on each monitor.
Note: Make sure you complete the pen display installation before connecting another device to the unit.
The Display Toggle function is available for use on systems with more than one monitor. This enables you to toggle the screen cursor between the pen display and other monitors.
Refer to your hardware and operating system documentation for information on connecting other monitors to your computer and configuring your system for use with multiple monitors. Be sure to use the correct cable and connector when adding an additional device to your system.
For troubleshooting tips, see troubleshooting.
Notes for the pen display screen:
Each interactive pen display LCD panel is produced under very stringent quality standards. Production techniques cannot guarantee an absolutely perfect display, and some panels may exhibit a certain number of pixels that show an incorrect color.
If an image has fine striping (such as screen stripes), it may appear to flicker or display a moiré pattern.
Do not apply excessive pressure on the display screen surface; it may cause the appearance of a moiré or pooling pattern. If this occurs, use less pressure on the display screen when working with the pen.
When a still image is displayed for a long period of time, an after-image may remain for a short time. To prevent this, use a screen saver or other power management feature.
To extend the life of the pen display backlight, set your computer’s power management to turn off the display when it is not in use for extended periods of time.
Contents Index
14

Interactive pen display
Contents Index
15
WORKING WITH THE INTERACTIVE PEN DISPLAY
As you work with the pen display you can rest your hand lightly on the display screen, just as if it were a sheet of paper.
Because the pen display surface will be a little higher than your desk, consider adjusting the height of your desk or chair to assure comfortable use of the device.
Ergonomics
Using the pen
Working with multiple monitors
Customizing Pen mode and options
ERGONOMICS
To minimize fatigue, comfortably organize your work area. Position your pen display, the pen, and your keyboard for easy access without unnecessary reaching. The pen display and any other displays should be positioned so you can view them comfortably with a minimum of eyestrain.
•Take short breaks between tasks to stretch and relax your muscles.
•Use a gentle grip when working with the pen.
•Alternate tasks throughout the day.
•Maintain a good posture at all times. Minimize awkward postures and repetitive movements that cause discomfort.
•Change your position if you feel any discomfort due to your work position.
Tip:
The pen display can also be mounted to articulated arms or other third-party stands meeting the VESA specification for display stands. For details, see using an alternate mount or stand.
PEN DISPLAY ORIENTATION
Your pen display can be rotated for use in one of two landscape orientations, or one of two portrait orientations. These positions are listed in the Pen Display Orientation Options list (see Pen Display Orientation Options). Refer to your hardware and operating system documentation for information on setting the pen display to your preferred orientation.
Contents Index
15
Interactive pen display
Contents Index
16
USING THE PEN
The pen is cordless, battery-free, and senses the amount of pressure you apply to the tip.
Holding the pen
Positioning
Clicking
Dragging
Using the pen switch
Working with pressure sensitivity
Working with multiple monitors
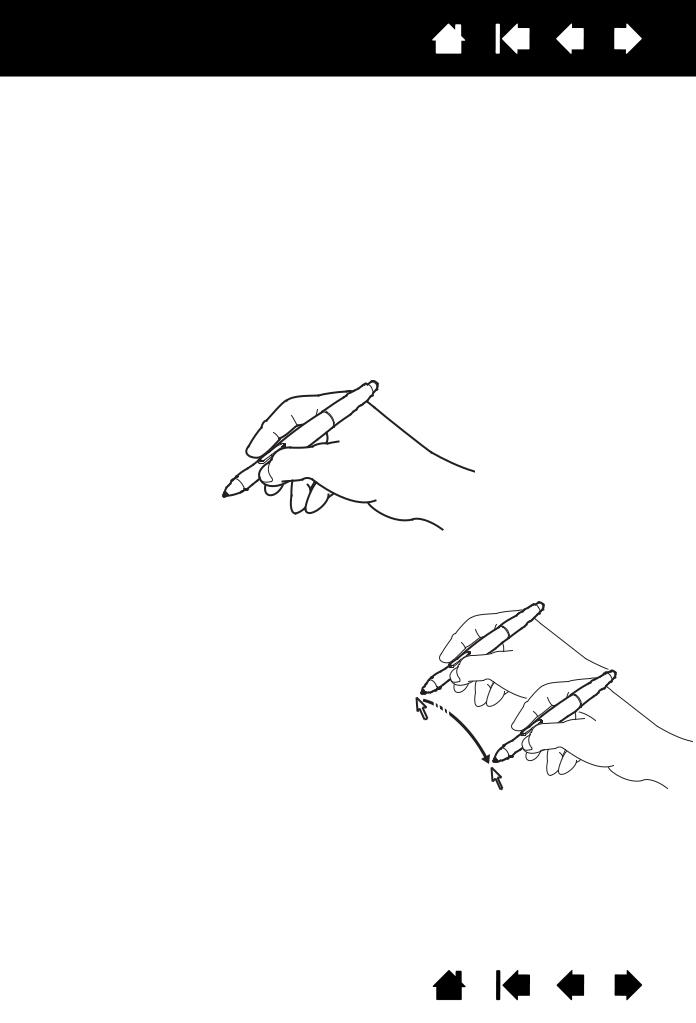
HOLDING THE PEN
Hold the pen like you would a normal pen or pencil. As you work with the interactive pen display you can rest your hand lightly on the display screen. You can tilt the pen in any way that feels most comfortable.
For information on changing the pen settings, see customizing.
POSITIONING
To position the screen cursor, move the pen slightly above the pen display screen without touching the screen surface. Press the pen tip on the display screen to make a selection.
Note: Calibrating and adjusting the pen display ensures correct alignment of the screen cursor with the pen tip. If the screen cursor does not jump to a position near the pen tip when you place the pen on the display screen, the pen display software driver may not be installed or is not loading. Re-install the driver software if necessary. Also see troubleshooting.
Contents Index
16

Interactive pen display
Contents Index
17
CLICKING
Tap the display screen once with the pen tip, or touch the pen to the display screen with enough pressure to register a click.
Windows tip: To make navigating with the pen easier, configure Windows to select when the pen is over an icon and to launch the icon with a single click. To turn on this feature, first open a folder.
For Windows 8, Windows 7 and Vista: From the ORGANIZE pull-down menu choose FOLDER AND SEARCH OPTIONS.
From the GENERAL tab select SINGLE-CLICK TO OPEN AN ITEM
(POINT TO SELECT). Note: Vista is not supported on the DTU-1031X.
For Windows XP: From the TOOLS pull-down menu choose
FOLDER OPTIONS.... From the GENERAL tab select SINGLE-
CLICK TO OPEN AN ITEM (POINT TO SELECT).
Press the switch if it is set to DOUBLE CLICK, or quickly tap the display screen twice in the same place with the pen tip. Double-clicking is easier when the pen is perpendicular to the pen display screen.
DRAGGING
Select an object, then slide the pen tip across the display screen to move the object.
Contents Index
17

Interactive pen display
Contents Index
18
USING THE PEN SWITCH
The pen has a programmable switch that can be used whenever the pen tip is within proximity (5 mm (0.2 inch)) of the display screen surface. You do not need to touch the pen tip to the display surface in order to use the switch. By default, the switch is set to RIGHT CLICK. The switch function can be modified or disabled using the Wacom Control Panel. See customizing.
WORKING WITH PRESSURE SENSITIVITY
The pen responds to the nuance and inflection of your hand movements, enabling you to create naturallooking pen strokes within applications that support this feature. To annotate and write with pressure, select a pressure-sensitive tool from your application’s tool palette. As you work on the screen surface, use various amounts of downward pressure on the tip of the pen.
WORKING WITH MULTIPLE MONITORS
When you are working with the pen display and additional monitors on the same system, the screen cursor movement on the standard monitors will depend on your system configuration.
If a second monitor is connected in mirror mode, both the pen display and the other monitor will show identical images and screen cursor movement.
If you are using the pen display with other monitors in extended monitor mode, you have the following options for navigating on the other monitors:
•Set the pen switch to the DISPLAY TOGGLE function. You can then press the switch to toggle the screen cursor between the pen display and your other displays. For example, your product can be used as a pen display (the screen cursor is positioned at the pen tip location) or toggled for use as a standard Wacom tablet (the screen cursor can be moved across the entire desktop or additional displays). See Working with Display Toggle for more information.
•Set the pen switch to MODE TOGGLE. You can then quickly switch between pen mode for working on the pen display and mouse mode for working on the other monitors.
•Set an ExpressKey to DISPLAY TOGGLE or MODE TOGGLE function.
Contents Index
18

Interactive pen display
Contents Index
19
USING THE EXPRESSKEYS
Press individual keys to perform frequently used functions or keystrokes. ExpressKeys can also be used to modify your pen properties as you work. Please note that there are no ExpressKeys on the DTU-1031X.
Default settings are shown by ExpressKey numbers, which are numbered 1 through 4 from top to bottom and shown in Front view. Use the Wacom Control Panel to set other functions for the ExpressKeys (see Customizing).
ExpressKey Number |
Function |
|
|
1 |
Radial Menu |
2 |
SHIFT |
3 |
CTRL |
4 |
ALT |
ExpressKeys can also be operated in combination with one another. When you press both keys at the same time, a combination function is initiated.
Contents Index
19
Loading...