


USER'S MANUAL
DTH-2420
About the Wacom Cintiq Pro Features of your Wacom Cintiq Pro Set up your device
Get started with your creative pen display Work with your pen
Customize your device in Wacom Tablet Properties Use On-Screen Controls as shortcuts
Access application-specific settings Multi-Touch
Wacom Desktop Center Customize Wacom Display Settings Care for your device
Technical Support About this Document

User's Manual |
2 |
|
|
Table of Contents
Table of Contents |
2 |
About the Wacom Cintiq Pro |
5 |
Included with your Wacom Cintiq Pro |
5 |
About the Wacom Cintiq Pro Engine |
6 |
Included with your Wacom Cintiq Pro Engine |
6 |
Finding more information |
6 |
Features of your Wacom Cintiq Pro |
7 |
Features of your Wacom Cintiq Pro Engine |
8 |
Use Touch Keys as shortcuts |
10 |
Set up your device |
11 |
Install the driver |
12 |
Update the driver |
12 |
Get started with your creative pen display |
13 |
Access user help |
13 |
Connect to your computer |
14 |
Install Your Wacom Cintiq Pro Engine to Create the Wacom Cintiq Pro Studio |
15 |
Calibration |
17 |
Work with your pen |
18 |
Personalize your pen with a color ring |
18 |
Specialty pens |
18 |
Use your pen |
19 |
Pen tip and eraser |
19 |
Pen buttons |
19 |
Store your pen |
20 |
Customize your pen functions |
21 |
Assign settings to the pen button and pen tip |
21 |
Customize other pen properties |
21 |
Eraser |
23 |
Replace the pen nib |
24 |
Where to find replacement nibs |
24 |
Where to find the nib replacement tool |
24 |
Use your pen with Windows Ink |
25 |
Advanced pen and eraser |
26 |
Customize your device in Wacom Tablet Properties |
27 |
What can I customize in Wacom Tablet Properties? |
27 |
Where can I access settings and other options in Wacom Tablet Properties? |
27 |
Open Wacom Tablet Properties |
28 |
Assign settings in Wacom Tablet Properties |
29 |
Example of assigning a setting in Wacom Tablet Properties |
30 |
|
2 |

User's Manual |
3 |
|
|
What settings can I assign? |
31 |
Assign keystrokes |
35 |
ExpressKeys™ |
36 |
Touch Ring |
37 |
Settings View |
38 |
Display Toggle |
39 |
Customize user options |
41 |
Use On-Screen Controls as shortcuts |
42 |
How to create and use an On-Screen Control |
42 |
On-Screen Control layouts |
42 |
Create On-Screen Controls |
44 |
Assign settings to Radial Menus and Screen Keys |
46 |
Assign settings to Keypads |
47 |
Assign On-Screen Controls |
48 |
Access application-specific settings |
49 |
Application-specific settings assigned by you |
50 |
Settings assigned by applications |
52 |
How do I know what setting is assigned? |
52 |
Settings assignments work differently for different customizable components |
52 |
Imported settings assigned by applications |
53 |
Multi-Touch |
54 |
Touch Options |
55 |
My Gestures |
57 |
Standard Gestures |
58 |
Wacom Desktop Center |
60 |
Customizing your device |
60 |
Running the Setup Wizard |
60 |
Redeeming Software |
60 |
Backing up your settings |
60 |
Backing up your files |
61 |
Updating your tablet |
61 |
Getting apps and products |
61 |
Getting Support for Wacom products |
61 |
Logging in with your Wacom ID |
61 |
Customize Wacom Display Settings |
62 |
Customize advanced Wacom Display Settings |
64 |
Wacom Display Settings - Set Color |
66 |
Care for your device |
67 |
Technical Support |
68 |
Test the creative pen display |
69 |
Test the pen |
70 |
|
3 |

User's Manual |
4 |
|
|
Diagnose issues using Wacom Tablet Properties |
70 |
Test touch |
72 |
Glossary |
73 |
Order parts and accessories |
75 |
Privacy |
76 |
About This Document |
77 |
Things to Know About User Help |
77 |
Device Features in User Help |
77 |
Trademarks |
78 |
4
User's Manual |
5 |
|
|
About the Wacom Cintiq Pro
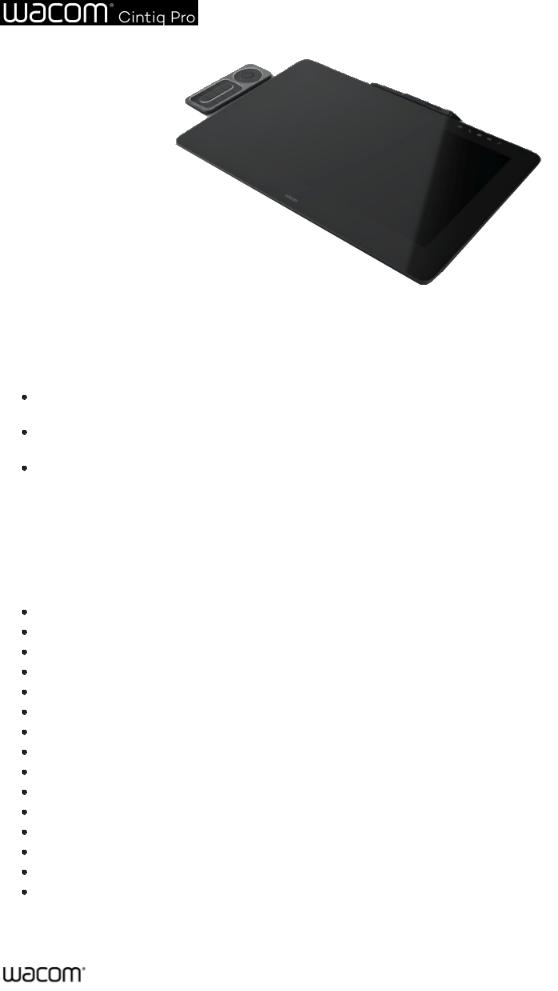
Your Cintiq Pro creative pen display helps you express yourself by allowing you to create directly on your screen.
Draw, paint, or design with the Pen included with your Cintiq Pro, or use other Wacom Pens and tools compatible with the Cintiq Pro.
Use the included ExpressKey Remote, which gives you 17 customizable ExpressKeys™ and a convenient Touch Ring, to quickly access your most-used functions.
Visit the Wacom Store to find more accessories that can help you work with the Cintiq Pro, such as a display stand or Color Manager.
Review the features of your Wacom Cintiq Pro and learn how to get started with your creative pen display.
Included with your Wacom Cintiq Pro
After unpacking your Cintiq Pro, make sure that you have the following items:
Cintiq Pro creative pen display
ExpressKey Remote with charging cable and wireless connection dongle
Wacom Pro Pen 2
Pen stand with extra nibs
Pen holder
Pen color rings
Quick Start Guide (booklet in Wacom Cintiq Pro box)
USB-A cable
USB-C cable
DisplayPort cable
HDMI cable
DisplayPort to Mini DisplayPort adapter
AC power adapter
Power cable(s)
Cleaning cloth
5

User's Manual |
6 |
|
|
About the Wacom Cintiq Pro Engine
The Cintiq Pro Engine is a creative PC module that combines with your Cintiq Pro. The result is the Cintiq Pro Studio: an all-in- one solution for creative professionals.
The Cintiq Pro and the Cintiq Pro Engine fit together easily and securely, providing fast and reliable installation.
Enjoy the Cintiq Pro Studio's sleek and compact industrial design, which gives you a minimalist workspace, free of cords and clutter.
Windows 10 Pro is pre-installed on the Cintiq Pro Studio.
The Cintiq Pro Engine is available in two performance models, giving you the option to use the model that fits your needs best.
Included with your Wacom Cintiq Pro Engine
Before assembling your Cintiq Pro Studio, make sure that you have the following items:
Cintiq Pro Engine creative PC module
Quick Start Guide (booklet in Cintiq Pro Engine box)
AC power adapter
Power cable
Panel screws (x2)
Screw tool
Finding more information
Access FAQS and other product information on the Wacom Cintiq Pro Getting Started page, or the Wacom Cintiq Pro Engine Getting Started page of the Wacom website.
Review the Important Product Information, which describes safety precautions, specifications, warranties, and the license agreement for your device, on the Wacom Desktop Center.
6
User's Manual |
7 |
|
|
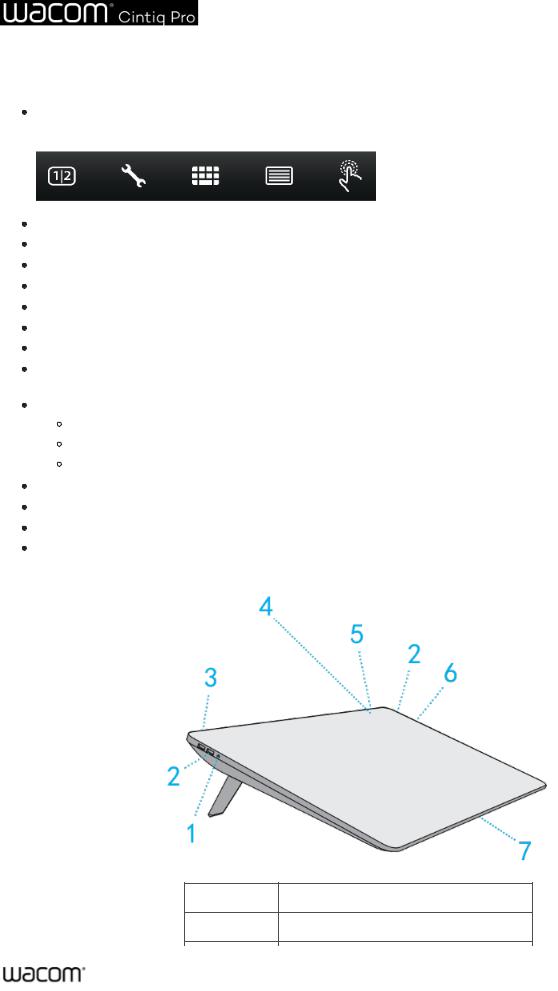
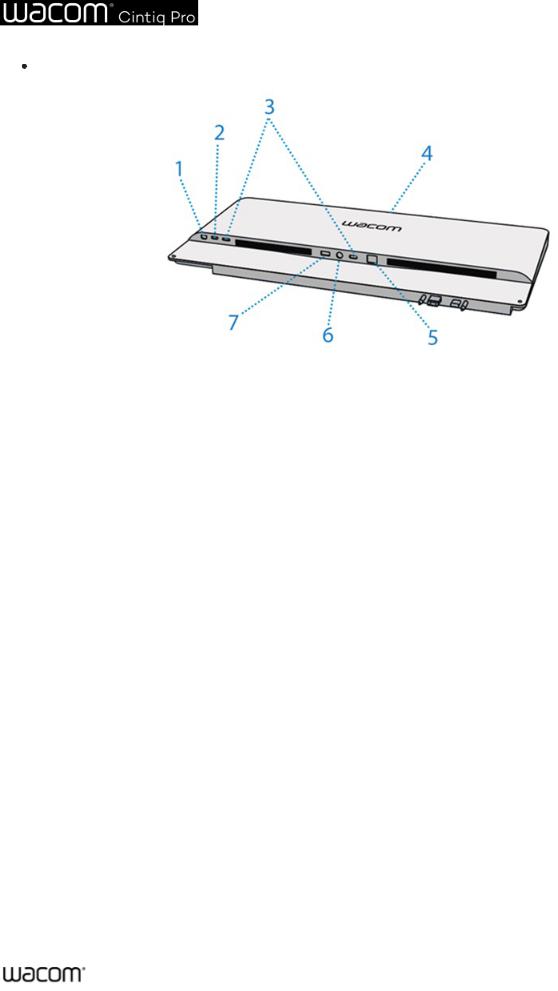
Features of your Wacom Cintiq Pro
Touch Keys: Buttons on the display which light up when you turn on the Cintiq Pro. The Touch Keys are shortcuts to commonly used utilities and functions.
USB-C port: You can use this port to attach both video and pen/touch.
DisplayPort: You can use this port to attach video.
HDMI port: You can also use this port to attach video.
Back USB-A ports: You can use these ports to attach pen/touch and your ExpressKey Remote.
Side USB-A ports: You can use these ports to attach other devices.
Headphone jack: This jack can be used to attach your headphones.
Built-in Microphone: This microphone can be used communicate and record.
Folding legs: You can unfold the legs to prop up the creative pen display at an angle for easier use. Fold in the legs for a lower angle.
Power LED: The Power LED indicates the current power state of the creative pen display.
The LED is blue when the creative pen display has full power.
The LED is orange when the creative pen display is in standby.
The LED is off when the creative pen display is off.
Power button: Press the power button to turn the device on and off.
Status LED: The Status LED lights when the Cintiq Pro has power and is communicating with the attached computer.
SD Card reader: You can insert an external SD card to transfer files.
Kensington Security Slot: This slot can be used to attach a locking cable to secure your creative pen display to a specific location, like your desk.
Number |
Item |
1Headphone jack
7

User's Manual |
8 |
|
|
2USB-A ports
3 |
Kensington Security Slot |
|
|
4 |
Touch Keys |
|
|
5 |
Power button and Power/Status LEDs |
|
|
6 |
SD Card reader |
|
|
7 |
Built-in Microphone |
Number |
Item |
|
|
1 |
USB-C port |
|
|
2 |
Power connection |
|
|
3 |
USB-A port for computer connection |
|
|
4 |
DisplayPort |
|
|
5 |
HDMI port |
|
|
6 |
USB-A port for ExpressKey Remote |
|
|
7 |
Folding legs |
|
|
Features of your Wacom Cintiq Pro Engine
The following features and connections are found on the back of your Cintiq Pro Engine. These features remain available when you install the Cintiq Pro Engine into your Cintiq Pro to create the Cintiq Pro Studio.
Two USB-C ports: You can use these ports to attach additional displays or other devices.
Mini HDMI port: You can use this port to attach additional displays.
Mini Display port: You can use this port to attach additional displays.
LAN/Ethernet: You can use this port for a wired network connection.
8
User's Manual |
9 |
|
|
Power button: Press the power button to turn the device on and off.
Number |
Item |
|
|
1 |
Mini DisplayPort |
|
|
2 |
Mini HDMI port |
|
|
3 |
USB-C port |
|
|
4 |
Power button and Power/Status LEDs |
|
|
5 |
LAN/Ethernet port |
|
|
6 |
Cintiq Pro Engine power connection |
|
|
7 |
Cintiq Pro power connection |
|
|
9

User's Manual 10
Use Touch Keys as shortcuts
You can tap the Touch Keys to use them as shortcuts to specific functions. The Touch Keys light up across the top of the creative pen display when you turn it on.
Video Input Source:
Tap to switch between the display inputs attached to your creative pen display.
Wacom Desktop Center:
Tap to open the Wacom Desktop Center to customize and manage your device. Tap it again to close it.
Toggle Keyboard:
Tap to display the on-screen keyboard. Tap it again to close it.
Wacom Display Settings:
Tap to open Wacom Display Settings to adjust display settings such as brightness and sharpness. Tap it again to close it.
Touch On/Off:
Tap to turn on touch. Tap it again to turn touch off. Pen-only models do not have this touch key.
10
User's Manual 11
Set up your device
1.First, follow the directions in this section of user help. The Quick Start Guide included in the box contains images that can help.
Attach any stands that are included with your device.
Set up your work area.
2.After you set up your device, follow the directions in the Get started section of this user help so you can start using your device.
Connect your device to your computer.
Install the driver.
11

User's Manual 12
Install the driver
Important: You must install the driver for your device to work properly, unless your device comes with a pre-installed driver. Refer to the Quick Start Guide to discover if your device has a pre-installed driver or not.
1.Go to the Wacom drivers page.
2.Click Download next to the latest driver that corresponds to your computer's operating system.
3.Follow the prompts to finish the driver installation.
Update the driver
Updated drivers are available on the Wacom Desktop Center and at the Wacom drivers page periodically. Check in and update regularly so that your device has the latest features and functionality.
From the Wacom Desktop Center, select Updates, and then click the update to install it.
If the Wacom Desktop Center is not available for your device, go to the Wacom drivers page to find the latest updates.
Note: Your device will not work if you uninstall the driver. If you uninstall the driver, reinstall the latest driver from the drivers page so that your device works again. If the driver is reinstalled, your device will revert to default settings.
12

User's Manual 13
Get started with your creative pen display
The Quick Start Guide included in the box with your device contains images that can help you to set up your pen display.
1.Connect your device to your computer.
2.Install the driver software on your computer.
Access user help
You can access user help topics directly from Wacom Tablet Properties. When you click the ? icon, you are directed to a help topic about the feature you are currently using.
You can also open user help from the Wacom Desktop Center Help menu.
You also can access user help from the Product Manuals page of the Customer Support website.
Notes:
User help is common to Windows and Mac computers. Screenshots are from a Windows computer, unless otherwise noted.
Information about your specific computer hardware, operating system, and application software is not included. Refer to the product information provided with those products.
13
User's Manual 14
Connect to your computer
Complete the following steps to setup your
Wacom Cintiq Pro:
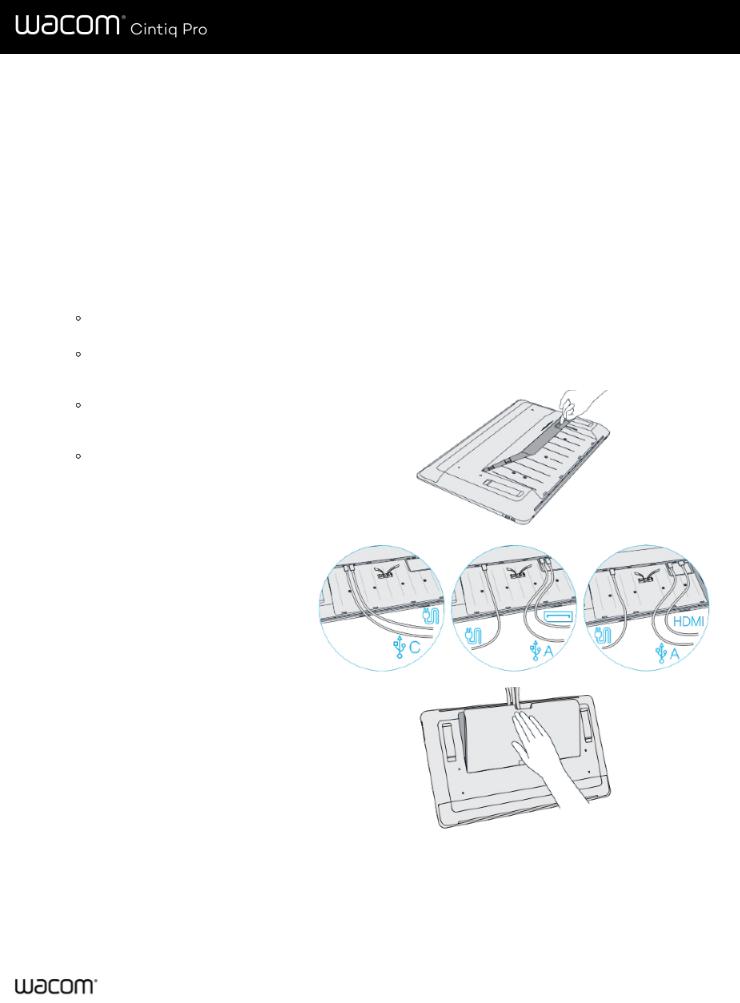
1.Gently lay the Cintiq Pro face down on a flat surface clear of debris.
2.Remove the back cover by pulling it away at the cable opening.
3.Connect your device to a power source using the power cable and AC adapter.
4.Determine what ports are available on your computer and attach your Cintiq Pro:
USB-C: Attach the USB-C cable from your computer to the Cintiq Pro.
DisplayPort: Attach the DisplayPort cable and the USB-A cable from your computer to the Cintiq Pro.
HDMI: Attach the HDMI cable and the USB-A cable from your computer to the Cintiq Pro.
Other: To function correctly both data and video cables must be attached from your computer to the Cintiq Pro. Data is communicated by the USB connection. If you have none of the above video connections available you may be able to purchase a converter which will allow you to connect video. Please contact Customer Support if you need assistance.
5.Bundle the cables with the attached cable ties.
6.Reattach the back cover, allowing the cables to pass through the cable opening.
7.Gently flip the Cintiq Pro so that it is face up and positioned for use.
8.Confirm your computer is on, and then turn on your Cintiq Pro by pressing the power button.
9.You must install the driver for pen & touch to function on your Cintiq Pro.
10.Your Cintiq Pro should now be functional. Check Testing the Creative Pen Display if you are not seeing input from pen and touch.
11.Wacom recommends that you click UPDATES in the Wacom Desktop Center to check for updates for the Wacom device driver and firmware.
14
User's Manual 15
12.A short tutorial to help you learn about and understand your Cintiq Pro is available in the Tutorials section of the Wacom Desktop Center.
13.Access FAQs and other product information on the Wacom Cintiq Pro Getting Started page of the Wacom website.
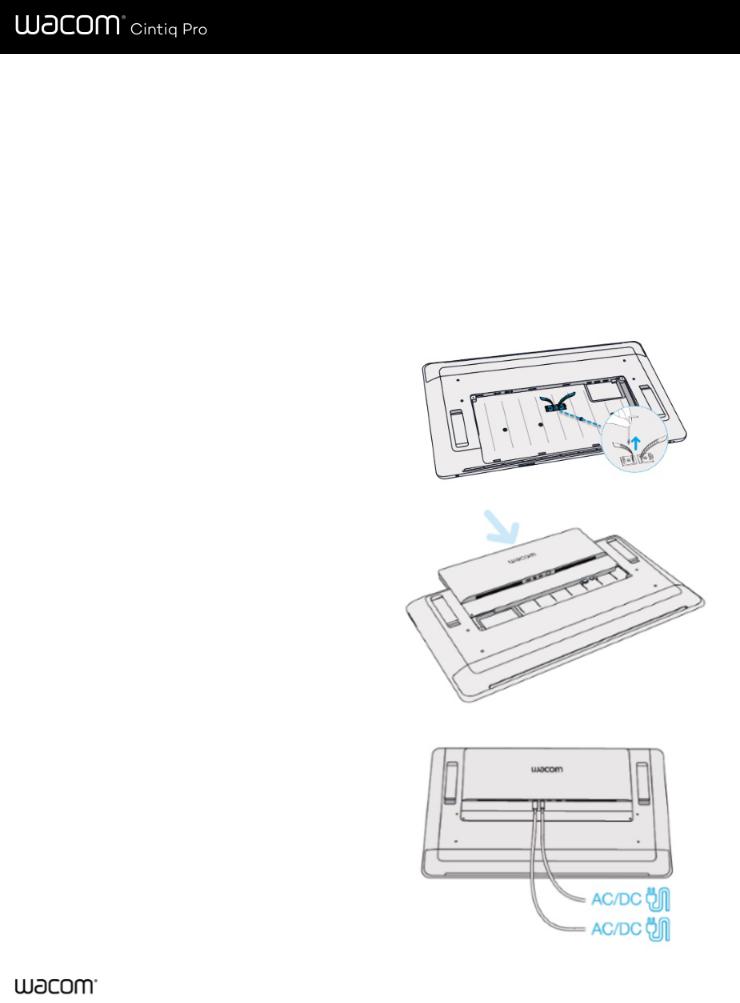
Install Your Wacom Cintiq Pro Engine to Create the Wacom Cintiq Pro Studio
The Cintiq Pro combines with the optional Cintiq Pro Engine to create the Cintiq Pro Studio. Complete the following steps to set up your Cintiq Pro Studio:
1.Gently lay the Wacom Cintiq Pro face down on a flat surface clear of debris.
2.Remove the back cover by pulling it away at the cable opening.
Note: Before proceeding, ensure there are no wired connections to your Cintiq Pro, including removing the power cable, AC adapter, and all USB connections. All ports on the back of your Cintiq Pro must be open for proper installation of the Cintiq Pro Engine.
3.Use the provided tool to remove the screws securing the attached cable ties, and then remove the cable ties.
4.Gently insert the Cintiq Pro Engine into the Cintiq Pro, using the guide rails to ensure proper alignment.
5.Use the provided tool to tighten the two screws securing the Cintiq Pro Engine to the Cintiq Pro.
6.Connect the Cintiq Pro power cable to the Cintiq Pro Engine.
7.Connect the Cintiq Pro Engine power cable to the Cintiq Pro Engine.
8.Gently flip your Cintiq Pro Studio so that it is face up and positioned for use. If desired, extend the stand legs to position your Cintiq Pro Studio at an angle.
9.Turn on your Cintiq Pro Studio by pressing the power button.
10.Your Cintiq Pro Studio should now be functional. Check Testing the Creative Pen Display if you are not seeing input from pen and touch.
11.Wacom recommends that you click UPDATES in the Wacom Desktop Center to check for updates for the Wacom device driver and firmware.
12.A short tutorial to help you learn about and understand your Cintiq Pro Studio is available in the Tutorials section of the Wacom Desktop Center.
13.Access FAQs and other product information on the
15

User's Manual 16
Wacom Cintiq Pro Studio Getting Started page of the
Wacom website.
16
User's Manual 17
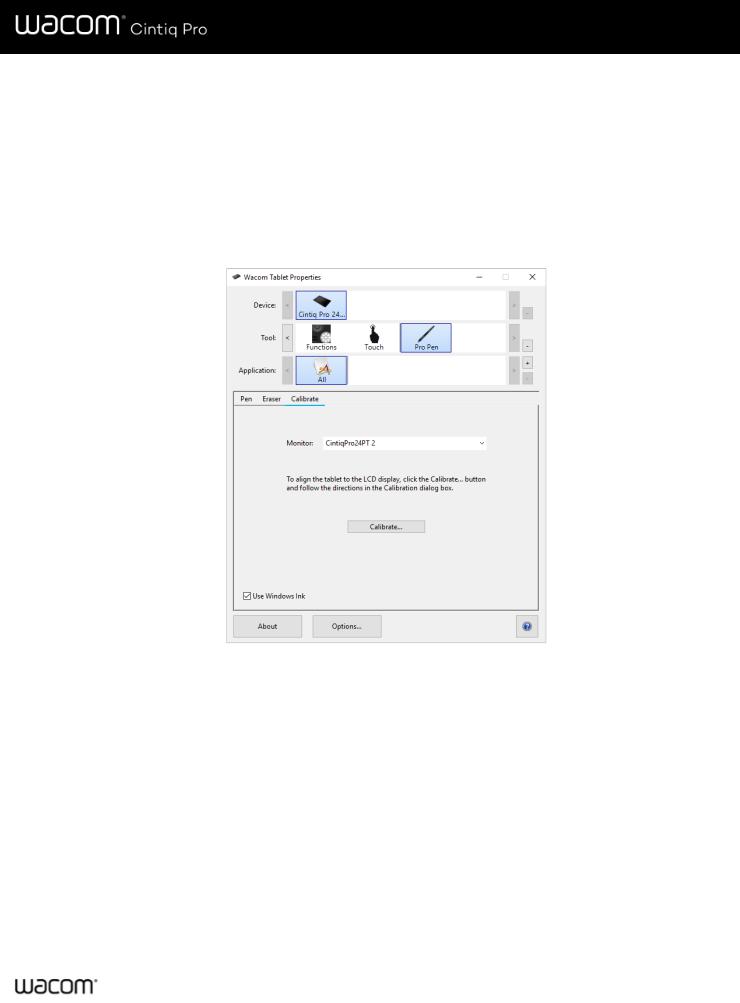
Calibration
For optimum performance, calibrate your pen display to align the screen cursor with the position of the pen on the screen. This is required to compensate for viewing angle, and to adjust for parallax.
1.Set up your pen display in its working position.
2.Open Wacom Tablet Properties. If more than one pen display is installed on your system, select the one you are working with from the Device list.
3.Select a pen from the Tool list.
4.Select the Calibrate tab.
The above screenshot isfor descriptive purposes; it may not match your screen.
5.If you are working with multiple monitors, select the monitor corresponding to your pen display from the dropdown menu.
6.Click Calibrate... to activate the calibration screen.
7.Holding the pen, sit or stand as you normally would when working with the pen display. Use the pen tip to click on the center of the crosshairs in the upper-left corner.
8.Click on the center of the crosshairs that are displayed in the remaining corners.
9.Test the alignment by positioning the pen at a few different points on the display.
10.Click OK to accept the calibration, or Try Again to recalibrate.
17
User's Manual 18
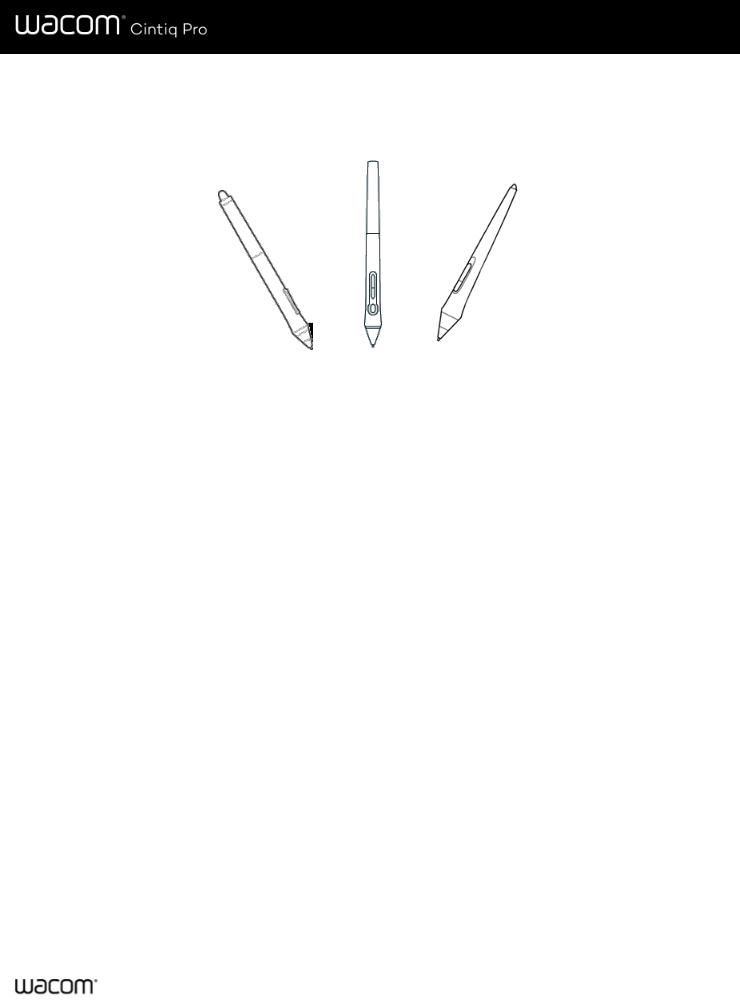
Work with your pen
All pen tablets and pen displays include a cordless, battery-free pen that you use to interact with your device. You can hold, write, and draw as you normally would with a pen or pencil.
Pen stylesvary depending on the pen tablet or pen display that you purchased.
Personalize your pen with a color ring
If your pen includes color rings, you can use them to identify and personalize your pen.
1.Unscrew the cone near the pen tip.
2.Remove the color ring that is already on the pen and slide on your preferred color ring.
3.Replace the cone.
Specialty pens
Pens designed for more advanced work, such as the Wacom Pro Pen 3D, Art Pen, or Airbrush, can be used with many pen tablets and pen displays.
To discover other pens and tools that can be used with your pen tablet or pen display, go to the Wacom Store.
18

User's Manual 19
Use your pen
Use your pen to interact with your device. This includes drawing, writing, or moving items, and activating settings that you assign to pen buttons.
Tips:
Hold the pen as you would normally hold a pen or pencil. Adjust your grip so that you can press any pen buttons easily with your thumb (recommended) or index finger without accidentally pressing it.
To make it easier to access tools in applications like Adobe Photoshop, assign modifiers, such as Alt and Ctrl, to your pen buttons so that you do not have to use your keyboard keys.
 Important: You can customize user options that change the way your pen works with your device. Try both Pen Button modes to see which works best for you.
Pen tip and eraser
Draw or sign: Draw or sign with the pen tip directly on the device surface.
Note: Pens are pressure-sensitive, so the harder you press, the thicker your lines and the denser the color.
Move the cursor: Move the pen while holding it slightly above the device without touching the screen surface.
Double-click: Quickly tap the screen twice in the same place with the pen tip.
Erase: Flip the pen to the side opposite the pen tip and move the eraser over the area you want to erase, just as you would use the eraser on a pencil.
Note: Some pens do not have an eraser.
Select an item: Tap the screen once with the pen tip.
Move an item: Select the item with the pen tip, then slide the pen tip across the screen to move it.
Pen buttons
Use pen buttons as shortcuts to settings. You can view and change the assigned settings on the Pen tab in Wacom Tablet Properties.
Note: Some pens do not have buttons.
You activate settings differently depending on your Pen Button mode.
If your Pen Button mode is Hover Click, then hold the pen tip slightly above the surface of your device and press the button.
If your Pen Button mode is Click & Tap, then touch the device surface and press the pen button.
If your pen has a long, thin button, press the upper part of the button for one setting and the lower part for another.
19
User's Manual 20
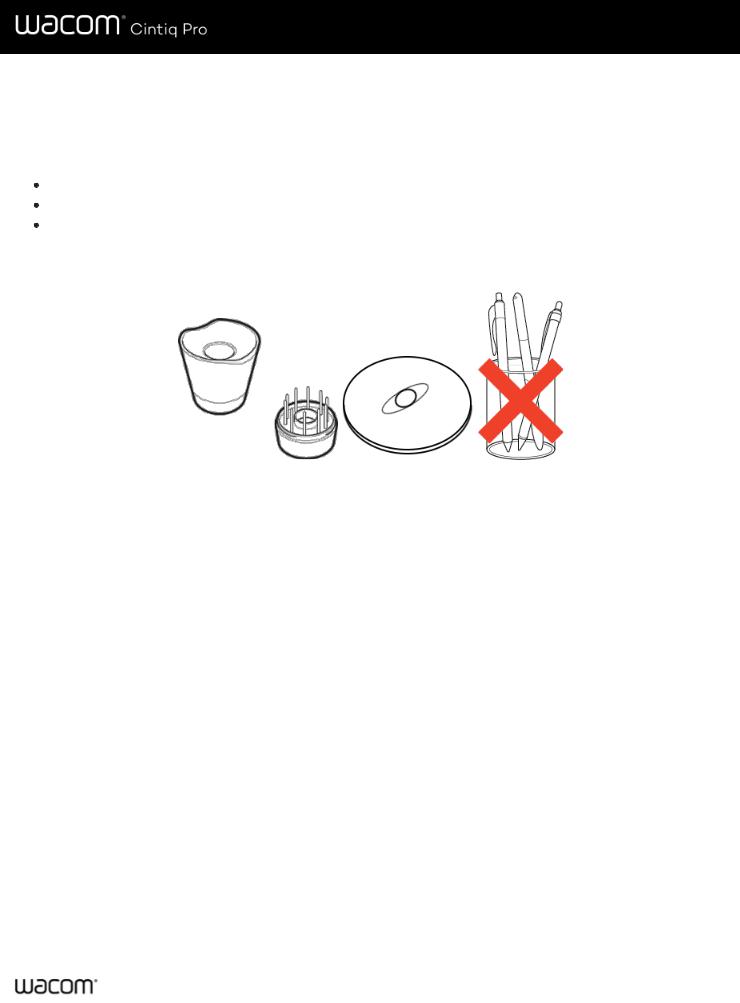
Store your pen
Store your pen properly keep it in good condition and help the pen tip last longer.
 Important: Store your pen so there is no pressure on the pen tip or eraser.
If your device has a pen stand, store the pen with the tip down in the stand.
If your device included a pen case, store the pen in the pen case.
If your device has a pen sleeve, holder, or tray, the pen can be stored there.
Tip: Do not leave the pen on the device when you are not using the pen. This might cause issues when you are using a mouse and might prevent your computer from going to sleep.
Pen standsvary depending on the pen tablet or pen display that you purchased.
20
User's Manual 21
Customize your pen functions
Customize your pen functions by assigning settings to pen buttons, adjusting the pen tip feel and pressure, and selecting how you perform a right-click.
Note: Some pens do not have buttons or an eraser.
Assign settings to the pen button and pen tip
1. Open Wacom Tablet Properties.
Note: The options available in Wacom Tablet Properties will vary depending on your device.
2.If there is a Tool row, select your pen.
3.Select the Pen tab.
4.For each of the pen buttons, select the setting you want from the drop-down menu next to the pen.
5.For the pen tip, double-click the pen tip in the image to display a drop-down menu. Then, select a setting for the pen to perform when you tap the tablet surface with it.
 Warning: The tip must be set to Click in order to draw for most graphics applications.
The above screenshot isfor descriptive purposes; it may not match your screen.
Customize other pen properties
Tip Double Click Distance: To change the distance between your pen and the tablet surface during a double-click, move the slider.
Current Pressure: To see how hard you need to press with the pen, check your Current Pressure by pressing down with the pen tip or eraser in an empty area of the Wacom Tablet Properties window.
21

User's Manual 22
If you want to change the amount of pressure you need to use the pen tip or eraser, move the Tip Feel and Eraser Feel sliders.
Options: To select the way you right-click with the pen, click Options and select a different Pen Button Mode.
Tilt Sensitivity: To change how much the tilt of your hand affects your pen strokes, drag the slider. Open an application that supports tilt to test while you are adjusting, so you can see how your changes affect your strokes.
Pen Feel Details: To change the tip sensitivity, click Customize and adjust advanced pen and eraser options.
Tips:
Set the pen tip to Click and one of the pen buttons to Double-Click.
If you want a narrower range of pressure values in a pressure-sensitive application, select a soft Tip Feel.
If the pen overreacts to slight pressure, try a firmer Tip Feel setting.
If you notice a delay at the beginning of brush strokes, inking strokes, or drag actions, try a smaller Tip Double Click Distance or set a pen button to double-click instead of the pen tip.
You can return the pen to default settings by going to the Pen tab in Wacom Tablet Properties and clicking Default.
22

User's Manual 23
Eraser
Select the Eraser tab to adjust eraser sensitivity.
The above screenshot isfor descriptive purposes; it may not match your screen.
Use the Eraser Feel slider to customize the amount of pressure needed to erase.
From the Erase dropdown menu, select the function to perform when using the eraser.
Click Customize to further adjust the eraser sensitivity.
With your screen cursor positioned over an empty area of the control panel, press down on the Current Pressure bar with the eraser to determine pressure levels.
23

User's Manual 24
Replace the pen nib
Tip: Replace your pen nib when it is approximately 1 mm (1/25 inch) or has a sharp edge.
1. Grab the old nib and pull it out of the pen.
You can use the nib removal tool or the hole in the stand, case, or pen end, depending on what was included with your device.
Nib removal tool |
Hole in stand or case |
2. Get a replacement nib and slide the end of the new nib straight into the barrel of the pen.
3. Push the nib in slowly and firmly until it stops.
Where to find replacement nibs
The extra nibs are stored in different places for different devices. First, look in the box that your device was packaged in. If you do not see the nibs there, try these places.
If your device included a pen case, check there.
If your device has a removable compartment cover on the back, slide it open.
If your device included a pen stand, unscrew the pen stand.
Tip for the Pro Pen 2 stand: To screw the stand back together, line up the dots on the bottom of the stand and the recess. Then, gently guide the bottom of the stand to the right until you feel it click into place.
If you need more nibs, you can purchase them from the Wacom Store.
Where to find the nib replacement tool
For some devices, the nib replacement tool is a metal ring included with your device.
Otherwise, use the small hole in pen stands and cases as the nib removal tool.
Pen standsvary depending on the pen tablet or pen display that you purchased.
24
 Loading...