


Installation Guide & Hardware Manual for Cintiq 21UX (DTZ-2100D)

Wacom Cintiq® 21UX
Installation Guide & Hardware Manual for Cintiq 21UX (DTZ-2100D) English version 2.2, November 05, 2007
Copyright Wacom Co., Ltd., 2007
All rights reserved. No part of this manual may be reproduced except for your express personal use. Wacom reserves the right to revise this publication without obligation to provide notification of such changes.
Wacom does its best to provide current and accurate information in this manual. However, Wacom reserves the right to change any specifications and product configurations at its discretion, without prior notice and without obligation to include such changes in this manual.
DuoSwitch is a trademark, and Cintiq and Wacom are registered trademarks of Wacom Co., Ltd.
Photoshop is either a registered trademark or a trademark of Adobe Systems Incorporated in the United States and/or other countries. Microsoft, Windows, and Vista are either registered trademarks or trademarks of Microsoft Corporation in the United States and/or other countries. Apple, the Apple logo, and Macintosh are trademarks of Apple Computer, Inc., registered in the U.S. and other countries.
Any additional company and product names mentioned in this documentation may be trademarked and/or registered as trademarks. Mention of third-party products is for informational purposes only and constitutes neither an endorsement nor a recommendation. Wacom assumes no responsibility with regard to the performance or use of these products.
ExpressKey is a registered trademark of Ginsan Industries, Inc., and is used with permission.

INTRODUCTION AND OVERVIEW
The Wacom® Cintiq® 21UX pen display combines the benefits of a Liquid Crystal Display (LCD) with the control, comfort, and productivity of Wacom’s cordless, battery-free pen technology. This gives you a direct pen-on-screen interface for your computer.
Cintiq’s basic components include a Wacom pen tablet internally mounted behind a 21.3" diagonal TFT color display, and Wacom’s Grip Pen.
Cintiq comes with a modular display stand, which allows you to easily rotate the pen display to any orientation, and to adjust the incline of the working surface to any angle between 10 and 65 degrees. Please refer to Working with your Cintiq on page 24 for more information.
This manual describes how to install the Cintiq hardware and software. It also describes how to use Cintiq, the Grip Pen, and the modular display stand.
See Unpacking your Cintiq on page 8 before setting up the Cintiq stand or unpacking the Cintiq pen display. Please follow all instructions carefully.
The computer treats the Cintiq pen display as two separate devices (the display and the pen tablet). Therefore, the installation process is completed in two stages:
•First install the Cintiq as a display.
•Then install the Cintiq as a pen tablet.
Both stages require hardware and software installations and adjustments. Please follow all instructions carefully.
IMPORTANT:You MUST install the Wacom pen tablet driver software for correct pen-on-screen functionality.
To learn about using the Wacom Tablet control panel to customize your pen display tablet and pen settings on Windows or Macintosh computers, see Customizing on page 32.
To use the pressure sensitivity of the Grip Pen with your favorite drawing application, see the instructions in that application’s manuals.
The following kinds of information are not included with this product: information about your specific computer hardware or operating system, or information about your application software. Your best source for this information is the set of manuals and discs that came with your hardware, operating system, or application.
Wacom’s philosophy is to continually improve all of its products. As a result, engineering changes and improvements are made from time to time. Therefore, some changes, modifications, and improvements may not be covered in this manual.
Introduction and overview
Page 1
PRECAUTIONS ON USE AND HANDLING
To ensure the safe usage of your product, be sure to follow all instructions, cautions, and warnings found within this manual. Failure to do so could cause the loss of data or damage to your computer. Failure to do so could also void your warranty, in which case Wacom shall have no responsibility to repair or replace the product.
WARNING This symbol indicates an item that, if disregarded, may lead to loss of human life or serious injury.
CAUTION This symbol indicates an item that, if disregarded, may lead to human injury or damage to personal property.
Exercise due care and diligence whenever engaging in a described action.
PHYSICAL LOCATION
WARNING Do not use the Cintiq pen display in a facility control system that requires extremely high reliability; it may cause other electronic devices to malfunction, or other devices may cause the pen display tablet to malfunction. Where use is prohibited, power off Cintiq to prevent the possibility of it causing other electronic devices to malfunction. Wacom does not accept any liability for direct or consequential damages. For details, please refer to your Warranty located at the end of this manual.
ENVIRONMENT
Temperature and Humidity
•Operating temperature and humidity: 5˚ to 35˚C, 20 to 80% RH
•Storage temperature and humidity: -10˚ to 60˚C, 20 to 90% RH
CAUTION Do not use or store Cintiq where:
• Temperature changes are severe or exceed specifications (e.g., outdoors or inside
a vehicle).
•The pen display, the Grip Pen, and the Cintiq stand are exposed to direct sunlight or heat from an appliance, or are exposed to water or any other kind of liquid.
 CAUTION Do not use Cintiq in a dusty environment; this may damage the unit.
Precautions on use and handling
Page 2

USAGE
WARNING Only use the power adapter that came with Cintiq. If a different type of power adapter is used, Cintiq will not work properly or may be damaged. Using a different type of power adapter also has the potential to result in fire. Use of a different power adapter will void your warranty.
 CAUTION Be sure to use a grounded power source when applying power to Cintiq.
 CAUTION Do not connect or disconnect the video or power cables while Cintiq or your computer
 are turned on; this may damage the display or computer video card. In this case, Wacom shall have no responsibility to repair or replace the product.
CAUTION This product is for use with a DVI or VGA video card; using an inappropriate video card may damage Cintiq.
 CAUTION Do not block the rear panel ventilation holes; this may overheat and damage the unit.
When not using Cintiq for long periods of time, unplug the power adapter from the AC outlet.
HANDLING
WARNING High Voltage. Do not open or disassemble the Cintiq pen display. There is a risk of electrical shock when the casing is open. This will also void your warranty and Wacom shall have no responsibility to repair or replace the product.
WARNING Do not operate the display stand incline adjustment levers when Cintiq is not mounted on the stand, and do not lift the stand by the adjustment levers; the stand is springloaded and may cause injury or damage if released without the weight of Cintiq on the stand. Improper operation may lead to physical injury or damage to the stand.
WARNING When moving Cintiq to a different location, either remove the display unit from the
stand (see page 13 for details) and then move both items separately, use the lock screws to fix Cintiq to the stand (see page 56 for details), or hold onto both Cintiq and the stand to make sure that the stand does not separate from the display unit when moving them together.
Before moving Cintiq, first adjust the stand to its full upright position; this will reduce the spring tension so that the stand will not accidentally release and snap shut. If the display unit is in landscape orientation, use one hand to grasp the bottom of the display and with your other hand grasp the back of the stand. Be sure to lift on both the display and the stand so that the stand will not separate from the display when moving Cintiq.
If Cintiq is in portrait orientation or has been locked to the stand with the rotation lock screws (see page 56), the stand will not separate from the display unit and Cintiq can be safely lifted by grasping the display unit with both hands.
Always follow the instructions on page 13 to remove the display unit from the stand.
WARNING If the LCD screen has been damaged, DO NOT touch any liquid that may be leaking from it; this liquid is an irritant. In case of contact with skin, eyes, or mouth, rinse immediately with running water for at least 15 minutes or more. If contact is made with the eyes or mouth, also consult a physician.
Precautions on use and handling
Page 3
WARNING
Hg
– LAMP(S) INSIDE THIS PRODUCT CONTAIN MERCURY AND MUST BE RECYCLED OR DISPOSED OF ACCORDING TO LOCAL, STATE OR FEDERAL LAWS.
The Cintiq pen display has a backlight which contains mercury (Hg).
Be sure to dispose of properly, and to manage any disposal of this unit in accordance with your local ordinances and laws.
WARNING Do not disassemble the Cintiq stand. Improper disassembly could result in physical injury or damage to the stand. In this case, Wacom shall have no responsibility to repair or replace the product.
WARNING Prevent children from swallowing the pen tip or side switch. The pen tip or side switch may accidentally be pulled out if children are biting on them.
CAUTION Do not disassemble the Grip Pen. This may cause the device to malfunction. In this case, Wacom shall have no responsibility to repair or replace the product.
CAUTION Do not scratch the display screen. Avoid placing sharp objects on the display screen surface.
CAUTION Avoid intensive shock or vibration to Cintiq, the Cintiq stand, or the Grip Pen. Hitting or dropping Cintiq may damage the display screen or other components.
CAUTION Do not put heavy articles on the pen display or push against it with a strong force; this may damage the display screen or break the Cintiq stand locking mechanism.
CAUTION Do not place heavy articles on the Cintiq cabling, repeatedly bend the cables sharply, or apply heavy stress to the cable connectors; this may damage the unit or cabling.
CAUTION Do not store the pen display tablet on a surface that would excessively bend or crimp the cable.
CAUTION If the pen tip becomes sharp or angular, it may damage the coating on the display screen. Please replace the pen tip if necessary.
CAUTION Do not use any organic solvent (e.g., alcohol) or even mild detergent to clean the display screen. Use of these cleaners can damage the coating on the screen.
Please note that damage of this kind is not covered by the manufacturer's warranty.
•To clean the display screen, use an anti-static cloth or a slightly damp cloth.
When cleaning, apply only a light amount of pressure to the display screen and do not make the surface wet.
•To clean the Cintiq casing, Cintiq stand, or Grip Pen, use a soft cloth with mild detergent (such as dish washing liquid) diluted with water.
•Before cleaning, always disconnect your product from the AC power source.
CAUTION Do not expose Cintiq to high voltage electrostatic discharges or to a build-up of an electrostatic charge on the LCD screen. This may result in a temporary discoloration and blotching of the display. If discolorations occur, leave the display on and the discolorations should disappear within a few hours.
Precautions on use and handling
Page 4

Reuse, recycling and recovery. You are urged to recycle this product when replacing it with a newer product or when it has outlived its useful life by bringing it to an appropriate collection point for recyclable materials in your community or region. By doing this, you can help improve the environment of your community as well as minimize the potential negative effects created, should any hazardous substance that may possibly be present within waste material reach the environment during the disposal process.
Within the European Union, users are required not to dispose of Waste Electrical and Electronic Equipment (WEEE) as unsorted municipal waste, according to the Directive 2002/96/EC of the European Parliament and of the Council of 27 January 2003, or the corresponding local laws of the Member States. Products for which this is applicable will be marked with the WEEE symbol shown at the beginning of this note unless this is not feasible because of the size or the function of the product. Wacom products are subject to the Directive 2002/96/EC and therefore you should always collect them separately and bring them to the appropriate collection point in your community or region.
Wacom pen display products (Cintiq series) comply with the European Union RoHS Directive 2002/95/EC (RoHS Directive).
Precautions on use and handling
Page 5

CONTENTS
Introduction and overview . . . . . . . . . . . . . . . . . . . . . . . . . . . . . . . . . . . . . . . . 1 Precautions on use and handling . . . . . . . . . . . . . . . . . . . . . . . . . . . . . . . . . . 2
Physical location . . . . . . . . . . . . . . . . . . . . . . . . . . . . . . . . . . . . . . . . . . . . . 2 Environment . . . . . . . . . . . . . . . . . . . . . . . . . . . . . . . . . . . . . . . . . . . . . . . . . 2 Usage . . . . . . . . . . . . . . . . . . . . . . . . . . . . . . . . . . . . . . . . . . . . . . . . . . . . . . 3 Handling . . . . . . . . . . . . . . . . . . . . . . . . . . . . . . . . . . . . . . . . . . . . . . . . . . . . 3
Unpacking your Cintiq . . . . . . . . . . . . . . . . . . . . . . . . . . . . . . . . . . . . . . . . . . . 8
Package contents . . . . . . . . . . . . . . . . . . . . . . . . . . . . . . . . . . . . . . . . . . . . . 8 Setting up the Cintiq stand . . . . . . . . . . . . . . . . . . . . . . . . . . . . . . . . . . . . . . 9 Unpacking and mounting the Cintiq pen display . . . . . . . . . . . . . . . . . . . . 10 Adjusting the display incline . . . . . . . . . . . . . . . . . . . . . . . . . . . . . . . . 11 Adjusting rotation . . . . . . . . . . . . . . . . . . . . . . . . . . . . . . . . . . . . . . . . 12 Using the pen holder . . . . . . . . . . . . . . . . . . . . . . . . . . . . . . . . . . . . . . 12 Removing Cintiq from the display stand . . . . . . . . . . . . . . . . . . . . . . . 13
Cintiq pen display components . . . . . . . . . . . . . . . . . . . . . . . . . . . . . . . . . . . 14
Front view . . . . . . . . . . . . . . . . . . . . . . . . . . . . . . . . . . . . . . . . . . . . . . . . . . 14 Rear view . . . . . . . . . . . . . . . . . . . . . . . . . . . . . . . . . . . . . . . . . . . . . . . . . . 15
Installation . . . . . . . . . . . . . . . . . . . . . . . . . . . . . . . . . . . . . . . . . . . . . . . . . . . . 16
System requirements . . . . . . . . . . . . . . . . . . . . . . . . . . . . . . . . . . . . . . . . . 16 Step 1: display installation . . . . . . . . . . . . . . . . . . . . . . . . . . . . . . . . . . . . . 17 Display cabling diagram . . . . . . . . . . . . . . . . . . . . . . . . . . . . . . . . . . . 19 Step 2: pen tablet installation . . . . . . . . . . . . . . . . . . . . . . . . . . . . . . . . . . . 22 USB cable installation . . . . . . . . . . . . . . . . . . . . . . . . . . . . . . . . . . . . . 22 Pen tablet USB cabling diagram . . . . . . . . . . . . . . . . . . . . . . . . . . . . . 22 Software installation . . . . . . . . . . . . . . . . . . . . . . . . . . . . . . . . . . . . . . 23
Working with your Cintiq . . . . . . . . . . . . . . . . . . . . . . . . . . . . . . . . . . . . . . . . |
24 |
Using the Grip pen . . . . . . . . . . . . . . . . . . . . . . . . . . . . . . . . . . . . . . . . . . . |
24 |
Pen components . . . . . . . . . . . . . . . . . . . . . . . . . . . . . . . . . . . . . . . . . |
24 |
Basic pen operations . . . . . . . . . . . . . . . . . . . . . . . . . . . . . . . . . . . . . |
25 |
Tablet controls . . . . . . . . . . . . . . . . . . . . . . . . . . . . . . . . . . . . . . . . . . . . . . |
27 |
Using ExpressKeys . . . . . . . . . . . . . . . . . . . . . . . . . . . . . . . . . . . . . . . |
28 |
Using the Touch Strips . . . . . . . . . . . . . . . . . . . . . . . . . . . . . . . . . . . . |
29 |
Setting up your work area . . . . . . . . . . . . . . . . . . . . . . . . . . . . . . . . . . . . . |
30 |
Customizing . . . . . . . . . . . . . . . . . . . . . . . . . . . . . . . . . . . . . . . . . . . . . . . . . . . 32
Opening the control panel . . . . . . . . . . . . . . . . . . . . . . . . . . . . . . . . . . . . . |
32 |
Learning more about Cintiq . . . . . . . . . . . . . . . . . . . . . . . . . . . . . . . . |
32 |
Customization basics . . . . . . . . . . . . . . . . . . . . . . . . . . . . . . . . . . . . . . . . . |
33 |
Calibrating Cintiq . . . . . . . . . . . . . . . . . . . . . . . . . . . . . . . . . . . . . . . . . |
34 |
Adjusting the display . . . . . . . . . . . . . . . . . . . . . . . . . . . . . . . . . . . . . . . . . |
35 |
Factory presets, auto-sync, and user settings . . . . . . . . . . . . . . . . . . |
35 |
On Screen Display (OSD) settings . . . . . . . . . . . . . . . . . . . . . . . . . . . |
35 |
Adjusting clock and phase (VGA only) . . . . . . . . . . . . . . . . . . . . . . . . |
39 |
Power saving . . . . . . . . . . . . . . . . . . . . . . . . . . . . . . . . . . . . . . . . . . . . |
40 |
Contents
Page 6

Troubleshooting . . . . . . . . . . . . . . . . . . . . . . . . . . . . . . . . . . . . . . . . . . . . . . . . 41
Testing Cintiq . . . . . . . . . . . . . . . . . . . . . . . . . . . . . . . . . . . . . . . . . . . . . . . 41 Testing controls and input tools . . . . . . . . . . . . . . . . . . . . . . . . . . . . . . . . . 43 Testing the ExpressKeys . . . . . . . . . . . . . . . . . . . . . . . . . . . . . . . . . . . 43 Testing the Touch Strips . . . . . . . . . . . . . . . . . . . . . . . . . . . . . . . . . . . 43 Testing a pen . . . . . . . . . . . . . . . . . . . . . . . . . . . . . . . . . . . . . . . . . . . . 44 Display troubleshooting . . . . . . . . . . . . . . . . . . . . . . . . . . . . . . . . . . . . . . . 45 General display problems . . . . . . . . . . . . . . . . . . . . . . . . . . . . . . . . . . 45 VGA problems . . . . . . . . . . . . . . . . . . . . . . . . . . . . . . . . . . . . . . . . . . . 46 Pen tablet troubleshooting . . . . . . . . . . . . . . . . . . . . . . . . . . . . . . . . . . . . . 47 General problems . . . . . . . . . . . . . . . . . . . . . . . . . . . . . . . . . . . . . . . . 47 Windows-specific problems . . . . . . . . . . . . . . . . . . . . . . . . . . . . . . . . . 50 Macintosh-specific problems . . . . . . . . . . . . . . . . . . . . . . . . . . . . . . . . 51 Technical support options . . . . . . . . . . . . . . . . . . . . . . . . . . . . . . . . . . . . . . 52 Obtaining driver downloads . . . . . . . . . . . . . . . . . . . . . . . . . . . . . . . . . . . . 53
Appendix . . . . . . . . . . . . . . . . . . . . . . . . . . . . . . . . . . . . . . . . . . . . . . . . . . . . . 54
Caring for Cintiq . . . . . . . . . . . . . . . . . . . . . . . . . . . . . . . . . . . . . . . . . . . . . 54 Cleaning . . . . . . . . . . . . . . . . . . . . . . . . . . . . . . . . . . . . . . . . . . . . . . . 54 Replacing the pen tip . . . . . . . . . . . . . . . . . . . . . . . . . . . . . . . . . . . . . 55 Optional display configurations . . . . . . . . . . . . . . . . . . . . . . . . . . . . . . . . . . 56 Using an alternate mount or stand . . . . . . . . . . . . . . . . . . . . . . . . . . . . . . . 57 Pen and digital ink capabilities in Windows Vista . . . . . . . . . . . . . . . . . . . . 60 About the Windows Vista Tablet PC Input Panel . . . . . . . . . . . . . . . . . 61 Uninstalling Cintiq . . . . . . . . . . . . . . . . . . . . . . . . . . . . . . . . . . . . . . . . . . . . 62 Product specifications . . . . . . . . . . . . . . . . . . . . . . . . . . . . . . . . . . . . . . . . 63 General specifications . . . . . . . . . . . . . . . . . . . . . . . . . . . . . . . . . . . . . 63 Display . . . . . . . . . . . . . . . . . . . . . . . . . . . . . . . . . . . . . . . . . . . . . . . . 63 Pen tablet . . . . . . . . . . . . . . . . . . . . . . . . . . . . . . . . . . . . . . . . . . . . . . 64 Display stand . . . . . . . . . . . . . . . . . . . . . . . . . . . . . . . . . . . . . . . . . . . . 64 Power adapter . . . . . . . . . . . . . . . . . . . . . . . . . . . . . . . . . . . . . . . . . . . 64 Grip pen (model ZP-501E) . . . . . . . . . . . . . . . . . . . . . . . . . . . . . . . . . 64 Accessories . . . . . . . . . . . . . . . . . . . . . . . . . . . . . . . . . . . . . . . . . . . . . 65 Ordering parts and accessories . . . . . . . . . . . . . . . . . . . . . . . . . . . . . . . . . 66 Radio and television interference . . . . . . . . . . . . . . . . . . . . . . . . . . . . . . . . 67 Federal Communications Commission (FCC) notice . . . . . . . . . . . . . 67 Industry Canada (Canada only) . . . . . . . . . . . . . . . . . . . . . . . . . . . . . 68 CE declaration . . . . . . . . . . . . . . . . . . . . . . . . . . . . . . . . . . . . . . . . . . . 68
Warranty
(Worldwide, Except for Europe, Africa and Middle East) . . . . . . . . . . . . . . 69
Contents
Page 7
UNPACKING YOUR CINTIQ
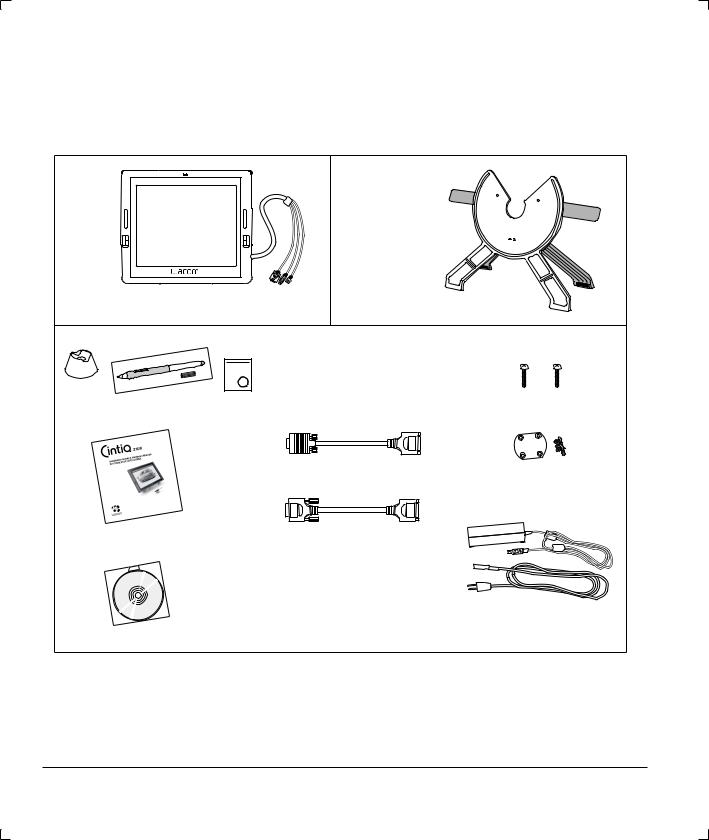
PACKAGE CONTENTS
You will find the product parts and accessories packed together in the accessories box. To avoid damaging your product, please review the instructions on the following pages before setting up or using Cintiq or the Cintiq stand. Your product came with the following items:
Cintiq 21UX pen display, main unit |
Cintiq stand (MST-A103) |
with attached cable |
*Patented |
Parts and accessories |
|
Grip Pen with replacement nibs, pen stand, and nib removal set |
Rotation lock screws (qty 2) |
|
(ZP-501E, PST-A034, and FUZ-A131) |
(MNE-059) |
|
|
VGA to DVI-I adapter |
Bearing hub recess |
|
(STJ-A262) |
cover plate and screws |
|
|
(PPL-A155) |
Installation Guide & Hardware Manual |
DVI-D to DVI-I adapter |
|
(this manual) |
(STJ-A263) |
|
Wacom Pen Tablet Driver CD |
Power supply |
(contains the driver software) |
(POW-A098) |
|
and power cable |
Note: Images not shown to scale. Some package configurations may include additional CDs or DVDs containing application software. To install these applications, review the instructions that came with those CDs or DVDs. Retain the package box for use when storing or shipping Cintiq.
Next step: Set up the Cintiq stand. See page 9.
Unpacking your Cintiq
Page 8
SETTING UP THE CINTIQ STAND
Place the stand on your desktop or work surface, making sure the stand is stable and will not tip or fall when the pen display is mounted on it. Then familiarize yourself with the stand components.
WARNING Do not operate the incline adjustment levers when Cintiq is not mounted on the stand, and do not lift the stand by the adjustment levers; the stand is spring-loaded and may cause injury or damage if released without the weight of Cintiq on the stand. Improper operation may lead to physical injury or damage to the stand. Be careful to avoid catching your finger in the gap of the movable portion of the stand.
Incline adjustment levers
When Cintiq is mounted on the stand, use these levers to adjust the display incline, as described in Adjusting the display incline on page 11.
Bearing recess
Front feet
The front feet have rubber pads to reduce stand slippage on the desktop when adjusting incline.
Rear feet
The rear feet are on rollers, allowing the feet to move when adjusting incline.
Next step: Unpack the pen display and mount it on the Cintiq stand. See page 10.
Unpacking your Cintiq
Page 9
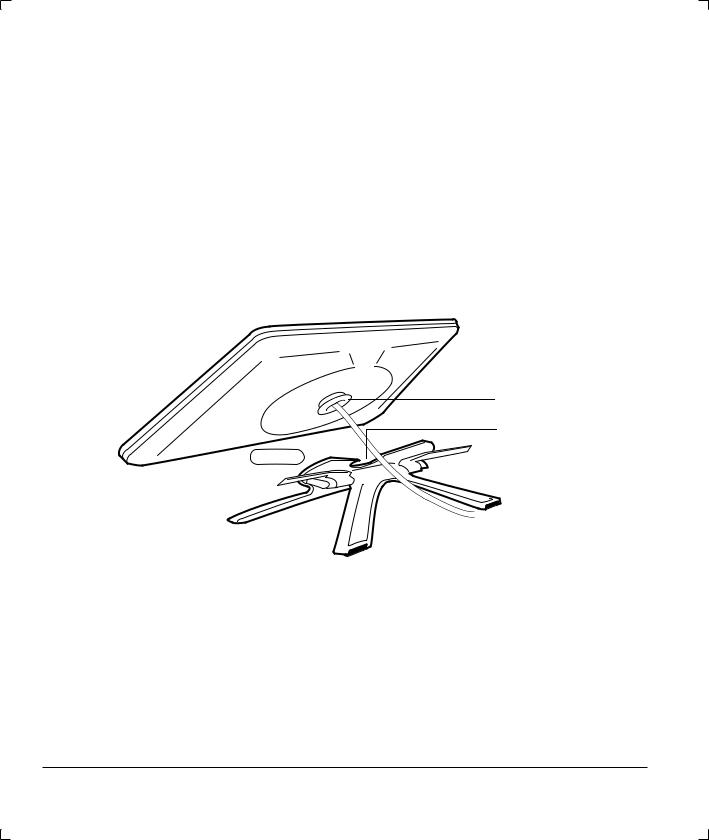
UNPACKING AND MOUNTING THE CINTIQ PEN DISPLAY
Remove any packing materials from the back of the display unit and cabling.
To mount Cintiq on the stand:
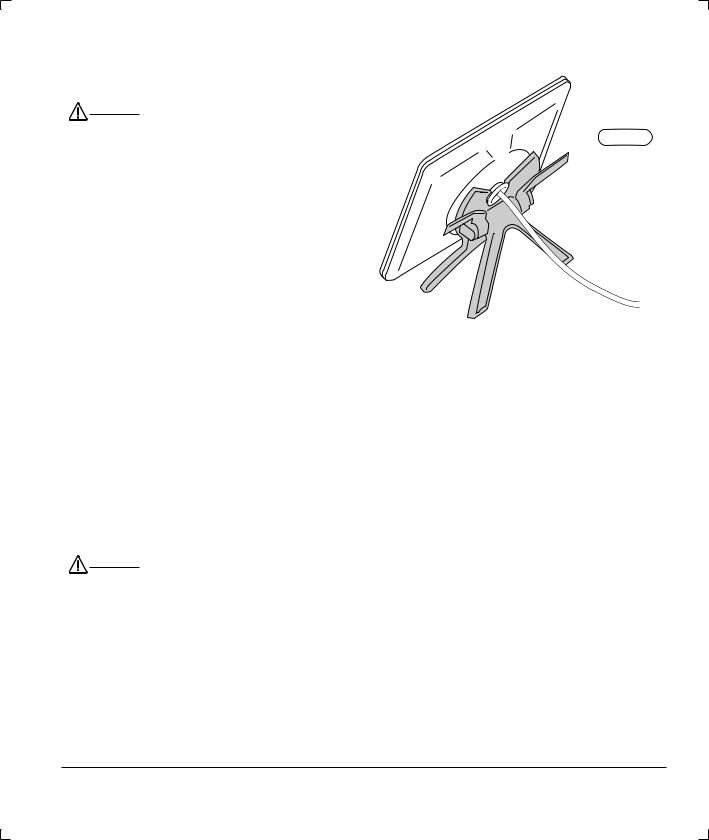
•Make sure the stand is stable on your desktop or other work surface and will not tip or fall when Cintiq is mounted on it. Securely grasp Cintiq with both hands so that the display faces toward you, with the power switch and LEDs located at the top.
Align Cintiq parallel to the front of the stand so that the bearing hub is located between the V-shaped upper edges of the stand’s bearing recess. See – A – (The V-shaped edges of the stand will serve as a guide for positioning the bearing hub.)
•With the back of Cintiq resting against the stand, lower Cintiq until the bearing hub rests securely in
the bearing recess of the stand. See – B – on the following page. The display unit will be held in place by gravity; there will be no audible ‘snap’ that indicates a mechanical lock.
Note: If you do not need to rotate the Cintiq pen display, you may want to secure it to the stand with the rotation lock screws. For information on this, see Optional display configurations on page 56. To learn about other mounting options, see Using an alternate mount or stand on page 57.
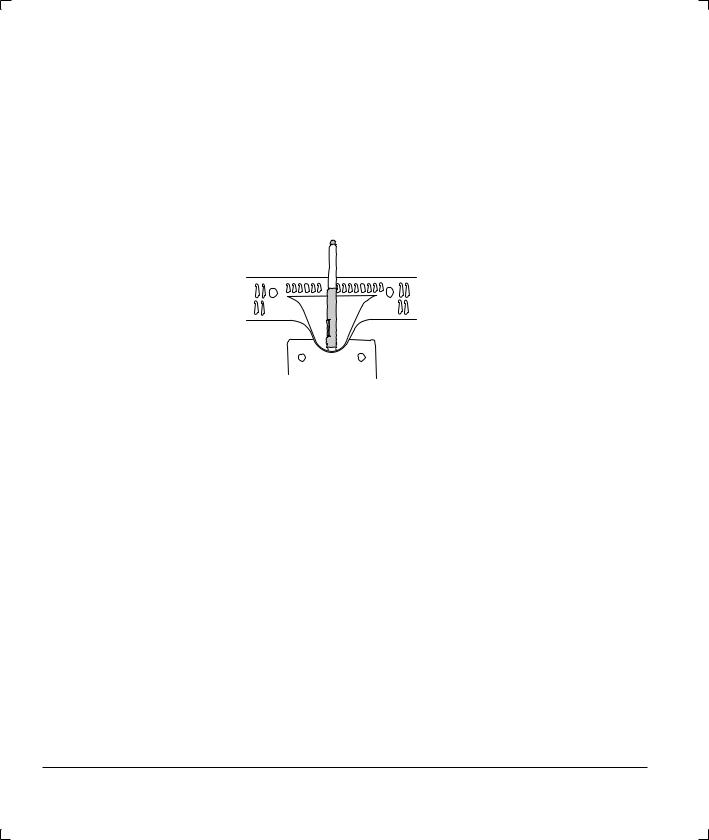
Bearing hub
Bearing recess
– A –
Unpacking your Cintiq
Page 10
WARNING When operating the incline adjustment |
|
|
levers, Cintiq must be mounted on the |
|
|
stand with the stand feet resting on a |
– B – |
|
stable, flat surface. The stand is |
||
|
||
spring-loaded and can snap back |
|
|
quickly, causing injury or damage if |
|
|
not operated properly. |
|
After the display unit has been mounted on the stand, remove the foam blocks that lock the adjustment levers in place. Save these blocks with the other packaging materials; you will need them if in the future you want to ship Cintiq.
ADJUSTING THE DISPLAY INCLINE
To adjust the display incline, face the front of the Cintiq pen display and grasp it on the left and right side at approximately the same height as the Cintiq stand adjustment levers. Use your fingertips to gently pull the incline adjustment levers toward the display unit; this will release the stand’s clutch mechanism. Tilt the display to adjust the incline setting.
•To lower Cintiq, pull the left incline adjustment lever toward Cintiq and gently lower Cintiq to the desired incline angle. Release the lever to lock the stand in place.
•To raise Cintiq, pull the right incline adjustment lever toward Cintiq and gently raise Cintiq to the desired incline angle. Release the lever to lock the stand in place.
Note: The stand adjustment levers exhibit some natural play before the clutch mechanism engages.
When adjusting the stand incline, set it slightly higher than you plan to work with, then lower the display to the desired position.
WARNING Before moving Cintiq, first adjust the stand to its full upright position; this will reduce the spring tension so that the stand will not accidentally release and snap shut. If the display unit is in landscape orientation, use one hand to grasp the bottom of the display and with your other hand grasp the back of the stand. Be sure to lift on both the display and the stand so that the stand will not separate from the display when moving Cintiq. If Cintiq is in portrait orientation or has been locked to the stand with the rotation lock screws (see page 56 for details), the stand will not separate from the display unit and Cintiq can be safely lifted by grasping the display unit with both hands.
Unpacking your Cintiq
Page 11
ADJUSTING ROTATION
The pen display can be rotated on the display stand when the incline is less than or equal to 25 degrees.
To adjust rotation, grasp Cintiq by the main body and rotate the unit to the desired position; it will move on the bearing hub. You can only rotate the display unit 180 degrees in either direction. If you do not plan to rotate the Cintiq, use the rotation lock screws to fasten the display to the stand in a horizontal position. See Optional display configurations on page 56 for more information.
USING THE PEN HOLDER
The integrated pen holder is located at the back of the pen display tablet.
Note: The pen holder is not available for use when routing the cable to exit through the top cable opening.
Next step: Go to page 14 and familiarize yourself with the pen display.
Unpacking your Cintiq Page 12

REMOVING CINTIQ FROM THE DISPLAY STAND
To remove Cintiq from the display stand:
•If the rotation lock screws are attached, remove them from the back of Cintiq.
•Position the pen display to landscape orientation before removing it from the display stand. The stand will not release unless Cintiq is in landscape orientation.
•Next, raise the stand incline to the highest position. See Adjusting the display incline on page 11 for instructions.
•Firmly grasp the pen display on both the left and right sides of the body, and lift the unit out of the display stand.
Important: When removing Cintiq from the display stand, always lift Cintiq in a direction parallel to the front of the stand. You may also need to rotate Cintiq slightly so the stand will release.
Note: When packing Cintiq for transport, first adjust the stand to its lowest position and place the foam packing blocks under the incline adjustment levers before removing Cintiq from the stand. The foam blocks will keep the stand from snapping shut while in its packaging. Always pack Cintiq and its stand in their original containers and protective cushions. Never pack Cintiq while it is mounted on the stand; this may damage the unit or stand during transportation.
Unpacking your Cintiq
Page 13
CINTIQ PEN DISPLAY COMPONENTS
After the Cintiq pen display is safely mounted on the Cintiq stand, take some time to familiarize yourself with its features and components.
The display and tablet sensor function as an integrated output and input device. The display supports resolutions up to 1600 x 1200 pixels at 16.77 million colors. The tablet sensor reports pen coordinates, pressure, tilt, switch, eraser, and other information.
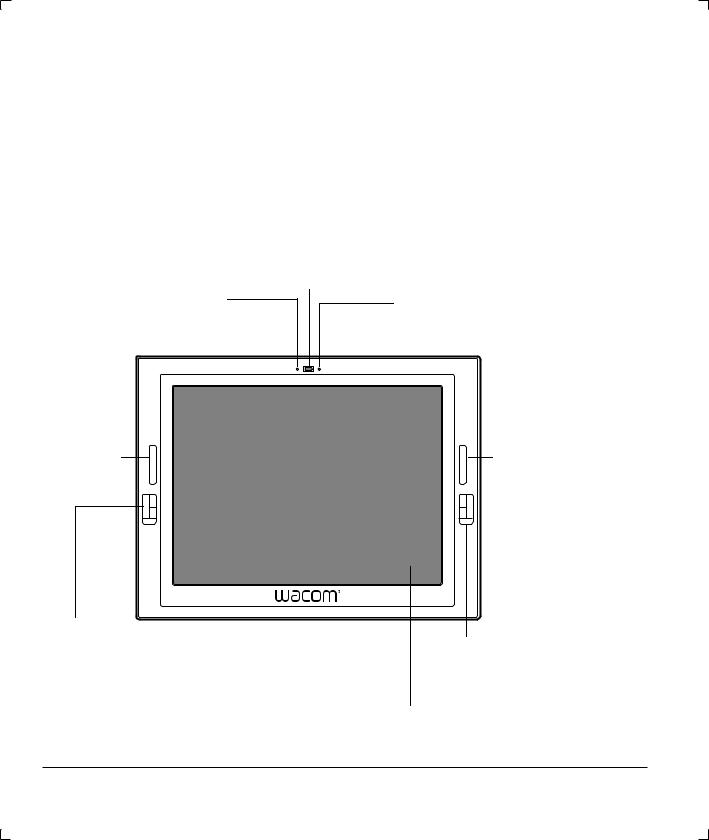
FRONT VIEW
Status LED
Lights blue when the pen is in the active area of the pen display tablet and the pen tip, eraser, or side switch are pressed. The USB cable connector must be plugged into an active USB port and a video signal must be present before the LED will light.
Touch Strip
Power switch
Turns power on or off.
Power LED
Lights blue when power has been supplied to Cintiq and a video signal is present.
Glows orange when no video signal is detected by Cintiq. (e.g., Your computer is turned off, starting up, or has entered a power management mode in which video signals are not sent.)
Touch Strip
ExpressKeys
These customizable keys simulate modifier keys, keystrokes, and other frequently used functions. A display toggle function is also available, enabling you to toggle the screen cursor between the Cintiq pen display and your other displays. See page 27.
Slide your finger over the Touch Strips to zoom, scroll, or perform custom keystroke actions. See Tablet controls on page 27.
ExpressKeys
Integrated display and tablet
Cintiq pen display components Page 14
REAR VIEW
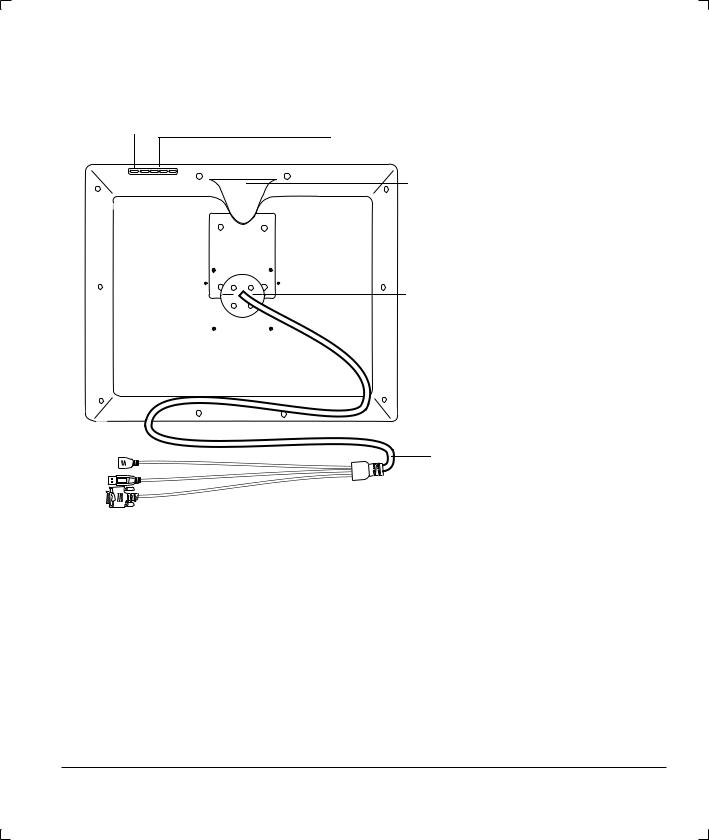
Digital/Analog (DVI/VGA) switch
Set this switch for the video connection you will be using.
On Screen Display (OSD) controls
Use these controls to adjust a variety of display settings. See Adjusting the display on page 35.
Integrated pen holder and alternate cable exit
The pen can be stored here. If you are not using the Cintiq stand supplied with the unit, you can route the cable to exit from this location. See Using an alternate mount or stand on page 57.
Bearing hub
Fits into the bearing recess on the Cintiq stand. Allows rotation of Cintiq, and easy mounting and removal from the stand.
Cabling and connectors
The connectors on the integrated cable are for DVI-I video, USB data, and power.
Important: Always store the pen display on the Cintiq display stand or in its original packing carton when not in use. Do not store the display unit on a surface that would excessively bend or crimp the cable.
Next step: Installation. See page 16.
Cintiq pen display components
Page 15

INSTALLATION
SYSTEM REQUIREMENTS
Before installing Cintiq, make sure your computer meets the following minimum system requirements:
•PC. Windows Vista™, Vista x64, XP, XP x64, or 2000. DVI or VGA video connector, available USB port, and CD-ROM drive.
•Macintosh. OS X, v10.3.9 or greater. DVI or VGA video connector, available USB port, and CD-ROM drive. ADC connectors require an ADC to DVI-I adapter, not included.
Cintiq supports both digital (DVI) and analog (VGA) video signals. If updating your video card, complete the video card hardware and software installation before connecting Cintiq. If you have another display that is compatible with your video card, you can connect that display to the card in order to verify the video card is operating correctly.
Using the VGA to DVI-I adapter, you can connect Cintiq to a VGA video card. However, connecting Cintiq to a DVI video card generally results in optimum performance.
Notes: Cintiq can be used alone or with another display, such as a CRT monitor or LCD projector. To use Cintiq with another display, you will need two video cards or a video card with dual output.
Depending on the capabilities of your video card and operating system, you may be able to set up Cintiq as a mirrored, extended, or independent display. Refer to your video card documentation for more information on its capabilities.
When you are working with more than one display, Cintiq will map to the displays based upon how your system is configured. By default, if you are in mirror mode, the pen tablet will map to the entire space on each display. Please refer to your hardware and operating system documentation for details on configuring your computer and operating system for use with multiple displays.
A display toggle function is available for use with multiple display systems. This enables you to toggle the screen cursor between the Cintiq pen display and your other displays. For more information, see Using ExpressKeys on page 28.
There are two primary steps to the installation process:
•Step 1: display installation
•Step 2: pen tablet installation
Follow ALL installation instructions carefully.
Installation
Page 16
STEP 1: DISPLAY INSTALLATION
In this step, Cintiq is installed as a display on your system.
Important: Do not connect the USB data cable until instructed to do so.
•Turn off your computer.
Caution: Never connect or disconnect the video or power cables while your computer or Cintiq are powered on – this can damage the display or video card.
•If your computer has only one video connector, you will need to unplug your previous display. Determine if your computer has a digital (DVI) or analog (VGA) connector, and set the DVI/VGA switch located on the back of Cintiq for the video connection you are using. Move the switch toward
the tablet edge for Digital (DVI-I or DVI-D), and move it toward the OSD buttons for ANALOG (VGA). See – A – in the connection diagram on page 19.
•Making sure to tighten the thumbscrews on the connectors, follow the instructions below for your video connector. See – B –
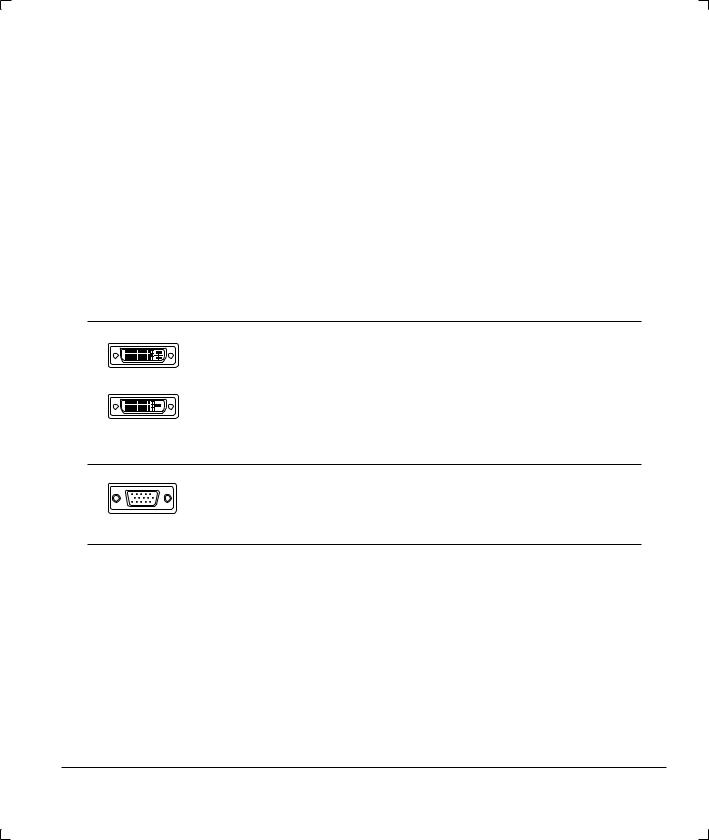
DVI-I connector
DVI-D connector
For DVI-I operation, plug the Cintiq video cable into the DVI-I connector of your video card.
For DVI-D operation, plug the Cintiq video cable into the DVI-D to DVI-I adapter supplied with Cintiq, and then plug the adapter into the DVI-D connector on your video card.
|
For VGA operation, plug the Cintiq video cable into the VGA to DVI-I |
|
adapter supplied with Cintiq, and then plug the adapter into the VGA |
VGA connector |
connector on your video card. |
|
Installation
Page 17
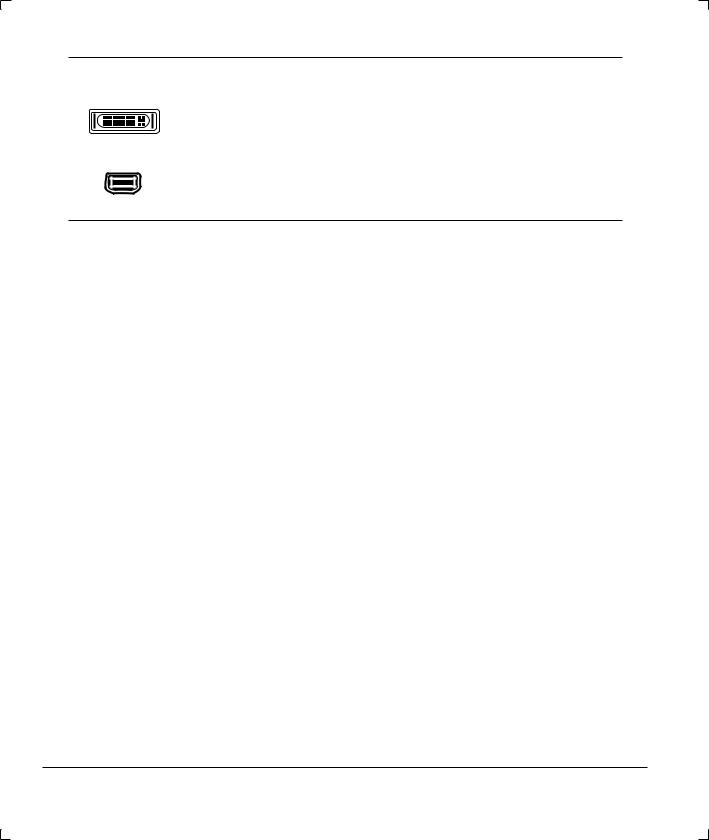
Apple ADC connector
Mini-VGA port
If connecting to an Apple ADC or mini-VGA connection, you will need to obtain an appropriate adapter. Adapters can be purchased at various retail outlets.
For ADC operation, plug the Cintiq video cable into the ADC to DVI-I adapter. Then plug the ADC adapter end into the ADC connector on your video card.
For an Apple mini-VGA connector, plug the Cintiq video cable into the VGA to DVI-I adapter (supplied with Cintiq). Plug the mini-VGA adapter into the computer’s mini-VGA port. Then plug the male and female VGA connectors together.
•Connect the power adapter to Cintiq. See – C – on the next page.
•Then connect the adapter’s power cable and plug the adapter into an AC outlet. See – D –
•Turn on Cintiq. The power LED will light orange.
Installation
Page 18

DISPLAY CABLING DIAGRAM
DVI/VGA switch
– A –
CAUTION Make sure your video card has a DVI or VGA connector, and that you correctly set the Cintiq DVI/VGA switch for the video connector you are using.
Do not attach the USB data cable until instructed to do so.
Cintiq, rear view
– B –
– C –
DC INput
DVI-I connector
To connect to a DVI-D connector, use the DVI-D to DVI-I adapter.
To connect to a VGA connector, use the VGA to DVI-I adapter.
Video card
DVI or VGA
Rear panel of your computer
|
– D – |
Power adapter |
To AC outlet |
CAUTION Use only the power adapter that came with Cintiq; use of an improper power adapter may
damage the unit.
Do not connect or disconnect the video or power cables while Cintiq or your computer are turned on – this can damage the display or computer video card.
Make sure that the display refresh rate does not exceed 85 Hz (60 Hz for UXGA).
Installation
Page 19

•Next, turn on your computer.
For Windows systems, Cintiq will automatically install as a default display. If you want Cintiq to be identified as a Cintiq display and if you want to install the color calibration profile for Cintiq, follow the instructions below to update the display driver for Cintiq:
1.Open the CONTROL PANEL folder.
•For Windows Vista, under APPEARANCE AND PERSONALIZATION select ADJUST SCREEN RESOLUTION.
•For other Windows versions, open the DISPLAY PROPERTIES control panel and select the SETTINGS tab.
Note: If you have more than one display and you need help in determining which display corresponds to Cintiq, click the IDENTIFY monitors button. Select the display for Cintiq.
2.Click the ADVANCED settings button.
3.Select the MONITOR tab and click the PROPERTIES button.
4.Select the DRIVER tab and click the UPDATE DRIVER... button. An update driver dialog or Wizard will appear.
5.Insert the Wacom Pen Tablet Driver CD. If the Wacom Tablet installation menu displays, close it.
Windows Vista:
•Select the option BROWSE MY COMPUTER FOR DRIVER SOFTWARE.
•Enter the drive letter for the Wacom Pen Tablet Driver CD and click NEXT.
•After the installation is complete, close any open control panel windows.
Windows XP:
•The Wizard will ask if Windows can search for software. Choose NO, NOT THIS TIME and click NEXT.
•Select the option INSTALL FROM A LIST OR SPECIFIC LOCATION (ADVANCED), and click NEXT.
•Select the option DON’T SEARCH. I WILL CHOOSE THE DRIVER TO INSTALL and click NEXT.
•Select the Cintiq pen display option and then click the HAVE DISK... button. Enter the letter of your CD-ROM drive (e.g., E:\), and click OK.
•Follow the prompts to continue. (If the HARDWARE INSTALLATION dialog box displays, click CONTINUE ANYWAY to accept the driver.) After the installation is complete, click the FINISH button and close any open control panel windows.
Windows 2000:
•Follow the prompts selecting the default options.
•If a signing warning dialog box displays, click YES to accept the driver. After the installation is complete click the FINISH button to close the Wizard and then close the DISPLAY PROPERTIES control panel.
Installation
Page 20

For Macintosh systems, a Cintiq color profile will be added to your computer’s color management system during the tablet software driver installation process. To activate this color profile for use with Cintiq, you may need to select the Cintiq 21UX profile in the system’s ColorSync Utility control panel. For more details, see the color management information in your operating system and application documentation.
•As necessary, configure the display control panel settings for the proper size and color resolution. The maximum (native) resolution of the Cintiq 21UX is 1600 x 1200 pixels with 24 bit color.
The display size and color resolution may be constrained by the capabilities of your video card. See the video card manufacturer’s documentation for details.
For Windows: If you are using Cintiq as a secondary display, you may first need to enable Cintiq in your Display Properties control panel.
•If using analog (VGA) mode, you may want to fine-tune the display. See Adjusting clock and phase (VGA only) on page 39 and Adjusting the display beginning on page 35.
•After the display portion of Cintiq is working to your satisfaction, move on to Step 2: pen tablet installation to install the pen tablet portion of Cintiq. For troubleshooting tips, see page 41.
Notes:
Each Cintiq LCD panel is produced under stringent quality standards. Production techniques cannot guarantee an absolutely perfect TFT display, and some panels may exhibit a certain number of pixels that show an incorrect color. See the specifications on page 63 for more information.
If an image has fine striping (such as screen stripes), it may appear to flicker or display a moiré pattern.
Do not apply excessive pressure on the display surface, it may cause the appearance of a moiré or pooling pattern. If this occurs, use less pressure on the display screen when working with the pen.
When a still image is displayed for a long period of time, an after-image may remain for a short time. To prevent this, Wacom recommends using a screen saver or other power management feature.
Important: To extend the life of the backlight, set your computer’s power management to turn off the display when it is not in use for extended periods of time.
Installation
Page 21
 Loading...