


 Loading...
Contents Index
1
User’s manual
Intuos5 touch
Intuos5 (PTK-450, PTK-650)
Setting up
Using a pen
Customizing a pen
Using the tablet
Customizing the tablet
Navigating with touch
Customizing touch
Using the Radial Menu
Application-specific settings
Going Wireless
Troubleshooting
Contents Index
1

Contents Index
2
Intuos5
User’s Manual
Version 1.0, Rev J3111
Copyright © Wacom Co., Ltd., 2011
All rights reserved. No part of this manual may be reproduced except for your express personal use. Wacom reserves the right to revise this publication without obligation to provide notification of such changes.
Wacom does its best to provide current and accurate information in this manual. However, Wacom reserves the right to change any specifications and product configurations at its discretion, without prior notice and without obligation to include such changes in this manual.
The above year indicates when this manual was prepared. However, the date of release to the users of the “manual” is simultaneous with the introduction into the market of the applicable Wacom product.
Intuos and Wacom are registered trademarks of Wacom Co., Ltd.
Adobe and Photoshop are either registered trademarks or trademarks of Adobe Systems Incorporated in the United States and/or other countries. Microsoft, Windows, and Vista are either registered trademarks or trademarks of Microsoft Corporation in the United States and/or other countries. Apple, the Apple logo, and Mac are registered trademarks of Apple, Inc., registered in the U.S. and other countries.
Any additional company and product names mentioned in this documentation may be trademarked and/or registered as trademarks. Mention of third-party products is for information purposes only and constitutes neither an endorsement nor a recommendation. Wacom assumes no responsibility with regard to the performance or use of these products.
ExpressKey is a registered trademark of Ginsan Industries, Inc., and is used with permission.
Contents Index
2

Contents Index
3
TABLE OF CONTENTS
About the manual
YOUR INTUOS5 TABLET
Identify your tablet model
Intuos5 touch tablet
Intuos5 tablet
Intuos5 pen
SETTING UP INTUOS5 Ergonomics
Configuring the tablet orientation USB cable installation Understanding the tablet active area Working with multiple monitors Control panel basics
USING INTUOS5
Using the Grip Pen Holding the pen Positioning Clicking Dragging
Using the side switch
Drawing with pressure sensitivity Drawing with tilt
Erasing
Eye-hand coordination exercise Tablet controls
Using the ExpressKeys
Using the Touch Ring
THE TOUCH EXPERIENCE WITH INTUOS5 Navigating with touch
Customizing touch
Setting the touch options Choosing standard touch functions Choosing custom touch functions Disabling touch
Testing touch
5 |
CUSTOMIZING INTUOS5 |
46 |
|
6 |
Manage your control panel settings |
47 |
|
Control panel overview |
48 |
||
6 |
|||
Customizing the pen |
50 |
||
7 |
|||
Adjusting tip feel and double-click |
51 |
||
9 |
|||
Adjusting eraser feel |
52 |
||
10 |
|||
Advanced tip and eraser pressure settings |
52 |
||
11 |
|||
Customizing tool buttons |
53 |
||
11 |
|||
Customizing tilt sensitivity |
54 |
||
13 |
|||
Customizing the tablet functions |
54 |
||
14 |
|||
Customizing the ExpressKeys |
55 |
||
15 |
|||
Customizing the Touch Ring |
56 |
||
17 |
|||
Tablet to screen mapping |
57 |
||
17 |
|||
Portion of screen area |
59 |
||
|
|||
18 |
Portion of tablet area |
60 |
|
18 |
Button functions |
61 |
|
19 |
Using and customizing the Radial Menu |
68 |
|
20 |
Working with Display Toggle |
69 |
|
21 |
Application-specific settings |
71 |
|
21 |
Creating an application-specific setting |
72 |
|
22 |
Changing application-specific settings |
73 |
|
23 |
Removing application-specific settings |
73 |
|
23 |
Working with multiple tools |
74 |
|
24 |
Changing the tablet mode |
75 |
|
24 |
Advanced options |
76 |
|
25 |
GOING WIRELESS WITH INTUOS5 |
77 |
|
26 |
|||
Wireless accessory components |
77 |
||
28 |
|||
Wireless setup |
78 |
||
|
|||
29 |
Establishing a wireless connection |
79 |
|
30 |
Optimizing the wireless connection |
80 |
|
40 |
Battery and power management |
81 |
|
41 |
Charging the battery |
81 |
|
42 |
Battery and wireless connection status |
82 |
|
43 |
Power saving features |
83 |
|
44 |
Battery life information |
84 |
|
45 |
Battery replacement |
85 |
|
|
Wireless module removal |
86 |
Contents Index
3

Contents
Wireless receiver storage Testing the wireless connection
TROUBLESHOOTING Testing your tablet
Testing the tablet controls and tools Testing the ExpressKeys Testing the Touch Ring
Testing a pen Troubleshooting tables
General problems Pen problems Touch problems
Wireless connection problems Windows-specific problems Mac-specific problems
Technical support options Obtaining driver downloads
Contents
Index |
|
4 |
|
|
|
||
87 |
APPENDIX |
107 |
|
88 |
Caring for Intuos5 |
107 |
|
89 |
Replacing the pen nib |
108 |
|
Uninstalling Intuos5 |
109 |
||
90 |
|||
Using the Express View display |
110 |
||
92 |
|||
Managing preferences |
111 |
||
93 |
|||
Installing multiple tablets |
112 |
||
93 |
|||
Using applications integrated for tablet control |
113 |
||
94 |
|||
Importing expert settings |
114 |
||
95 |
|||
Using the optional Airbrush and Art Pen |
115 |
||
95 |
|||
Using the optional Mouse |
116 |
||
96 |
|||
Customizing the mouse |
117 |
||
99 |
|||
Testing the mouse |
118 |
||
100 |
|||
Pen and digital ink capabilities in Windows |
119 |
||
102 |
|||
Product information |
120 |
||
103 |
|||
Ordering parts and accessories |
121 |
||
105 |
|||
Available parts and accessories |
121 |
||
106 |
|||
|
|
||
|
GLOSSARY |
122 |
|
|
INDEX |
125 |
Index
4
Contents Index
5
ABOUT THE MANUAL
This manual provides quick access to information about your Intuos5. The information is common to Windows and Mac computers and Windows screen captures are shown, unless otherwise noted.
•Go directly to table of contents or index topics by clicking on them.
•Use the navigation controls to move through the manual.
|
|
Go to front page. |
Contents |
Go to table of contents. |
Page back, or page forward. |
Index |
Go to index. |
Go back to previous view. |
topic |
Go to topic. |
Topic continued. |
•Use your .pdf viewer zoom-in tool to increase the size of the manual on your display screen. See the viewer application help for information on any additional tools that help you use and print the manual.
•SMALL CAPITAL LETTERS are used to identify the names of keyboard keys, dialog boxes, and control panel options.
•Be sure to see also the Important Product Information guide for Intuos5, located on the Intuos5 installation CD. The guide includes product safety precautions, specifications, and your license agreement.
•The following information is not included with this product: information about your specific computer hardware or operating system, or information about your application software. Your best source for this information is the set of manuals and discs that came with your hardware, operating system, or application.
•In addition to the built-in inking support found within Microsoft Windows 7 and Vista, many graphics applications also support pressure sensitivity and the pen eraser. You can find a listing of applications that support these features on the Wacom web site (see product information).
•For information on how best to use tablet features within a specific application, see the instructions in that application’s manuals.
Note: This manual does not describe how to install your Wacom tablet. Please refer to your product Quick Start Guide, and use the automated software installer (located on the Intuos5 installation CD).
Wacom’s philosophy is to continually improve all of its products. As a result, engineering changes and improvements are made from time to time. Therefore, some changes, modifications, and improvements may not be covered in this manual.
Contents Index
5

Contents Index
6
YOUR INTUOS5 TABLET
This section introduces you to Intuos5. The quickest way to learn about your Intuos5 tablet is to become familiar with its appearance and features.
•Not all product models are available in all regions.
•Your Intuos5 tablet can only be used with a compatible Wacom pen, such as the pen that came with your product or a Wacom accessory tool specified for use with Intuos5. Other pens may not function properly. See available parts and accessories.
Intuos5 consists of two basic elements:
•The professional pen tablet that serves as your work area,
•and the tools that you use on the tablet.
Identify your tablet model
Intuos5 touch tablet
Intuos5 tablet
Intuos5 pen
IDENTIFY YOUR TABLET MODEL
Each tablet model within the Intuos5 family has a specific feature set. The Wacom wireless accessory kit is sold separately. Not all models or accessories are available in all regions.
TABLET MODEL |
TOUCH |
PEN |
EXPRESSKEYS |
TOUCH RING |
WIRELESS |
|
INPUT |
INPUT |
CAPABLE |
||||
|
|
|
||||
|
|
|
|
|
|
|
|
|
|
|
|
|
|
Intuos5 touch |
X |
X |
X |
X |
X |
|
Intuos5 |
|
X |
X |
X |
X |
You will find that icons are located near some of the topic headings in this manual. Use them to quickly identify sections that have information specific to touch or pen input. Icons will not be used in sections that commonly apply to all Intuos5 tablet models. Model-specific notes may be used as necessary.
•Touch input is identified by this icon: 
•Pen input is identified by this icon: 
Contents Index
6
Contents Index
7
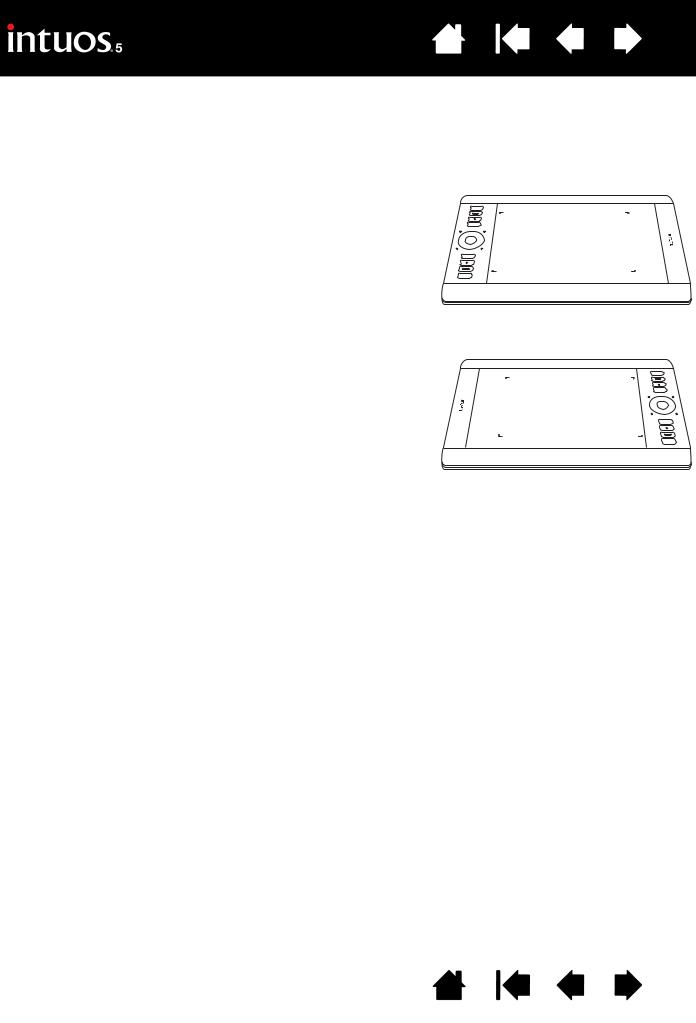
INTUOS5 TOUCH TABLET
Touch Ring |
|
|
|
Status LEDs |
|
|
|||
Includes toggle button at |
|
|
• An LED will glow dimly when Intuos5 is connected |
|
center of ring. Press to: |
|
|
to an active USB port. |
|
• Toggle between Touch |
|
|
• An LED will brighten when you touch the active |
|
Ring modes. |
|
|
area, or use the pen, Touch Ring or ExpressKeys. |
|
• Wake tablet from sleep |
|
|
• LEDs also indicate which of the four Touch Ring |
|
mode when operating |
|
|
modes are active. |
|
wirelessly. |
|
|
For wireless operation, see battery and wireless |
|
|
|
|
|
|
|
|
|
|
connection status. |
|
|
|
|
|
|
|
|
|
|
|
Intuos5 touch |
|
(medium-sized tablet shown) |
Customizable ExpressKeys |
Active area |
Small-sized tablets are equipped with six |
Active area markers are used to |
ExpressKeys. |
identify the active area for pen input |
See also using the Express View display. |
and touch. Learn about your Intuos5 |
|
pen and the touch experience with |
||
|
||
|
Intuos5. |
|
|
To set the brightness level of the |
|
|
active area markers and status LEDs, |
|
|
see advanced options. |
Contents Index
7
Contents Index
8
Wacom wireless module slot
Storage compartment for Wacom wireless receiver
See going wireless with Intuos5.
Wireless compartment
See wireless setup.
Battery compartment
Small-sized tablets are equipped with a single cover used to access the Wacom wireless module and rechargeable battery.
Anchor point
The Intuos5 pen tether (sold separately) or aftermarket security cable can be connected here.
USB port
USB cable, detachable
Disconnect the USB cable when storing Intuos5. Do not wrap the cable around the tablet.
See USB cable installation.
Contents Index
8
Contents Index
9
INTUOS5 TABLET
Touch Ring |
|
|
|
Status LEDs |
|
|
|||
Includes toggle button at |
|
|
• An LED will glow dimly when Intuos5 is connected |
|
center of ring. Press to: |
|
|
to an active USB port. |
|
• Toggle between Touch |
|
|
• An LED will brighten when you use the pen, Touch |
|
Ring modes. |
|
|
Ring, or ExpressKeys. |
|
• Wake tablet from sleep |
|
|
• LEDs also indicate which of the four Touch Ring |
|
mode when operating |
|
|
modes are active. |
|
wirelessly. |
|
|
For wireless operation, see battery and wireless |
|
|
|
|
|
|
|
|
|
|
connection status. |
|
|
|
|
|
Intuos5 |
|
|
|
|
|
|
|
|
|
|
|
|
|
|
|
|
|
|
|
|
(medium-sized tablet shown) |
|
|
|
|
|
|
|
|
|
|
|
|
|
See also the bottom view. |
|
Customizable ExpressKeys |
|
|
|
|
Active area |
|
|
|
|
||||
|
|
|
|
|
||
Small-sized tablets are equipped with six |
|
Active area markers are used to |
||||
ExpressKeys. |
|
identify the active area for pen input. |
||||
See also using the Express View display. |
|
Learn about your Intuos5 pen. |
||||
|
|
|
||||
To set the brightness level of the active area markers and status LEDs, see advanced options.
Contents Index
9
Contents Index
10
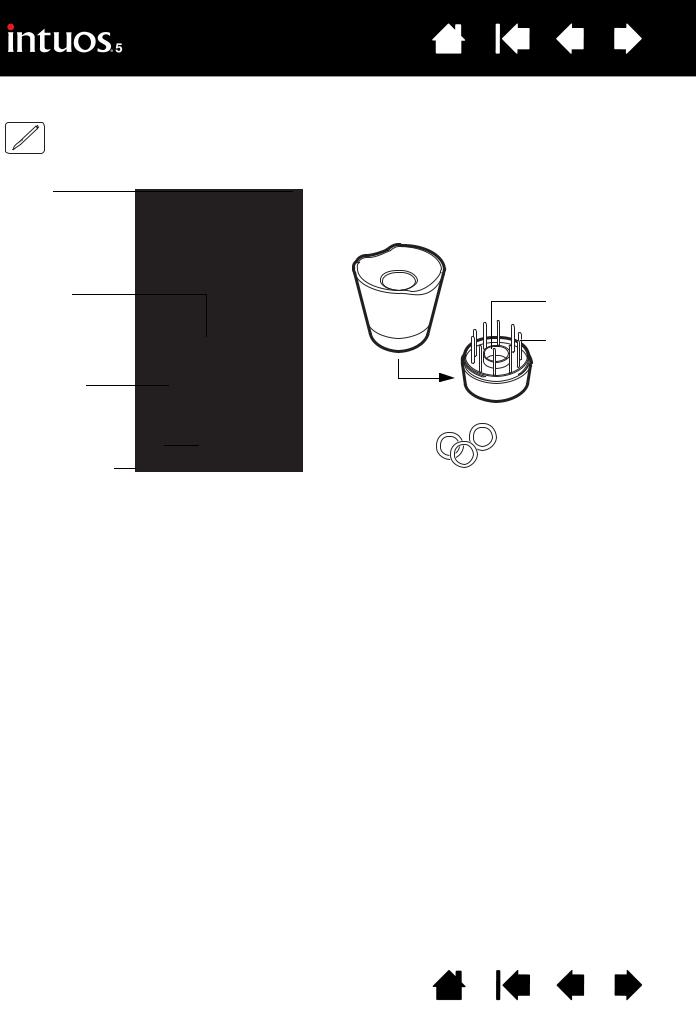
INTUOS5 PEN
All Intuos5 pens are cordless and battery free.
Eraser
Grip area
Side switch (rocker style)
Replaceable nib (pen tip)
Pen stand
Unscrew the base to access the nib removal tool and assorted replacement nibs.
|
Nib removal tool |
|
|
Replacement nibs |
|
|
• |
5 standard nibs, |
|
|
black |
|
• 1 flex nib, white |
|
|
|
and black |
Intuos5 Grip Pen |
• |
1 stroke nib, white |
If you are working in a multi-user |
• |
3 hard felt nibs, |
environment or otherwise want to |
|
gray |
personalize your pen, unscrew the |
|
|
tip cone and replace the ring with a |
|
|
different color (included). |
|
|
Colored rings may not be available in all regions.
See product information to learn more about which applications currently support the special features of your Intuos5 Grip Pen. For information on additional tools and accessories, see available parts and accessories.
Contents Index
10
Contents Index
11
SETTING UP INTUOS5
To minimize fatigue, comfortably organize your work area. Position your tablet, pen, and keyboard for easy access without unnecessary reaching. Adjust your monitor so you can view it comfortably with minimum eyestrain. For best results, position the tablet so the screen cursor follows the same direction as your hand movements on the tablet.
Ergonomics
Configuring the tablet orientation
USB cable installation
Understanding the tablet active area
Working with multiple monitors
Control panel basics
ERGONOMICS
Note regarding Repetitive Stress Injury (RSI): Wacom makes no representation, promise or guarantee that Wacom products will cure or prevent, in whole or in part, mouse-induced repetitive stress symptoms, injuries or conditions. Individual results may vary. Always obtain competent medical advice to determine the most appropriate treatment for your specific situation.
•Maintain a good posture at all times.
•Use a gentle grip when working with Intuos5.
•Periodically shift your gaze from your computer and focus on other objects within the room. This will help to relax your eyes.
•Take short breaks between tasks to stretch and relax your muscles.
•Alternate tasks and tools throughout the day. Minimize awkward postures and repetitive movements that cause discomfort.
•Change your position if you feel any discomfort due to your work position.
•If using the tablet primarily as a creative tool, consider placing the tablet below the keyboard, centered with respect to your monitor.
•For right-handed use, position the tablet so the input (active) area is located to the right of the ExpressKeys. For left-handed use, position to the left of the ExpressKeys. See configuring the tablet orientation.
•If using the tablet instead of a mouse, consider placing it to the right or left of your keyboard.
Contents Index
11

Contents Index
12
You will discover many ways to use your Intuos5 tablet. For example, if your tablet supports both pen and touch, you can add touch to your workflow:
Zooming |
Use two fingers on the tablet surface to zoom-in and zoom-out.
Photo retouching
Use the pressure-sensitive pen to edit images within a photo or image editing application.
Annotation
Simplify document reviews by using the pen to digitally mark-up and annotate documents.
Switch applications
Swipe four fingers across the tablet surface to open the application switcher.
Open the Radial Menu
Using three fingers, tap and hold on the tablet surface to open the Radial Menu.
Show tablet settings
Swipe five fingers down the tablet surface to show your tablet settings for easy customization.
Illustration
Use the pen with your favorite application to draw freehand illustrations.
For details on these and other ways to work with your tablet, see the touch experience with Intuos5, using the Grip Pen, or tablet controls.
Contents Index
12
Contents Index
13
CONFIGURING THE TABLET ORIENTATION
When you first installed Intuos5, you were prompted to choose a default tablet orientation. The orientation you chose was used to determine the tablet default settings.
However, you can easily reconfigure Intuos5 for leftor right-handed users at any time. ExpressKey and Touch Ring settings are automatically reconfigured when you change the handedness setting.
Right-handed operation:
• Open the Wacom Tablet control panel and select the MAPPING tab. Choose the EXPRESSKEYS LEFT orientation option. The tablet driver automatically configures all aspects of the tablet (including the Wacom Tablet control panel options) for correct right-handed use.
• Next, physically rotate your tablet so the tablet ExpressKeys are positioned to the left. See also USB cable installation.
Left-handed operation:
• Open the control panel and select the MAPPING tab. Choose the EXPRESSKEYS RIGHT orientation option. The tablet driver automatically configures all aspects of the tablet (including the Wacom Tablet control panel options) for correct left-handed use.
• Next, physically rotate your tablet so the tablet ExpressKeys are positioned to the right. See also USB cable installation.
Verify that you have correctly set the orientation by moving the pen upwards on the tablet.
To work with a tall monitor:
•Choose EXPRESSKEYS TOP to work with the tablet rotated 90 degrees clockwise. The Touch Ring and ExpressKeys are oriented toward the top.
•Choose EXPRESSKEYS BOTTOM to work with the tablet rotated 90 degrees counter-clockwise. The Touch Ring and ExpressKeys are oriented toward the bottom.
Tip: If you have an optional Mouse for Intuos5, click the control panel OPTIONS... button to set the device for rightor left-handed use. See advanced options.
Note: This procedure does not affect the default orientation. At the system log on and user switching screens, the tablet uses the default orientation you chose during the install process. To change the default orientation, you must re-install the tablet driver.
Contents Index
13
Contents Index
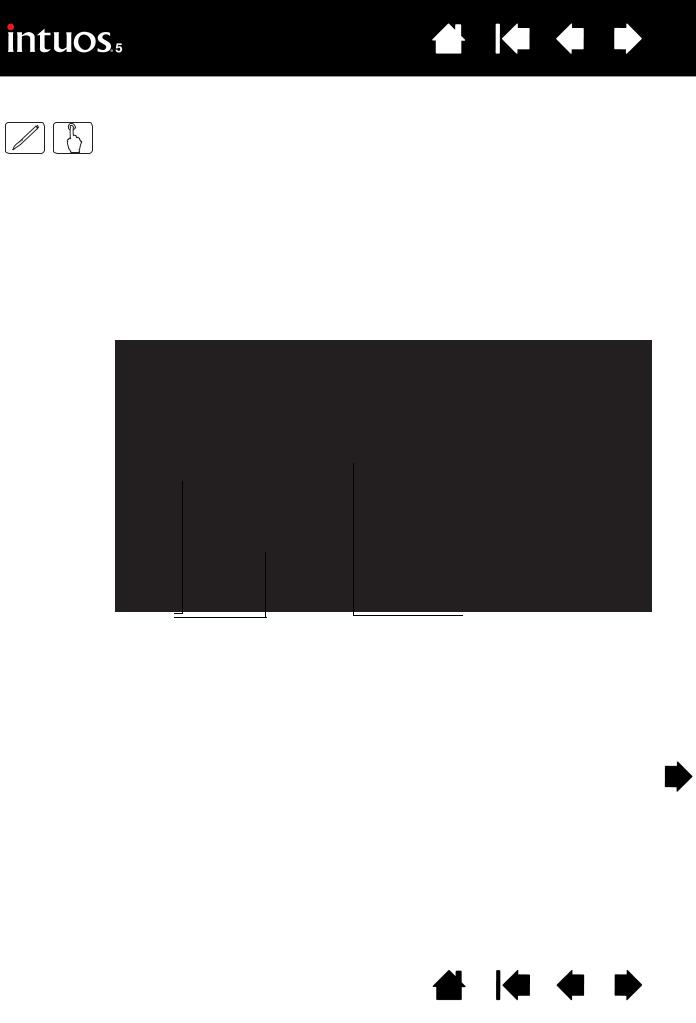
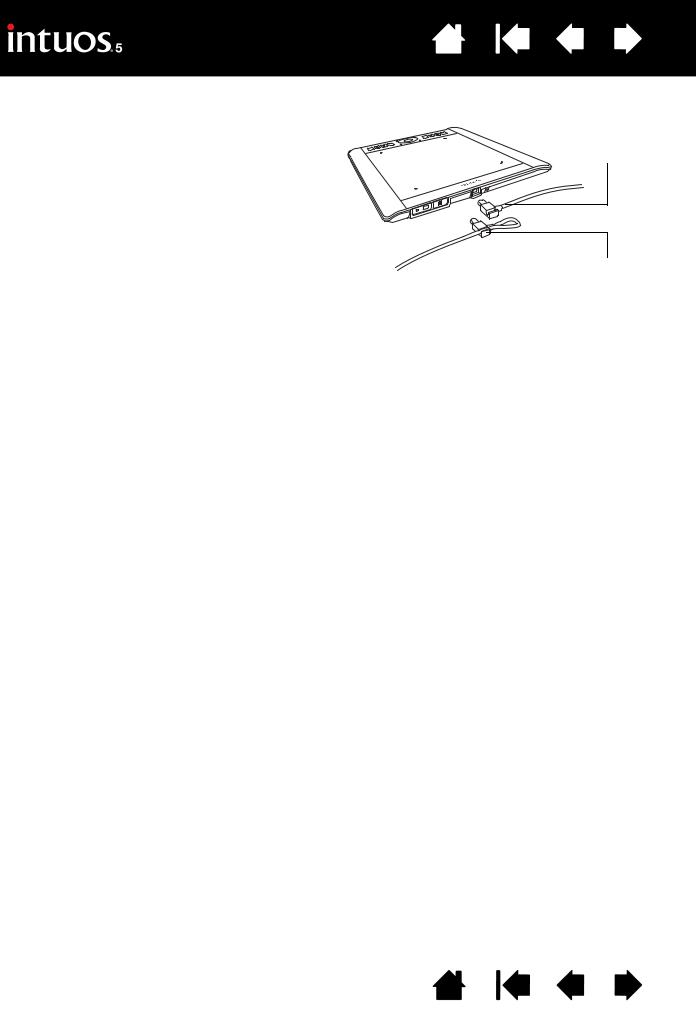
USB CABLE INSTALLATION
1.The USB cable can be connected to best suit your preferred handedness.
•For right-handed use, connect the USB cable to the tablet as is.
•For left-handed use, make a loose loop and press the cable into the looping clip located on the USB plug.
2.Connect the other end of the cable to your computer.
See also configuring the tablet orientation.
14
Right-handed use
Left-handed use
Contents Index
14
Contents Index
15
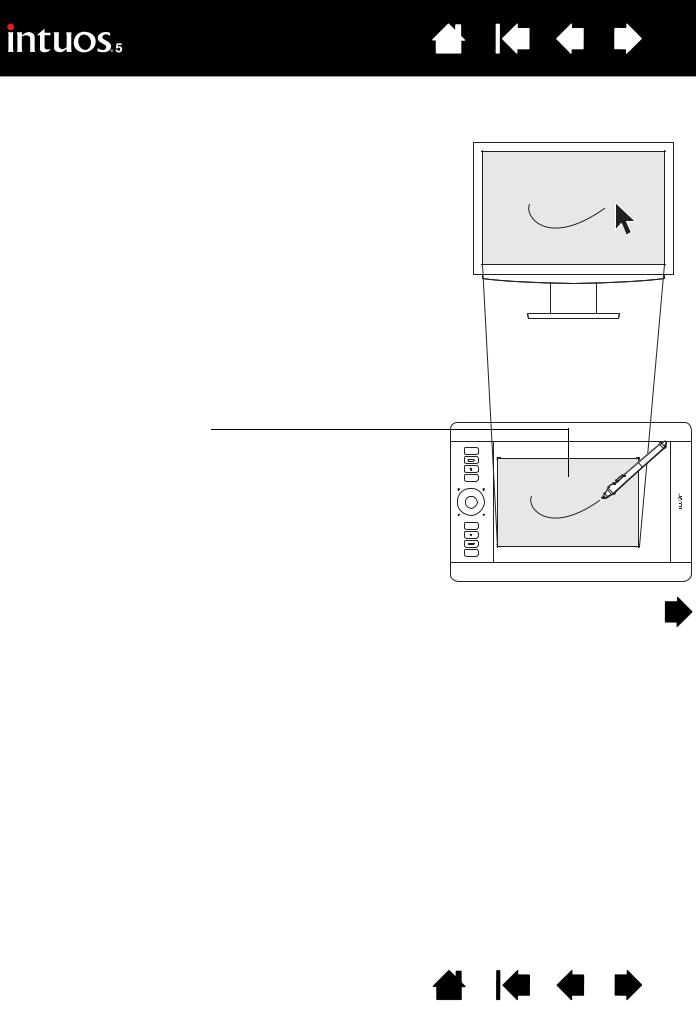
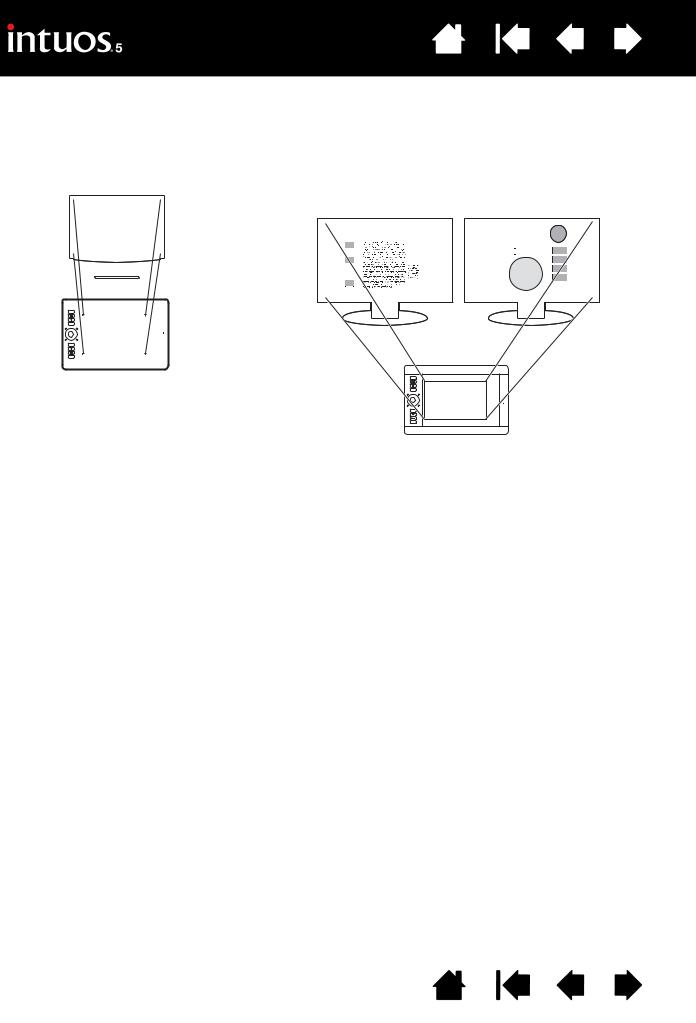
UNDERSTANDING THE TABLET ACTIVE AREA
Depending on your tablet model, Intuos5 can accept pen input or both pen and touch input.
Pen input
Your Intuos5 pen works only on the active area of the tablet.
Wherever you place the pen on the tablet, the screen pointer will jump to the corresponding point on the screen. The screen pointer indicates pen position, and follows the movement of the pen across the tablet surface.
Learn about using the Grip Pen.
Note: The active area is a mapped representation of your computer screen(s). By default it uses the entire screen or all screens if you have multiple displays. You can customize the mapping relationship for pen input by setting the tablet to screen mapping.
The tablet active area is the area of your Intuos5 tablet that senses pen input or touch.
For tablet models that support both pen input and touch:
Touch is ignored whenever the pen tip or eraser is within the tablet proximity range. Lift the pen and your hand away from the tablet active area to enable touch.
Contents Index
15

Contents Index
16
Touch input
On touch-sensitive tablet models you can:
•Slide your finger(s) across the active area to position the screen pointer.
• Click or right-click.
•Scroll and zoom.
• Move between pages in most web browsers, document, or picture viewers.
• Display the Radial Menu.
•Switch between applications and perform other desktop functions.
•Save your work.
•View your Wacom tablet settings.
Some gestures can be customized.
Learn about the touch experience with Intuos5.
The tablet active area is the area of your Intuos5 tablet that senses pen input or touch.
For tablet models that support both pen input and touch:
Touch is ignored whenever the pen tip or eraser is within the tablet proximity range. Lift the pen and your hand away from the tablet active area to enable touch.
Contents Index
16
Contents Index
17
WORKING WITH MULTIPLE MONITORS
If your computer is equipped with more than one monitor, Intuos5 will map to the monitors based upon how they are configured in the display properties control panel.
•If more than one monitor is in use and you are in extended monitor mode, the tablet maps to all monitors as if they were one large display.
|
|
|
|
|
|
|
|
|
|
Monitor 1 |
|
Monitor 2 |
||||||||||||||||||||||
|
|
|
|
|
|
|
|
|
|
|
||||||||||||||||||||||||
|
|
|
|
|
|
|
|
|
|
|
|
|
|
|
|
|
|
|
|
|
|
|
|
|
|
|
|
|
|
|
|
|
|
|
|
|
|
|
|
|
|
|
|
|
|
|
|
|
|
|
|
|
|
|
|
|
|
|
|
|
|
|
|
|
|
|
|
|
|
|
|
|
|
|
|
|
|
|
|
|
|
|
|
|
|
|
|
|
|
|
|
|
|
|
|
|
|
|
|
|
|
|
|
|
|
|
|
|
|
|
|
|
|
|
|
|
|
|
|
|
|
|
|
|
|
|
|
|
|
|
|
|
|
|
|
|
|
|
|
|
|
|
|
|
|
|
|
|
|
|
|
|
|
|
|
|
|
|
|
|
|
|
|
|
|
|
|
|
|
|
|
|
|
|
|
|
|
|
|
|
|
|
|
|
|
|
|
|
|
|
|
|
|
|
|
|
|
|
|
|
|
|
|
|
|
|
|
|
|
|
|
|
|
|
|
|
|
|
|
|
|
|
|
|
|
|
|
|
|
|
|
|
|
|
|
|
|
|
|
|
|
|
|
|
|
|
|
|
|
|
|
|
|
|
|
|
|
|
|
|
|
|
|
|
|
|
|
|
|
|
|
|
|
|
|
|
|
|
|
|
|
|
|
|
|
|
|
|
|
|
|
|
|
|
|
|
|
|
|
|
|
|
|
|
|
|
|
|
|
|
|
|
|
|
|
|
|
|
|
|
|
|
|
|
|
|
|
|
|
|
|
|
|
|
|
|
|
|
|
|
|
|
|
|
|
|
|
|
|
|
|
|
|
|
|
|
|
|
|
|
|
|
|
|
|
|
|
|
|
|
|
|
|
|
|
|
|
|
|
|
|
|
|
|
|
|
|
|
|
|
|
|
|
|
|
|
|
|
|
|
|
|
|
|
|
|
|
|
|
|
|
|
|
|
|
|
|
|
|
|
|
|
|
|
|
|
|
|
|
|
|
|
|
|
|
|
|
|
|
|
|
|
|
|
|
|
|
|
|
|
|
|
|
|
|
|
|
|
|
|
|
|
|
|
|
|
|
|
|
|
|
|
|
|
|
|
|
|
|
|
|
|
|
|
|
|
|
|
|
|
|
|
|
|
|
|
|
|
|
|
|
|
|
|
|
|
|
|
|
|
|
|
|
|
|
|
|
|
|
|
|
|
|
|
|
|
|
|
|
|
|
|
|
|
|
|
|
|
|
|
|
|
|
|
|
|
|
|
|
|
|
|
|
|
|
|
|
|
|
|
|
|
|
|
|
|
|
|
|
|
|
|
|
|
|
|
|
|
|
|
|
|
|
|
|
|
|
|
|
|
|
|
|
|
Example of tablet mapping to a single monitor.
Example of tablet mapping to the entire system desktop, which is displayed on two monitors.
•If your monitors are in mirror mode (both monitors display the same content), the tablet maps to the entire space on each monitor and the screen cursor is displayed on each monitor simultaneously.
See your hardware and operating system documentation for details on configuring your computer and operating system for use with multiple monitors.
Tips:
•You can customize the tablet to map to a single monitor or to a portion of the monitor area. See tablet to screen mapping.
•When your system is configured with multiple monitors, you can assign the DISPLAY TOGGLE function to an ExpressKey. This enables you to toggle the current tablet mapping and screen cursor between the primary display and your other monitors. See working with Display Toggle.
CONTROL PANEL BASICS
After mastering the basics of using your Intuos5 tablet, you may want to customize the way touch or pen input works. The Wacom Tablet control panel is where you customize your Intuos5 tablet settings.
Manage your control panel settings
Control panel overview
Contents Index
17

Contents Index
18
USING INTUOS5
If you are new to using Intuos5, read the following sections. See also the touch experience with Intuos5.
Important: Use only a compatible Wacom pen, such as the pen that shipped with your product, or a Wacom accessory tool specified for use with Intuos5. Other pens may not function properly.
See available parts and accessories.
Using the Grip Pen
Tablet controls
USING THE GRIP PEN
The cordless, battery-free Grip Pen senses the amount of pressure and tilt you apply to the pen.
There are four basic techniques for using the pen on the active area of the tablet: pointing, clicking, doubleclicking, and dragging. If you are unfamiliar with using the pen, try the exercises on the following pages.
Note: For Intuos5 tablets that support both pen input and touch, the pen disengages touch whenever the pen tip or eraser is within the tablet proximity range. Lift the pen and your hand away from the tablet active area to enable touch.
If you experience unintended touch actions, manually disable touch by pressing an ExpressKey set to TOUCH ON/OFF. When done working with the pen, press the ExpressKey again to enable touch. You can also use the Wacom Tablet control panel to disable touch. See customizing the tablet functions.
Holding the pen
Positioning
Clicking
Dragging
Using the side switch
Drawing with pressure sensitivity
Drawing with tilt
Erasing
Eye-hand coordination exercise
Contents Index
18
Contents Index
19
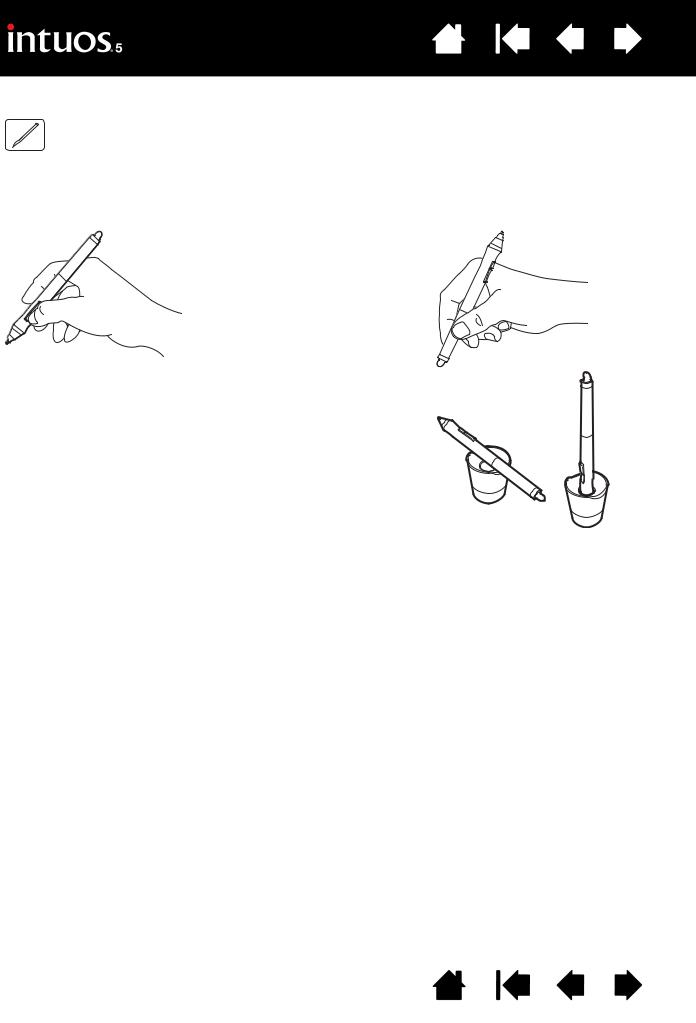
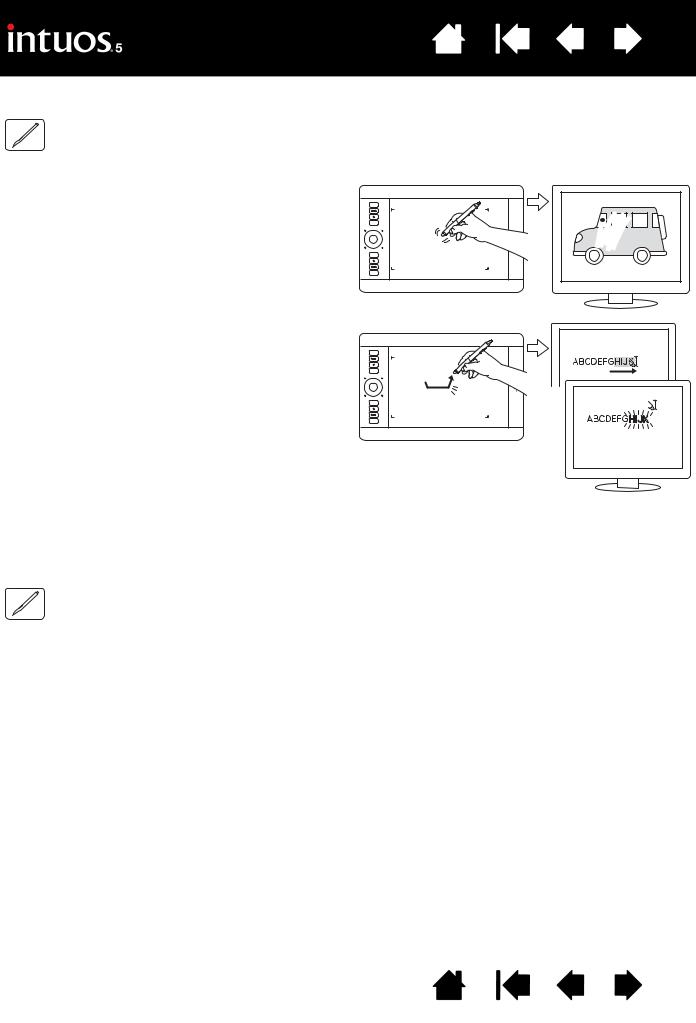
HOLDING THE PEN
Hold the Grip Pen as you would a normal pen or pencil. Adjust your grip so that the side switch is in a convenient location where you can easily toggle it with your thumb or forefinger. Be careful not to accidently press the switch while drawing or positioning with the pen. Tilt the pen in any way that feels most comfortable.
Position for drawing and navigating |
Position for erasing |
Place the pen stand within easy reach of your tablet. The stand allows for vertical or horizontal placement of the pen.
Important:
• When not in use, place the pen in the pen stand or lay it flat on your desk. To maintain the sensitivity of your pen, do not store the pen in a container where it will rest on its tip or eraser.
• Leaving an Intuos5 tool on the tablet may interfere with screen cursor positioning when using other pointing devices, or may prevent your computer from going to sleep.
Contents Index
19
Contents Index
20
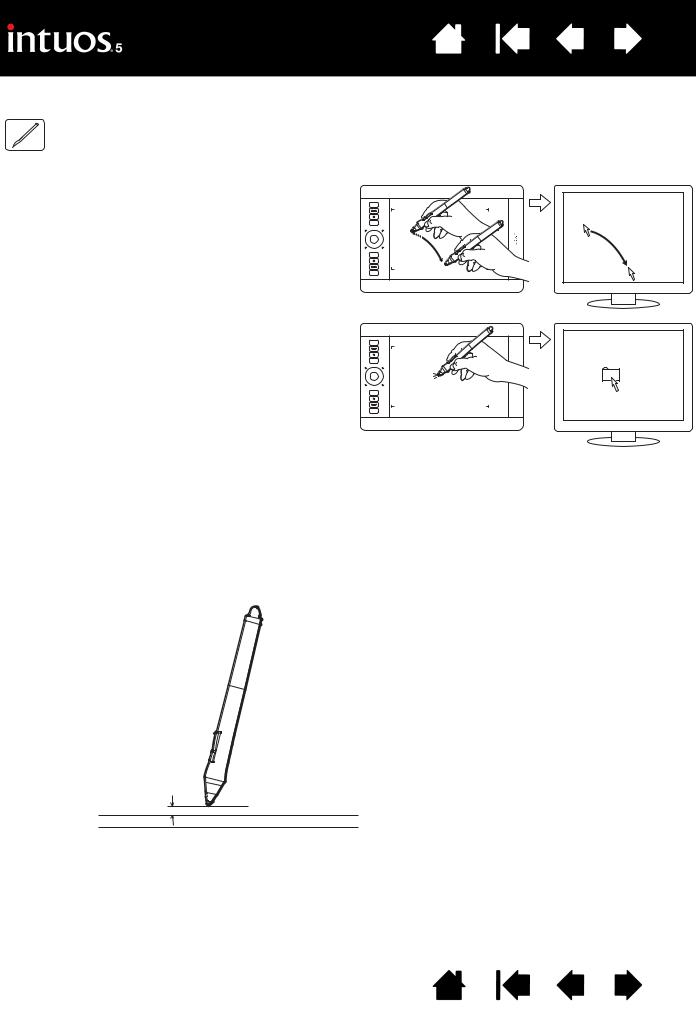
POSITIONING
Use the pen to position the cursor (or pointer) on your screen.
When you lift the pen and place the pen tip on the tablet active area, the screen cursor jumps to the new location.
Move the screen cursor by hovering the pen over the tablet surface and moving your hand. Do this without touching the tablet surface, but while still keeping the pen tip within proximity of the tablet.
To select an icon or folder, use your pen to position the screen cursor over the object. Then press down on the icon or folder to select.
Tips:
• If you find using a pen to be somewhat difficult, try the eye-hand coordination exercise.
•Pointing is easier when you orient the tablet square to the computer monitor so the screen cursor follows the same direction as your hand movements on the tablet.
You can set the pen to position the screen cursor two different ways: pen mode or mouse mode. See tablet to screen mapping.
In pen mode, wherever you place the pen on the tablet, the screen cursor jumps to a corresponding point on the display screen. The screen pointer indicates the pen position and follows the movement of the pen across the tablet surface. This is the default setting for the pen.
When positioning the screen cursor and operating a pen button, the pen tip needs to be within approximately 10 mm (0.4inch) of the tablet surface. The pen tip does not need to touch the tablet in order to move the screen cursor or use the side switch.
All Intuos5 tools work only over the active area of the tablet.
10 mm (0.4 inch) proximity, approximately
Contents Index
20
Contents Index
21
CLICKING
Click to highlight or select something on the screen. Double-click to open it.
Clicking. Tap the pen tip once on the tablet, or press the pen tip on the tablet with enough force to register a click. There will not be an audible pen tip “click” sound.
Try clicking on a folder icon by moving the screen cursor over the icon and pressing the pen tip down on the tablet. The folder should highlight when you press.
Tip: Configure Windows to select when hovering the pen over an icon and to launch the icon with a single click. To turn on this feature, first open a folder.
Windows 7 and Vista: From the ORGANIZE pull-down menu choose FOLDER AND SEARCH OPTIONS.... From the GENERAL tab select SINGLE-CLICK TO OPEN AN ITEM (POINT TO SELECT).
Windows XP: From the TOOLS pull-down menu choose FOLDER OPTIONS.... From the GENERAL tab select SINGLE-CLICK TO OPEN AN ITEM (POINT TO SELECT).
Double-clicking. Quickly tap the tablet twice in the same place with the pen tip. This is like clicking twice with a mouse button. Try double-clicking on a folder icon to open it.
Tip: Press the upper side switch to double-click. This is easier than tapping twice with the pen tip, and is the preferred method of doubleclicking with a pen.
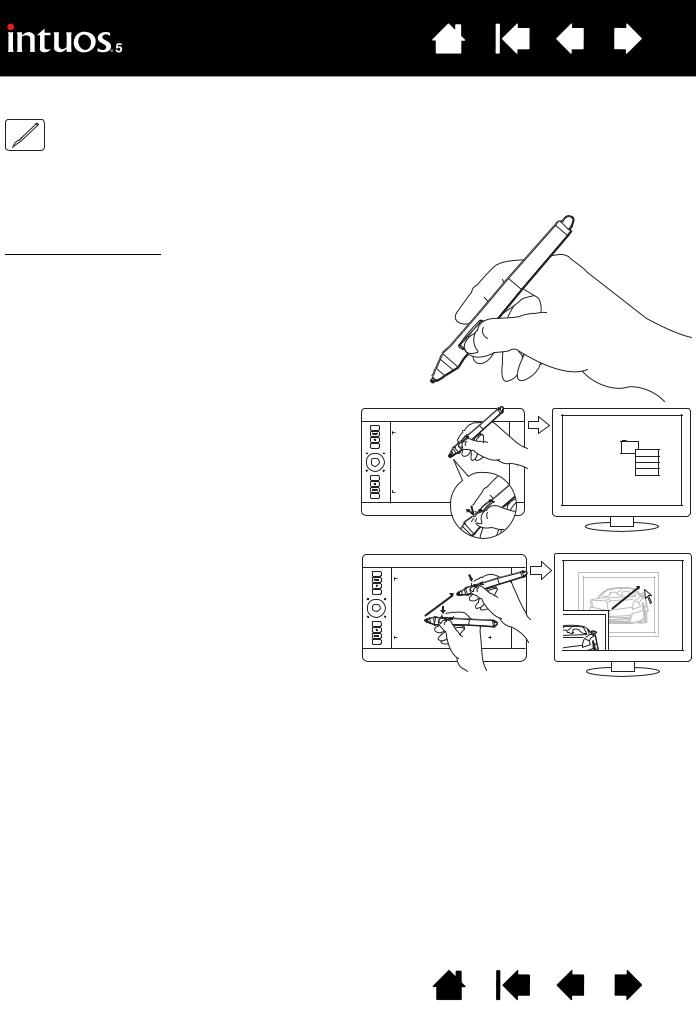
DRAGGING
Dragging is used to select and move objects on the monitor screen.
First point to an object. Then press the pen tip to the tablet and slide it across the tablet surface. The selected object will move across the display screen.
To select text within a document, move the screen cursor to the beginning of a text line. Then drag the pen across the tablet to highlight the text.
Contents Index
21
Contents Index
22
USING THE SIDE SWITCH
The pen side switch has two customizable functions that can be selected by rocking the switch in either direction. You can use the switch whenever the pen tip is within 10 mm (0.4 inch) of the tablet active area. You do not have to touch the pen tip to the tablet in order to use the switch.
The default switch positions are:
Upper: DOUBLE CLICK
Lower: RIGHT CLICK
Press the upper switch to double-click. This is easier than tapping twice with the pen tip.
Press the lower switch to right-click and bring up application-specific or icon-specific menus.
Tip: To position a document or image in any direction within the active window, set a switch function to PAN/SCROLL. Then press the pen button and move the pen tip across the tablet. As you move the pen tip, the document or image is repositioned to follow the direction of pen movement on the tablet. Release the pen button or lift the pen tip from the tablet surface when done.
In some application windows the document will precisely follow the screen cursor as you move the pen tip. In others it will simply move in the same general direction as the screen cursor.
To assign new switch functions, see customizing tool buttons.
Contents Index
22

Contents Index
23
DRAWING WITH PRESSURE SENSITIVITY
The pen responds to your hand movements, enabling you to create natural-looking pen and brush strokes within applications that support this feature. Many graphics applications have drawing tools that respond to the pressure you place on the pen. For example, sliders are used in some applications to vary line characteristics such as width, color, and opacity. These characteristics can be controlled much better by the pen’s pressure sensitivity. You can vary line width, blend colors, and change opacity with the pressure you exert upon the pen. The digital ink tools in Microsoft Windows 7, Vista, and Office 2007 (or later) also respond to the pressure you place on the pen.
To draw, write, or ink with pressure sensitivity, move the pen along the surface of the tablet while applying various amounts of pressure downward on the tip of the pen.
• Press hard for thick lines or dense color.
• Press gently for thin lines or softer color.
Some applications require that you first select a pressure-sensitive tool from the application tool palette.
To adjust the tip feel, see adjusting tip feel and double-click.
Visit our web site for a list of applications that support pressure. See product information.
DRAWING WITH TILT
The tablet recognizes when you tilt the pen from vertical to incline positions. Tilt can be used to control line shape and thickness in supporting applications. This is like working with an airbrush where tilt can be used to make a line thin when the tool is vertical, or wide when the tool is tilted. In other applications, you can adjust tilt to define brush characteristics such as width, color, and opacity.
To test tilt, draw a curve in a graphics application, such as Corel® PainterTM, that supports tilt. Make sure that the tilt function in your application is active. Then change the tilt of the pen as you draw to vary the shape and thickness of the brush stroke.
You can adjust the brush characteristics within your application to create different effects.
To adjust the amount of pen tilt required to produce a desired effect in your application, see customizing tilt sensitivity.
Visit our web site for a list of applications that support tilt. See product information.
Contents Index
23
Contents Index
24
ERASING
The pen eraser works like the eraser on a pencil.
You can erase intuitively and naturally in graphics applications that support the pen eraser. When you use the pen eraser, the application will automatically switch to the eraser tool.
In applications that support pressure sensitivity, you can select pressure-sensitive tools in the application tool palette to vary the width and depth of your erasures as you change the amount of pressure exerted upon the pen.
See adjusting eraser feel for more information.
Use the pen eraser in Microsoft Windows 7, Vista, and Office 2007 (or later) to erase notes or sketches made with digital ink, and to select and delete text or spreadsheet cells within an application.
In supporting text applications, you can use the eraser to select text and then lift the eraser from the tablet to delete the text.
Visit www.wacom.com for a list of applications that support the eraser (see also product information). If the eraser is not supported in an application, you can still use the eraser for positioning, drawing, or annotation.
EYE-HAND COORDINATION EXERCISE
This exercise is designed to retrain your eye-hand coordination for using the pen:
1.Open any graphics application. Use the line tool to draw a rectangular grid with line spacings of about 20-25 mm (3/4 to 1 inch). You can use your standard mouse to do this.
2.Choose a free-hand tool in your application and use the pen to draw a dot at each grid intersection.
3.Draw an X at each grid intersection.
4.Clear your screen and make a simple drawing of your own. The more you use your pen, the easier drawing, writing, and navigation will become.
Contents Index
24
Contents Index
25
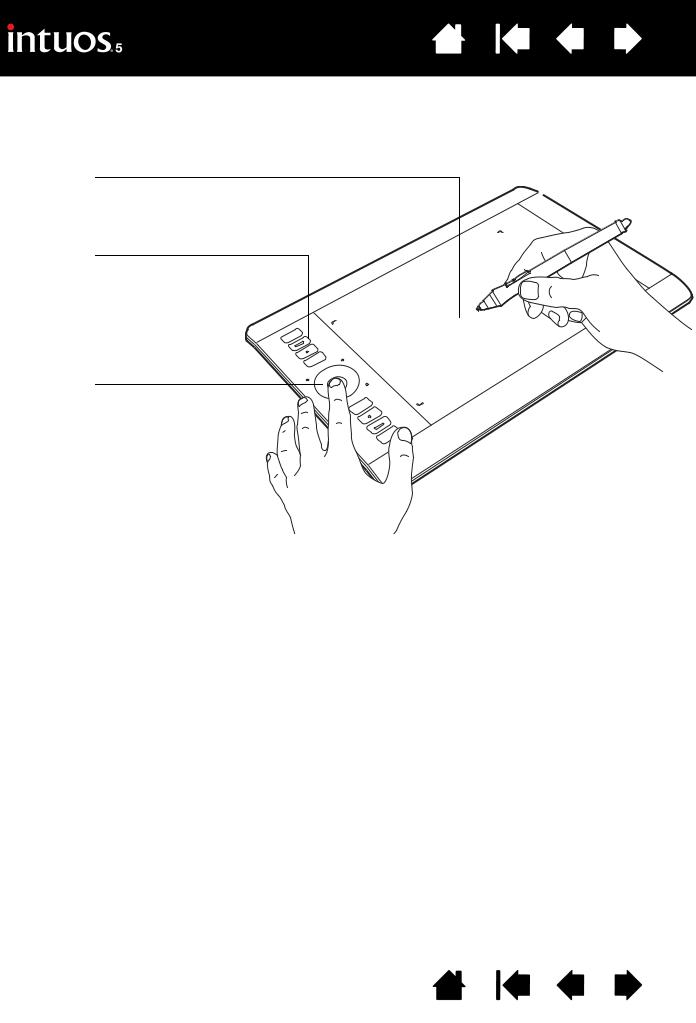
TABLET CONTROLS
To improve your workflow in graphics or other applications, Intuos5 features ExpressKeys and a Touch Ring. While using your dominant hand for touch or pen input, you can simultaneously use your other hand to operate the ExpressKeys or Touch Ring.
Active area
The section of your tablet that senses touch or pen input.
ExpressKeys
Press the customizable ExpressKeys to perform frequently used functions or keystrokes, or to simulate button clicks or modifier keys.
Note: Small-sized tablets are equipped with six ExpressKeys.
Touch Ring
Slide your finger around the ring to zoom, scroll, or perform other custom actions.
Press the toggle (center) button to toggle between four customizable modes. As you toggle between settings, a corresponding status LED illuminates.
See also customizing the ExpressKeys and customizing the Touch Ring.
Contents Index
25

Contents Index
26
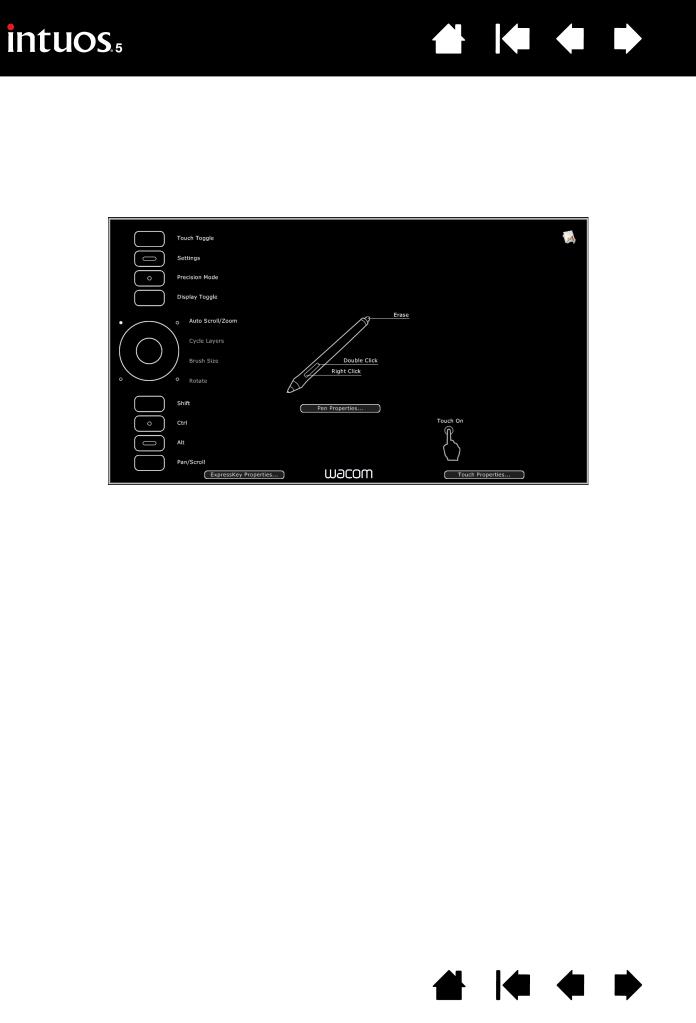
USING THE EXPRESSKEYS
Press individual keys to perform frequently used functions or keystrokes. ExpressKeys can also be used to modify touch, pen, or other tool properties as you work. If your tablet supports touch, you can also use gestures to perform many of these functions.
ExpressKeys configuration when positioned |
ExpressKeys configuration when positioned |
on left side of tablet (EXPRESSKEYS LEFT). |
on right side of tablet (EXPRESSKEYS RIGHT). |
Pen & touch tablet default settings:
TOUCH ON/OFF
SETTINGS
PRECISION MODE
DISPLAY TOGGLE
SHIFT modifier key
CTRL/CMD modifier key
ALT/OPT modifier key
PAN/SCROLL
Notes:
Pen-only tablets. The default settings from top to bottom are: SETTINGS, RADIAL MENU, PRECISION MODE, DISPLAY TOGGLE, SHIFT, CTRL/CMD, ALT/OPT, and PAN SCROLL.
Small-sized tablets are equipped with six ExpressKeys.
Small-sized pen & touch tablets. The default settings from top to bottom are: TOUCH ON/OFF, SETTINGS, SHIFT, CTRL/CMD, ALT/OPT, and PAN/SCROLL.
Small-sized pen-only tablets. The default settings are: SETTINGS, PRECISION MODE, SHIFT, CTRL/CMD, ALT/OPT, and PAN SCROLL.
The ExpressKeys can be operated in combination with one another. For example, customize one key for the CTRL function and another for ALT. When you press both keys at the same time a CTRL+ALT function is initiated.
Contents Index
26
Contents Index
27
Tips:
•Use the Radial Menu to expand the functionality of your tablet.
•Rest your finger on an ExpressKey to activate the Express View display, which shows the ExpressKey settings.
•You can display an interactive diagram of the current tablet settings by pressing an ExpressKey set
to SETTINGS.
Settings may vary depending on your tablet model.
Consider some of these other ways to use the ExpressKeys:
•Set a key to a commonly used keyboard shortcut.
•Set a key to launch a commonly used file or application.
•If you prefer not to (or cannot) use the side switches on your Grip Pen, then set a key to rightor double-click.
•Choose from any of the other available functions. See customizing the ExpressKeys.
Important: Some applications can override and control the ExpressKey functions. For details, see using applications integrated for tablet control.
Use the Wacom Tablet control panel to customize the ExpressKey options.
Manage your control panel settings
Control panel overview
Customizing the ExpressKeys
Contents Index
27
Contents Index
28
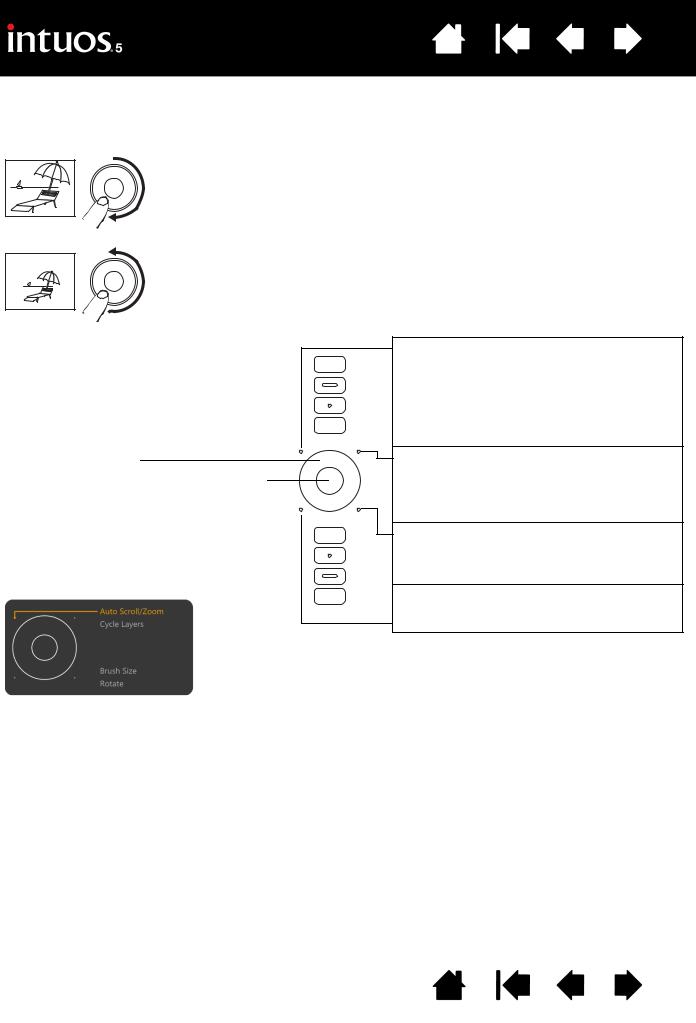
USING THE TOUCH RING
Slide your finger around the ring to zoom in or out, scroll up or down, or to issue the assigned keystroke functions.
Example of zooming in
Move your finger clockwise along the ring to zoom in or scroll down in most applications. Tap the upper portion of the Touch Ring for single increment changes based on the assigned function.
Example of zooming out
Move your finger counter-clockwise to zoom out or scroll up. Tap the lower portion of the Touch Ring for single increment changes.
Touch Ring configuration when positioned on left side of tablet. Default settings:
Tap upper or lower portion of ring for incremental changes.
Press the toggle button to switch between four customizable modes. As you toggle between settings, a corresponding status LED illuminates. Any disabled settings are skipped in the toggle sequence.
A diagram of the current Touch Ring settings appears briefly on your display screen as you press the toggle.
Setting 1: AUTO SCROLL/ZOOM. Sets the ring to zoom in graphics applications and scroll in other applications.
Some applications may interpret zooming as scrolling, or may completely ignore zooming. Likewise, scrolling may be interpreted as zooming, or ignored completely.
Setting 2: CYCLE LAYERS. Enables you to cycle up or down through a stack of layers when working in Adobe Photoshop.
Move your finger clockwise along the ring to cycle up through layers.
Setting 3: BRUSH SIZE. Sets the ring to increase or decrease the brush size of your drawing tool when working in Adobe Photoshop.
Setting 4: CANVAS ROTATION. Enables you to rotate or flip an entire image when working in Adobe Photoshop CS4 (or later).
See customizing the Touch Ring to modify how the Touch Ring works.
Important: Some applications can override and control the Touch Ring functions. For details, see using applications integrated for tablet control.
Use the Wacom Tablet control panel to customize the Touch Ring options.
Manage your control panel settings
Control panel overview
Customizing the Touch Ring
Contents Index
28

Contents Index
29
THE TOUCH EXPERIENCE WITH INTUOS5
Intuos5 is designed to enhance the way you work. Touch enables you to interact with a computer using only your fingertips on the Intuos5 tablet.
You can use touch on Intuos5 as you would on any other Mac or Windows device, such as phones, trackpads, and notebooks. First learn the basic actions to navigate and perform typical mouse operations. Then learn how to scroll, zoom, and rotate.
Touch is activated whenever you touch the tablet active area.
•When using touch, you can generally position your fingers as far apart as is comfortable. However, placing your fingers too closely together may be interpreted by the tablet as input from a
single finger, or the tablet may confuse which finger initiated or performed an action or gesture. Your fingers must remain within the active area.
•Experiment with touch to see what works best for you. Take care to prevent accidental touches on the tablet when making gestures. For example, if your small finger or the palm of your hand touches the active area of the tablet when zooming or scrolling, then you may trigger an unanticipated right-click.
Note: For tablet models that support both pen input and touch, the pen disengages touch whenever the pen tip or eraser is within the tablet proximity range. Lift the pen and your hand away from the tablet active area to enable touch.
Navigating with touch
Customizing touch
Testing touch
Contents Index
29
Contents Index
30
NAVIGATING WITH TOUCH
The touch feature of your Intuos5 touch tablet enables you to control a computer using only your fingertips on the tablet surface. See understanding the tablet active area.
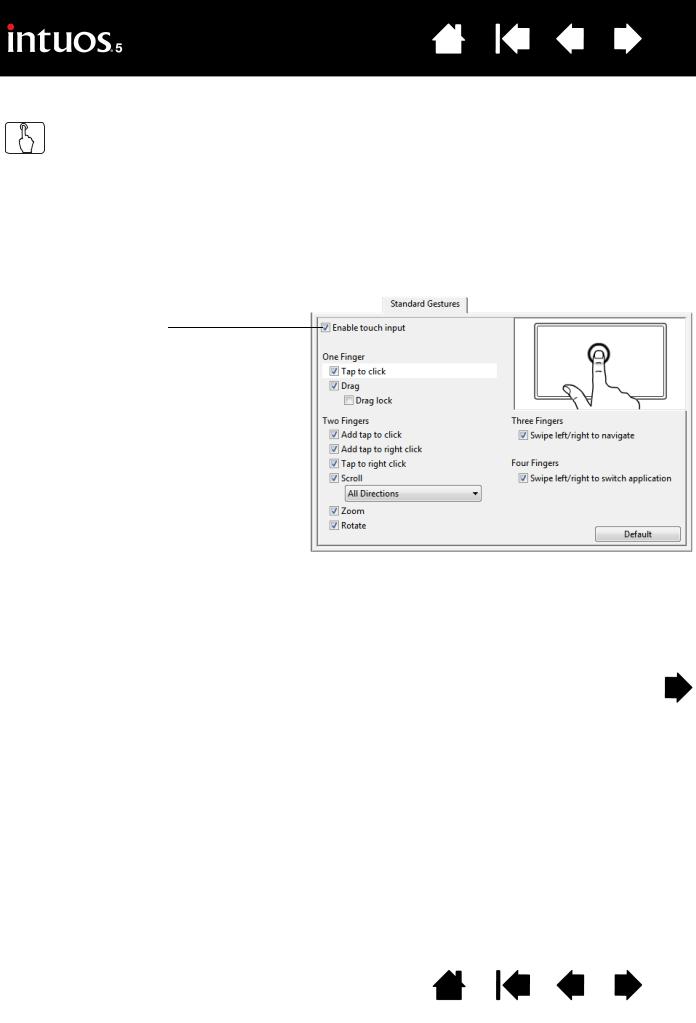
Touch options can be individually enabled or disabled within the Wacom Tablet control panel. Touch is on
when selected in the TOUCH OPTIONS, STANDARD GESTURES, or MY GESTURES tab.
•Use basic actions to navigate and perform typical mouse operations.
•Use gestures to scroll, zoom, rotate, and perform other functions. Some gestures may provide a visual cue on your display screen to indicate when the gesture has been recognized by Intuos5.
Uncheck to disable touch.
Touch can be completely disabled (and again enabled) from any of the touch function tabs in the Wacom Tablet control panel.
STANDARD GESTURES tab shown.
Windows screen capture shown. Available options may vary, depending on your operating system and version.
You can customize your touch experience and also customize the ExpressKeys to perform some touch functions.
Contents Index
30
Loading...