


DTK-2400
Table of contents
 Loading...
User’s manual
Contents Index
Contents
1
Index
1
Cintiq (DTK-2400)
Setting up
Using the display stand
Using the pen
Customizing the pen
Using the pen display
Customizing the pen display
Using the Radial Menu
Application-specific settings
FAQs
Troubleshooting

Contents Index
Contents
2
Index
2
Cintiq 24HD
User’s Manual
Version 1.0, Rev F1711
Copyright © Wacom Co., Ltd., 2011
All rights reserved. No part of this manual may be reproduced except for your express personal use.
Wacom reserves the right to revise this publication without obligation to provide notification of such changes.
Wacom does its best to provide current and accurate information in this manual. However, Wacom reserves the right
to change any specifications and product configurations at its discretion, without prior notice and without obligation
to include such changes in this manual.
The above year indicates when this manual was prepared. However, the date of release to the users of the “manual”
is simultaneous with the introduction into the market of the applicable Wacom product.
Cintiq and Wacom are registered trademarks of Wacom Co., Ltd.
Adobe and Photoshop are either registered trademarks or trademarks of Adobe Systems Incorporated in the United
States and/or other countries. Microsoft, Windows, and Vista are either registered trademarks or trademarks of
Microsoft Corporation in the United States and/or other countries. Apple, the Apple logo, and Mac are trademarks of
Apple, Inc., registered in the U.S. and other countries.
Any additional company and product names mentioned in this documentation may be trademarked and/or registered
as trademarks. Mention of third-party products is for informational purposes only and constitutes neither an
endorsement nor a recommendation. Wacom assumes no responsibility with regard to the performance or use of
these products.
ExpressKey is a registered trademark of Ginsan Industries, Inc., and is used with permission.

Contents Index
Contents
3
Index
3
TABLE OF CONTENTS
About the manual 5
UNPACKING YOUR CINTIQ 6
Unpacking your product 6
Box contents 8
SETTING UP YOUR CINTIQ 10
System requirements 10
Step 1: Hardware installation 11
Step 2: Software installation 14
GETTING TO KNOW YOUR CINTIQ 15
Pen display features 15
Front view 16
Rear view 17
Pen features 18
USING THE CINTIQ DISPLAY STAND 19
Display stand features 20
Display stand location 21
Adjusting display height and incline 24
Using a keyboard with Cintiq 26
Cable replacement 27
WORKING WITH YOUR CINTIQ 30
Setting up your work area 30
Configuring Cintiq for handedness 32
Using the Grip Pen 33
Holding the pen 33
Positioning 34
Clicking 34
Dragging 35
Using the side switch 35
Working with pressure sensitivity 35
Drawing with tilt 36
Erasing 36
Pen display controls 37
Using the hardware control buttons 38
Using the ExpressKeys 39
Using the Touch Rings 40
Working with multiple monitors 41
Adjusting the display 42
Factory presets, auto-sync, and user settings 42
On Screen Display (OSD) settings 43
Power saving 45
CUSTOMIZING YOUR CINTIQ 46
Opening the control panel 46
Control panel overview 47
Calibrating the pen display 49
Customizing the pen 50
Adjusting tip feel and double-click 51
Adjusting eraser feel 52
Advanced tip and eraser pressure settings 52
Customizing tool buttons 53
Customizing tilt sensitivity 54
Customizing pen display functions 54
Customizing the ExpressKeys 55
Customizing the Touch Rings 56
Button functions 57
Using and customizing the Radial Menu 64
Working with Display Toggle 65
Application-specific settings 66
Creating an application-specific setting 67
Changing application-specific settings 67
Removing application-specific settings 67
Working with multiple tools 68
Changing the tablet mode 69

Contents Index
Contents
4
Index
4
TROUBLESHOOTING 70
Testing Cintiq 71
Testing controls and input tools 72
Testing the hardware control buttons 72
Testing the ExpressKeys 73
Testing the Touch Rings 73
Testing a pen 74
Display troubleshooting 75
General display problems 75
VGA problems 77
Pen tablet troubleshooting 78
General problems 78
Windows-specific problems 82
Mac-specific problems 83
Technical support options 85
Obtaining driver downloads 86
FREQUENTLY ASKED QUESTIONS 87
CARE AND MAINTENANCE 89
Caring for Cintiq 89
Replacing the pen nib 90
OTHER USEFUL INFORMATION 91
Removing Cintiq from the display stand 92
Mounting Cintiq on the display stand 95
Using an alternate mount or stand 98
Uninstalling Cintiq 99
Managing preferences 100
Installing multiple tablets 101
Using applications integrated for tablet control 102
Importing expert settings 103
Pen and digital ink capabilities in Windows 104
Product information 105
Ordering parts and accessories 106
Available parts and accessories 106
GLOSSARY 107
INDEX 110

Contents Index
Contents
5
Index
5
ABOUT THE MANUAL
This manual provides quick access to information about Cintiq. The information is common to Windows
and Mac computers and Windows screen captures are shown, unless otherwise noted.
• Go directly to table of contents
or index topics by clicking on them.
• Use the navigation controls to move through the manual.
• You can use your .pdf viewer zoom-in tool to increase the size of the manual on your display screen.
Most .pdf viewers include additional tools for using and printing the manual. See the viewer application
help for more information.
•S
MALL CAPITAL LETTERS are used to identify the names of keyboard keys, dialog boxes, and control panel
options.
• Be sure to see also the Important Product Information guide for Cintiq, located on the Installation CD.
The guide includes product safety precautions, specifications, and your license agreement.
• The following information is not included with this product: information about your specific computer
hardware or operating system, or information about your application software. Your best source for this
information is the set of manuals and discs that came with your hardware, operating system, or
application.
Wacom’s philosophy is to continually improve all of its products. As a result, engineering changes and
improvements are made from time to time. Therefore, some changes, modifications, and improvements
may not be covered in this manual.
Go to front page.
Go to table of contents. Page back, or page forward.
Go to index. Go back to previous view.
Go to topic. Topic continued.
Contents
Index
topic
Contents Index
Contents
6
Index
6
UNPACKING YOUR CINTIQ
Your Cintiq interactive pen display comes pre-assembled with the pen display mounted on the Cintiq
display stand. The product parts and accessories are packed together in the accessories box. To avoid
damage, see the instructions on the following pages before setting up and using Cintiq.
Unpacking your product
Box contents
UNPACKING YOUR PRODUCT
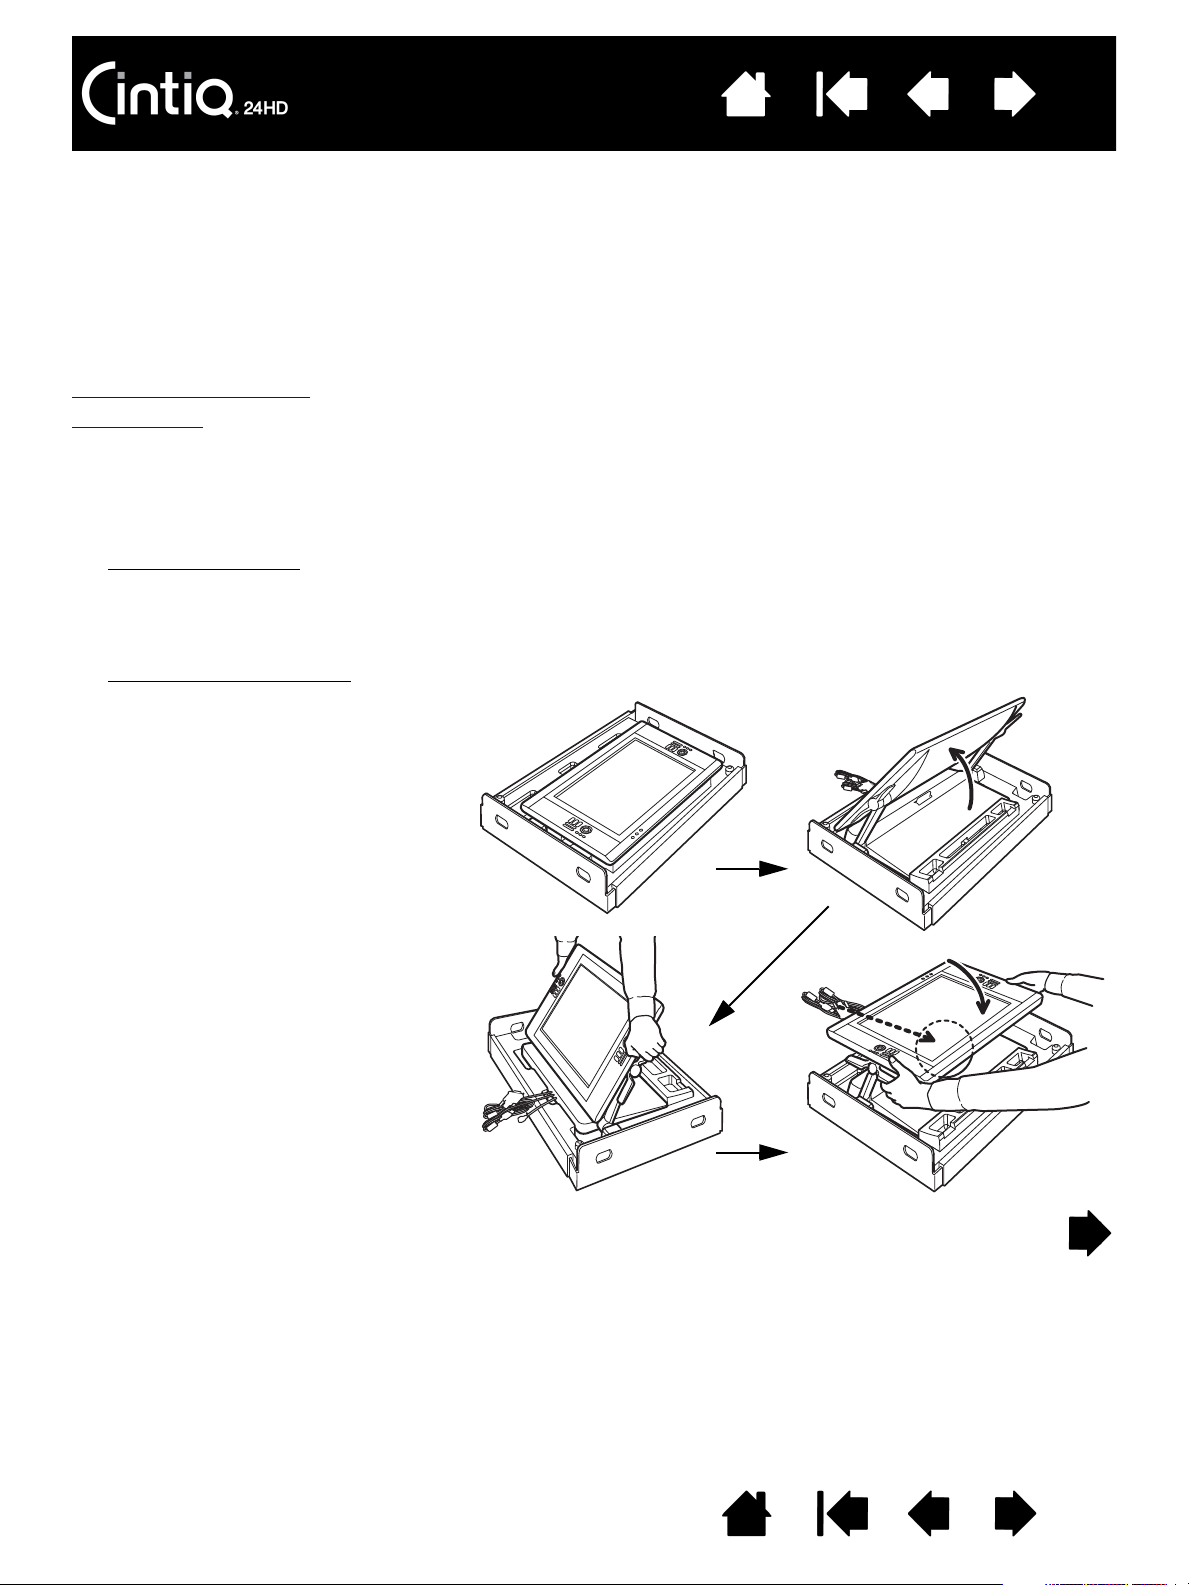
Carefully unpack and place all items on a stable surface.
1. Open the box cover
. Lift away the accessory parts box. Move the cabling and lift away the upper
cushion. Remove any packing materials from around the interactive pen display and stand.
To better access Cintiq, remove the plastic joiners from the lower corners of the product box. Then lift
away the upper portion of the box.
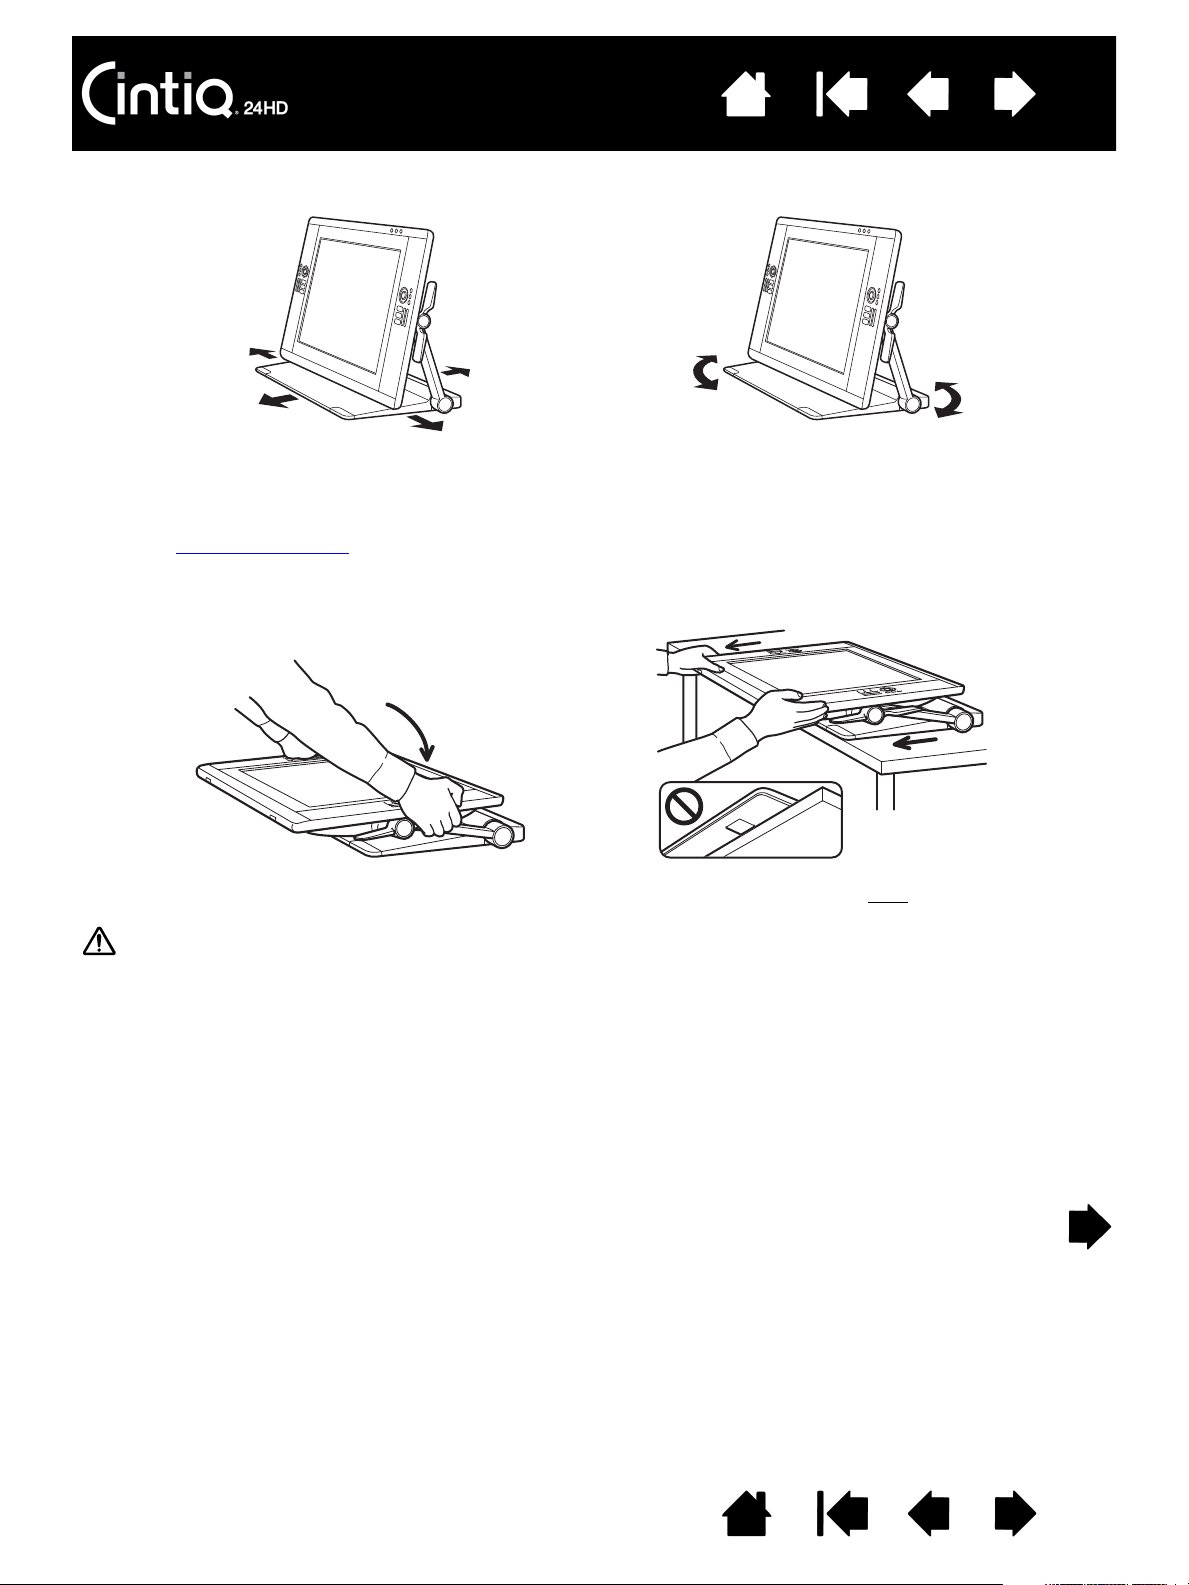
2. Lock the display in place
.
• Locate the incline levers on each
side of the unit. Grasp the pen
display on both sides at
approximately the same height as
the levers.
• Use your fingertips to gently
squeeze the upper levers. As you
squeeze, gently rotate and lift the
pen display upward. The display
support arms will follow your
movement. Continue to rotate
the pen display to a vertical
position until the support arms
lock into place. When in a vertical
position, release the incline
levers.
• Next, use the incline levers to
rotate the display to a flat
position.
Contents Index
Contents
7
Index
7
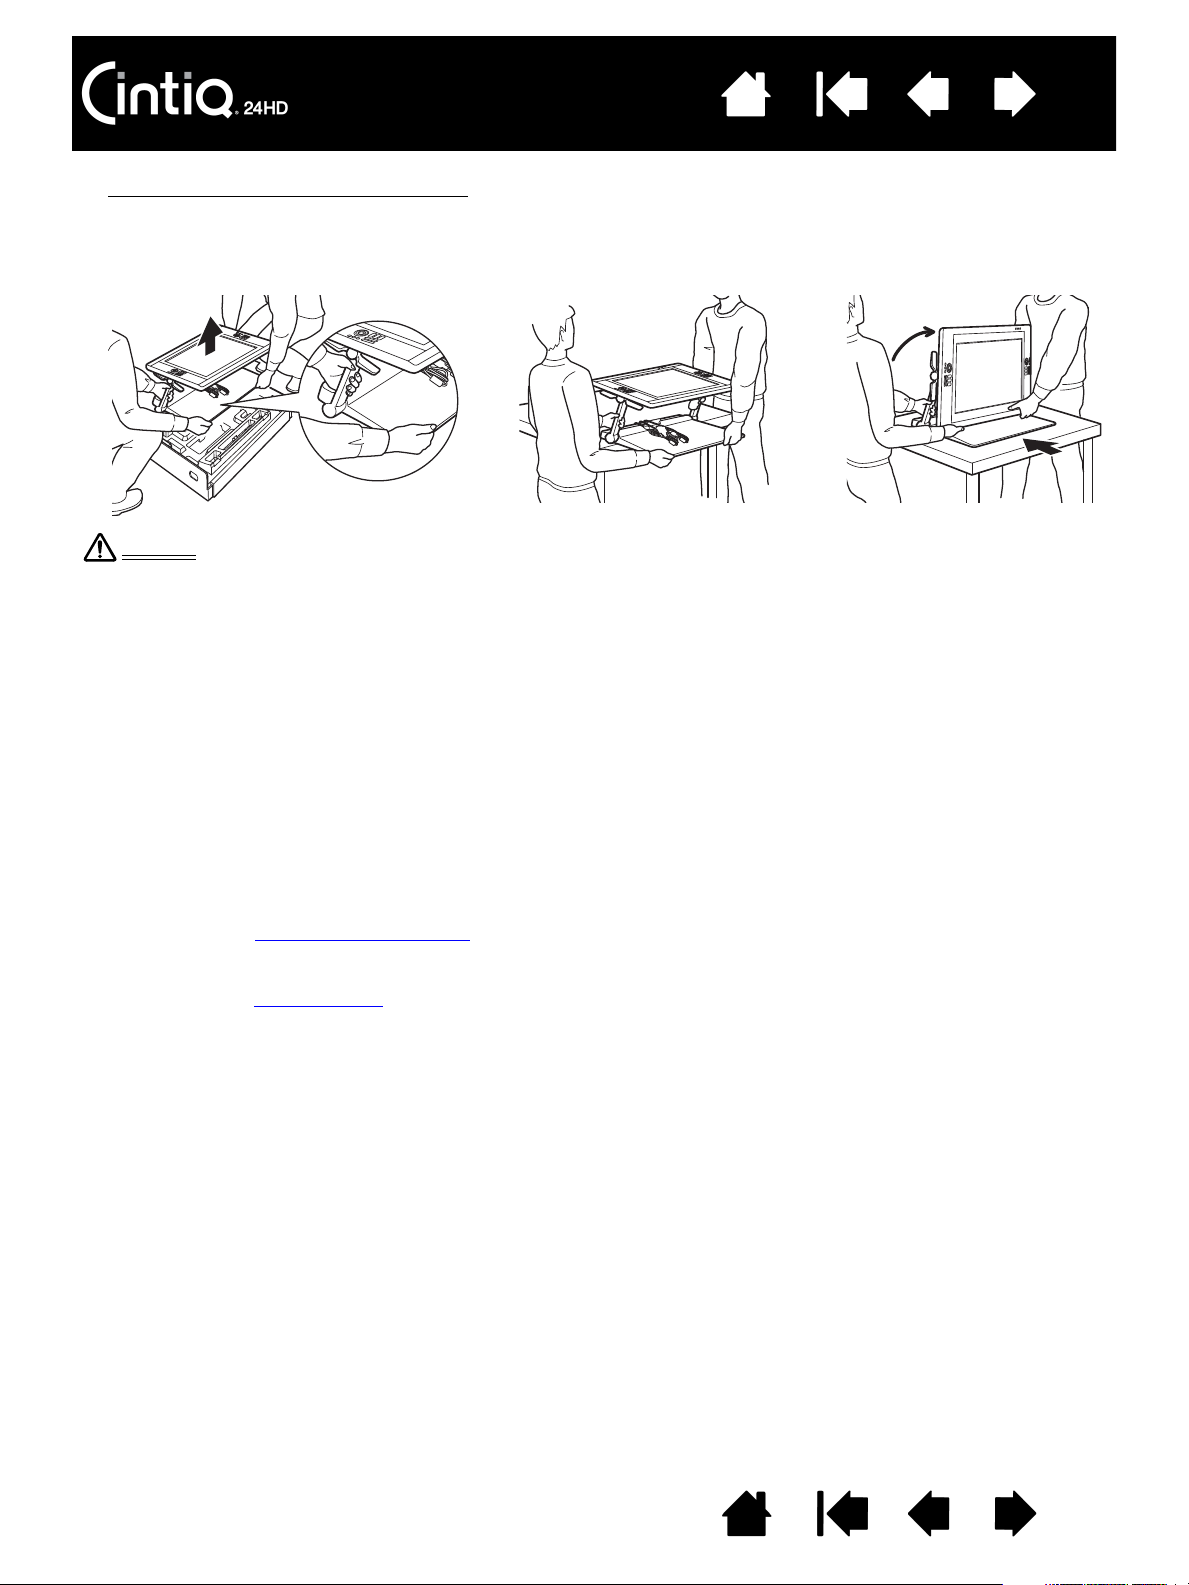
3. Carefully remove Cintiq from the box
. Holding the lower part of the display support arms near the
display stand base, lift and move this product while also supporting the base of the stand.
Important: Do not attempt to lift Cintiq by yourself. Each person should use both hands to securely
grasp the product. The assembly is heavy. Work together, and lift carefully.
4. Place the Cintiq assembly in a stable position on your desktop or other work surface so that it will not
tip or fall. See display stand location
.
5. When in place, use the incline levers to rotate the display back to a vertical position.
6. Inventory your box contents
.
Warning
Request assistance from another person or persons when removing, lifting, or moving this product.
Physical damage or personal injury may result from a single person attempting to lift or carry this product.
Use care not to let the pen display fall backward. Doing so may cause personal injury or damage to your
product. Request assistance from another person if needed.
Avoid catching your finger in the gaps of the movable portions of the stand.
Locate the cables on top of the stand base, and ensure they do not hang free. Tripping over loose cables
can cause physical damage or personal injury.
Do not lift by the incline levers or upper portion of the support arms. Improper operation may lead to
physical injury or damage to the stand. Avoid catching your finger in the gaps of the movable portions of
the stand.
Place your product completely and securely on a level, stable surface. Do not allow any portion of the
display stand base to protrude from the installation surface. Otherwise, Cintiq may fall and cause physical
damage or personal injury.

Contents Index
Contents
8
Index
8
BOX CONTENTS
After unpacking your product, ensure the box contents are complete.
Pen, with personalization rings Pen stand
AC power adapter and cable
Cintiq interactive pen display & Cintiq display stand,
pre-assembled
(DVI-I to DVI-D Dual-Link, DisplayPort, and USB
cables are pre-installed. DisplayPort cable is stored
within the Cintiq display stand.)

Contents Index
Contents
9
Index
9
Notes:
Some configurations may include additional CDs or DVDs containing application software.
To install, see the instructions for those CDs or DVDs.
Save the packing materials and package box for use when shipping or storing Cintiq.
When packing Cintiq for transport, adjust incline to a flat position. Always pack Cintiq in the original
containers and protective cushions.
Before installing, take some time to learn about your Cintiq interactive pen display
and Cintiq display stand.
DVI-I to VGA cable
(DVI-I to DVI-D Dual-Link, DisplayPort, and
USB cables are pre-installed. DisplayPort
cable is stored within the Cintiq display stand.)
Installation CD
Includes the Important Product Information guide.
Quick Start Guide
and
Warranty
Pen grip, wide bodied
May not be included in some product configurations.
Spacers, qty 3, for VESA mount
Screws, qty 6, for VESA mount

Contents Index
Contents
10
Index
10
SETTING UP YOUR CINTIQ
Your Cintiq interactive pen display functions as both a display and a pen tablet. Follow the instructions
below to complete the hardware and software installation.
System requirements
Step 1: Hardware installation
Step 2: Software installation
SYSTEM REQUIREMENTS
Make sure your computer meets the following minimum system requirements:
•PC
. Windows 7, Vista (SP2 or later), XP (SP3 or later). 32 or 64-bit configurations.
DVI, DisplayPort, or VGA port. Available USB port and CD-ROM drive.
•Mac
. OS X, v10.5.8 or later. G3 platforms are not supported. DVI, DisplayPort, or VGA port, or
appropriate Mini DisplayPort to DVI adapter. Available USB port and CD-ROM drive.
Cintiq supports digital (DVI or DisplayPort) and analog (VGA) video signals. For optimum performance,
connect Cintiq to a digital video card. VGA connection is not recommended as the display quality will not
be as good as with a digital connection.
Notes:
You may be able to set up Cintiq as a mirrored, extended, or independent display. When working
with more than one monitor, Cintiq will map to the monitors based upon how your system is
configured. By default, if you are in mirror mode, the pen display will map to the entire space on
each monitor. See your hardware and operating system documentation for details on configuring
your system for use with multiple monitors.
A Display Toggle
function is available for use with multiple display systems. This enables you to
toggle the screen cursor between Cintiq and your other displays.
Contents Index
Contents
11
Index
11
STEP 1: HARDWARE INSTALLATION
In this step, install the video, USB, and power cables.
Important: Never connect or disconnect the video or power cables while your computer or pen
display are powered on. This can damage the display or video card.
1. Turn off your computer.
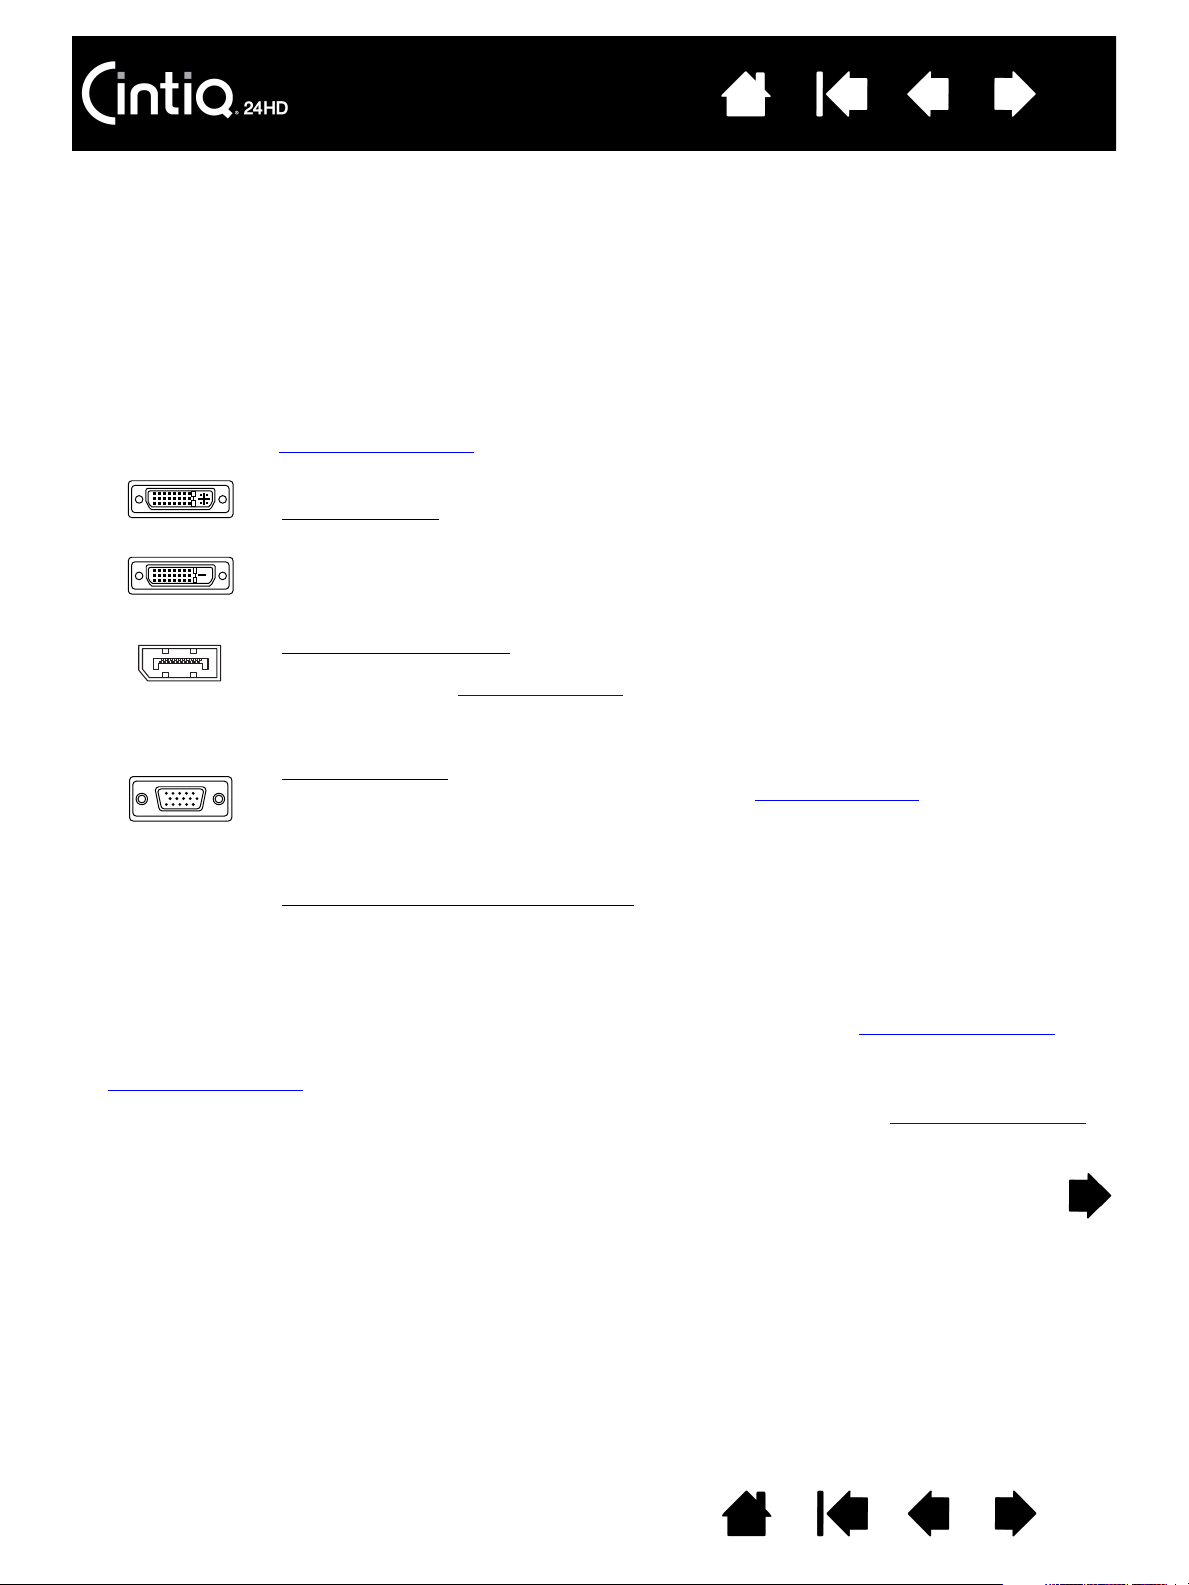
2. Determine if your computer has a digital (DVI or DisplayPort) or analog (VGA) port. If your computer has
only one video port, unplug your previous monitor or add a second video card. For best results,
connect Cintiq to a DVI-D or DisplayPort card.
3. Follow the below instructions for your video port. Make sure to tighten any connector thumbscrews.
See – A – in the connection diagram
.
4. Using the USB cable located at the base of the Cintiq display stand, connect to an available USB port
on your computer or USB hub attached to your computer. See – B – in the connection diagram
.
5. Connect the power adapter to the display stand extension cable for power. See – C – in the
connection diagram
.
6. Connect the adapter power cable and plug into an AC outlet. See – D – in the connection diagram
.
7. Turn on the pen display. The power LED will light orange.
For DVI operation, use the DVI-D video cable connector located at the base of the Cintiq
display stand. Connect the cable to the DVI port located on your computer video card.
Cintiq can be connected to either a DVI-D or a DVI-I card.
For DisplayPort operation
, use the DisplayPort cable. The cable is located within the base
of the display stand. Access the DisplayPort cable by removing the rear cover from the
display stand. See cable replacement
for details.
Connect the DisplayPort cable to your computer video card.
For VGA operation
, you will need to completely remove the DVI-I to DVI-D cable and
replace it with the provided DVI-I to VGA cable. See cable replacement
for details.
If connecting to a Mac Mini DisplayPort
, you will need to obtain an appropriate adapter.
Using an Apple Mini DisplayPort to Dual-Link DVI Adapter is recommended. Check with
your local product retailer or an online outlet for availability.
Connect the adapter between the Cintiq DVI-D cable connector and your Mac.
DVI-I
DVI-D
DisplayPort
VGA
Contents Index
Contents
12
Index
12
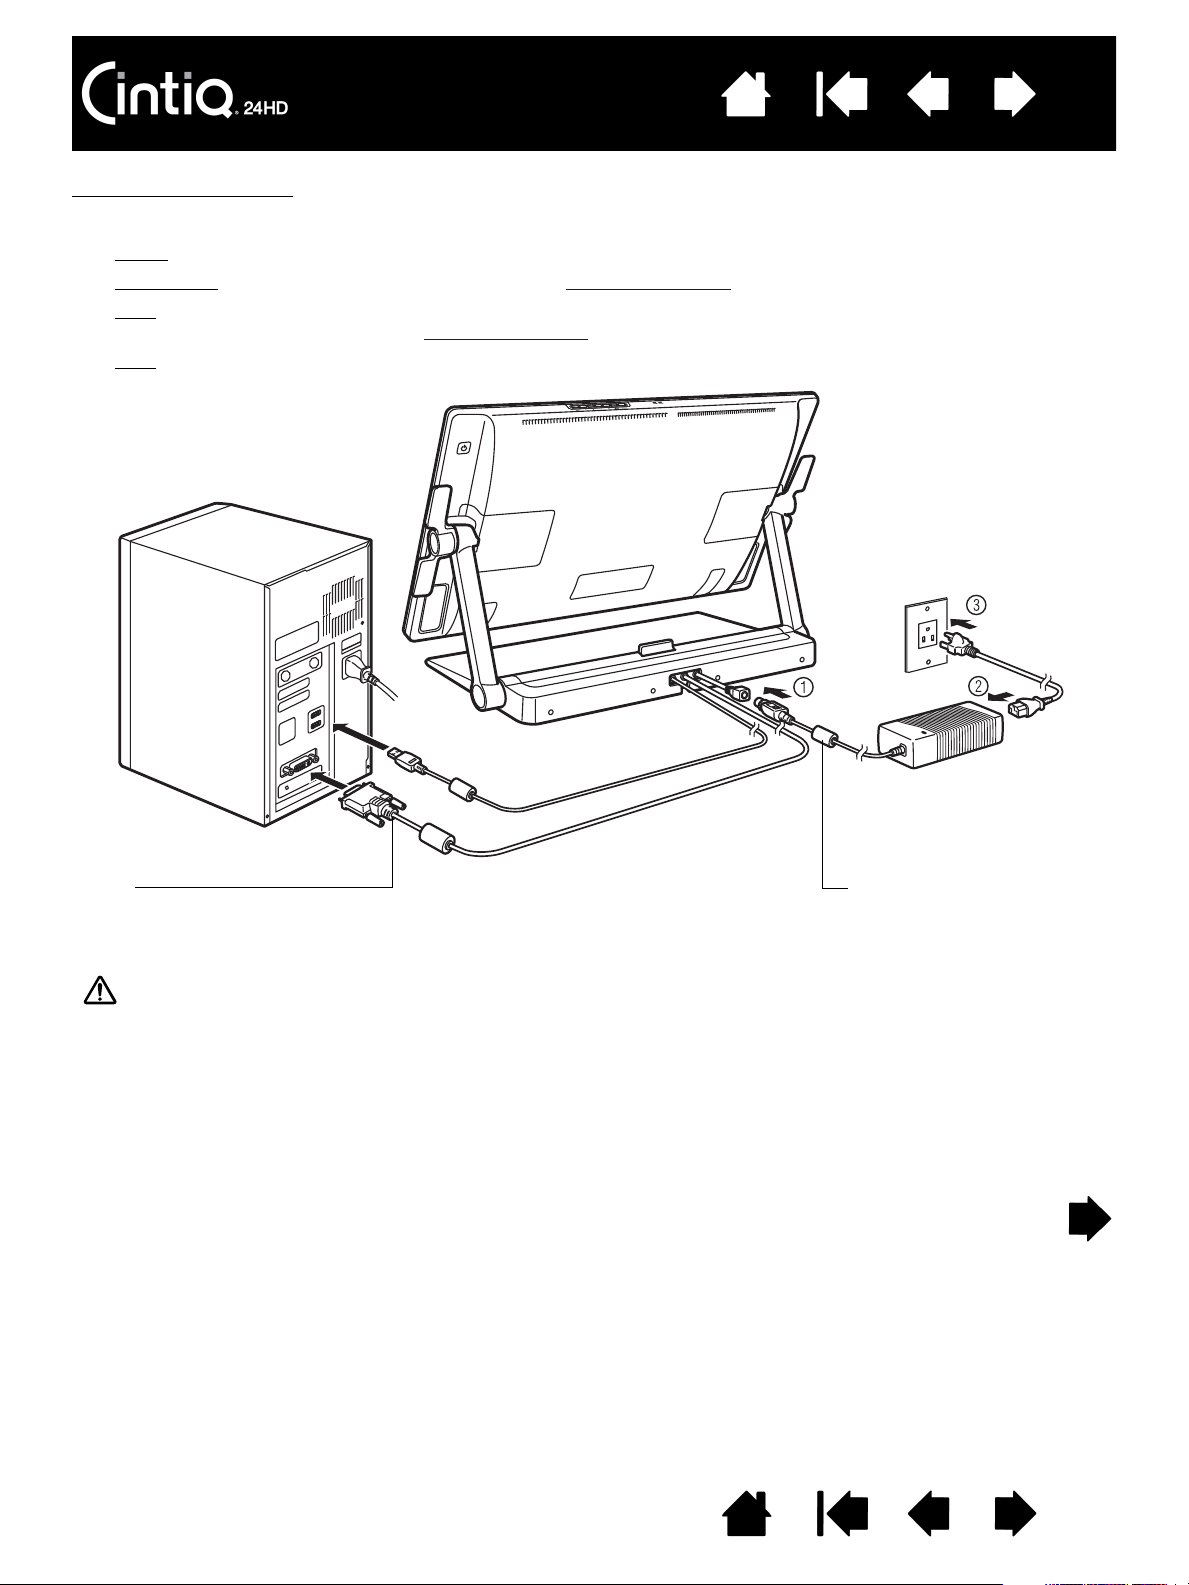
Cintiq cabling diagram
– A –
DVI-I to DVI-D Dual-Link, DisplayPort,
or DVI-I to VGA
Video card:
DVI, DisplayPort, or VGA
– C –
DC input. Connect to
display stand extension
cable.
AC
– D –
Power adapter
Caution
Do not connect or disconnect the video or power cables while Cintiq or your computer are turned on.
This can damage the display or computer video card.
Only use a power adapter specified for use with your pen display. Use of an improper power adapter may
damage the unit.
For optimum performance, the display refresh rate should use a vertical frequency of 60 Hz. Make sure the
refresh rate does not exceed the maximum vertical frequency (85 Hz) that Cintiq can support. See the
Important Product Information guide for specifications.
Connection cables are pre-installed.
•DVI-D
. Connector located at display stand base.
•DisplayPort
. Remove cover to access cable. See cable replacement.
•VGA
. Requires removal of DVI-I to DVI-D cable and replacement with the
provided DVI-I to VGA cable. See cable replacement
.
•USB
. Connector located at display stand base.
– B –
USB

Contents Index
Contents
13
Index
13
8. Turn on your computer. The interactive pen display will automatically install as a default monitor.
9. As necessary, configure the display control panel settings for the proper size and color resolution.
For best results, set Cintiq to the maximum (native) resolution of 1920x1200. See the Important
Product Information guide located on the Installation CD for details about resolution sizes that can be
used with Cintiq. The display size and color resolution may be constrained by the capabilities of your
video card. To fine-tune, see adjusting the display
.
Windows
: If you are using Cintiq as a secondary display, you may first need to enable the unit in your
display properties control panel.
After the LCD monitor portion of the installation is working to your satisfaction, move on to step 2: software
installation.
Notes:
Each interactive pen display LCD panel is produced under very stringent quality standards.
Production techniques cannot guarantee an absolutely perfect display, and some panels may exhibit
a certain number of subpixels that show an incorrect color. See the Important Product Information
guide for more information.
If an image has fine striping (such as screen stripes), it may appear to flicker or display a moiré
pattern.
Do not apply excessive pressure on the display screen surface, it may cause the appearance of a
moiré or pooling pattern. If this occurs, use less pressure on the display screen when working with
the pen.
When a still image is displayed for a long period of time, an after-image may remain for a short time.
To prevent this, use a screen saver or other power management feature.
To extend the life of the pen display backlight, set your computer’s power management to turn off
the display when not in use for extended periods of time.
Your eyes may feel more comfortable if you reduce the display screen brightness when working with
Cintiq for extended periods of time. This will also extend the life of the backlight and reduce the
heat felt on the display screen surface.
Some models may include a color profile on the Installation CD. To activate for use with Cintiq, first
identify Cintiq as a pen display in the system display settings control panel. Then select the Cintiq
profile in the color management control panel. For details, see the color management information in
your operating system and application documentation.
For troubleshooting tips, see troubleshooting
.

Contents Index
Contents
14
Index
14
STEP 2: SOFTWARE INSTALLATION
Save your work and close all open applications. Temporarily disable any virus protection programs.
1. Insert the Installation CD into your computer’s CD-ROM drive. If the software installer menu does not
automatically display, double-click on the I
NSTALL icon located on the CD. (When available, you can
also download and install the latest software driver from the Wacom web site for your region.)
2. Click I
NSTALL TABLET and follow the prompts to install the driver software.
3. Reactivate your virus protection program.
4. After completing the software installation, make sure you can use your pen on the Cintiq display screen
to move the screen cursor.
When you place the pen tip on the display screen, the screen cursor should immediately jump to a
corresponding position approximately beneath the pen tip. Lift the pen tip and place it on the display
screen surface in a different location. The screen cursor should again jump to the new position. This is
known as absolute positioning, and enables you to position the screen cursor without having to drag
your pen across the display screen surface.
5. Check the Read Me file for updated information. Review also the Important Product Information guide
located on the Installation CD for cautions and warnings. If you have trouble installing Cintiq, see
troubleshooting
.
6. Next, precisely align the screen cursor with the pen tip position. See calibrating the pen display
.
Notes:
User-specific preferences are supported. After logging on, each user can customize their personal
settings in the Wacom Tablet control panel. Switching to another user (either by logging on or fast
user switching methods) will automatically load the settings for that user.
If the pen display does not respond properly or you lose cursor control, the pen display preferences
may be corrupted. See managing preferences
to delete the current preference settings and return
the pen display to its factory default condition.
Driver installation automatically activates the pen input functions available within Microsoft
Windows 7, Vista, and Office 2007 or later (except for Windows 7 Starter and Home Basic, and
Windows Vista Home Basic). See pen and digital ink capabilities in Windows
.
To download a new software driver (when available) from the Internet, see obtaining driver
downloads.
To uninstall the software driver, see uninstalling Cintiq
.

Contents Index
Contents
15
Index
15
GETTING TO KNOW YOUR CINTIQ
The Cintiq interactive pen display combines the benefits of a Liquid Crystal Display (LCD) with the control,
comfort, and productivity of Wacom’s cordless, battery-free pen technology. This gives you a direct pen-
on-screen interface for your computer.
The basic components of your Cintiq include a Wacom pen tablet internally mounted behind a high quality
IPS color display, the Wacom Grip Pen, and the Cintiq display stand
.
This manual describes how to set up
and use of your Cintiq. The Wacom Tablet control panel enables you
to customize your pen and pen display settings. To learn more, see customizing
.
Note: Not all product models are available in all regions.
Pen display features
Pen features
PEN DISPLAY FEATURES
Take some time to familiarize yourself with the features and components of your Cintiq interactive pen
display. Although they will appear as separate devices to your operating system, the display and tablet
sensor function as an integrated output and input device. The tablet sensor reports pen coordinates,
pressure, tilt, switch, eraser, and other information.
• Many applications have built-in support for pen display features (such as pressure sensitivity,
tilt, and rotation). Visit the Wacom web site to find a listing of applications that support these features
(See product information
).
• For information on how best to use pen display features within a specific application, see the
instructions in that application’s manuals.
Front view
Rear view
Contents Index
Contents
16
Index
16
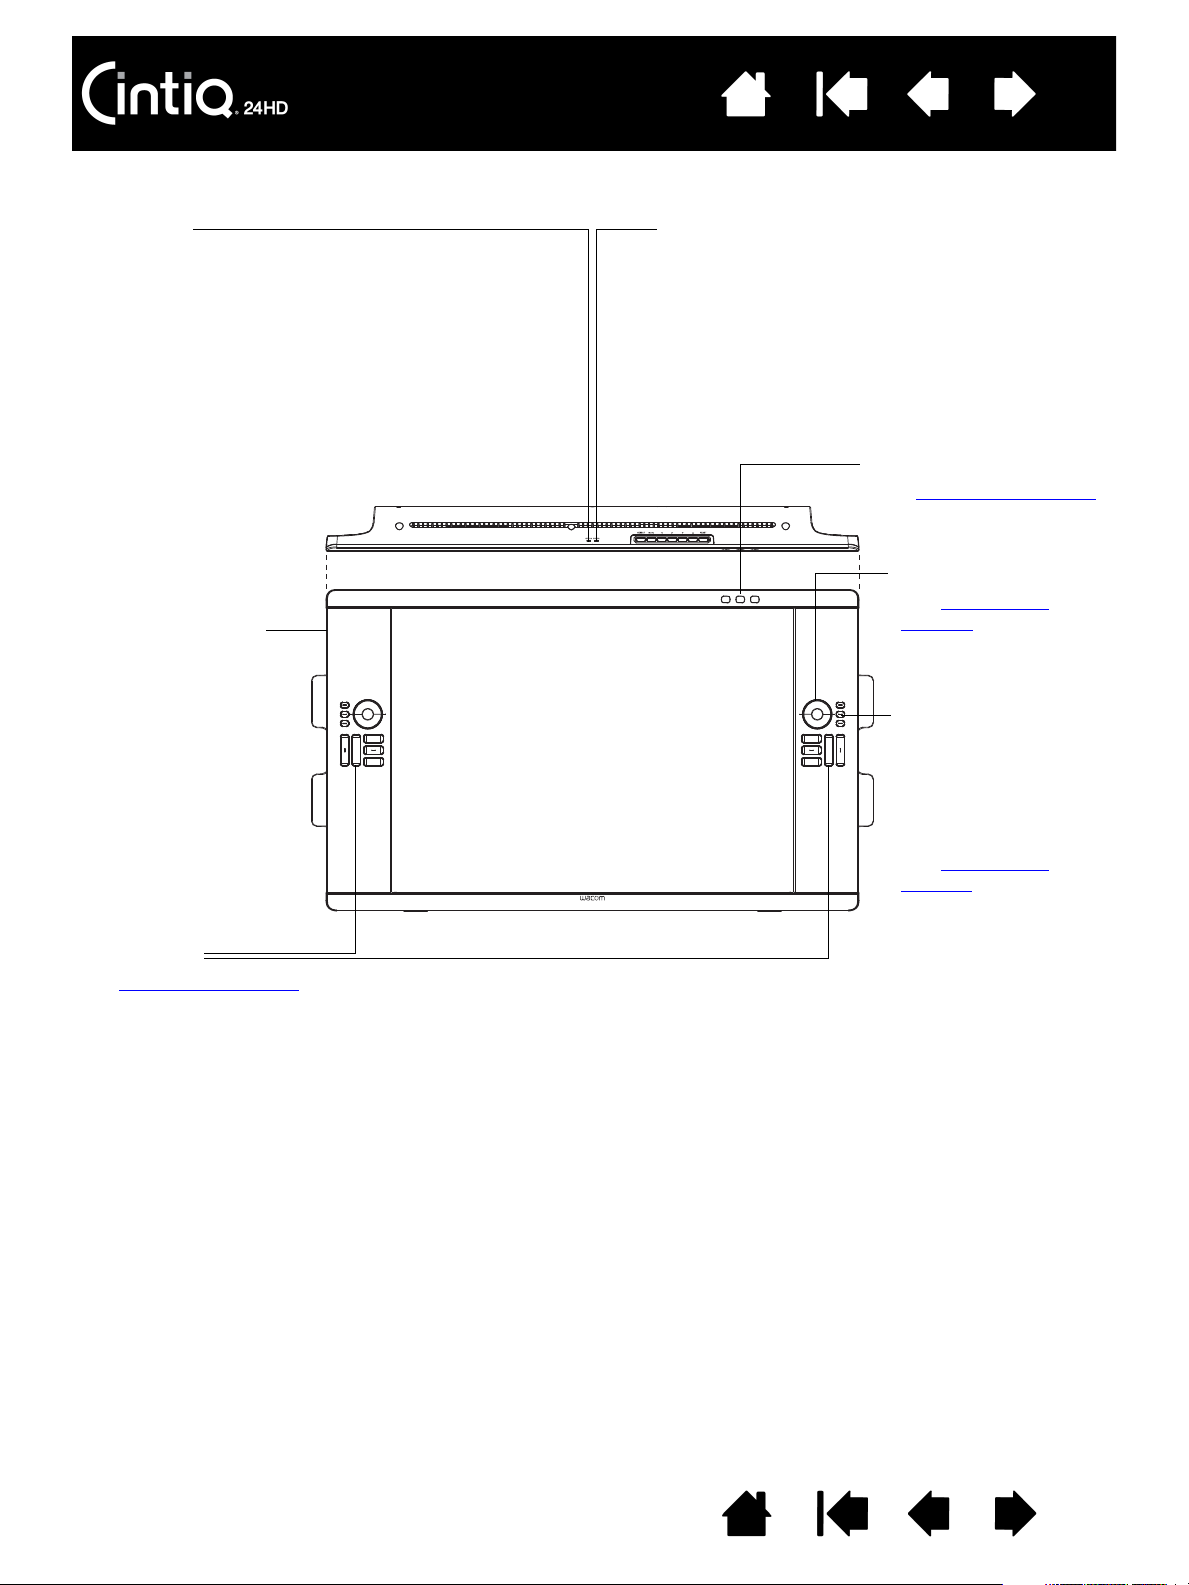
FRONT VIEW
Status LED
• When using pen in active area of the pen
display, lights blue when the pen tip, eraser,
or side switch are pressed.
• LED will not light unless the USB cable is
plugged into an active USB port and a video
signal is present.
Power LED
• Lights blue when power has been supplied to
Cintiq and a video signal is present.
• Glows orange when no video signal is
detected. (e.g., The computer is turned off,
starting up, or has entered a power
management mode in which video signals are
not sent.)
ExpressKeys
See pen display controls
.
Touch Ring
mode buttons
Press to choose a
Touch Ring function.
Status LEDs show the
active mode.
See pen display
controls.
Hardware control buttons
See pen display controls
.
Touch Ring
See pen display
controls.
USB accessory port
Contents Index
Contents
17
Index
17
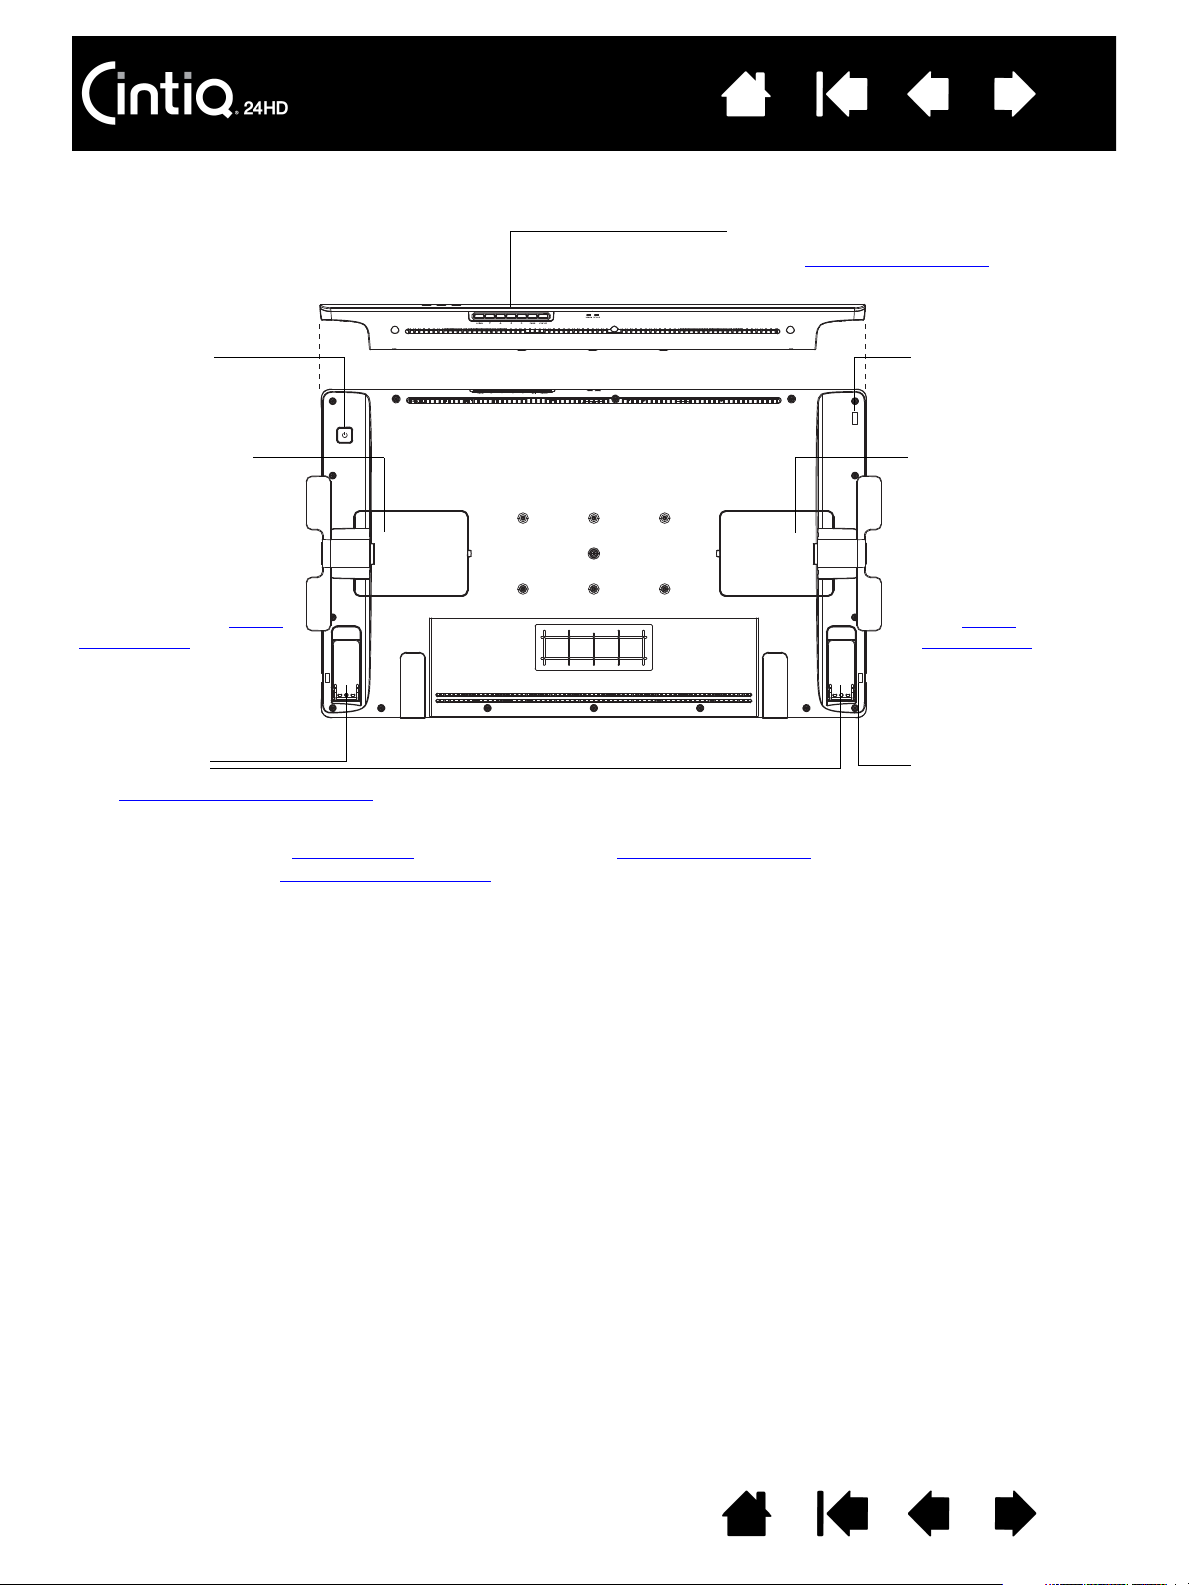
REAR VIEW
Next step: Review the pen features and learn about the Cintiq display stand. Then, if you have not already
done so, move on to setting up your Cintiq
.
On Screen Display (OSD) controls
Use for adjusting the display
settings.
Security slot
Pen tether
attachment point
One on each side.
Connection ports,
DVI-I Dual-Link and
DisplayPort
Pre-installed cables are
routed to enter unit at
this point.
Remove cover if access
is required. See cable
replacement.
Connection ports,
USB and power
Pre-installed cables
are routed to enter
unit at this point.
Remove cover if
access is required.
See cable
replacement.
Support legs
See using a keyboard with Cintiq
.
Power switch
Push to turn unit on
or off.
Contents Index
Contents
18
Index
18
PEN FEATURES
Important: Use only the pen that came with your product, or a Wacom accessory pen specified for
use with the Cintiq 24HD. Other pens may not function properly. See available parts and
accessories. Also, the Cintiq pen tip is specifically designed for use with the Cintiq pen display.
The tips on other pens could damage the Cintiq display screen.
When not in use, place the pen in the pen stand or lay it flat on your desk. To maintain the
sensitivity of your pen, do not store it in a container where it will rest on the tip or eraser. Improper
storage may damage pen tip pressure sensor(s).
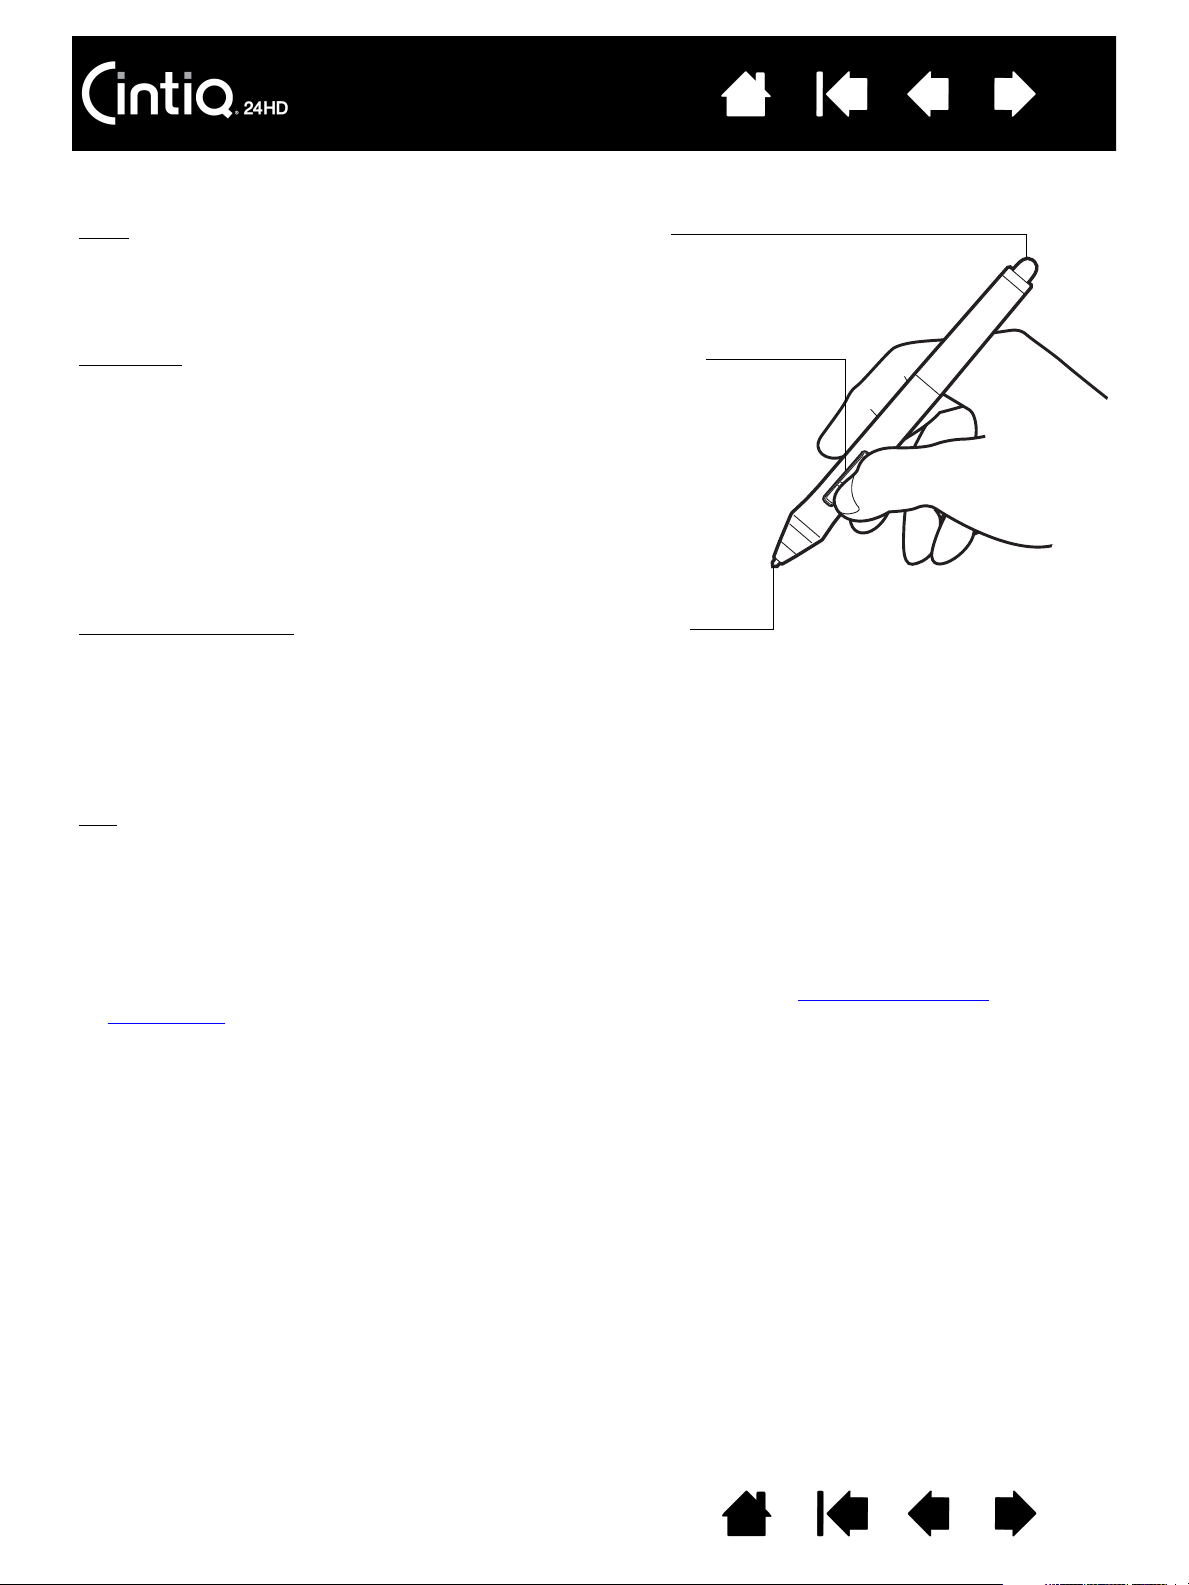
Eraser: When brought within proximity of the pen display screen,
the tablet portion of the display reports the pen location.
Pressure information is reported as you press down on the eraser.
By default, the function is set to E
RASE.
Side switch
: Be sure the customizable side switch is in a convenient
location where you can toggle it with your thumb or forefinger but not
accidentally press it while using the pen.
You can use the switch whenever the pen tip is within proximity of the
display screen. You do not need to touch the pen tip to the display
surface.
Toggle the switch in either direction to activate the button functions.
By default, the upper switch is set to D
OUBLE CLICK and the lower
switch is set to R
IGHT CLICK.
Pen tip (replaceable nib)
: The pen activates as soon as it is brought
within proximity of the pen display screen. This allows you to
position the screen cursor without touching the pen tip to the
display screen.
When pressure is applied to the pen tip, the pen simulates a primary
mouse button click. Tip click pressure can be adjusted in the
Wacom Tablet control panel.
Tips:
The pen enters proximity when the tip or eraser is brought
within 5 mm (0.2 inch) of the pen display screen surface.
To resume operations after the pen display has entered auto
sleep mode, bring the pen tip within proximity or touch the
pen tip on the pen display screen.
Contents Index
Contents
19
Index
19
USING THE CINTIQ DISPLAY STAND
The Cintiq display stand is designed to support the weight of your Cintiq interactive pen display.
• Cintiq can accommodate a variety of uses and working styles. Use the stand to adjust the working
position of Cintiq so as to best meet your needs throughout the day.
• You can move or slide Cintiq to different locations on your desktop. Remember that you may need to
adjust the height or incline to which you have positioned Cintiq before moving the unit.
Display stand features
Display stand location
Adjusting display height and incline
Using a keyboard with Cintiq
Cable replacement
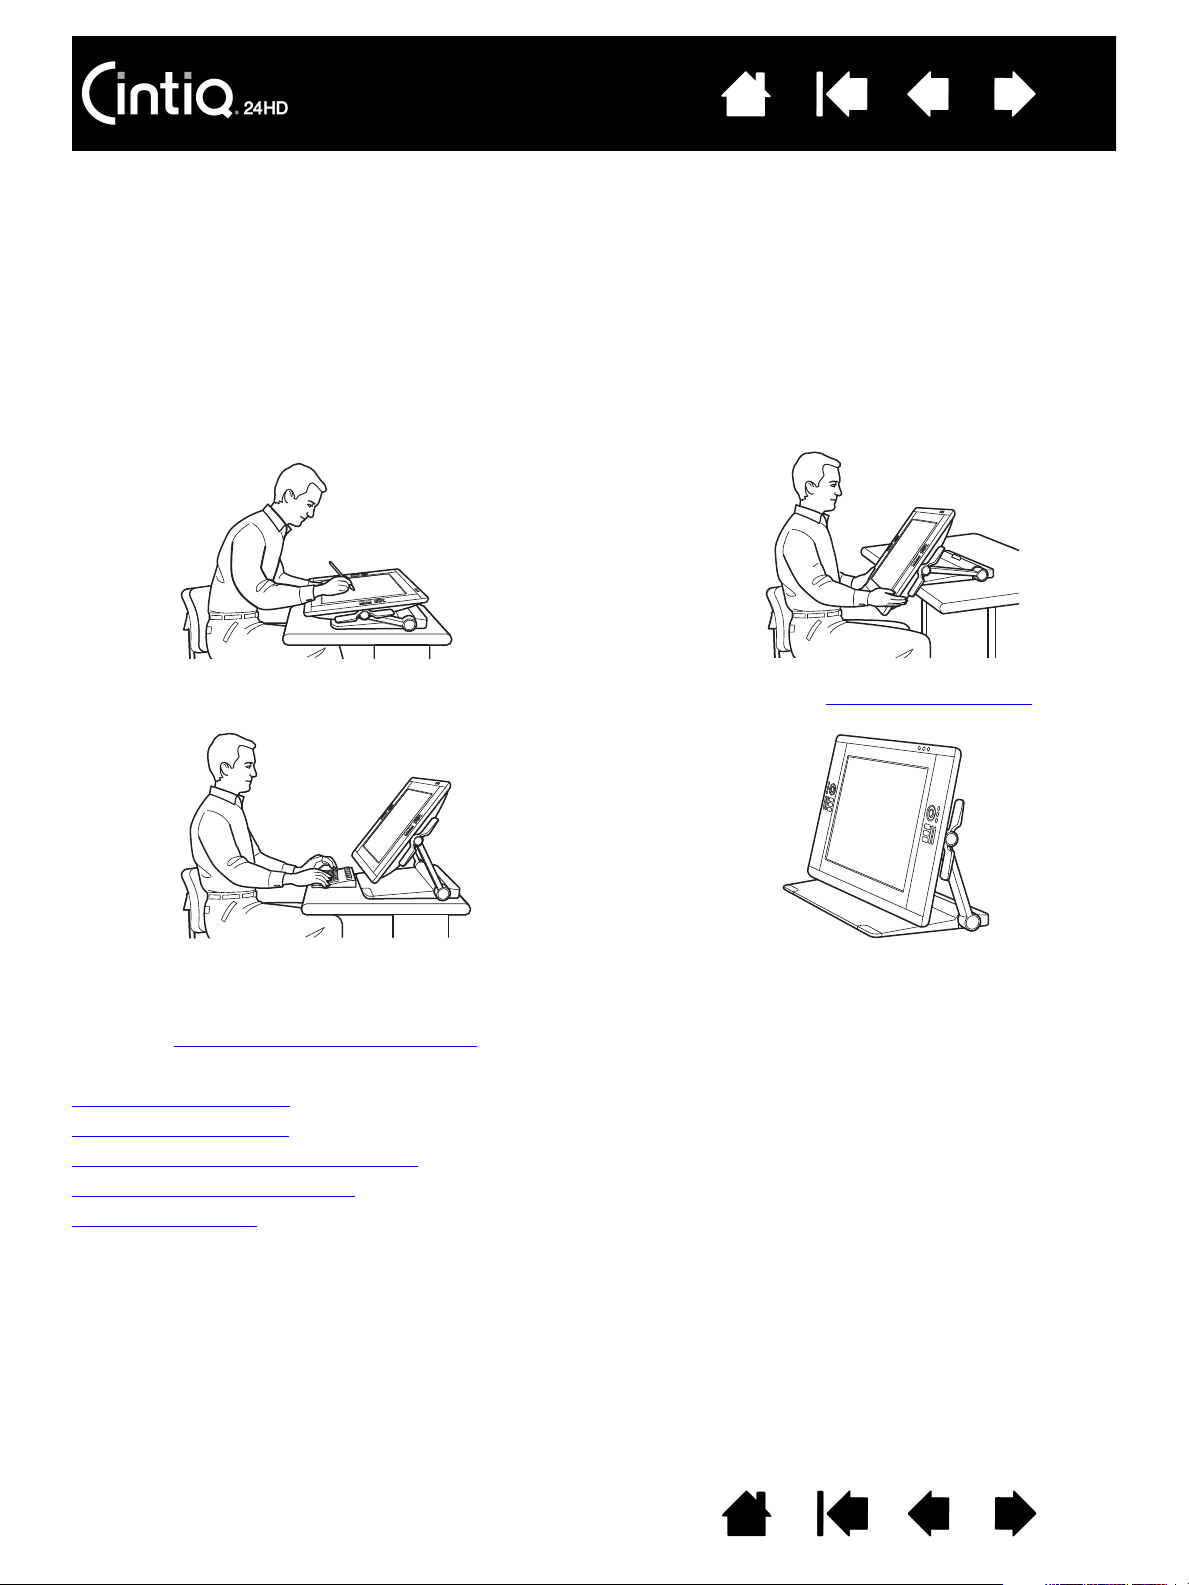
Adjust the display position as needed to emulate
an easel, animator’s table, or drafting table.
Adjust Cintiq to a more vertical position when a large
amount of keyboard input is required. This position
is also useful when presenting your work to co-
workers or clients. Extend the pen display support
legs to place a keyboard beneath the unit
.
For a more immersive experience, position
the display to overhang your desktop
.
Cintiq can also be used vertically upright
as a display.

Contents Index
Contents
20
Index
20
DISPLAY STAND FEATURES
Locate Cintiq on your desktop or other stable work surface. Select a level display stand location where
Cintiq will not tip or fall. Take some time to familiarize yourself with the display stand components.
Incline levers
One on each side. Use to adjust display height
and incline.
Release latch
Frees the display support arms when in locked position.
Support the pen display with one hand and lift slightly
while using your other hand to pull the latch toward you.
See adjusting display height and incline
.
Display support arms
One on each side. Movable arms create a smooth
transition when adjusting Cintiq. Locked when in
vertical position.
Do not lift by the incline levers or upper portion of the display support arms. Improper operation may lead
to physical injury or damage to the stand. Avoid catching your finger in the gaps of the movable portions of
the stand.
Always place Cintiq securely on a level, stable desktop or other working surface. Do not allow any portion
of the display stand base to protrude from the installation surface. Otherwise, Cintiq may fall and cause
physical damage or personal injury.
Do not place on any unsteady surface or table. Do not place on slanted areas, unstable areas, or areas
where vibration is present. Physical damage or personal injury may result if this product falls from an
unsuitable surface.
Warning
Connection cables
DVI-D Dual-Link, DisplayPort, USB, and power.
See step 1: hardware installation
.
Note: Remove cover to access the DisplayPort
cable. See cable replacement
.
Security slot
Display stand base

Contents Index
Contents
21
Index
21
DISPLAY STAND LOCATION
Select a location on your desktop or other work surface that is level and stable. This product weighs
approximately 29 kg (64 lbs). Any table or platform on which this product is installed must be able to
support the combined weight of the Cintiq interactive pen display and Cintiq display stand.
• Before moving Cintiq, adjust the pen display height and incline
so the display stand support arms are
locked upright, with Cintiq positioned horizontally. Place all cables on top of the stand base and ensure
they do not hang free. Tripping over loose cables can cause physical damage or personal injury.
• Request assistance from another person or persons. Each person should securely grasp the lower part
of a display support arm near the display stand base. With the other hand, grasp the base of the stand
at the front corner. Using care, lift and carefully move this product while supporting the base of the
stand.
Important: The assembly is heavy. Do not attempt to lift Cintiq by yourself. Each person should use
both hands to securely grasp the product. Grasp the stand base at the corner areas to avoid any
sharp edging. DO NOT lift the display unit itself, otherwise damage might occur to the LCD if it
flexes during movement. Also, the display unit does not have sufficient strength to support the load
of the stand hanging freely from it. Work together, and lift carefully.
• Locate Cintiq on a desktop or other working surface that is flat, clean, and free of any moisture or oily
film. Taking care not to pinch your fingers, do this by first placing the rear half portion of the stand onto
the table surface. Then slide the stand fully into place so that it will not tip or fall.
• When in place, use the incline levers to rotate the display back to a vertical position.
Do not lift by the incline levers or upper portion of the display support arms. Improper operation may lead
to physical injury or damage to the stand. Avoid catching your finger in the gaps of the movable portions
of the stand.
Place Cintiq securely on a level, stable desktop or other working surface. Do not allow any portion of the
display stand base to protrude from the installation surface. Otherwise, Cintiq may fall and cause physical
damage or personal injury.
Do not place this product on any unsteady surface or table. Do not place on slanted areas, unstable areas,
or areas where vibration is present. Physical damage or personal injury may result if this product falls from
an unsuitable surface.
Do not place this product on any wet surface or table. Doing so may cause the pads on the base of this
product to slip, allowing the product to fall.
Warning
Contents Index
Contents
22
Index
22
After placing Cintiq in its primary location, you can shift the unit to different positions.
For those who prefer a more immersive environment, Cintiq has been designed so that you can work with
the pen display overhanging your desktop.
1. Adjust height and incline
so the pen display is slightly above and overhanging the display stand edge.
2. Pull Cintiq toward you. As the front of the stand moves over the edge of your desktop, the friction of
the base pads will increase.
Slide the display stand on your desktop. Turn from side to side.
Prepare by adjusting the display to a
lowered, horizontal (flat) position.
Using a smooth motion, pull Cintiq toward you. If you
feel an increase in friction, stop
pulling. Check to
ensure the display stand base does not extend
beyond desktop edge.
Caution
Use care when adjusting the working position. Use a smooth, horizontal motion when pulling Cintiq toward
you. Do not lift the stand from the desktop. You can move the stand base to align with the edge of your
desktop. DO NOT let the stand base protrude over the desktop.
If you pull too far, and as the front of the stand moves over the edge of your desktop, the friction of the base
pads will increase and “lock” the stand in place. Do not pull beyond this point or past the base pads.
Push the display stand back onto the working surface until the front edge of the stand base aligns with the
edge of the installation surface.
Improper movement or pulling beyond the tipping point will prevent the friction lock from engaging, and
could cause personal injury or damage to the pen display if it were to fall. Cintiq is heavy. Use care when
moving the unit.
Contents Index
Contents
23
Index
23
3. Readjust the pen display height and incline as needed.
4. When you are done working, use the incline levers to raise the pen display and then push Cintiq back
onto your desktop. Always make sure this product is fully supported by your desktop when you are not
actively working with Cintiq.
Readjust height and incline.
Important: Push Cintiq fully back
onto desktop when done working.
Caution
When using Cintiq in a position where the display overhangs your desktop, do not push or lean against the
bottom edge of the display. This could cause the stand to disengage and possibly result in personal injury
or damage to the pen display if it were to fall. When you are done working, always move Cintiq fully back
onto the desktop.
Contents Index
Contents
24
Index
24
ADJUSTING DISPLAY HEIGHT AND INCLINE
You can adjust the pen display height and incline to best meet your needs throughout the day.
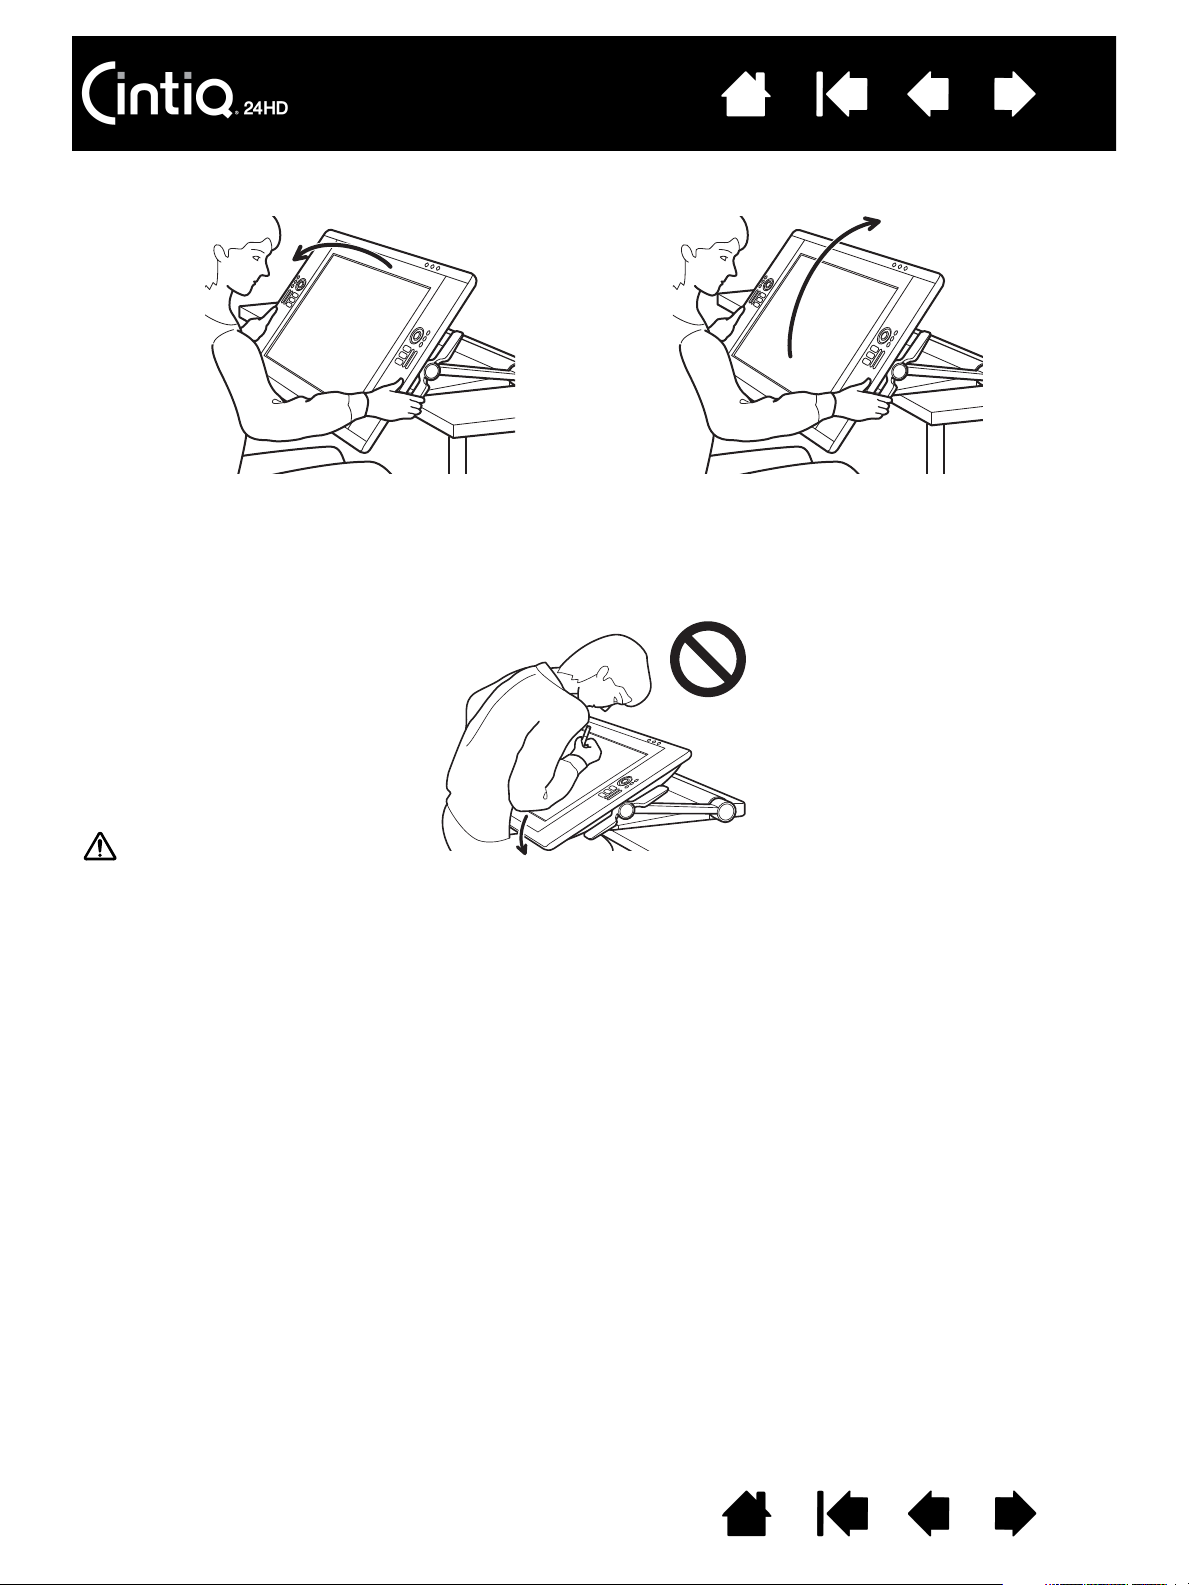
To change incline or viewing angle
, face the front of the pen display and grasp it on the left and right side at
approximately the same height as the incline levers. Use your fingertips to gently squeeze or pull the
incline levers toward the pen display. This will release a clutch mechanism. As you squeeze the levers, tilt
the pen display to adjust the viewing angle.
• Squeeze the incline levers on both sides of the pen display at the same time. For example: squeeze
both lower levers, or squeeze both upper levers.
• For a flatter incline
, squeeze the lower levers and gently rotate Cintiq down to the desired position.
• For a more vertical incline
, squeeze the upper levers and gently rotate Cintiq up to the desired position.
• As you tilt the pen display, the support arms may travel to follow your movements.
• Release the incline levers to lock in place.
• Pay attention to how the pen display feels as you adjust incline or viewing angle. You may find
instances where it is easier to use the upper levers instead of the lower, and vice versa.
Notes:
The incline levers exhibit some natural play before the clutch mechanism engages.
When tilting the display upward to a more vertical position, you may notice the stand wanting to slip
forward. Use the upper incline levers and pull Cintiq slightly toward you as you tilt the display
upward.
Contents Index
Contents
25
Index
25
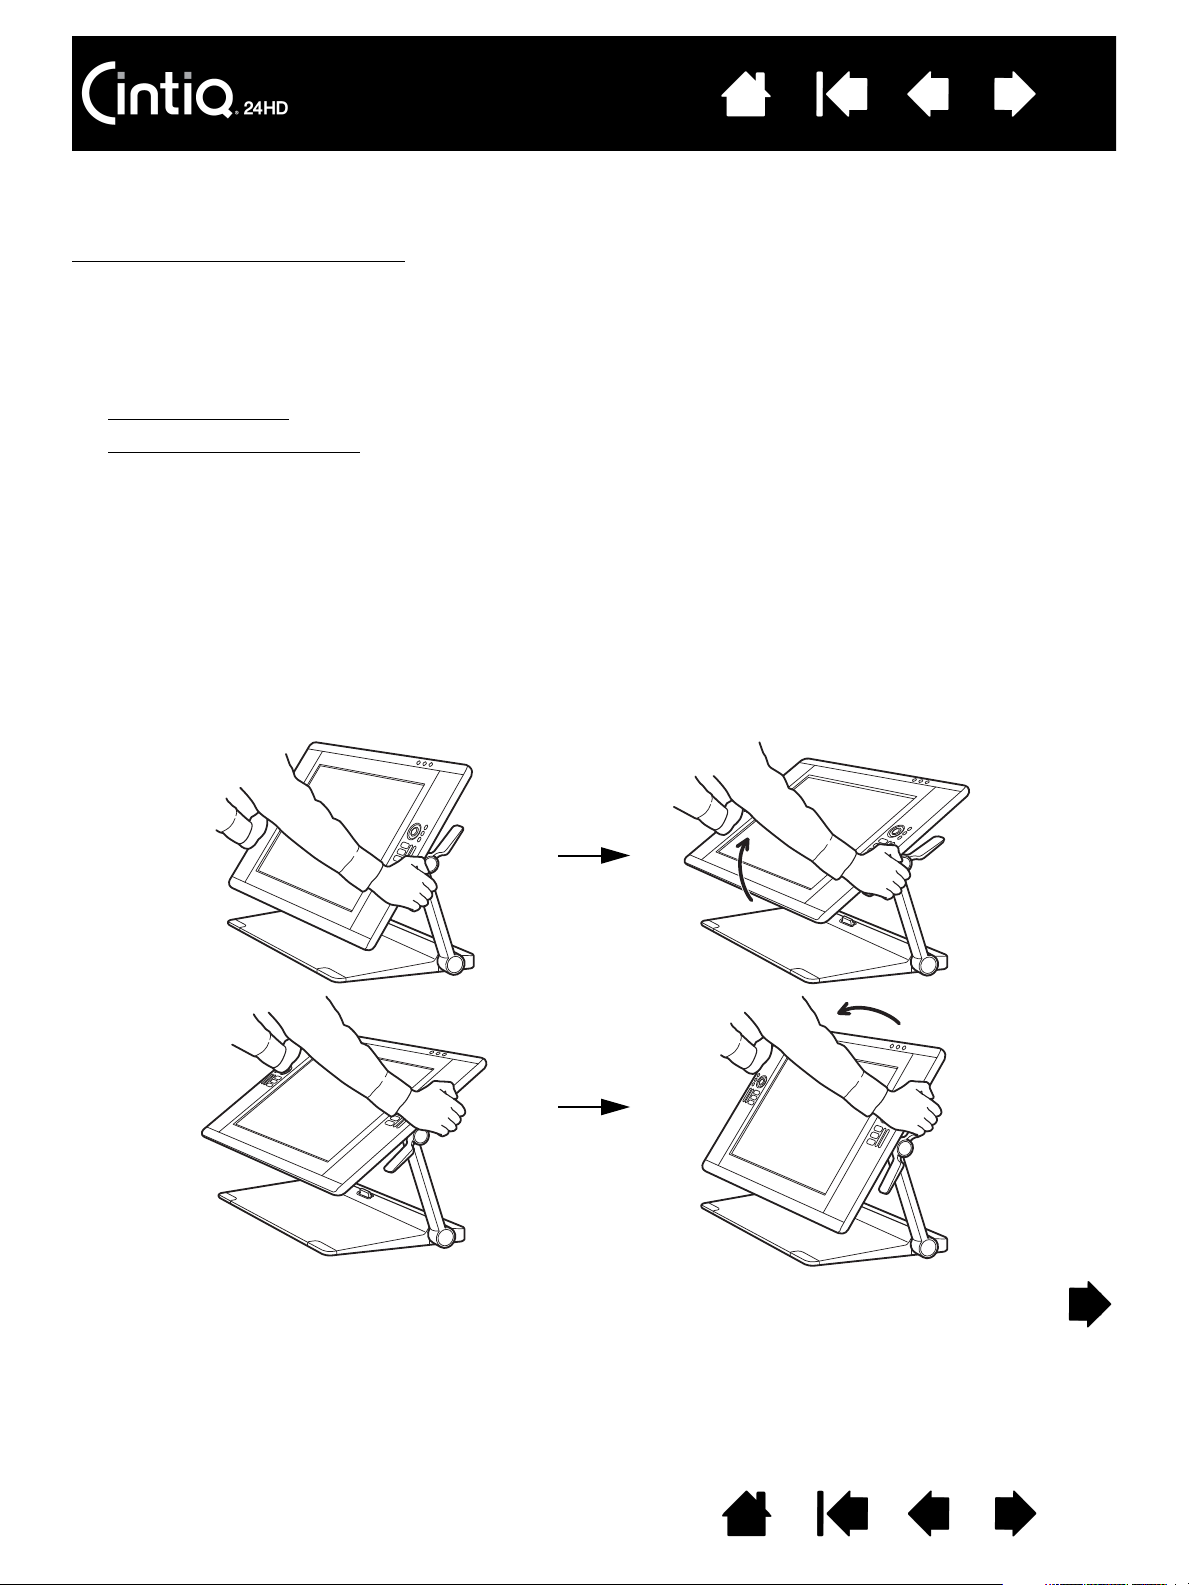
When repositioning Cintiq
, face the front of the pen display and grasp it on both sides.
•Use the incline levers
to adjust height and viewing angle.
• The viewing angle will change as the pen display moves through an arc created by the support arms.
• The display support arms lock in place when moved to a vertical position.
Important: The support arms lock in place ONLY when moved to a vertical position.
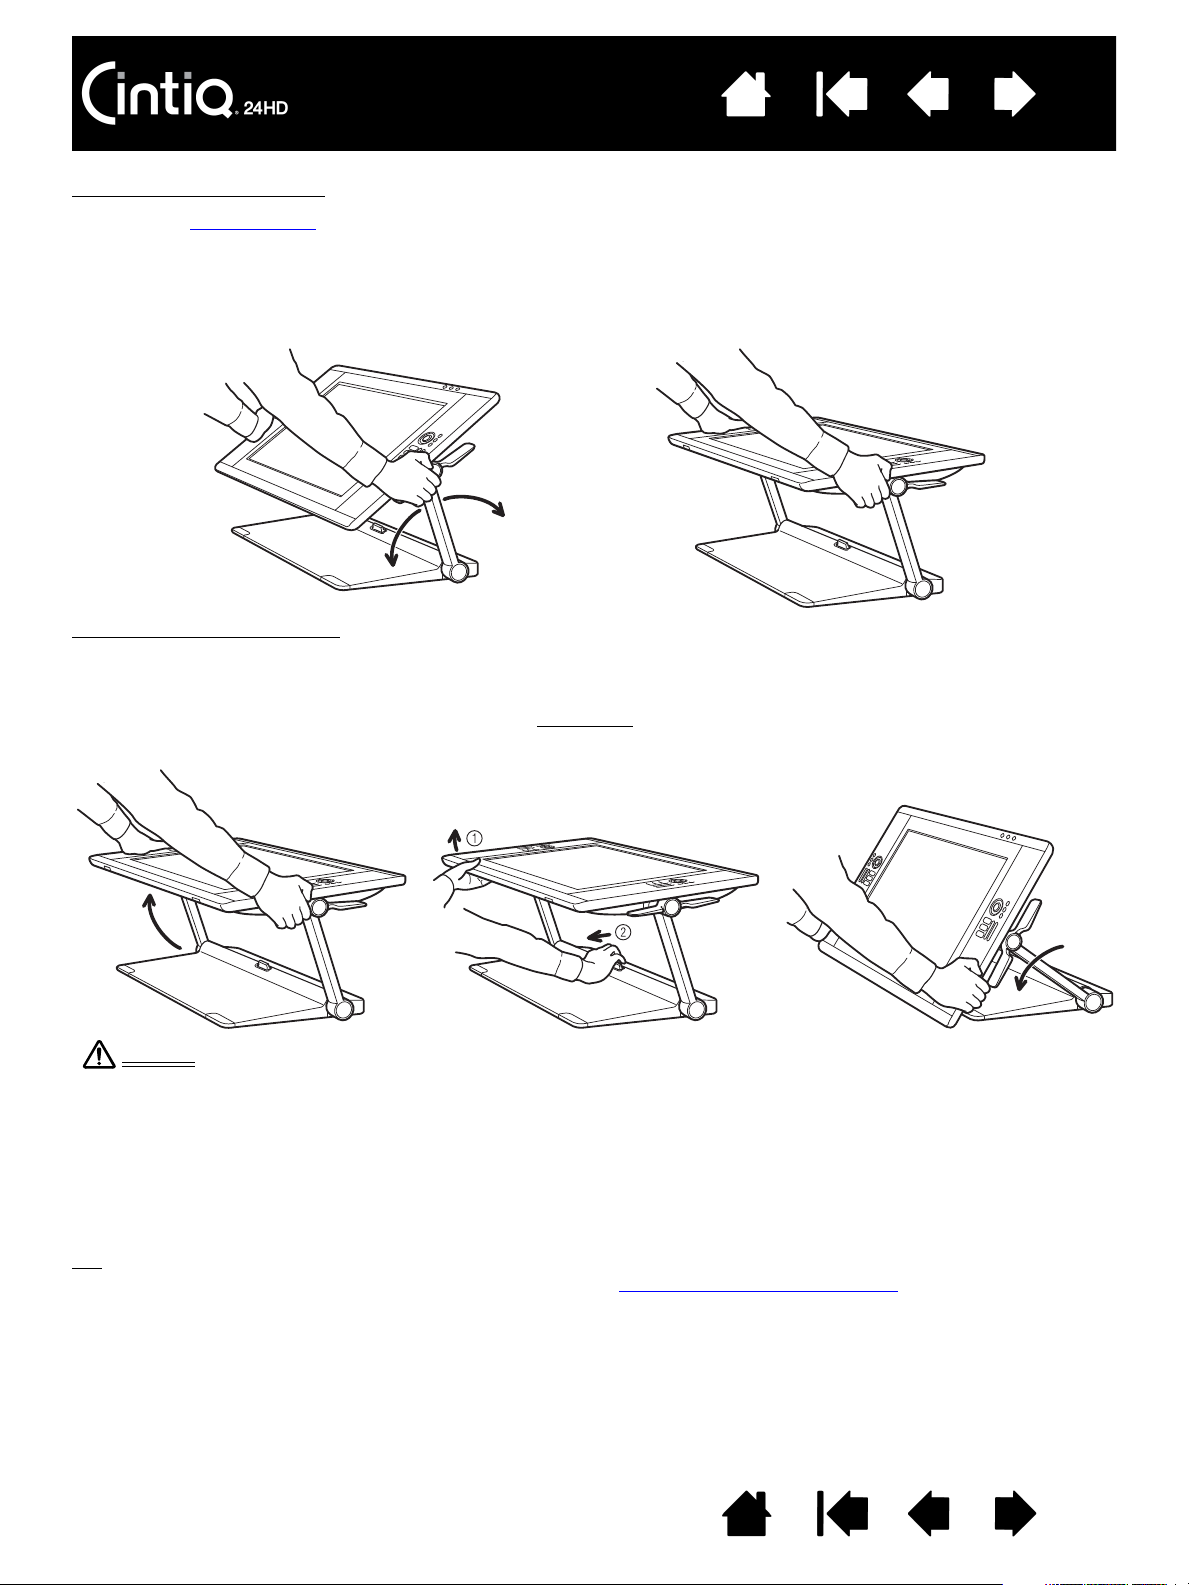
To unlock the support arms
:
1. As necessary, use the incline levers to slightly raise the lower part of the pen display so you can access
the release latch.
2. Support the pen display with one hand and lift slightly
. Using your other hand, pull the release latch
toward you. This will unlock and release the support arms for movement.
3. Carefully lower the pen display unit until its lower edge rests on the display stand or your desktop.
Tip
: You can extend the pen display support legs to slightly raise the pen display or allow for placement
of a keyboard beneath the pen display unit. See using a keyboard with Cintiq
.
Warning
Use care when unlocking the support arms, and always support the pen display with one hand as you do
so. The display comes down when the lock is released. DO NOT hold the support arms when releasing the
lock. Improper release of the support arms from a locked position may allow the pen display to fall, and
could cause personal injury or damage to the pen display unit.
Contents Index
Contents
26
Index
26
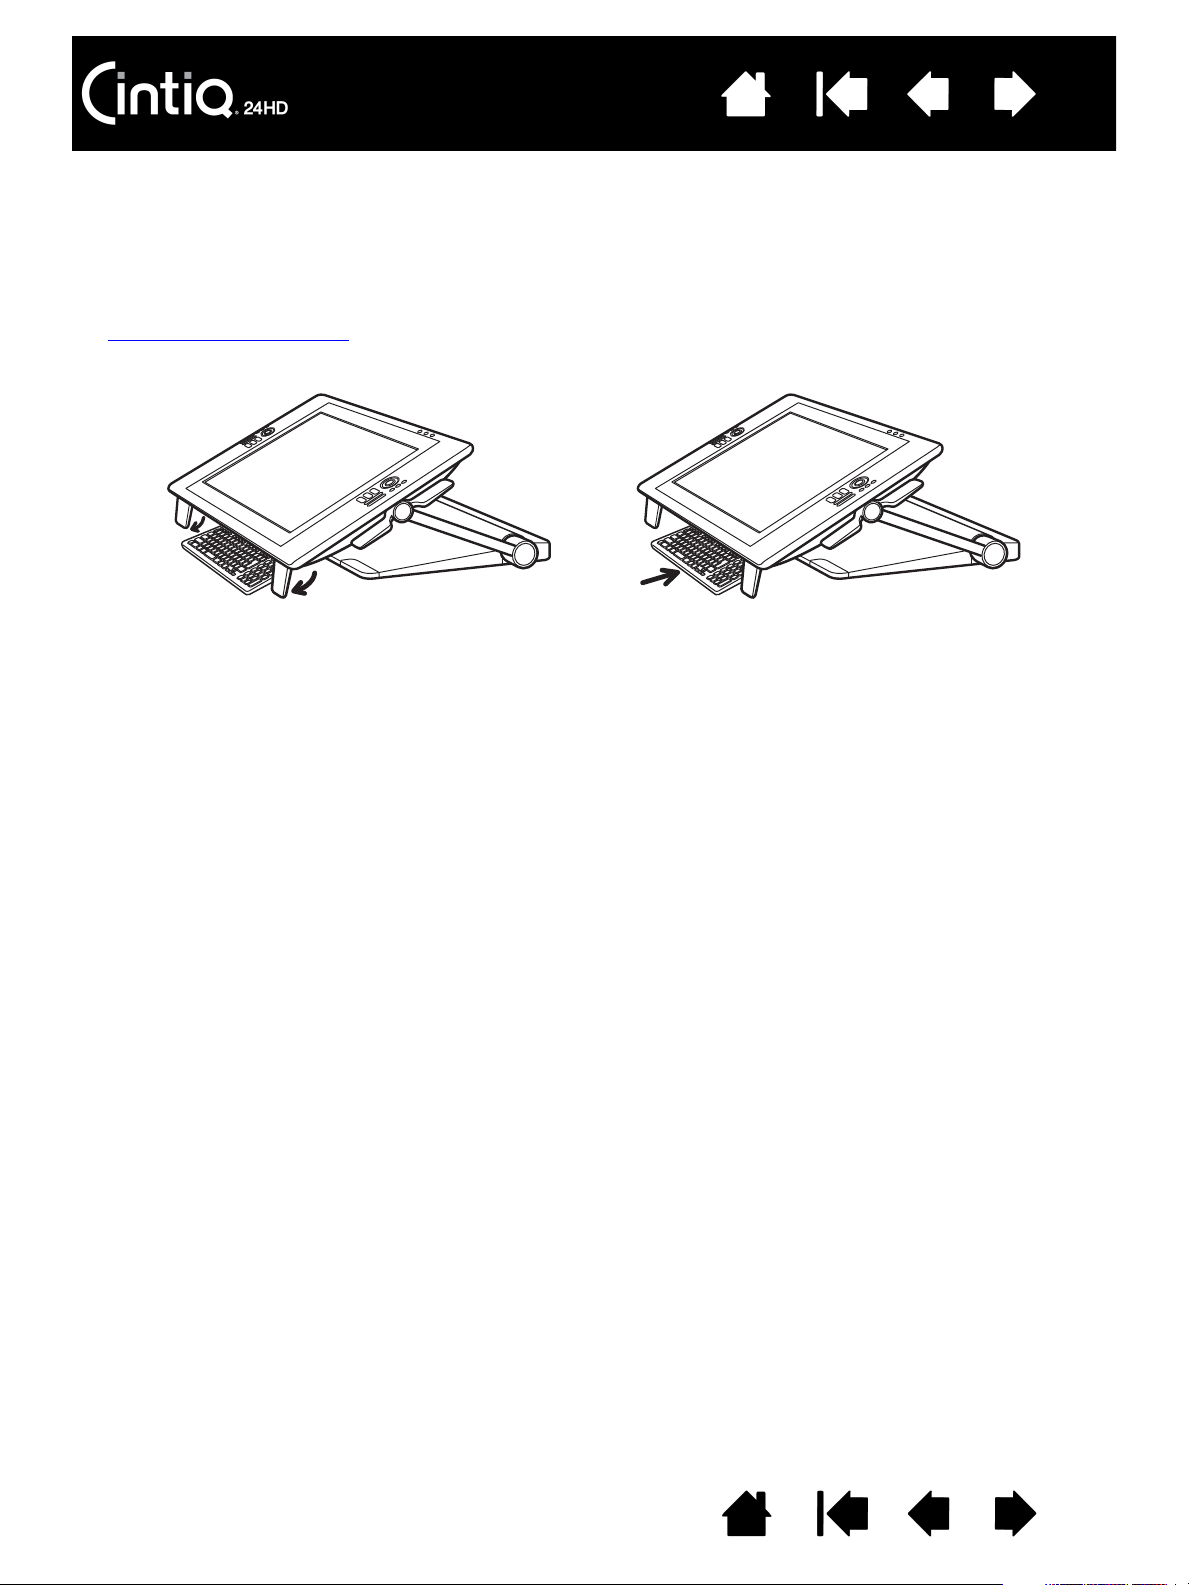
USING A KEYBOARD WITH CINTIQ
Extend the pen display support legs to allow for placement of a keyboard or other input tools beneath the
pen display unit.
• The support legs are located beneath the pen display unit, one at each lower corner. Flip out and then
push up slightly on each leg until it clicks into place.
• Adjust height and incline
as needed. The legs should rest evenly on your desktop or work surface.
• Slide your keyboard or other input device into the opening beneath the pen display.
Contents Index
Contents
27
Index
27
CABLE REPLACEMENT
The connection cables (DVI-I to DVI-D Dual-Link, DisplayPort, USB, and power) come pre-installed on your
Cintiq.
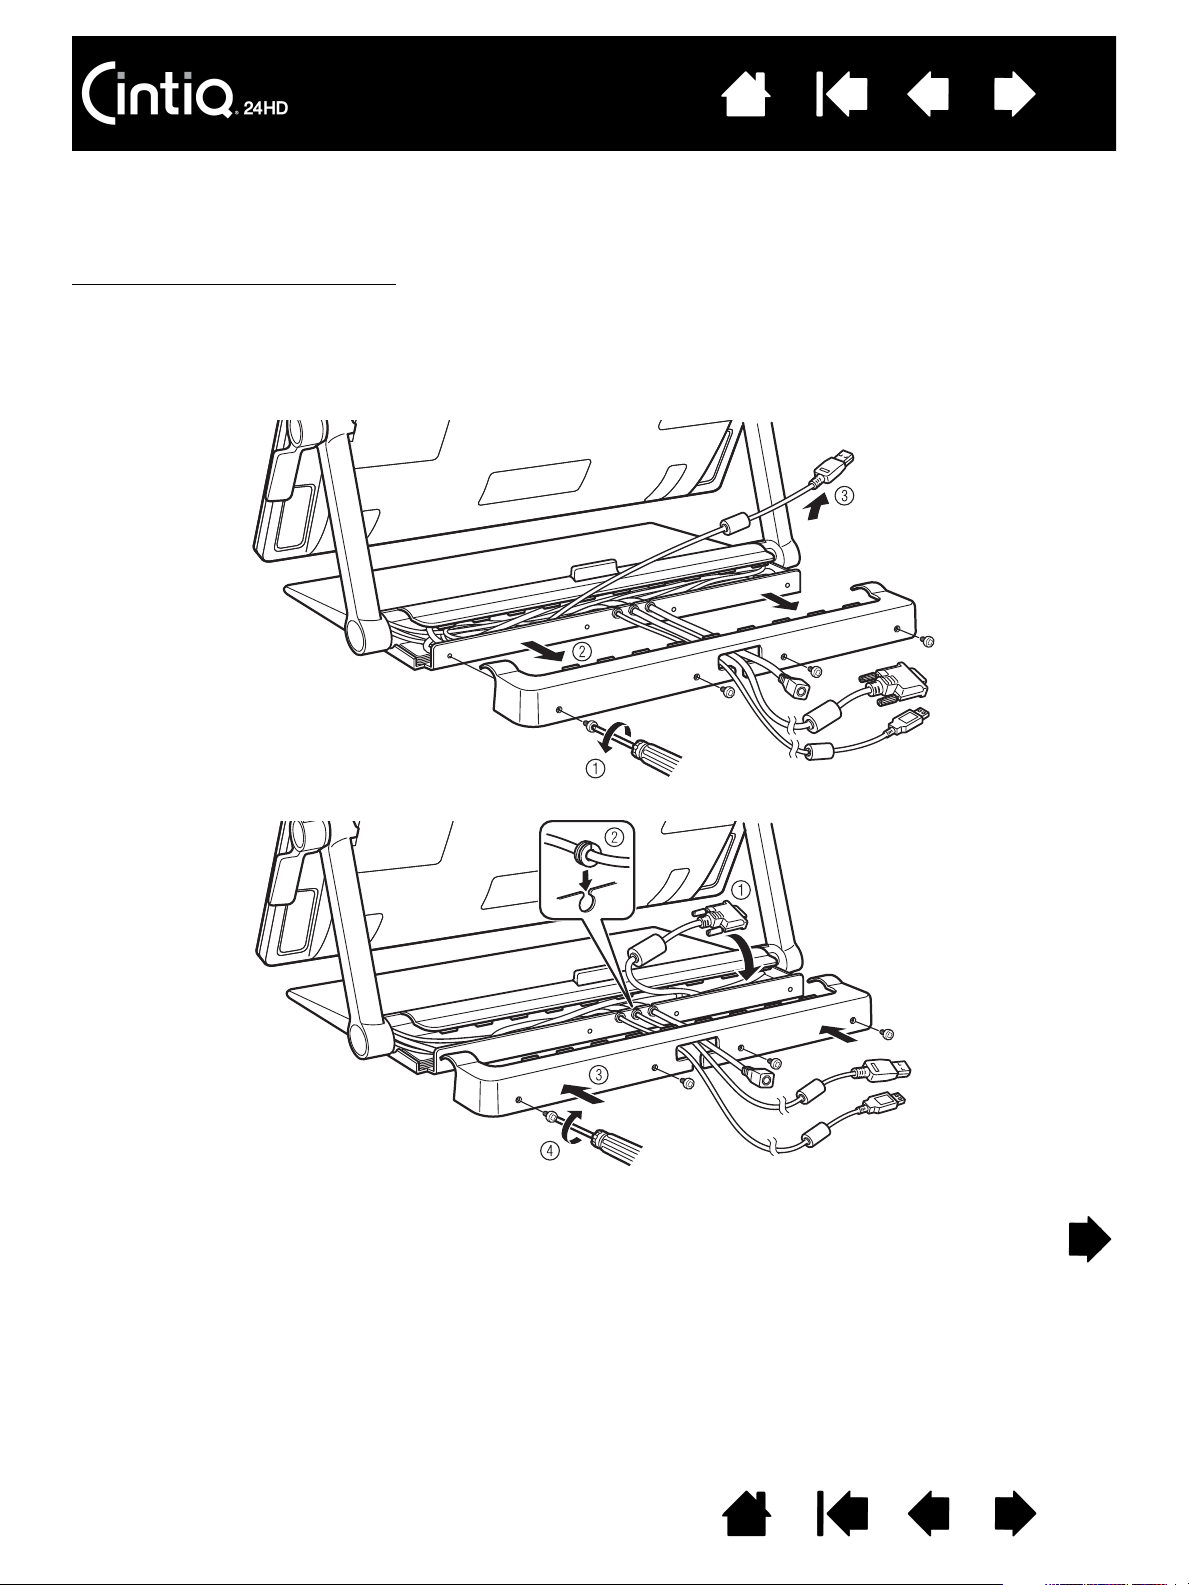
If using a DisplayPort connection
, access the DisplayPort cable by removing the back cover from the
display stand.
1. Remove the screws (qty 4, Phillips) from the back cover of the display stand. Remove the back cover.
2. Extract the DisplayPort cable and set it within the center cable channel. Tuck the DVI-I to DVI-D cable
into the stand for a clean appearance.
3. Replace the back cover and secure using the original screws.
Screw type: Phillips, flat fillister head,
M3-6, black
Contents Index
Contents
28
Index
28
There may be times when you will need to remove or replace a connection cable. For example:
• When using a VGA connection
, you must remove the DVI-I to DVI-D cable and replace it with the
provided DVI-I to VGA cable.
• When mounting Cintiq on a VESA mounting arm, and you wish to use the existing cables that come
with Cintiq.
• When replacing a suspected bad cable.
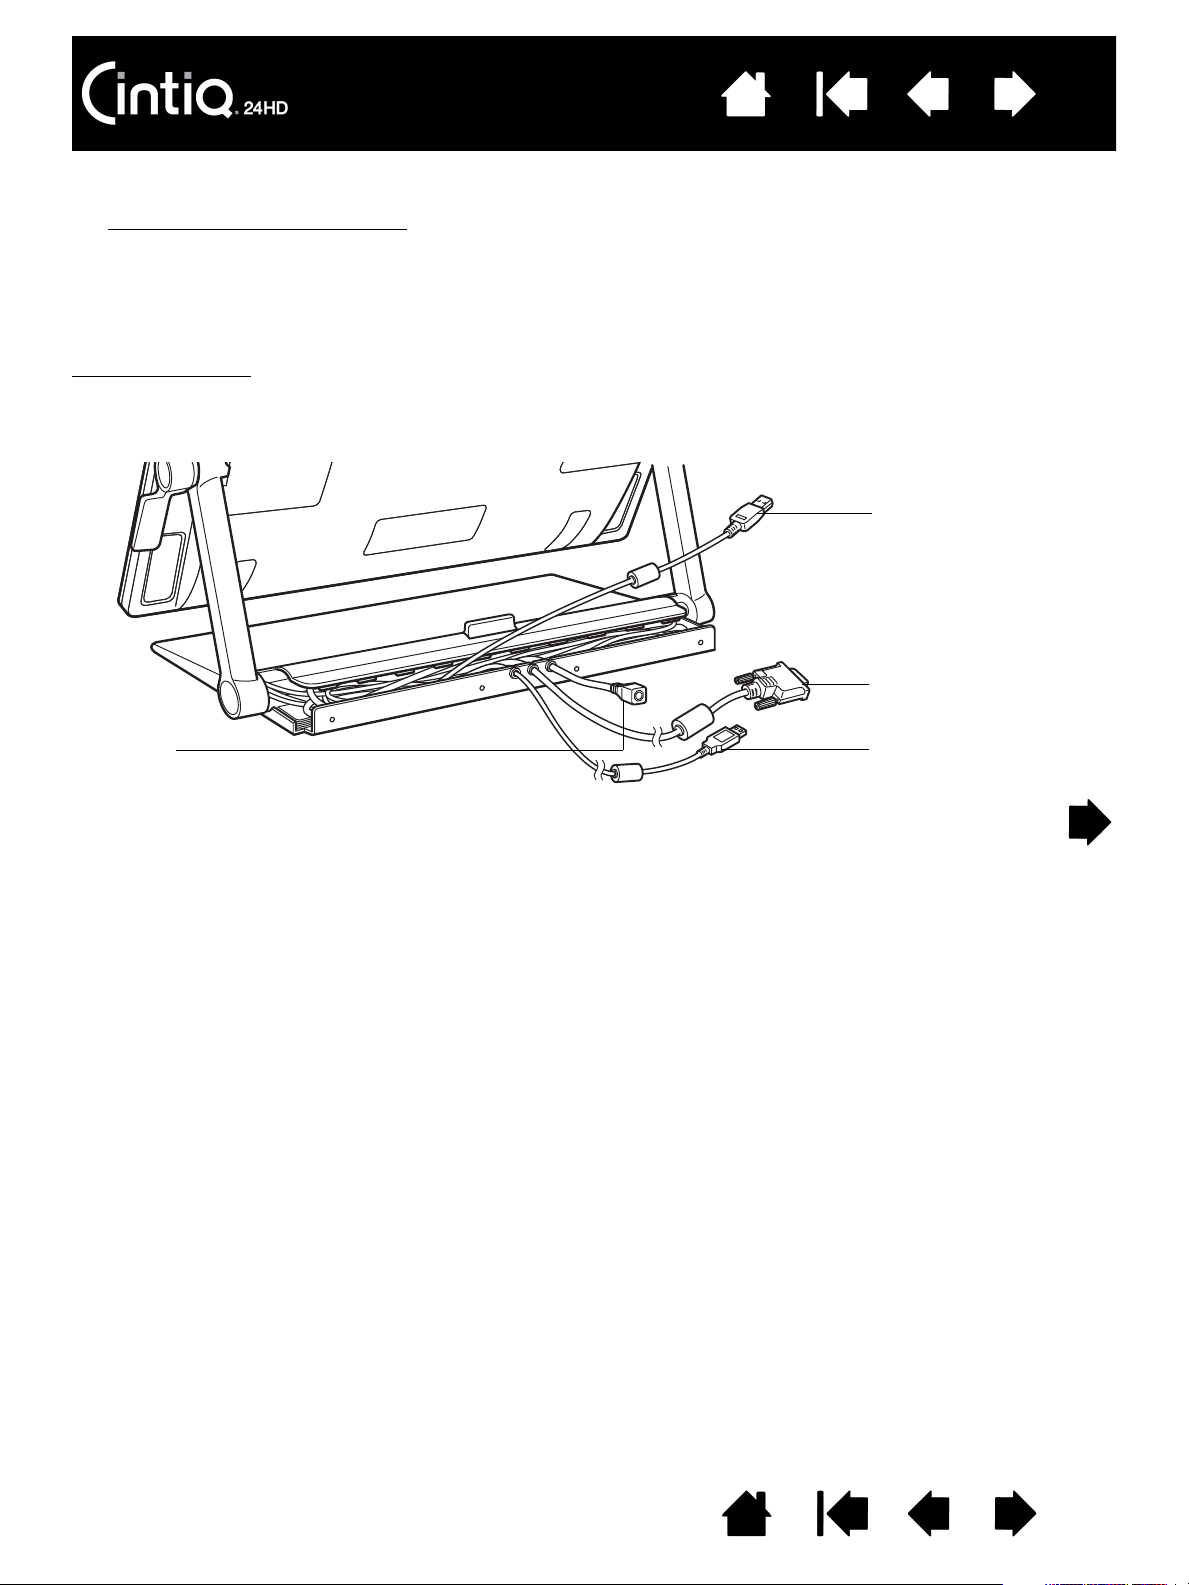
To remove a cable
:
1. Remove the back cover of the display stand as described above.
2. Determine which cable to remove. Cable track locations are as follows:
Power
DisplayPort
DVI-I to DVI-D Dual-Link
USB
Contents Index
Contents
29
Index
29
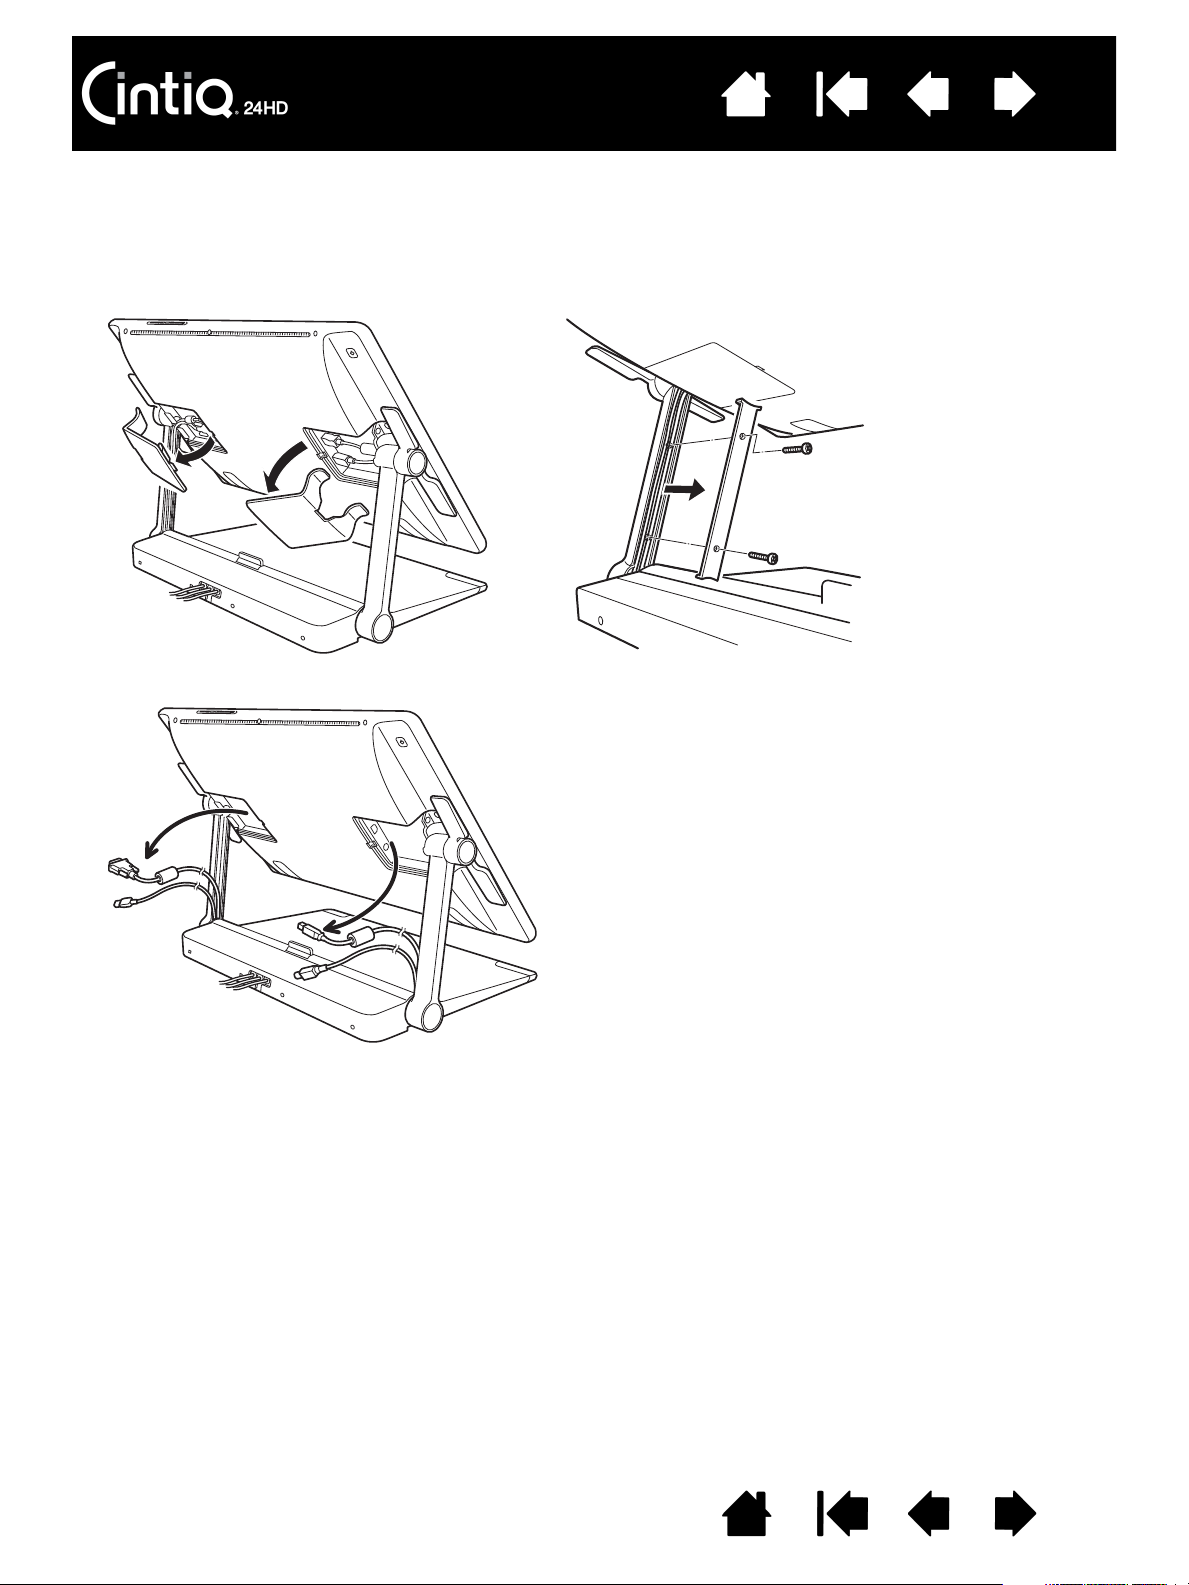
3. Raise the display support arms to the vertical locked position. Adjust the pen display incline as needed
for adequate clearance. From the rear of the pen display, unclip and lift away the cable connector
covering.
4. Remove the screws (qty 2, Phillips) from the support arm cover which houses the cable you wish
to remove.
5. Carefully disconnect the cable and unthread it from the support arm cable track.
6. Install or replace a cable by reversing this procedure.
Screw type: Phillips, flat fillister head,
M3-17, black
Important: When installing or replacing a cable,
properly route the cable through the support arm
pivots where the arm joins the pen display and the
base of the stand. Proper routing will prevent the
cable from getting caught in the pivot mechanism.
Contents Index
Contents
30
Index
30
WORKING WITH YOUR CINTIQ
The Cintiq interactive pen display and Cintiq display stand were designed for a wide range of flexibility and
ergonomic work approach. The design allows you to quickly adjust Cintiq to a different height and position
whenever the need arises. Experiment by adjusting display height and incline
to determine which best fits
your particular working style and tasks.
As you work with Cintiq you can rest your hand lightly on the display screen, just as if it were a drawing
board or sheet of paper.
Because the Cintiq pen display surface will be a little higher than your desk, consider adjusting the height
of your desk or chair to assure comfortable use of the device.
Setting up your work area
Configuring Cintiq for handedness
Using the Grip Pen
Pen display controls
Working with multiple monitors
Adjusting the display
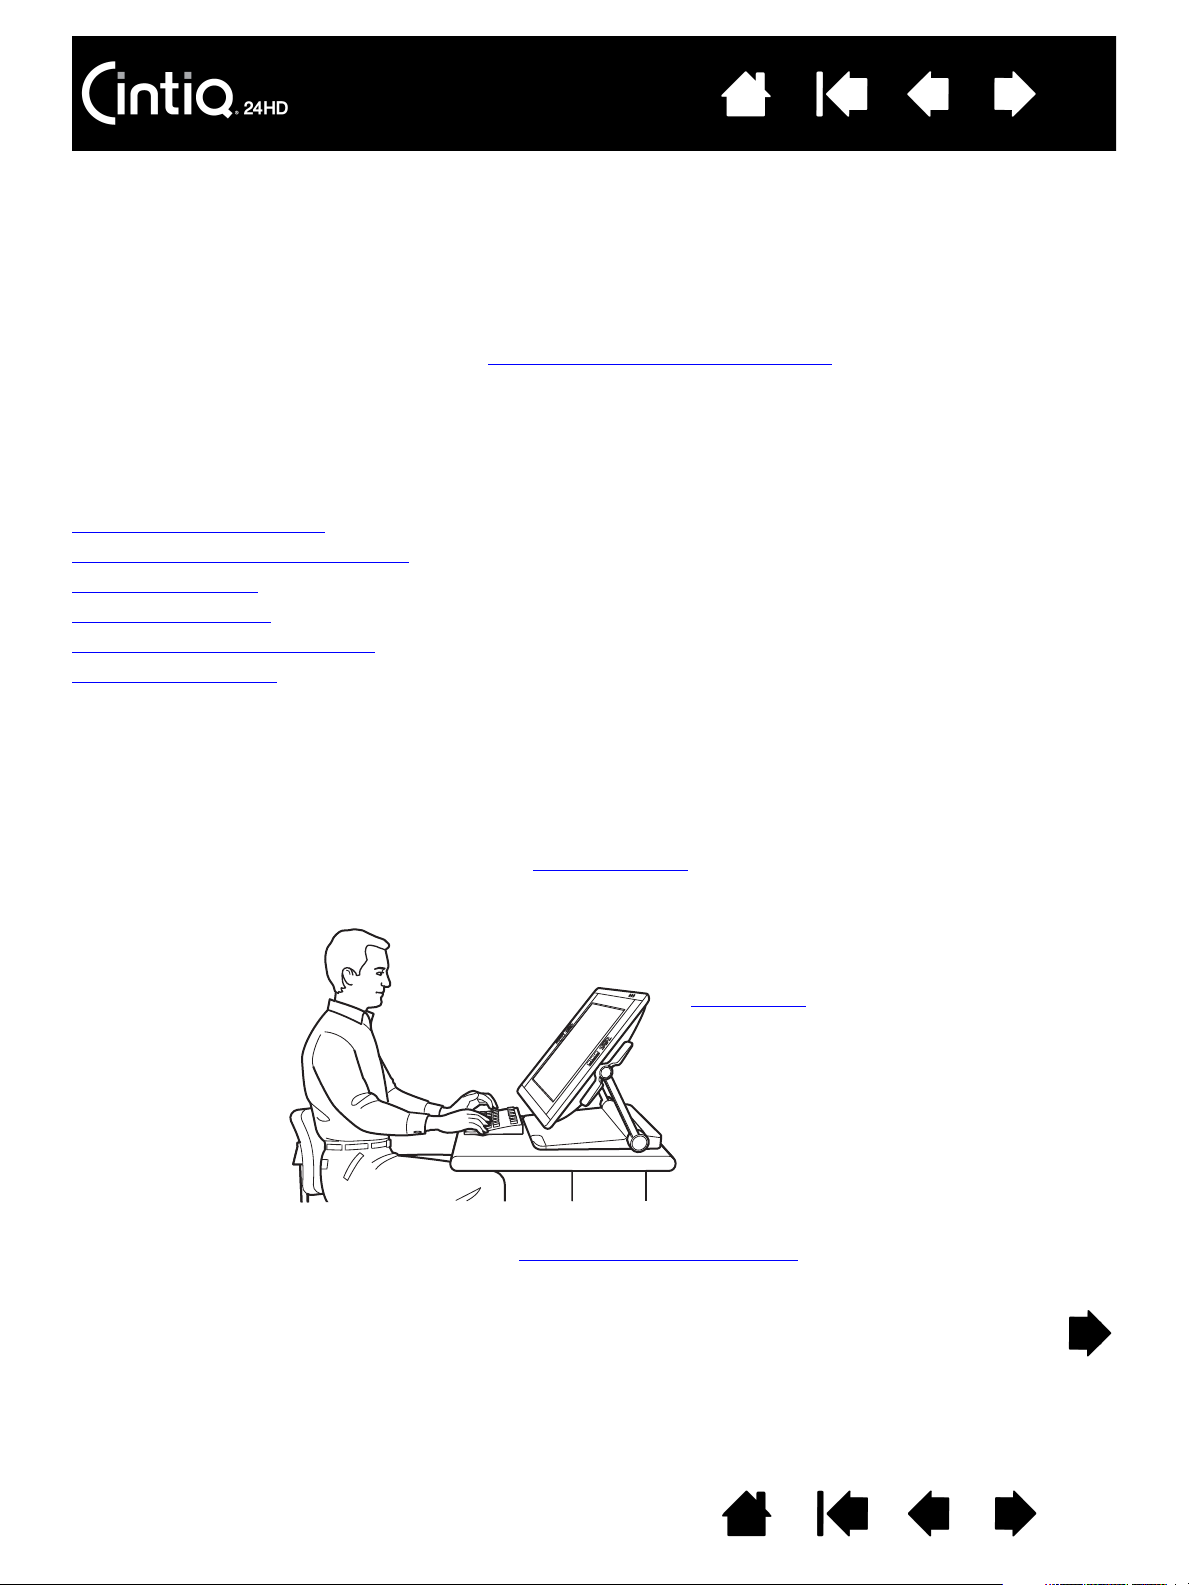
SETTING UP YOUR WORK AREA
To minimize fatigue, organize your work area to create a comfortable environment. Position Cintiq, the pen,
and your keyboard for easy access without unnecessary reaching. The pen display and any other displays
should be positioned so you can view them comfortably with a minimum of eyestrain.
• If you have not already done so, be sure to configure Cintiq
for your preferred handedness.
• When using Cintiq as a display, align the top of the unit in line with the level of your eyes.
• If working with a keyboard, consider locating the keyboard slightly below the desk surface in an
adjustable keyboard tray. Otherwise, see using a keyboard with Cintiq
.
• Maintain a good posture at all times.
Adjust Cintiq to a position that best meets
your creative needs.
Loading...