


VSD242
Quick Start Guide Guide rapide de début Guía de inicio rápido

Compliance Information
Please read before proceeding
•Use only the batteries and power adapter provided by the manufacturer. The use of unauthorized accessories may void your warranty.
•Do not store your device in temperatures higher than 50°C (122°F).
•The operating temperature for this device is from 0°C (32°F) to 35°C (95°F).
Connect the power cord to the unit and a grounded AC outlet. Ensure that the power source is suitable for the operating voltage of the media player. The operating voltage can be found on the device label. The device uses either 110 to 127 volts alternating voltage or 220 to 240 volts alternating voltage and 50/60 Hz.
CAUTION: To avoid damage to the unit, be sure to use only the power cord that came with the unit.
CE Conformity for European Countries
The device complies with the EMC Directive 2014/30/EU and Low Voltage Directive 2014/35/EU, R&TTE-Richtlinie 1999/5/EC.
European Union Regulatory Conformance
The equipment complies with the RF Exposure Requirement 1999/519/EC, Council Recommendation of 12 July 1999 on the limitation of exposure of the general public to electromagnetic fields (0-300 GHz). This equipment meets the following conformance standards: EN301489-1, EN301489-17, EN55022/24, EN60950-1, EN300328.
Declaration of RoHS2 Compliance
This product has been designed and manufactured in compliance with Directive 2011/65/EU of the European Parliament and the Council on restriction of the use of certain hazardous substances in electrical and electronic equipment (RoHS2 Directive) and is deemed to comply with the maximum concentration values issued by the European Technical Adaptation Committee (TAC) as shown below:
Substance |
Proposed Maximum Concentration |
Actual Concentration |
Lead (Pb) |
0.1% |
< 0.1% |
Mercury (Hg) |
0.1% |
< 0.1% |
Cadmium (Cd) |
0.01% |
< 0.01% |
Hexavalent Chromium (Cr6+) |
0.1% |
< 0.1% |
Polybrominated biphenyls (PBB) |
0.1% |
< 0.1% |
Polybrominated diphenyl ethers (PBDE) |
0.1% |
< 0.1% |
Certain components of products as stated above are exempted under the Annex III of the RoHS2 Directives as noted below: Examples of exempted components are:
1.Mercury in cold cathode fluorescent lamps and external electrode fluorescent lamps (CCFL and EEFL) for special purposes not exceeding (per lamp):
(1)Short length ( 500 mm): maximum 3.5 mg per lamp.
(2)Medium length ( 500 mm and 1,500 mm): maximum 5 mg per lamp.
(3)Long length ( 1,500 mm): maximum 13 mg per lamp.
2.Lead in glass of cathode ray tubes.
3.Lead in glass of fluorescent tubes not exceeding 0.2% by weight.
4.Lead as an alloying element in aluminium containing up to 0.4% lead by weight.
5.Copper alloy containing up to 4% lead by weight.
6.Lead in high melting temperature type solders (i.e. lead-based alloys containing 85% by weight or more lead).
7.Electrical and electronic components containing lead in a glass or ceramic other than dielectric ceramic in capacitors, e.g. piezoelectronic devices, or in a glass or ceramic matrix compound.
Product disposal at end of product life
ViewSonic respects the environment and is committed to working and living green. Thank you for being part of Smarter, Greener Computing. Please visit ViewSonic website to learn more.
USA & Canada: http://www.viewsonic.com/company/green/recycle-program/ Europe: http://www.viewsoniceurope.com/uk/support/recycling-information/ Taiwan: http://recycle.epa.gov.tw/recycle/index2.aspx
Copyright Information
Android, Google, Google Play, the Google Play logo and other marks are trademarks of Google Inc.
i

Caution
IC Caution:
This device complies with Industry Canada licence-exempt RSS standard(s).
Operation is subject to the following two conditions:
(1)This device may not cause interference, and
(2)This device must accept any interference,
including interference that may cause undesired operation of the device.
CAN ICES-3 (B)/NMB-3(B)
FCC Caution:
This device complies with part 15 of the FCC Rules. Operation is subject to the condition that this device does not cause harmful interference (1) this device may not cause harmful interference, and (2) this device must accept any interference received, including interference that may cause undesired operation.
Any changes or modifications not expressly approved by the party responsible for compliance
could void the user's authority to operate the equipment.
NOTE: This equipment has been tested and found to comply with the limits for a Class B digital device, pursuant to Part 15 of the FCC Rules. These limits are designed to provide reasonable protection against harmful interference in a residential installation. This equipment generates, uses and can radiate radio frequency energy and, if not installed and used in accordance with the instructions, may cause harmful interference to radio communications. However, there is no guarantee that interference will not occur in a particular installation.
If this equipment does cause harmful interference to radio or television reception,
which can be determined by turning the equipment off and on, the user is encouraged to try to correct the interference by one or more of the following measures:
--Reorient or relocate the receiving antenna.
--Increase the separation between the equipment and receiver.
--Connect the equipment into an outlet on a circuit different from that to which the receiver is connected.
--Consult the dealer or an experienced radio/TV technician for help.
To maintain compliance with FCC’s RF Exposure guidelines, This equipment should be installed and operated with minimum distance between 20cm the radiator your body: Use only the supplied antenna.
FCC ID: GSS-VS16340
ii

Informations de conformité
Veuillez lire la section suivante avant de continuer
•Utilisez seulement les batteries et l’adaptateur secteur fournis par le fabricant. L’utilisation d’accessoires non autorisés peut annuler la garantie.
•Ne rangez pas votre téléphone dans des endroits où la température est plus de 50ºC ou 122ºF.
•La température recommandée pour cet appareil est entre 0°C (32°F) et 35ºC (95°F).
Branchez le cordon d'alimentation à l'appareil et une prise en tension alternative. Assurez-vous que la source d'alimentation pour la tension de fonctionnement du lecteur multimédia est adapté en toute sécurité. La tension de fonctionnement est indiquée sur l'étiquette de l'appareil. Le dispositif utilise soit 110-127 VAC ou 220 à 240 V CA, 50/60 Hz.
ATTENTION: Pour éviter d'endommager l'appareil, utilisez uniquement le cordon d'alimentation qui est fourni avec l'appareil.
Conformité CE pour les pays européens
L’appareil est conforme la norme EMC 2014/30/EU et à la norme sur la basse tension 2014/35/EU, la norme R&TTE 1999/5/EC.
Certificat de conformité dans l'Union Européenne
Cet appareil répond aux directives d'exposition RF 1999/519/EC, Recommandation du Conseil du 12 Juillet 1999, sur la limitation d'exposition du public général aux champs électromagnétiques (0–300 GHz). Cet appareil est conforme aux normes de conformité suivantes : EN301489-1, EN301489-17, EN55022/24, EN60950-1, EN300328.
Déclaration de conformité RoHS2 (LSDEEE2)
Ce produit a été conçu et fabriqué dans le respect de la directive 2011/65/EU du Parlement Européen et du Conseil relative à la limitation de l’utilisation de certaines substances dangereuses dans les équipements électriques et électroniques (Directive RoHS2 - LSDEEE2) et il est déclaré respecter les valeurs de concentration maximum définies par le Comité technique d’adaptation (TAC) européen, qui sont les suivantes:
Substance |
Concentration maximale proposée |
Concentration réelle |
Plomb (Pb) |
0.1% |
< 0.1% |
Mercure (Hg) |
0.1% |
< 0.1% |
Cadmium (Cd) |
0.01% |
< 0.01% |
Chrome hexavalent (Cr6+) |
0.1% |
< 0.1% |
Polybromobiphényle (PBB) |
0.1% |
< 0.1% |
Polybromodiphénylséthers (PBDE) |
0.1% |
< 0.1% |
Certains composants de produits mentionnés ci-dessus ne sont pas soumis à ces limitations, conformément aux dispositions de l’Annexe III de la Directive RoHS2 (LSDEEE2). Il s’agit des composants suivants:
Exemples de composants exemptés:
1.Mercure dans les lampes fluorescentes à cathode froide et lampes fluorescentes à électrodes externes (CCFL et EEFL) pour des buts spécifiques ne dépassant pas (par lampe) :
(1)Longueur courte ( 500 mm) : maximum 3,5 mg par lampe.
(2)Longueur moyenne ( 500 mm and 1.500 mm): maximum 5 mg par lampe.
(3)Longueur élevée( 1.500 mm) : maximum 13 mg par lampe.
2.Plomb dans le verre des tubes cathodiques.
3.Le plomb dans le verre des tubes fluorescents ne dépasse pas 0,2 % du poids.
4.Plomb en tant qu’élément d’alliage de l’aluminium jusqu’à 0,4 % du poids.
5.L’alliage de cuivre contient jusqu’à 4 % de plomb.
6.Soudures à haute température (les alliages basés sur le plomb contiennent du plomb à 85 % ou plus).
7.Composants électriques et électroniques contenant du plomb dans le verre ou des porcelaines. (appareils piézoélectriques ou dans un composant de matrice de verre ou de céramique).
Elimination du produit en fin de vie
ViewSonic respecte l’environnement et fait des efforts allant dans le sens d’un environnement de travail et de vie écologiques. Merci d’oeuvrer aussi pour une informatique plus intelligente et plus écologique. Pour en savoir plus, veuillez visiter le site web de ViewSonic.
Etats-Unis et Canada: http://www.viewsonic.com/company/green/recycle-program/ Europe: http://www.viewsoniceurope.com/uk/support/recycling-information/ Taiwan: http://recycle.epa.gov.tw/recycle/index2.aspx
Informations de copyright
Android, Google, Google Play, la Google Play logo et les autres marques sont des marques commerciales de Google Inc.
iii

Información de conformidad
Lea estas instrucciones antes de continuar
•Use exclusivamente las baterías y el adaptador de alimentación suministrados por el fabricante. El uso de accesorios no autorizados puede invalidar la garantía.
•No almacene el teléfono en lugares con temperaturas superiores a 50 ºC o 122 ºF.
•La temperatura de funcionamiento para este dispositivo está comprendida entre 0 ºC (32°F) y 35 ºC (95°F).
Conectar el cable de alimentación al dispositivo y una toma de tierra con tensión alterna. Asegúrese de que la fuente de energía para el voltaje de funcionamiento del reproductor multimedia es seguro adecuado. La tensión de alimentación está indicada en la etiqueta del dispositivo. El dispositivo utiliza DE 110 a 127 VCA o 220 a 240 VCA, 50/60 Hz.
PRECAUCIÓN: Para evitar daños a la unidad, utilice únicamente el cable de alimentación que se incluye con el dispositivo
Certificación CE para países europeos
Este dispositivo cumple con la Directiva EMC (Compatibilidad Electromagnética) 2014/30/EU y la Directiva de Baja Tensión 2014/35/EU, R&TTE Directiva 1999/5/EC.
Cumplimiento de normativas de la Unión Europea
El equipo cumple el requisito de exposición a la radiofrecuencia 1999/519/EC, Recomendación del consejo de 12 de julio de 1999 Sobre la limitación de exposición del público en general a los campos electromagnéticos (0-300 GHz). Este equipo cumple los siguientes estándares de conformidad: EN301489-1, EN301489-17, EN55022/24, EN60950-1, EN300328.
Declaración de Cumplimiento de RoHS2
Este producto ha sido diseñado y fabricado cumpliendo la Directiva 2011/65/EU del Parlamento Europeo y el Consejo para la restricción del uso de ciertas sustancias peligrosas en equipos eléctricos y electrónicos (Directiva RoHS2) y se considera que cumple con los valores de concentración máximos publicados por el European Technical Adaptation Committee (Comité Europeo de Adaptaciones Técnicas) (TAC) tal y como se muestra a continuación:
Sustancia |
Concentración Máxima Propuesta |
Concentración Real |
Plomo (Pb) |
0.1% |
< 0.1% |
Mercurio (Hg) |
0.1% |
< 0.1% |
Cadmio (Cd) |
0.01% |
< 0.01% |
Cromo Hexavalente (Cr6+) |
0.1% |
< 0.1% |
Bifenilo Polibromado (PBB) |
0.1% |
< 0.1% |
Éteres de Difenilo Polibromado (PBDE) |
0.1% |
< 0.1% |
Ciertos componentes de los productos indicados más arriba están exentos bajo el Apéndice III de las Directivas RoHS2 tal y como se indica a continuación:
Ejemplos de los componentes exentos:
1.Mercurio en lámparas fluorescentes de cátodo frío y lámparas fluorescentes de electrodo externo (CCFL y EEFL) para usos especiales sin sobrepasar (por lámpara):
(1)Longitud pequeña ( 500 mm): máximo de 3,5 por lámpara.
(2)Longitud media ( 500 mm y 1.500 mm): máximo de 5 mg por lámpara.
(3)Longitud grande ( 1.500 mm): máximo de 13 mg por lámpara.
2.Plomo en el vidrio de los tubos de rayos catódicos.
3.Plomo en el vidrio de los tubos fluorescentes sin sobrepasar el 0,2 % en peso.
4.Plomo como elemento de aleación en aluminio que contenga hasta un 0,4 % de su peso en plomo.
5.Aleación de cobre que contenga hasta un 4 % de su peso en plomo.
6.Plomo en pastas de soldadura de alta temperatura de fusión (es decir, aleaciones de plomo que contengan en peso un 85 % de plomo o más).
7.Componentes eléctricos y electrónicos que contengan plomo en un vidrio o cerámica de un tipo distinto de la cerámica dieléctrica de condensadores, por ejemplo, dispositivos piezoelectrónicos, o en un compuesto de matrices de vidrio o cerámica.
Desecho del producto al final de su vida útil
ViewSonic es respetuoso con el medioambiente y está comprometido a trabajar y vivir de una manera que sea respetuosa con el medioambiente. Gracias por ser parte de una forma de Computación más Inteligente y más Verde. Visite el sitio web de ViewSonic para saber más.
EE.UU. y Canadá: http://www.viewsonic.com/company/green/recycle-program/ Europa: http://www.viewsoniceurope.com/uk/support/recycling-information/ Taiwán: http://recycle.epa.gov.tw/recycle/index2.aspx
Información del Copyright
Android, Google, Google Play, el Google Play logo y otras marcas son marcas comerciales de Google Inc.
iv
50ºC 122ºF
0ºC (32°F) 35ºC (95°F)
|
|
|
|
|
|
|
|
|
|
|
|
|
|
|
|
|
|
|
|
|
|
(Pb) |
(Hg) |
(Cd) |
(Cr6+) |
PBB |
PBDE |
/ |
O |
O |
O |
O |
O |
O |
|
|
|
|
|
|
|
(PCBA)* |
O |
O |
O |
O |
O |
O |
|
|
|
|
|
|
|
FP / |
O |
O |
O |
O |
O |
O |
|
|
|
|
|
|
|
/ / |
O |
O |
O |
O |
O |
O |
|
|
|
|
|
|
|
/ |
O |
O |
O |
O |
O |
O |
|
|
|
|
|
|
|
/ / |
O |
O |
O |
O |
O |
O |
|
|
|
|
|
|
|
SJ/T 11364 ○ GB/T 26572GB/T 26572
,10
ViewSonic Smarter, Greener ComputingViewSonic
http://www.viewsonic.com/company/green/recycle-program/http://www.viewsoniceurope.com/uk/support/recycling-information/http://recycle.epa.gov.tw/recycle/index2.aspx
:
(kWh) |
159.0 |
|
|
|
1 |
|
|
|
GB 28380-2012 |
|
|
Android Google Google Play Google Play logo Google Inc.
v

Introduction
Thank you for purchasing this VSD242. This Start-up Guide describes how to handle and use this product safely. Before operating, please read this guide carefully for safe and correct use. Please also keep this guide handy for quick reference should you encounter any difficulties when using this product.
You can find the full user guide on the home screen of your device once powered on.
A. Getting Started
■■You can find the full user guide on the home screen of your device once powered on.
■■Before using this product, please ensure that the following items are included:
Main unit x 1 |
AC Adapter x 1 |
Power cable |
|
* Plug types by country |
|||
|
|
Quick Start Guide x 1
Items supplied with this product
■■Please ensure that the serial number on this product is identical to that on the product warranty. ■■If any parts are missing or broken, please contact your store of purchase.
 To use this product safely
Even though this product is designed with safety in mind, improper use of this product may cause fire or electric shock that can lead to injuries or death. To prevent such accidents, please comply with the following recommendations:
■■ Observe safety precautions
Please read and follow all safety precautions as indicated.
■■ Stop using the product if it malfunctions
In the event of a malfunction, please contact ViewSonic Customer Care for support.
■■ If the following events occur, then follow the recommendations
•Smoke is detected
•Strange sound or odor is observed
•If water gets inside this product
•This product is dropped or damaged
•Turn off the power
•Unplug the AC adapter cable and USB cable
•Please contact ViewSonic Customer Care for service support.
Safety warning indications
Attention Sign |
|
Prohibition Signs |
|
Instruction Signs |
|
Attention |
Prohibited |
Disassembly is |
Keep dry |
Handle with dry |
Disconnect the |
|
|
prohibited |
|
hands |
plug |
6

B. Product Overview
Basic Operations and Front View
 Built-in Webcam (5.0MP)
 Built-in Microphone
 Display with touch panel function
About LCD display:
This product uses a TFT LCD display. Note that some pixels may always appear off (black) while some are always on (orange, green, or blue). Depending on the viewing angle, uneven color or uneven brightness may be observed. Please note that these are natural characteristics of TFT LCD and should not be regarded as defects.
 Power button
 LED indicator
 OSD Menu / Exit
 Arrow Button (Down/Left)
 Arrow Button (Up/Right)
 Input Signal Switch / OSD Menu Select
Back View
LEFT SIDE
 LAN port (RJ-45)
 HDMI-OUT jack
 HDMI-IN jack
 Headset jack
 Microphone IN
 SD Card Slot
 MiniUSB port (OTG)
 DC-in jack
RIGHT SIDE
 USB Type-A x 4
 USB Type-B
Please do not use AC adapters other than the one  supplied in this product package to prevent fire and

 electric shock.
Please do not place objects on the AC adapter, or cover it with anything. Overheating of the AC adapter may lead to a fire.
LEFT SIDE RIGHT SIDE
1
2
3

 1 4
1 4 


 5
5 


6 


 2
2
7
8
7

C. Installation precautions
Installation Environment
Health precautions
Viewing computer monitor displays for extended periods of time may result in tiredness, numbness in the hands and feet, blurry vision,etc. Please see the picture on the right as a guide for extended use conditions.
Safety precautions
•Install this product in a well-ventilated location to eliminate exposure to high humidity conditions that may lead to condensation on or in the product.
•For proper heat dissipation, ensure a gap of at least 15cm between this product and the wall during installation.
Regarding lightning hazards
In the case where lightning strikes are expected, it is advised to turn off the computer, and unplug any cable or cord connected to this product
Ideal installation and method of use
8

D. Installation and Connection
1)Open the stand in the direction of the arrow.
Place face down on a clean, flat surface and be wary of any objects that could damage the display.
2) Connect the power
 Connect one end of the supplied AC adapter to the DC-in jack at the back of the unit.
 Connect the power cord to the other end of the AC adapter.
 Connect the power plug to the outlet.
3) Place the unit on a stable, flat surface.
9
E. Start-up and initial setting
Turn on the Power
1)Make sure the power cable and AC adapter are connected.
2)Long press the power switch until the status LED turns blue.
1)Select your language and tap 2) Select a Wi-Fi network, or tap 3) Tap “Yes” to setup your
“Start”. |
“Skip” to configure later. |
GoogleTM account or “No” to |
|
|
configure later. |
4) Confirm on screen |
5) Select the appropriate time |
6) Enter username and tap “ ”. |
instructions and tap “ ”. |
zone to set the date and time, |
|
|
and then tap “ ”. |
|
7) Confirm onscreen instructions 8) |
Tap “Next” to setup your |
9) Confirm onscreen |
and tap “ ”. |
“Google Now™” or “skip” to |
instructions and tap “OK”. |
|
configure later. |
|
10)The initial settings are completed.
10
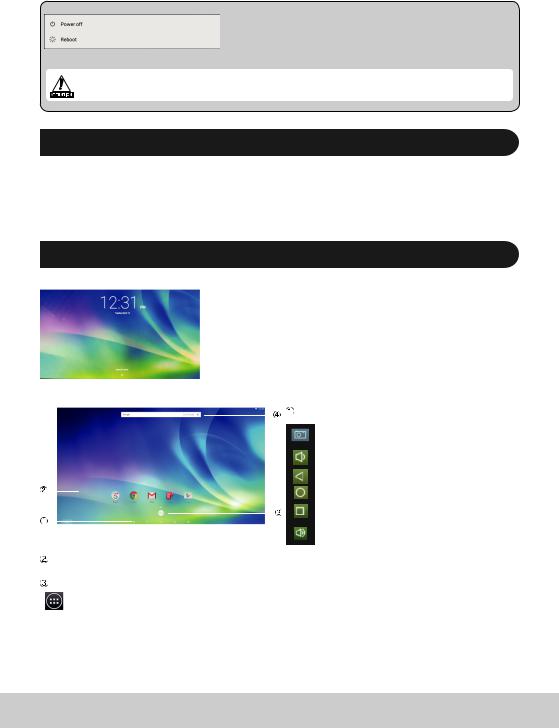
Shut Down
1)Press and hold the power button until you see “Power off” appears on the screen.
2)When the screen appears as shown on the left, tap “OK” to shut down the power.
If the power button is pressed shortly, the screen shuts off and goes into power saving mode. When the power button is pressed for about 8 seconds, the product is forced to shut down.
F. Power saving mode and Returning to operation
Entering Power Saving Mode
While product is in operation, briefly press of the power button puts the unit into power saving mode.
Returning from Power Saving Mode
While the power LED lights orange, briefly press the power button to return from power saving mode
G. Basic Operation
Lock Screen
1)Touch the  .
.  is shown besides the
  .
.
2)Drag  to
to  .
.
3)Home screen is shown.
Home Screen
|
|
|
|
|
|
|
|
|
|
|
Operation buttons |
|
|
|
|
|
|
|
|
|
|
|
|
||||
|
|
|
|
|
|
|
|
|
|
|
|
|
|
|
|
|
|
|
|
|
|
|
|
|
|
Screenshot button |
Tap this button to capture an |
|
|
|
|
|
|
|
|
|
|
|
|
image of your screen. |
|
|
|
|
|
|
|
|
|
|
|
|
|
Decreased volume |
To a djust the volume(-) |
|
|
|
|
|
|
|
|
|
|
|
|
button |
setting on the OSD menu. |
|
|
|
|
|
|
|
|
|
|
|
|
Back button |
Returns to previous screen. |
|
|
|
|
|
|
|
|
|
|
|
|
|
|
|
|
|
|
|
|
|
|
|
|
|
|
Home button |
Returns to Home screen. |
|
|
|
|
|
|
|
|
|
|
||||
|
|
|
|
|
|
|
|
|
|
|
|
Recently used |
Shows the list of recently |
|
|
|
|
|
|
|
|
|
|
|
|
applications |
used applications. |
|
|
|
|
|
|
|
|
|
|
||||
|
|
|
|
|
|
|
|
|
|
|
|
Increased volume |
To adjust the volume(+) |
|
|
|
|
|
|
|
|
|
|
|
|
button |
setting on the OSD menu. |
|
Desktop area |
|
|
|
|
|
|
|
|
|
|||
|
Tool icons |
|
|
|
|
|
|
|
|
|
|||
|
|
All applications |
Shows the list of all |
|
|
||||||||
|
|
applications. |
|
|
|||||||||
Depending on the screen shown, the content displayed in tool icons may vary.
 Status display
11

H. Network Setting
Connecting to Wireless LAN
1)Tap “All applications” – “Settings”.
2)Turn “Wi-Fi” to ON by dragging “OFF” to the right.
3)When Wi-Fi is turned on, a list of all available wireless LAN access points will be shown on the right side of the screen. Tap the desired Wireless LAN access point for connection.
4)If a password is required, enter it and tap “Connect” to connect to the wireless LAN.
Connecting to RJ45
Simply plug in your Ethernet cable to the RJ45 port to connect to a LAN. No set-up or configuration is required.
I. Formatting
Resetting Your Smart Display
Formatting will delete all of your data created and added after purchase (including system and application 

 settings, downloaded applications, etc.)
1)Tap “All applications” – “Settings”.
2)Tap “Back up & reset”.
3)Tap “Factory data reset".
4)Confirm all onscreen instructions and tap “reset”.
5)Again, confirm all onscreen instructions and tap “Delete All”. Formatting will begin shortly.
 System will reboot several times during formatting.
J. Use as HDMI-supported Display
Depending on the mode selected, this product may be used as an HDMI-supported display.
AndroidTM Mode |
Can be used as an Android device. |
HDMI Mode |
Connected to the PC can be used as a Monitor device. |
Switching to HDMI Mode
1)Connect the main unit and HDMI device with the HDMI-HDMI cable. Optional accessory; may not be included with this product package in some territories.
2)Tap the SELECT icon  to switch to HDMI mode.
Switching to Android Mode
1)Tap the SELECT icon  to switch to Android mode.
12
 Loading...