


 Loading...
VX3258-2KPC-mhd
Display
User Guide
IMPORTANT: Please read this User Guide to obtain important information on installing and using your product in a safe manner, as well as registering your product for future service. Warranty information contained in this User Guide will describe your limited coverage from ViewSonic Corporation, which is also found on our web site at http://www.viewsonic.com in English, or in specific languages using the Regional selection box in the upper right corner of our website. “Antes de operar su equipo lea cu idadosamente las instrucciones en este manual”
Model No. VS17752
P/N:VX3258-2KPC-MHD

Thank you for choosing ViewSonic
As a world leading provider of visual solutions, ViewSonic is dedicated to exceeding the world’s expectations for technological evolution, innovation, and simplicity. At ViewSonic, we believe that our products have the potential to make a positive impact in the world, and we are confident that the ViewSonic product you have chosen will serve you well.
Once again, thank you for choosing ViewSonic !

Contents |
|
|
1. |
Cautions and Warnings...................................... |
1 |
2. |
Getting Started.................................................... |
4 |
|
2-1. Package Contents............................................................. |
5 |
|
2-2. The Exterior of the Monitor................................................ |
6 |
|
2-3. Hardware Installation......................................................... |
7 |
|
2-4. Quick Installation............................................................... |
9 |
|
2-5. Power On......................................................................... |
10 |
|
2-6. Driver Installation (Windows 10 Setup)............................ |
11 |
3. |
Adjusting the Screen Image............................. |
12 |
|
3-1. Setting the Timing Mode.................................................. |
12 |
|
3-2. Using the Control Panel................................................... |
13 |
4. |
OSD Menu Introduction.................................... |
16 |
|
4-1. OSD Menu Tree............................................................... |
16 |
|
4-2. OSD Menu Explanation................................................... |
23 |
|
4-3. Monitor Setting Management........................................... |
28 |
5. |
Specifications.................................................... |
29 |
6. |
Troubleshooting................................................ |
31 |
7. |
Cleaning and Maintenance............................... |
32 |
|
Safe Cleaning Practices.......................................................... |
32 |
iii

8. |
Compliance Information................................... |
34 |
|
|
8-1. FCC Compliance Statement............................................ |
34 |
|
|
8-2. |
Industry Canada Statement............................................. |
35 |
|
8-3. |
Declaration of RoHS2 Compliance.................................. |
35 |
|
8-4. |
Indian Restriction of Hazardous Substances................... |
37 |
|
8-5. |
Product Disposal at End of Product Life.......................... |
37 |
9. |
Copyright Information...................................... |
38 |
|
|
Customer Service.................................................................... |
39 |
|
|
Limited Warranty..................................................................... |
42 |
|
|
Mexico Limited Warranty......................................................... |
47 |
|
iv

1. Cautions and Warnings
1.Read these instructions completely before using the equipment.
2.Keep these instructions in a safe place.
3.Heed all warnings and follow all instructions.
4.Sit at least 18” / 45cm from the monitor.
5.When installing the monitor, please leave 10cm of open space around the monitor for ventilation safety purposes.
6.Always handle the display with care when moving it.
7.Exercise caution when removing the rear cover of the monitor. This monitor contains high-voltage parts.
8.Do not use this equipment near water. To reduce the risk of fire or electric shock, do not expose the monitor to rain or moisture.
9.Avoid exposing the monitor to direct sunlight or other sources of sustained heat. Do not install near any heat sources such as radiators, heat registers, stoves, or other devices (including amplifiers) that may increase the temperature of the monitor to dangerous levels.
10.Clean with a soft, dry cloth. If further cleaning is required, see “Cleaning the Display” in this guide for further instructions.
11.Avoid touching the screen. Skin oils are difficult to remove.
12.Do not touch, rub or apply pressure to the monitor screen, as it may permanently damage the screen.
13.Place the monitor in a well-ventilated area. Do not place anything on the display that prevents heat dissipation.
14.Do not place heavy objects on the display, video cable, or power cord.
1

15.If smoke appears, an abnormal noise, or a strange odor is present, immediately switch the display off and call your dealer or ViewSonic. It is dangerous to continue using the display.
16.Do not attempt to circumvent the safety provisions of the polarized or grounding-type plug. A polarized plug has two blades with one wider than the other. A grounding type plug has two blades and a third grounding prong. The wide blade and the third prong are provided for your safety. If the plug does not fit into your outlet, obtain an adaptor and do not attempt to force the plug into the outlet.
17.When connecting to a power outlet, DO NOT remove the ground prong. Please ensure grounding prongs are NEVER REMOVED.
18.Protect the power cord from being treaded upon or pinched, particularly at the plug, and at the point where it emerges from the equipment. Be sure that the power outlet is located near the equipment so that it is easily accessible.
19.Only use attachments/accessories specified by the manufacturer.
20.Use only with the cart, stand, tripod, bracket, or
table specified by the manufacturer, or sold with the equipment. When a cart is used, use with caution when moving the cart/equipment combination to avoid injury from tipping over.
21.Unplug this equipment when it will be unused for long periods of time.
2

22.Refer all servicing to qualified service personnel. Service will be required when the unit has been damaged in any way, such as: if the power-supply cord or plug is damaged, if liquid is spilled onto or objects fall into the unit, if the unit is exposed to rain or moisture, or if the unit does not operate normally or has been dropped.
23.Excessive sound pressure from ear-/headphones can cause hearing damage /hearing loss.
24.Adjustment of the volume control as well as the equalizer may increase the ear-/ headphones output voltage and therefore, the sound volume level.
25.The factors influencing the ear-/headphones output other than those specified by the manufacturer (e.g. operating system, equalizer software, firmware, driver) may increase the ear-/ headphone output voltage and therefore, the sound volume level.
3

2. Getting Started
Should problems arise and the product you have purchased needs to be returned for any reason, please keep the original packaging, registration form, and receipt. Having these items will make it easier for you to verify your product and repair, refund and/or return your product to you.
If you have any problems with your product or questions that have not been addressed in the User Guide, please contact customer service for help.
Important! Save the original box and all packing material for your future shipping needs.
NOTE: The word “Windows” in this user guide refers to Microsoft Windows operating system.
4

2-1. Package Contents
Your monitor package includes:
•Monitor
•Power cord
•Video cable1
•Quick Start Guide
NOTE:
1The video cables included in your package may vary depending on your country. Please contact your local reseller for more information.
5
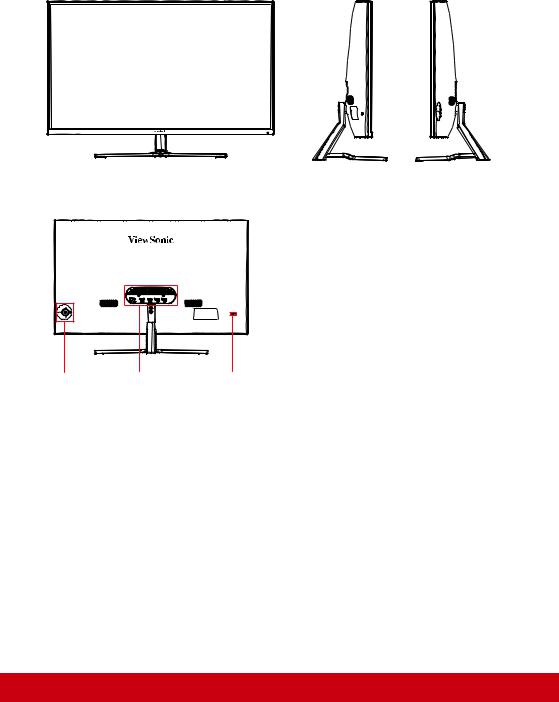
2-2. The Exterior of the Monitor
A. Front |
|
B. Left and Right |
|
|
|
C. Rear |
|
|
|
|
|
1. |
Control panel |
|
|
|
(Expanded in 3-1) |
|
|
2. |
I/O port (input/output) |
|
|
|
This area should include all I/O |
|
|
|
connection options, as well as the |
|
|
|
power input connector (Expanded in |
|
|
|
2-4) |
|
|
3. |
Kensington security slot |
1 |
2 |
3 |
(Expanded in 2-3 section B) |
6
2-3. Hardware Installation
A. |
Base Attachment |
B. Base Removal Procedure |
1 |
Procedure |
1 |
2 |
2 |
3 |
3 |
7
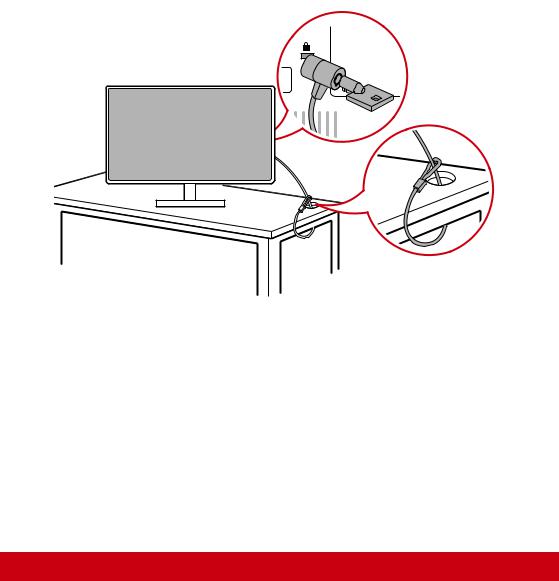
C. Using the Kensington Lock
The Kensington security connector is located on the back side of the monitor. For more information on installation and usage please visit the Kensington website at http://www. kensington.com.
Below is an example of setting up the Kensington lock on a table for your reference.
*This picture is for reference only
8

2-4. Quick Installation
Connect Signal Cables
1.Make sure both the LCD monitor and computer are turned OFF.
2.Remove rear panel covers if necessary.
3.Connect the signal cables from the LCD monitor to the computer.
9

3.A. Video and Audio Cable
For a MAC with Thunderbolt output, please connect the mini DP end of the “mini DP to DisplayPort cable” to the
Thunderbolt output of MAC. And connect the other end of the cable to the DisplayPort connector on the rear of the monitor.
3.B. Power Cable (and AC/DC adapter if required)
Connect the female connector of AC power cord to the power connector of monitor, and the AC plug of AC power cord to the AC outlet.
2-5. Power On
Turn On LCD Monitor and Computer
Turn ON the LCD Monitor, then turn ON the computer. This particular order (LCD monitor before computer) is important.
*This picture is for reference only
10
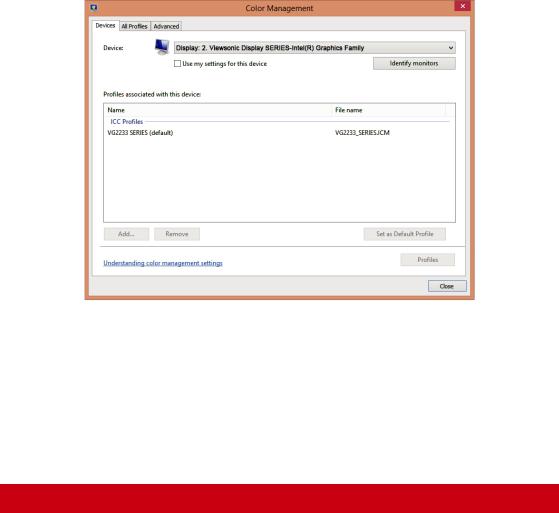
2-6. Driver Installation (Windows 10 Setup)
In order to install the driver, first connect your monitor to your PC, boot up your PC (make sure to first turn on the monitor first) and make sure your internet is available. When the PC has finished booting up, your PC should autodetect the monitor.
To ensure auto-detection is successful, go to ‘Advanced Display Settings’ under your system ‘Display Settings’ (screen resolution) window. There you can verify your ViewSonic monitor has been recognized by your PC in the ‘Color Management’ section of your advanced settings.
VX3258-2KPC-mhd SERIES |
|
VX3258-2KPC-mhd SERIES.icm |
|
|
|
If your PC has not auto-detected the monitor, but is still functioning, you can download the driver from ViewSonic website and install it then restart.your computer and follow the steps above again. It is not imperative for your computer to detect the monitor for normal use, but it is recommended.
If you encounter additional problems or have questions, please contact Customer Support.
11

3. Adjusting the Screen Image
3-1. Setting the Timing Mode
Set your monitor resolution to its recommended resolution (see section "specification") to get the best experience possible, with brilliant color and crisp text. Here is how:
1.Go to your display resolution settings window (each operating system will have a different process to get there).
2.Next, adjust the display resolution setting to match your monitor’s native resolution. This will provide you with your best usage experience.
If you have difficulty setting the resolution or you do not see recommended resolution as an available option, you may need a newer video card driver. Contact your computer or video card manufacturer to obtain the latest driver.
•If necessary, make small adjustments using H. POSITION and V. POSITION until the screen image is completely visible. (*for analog only). (The black border around the edge of the screen should barely touch the illuminated “active area” of the LCD monitor.)
12
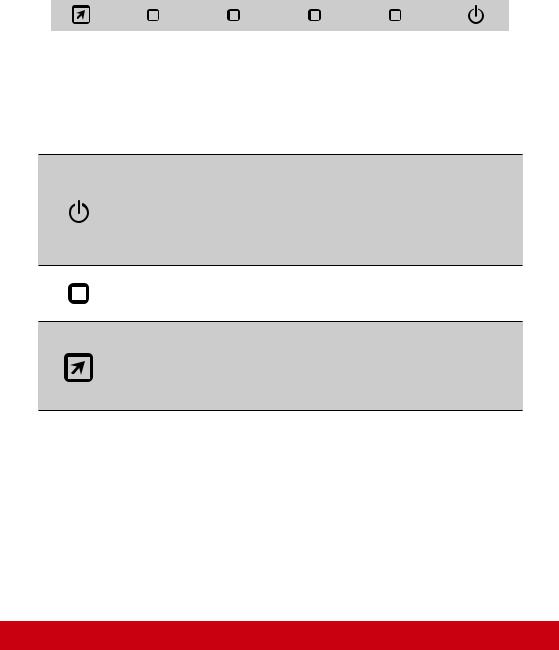
3-2. Using the Control Panel
After setting the timing mode, use the buttons on the front or rear control panel to display and adjust OSD for screen image adjustment.
* The postition refer to section 2.2
Bezel & OSD symbol explanation
The bezel symbol explanation is stated below:
Standby Power On/Off
NOTE: Power light
White = ON
Orange = Power Saving
Display the Menu by pressing any square button.
Shortcut Key 1 : This is a Shortcut key. The default setting is Volume. Keep pushing for 5 seconds, user can select one of the followings: Volume, Blue Light Filter, Game Mode, Aspect Ratio and Color Temperature to set the default of Shortcut Key 1.
13
Loading...