


 Loading...
M1
Portable Cinema
User Guide
IMPORTANT: Please read this User Guide to obtain important information on installing and using your product in a safe manner, as well as registering your product for future service. Warranty information contained in this User Guide will describe your limited coverage from ViewSonic Corporation, which is also found on our web site at http:// www.viewsonic.com in English, or in specific languages using the Regional selection box in the upper right corner of our website. “Antes de operar su equipo lea cu idadosamente las instrucciones en este manual”
Model No. VS17337
Compliance Information
FCC Statement
This device complies with part 15 of FCC Rules. Operation is subject to the following two conditions: (1) this device may not cause harmful interference, and (2) this device must accept any interference received, including interference that may cause undesired operation.
This equipment has been tested and found to comply with the limits for a Class B digital device, pursuant to part 15 of the FCC Rules. These limits are designed to provide reasonable protection against harmful interference in a residential installation. This equipment generates, uses, and can radiate radio frequency energy, and if not installed and used in accordance with the instructions, may cause harmful interference to radio communications. However, there is no guarantee that interference will not occur in a particular installation. If this equipment does cause harmful interference to radio or television reception, which can be determined by turning the
equipment off and on, the user is encouraged to try to correct the interference by one or more of the following measures:
yy
yy
yy
yy
Reorient or relocate the receiving antenna.
Increase the separation between the equipment and receiver.
Connect the equipment into an outlet on a circuit different from that to which the receiver is connected.
Consult the dealer or an experienced radio/TV technician for help.
Warning: You are cautioned that changes or modifications not expressly approved by the party responsible for compliance could void your authority to operate the equipment.
For Canada
CAN ICES-3 (B)/NMB-3(B)
CE Conformity for European Countries
The device complies with the EMC Directive 2014/30/EU and Low Voltage
Directive 2014/35/EU.
Following information is only for EU-member states:
The mark is in compliance with the Waste Electrical and Electronic
Equipment Directive 2012/19/EU (WEEE).
The mark indicates the requirement NOT to dispose the equipment including any spent or discarded batteries or accumulators as unsorted municipal waste, but use the return and collection systems available.
If the batteries, accumulators and button cells included with this equipment, display the chemical symbol Hg, Cd, or Pb, then it means that the battery has a heavy metal content of more than 0.0005% Mercury or more than,
0.002% Cadmium, or more than 0.004% Lead.
i

Important Safety Instructions
1.Read these instructions.
2.Keep these instructions.
3.Heed all warnings.
4.Follow all instructions.
5.Do not use this unit near water.
6.Clean with a soft, dry cloth.
7.Do not block any ventilation openings. Install the unit in accordance with the manufacturer’s instructions.
8.Do not install near any heat sources such as radiators, heat registers, stoves, or other devices (including amplifiers) that produce heat.
9.Do not defeat the safety purpose of the polarized or grounding-type plug. A polarized plug has two blades with one wider than the other. A grounding type plug has two blades and a third grounding prong. The wide blade and the third prong are provided for your safety. If the provided plug does not fit into your outlet, consult an electrician for replacement of the obsolete outlet.
10.Protect the power cord from being walked on or pinched particularly at plugs. Convenience receptacles and the point where they exit from the unit. Be sure that the power outlet is located near the unit so that it is easily accessible.
11.Only use attachments/accessories specified by the manufacturer.
12.Use only with the cart, stand, tripod, bracket, or table specified by the manufacturer, or sold with the unit. When a cart is used, use caution when moving the cart/unit combination to avoid injury from tipping over.
13.Unplug this unit when unused for long periods of time.
14.Refer all servicing to qualified service personnel. Servicing is required when the unit has been damaged in any way, such as: if the power-supply cord or plug is damaged, if liquid is spilled onto or objects fall into the unit, if the unit is exposed to rain or moisture, or if the unit does not operate normally or has been dropped.
ii

Declaration of RoHS2 Compliance
This product has been designed and manufactured in compliance with Directive
2011/65/EU of the European Parliament and the Council on restriction of the use of certain hazardous substances in electrical and electronic equipment (RoHS2
Directive) and is deemed to comply with the maximum concentration values issued by the European Technical Adaptation Committee (TAC) as shown below:
Substance |
Proposed Maximum |
Actual Concentration |
|
Concentration |
|||
|
|
||
Lead (Pb) |
0.1% |
< 0.1% |
|
Mercury (Hg) |
0.1% |
< 0.1% |
|
Cadmium (Cd) |
0.01% |
< 0.01% |
|
Hexavalent Chromium (Cr6+) |
0.1% |
< 0.1% |
|
Polybrominated biphenyls (PBB) |
0.1% |
< 0.1% |
|
Polybrominated diphenyl ethers (PBDE) |
0.1% |
< 0.1% |
Certain components of products as stated above are exempted under the Annex III of the RoHS2 Directives as noted below:
Examples of exempted components are:
1.Lead in glass of cathode ray tubes.
2.Lead in glass of fluorescent tubes not exceeding 0.2% by weight.
3.Lead as an alloying element in aluminium containing up to 0.4% lead by weight.
4.Copper alloy containing up to 4% lead by weight.
5.Lead in high melting temperature type solders (i.e. lead-based alloys containing 85% by weight or more lead).
6.Electrical and electronic components containing lead in a glass or ceramic other than dielectric ceramic in capacitors, e.g. piezoelectronic devices, or in a glass or ceramic matrix compound.
iii

Copyright Information
Copyright © ViewSonic® Corporation, 2018. All rights reserved.
Macintosh and Power Macintosh are registered trademarks of Apple Inc.
Microsoft, Windows, Windows NT, and the Windows logo are registered trademarks of Microsoft Corporation in the United States and other countries.
ViewSonic, the three birds logo, OnView, ViewMatch, and ViewMeter are registered trademarks of ViewSonic Corporation.
VESA is a registered trademark of the Video Electronics Standards Association.
DPMS and DDC are trademarks of VESA.
PS/2, VGA and XGA are registered trademarks of International Business Machines Corporation.
Disclaimer: ViewSonic Corporation shall not be liable for technical or editorial errors or omissions contained herein; nor for incidental or consequential damages resulting from furnishing this material, or the performance or use of this product.
In the interest of continuing product improvement, ViewSonic Corporation reserves the right to change product specifications without notice. Information in this document may change without notice.
No part of this document may be copied, reproduced, or transmitted by any means, for any purpose without prior written permission from ViewSonic Corporation.
Product Registration
To fulfill possible future product needs, and to receive additional product information as it becomes available, please visit your region section on ViewSonic’s website to register your product online.
The ViewSonic CD also provides an opportunity for you to print the product registration form. Upon completion, please mail or fax to a respective ViewSonic office. To find your registration form, use the directory “:\CD\Registration”. Registering your product will best prepare you for future customer service needs. Please print this user guide and fill the information in the “For Your Records” section.
For additional information, please see the “Customer Support” section in this guide.
Product Name: |
For Your Records |
M1 |
|
Model Number: |
ViewSonic LED Projector |
VS17337 |
|
Document Number: |
M1_UG_ENG Rev. 1A 03-22-18 |
Serial Number: |
________________________________________ |
Purchase Date: |
________________________________________ |
Product disposal at end of product life
ViewSonic respects the environment and is committed to working and living green. Thank you for being part of Smarter, Greener Computing. Please visit ViewSonic website to learn more.
USA & Canada: http://www.viewsonic.com/company/green/recycle-program/ Europe: http://www.viewsoniceurope.com/eu/support/call-desk/
Taiwan: http://recycle.epa.gov.tw/recycle/index2.aspx
iv

Table of Contents |
|
Introduction........................................................................ |
1 |
Projector features.................................................................................................................. |
1 |
Shipping contents ............................................................. |
2 |
Package Overview................................................................................................................ |
2 |
Product Overview.................................................................................................................. |
3 |
Controls and functions .................................................... |
4 |
Setting up .......................................................................... |
7 |
Power On/Off........................................................................................................................ |
8 |
Mount the Projector............................................................................................................ |
10 |
Open the smart stand and adjust the focus ring................................................................. |
11 |
Adjust Projected Image...................................................................................................... |
12 |
Positioning your projector.............................................. |
13 |
Using the menus................................................................................................................ |
14 |
Adjusting your projector’s settings..................................................................................... |
16 |
Connect the projector to your device................................................................................. |
17 |
Different menu options....................................................................................................... |
18 |
M1 FW Upgrade................................................................................................................. |
20 |
Wallpaper........................................................................................................................... |
21 |
Image Settings................................................................................................................... |
21 |
About the aspect ratio........................................................................................................ |
22 |
Auto Keystone.................................................................................................................... |
23 |
V Keystone......................................................................................................................... |
23 |
Brightness.......................................................................................................................... |
23 |
Contrast.............................................................................................................................. |
23 |
Optimizing the image......................................................................................................... |
24 |
Harman Kardon - Adjusting the audio settings................................................................... |
24 |
Muting the Sound............................................................................................................... |
24 |
Adjusting the Sound level................................................................................................... |
24 |
v

Adjusting the Audio Mode.................................................................................................. |
25 |
Adjusting the Light source settings.................................................................................... |
25 |
Reset All Settings............................................................................................................... |
26 |
Eye Protection.................................................................................................................... |
26 |
Viewing different file........................................................................................................... |
26 |
Using the 3D function......................................................................................................... |
30 |
OSD Menu System............................................................................................................ |
32 |
Specification sheet............................................................................................................. |
34 |
HDMI Support Video Timing............................................................................................... |
36 |
HDMI Support PC Timing................................................................................................... |
37 |
3D Support Timing............................................................................................................. |
38 |
USB-C Support Timing....................................................................................................... |
39 |
vi

Introduction
Projector features
The Portable Cinema providing users with high-performance LED projection and a userfriendly design to deliver high reliability and ease of use.
Some of the features may not be available on your projector. Actual performance may vary and subject to model specifications.
•360 degree smart stand enable instant Power ON / OFF (with Lens cover function).
•Auto keystone to correct distorted image automatically.
•Eye Protection function avoiding objects get close to the direct light from optical engine (30cm distance / 30 degree).
•USB-C for video transmission and power supply.
•Embedded battery for easy outdoor projection (up to 6 hours).
•Switchable light source mode to extend your battery usage hours.
•16GB internal storage ( Max. 12GB available storage for users).
•User-friendly UI design for easy navigation (with Wallpaper download).
•Music mode enables users to enjoy music without projection image.
•Short throw lens design to allow 1.6m distance to project 60” screen size.
•LED light source with excellent light source life (30,000 hrs).
•Supports 3D display.
•Color modes providing choices for different projection purposes.
•Multi-language On-Screen Display (OSD) menus.
The apparent brightness of the projected image will vary depending on the ambient lighting conditions, selected input signal contrast/brightness settings, and is directly proportional to projection distance.
1
Shipping contents
Package Overview
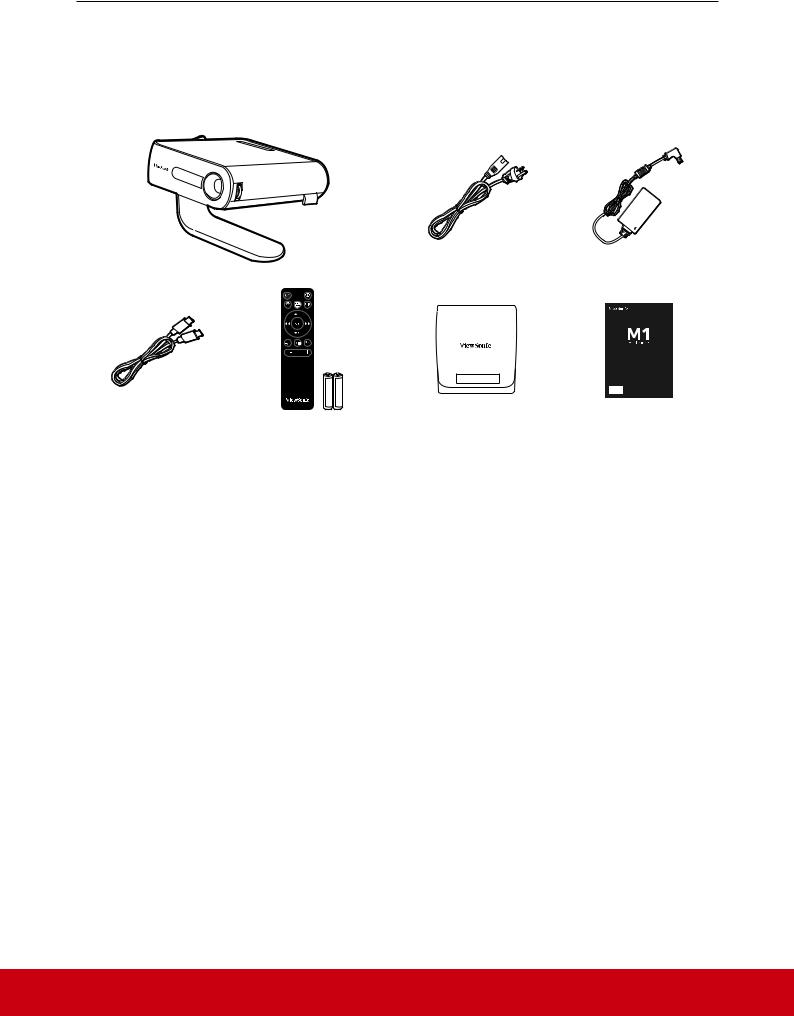
Carefully unpack and verify that you have all of the items shown below. If any of these items are missing, please contact your place of purchase.
Projector |
AC Power Cord |
AC Power Adapter |
Quick Start Guide
|
|
|
|
|
|
USB-C Cable (1M) |
Remote Control (with batteries) |
Soft Carrying Bag |
Quick Start Guide |
||
Others
• Warranty Card (for specific regions ONLY)
 NOTES
NOTES
•Due to different applications in each Country, some regions may have different accessories..
•Make sure to properly discard the used batteries according to local regulations. 
2
Product Overview
2 |
|
|
|
2 |
|
|
|
|
|
3 |
|
3 |
||||||
22 |
|
22 |
|
|
|
|
|
3 |
3 |
33 |
||||||||
|
|
|
|
|
2 |
|
|
|
|
|
|
|
|
|
|
3 |
||
|
|
|
|
|
|
|
|
|
|
|
|
|
|
|
|
|
|
|
|
|
|
|
|
|
|
|
|
|
|
|
|
|
|
|
|
|
|
|
|
|
|
|
|
|
|
|
|
|
|
|
|
|
|
|
|
|
|
|
|
|
|
|
|
|
|
|
|
|
|
|
|
|
|
|
|
|
|
|
|
|
|
|
|
|
|
|
|
|
|
|
|
|
|
|
|
|
|
|
|
|
|
|
|
|
|
|
|
|
|
|
|
|
|
|
|
|
|
|
|
|
|
|
|
|
|
|
|
|
|
|
|
|
|
|
|
|
|
|
|
|
|
|
|
|
|
|
|
|
|
|
|
|
|
|
|
|
|
|
|
|
|
|
|
|
|
|
|
|
|
|
|
|
|
|
1 |
|
|
|
|
|
|
|
|
|
|
|
|
|
|
|
|
|
8 |
|
10 |
|
|
|
|
|
|
|
|
|
|
|
|
|
|
|
|
|
|
|
|
|
|
|
|
|
||||
|
|
|
|
|
|
|
|
|
|
|
|
|
|
|
|
|
|
|
|
|
|
|
||||
1 |
1 |
|
|
|
|
|
|
|
|
|
|
8 |
8 |
|
|
10 |
|
|
||||||||
|
|
|
|
|
|
|
|
|
|
|
|
|
|
|||||||||||||
|
1 |
1 |
|
|
|
|
|
|
|
|
|
|
|
|
|
10 |
|
10 |
|
|
|
|||||
|
|
|
|
|
|
|
|
|
|
|
|
|
|
|
|
|
|
8 |
|
|
|
|
||||
|
1 |
1 |
|
|
|
|
|
|
|
5 |
6 |
|
|
|
|
8 |
|
8 |
|
10 |
|
12 |
||||
|
1 |
|
5 |
|
|
|
|
7 |
|
|
|
|
|
710 |
|
9 |
|
|||||||||
|
|
|
|
|
6 |
|
|
|
|
|
9 |
9 |
|
8 |
|
1012 |
|
|||||||||
|
|
|
|
|
5 |
|
|
6 |
|
7 |
|
|
|
|
|
9 |
12 |
12 |
||||||||
|
|
|
|
|
|
|
5 |
5 |
|
|
7 |
|
7 |
9 |
|
|
||||||||||
|
|
|
|
|
|
|
|
|
56 |
6 |
|
|
|
|
7 |
|
9 |
|
|
12 |
12 |
|||||
|
|
|
|
|
|
|
|
|
|
5 |
6 |
|
|
|
|
|
|
7 |
|
|
ENTER 9 |
|
|
|
12 |
|
|
|
|
|
|
|
|
|
|
|
|
|
|
ENTER |
|
|
|
|
|
|
|
|
|
|
|
|
|
|
|
|
|
|
4 |
|
|
|
|
|
|
|
ENTER |
|
|
|
|
|
|
|
|
|
|
|
|
|
|
|
|
|
|
|
|
|
|
|
|
|
|
|
|
|
ENTER |
|
|
|
|
|
|
|
|
||
|
|
|
|
44 |
|
|
|
|
|
|
|
|
|
ENTER |
|
|
ENTER |
|
|
|
|
11 |
|
20 |
||
|
|
|
|
|
|
|
|
|
|
|
|
|
|
|
|
|
ENTER |
|
|
|
|
|||||
|
|
|
|
4 |
44 |
|
|
|
|
|
|
|
|
111 |
|
111 |
2020 |
|
||||||||
|
|
|
|
|
4 |
|
|
|
|
|
|
|
|
|
|
|
|
11 |
|
|
20 |
|||||
|
|
|
|
|
|
|
|
|
|
|
|
|
|
|
|
|
|
|
|
|
11 |
|
|
20 |
20 |
|
|
|
|
|
|
|
|
|
|
|
|
|
|
|
|
|
|
|
|
|
|
|
|
|
20 |
||
|
|
|
|
|
|
|
|
|
|
|
|
|
|
|
|
|
|
|
|
|
|
|
|
|
|
|
|
|
|
|
|
|
14 |
|
|
|
|
|
|
|
|
14 |
|
|
13 |
|
15 |
|
16 |
|
17 |
18 |
||
13 |
14 15 |
|
|
16 |
17 |
18 |
|
|
|
||||
13 |
|
14 |
|
|
16 |
|
17 |
18 |
|
|
|
||
|
141514 |
|
|
18 |
|
||||||||
|
13 |
1415 |
16 |
17 |
|
||||||||
13 |
13 |
15 |
1516 |
1617 |
1718 |
18 |
|
||||||
|
|
13 |
|
|
|
15 |
|
16 |
17 |
|
18 |
|
|
19
19
19 19
19 19
19
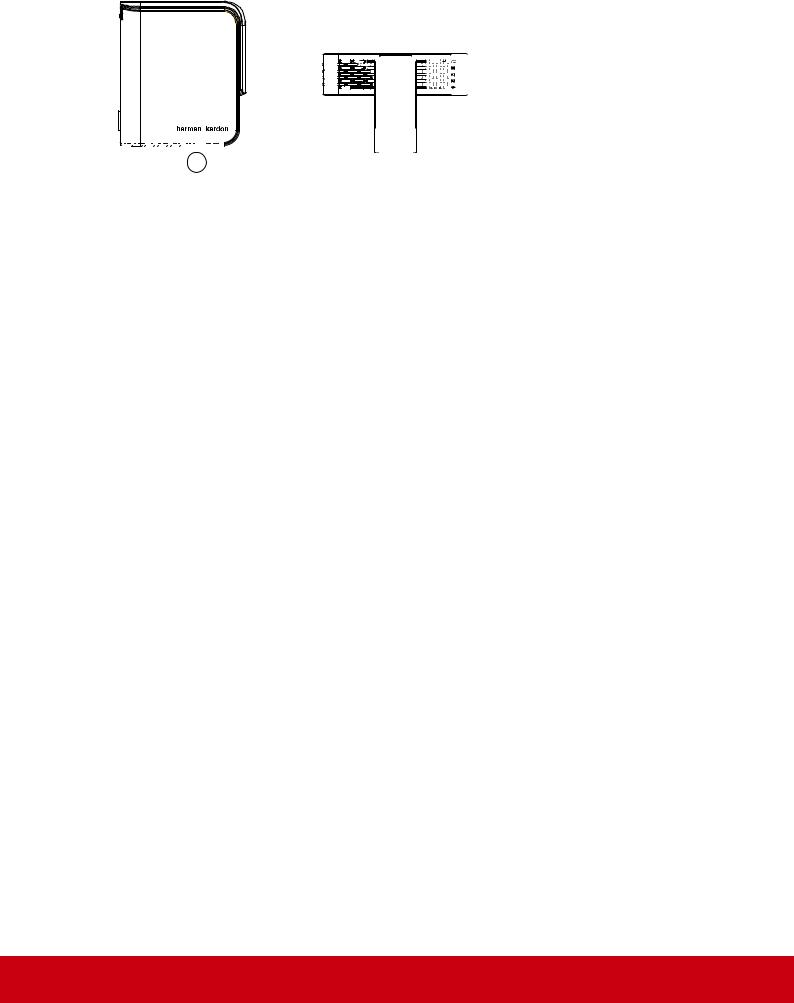
1. |
Speaker |
8. |
Volume - / Down |
15. |
USB-C |
2. |
Ventilation |
9. |
Volume + / Up |
16. |
HDMI port |
3. |
Focus Ring |
10. |
Return |
17. |
Headphone |
4. |
Tripod hole |
11. |
Battery indicator |
18. |
USB Reader (5V1A out) |
5. |
IR receiver |
12. |
Speaker PR |
19. |
Reset button** |
6. |
Eye Protection sensor |
13. |
Micro SD |
20. |
360 degree smart stand |
7. |
Enter / Power button |
14. |
DC in |
|
|
** Insert a paper clip into the reset button to restart the projector if system freezing.
3

Controls and functions
Projector
ENTER
Power / Enter
ENTER - Press 3 seconds to power on/off the projector
- Enacts the selected On-Screen Display(OSD) menu item.
Volume down
-Decrease the volume level.
-Down
Volume up
- Increase the volume level. - Up
Return
- Return to the previous stage/level
Battery indicator light
- Indicates the status of the embedded battery.
4
Remote Control
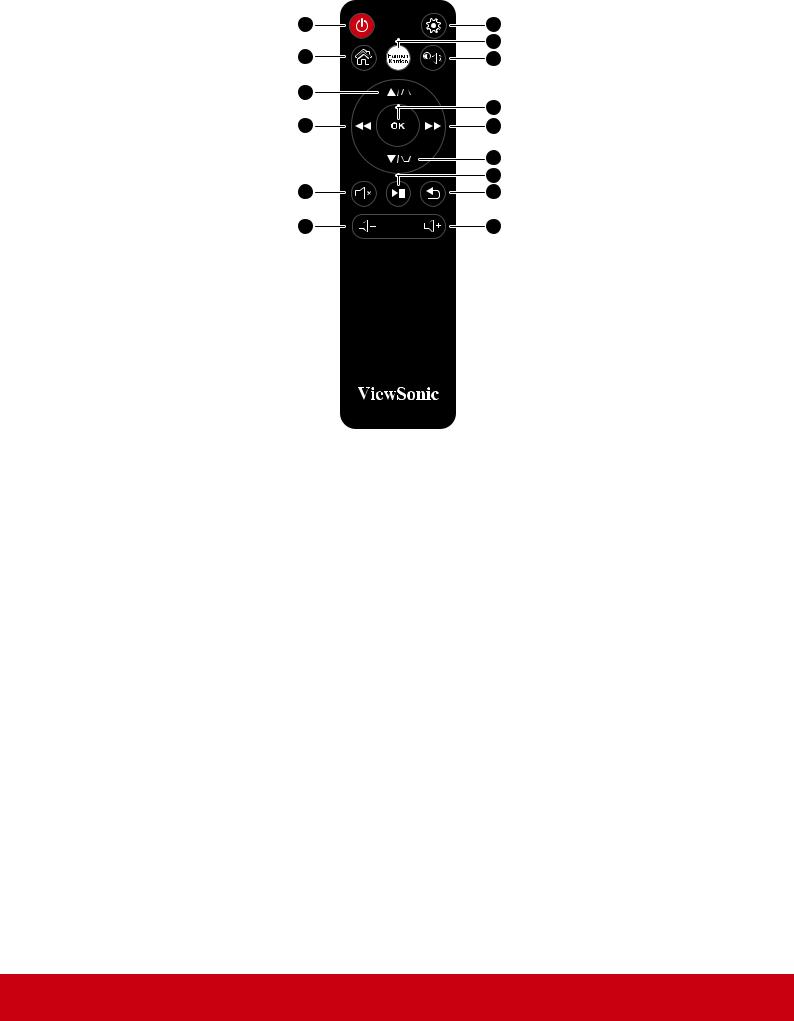
1 |
2 |
|
3 |
4 |
|
5 |
||
6 |
7 |
|
9 |
||
10 |
||
|
8 |
|
11 |
12 |
|
13 |
||
15 |
14 |
1. |
Power button |
9. |
LEFT / BACKWARD |
2. |
Settings |
10. |
RIGHT / FORWARD |
3. |
Home |
11. |
MUTE |
4. |
Harman Kardon Settings |
12. |
PLAY / PAUSE |
5. |
MUSIC Mode |
13. |
RETURN |
6. |
UP / KEYSTONE |
14. |
Volume Up |
7. |
OK |
15. |
Volume Down |
8.DOWN / KEYSTONE
Remote control effectiverange
Refer to the illustration about the location of the Infra-Red (IR) remote control sensor(s).
The remote control must be held at an angle within 30 degrees perpendicular to the projector’s IR remote control sensor(s) to function correctly. The distance between the remote control and the sensor(s) should not exceed 8 meters (~26 feet).
Make sure that there are no obstacles between the remote control and the III sensor(s) on the projector that might obstnict the infra-red beam.
5
Replacing the remote control battery
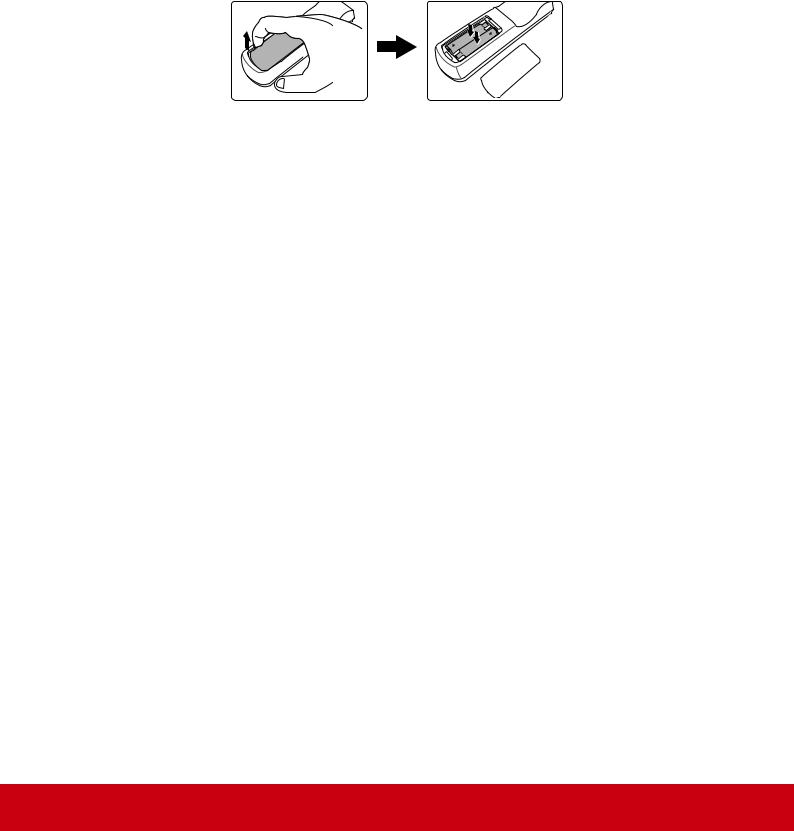
1.To open the battery cover, turn the remote control over to view its back, open the cover in the direction of the arrow as illustrated.
2.Remove any existing batteries (if necessary) and install two AAA batteries observing the battery polarities as indicated in the base of the battery compartment. Positive (+) goes to positive and negative (-) goes to negative.
3.Refit the cover by aligning it with the base and pushing it back down into position.
Stop when it clicks into place.
 Warning
•Avoid leaving the remote control and batteries in an excessive heat or humid environment like the kitchen, bathroom, sauna, sunroom or in a closed car.
•Replace only with the same or equivalent type recommended by the battery manufacturer.
•Dispose of the used batteries according to the manufacturer’s instructions and local environment regulations for your region.
•Never throw the batteries into a fire. There may be danger of an explosion.
•If the batteries are drained or if you will not be using the remote control for an extended period of time, remove the batteries to avoid damage to the remote control from possible battery leakage.
6

Setting up
Operating your projector
This portable projector allows you to plug and play your devices so you can easily open multimedia files and hear audio straight from it’s built-in Harman Kardon speakers.
For your safety and to maintain the quailty of this unit, refer to the following steps when operating your Projector.
7
Power On/Off
Using power cord
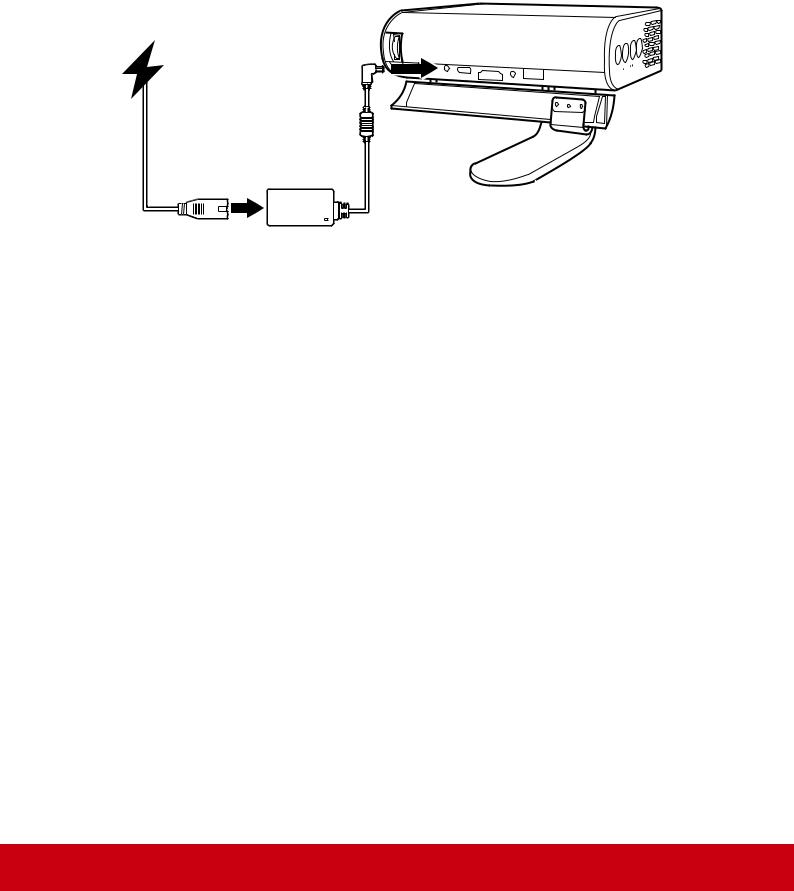
1.Connect the power cord to the power adapter.
2.Connect the AC power cord to a power source
3.Connect the DC power connector to your projector.
 Charge the projector for 3 hours before using it in battery mode for the first time.
 IMPORTANT!
•Use only the bundled power adapter to change the battery pack and supply power to your LED projector.
•Ensure that your LED projector is connected to the power adapter before turning it on for the first time.We strongly recommend that you use a grounded wall socket while using your LED projector on power adapter mode.
•The socket outlet must be easily accessible and near your LED projector.
•To disconnect your LED projector from its main power supply, unplug your LED projector from the power socket.
 Warning
Read the following precautions for your LED projector’s battery.
•The battery used in this device may present a risk of fire or chemical burn if removed or disassembled.
•Follow the warning labels for your personal safety. • Risk of explosion if battery is replaced by an incorrect type.
•Do not dispose of in fire. • Never attempt to short-circuit your LED projector’s battery.
•Never attempt to dissemble and reassemble the battery.
•Discontinue usage if leakage is found. • The battery and its components must be recycled or disposed of properly.
•Keep the battery and other small components away from children,
8

Using The Battery
Warning message is displayed when the battery is running out.
As your battery is low, the projector will be turned off in a minute.
If the screen shows a low battery message, be sure to charge the battery.
Battery using time information
Status |
Time and Display |
|
Charging |
About 3 hours |
|
Usage Hours |
Up to 6hrs battery life (with Battery Saving mode and without |
|
USB power supply) |
||
|
||
Battery Level indicator |
• During charging: Power button with Red LED light up |
|
(Charging) |
• Full charge: Power button with White LED light up |
There will be a very low power consumption during standby mode, suggest to full charge the battery before usage every time.
9
Loading...