


User’s Manual
NB 100 Series
computers.toshiba-europe.com

NB 100 Series
Copyright
© 2008 by TOSHIBA Corporation. All rights reserved. Under the copyright laws, this manual cannot be reproduced in any form without the prior written permission of TOSHIBA. No patent liability is assumed, with respect to the use of the information contained herein.
TOSHIBA NB 100 Series Portable Personal Computer User’s Manual First edition August 2008
Copyright authority for music, movies, computer programs, data bases and other intellectual property covered by copyright laws belongs to the author or to the copyright owner. Copyrighted material can be reproduced only for personal use or use within the home. Any other use beyond that stipulated above (including conversion to digital format, alteration, transfer of copied material and distribution on a network) without the permission of the copyright owner is a violation of copyright or author’s rights and is subject to civil damages or criminal action. Please comply with copyright laws in making any reproduction from this manual.
Disclaimer
This manual has been validated and reviewed for accuracy. The instructions and descriptions it contains are accurate for the TOSHIBA NB 100 Series Portable Personal Computer at the time of this manual’s production. However, succeeding computers and manuals are subject to change without notice. TOSHIBA assumes no liability for damages incurred directly or indirectly from errors, omissions or discrepancies between the computer and the manual.
Trademarks
IBM is a registered trademark, and IBM PC and PS/2 are trademarks of International Business Machines Corporation.
Intel, Intel SpeedStep and Intel Core and Centrino are trademarks or registered trademarks of Intel Corporation or its subsidiaries in the United States and other countries/regions.
Windows and Microsoft are registered trademarks of Microsoft Corporation. Photo CD is a trademark of Eastman Kodak.
Bluetooth is a registered trademark owned by its proprietor and used by TOSHIBA under license.
Memory Stick is a registered trademark of SonyCorporation.
Other trademarks and registered trademarks not listed above may be used in this manual.
User’s Manual |
i |
NB 100 Series
EU Declaration of Comformity
This product and - if applicable - the supplied accessories too are marked with "CE" and comply therefore with the applicable harmonized European standards listed under the Low Voltage Directive 2006/95/EC, the EMC Directive 2004/108/EC and/or R&TTE Directive 1999/5/EC.
Responsible for CE marking:TOSHIBA EUROPE GMBH, Hamfeldamm 8, 41460 Neuss, Germany.
Manufacturer:Toshiba Corporation, 1-1 Shibaura 1-chome, Minato-ku, Tokyo, 105-8001, Japan.
The complete official EU CE Declaration can be obtained on following internet page: http://epps.toshiba-teg.com
Following information is only valid for EU-member States:
Disposal of products
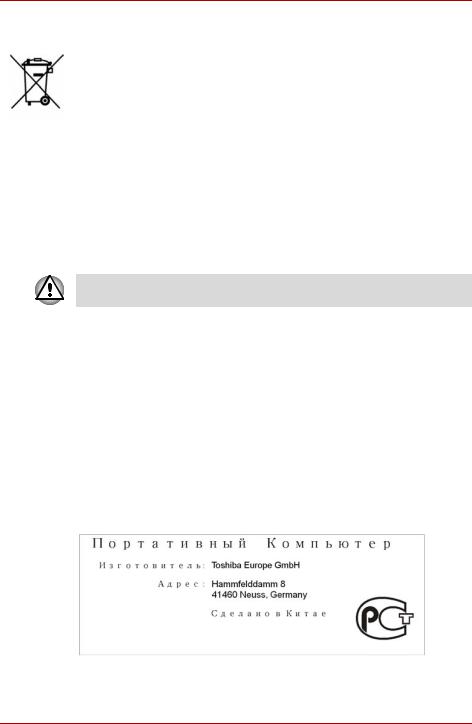
The crossed out wheeled dust bin symbol indicates that products must be collected and disposed of separately from household waste. Integrated batteries and accumulators can be disposed of with the product. They will be separated at the recycling centres.
The black bar indicates that the product was placed on the market after August 13, 2005.
By participating in separate collection of products and batteries, you will help to assure the proper disposal of products and batteries and thus help to prevent potential negative consequences for the environment and human health.
For more detailed information about the collection and recycling programmes available in your country, please visit our website (http://eu.computers.toshiba-europe.com) or contact your local city office or the shop where you purchased the product.
ii |
User’s Manual |
NB 100 Series
Disposal of batteries and/or accumulators
The crossed out wheeled dust bin symbol indicates that batteries and/or accumulators must be collected and disposed of separately from household waste.
If the battery or accumulator contains more than the specified values of lead (Pb), mercury (Hg), and/or cadmium (Cd) defined in the Battery
Pb, Hg,Cd Directive (2006/66/EC), then the chemical symbols for lead (Pb), mercury (Hg) and/or cadmium (Cd) will appear below the crossed out wheeled dust bin symbol.
By participating in separate collection of batteries, you will help to assure the proper disposal of products and batteries and thus help to prevent potential negative consequences for the environment and human health.
For more detailed information about the collection and recycling programmes available in your country, please visit our website (http://eu.computers.toshiba-europe.com) or contact your local city office or the shop where you purchased the product.
This symbol may not be displayed depending on the country and region where you purchased.
Disposing of the computer and the computer's batteries
■Discard this computer in accordance with applicable laws and regulations. For further information, contact your local government.
■This computer contains rechargeable batteries. After repeated use, the batteries will finally lose their ability to hold a charge and you will need to replace them. Under certain applicable laws and regulation, it may be illegal to dispose of old batteries by placing them in the trash.
■Please be kind to our shared environment. Check with your local government authority for details regarding where to recycle old batteries or how to dispose of them properly.
GOST
User’s Manual |
iii |

NB 100 Series
ENERGY STAR® Program
Your computer model may be ENERGY STAR® compliant. If the model you purchased is compliant, it is labeled with the ENERGY STAR logo on the computer and the following information applies.
TOSHIBA is a partner in the ENERGY STAR® Program and has designed this computer to meet the latest ENERGY STAR® guidelines for energy efficiency. Your computer ships with the power management options preset to a configuration that will provide the most stable operating environment and optimum system performance for both AC power and battery modes.
To conserve energy, your computer is set to enter the low-power Suspend Mode which shuts down the system and display within 15 minutes of inactivity in AC power mode. TOSHIBA recommends that you leave this and other energy saving features active, so that your computer will operate at its maximum energy efficiency. You can wake the computer from Suspend Mode by pressing the power button.
Products that earn the ENERGY STAR® prevent greenhouse gas emissions by meeting strict energy efficiency guidelines set by the US EPA and the EU Commission. According to the EPA, a computer meeting the new ENERGY STAR® specifications will use between 20% and 50% less energy depending on how it is used.
Visit http://www.eu-energystar.org or http://www.energystar.gov for more information regarding the ENERGY STAR® Program.
iv |
User’s Manual |

NB 100 Series
Table of Contents
Chapter 1 Introduction
Equipment checklist. . . . . . . . . . . . . . . . . . . . . . . . . . . . . . . . . . . . . . . 1-1 Features. . . . . . . . . . . . . . . . . . . . . . . . . . . . . . . . . . . . . . . . . . . . . . . . . 1-2 Special features . . . . . . . . . . . . . . . . . . . . . . . . . . . . . . . . . . . . . . . . . . 1-5 Utilities. . . . . . . . . . . . . . . . . . . . . . . . . . . . . . . . . . . . . . . . . . . . . . . . . . 1-7 Options . . . . . . . . . . . . . . . . . . . . . . . . . . . . . . . . . . . . . . . . . . . . . . . . . 1-8
Chapter 2 The Grand Tour
Front with the display closed . . . . . . . . . . . . . . . . . . . . . . . . . . . . . . . 2-1 Left side . . . . . . . . . . . . . . . . . . . . . . . . . . . . . . . . . . . . . . . . . . . . . . . . . 2-2 Right side . . . . . . . . . . . . . . . . . . . . . . . . . . . . . . . . . . . . . . . . . . . . . . . 2-3 Back side. . . . . . . . . . . . . . . . . . . . . . . . . . . . . . . . . . . . . . . . . . . . . . . . 2-4 Underside . . . . . . . . . . . . . . . . . . . . . . . . . . . . . . . . . . . . . . . . . . . . . . . 2-4 Front with the display open. . . . . . . . . . . . . . . . . . . . . . . . . . . . . . . . . 2-6 System indicators. . . . . . . . . . . . . . . . . . . . . . . . . . . . . . . . . . . . . . . . . 2-8 AC adaptor . . . . . . . . . . . . . . . . . . . . . . . . . . . . . . . . . . . . . . . . . . . . . . 2-9
Chapter 3 Getting Started
Connecting the AC adaptor . . . . . . . . . . . . . . . . . . . . . . . . . . . . . . . . . 3-2 Opening the display . . . . . . . . . . . . . . . . . . . . . . . . . . . . . . . . . . . . . . . 3-4 Turning on the power . . . . . . . . . . . . . . . . . . . . . . . . . . . . . . . . . . . . . . 3-5 Starting up for the first time . . . . . . . . . . . . . . . . . . . . . . . . . . . . . . . . 3-5 Turning off the power. . . . . . . . . . . . . . . . . . . . . . . . . . . . . . . . . . . . . . 3-5 Restarting the computer . . . . . . . . . . . . . . . . . . . . . . . . . . . . . . . . . . . 3-8 System recovery options. . . . . . . . . . . . . . . . . . . . . . . . . . . . . . . . . . . 3-9
Chapter 4 Operating Basics
Using the touchpad . . . . . . . . . . . . . . . . . . . . . . . . . . . . . . . . . . . . . . . 4-1 TOSHIBA Disc Creator . . . . . . . . . . . . . . . . . . . . . . . . . . . . . . . . . . . . . 4-2 Using the web camera . . . . . . . . . . . . . . . . . . . . . . . . . . . . . . . . . . . . . 4-4 Using the microphone . . . . . . . . . . . . . . . . . . . . . . . . . . . . . . . . . . . . . 4-6 Wireless communications . . . . . . . . . . . . . . . . . . . . . . . . . . . . . . . . . . 4-6 LAN . . . . . . . . . . . . . . . . . . . . . . . . . . . . . . . . . . . . . . . . . . . . . . . . . . . . 4-8 Cleaning the computer. . . . . . . . . . . . . . . . . . . . . . . . . . . . . . . . . . . . . 4-9
User’s Manual |
v |

NB 100 Series
Moving the computer . . . . . . . . . . . . . . . . . . . . . . . . . . . . . . . . . . . . . . 4-9 Heat dispersal . . . . . . . . . . . . . . . . . . . . . . . . . . . . . . . . . . . . . . . . . . . 4-10
Chapter 5 The Keyboard
Typewriter keys. . . . . . . . . . . . . . . . . . . . . . . . . . . . . . . . . . . . . . . . . . . 5-1 Function keys: F1 … F12 . . . . . . . . . . . . . . . . . . . . . . . . . . . . . . . . . . . 5-2 Soft keys: Fn key combinations . . . . . . . . . . . . . . . . . . . . . . . . . . . . . 5-2 Windows special keys . . . . . . . . . . . . . . . . . . . . . . . . . . . . . . . . . . . . . 5-5 Keypad overlay . . . . . . . . . . . . . . . . . . . . . . . . . . . . . . . . . . . . . . . . . . . 5-5 Generating ASCII characters. . . . . . . . . . . . . . . . . . . . . . . . . . . . . . . . 5-7
Chapter 6 Power and Power-up Modes
Power conditions . . . . . . . . . . . . . . . . . . . . . . . . . . . . . . . . . . . . . . . . . 6-1 Power indicators. . . . . . . . . . . . . . . . . . . . . . . . . . . . . . . . . . . . . . . . . . 6-2 Battery types. . . . . . . . . . . . . . . . . . . . . . . . . . . . . . . . . . . . . . . . . . . . . 6-3 Real Time Clock battery. . . . . . . . . . . . . . . . . . . . . . . . . . . . . . . . . . . . 6-4 Care and use of the battery pack . . . . . . . . . . . . . . . . . . . . . . . . . . . . 6-4 Replacing the battery pack . . . . . . . . . . . . . . . . . . . . . . . . . . . . . . . . . 6-8 Starting the computer by password . . . . . . . . . . . . . . . . . . . . . . . . . 6-11 Power-up modes. . . . . . . . . . . . . . . . . . . . . . . . . . . . . . . . . . . . . . . . . 6-11
Chapter 7 BIOS Setup and Passwords
Accessing BIOS Setup Menu . . . . . . . . . . . . . . . . . . . . . . . . . . . . . . . 7-1
Chapter 8 Optional Devices
Bridge media card slot. . . . . . . . . . . . . . . . . . . . . . . . . . . . . . . . . . . . . 8-1 Memory expansion . . . . . . . . . . . . . . . . . . . . . . . . . . . . . . . . . . . . . . . . 8-4 SIM card. . . . . . . . . . . . . . . . . . . . . . . . . . . . . . . . . . . . . . . . . . . . . . . . . 8-7 Additional AC adaptor . . . . . . . . . . . . . . . . . . . . . . . . . . . . . . . . . . . . . 8-8 USB FDD Kit . . . . . . . . . . . . . . . . . . . . . . . . . . . . . . . . . . . . . . . . . . . . . 8-8 External monitor . . . . . . . . . . . . . . . . . . . . . . . . . . . . . . . . . . . . . . . . . . 8-8 Security lock . . . . . . . . . . . . . . . . . . . . . . . . . . . . . . . . . . . . . . . . . . . . . 8-9
Chapter 9 Troubleshooting
Problem solving process. . . . . . . . . . . . . . . . . . . . . . . . . . . . . . . . . . . 9-1 Hardware and system checklist . . . . . . . . . . . . . . . . . . . . . . . . . . . . . 9-3 TOSHIBA support . . . . . . . . . . . . . . . . . . . . . . . . . . . . . . . . . . . . . . . . 9-12
Chapter 10 Disclaimers
CPU*1. . . . . . . . . . . . . . . . . . . . . . . . . . . . . . . . . . . . . . . . . . . . . . . . . . 10-1 Memory (main system)*2 . . . . . . . . . . . . . . . . . . . . . . . . . . . . . . . . . . 10-2 Battery life*3 . . . . . . . . . . . . . . . . . . . . . . . . . . . . . . . . . . . . . . . . . . . . 10-2 HDD drive capacity*4 . . . . . . . . . . . . . . . . . . . . . . . . . . . . . . . . . . . . . 10-2 LCD*5. . . . . . . . . . . . . . . . . . . . . . . . . . . . . . . . . . . . . . . . . . . . . . . . . . 10-3 Graphics Processor Unit (GPU)*6. . . . . . . . . . . . . . . . . . . . . . . . . . . 10-3 Wireless LAN*7 . . . . . . . . . . . . . . . . . . . . . . . . . . . . . . . . . . . . . . . . . . 10-3 Non-applicable icons*8 . . . . . . . . . . . . . . . . . . . . . . . . . . . . . . . . . . . 10-3
User’s Manual |
vi |

NB 100 Series
Copy protection . . . . . . . . . . . . . . . . . . . . . . . . . . . . . . . . . . . . . . . . . 10-3 USB Sleep and Charge. . . . . . . . . . . . . . . . . . . . . . . . . . . . . . . . . . . . 10-3
Appendix A Specifications
Appendix B Display Controller
Appendix C Wireless LAN
Appendix D AC Power Cord and Connectors
Appendix E If your computer is stolen
Glossary
Index
User’s Manual |
vii |

NB 100 Series
Preface
Congratulations on your purchase of the TOSHIBA NB 100 Series computer. This powerful, lightweight notebook computer is designed to provide years of reliable, computing.
This manual tells you how to set up and begin using your NB 100 Series computer. It also provides detailed information on configuring your computer, basic operations and care, using optional devices and troubleshooting.
If you are a new user of computers or if you are new to portable computing, first read over the Introduction and The Grand Tour chapters to familiarize yourself with the computer’s features, components and accessory devices. Then read Getting Started for step-by-step instructions on setting up your computer.
If you are an experienced computer user, please continue reading the preface to learn how this manual is organized, then become acquainted with this manual by browsing through its pages. Be sure to read the Special features section of the Introduction, to learn about features that are uncommon or unique to the computers and carefully read BIOS Setup and Passwords, If you are going to install SIM card,or connect external devices such as a printer, be sure to read Chapter 8,Optional Devices.
Manual contents
This manual is composed of the following chapters, appendixes, a glossary and an index.
Chapter 1, Introduction, is an overview of the computer’s features, capabilities, and options.
Chapter 2, The Grand Tour, identifies the components of the computer and briefly explains how they function.
Chapter 3, Getting Started, provides a quick overview of how to begin operating your computer.
Chapter 4, Operating Basics, includes tips on care of the computer and on using the touchpad, the web camera, the microphone, wireless communication and LAN.
Chapter 5, The Keyboard, describes special keyboard functions including the keypad overlay and hot keys.
User’s Manual |
viii |

NB 100 Series
Chapter 6, Power and Power-up Modes, gives details on the computer’s power resources and battery save modes.
Chapter 7, BIOS Setup and Passwords, explains how to configure the computer using the BIOS Setup program. It also tells how to set a password.
Chapter 8, Optional Devices, describes the optional hardware available.
Chapter 9, Troubleshooting, provides helpful information on how to perform some diagnostic tests, and suggests courses of action if the computer doesn’t seem to be working properly.
Chapter 10, Disclaimers, provides Legal Footnotes information related to your computer.
The Appendixes provide technical information about your computer.
The Glossary defines general computer terminology and includes a list of acronyms used in the text.
The Index quickly directs you to the information contained in this manual.
Conventions
This manual uses the following formats to describe, identify, and highlight terms and operating procedures.
Abbreviations
On first appearance, and whenever necessary for clarity, abbreviations are enclosed in parenthesis following their definition. For example: Read Only Memory (ROM). Acronyms are also defined in the Glossary .
Icons
Icons identify ports, dials, and other parts of your computer. The indicator panel also uses icons to identify the components it is providing information on.
Keys
The keyboard keys are used in the text to describe many computer operations. A distinctive typeface identifies the key top symbols as they appear on the keyboard. For example, Enter identifies the Enter key.
ix |
User’s Manual |
NB 100 Series
Key operation
Some operations require you to simultaneously use two or more keys. We identify such operations by the key top symbols separated by a plus sign (+). For example, Ctrl + C means you must hold down Ctrl and at the same time press C. If three keys are used, hold down the first two and at the same time press the third.
ABC |
When procedures require an action such as clicking an icon |
|
or entering text, the icon’s name or the text you are to type |
|
in is represented in the typeface you see to the left. |
Display
ABC |
Names of windows or icons or text generated by the |
|
computer that appear on its display screen are presented in |
|
the typeface you see to the left. |
Messages
Messages are used in this manual to bring important information to your attention. Each type of message is identified as shown below.
Pay attention! A caution informs you that improper use of equipment or failure to follow instructions may cause data loss or damage your equipment.
Please read. A note is a hint or advice that helps you make best use of your equipment.
Indicates a potentially hazardous situation, which could result in death or serious injury, if you do not follow instructions.
User’s Manual |
x |

NB 100 Series
xi |
User’s Manual |

NB 100 Series
General Precautions
TOSHIBA computers are designed to optimize safety, minimize strain and withstand the rigors of portability. However, certain precautions should be observed to further reduce the risk of personal injury or damage to the computer.
Be certain to read the general precautions below and to note the cautions included in the text of the manual.
Provide adequate ventilation
■Always make sure your computer and AC adaptor have adequate ventilation and are protected from overheating when the power is turned on or when an AC adaptor is connected to a power outlet (even if your computer is in Sleep Mode). In this condition, observe the following:
■Never cover your computer or AC adaptor with any object.
■Never place your computer or AC adaptor near a heat source, such as anelectric blanket or heater.
■Never cover or block the air vents including those located at the base of the computer.
■Always operate your computer on a hard flat surface. Using your computer on a carpet or other soft material can block the vents.c
■Always provide sufficient space around the computer.
■Overheating your computer or AC adaptor could cause system failure, computer or AC adaptor damage or a fire, possibly resulting in serious injury.
User’s Manual |
xii |

NB 100 Series
Creating a computer-friendly environment
Place the computer on a flat surface that is large enough for the computer and any other items you are using, such as a printer.
Leave enough space around the computer and other equipment to provide adequate ventilation. Otherwise, they may overheat.
To keep your computer in prime operating condition, protect your work area from:
■Dust, moisture, and direct sunlight.
■Equipment that generates a strong electromagnetic field, such as stereo speakers(other than speakers that are connected to the computer) or speakerphones.
■Rapid changes in temperature or humidity and sources of temperature change such as air conditioner vents or heaters.
■Extreme heat, cold, or humidity.
■Liquids and corrosive chemicals.
Stress injury
Carefully read the Instruction Manual for Safety and Comfort. It contains information on the prevention of stress injuries to your hands and wrists that can be caused by extensive keyboard use.
Heat injury
■Avoid prolonged physical contact with the computer. If the computer is used for long periods, its surface can become very warm. While the temperature will not feel hot to the touch, if you maintain physical contact with the computer for a long time, for example if you rest the computer on your lap or if you keep your hands on the palm rest, your skin might suffer a low-heat injury.
■If the computer has been used for a long time, avoid direct contact with the metal plate supporting the various interface ports as this can become hot.
■The surface of the AC adaptor can become hot when in use but this condition does not indicate a malfunction. If you need to transport the AC adaptor, you should disconnect it and let it cool before moving it.
■Do not lay the AC adaptor on a material that is sensitive to heat as the material could become damaged.
Pressure or impact damage
Do not apply heavy pressure to the computer or subject it to any form of strong impact as this can damage the computer’s components or otherwise cause it to malfunction.
xiii |
User’s Manual |

NB 100 Series
Mobile phones
Please be aware that the use of mobile phones can interfere with the audio system. The operation of the computer will not be impaired in any way, but it is recommended that a minimum distance of 30cm is maintained between the computer and a mobile phone that is in use.
Instruction Manual for Safety and Comfort
All important information on the safe and proper use of this computer is described in the enclosed Instruction Manual for Safety and Comfort. Be sure to read it before using the computer.
User’s Manual |
xiv |

NB 100 Series
xv |
User’s Manual |

Introduction
Chapter 1
Introduction
This chapter provides an equipment checklist, and it identifies the computer’s features, options and accessories.
Some of the features described in this manual may not function properly if you use an operating system that was not preinstalled by TOSHIBA.
Equipment checklist
Carefully unpack your computer. Save the box and packaging materials for future use.
Hardware
Check to make sure you have all the following items:
■NB 100 Series Portable Personal Computer
■Universal AC adaptor and power cord
■Battery pack (is pre-installed in some models)
Software
Windows XP Home Service Pack 3
The following software is preinstalled:
■Microsoft® Windows XP Home
■Bluetooth Driver (Can be used only for Bluetooth models)
■LAN Driver
■Pointing Device Driver
■Wireless LAN driver (Can be used only for Wireless LAN models=
■TOSHIBA DVD PLAYER
■TOSHIBA ConfigFree
■TOSHIBA Disc Creator
■TOSHIBA 3G RF Power Control Utility (Can be used only for 3G models)
■TOSHIBA User’s Manual
User’s Manual |
1-1 |

NB 100 Series
Documentation
■TOSHIBA NB 100 Series User’s Manual
■TOSHIBA NB 100 Series Quickstart
■Instruction Manual for Safety and Comfort
■Warranty information
If any of the items are missing or damaged contact your dealer immediately.
Features
This computer incorporates the following features and benefits:
Processor
Built-in |
Your computer is equipped with one processor |
|
and processor type varies depending on model. |
|
To check which type of processor is included in |
|
your model, clicking Start Control Panel |
|
Performance and Maintenance System, and |
|
check the CPU information. |
CPU*1
For more information regarding CPU, please refer to the Disclaimer section in Chapter 10 or click the *1 above.
Memory
Slots |
PC2-5300/ PC6400 512 MB or 1 GB memory |
|
module can be installed in the memory slot of all |
|
model: |
|
Mobile Intel® 945GSE Express Chipset model |
|
Maximum system memory size and speed |
|
depend on the model you purchased. The actual |
|
amount of useable system memory will be less |
|
than the installed memory modules. |
PC2-6400/PC2-5300 memory modules work as PC2-4200 speed on 945GSE Express chipset.
Video RAM |
Depending on the model you purchased. |
1-2 |
User’s Manual |

Introduction
Mobile Intel® 945GSE Express Chipset
Video RAM capacity shares with main memory, and the proportion depends on Dynamic Video Memory Technology.
Memory (main system)*2
For more information regarding Memory (Main System), please refer to the Disclaimer section in Chapter 10 or click the *2 above.
Disks
Hard disk drive (HDD) The computer has one or two integrated, 2 1/2" hard disk drive(s) for nonvolatile storage of data and software (depending on the model you purchased). It comes in the following sizes.
■120 GB
■160 GB Additional Hard Disk drive or Solid State Disk sizes may be introduced.
HDD drive capacity*4
For more information regarding Hard disk drive capacity, please refer to the Disclaimers section in Chapter 10 or click the *4 above.
Keyboard
Built-in
80 keys, compatible with IBM® enhanced keyboard, embedded numeric overlay, dedicated
cursor control,  and
and  keys. See Chapter 5, The Keyboard, for details.
Pointing device
Built-in |
A touchpad and control buttons in the palm rest |
|
enable control of the on-screen pointer. |
|
|
Power
Battery pack |
The computer is powered by one rechargeable |
|
lithium-ion battery pack. |
|
|
Battery life*3
For more information regarding Battery life, please refer to the Disclaimers section in Chapter 10 or click the *3 above.
User’s Manual |
1-3 |

NB 100 Series
RTC battery |
The internal RTC battery backs up the Real Time |
|
Clock (RTC) and calendar. |
|
|
AC adaptor |
The universal AC adaptor provides power to the |
|
system and recharges the batteries when they |
|
are low. It comes with a detachable power cord. |
|
Because it is universal, it can receive a range of |
|
AC voltage between 100 and 240 volts. |
Ports
Headphone |
Enables connection of a stereo headphone. |
Microphone |
Enables connection of a microphone. |
External monitor |
15-pin, analog VGA port. |
Universal Serial Bus |
Three Universal Serial Bus (USB) enable a chain |
(USB 2.0) |
connection of USB-equipped devices to your |
|
computer through the ports. The ports with the |
|
icon ( ) has USB Sleep and Charge function. |
Slots
Bridge media card slot |
This slot lets you easily transfer data from |
|
devices, such as digital cameras and Personal |
|
Digital Assistants, that use flash memory (SD/ |
|
MS/MS Pro memory cards) |
|
See Chapter 8, Optional Devices, for details. |
|
|
SIM card slot |
This slot allows you to install a SIM card to |
|
expand functionality. |
|
See Chapter 8, Optional Devices, for details. |
|
(Provided with some models) |
Multimedia
Web camera |
Record/Send still or video images with this |
|
integrated web camera. (Provided with some |
|
models) |
Sound system |
Sound System provides internal speaker as well |
|
as jacks for an external microphone and |
|
headphone. |
1-4 |
User’s Manual |
|
|
Introduction |
|
|
|
|
|
Communications |
|
|
|
|
|
|
|
|
LAN |
The computer is equipped with a LAN that |
|
|
|
supports Ethernet LAN (10 Mbit/s, 10BASE-T) |
|
|
|
and Fast Ethernet LAN (100 Mbit/s, |
|
|
|
100BASE-TX). It is preinstalled as a standard |
|
|
|
device in some markets. |
|
|
Wireless LAN |
The computers in this series are equipped with a |
|
|
|
Wireless LAN module that is compatible with |
|
|
|
other LAN systems based on Direct Sequence |
|
|
|
Spread Spectrum/Orthogonal Frequency Division |
|
|
|
Multiplexing radio technology that complies with |
|
|
|
the IEEE 802.11 Standard. |
|
Wireless LAN*7
For more information regarding Wireless LAN, please refer to the
Disclaimer section in Chapter 10 or click the *7 above.
Wireless WAN |
Some computers in this series are equipped with |
|
Wireless WAN function. Wireless WAN provides |
|
the high speed data service, the speed generally |
|
above several hundred kbps. And Wireless WAN |
|
service also can simultaneously transmit the |
|
sound (telephone conversation) and the data |
|
message (the email, the immediate |
|
communication and so on). |
|
(Provided with some models) |
|
|
Bluetooth |
Some computers in this series are equipped with |
|
Bluetooth functions. BluetoothTM wireless |
|
technology eliminates the need for cables |
|
between electronic devices such as computers |
|
and printers. BluetoothTM provides fast, reliable, |
|
and secure wireless communication in a small |
|
space. |
Security
Security lock slot Connects a security lock to anchor the computer to a desk or other large object.
Special features
The following features are either unique to TOSHIBA computers or are advanced features which make the computer more convenient to use..
Hot keys |
Key combinations let you quickly modify the |
|
system configuration directly from the keyboard |
|
without running a system configuration program. |
User’s Manual |
1-5 |

NB 100 Series
Display automatic This feature automatically cuts off power to the power off internal display when there is no keyboard input for a time specified. Power is restored when any
key is pressed.
HDD automatic power This feature automatically cuts off power to the off hard disk drive when it is not accessed for a time
specified. Power is restored when the hard disk is accessed.
System automatic |
This feature automatically shuts down the |
standby/hibernation |
system in standby mode or hibernation mode |
|
when there is no input or hardware access for a |
|
time specified. |
Keypad overlay |
A ten-key pad is integrated into the keyboard. |
|
Refer to the Keypad overlay section in Chapter 5, |
|
The Keyboard, for instructions on using the |
|
keypad overlay. |
Power-on password |
Two levels of password security, supervisor and |
|
user, are available to prevent unauthorized |
|
access to your computer. |
Instant security |
A hot key function blanks the screen and |
|
disables the computer providing data security. |
Intelligent power |
A microprocessor in the computer’s intelligent |
supply |
power supply detects the battery’s charge and |
|
calculates the remaining battery capacity. It also |
|
protects electronic components from abnormal |
|
conditions, such as voltage overload from an AC |
|
adaptor. |
Battery save mode |
This feature allows you to save battery power. |
Panel power on/off |
This feature turns power to the computer off |
|
when the display panel is closed and turns it |
|
back on when the panel is opened. |
Low battery automatic When battery power is exhausted to the power hibernation mode that computer operation cannot be continued, the
system automatically enters Hibernation and shuts down.
Heat dispersal |
To protect from overheating, the CPU has an |
|
internal temperature sensor. If the computer’s |
|
internal temperature rises to a certain level, the |
|
CPU processing speed will lower half. |
Hibernation |
This feature lets you turn off the power without |
|
exiting from your software. The contents of main |
|
memory are saved to the hard disk, when you |
|
turn on the power again, you can continue |
|
working right where you left off. Refer to the |
|
Turning off the power section in Chapter 3, |
|
Getting Started, for details |
1-6 |
User’s Manual |

|
|
Introduction |
|
|
|
|
|
|
|
|
|
|
Standby |
If you have to interrupt your work, you can turn |
|
|
|
off the power without exiting from your software. |
|
|
|
Data is maintained in the computer’s main |
|
|
|
memory. When you turn on the power again, you |
|
|
|
can continue working right where you left off. |
|
Utilities
This section describes preinstalled utilities and tells how to start them. For details on operation, refer to each utility’s online manual, help files or readme.txt files.
TOSHIBA DVD |
This software is provided for playback of DVD |
PLAYER |
Video. |
|
(This software is preinstalled in some modelsl) |
TOSHIBA ConfigFree ConfigFree is a suite of utilities to allow easy control of communication devices and network connections. ConfigFree also allows you to find communication problems and create profiles for easy switching between location and communication networks.
|
You can boot ConfigFree from the menu bar as |
|
follows. |
|
Start All Programs TOSHIBA Networking |
|
ConfigFree |
TOSHIBA |
You can create CD/DVDs in several formats |
Disc Creator |
including audio CDs that can be played on a |
|
standard stereo CD player and data CD/DVDs to |
|
store the files and folderson your hard disk drive. |
|
This software can be used on a model with CD- |
|
RW/DVD-ROM drive, and DVD Super Multi |
|
drive. |
|
You can boot TOSHIBA Disc Creator from the |
|
menu bar as follows. |
|
Start All Programs TOSHIBA CD&DVD |
|
Applications Disc Creator |
TOSHIBA Bluetooth |
This software enables communication between |
Stack |
remote Bluetooth devices. |
(depending on the |
|
model you |
|
purchased) |
|
Bluetooth cannot be used in models that do not have a Bluetooth module installed.
User’s Manual |
1-7 |

NB 100 Series
Options
You can add a number of options to make your computer even more powerful and convenient to use. The following options are available:
Memory |
PC2-5300/ PC2-6400 512 MB or 1 GB memory |
|
module can be installed in the memory slot of all |
|
models: |
|
Mobile Intel® 945GSE Express Chipset model |
|
Maximum system memory size and speed |
|
depend on the model you purchased. The actual |
|
amount of useable system memory will be less |
|
than the installed memory modules. |
PC2-5300/PC2-6400 memory modules work as PC2-4200 speed on 945GSE Express chipset.
Battery Pack |
An additional battery pack 4 cell Type can be |
|
purchased from your TOSHIBA dealer. The |
|
battery pack is identical to the one that came with |
|
your computer. Use it as a spare or replacement. |
Universal AC adaptor If you use your computer at more than one site, it may be convenient to purchase an additional AC adaptor for each site so you will not have to carry the adaptor with you.
USB FDD Kit |
The USB floppy disk drive accommodates either |
|
a 1.44 MB or 720 KB floppy disk through |
|
connection to one of the computer’s USB ports. |
Security lock |
A slot is available to attach a security cable to the |
|
computer to deter theft. |
1-8 |
User’s Manual |
The Grand Tour
Chapter 2
The Grand Tour
This chapter identifies the various components of your computer. Become familiar with each component before you operate the computer.
Non-applicable icons*8
For more information regarding Non-applicable icons, please refer to the Disclaimer section in Chapter 10 or click the *8 above.
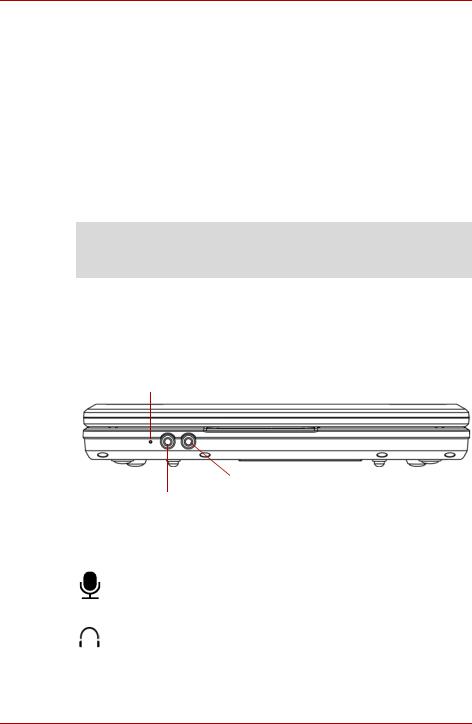
Front with the display closed
Figure below shows the computer’s front with its display panel in the closed position.
Built-in microphone
Headphone jack
Microphone jack
Front of the computer with display closed
Microphone jack |
A standard 3.5 mm mini microphone jack enables |
|
connection of a microphone or other device for |
|
audio input. |
|
|
Headphone jack |
A standard 3.5 mm mini headphone jack enables |
|
connection of a stereo headphone (16 ohm |
|
minimum) or other device for audio output. When |
|
you connect headphones, the internal speaker is |
|
automatically disabled. |
Built-in |
Record monaural sounds into your applications. |
microphone |
(Provided with some models) |
User’s Manual |
2-1 |

NB 100 Series
Left side
Figure below shows the computer’s left side.
Security lock slot |
USB port |
|
The left side of the computer
Universal serial The universal serial bus (USB) port comply with bus (USB 2.0) ports USB Serial 2.0 standards, which enables data
transfer speeds 40 times faster than the USB 1.1 standards. The ports with the icon (  ) has USB Sleep and Charge function.
Security lock slot A security cable attaches to this slot. The optional security cable anchors your computer to a desk or other large object to deter theft.
Keep foreign metal objects, such as screws, staples and paper clips, out of the USB connectors. Foreign metal objects can create a short circuit, which can cause damage and fire, possibly resulting in serious injury.
Please note that it is not possible to confirm the operation of all functions of all USB devices that are available. In view of this it may be noted that some functions associated with a specific device might not operate properly.
2-2 |
User’s Manual |
The Grand Tour
Right side
Figure below shows the computer’s right side.
SIM card slot*
Bridge media |
|
card slot |
Fan |
|
vent |
USB ports |
|
|
|||||
*Depending on the model you purchased |
|
|||||
|
|
|
The right side of the computer |
|||
Bridge media card This slot lets you easily transfer data from devices,
slot |
such as digital camera and PDA, that use flash |
|
memory. (SD/MS/MS Pro memory cards) |
|
|
SIM card slot |
The computer provides a SIM card slot on right side, |
|
which allows you to install an additional SIM card. |
|
(Provided with some models) |
Fan vent |
Provides air flow for the fan. |
Universal serial The two universal serial bus (USB) ports comply bus (USB 2.0) ports with USB Serial 2.0 standards, which enables data
transfer speeds 40 times faster than the USB 1.1 standards. The ports with the icon (  ) has USB Sleep and Charge function.
Keep foreign metal objects, such as screws, staples and paper clips, out of the USB connectors. Foreign metal objects can create a short circuit, which can cause damage and fire, possibly resulting in serious injury.
Please note that it is not possible to confirm the operation of all functions of all USB devices that are available. In view of this it may be noted that some functions associated with a specific device might not operate properly.
Security lock slot A security cable attaches to this slot. The optional security cable anchors your computer to a desk or other large object to deter theft.
User’s Manual |
2-3 |
NB 100 Series
Back side
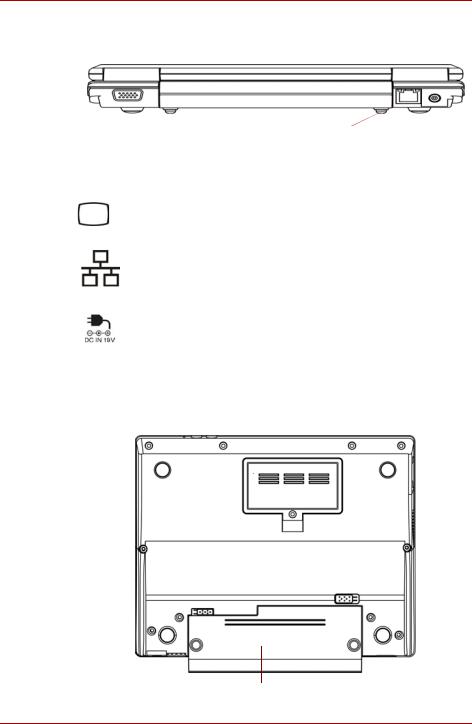
Figure below shows the computer’s back side.
|
|
|
|
|
|
|
|
|
|
External monitor port |
LAN jack |
DC IN 19V |
||
|
|
The computer’s back side |
|
|
|
|
|
|
|
External monitor |
This 15-pin port allows you to connect an external |
|||
port |
monitor. |
|
|
|
|
|
|
|
|
LAN jack |
This jack lets you connect to a LAN. The adaptor |
|||
|
|
has built-in support for Ethernet LAN (10 Mbit/s, |
||
|
|
10BASE-T), or Fast Ethernet LAN (100 Mbit/s, |
||
|
|
100BASE-TX). |
|
|
|
|
|
|
|
DC IN 19V |
The AC adaptor connects to this socket. Use only |
|||
|
|
the model of AC adaptor that comes with the |
||
|
|
computer. Using the wrong adaptor can damage |
||
|
|
your computer. |
|
|
Underside
Figure below shows the underside of the computer. Make sure the display is closed before turning over your computer.
Memory  module cover
Battery release Latch |
Battery pack lock |
||
|
|
||
|
|
|
|
|
|
|
|
|
|
|
|
Battery pack
2-4 |
User’s Manual |

|
|
The Grand Tour |
|
|
|
|
|
The underside of the computer |
|
|
|
|
Battery pack |
The battery pack powers the computer when the AC |
|
|
adaptor is not connected. The Batteries section in |
|
|
Chapter 6, Power and Power-up Modes, describes |
|
|
how to access the battery pack. Additional battery |
|
|
packs can be purchased from your TOSHIBA dealer |
|
|
to extend the computer’s battery operating time.. |
|
Battery release |
Slide this latch to release the battery pack. |
|
latch |
This latch moves only when the computer is upside |
|
|
down. |
|
|
|
|
Battery pack lock |
Slide the battery pack lock to unlocked position to |
|
|
free the battery latch. |
|
|
|
|
Memory module |
This cover protects one memory module socket. |
|
cover |
One module is preinstalled. |
|
|
|
User’s Manual |
2-5 |

NB 100 Series
Front with the display open
Figure below shows the front of the computer with the display open. To open the display, lift the display up and position the display at a comfortable viewing angle.
Web camera led* |
Web camera* |
Wireless Lan Antenna |
|
(Not shown) |
|||
|
|||
|
|
Wireless Lan Antenna (Not shown) 
Display screen
Stereo speaker (right)
Power button
Touch pad control buttons
Stereo speaker (left)
Bluetooth Antenna (Not shown)*
Touch pad |
System indicators |
*Depending on the model you purchased
The front with the display open
Display screen The full-color LCD displays high-contrast text and graphics The computer’s LCD is 8.9" WSVGA, 1024 horizontal × 600 vertical pixels.
The computer has a Thin-Film Transistor (TFT) display. Refer to Appendix B, Display Controller.
When the computer operates on power through the AC adaptor, the display screen’s image won’t change.
LCD*5
For more information regarding LCD, please refer to the Disclaimer section in Chapter 10 or click the *5 above.
Graphics Processor Unit (GPU)*6
For more information regarding Graphics Processor Unit (GPU), please refer to the Disclaimer section in Chapter 10 or click the *6 above.
2-6 |
User’s Manual |
 Loading...