


TekBright Photo Frame_QSG_WEU.book Page 1 Tuesday, October 9, 2007 11:42 PM
GB
Quick Start Guide
TekBright™ Photo Frame (PA3637*)
Before operating this unit (TekBright™ photo frame), please carefully read and follow the instructions below.
■The operating temperature is between 0 and 40 degrees Celsius.
■Do not use or store this unit in the environments listed below:
■Direct sunlight
■A high-humidity area such as bathroom
■Dusty places
■Next to an air conditioner, electric heater or other heat sources
■In a closed car that is in direct sunlight
■Unstable locations
■If this unit becomes wet, wipe it with a dry cloth as soon as possible.
■Salt or seawater may cause severe damage to this unit.
■Do not use solvents (such as alcohol) to clean this unit.
■If the screen is dirty, use a lens brush or soft cloth to clean the screen.
■To prevent electric shock, do not attempt to disassemble or repair this unit by yourself.
■Water may cause a fire or electric shock. Therefore, store this unit in a dry place.
■Do not use this unit outdoors when it is raining or snowing.
■Do not use this unit in or near water.
■If a foreign substance or water gets in this unit, please turn the power off immediately and disconnect the power adapter. Next, remove the foreign substance or water, and then send it to your nearest service center.
■Only use the power supply which comes bundled with the photo frame
■For disconnecting it from power line, unplug the power supply from the jack
computers.toshiba-europe.com
TekBright Photo Frame_QSG_WEU.book Page 2 Tuesday, October 9, 2007 11:42 PM
TekBright™ Photo Frame
Follow the instructions below to install and operate the unit.
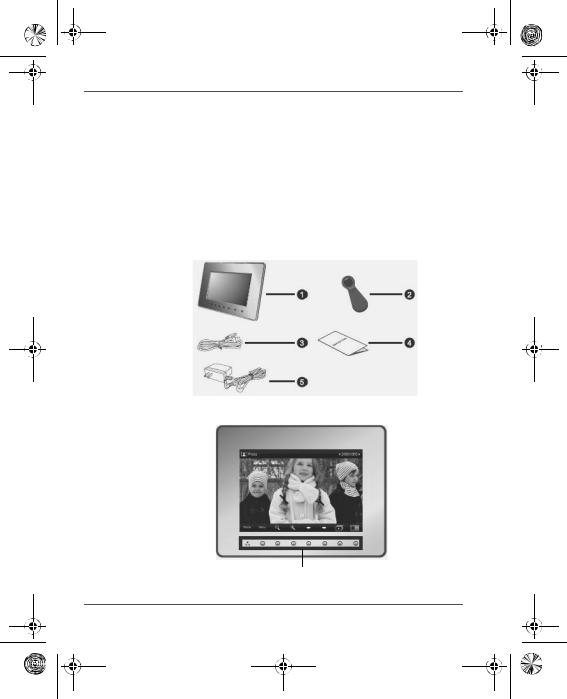
Step 1: Check the package contents.
Carefully open the packing box and ensure that you have the following items.
1.TekBright™ photo frame
2.Foot stand
3.USB cable
4.Quick Start Guide
5.AC power adapter
Controls on the front
Control panel
GB-2 |
Quick Start Guide |
TekBright Photo Frame_QSG_WEU.book Page 3 Tuesday, October 9, 2007 11:42 PM
|
|
|
|
TekBright™ Photo Frame |
Controls on the back |
|
|
|
|
|
|
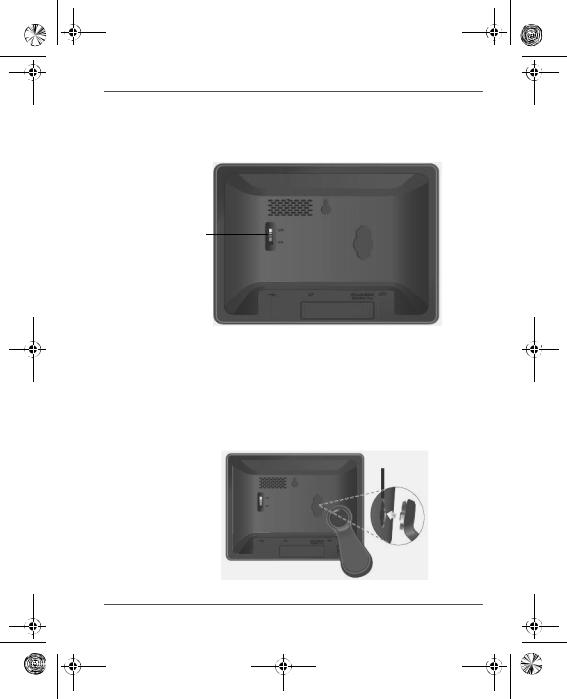
Hanging slot |
||
Speaker |
|
Lock slot |
||
|
||||
|
|
|
|
|
|
|
|
|
|
Power
switch
|
|
|
|
|
|
|
|
|
|
|
|
|
|
USB jack (for connecting |
|
CF card slot |
Power jack |
|||
to a computer so the |
|
|
|
|||
5-in-1 card slot: |
||||||
computer can edit files in |
|
|
||||
|
SD/xD/MMC/MS/MS Pro |
|||||
the unit) |
|
|
||||
|
|
|
||||
|
|
|
|
|
|
|
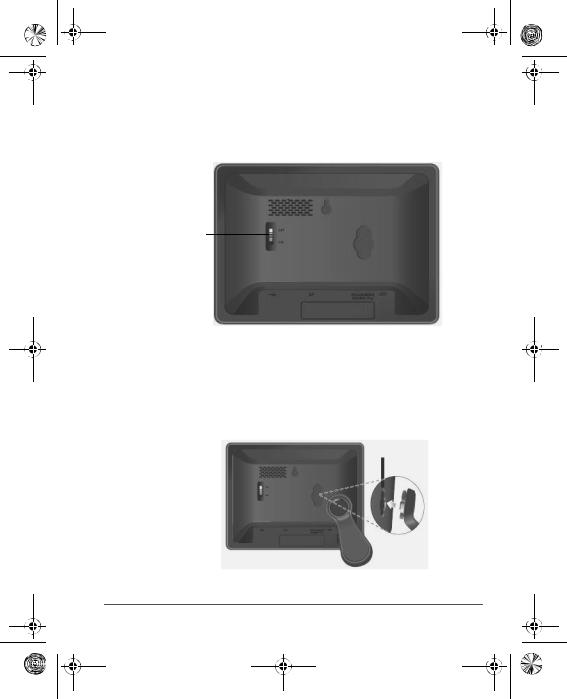
Step 2: Install the foot stand.
1. On the back of the unit, attach the foot stand to the lock slot.
Lock slot
Quick Start Guide |
GB-3 |

TekBright Photo Frame_QSG_WEU.book Page 4 Tuesday, October 9, 2007 11:42 PM
TekBright™ Photo Frame
2.Rotate the foot stand counter-clockwise until it is secured to the photo frame.
Step 3: Connect the AC power.
1.Plug one end of the AC power adapter into the power jack on the back of this unit.
2.Plug the other end into a power outlet.
3.Place this unit horizontally (recommended direction) or vertically on a stable surface.
GB-4 |
Quick Start Guide |
TekBright Photo Frame_QSG_WEU.book Page 5 Tuesday, October 9, 2007 11:42 PM
TekBright™ Photo Frame
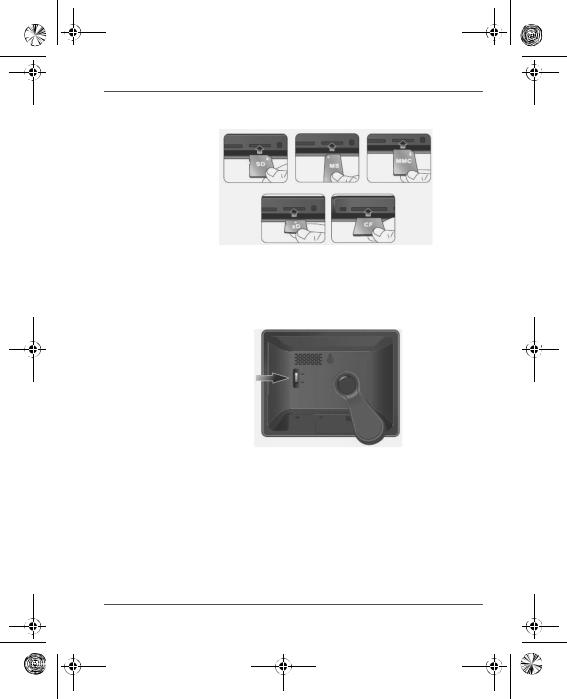
Step 4: (Optional) Insert a memory card.
The unit is preloaded with some demo images and music in the internal memory. On the back of the unit, you can also insert a memory card containing the content you want to show on the unit.
Step 5: Turn on the unit.
Sliding the power switch to ON turns on the unit.
Power switch
Step 6: Operate the unit.
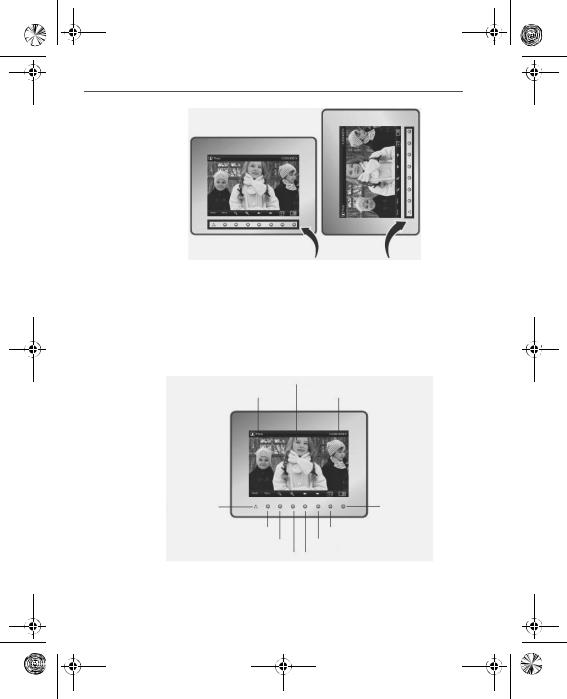
After the unit is turned on, available functions (represented by name or icon) show on the screen. Their corresponding buttons also light up on the control panel for a period of time.
Simply press the corresponding button below (if the unit is placed horizontally) or beside (if the unit is placed vertically) the name or icon indicating the function you want to use.
Quick Start Guide |
GB-5 |

TekBright Photo Frame_QSG_WEU.book Page 6 Tuesday, October 9, 2007 11:42 PM
TekBright™ Photo Frame
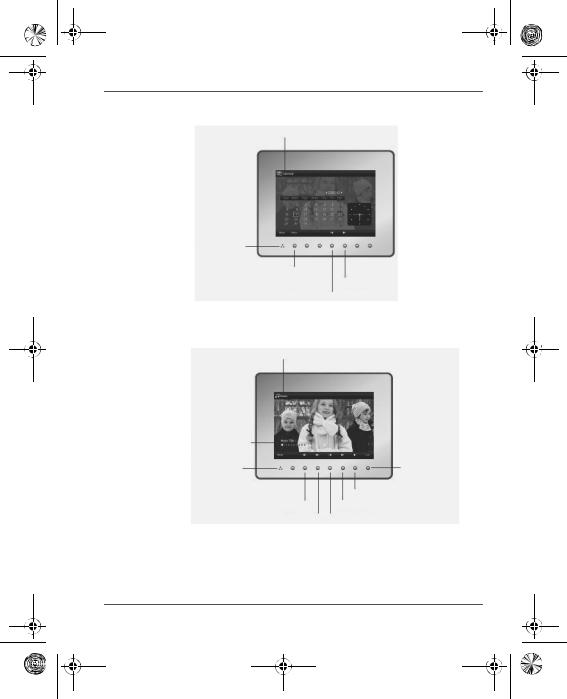
Control panel
■To toggle among Photo, Calendar, and Music modes, press  under Mode.
■If the control panel is unused for a certain period of time, the LED turns off automatically. To turn on the backlight again, press anywhere on the control panel.
Using the Photo mode
LCD screen |
Current file number/Total number |
Current mode |
of files |
Mode selection |
Thumbnail view |
Menu |
Slideshow |
Zoom-out |
Next file |
Zoom-in |
Previous file |
GB-6 |
Quick Start Guide |
TekBright Photo Frame_QSG_WEU.book Page 7 Tuesday, October 9, 2007 11:42 PM
TekBright™ Photo Frame
Using the Calendar mode
Current mode
Mode selection
Menu
Next month
Previous month
Using the Music mode
Current mode
Track name, |
|
elapsed time, and |
|
volume level |
List of all music |
Mode selection |
tracks and access |
to menu |
|
Play or Pause |
Volume down |
Next track |
Volume up |
Previous track |
Quick Start Guide |
GB-7 |
TekBright Photo Frame_QSG_WEU.book Page 8 Tuesday, October 9, 2007 11:42 PM
TekBright™ Photo Frame
Need help?
TOSHIBA options & services support page: computers.toshiba.eu/options-support
Please see computers.toshiba.eu/options-warranty for the TOSHIBA hotline numbers
Regulatory Compliance
EU Conformity Statement
“This product and - if applicable - the supplied accessories too are marked with “CE” and complies therefore with the applicable harmonized European standards listed under the EMC Directive 2004/108/EC.”
Responsible for CE-marking:
TOSHIBA EUROPE GMBH, Hammfelddamm 8, 41460 Neuss, Germany.
Manufacturer:
Toshiba Corporation, 1-1 Shibaura 1-chome, Minato-ku, Tokyo, 105-8001, Japan
The complete official EU CE Declaration can be obtained on following internet page: http://epps.toshiba-teg.com/
WEEE Information
For EU (European Union) member users: According to the WEEE (Waste electrical and electronic equipment) Directive, do not dispose of this product as household waste or commercial waste. Waste electrical and electronic equipment should be appropriately collected and recycled as required by practices established for your country. For information on recycling of this product, please contact your local authorities, your household waste disposal service or the shop where you purchased the product.
GB-8 |
Quick Start Guide |

TekBright Photo Frame_QSG_WEU.book Page 1 Tuesday, October 9, 2007 11:42 PM
FR
Guide de démarrage rapide
Cadre photo TekBright™ (PA3637*)
Avant d’utiliser cet appareil (cadre photo TekBright™), veillez à consulter les instructions ci-dessous.
■La température de fonctionnement est comprise entre 0 et 40 degrés Celsius.
■Ne stockez ou n’utilisez pas cet appareil dans les environnements indiqués ci-dessous :
■Rayons directs du soleil
■Zones à forte humidité, telles que les salles de bain
■Endroits poussiéreux
■Près d’un climatiseur, d’un chauffage électrique ou toute autre source de chaleur
■Dans une voiture fermée et au soleil
■Emplacements instables
■Si cet appareil devient humide, essuyez-le avec un chiffon sec aussi rapidement que possible.
■Le sel ou l’eau de mer peuvent endommager gravement cet appareil.
■N’utilisez pas de dissolvants (tels que de l’alcool) pour nettoyer cet appareil.
■Si l’écran est sale, utilisez un pinceau ou un chiffon doux pour nettoyer l’écran.
■Afin d’éviter tout risque d’électrocution, ne tentez pas de démonter ou réparer cet appareil par vous-même.
■Toute exposition à l’eau risque d’entraîner un incendie ou une électrocution. Il est donc important de ranger cet appareil à un endroit sec.
■N’utilisez pas cet appareil à l’extérieur ou lorsqu’il pleut ou neige.
■N’utilisez pas cet appareil près d’eau.
■Si un corps étranger ou de l’eau pénètre dans l’appareil, mettez-le hors tension immédiatement et déconnectez le cordon d’alimentation. Ensuite, enlevez toute trace de substance ou d’eau et confiez l’appareil à un centre de réparation agréé.
computers.toshiba-europe.com

TekBright Photo Frame_QSG_WEU.book Page 2 Tuesday, October 9, 2007 11:42 PM
Cadre photo TekBright™
Suivez les instructions ci-dessous pour installer et utiliser l’appareil.
Étape 1 : Vérifiez le contenu de l’emballage.
Ouvrez le carton avec précautions et assurez-vous que vous disposez des articles suivants.
1.Cadre photo TekBright™
2.Base
3.Câble USB
4.Guide de démarrage rapide
5.Adaptateur secteur
Commandes sur la partie avant
Panneau de configuration
FR-2 |
Guide de démarrage rapide |
TekBright Photo Frame_QSG_WEU.book Page 3 Tuesday, October 9, 2007 11:42 PM
Cadre photo TekBright™
Commandes sur la partie arrière
Emplacement de fixation au mur
Haut-parleur |
Emplacement de verrouillage |
||
|
|
|
|
|
|
|
|
Bouton d’alimentation
|
|
|
|
|
|
|
|
|
|
|
|
|
|
|
|
Port USB (permet de se |
Emplacement |
|
Prise d’alimentation |
||||
pour carte CF |
|
|
|
||||
connecter à un ordinateur |
|
|
|
||||
Emplacement de carte 5 en 1 : |
|||||||
de façon à pouvoir modifier |
|
|
|||||
|
|
SD/xD/MMC/MS/MS Pro |
|||||
les fichiers de l’appareil) |
|
|
|||||
|
|
|
|
|
|||
|
|
|
|
|
|
|
|
Étape 2 : Installation de la base
1.Fixez la base sur la partie arrière de l’appareil, dans l’emplacement verrouillable prévu à cet effet.
Emplacement de verrouillage
Guide de démarrage rapide |
FR-3 |

TekBright Photo Frame_QSG_WEU.book Page 4 Tuesday, October 9, 2007 11:42 PM
Cadre photo TekBright™
2.Faites pivoter la base dans le sens anti-horaire jusqu’à ce qu’elle soit solidaire du cadre photo.
Étape 3 : Branchez l’adaptateur secteur.
1.Branchez l’une des extrémités de l’adaptateur secteur à l’arrière de l’appareil.
2.Branchez l’autre extrémité sur une prise murale.
3.Posez l’appareil à l’horizontale (position recommandée) ou à la verticale sur une surface stable.
FR-4 |
Guide de démarrage rapide |

TekBright Photo Frame_QSG_WEU.book Page 5 Tuesday, October 9, 2007 11:42 PM
Cadre photo TekBright™
Étape 4 : (Facultatif) Insérez une carte mémoire.
Des images et de la musique de démonstration ont été chargées en mémoire interne. Sur la partie arrière de l’appareil, vous pouvez également insérer une carte mémoire contenant les photos que vous souhaitez afficher sur l’appareil.
Étape 5 : Mettez l’appareil sous tension.
Faites glisser le bouton d’alimentation sur la position ON (marche) pour mettre l’appareil sous tension.
Bouton d’alimentation
Étape 6 : Utilisation de l’appareil.
Lorsque l’appareil est sous tension, les fonctions disponibles (désignées par un nom ou une icône) s’affichent à l’écran. Les boutons correspondants s’allument également sur le panneau de commande pendant quelque temps.
Appuyez simplement sur les boutons correspondants en dessous (si l’appareil est placé à l’horizontale) ou à côté (si l’appareil est placé à la verticale) du nom ou de l’icône indiquant la fonction à utiliser.
Guide de démarrage rapide |
FR-5 |

TekBright Photo Frame_QSG_WEU.book Page 6 Tuesday, October 9, 2007 11:42 PM
Cadre photo TekBright™
Panneau de configuration
■Pour parcourir les modes Photo, Calendrier et Musique, appuyez sur  dans la section Mode.
■Lorsque le panneau de commande reste inactif pendant un certain temps, le voyant s’éteint de façon automatique. Pour rétablir le rétro-éclairage, appuyez sur l’une des touches du panneau de commande.
Mode Photo
Ecran interne (LCD) |
Numéro du fichier affiché/ |
Mode actif |
nombre total de fichiers |
Sélection |
Vue Réduction |
du mode |
|
Menu |
Diaporama |
Réduire |
Fichier suivant |
Grossir |
Fichier précédent |
|
|
FR-6 |
Guide de démarrage rapide |

TekBright Photo Frame_QSG_WEU.book Page 7 Tuesday, October 9, 2007 11:42 PM
Cadre photo TekBright™
Mode Calendrier
Mode actif
Sélection du Mode
Menu
Mois suivant
Mois précédent
Mode Musique
Mode actif
Nom de la |
Liste de |
piste, temps |
|
écoulé et |
l’ensemble des |
volume |
morceaux |
Sélection |
musicaux et |
accès au menu |
du Mode |
|
|
Lecture ou Pause |
Réduction du volume |
Piste suivante |
Augmentation du volume |
Piste précédente |
Guide de démarrage rapide |
FR-7 |
TekBright Photo Frame_QSG_WEU.book Page 8 Tuesday, October 9, 2007 11:42 PM
Cadre photo TekBright™
Vous avez besoin d’aide ?
Page d’assistance, d’options et de services TOSHIBA : computers.toshiba.eu/options-support
Pour communiquer directement avec une personne, consultez la page computers.toshiba.eu/options-warranty
Conformité aux réglementations
Déclaration européenne de conformité
« Ce produit et ses accessoires éventuels portent la mention « CE » et sont conformes aux normes européennes figurant dans la directive sur la compatibilité électromagnétique 2004/108/EC. »
Partie responsable de l’homologation CE :
TOSHIBA EUROPE GMBH, Hammfelddamm 8, 41460 Neuss, Allemagne.
Fabricant :
Toshiba Corporation, 1-1 Shibaura 1-chome, Minato-ku, Tokyo, 105-8001, Japon
Vous trouverez la déclaration UE CE complète de conformité sur le site Web suivant : http://epps.toshiba-teg.com/
Informations WEEE
Utlisateurs résidant dans la communauté européenne : conformément à la directive DEEE (déchets des équipements électriques et électroniques), ne jetez pas ce produit avec les déchets domestiques ou industriels. Les déchets des équipements électriques et électroniques doivent être recyclés conformément aux pratiques établies pour votre pays. Pour plus d’informations sur le recyclage de ce produit, contactez votre mairie ou le service de collecte des déchets, voire le magasin où vous avez acheté ce produit.
FR-8 |
Guide de démarrage rapide |
TekBright Photo Frame_QSG_WEU.book Page 1 Tuesday, October 9, 2007 11:42 PM
DE
Kurzanleitung
TekBright™ Photo Frame (PA3637*)
Bevor Sie dieses Produkt (TekBright™ Photo Frame) verwenden, lesen Sie bitte die nachstehenden Anleitungen durch.
■Die Betriebstemperatur liegt zwischen 0 und 40 Grad Celsius.
■Verwenden oder lagern Sie diese Einheit nicht in den unten aufgeführten Umgebungen.
■Direktes Sonnenlicht
■Sehr feuchte Räume, zum Beispiel Badezimmer
■Staubige Orte
■Neben einer Klimaanlage, einer Heizung oder anderen Wärmequellen
■In einem geschlossenen Fahrzeug, das in der Sonne steht
■Wackelige Oberflächen
■Wenn die Einheit nass wird, wischen Sie sie so schnell wie möglich mit einem trockenen Tuch ab.
■Salzoder Meerwasser kann diese Einheit schwer beschädigen.
■Verwenden Sie keine Lösungsmittel (zum Beispiel Alkohol) zum Reinigen dieser Einheit.
■Wenn der Bildschirm verschmutzt ist, reinigen Sie ihn mit einem Linsenpinsel oder einem weichen Tuch.
■Versuchen Sie nicht, die Einheit auseinanderzunehmen oder selbst zu reparieren. Sie könnten einen elektrischen Schock erleiden.
■Wasser kann einen Brand oder elektrischen Schock verursachen. Lagern Sie die Einheit deshalb an einem trockenen Platz.
■Verwenden Sie die Einheit nicht im Freien, wenn es regnet oder schneit.
■Verwenden Sie die Einheit nicht im oder am Wasser.
■Falls Fremdkörper oder Wasser in das Innere der Einheit gelangen, schalten Sie das Gerät sofort aus und ziehen Sie den Netzadapter ab. Entfernen Sie dann den Fremdkörper bzw. das Wasser und senden Sie die Einheit an das nächste Service-Center.
computers.toshiba-europe.com

TekBright Photo Frame_QSG_WEU.book Page 2 Tuesday, October 9, 2007 11:42 PM
TekBright™ Photo Frame
Befolgen Sie bei der Installation und Verwendung die Anleitungen.
Schritt 1: Überprüfen Sie den Inhalt der Verpackung.
Öffnen Sie den Karton sorgfältig und überprüfen Sie, ob Sie die folgenden Teile erhalten haben.
1.TekBright™ Photo Frame
2.Ständer
3.USB-Kabel
4.Kurzanleitung
5.Netzadapter
Steuerungen auf der Vorderseite
Systemsteuerung
DE-2 |
Kurzanleitung |

TekBright Photo Frame_QSG_WEU.book Page 3 Tuesday, October 9, 2007 11:42 PM
TekBright™ Photo Frame
Steuerungen auf der Rückseite
Aufhängevorrichtung
Lautsprecher Verriegelungsvorrichtung
Ein/Aus-
Taste
|
|
|
|
|
|
|
|
|
|
|
|
USB-Buchse (für den |
CF- |
Kartensteckplatz |
Anschluss für |
||
Anschluss an einem |
|
|
Netzadapter |
||
|
|
||||
|
5-in-1 Kartensteckplatz: |
||||
Computer, um Dateien auf |
|
||||
dem Gerät zu bearbeiten) |
|
SD/xD/MMC/MS/MS Pro |
|||
|
|
|
|
|
|
Schritt 2: Installieren Sie den Ständer.
1.Befestigen Sie den Ständer im dafür vorgesehenen Schlitz auf der Rückseite der Einheit.
Verriegelungsvorrichtung
Kurzanleitung |
DE-3 |

TekBright Photo Frame_QSG_WEU.book Page 4 Tuesday, October 9, 2007 11:42 PM
TekBright™ Photo Frame
2.Drehen Sie den Ständer gegen den Uhrzeigersinn, bis er gesichert ist.
Schritt 3: Schließen Sie den Netzadapter an.
1.Stecken Sie ein Ende des Netzadapterkabels in den Netzanschluss auf der Rückseite der Einheit.
2.Stecken Sie das andere Ende in eine Steckdose.
3.Stellen Sie die Einheit horizontal (empfohlen) oder vertikal auf einer stabilen Oberfläche auf.
DE-4 |
Kurzanleitung |
TekBright Photo Frame_QSG_WEU.book Page 5 Tuesday, October 9, 2007 11:42 PM
TekBright™ Photo Frame
Schritt 4: (Optional) Setzen Sie eine Speicherkarte ein.
Im internen Speicher der Einheit sind bereits einige Demobilder und Musik enthalten. Auf der Rückseite der Einheit können Sie eine Speicherkarte mit den Inhalten, die Sie auf der Einheit betrachten möchten, einsetzen.
Schritt 5: Schalten Sie die Einheit ein.
Schieben Sie den Betriebsschalter in die Position ON, um die Einheit einzuschalten.
Ein/Aus-Taste
Schritt 6: Verwenden Sie die Einheit.
Nachdem Sie das Gerät eingeschaltet haben, werden auf dem Bildschirm die verfügbaren Funktionen namentlich oder als Symbol angezeigt. Auf der Bedienkonsole leuchten für eine gewisse Zeit die entsprechenden Bedienelemente auf.
Drücken Sie einfach auf die Taste unter (bei horizontaler Aufstellung) bzw. neben (bei vertikaler Aufstellung) dem Namen oder Symbol der gewünschten Funktion.
Kurzanleitung |
DE-5 |
TekBright Photo Frame_QSG_WEU.book Page 6 Tuesday, October 9, 2007 11:42 PM
TekBright™ Photo Frame
Systemsteuerung
■Um zwischen den Modi „Foto“, „Kalender“ und „Musik“ zu wechseln, drücken Sie  unter Modus.
■Wenn die Bedienkonsole über einen bestimmten Zeitraum nicht genutzt wird, schalten sich die LEDs automatisch aus. Drücken Sie ein beliebiges Element der Bedienkonsole, um die Hintergrundbeleuchtung wieder einzuschalten.
Fotomodus verwenden
LCD-Bildschirm |
Aktuelle Dateinummer/Anzahl |
Aktueller Modus |
der Dateien |
Modusauswahl |
Vorschaubild |
Menü |
Diashow |
Verkleinern |
Nächste Datei |
Vergrößern |
Vorherige Datei |
|
|
DE-6 |
Kurzanleitung |

TekBright Photo Frame_QSG_WEU.book Page 7 Tuesday, October 9, 2007 11:42 PM
TekBright™ Photo Frame
Kalendermodus verwenden
Aktueller Modus
Modusauswahl
Menü
Nächster Monat
Vorheriger Monat
Musikmodus verwenden
Aktueller Modus
Name des Titels, |
|
abgelaufene Zeit, |
|
Lautstärke |
Liste aller |
Modusauswahl |
Musiktitel und |
Zugriff auf Menü |
|
Wiedergabe oder Pause |
Leiser |
Nächster Titel |
Lauter |
Vorheriger Titel |
Kurzanleitung |
DE-7 |

TekBright Photo Frame_QSG_WEU.book Page 8 Tuesday, October 9, 2007 11:42 PM
TekBright™ Photo Frame
Brauchen Sie Hilfe?
TOSHIBA Optionen & Services Support-Seite: computers.toshiba.eu/options-support
Die Telefonnummern der TOSHIBA-Hotline finden Sie unter computers.toshiba.eu/options-warranty
Zulassungsrichtlinien
EU-Konformitätserklärung
“Dieses Produkt und - sofern zutreffend - das mitgelieferte Zubehör trägt das Kennzeichen “CE” und erfüllt somit die entsprechenden angeglichenen europäischen Standards der EMV-Richtlinie 2004/108/EG.”
Verantwortlich für die CE-Kennzeichnung:
TOSHIBA EUROPE GMBH, Hammfelddamm 8, 41460 Neuss, Deutschland.
Hersteller:
Toshiba Corporation, 1-1 Shibaura 1-chome, Minato-ku, Tokyo, 105-8001, Japan
Die vollständige CE-Erklärung der EU finden Sie auf der folgenden Internetseite: http://epps.toshiba-teg.com/
WEEE-Informationen
Für Benutzer aus EU-Mitgliedstaaten: Entsprechend der Richtlinie über Elektround Elektronikaltgeräte (WEEE) dürfen Sie dieses Produkt nicht als Hausmüll entsorgen. Elektround Elektronikaltgeräte sollten den örtlich geltenden Vorschriften gemäß dem Recycling zugeführt werden. Wenn Sie ausführliche Informationen zum Recycling dieses Produkts wünschen, wenden Sie sich bitte an die örtlichen zuständigen Behörden oder den Händler, bei dem Sie dieses Produkt erworben haben.
DE-8 |
Kurzanleitung |

TekBright Photo Frame_QSG_WEU.book Page 1 Tuesday, October 9, 2007 11:42 PM
ES
Guía de inicio rápido
Marco fotográfico TekBright™ (PA3637*)
Antes de utilizar esta unidad (el marco fotográfico TekBright™), lea detenidamente y siga cuidadosamente las siguientes instrucciones.
■El rango de temperatura de funcionamiento es de 0 a 40 grados Celsius.
■No utilice ni almacene esta unidad en los entornos indicados a continuación:
■Bajo la luz solar directa
■En áreas con alta humedad, como un cuarto de baño
■Lugares polvorientos
■Cerca de aparatos de aire acondicionado, calefactores eléctricos u otras fuentes de calor
■En un vehículo cerrado expuesto al sol
■En lugares inestables
■Si esta unidad se moja, pásele un paño seco lo antes posible.
■La sal y el agua del mar pueden provocar graves daños en la unidad.
■No utilice disolventes (como alcohol, por ejemplo) para limpiar la unidad.
■Si la pantalla está sucia, utilice un cepillo de lente o un paño suave para limpiarla.
■Con el fin de evitar descargas eléctricas, no intente desmontar ni reparar la unidad usted mismo.
■El agua puede provocar fuego o una descarga eléctrica. Por tanto, deberá almacenar la unidad en un lugar seco.
■No utilice esta unidad en exteriores cuando esté lloviendo o nevando.
■No utilice la unidad cerca del agua.
■Si alguna sustancia externa o agua penetran en la unidad, apáguela inmediatamente y desconecte el adaptador de alimentación. Seguidamente, extraiga la sustancia externa o el agua y envíe la unidad al centro de reparación más cercano.
computers.toshiba-europe.com

TekBright Photo Frame_QSG_WEU.book Page 2 Tuesday, October 9, 2007 11:42 PM
Marco fotográfico TekBright™
Siga estas instrucciones para instalar y utilizar la unidad.
Paso 1: Compruebe el contenido del paquete.
Abra con cuidado la caja y asegúrese de que dispone de los siguientes artículos.
1.Marco fotográfico TekBright™
2.Base
3.Cable USB
4.Guía de inicio rápido
5.Adaptador de alimentación de CA
Controles de la parte delantera
Panel de control
ES-2 |
Guía de inicio rápido |
TekBright Photo Frame_QSG_WEU.book Page 3 Tuesday, October 9, 2007 11:42 PM
Marco fotográfico TekBright™
Controles de la parte posterior
Ranura para colgar
Altavoz |
Ranura de bloqueo |
||
|
|
|
|
|
|
|
|
Interruptor de alimentación
|
|
|
|
|
|
|
|
|
|
|
|
|
|
Conector USB (para la |
Ranura para |
Conector de alimentación |
||||
tarjeta CF |
|
|
||||
conexión a un ordenador |
|
|
||||
Ranura para tarjetas 5 en 1: |
||||||
que permita editar los |
|
|
||||
|
|
SD/xD/MMC/MS/MS Pro |
||||
archivos de la unidad) |
|
|
||||
|
|
|
|
|||
|
|
|
|
|
|
|
Paso 2: Instale la base.
1.En la parte posterior de la unidad, ajuste la base a la ranura de bloqueo.
Ranura de bloqueo
Guía de inicio rápido |
ES-3 |
 Loading...