


 Loading...
Telecommunication Systems Division


 ®
®
Net Phone
User Guide
April 2008

Publication Information
Toshiba America Information Systems, Inc.
Telecommunication Systems Division
Publication Information
Toshiba America Information Systems, Inc., Telecommunication Systems Division, reserves the right, without prior notice, to revise this information publication for any reason, including, but not limited to, utilization of new advances in the state of technical arts or to simply change the design of this document.
Further, Toshiba America Information Systems, Inc., Telecommunication Systems Division, also reserves the right, without prior notice, to make such changes in equipment design or components as engineering or manufacturing methods may warrant.
CIX-UG-NP-VA
Version A, April 2008
Our mission to publish accurate, complete and user accessible documentation. At the time of printing the information in this document was as accurate and current as was reasonably possible. However, in the time required to print and distribute this manual additions, corrections or other changes may have been made. To view the latest version of this or other documents please refer to the Toshiba FYI web site.
Toshiba America Information Systems shall not be liable for any commercial losses, loss of revenues or profits, loss of goodwill, inconvenience, or exemplary, special, incidental, indirect or consequential damages whatsoever, or claims of third parties, regardless of the form of any claim that may result from the use of this document.
THE SPECIFICATIONS AND INFORMATION PROVIDED HEREIN ARE FOR INFORMATIONAL PURPOSES ONLY AND ARE NOT A WARRANTY OF ACTUAL PERFORMANCE, WHETHER EXPRESSED OR IMPLIED. THE SPECIFICATIONS AND INFORMATION ARE SUBJECT TO CHANGE WITHOUT NOTICE. ACTUAL PERFORMANCE MAY VARY BASED ON INDIVIDUAL CONFIGURATIONS, USE OF COLLATERAL EQUIPMENT, OR OTHER FACTORS.

© Copyright 2008
This document is copyrighted by Toshiba America Information Systems, Inc. with all rights reserved. Under the copyright laws, this document cannot be reproduced in any form or by any means—graphic, electronic, or mechanical, including recording, taping, photocopying, without prior written permission of Toshiba. No patent liability is assumed, however, with respect to the use of the information contained herein.
Trademarks
Strata, SD (Secure Digital) and CIX are registered trademarks of Toshiba Corporation.
Stratagy, eManager, My Phone Manager and Info Manager are registered trademarks of Toshiba America Information Systems, Inc.
Windows and Microsoft are registered trademarks of Microsoft.
Trademarks, registered trademarks, and service marks are the property of their respective owners.
TOSHIBA AMERICA INFORMATION SYSTEMS, INC. (“TAIS”)
Telecommunication Systems Division License Agreement
IMPORTANT: THIS LICENSE AGREEMENT (“AGREEMENT”) IS A LEGAL AGREEMENT BETWEEN YOU (“YOU”) AND TAIS. CAREFULLY READ THIS LICENSE AGREEMENT. USE OF ANY SOFTWARE OR ANY RELATED INFORMATION (COLLECTIVELY, “SOFTWARE”) INSTALLED ON OR SHIPPED WITH A TAIS DIGITAL SOLUTIONS PRODUCT OR OTHERWISE MADE AVAILABLE TO YOU BY TAIS IN WHATEVER FORM OR MEDIA, WILL CONSTITUTE YOUR ACCEPTANCE OF THESE TERMS, UNLESS SEPARATE TERMS ARE PROVIDED BY THE SOFTWARE SUPPLIER. IF YOU DO NOT AGREE WITH THE TERMS OF THIS LICENSE AGREEMENT, DO NOT INSTALL, COPY OR USE THE SOFTWARE AND PROMPTLY RETURN IT TO THE LOCATION FROM WHICH YOU OBTAINED IT IN ACCORDANCE WITH APPLICABLE RETURN POLICIES. EXCEPT AS OTHERWISE AUTHORIZED IN WRITING BY TAIS, THIS SOFTWARE IS LICENSED FOR DISTRIBUTION THROUGH TAIS AUTHORIZED CHANNELS ONLY TO END-USERS PURSUANT TO THIS LICENSE AGREEMENT.
1.License Grant. The Software is not sold; it is licensed upon payment of applicable charges. TAIS grants to you a personal, non-transferable and non-exclusive right to use the copy of the Software provided under this License Agreement. You agree you will not copy the Software except as necessary to use it on one TAIS system at a time at one location. Modifying, translating, renting, copying, distributing, printing, sublicensing, transferring or assigning all or part of the Software, or any rights granted hereunder, to any other persons and removing any proprietary notices, labels or marks from the Software is strictly prohibited except as permitted by applicable law; you agree violation of such restrictions will cause irreparable harm to TAIS and provide grounds for injunctive relief, without notice, against you or any other person in possession of the Software. You and any other person whose possession of the software violates this License Agreement shall promptly surrender possession of the Software to TAIS, upon demand. Furthermore, you hereby agree not to create derivative works based on the Software. TAIS reserves the right to terminate this license and to immediately repossess the software in the event that you or any other person violates this License Agreement. Execution of the Software for any additional capabilities require a valid run-time license.
2.Intellectual Property. You acknowledge that no title to the intellectual property in the Software is transferred to you. You further acknowledge that title and full ownership rights to the Software will remain the exclusive property of TAIS and/or its suppliers, and you will not acquire any rights to the Software, except the license expressly set forth above. You will not remove or change any proprietary notices contained in or on the Software. The Software is protected under US patent, copyright, trade secret, and/or other proprietary laws, as well as international treaties. Any transfer, use, or copying of the software in violation of the License Agreement constitutes copyright infringement. You are hereby on notice that any transfer, use, or copying of the Software in violation of this License Agreement constitutes a willful infringement of copyright.
3.No Reverse Engineering. You agree that you will not attempt, and if you employ employees or engage contractors, you will use your best efforts to prevent your employees and contractors from attempting to reverse compile, reverse engineer, modify, translate or disassemble the Software in whole or in part. Any failure to comply with the above or any other terms and conditions contained herein will result in the automatic termination of this license and the reversion of the rights granted hereunder back to TAIS.
4.Limited Warranty. THE SOFTWARE IS PROVIDED “AS IS” WITHOUT WARRANTY OF ANY KIND. TO THE MAXIMUM EXTENT PERMITTED BY APPLICABLE LAW, TAIS AND ITS SUPPLIERS DISCLAIM ALL WARRANTIES WITH REGARD TO THE SOFTWARE, EITHER EXPRESS OR IMPLIED, INCLUDING, BUT NOT LIMITED TO, THE WARRANTY OF NON-INFRINGEMENT OF THIRD PARTY RIGHTS, THE WARRANTY OF YEAR 2000 COMPLIANCE, AND THE IMPLIED WARRANTIES OF MERCHANTABILITY AND FITNESS FOR A PARTICULAR PURPOSE. THE ENTIRE RISK AS TO THE QUALITY AND PERFORMANCE OF THE SOFTWARE IS WITH YOU. NEITHER TAIS NOR ITS SUPPLIERS WARRANT THAT THE FUNCTIONS CONTAINED IN THE SOFTWARE WILL MEET YOUR REQUIREMENTS OR THAT THE OPERATION OF THE SOFTWARE WILL BE UNINTERRUPTED OR ERROR-FREE. HOWEVER, TAIS WARRANTS THAT ANY MEDIA ON WHICH THE SOFTWARE IS FURNISHED IS FREE FROM DEFECTS IN MATERIAL AND WORKMANSHIP UNDER NORMAL USE FOR A PERIOD OF NINETY (90) DAYS FROM THE DATE OF DELIVERY TO YOU.
5.Limitation Of Liability. TAIS’ ENTIRE LIABILITY AND YOUR SOLE AND EXCLUSIVE REMEDY UNDER THIS LICENSE AGREEMENT SHALL BE AT TAIS’ OPTION REPLACEMENT OF THE MEDIA OR REFUND OF THE PRICE PAID. TO THE MAXIMUM EXTENT PERMITTED BY APPLICABLE LAW, IN NO EVENT SHALL TAIS OR ITS SUPPLIERS BE LIABLE TO YOU FOR ANY CONSEQUENTIAL, SPECIAL, INCIDENTAL OR INDIRECT DAMAGES FOR PERSONAL INJURY, LOSS OF BUSINESS PROFITS, BUSINESS INTERRUPTION, LOSS OF BUSINESS INFORMATION/DATA, OR ANY OTHER PECUNIARY LOSS OF ANY KIND ARISING OUT OF THE USE OR INABILITY TO USE THE SOFTWARE, EVEN IF TAIS OR ITS SUPPLIER HAS BEEN ADVISED OF THE POSSIBILITY OF SUCH DAMAGES. IN NO EVENT SHALL TAIS OR ITS SUPPLIERS BE LIABLE FOR ANY CLAIM BY A THIRD PARTY.
6.State/Jurisdiction Laws. SOME STATES/JURISDICTIONS DO NOT ALLOW THE EXCLUSION OF IMPLIED WARRANTIES OR LIMITATIONS ON HOW LONG AN IMPLIED WARRANTY MAY LAST, OR THE EXCLUSION OR LIMITATION OF INCIDENTAL OR CONSEQUENTIAL DAMAGES, SO SUCH LIMITATIONS OR EXCLUSIONS MAY NOT APPLY TO YOU. THIS LIMITED WARRANTY GIVES YOU SPECIFIC RIGHTS AND YOU MAY ALSO HAVE OTHER RIGHTS WHICH VARY FROM STATE/JURISDICTION TO STATE/JURISDICTION.
7.Export Laws. This License Agreement involves products and/or technical data that may be controlled under the United States Export Administration Regulations and may be subject to the approval of the United States Department of Commerce prior to export. Any export, directly or indirectly, in contravention of the United States Export Administration Regulations, or any other applicable law, regulation or order, is prohibited.
8.Governing Law. This License Agreement will be governed by the laws of the State of California, United States of America, excluding its conflict of law provisions.
9.United States Government Restricted Rights. The Software is provided with Restricted Rights. The Software and other materials provided hereunder constitute Commercial Computer Software and Software Documentation and Technical Data related to Commercial Items. Consistent with F.A.R. 12.211 and 12.212 they are licensed to the U.S. Government under, and the U.S. Government’s rights therein are restricted pursuant to, the vendor’s commercial license.
10.Severability. If any provision of this License Agreement shall be held to be invalid, illegal or unenforceable, the validity, legality and enforceability of the remaining provisions hereof shall not in any way be affected or impaired.
11.No Waiver. No waiver of any breach of any provision of this License Agreement shall constitute a waiver of any prior, concurrent or subsequent breach of the same or any other provisions hereof, and no waiver shall be effective unless made in writing and signed by an authorized representative of the waiving party.
12.Supplier Software. The Software may include certain software provided by TAIS suppliers. In such event, you agree that such supplier may be designated by TAIS as a third party beneficiary of TAIS with rights to enforce the Agreement with respect to supplier’s software.
YOU ACKNOWLEDGE THAT YOU HAVE READ THIS LICENSE AGREEMENT AND THAT YOU UNDERSTAND ITS PROVISIONS. YOU AGREE TO BE BOUND BY ITS TERMS AND CONDITIONS. YOU FURTHER AGREE THAT THIS LICENSE AGREEMENT CONTAINS THE COMPLETE AND EXCLUSIVE AGREEMENT BETWEEN YOU AND TAIS AND SUPERSEDES ANY PROPOSAL OR PRIOR AGREEMENT, ORAL OR WRITTEN, OR ANY OTHER COMMUNICATION RELATING TO THE SUBJECT MATTER OF THIS LICENSE AGREEMENT.
Toshiba America Information Systems, Inc.
Telecommunication Systems Division 5932
9740 Irvine Boulevard
Irvine, California 92618-1697
United States of America
DSD 020905
Toshiba America Information Systems, Inc.
Telecommunication Systems Division
Limited Warranty
Toshiba America Information Systems, Inc., (“TAIS”) warrants that:
•The CIX Attendant Console equipment, such as the PC (except for fuses, lamps, and other consumables) will, upon delivery by TAIS or an authorized TAIS dealer to a retail customer in new condition, be free from defects in material and workmanship for twelve (12) months after delivery.
•And that the Toshiba telephone equipment (except for fuses, lamps, and other consumables) will, upon delivery by TAIS or an authorized TAIS dealer to a retail customer in new condition, be free from defects in material and workmanship for twenty-four (24) months after delivery.
This warranty is void (a) if the equipment is used under other than normal use and maintenance conditions, (b) if the equipment is modified or altered, unless the modification or alteration is expressly authorized by TAIS, (c) if the equipment is subject to abuse, neglect, lightning, electrical fault, or accident, (d) if the equipment is repaired by someone other than TAIS or an authorized TAIS dealer, (e) if the equipment’s serial number is defaced or missing, or (f) if the equipment is installed or used in combination or in assembly with products not supplied by TAIS and which are not compatible or are of inferior quality, design, or performance.
The sole obligation of TAIS or Toshiba Corporation under this warranty, or under any other legal obligation with respect to the equipment, is the repair or replacement by TAIS or its authorized dealer of such defective or missing parts as are causing the malfunction with new or refurbished parts (at their option). If TAIS or one of its authorized dealers does not replace or repair such parts, the retail customer’s sole remedy will be a refund of the price charged by TAIS to its dealers for such parts as are proven to be defective, and which are returned to TAIS through one of its authorized dealers within the warranty period and no later than thirty (30) days after such malfunction, whichever first occurs.
Under no circumstances will the retail customer or any user or dealer or other person be entitled to any direct, special, indirect, consequential, or exemplary damages, for breach of contract, tort, or otherwise. Under no circumstances will any such person be entitled to any sum greater than the purchase price paid for the item of equipment that is malfunctioning.
To obtain service under this warranty, the retail customer must bring the malfunction of the machine to the attention of one of TAIS’ authorized dealers within the twenty-four (24) month period and no later than thirty (30) days after such malfunction, whichever first occurs. Failure to bring the malfunction to the attention of an authorized TAIS dealer within the prescribed time results in the customer being not entitled to warranty service.
THERE ARE NO OTHER WARRANTIES FROM EITHER TOSHIBA AMERICA INFORMATION SYSTEMS, INC., OR TOSHIBA CORPORATION WHICH EXTEND BEYOND THE FACE OF THIS WARRANTY. ALL OTHER WARRANTIES, EXPRESS OR IMPLIED, INCLUDING THE WARRANTIES OF MERCHANTABILITY, FITNESS FOR A PARTICULAR PURPOSE, AND FITNESS FOR USE, ARE EXCLUDED.
No TAIS dealer and no person other than an officer of TAIS may extend or modify this warranty. No such modification or extension is effective unless it is in writing and signed by the vice president and general manager, Telecommunication Systems Division.
WARRANTIES FOR NON-TOSHIBA BRANDED
THIRD PARTY PRODUCTS
A valuable element of Toshiba’s product strategy is to offer our customers a complete product portfolio. To provide this value to our customers at the most optimal prices, we offer both Toshiba-branded and third-party manufactured products that support our Toshiba Strata CIX product portfolio. Similar to other resellers of software, hardware and peripherals, these thirdparty manufactured products carry warranties independent of our Toshiba limited warranty provided with our Toshiba-branded products. Customers should note that third-party manufacturer warranties vary from product to product and are covered by the warranties provided through the original manufacturer and passed on intact to the purchaser by Toshiba. Customers should consult their product documentation for third-party warranty information specific to third-party products. More information may also be available in some cases from the manufacturer’s public website.
While Toshiba offers a wide selection of software, hardware and peripheral products, we do not specifically test or guarantee that the third-party products we offer work under every configuration with any or all of the various models of the Toshiba Strata CIX. Toshiba does not endorse, warrant nor assume any liability in connection with such third party products or services. If you have questions about compatibility, we recommend and encourage you to contact the third-party software, hardware and peripheral product manufacturer directly.

Contents
Introduction |
|
Organization......................................................................................................................... |
v |
Conventions ........................................................................................................................ |
vi |
Related Documents/Media................................................................................................ |
vii |
Chapter 1 — The Grand Tour |
|
The Main Screen .................................................................................................................. |
2 |
The Streamlined View ...................................................................................................... |
2 |
Expanded View................................................................................................................. |
5 |
Screen Docked Views....................................................................................................... |
7 |
Net Phone Main Menu...................................................................................................... |
7 |
The Side Window Screen..................................................................................................... |
9 |
Call Handler Mode ........................................................................................................... |
9 |
Buttons Mode.................................................................................................................. |
10 |
Companion Application Windows..................................................................................... |
11 |
Skins................................................................................................................................... |
12 |
To Change Skin Selection .............................................................................................. |
12 |
Chapter 2 — Net Phone Settings |
|
Preferences......................................................................................................................... |
13 |
General Tab .................................................................................................................... |
14 |
Dialing Tab ..................................................................................................................... |
20 |
Docking Tab ................................................................................................................... |
25 |
Advanced Tab................................................................................................................. |
26 |
Setting Up Hot Key Dialing & Popup ............................................................................... |
29 |
Setting Shortcut Keys ..................................................................................................... |
29 |
Strata CIX Net Phone UG 04/08 |
i |

Contents |
|
Chapter 3 – User-Defined Actions |
|
Options Buttons ................................................................................................................. |
30 |
Option Button Key Types............................................................................................... |
31 |
User Programmable Keys .................................................................................................. |
39 |
To Initialize Key ............................................................................................................. |
39 |
To Swap Keys................................................................................................................. |
39 |
To Copy This Key .......................................................................................................... |
39 |
To Change Key............................................................................................................... |
40 |
Chapter 3 — User-Defined Actions |
|
Creating Actions ................................................................................................................ |
47 |
Attach Acct Code............................................................................................................ |
48 |
Export Call Info .............................................................................................................. |
49 |
Log Info to File............................................................................................................... |
49 |
Lookup in Outlook.......................................................................................................... |
50 |
Minimize Phone Screen.................................................................................................. |
50 |
Modify Call Information................................................................................................. |
51 |
Play WAV File ............................................................................................................... |
53 |
Pop External Web Browser ............................................................................................ |
53 |
Pop Internal Web Browser.............................................................................................. |
54 |
Popup Call Info Screen................................................................................................... |
56 |
Popup Phone Screen ....................................................................................................... |
57 |
Run another Program...................................................................................................... |
58 |
Send DDE Msg............................................................................................................... |
59 |
Send Keystrokes to a Program........................................................................................ |
60 |
Set Phone Do Not Disturb .............................................................................................. |
63 |
Set Phone Status Message .............................................................................................. |
64 |
Set Phone Forwarding..................................................................................................... |
64 |
System/PBX Command.................................................................................................. |
65 |
Transfer Call ................................................................................................................... |
66 |
Action Variables ................................................................................................................ |
67 |
Call Variables ................................................................................................................. |
67 |
System Variables ............................................................................................................ |
69 |
Exporting Actions........................................................................................................... |
70 |
Importing Actions........................................................................................................... |
71 |
Testing Actions............................................................................................................... |
72 |
ii
Strata CIX Net Phone UG 04/08

|
Contents |
Chapter 4 – Using Net Phone Features |
|
Chapter 4 — Using Net Phone Features |
|
Call Handling Features ...................................................................................................... |
73 |
Making Outgoing Calls................................................................................................... |
73 |
Answering Calls.............................................................................................................. |
75 |
Transferring Calls ........................................................................................................... |
76 |
Viewing Extra Call Information ..................................................................................... |
77 |
Holding Calls .................................................................................................................. |
78 |
Phone Feature Operation.................................................................................................... |
79 |
Status Messages .............................................................................................................. |
79 |
Call Fowarding ............................................................................................................... |
80 |
Call Center Features........................................................................................................... |
81 |
Logging In or Out ........................................................................................................... |
81 |
Changing Agent Status ................................................................................................... |
82 |
Chapter 5 — Connecting Headsets |
|
Plantronics Wireless Headset ............................................................................................ |
83 |
CS50-USB and CS60-USB DECT ................................................................................. |
83 |
Installation ...................................................................................................................... |
84 |
Headset Controls and Operation..................................................................................... |
85 |
Net Phone Audio Setup Screen....................................................................................... |
86 |
Trouble Shooting ............................................................................................................... |
87 |
Chapter 6 — Using Microsoft Outlook |
|
Dialing from within Outlook ............................................................................................. |
89 |
Incoming Calls ................................................................................................................... |
89 |
While on a Call .................................................................................................................. |
91 |
Integrating with Outlook Calendar .................................................................................... |
92 |
Step 1: Create Actions to set and clear the DSS Message .......................................... |
92 |
Step 2: Create Personal Call Handler Rules ..................................................................... |
93 |
Step 3: The Final PCH Rules ............................................................................................ |
94 |
Strata CIX Net Phone UG 04/08 |
iii |

Contents |
|
Chapter 7 – Personal Call Handler |
|
Chapter 7 — Personal Call Handler |
|
Creating Personal Call Handling Rules ............................................................................. |
96 |
Like Matches.................................................................................................................... |
104 |
Unlike Matches ................................................................................................................ |
105 |
Export Rules..................................................................................................................... |
106 |
Importing Rules ............................................................................................................... |
107 |
Chapter 8 — Using Companion Applications |
|
Directories........................................................................................................................ |
109 |
Sorting Entries .............................................................................................................. |
109 |
Finding Entries.............................................................................................................. |
110 |
Extension Directory ...................................................................................................... |
110 |
Speed Dial Directory .................................................................................................... |
112 |
Call History...................................................................................................................... |
113 |
Browser Window ............................................................................................................. |
118 |
Presence Viewer............................................................................................................... |
119 |
Other Applications ........................................................................................................... |
122 |
Chat............................................................................................................................... |
122 |
Personal Power Dialer .................................................................................................. |
122 |
Replay.......................................................................................................................... |
122 |
Index .................................................................................................................................... |
123 |
iv
Strata CIX Net Phone UG 04/08
Introduction
This user guide describes how to use the Toshiba Net Phone software with Strata CIX670, CIX200, CIX100, CIX100-S, and CIX40 telephone systems:
Organization
•Chapter 1 – The Grand Tour provides an overview of the Net Phone buttons and screens.
•Chapter 2 – Net Phone Settings covers the customizable settings.
•Chapter 3 – User-Defined Actions includes setting up actions for personal call handling and programmable keys.
•Chapter 4 – Using Net Phone Features shows how to use PBX features from Net Phone.
•Chapter 5 – Connecting Headsets describes the user information when connecting to a Plantronics USB Wireless headset.
•Chapter 6 – Using Microsoft Outlook explains the interactions between Net Phone and Outlook.
•Chapter 7 – Personal Call Handler explains the details of personal call handler feature of Net Phone.
•Chapter 8 – Using Companion Applications explains how to use applications, such as Call History, Extension Directory, Feature Directory, Personal Speed Dial Directory, Extra Buttons, Presence, and an Integrated Web Browser.
Strata CIX Net Phone UG 04/08 |
v |

Introduction
Conventions
Conventions
Conventions |
Description |
|
|
|
|
|
Elaborates specific items or references other information. Within some |
|
Note |
tables, general notes apply to the entire table and numbered notes apply to |
|
|
specific items. |
|
|
|
|
Important! |
Calls attention to important instructions or information. |
|
|
|
|
|
Press to answer a call to the Extension Number. Each station can have |
|
|
multiple extension buttons. Incoming calls ring the extension button(s) |
|
|
from the top down. For example, station 10's extensions ring 10-1 first, |
|
Extension |
then 10-2, 10-3, and 10-4. A station is considered busy when all |
|
extensions are being used. |
||
Number |
||
Note The naming convention for DKT assignments within Toshiba is |
||
|
||
|
Directory Numbers. For clarity and ease of understanding, the |
|
|
terms Extension Number and Phantom Extension Number will be |
|
|
used in this document in lieu of PDN and PhDN. |
|
|
|
|
Arial Bold |
Represents telephone buttons. |
|
|
|
|
|
shows a multiple PC keyboard or telephone button entry. Entries without |
|
+ |
spaces between them show a simultaneous entry. |
|
Example: Delete+Enter. |
||
|
Entries with spaces between them show a sequential entry. |
|
|
Example: # + 5. |
|
|
|
|
Tilde (~) |
Means “through.” Example: 350~640 Hz frequency range. |
|
|
|
|
See Figure 10 |
Grey words within the printed text denote cross-references. In the |
|
electronic version of this document (Library CD-ROM or FYI Internet |
||
|
download), cross-references appear in blue hypertext. |
|
|
|
vi
Strata CIX Net Phone UG 04/08

Introduction
Related Documents/Media
Related Documents/Media
Note Some documents listed here may appear in different versions on the CD-ROM or in print. To find the most current version, check the version/date in the Publication Information on the back of the document’s title page.
Refer to the following for more information:
•Strata CIX Net Phone System Administrator Manual
•Net Phone On-line Help
Strata CIX Net Phone UG 04/08 |
vii |
This page is intentionally left blank.

The Grand Tour |
1 |
|
|
The Net Phone works with Net Server to provide a small but powerful "PC-Phone" for use by telephone users to provide productivity enhancements.
The Net Phone is designed to run on a PC with Microsoft® Windows '98, Windows NT 4.0, Windows 2000, Windows XP or 32-bit Windows Vista operating systems connected to a standard TCP/IP network with the Net Server. The Net Server must be installed with the proper software license(s) for Net Phone to operate correctly. Net Phone will operate in Demo Mode if the appropriate licenses are unavailable. Demo mode lets you use the software for Demonstration purposes only for a limited period of time.
Net Phone provides the following major functions:
•It allows you to place, answer, handle, view, and manage phone calls all from your computer screen, keyboard, and mouse.
•Using the VoIP Audio capabilities can provide a complete speech path when using a PC with the proper speech component support.
•It allows you to setup rules and actions to automatically activate when calls arrive even while you are away.
•It provides the glue to easily interface with many popular programs (like Microsoft Outlook, Goldmine, ACT, etc.). This allows you to dial from and “screen-pop” into these programs or the Internet/Intranet.
Strata CIX Net Phone UG 04/08 |
1 |

The Grand Tour
The Main Screen
The Main Screen
This section gives an overview of the main user interface of the Net Phone, including the buttons, displays, and indicators, which allow you to easily and efficiently operate your phone. Net Phone provides two views, Streamlined and Expanded, allowing you to operate using only the space on your screen that you want.
Note You can easily change the color scheme and appearance of your Net Phone by right-clicking your mouse on the logo and selecting one of the “Skins” on page 6 from the Phone colors menu.
The Streamlined View
In “Streamlined” view Net Phone consumes minimal screen space but still provides the user with indictors, information, and buttons to effectively operate the phone. This view is most effective when users handle one call at a time, or have very little available screen space available. Below is a sample view and information about the various parts of Net Phone.
Main Menu |
InformationLCD |
Expand |
Button |
Display |
Button |
Minimize Button
Message Waiting
Indicator
 Slide Window
Rollout
Call Handling |
Option |
|
Buttons |
|
|||
Toolbar |
(Applications) |
||
2 |
Strata CIX Net Phone UG 04/08 |

The Grand Tour
The Main Screen
Button / Icon |
Description |
|
|
|
|
Main Menu |
Click this button to access Net Phone configuration menus and |
|
Help. |
||
|
||
|
|
|
|
This window simulates a phone LCD and provides different types |
|
|
of information depending on current status. If your phone is idle, |
|
|
it shows the date/time, Extension number, and current Name. |
|
Information LCD Display |
While a call is active on your phone it shows information about |
|
|
the call — Duration, CallerID or Name (if present.) When a call is |
|
|
active in the window, right-click on the LCD to access to popup a |
|
|
menu of call control options. |
|
|
|
|
Expand Button |
Used to change the phone to/from its "Streamlined" view and its |
|
"Expanded" view. |
||
|
||
|
|
|
|
Hides Net Phone into the system tray. Simply click on the Net |
|
Minimize Button |
Phone icon (shown left) in the system tray to return the Net |
|
|
Phone to the screen. |
|
|
|
|
Message Waiting |
This indicator blinks a Red light when you have messages |
|
Indicator |
waiting. |
|
|
|
|
Side Window Rollout |
Press this button to rollout a side window that has additional |
|
Button |
programmable buttons. |
|
|
|
|
|
A number of optional functions and companion programs can be |
|
Options Buttons |
configured to add significant functionality to the Net Phone. |
|
(Applications) |
Each Companion Application uses an Option Button to provide |
|
|
easy access to the features/functions of the application. |
|
|
|
|
Call Handling Keys |
These keys |
|
|
|
|
|
The first four keys allow you to (from left to right) Answer, Hold, |
|
Call Handling Keys |
Transfer, and Hang up a call. Should you forget, you can hover |
|
your mouse over a key to be reminded what function a key |
||
|
||
|
performs. |
|
|
|
|
Do-Not-Disturb Key and |
Displays the current Do Not Disturb status of your phone. Hover |
|
the mouse over this area to see the current DND status |
||
Indicator |
||
message. Right-click to change your DND status and message. |
||
|
||
|
|
|
|
Displays the current "PBX call forwarding" status for your phone. |
|
Call Forward Key and |
Hover the mouse over this area to see the entire FWD status. |
|
Indicator |
Right-click to change your PBX forwarding status and |
|
|
destination. |
|
|
|
Strata CIX Net Phone UG 04/08 |
3 |
The Grand Tour
The Main Screen
Button / Icon |
Description |
|
|
|
|
|
|
|
|
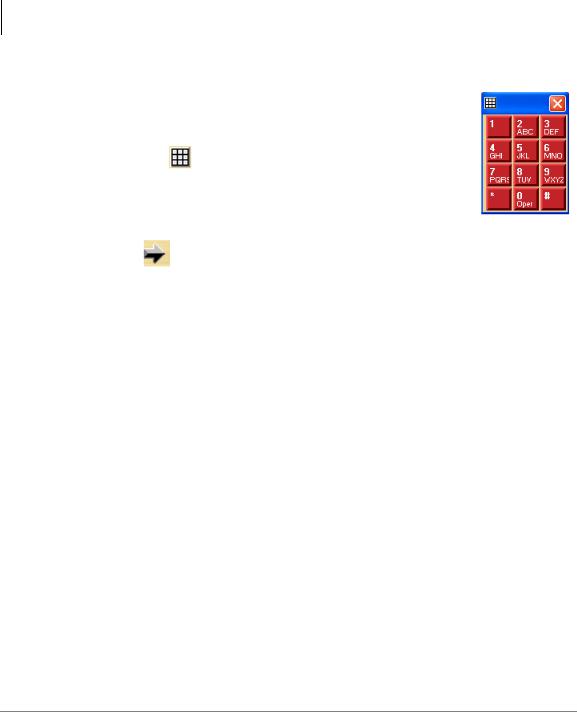
Click the dial pad button to expose and hide |
|
|
the popup Dial Pad. Use the Dial Pad when |
|
|
you reach a recording that says “...Press 1 for |
|
Dial Pad Button |
sales, 2 for support,...”. When this dial pad is |
|
displayed you can use your mouse to click the |
||
|
digits to dial or use the number keys or |
|
|
NumLock keypad on your computer keyboard |
|
|
to dial digits. |
|
|
|
|
Dial Button |
Click the dial button to dial the number shown in the Dial Buffer. |
|
|
|
|
|
Type a number into this space and press Enter or click the “Dial” |
|
|
button to the left of the box. Click the drop-down arrow to view |
|
|
the last 10 outside phone numbers you dialed. Select a number |
|
Dial Buffer and Redial |
from the drop-down and press Enter or click Dial to redial that |
|
number. You can even Copy/Paste phone numbers from other |
||
Selection |
||
programs into this window to dial. You may also include letters in |
||
|
||
|
the dial number — Net Phone automatically converts the letters to |
|
|
the matching numbers on the telephone keypad (i.e. 1-800- |
|
|
IFLYSWA). |
|
|
|
A number of shortcut keys allow you to use the keyboard in place of the mouse to control Net Phone. The list of Shortcut keys can be found using the menu selection Setup>Shortcut Keys. Note: The F1 key is the HELP key a can be pressed at any time to access Help.
4 |
Strata CIX Net Phone UG 04/08 |

The Grand Tour
The Main Screen
Expanded View
In “Expanded” view the Net Phone is enlarged beyond the streamlined view to provide the user with additional buttons, indictors, information to manage multiple simultaneous calls and to access many other features. The follow describes the additional items in the “Expanded” view.
•Volume Controls – These buttons provide control over volume settings on the phone. Note: These volume control settings are only available when the PBX software version supports Volume Control commands.
•Audio Control – The audio control is your line button with a status indicator for that line when using the VoIP audio interface.
•Recording Button & Indicator – The indicator light works in conjunction with OAISYS Tracer and OAISYS Auto Call Record. Users with appropriate permissions will have this indicator on their Net Phone. If the light is red, this means the user’s call is currently being recorded. If the light is gray, it is not being recorded. The user can click on this button and select ‘Start Recording’ to initiate recording of the call. If the call is being recorded the user can click on the button to terminate the recording.
Strata CIX Net Phone UG 04/08 |
5 |

The Grand Tour
The Main Screen
•Streamline Button – Used to change Net Phone back to its "Streamlined" view.
•Calls Window – This window displays that status and associated information for each active phone call on the phone. Thus you can easily view and manage multiple phone calls. Right click the mouse on any call to view a menu of options for handling the call (like Hold, Transfer to Voice Mail, Hang Up, etc.).
•Call Info Indicators – on the right side of the Call Window is a “Call Info Indicator" that indicates if Extra call information is attached to a call. A gray notebook icon means no information is attached, a blue notebook icon means standard information is attached, and a red notebook icon indicates priority information is attached to the call. Press the Call Notes icon to view or change Notes information on the call. Notes are retained with the call even when you transfer it to another person. You may use Call Notes with an IVR to attach a Customer Name, Credit Card Number, and Zip Code to the call before you answer, saving you from asking the caller for this information.
•Programmable Buttons – A number of keys can be easily configured by the user as "Feature" keys, "Speed Dial" keys, "Call" keys, "User Action" keys, etc. To change one of these keys simply Right-Click the mouse over the key and use the Setup Key window to configure the settings for the key (for details on programming these buttons refer to the “User Programmable Keys” on page 22). Note: To expose more programmable buttons click the Side Window rollout button.
•ACD Buttons – ACD keys are larger programmable buttons that would give ACD agents easy login/logout of ACD groups. These keys also display the current ACD agent status, and allow agents to control their Wrap-Up mode.
6 |
Strata CIX Net Phone UG 04/08 |
The Grand Tour
The Main Screen
Screen Docked Views
Net Phone provides a screen-docking feature (in Ver. 4.7 and after) where the Net Phone can dock to the top or bottom of your PC screen. When screen docked the Net Phone takes on a very low profile using only a small portion of the screen, and stays accessible even when other applications are maximized. This allows user’s to access the features of Net Phone while consuming a minimal amount of PC screen space.
Two screen-docked profiles are available, slim and regular, as shown below:
Slim Screen-docked profile
Regular Screen-docked profile
Most of the phone display, buttons, and controls that appear on each screen-docking profile can be chosen by the user from the “Docking Tab” on page 16 in Net Phone Preferences.
Net Phone Main Menu
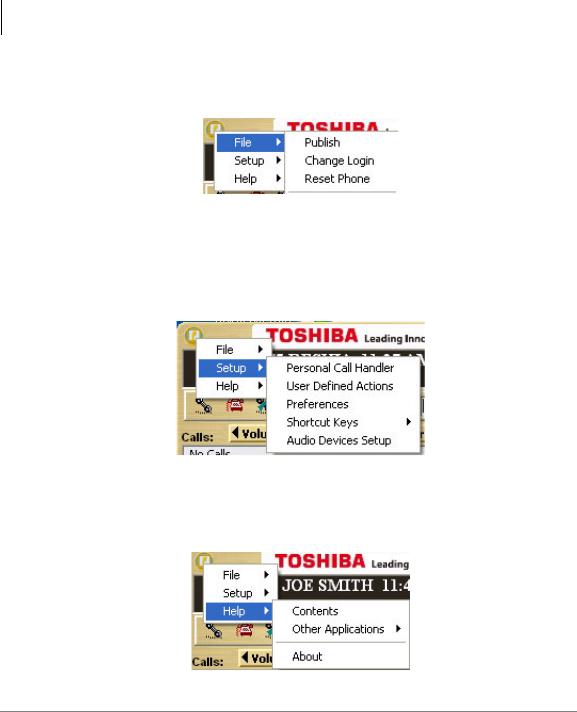
To reach Net Phones Main Menu, click on the icon in the upper left-hand corner. The Main Menu opens as shown below:
Strata CIX Net Phone UG 04/08 |
7 |
The Grand Tour
The Main Screen
The File menu item expands into an ability to Change the Login settings, an ability to reset the phone to its default settings, or exit the Net Phone application.
The Setup menu item expands into six sub-menu items for setting parameters for your Net Phone. These include Personal Call Handling rules, User Defined Actions, Preferences, Advanced, when enabled, provides event and call views of activity that has occurred during operation, Shortcut Keys, and Auto Devices Setup. See the Net Phone System Administrator Guide for instructions on enabling the advanced menu item.
The Help menu item expands into Contents for the on-line User Guide, Other Applications has sub-menus for other help files including Net Phone System Administration Guide and application note for the installed integration with an outside application, such as MS Outlook or ACT! 2007.
8 |
Strata CIX Net Phone UG 04/08 |
The Grand Tour
The Side Window Screen
The Side Window Screen
Click the “Side Window Rollout” button on the main screen to cause the side window to appear just to the right side of the main window or below when the main window is docked. The side window provides access to the Personal Call Handler window and additional programmable buttons can also be reached.
This window can be docked (connected) to or undocked (moved away) from the main window. While docked to the main window, whenever the main window is moved the side window will move with it. And likewise whenever the main window is minimized (into the system tray) or restored, the side window will move with it.
When the side window is undocked, it floats separately from the main window and can be moved and resized separately.
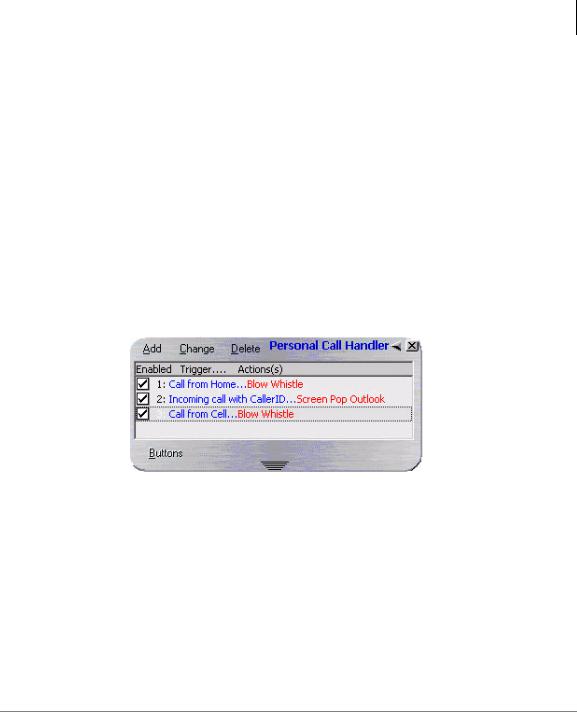
Call Handler Mode
•Call Handler Management Buttons – Used to Add, Change, or Delete Personal Call Handler rules.
•Dock Button – Use to dock the window back to the main screen (if detached) or hide inside the main screen (if attached.)
•Close Button – Use to close the Call Handler window.
•Call Handler Rules Window – Displays the current Call Handler rules along with an enabled (checked) and disabled (unchecked) box per rule. The triggering event is show in blue text while the action to take place is shown in red text for easier viewing.
•Buttons Mode Button – Use to switch the window from the “Call Handler” mode to the “Buttons” mode.
Strata CIX Net Phone UG 04/08 |
9 |
The Grand Tour
The Side Window Screen
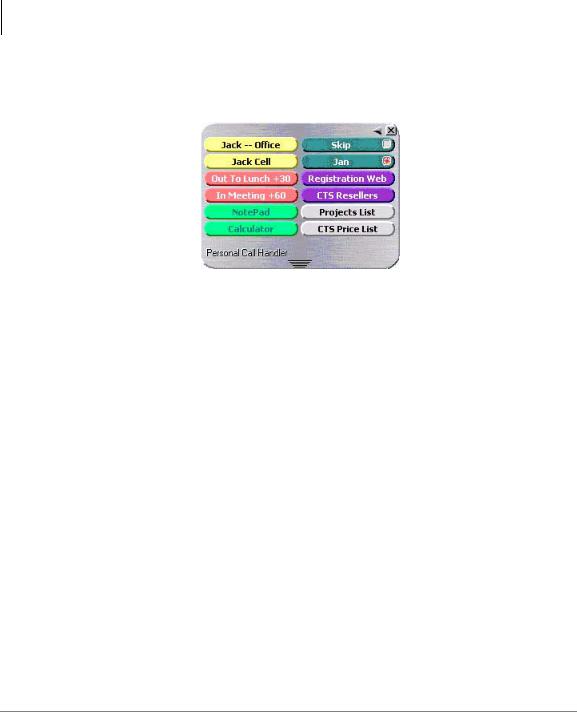
Buttons Mode
Below is a sample view of the side window screen in Buttons mode, which provides 12 user-programmable buttons for the user.
•Dock button – Use to dock the window back to the main screen (if detached) or hide inside the main screen (if attached.)
•Close button – Use to close the side window.
•User Programmable Buttons – A number of keys can be easily configured by the user as “Feature” keys, “Speed Dial” keys, “Call” keys, “User Action” keys, etc. For programming details see “User Programmable Keys” on page 22.
•Resize Points – Click and drag to resize the side window. The buttons will automatically rearrange to the shape of the window. Small sizes cause some buttons to hide.
•Call Handler Button – Use to switch the window from “Buttons” mode to the “Call Handler” mode.
10 |
Strata CIX Net Phone UG 04/08 |

The Grand Tour
Companion Application Windows
Companion Application Windows
Companion Application Windows open as the result of clicking one of the Option Keys on Net Phone. These windows open docked (connected) to the bottom side of the main window or can be undocked (moved away) from the main window. While a companion window is docked with the main window, whenever the main window is moved the companion window will move with it. And likewise whenever the main window is minimized (into the system tray) or restored, the companion window(s) moves with it.
When companion windows are undocked, they float separately from the main window and can be moved and resized separately.
The More Buttons companion application provides an optional capability allowing the window to dock to either the left or right side of the screen. The buttons change configuration to show in a single vertical column and remain in view with other applications open on the desktop.
Strata CIX Net Phone UG 04/08 |
11 |
The Grand Tour
Skins
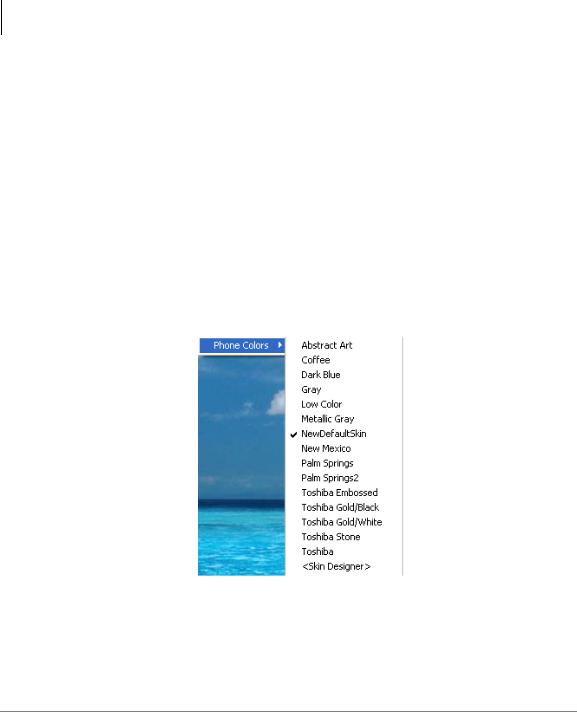
Skins
Skins provide the method for changing the color scheme and button appearance. Skins can affect the following elements of Net Phone:
•Screen colors, texture, rounding, and appearance.
•LCD colors
•Calls window size.
•Programmable Button shapes and colors
•Dial Pad button shape and colors
•Graphic on the main screen
To Change Skin Selection
Right-click your mouse on the logo on the main window.
•Select one of the “Skins” from the Phone Colors menu or choose the <Skin Designer> to create a new design. Note: When you design a new “Skin” and save it as a new file name, this change will not appear in the Phone Colors menu until the next time you restart Net Phone.
12 |
Strata CIX Net Phone UG 04/08 |

Net Phone Settings |
2 |
|
|
This section defines settings that are available to the user for customizing Net Phone to meet their needs. A number of additional settings are available for the System Administrator for setting more advanced features such as controlling access to some features, creating a server-based rules and configurations. This section will concentrate on the settings readily available to the user.
These settings are arranged into Preferences, Hot Keys, Option Buttons, User Programmable Buttons, and User Defined Actions. Each of these sections will define the settings and how to change these settings to match your needs.
Preferences
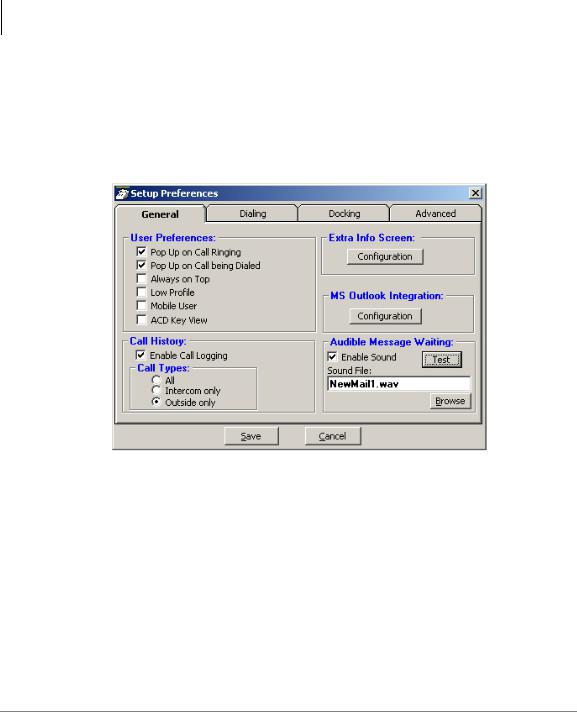
Setup Preferences has a number of settings for making Net Phone work and look the way you choose. To access Setup Preferences click on then select Setup > Preferences. The settings in Preferences are divided between four tabs each defined below.
Note: Depending on your configuration you may not be able to change the Preferences, in which case you should check with your System Administrator.
Strata CIX Net Phone UG 04/08 |
13 |
Net Phone Settings
Preferences
General Tab
These settings control how Net Phone interacts with other Windows-based programs and how it should react when calls ring or are being dialed. Extra Call Information can be enabled and content to be displayed defined as well as details for Microsoft Outlook Integration when used.
User Preferences
•Pop Up on Call Ringing – Check this option if you'd like your Net Phone to automatically pop up when a call rings on your phone.
•Pop Up on Call being Dialed – Check this option if you'd like your Net Phone to automatically pop up whenever a call is being dialed from another program (via TAPI or DDE dialing) or dialed via Hot Key dialing.
•Always on Top – Use this option to keep Net Phone on top of all other programs. This makes it easily accessible.
•Low Profile – Enabling this option makes the Net Phone very thin in the “Streamlined Mode” by eliminating the Option Buttons on the bottom of the screen.
14 |
Strata CIX Net Phone UG 04/08 |

Net Phone Settings
Preferences
•Mobile User – some users travel with a laptop PC from desktop to desktop each time using the Net Phone with a different PBX extension. This Mobile User option will pop up a “Login” screen each time Net Phone is started so that they can log into the appropriate PBX phone extension.
•ACD Key View – This option changes the keys on the left side of the main Net Phone screen to wide keys, which can then be programmed to ACD functions, like login/logout, ACD status, etc.
Call History
•Enable Call Logging – To have Net Phone collect and display Call History, Call Logging must be enabled.
•Call Types – Once Call Logging is enabled, a choice needs to be made to log All, Intercom Only, or Outside Only calls.
Audible Message Waiting
An audible sound can be played when the Message Waiting indication turns on. The sound played can be any .WAV file of your choosing.
•Enable Sound – Placing a check mark in the box enables playing a sound in the file shown. Clicking the Test button will allow you to listen to the sound selected.
•Sound File – Enter the path to the .WAV file to be played. Use the Browse button when needed to search for the path to the sound file.
Strata CIX Net Phone UG 04/08 |
15 |
Net Phone Settings
Preferences
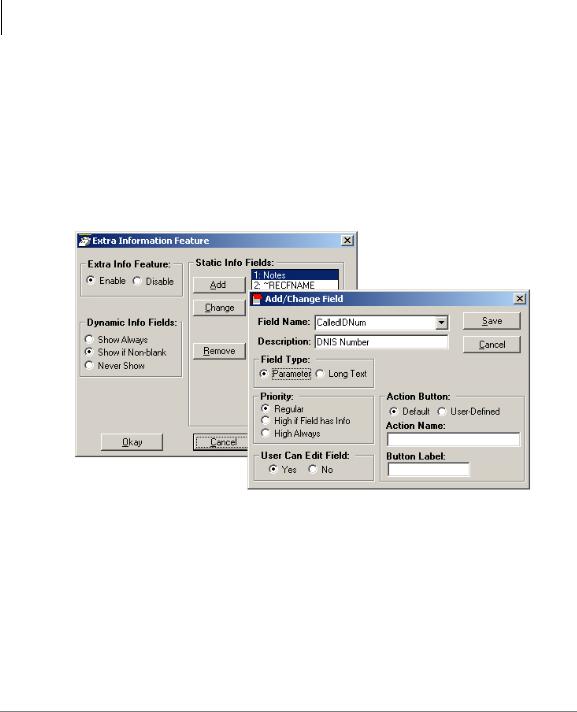
Extra Info Screen
Each call may have additional information attached to the call that may be useful. With the Extra Info Feature enabled, this symbol appears with each call. When the symbol is gray, no information is present, when cyan, information is attached and when red, high priority information is available.
The Configuration button in the window accesses the screen for enabling this feature as well as choosing the extra information items to be displayed along with their properties shown below:
•Extra Info Feature – Provides for enabling or disabling this feature. When disabled, the Call Information icon will not appear with each call.
•Static Information Fields – These fields will have a fixed area within the Call Notes window for the information to be displayed. You have the ability to Add, Change an existing or Remove any field.
16 |
Strata CIX Net Phone UG 04/08 |
Loading...