


GMAA00217011.book Page 1 Friday, March 26, 2010 10:53 AM
CAMILEO S20
Quick Start Guide
English/Español

GMAA00217011.book Page 2 Friday, March 26, 2010 10:53 AM
2 Introduction
Introduction
For more detailed information please refer to the User's Guide on the included CD.
Safety instructions
1Do not drop, puncture or disassemble the camcorder; otherwise the warranty will be voided.
2Avoid all contact with water, and dry hands before using.
3Do not expose the camcorder to high temperature or leave it in direct sunlight. Doing so may damage the camcorder.
4Use the camcorder with care. Avoid pressing hard on the camcorder body.
5For your own safety, avoid using the camcorder when there is a storm or lightning.
6Do not use batteries of different specifications. Doing so may lead to the potential for serious damage.
7Remove the battery during long periods between usages, as a deteriorated battery may affect the functionality of the camcorder.
8Remove the battery if it shows signs of leaking or distortion.
9Use only the accessories supplied by the manufacturer.
10Keep the camcorder out of the reach of infants.
11Risk of explosion if battery is replaced by an incorrect type.
12Dispose of used batteries according to the instructions.
About the battery pack
Use only batteries recommended by TOSHIBA as replacements. The battery pack is lithium ion batteries, which can explode if not replaced, used, handled or disposed of properly. Dispose of the battery as required by local ordinances or regulations.
Charge the battery pack only in an ambient temperature between 5 and 35 degrees Celsius. Otherwise, the electrolyte solution might leak, battery pack performance might deteriorate and the battery life might be shortened.
Never install or remove the battery pack without first turning off the power and disconnecting the AC adaptor.
Only use the supplied AC adaptor or USB cable, or an optional Toshiba battery charger to charge the battery pack. Never attempt to charge the battery pack with any other charger.

GMAA00217011.book Page 3 Friday, March 26, 2010 10:53 AM
Safety instructions |
3 |
|
|
|
|
Handling the cord on this product will expose you to lead, a chemical known to the State of California to cause birth defects or other reproductive harm. Wash hands after handling.
Regulatory Information
TOSHIBA declares that this product conforms to the following Standards: FCC Conditions
This equipment has been tested and found to comply with Part 15 of the FCC Rules.
Operation is subject to the following two conditions:
(1)This device may not cause harmful interference.
(2)This device must accept any interference received. Including interference that may cause undesired operation.
Contact
Address: TOSHIBA America Information Systems, Inc.
9740 Irvine Boulevard
Irvine, California 92618-1697
Telephone: (949) 583-3000
Trademarks
Adobe and Photoshop are either registered trademarks or trademarks of Adobe Systems Incorporated in the United States and/or other countries.
ArcSoft, MediaImpression, and MediaConverter are registered trademarks of ArcSoft, Inc.
HDMI, the HDMI Logo and High-Definition Multimedia Interface are trademarks or registered trademarks of HDMI Licensing, LLC.
Secure Digital and SD are trademarks of SD Card Association.
YouTube and the YouTube logo are registered trademarks of Google, Inc.
All other brand and product names are trademarks or registered trademarks of their respective companies.

GMAA00217011.book Page 4 Friday, March 26, 2010 10:53 AM
4 |
Getting Started |
Getting Started
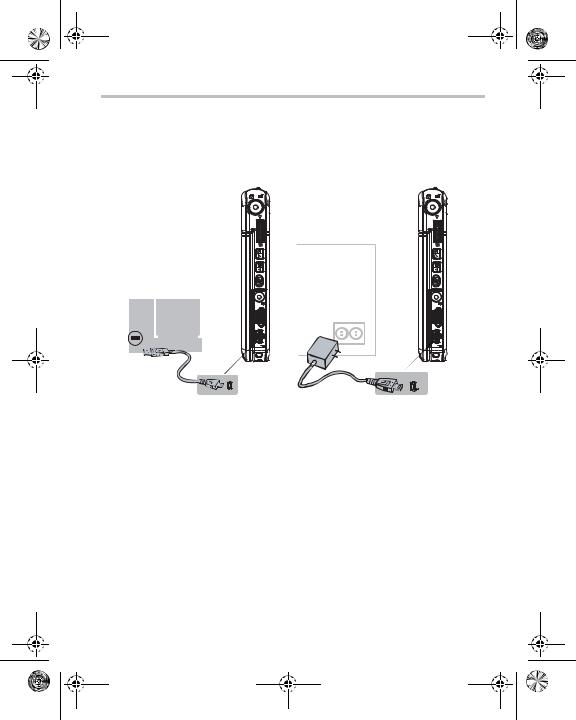
The battery comes pre-installed in the camcorder, however you must remove the protective film on the battery before use.
To properly connect the battery:
1Slide the back battery cover off.
2Remove the battery.
3Pull the film off.
4Reinsert the battery, making sure it is lined-up with the correct polarity marks.
5Close the battery cover.
To insert the SD™ Card (optional):
1Flip open the SD™ Card cover.
2Insert the SD™ Card into the slot until it locks in place.
3Once inserted, close the SD™ Card cover.
To remove the SD™ Card, press inward to release it. When the card pops out, grasp it and pull it straight out.
Li-ion battery
GMAA00217011.book Page 5 Friday, March 26, 2010 10:53 AM
Getting Started |
5 |
Charge your battery
You must use the supplied AC adaptor or the USB cable to charge your camcorder before use. Turn off the camcorder. A blinking light will indicate active charging and a solid light will indicate that charging is complete. In AC charging mode, the light will turn off automatically after 5 minutes.

GMAA00217011.book Page 6 Friday, March 26, 2010 10:53 AM
6 |
Quick Tour |
Quick Tour
Record and Play
2 4 |
3 |
|
|
5 |
7 |
6
1
For more detailed operational instructions, please refer to the User’s Guide, chapters
3 & 4 on the supplied CD.
1 Flip to power on
 Flip out the LCD screen or hold
the Power ( ) button for one second.
 To conserve battery power, the camcorder will turn off automatically after 3 minutes of non-operation.
2 To start or stop recording
 Press the Mode (
  ) button to switch to Movie Record mode.
NOTE: The Movie Record ( ) indicator light will glow.
 Press the Record (
 ) button.
3 Dual record
 When recording a movie, press the
Mode (  ) button to capture a still image.
4 To take pictures
 Press the Mode (
  ) button to switch to Picture Record mode.
NOTE: The Picture mode ( ) indicator light will glow.
 Press the Record (
 ) button.
5 To zoom in and out
 Press T/W
6 To review movies/pictures
 Press the Playback (
 ) button.
7 To operate more advanced options
 Press the OK button to access the options menu.

GMAA00217011.book Page 7 Friday, March 26, 2010 10:53 AM
Quick Tour |
7 |
|
|
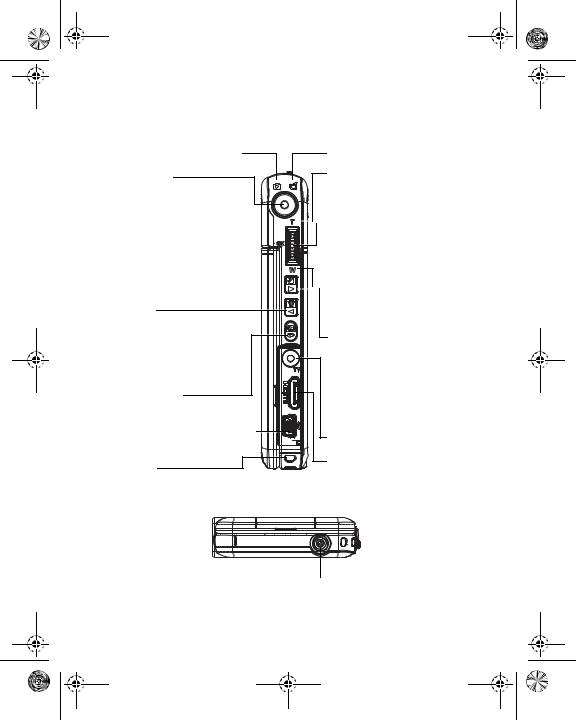
Front/Side
SD™ Card cover
Macro switch |
LCD screen |
Switch between Macro mode and Normal mode.
Lens
NOTE: Remove the protective film from the lens before use.
Microphone
Light
Speaker
Power button
Mode button
When recording movies, press to capture the image. Switch between Movie mode and Picture mode or switch between Movie Preview Screen and Picture Preview Screen.
 Pre-Record/YouTube™ Direct button
In Record mode, press to activate the Pre-Record function and the movie will be recorded 3 seconds before the Record button is pressed. In Movie Playback mode, press to select current movies to upload
to YouTube™.
When the camera is connected to the computer, press to launch the
YouTube™ Direct application automatically.
GMAA00217011.book Page 8 Friday, March 26, 2010 10:53 AM
8 |
Quick Tour |
Rear/Underside
Picture mode indicator light
Record button
In Movie Record mode, press to record a movie, press again to stop. In Picture Record mode, press to take
pictures. During playback, press to view the movie/picture or play/pause the movie. In Picture Playback mode, press to start/stop the slideshow.
Left button
Digital Light ON/OFF. In Record mode, press to return to the main menu. During playback, move to the previous movie/picture or Fast Rewind a movie.
Playback button
Switch between Record/Playback mode. For quick review, press after recording.
Mini USB 2.0 port 
Strap hook
Movie mode indicator light
Tele (Up) button
Move between the option items,
Zoom in, and Volume increase.

 OK button
Menu ON or Validate the setting. During playback, press to delete movie/picture.
 Wide (Down) button
Move between the option items, Zoom out and Volume decrease.
Right button
Resolution switch (FHD (1080p30)/ WVGA 60) (High (16 MP)/Standard 5 MP). In Record menu, press to switch to the submenu. During playback, go to the next movie/picture Fast Forward movies.
TV port
HDMI™ port
Tripod socket

GMAA00217011.book Page 9 Friday, March 26, 2010 10:53 AM
|
|
|
|
|
|
|
|
|
Quick Tour |
9 |
|
|
|
|
|
|
|
|
|
|
|
|
|
|
|
|
|
Menu options |
|
|
|
|
|
|
|
|||
|
|
|
|
|
|
|
|
|
|
|
|
|
|
|
|
|
|
Resolution |
|
|
|
|
|
|
|
|
|
|
|
|
|
|
|
|
|
|
|
|
|
|
|
|
|
|
|
|
|
|
|
|
|
|
|
Movie |
Resolution |
|
|
|
|
|
|
|
||
|
|
|
|
|
|
|
|
|
|
|
|
|
|
|
|
|
|
FHD (1080p 30) |
1920 x 1080p (30fps) |
|
|
|
|||
|
|
|
|
|
|
|
|
|
|
|
|
|
|
|
|
|
|
HD (720p 30) |
1280 x 720p (30fps) |
|
|
|
|||
|
|
|
|
|
|
|
|
|
|
|
|
|
|
|
|
|
|
WVGA 60 |
848 x 480 (60fps) |
|
|
|
|||
|
|
|
|
|
|
|
|
|
|
|
|
|
|
|
|
|
|
VGA (4:3) |
640 x 480 |
|
|
|
|||
|
|
|
|
|
|
|
|
|
|
|
|
|
|
|
Picture |
resolution |
|
|
|
|
|
|
|
||
|
|
|
|
|
|
|
|
|
|
|
|
|
|
|
|
|
|
High (16 MP) |
4608 x 3456 (16 M pixels) |
|
|
|
|||
|
|
|
|
|
|
|
|
|
|
|
|
|
|
|
|
|
|
Standard (5 MP) |
2592 x 1944 (5 M pixels) |
|
|
|
|||
|
|
|
|
|
|
|
|
|
|
|
|
|
|
|
|
|
|
Low (3 MP) |
2048 x 1536 (3 M pixels) |
|
|
|
|||
|
|
|
|
|
|
|
|
|
|
|
|
|
|
|
|
|
|
White Balance |
|
|
|
|
|
|
|
|
|
|
|
|
|
|
|
|
|
|
|
|
|
|
|
|
|
|
|
|
|
|
|
|
|
|
|
Auto |
|
Automatic adjustment |
|
|
|
|||||
|
|
|
|
|
|
|
|
|
|
|
|
|
|
|
Daylight |
Use under outside lighting conditions |
|
|
|
||||||
|
|
|
|
|
|
|
|
|
|
|
|
|
|
|
Fluorescent |
Use under fluorescent lighting conditions |
|
|
|
||||||
|
|
|
|
|
|
|
|
|
|
|
|
|
|
|
Tungsten |
Use under tungsten lighting conditions |
|
|
|
||||||
|
|
|
|
|
|
|
|
|
|
|
|
|
|
|
|
|
|
Scene |
|
|
|
|
|
|
|
|
|
|
|
|
|
|
|
|
|
|
|
|
|
|
|
|
|
|
|
|
|
|
|
|
|
|
|
Auto |
|
Shoot with no special effect on the image |
|
|
|
|||||
|
|
|
|
|
|
|
|
|
|
|
|
|
|
|
|
|
|
Skin |
Makes skin tones appear more natural |
|
|
|
|||
|
|
|
|
|
|
|
|
|
|
|
|
|
|
|
|
|
|
Night |
Use Night mode for night scenes or low light conditions |
|
|
|
|||
|
|
|
|
|
|
|
|
|
|
|
|
|
|
|
|
|
|
Backlight |
Take pictures when bright light is behind the subject |
|
|
|
|||
|
|
|
|
|
|
|
|
|
|
|
|
|
|
|
|
|
|
|
|
|
|
|
|
|
|
|
|
|
|
|
|
|
|
|
|
|
|
|
|
|
|
|
|
|
|
|
|
|
|
|
|
 Loading...