


 Loading...
CE27T11/CE32T11/CE36T11
cTOSHIBA CORPORATION, 1999
Set up
Preparation
Reference Section Advanced Operation Basic Operation
1
Set up
Preparation
Reference Section Advanced Operation Basic Operation
Dear Customer
Congratulations! You have purchased one of the finest Color TV’s on the market!
This manual will help you use the many exciting and useful features to make your TV viewing more enjoyable than ever before.
Before operating your TV set, please read all these safety and operating instructions completely and then retain for future reference.
Customer’s Record
You will find the model number and serial number on the back of your TV set.
Record these numbers in the spaces provided below. Refer to them whenever you call upon your TOSHIBA dealer regarding this product.
Model Number
Serial Number
Safety Precautions
WARNING:
TO REDUCE THE RISK OF FIRE OR ELECTRIC SHOCK, DO NOT EXPOSE THIS APPLIANCE TO RAIN OR MOISTURE.
WARNING
RISK OF ELECTRIC SHOCK
DO NOT OPEN
AVIS: RISQUE DE CHOC
ELECTRIQUE-NE PAS OUVRIR
WARNING: TO REDUCE THE RISK OF ELECTRIC SHOCK, DO NOT REMOVE COVER (OR BACK). NO USERSERVICEABLE PARTS INSIDE. REFER SERVICING TO QUALIFIED SERVICE PERSONNEL.
The lightning symbol in the triangle tells you that the voltage inside this product may be strong enough to cause an electric shock.
DO NOT TRY TO SERVICE THIS PRODUCT YOURSELF.
The exclamation point in the triangle tells you that important operating and maintenance instructions follow this symbol.
This TV set may be used only with TOSHIBA stand shown on page 33. Use with other stands may result in instability causing possible injury.
CAUTIONS:
TO PREVENT ELECTRIC SHOCK, DO NOT USE THIS POLARIZED PLUG WITH AN EXTENSION CORD RECEPTACLE OR OTHER OUTLET UNLESS THE PRONGS CAN BE FULLY INSERTED INTO THE OUTLET TO PREVENT ANY EXPOSURE OF THE PRONGS ON THE POLARIZED PLUG.
ATTENTION:
POUR PRÉVENIR LES CHOCS ÉLECTRIQUES, NE PAS UTILISER CETTE FICHE POLARISÉE AVEC UN PROLONGATEUR, UNE PRISE DE COURANT OU UNE AUTRE SORTIE DE COURANT, SAUF SI LES LAMES PEUVENT ÊTRE INSÉRÉS À FOND SANS EN LAISSER AUCUNE PARTIE À DÉCOUVERT.
Avoid displaying stationary images on your TV screen for extended periods of time. Stationary patterns generated by PIP display, computer displays, video games, stock market reports, etc. can become permanently engrained on the picture tube. This damage is not protected by your warranty as it is the result of misuse. Should you wish to use your TOSHIBA Television to display still images, it is always advisable to reduce brightness and contrast settings. Never leave a PIP display, a computer or video game display unattended.
Note to CATV system installer in the USA:
This reminder is provided to call the CATV system installer’s attention to Article 820-40 of the NEC that providesguidelinesforpropergroundingand,inparticular, specifies that the cable ground shall be connected to the grounding system of the building, as close to the point of cable entry as practical.
2

Table of Contents
Set Up ....................................................................... |
4 |
Introduction ................................................................... |
4 |
Exploring your new TV ............................................... |
4 |
Selecting a location for the TV .................................... |
4 |
Connecting Your TV ..................................................... |
5 |
Connecting a VCR ....................................................... |
5 |
Connecting a cable converter box ............................... |
5 |
Connecting a cable converter box and a VCR ....................... |
6 |
Connecting a satellite receiver and a VCR .................. |
6 |
Connecting a DVD (or laserdisc player) and VCR ..... |
7 |
Connecting two VCRs ................................................. |
7 |
Preparation ............................................................... |
8 |
Preparing the Remote Control for Use ....................... |
8 |
Installing the Remote Control batteries ....................... |
8 |
Location of Controls ..................................................... |
9 |
Using the Remote with VCR or Cable TV |
|
Converter ................................................................ |
10 |
Programming the Remote Control ............................ |
11 |
Controlling other brands of VCR’s and |
|
cable TV converters ............................................... |
11 |
Menu function (General Instructions) ...................... |
14 |
First-Time Operation .................................................. |
15 |
Turning the TV set on ................................................ |
15 |
Selecting the on-screen display language .................. |
15 |
Programming Channel Memory ............................... |
16 |
TV/CABLE function ................................................. |
16 |
CH PROGRAM function ........................................... |
16 |
ADD/ERASE function .............................................. |
17 |
Basic Operation ...................................................... |
18 |
Watching TV Programs or Video Input ................... |
18 |
Selecting the TV channels ......................................... |
18 |
Selecting the video input source ................................ |
18 |
Convenient Remote Functions ................................... |
19 |
Displaying on-screen information ............................. |
19 |
Muting the Sound ...................................................... |
19 |
Changing quickly between two channels .................. |
19 |
Setting the off-timer (sleep timer) ............................. |
20 |
Displaying the XDS information ............................... |
20 |
Receiving Stereo/SAP Broadcasts ............................. |
21 |
Selecting stereo or SAP sound ................................... |
21 |
Activating the surround sound effect ......................... |
21 |
Adjusting the Picture .................................................. |
22 |
Adjusting the picture quality ..................................... |
22 |
Adjusting the Sound ................................................... |
23 |
Adjusting the sound quality ....................................... |
23 |
Advanced Operation .............................................. |
24 |
Watching Picture-in-Picture ...................................... |
24 |
Displaying a small picture ......................................... |
24 |
Using advanced functions .......................................... |
25 |
Programming Your Favorite Channels .................... |
26 |
Programming your favorite channels ........................ |
26 |
Selecting your favorite channels ................................ |
26 |
Operating Closed Caption Feature ........................... |
27 |
Viewing captions or text ............................................ |
27 |
Using V-CHIP Control ............................................... |
28 |
Selecting the V-CHIP CONTROL menu .................. |
28 |
Adjusting the V-CHIP CONTROL menu ................. |
29 |
Unblocking programs temporarily ............................. |
31 |
BLOCK CHANNEL function ................................... |
31 |
Reference Section .................................................. |
32 |
Cleaning and Care ...................................................... |
32 |
Specifications ............................................................... |
33 |
Before Calling Service Personnel .............................. |
34 |
Limited United States Warranty ............................... |
35 |
Set up
Preparation
Reference Section Advanced Operation Basic Operation
3
Set up
Preparation
Reference Section Advanced Operation Basic Operation
Introduction
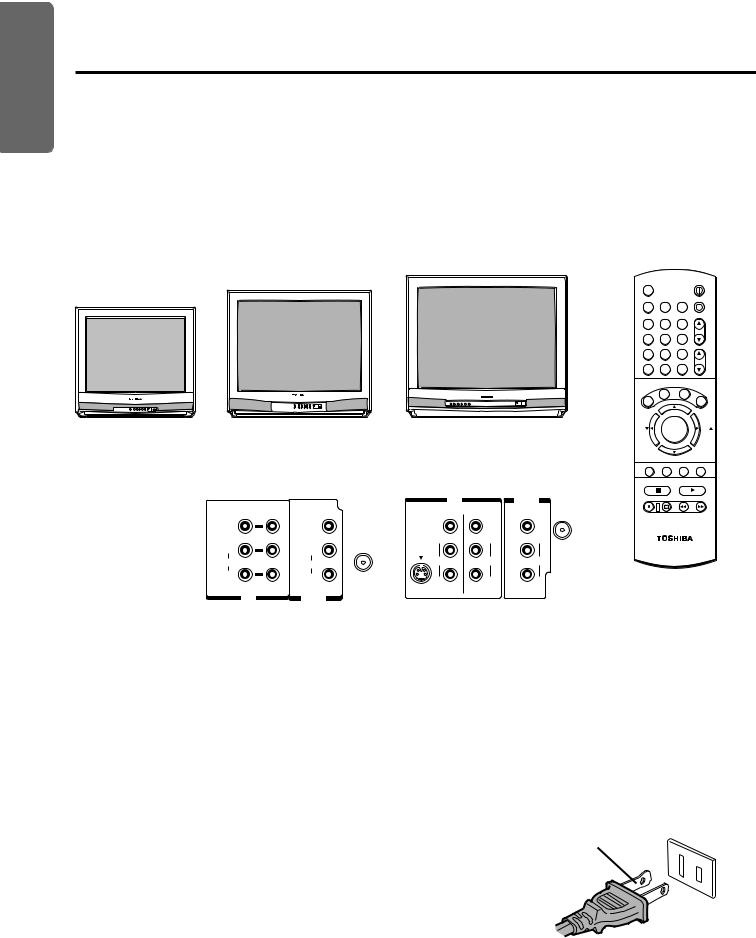
This manual applies to models CE27T11, CE32T11 and CE36T11, and there are slight differences among them.
The CE32T11 is the model used for illustration purposes. Instructions in this manual are based on using the Remote Control. Check the model of your TV before using this manual.
Exploring your new TV
You can operate your TV using the buttons on the front panel or the Remote Control.
The back panel provides all the terminal connections you will need to connect other equipment to your TV. Model CE27T11 is not equipped with an S-VIDEO IN jack.
|
|
|
CE36T11 |
|
|
|
|
|
|
CE32T11 |
|
|
|
|
|
POWER |
|
CE27T11 |
|
|
|
|
MTS |
|
|
|
|
|
|
|
|
|
|
TIMER |
|
|
|
|
|
|
TV |
CABLE |
VCR |
|
|
|
|
|
|
1 |
2 |
3 |
|
|
|
|
|
|
|
|
|
CH |
|
|
|
|
|
4 |
5 |
6 |
|
|
|
|
|
|
7 |
8 |
9 |
|
|
|
|
|
|
|
|
CH RTN |
VOL |
|
|
|
|
|
100 |
0 |
ENT |
|
|
|
|
|
|
|
APT |
RE |
|
|
|
|
|
|
|
C.C |
SET |
|
|
|
|
|
|
|
|
|
E |
|
|
|
|
|
S |
|
|
XI |
|
|
|
|
|
D |
|
|
T |
|
|
|
|
|
X |
ADV |
SUR |
|
|
|
|
|
|
|
|||
|
|
|
|
|
FAV |
MENU |
FAV |
|
|
|
|
|
|
- |
|
|
+ |
|
Back panel |
|
|
|
ADV |
|
||
|
|
|
MUTE RECALL TV/VIDEO SURROUND |
|||||
CE27T11 |
CE32T11/CE36T11 |
STOP SOURCE |
PLAY PIP |
|||||
|
|
|
|
|||||
|
|
IN |
|
OUT |
REC TV/VCR REW |
FF |
||
VIDEO1 |
VIDEO2 |
|
|
ANT |
|
|
|
|
|
|
VIDEO |
VIDEO |
VIDEO (75Ω) |
|
STILL LOCATE SWAP |
||
VIDEO |
VIDEO |
L/ |
L/ |
L/ |
|
|
|
|
|
|
|
|
|
|
|||
L/ |
ANT |
MONO |
MONO |
MONO |
|
|
|
|
(75Ω) |
|
|
|
|
|
|
|
|
MONO |
S-VIDEO |
|
|
|
|
|
|
|
L/MONO |
|
|
|
|
|
|
||
AUDIO |
AUDIO |
AUDIO |
AUDIO |
AUDIO |
|
|
|
|
|
|
|
|
|
|
|
|
|
R |
R |
R |
R |
R |
|
|
|
|
|
|
|
|
|
||||
|
|
|
|
|
|
|||
IN |
OUT |
VIDEO1 |
VIDEO2 |
|
|
|
|
|
|
|
|
|
|
|
|
||
Selecting a location for the TV
●Place the TV on the floor or on a sturdy platform in a location where light does not directly hit the screen.
●Place the TV far enough from the walls to allow proper ventilation. Inadequate ventilation may cause overheating, which may damage the TV.
WARNING
To avoid personal injury:
●Do not stand or climb on the TV.
●Do not put a VCR or any heavy object on top of the TV.
Caution :
The plug has one prong wider than the other and will fit only one way into a standard electrical outlet (120 volt AC, 60 Hz). If the plug does not fit into the outlet, try turning it around. If the plug still does not fit, the outlet is probably non-standard and must be replaced by a qualified electrician. Do not tamper with the plug or try to force it into a non-standard outlet.
Wide prong
4

Connecting Your TV
If you haven’t connected electronic equipment before, or you have been frustrated in the past, you may wish to read this
section. (Cables are not supplied.)
●A coaxial cable is the standard cable that comes in from your antenna or cable converter box. Coaxial cables use “F” connectors.
●Audio and video cables are usually color coded according to use: yellow for video and red and white for audio. The red audio cable is for the stereo right channel, and the white audio cable is for the stereo (or mono) left channel. If you look at the rear panel of the TV, you will see that the terminals are color coded in the same manner as the cables.
●S-video cables provide better picture performance. S-video cables can only be used with S-video compatible components.
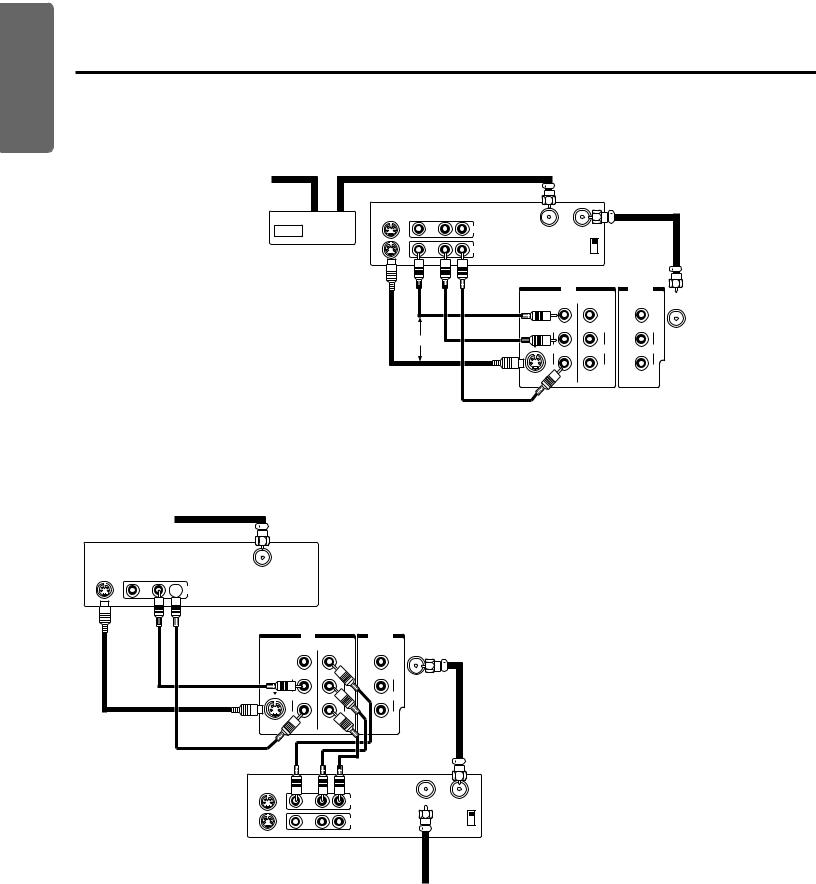
Connecting a VCR
This connection allows you to watch local channels and video programs, play or record on the VCR while watching TV, and to record from one channel while watching another channel.
Antenna Coaxial Cable
AUDIO/VIDEO Cables
S-Video Cable
Caution:
Do not plug the TV in until you have finished connecting all of your equipment.
Cable lead-in or antenna
Stereo VCR
S-VIDEO |
VIDEO |
L OUT R |
IN |
IN from ANT OUT to TV |
|
CH3 |
|
|
|
OUT |
CH4 |
|
|
|
|
TV |
|
OUT |
|
|
IN |
|
ANT |
|
|
|
|
|
|
|
VIDEO |
VIDEO |
VIDEO |
(75Ω) |
|
|
L/ |
L/ |
|
|
MONO |
MONO |
MONO |
|
OR |
|
|
|
|
|
AUDIO |
AUDIO |
AUDIO |
|
|
|
R |
R |
|
|
|
VIDEO2 |
|
|
Caution:
If using a mono VCR, connect L/Mono to VCR Audio OUT using only one audio cable.
If you have a S-VHS VCR, use the S-video connections and remove the video cable. Do not connect the video cable and the S- video cable to VIDEO 1 simultaneously.
Note:
The VIDEO 2 jacks can also be used for connecting a second piece of video equipments, such as a DVD, laser disc player and camcorder etc. with audio/video outputs. See page 7 for one example.
Connecting a cable converter box
This connection allows you to watch cable and premium channels. Tune the TV to channel 3 or 4 (whichever channel is vacant in your area), then use the converter box to change channels.
From cable
|
|
TV |
|
OUT |
IN |
OUT |
IN |
|
|
|
|
ANT |
||
|
|
VIDEO |
VIDEO |
VIDEO (75Ω) |
|
|
L/ |
L/ |
L/ |
Cable converter |
MONO |
MONO |
MONO |
|
S-VIDEO |
|
|
||
box |
|
|
|
|
|
AUDIO |
AUDIO |
AUDIO |
|
|
|
R |
R |
R |
|
|
VIDEO1 |
VIDEO2 |
|
Note:
When you use a converter box with your TV, there may be features that you cannnot program using the Remote Control, such as block channel, and programming your favorite channels.
Set up
Preparation
Reference Section Advanced Operation Basic Operation
5
Set up
Preparation
Reference Section Advanced Operation Basic Operation
Connecting Your TV (continued)
Connecting a cable converter box and a VCR
This connection allows you to watch and record basic and premium cable channels, as well as watch video tapes. Tune the TV and VCR channels to 3 or 4 (whichever channel is vacant in your area), then use the converter box to change channels.
From Cable |
|
|
|
|
|
|
|
|
|
Stereo VCR |
|
|
|
|
|
|
|
IN |
S-VIDEO |
VIDEO |
AUDIO |
|
|
|
|
|
OUT |
|
L |
R |
|
|
|
|
|
|
|
|
|
IN |
IN from ANT OUT to TV |
|
|
|
|
|
|
|
|
|
CH3 |
|
|
Cable converter box |
|
|
OUT |
|
CH4 |
|
|
|
|
|
|
|
|
|
|
||
Caution: |
|
|
|
|
TV |
|
|
|
● If you have a mono VCR, connect L/Mono to VCR Audio |
|
|
|
|
OUT |
|
||
|
|
|
IN |
|
ANT |
|||
OUT using only one audio cable. |
|
|
|
|
|
|
|
|
|
|
|
|
VIDEO |
VIDEO |
VIDEO |
(75Ω) |
|
If you have a S-VHS VCR, use the S-video connections and |
|
|
|
|
L/ |
L/ |
|
|
remove the video cable. Do not connect the video cable and |
|
|
|
MONO |
MONO |
MONO |
|
|
OR |
|
|
|
|
|
|
||
the S-video cable to VIDEO 1 simultaneously. |
|
|
|
|
|
|
|
|
|
|
|
|
AUDIO |
AUDIO |
AUDIO |
|
|
● When you use a converter box with your TV, there may be |
|
|
|
|
R |
R |
|
|
features that you cannot program using the remote control, |
|
|
|
|
|
|||
|
|
|
VIDEO1 |
VIDEO2 |
|
|
||
such as block channel, and programming your favorite |
|
|
|
|
|
|
|
|
channels. |
|
|
|
|
|
|
|
|
Connecting a satellite receiver and a VCR
This connection allows you to watch satellite, video and TV programs. You can record one TV channel while watching another channel.
From satellite dish
Satellite Receiver
S-VIDEO VIDEO |
AUDIO |
Satellite IN |
|
OUT |
L |
R |
|
 OUT
OUT
TV
IN |
|
OUT |
|
|
ANT |
VIDEO |
VIDEO |
VIDEO (75Ω) |
L/ |
|
L/ |
MONO |
|
MONO |
S |
|
|
AUDIO |
|
AUDIO |
|
|
R |
Stereo VCR
S-VIDEO |
AUDIO |
|
|
OUT |
IN from ANT OUT to TV |
|
|
CH3 |
|
IN |
CH4 |
Caution:
●You can use a video cable instead of the S-video cable, but the picture quality will decrease.
Do not connect the video cable and the S-video cable to VIDEO 1 simultaneously.
Notes:
●To watch from the Satellite Receiver, the TV must select VIDEO 1.
●To watch from the VCR, the TV must select VIDEO 2.
From antenna
6

Connecting a DVD (or laserdisc player) and VCR
This connection allows you to watch DVD (or laserdisc player), video or TV programs and to record TV programs.
From Antenna
Stereo VCR
S-VIDEO |
VIDEO |
AUDIO |
|
|
|
|
|
|
|
|
|
|
|
L |
R |
|
|
|
|
|
|
|
|
|
|
|
IN |
IN from ANT OUT to TV |
|
|
|
|
|||
|
|
|
|
|
|
CH3 |
|
|
|
|
|
|
|
|
OUT |
|
|
CH4 |
|
|
|
|
|
|
|
|
|
TV |
IN |
|
|
OUT |
|
|
|
|
|
|
|
|
|
|
ANT |
|
|
||
|
|
|
|
|
|
|
|
|
|
|
|
|
|
|
|
|
VIDEO |
|
VIDEO |
VIDEO |
(75Ω) |
|
|
|
|
|
|
|
|
|
|
L/ |
|
|
|
|
|
|
|
|
MONO |
|
|
MONO |
|
|
|
|
OR |
|
|
|
|
|
|
|
|
|
|
|
|
|
|
|
AUDIO |
|
|
AUDIO |
|
|
|
|
|
|
|
|
|
|
|
R |
|
|
|
|
|
|
|
DVD |
|
|
|
|
|
|
|
|
|
|
|
1 |
L |
R |
|
|
Y |
Cr |
Cb |
|
|
|
|
|
|
|
|
|
|||
|
|
|
|
2 |
L |
R |
VIDEO |
S |
|
|
|
|
|
|
|
VIDEO OUT |
COMPONENT VIDEO OUT |
||||||
|
|
|
|
|
|
||||||
AUTO OUT
Notes:
●To watch from the VCR, the TV must select VIDEO 1.
●To watch from DVD, the TV must select VIDEO 2.
Connecting two VCRs
This connection allows you to record (dub/edit) from one VCR to another VCR while watching a video program. You will also be able to record from one TV channel while watching another channel.
From Antenna
VCR 1
S-VIDEO VIDEO |
AUDIO |
|
|
L |
R |
IN |
IN from ANT OUT to TV |
|
CH3 |
OUT |
CH4 |
TV |
|
OUT |
|
IN |
|
ANT |
|
|
|
|
|
VIDEO |
VIDEO |
VIDEO |
(75Ω) |
|
L/ |
L/ |
|
MONO |
MONO |
MONO |
|
OR |
|
|
|
AUDIO |
AUDIO |
AUDIO |
|
|
R |
R |
|
|
VIDEO2 |
|
|
Caution:
The unauthorized recording of television programs, video tapes and other materials may infringe upon the provisions of copyright laws.
Note:
To monitor dubbing/editing, the VCR 2 for recording must select LINE IN, and the TV must select VIDEO 1.
VCR 2
AUDIO |
|
IN |
IN from ANT OUT to TV |
|
CH3 |
OUT |
CH4 |
Set up
Preparation
Reference Section Advanced Operation Basic Operation
7

Set up
Preparing the Remote Control for Use
With the Remote Control, you can operate your TV, most VCR models, and cable TV converters together, even if they are different brands. If you will be using your TV with a Toshiba VCR, your Remote Control is already programmed and ready to use. If you own different brands of VCRs and/or converters, you first have to program your Remote Control.
(See “Programming the Remote Control” on page 11.)
Preparation
Reference Section Advanced Operation Basic Operation
Installing the Remote Control batteries
1 Slide the battery cover off of the back of the Remote Control.
Press and slide to remove.
2 Install two “AA” size batteries. Match the + and – signs on the batteries to the signs on the battery compartment.
3 Slide the battery cover back on to the Remote Control until the lock snaps.
Caution:
●Dispose of your batteries in a designated disposal area. Do not throw your batteries into a fire.
●Do not mix battery types or combine used batteries with new ones.
●Remove dead batteries immediately to prevent battery acid from leaking into the battery compartment.
●If you do not intend to use the remote control for a long time, remove the batteries.
Note:
This Remote Control’s functions may or may not operate your VCR or cable TV converter.
Refer to the owner’s manuals supplied with the equipment to see which features are available. In addition, the original controllers may have features not available on this Remote Control. If you would like to continue to use these features, you may want to use the original remote control.
8
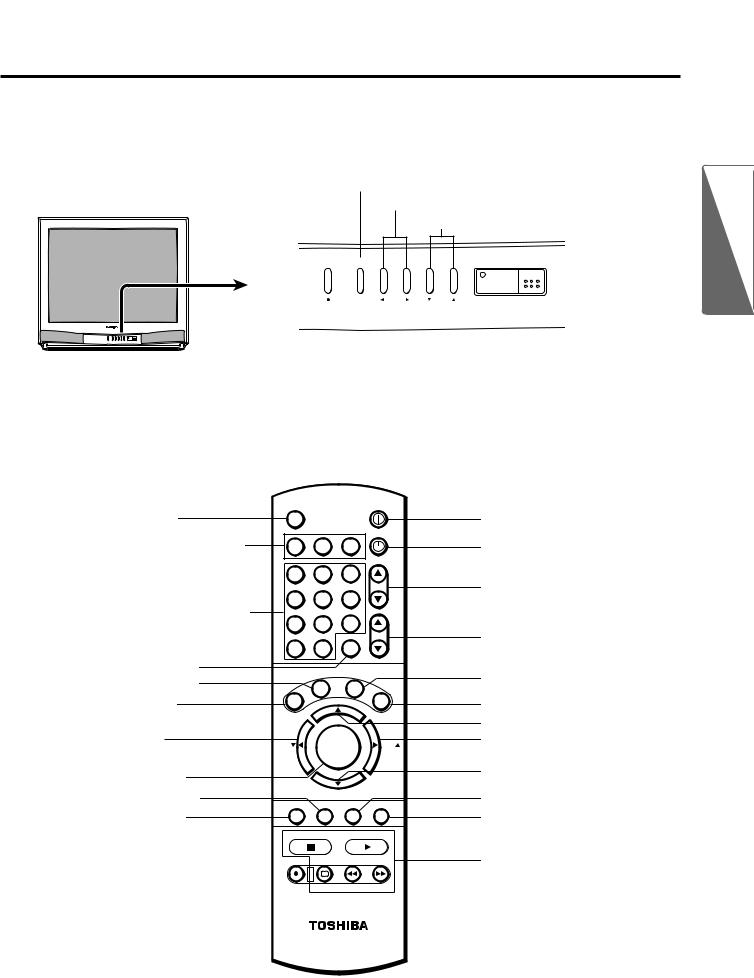
Location of Controls
Only the buttons that are used to operate the TV set are described here.
For details on the use of each control, refer to pages in brackets.
TV front
TV/VIDEO [18]
VOLUME T/S [15]
CHANNEL t/s [18]
MENU |
TV/VIDEO |
VOLUME |
CHANNEL |
POWER
|
|
|
|
|
|
|
|
|
|
|
|
|
|
|
|
|
|
|
|
|
|
|
|
|
|
|
|
|
|
|
|
|
|
|
|
|
|
|
|
|
|
|
|
|
|
|
|
|
|
|
|
|
|
|
|
|
|
|
|
|
|
|
|
|
|
|
|
|
|
|
|
|
|
|
|
|
|
|
|
|
|
|
|
|
|
|
|
|
|
|
|
|
|
|
|
|
|
|
|
|
|
|
POWER [15] |
|
|
|
|
T/S/t/s [14] |
|||||||||||
|
|
|
|
Remote sensor |
||||||||||
|
|
|
|
|
|
|
|
|
|
|
|
|
||
MENU [14] |
POWER indicator |
|||||||||||||
Remote Control
MTS [21]
Device buttons* [11]
Press “TV” until it blinks to control the TV.
Channel Number [18]
CH RTN [19]
C. CAPT [27]
XDS [20]
T [14]
FAV t[26]
MENU [14]
RECALL [19]
MUTE [19]
POWER
MTS
TIMER
TV CABLE VCR
1 |
|
|
2 |
3 |
|
|
|
|
|
|
CH |
4 |
|
|
5 |
6 |
|
7 |
|
|
8 |
9 |
|
|
|
|
|
RTN |
VOL |
100 |
|
|
0 |
ENT |
|
|
|
AP |
RE |
|
|
|
.C |
T |
SE |
T |
|
C |
|
|
|
||
S |
|
|
|
|
E |
|
|
|
|
I |
|
|
|
|
|
|
|
X |
|
|
ADV |
T |
|
|
|
|
|||
|
|
|
|
||
FAV |
|
|
MENU |
FAV |
|
- |
|
|
|
|
+ |
|
|
|
ADV |
|
|
MUTE |
|
RECALL |
TV/VIDEO SURROUND |
||
STOP SOURCE |
PLAY PIP |
||||
REC |
|
TV/VCR |
REW |
FF |
|
POWER [15]
TIMER [20]
CHANNEL s/ t [18]
VOLUME s/ t [15]
RESET [22]
EXIT [14]
s [14] S [14]
FAV s [26]
t [14]
TV/VIDEO [18]
SURROUND [21]
PIP functions [24]
STILL LOCATE SWAP
Set up
Preparation
Reference Section Advanced Operation Basic Operation
9

Set up
Preparation
Using the Remote with VCR or Cable TV Converter
●To control a TOSHIBA VCR, first press the VCR button. The buttons shown below will then control the VCR. The rest of the buttons operate the TV as usual.
If you have another brand of VCR, you can probably program your Remote to control it. Details are on page 11.
●To control a cable TV converter, this Remote Control must be programmed to recognize the brand of your converter. See page 11.
The shaded buttons can be used to control the cable TV converter. Press the CABLE button whenever you control the cable TV converter.
Aim at the VCR or cable TV converter
Reference Section Advanced Operation Basic Operation
VCR |
|
|
|
|
|
|
POWER |
Press to control VCR. |
MTS |
|
|
|
|
|
|
|
|
|
|
|
|
|
TIMER |
CABLE |
TV |
|
CABLE |
VCR |
|
||
|
|
|
|
|
|
|
|
Press to control cable |
1 |
|
|
2 |
3 |
|
|
TV converter. |
4 |
|
|
5 |
6 |
CH |
|
Channel Number |
|
|
|
||||
|
|
|
|
|
|
|
|
Press the numbers |
7 |
|
|
8 |
9 |
|
|
desired for direct |
|
|
|
|
CH RTN VOL |
||
100 |
|
|
0 |
ENT |
|
||
access. |
|
|
|
||||
|
|
|
|
|
|
|
|
|
|
|
|
T |
R |
E |
|
|
|
|
AP |
|
SE |
||
|
|
.C |
|
|
|
||
|
|
C |
|
|
|
|
T |
|
S |
|
|
|
|
|
E |
|
|
|
|
|
|
X |
|
|
|
|
|
|
|
|
I |
|
X |
|
|
|
ADV |
|
T |
|
|
|
|
|
|
|
|
STOP
Press to stop the tape.
REC
Press to start recording.
TV/VCR
Press to the TV mode to view one program while recording another program.
FAV |
MENU |
FAV |
|
- |
|
|
+ |
|
ADV |
|
|
MUTE |
RECALL |
TV/VIDEO SURROUND |
|
STOP SOURCE |
PLAY PIP |
||
REC |
TV/VCR |
REW |
FF |
|
STILL LOCATE SWAP |
||
POWER
Press the button to turn the VCR (or converter) on.
Press again to turn off.
CHANNEL s / t
Press s button to select next higher channel.
Press t button to select next lower channel.
ENTER
Some VCR's and Cable TV converters requires ENT to change channel number.
This button does not function until you program the Remote Control to enter the VCR (or CABLE) code.
PLAY
Press to begin tape playback.
FF
Press to rapidly advance the tape.
In playback mode, press to view the picture moving rapidly in forward direction.
REW
Press to rewind the tape.
In playback mode, press to view picture moving rapidly in reverse.
10
Programming the Remote Control
●This Remote Control is preprogrammed to operate TOSHIBA VCR’s.
●To use VCR’s other than TOSHIBA models (or cable converter), perform the following procedures before operating.
Device |
Controlling other brands of VCR’s and cable TV converters |
|
buttons |
1 Refer to the “VCR code table” (or “Cable TV converter code |
|
POWER |
||
table”) on pages 12 and 13 to find the code number that corresponds to |
||
MTS |
||
TIMER |
the brand name of your VCR (or converter). |
|
TV CABLE VCR |
|
1 |
|
|
2 |
3 |
|
|
|
|
|
|
|
|
|
|
|
|
CH |
4 |
|
|
5 |
6 |
|
|
|
|
7 |
|
|
8 |
9 |
|
|
|
|
|
|
|
|
CH RTN |
VOL |
|||
100 |
|
|
0 |
ENT |
|
|
||
|
|
|
T |
R |
E |
|
|
|
|
|
AP |
|
|
|
|||
|
.C |
|
|
|
S |
|
||
C |
|
|
|
|
|
ET |
|
|
S |
|
|
|
|
|
|
|
E |
|
|
|
|
|
|
|
X |
|
D |
|
|
|
|
|
|
|
T |
X |
|
|
|
|
|
|
|
I |
|
|
ADV |
|
|
|
|
||
|
|
|
|
|
|
|
||
FAV |
|
|
MENU |
|
|
|
FAV |
|
- |
|
|
|
|
|
|
|
+ |
|
|
|
ADV |
|
|
|
|
|
MUTE |
|
RECALL |
TV/VIDEO SURROUND |
|||||
STOP SOURCE |
PLAY PIP |
|||||||
REC |
|
TV/VCR |
REW |
|
FF |
|||
|
|
STILL LOCATE SWAP |
||||||
Number buttons
ENT
If more than one number is listed, try each one separately until you find the one that works.
2 Turn on the device (VCR or converter) you wish to operate with this remote.
3 Press the matching Device button “VCR” (or “CABLE”) and ENT at the same time until the Device button lights up. It indicates that the Remote
Control is in the program mode. Perform the following steps while the back-light is on (about 20 seconds).
4 Point the Remote Control toward the VCR (or converter) and press the Number buttons to enter the three digit code number for your brand of VCR (or converter).
–If the right number was entered, the VCR (or the converter) should turn off.
–If the VCR (or the converter) does not respond to the Remote Control, repeat steps 1 to 4 with another code number until the device turns off.
The back-light will blink to confirm the storage.
5 Press the Device button again to release the program mode.
VCR CODE
CABLE CODE
Notes:
●You have to reprogram the Remote Control when you change its batteries.
●Some newer VCR’s are capable of working on either of two remote codes. These VCR’s have a switch labeled “VCR1/VCR2”.
If your VCR has this kind of switch, and does not respond to all the code numbers for your VCR brand name, set the switch to another position (“VCR1” or “VCR2”) and reprogram the Remote Control.
Set up
Preparation
Reference Section Advanced Operation Basic Operation
11
Loading...