


 Loading...
CAMILEO® BW20
Quick Start Guide
English/Español

2 Introduction
Introduction
For more detailed information please refer to the User's Guide on the included CD.
Contact
Address: |
TOSHIBA America Information Systems, Inc. |
|
9740 Irvine Boulevard |
|
Irvine, California 92618-1697 |
Telephone: |
(949) 583-3305 |
Additional Information
© Copyright 2012 TOSHIBA CORPORATION. All rights reserved. TOSHIBA reserves the right to make technical changes. TOSHIBA assumes no liability for damages incurred directly or indirectly from errors, omissions or discrepancies between this product and the documentation.
Trademarks
CAMILEO is a registered trademark of Toshiba America Information Systems, Inc. and/or Toshiba Corporation.
ArcSoft and MediaImpression are registered trademarks of ArcSoft, Inc.
HDMI, the HDMI Logo and High-Definition Multimedia Interface are trademarks or registered trademarks of HDMI Licensing, LLC.
Secure Digital and SD are trademarks of SD Card Association.
Windows is a registered trademark of Microsoft Corporation in the United States and/or other countries.
All other brand and product names are trademarks or registered trademarks of their respective companies.

Waterproof design 16’ (5 meters) |
3 |
Waterproof design 16’ (5 meters)
The camcorder can record videos or photos under water, at a depth of up to 16’ (5 meters), for a period of up to 30 minutes.
The cover for the ports must be firmly closed and clean when used under water.
The camcorder is not guaranteed to be waterproof in all environments or conditions.
Keep the lens clean, and wipe any water off the camcorder, after underwater use, with a soft and dry cloth.

4 |
Getting Started |
Getting Started
Charge the built-in battery
You must use the AC adaptor (sold separately) or the USB cable to charge your camcorder before use.
To charge your camcorder through the AC adaptor (rated at 5 volts, 2 amps), follow these steps:
1Plug the AC adaptor into an AC wall socket, and connect its mini USB plug into the mini USB port on the underside of the camcorder.
The blinking light indicates that the battery is currently charging; the light glows continuously once charging is completed.
The full charge time from the AC adaptor is approximately 4 hours. (Actual charging time will vary, depending on battery condition and charging conditions.)
To charge your camcorder through the supplied USB cable, follow these steps:
1Connect your camcorder’s mini USB port to a USB port on your computer, with the supplied USB cable.
The blinking light indicates that the camcorder is currently charging, and the light remains on after the charging is completed.
Charging the battery through the USB cable takes approximately 5 hours. (Actual charging time will vary, depending on battery condition and charging conditions, including power availability from the computer’s USB port.)
Never charge the battery by a method other than as instructed. Doing so may cause a fire or explosion possibly resulting in serious injury.

Getting Started |
5 |
Inserting and removing a Micro SD™ Card:
Your camcorder comes with a Micro SD™ Card slot that allows you to expand the camcorder’s memory capacity with an optional Micro SD™, Micro SDHC™, or Micro SDXC™ memory card.
1Open the ports cover.
2Insert the Micro SD™ card (optional) into the slot until it locks properly.
3To remove the Micro SD™ card, press inward to release it and gently pull it out.
4Close the ports cover.
To remove the Micro SD™ Card, press inward to release it. When the card pops out, grasp it and pull it straight out.
To prevent data corruption, format the Micro SD™ card in the camcorder before using.
All data will be erased when the Micro SD™ Card is formatted. Make sure that all data is copied to your computer or other media before formatting the Micro SD™ Card.
For more information on formatting the Micro SD™ Card within the camcorder, please see the User's Guide.
6 |
Getting Started |
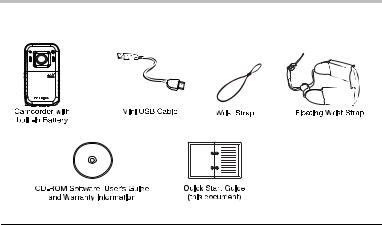
Box contents
The following items are included with your CAMILEO® BW20:
USB cable |
Connects the CAMILEO® BW20 to your computer |
|
for file transfer and charging. |
||
|
||
|
|
|
Quick Start Guide |
This document. |
|
|
|
|
Software |
Organizes, edits, presents, and shares your video files. |
|
|
|
|
Wrist Strap |
Adds security to your camcorder. |
|
|
|
|
Floating Strap |
Keeps the waterproof camcorder afloat. |
|
|
|

Getting Started |
7 |
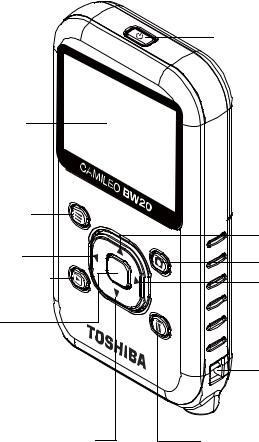
CAMILEO® BW20 Snapshot
Power button
LED indicator

Speaker |
|
Lens |
Light |
|
Microphone |
Mini USB 2.0 port |
Mini HDMI® port |
Tripod socket |
|
Reset button |
Micro SD™ Card slot |
8 |
Getting Started |
|
|
Power button
LCD screen
Menu button |
|
|
Left button |
Up button |
|
Mode button |
||
Playback button |
||
Right button |
||
Record / OK |
|
|
button |
|
|
Strap hook |
Down button |
Delete button |

|
|
|
|
|
|
|
|
|
Getting Started |
9 |
|
|
|
|
|
|
|
|
|
|
|
|
|
|
|
|
|
|
|
|
|
|
|
Buttons |
Description |
|
|
||||||
|
|
|
|
|
|
|
|
|
|
|
|
|
|
|
|
|
|
|
Power |
Press for one second to turn |
|
|
|
|
|
|
|
|
|
|
||
|
|
|
|
|
|
|
|
the camcorder on or off. |
|
|
|
|
|
|
|
|
|
|
|
|
|
|
|
|
|
|
|
|
|
|
|
|
|
|
|
|
|
|
|
|
Mode |
Switch between Video mode and Photo mode. |
|
|
|
|
|
|
|
|
|
|
||
|
|
|
|
|
|
|
|
|
||
|
|
|
|
|
|
|
|
|
||
|
|
|
|
|
|
|
|
|
|
|
|
|
|
|
|
|
|
|
|
|
|
|
|
|
|
|
|
|
|
Menu |
• Menu ON. |
|
|
|
|
|
|
|
|
|
|
||
|
|
|
|
|
|
|
|
• Return to Preview mode. |
|
|
|
|
|
|
|
|
|
|
|
|
|
|
|
|
|
|
|
|
|
|
|
|
|
|
|
|
|
|
|
|
|
|
|
|
• View recorded videos / photos. |
|
|
|
|
|
|
|
|
|
|
|
Playback |
• Switch between Record and Playback modes. |
|
|
|
|
|
|
|
|
|
|
|
• In Menu mode, return to the previous menu level. |
|
|
|
|
|
|
|
|
|
|
|
|
||
|
|
|
|
|
|
|
|
|
|
|
|
• In Playback mode, view your videos / photos in |
|
|
|
|
|
|
|
|
|
|
|
|
|
|
|
|
|
|
|
|
|
|
|
|
|
continuous / slideshow mode. |
|
|
|
|
|
|
|
|
|
|
|
|
|
|
|
|
|
|
|
|
|
|
|
|
|
• In Video mode, press the Playback button to |
|
|
|
|
|
|
|
|
|
|
|
|
review recorded videos. Press the Delete button to |
|
|
|
|
|
|
|
|
|
|
|
Delete |
delete videos. |
|
|
|
|
|
|
|
|
|
|
|
||
|
|
|
|
|
|
|
|
|
|
|
• In Photo Mode, press the Playback button to |
|
|
|
|
|
|
|
|
|
|
|
|
||
|
|
|
|
|
|
|
|
|
|
|
|
|
|
|
|
|
|
|
|
|
|
|
|
|
review recorded photos. Press the Delete button to |
|
|
|
|
|
|
|
|
|
|
|
|
|
|
|
|
|
|
|
|
|
|
|
|
|
delete photos. |
|
|
|
|
|
|
|
|
|
|
|
|
|
|
|
|
|
|
|
|
|
|
|
|
Up |
Zoom in. |
|
|
|
|
|
|
|
|
|
|
|
|
|
|
|
|
|
|
|
|
|
|
|
|
Down |
Zoom out. |
|
|
|
|
|
|
|
|
|
|
|
|
|
|
|
|
|
|
|
|
|
|
|
|
Left |
• In preview mode, press to activate underwater |
|
|
|
|
|
|
|
|
|
|
|
scene. |
|
|
|
|
|
|
|
|
|
|
|
|
|
• Move between menu option items. |
|
|
|
|
|
|
|
|
|
|
|
|
|
|
|
|
|
|
|
|
|
|
|
|
|
|
|
|
|
|
|
|
|
|
|
|
|
|
|
|
|
|
|
|
|
|
|
|
|
|
|
|
|
|
|
|
|
|
|
|
|
|
|
|
|
|
|
|
|
|
|
|
|
|
|
|
|
• In preview mode, press to toggle between Anti- |
|
|
|
|
|
|
|
|
|
|
|
|
|
|
|
|
|
|
|
|
|
|
|
|
Right |
glare On and Anti-glare Off. |
|
|
|
|
|
|
|
|
|
|
|
• While recording video, press to pause the |
|
|
|
|
|
|
|
|
|
|
|
|
||
|
|
|
|
|
|
|
|
|
|
|
|
recording. Press again to resume recording. |
|
|
|
|
|
|
|
|
|
|
|
|
|
|
|
|
|
|
|
|
|
|
|
|
|
|
|
|
|
|
|
|
|
|
|
|
|
|
|
|
|
|
|
|
|
|
|
|
|
|
|
• Move between menu option items. |
|
|
|
|
|
|
|
|
|
|
|
|
|
|
|
|
|
|
|
|
|
|
|
|
|
• In Video mode, press to take video. |
|
|
|
|
|
|
|
|
|
|
|
Record / |
Press again to stop recording. |
|
|
|
|
|
|
|
|
|
|
|
• In Photo mode, press to take a photo. |
|
|
|
|
|
|
|
|
|
|
|
|
OK |
|
|
|
|
|
|
|
|
|
|
|
|
• In Playback mode, press to view selected videos. |
|
|
|
|
|
|
|
|
|
|
|
|
|
|
|
|
|
|
|
|
|
|
|
|
|
|
• Confirm the menu selection. |
|
|
|
|
|
|
|
|
|
|
|
|
|

10 |
Getting Started |
Turning the camcorder on and off
To turn the camcorder on, press the Power ( ) button for approximately one second. To turn the camcorder off, press it again for approximately one second.
Video mode menu
In Video Mode, press the Menu (
 ) button to go to the Video Mode menu.
CHECK RECORDED VIDEOS
In Video Mode, press the Playback (
 ) button to go to the recorded video files carousel. The information screen will display for approximately 3 seconds, then disappear. You can check or delete the recorded video files.
VIDEO SETTINGS
|
FULL HD |
1920 x 1080 (30fps) |
|
|
1080 / 30 |
||
|
|
||
|
|
|
|
RESOLUTION |
HD 720 / 60 |
1280 x 720 (60fps) |
|
|
|
||
|
|
|
|
|
HD 720 / 30 |
1280 x 720 (30fps) |
|
|
|
|
|
|
VGA 480 / 30 |
640 x 480 (30fps) |
|
|
|
|
|
|
ON |
Turns the light ON. |
|
|
|
|
|
LIGHT |
OFF |
Turns the light OFF. |
|
|
|
||
|
Digital Light |
Extends the dynamic range for backlight so that the |
|
|
foreground objects in the videos will be brighter. |
||
|
|
||
|
|
|
|
|
ON |
Enables motion stabilization, which reduces the |
|
STABILIZATION |
effect of camcorder shaking, for less blurry video. |
||
|
|||
|
|
||
|
|
|
|
|
OFF |
Disables motion stabilization. |
|
|
|
|
Loading...