


VCR
ENGLISH . . . . . . . . . . . . . . |
GB |
1
2
3
|
I |
mpor |
|
|
|
|
|
|
|
|
|
|
|
|
|
|
|
|
|
|
|
|
|
|
|
|
|
|
|
|
|
|
|
||||||
PrécautionsI |
|
|
tante |
|
|
|
|
|
|
|
|
|
|
|
|
|
|
|
|
|
|
|
|
|
|
|
|
|
|
||||||||||
conforme |
à |
|
- |
Assurez- |
|
que |
|
|
|
|
|
|
|
|
|
|
|
|
|
|
|
|
|
|
|
|
|
|
|
|
|
|
|
|
|
|
|||
appareil. |
|
celle indiquée |
vous |
la |
tension-secteur |
|
|
|
|
|
|
|
|
|
|
|
|
|
|
|
|
|
|
|
|
|
|
|
|
||||||||||
chaleur |
Installez |
le |
|
sur l'étiquette |
de votre |
|
|
|
|
|
|
|
|
|
|
|
|
|
|
|
|
|
|
|
|
F |
|||||||||||||
magnétiquesimportante |
magnétoscope |
|
d'identification, |
|
|
|
|
votre |
|
Sommaire |
|
|
|
|
|
|
|
||||||||||||||||||||||
Celsiuschaleur.. |
Laélectriques |
élevés. |
Les |
d'appareils |
|
loin |
de l'arrière de |
|
|
|
|
|
|
|
|
|
|||||||||||||||||||||||
à |
la |
|
ou |
|
(cheminée... |
ouhorizontalement, |
située |
à |
|
habitation |
|
est |
|
|
|
|
|
|
|
|
|
|
|
|
|
|
|
||||||||||||
correcte. |
Laissez |
températur |
|
|
composants |
|
|
produisanttoute |
|
source |
de |
|
|
|
|
|
|
|
|
|
|
|
|
|
|
|
|||||||||||||
et 7 |
Laissez |
suffisamment |
maximale |
|
|
|
de cet |
|
|
|
|
des |
|
|
|
|
|
|
|
|
|
|
|
|
|
|
|
|
|
||||||||||
pas cm minimum10 cm minimumd’espace |
ambiante |
|
|
appareil sont |
champs |
|
|
|
|
|
|
|
|
|
|
|
|
|
|
|
|||||||||||||||||||
à |
dépasser un |
au dessus. |
|
|
de chaqueautour |
pour |
|
doit |
pas |
|
|
sensibles |
|
|
|
|
|
|
|
|
|
|
|
|
|
|
|
||||||||||||
|
l’extérieur, |
|
|
taux |
|
|
L’humidité |
|
côté |
ainsi |
assurer |
unedépasser |
|
35° |
|
|
|
|
|
|
Installation |
|
|
||||||||||||||||
passage |
|
évitez hygrométriquede |
de |
des locaux |
|
qu’à l’arrière |
|
ventilation |
|
|
Avant de |
|
|
|
|
|
|||||||||||||||||||||||
|
|
d’une |
|
atmosphèrel’exposer |
à |
85 %. Si vousoù |
est placé |
|
|
de l’appareil |
|
|
|
|
|
|
|||||||||||||||||||||||
condensation sur |
|
|
|
froide |
|
l’eau |
de |
|
pluie |
devez |
|
|
l’appareil |
ne doit |
|
Branchercommencer |
|
|
|
|
|
|
|
||||||||||||||||
Laissez-la |
|
|
l’écran (et sur |
une |
|
|
|
|
ou |
utiliser votre |
|
|
Prépar |
. |
. |
. . . |
. . . |
. |
. . . |
. |
. . . . |
. . |
23 |
|
|
||||||||||||||
|
|
|
disparaître d’elle-mêmecertainsambiance |
|
chaudeauxpeutéclaboussuresappareil. |
|
Préparerer lele magnétoscope. . . . |
. |
. . . . |
. . .. |
|
|
|||||||||||||||||||||||||||
|
|
|
|
|
|
|
|
|
|
avant decomposants |
l’intérieurprovoquer |
deLe |
|
Installer lestéléviseur |
. . . |
. |
. . . |
. . . . |
4 |
|
|
||||||||||||||||||
|
10cm |
|
|
|
|
7 cm |
|
|
|
|
|
remettre l’appareil en |
|
|
|
l’appareil)la |
|
Installation chaînes |
. |
. . . . |
. |
. . . |
. . . . |
4 |
|
|
|||||||||||||
|
|
|
|
|
|
|
|
|
|
|
|
|
|
|
|
|
|
|
marche. |
|
|
. |
|
Classer les |
|
automatique |
|
. . . |
. . . . |
5 |
|
|
|||||||
|
|
|
|
|
|
|
|
|
|
|
|
|
|
|
|
|
|
|
|
|
|
|
|
|
|
|
Compléter chaînes |
. |
. . |
. . |
. . . |
. . . . |
5 |
|
|
||||
|
U |
|
|
|
|
|
|
|
|
10cm |
|
|
|
|
|
|
|
|
7 |
cm |
|
|
|
|
|
Régler |
|
l'installation. |
. . |
. . . |
. . . |
|
|
||||||
|
|
|
|
|
|
|
|
|
|
|
|
|
|
|
|
|
|
|
|
|
|
|
|
l'horloge |
|
|
. . |
. |
|
5 |
|
|
|||||||
|
froide |
|
- |
Si |
votre appareil, ou |
|
|
|
|
10cm |
|
|
|
|
|
|
|
|
|
|
|
Nouvelle chaîne .. . . |
. |
. . . |
. . |
. .. .. |
. . . |
.6 |
|
|
|||||||||
|
environquelque |
|
|
|
|
|
|
|
|
|
|
|
|
|
|
|
|
|
Récepteur satellite. . |
/câble. . . . |
. . |
. . . |
.. . . |
.6 |
|
||||||||||||||
|
dessus |
2 heurestemps, |
comme parsi une cassette, |
a |
|
|
|
|
|
|
|
|
|
|
|
|
Branchements |
. . . |
. . |
. . |
. . . |
.6 |
|
||||||||||||||||
|
|
et |
en- |
|
|
avant |
|
|
|
exemple |
|
|
|
|
|
|
une |
|
|
|
|
|
Réglage du |
magnétoscope. . . . . . |
|
. . |
.7 |
|
|||||||||||
|
obstruées. |
|
dessous |
sontd’utiliser votre |
|
|
après |
unséjourné dans |
|
|
|
|
|
|
Codes |
|
|
. . |
. . . |
.7 |
|
||||||||||||||||||
|
électrique |
En |
cas |
|
|
prévues |
pourmagnétoscopela |
transport |
l’hiver,atmosphère |
Autressatellites/câble |
. . |
. . |
. . . |
8 |
|
||||||||||||||||||||||||
|
ou |
|
et de |
|
d’orage, |
il |
Les |
|
|
appareils |
|
. . |
. . . |
. |
|
|
|||||||||||||||||||||||
|
|
|
|
|
l’antenne |
|
|
est |
|
ventilation |
|
|
|
|
|
|
|
attendez |
Prises AV1 |
/ AV2 . |
. . |
. . |
|
. |
. . . |
.9 |
|
||||||||||||
|
secteurélectromagnétiqueset |
|
afin de ne |
recommandé |
dans. Ellesouverturesne |
situées |
au |
|
Prise AV3 |
|
. . |
. . |
. . |
. . |
. . . . |
|
|
|
|||||||||||||||||||||
|
prolongéela fiche |
|
qui |
peuvent |
pas le soumettred’isolerles pagesdoivent2 à |
pas |
|
|
- |
Prise AV4 |
. |
. . |
. . . . |
. . |
. . |
. . . |
. . |
. . . . |
11 |
|
|||||||||||||||||||
|
certains |
éteignezd’antenne |
|
|
l’endommager |
|
à des |
l’appareil |
du8. |
|
être |
|
|
. |
. . . |
. . . |
. . |
. |
. . . |
. . |
. . . |
11 |
|
||||||||||||||||
|
|
|
composants l’appareilaccessibles pour |
les |
|
A cettesurcharges |
|
réseau |
|
|
|
|
|
. |
. |
. . . |
. . |
. . |
.11 |
|
|||||||||||||||||||
|
complètement |
|
|
restent |
|
avec |
|
|
|
|
|
|
|
fin, |
|
|
électriques |
|
|
|
|
|
|
|
|
|
. .12 |
|
|||||||||||
|
Débranchez |
|
vous devez |
|
en |
contactl’interrupteurdébrancher. Enlaissez |
la |
fiche |
|
|
|
|
|
|
|
|
|
|
|
|
|
||||||||||||||||||
|
de brûlé |
ou immédiatementdébrancherde la |
|
avec |
|
|
marche/arrêt. |
|
cas d’ |
|
|
|
|
|
|
|
|
|
|
|
|
|
|
|
|
|
|||||||||||||
|
même, |
|
la fiche |
|
réseau |
|
|
|
|
Même |
àabsence |
|
|
|
|
|
|
|
|
|
|
|
|
|
|||||||||||||||
|
à des |
vous risquezfumée. |
Enl’appareil si vousd’alimentationélectrique. |
|
Pour |
l’arrêt, |
|
|
|
|
|
|
Utilisation |
|
|
||||||||||||||||||||||||
|
recopiefins |
industriellesl’électrocutionaucun. |
cas |
vous constatezne |
qu’ilde la |
|
prise |
l’isoler |
|
|
|
|
|
|
|
|
|||||||||||||||||||||||
|
|
|
totale |
|
|
. |
Il |
|
|
Cet |
|
|
|
|
|
|
|
dégage |
|
secteur. |
Utiliser le |
|
|
|
|
|
|
|
|
|
|
||||||||
|
droits d’auteur ou |
partielleest |
uniquementappareil nedevez |
ouvrir |
|
|
une odeur |
|
|
|
|
|
|
|
|
|
|
||||||||||||||||||||||
|
législation |
|
|
, sans |
|
|
|
|
|
|
prévu |
pourdoit en aucunl’appareil |
vous- |
Contrôler télécommande |
|
. . . . .13 |
|
||||||||||||||||||||||
|
excluant touten |
vigueur.autoErisationd’enregistrements |
protégés un |
usage |
cas |
être utilisé |
Regarder |
le. |
|
|
|
|
. . . |
|
|||||||||||||||||||||||||
|
les ouverturesproduit |
décapant, |
explicite- |
|
du titulaire |
|
par la |
|
|
domestique. |
La |
Enregistrer .fonctionnement. . . . . . . . . . |
. . . . |
. |
14 |
|
|||||||||||||||||||||||
|
produits |
|
|
de |
|
|
Utilisez |
|
un |
|
|
des |
|
législation |
|
sur |
les |
Pr |
|
|
. |
. . . |
. . |
|
. |
. . |
. . . . |
|
15 |
|
|||||||||
|
Si un |
|
abrasifs |
ventilation |
à |
solvant, abrasif, |
|
chiffon |
|
droits, |
|
|
|
|
ogrammer un |
. |
. . |
. . |
. . |
. . |
. |
|
|||||||||||||||||
|
faitesobjet ou unou de produitsl’arrièreà |
ou sur leetc... |
|
doux, |
|
seccontrevientet |
à la |
Contrôle |
|
de bandeenregistr |
. . |
. |
16 |
|
|||||||||||||||||||||||||
|
votre |
-le |
vérifier |
liquide pénètre |
base |
d’alcool côté. |
Dépoussiérez |
|
propre, |
|
Contrôle d'images . . |
. |
. . . |
ement. . . . . |
. |
17 |
|
||||||||||||||||||||||
|
|
magnétoscope,par |
un |
techniciendans l’appareil,risqueL’utilisation derégulièrement |
Contrôle du son . |
. . . |
. |
. . . |
. . |
. . .. |
. . |
18 |
|
||||||||||||||||||||||||||
|
Garantie |
|
n’utilisez |
|
agréé. |
|
Pour |
|
débranchezd’endommagersolvants, de |
Réglage des préfér . . |
ences. . . . |
. . |
. . |
. . |
19 |
|
|||||||||||||||||||||||
|
|
|
|
|
jamais de |
|
|
|
ne |
pas |
|
|
|
|
|
|
l’appareil. |
Autres fonctions |
|
. . |
. |
. |
.20 |
|
|||||||||||||||
|
Le certificat |
|
|
|
|
|
|
|
cassette de |
|
endommagerimmédiatement et |
Plus d'infos |
|
. . . |
. |
. . . |
|
. . . |
. |
.21 |
|
||||||||||||||||||
|
de fabricationde garantie livré |
avec votre |
|
|
|
|
nettoyage. |
|
|
les |
|
têtes |
de |
Caractéristiques. . . |
.techniques. . . . . . . .. .. |
. . . |
. |
.22 |
|
||||||||||||||||||||
|
documents |
|
|
de votre |
|
|
|
|
|
|
|
|
|
|
|
|
|
|
|
|
|
Réglage des |
|
. . . |
. |
.23 |
|
||||||||||||
|
réparation |
|
indispensablesappareil. |
|
|
|
|
|
|
porte |
|
|
|
|
|
|
|
|
Autr |
|
|
|
préférences . |
|
. . . |
. |
.25 |
|
|||||||||||
|
agréé |
|
|
pendant |
|
|
pour Conservezmagnétoscope-le |
le type et le |
|
|
|
Plus |
fonctions |
. |
|
|
. |
. . . . |
|
|
|
||||||||||||||||||
|
représentant la |
période |
de |
faire |
valoir |
avec |
la |
|
|
numéro |
|
d'infos |
. . . |
. . .. |
. . |
. . . |
. |
. . . . |
.. |
21 |
|
||||||||||||||||||
|
l'annulation de |
vos |
notre |
|
garantie |
doit |
vos |
|
facture. |
|
Ils |
|
|
Caractéristiques |
|
. . |
. . |
. . |
. . . . . |
22 |
|
||||||||||||||||||
|
Cela |
peut |
être |
|
droits |
à lamarque. |
Toute |
être |
droits |
|
la |
|
constituent |
les |
Réglage |
des préfértechniques |
23 |
|
|||||||||||||||||||||
|
|
|
|
|
|
|
|
|
|
garantie. |
|
|
Autr |
|
|
. . . |
|
|
|||||||||||||||||||||
|
Multimédia |
|
dangereux |
|
garantie. |
|
|
dérogationfectuée |
|
par |
un |
|
Toute |
|
|
fonctions |
ences . . |
. |
. |
25 |
|
||||||||||||||||||
|
indications |
dégage |
sa |
|
pour vous, ouN'ouvrez |
|
|
|
à |
cette |
|
|
technicien |
Plus d'infos |
|
. . |
. |
. . . |
. |
. . |
. . |
21 |
|
||||||||||||||||
|
|
|
|
|
de cette notice.responsabilité pourrait jamais votre appareilrègle |
|
entraîne |
|
|
|
|
. . . |
. . . |
. |
. . . |
. . |
. . . |
. . |
22 |
|
|||||||||||||||||||
|
|
|
A propos |
|
|
|
|
|
en |
|
cas endommager l’appareil.vous-même. |
Avant |
d’utiliser |
|
|
|
. |
. . . |
. . |
23 |
|
||||||||||||||||||
|
|
|
|
|
|
|
|
|
|
|
d’utilisation |
|
non |
|
Thomson |
vous |
|
|
|
magnétoscope |
|
||||||||||||||||||
|
. conséquentde cette notice - |
Ce document |
|
|
|
|
|
conforme |
aux |
|
devez suivrevotrela |
|
|||||||||||||||||||||||||||
|
|
|
avez acheté.certaines |
|
est commun |
|
|
|
|
d’installation et de procédure |
|
|
|
||||||||||||||||||||||||||
|
|
|
|
|
|
|
|
|
|
|
fonctions ou |
|
|
plusieurs |
|
|
|
|
|
réglages décrite |
|
||||||||||||||||||
|
|
|
|
|
|
|
|
|
|
|
|
|
|
|
|
certains réglages |
|
|
|
|
|
|
|
|
|
|
|
|
|||||||||||
|
|
|
|
|
|
|
|
|
|
|
|
|
|
|
|
|
|
|
|
|
|
|
peuvent |
êtremodèles de |
|
|
|
|
|
|
|
|
|
||||||
|
|
|
|
|
|
|
|
|
|
|
|
|
|
|
|
|
|
|
|
|
|
|
|
|
|
|
absents dumagnétoscope |
. Par |
|
|
|||||||||
|
|
|
|
|
|
|
|
|
|
|
|
|
|
|
|
|
|
|
|
|
|
|
|
|
|
|
|
|
|
|
modèle |
|
|
|
1 |
||||
|
|
|
|
|
|
|
|
|
|
|
|
|
|
|
|
|
|
|
|
|
|
|
|
|
|
|
|
|
|
|
|
|
|
que vous |
|
|
|||
F

2
vps
14  s.o.s. rec
15  sp/lp
sp/lp
16  0000
0000
index 17  mark
mark
18
20 
|
4 |
1 |
|
|
|
3 |
|
5 |
status |
|
|
|
|
|
showview |
|
6 |
|
|
|
|
|
text |
7 |
|
|
10 |
8 |
|
|
|
|
|
ok |
|
9 |
11 |
|
|
|
|
12 |
|
13 |
exit |
menu |
|
pr+
19
pr-
1 |
2 |
3 |
4 |
5 |
6 |
7 |
8 |
21 |
9 |
||
|
0/-- |
|
AV |
|
|
22 |
|
|
23 |
|
25 |
|
|
|
|
24 |
|
26 

 28
28
27


1
21 |
31 |
Safety information
Mains connection
This video is suitable for use on A.C. mains supply, 220-240 V - 50 Hz only. It must not be connected to D.C. mains.
Note: The mains lead of the video is fitted with a moulded plug. If the mains sockets are not compatible or if for any reason the plug is removed please follow the directions below.
The moulded plug cannot be rewired and if removed must be disposed of safely. Remove the fuse to make it safer.
Do NOT under any circumstances plug the severed plug into any mains socket as this could result in an electric shock.
Important!
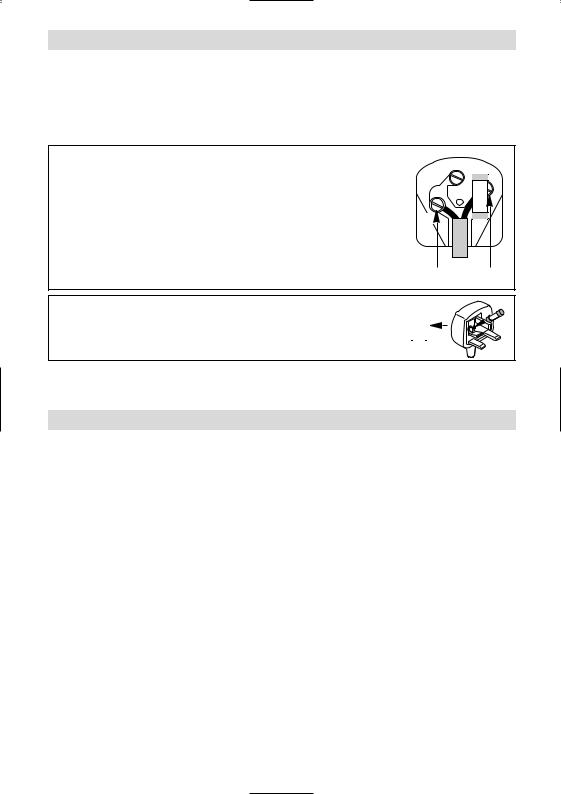
If the plug is removed rewire new plug as follows: The wires in the mains plug are coloured in accordance with the following code:
BLUE - NEUTRAL BROWN - LIVE
As the colours of the wires in the mains lead of this apparatus may not correspond with the coloured markings identifying the terminals in your plug, proceed as follows:
BLUE wire to the terminal coded N (Neutral) or coloured black. BROWN wire to the terminal coded L (Live) or coloured red.
Do NOT make any connection to the terminal in the plug which is marked by the letter E or by the safety symbol l or coloured green and yellow.
E |
|
|
|
3A |
L |
N |
|
|
BLUE |
BROWN |
|
A fused plug must be fitted with a 3A fuse approved by ASTA or BSI to BS 1362 and fuse |
|
|
covers must always be securely replaced. |
3A |
|
If the fuse blows, check the mains cable for damage or call a qualified technician. Do |
||
|
||
not try to bridge the fuse or increase its rating! |
|
3A
!The OFF button B on the remote control and the video recorder does not completely disconnect the unit from the mains supply but switches operating power on and off.
Your guarantee
Dear Customer,
Thank you for purchasing this THOMSON multimedia product and for your confidence in our company. This product meets applicable safety requirements and has undergone stringent testing during manufacture.
However, should there occur a defect, the product or its defective part(s) (excluding accessories and consumables) will be repaired free of charge (labor and parts) or, at THOMSON multimedia’s discretion, exchanged for a similar item, provided that it has been returned within 12 (twelve) months from the date of original purchase (date of receipt), is defective in materials and/or workmanship and has been bought in any of the following countries: F, I, E, P, GB, IRL, D, CH, A, B, L, NL (Territory) or in a Duty-free shop in the named countries.
This guarantee will be granted only upon presentation of the original invoice or cash receipt, indicating the date of purchase and dealer’s name, and of this guarantee card with the product type and serial number. The benefits of this guarantee may be refused if the invoice, cash receipt or guarantee card has been altered in any way, deleted or made illegible after the original purchase.
This guarantee does not apply to any of the following:
1.Damage caused by accidents including, but not limited to, lightning, fire, water;
2.Transport costs between the home and place of service and other costs and risks of transport relating directly or indirectly to this guarantee;
3.Damage to the product resulting from neglect, misuse, including but not limited to, failure to use, repair and/or install the product for its normal domestic purposes and/or in accordance with the operating instructions on its proper installation and use;
4.Modifications, adaptations and alterations of the product to operate in a country other than that for which it was originally designed and manufactured, or any damage resulting from such modifications;
These statements do not affect your statutory rights as a consumer under applicable national legislation in force, nor your consumer’s rights against the dealer from whom you bought the product.
If you need service, whether or not under guarantee, please approach the dealer who sold you the product.
In your own interest we advise you to read the instruction booklet for your THOMSON multimedia product carefully before contacting your dealer or service center.
If you need service while in a country (within the named Territory) other than the one where you bought your product, please contact the nearest THOMSON multimedia InfoCenter.
Should you have any questions which your dealer is unable to answer, please contact: THOMSON InfoCenter (UK,IRL)
THOMSON multimedia Sales UK Ltd., 30 Tower View
Kings Hill West Malling
Kent ME19 4NQ
tel. 44 (0) 173 252 0920 fax. 44 (0) 173 252 0921
http://www.thomson-europe.com
 Important
Precautions
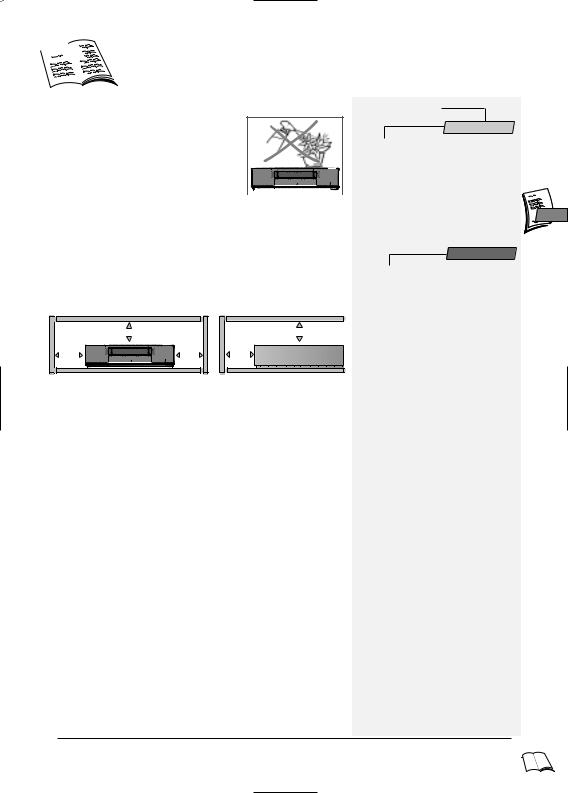
SETTING UP - Ensure that the mains supply in your house complies with that indicated on the identification sticker located on the back of your appliance. Install the video recorder horizontally, away from any source of heat
(fireplace) or appliances creating strong  magnetic or electric fields. The components of
  this video recorder are sensitive to heat. The maximum ambient temperature should not exceed 40° Celsius. Leave sufficient space around the video recorder to allow adequate ventilation: 10 cm on either side and at the rear, as well as 7 cm above the top are minimum requirements. The humidity of the room should not exceed 80%. If you have to use the video recorder outdoors, do not expose it to water from rain or splashing. Moving it from a cold atmosphere into a warm one is likely to cause condensation on some components inside the video recorder. Let the condensation disappear by itself before turning the video recorder on again.
7 cm |
|
7 cm |
10 cm |
10 cm |
10 cm |
USE - If your appliance, or a cassette, has been stored in a very cold atmosphere for a certain amount of time (transported during winter for example), wait approximately 2 hours before using your video recorder. The openings located on the top and the bottom are for ventilation purposes. They should not be obstructed. During thunder storms, we recommend that you disconnect the video recorder from the mains and aerial so that it is not affected by electrical or electromagnetic surges that could damage it. For this reason, keep the mains socket and aerial socket accessible so they can be disconnected. When the unit is on standby, some components remain connected to the mains. To fully disconnect your set, you have to unplug the mains connector from the mains socket. Immediately disconnect the video recorder if you notice it giving off a smell of burning or smoke. Under no circumstances whatsoever must you open the video recorder yourself. You risk electrocution if you do so. CLEANING – Use a soft, dry and clean cloth. Regularly dust the vents at the back or sides. Using solvents, abrasive or alcohol based products risks damaging the set. If an object or liquid enters inside the appliance, unplug it immediately and have it checked by an authorised technician. To avoid deterioration of your video recorder’s heads, never use a cleaning tape.
Guarantee
The type and production number of your appliance are printed on the guarantee certificate delivered with your video recorder. Keep this certificate as well as the invoice. These documents are indispensable for claiming your guarantee rights. All repairs during the guarantee period must be carried out by an authorised technician representing our brand. If this condition is not met, your rights will no longer be valid. Never open the appliance yourself, since this may be dangerous for you or damage the equipment. Thomson Multimedia is not liable if the video recorder is used other than in accordance with this manual.
Prior to using your video recorder, you'll have to follow the set-up procedure and make the settings described on pages 2 to 7.
Contents
Installation
Before you start . . . . . |
2 |
|
Making the connections |
3 |
|
Initial installation . . . |
4 |
|
Auto installation - New or |
|
|
Sorting the channels - Clock |
|
|
Satellite / cable receiver |
6 |
GB |
Recommended connection |
|
|
Video recorder settings |
|
|
Other sets . . . . . . . . . . |
8 |
|
Sockets AV1 / AV2 / AV3 |
|
|
Use
Using the remote control . . . . . . . . . . . . .9
Controlling the video recorder - Programming the code of another set - Controlling the television set
Controlling the operation . . . . . . . . . . .10
On the display - On the screen
Viewing a tape . . . . . . . . . . . . . . . . . . . . . . . .11
Watching a channel via the video recorder - Viewing a tape - Play - Accelerated play -
Still image - Pause - Variable slow motion - Stop Rewind or Fast forward - Ejection of the tape
Recording . . . . . . . . . . . . . . . . . . . . . . . . . . . .12
Preparing the recording - Simple recording, with automatic stop, "S.O.S. record" - Mark a scene with an index
NAVICLICK . . . . . . . . . . . . . . . . . . . . . . . . .13
Before using NAVICLICK - Consulting TV programmes with NAVICLICK - Programming a recording with NAVICLICK - Updating NAVICLICK
Programming a recording . . . . . . . . . . .14
With the PlusCode® numbers - Without the PlusCode numbers - When the video recorder is programmed - Deleting a programmed recording - Recording programmed by an external connected unit - Error messages likely to occur when programming
Tape library . . . . . . . . . . . . . . . . . . . . . .16
New tape - Organising recordings on a tape - Looking for a recorded programme
Tape control . . . . . . . . . . . . . . . . . . . . . .18
Index search - Introduction search - Clear index - Access to counter - Access to remaining time - Tape type – Auto Sequence Memory
Sound adjusting . . . . . . . . . . . . . . . . . . .19
Adjusting the sound in the play mode Setting the type of sound to be recorded
Picture adjusting . . . . . . . . . . . . . . . . . .20
Tracking - Sharpness - Stability - Format - S-VHS cassette - TVNTSC - Copy - Black and white - Colour system
Adjusting preferences . . . . . . . . . . . . . .22 Audio dubbing - Auto Sequence Memory . .24
Other functions . . . . . . . . . . . . . . . . . . .25
Electronic key - Continuous play / recording - VPS/PDC system - Concerning video tapes
More information . . . . . . . . . . . . . . . . .26
TV set and video recorder code lists
Technical features . . . . . . . . . . . . . . . . .27
☺ON THIS USER MANUAL: This user manual being common to several VCR models, some 1 functions or settings may not be available on the model you have bought. 
Installation
 Before you start
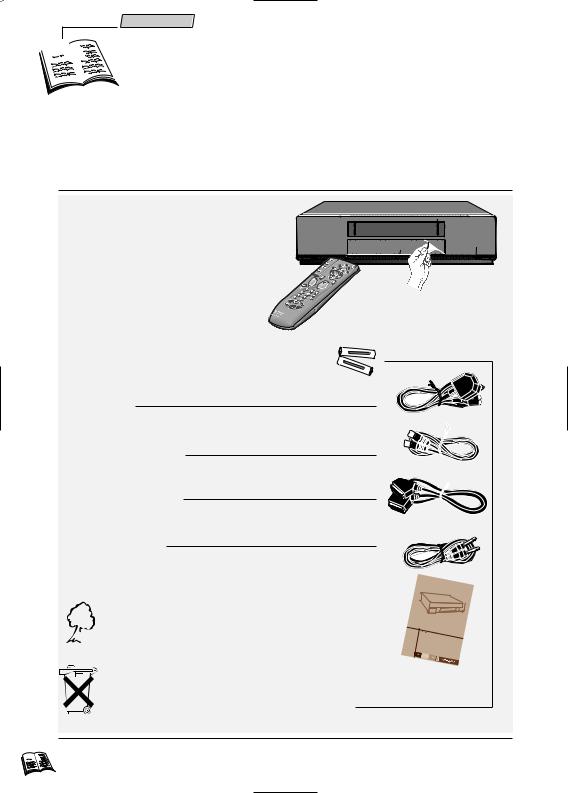
☺Thank you for purchasing one or our videos. Unpack the set completely and tear off the protection films.
Video recorder
Remote control
2 non-rechargeable batteries, type AA
Power cord
+ |
DUTY HEAVY |
EXTRA - |
|
- |
EXTRA |
HEAVY |
|
|
|
|
DUTY |
+ |
|
|
|
|
||
|
|
0%MERCURY |
||
Coaxial cable (75 Ω )
Scart cable
(21 pins connected)
Connection cable
Set-up and user manual
To respect the environment, we have printed this document on unbleached recycling paper.
VCR
Please respect the environment and prevailing regulations. Before you dispose of batteries or accumulators, ask your dealer whether they are subject to special recycling and it they will accept them for disposal.
2

Installation
 Making the connections
☺ Connecting the video recorder and television set with this cable simplifies set-up and subsequent use, and considerably improves the pictures and sound reproduction quality.
1 Disconnect the aerial cable from your TV set and reconnect it to the IN socket of your |
GB |
video recorder. |
|
2By means of the coaxial cable supplied, connect the video recorder's OUT socket to the television's aerial socket g.
3With the SCART cable supplied, connect the video recorder's AV 1 socket (audio/video 1) to the television's SCART socket (AV 1, EXT 1, AUX 1 depending on the make).
☺Your television socket should be compatible with for the RGB signals (21 pins connected). If this is not the case, use the AV4 socket on the video recorder (yellow cinch socket).
See your retailer for the appropriate cable.
4Connect the video recorder to the mains with the power cord supplied by first plugging in the connector at the video recorder rear.
1
AV1 |
|
|
|
IN |
|
|
|
|
|
AUDIO/VIDEO 2 DECODER |
L |
OUT |
R |
ANTENNA |
AUDIO/VIDEO 1 |
VIDEO |
AUDIO |
|
|
OUT
2
4
AV1 |
EXT1 |
AUX1 |
3
220V/240V - 50Hz
☺ Other possible connection schemes are shown on page 6 and 8. |
3 |
Installation
 Initial Installation
☺As the video recorder has not been preset to receive channels from your region, you have to install the channels yourself by carrying out the automatic channel installation procedure described
below.
Auto Installation
1Switch on the television.
2Set vcr/dvd/tv on the remote control to vcr a.
3Switch on your video recorder with button B (1).
When switching on the video recorder for the first time, a language selection menu comes up. Should it not appear, press key menu (13).
4With keys ▲ (7) and ▼ (9), select the language you prefer to display the menus on the screen, then validate your choice with the key ok (11).
A welcoming message appears. Validate with ok (11) key.
5The INSTALLATION menu appears. The Auto installation line has already been selected. Validate with ok (11) key.
6Press key ▲ (7) and ▼ (9), ) to select the country where you usually live, then validate with the ok (11) key.
☺ Your video recorder comes with the NexTView Link feature. This function simplifies the channel installation procedure, dowloading them from a TV set fitted with the NexTView Link or similar feature (Easy Link, Smart Link, Megalogic, etc.) and already installed. The channels downloaded in this way preserve the same properties as your TV set (same number, same name, etc.).
If your TV set is fitted with the NexTView Link function or similar, the video recorder automatically initiates channel download once you have selected the country. You can view channel download on the video recorder display (Pr1, Pr2,...). On completion of download, the video recorder switches over to standby. Channel installation is finished.
When your television set is not fitted with the NexTView Link or any similar feature, a message tells you that your video recorder is searching and storing the channels you can receive in your region. Keep patient until a message informs you that your channels are stored.
7 Press key ok (11) to confirm your channels.
8a If the proposed channel number matches the displayed picture, press ok (11) to pass on to the next channel.
8b If the proposed channel number does not correspond to the picture that you see, scroll the channels with the C (10) or B (8) keys. Validate with ok (11) key.
9 When all the channels have been confirmed, press exit (12) to leave the menu.
New or encoded channel
☺To complete the installation of your video recorder when the automatic channel installation has not stored all of the channels or when you wish to store a new channel.
1With the menu (13) key, call up the SUMMARY menu.
2Press the ▼ key to select the Installation line, then validate with ok (11) key.
3The Manual set up line is already selected. Press ok (11).
The MANUAL SET UP menu comes up. The Standard line is selected. 4 Press C (10) or B (8) to choose the reception standard.
4 |
When the picture of a channel is of poor quality or encoded, try out the fine tuning feature. |
|
|
|
Refer to New or encoded channel, step 7. |
Installation
5Press ▼ (9) to select Reception then choose Aerial (for channels received via roof aerial) or Cable (for cable channels) with C (10) or B (8).
6Press ▼ (9) to select the Autosearch line, then press C (10) or B (8) several times to search for the programme channel, or you may also directly enter a number with keys 0 to 9 (21).
When a channel is found, the pictures come up on the screen.
7When the picture is poor, select the Fine tuning line, then press C (10) or B (8) to adjust the picture.
8When the channel name is incorrect, select the Name line and with keys C (10) or B (8),select a name, or you may also enter a name by choosing the characters with the keys 1 and 2 and press B (8) to move on to the next character.
9If the channel is encoded, press key ▼ (9), to select Decoder and check the box with
key ok (11).
10 Position the cursor on Store on Pr and assign a channel number with keys C (10) or B (8), or you may also enter the number with keys 0 to 9 and press on ok (11) .
11 If you wish to continue with TV channels installation, repeat steps 5 to 10. Otherwise, press exit (12).
Sorting the channels
☺The automatic channel installation assigns numbers to the channels in a pre-defined order. These numbers may therefore not match the actual channel numbers. Should this be the case, change these numbers by carrying out the instructions below. For easy channel identification, we suggest that you have a TV magazine at hand.
1With the menu (13) key call up the SUMMARY menu.
2With key ▼ (9), select the Installation line, then validate with ok (11).
3Select the Organizer line from the INSTALLATION menu and validate with ok (11).
4Select the Select Pr line, and choose a channel by entering its number or by scrolling with keys C (10) or B (8).
5If you wish to change the name of the channel, call up the Name line and with keys C (10) or B (8), scroll the names available, or you may enter the name with keys 1 and 2 and press B (8) to pass on to the next character.
6Call up the Swap with Pr line to exchange two channels and enter the channel number you wish to exchange with the channel which presently appears on the Select Pr line. Validate with ok (11).
7To delete the currently selected channel, call up the Delete Pr line and validate with ok (11), reconfirm with ok (11).
Clock setting
☺Your video recorder is fitted with an automatic clock setting feature that detects the clock setting signals sent by some channels. If your video recorder clock is not right, you can set it right by carrying out the steps below.
1With key menu (13) call up the SUMMARY menu.
2With key ▼ (9), select the Installation line, then validate with ok (11).
3With key ▼ (9), select the Clock set line and confirm with ok (11). The CLOCK SET menu comes up.
4If the displayed time is incorrect, select Auto clock line, then validate with ok (11).
5If the displayed time is still incorrect, change clock in the following order: day, month, time or year by means of keys ▲ (7) and ▼ (9), and press keys C (10) or B (8) to change them.
6Validate with ok (11), then press exit (12) to leave clock setting.
Did you insert the batteries in the remote control ? |
|
+ DUTY HEAVY EXTRA |
|
||
☺ For detail instructions, see inside the cover. |
|
0%MERCURY |
V 1,5 AA SIZE |
|
- |
- |
|
|
|
||
EXTRA HEAVY |
DUTY |
+ |
|
||
|
|
0%MERCURY |
|
||
GB
5
 Loading...