


USE & CARE
GUIDE
MANUAL DE USO Y CUIDADO
GUIDE
D’UTILISATION ET D’ENTRETIEN
Model/Modelo/Modele
T24UR920DS
T24UR910DS
T24UR900DP
Double Drawer Refrigerator Refrigerador de doble cajón Réfrigérateur à double tiroir
Table of Contents
Welcome to Your THERMADOR Under-Counter Appliance
Important Safety Instructions ………….…4
-Definition
-Before you switch ON the appliance
-Technical safety
-Important information when using the appliance
-Children in the household
-General regulations
Information concerning disposal …….….5
-Disposal of packaging
-Disposal of your old appliance
Installing the appliance ……………………5
-Transporting
-Installation location
Ventilation ……………………………………5
Getting to know your appliance ………….6
Getting started with your appliance ……..7
-Touch control
-Setting the temperature
-Switching the appliance on
-Special functions:
-Sabbath Mode
-Off Mode
-Fahrenheit / Celsius Display
Refrigerator Drawers ………………………9 Toe-Kick ………………………...…………..10
Cleaning the appliance ……………………10
- Cleaning behind the Toe-kick
Odors …………………………………………11
Page |2
Light (LED) ………………………………….11
Tips for saving energy ……………………11
Operating noises …………………………..11
-Normal noises
-Preventing noises
Troubleshooting ……………………………12
BSH Home Appliances Corporation
1901 Main Street, Irvine, CA.
Questions?
1-800-735-4328
www.thermador.com
We look forward to hearing from you!
Welcome
To Your Thermador® Under-counter Appliance
Thank you and congratulations on your recent THERMADOR purchase! Whether you are a dedicated chef or simply a connoisseur of the art of cooking, owning a THERMADOR kitchen is the ultimate expression of personal style, good taste, and an appreciation for the complete culinary experience. Our award-winning products have been empowering culinary enthusiasts for more than eleven decades.
Before you begin using your new THERMADOR product, please take a moment to review the Use and Care Guide. You will find the answers to all of your questions as well as some very important safety information. Pay special attention to the Important Safety Instructions located at the beginning of the manual.
Our products are handcrafted with the highest quality authentic materials to ensure reliable service. In the unlikely event that you have a service question, please have your model and serial numbers of your product available when calling for technical service. You can find this information in the name plate of the appliance located inside the cabinet, at the right side of the bottom compartment.
We realize that you have made a considerable investment in your kitchen and thank you again for choosing THERMADOR. Please feel free to share your kitchen photos and remodeling stories with us. Follow us on Twitter or post your kitchen photos to Facebook. We would love to hear from you!
Page |3

 Important Safety Instructions
READ AND SAVE THESE INSTRUCTIONS!
Definition
WARNING:
This indicates that death or serious injury may result due to non-observance of this warning.
CAUTION:
This indicates that minor or moderately severe injury may result due to nonobservance of this warning.
NOTE:
This is used to draw the user’s attention to something in particular.
WARNING: To reduce the risk of fire, electric shock, or injury when using your appliance, follow these basic precautions:
Before you switch ON the appliance
Please read the operating and installation instructions carefully. They contain important information on how to install, use and maintain the appliance. Retain all documents for subsequent use or for the next owner.
Technical safety
If the power cord of this appliance is damaged, it must be replaced by an authorized servicer. Improper installation and repairs may put the user at considerable risk. Repairs must be performed by an authorized servicer.
Only original parts supplied by the manufacturer should be used. Only original parts satisfy safety requirements.
The appliance comes with a UL registered 3-wire power cord. Never sever or remove the third (ground) conductor from the power cord.
The appliance requires a 3-pole socket. The socket should be connected by an electrician only. Where there is a 2-pole standard wall socket, it is the responsibility of the customer to have this socket replaced with a correctly grounded 3-pole wall socket. Do not use any adapter plugs.
Important information when using the appliance
xNever use electrical appliances inside the appliance (e.g. heater, electric ice maker, etc.).
Risk of explosion!
xNever use a steam cleaner to defrost or clean the appliance! The steam may penetrate electrical parts and cause a short–circuit. Risk of electric shock!
xDo not use pointed and sharp–edged implements to remove frost or layers of ice. You could damage sensitive internal components, including the refrigerant tubes. Leaking refrigerant may ignite or cause eye injuries.
xDo not store products which contain flammable propellants (e.g. spray cans) or explosive substances in the appliance. Risk of explosion!
xDo not stand on or lean heavily against the base of appliance, door, shelves etc.
xSwitch the appliance off prior to cleaning.
xBottles which contain a high percentage of alcohol must be sealed and stored in an upright position.
xKeep plastic parts and the refrigerator seal free of oil and grease. Otherwise, parts and the refrigerator seal will become porous.
xNever cover or block the ventilation openings for the appliance.
xChildren should not be allowed to use the appliance unless supervised by an adult.
Children in the household
xKeep children away from packaging and its parts. Danger of suffocation from folding cartons and cling wrap!
xDo not allow children to play with the appliance!
General regulations
The appliance is designed exclusively for the storage
of food and beverage.
This appliance is intended for use in the home and the home environment.
The refrigeration circuit has been checked for leaks.
Page |4
Information concerning disposal
Disposal of packaging
The packaging protects your appliance from damage during transit. All utilized materials are environmentallysafe and recyclable. Please help us by disposing of the packaging in an environmentally friendly manner. Please ask your dealer or your local authority about current means of disposal.
Disposal of your old appliance
Old appliances are not worthless rubbish! Valuable raw materials can be reclaimed by recycling old appliances.
 WARNING:
1.Pull out the power plug.
2.Cut off the power cord and discard with the power plug.
3.Remove the door from the appliance.
4.Do not allow children to play with the appliance once it has spent its useful life. Danger of suffocation!
Refrigerators contain refrigerant and gases in the insulation. Refrigerant and gases must be recycled by professionals. Ensure that tubing of the refrigerant circuit is not damaged prior to proper disposal.
Installing the appliance
For detailed installation instructions, please refer to the Installation Guide provided with the appliance.
Have a qualified technician install and connect the appliance according to the enclosed installation instructions.
NOTE: For detailed installation instructions, relevant measurements and information, please, see the Installation Guide provided with this appliance.
WARNING:
Do not install this appliance:
-Outdoors
-In an environment with dripping water
-In rooms where there is a risk of frost
Transporting
The appliance is heavy and must be handled with caution during transportation and installation. Because of the weight and dimensions of the appliance, at least two persons are necessary to move the appliance into position securely and avoid injuries to people or damage to the appliance.
Installation location
A dry, well ventilated room is suitable as an installation location. The installation location should not be exposed to direct sunlight and not placed near a heat source, e.g. a cooker, radiator, etc.
If installation next to a heat source is unavoidable, use a suitable insulating plate or observe the following minimum distance from the heat source:
xTo electric or gas cookers 1¼” (3 cm).
xTo an oil or coal-fired cooker 1113/16” (30cm).
The floor of the installation location must not give way; if required, reinforce floor. The appliance must be upright and level to function correctly.
Ventilation
The refrigeration unit is ventilated only at the ToeKick in the base. Never cover that area or place anything in front of it. Otherwise the refrigeration cooling performance will be affected and the unit must work harder increasing power consumption. Additionally, make certain all 4 leveling legs are extended (unit height approximately 34 3/4”), so that there is sufficient airflow underneath the appliance.
Adjust all 4 legs to extend the appliance height by approximately 1/2 inch.
Page |5
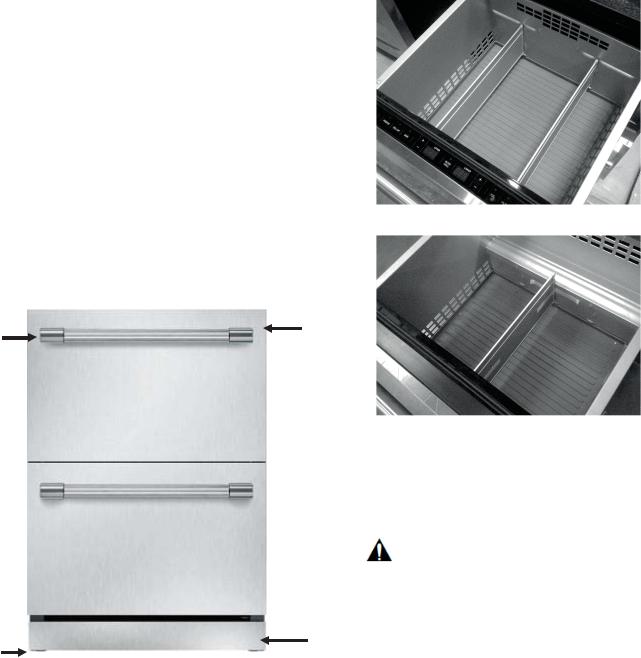
Getting to know the appliance
THERMADOR under-counter Double Drawer Refrigerator units can be freestanding or built-in and are available in a number of configurations.
These operating instructions refer to several models;
the diagrams may differ.
1.Cabinet
2.Touch control (over Top Drawer)
3.Top Drawer
4.Handle (“Professional”* Style shown)
5.Bottom Drawer
6.Toe-Kick
7.Leveling legs
8.Aluminum separator (long)
9.Mat
10.Aluminum separator (short)
4 |
1 |
 3
3
4 
 5
5
7 |
6 |
Page |6
 8
8
 9
9
 2
2
Top drawer
 10
10
 9
9
Bottom drawer
NOTE: Overlay model does not include the stainless door or the handle.
NOTE: The mats are not washable in dishwasher machine.
WARNING
To avoid the appliance tilting due to unbalanced overweight do not pull out both drawers at the same time. Always close one of the drawers before pull out the other one.

Getting started with your appliance
Touch control
A B C D E F G H
A. ALARM
When either drawer has been left open for 3 minutes or longer, an audible alarm sound is triggered in addition to a flashing blue LED indicator light above the ALARM button. Press the button once to temporarily disengage the ALARM, or close the open drawers.
•Press and hold ALARM for 3 seconds to disengage the door-open ALARM function entirely. The key-press will sound once, confirming the ALARM function has been disengaged.
•Press and hold ALARM for 3 seconds to reengage the door-open ALARM function.
NOTE: The ALARM function will not operate when the
unit is in Sabbath mode. See the Sabbath Mode section of Special Functions.
• There are other situations when the ALARM will sound. See the Troubleshooting section starting on page 13.
B. LOCK
• Press and hold the LOCK button for 3 seconds, LOCK LED will light up and all buttons will be blocked. To disengage, press and hold the LOCK button for 3 seconds or until LOCK LED light goes off.
C. FRIDGE
• Activate the mode by pressing the FRIDGE button, this will set the temperature to 37°F (3°C). Or manually adjusting the set temperature to the FRIDGE mode range.
The FRIDGE mode temperature can be adjusted to between 36°F and 40°F (2°C & 4°C) using the SELECTION BUTTONS: COOLER (-) or WARMER
(+).
We recommend a setting of 37°F. Perishable food and beverages should not be stored above 37°F.
D. PANTRY
• Activate the mode by pressing the PANTRY button, this will set the temperature to 53°F (12°C). Or manually adjusting the set temperature to the PANTRY mode range.
The PANTRY mode temperature can be adjusted to between 41°F and 64°F (5°C & 18°C) using the SELECTION BUTTONS: COOLER (-) or WARMER
(+).
This mode can be used for storing non-perishable food or beverages.
 CAUTION:
Perishable foods and/or beverages kept in the unit may spoil when the temperature setting is in the PANTRY range.
E. BAR
• Activate the mode by pressing the BAR button, this will set the temperature to 34°F (1°C). Or manually adjusting the set temperature to the BAR mode range. The BAR mode temperature can be adjusted to between 33°F and 35°F (0°C-1°C) using the SELECTION BUTTONS: COOLER (-) or WARMER
(+).
F. QUICK CHILL
The QUICK CHILL mode temperature is fixed to 33°F (0°C).
This mode is useful for cooling down food or beverage products within a relatively short period of time. NOTE: All other temperature setting buttons become non-functional when the unit is in the QUICK CHILL mode.
•Activate the mode by pressing the QUICK CHILL button.
•Deactivate by pressing the QUICK CHILL button again. The mode will also deactivate automatically after 24 hours.
•The temperature settings will return to what they were
prior to entering QUICK CHILL mode.
Page |7
G. DISPLAY PANEL
The set temperature of both refrigerator compartments, top and bottom, is shown in the display panel.
H. SELECTION BUTTONS
The temperature setting is adjusted using the selection buttons.
•Press COOLER (-) to lower the set temperature.
•Press WARMER (+) to raise the set temperature.
Setting the temperature
By default, the temperature set in your Refrigerator is: 37°F (3°C) for both drawers’ compartments. Both drawers share the same temperature.
You can adjust the temperature to your liking using the SELECTION BUTTONS or the PRESET BUTTONS.
To set a new temperature press the SELECTION BUTTONS: COOLER (-) or WARMER (+).
The temperature will increase or decrease by one degree every time the SELECTION BUTTON is pressed.
The temperature can be displayed in degrees Celsius (°C) or degrees Fahrenheit (°F). The factory setting is degrees Fahrenheit (°F).
Switching the appliance on
The appliance begins to cool when plugged in.
WARNING:
Follow the instructions and recommendations in the
“Connecting the appliance” section in the
Installation Guide for a correct and safe use of your Double Drawer Refrigerator.
•The interior drawer light(s) turn on when either drawer is opened.
•The exterior TOUCH CONTROL lights and buttons are non-functional when the upper-drawer is closed.
The unit is preset to the following factory recommended temperature settings: 37°F (3°C)
Special functions
The following special functions can be selected or displayed:
Sabbath Mode
The Sabbath Mode is designed for those users whose religious observancesrequires the turning off of lights or for travelers who will be absent from home.
This appliance is certified by Star-K to meet strict religious regulations in conjunction with specific instructions found on www.star-k.org.
When Sabbath mode is activated:
xThe display panel will indicate the unit is in Sabbath mode.
xAll other interior and exterior lights deactivate and cannot be engaged.
xAll control buttons become inactive.
xAll audible and visual alarms become inactive.
Activating:
1. Pull out the top drawer
2.Press and hold the QUICK CHILL and FRIDGE buttons simultaneouslyfor 3 seconds to engage the Sabbath mode. The temperature settings used prior to engaging the Sabbath mode are maintained.
3.The key-press sounds once, and the display panel will change to continuously display the following characters:
The display will not change, even if the drawer is closed, as long as the unit remains in Sabbath mode. NOTE: The Sabbath mode will remain active if the unit is restarted after a power loss.
4. Unit will stay in SAB until deactivated.
Deactivating:
1.Press and hold the QUICK CHILL and FRIDGE buttons simultaneouslyfor 3 seconds.
2.All buttons, displays, lights and alarms will again
become functional.
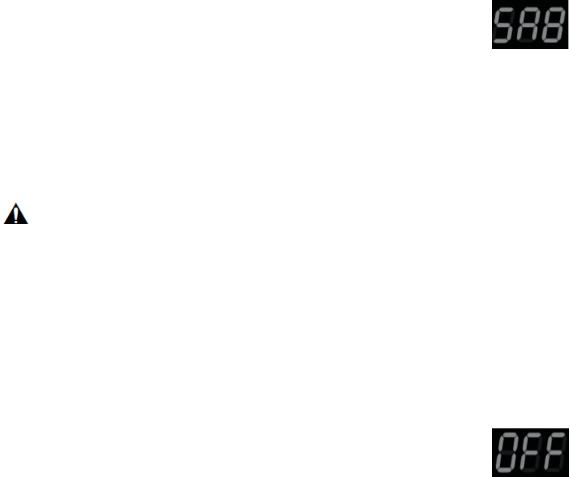
Off Mode
Off mode deactivates all functional elements of the unit.
Activating:
1.Press and hold the QUICK CHILL and PANTRY buttons simultaneously for 3 seconds to engage the OFF mode.
2.The key-press sounds once and the display panel
will change to continuously display the following characters:
Deactivating:
1.Press and hold the QUICK CHILL and PANTRY buttons simultaneouslyfor 3 seconds.
2.All functional elements of the unit will revert to where
they were set prior to engaging the OFF mode.
Fahrenheit / Celsius Display
1. Press and hold the QUICK CHILL and COOLER buttons simultaneouslyfor 3 seconds in order to switch between degrees Fahrenheit (°F ) and degrees Celsius (°C) for the temperature control and display.
Page |8

2. The factory setting is degrees Fahrenheit. When switching to degrees Celsius (°C), the display panel will show the following characters for a few seconds, and the key press will sound once:
Repeat the same process to show the temperature back in degrees Fahrenheit.
When switching back to Fahrenheit, the following characters will be displayed:
3. The display will then indicate the previously set temperature, adjusted to either the Celsius or Fahrenheit scale.
Refrigerator Drawers
WARNING:
To avoid risk of explosion, do not store explosive substances in the appliance.
When purchasing food, please note:
The “purchase freshness” is important for the shelf-life of your food. When buying food, always pay attention to the degree of freshness. Spoiled food or food close to the expiration date will decay faster even refrigerated and may contaminate the drawer with unpleasant odors.
Arranging food in the appliance
•Wrap or cover food before placing in the appliance. This will retain the aroma, color and freshness of the food. In addition, flavors will not be transferred between foods and the plastic parts will not become discolored.
•Allow warm food and drinks to cool down before placing in the appliance.
•Do not block air outlet/inlet openings with food in the refrigerator compartment, otherwise the air circulation will be impaired. Food which is stored directly in front of the air outlet openings may be frozen by the cold air flowing out.
•Avoid contact of oil and fat with the plastic parts and door seal.
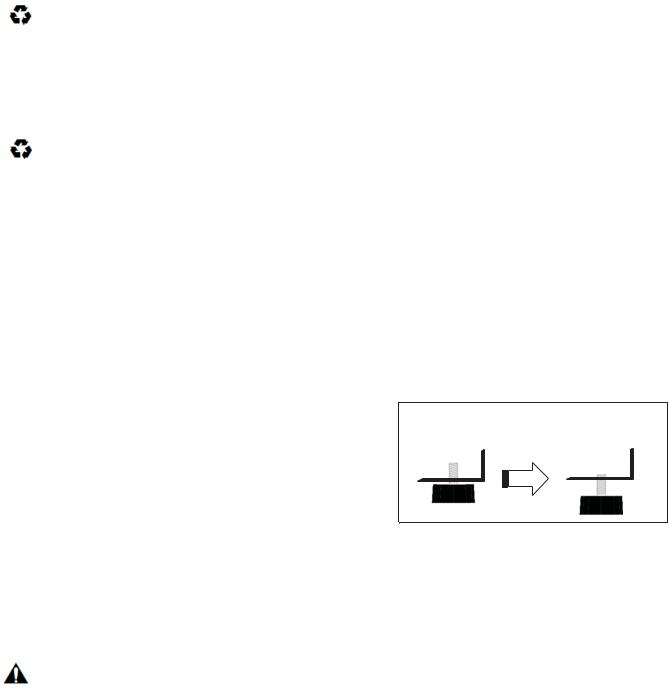
Drawer partitions
The upper drawer has 2 long aluminum partitions which are removable, and can be placed flat onto the
horizontal dimples that run on the front and back sides of the drawer as shown in the following illustrations:
Remove one or both partitions from the vertical dimple guides.
Place one or both partitions flat onto the horizontal dimples for an extra level of storage.
Page |9
The partitions can be used to organize the contents of your refrigerator, or provide a secondary surface to store and display items above the main storage space.
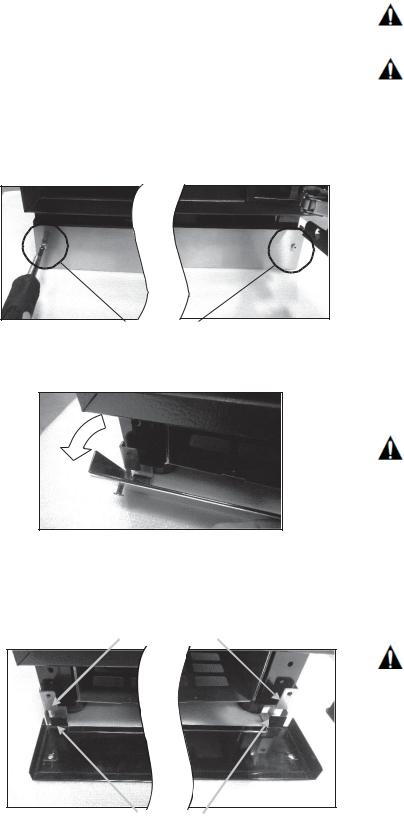
Toe-Kick
The Toe-Kick itself can be removed for service or cleaning (see “Cleaning behind the Toe-Kick” in the next section).
1. Remove the stainless steel Toe-Kick by unscrewing and removing the two front screws with a Philips screwdriver.
Front screws
2. You can remove the Toe-Kick by simply pulling it out of the left and right mounting brackets.
3. To reattach the Toe-Kick, slide over the left and right mounting brackets, such that bottom tabs of the ToeKick rest on top of the bracket bases. This will allow the Toe-Kick and mounting bracket screw holes to align.
Bracket bases
Bottom tabs
Cleaning the appliance
WARNING:
Never clean the appliance with a steam cleaner!
CAUTION:
•Do not use abrasive or acidic cleaning agents and solvents.
•Do not use scouring or abrasive sponges. The metallic surfaces could corrode.
•Never clean the aluminum partitions in the dishwasher. The parts may be damaged.
Proceed as follows:
1.Before cleaning: switch the appliance off. For instructions, see “Off Mode” section on the “Special Functions” page.
2.Remove food and/or frozen food items and store in a cool location.
3.Clean the appliance with a soft cloth, lukewarm water and a little pH neutral detergent.
4.Wipe the drawer seals with clear water only and then wipe dry thoroughly.
5.After cleaning switch the appliance back on.
CAUTION:
When rinsing, water must not enter the interior drawer light recesses located on the upper side of both the top and bottom drawers. Water must also not spill out from the bottom of the cabinet.
Cleaning behind the Toe-Kick
1.Before cleaning: switch the appliance off.
2.Remove the Toe-Kick. See “Toe-Kick” section on the previous page.
WARNING:
Do not remove the electrical box cover behind the Toe-Kick. Risk of electric shock!
3.Use a vacuum cleaner with an extended attachment to clean the accessible areas when they are dusty or dirty.
4.Replace the Toe-Kick.
5.Switch the appliance on.
Page |10
Odors
If you experience unpleasant odors:
1.Switch the appliance off.
2.Take all food out of the appliance.
3.Clean the interior. See chapter “Cleaning the appliance”.
4.Clean all packages.
5.Seal strong smelling foods in order to avoid odors from forming.
6.Switch the appliance on again.
7.Store food in the appliance.
8.Check whether the formation of odors is still occurring after 24 hours.
Light (LED)
Your appliance features a maintenance-free LED light located at the top of the interior cabinet and under the mullion. This light must be repaired by authorized technicians only.
Tips for saving energy
•Install the appliance in a dry, well ventilated room. The appliance should not be installed in direct sunlight or near a heat source (e.g. radiator, cooker).
If required, use an insulating plate.
•Do not block the ventilation openings in the appliance.
•Allow warm food and drinks to cool down before placing in the appliance.
•Open the appliance drawers as briefly as possible.
Operating noises
Normal noises
Droning: Motors are running (e.g. refrigeration units, fan).
Bubbling, humming or gurgling noises: Refrigerant is flowing through the tubing.
Clicking: Motor, switches or solenoid valves are switching On/Off.
Preventing noises
Be sure the appliance is leveled
Please align the appliance with a spirit level. Use the height-adjustable feet.
Containers or storage areas wobble or stick: Please check the removable parts (aluminum partitions, icebucket, etc.) and re-insert them correctly as needed.
Bottles or containers are touching each other
Move the bottles or containers slightly away from each other.
Page |11

Troubleshooting
Be sure to check these items first:
xIs there a power outage in the area?
xIs the household fuse blown or the circuit breaker tripped?
xIs the appliance properly connected to the electrical supply?
Many problems can be resolved without the need for a service call. See the following list as a reference of possible solutions of simple problems.
Symptom |
Possible Cause |
Potential Remedy |
|
|
|
|
|
|
|
Check display to make sure the unit is not |
|
|
Appliance has been switched |
switched off. If display reads “OFF”, |
|
Appliance is not cooling. |
simultaneously press and hold QUICK |
||
off. |
|||
|
CHILL + PANTRY to return to operating |
||
|
|
||
|
|
mode. |
|
|
Appliance opened frequently. |
Do not open the appliance |
|
|
unnecessarily. |
||
|
|
||
|
|
|
|
|
The ventilation openings |
Remove obstacles at the ventilation |
|
|
openings located at the base of the unit and |
||
|
have been covered. |
||
|
in the refrigerator interiors. |
||
|
|
||
|
|
|
|
|
A large amount of product, or |
The compressor will run more than |
|
|
normal until the product cools. The |
||
|
warm product was placed |
||
The compressor is |
into the appliance. |
more that is added, the longer the motor will |
|
|
run. |
||
constantly running or |
|
|
|
|
Avoid placing the unit in direct sunlight, or |
||
running too much. |
|
||
|
Excessively warm environment. |
near a heat source. If the appliance is in an |
|
|
unusually warm environment, the |
||
|
|
compressor will run more. |
|
|
|
|
|
|
|
Extend the leg height to improve air |
|
|
Leveling legs are not extended. |
circulation. This will reduce the amount of |
|
|
|
time the compressor needs to run. |
|
|
|
|
|
|
|
Inspect the condition of the gasket. If |
|
|
Door gasket is not sealing. |
damaged, cold air can escape the cabinet |
|
|
and cause the compressor to run more |
||
|
|
||
|
|
than normal. |
|
Control panel LED lights and |
|
The top drawer must be open for the |
|
display do not illuminate. |
|
||
Drawer is closed. |
control panel to illuminate and be |
||
Control buttons do not |
|||
|
functional. |
||
function. |
|
||
|
|
||
|
|
Increase the temperature. See “Setting the |
|
|
Temperature has been set too |
temperature”. |
|
|
low. |
Make sure the unit is not in “Quick |
|
Food products and beverages |
|
Chill” mode. |
|
in the unit are too cold. |
Product placed too close to |
Rearrange the bottles, so that nothing |
|
|
|||
|
ventilation holes. |
obstructs the interior ventilation holes. |
|
|
|
|
Page |12
 Loading...