


INSTALLATION GUIDE
GUIDE D'INSTALLATION
GUIA DE INSTALACION
Model/Modele/Modelo
T24UR925RS
T24UR925LS
T24UR915RS
T24UR915LS
T24UR905RP
T24UR905LP
Glass Door Refrigerator Verre Porte Frigo Refrigerador Puerta de Vidrio
Page | 1

IMPORTANT: Before you begin, read these instructions completely and  carefully.
INSTALLER: Please leave this manual with owner for future reference.
OWNER: Save these installation instructions for local electrical inspector’s use and for future reference.
Table of Contents
Important Safety Instructions ….…………. 3
-Inspect the Glass Door Refrigerator
Tools needed for installation …………….. 4
Materials supplied …………….………….… 4
Installing the appliance ……………………. 5
-Transporting
-General measures
-Installation location
-Installing Side-by-Side
Ventilation ……………………………………. 9
Connecting the appliance ………………… 9
-Electrical connection
Door opening …………………………………11
Installing the anti-tip-brackets ……………..13
Installing the overlay frame ………………..17
Customer Service Information …………… 21
Addendum A ………………………………… 22
Page |2

 Important Safety Instructions
READ AND SAVE THESE INSTRUCTIONS!
These installation instructions are intended for use by qualified installers.
In addition to these instructions, the appliance shall be installed:
•In the United States, in accordance with the National Electric Code/State and municipal codes and/or local codes.
•In Canada, in accordance with the Canadian Electric Code C22.1 – latest edition/Provincial and Municipal codes and/or local codes.
Be sure to observe all listed warnings and cautions.
Look for the triangles with exclamation marks inside.
WARNING:
This indicates that death or serious injury may result due to non-observance of this warning.
CAUTION:
This indicates that minor or moderately severe injury may result due to non-observance of this warning.
NOTE:
This is used to draw the user’s attention to something in particular.
.
Important
•NEW INSTALLATION – If the appliance is a new installation, most of the work must be done before the unit is moved into place.
•REPLACEMENT – If the appliance is replacing another appliance, the connections for the appliance being replaced must be checked for compatibility with the new unit and replaced as necessary.
Inspect the Glass Door Refrigerator
Remove all tape, packaging and plastic covers.
After unpacking the appliance and prior to installation, thoroughly inspect the Glass Door Refrigerator for possible freight or cosmetic damage. Report any damage immediately.
NOTE: Please do not discard any bags or items that come with the original package until after the entire installation has been completed!
Page | 3
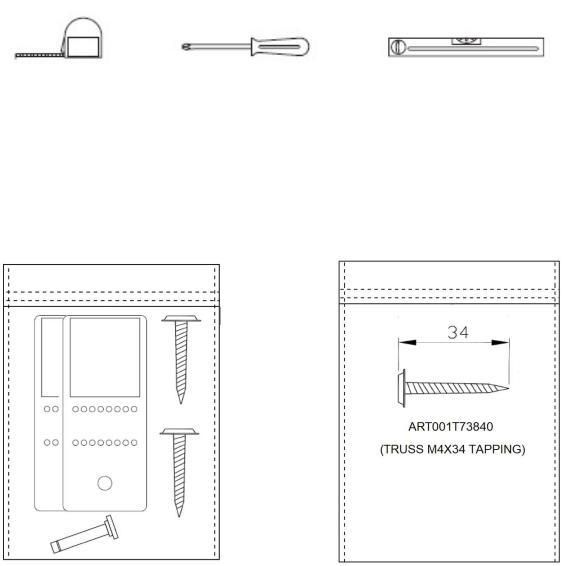
Tools needed for installation
Tape Measure |
Philips Screwdriver |
Level |
These are the tools that you may need for the installation of the appliance. However, if you need to modify the counter or cabinetry to fit the unit, you may need other tools to make counter/cabinetry modifications before installing the appliance.
Materials supplied
Anti-tip-bracket.2 pieces. |
Screws for Overlay Panel: |
Screws: 2 pieces. |
ART001T73840(TRUSSM4X34 |
Door Stopper Pin: 1 |
TAPPING). 8 pieces. ONLY FOR |
1 Insulating Foam (Not |
T24UR905LP AND T24UR905RP |
MODELS. |
|
illustrated) 20 1/2” |
|
(520mm)x 29 1/8” (740mm) |
|
x 1/8”(3mm) |
|
Page |4
Installing the appliance
Most of the installation work must be done before the Glass Door Refrigerator is moved into place. Have a qualified technician install and connect the appliance according to the enclosed installation instructions.
 WARNING:
Do not install this appliance:
-Outdoors
-In an environment with dripping water
-In rooms where there is a risk of frost
Transporting
The appliance is heavy and must be handled with caution during transportation and installation. Because of the weight and dimensions of the appliance, at least two persons are necessary to move the appliance into position securely and avoid injuries to people or damage to the appliance.
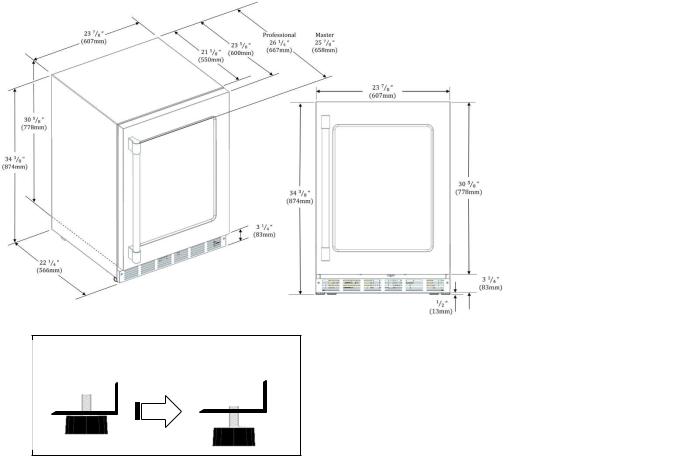
General measures
Note: With the legs fully retracted the appliance has a minimum dimension of 34 3/8” from top to bottom. The legs can be extended up to 1/2” (13mm).
Measurements in inches (mm)
All legs are adjustable by up to ½ inch.
Page | 5

Installation location
A dry, well ventilated room is suitable as an installation location. The installation location should not be exposed to direct sunlight and not placed near a heat source, e.g. a cooker, radiator, etc.
If installation next to a heat source is unavoidable, use a suitable insulating plate or observe the following minimum distance from the heat source:
▪To electric or gas oven/range 1¼” (3 cm).
▪To an oil or coal-fired cooker 1113/16” (30cm).
▪To another Refrigerator or Wine Reserve 1” (2.54cm).
The floor of the installation location must not give way; if necessary, reinforce floor. The appliance must be upright and level to function correctly.
For proper operation and appearance of the unit, the cabinet opening should be square and have dimensions as shown in the next diagrams.
TOP VIEW
FRONTAL VIEW
Page |6
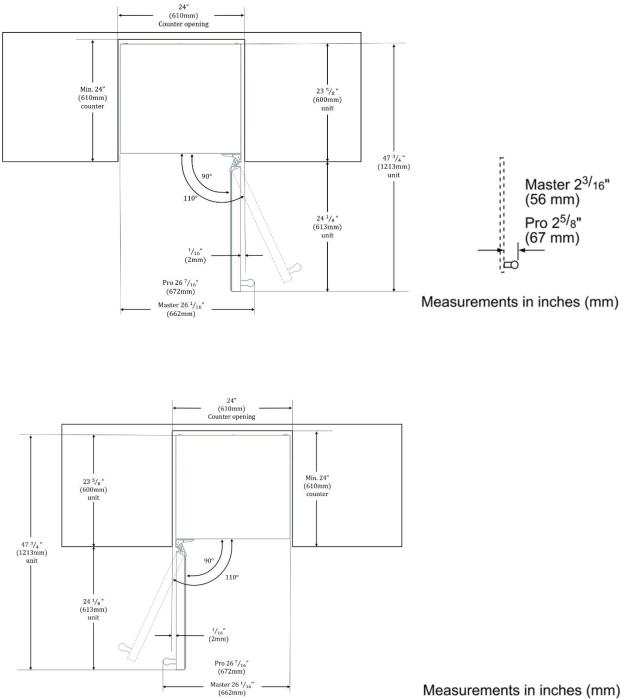
TOP VIEW OPEN RIGHT SWING
TOP VIEW OPEN LEFT SWING
Page | 7

Installing Side-by-Side
The appliance can be installed next to another Thermador appliance. Follow the next dimensions and notes for the correct installation of the appliance in a side-by-side layout.
NOTE: Before placing the unit into the niche, adhere the Insulating Foam (included with the product) on the side of the unit that will be placed next to the additional appliance. Be sure that the Insulating Foam is even with the surface of the unit and that there are no bubbles or bumps on the Insulation Foam after adhering it to the unit.
Side of the unit next to the other appliance.
Insulating Foam
Included with the unit.
Install the appliances in a “French Door” configuration; appliances with Left Hinge should be opposite to another with Right Hinge.
Page |8
 Loading...