

Teac MC-DX90i Owner's Manual
VIDEO
IN
Wall socket
TV (monitor) etc.
AM loop antenna
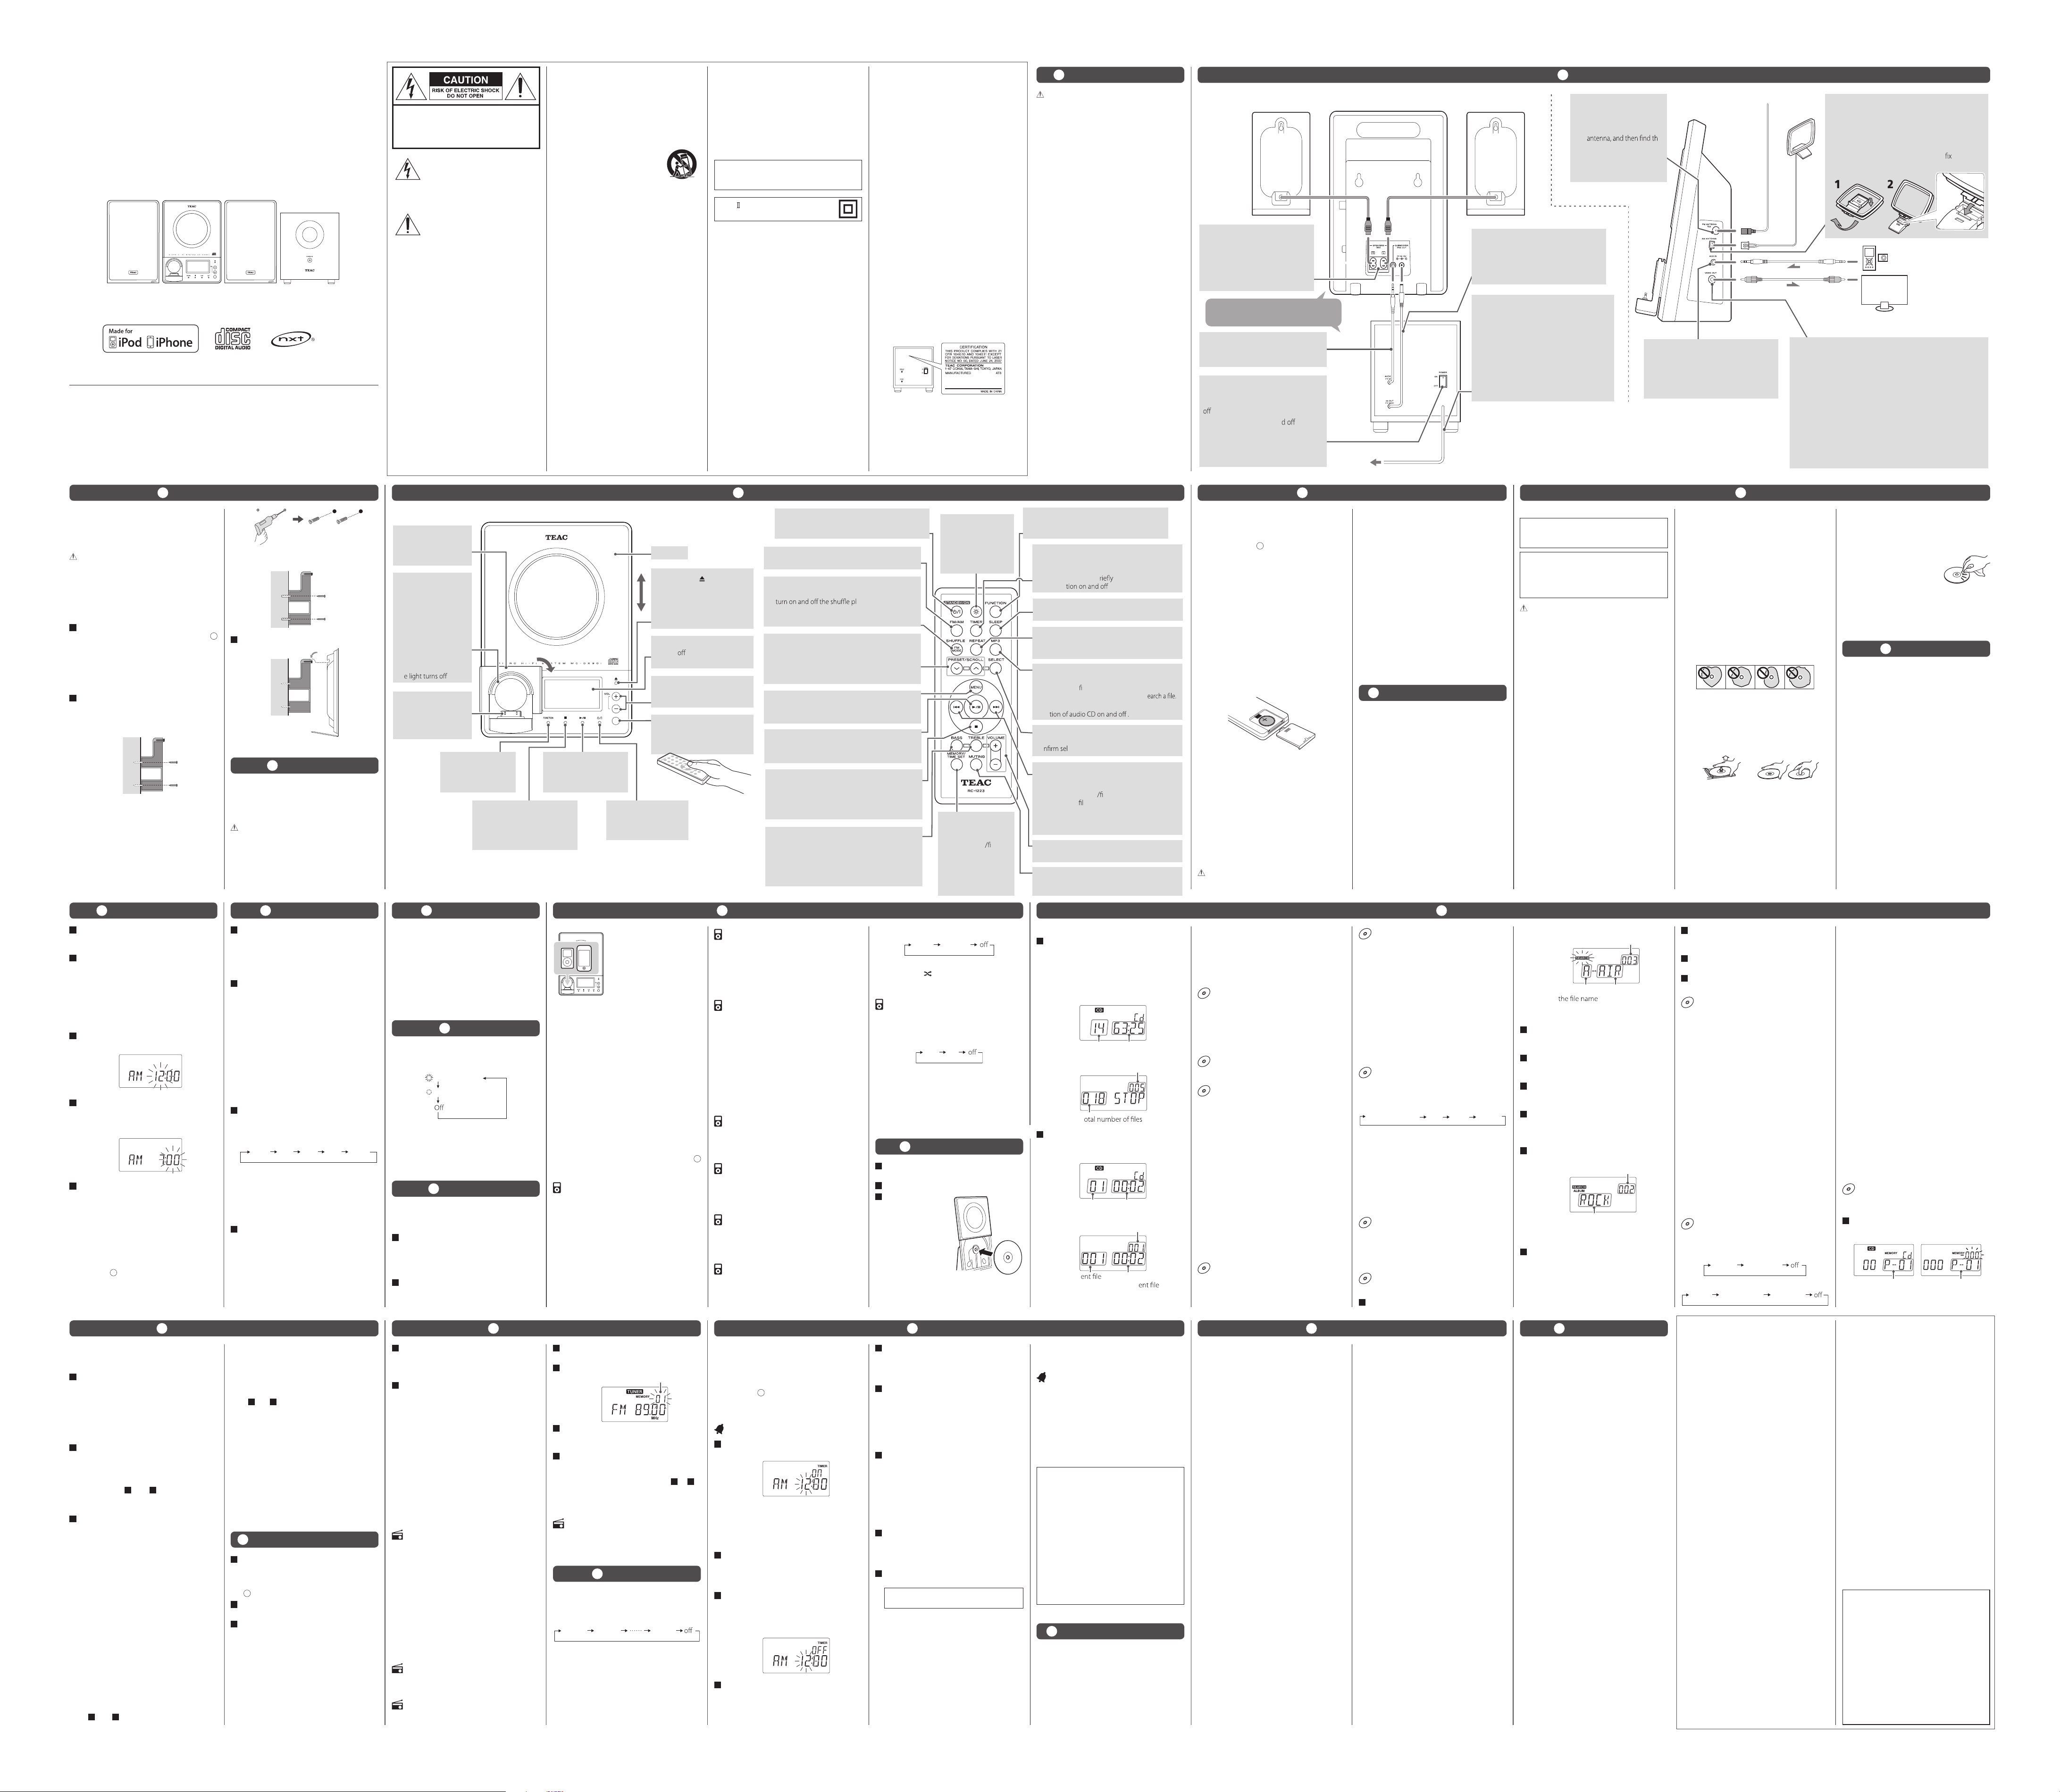
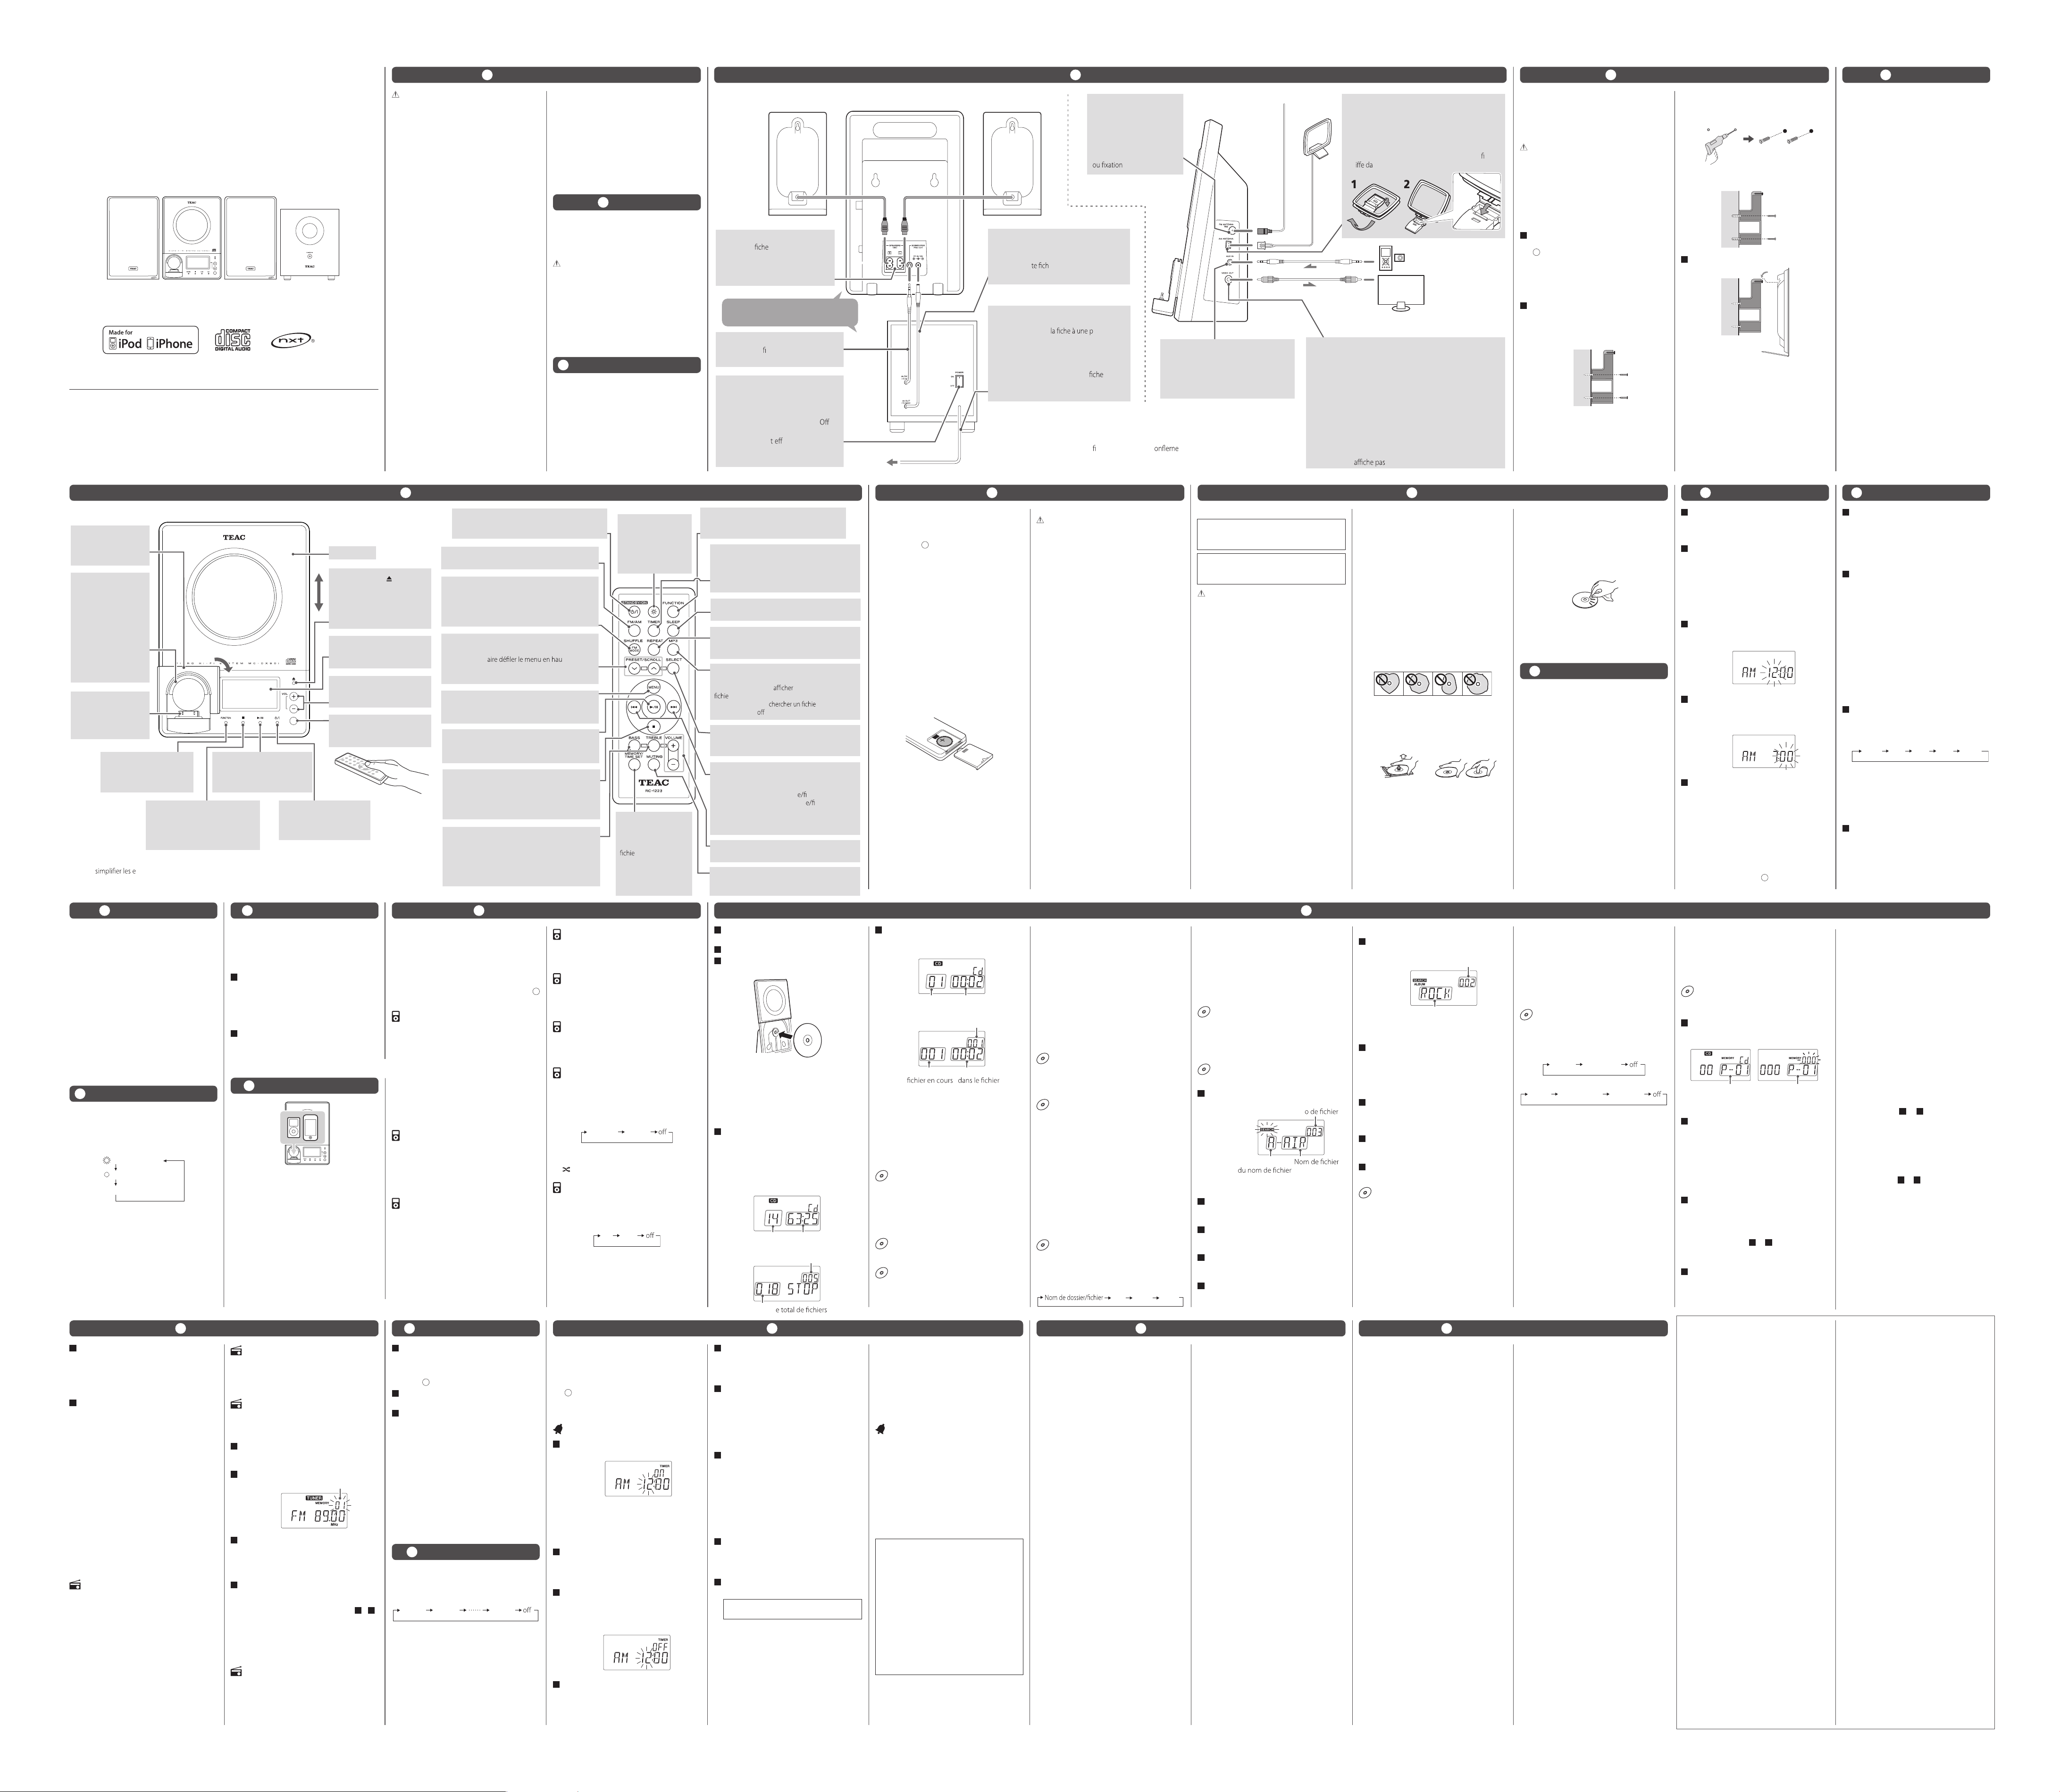
Connect the supplied AM loop antenna to the AM
ANTENNA terminal.
Place the antenna in the direction which gives the
best reception.
To stand the loop antenna on a surface,
the claw to
the slot in the antenna base.
VIDEO OUT
This terminal outputs video signal from an iPod connected to the
dock of the MC-DX90i.
Connect the unit to the composite video connector of a television
or monitor using commercially available RCA (pin) video cable.
If your iPod has the TV Out options, set it to “Yes” or “Ask”.
(iPod main menu
w
Videos w Settings w TV Out)
o
When you have set the TV Out option to “Ask”, each time you
play a video your iPod prompts you to specify whether to
output it to a TV.
o
When you output video signal to a TV through this unit, the
video is not displayed on the iPod's display.
FM antenna
Connect the supplied FM
antenna to the FM 75Ω
ANTENNA terminal. Extend
the
e
best position for reception.
Attach it to a window frame or
wall with thumbtacks or the
like.
AC IN (Subwoofer)
After all other connections have been
completed, connect the plug to an AC wall
socket.
B
Be sure to connect the power cord to an
AC outlet which supplies the correct
voltage.
B
Hold the power plug when plugging or
unplugging the power cord. Never pull
or yank on the power cord.
B
After all connections are complete, connect the power cord’s plug to the AC wall socket.
o
Read the instructions of each device that you intend to use with this unit.
o
Be sure to connect each plug securely. To avoid hum and noise, do not bundle the connection
cords.
SPEAKERS
Connect the left speaker’s plug to L,
and the right speaker’s plug to R.
B
Do not connect anything other
than the supplied speakers to
these terminals.
SUBWOOFER PRE OUT cable
Connect this plug to the SUBWOOFER
PRE OUT terminal of the main unit.
DC cable
(Power supply from the subwoofer
to the main unit)
Connect this plug to the DC IN terminal of
the main unit.
AUX IN
You can connect a portable audio player to
this jack.
Connect the PHONES jack (audio output
jac
k) of the player using the supplied stereo
mini plug cable.
POWER switch of the Subwoofer
(Main power switch)
Use this switch to turn the system on and
.
o
When this switch is turne , the clock
and the wake up timer settings kept in
memory will be erased. However, the
preset s et tings of FM/A M wil l be
retained in memory.
Back of the main unitBack of the Speaker (R) Back of the Speaker (L)
Back of the
Subwoofer
Side of the
main unit
Place the subwoofer at least 2 feet (60 cm)
away from the main unit.
equipment does cause harmful interference
to radio or television reception, which can be
determined by turning the equipment o and
on, the user is encouraged to try to correct the
inter ference by one or more of the following
measures:
• Reorient or relocate the equipment and/or the
receiving antenna.
• In crease the sep ar ation b etween t he
equipment and receiver.
• Connect the equipment into an outlet on a
circuit dierent from that to which the receiver
is connected.
• Consult the dealer or an experienced radio/TV
technician for help.
CAUTION
Changes or modications to this equipment not
expressly approved by TEAC CORPORATION for
compliance will void the user’s warranty.
This pr od uc t h as be en de si gn ed an d
manufactured according to FDA regulations
“title 21, CFR, chapter 1, subchapter J, based
on the Radiation Control for Health and Safety
Act of 1968”, and is classied as
class 1 laser
product. There is not hazardous invisible laser
radiation during operation because invisible
laser radiation emitted inside of this product is
completely conned in the protective housings.
The label required in this regulation is as follows:
Back of the subwoofer
Optical pickup
Type: SF-P200Z
Manufacturer: SANYO Electric Co., Ltd.
Laser output:
Less than 0.5 mW on the objective lens
Wave length: 765 - 815 nm
unit will turn o (enter standby) when the o
time is reached.
Turning on and o the wake up
timer
Press the TIMER button brie y to turn the
wake up timer on and o.
o When the timer is turned on, the timer
settings are displayed one by one, and the
TIMER indicator appears on the display.
o When the wake up timer is turned o, the
“TIMER” indicator disappears from the display.
TEAC CORPORATION
1-47 Ochiai, Tama-shi, Tokyo 206-8530 Japan
Phone: (042) 356-9156
TEAC AMERICA, INC.
7733 Telegraph Road, Montebello,
California 90640 U.S.A.
Phone: (323) 726-0303
TEAC CANADA LTD.
5939 Wallace Street, Mississauga,
Ontario L4Z 1Z8, Canada
Phone: (905) 890-8008
TEAC MEXICO, S.A. DE C.V.
Río Churubusco 364, Colonia Del Carmen,
Delegación Coyoacàn, CP 04100, México DF, México
Phone: (5255)5010-6000
77-20DX90I00000
Z
MC-DX90i
Thank you for choosing TEAC.
Read this manual carefully to get the best performance from this unit.
The unit can be programmed to turn on and
turn to standby at a specied time.
You can set the unit to play an iPod/iPhone, CD,
or FM/AM sound.
o Adjust the clock before setting the wake up
timer (see “10 Setting the Clock”).
o These operations are available in every sound
source.
Setting the wake up timer
1
Press and hold the TIMER bu tton for
more than 2 seconds.
Example:
“TIMER” and “on” appear on the display.
The hour value starts blinking.
o If there is no operation for 10 seconds ,
the wake up timer setting mode will be
cancelled.
2
Press the Skip (.//) button to set
the p ower on time (hour), and t hen
press the TIMER button.
The minute value starts blinking.
3
Press the Skip (.//) button to set
the power on time (minute), and then
press the TIMER button.
“TIMER” and “OFF” appear on the display.
The hour value starts blinking.
Example:
4
Press the Skip (.//) button to set
the power o time (hour), and then
press the TIMER button.
The minute value starts blinking.
5
Press the Skip (.//) button to set
the power o time (minute), and then
press the TIMER button.
The sound source starts blinking.
6
Press the Skip (.//) button to select
a sound s ource (“iPo d” , “ CD ” or
“TUNER”), and then press the TIMER
button.
The volume value starts blinking.
o You can not select “AUX (External source)” as
a sound source.
7
Press the Skip (.//) button to set
the volume, and then press the TIMER
button.
o The volume cannot be set lower than 10.
Setting the wake up timer is now completed
and the timer is turned on.
The timer settings are displayed one by one,
and the “TIMER” remains on the display.
8
Prepare the source.
“iPod”
e Set an iPod/iPhone.
“CD” e Set a disc.
“TUNER” e Tune in to a station.
9
Press the STANDBY/ON (¤) button to
turn the unit to standby.
Be sure to turn the unit to standby, or
the wake up timer will not work.
The unit will turn on and turn to standby at
the specied time every day.
o When the POWER switch on the rear panel
of the subwoofer is turned o, the wake up
timer setting kept in memory will be erased.
o When the unit is turned on by the wake up
timer, playback volume will gradually increase
up to the set volume.
o If the source is set to “iPod” or “CD” but no
iPod/iPhone or CD is set, the unit will turn on
with the last selected radio station.
o If the unit is on when the on time is reached,
the wake up timer won’t work. However, the
If you have problems with your unit, check the
following items before calling your dealer or
TEAC service center.
No power
e Che ck the con nec tion to the AC power
supply. Check and make sure the AC source
is not a switched outlet. If it is, conrm the
switch is turned on. Make sure there is power
to the AC outlet by plugging another item
such as a lamp or fan.
e Turn on the
POWER switch on the rear panel
of the subwoofer.
No sound from speakers.
e Select the source by pressing the FUNCTION
button.
e Check the connection to the speakers.
e Adjust the volume.
e If “MUTING” is shown on the display, press
the MUTING button.
The sound is noisy.
e The unit is too close to a TV or si milar
appliances. Install the unit apart from them,
or turn them o.
Remote control doesn’t work.
e Press the STANDBY/ON (
¤) button to turn
the
unit on.
e When the battery has run out, replace with a
new one.
e Use remote control unit within the range
(16 ft/5 m) and point at the front panel.
e Clear obstacles between the remote control
unit and the main unit.
e If a strong light is near the main unit, turn it
o.
CD Player
Will not play.
e Load a disc with the label side facing you.
e If the disc is dirt y, clean the surface of the
disc.
e A blan k d is c may b e loaded. Load a
prerec
orded
disc.
e Depending on the disc, etc. it may not be
possible to playback CD-R/RW discs. Try
again with another disc.
e You cannot playback unnalized CD-R/RW
discs. Finalize such a disc in a CD recorder
and try again.
Sound skips.
e Place the uni t on a stable place to avoid
vibration and shock.
e If the disc is dirt y, clean the surface of the
disc.
e Do not use scratched, damaged or warped
discs.
Cannot open the CD door.
e Sel ect “CD
” by pr ess ing the FUN CTI ON
button
.
iPod/iPhone Player
Cannot insert the iPod/iPhone.
e Remove dust or obstacles f rom the Dock
connec tor of the MC-DX90i and the iPod/
iPhone, and insert the iPod/iPhone again.
Will not play.
e Remove the iPod/iPhone from the dock, wait
a few seconds, and insert it again.
e Software update may solve the problem.
Tuner
Cannot listen to any station, or signal is too
weak.
e Tune in to the station properly.
e For FM stations, rotate the FM antenna.
For
AM stations, rotate the main unit or relocate
the main unit.
When the source is “FM RADIO”, though the
broadcast is stereo, it sounds monaural.
e Press the FM MODE button.
If normal operation cannot be recovered,
unplug the power cord from the outlet and
plug it again.
Note for use with an iPod touch/iPhone
(When using the wake up timer of the
MC-DX90i with an iPod touch/iPhone as
the sound source)
o Af ter setting the iPod touch/iPhone, do
not turn o the iPod tou
ch/iPhone by
sliding the slider of “Slide to power o”.
(The screen of the iPod touch/iPhone can
be turned o without any problem.)
o You cannot use the Video of the iPod
touch/iPhone as a sound source. When
you use an iPod touch/iPhone that is in
Video mode with the wake up timer, the
MC-DX90i will not start playback from the
Video but will start playback from the
music list of iPod touch/iPhone.
IMPORTANT SAFETY
INSTRUCTIONS
1) Read these instructions.
2) Keep these instructions.
3) Heed all warnings.
4) Follow all instructions.
5) Do not use this apparatus near water.
6) Clean only with dry cloth.
7) Do not block any ventilat ion openings.
Install in accordance with the manufacturer’s
instructions.
8) Do not install near any heat sources such as
radiators, heat registers, stoves, or other
apparatus (including ampliers) that produce
heat.
9) Do not defeat the safety purpose of the
polariz ed or groun ding -t ype plug. A
polarized plug has t wo blades with one
wider than the other. A grounding type plug
has two blades and a third groundin g
prong. The wide blade or the third prong
are provided for your safety. If the provided
CAUTION: TO REDUCE THE RISK OF ELECTRIC
SHOCK, DO NOT REMOVE COVER (OR BACK).
NO USER-SERVICEABLE PARTS INSIDE. REFER
SERVICING TO QUALIFIED SERVICE PERSONNEL.
The li gh tn ing as h wi th a rr ow he ad
symbol, with in an equilateral tria ngle, is
intended to alert the user to the presence
of uninsulated “dangerous voltage” within
the p rodu ct’s e nclosure t hat may be of
sucient magnitude to constitute a risk of
electric shock to persons.
The exclamation point within an equilateral
triangle is intende d to a lert t he user to
the presence of impor
tant operating and
maintenance (servicing) in
structions in the
literature accompanying the appliance.
CAUTION
o DO NOT REMOVE THE EXTERNAL CASES OR
CABINETS TO EXPOSE THE ELECTRONICS. NO
USER SERVICEABLE PARTS ARE WITHIN!
o IF YOU ARE EXP ER IENCI NG PR OB LEMS
WITH THIS PRODUCT, CONTAC T TEAC FOR
A SERVI CE RE FER RAL. DO NOT USE TH E
PRODUCT UNTIL IT HAS BEEN REPAIRED.
o USE OF CONT ROLS OR ADJUSTMENTS OR
PERF ORMANCE OF PROCEDURE S OTHER
THAN THOSE SPECIFIED HEREIN MAY RESULT
IN HAZARDOUS RADIATION EXPOSURE.
WA RNIN G: TO PR EV EN T FIRE OR SH
OCK
H
AZARD, DO NOT EXPOSE THIS APPLIANCE TO
RAIN OR MOISTURE.
plug does not t into your outlet, consult an
electrician for replacement of the obsolete
outlet.
10) Protect the power cord from being walked
on or p inch ed par ticularly at plu gs ,
convenience receptacles, and the point
where they exit from the apparatus.
11) Only use attachments/accessories specied
by the manufacturer.
12) Use only with the cart, stand,
t ri po d, br a ck et, or t ab l e
specied by the manufacturer,
or so ld with th e ap paratus .
When a cart is used, use caution
w hen m ovi ng t h e c a rt/a p par at u s
combination to avoid injury from tip-over.
13) Unplug this apparatus during lightning
storms or when unused for long periods of
time.
14) Refer al l se rvic ing to quali ed service
personnel. Servicing is required when the
apparatus has been damaged in any way,
su ch as po wer-su pply cord or plug is
damaged, liquid has been spilled or objects
have fallen into the apparatus, the apparatus
has been exposed to rain or moisture, does
not operate normally, or has been dropped.
o Do not expose this apparatus to drips or
splashes.
o Do not place any objects lled with liquids,
such as vases, on the apparatus.
o Do not install this apparatus in a conned
space such as a book case or similar unit.
o The apparatus draws nominal non-operating
power from the AC outlet wit
h its
POWER or
STANDBY/ON switch not in the ON position.
o
Th e ap pa ratus s hould be loc ated close
enough to the AC outlet so that you can easily
grasp the power cord plug at any time.
o The mains plug is used as the disconnect
device, the disconnect device shall remain
readily operable.
o If the pro duct uses batteries (including a
battery pack or installed bat teries), they
should not be exposed to sunshine, re or
excessive heat.
o CAUTION for products that use replaceable
lithium batteries: there is danger of explosion
if a battery is replaced with an incorrect type
of battery. Replace only with the same or
equivalent type.
o Caut ion shoul d be tak en when usi ng
earphones or headphones with the product
because excessive sound pressure (volume)
from earphones or headphones can cause
hearing loss.
For U.S.A.
This equipment has been tested and found
to comply with the limits for a Class B digital
device, pursuant to Part 15 of the FCC Rules.
These
limits are designed to provide reasonable
protection against harmful interference in a
re side nti al in stal latio n. Thi s equip ment
gen era te s, use s, an d c an r adia te rad io
frequency energy and, if not installed and used
in accordance with the instructions, may cause
harmful interference to radio communications.
However, there is no guarantee that interference
will not occur in a particular installation. If this
are covered by warranty, we will pay the return shipping
charges to any destination within the country in which
the product was purchased. Whenever warranty service
is required, you must present the original dated sales
receipt, or other proof indicating the purchase place and
date, as proof of warranty coverage.
LIMITATION OF IMPLIED WARRANTIES
ALL IMPLIED WARRANTIES, INCLUDING WARRANTIES OF
MERCHANTABILIT Y AND FITNESS FOR A PARTICUL AR
PURPOSE, ARE LIMITED IN DURATION TO THE LENGTH OF
THIS WARRANTY.
EXCLUSION OF DAMAGES
TEAC’S LIABILITY FOR ANY DEFECTIVE PRODUCT IS LIMITED
TO REPAIR OR REPLACEMENT OF THE PRODUCT, AT TEAC’S
OPTION. TEAC SHALL NOT BE LIABL E FOR DAM AGE
BASED UPON IN CONVENIENCE, LOSS OF USE OF THE
PRODUCT, INTERRUPTED OPERATION, COMMERCIAL LOSS
OR LOST PROFITS, OR ANY OTHER DAMAGES, WHETHER
INCIDENTAL, CONSEQUENTIAL, PUNITIVE OR OTHERWISE.
SOME S TAT ES OR PR OV INCE S D O N OT ALL OW
LIMITATIONS ON HOW LONG AN IMPLIED WARRANTY
LASTS AND/OR DO NOT ALLOW THE EXCLUSION OR
LI MITATION OF IN CID ENTAL OR CONSEQUENT IAL
DAMAGES, SO THE ABOVE LIMITATIONS AND EXCLUSIONS
MAY NOT APPLY TO YOU.
THIS WARRANTY GIVES YOU SPECIFIC RIGHTS, AND MAY
VARY FROM SOME OF THE RIGHTS PROVIDED BY LAW.
THESE RIGHTS MAY VARY FROM STATE TO STATE OR
PROVINCE TO PROVINCE.
To Locate An Authorized Service Center In The United States
CALL 1-800-447-TEAC
CONSUMER AUDIO LIMITED WARRANTY
This product is warranted by TEAC AMERICA, Inc. or TEAC
CANADA Ltd., dependent upon the country in which the
original purchase was made, against defects in materials
and workmanship.
Length of War ranty. The parts and labor warranty will be
eective for one (1) year from the date of the original
.sesoprup laicremmoc rof desu ton stcudorp rof esahcrup
For products used commercially, the warranty is ninety
(90) days for magnetic heads and optical pickups, one (1)
year for all other parts and ninety (90) days for labor.
Who M ay Enforc e This Wa rranty . This warranty is valid
only in the United States or Canada, dependent upon
the country in which original purchase was made, and
enforceable only by the original purchaser within the
country in which the purchase was made.
What Is Not Co vered by This Warranty
1. Damage to or deterioration of the external cabinet.
2. Damage resulting from accident, misuse, abuse, or
neglect.
3. Damage resulting from failure to follow instructions
contained in the products owners’ manual or otherwise
provided with the product.
4. Damage occurring during shipment of the product
(Claims must be presented to the carrier).
5. Damage resulting from the repair or attempted repair
by anyone other than TEAC or an authorized TEAC.
6. Damage resulting from modication or attempte d
modication of product not authorized by TEAC.
7. Damage resulting from causes other than product
defects, including lack of technical skills, competence,
or experience of the user.
8. Damage to any unit that has been altered or which the
serial number has been defaced, modied or removed.
What TEAC W ill Pay For. TEAC will pay all labor and material
expenses for items covered by the warranty. Payment of
shipping charges is covered in the next section.
How To Obtain Warrant y Service. Your unit must be serviced
by an authorized TEAC service station within the country
in which the product was purchased. If you are unable to
locate an authorized service station in your area, please
contact TEAC at the applicable address shown at the
end of this warranty statement. PLEASE DO NOT RETURN
YOUR UNIT TO TEAC WITHOUT OUR PRIO R AUTHORIZATION.
You must pay shipping charges if it is necessary to ship
the product for service. However, if the necessary repairs
NXT is a trad emark of HiWave Technologies plc.
MPEG Layer-3 audio coding technology licensed from Fraunhofer IIS and Thomson.
This product is protec ted by certain intellectual propert y rights of Microsoft. Use or distribution of such technology outside of this
product is prohibited without a license from Microsoft.
iPhone, iPod, iPo d classic, iPod nano, and iPod touch are trademarks of Apple Inc., registered in the U.S. and other countries.
“Made for iPod” and “Made for iPhone” mean that an electronic accessory has been designed to connect specically to iPod or iPhone,
respectively, and has been cer tied
by the developer to meet Apple performance standards.
Apple is not responsible for the op eration of this device or its compliance with safety and regulator y standards.
Please note that th e use of this accessory with iPod or iPhone may a ect wireless per formance.
Other company names and produc t names in this document are the trademarks or registered trad emarks of their respec tive owners.
0611.MA-1716A
The included remote control allows this unit to
be operated from a distance.
When operating the remote control unit, point it
towards the remote sensor on the front panel of
the main unit (see “5 Identifying the Parts”).
o Even if the remote control unit is operated
within the eective range (16 ft/5 m), remote
control operation may be impossible if there
are any obstacles between the unit and the
remote control.
o If the remote control unit is operated near
other devices that generate infrared rays, or
if other remote controls that use infrared rays
are operated near the unit, this unit might
operate incorrectly. The other devices might
also operate incorrectly.
Battery Installation
1 Remove the battery compartment cover.
2 Put the lithium battery (CR2032, 3 V) in with
the “+” side up.
3 Close the cover.
Battery Replacement
If the distance required between the remote
control unit and main unit decreases, the battery
is exhausted. In this case replace the battery
with a new one.
o For inf orm at ion a bout the col lection
of bat teries, pleas e co ntact y ou r local
municipality, your waste disposal service, or
the place where you purchased them.
Precautions concerning batteries
Misuse of bat teries could cause them to
rupture or leak, leading to re, injury or the
staining of nearby things. Please read and
observe the following precautions carefully.
o Be sure to insert the battery with the positive
“+” an d negative “–” polarities correctly
positioned.
o If the battery leaks, wipe away the leakage
inside the battery compartment and replace
the battery with a new one.
o If the remote control unit is not to be used
for a long time (more than a month), remove
the battery from the remote control unit to
prevent it from being exhausted.
o Do not use any batteries other than those
specied.
o Do not heat or disassemble batteries. Never
throw them in re or water.
o Do not carry or store batteries with other
metallic objects. The batteries could shor t
circuit, leak or explode.
CLASS
apparatus with double insulation,
and no protective earth provided.
1
Connect the PHONES jack (audio output
jack) of a portable audio player to the
AUX IN j ack of t he MC-DX90i using
supplied stereo mini plug cable (see
“
2
Connections”).
2
Press the FUNCTION button to select
“AUX”.
3
Play the source, and then adjust the
volume of both the MC-DX90i and the
connected audio player.
o When using the PHONES jack of your portable
audio player, you have to adjust the volume
of the portable audio player or you might not
hear any sound from the MC-DX90i.
o
Turning the volume of the por table audio
player up too high may cause audio distortion.
If this happens, reduce the volume of the
portable audio player until the distortion
stops, and then ad
just the volume of the
MC-DX90i to a comfortable listening level.
Micro Hi-Fi System
OWNER’S MANUAL
1
Before Using the Unit
2
Connections
CAUTION
o Do not tilt the unit with a disc inserted. It may
damage the disc and cause a malfunction.
o Do not move the unit during disc playback.
During playback, the disc rotates at high
speed.
Do not lift or move the unit during playback.
Doing so might damage the disc or the unit.
o The voltage supplied to the unit should
match the voltage as printed on the rear
panel of the subwoofer. If you are in any
doubt re garding this matter, consult an
electrician.
o Do not open the cabinet because this might
result in damage to the circuitry or electrical
shock. If a foreign object should get into the
unit, contact your dealer or service company.
o When removing the AC power plug from the
wall socket, always pull directly on the plug,
never yank on the cord.
o Always remove the disc before relocating or
moving this unit. Moving the unit with a disc
inside it could cause mal
functi
on.
Placement of the unit
o Choose the installation location of your unit
carefully. Avoid placing it in direct sunlight or
close to a source of heat. Also avoid locations
subject to vibrations and excessive dust, heat,
cold or moisture.
o
As t he unit may becom e war m durin g
op eration, always leav e sucie nt space
around it for ventilation. Make sure there is at
least 8” (20 cm) of space above and at least 2”
(5 cm) of space on
back and each side of the
unit. Do not place anything on top of the unit.
o Do not place the unit on an amplier, a
receiver or any other device that generates
heat.
o When the unit is turned on, if a TV is turned
on nearby lines might appear on the TV
screen depending on the frequency of the
TV broadcast. This is not a malfunction of the
unit or the TV. If you see such lines, move the
unit and the TV further apart.
Remote Sensor
When operating the remote
control unit, point it towards
here.
Display
o
Turns when the iPod/iPhone
guide is in horizontal position.
STANDBY/ON (¤)
Press this button to turn the unit on and put it into
standby.
Standby/On (¤)
Press this button to turn
the unit on and put it into
standby.
FUNCTION
Press this button to select a source (iPod, CD, FM,
AM, or AUX).
FUNCTION
Press this button to
select a source (iPod,
CD, FM, AM, or AUX).
iPod/iPhone guide
You can rotate this guide
90 degrees to the right.
When in vertical position
Lights in blue when the
unit is turned on. You can
change the brightness by
pressing the D
IMMER
button on the remote
control.
When in horizontal position
Th .
iPod/iPhone dock
Insert an iPod/iPhone into
this dock.
You can tilt this back and
forward.
iPhone holder
Set the supplied iPhone
holder when you use an
iPhone.
Open/Close ( )
In CD mode, use this button to
slide open and close the CD
door.
o
This button works only when
the source is “CD”.
CD door
MP3
During playback of MP3/WMA disc, press this button
to display the
le information. When playback of
MP3/WMA is stopped, use this button to s
This button is also used for switching the ESP
func
FM/AM
Press this button to select FM or AM.
SHUFFLE/FM MODE
When the source is “iPod” or “CD”, press this button
to
ayback.
When the source is “FM”, press this button to select
Stereo or Mono.
PRESET/SCROLL (j/k)
When the source is “iPod”, press these buttons to
scroll up and down the menu.
When the source is “FM” or “AM”, press these
buttons to select a preset station.
Volume (+/–)
Use these buttons to adjust the volume.
VOL (+/–)
Use these buttons to adjust the
volume.
Stop (8)
When the source is “CD”, use this button to stop
playback.
o
This button doesn’t work when the source is
“iPod”.
BASS
Use this button and the Volume (+/–) buttons to
adjust the level of low frequency sound.
TREBLE
Use this button and the Volume (+/–) buttons to
adjust the level of high frequency sound.
MEMORY/TIME SET
When the source is
“CD”, use this button to
program tracks
les.
When the source is “FM”
or “AM”, use
this button
to preset stations.
This button is also used
for clock adjustment.
Play/Pause (y/9)
When the source is “iPod” or “CD”, press this
button to start or pause playback.
Stop (8)
When the source is “CD”, use this
button to stop playback.
o
This button doesn’t work
when the source is “iPod”.
Play/Pause (y/9)
When the source is “iPod”
or “CD”, press this button to
start or pause playback.
MUTING
Press this button to mute the sound. Press this
button again to restore the sound.
SLEEP
Press this button to set the sleep timer.
TIMER
Hold down this button for more than 2 seconds to
enter the wake up timer setting mode.
Pressing this button b
turns the the wake up
timer func
.
REPEAT
When the source is “iPod” or “CD”, press this
button to set the repeat function.
MENU
When the source is “iPod”, press this button to go
back to the previous menu.
SELECT
When the source is “iPod”, press this button to
co
ection in menus.
(.//)
Skip/Search
When the source is “iPod” or “CD”, use these
buttons to skip tracks
les/songs or to search for a
part of a track/
e/songs.
Tuning
When the source is “FM” or “AM”, use these buttons
to tune in to stations.
DIMMER (¦)
Press this button to
change the brightness
of the display and the
light of the iPod/iPhone
guide.
Note:
To simplify explanations, instructions in this manual might refer to the main
unit or remote control unit only. In such cases, the same controls on the
remote control and main unit will operate similarly.
5
Identifying the Parts
4
Maintenance
11
Basic Operation
12
Mute the Sound
13
Dimmer
14
Tone Control
18
Listening to the Radio
17
Listening to an External Source
19
Sleep Timer
21
Beware of Condensation
20
Wake Up Timer
22
Troubleshooting
15
Listening to an iPod/iPhone
23
Specications
16
Listening to a Disc (continued)
6
Remote Control Unit
8
Discs
7
MP3/WMA Compatibility
Discs that can be played on this unit
CDs that bear the “COMPAC T disc D IGITAL
AUDIO” logo (12 cm).
Do not use 8 cm discs with this unit.
CD -R an d CD- RW discs that have bee n
correctly recorded in the audio CD format
(CD-DA) and nalized.
Finalized CD-R and CD-RW discs that contain
MP3/WMA les.
CAUTION
Play back of any other type of disc could
cause loud noise and damage to speakers
as well as harm hearing. Never play back
any other type of disc.
o Video CDs, CD-ROMs and similar types of
discs can be read by the unit, but they will
make no sound when played back.
o Video and audio DVDs, DVD-ROMs and other
types of DVDs cannot be read and played
back by this unit.
o Copy-protected discs and other discs that do
not conform to the CD standa
rd might not
play correctly in this player. If you use such
discs in this unit, TEAC Corporation and its
subsidiaries will not be responsible for any
consequences or guarantee the quality of
reproduction. If you experience problems
with such non-standard discs, you should
contact their issuers.
About CD-R/CD-RW discs
o Discs created by a CD recorder must be
nalized before use with this unit.
o Depending on disc quality and recording
conditions, playback of some discs might not
be possible. Please see the manual for the
device that you used to create the disc.
o If you are uncertain about the handling of a
CD-R or CD-RW disc, please contact the seller
of the disc directly.
o Printable CD-R and CD -RW discs are not
recommended because their lab el sides
could be sticky and damage the unit.
are not stored in locations where they will
be exp
osed to direct sunlight. They should
also
be kept away from sources of heat, such
as radiators and heat-generating electrical
devices.
Maintenance
o If a disc becomes dirty, wipe
its surface radially from the
center hole outward towards
the outer edge with a soft, dry cloth.
o Never clean discs using chemicals such as
record sprays, antistatic sprays and uids, or
thinner. Such chemicals will do irreparable
damage to the plastic surface
of the disc.
Caution:
Failure to follow these ins tructions may
result in damage to the unit and discs.
o Do not use 8 cm discs.
o Do not play any disc that is warped, deformed
or damaged.
o Do not stick pap ers or protective sheets
on the discs and do not use any protective
coating sprays.
o Use a soft oil-based felt-tipped pen to write
information on the label side. Never use a
ball-point or hard-tipped pen, as this could
cause damage to
the recorded side.
o Nev er u se a s tabilize r. D o n ot use a
commercially available CD stabilizers.
o D o n ot use i rregu larly- sh ape d d isc s
(octagonal, heart-shaped, business card size,
etc.).
Handling precautions
o Always inser t a disc with the label facing
you. Only one side of a Compact Disc can be
played.
o To remove a disc from its storage case, press
down on the center of the case and lift the
disc out, holding it carefully by the edges.
How to remove the disc How to hold the disc
Storage precautions
o Discs should be returned to their cases after
use to avoid dust and scratches that could
cause the laser pickup to “skip.”
o Do not expose discs to dire ct sunlight or
high-temperature and humidity for extended
periods. Long exposure to high temperatures
will warp discs.
o CD-R and CD-RW discs are more sensitive
to the eects of heat and ultraviolet rays
than ordinary CDs.
It is important that they
o File nam es of M P3/WM A shou ld be
alphanumeric characters. This unit cannot
display symbols and full-size or 2 bytes-wide
characters correctly.
o Always include the extension in the le name.
This unit recognizes MP3 les by their “.mp3”,
and WMA les by their “.wma” le extensions.
o The disc must be nalized in order to play.
o The CD-ROM must be ISO 9660 compatible.
o When more than 500 les or 200 folders are
recorded on the disc, the unit might not be
able to play it correctly.
o MP3 le must be mono or stereo MPEG-1
Audio Layer 3 format, 44.1 or 48 kHz, xed
bit-rate. WMA le must have a sampling rate
of 44.1 kHz, and a bit-rate of 192 kbps or less.
o Audio encoded at 128 Kbps should sound
close to regular audio CD quality. Although
this player will play lower bit-rate MP3/WMA
les, the sound quality becomes noticeably
worse.
1
Press the FUNCTION button to select
“FM” or “AM”.
o
You can also use the FM/AM button on the
remote control unit to select directly “FM” or “AM”.
2
Select the station you want to listen to.
e Automatic selection
Hold down the Tuning (
.//) button
until the frequency display begins to change.
When a station is tuned in, the tuning process
will stop automatically.
Repeat this step until the station you want to
listen to is found.
o Press the Tuning (.//) button briey
to stop the auto selection.
e Manual selection
Press the Tun ing (
. // ) bu tton
repeatedly. The frequency changes by a xed
step.
Press t he Tuning (
. / / ) button
repeatedly until the station you want to listen
to is found.
FM mode
Pressing the FM MOD E butto n alternates
between STEREO mode and MONO mode.
STEREO
FM stereo broadcasts are received in stereo and
the “STEREO” indicator lights on the display.
o If the sound is distorted and the “STEREO”
indicator does not appear, the signal is not
strong enough for good stereo reception. In
this case, change to MONO mode.
MONO
To compensate for weak FM stereo reception,
select this mode. Reception will now be force
d
to
monaural, reducing unwanted noise.
If the reception is poor
For the best reception, rotate the FM or AM
antenna until you get stations clearly.
Preset tuning
You can store up to 20 FM stations and 20 AM
stations.
1
Tune in to a station you want to store
(see left).
2
Press the MEMORY button.
Example:
Preset number
3
Within 5 seconds, select a preset channel
to store the station using the PRESET
(j/k) buttons.
4
Within 5 seconds, press the MEMORY
button.
The tuned station is stored.
To store more stations, repeat steps
1
to 4 .
o The preset settings kept in memory will not
be erased even when the POWER switch on
the rear panel of the subwoofer is turned o.
Selecting a preset station
When the source is “FM” or “AM”, press the
PRESET (j/k) but ton repeatedly until the
desired preset station is found.
the spindle and locked in place.
4
Press the Open/Close ( ) button to close
the CD door.
o It takes a few seconds for the unit to load the
disc. No buttons will work during loading.
o When no disc is loaded in the CD player, “NO
DISC” is displayed.
Example: When a CD is loaded
Total tracks Total playing time
Example: When a MP3/WMA disc is loaded
Total number of folders
T
5
Press the Play/Pause (y/9) button to
start playback.
Example: Display during playback
Current track
number
CD
Elapsed time
of current track
Curr
number
Elapsed time
of curr
Current folder number
MP3/
WMA
Playback starts from the rst track/le of the
disc.
1
Press the FUNCTION button to select
“CD”.
2
Press the Open/Close (
) b
utton.
3
Put a disc onto the
center spindle of
the p la yer with
the l a bel side
facing you.
Press the disc onto
the spindle until a
slight “click” is heard
indicating the disc is
mounted correctly.
o This unit cannot play 8 cm discs.
o Never set more than one disc at a time.
o Ensure that the disc is correctly mounted on
o MP3/WMA les that are not placed in folders
are automatically put in the “0 01” (root)
folder. Playback starts from the rst le in the
“001” (root) folder.
o When the playback of all the tracks/les has
nished, playback stops automatically.
Suspending playback
temporarily (pause mode)
Press the Play/Pause (y/9) button during
playback. Playback stops at the current position.
To resume playback, press the Play/Pause (y/9)
button again.
Stopping playback
Press the Stop (8) button to stop playback.
Skipping to the next
or a previous track/le
During playback
e P ress t he S ki p (. // ) b ut tons
repeatedly until the desired track /le is
found. The selected track/le will be played
from the beginning.
When playback is stopped
e P ress t he S ki p (. // ) b ut tons
repeatedly until the track/l e you want
to listen to is found. Then press the Play/
Pause (y/9) button to start playback from
the selected track/le.
o When the . but ton is pressed during
playback, the track/le being played will be
played from the beginning. To return to the
beginning of the previous track/le, press the
. button twice.
Searching for a part of a track/le
During playback, h old down th e Search
button (.//) and release it when the part
you want to listen to is found.
ESP (Electronic Shock Protection)
The ESP function stores music in a buer to
prevent sound from skipping.
This function can be turned on and o when
playing an audio CD. During playback of MP3/
WMA les, this function is always on.
After loading a CD, when playback is stopped,
press the MP3 button to turn this function on
and o.
o The “(ESP)” indicator lights while the unit is
lling the buer.
o We recommend that you place this unit in a
stable location that is free from vibration and
turn the ESP function o when playing an
audio CD.
Displaying MP3/WMA information
During playback of an MP3/WMA disc, when
you press the MP3 button, the display scrolls
the current le information as follows:
Folder/File name
Title
Artist
Album
Press the MP3 button again to cancel the MP3/
WMA information mode.
o “UNKNOWN” appears when the unit cannot
read the information.
o “ NONE ” a pp ea rs when t here is n o
information.
o The rst 15 characters of the le name can be
displayed. The rst 32 characters Title/Artist/
Album can be displayed.
Selecting a folder on the MP3/
WMA disc
Press the SCROLL (j/k) buttons to select a
folder. The rst le of the selected folder will be
played automatically.
Search mode (MP3/WMA only)
Search for the name of a le
1
Press the MP3 button when playback is
You can set the sleep timer so the unit turns
itself to standby after a specied amount of
time. Each time the SLEEP button is pressed,
the setting is changed as follows:
90 min. 75 min. 15 min.
o Select “o” to cancel the sleep timer.
o The display and the light of iPod/iPhone
guide are dimmed while the sleep timer is
activated.
o If you want to check the time remaining until
the unit is switched to standby, press the
SLEEP button once. The remaining time will
be displayed for a few seconds.
o This operation is available in every sound
source.
When the unit is moved from a cold to a warm
place, or used after a sudden tem
perature
cha
nge, there is a danger of condensation on
the lens of CD player; vapor in the air could
condense on the internal mechanism, making
correct operation impossible. To prevent this, or
if this occurs, leave the unit turned on for one
or two hours. Then the unit will stabilize at the
temperature of its surroundings.
AMPLIFIER section
Output Power . . ... . . ... . . ... ... . Total 10 W (5 W + 5 W)
Output Power (Subwoofer) . . ... . . ... . . ... ... ... ... 15
W
Input Sensitivity . . . . ... ... ... . . ..... ... ... ... . . . 300 mV
Frequency Response . . ... . . ... . . ... ... . 20 to 20,000 Hz
CD PLAYER Sec tion
Frequency Response . .... .. ... . . ....20 to 20,000 Hz (±1 dB)
Signal-to-Noise Ratio . . ..... ... . . ... ... ... . . ... . . . 55 dB
Wow and Flutter . . ... . . ... ..... ... ... . . . Unmeasurable
FM TUNER Section
Frequency Range . . ... . . ... ..... ...87.50 to 108.00 MHz
Sensitivit y (S/N30 dB) . . . . ... ...... . . ... . . ... .25 dBµV/m
AM TUNER Section
Frequency Range . . ... . . ... ..... ... ... .520 to 1,7
10
kHz
Sensitivit y (S/N20 dB) . . ... . . ... ..... ... ... . . .54 dBµV/m
SPEAKER
Type . . ... . . ... . . ... ... ... . . ... . . ... . .Full range at type
Impedance . . . . ...... ... . . ... . . ... ... ... . . ... . . . 8 ohms
Impedance (Subwoofer) . . ..... ... ... . . ... . . ... . 6 ohms
GENERAL
Power Requirements . . ..... ... . . ... ... . 120 V AC, 60 Hz
Power Consumption . . . . ... ... ... . . ... . . ... ... ... .80 W
(less than 4 W in standby)
Dimensions (W x H x D)
Main Unit . ... .6 5/16” x 8 7/8” x 4 5/8” (160 x 226 x 116.5 mm)
L & R Speakers . . ...5 8/5” x 8 7/8” x 2 6/8” (142 x 226 x 70 mm)
Subw
oofer . . . 6 11/16” x 7 7/8” x 9 16/7” (170 x 200 x 240 mm)
Weight (Net)
Main Unit . . . . ... ... ... . . ... . . ... ... ... .2 1/5 lb (1.0 kg)
L & R Speakers . . ... . . ... . . ... ... .1 5/16 lb (0.6 kg) each
Subwoofer . . ... . . ... ..... ... ... . . ... 8 13/16 lb (4.0 kg)
Standar d Accessories
Remote control unit (RC-1223) x 1
Battery for remote control unit (CR2032) x 1
Stereo mini plug cable x 1 FM lead-type antenna x 1
AM loop antenna x 1 iPhone holder x 2
Wall mount bracket x 2 Screw (M5) x 4
Wall anchor x 4 Template for wall mounting x 2
Quick guide for connect
ions x 1
Owner’s
manual (this document) x 1
• This document includes warranty (see right).
• Desig n and specicati ons are subject to chan ge
without notice.
• Weight and dimensions are approximate.
• Illus tratio ns may dier slightly from pro ductio n
models.
10
Setting the Clock
3
Wall Mounting (Speakers)
You can mount the speakers on a wall, or simply
place them on a shelf or stand.
Follow the instructions below to mount the
speakers.
CAUTION
Before mounting the speakers, ensure that a
mounted wall is strong enough to bear the
weight of the speakers and the brackets.
If you are unsure how to use the supplied
brackets and wall anchors, consult with a local
hardware store or building supply expert.
1
Before mounting the speakers, connect
them to the main unit (se e “
2
Connections”).
The length of the connection cables are
approximately 6 feet (1.8 m). You can not
mount the speakers too far from the main
unit and the subwoofer.
2
Mount the brackets.
Mounting on a wooden wall
Secure the brackets on the wall using the
supplied screws.
Mounting on a concrete or brick wall
1 Position the supplied wall mount template
where you want to mount the speakers.
2 Drill pilot holes in the wall at the marked
points.
3 Insert the supplied wall anchors into the
pilot holes. Then, gently tap the anchors
using a hammer until each anchor is ush
with the wall.
4 Secure the brackets by screwi ng the
supplied screws into the anchors.
3
Hang the speakers onto the brackets.
If the surface of the unit gets dirty, wipe with a
soft cloth or use a diluted mild liquid soap. Allow
the surface of the unit to dry completely before
using.
For safety, disconnect the power cord from
the outlet before cleaning.
o Never spray liquid directly on this unit.
o Do not use thinner or alcohol as they could
damage the surface of the unit.
1
If the unit is on, press the STANDBY/ON
button (
¤
) to turn the unit to standby.
2
Press and hold the TIME SET button for
more than 2 seconds.
“12 H” or “24 H” start blinking on the display.
If you want to change the hour mode, press
the Skip (
.//) button.
o If there is no ope ration f or more than
10 seconds, the clock setting mode will be
cancelled.
3
Press the TIME SET button again.
The hour value starts blinking.
Example:
4
Press the Skip (
.//
) button to set
the current hour, and then press the
TIME SET button.
The minute value starts blinking.
Example:
5
Press the Skip (
.//
) button to set
the current minute, and then press the
TIME SET button.
The clock starts.
o When the POWER switch on the rear panel of
the subwoofer is turned o, the clock setting
kept in memory will be erased.
o The clock set ting will be automatically
adjusted according to iPod/iPhone’s clock
data (see “9 iPod/iPhone”).
1
Set the POWER switch on the rear panel
of the subwoofer to “ON”
to turn on the
system.
The indicator on the front panel of t he
subwoofer lights in blue.
2
Press the STANDBY/ON (
¤
) button to
turn the unit on.
The unit turns on with the source that was
last selected.
o If an iPod/iPhone that is in playback mode
is inserted into the dock, the MC-DX90i will
automatically turn on and start playback from
the play list of the iPod.
o When the source is “iPod” or “AUX”, th e
display always shows the clock.
o When the source is “CD”, “FM” or “AM”, press
and hold the TIME SET button for 2 seconds
to display the clock for a few seconds.
3
Select a source by pressing the FUNCTION
button.
The selected source is shown on the display.
The source changes as follows:
iPod CD FM AM AUX
o To listen to an external source connected to
the AUX IN jack, select “AUX”.
o You can also use the FM/AM button on the
remote control unit to select directly “FM” or
“AM”.
4
Play the source and adjust the volume
using the Volume (+/−) buttons.
The volume is adjustable from 0 to 40.
To mute the sound temporarily, press th e
MUT ING but ton. Press the MUTING button
again to restore the sound.
o While muting is engaged, “MUTING” appears
on the display.
o You can also restore the sound by pressing
the VOLUME (+/−) buttons or the FUNCTION
button.
o This operation is available in every sound
source.
Each time the DIMMER button is pressed, the
brightness of the display and the lights of the
iPod/iPhone
guide changes as follows:
Full brightness
Dimmed brightness
o This function will be cancelled when the
STANDBY/ON (¤) button is pressed.
o This operation is available in every sound
source except wh en the sl eep timer i s
activated or the iPod/iPhone guide is in
horizontal position.
You can change the bass and treble sound.
o This operation is available in every sound
source.
1
Press the BASS or TREBLE button.
To adjust the level of low frequency sound
range, press the BASS button.
To adjust the level of high frequency sound
range, press the TREBLE button.
2
Within 3 seconds, press the Volume (+/–)
buttons to change the setting.
The level can be adjusted from “–4” to “+4”.
Insert the iPod/iPhone into
the dock of the MC-DX90i.
Then press the Play/Pause
button (
y9) on the iPod/
iPhone. The MC-DX90i will
automatically turn on and
st art pl ayback from t he
music list of iPod/iPhone.
o When an iPod/iPhone that is in playback
mode is inserted into the dock, the MC-DX90i
will automatically turn on and start playback
of the iPod/iPhone.
o Set the supplied iPone holder when you use
an iPhone.
o While the iPod/iPhone is docked and the
MC-DX90i is turned on, the battery of the
iPod/iPhone is recharged to the full.
o When headphones are plugged into the
iPod/iPhone, sound comes out from both
the s peakers of t he MC-DX90i and t he
headphones.
o The Stop (8)button does not work when
the source is “iPod”.
o The video signal from a connected iPod/
iPhone can be output from the VIDEO OUT
terminal of the MC-DX90i to a TV (see “2
Connections”).
Selecting iPod mode
Press the FUNCTION button to select “iPod”.
When an iPod/iPhone that is in playback
mode has already been docked
e Playback starts automatically.
When no iPod/iPhone is docked
e The iPod indicator on the display blinks.
Insert the iPod/iPhone into the dock, and
then press the Play/Pause (y/9) button
to start playback.
Suspending playback temporarily
(pause mode)
Press the Play/Pause (y/9) button during
playback. Playback stops at the current position.
To resume playback, press the Play/Pause (y/9)
button again.
Skipping to the next or a
previous song
During playback, press the Ski p (.//)
buttons repeatedly until the desired song is
found. The selected song will be played from
the beginning.
o When the . but ton is pressed during
playback, the song being played will be
played from the beginning. To return to the
beginning of the previous song, press the
. button twice.
Searching for a part of a song
During playback, h old down th e Search
button (.//) and release it when the part
you want to listen to is found.
Returning to the previous menu
Press the MENU button.
This button has the same functions as its iPod
counterpart.
Selecting a menu item
Press the SCROLL (j/k) buttons to scroll to
the menu item you want, and then press the
SELECT button.
Activating the shue mode
During playback, press the SHUFFLE button
to change the shu e mode. Each time the
SHUFFLE button is pressed, the shue setting of
iPod/iPhone is changed as follows:
songs albums
o When iPod/iPhone is set to shue songs or
albums, the icon appears on the display
of iPod/iPhone.
Activating the repeat mode
Press the REPEAT button to change the repeat
mode. Each time the REPEAT button is pressed,
the Repeat setting of iPod/iPhone is changed
as follows:
one all
o When the iPod/iPhone is set to repeat one
song, the » icon appears on the display of
iPod/iPhone.
o When the iPod/iPhone is set to repeat all
songs, the ¼ icon appears on the display
of iPod/iPhone.
stopped.
Example:
File number
First letter of
File name
o To cancel the search mode, press the STOP
button (8).
2
Select the rst letter of the le you want
to listen by pressing the Skip (.//)
buttons.
3
When you have reached the letter, press
and hold a the Skip (.// ) button
until the rst letter blinks.
4
Pr ess t he Skip ( . // ) button s
repeatedly until you nd the le that
you want to play.
5
Press the Play/Pause (y/9) button to
start playback.
Search for a le in a folder
1
Press the MP3 button twice when
playback is stopped.
Example:
Folder number
Folder name
o To cancel the search mode, press the STOP
button (8).
2
Press the Skip (.//) buttons to nd
the folder that contains the le that you
want to listen.
o MP3/WMA les that are not placed in folders
are automatically put in the “0 01” (root)
folder.
16
Listening to a Disc (continued)
16
Listening to a Disc
3
When you have found the folder, press
and hold a Skip (.//) button until
the ALBUM indicator disappears.
4
Select the le in the folder by pressing
the Skip (.//) buttons.
5
Press the Play/Pause (y/9) button to
start playback.
Shue playback
Press the Shue button during playback or
when playback is stopped. “SHUFFLE” appears
on the display and the tracks/les will be played
randomly.
o If you press the / button during shue
playback, next track/le will be randomly
selected and played.
If you press the
. bu tton o nce, t he
currently played track/le will be played
from the beginning. If you press the .
button twice or more, next track/le will be
randomly selected and played.
o During shue playback, a track /le that has
completed playback will not be played again.
o Repeat playback is not av ailable during
shue playback.
o Sh ue pl ayback does not work du ring
programmed playback.
o If any of the following buttons are pressed,
random playback will be cancelled:
SHUFFLE, Stop (
8), FUNCTION, FM/AM,
STANDBY/ON (
¤), Open/Close ( )
Repeat Playback
Each time the REPEAT button is pressed, the
repeat mode is changed as follows:
When a CD is loaded
REPEAT REPEAT ALL
When a MP3/WMA disc is loaded
REPEAT ALBUMREPEAT REPEAT ALL
o If any of the following buttons are pressed,
repeat playback will be cancelled:
Stop (
8), FUNCTION, FM/AM,
STANDBY/ON (
¤), Open/Close ( )
REPEAT (Repeat one track/le)
The track/le being played will be played
repeatedly. “REPEAT” lights on the display.
o If you press the Skip (.//) button and
select another track /le, the track/le will be
played repeatedly.
o It is also possible to select a track /le to be
repeated in the stop mode. Press the REPEAT
button, select a track/le by pressing the
Skip (.//) button, and then press the
Play/Pause (y/9) button to start playback.
REPEAT ALL (Repeat all the tracks/les)
All the tracks/les will be played repeatedly.
“REPEAT ALL” lights on the display.
o D ur in g progr am me d p la ybac k, the
programmed tracks/le s will be played
repeatedly.
REPEAT ALBUM (Repeat all the les in the
folder) (MP3/WMA only)
Al l the le s in th e fol der will be played
repeate dly. “ REPE AT ALBUM ” light s on the
dis
play.
Programmed playback
Up to 64 tracks/les can be programmed in the
desired order.
1
Whe n th e source is “CD”, p ress the
MEMORY button.
CD MP3/WMA
Program number Program number
Continued on the lower left column
9
iPod/iPhone
iPod/iPhone compatibility
The following iPod/iPhone mod els can be
connected to and used with this unit:
iPod classic
iPod nano (2nd, 3rd, 4th, 5th, and 6th generation)
iPod touch (1st, 2nd, 3rd, and 4th generation)
iPhone 4 iPhone 3GS
iPhone 3G iPhone
Clock sync function
When you insert an iPod/iPhone into the dock of
the MC-DX90i, the clock of the MC-DX90i will be
automatically adjusted according to the iPod/
iPhone’s clock data.
This function works when the source is “iPod”,
“CD”, or “AUX”.
o It takes about 30 seconds for the sync.
o By default, the clock sync function is ON.
Turning the clock sync function on and o
1 In iPod mode, Press and hold the TIME SET
button for more than 3 seconds. “SYNC ON”
appears on the display.
2 Within 5 seconds, select “SYNC ON” or “SYNC
OFF” by pressing the Skip (
.//) buttons.
3
Press the Select button to conrm the setting.
This appliance has a serial number located on the rear panel.
Please record the serial number and retain it for your records.
Serial number:
(Programmed Playback)
o To cancel the program mode, press the Stop
(8) button.
2
(When programming MP3/WMA les)
Press Skip (.//) buttons repeatedly
to select a folder of a MP3/WMA disc,
and then press the MEMORY button.
The le number of the rst le in the folder
appears.
o MP3/WMA les recorded out of folders are in
the “001” (root) folder.
3
Press the Skip ( . // ) b utton s
rep eatedly to select a track/le, then
press the MEMORY button.
The track/le is programmed, and “P-02” is
displayed.
o Repeat steps
2
and 3 to program more
tracks/les.
o You can program up to 64 tracks/les.
4
When you have nished selecting track/
le numbers, press t he Play/Pause
(y /8) button to start programmed
playback.
o Shue function does n ot work during
programmed playback.
o To stop the program playback, press the Stop
button (
8).
o
When the playback of all the programmed
tracks/les has nished, or if you press the Stop
(
8) button, the “MEMORY” indicator will go o.
However, the program setting is retained in
memory. To restart the programmed playback,
press the MEMOR
Y button,
and then press the
Play/Pause (
y/9) button.
Checking the programmed order
When playback is stopped, press the MEMORY
button repeatedly. The track/le number and
program number will be shown on the display.
Adding a track/le to the end of the program
When playback is stopped, press the MEMORY
button repeatedly until “00” appears on the
display. Select a track/le number by performing
steps 2 and 3 . The track/le is added to the
end of the program.
Overwriting the program
When playback is stopped, press the MEMORY
button repeatedly until the program number to
be changed appears on the display.
Select a new track/le number
by performing
steps 2 and 3
.
Clearing the program
When playback is stopped, press the MEMORY
button, and then press the Stop (8) button.
o ,desserp era snottub gniwollof eht fo yna fI
the programm ed contents will a lso be
cleared:
FUNCTION, FM/AM,
STANDBY/ON (
¤), Open/Close ( )
o When the POWER switch on the rear panel
of the subwoofer is turned o, the program
kept in memory will be erased.
ENTRÉE
VIDÉO
Prise murale
Téléviseur (moniteur) etc.
Antenne cadre AM
Branchez l’antenne cadre AM fournie à la prise AM
ANTENNA.
Orientez l’antenne dans la direction qui donne la
meilleure réception.
Pour monter l’antenne cadre sur une surface,
xez la
gr
ns la fente du socle d’antenne.
Sortie vidéo (VIDEO OUT)
Cette prise produit le signal vidéo de l'iPod connecté au dock du
MC-DX90i.
Branchez l'appareil au connecteur vidéo composite d'un téléviseur
ou moniteur à l'aide d'un câble vidéo RCA du commerce.
Si votre iPod/iPhone a une option “Sortie télévision”, réglez-la sur
“Oui” ou “Demander” (menu principal de l’iPod
w
Vidéo w
Réglages
w
Sortie télévision)
o
Si vous avez réglé “Sortie télévision” sur “Demander”, votre iPod
vous demande chaque fois que vous voulez reproduire une
séquence vidéo si vo
us souhaitez l’envoyer à un téléviseur.
o
Si vous envoyez un signal vidéo à un téléviseur par cette unité,
la vidéo ne s’
sur l’écran de l’iPod.
Antenne FM
Branchez l’antenne FM fournie
à la prise FM 75Ω.
Déployez l’antenne et trouvez la
meilleure position de réception.
Fixez-la à un cadre de fenêtre
ou au mur avec des punaises
s équivalentes.
Entrée d’alimentation (caisson)
Une fois tous les autres branchements
terminés, branchez
rise secteur.
B
Veillez à brancher le cordon d’alimentation
à une prise secteur
fournissant la tension
correcte.
B
Saisissez le cordon par sa quand
vous le branchez ou le débranchez. Ne
tirez jamais sur le cordon d’alimentation.
B
Une fois les connexions faites, branchez le cordon d’alimentation à une prise secteur.
o
Lisez les instructions de chaque appareil que vous avez l’intention d’utiliser avec cette unité.
o
Veillez à bien brancher chaque che. Pour éviter les r nts et les bruits, ne regroupez pas les
cordons de connexion.
ENCEINTES
Branchez la de l’enceinte gauche
en L, celle de l’enceinte droite en R.
B
Ne branchez rien d’autre à ces
prises que les enceintes fournies.
Câble de sortie préampli du caisson
Branchez cette che à la prise SUBWOOFER
PRE OUT de l’unité principale.
Câble d’alimentation CC
(alimentation du caisson vers l’unité
principale)
Branchez cet e à la prise DC IN de l’unité
principale.
Entrée auxiliaire (AUX IN)
Vous pouvez brancher un lecteur audio
portable à cette prise.
Branchez-y la prise PHONES (prise de sortie
audio ou casque) du lecteur à l’aide du câble
à mini-jack stéréo fourni.
Commutateur POWER du caisson
(interrupteur général d’alimentation)
Sert à mettre le système sous et hors
tension.
o
Quand cet interrupteur est sur , les
ré gla ges d 'h orloge et de réve il
mémorisés son
acés. Par contre, les
préréglages de FM/AM sont conservés
en mémoire.
Arrière de l’unité principaleArrière de l’enceinte droite (R) Arrière de l’enceinte gauche (L)
Arrière du
caisson de
graves
Côté de l’unité
principale
Placez le caisson de graves à au moins 60 cm
de l’unité principale.
o Si la source est réglée sur “iPod” ou “CD”
alors qu'il n'y a pas d'iPod/iPhone ou de CD,
l'appareil s'allume sur la dernière station de
radio sélectionnée.
o Si l'appareil est déjà allumé à l'heure de
réveil, le réveil ne fonctionne pas. Par contre,
l'appareil s'étein dra (passer a en veille) à
l'heure d'extinction.
Ac tivation/désactivation du
réveil
Appuyez brièvement sur la touche TIMER pour
mettre le réveil en/hors service.
o Quand le réveil est activé, ses réglages sont
a chés un par un, et l'indicateur TIMER
s'ache à l'écran.
o Quand le réveil est désactivé, l'indicateur
“TIMER” disparaît de l'écran.
Z
MC-DX90i
Nous vous remercions d’avoir choisi TEAC.
Lisez ce manuel avec attention pour tirer les meilleures performances
de cet appareil.
L'appareil
peut être program
mé pour s'allumer
et se mettre en veille à une heure déterminée.
Vous pouvez le régler pour produire le son d'un
iPod/iPhone, d'un CD ou de la radio FM/AM.
o Réglez l'horloge avant de régler le réveil (voir
“11 Réglage de l'horloge”).
o Ces opérations sont possibles avec toutes les
sources sonores.
Réglage de l'heure de réveil
1
Maintene z pressée la to uche TIMER
pendant plus de 2 secondes.
Exemple :
“TIMER” et “on” apparaissent à l'écran.
La valeur des heures commence à clignoter.
o Si rien n'est fait dans les 10 secondes, le mode
de réglage de réveil est abandonné.
2
Avec l es touches de saut (.//),
réglez l'heure de réveil (les heures), puis
appuyez sur la touche TIMER.
La valeur des minutes commence à clignoter.
3
Avec l es touches de saut (.//),
réglez l'heure de réveil (les minutes),
puis appuyez sur la touche TIMER.
“TIMER” et “OFF” apparaissent à l'écran.
La valeur des heures commence à clignoter.
Exemple :
4
Avec l es touches de saut (.//),
réglez l'heure d'extinction (les heures),
puis appuyez sur la touche TIMER.
La valeur des minutes commence à clignoter.
5
Avec l es touches de saut (.//),
réglez l'heure d'extinction (les minutes),
puis appuyez sur la touche TIMER.
La source sonore commence à clignoter.
6
Avec l es touches de saut (.//),
sélectionnez une source sonore (“iPod”,
“CD” ou “TUNER”), puis appuyez sur la
touche TIMER.
La valeur de volume commence à clignoter.
o Vous ne pouvez p as sélectionner “AUX
(source externe)” comme source sonore.
7
Avec l es touches de saut (.//),
réglez le volume, puis appuyez sur la
touche TIMER.
o Le volume ne peut pas être réglé plus bas
que 10.
Le réglage du réveil est maintenant terminé
et le réveil est activé.
Vos réglages de réveil sont achés un par
un, et l'indicateur “TIMER” s'allume à l'écran.
8
Préparez la source.
“iPod”
e Placez un iPod/iPhone.
“CD” e Placez un disque.
“TUNER” e Recherchez une station.
9
Appuyez sur la touche STANDBY/ON
(¤) pour mettre l’appareil en veille.
Veillez à remettre l'appareil en veille
ou le réveil ne fonctionnera pas.
L'appareil s'allumera et se mettra en veille
chaque jour à l'heure spéciée.
o Quand l'interrupteur d'alimentation POWER
en face arrière du caisson de graves es t
basculé sur O, le réglage de réveil conservé
en mémoire est eacé.
o Quan d l'appa reil e st m is e n ser vi ce
par le réveil, le volume de lecture monte
progressivement jusqu'au volume réglé.
Si vous avez des problèmes avec votre appareil,
vériez les points suivants avant d'appeler votre
revendeur ou le service après-vente TEAC.
Pas d’ali
mentation.
e Véri e z l e branchement à l'alimentation
sec te ur. A ss ur ez- vou s q ue l a sourc e
d ’a liment atio n n’e s t p as une prise
commutée. Si c'est le cas, vériez que son
interrupteur est enclenché et que la prise
délivre du courant en y branchant un autre
appareil tel qu'une lampe ou un ventilateur.
e Encl enchez l'interrupteur d'alimentatio n
POWER à l'arrière du caisson de graves.
Aucun son ne sort des enceintes.
e Sélectionnez la source en ap
puyant
sur la
touche FUNCTION.
e Vériez le branchement des enceintes.
e Réglez le volume.
e Si “MUTING” apparaît dans l'écran, appuyez
sur la touche MUTING.
Le son est parasité.
e L'appareil est trop proche d'un téléviseur ou
d'un appareil similaire. Installez-le à l'écart de
tels dispositifs ou éteignez-les.
La télécommande ne fonctionne pas.
e Appuyez sur la touche STANDBY/ON (
¤)
pour allumer l’appareil.
e Si la pile est déchargée, remplacez-la.
e Utilisez la télécommande à portée (5 m) et
pointez-la vers la face avant.
e Retirez les obstacles entre la télécommande
et l’appareil principal.
e S’il y a un fort éclairage près de l’appareil
principal, éteignez-le.
Lecteur de CD
Pas de lecture.
e Chargez un disque, face sérigraphiée vers
vous.
e Si le disque est sale, nettoyez sa surface.
e Un disque vierge a été chargé. Chargez un
disque déjà enregistré.
e Selon le disque, etc. la lecture
de
certains
CD- R /R W peut n e pas être possib le.
Réessayez avec un autre disque.
e Vous ne pouvez pas faire lire de CD-R /RW
non nalisé. Finalisez un tel disque dans un
enregistreur de CD et réessayez.
Le son saute.
e Placez l'appareil sur une surface stable pour
éviter les vibrations et les chocs.
e Si le disque est sale, nettoyez sa surface.
e N'utilisez pas de disques rayés, endommagés
ou gondolés.
Impossible d'ouvrir la porte du CD.
e Sélection
nez
“CD” en appuyant sur la touche
FUNCTION.
Lecteur iPod/iPhone
Impossible d’insérer l’iPod/iPhone.
e Retirez la po ussière ou les obs ta cles du
connec teur de doc k du MC-DX90i et de
l'iPod/iPhone, et réinsérez l'iPod/iPhone.
Pas de lecture.
e Retirez l’iPod/iPhone du dock, attende z
quelques secondes et insérez-le de nouveau.
e Une mise à jour du logiciel peut résoudre le
problème.
Tuner (syntoniseur)
Aucune sta tion ne peut être captée, ou
signal trop faible.
e Réglez correctement la station.
e Pour les stations FM, tournez l'antenne FM.
Pour les stations AM, tournez l'appareil luimême ou déplacez-le.
Avec “FM RADIO” comme source, bien que
l'émission soit stéréo, le son est mono.
e Appuyez sur la touche FM MODE.
Si vous ne pa rv en ez pas à ré tabl ir un
fonc tionn ement normal, débranchez le
cordon d’alimentation et rebranchez-le.
Note d'emploi avec un iPod touch/iPhone
(utilisation du rév
eil du MC-DX90 i avec
com
me source sonore un iPo d touch/
iPhone)
o Après avoir choisi l'iPod touch/iPhone, ne
l'éteignez pas en faisant glisser le curseur
“Éteindre” (l'écran de l'iPod touch/iPhone
peut être éteint sans aucun problème).
o Vous ne pouvez pas utiliser la vidéo de
l'iPod touch/iPhone comme source sonore.
Quand vous utilisez un iPod touch/iPhone
en mode vidéo avec le réveil, le MC-DX90i
ne lance pas la lecture de la vidéo mais
celle de la liste musicale de l'iPod touch/
iPhone.
région, veuillez contacter TEAC à l'adresse appropriée
donnée à la n de cet te garantie. VEUILLEZ NE PAS
RENVOYER VOTRE UNITÉ CHEZ TEAC SA NS NOTRE
AUTORISATION PRÉALABLE. Si le produit doit être renvoyé
pour réparation, les frais d'expédition sont à votre charge.
Toutefois, si les réparations nécessaires sont couvertes
par la garantie, nous prendrons à notre charge les frais
de retour vers toute destination dans le pays d'achat du
produit. Lorsqu'une réparation sous garantie est requise,
vous devez présenter comme preuve de couverture par
la garantie la facture d'achat originale datée ou une autre
preuve d'achat mentionnant le lieu et la date d'achat.
LIMITATION DES GARANTIES IMPLICI TES
TOU TES LES GARANTIES IMPLICITES, Y COMPRIS LES
GARANTIES DE QUALITÉ MARCHANDE ET D'ADÉQUATION
À UN USAGE PARTICULIER, SONT LIMITÉES À LA DURÉE
DE CETTE GARANTIE.
EXCLUSION DE DOMMAGE S
LA RESPO NSABI LITÉ DE TEAC VIS -À- VIS DE TOUT
PRODUIT DÉFECTUEUX EST LIMITÉE À LA RÉPARATION
OU AU REMPLACEMENT DU PRODUIT, AU GRÉ DE TEAC.
TEAC NE POURRA ÊTRE TENU POUR RESPONSABLE DE
QU ELC ONQUES D OMM AGES SE R APPO RTA NT AU
DÉR ANGEMENT, À LA PERTE D'USAGE DU PRODUIT, À
L'IN TERRU PTIO N DE L'UT IL ISATI ON , AUX P ER TES
COMMERCIALE S OU DE PROFITS, NI D'AUCUN AUTRE
DOMMAGE, QU'IL SOIT ACCESSOIRE, INDIRECT, PUNITIF
OU AUTRE.
CERTAINS ÉTATS OU PROVINCES N'AUTORISENT PAS DE
LIMITATIONS DE DURÉE D'UNE GARANTIE IMPLICITE ET/
OU N'AUTORISENT PAS L'EXCLUSION OU LA LIMITATION
DES DOMMAGES ACCESSOIRES OU INDIRECTS, AUQUEL
CA S LES LIMITATI ONS ET EXCLUSIONS C I-DESSU S
PEUVENT NE PAS VOUS ÊTRE APPLICABLES.
CETTE GARANTIE VOUS DONNE DES DROITS SPÉCIFIQUES
QUI PEUVENT ÊTRE DIFFÉRENTS DE CERTAINS DROITS
OCTROYÉS PAR LA LOI. CES DROITS PEUVENT VARIER
D'UN ÉTAT À L'AUTRE OU D'UNE PROVINCE À L'AUTRE.
Pour obtenir les coordonnées d'un service après-vente aux
États-Unis
APPELEZ LE 1-800-447-TEAC
GARANTIE AUDIO LIMITÉE POUR
LE CONSOMMATEUR
Ce produit est garanti par TEAC AMERICA, Inc. ou TEAC
CANADA Ltd., selon le pays d'achat initial, contre les
défauts de pièces et de main d'œuvre.
Durée de la ga rantie. La garantie pièces et main d'œuvre
sera valable un (1) an à compter de la date d'achat initial
des produits non utilisés dans un but commercial. Pour
les produits à utilisation commerciale, la garantie des têtes
magnétiques et capteurs optiques est de quatre-vingt
dix (90) jours, elle est d'un (1) an pour les autres pièces et
quatre-vingt dix (90) jours pour la main d'œuvre.
Bén éc iaire de la g aran tie. Cet te garantie n'est valable
qu'aux États-Unis et au Canada, selon le pays d'achat initial,
et ne s'applique qu'à l'acquéreur initial dans le pays d'achat.
Ce qui n'est pa s couvert par cet te garantie
1. Les dommages ou détériorations du boîtier externe.
2. Les dommages résultant d'un accident, d'une mauvaise
utilisation, d'un abus ou d'une négligence.
3. Les dommages résultant du non-respect des instructions
contenues dans le mode d'emploi du produit ou fournies
avec le produit.
4. Les domma ges su rve nus du rant l e transport du
produit (les réclamations doivent être adressées au
transporteur).
5. Les dommages résultant d'une réparation ou tentative
de réparation eectuée par toute personne extérieure
au service après-vente TEAC ou agréé par TEAC.
6. Les dommages résultant d'une modication ou tentative
de modication de produit non autorisée par TEAC.
7. Les dommages résultant de causes autres que des
défauts de produit, y compris le manque d'aptitude
te chniq ue, de co mpé ten ce ou d'ex périen ce de
l'utilisateur.
8. Les dommages de toute unité ayant été modiée ou
dont le numéro de série a été eacé, modié ou retiré.
Fra is pris en ch arge pa r T EAC. TEAC prendra en charge
tous les frais de pièces et main d'œuvre pour les articles
couver ts par la garantie. Les frais d'expédition sont
évoqués dans la section suivante.
Com ment obtenir un e inter ven tion sous gara ntie. Votre
unité doit être réparée par un service après-vente agréé
par TEAC dans le pays d'achat du produit. Si vous ne
trouvez pas de serv ice après-vente agréé dans votre
La télécommande fournie permet la commande
à distance de cet appareil.
Pour utiliser la télécommande, pointez-la vers le
capteur de télécommande du panneau avant de
l’appareil (voir “7 Identication des parties”).
o Même si la télécommande est employée
à por tée d e fonctionneme nt (5 m), la
commande à distance peut être impossible
s’il y a des obstacles entre l'appareil et la
télécommande.
o Si la télécommande est employée à proximité
d’autres appa reils g énérant de s rayo ns
infrarouges, ou si d’autres télécommandes
utilisant des rayons infrarouges sont utilisées
près de l'appareil, ce dernier peut ne pas bien
fon
ctionner. Les autres appareils peuvent
aussi fonctionner incorrectement.
Mise en place de la pile
1 Retirez le couvercle du compartiment de pile.
2 Placez la pile au lithium (CR2032, 3 V) avec
son côté “+” vers le haut.
3 Fermez le couvercle.
Remplacement de la pile
Si vou s r emarqu ez q ue l a dis ta nce de
fonctionnement entre la télécommande et
l'appareil se réduit, c'est que la pile est usée.
Dans ce cas, remplacez-la par une neuve.
o Pour des informations sur la collecte des piles,
veuillez contacter votre mairie, votre service
d’ordures ménagères ou le point de vente
dans lequel vous les avez achetées.
Précautions concernant les piles
Un mauvais emploi des piles peut entraîner
le ur r uptur e o u le ur f uite, av ec p our
conséquence un incendie, des blessures
ou la salissure des objets proches. Veuillez
lire et suivre attentivement les précautions
suivantes.
o Vei ll ez à ins ér er la p il e e n p laçan t
correctement les pôles positif “+” et négatif
“ - ”.
o Si la pile coule, essuyez le liquide dans le
compartiment de pile et remplacez la pile par
une neuve.
o Si la télécommande ne doit pas être utilisée
durant une période prolongée (plus d’un
mois), retirez sa pile pour éviter qu’elle ne se
décharge.
o N’utilisez pas d’autres pil es que cell es
spéciées.
o Ne chauez pas et ne démontez pas les piles.
Ne jetez jamais les piles dans un feu ou dans
de l’eau.
o Ne conservez et ne transportez pas les piles
avec d’autres objets métalliques. Les piles
pourraient entrer en court-circuit, couler ou
exploser.
1
Reliez la prise PHONES (prise de sortie
audio pour casque) d'un lecteur audio
portable à la prise AUX IN du MC-DX90i
à l'aide du câble mini-jack stéréo fourni
(voir “4 Branchements”).
2
Appuyez sur la touche FUNCTION pour
sélectionner “AUX”.
3
Faites jouer la s ource, et ré glez le
volume du MC-DX90i et du lecteur audio
connecté.
o Si vous utilisez la prise PHONES (casque) de
votre lecteur audio por table, vous devez
régler le volume de ce dernier ou vous
risquez de ne pas entendre de son par votre
MC-DX90i.
o Trop monter le volume du lec teur audio
por table peut entraîner une distorsion du
son. Si cela se produit, réduisez le volume
du lecteur audio portable jusqu'à ce que
la distorsion cesse puis réglez le niveau du
MC-DX90i à un niveau d'écoute confortable.
Micro-système Hi-Fi
MODE D'EMPLOI
1
Avant d'utiliser l'appareil
4
Branchements
ATTENTION
o N'inclinez pas l'appareil quand un disque est
inséré. Cela peut endommager le disque et
causer un mauvais fonctionnement.
o Ne déplacez pas l'appareil durant la lecture
d'un disque. Durant la le cture, le disque
tourne à haute vitesse.
Ne soulevez et ne déplacez pas l'appareil
durant la lecture. Cela pourrait endommager
le disque ou l'appareil.
o La tension d’alimentation fournie à l'appareil
doit correspondre à la tension imprimée
sur la face arrière du caisson de graves. Si
vous avez des doutes à ce sujet, consultez un
électricien.
o N’ou vre z pas l e boî tier c ar c ela peu t
endommager les circuits ou causer un choc
électrique. Si un objet étranger pénètre
dans l’unité, consultez votre revendeur ou le
service après-vente.
o Quand vous d éb ra nc he z le cordon
d'a limentation de la pr ise secteur, tire z
toujours sur la prise, jamais sur le cordon.
o Retirez toujours le disque avant de déplacer
ou de transporter cet appareil. Transporter
cet appareil avec un disque à l'intérieur peut
entraîner un mauvais fonctionnement.
Emplacement de l'appareil
o Choisissez soigneusement l'emplacement de
votre appareil. Évitez de l’exposer directement
aux rayons solaires ou à une source de
chaleur. Évitez aussi les endroits sujets aux
vibrations, à une poussière excessive, à la
chaleur, au froid et à l’humidité.
o
Comm e l’ap pareil peut chau er d urant
l’utilisation, laissez toujours un espace susant
autour de lui pour la ventilation. Assurez-vous
qu’il y ait un espace d’au moins 20 cm au
dessus de l’appareil et d’au moins 5 cm de
chaque côté. Ne placez rien sur l’appareil.
Capteur de télécommande
Si vous utilisez la télécommande,
pointez-la vers ici.
Écran
o
S’éteint quand le guide iPod/
iPhone est à l’horizontale.
STANDBY/ON (¤)
Appuyez sur cette touche pour allumer l’unité ou la
mettre en veille.
Standby/On (¤)
Appuyez sur cette touche
pour allumer l’unité ou la
mettre en veille.
Note :
Pour
xplications, les instructions de ce manuel peuvent ne se référer qu'à l'appareil ou à la télécommande.
Les mêmes commandes fonctionnent alors de façon similaire sur la télécommande et sur l'appareil lui-même.
FUNCTION
Appuyez sur cette touche pour sélectionner
une source (iPod, CD, FM, AM ou AUX).
FUNCTION
Appuyez sur cette touche
pour sélectionner une source
(iPod, CD, FM, AM ou AUX).
Guide iPod/iPhone
Vous pouvez tourner ce
guide de 90 degrés sur la
droite.
En position verticale
S’allume en bleu quand
l’unité est sous tension.
La luminosité se change
avec la touche DIMMER
de la télécommande.
En position horizontale
La lumière s’éteint.
Dock d’iPod/iPhone
Insérez un iPod/iPhone
dans ce dock.
Vous pouvez l’incliner en
arrière et en avant.
Support iPhone
Placez le support iPhone
fourni si vous utilisez un
iPhone.
Ouvrir/Fermer ( )
En mode CD, utilisez cette
touche pour ouvrir et fermer la
porte du CD.
o
Cette touche ne fonctionne
que si la source est sur “CD”.
Porte de CD
MP3
Durant la lecture d’un disque de MP3/WMA, appuyez
sur cette touche pour
des informations sur le
r. Si la lecture de MP3/WMA est arrêtée, utilisez
cette touche pour re
r. Elle sert aussi
à commuter on/
la fonction ESP d’un CD audio.
FM/AM
Appuyez sur cette touche pour choisir FM ou AM.
SHUFFLE/FM MODE
Quand la source est sur “iPod” ou “CD”, appuyez sur
cette touche pour activer/désactiver la lecture aléatoire.
Quand la source est sur “FM”, appuyez sur cette
touche pour choisir Stéréo ou Mono.
PRESET/SCROLL (j/k)
Quand la source est sur “iPod”, appuyez sur ces
touches pour f
t/en bas.
Quand la source est sur “FM” ou “AM”, appuyez sur
ces touches pour choisir une station préréglée.
Volume (+/–)
Utilisez ces touches pour régler le volume.
VOL (+/–)
Utilisez ces touches pour régler
le volume.
Stop (8)
Quand la source est sur “CD”, utilisez cette touche
pour arrêter la lecture.
o
Cette touche ne fonctionne pas quand la source
est sur “iPod”.
BASS
Utilisez cette touche et les touches Volume (+/–)
pour régler le niveau des basses fréquences (graves).
TREBLE
Utilisez cette touche et les touches Volume (+/–)
pour régler le niveau des hautes fréquences (aigus).
MEMORY/TIME SET
Quand la source est sur
“CD”, cette touche sert à
programmer des pistes/
rs. Quand la source
est sur “FM” ou “AM”, elle
sert à prérégler des
stations. Elle sert aussi à
régler l’horloge.
Lecture/Pause (y/9)
Quand la source est sur “iPod” ou “CD”, appuyez
sur cette touche pour lire ou mettre en pause.
Stop (8)
Quand la source est sur “CD”, utilisez
cette touche pour arrêter la lecture.
o
Cette touche ne fonctionne pas
quand la source est sur “iPod”.
Lecture/Pause (y/9)
Quand la source est sur “iPod” ou
“CD”, appuyez sur cette touche
pour lire ou mettre en pause.
MUTING
Appuyez sur cette touche pour couper le son.
Appuyez à nouveau pour rétablir le son.
SLEEP
Sert à régler la minuterie d’extinction.
TIMER
Maintenez cette touche plus de 2 secondes pour
passer en mode de réglage de réveil.
Appuyer brièvement sur cette touche active/
désactive la fonction réveil.
REPEAT
Quand la source est sur “iPod” ou “CD”, appuyez
sur cette touche pour régler la lecture en boucle.
MENU
Quand la source est sur “iPod”, appuyez sur cette
touche pour revenir au menu précédent.
SELECT
Quand la source est sur “iPod”, appuyez sur cette
touche pour valider votre sélection de menu.
(.//)
Saut/Recherche
Quand la source est sur “iPod” ou “CD”, utilisez ces
touches pour changer de pist
chier/morceau ou
pour chercher un passage de pist
chier/morceau.
Syntonisation
Quand la source est sur “FM” our “AM”,
utilisez ces
touches pour
vous caler sur des stations.
DIMMER (¦)
Appuyez sur cette
touche pour changer la
luminosité de l’écran et
de l’éclairage du guide
iPod/iPhone.
7
Identication des parties
13
Coupure du son
14
Atténuateur de luminosité
15
Commandes de tonalité
18
Écoute de la radio
19
Écoute d'une source externe
20
Minuterie d'extinction
21
Réveil
22
Guide de dépannage
16
Écoute d’iPod/iPhone (suite)
16
Écoute d’un iPod/iPhone
23
Caractéristiques techniques
17
Écoute d'un disque
8
Télécommande
9
Disques
10
Compatibilité MP3/WMA
Disques lisibles par cet appareil
CD portant le logo “COMPAC T disc DIGITAL
AUDIO” (12 cm). N'employez pas de disques
de 8 cm avec cet appareil.
CD-R et CD-RW correctement enregistrés au
format CD audio (CD-DA) et nalisés. CD-R et
CD-RW nalisés contenant des chiers MP3/WMA.
ATTENTION
La lecture de tout au tre type de di sque
pourrait entraîner un bruit fort et causer des
dommages aux enceintes et à votre audition.
Ne lisez jamais un autre type de disque.
o Les CD vidéo, CD-ROM et types de disque
similaires peuvent être lus par l'appareil, mais
ne produiront aucun son à la lecture.
o Les DVD vidéo et audio, les DVD-ROM et
autres types de DVD ne peuvent pas être lus
et reproduits par cet appareil.
o Les disques protégés contre la copie et ceux
ne se conformant pas à la norme CD peuvent
ne pas être bien lus par cet appareil. Si vous
utilisez de tels disques dans cet appareil, TEAC
Corporation et ses liales ne pourront être
tenues pour responsables des conséquences
quelles qu'elles soient ni garantir la qualité
de reproduction. Si vous rencontrez des
problèmes avec de tels disques non standard,
vous devez contacter le
urs
diuseurs.
À propos des CD-R/CD-RW
o Les disques créés par un enregistreur de CD
doivent être nalisés pour être utilisés avec
cet appareil.
o Selon la qualité du disque et les conditions
de l'enregistrement, certains disques peuvent
ne pas être lus. Veuillez lire le mode d'emploi
de l'appareil ayant servi à créer le disque.
o En ca s d'incertitud e quant à l a gestion
d'un CD-R ou CD-RW, veuillez direc tement
contacter le vendeur du d
isque.
o Les CD-R et CD-RW imprimables ne sont pas
recommandés car le côté étiquette peut être
collant et risque d'endommager l'appareil.
que les CD ordinaires. Il est important de ne pas
les conserver dans des lieux exposés au soleil
et de les tenir à l'écart des sources de chaleur
telles que radiateurs et chauages électriques.
Entretien
o Si un disque est sale, essuyez sa surface d'un
mouvement radial (du trou central vers le
bord
externe) avec un chion sec et doux.
o Ne nettoyez jamais les disques avec des
pro duits chimiques tels qu’aérosols pour
di sque, a éro sol s/liquid es ant ist atiqu es
ou diluants. Ils provoqueraient des dégâts
irréparables à la surface plastique du disque.
Attention :
Ne p as s ui vre ces i ns truc tion s p eu t
entraîner des dommages pour l'appareil et
les disques.
o N'employez pas de disques de 8 cm.
o Ne faites pas lire de disque gondolé, déformé
ou endommagé.
o Ne collez pas de papiers ou de feuillets
protecteurs sur les disques et n'utilisez aucun
aérosol de revêtement protecteur.
o Utilisez un stylo-feutre tendre à huile pour
écrire du côté sérigraphié. N'utilisez jamais de
stylo à bille ou à pointe dure car cela pourrait
abîmer la surface enregistrée du disque.
o N'utilisez jamais de stabilisateurs. N'utilisez
pas de stabilisateurs de CD du commerce.
o N'utilisez pas de disques ayant une forme
irrégulière (octogonale,
en forme de cœur, de
la taille d'une carte de visite, etc.).
Précautions de manipulation
o Insérez toujours le disque face sérigraphiée
vers vous. Les CD ne se lisent que d'un côté.
o Pour sortir un disque de son boîtier, appuyez
sur le centre du boîtier et soulevez le disque,
en le tenant soigneusement par la tranche.
Comment sortir le disque Comment tenir le disque
Précautions de rangement
o Les d isq ue s do ive nt être r ang és dan s
leurs boîtiers après utilisation an d’éviter
la poussière et les rayures qui pourraient
provoquer des "sauts" du capteur laser.
o N'exposez pas les disques au soleil, à une
température élevée et à l'humidité de façon
prolongée. Une exposition prolongée à des
hautes températures les fera gondoler.
o
Les CD-R et CD-RW sont plus sensibles aux
eets de la chaleur et des rayons ultraviolets
o Le nom des chiers MP3/WMA doit être
constitué de caractères alphanumériques. Cet
appareil ne peut pas correctement acher
les symboles ni les caractères à double octet.
o
Incluez toujours l'extension dans le nom de
chier. Cet appareil reconnaît les chiers MP3
par leur extension “.mp3” et les chiers WMA
par leur extension “.wma”.
o
Le disque doit être nalisé pour pouvoir être lu.
o Le CD-ROM doit être compatible ISO 9660.
o Si plus de 500 chiers ou 200 dossiers sont
enregistrés sur le disque, l'appareil risque de
ne pas pouvoir les lire correctement.
o Le chier MP3 doit être au format MPEG-1
Audio Layer 3 mono ou stéréo, à débit binaire
xe, 44,1 ou 48 kHz. Un chier WMA doit avoir
une fréquence d'échantillonnage de 44,1 kHz
et un débit binaire de 192 kb/s ou moins.
o L'audio enco dé à 128 kb/s a une qualité
so no re p roche de cell e d'un CD audio
ordinaire. Même si ce lecteur peut lire des
morceaux MP3/WMA à débit binaire inférieur,
la qualité sonore est alors bien moins bonne.
1
Appuyez sur la touche FUNCTION pour
sélectionner “FM” ou “AM”.
o Vous pouvez aussi employer la touche FM/
AM de la télécommande pour directement
sélectionner “FM” ou “AM”.
2
Sélectionnez la station souhaitée.
e Sélection automatique
Maintenez pressée la touche de syntonisation
(.//) jusqu'à ce que l'achage de la
fréquence commence à changer. Quand
une station est trouvée, le processus de
syntonisation s'arrête automatiquement.
Répétez cette étape jusqu’à ce que vous ayez
trouvé la station souhaitée.
o Appuyez brièvement sur une touche de
syntonisation (.//) pour arrêter la
sélection automatique.
e Sélection manuelle
Appuyez plusieurs fois sur la touche de
syntonisation (. // ). La fréquence
change par pas xes.
Appuyez répétitivement sur la touche de
syntonisation (.//) jusqu'à ce que vous
ayez trouvé la station souhaitée.
Mode FM
Appuyer sur la touch e FM MODE permet
d’alterner entre les modes STEREO et MONO.
STÉRÉO
Les émissions FM stéréo sont reçues en stéréo et
l’indicateur “STEREO” s'allume à l'écran.
o Si le son soure de distorsion et si l'indicateur
“STEREO” n'apparaît pas, c'est que le signal
n'est pas assez fort pour une bonne réception
stéréo. Dans ce cas, passez en mode MONO.
MONO
Pour compenser une faible réception FM stéréo,
sélectionnez ce mode. La réception est alors
forc
ée en mono, ce qui réduit les parasites
indésirables.
Si la réception est mauvaise
Pour la meilleure réception, tournez l'antenne
FM ou AM jusqu'à ce qu e vous recev iez
correctement les stations.
Préréglage de syntonisation
(preset)
Vous pouvez mémoriser 20 stations FM et 20
stations AM.
1
Réglez l'a ppareil sur une station que
vous voulez mémoriser (voir à gauche).
2
Appuyez sur la touche MEMORY.
Exemple :
Numéro de preset
3
Dans les 5 secondes, sélectionnez une
mémoire de préréglage (preset) où
mémoriser la station avec les touches
PRESET (j/k).
4
Dans les 5 secondes, appuyez sur la
touche MEMORY.
La station reçue est mémorisée. Pour en
mémoriser d’autres, répétez les étapes 1 à 4 .
o Les préréglages conservés ne seront pas
eacés même après avoir basculé sur O
l'interrupteur d'alimentation POWER de la
face arrière du caisson de graves.
S é lec tion d ' une st ation
préréglée (preset)
Si la source est réglée sur “FM” ou “AM”, appuyez
répétitivement sur la touche PRESET (j/k)
jusqu'à ce que la station préréglée désirée soit
trouvée.
5
Appuyez sur Lecture/Pause (
y/9) pour
lancer la lecture.
Exemple : achage durant la lecture
Numéro de
piste en cours
CD
Temps écoulé
sur la piste
Numéro de Temps écoulé
Numéro de dossier actuel
MP3/
WMA
La lecture part du premier chier/piste du
disque.
o Les chiers MP3/WMA qui ne sont pas dans
des dossiers sont automatiquement placés
dans le dossier racine “001”. La lecture part du
premier chier du dossier “001” (racine).
o Quand la lecture de tous les chiers/pistes
est terminée, elle s'arrête automatiquement.
Arrêt provisoire de la lecture
(mode pause)
Appuyez sur la touche Lecture/Pause (y/9)
durant la lecture. La lecture s'arrête à la position
actuelle. Pour reprendre la lecture, appuyez à
nouveau sur la touche Lecture/Pause (y/9).
Arrêt de la lecture
Appuyer sur la touche Stop (8) arrête la lecture.
Saut au chier/piste suivant
ou précédent
Durant la lecture
e Appuyez répétitivement sur une touche
1
Appuyez sur la touche FUNCTION pour
sélectionner “CD”.
2
Appuyez sur la touche Ouvrir/Fermer
( ).
3
Placez un disque sur le moyeu central du
lecteur, face sérigraphiée vers vous.
Pressez le disque sur le moyeu jusqu'à ce
qu'un léger “clic” se fasse entendre, indiquant
que le disque est bien installé.
o Cet appareil ne lit pas les disques de 8 cm.
o Ne mettez jamais plus d'un disque à la fois.
o Assurez-vous que le disque est correctement
installé sur le moyeu et tient bien en place.
4
Appuyez sur la touche Ouvrir/Fermer
(
) pour f
ermer la porte du CD.
o
Charger le disque prend quelques secondes
durant lesquelles aucune touche ne fonctionne.
o S'il n'y a pas de disque chargé dans le lecteur
de CD, “NO DISC” est aché.
Exemple : si un CD audio est chargé
T
otal de pistes Durée totale de lecture
Exemple : si un disque de MP3/WMA est chargé
Nombre total de dossiers
Nombr
de saut (.//) jusqu’à ce que le chier/
piste souhaité soit trouvé. Le chier/piste
sélectionné sera lu depuis son début.
Avec la lecture à l'arrêt
e Appu yez répétitivement sur une touche
de saut (.//) jusqu'à l’obtention du
chier/piste souhaité. Puis appuyez sur la
touche Lecture/Pause (y/9) pour lancer la
lecture depuis le chier/piste sélectionné.
o
Appuyer sur la touche . durant la lecture
du chier/piste la fait reprendre au début. Pour
revenir en début de piste/chier précédent,
appuyez deux fois sur la touche
..
Recherche d'un passage
Pendant la lec ture, maintenez pressée une
touche de sau t (.//) puis relâchez-la
lorsque vous avez trouvé le passage souhaité.
ESP (Electronic Shock Protection)
La fonction ESP conserve de la musique dans
une mémoire tampon pour éviter les sautes de
son en cas de choc. Elle peut être mise en et
hors service durant la lecture d'un CD audio. Elle
est toujours active sur les chiers MP3/WMA.
Après avoir chargé un CD, quand la lec ture
est arrêtée, appuyez sur la touche MP3 pour
activer/désactiver cette fonction.
o Le témoin “(ESP)” s'allume le temps que
l'appareil remplisse la mémoire tampon.
o Nous vous recommandons de placer cet
appareil sur une surface stable exempte de
vibrations et de désactiver la fonction ESP
pour la lecture d'un CD audio.
Achage des infos de MP3/WMA
Durant la lecture d'un disque MP3/WMA, quand
vous appuyez sur la touche MP3, l'écran fait
déler les informations sur le chier actuel
comme suit :
Titre
Artiste
Album
Appuyez à nouveau sur la touche MP3 pour
annuler le mode d'informations MP3/WMA.
o “UNKNOWN” apparaît quand l'appareil ne
peut pas lire les informations.
o ““NONE” apparaît s'il n'y a pas d'informations.
o reihcif ed mon ud serètcarac sreimerp 51 seL
et les 32 premiers caractères du titre/artiste/
album peuvent être achés.
Sélection d'un dossier sur le
disque de MP3/WMA
Appuyez sur une touche SCROLL (j/k) pour
sélectionner un dossier. Le premier chier du
dossier sélectionné sera automatiquement lu.
Mode de recherche
(MP3/WM A seulement)
Recherche du nom d'un chier
1
Appuyez sur la touche MP3 alors que la
lecture est à l'arrêt.
Exemple :
Numér
Première lettre
o Pour annuler le mode de recherche, appuyez
sur la touche STOP (8).
2
Sélectionnez la première lettre du chier
que vous voulez écouter en appuyant
sur les touches de saut (.//).
3
Une fois la lettre atteinte, maintenez la
touche de saut (.//) jusqu'à ce que
la première lettre clignote.
4
Appuyez répétitivement sur les touches
de saut (.//) jusqu'à ce que vous
ayez trouvé le chier à lire.
5
Appuyez sur la touche Lecture/Paus e
(y/9) pour lancer la lecture.
Vous pouvez régler la minuterie d'extinction pour
que l'appareil passe en veille tout seul après un
temps donné. À chaque pression de la touche
SLEEP, le réglage change comme suit :
90 min. 75 min. 15 min.
o Sélectionnez “o” pour annuler la minuterie
d'extinction.
o L'écran et l'éclairage du guide iPod/iPhone
sont atténués quand la minuterie d'extinction
est activée.
o Si vous voulez contrôler le temps restant
avant passage en veille, appuyez une fois sur
la touche SLEEP. Le temps restant s'achera
durant quelques secondes.
o Cette opération est possible avec toutes les
sources sonores.
Section AMPLIFICATEUR
Puissance de sortie . . . . 10
W au total (5 W + 5 )W
Puissance de sortie (caisson de graves) . . . . . 15 W
Sensibilité d’entrée . . . . ... ... . . ... ... . . . . 300 mV
Réponse en fréquence . . . . ... ... . 20 à 20 000 Hz
Section LECTEUR DE CD
Réponse en fréquence . . . . ... .20 Hz à 20 000 Hz
(+/- 1 dB)
Rapport signal/bruit . ... . . ... ... . . ... ... . . . 55 dB
Pleurage et scintillement . . . . ... . Non mesurable
Section SYNTONISEUR FM
Plage de fréquences . ... . . ... .87.50 à 108.00 MHz
Sensibilité (S/B 30 dB) ... . . ... . . ... ... . 25 dBµV/m
Section S
YNTONISEUR
AM
Plage de fréquences . ... . . ... . . . . 520 à 1 710 kHz
Sensibilité (S/B 20 dB) . . ... . . ... ... . . . . 54 dBµV/m
ENCEINTE
Type ... ... . . ... . . ... ... . Large bande extra-plate
Impédance . ... ... . . ... ... . . ... ... . . ... . . 8 ohms
Impédance (caisson de graves) . . . . ... ... 6 ohms
GÉNÉRALES
Alimentation électrique . . . . ... . . CA 120 V, 60 Hz
Consommation électrique . . ... . . ... ... . . ...80 W
(moins de 4 W en veille)
Dimensions (L x H x P)
Unité principale . . . . ... ... 160 x 226 x 116,5 mm
Enceintes G & D. . . . . . . . . . . . . . 142 x 226 x 70 mm
Ca
isson
de graves . . . . ... ...170 x 200 x 240 mm
Poids (net)
Unité principale ... . . ... ... . . ... ... . . ... . . 1,0 kg
Enceintes G & D. . . . . . . . . . . . . . . . . .0,6 kg chacune
Caisson de graves . . . . ... ... . . ... ... . . ... .4,0 kg
Pour couper temporairement le son, appuyez
sur la touche MUTING. Appuyez à nouveau sur
la touche MUTING pour rétablir le son.
o “MUTING” apparaît à l'écran quand le son est
coupé.
o Vo us p ouv ez au ssi re sta urer le so n en
appuyant sur les touches VOLUME (+/−) ou la
touche FUNCTION.
o Cette opération est possible avec toutes les
sources sonores.
Chaque fois que vous appuyez sur la touche
DIMME R, la luminosité de l'é cran et des
lumières du guide iPod/iPhone change comme
suit :
Luminosité max.
Luminosité atténuée
Extinction
o Cette fonction sera annulée si on appuie sur
la touche STANDBY/ON (¤).
o Cette opération est possible avec toutes
les sources sonores sauf quand la minuterie
d'extinction est activée ou quand le guide
iPod/iPhone est en position horizontale.
Vous pouvez régler les graves et les aigus
o Cette opération est possible avec toutes les
sources sonores.
1
Appuyez sur la touche BASS ou TREBLE.
Pour régler le niveau des basses fréquences,
appuyez sur la touche BASS.
Pour régler le niveau des hautes fréquences,
appuyez sur la touche TREBLE.
2
Dans les 3 secondes, utilisez les touches
VOLUME +/– pour changer le réglage.
Le niveau peut être réglé entre “-4” et “+4”.
In sér ez l 'iPod /iPhone dans le dock du
MC-DX90 i. P uis appuyez sur la touche
Lecture/Pause (y9) de l'iPod/iPhone. Le
MC-DX90i s'allumera automatiquement et
commencera la lecture de la liste musicale
de l'iPod/iPhone.
o Si un iPod/iPhone en mode de lecture est
inséré dans le dock, le MC-DX90i s'allume
automatiquement et lance la lecture sur
l'iPod/iPhone.
o Installez le support d'iPhone fourni si vous
utilisez l'iPhone.
o Quand l'iPod/iPhone est sur le dock et le
MC-DX90i allumé, la batterie de l'iPod/iPhone
se recharge à fond.
o Quand un casque est bran ché à l'iPod/
iPhone, le son sort à la fois par les enceintes
du MC-DX90i et par le casque.
o La touche Stop (8) ne fonctionne pas quand
la source est réglée sur “iPod”.
o Le signal vidéo de l'iPod/iPhone connecté
peut être envoyé par la prise de sortie VIDEO
OUT du MC-DX90i à un téléviseur (voir “4
Branchements”).
Sélection du mode iPod
Ap puy ez s ur la touche FUNCTIO N p ou r
sélectionner “iPod”.
Si un iPod/iPhone en mode de lecture est
déjà sur le dock
e La lecture démarre automatiquement.
S'il n'y a pas d'iPod/iPhone sur le dock
e L'indicateur iPod clignote dans l'écran.
Insérez l'iPod/iPhone dans le dock, puis
appuyez sur la touche Lecture/Paus e
(y/9) pour lancer la lecture.
Arrêt provisoire de la lecture
(mode pause)
Appuyez sur la touche Lecture/Pause (y/9)
durant la lecture. La lecture s'arrête à la position
actuelle. Pour reprendre la lecture, appuyez à
nouveau sur la touche Lecture/Pause (y/9).
Saut au morceau suivant ou
précédent
Pendant la lecture, appuyez répétitivement sur
les touches de saut (.//) jusqu’à ce que
le morceau souhaité soit trouvé. Le morceau
sélectionné sera lu depuis son début.
o Si on appuie sur la touche . durant la
lecture, la lecture du morceau en cours
reprend au début. Pour revenir au début du
morceau précédent, appuyez deux fois sur la
touche ..
Recherche d'un passage
Pendant la lecture, maintenez pressée une
touche de recherche (.//) puis relâchez-
la lorsque vous avez trouvé le passage souhaité.
Retour au menu précédent
Appuyez sur la touche MENU.
Cette touche a les mêmes fonctions que son
homologue sur l'iPod.
Sélection d'une option de menu
Appuyez sur une des touches SCROLL (j/k)
pour faire déler le menu jusqu'à l'option voulue,
puis appuyez sur la touche SELECT.
Activation du mode aléatoire
Pen dant la lecture, appuye z sur la touch e
SHUFFLE pour passer en mode aléatoire.
Chaque fois que vous appuyez sur la touche
SHUFFLE, le réglage de lec ture aléatoire de
l'iPod/iPhone change comme suit :
morceaux albums
o
Quand l'iPod /iPhone est réglé pour lire
aléatoirement les morceaux ou albums, l'icône
apparaît sur l'écran de l'iPod/iPhone.
Activation de la lecture en boucle
Appuyez sur la touche REPEAT pour changer
le mode de lecture en boucle. Chaque fois que
vous appuyez sur REPEAT, le réglage de lecture
en boucle de l'iPod/iPhone change comme suit :
un tous
o Quand l'iPod/iPhone est réglé pour lire un
morceau en boucle, l'icône » apparaît sur
l'écran de l'iPod/iPhone.
o Quand l'iPod/iPhone est réglé pour lire tous
les morceaux en boucle, l'icône ¼ apparaît
sur l'écran de l'iPod/iPhone.
Recherche d'un chier dans un dossier
1
Appuyez deux fois sur la touche MP3
alors que la lecture est à l'arrêt.
Exemple :
Numéro de dossier
Nom de dossier
o Pour annuler le mode de recherche, appuyez
sur la touche STOP (8).
2
tuas ed sehcuot sel rus zeyuppA
(. // ) po ur trouver le dossier du
chier que vous voulez entendre.
o Les chiers MP3/WMA qui ne sont pas dans
des dossiers sont automatiquement placés
dans le dossier “001” (root).
3
Quand vous a vez atte int le dossier,
maintenez pressée une touche de saut
(. // ) jusqu'à ce que l'indicateur
ALBUM disparaisse.
4
Sélectionnez le chier dans le dossier en
appuyant su r les t ouches de saut
(.//).
5
Appuyez sur la touche Lecture/Paus e
(y/9) pour lancer la lecture.
Lecture aléatoire
Appuyez sur la touche Shue durant la lecture
ou à l'arrêt. “SHUFFLE” s'ache et les chiers/
pistes sont lus en ordre aléatoire.
o Si vous appuyez sur la touche / durant la
lecture aléatoire (Shue), le prochain chier/
piste lu sera choisi aléatoirement.
Si vous appuyez une fois sur la touche ., la
lecture du chier/piste en cours reprend au
début. Si vous appuyez deux fois ou plus, le
chier/piste lu ensuite est choisi aléatoirement.
o Durant la lecture aléatoire, un chier/piste
déjà lu ne sera pas lu de nouveau.
o La lecture en boucle n'est pas possible en
mode de lecture aléatoire.
o La lecture aléatoire (Shue) ne fonctionne
pas durant la lecture programmée.
o Si l'on appuie sur l'une des touches suivantes,
la lecture aléatoire est abandonnée :
SHUFFLE, Stop (
8), FUNCTION, FM/AM,
STANDBY/ON (
¤), Ouvrir/Fermer ( )
Lecture en boucle
Chaque fois que vous appuyez sur la touche
REPEAT de le cture en boucle, le mode de
lecture en boucle change comme suit :
Si un CD audio est chargé
REPEAT REPEAT ALL
Si un disque de MP3/WMA est chargé
REPEAT ALBUMREPEAT REPEAT ALL
o Si l'on appuie sur l'une des touches suivantes,
la lecture en boucle est annulée :
Stop (
8), FUNCTION, FM/AM,
STANDBY/ON (
¤), Ouvrir/Fermer ( )
REPEAT (Lecture en boucle d'un chier/piste)
Le chier/piste sera lu en boucle. “REPEAT”
s'allume à l'écran.
o Si vous appuyez sur une touche de saut
(.//) et sélectionnez un autre chier/
piste, c'est ce dernier qui est lu en boucle.
o Il est aussi possible de sélectionner à l'arrêt
un chier/piste à lire en boucle. Appuyez sur
la touche REPEAT, sélectionnez un chier/
piste en appuyant sur une touche de saut
(. //), puis appuyez sur la touche
Lecture/Pause (y/9) pour lancer la lecture.
REPEAT ALL (Lectur
e en boucle de tous les
chiers/pistes)
Tous les chiers/pistes seront lus en boucle.
“REPEAT ALL” s'allume à l'écran.
o En lecture programmée, ce sont les chiers/
pistes programmés qui sont lus en boucle.
REPEAT ALBUM (Lecture en boucle de tous
les chiers du dossier)
(MP3/WMA uniquement)
Tous les chiers du dossier seront lus en boucle.
“REPEAT ALBUM” s'allume à l'écran.
Lecture programmée
64 chiers/pistes peuvent être programmés
dans l'ordre désiré.
1
Quand la source est réglée sur “CD”,
appuyez sur la touche MEMORY.
CD MP3/WMA
Numéro de programme Numéro de programme
o Pour annuler le mode de programmation,
appuyez sur la touche Stop (8).
2
(Programmer des chiers MP3/WMA)
Appuyez répétitivement sur une touche
de saut (./ /) pour sélectionner
un dossier de disque MP3/WMA, puis
appuyez sur la touche MEMORY.
Le numéro du premier chier du dossier
apparaît.
o
Les chiers MP3/WMA enregistrés hors des
dossiers sont dans le dossier racine “001” (root).
3
Appuyez successivement sur une touche
de saut (.//) pour choisir un chier/
piste, puis appuyez sur la touche MEMORY.
Le chier/piste est programmé, et “P-02”
s'ache.
o Répétez les étapes
2
et 3 pour programmer
des chiers/pistes supplémentaires.
o Vous pouvez programmer 64 pistes/chiers.
4
Une fo is terminée la s éle ction des
numéros de chier/piste, appuyez sur la
touche Lecture/Pause (y/8) pour lancer
la lecture programmée.
6
iPod/iPhone
Compatibilité iPod/iPhone
Les modèles suivants d'iPod/iPhone peuvent
être connectés et employés avec cet appareil :
iPod classic
iPod nano
(
2e, 3e, 4e, 5e et 6e génération
)
iPod touch
(1ère, 2e, 3e et 4e génération)
iPhone 4
iPhone 3GS
iPhone 3G
iPhone
Fonction de synchronisation d'horloge
Quand vous insérez un iPod/iPhone dans le dock
du MC-DX90i, l'horloge du MC-DX90i se cale
automatiquement sur les données d'horloge de
l'iPod/iPhone.
Cela fonctionne quand la source est r
églée sur
“iPod”, “CD” ou “AUX”.
o L a synchro nisation pre nd e nviron
30 secondes.
o Par défaut, la fonction de synchronisation
d’horloge de l’iPod/iPhone est activée (ON).
Activation/désactivation de la fonction de
synchronisation d’horloge de l’iPod/iPhone
1 Quand la source est sur “iPod”, maintenez
pressée la touche TIME SET pendant plus de
3 secondes. “SYNC ON” s’ache.
2 Dans les 5 secondes, sélectionnez “SYNC ON”
ou “SYNC OFF” à l’aide des touches de saut
(
.//).
3
Appuyez sur la touche Select pour conrmer
le réglage.
Cet appareil possède un numéro de série en face arrière.
Veuillez noter le numéro de série et le conserver pour
mémoire.
Numéro de série :
o La fonction Shue de lecture aléatoire ne
fonctionne pas en lecture programmée.
o Po ur ar rêter la lec ture du programme,
appuyez sur la touche Stop (8).
o Une fois terminé e la lec ture de tous les
c hi er s/pistes p rogrammés, ou si v ou s
appuyez sur la touche Stop (8), l'indicateur
“MEM ORY ”
s'ét eint ma is le programme
reste mémorisé. Pour relan cer la lecture
programmée, appuyez sur la touche MEMORY
puis sur la touche Lecture/Pause (
y/9
).
Véricatio
n de l'ordre de programmation
À l'arrêt, appuyez répétitivement sur la touche
MEMORY. Le numéro de chier/piste et sa
position dans le programme s'achent.
Ajout d'un chier/piste à la n du programme
À l'ar rêt, app uye z rép étitivem ent sur la
touche MEMORY jusqu'à ce que “00” s'ache.
Sélec tionnez un numéro de chier/piste en
suivant les étapes 2 et 3 . La piste ou le chier
est ajouté à la n du programme.
Modication du programme
À l’arrêt, appuyez sur la touche MEMORY jusqu'à
ce que le numéro de programme à changer
s'ache.
Sélectionnez un numéro de chier/piste
en
suivant les étapes 2 et 3
.
Eacement du programme
À l’arrêt, appuyez sur la touche MEMORY, puis
appuyez sur la touche Stop (8).
o Si l'on appuie sur l'une des touches suivantes,
le contenu programmé est aussi eacé :
FUNCTION, FM/AM,
STANDBY/ON (
¤), Ouvrir/Fermer ( )
o Quand l'interrupteur d'alimentation POWER
en face arrière du caisson de graves est mis
sur O, le programme conservé en mémoire
est eacé.
o Ne placez pas l'appareil sur un amplicateur,
un récepteur ou tout autre dispositif générant
de la chaleur.
o Quand cet appareil est en service, allumer
un téléviseur à proximité peut entr aîner
l’apparition de lignes sur l’écran de celui-ci, en
fonction de la fréquence de la télédiusion.
Ce n’est pas un mauvais fonctionnement de
l’appareil ni du téléviseur. Si vous voyez de
telles lignes, éloignez l'appareil du téléviseur.
5
Montage mural (enceintes)
Vous pouvez monter les enceintes au mur ou
simplement les placer sur une étagère ou un
pied.
Suivez les instructions ci-dessous pour monter
les enceintes.
ATTENTION
Avant de monter les enceintes, assurez-vous
que le mur de montage est susamment solide
pour supporter le poids des enceintes et des
xations.
Si vous n'êtes pas sûr d e s avoir comment
utiliser les supports et chevilles murales fournis,
consultez un magasin local d'outillage ou un
expert en fournitures de construction.
1
Av an t d e monter l es e ncei nt es ,
branchez-les à l'unité principale (voir
“4 Branchements”).
La longueur des câbles de branchement est
d'environ 1,8 retnom sap zevuop en suoV .m
les enceintes trop loin de l'unité principale ni
du caisson de graves.
2
Montez les supports.
Montage sur un mur en bois
Fixez les supports au mur à l'aide des vis
fournies.
Montage sur un mur en béton ou en
briques
1 Positionnez le gabarit de montage mural là
où vous voulez monter les enceintes.
2 Percez des avant-trous dans le mur aux
points marqués.
3 Insérez les chevilles murales fournies dans
les avant-trous. Puis, enfoncez délicatement
les chevilles au marteau jusqu'à ce qu'elles
ne dépassent plus du mur.
4 Fixez les supports en vissant les vis fournies
dans les chevilles.
3
Accrochez les enceintes sur les supports.
11
Réglage de l'horloge
1
Si l'appareil est en service, appuyez sur
la touche STANDBY/ON (¤) pour le
mettre en veille (standby).
2
Maintenez pressée la touche TIME SET
pendant plus de 2 secondes.
“12 H” ou “24 H” commence à clignoter
dans l'acheur. Si vous souhaitez changer le
mode d'achage de l'heure, appuyez sur une
touche de saut (
.//).
o Si rien n’est fait dans les 10 secondes, le mode
de réglage d'horloge est abandonné.
3
Appuyez à nouveau sur la touche TIME
SET.
La valeur des heures commence à clignoter.
Exemple :
4
Utilisez les touches de saut (.//)
pour régler les heures, puis appuyez sur
la touche TIME SET.
La valeur des minutes commence à clignoter.
Exemple :
5
Utilisez les touches de saut (.//)
pour régler les minutes, puis appuyez
sur la touche TIME SET.
L'horloge démarre.
o Quand l'interrupteur d'alimentation POWER
en face arrière du caisson de graves es t
sur O , le réglage d'horloge conservé en
mémoire est eacé.
o L e r é gl age d'h or l og e se cal er a
automatiquement sur les données d'horloge
de l’iPod/iPhone (voir “
6
iPod/iPhone”).
2
Entretien
Si la surface de l’appareil est sale, essuyez-la avec
un chi on doux ou utilisez un savon liquide
léger dilué. Laissez la surface de l'appareil sécher
complètement avant utilisation.
Par sécur it é, débranchez le cordon
d'alimentation de la prise secteur avant tout
nettoyage.
o Ne vaporisez jamais du liquide directement
sur cet appareil.
o
N’utilisez pas de diluant ni d'alcool car ils
peuvent endommager la surface de l’appareil.
3
Attention à la condensation
Si l’appareil est déplacé d’un endroit froid à un
endroit chaud, ou utilisé après un changement
soudain de température, il existe un danger
de condensation sur la lentille du lecteur de
CD ; la vapeur de l’air peut se condenser sur
le mécanisme interne, empêchant un bon
fonctionnement. Pour empêcher cela, ou si cela
se produit, laissez l'appareil allumé une heure
ou deux. Il se stabilisera alors à la température
ambiante.
12
Fonctionnement de base
1
Réglez l'in terrupteur d'alimentatio n
PO WER sur “ON” en face arrière du
caisson d e graves
pour a llumer l e
système.
Le voyant en face avant du caisson de graves
s'allume en bleu.
2
Appuyez sur la touche STANDBY/ON
(¤) pour allumer l’appareil.
L'appareil s'allume sur la dernière source
ayant été sélectionnée.
o Si un iPod/iPhone en mode de lecture est
inséré dans le dock, le MC-DX90i s'allume
automatiquement et lance la liste de lecture
de l'iPod.
o Quand la source est réglée sur “iPod” ou
“AUX”, l'écran ache toujours l'horloge.
o Quand la source est réglée sur “CD”, “FM” ou
“AM”, maintenez la touche TIME SET pressée
durant 2 secondes pour acher quelques
secondes l'horloge.
3
Sélectionnez une source en appuyant sur
la touche FUNCTION.
La source sélectionnée s'ache à l'écran.
La source change comme suit :
iPod CD FM AM AUX
o Pour écouter une source externe branchée à
la prise AUX IN, sélectionnez “AUX”.
o Vous pouvez aussi employer la touche FM/
AM de la télécommande pour directement
sélectionner “FM” ou “AM”.
4
Faites jouer la source, et réglez l e
volume avec les touches Volume (+/−).
Le volume se règle de 0 à 40.
Accessoires standard
Télécommande (RC-1223) x 1
Pile (CR2032) pour télécommande x 1
Câble mini-jack stéréo x 1
Antenne laire FM x 1
Antenne cadre AM x 1
Support pour iPhone x 2
Support de xation murale x 2
Vis (M5) x 4
Cheville murale x 4
Gabarit de montage mural x 2
Guide rapide de branchement x 1
Mode d’emploi (ce document) x 1
• Ce document comprend la garantie (voir à
droite).
• Conception et caractéristiques techniques
sont sujettes à changements sans préav
is.
•
Le poids et les dimensions sont des valeurs
approchées.
• Les illustrations peuvent légèrement diérer
des modèles de production.
o N’exposez pas cet appareil aux gouttes ni aux éclaboussures.
o Ne placez pas d’objet rempli de liquide sur l’appareil, comme
par exemple un vase.
o N’installez pas cet appareil dans un espace conné comme
une bibliothèque ou un meuble similaire.
o L’appareil tire un courant nominal de veille de la prise secteur
quand son interrupteur POWER ou STANDBY/ON n’est pas en
position ON.
o L’appareil doit être placé susamment près
de la prise de
courant pour que vous puissiez à tou
t moment attraper
facilement la che du cordon d’alimentation.
o La che secteur est utilisée comme dispositif de déconnexion
et doit donc toujours rester disponible.
o Si le produit utilise des batteries (y compris un pack d’accus ou
des piles), elles ne doivent pas être exposées au soleil, au feu
ou à une chaleur excessive.
o PRÉCAU TION pour les pro duits utilisant des ba
tte rie
s au
lithium remplaçables : Il existe un danger d’explosion en cas de
remplacement par un type de batterie incorrect. Remplacezles par des modèles identiques ou équivalents.
o Des précautions doivent être prises pour l’emploi d’écouteurs
ou d’un casque avec le produit car une pression acoustique
(volume) excessive dans les écouteurs ou dans le casque peut
provoquer une perte d’audition.
 Loading...