

Page 1

Director
User Manual
Software Version E1/B6
Control Software Version V3.0
D5016402
This document is not to be reproduced in whole or in part
without permission in writing from:
Page 2

Page 3

TANDBERG Director Videoconferencing System
Trademarks and copyright
COPYRIGHT © 2003, TANDBERG
1860 Michael Faraday Drive, Suite 250
Reston, Virginia, USA 20190
Tel: 703-709-4281, Fax: 703-709-4231
All rights reserved. This document contains information that is proprietary to TANDBERG. No part of this publication may
be reproduced, stored in a retrieval system, or transmitted, in any form, or by any means, electronically, mechanically, by
photocopying, or otherwise, without the prior written permission of TANDBERG. Nationally and internationally recognized
trademarks and tradenames are the property of their respective holders and are hereby acknowledged.
Portions of this software are © 1996-2003 RADVision Ltd. All intellectual property rights in such portions of the Software
and documentation are owned by RADVision and are protected by United States copyright laws, other applicable copyright
laws and international treaty provisions. RADVision and its suppliers retain all rights not expressly granted.
SMART Board is a trademark of SMART Technologies Inc.
Disclaimer
The information in this document is furnished for informational purposes only, is subject to change without prior notice,
and should not be construed as a commitment by TANDBERG.
The information in this document is believed to be accurate and reliable, however TANDBERG assumes no responsibility or
liability for any errors or inaccuracies that may appear in this document, nor for any infringements of patents or other rights
of third parties resulting from its use. No license is granted under any patents or patent rights of TANDBERG.
This document was written by the Solutions Group of TANDBERG. We are committed to maintaining a high level of quality
in all our documentation. Towards this effort, we welcome your comments and suggestions regarding the content and
structure of this document. Please fax or mail your comments and suggestions to the attention of:
Solutions Group
1860 Michael Faraday Drive, Suite 250
Reston, Virginia, USA 20190
Tel: 703-709-4281, Fax: 703-709-4231
Environmental Issues
Thank you for buying a product which contributes to a reduction in pollution and thereby helps save the environment.
- Our products reduce the need for travel and transport and thereby reduce pollution.
- Our products have either none or few consumable parts (chemicals, toner, gas, paper).
- Our products are low energy consuming products.
Production of products
Our factories employ the most efficient environmental methods for reducing waste and pollution and ensuring the
products are recyclable.
WARNING: TO REDUCE RISK OF ELECTRIC SHOCK, DO
NOT EXPOSE THIS PRODUCT TO WATER OR MOISTURE.
3
Page 4
Important Information
Please review this manual and the REAR PROJECTION SMART BOARDTM 3000i INSTALLATION GUIDE
carefully before setting up and using the Director videoconferencing system. With proper care, your
system should provide years of trouble-free service.
WARNING: THE PROJECTOR INSIDE THE CABINET IS A HIGH-BRIGHTNESS LIGHT SOURCE. DO
STARE INTO THE BEAM OF LIGHT OR VIEW IT DIRECTLY. PREVENT CHILDREN FROM STARING
NOT
DIRECTLY INTO THE BEAM OF LIGHT.
WARNING: TO REDUCE THE RISK OF FIRE OR ELECTRIC SHOCK, DO NOT EXPOSE THIS PRODUCT
TO RAIN OR MOISTURE.
WARNING FOR EUROPEAN CUSTOMERS:
THE 3000i SHOULD ONLY BE USED WITH EUROPEAN TN AND TT POWER DISTRIBUTION SYSTEMS.
TANDBERG Director Videoconferencing System
THE 3000I IS NOT SUITABLE FOR OLDER, IT-TYPE POWER DISTRIBUTION SYSTEMS FOUND IN SOME
EUROPEAN COUNTRIES. “THIS SYSTEM (IT-TYPE) IS WIDELY USED ISOLATED FROM EARTH, IN
INSTALLATIONS IN F RANCE, WITH IMPEDANCE TO EARTH, AT 230/400V, AND IN NORWAY,
SOME
WITH VOLTAGE LIMITER, NEUTRAL NOT DISTRIBUTED, AT 230V LINE-TO-LINE.” (IEC 60950:1999).
CONTACT QUALIFIED PERSONNEL IF YOU’RE UNCERTAIN OF THE TYPE OF POWER SYSTEM
AVAILABLE WHERE YOU’RE INSTALLING YOUR 3000I.
Other Warnings and Safety Precautions
For operating safety and to avoid damage to the unit, follow these instructions.
• Move the cabinet with care. Quick stops, excessive force and uneven surfaces can overturn
the cabinet.
• When you transport the Director, only ship the cabinet in the upright position and never lay the
interactive whiteboard face down. In addition, ensure that the projector is secure by tightening
the projector adjustment knob, locking bolt and two shipping straps.
• If you transport the Director over a distance, we strongly urge you to completely repackage it
using the original packaging. This packaging for the Director was designed with optimal shock
and vibration protection. If the original packaging is no longer available, pack all components
with as much padding as reasonably possible to ensure that they are not exposed to
excessive vibration or shock.
• If cabinet assembly is required, we strongly recommend that at least two people perform this
task.
• Do not touch the rear surface of the interactive whiteboard or apply isopropyl alcohol, water or
acetone. If any of these fluids come into contact with this surface, the diffusion coating on the
rear of the interactive whiteboard will be damaged, resulting in a permanent deterioration in
display quality.
4
Page 5

TANDBERG Director Videoconferencing System
• If you inadvertently smudge the rear surface of the interactive whiteboard, wipe it carefully
with a soft cloth and alcohol-free glass cleaner. Do not spray the glass cleaner directly onto
the surface; spray it lightly on the cloth, and then gently dab the rear surface of the interactive
whiteboard until the marks are removed.
• The 3000i uses digital cameras that are located inside the bezel. If you allow excess glass
cleaner to flow into the crack between the bezel and the writing surface, these cameras could
be damaged.
• Avoid setting up and using the Director in an area with excessive levels of dust, humidity and
cigarette smoke.
• Lock the casters after you set up the cabinet, so it remains stationary while in use.
• Avoid exposing the Director to extreme heat or cold. The operating temperature range is from
41 °F to 85 °F (5 °C to 29 °C) with up to 80% humidity (non-condensing). The shipping and
storage range is from -4 °F to 95 °F (-20 °C to 35 °C) with up to 80% humidity (non-condensing).
• Unplug the cabinet during electrical storms or if you won’t use it for an extended period of
time.
• This product is equipped with a three-wire grounding-type plug. This plug will only fit into a
grounding-type power outlet. If you are unable to insert the plug into the outlet, have your
electrician replace the obsolete outlet. Do not circumvent the safety features of the groundingtype plug.
• Handle the power cord carefully and avoid excessive bending. Route the power cord so its
unlikely to be walked on or pinched by items placed upon or against it. Do not modify the
power cord.
• The socket outlet shall be installed near to the equipment and shall be easily accessible.
• Never do any installation of cables without first unplugging the Director’s power cord.
• Never install telephone jacks in wet locations unless the jack is specifically designed for wet
locations.
• Never touch uninstalled telephone wires or terminals unless the telephone line has been
disconnected at the network interface.
• Use caution when installing or modifying telephone lines.
• Avoid using a telephone (other than a cordless type) during an electrical storm. There may be a
remote risk of electrical shock from lightning.
• Do not use the telephone to report a gas leak in the vicinity of the leak.
• 1TR6 network type is not approved for connection directly to the telecommunications network.
This network type is only to be used behind a PABX.
• X.21 network type is not approved for connection directly to the telecommunications network.
This network type is only to be used together with already approved equipment, and is not
meant for direct connections to the telecommunication networks.
• V.35/RS-449/RS-366 network type is not approved for connection directly to the
telecommunications network. This network type is only to be used together with already
approved equipment, and is not intended for direct connection to the telecommunication
networks.
• Allow adequate air circulation to prevent internal heat build-up. Do not block any of the
ventilation openings of the apparatus.
• Do not install the system in a location near heat sources such as radiators or air ducts, or in a
place subject to direct sunlight, excessive dust, mechanical vibration or shock.
5
Page 6

Contents
Trademarks and copyright ................................................................................... 3
Disclaimer.............................................................................................................. 3
Environmental Issues ............................................................................................ 3
Production of products......................................................................................... 3
Important Information ....................................................................................................... 4
Other Warnings and Safety Precautions .................................................................... 4
Introduction....................................................................................................................... 8
Welcome to the TANDBERG Director ........................................................................ 8
At a Glance: The TANDBERG Director ...................................................................... 9
System Overview ...................................................................................................... 10
Control Interface ................................................................................................. 10
Audio and Video Sources ................................................................................... 10
Optional Equipment** .......................................................................................... 11
System Connections .......................................................................................... 12
TANDBERG Director Videoconferencing System
Installation & Setup ......................................................................................................... 15
Getting Started ............................................................................................................... 30
General use .....................................................................................................................37
TF - TANDBERG FIRST
Room Configuration ................................................................................................. 15
Installing the Guest Laptop Shelf ............................................................................. 16
Installing the Adjustable Camera Shelf..................................................................... 17
Powering on the System .......................................................................................... 21
System Setup ........................................................................................................... 21
SMART Board
Touch Panel Tools for System Configuration ..................................................... 23
Network Connections ............................................................................................... 26
Device Connections ................................................................................................. 27
PC and Laptop Computer Setup ....................................................................... 28
System startup ......................................................................................................... 30
Control Orientation.................................................................................................... 30
Touch Screen and Remote IR Controls.................................................................... 31
Codec Basics............................................................................................................ 33
General Codec Configuration ............................................................................. 34
Network and LAN Settings ................................................................................. 35
Adjusting volume ................................................................................................ 37
Microphone on/off............................................................................................... 37
Directory.............................................................................................................. 37
Projector Standby Button................................................................................... 38
MultiSite
PC SoftPresenter ................................................................................................ 41
Web-interface ...................................................................................................... 41
TM
Projector Setup and Calibration ............................................. 21
TF
(MCU)................................................................................................. 39
6
Page 7

TANDBERG Director Videoconferencing System
Display Operation ........................................................................................................... 42
Local Display Operation ........................................................................................... 42
Screen Basics ..................................................................................................... 42
Source Selection ................................................................................................. 43
Device Control .................................................................................................... 43
Taskbar................................................................................................................ 44
Video Display Window ........................................................................................ 44
Videoconference Operation ...................................................................................... 45
On Screen Symbols ............................................................................................ 49
Videoconference Main Screen ............................................................................ 49
Video Window Display Control ........................................................................... 49
Videoconferencing Taskbar ................................................................................ 50
Far End Camera Control ..................................................................................... 51
DuoVideoTF Operation ......................................................................................... 52
Multipoint Operation ........................................................................................... 53
Advanced use ................................................................................................................. 54
Main menu ................................................................................................................. 54
Call quality ........................................................................................................... 55
Presentations ...................................................................................................... 57
Utilities ................................................................................................................. 58
MCU services ..................................................................................................... 60
Audio Settings .................................................................................................... 63
Video Settings ..................................................................................................... 68
Terminal Settings ................................................................................................ 72
LAN Settings ....................................................................................................... 81
Call Settings ........................................................................................................ 87
Dataport configuration ........................................................................................ 90
Language............................................................................................................. 91
Software Options ................................................................................................ 91
Diagnostics ......................................................................................................... 92
Appendices ..................................................................................................................... 95
Technical Description .................................................................................................... 110
Abbreviations................................................................................................................ 112
Index ............................................................................................................................. 113
Servicing ....................................................................................................................... 116
TF - TANDBERG FIRST
Appendix 1: Connecting to ISDN using network adapters ..................................... 96
Appendix 2: Connecting to the Switched 56 network ............................................. 97
Appendix 3: Connecting to PRI/T1 .......................................................................... 98
Appendix 4: Environmental & operational considerations ....................................... 99
Appendix 5: Using the file system .......................................................................... 101
Appendix 6: Security............................................................................................... 102
Appendix 7: 12” Touch Panel Interface .................................................................. 104
7
Page 8
Introduction TANDBERG Director Videoconferencing System
Introduction
Welcome to the TANDBERG Director
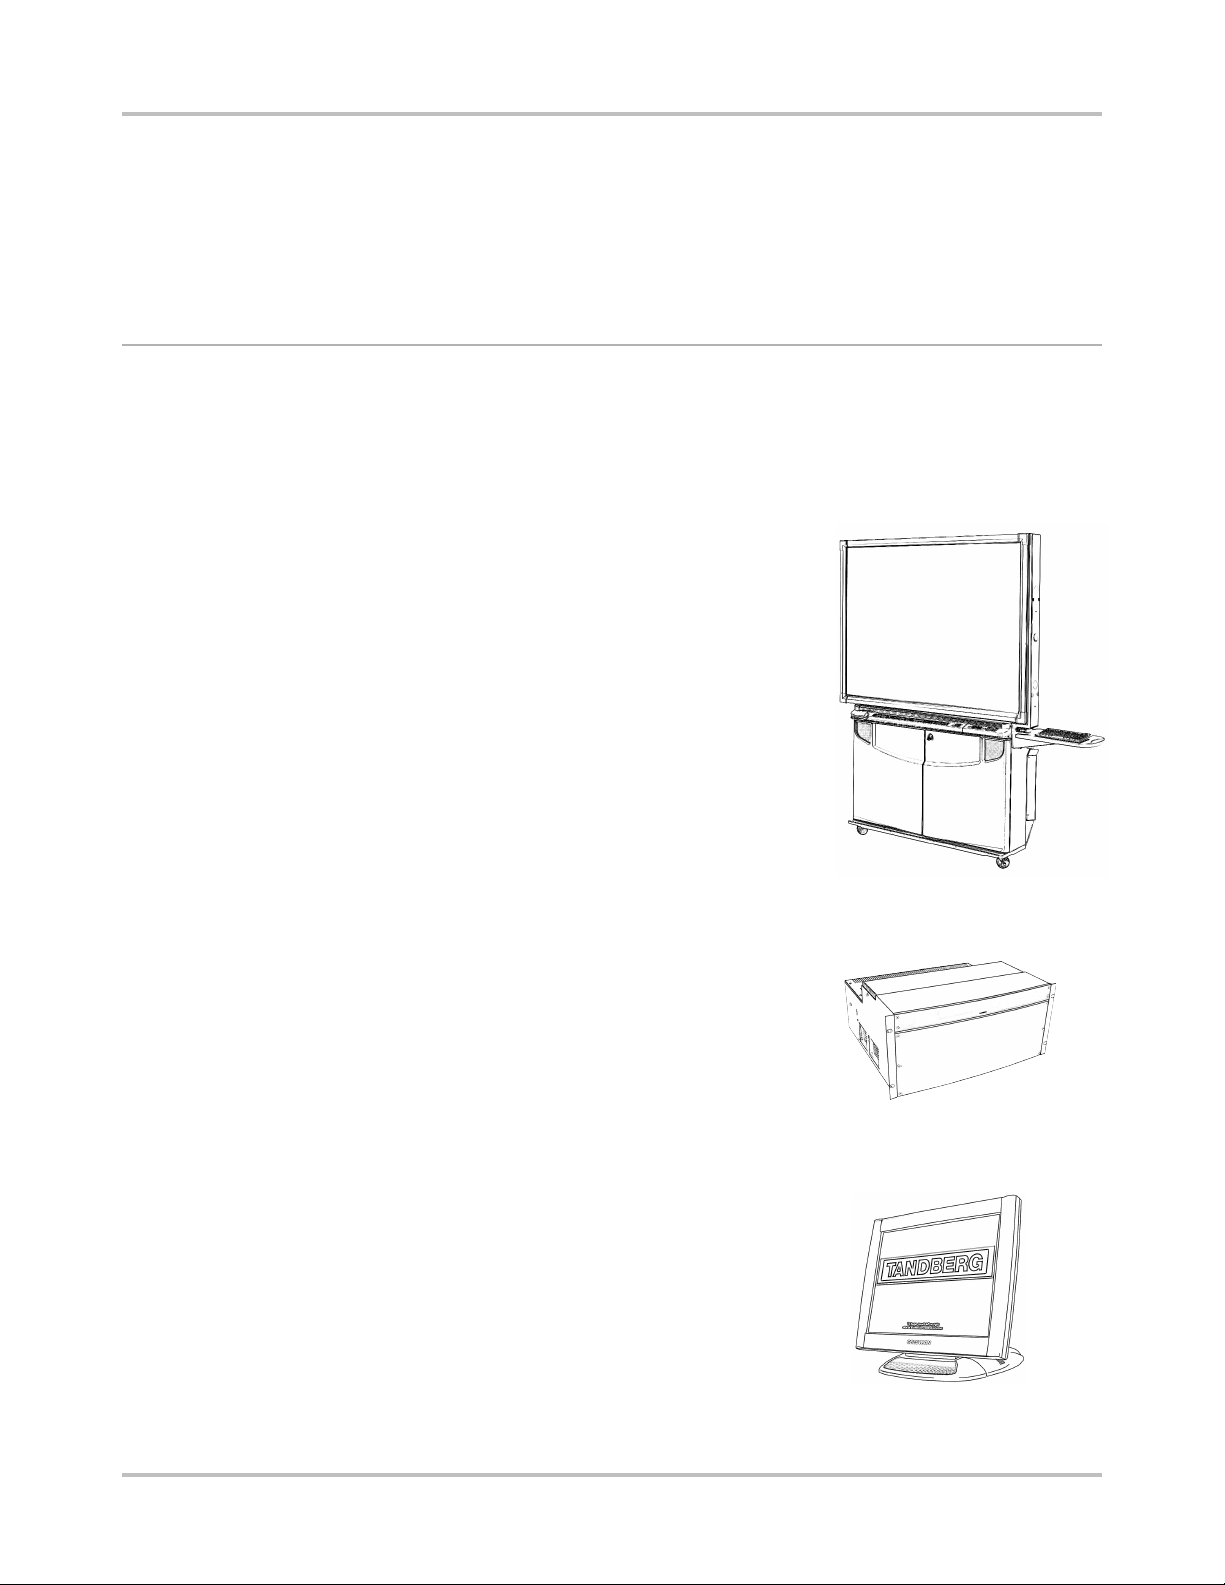
The TANDBERG Director is a multimedia and videoconferencing system that is integrated into the
Rear Projection SMART BoardTM 3000i system.
The core component of the Director, the DAM (Director Applications Module) is a 19” rack
mountable unit that provides all the necessary audio, video, network, and control connections for
videoconferencing. The intuitive on-screen controls provide configuration of multiple simultaneous
displays from a variety of sources. Annotation over the PC
image is possible in a variety of colors and can be viewed by
both the local and remote participants (software provided for
annotation, see INSTALLATION AND CONFIGURATION manual).
An optional color touch panel provides desktop control of the
system. Please refer to APPENDIX 7 for touch panel information.
Design features
• 67" display with on-screen touch controls
• Integrated mobile stand with electronic annotation markers and
storage for multiple peripherals such as a PC and VCR
• W.A.V.E II (wide angle view) camera with extensive zoom, pan &
tilt
• Ability to add a laptop with auto-detect switching capability
Application features
• Join up to 4 video sites and 1 audio site with embedded
MultiSite
• Powerful live presentations through one-step PC plug-in (PC
PresenterTF) or LAN connection (PC SoftPresenterTF)
• View presentations and multiple video sites simultaneously on
one screen using DuoVideo
• Display images from PCs, DVDs, VCRs, document cameras and
other input devices
• Annotate over any PC program and display annotations to all
conference participants
Performance features
• Choice of network: IP, ISDN and other external network
• Bandwidth: up to 2 Mbps ISDN / 3 Mbps IP
• Highest level of standards-based embedded encryption
• Protection against network interruptions with automatic
Downspeeding
TF
functionality
TF
TF
SMART BoardTM 3000i
DAM
(Director Applications Module)
Touch Panel
8
Page 9
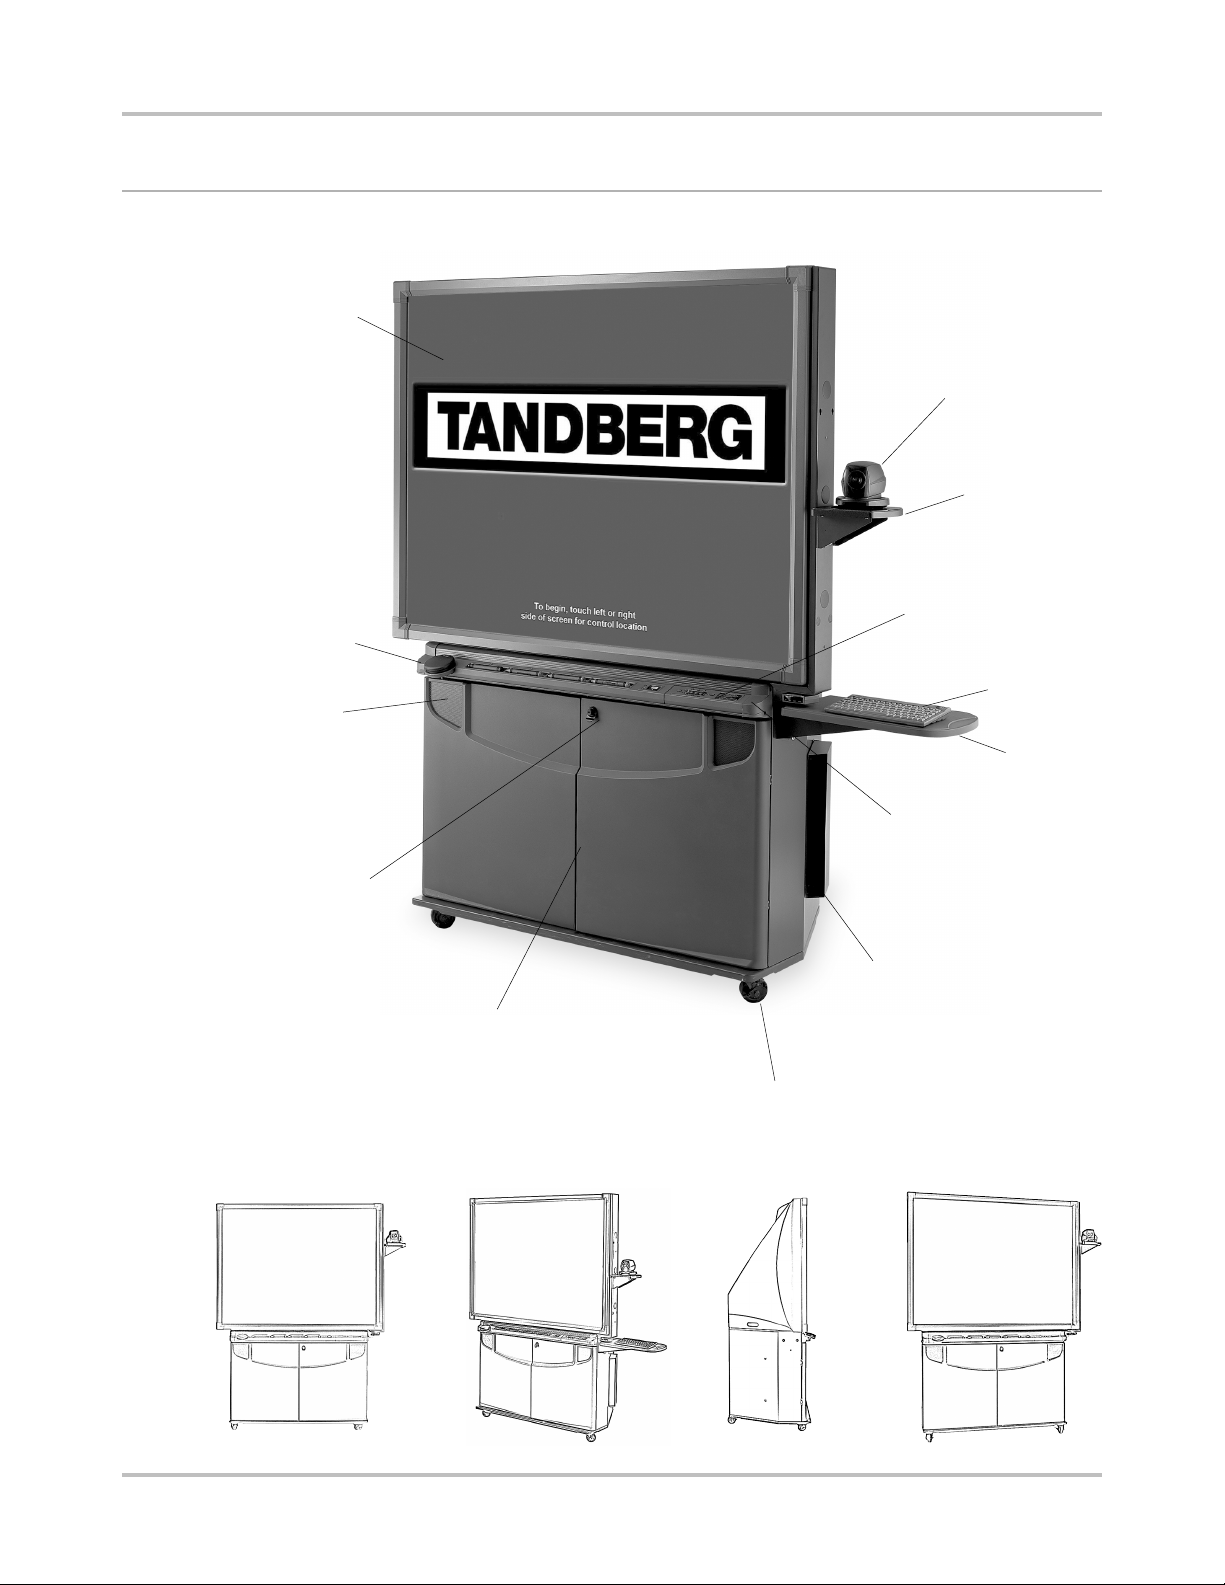
At a Glance: The TANDBERG Director
Interactive touch
SMART Board
SMART
pen tray
speaker vent
(x 2)
IntroductionTANDBERG Director Videoconferencing System
WAVE II
Camera
Adjustable
Camera
platform
power
On/Off
wireless
keyboard
laptop
shelf
key lock
for door
doors to mounted speakers and components
(Director Applications Module / 6000 codec / projector)
control
panel
wireless
keyboard
holder
lockable
casters (x4)
9
Page 10

Introduction TANDBERG Director Videoconferencing System
System Overview
The TANDBERG Director system is comprised of the following, as well as optional components
that can and will enhance your videoconferencing experience.
Control Interface
Director Application Module (DAM)
The Director Application Module is an integrated control, presentation, and videoconferencing
system. Using a TANDBERG 6000 codec, coupled with a video-scaling control system, allows
effective local presentations as well as videoconferencing. The module has an easy access rear I/
O panel that allows for connections to various A/V and control devices. The XGA resolution output
can be displayed on projectors, plasmas, or monitors. The 5U high, rack mountable package
allows for easy integration into classrooms, boardrooms, or podiums.
Interactive SMART Board
The Director can be used with the SMART BoardTM 3000i as the touch input device. This allows the
user to conduct a local presentation or videoconference by selecting intuitive controls displayed on
the board. Using the SMART BoardTM also allows for on-screen annotation and collaboration with
another site, as well as transmitting the session to a remote site in real-time. Refer the REAR
PROJECTION SMART BoardTM 3000i INSTALLATION GUIDE for more detailed description of features.
Touch Panel Control*
An optional 12” or 15” touch panel can be incorporated enabling a user to manage the
presentation from a podium or desktop. In some cases, this touch panel can be used as the only
control source or in conjunction with the controls on the interactive SMART BoardTM. See APPENDIX
7: 12” TOUCH PANEL INTERFACE.
Audio and Video Sources
Main Camera and AUX Camera**
The Director is capable of handling two controllable s-video sources. A TANDBERG W.A.V.E II
Camera, included with your system, or other VISCA controllable camera can be configured for use.
At present, if you intend to connect two cameras, they must be identical - you cannot have one
WAVE II camera and one Sony camera. They must both be WAVE II cameras or both be a VISCA
controllable camera of the same make and model.
TM
AudioScience Microphone**
The AudioScience Microphone is an overhead, transparent microphone that eliminates the need for
multiple tabletop microphones. Mounted on the ceiling, the microphone effectively picks up
participants within a wide range with very little distortion. Using the Automatic Gain Control (AGC)
on the codec maintains the audio signal level at a fixed value by attenuating strong signals and
amplifying weak signals.
* - OPTIONAL F EATURE.
** - OPTIONAL EQUIPMENT AVAILABLE THROUGH TANDBERG OR IS USER SUPPLIED.
10
Page 11

Document Camera**
A composite video source is available for a document camera. Document cameras can be used to
show a wide variety of media, such as whitepapers, film negatives, or standard overhead projector
transparencies. Source selection, zoom, focus and lighting can all be controlled from the button
panel of the document camera.
VCR/DVD player**
Standard composite video VCR’s or DVD players can be added for playback and recording. Using
codec features such as audio “ducking” (lowering the VCR output while the presenter is talking)
allows seamless presentations and participant interaction. Use the front panel controls or the
supplied remote control specific to these devices.
Auxiliary Sources**
Any auxiliary source can be substituted for the sources above.
There are a total of 2 s-video and 2 composite inputs available on the system.
Optional Equipment**
IntroductionTANDBERG Director Videoconferencing System
Additional Monitors
An additional monitor can be added for viewing the far or local video. Typically used to view the far
side in a teaching environment, the monitor will also show the local image when giving a local
presentation.
PC and Laptop Computer
A user supplied PC and/or laptop can be connected to the system to enhance presentation.
You may choose to connect a PC placed inside the 3000i cabinet and use it as a source for
presentation. If you intend to use a PC as a presentation source only, then the PC must be, at
minimum, able to support VGA.
You may choose to connect a laptop computer to the 3000i as a source for presentation. This can
be done in conjunction with, or independently from, the PC that is integrated to the Director
system.
Refer to the REAR PROJECTION SMART BOARDTM 3000I INSTALLATION GUIDE for information on
connecting the PC and laptop as well as SMART software installation and configuration.
** - OPTIONAL EQUIPMENT AVAILABLE THROUGH TANDBERG OR IS USER SUPPLIED.
11
Page 12

Introduction TANDBERG Director Videoconferencing System
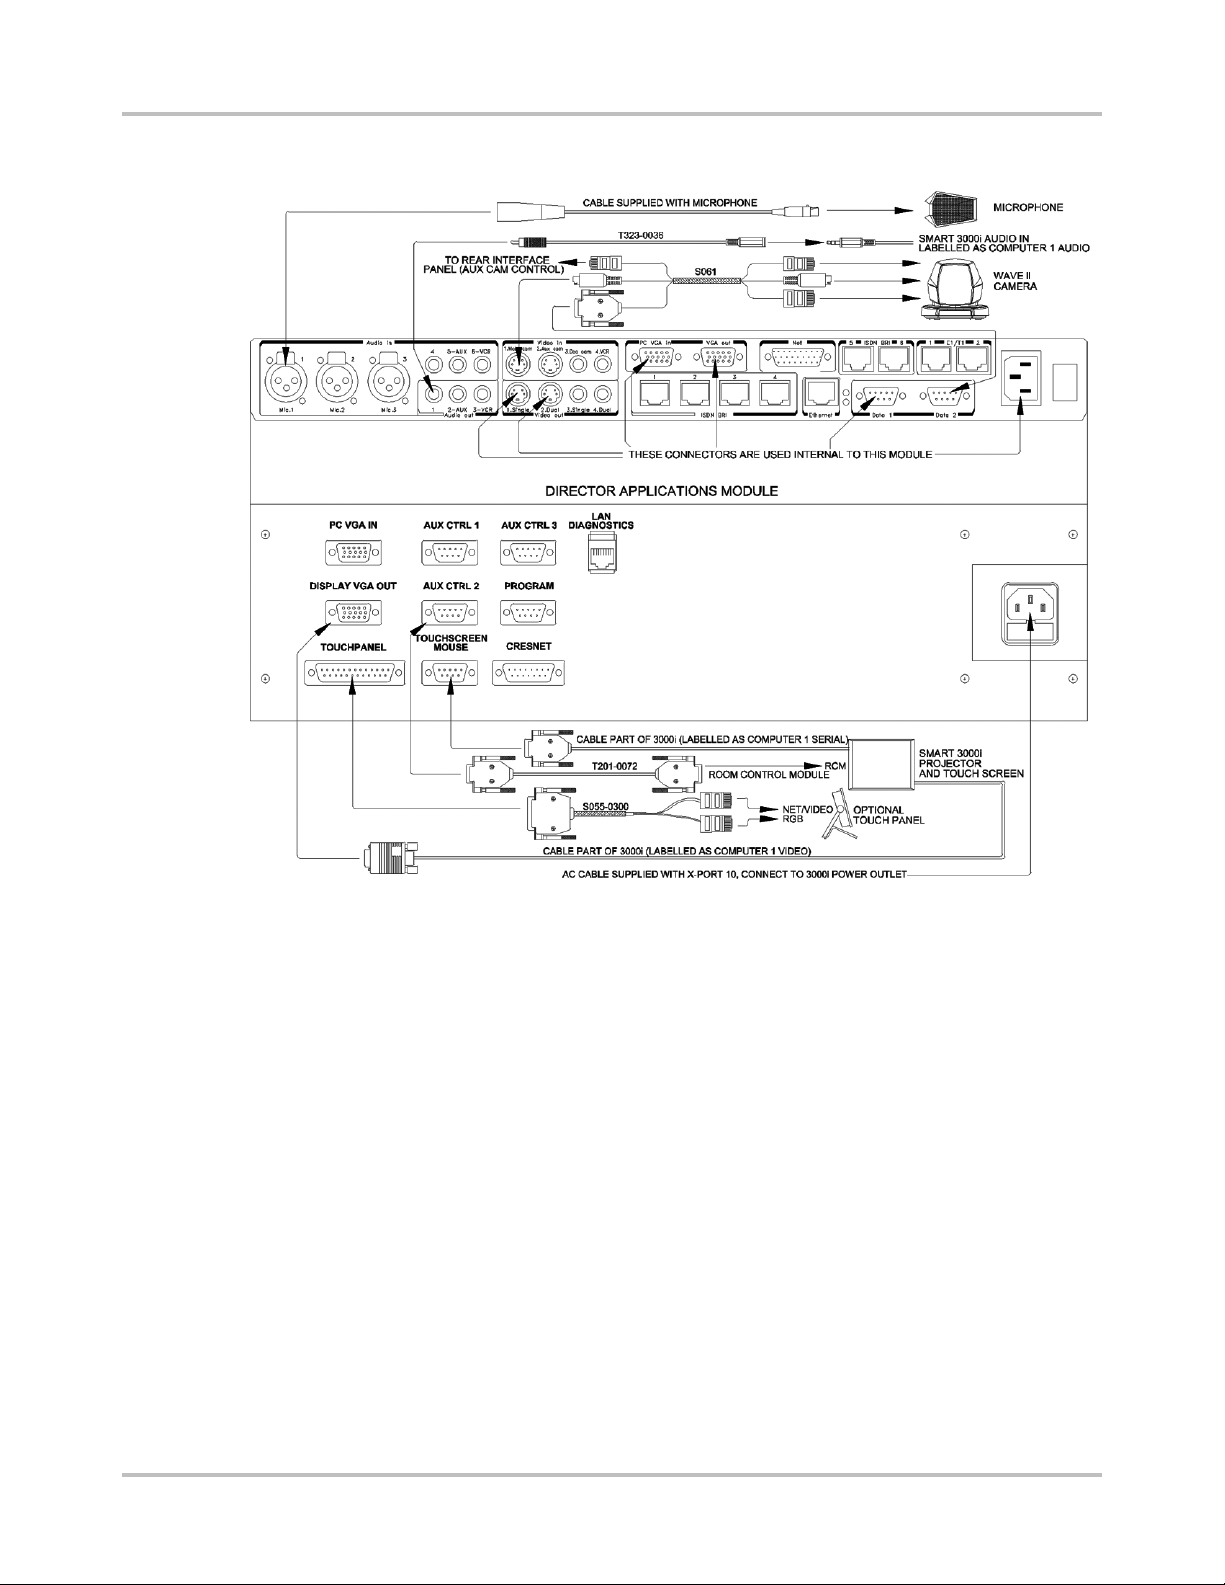
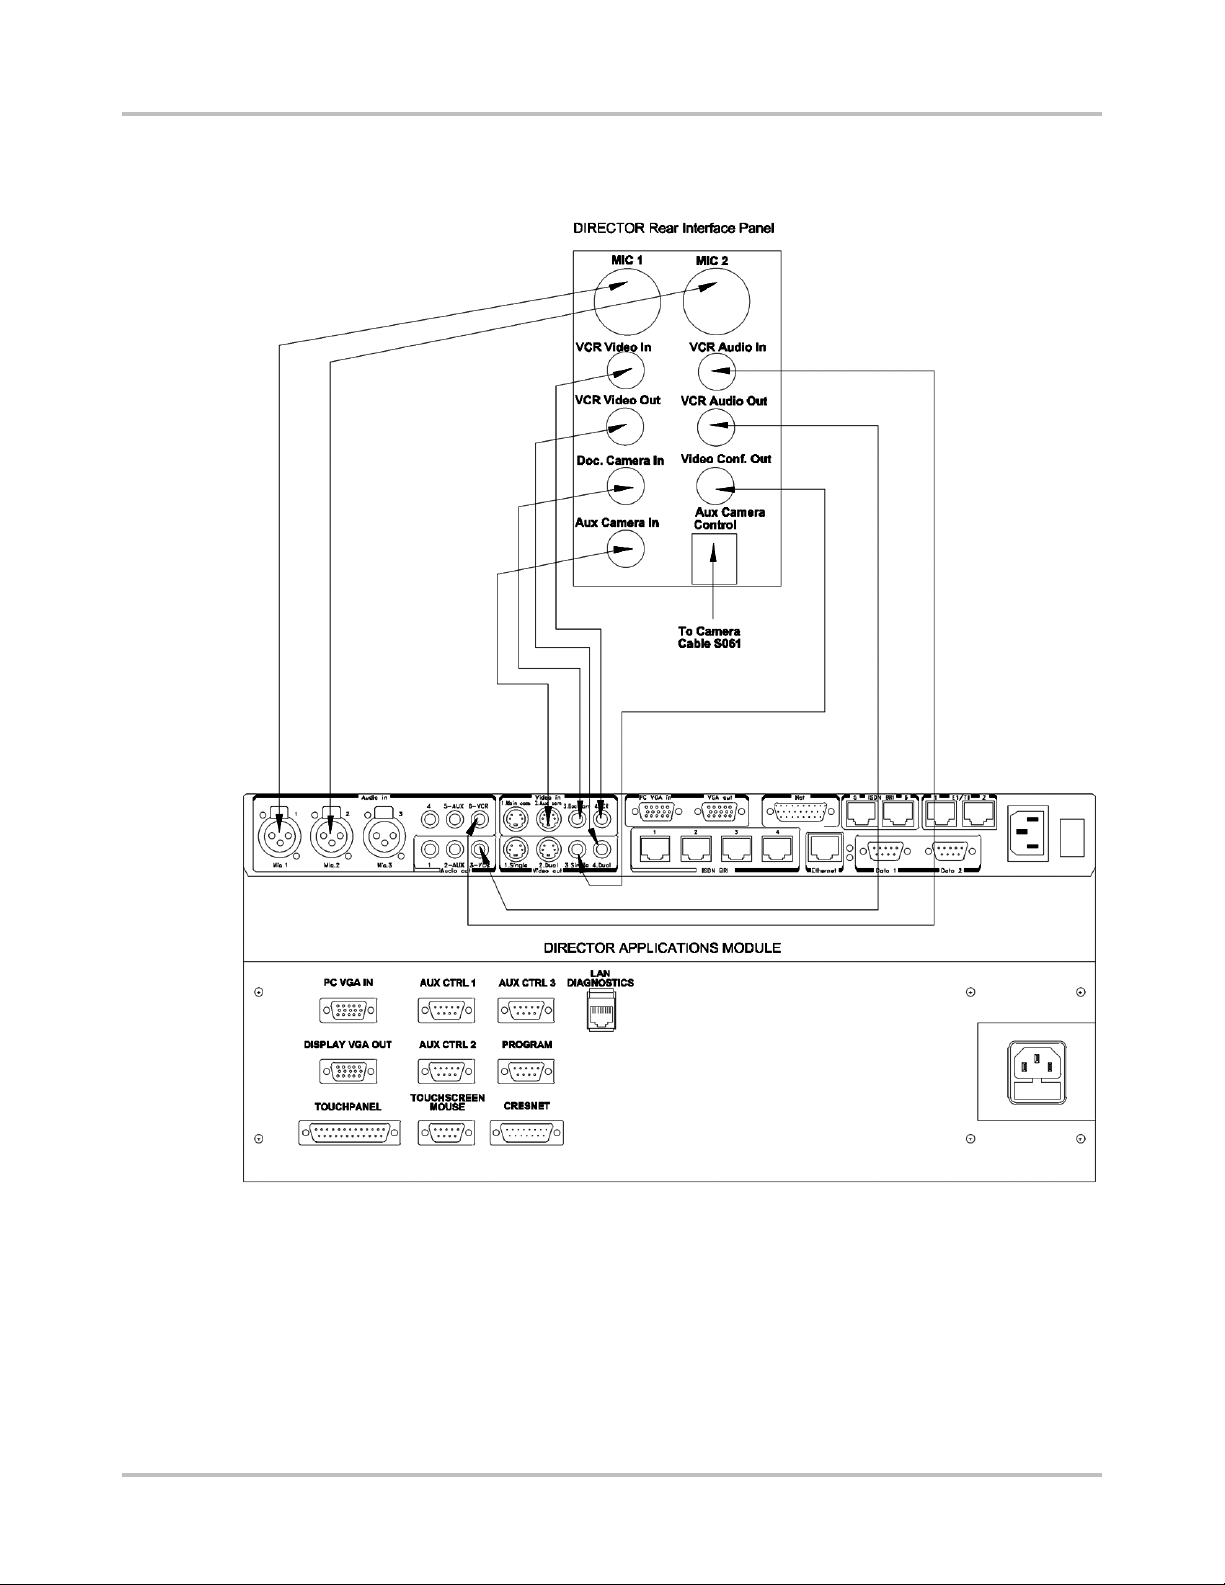
System Connections
The following diagrams provides an overview of the connections that are required for the Director
system. Before handling the system’s cables and components, make sure that the main power
plug is unplugged from any power source. For simplicity the Network connections are not shown in
the diagram below. See GETTING STARTED > CODEC BASICS > NETWORK AND LAN SETTINGS for
connecting network cables to the Director.
Rear Interface Panel
1. TANDBERG 6000 Codec.
2. PC VGA IN: Personal Computer Video Input, supports VGA, SVGA, and XGA resolution (15
pin female HD D-sub connector). See TANDBERG 6000 USER’S MANUAL for more information
regarding codec I/O.
3. DISPLAY VGA OUT: System Display VGA out, XGA resolution (15 pin female HD D-sub
connector).
4. AUX CTRL 1: Bi-directional RS232 (9600,N, 8,1) (9 pin female D-sub connector).
5. AUX CTRL 2: Bi-directional RS232 (9600,N, 8,1) supports SMART BoardTM 3000i Room
Control Module (9 pin female D-sub connector).
6. AUX CTRL 3: Bi-directional RS232 (9600,N, 8,1) used for PC com port with SMART Board
Software Package (9 pin female D-sub connector).
7. PROGRAM: Bi-directional RS232 (115200,N, 8,1) used for diagnostics and loading software
to Director Module. (9 pin female D-sub connector).
8. LAN DIAGNOSTICS: Ethernet port used for upgrading and troubleshooting the control
system (RJ45 connector).
9. AC Input: Fused 120VAC (or 220VAC for Europe) Input.
10. TOUCHPANEL: Supports Optional Touch sensitive panel (25pin female D-sub connector).
11. TOUCHSCREEN/MOUSE: Supports SMART BoardTM 3000i touch overlay or Microsoft
compatible mouse (9 pin female D-sub connector).
12. CRESNET: Port reserved for future expansion of Cresnet devices (15 pin male D-sub
connector).
TM
12
Page 13
Rear Interface Panel Connections
IntroductionTANDBERG Director Videoconferencing System
13
Page 14
Introduction TANDBERG Director Videoconferencing System
Rear Interface Panel - A/V Plate
14
Page 15
Installation & Setup
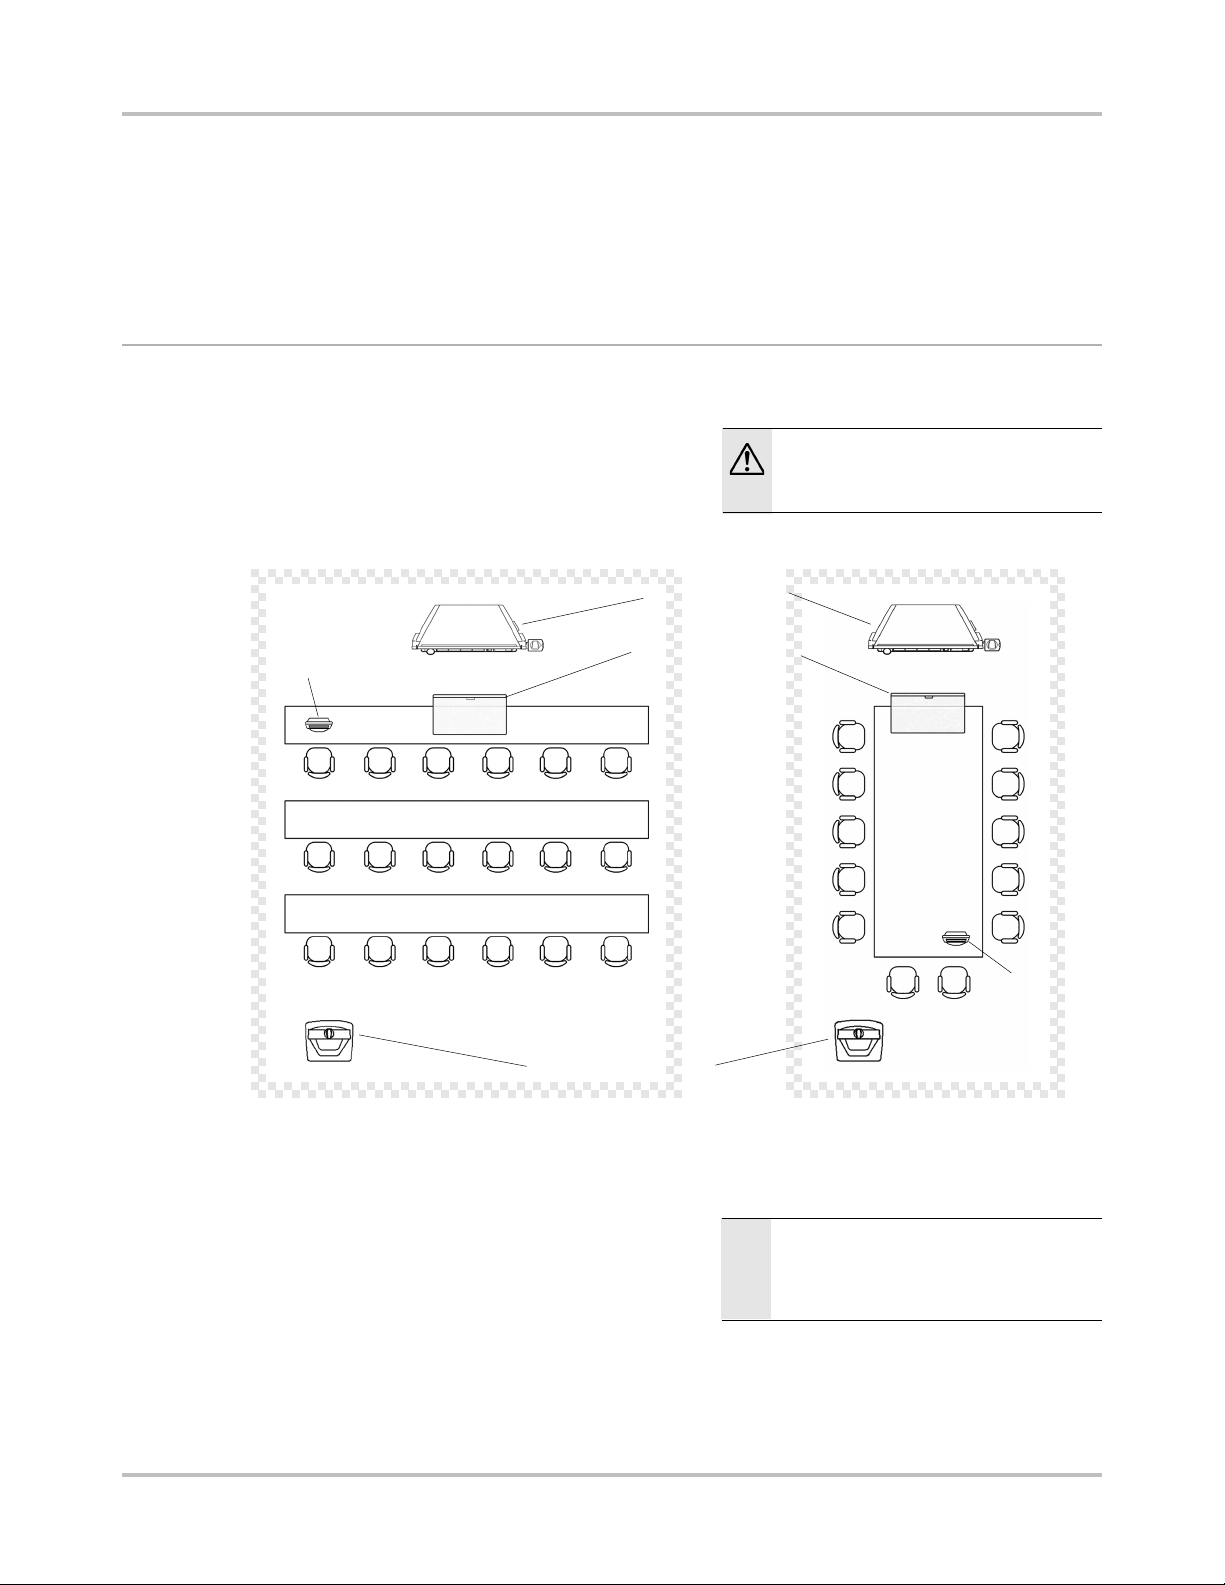
Room Configuration
The TANDBERG Director system has been designed to provide versatility for installation at any site,
whether for corporate, military or educational applications.
InstallationTANDBERG Director Videoconferencing System
Optional
Touch Panel
SMART BoardTM 3000i
Interactive Whiteboard
AudioScience Microphone
(ceiling mount)
REVIEW THE WARNINGS AND SAFETY
PRECAUTIONS
INSTALLATION AND SETUP.
ON PP 4-5 BEFORE
Touch Panel
Optional
Optional Monitor and Camera
See APPENDIX 4: ENVIRONMENTAL AND OPERATION CONSIDERATIONS for more information.
BE SURE TO LEAVE SUFFICIENT SPACE AROUND
NOTE
ENTIRE CABINET SO YOU CAN
THE
COMFORTABLY
INSTALLATION.
ACCESS IT DURING AND AFTER
15
Page 16
Installation TANDBERG Director Videoconferencing System
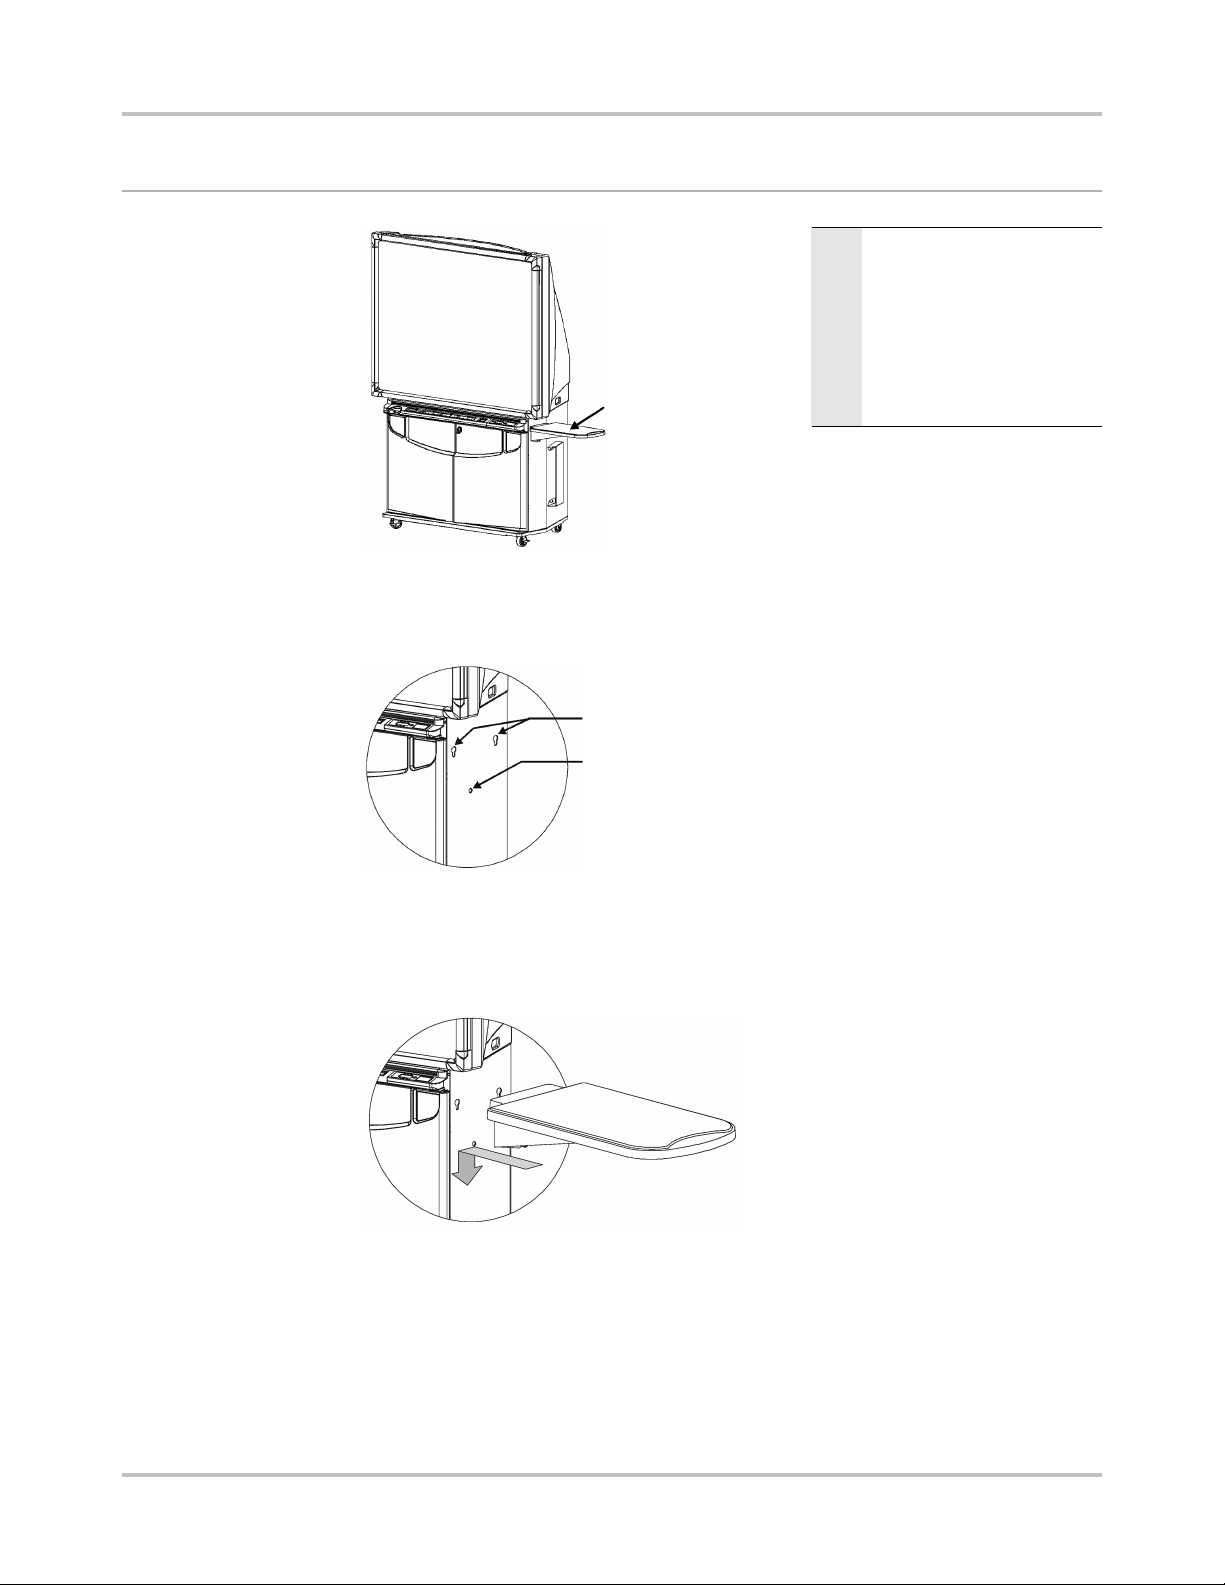
Installing the Guest Laptop Shelf
YOU CAN INSTALL THE SHELF ON
TIP
guest laptop shelf
1. Locate the two laptop shelf keyholes and the single thumbscrew hole on the upper right (or
left) side of the cabinet. Remove the plastic hole covers.
SIDE OF THE CABINET. IF
EITHER
’RE INSTALLING THE SHELF ON
YOU
COMPUTER SIDE OF THE
THE
, INSTALL THE SHELF
CABINET
THE COMPUTER. THE
BEFORE
HOLE COVERS ARE MUCH
PLASTIC
TO REMOVE WHEN THE
EASIER
COMPUTER IS NOT INSIDE.
2 keholes
thumbscrew hole
2. Push the two protruding bolts on the edge of the shelf into the two keyholes, and then push
the shelf firmly down.
3. Push the captive thumbscrew at the bottom of the shelf into the thumbscrew hole and
tighten.
16
Page 17
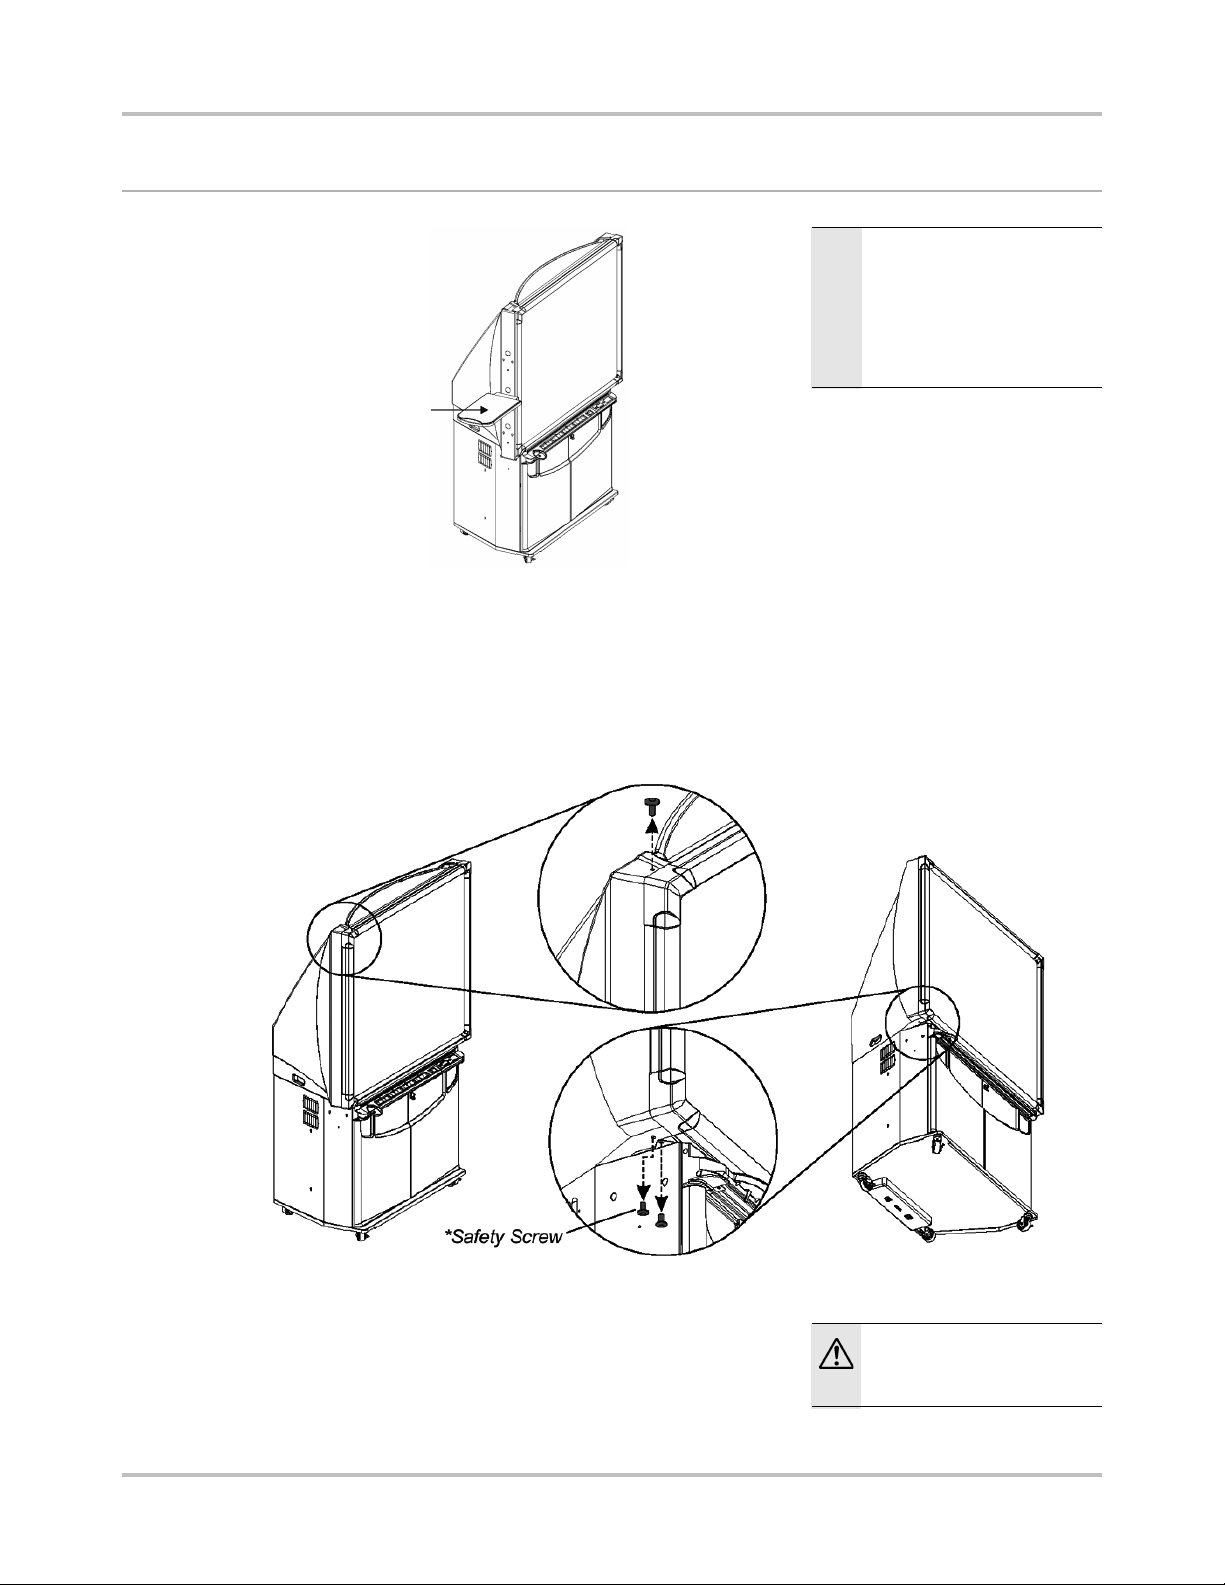
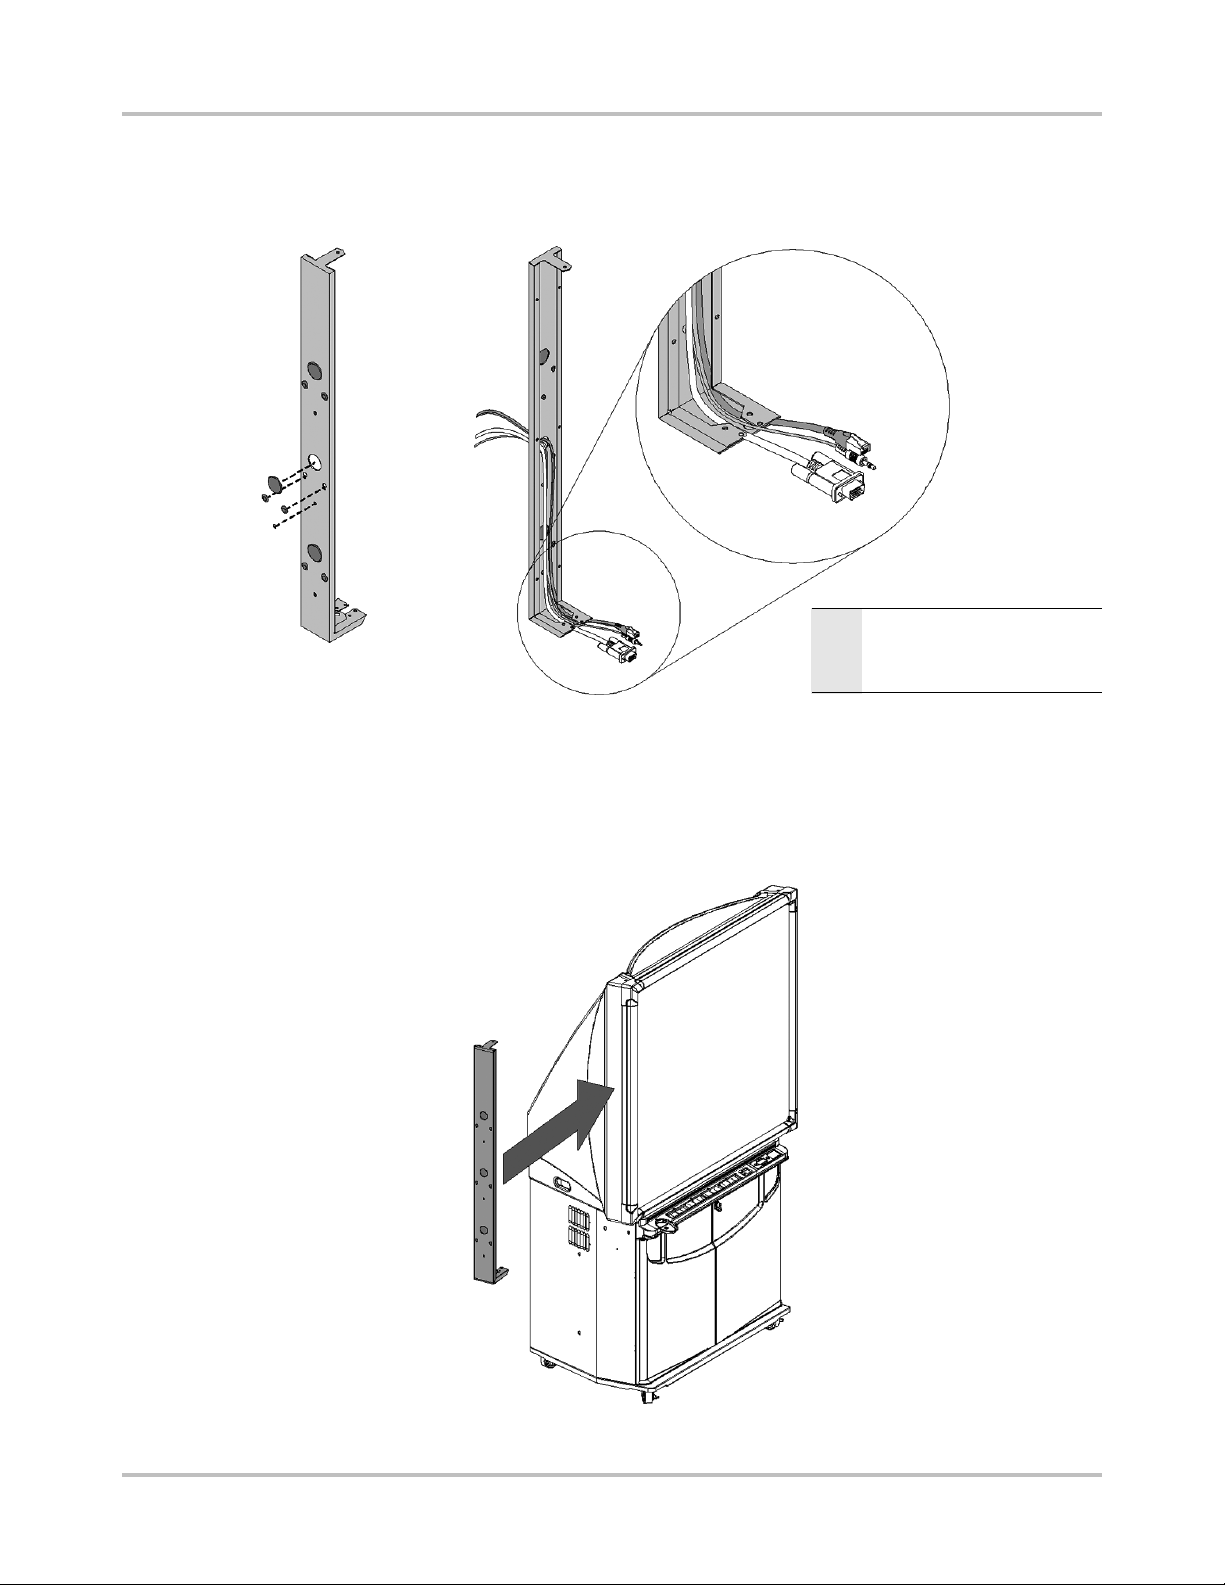
Installing the Adjustable Camera Shelf
installed
videoconferencing
camera shelf
To install the videoconferencing shelf
1. Choose the side on which you want to mount the shelf. Using the supplied hex-head
screwdriver, remove the three 1/4-20 x ˚” fasteners as shown. Note that one safety screw will
be removed.
YOU CAN INSTALL THE 3000I
TIP
VIDEOCONFERENCING
SIDE OF THE CABINET. THE
EITHER
MOUNTING
PROVIDES
CHANNEL
CABLING.
ARM OF THE SHELF
A CONVENIENT HIDDEN
FOR THE CAMERA
InstallationTANDBERG Director Videoconferencing System
SHELF ON
WARNING: DO NOT MOVE THE
UNTIL THE SAFETY SCREW
CABINET
IS REPLACED IN STEP 4.
17
Page 18
Installation TANDBERG Director Videoconferencing System
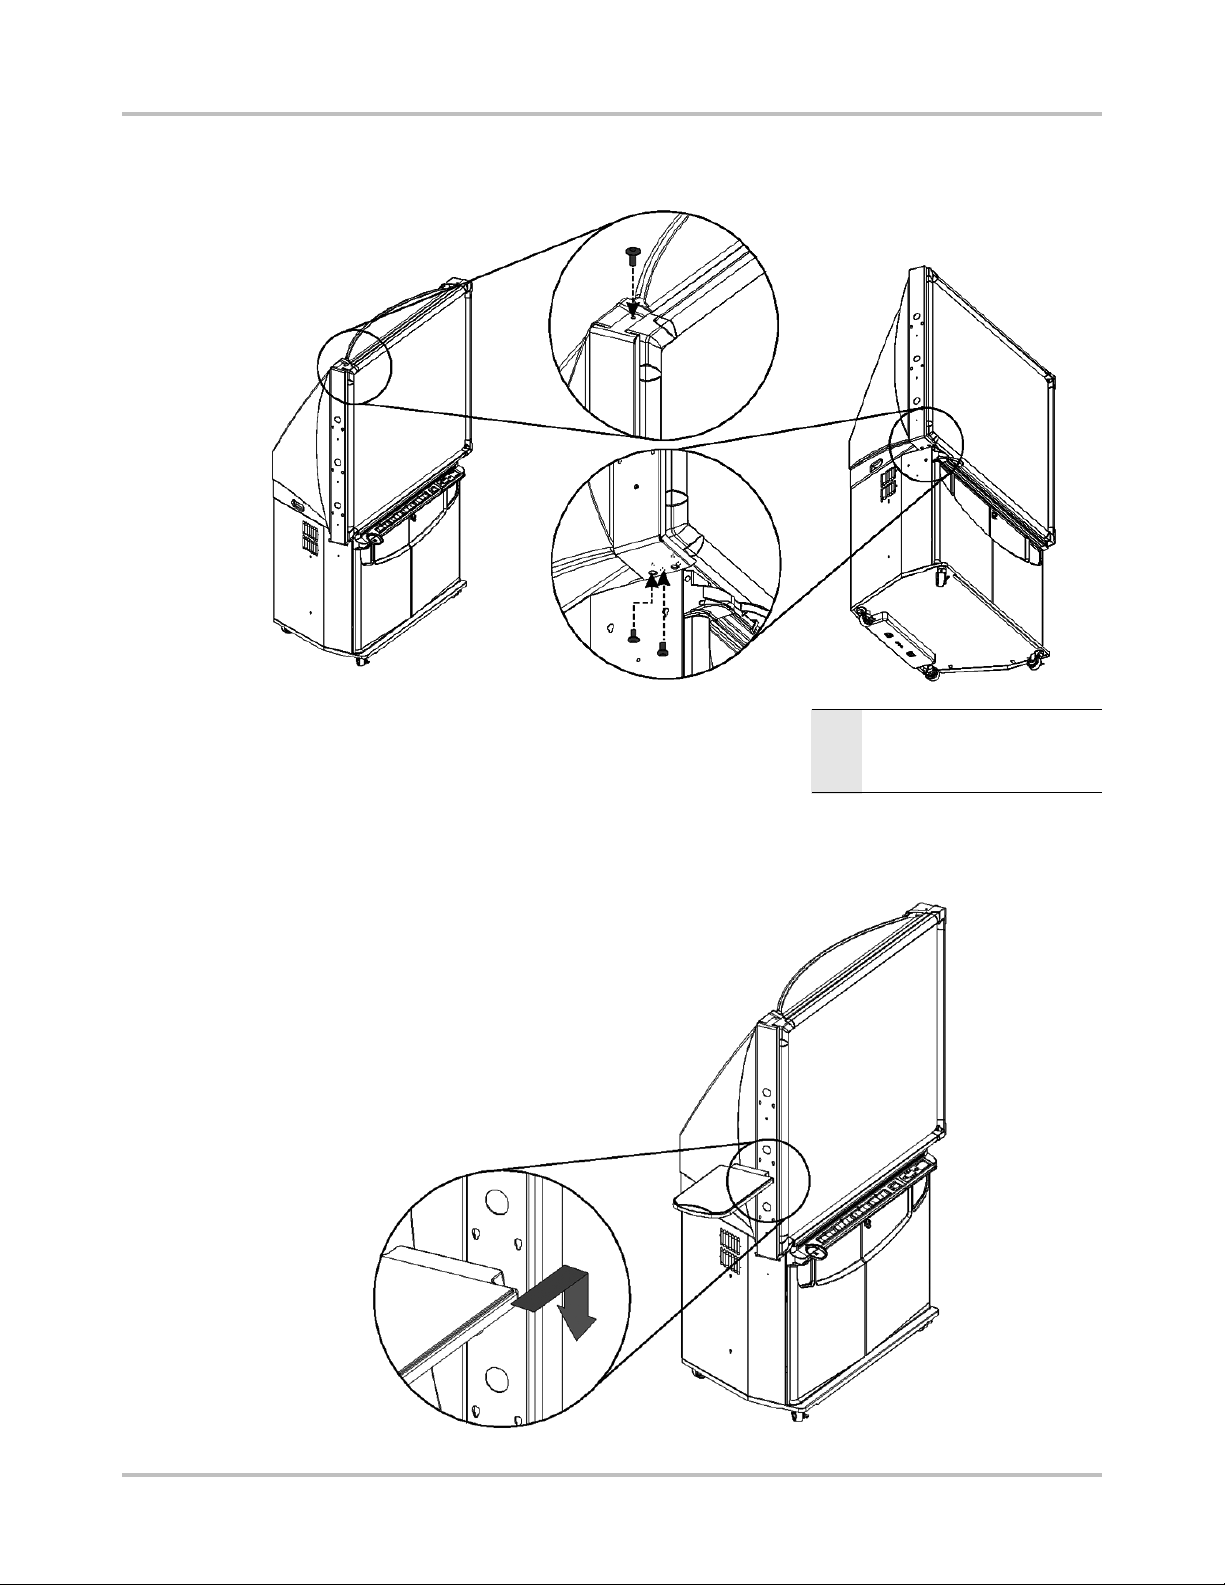
2. Remove the four caps and plugs from the mounting arm at the location where you want to
mount the shelf. Feed the cables for the videoconferencing camera through the large hole,
down the channel and through the lower mounting point.
CABLES SHOWN MAY NOT MATCH
NOTE
REQUIRED BY YOUR
THOSE
VIDEOCONFERENCING CAMERA.
3. If you’re installing the mounting arm on the same side as the IR receiver, detach the receiver
and leave it temporarily dangling. Carefully slide the mounting arm onto the side of the cabinet,
ensuring that the cables remain in the channel and are not pinched.
18
Page 19
InstallationTANDBERG Director Videoconferencing System
4. Use the three supplied 1/4-20 x ∫” fasteners in place of the 1/4-20 x ˚” fasteners (removed in
step 1) to secure the mounting arm to the cabinet. The safety screw is now replaced.
NOW THAT YOU’VE REPLACED THE
NOTE
SCREW, YOU CAN SAFELY
SAFETY
MOVE THE CABINET.
5. Hook the shelf to the keyholes in the mounting arm, tightening the thumbscrew to secure the
shelf.
19
Page 20

Installation TANDBERG Director Videoconferencing System
6. Cable management along the side of the cabinet is provided by the J-hook. Clip the J-hook
onto the handle on the side of the 3000i and route the cables through that hook to the
Connection Panel at the rear of the cabinet.
7. If you detached the IR receiver in step 3, use the Velcro included in the accessory kit to
reattach it to the bottom of the mounting arm.
8. To connect the camera to the system, find the cable loom (cable #S061) that has three
corresponding connectors for the camera (the cable should be coiled and secured with a Velcro
strapon the inside of the Director system):
CAMERA S-VID OUT
CAMERA CTRL OUT
CAMERA CTRL IN
Run the cable loom up the inside of the 3000i cabinet, on whichever side you have installed
the shelf, and deposit it through the appropriate hole to connect to the camera.
Installation is complete. Follow the instructions in reverse order to uninstall.
20
Page 21
Powering on the System
Once the system is installed in the
appropriate location, it is now ready for the
AC mains to be plugged in. To verify that all
components have been powered on, you
should be able to see the following LED
indicators through the smoked glass cover
of the Director Application Module.
If any of the green or red LED’s do not show
through the smoked glass, the system will
not work properly. Contact TANDBERG
Technical Service immediately.
To power on the projector, press the green
PROJECTOR STANDBY button on the front of
the 3000i cabinet. Once powered, refer to
‘SYSTEM SETUP’ for screen calibration.
YELLOW
GREEN
IT IS RECOMMENDED THAT YOU PRESS THE
NOTE
PROJECTOR STANDBY BUTTON TO
GREEN
THE SYSTEM IN STANDBY WHENEVER IT
PLACE
NOT IN USE. THIS WILL MAXIMIZE THE LIFE
IS
OF LAMP INSIDE THE PROJECTOR.
InstallationTANDBERG Director Videoconferencing System
RED
System Setup
SMART BoardTM Projector Setup and Calibration
When you press the POWER BUTTON on the 3000i
front control panel unit to activate the projector
display, it will then require approximately 40
seconds to complete the start-up routine, at
which point the TANDBERG start-up screen will
be displayed.
For SMART BoardTM software installation and
configuration, or any additional information,
please reference the ‘REAR PROJECTION SMART
BOARDTM 3000i INSTALLATION GUIDE’.
21
Page 22
Installation TANDBERG Director Videoconferencing System
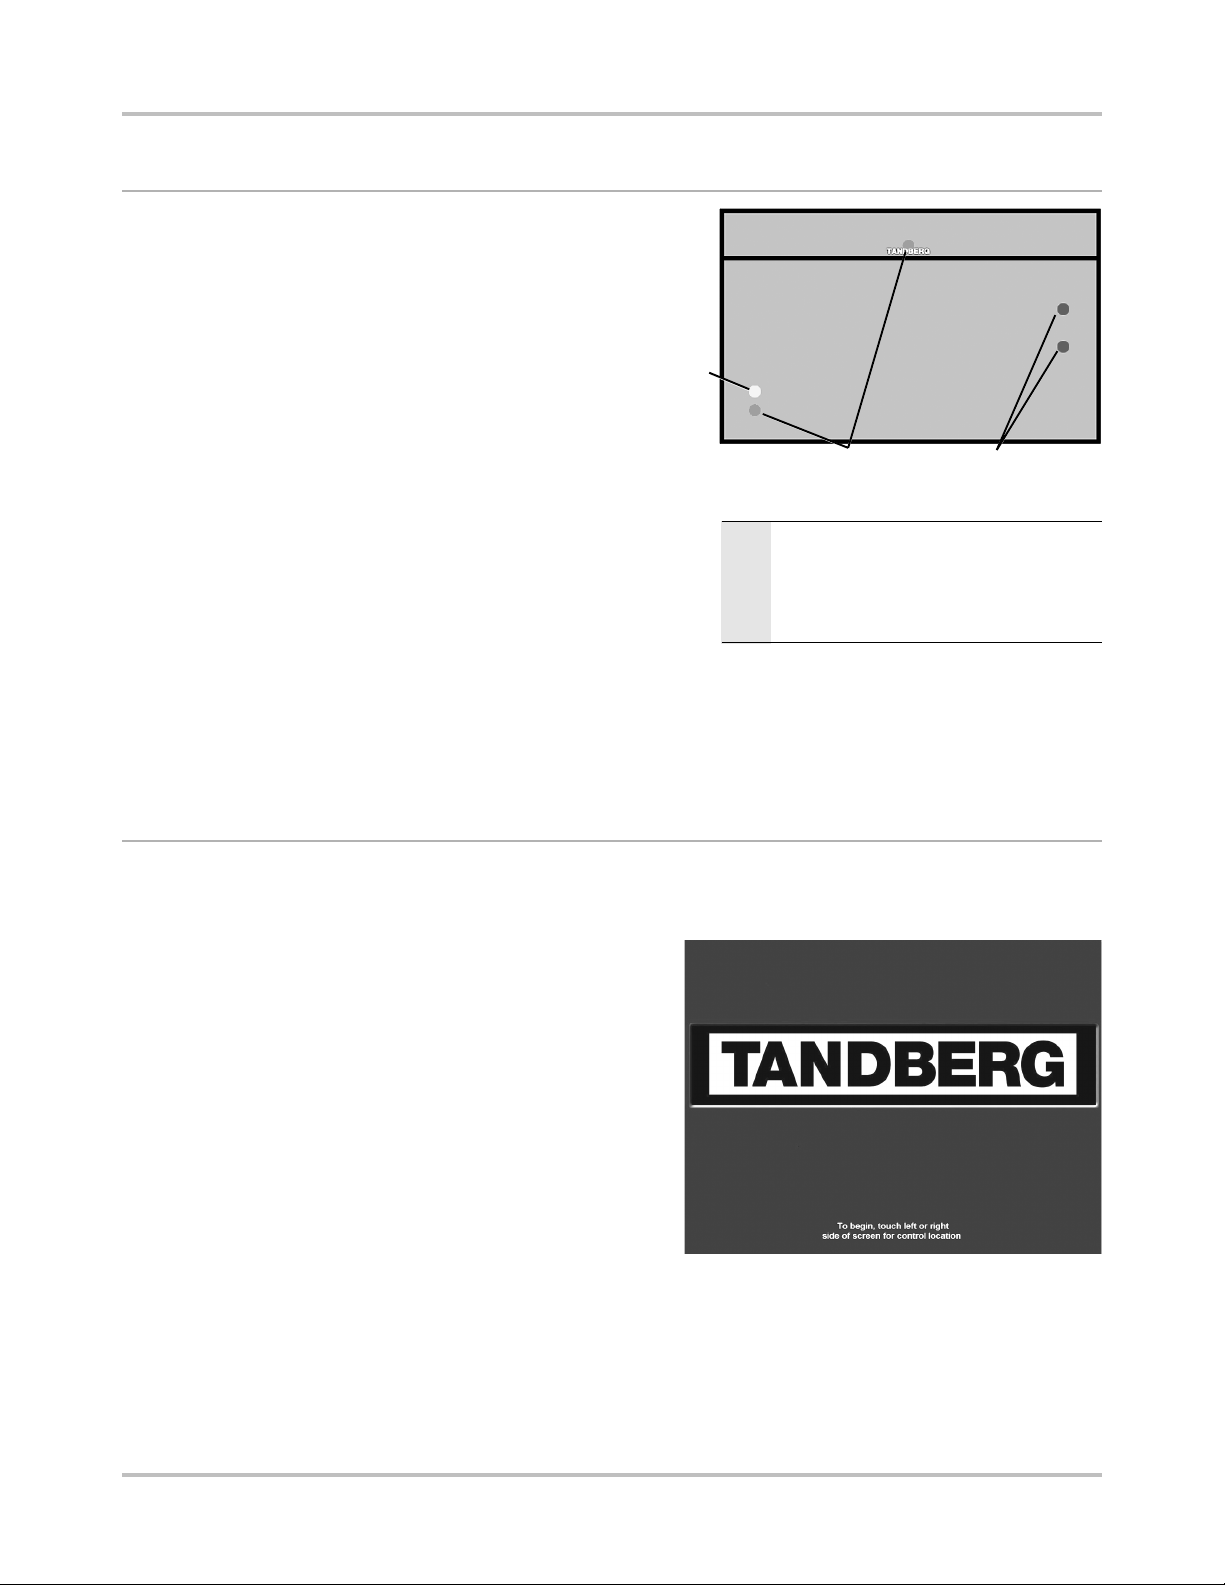
Touchscreen Calibration
Once the system is installed and functioning, it is recommended that the SMART BoardTM 3000i
touch screen be calibrated.
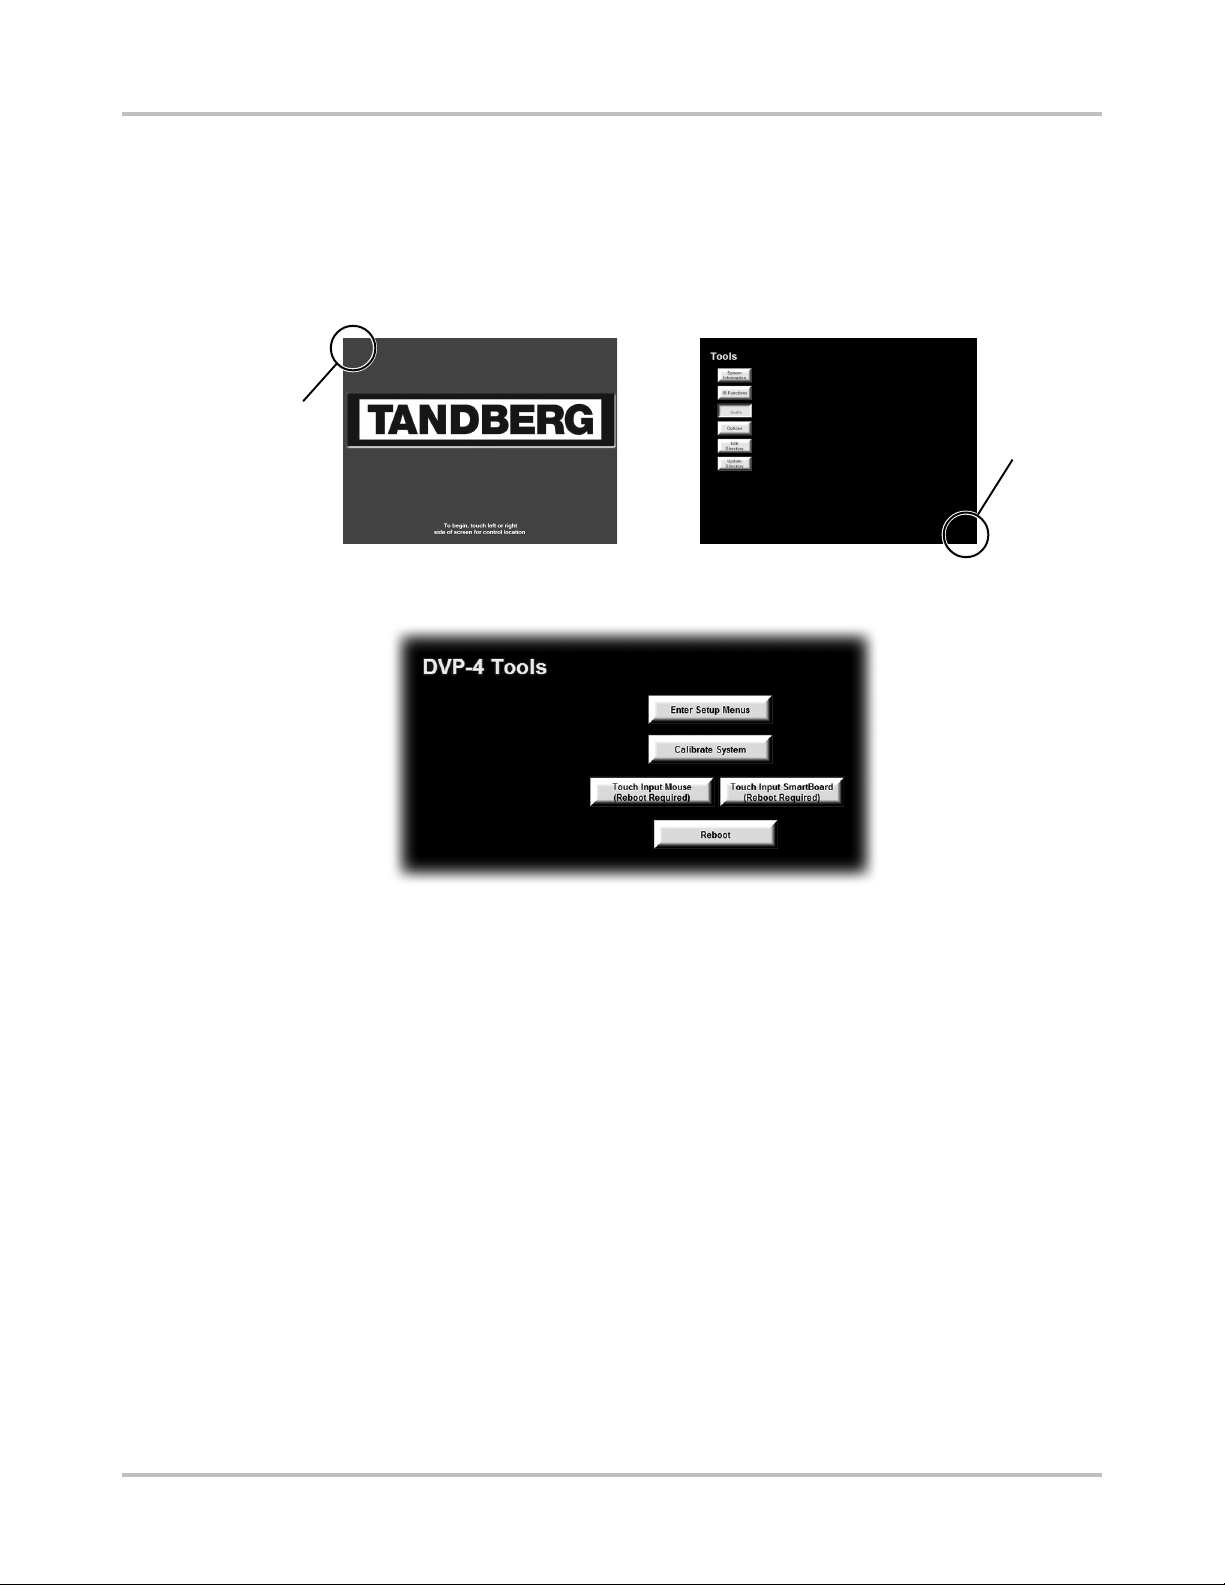
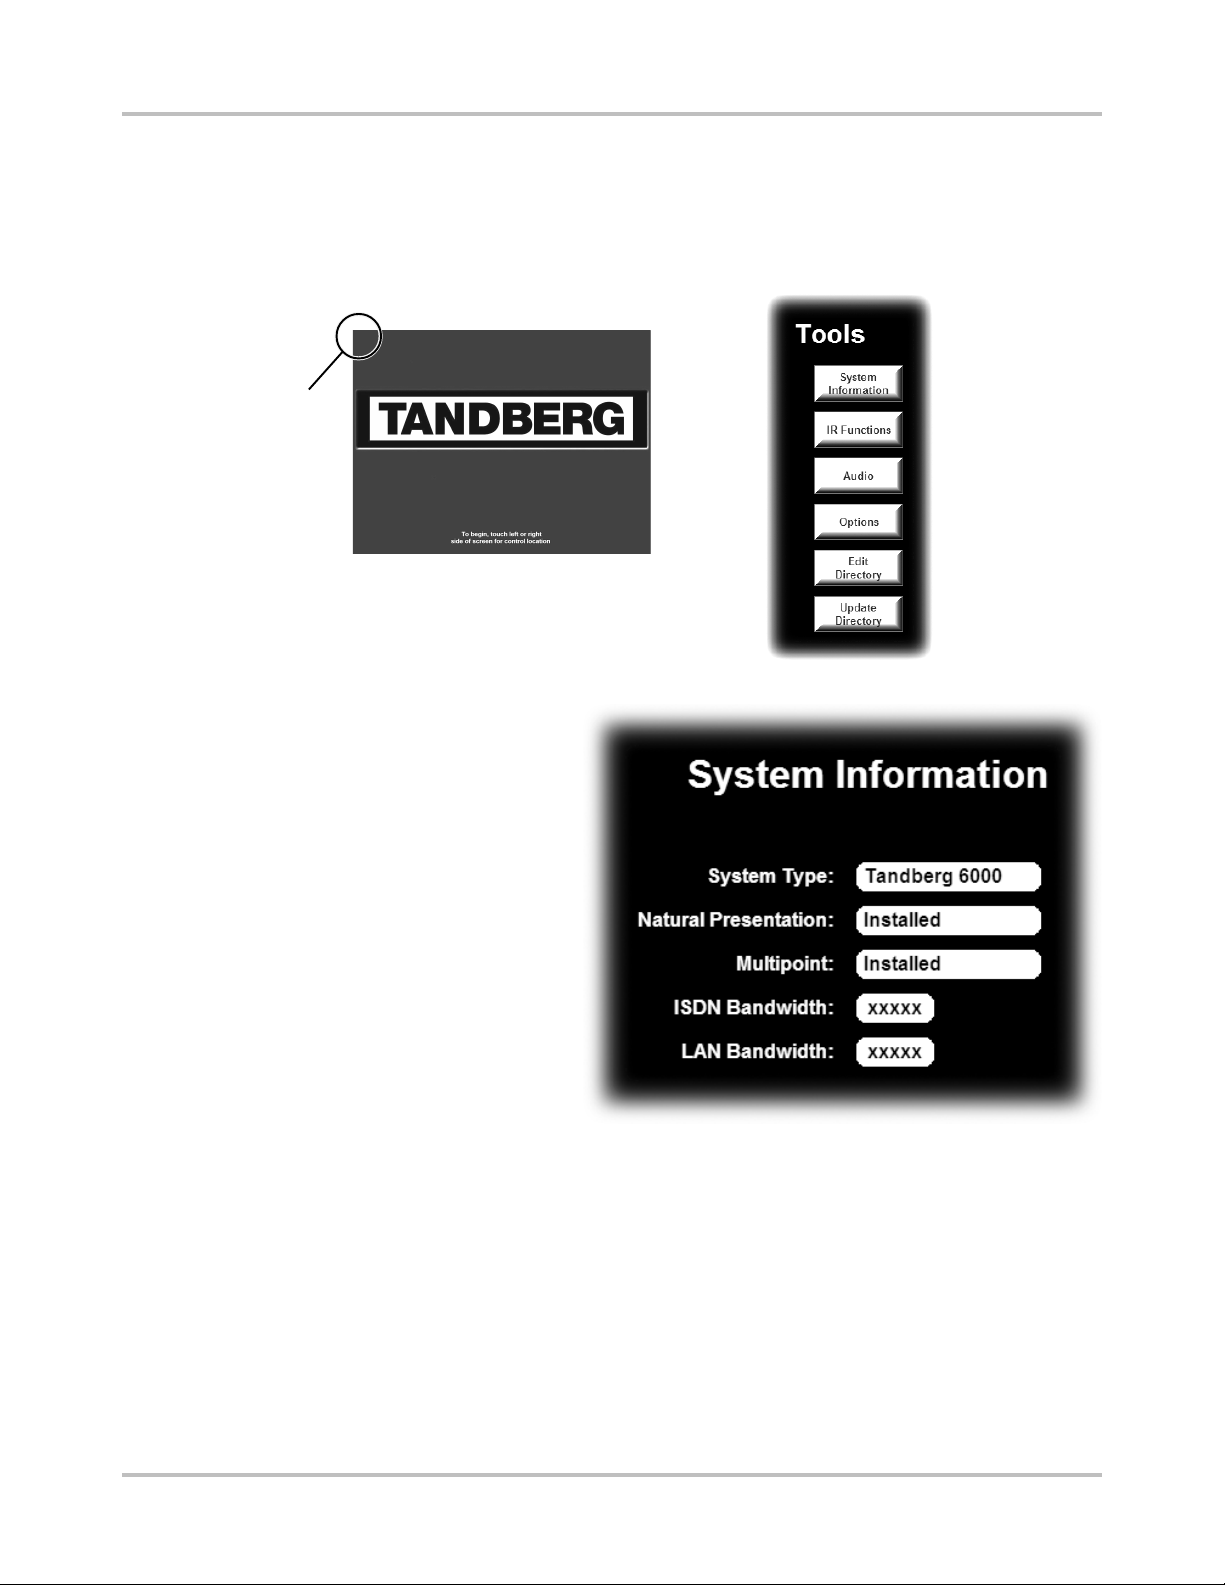
First touch and hold the top left corner of the screen for 5 seconds. This will give you a hidden
‘Tools’ setup screen. Then touch and hold the bottom right corner of the ‘Tools’ screen for another
5 seconds.
Press and
hold for 5
seconds
Press and
hold for 5
seconds
You will get the following ‘DVP-4 Tools’ setup screen:
Selecting ‘Calibrate System’ will display a series of push-points on the touch-screen device used to
calibrate the screens. Carefully touch the calibration points, and after the third point, the system will
restart and return to the opening start-up page.
In rare cases, it may not be possible to reach this page because the calibration is too far off the
screen. You can connect direct to the Director Application Module and enter a simple command:
• Connect your PC with a “straight through” RS232 cable to PROGRAM on the rear interface panel
of the Director Applications Module.
• Open a terminal program such as ’HyperTerminal’ or ’PROCOMM Plus’.
• Set the baud rate settings to 115200,N, 8,1.
• Type the command CALTOUCH and <enter>.
• Touch the crosshairs on the screen to calibrate the system.
22
Page 23
Touch Panel Tools for System Configuration
Various tools may be accessed from the systems opening page. Touching the top left corner of the
touch screen and holding for 5 seconds will access a list of tools where system information, IR
functions, audio, system options, and directory information can be accessed and edited.
Press and
hold for 5
seconds
InstallationTANDBERG Director Videoconferencing System
System Information
This button gives information about
options and bandwidths available on
the codec. The Director system should
already be equipped with Security,
Natural Presenter PackageTF, and
MultiSiteTF options.
These options can be set on the codec
using the IR controls (see
TOUCHSCREEN AND R EMOTE IR
CONTROLS and ADVANCED USE >
SOFTWARE OPTIONS).
TF - TANDBERG FIRST
23
Page 24
Installation TANDBERG Director Videoconferencing System
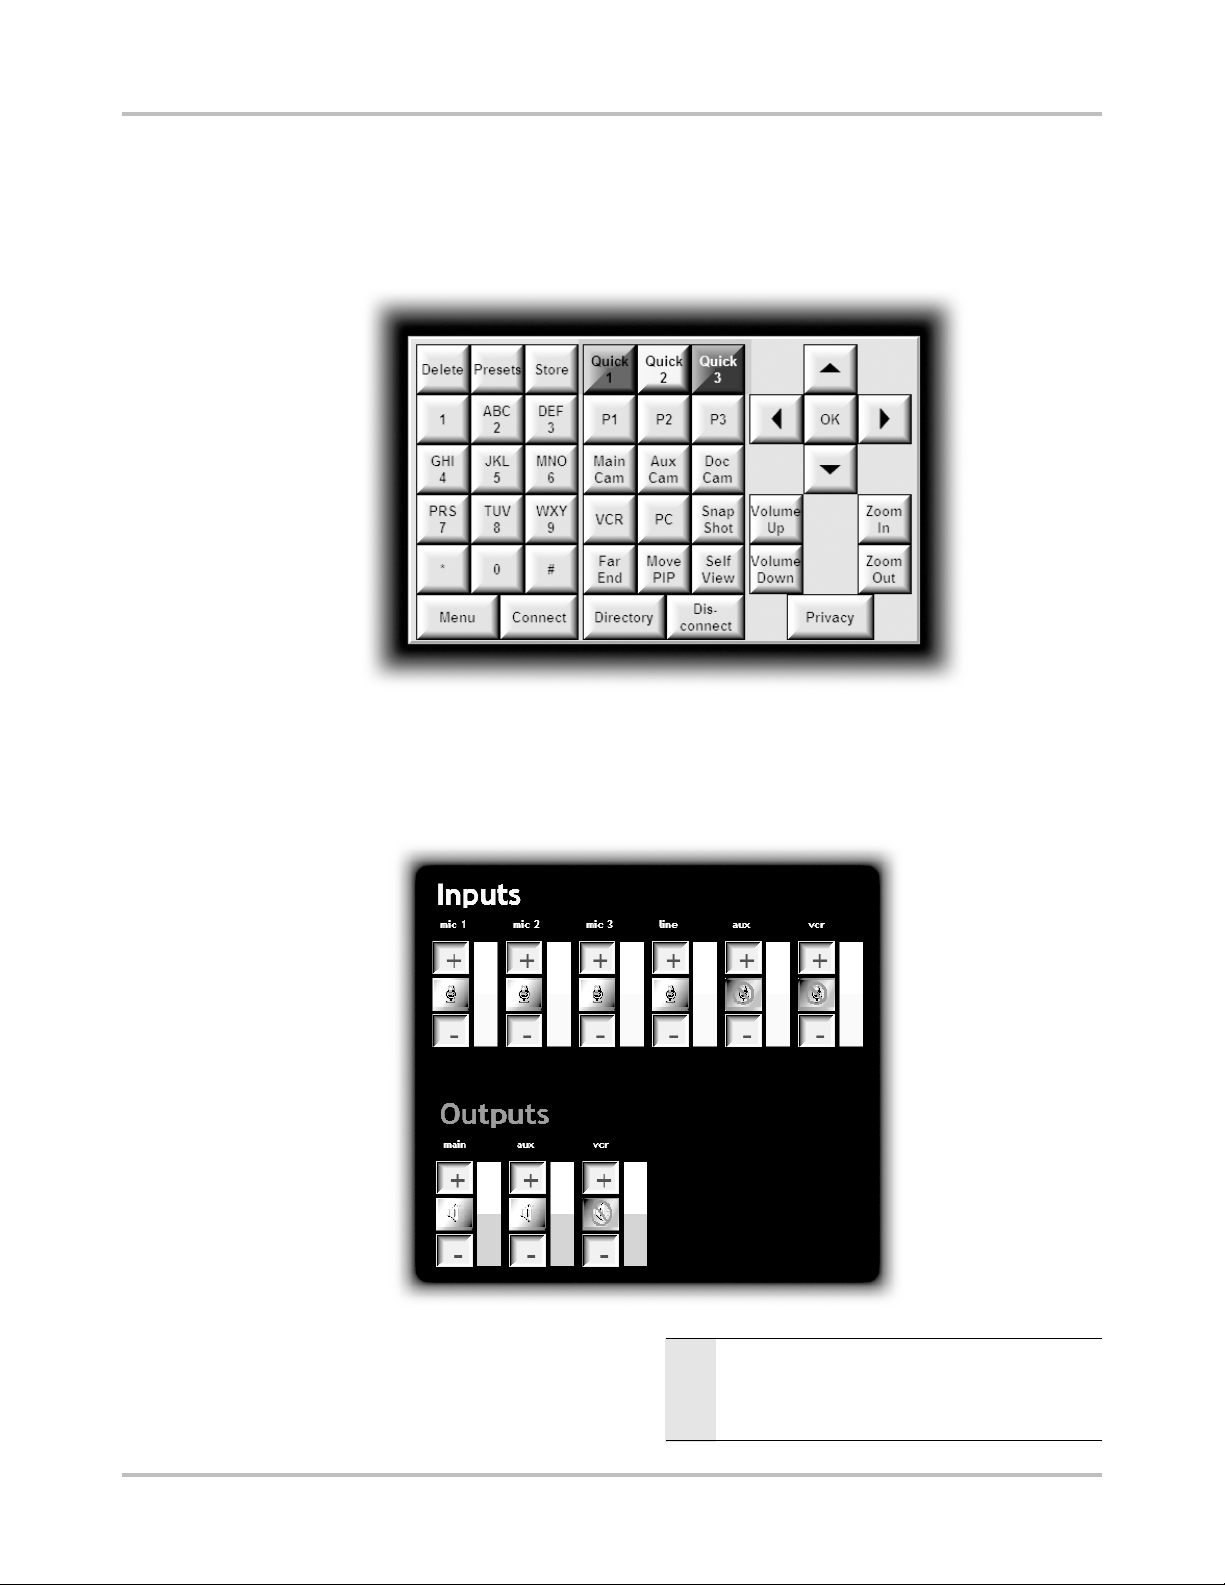
IR Functions
Selecting the IR FUNCTIONS button will display both near- and far end video outputs as well as all
the IR control buttons that correspond to the TANDBERG remote control. You can use any of these
buttons to emulate button pushes on the remote. See GETTING STARTED > TOUCHSCREEN AND
REMOTE IR CONTROLS.
Audio
Choosing the AUDIO button will display the audio inputs and outputs of the codec. Touching the +
or – for each input will raise or lower the gain of each input. Inputs may also be disabled/enabled
by touching the icon in the middle of each respective input.
24
WHEN IN THE NORMAL PRESENTATION AND VIDEOCON-
NOTE
FERENCE PAGES AND THE VCR SOURCE IS SELECTED,
THE SYSTEM WILL AUTOMATICALLY TURN ON AND OFF
AUDIO INPUT 6 CORRESPONDING TO THAT VIDEO INPUT.
Page 25
InstallationTANDBERG Director Videoconferencing System
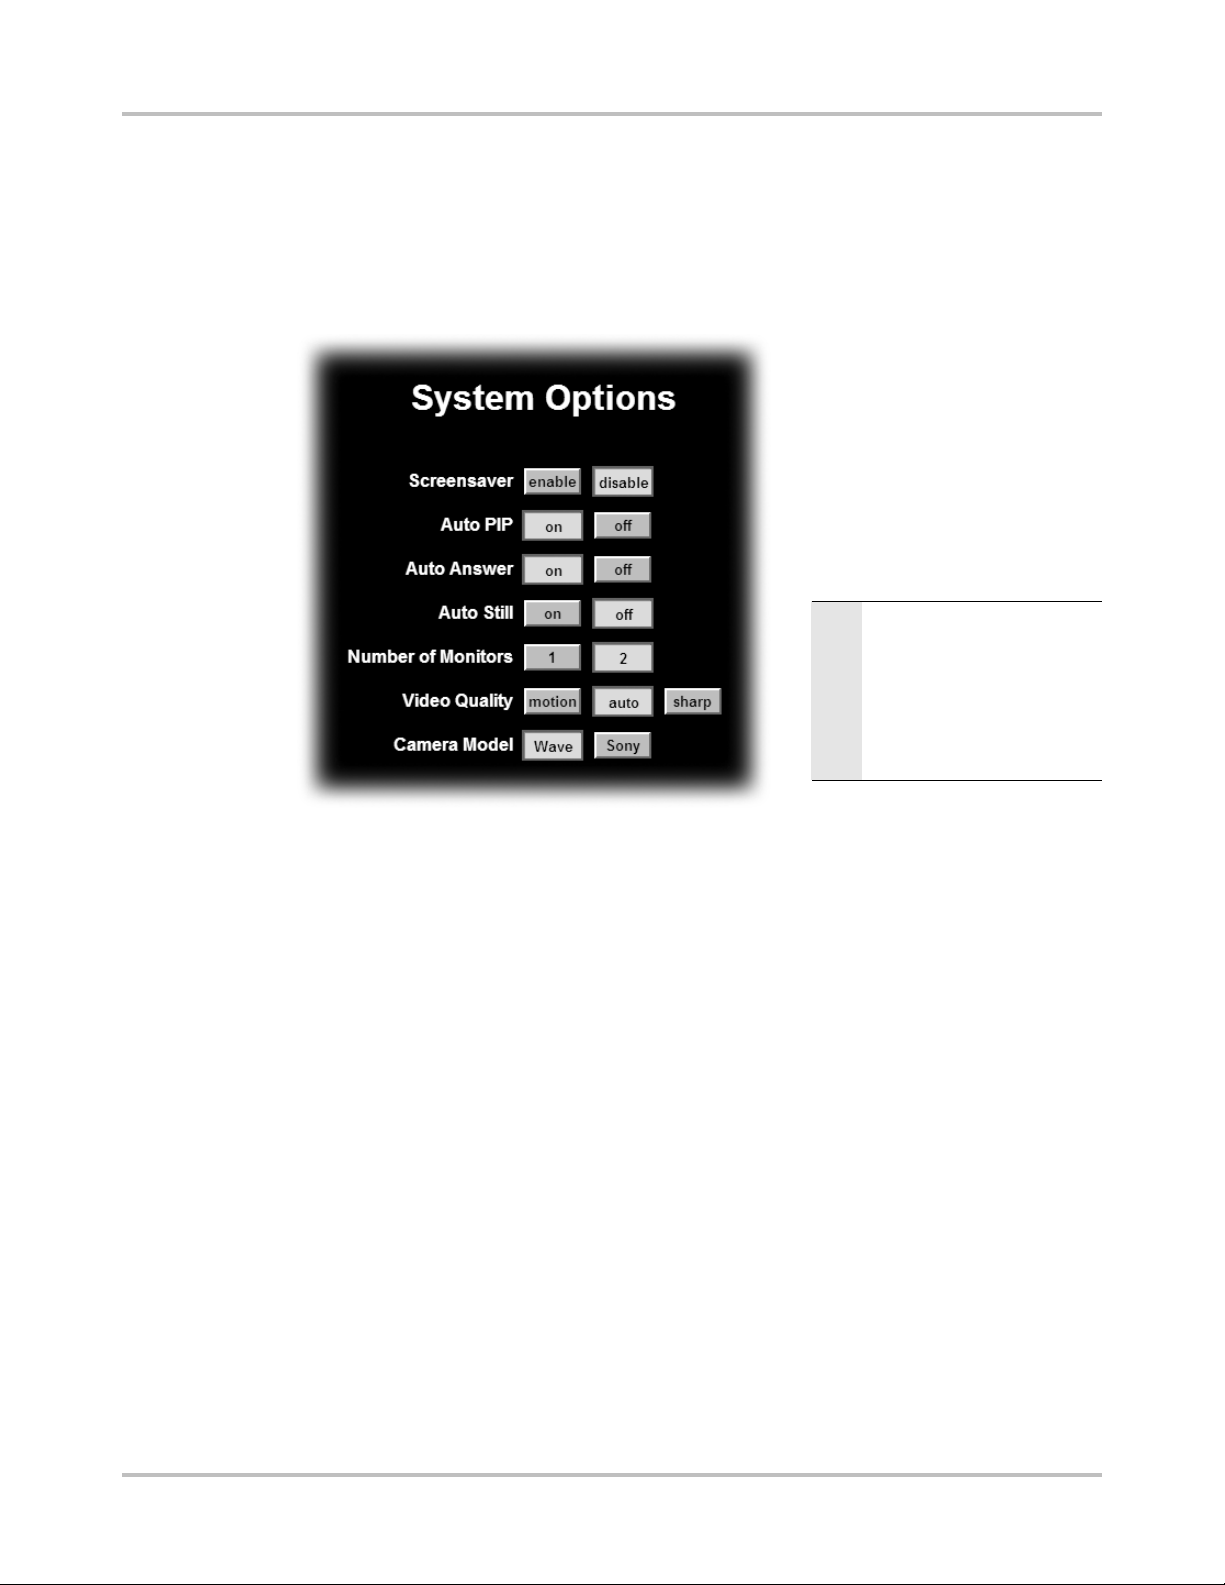
System Options
The SYSTEM OPTIONS button allows for limited modification of setup of the codec. Modification of
these setting from the default values may affect the operation of the Director system. The main
item of note is the ‘Camera Model’ setting. The system supports VISCA controlled cameras and
therefore is selectable between the W.A.V.E II and VISCA controlled cameras. VISCA cameras
would use the Aux 1 Output on the Director Rear Interface Panel.
IF CONNECTING TWO CAMERAS,
NOTE
THEY MUST BE IDENTICAL - YOU
HAVE ONE WAVE II
CANNOT
CAMERA AND ONE SONY CAMERA.
THEY MUST BOTH BE WAVE II
CAMERAS OR BOTH BE A VISCA
CONTROLLABLE CAMERA OF THE
SAME MAKE AND MODEL.
Edit Directory
Allows the user to enter and edit directory entries for the Director system. First, update the
directory by following the instructions below. Then select the ‘Add New Entry’ button to add a new
directory entry, or select an existing directory entry to edit that information. Refer to
‘VIDEOCONFERENCE OPERATION’ > ‘EDITING SPEED DIAL DIRECTORY’ for more information.
Update Directory
Click UPDATE DIRECTORY to set the initial directory placeholders that will be negotiated between
the codec and control device for the Director system. Any time the codec directory is updated with
new or modified entries through any other method than using the EDIT DIRECTORY method
discussed above (i.e. Codec Data port, Web browser, Telnet, or TMS), the control device should be
“synchronized” with the updates made in the codec by clicking UPDATE DIRECTORY on the TOOLS
screen to have the latest modifications displayed.
25
Page 26

Installation TANDBERG Director Videoconferencing System
Network Connections
The network connections are located on the rear interface panel of the TANDBERG 6000 Codec.
The network cables should be connected as applicable to the site. Refer to ‘ADVANCED USE’ >
‘TERMINAL SETTINGS’ for more information concerning IP settings and other network equipment
that may be required, such as network terminating units and CSUs.
BE SURE TO WRITE DOWN THE
NOTE
NUMBERS
OF
NEED
THE SYSTEM.
ISDN BRI
Connect each ISDN cable to the ISDN BRI sockets found on the codec. Then connect the other
end of the loom to the appropriate wall sockets. If however, the wall sockets provide an ISDN Uinterface, the ISDN lines from the codec must first be connected to the S/T interface of network
terminating units NT1 and NT384. Then connect the U interface of the network terminating units to
the wall sockets.
ASSOCIATED WITH EACH
THE ISDN LINES. YOU WILL
THEM LATER TO CONFIGURE
ISDN PRI/T1
Connect the PRI/T1 cable to the PRI/T1 socket labeled “1” on the codec. Connect the other end of
the cable to a Channel Service Unit (CSU). Then connect the CSU to the site’s PRI/T1 line.
Other Networks - Using the External Network Interface
If you are using other networks, please refer to ‘EXTERNAL NETWORK SETTINGS’ and ‘APPENDIX 2’.
LAN
Connect the LAN cable from the LAN connector on the rear of the codec to the site’s LAN network
connection.
It is recommended that both the codec and control system be provided with a LAN connection.
The system will function without a LAN connection if you are placing ISDN calls only, but a LAN
connection is recommended for both software upgrades and remote diagnostics. The control
system LAN information must be set locally. For information regarding the network settings on the
codec, refer to ‘ADVANCED USE’ > ‘TERMINAL SETTINGS’.
THE LAN CONNECTION ENABLES
NOTE
TO PLACE IP CALLS ONLY,
YOU
SOFTWARE UPGRADES AND
DIAGNOSTICS. ISDN
REMOTE
CALLS MUST HAVE ISDN
CONNECTIONS CONFIGURED.
26
Page 27

Device Connections
Microphone
Connect the microphone cable to the XLR input of the 6000 codec. The default codec setting has
all microphone inputs enabled and the gain set to +3dB. Adjustments to the audio settings may be
done in ‘TOUCHSCREEN TOOLS’ or with the ‘IR CONTROLS’ (discussed later in this document).
Touch Panel
A 12” or 15” color video touch panel options are available for the Director system. Cables
necessary for connecting them to the system are included with the touch panel. See ‘BASIC
SYSTEM CONNECTIONS’ for details on connecting a touch panel. See APPENDIX 7: 12” TOUCH
PANEL INTERFACE.
Main Camera
The main camera source selection corresponds to the first s-video input (labeled “1”) on the codec.
This camera input used specifically with the controllable TANDBERG W.A.V.E II camera.
AUX Camera
The auxiliary camera source selection corresponds to the second s-video input (labeled “2”) on the
codec. This camera input can be a fixed room camera or can be a second controllable TANDBERG
W.A.V.E II camera. To control a second camera, control signaling must be “daisy-chained” from the
first camera. Additionally, the camera must be powered locally and the video must be run
separately back to the codec. Installation instructions for installing this are included with an extra
camera when purchased.
InstallationTANDBERG Director Videoconferencing System
IF CONNECTING TWO CAMERAS,
NOTE
THEY MUST BE IDENTICAL - YOU
HAVE ONE WAVE II
CANNOT
CAMERA AND ONE SONY CAMERA.
THEY MUST BOTH BE WAVE II
CAMERAS OR BOTH BE A VISCA
CONTROLLABLE CAMERA OF THE
SAME MAKE AND MODEL.
27
Page 28

Installation TANDBERG Director Videoconferencing System
PC and Laptop Computer Setup
A user supplied PC and laptop can be connected to the system to enhance your
videoconferencing presentation. Refer the REAR PROJECTION SMART BoardTM 3000i INSTALLATION
GUIDE for details on installation and configuration for a PC and laptop.
PC
A PC can be placed inside the 3000i cabinet and used as a source for presentation. If you intend
to use a PC as a videoconferencing presentation source only, then the PC must be, at minimum,
able to support VGA.
THE STRAPS ALLOW YOU TO ROLL
If you intend to utilize SMART Tools with the PC, refer to the
NOTE
SMART Tools documentation for minimum PC requirements.
Slide the computer into place above the computer straps, and
then use them to secure it. Then locate the tie-wrapped bundle
of labeled cables dangling inside the cabinet. In addition to this
cable bundle, AC power, keyboard and mouse cables are located nearby. Make the appropriate connections to the PC.
Laptop
You may choose to connect a laptop computer to the 3000i as a source for presentation. This can
be done in conjunction with or independently from the PC that is integrated to the Director system.
CABINET FROM ROOM TO
THE
WITHOUT REMOVING THE
ROOM
COMPUTER
STRAPS
COMPUTER
CABINET
THE
COMPUTER FIRST.
. HOWEVER, THESE
WILL NOT SECURE THE
IN PLACE DURING
SHIPMENT. IF YOU SHIP
CABINET, REMOVE THE
Simply connect it to the ‘Laptop Umbilical’. Extend the laptop end of the umbilical from the rear of
the 3000i cabinet until it reaches the laptop shelf. Then make the appropriate connections to the
laptop. If you want network access, you’ll also need to connect the adapter end of the umbilical’s
network cable to a room network connection.
BECAUSE THE SYSTEM IS VIDEO
NOTE
, YOUR LAPTOP MUST
SENSING
A VIDEO SIGNAL IN ORDER
SEND
DISPLAY THE LAPTOP IMAGE
TO
THE 3000I.
ONTO
REFER TO THE LAPTOP USER
FOR SWITCHING VIDEO.
MANUAL
MOST LAPTOPS USE ‘FN+F5’ TO
SWITCH.
28
Page 29
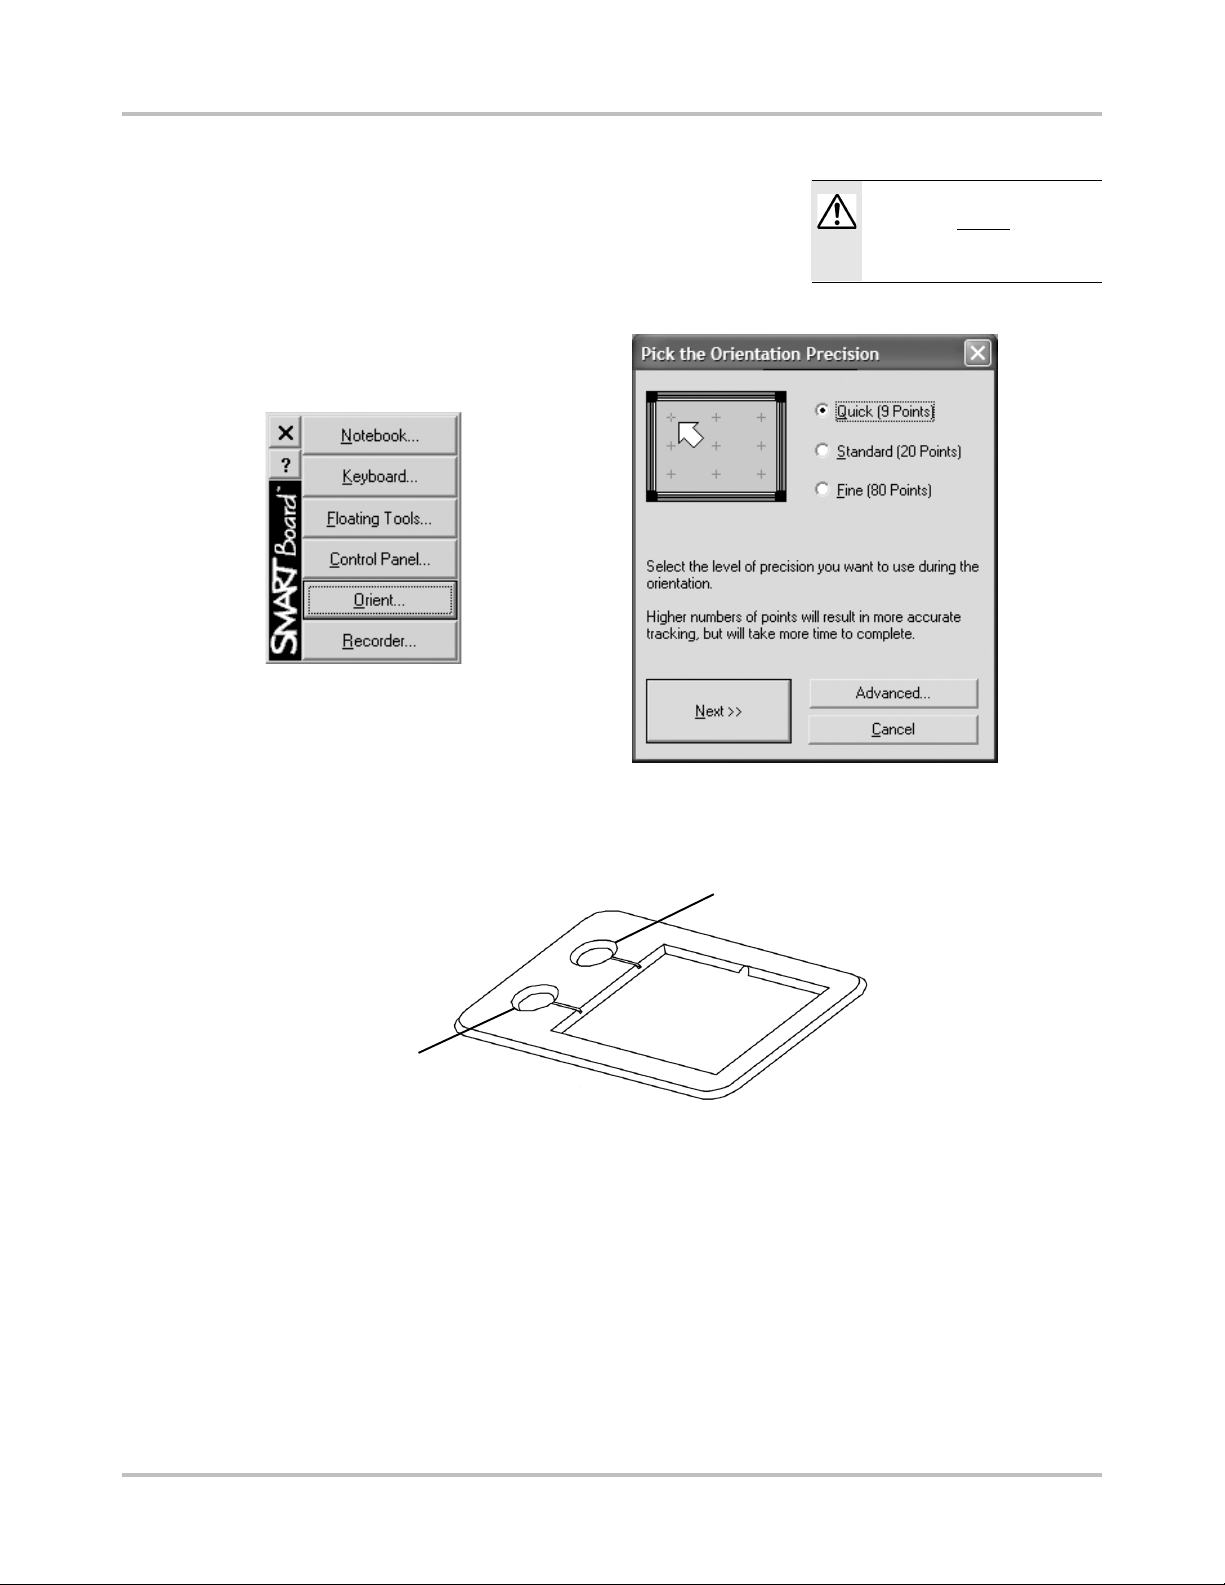
PC Calibration
It may also be necessary to calibrate the SMART BoardTM Software on your computer with the 3000i.
To calibrate the SMART Board Software, select the PC as your
video source and use the ‘Orient’ utility found in the SMART
BoardTM Software’s Control Panel.
InstallationTANDBERG Director Videoconferencing System
THE TOUCH SCREEN SHOULD BE
CALIBRATED
THE
SOFTWARE.
BEFORE CALIBRATING
SMART BOARD
TM
You can also calibrate the PC software by holding down the KEYBOARD and RIGHT MOUSE buttons
at the same time, found on the front of the 3000i.
Keyboard
Button
Right-Mouse
Button
29
Page 30
Getting Started TANDBERG Director Videoconferencing System
6
6
6
6
6
6
6
6
6
6
6
6
6
6
6
6
6
6
6
6
6
Getting Started
System startup
If the TANDBERG Director System is not already
powered on, press the POWER BUTTON on the
SMART BoardTM 3000i front control panel unit to
activate the projector display. It will then require
approximately 40 seconds to complete the startup
routine, at which point the TANDBERG startup
screen will be displayed.
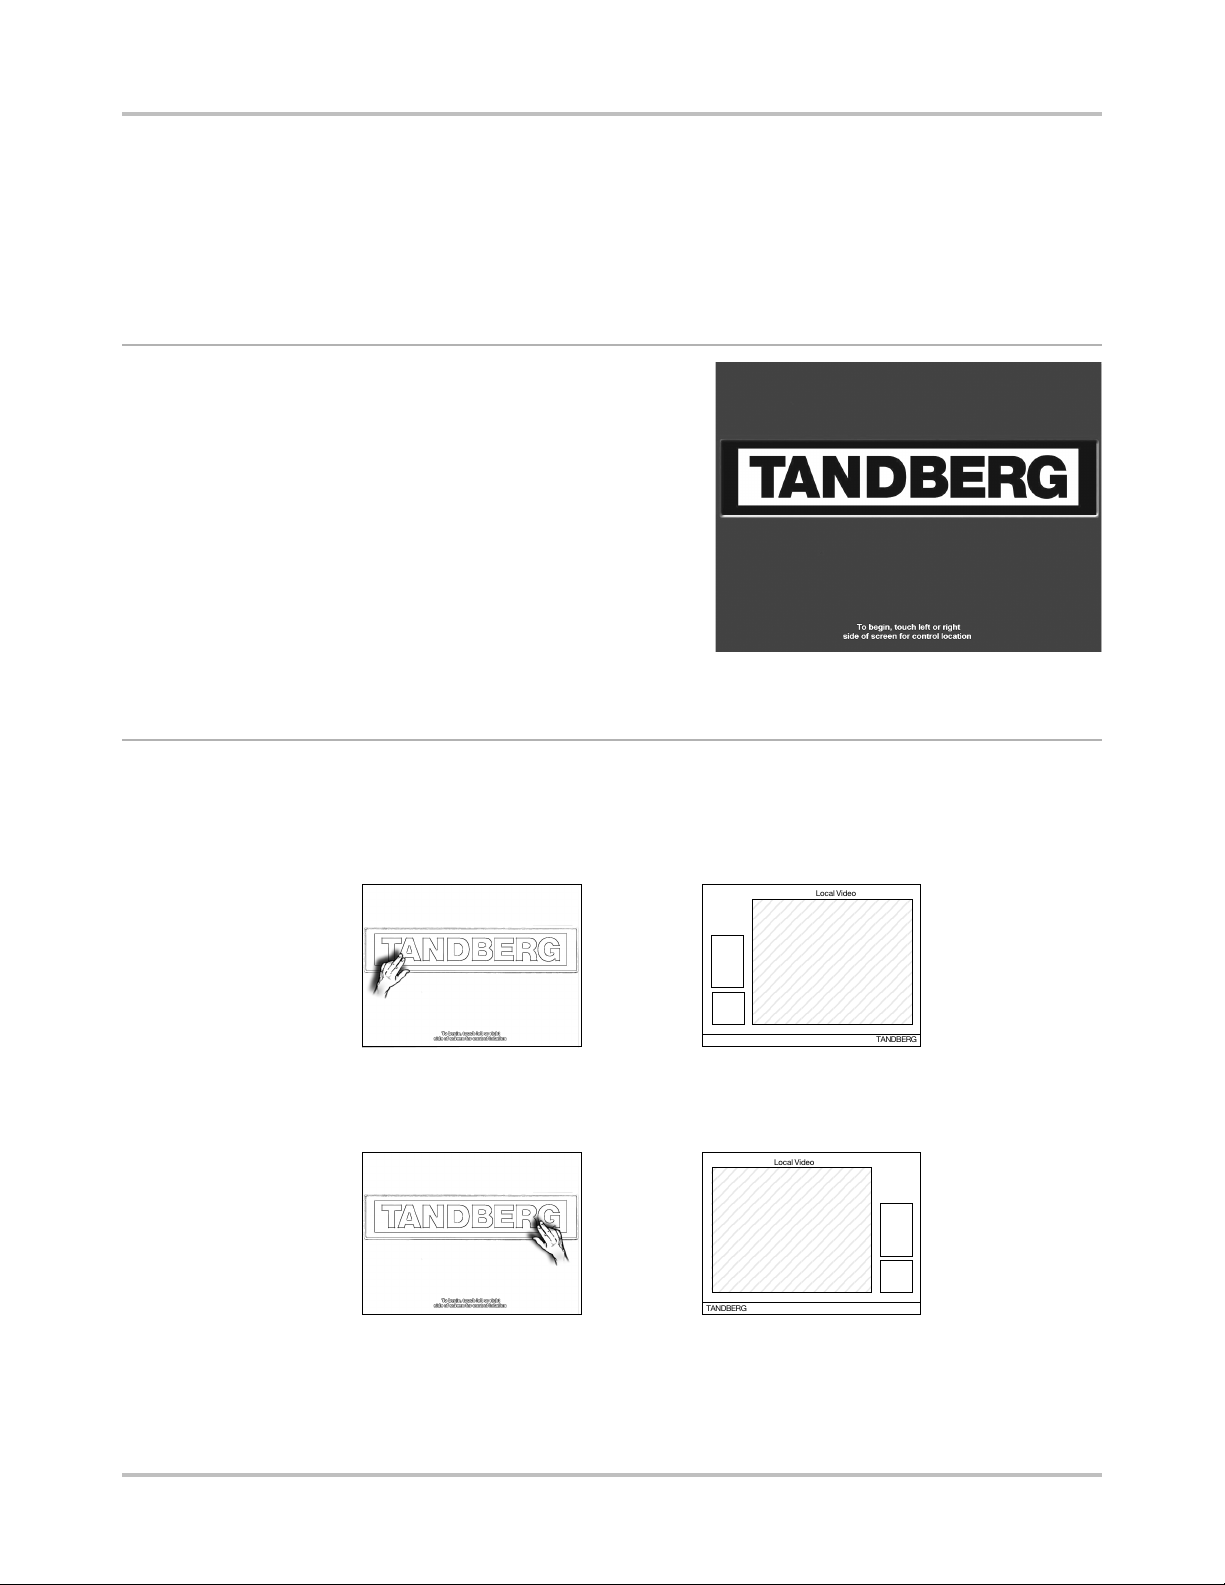
Control Orientation
Touch either the LEFT or RIGHT hand side of the start screen depending on your control
preference. When using a mouse to control the system right-click on the preferred side.
Selecting the left hand side will display the source selection and device control on that
left side of the screen. The taskbar controls will be configured from the left side.
Selecting the right hand side will display the source selection and device control on that
right side of the screen. The taskbar controls will be configured from the right side.
Local Video
23456789012345
23456789012345
23456789012345
23456789012345
23456789012345
23456789012345
23456789012345
23456789012345
23456789012345
23456789012345
Local Video
23456789012345
23456789012345
23456789012345
23456789012345
23456789012345
23456789012345
23456789012345
23456789012345
23456789012345
23456789012345
23456789012345
TANDBERG
TANDBERG
The control preference feature has been incorporated primarily for when the Director Applications
Module has been integrated within the SMART Board™ hardware. This allows the user to
manipulate the controls without standing in front of the main display or camera.
30
Page 31

Touch Screen and Remote IR Controls
The Director is designed to utilize the SMART BoardTM 3000i interactive whiteboard touch screen.
Every command and operation can be executed through the 3000i touch screen interface.
The TANDBERG remote control may also be used to control the Director. While the Director system
can execute most commands from the TANDBERG infrared remote control, it is recommended that
you use the controls presented on the display or
optional touch panel as the primary source for
control. The examples in this documentation will
present the touch screen operation.
IR Functions
The system’s most commonly used functions can be accessed directly from either the touch
screen or remote IR control with single key presses. The IR controls are particularly useful for
codec configuration.
QUICK KEYS
The three colored buttons on top of the remote
control refer to the corresponding color blocks at the
bottom of the screen (green, yellow, and blue). The
text inside the blocks will change depending on
which menu is selected.
DUE TO THE ENHANCED FEATURES OF THE TOUCH
NOTE
INTERFACE USING THE TANDBERG REMOTE
SCREEN
CONTROL
THE DIRECTOR SYSTEM’S CAPABILITIES.
MAY PREVENT YOU FROM FULLY UTILIZING
Getting StartedTANDBERG Director Videoconferencing System
PRESET KEYS
Activate pre-stored
camera positions.
VIDEO SOURCE KEYS
Activate connected
video sources.
CAMERA CONTROL AND MENU NAVIGATION KEYS
Frequently used keys allowing you to control
your own camera and the far end camera,
control your volume, select and move selfview, switch your microphone off and navigate
in the menu system.
DIALING KEYS / PRESET KEYS
Used to make a call. The twelve number keys, (0-9), #, * operate in
the same way as on a modern push-button telephone. These
buttons are also used when entering a name into a text field.
31
Page 32

Getting Started TANDBERG Director Videoconferencing System
6
6
6
6
6
6
6
6
6
6
The initial screen will show a large view of the local display with controls
on either side, depending on your control orientation preference.
Camera
Control
Video
Sources
Task Bar
Local Video
23456789012345
23456789012345
23456789012345
23456789012345
23456789012345
23456789012345
23456789012345
23456789012345
23456789012345
23456789012345
To use the on-screen IR controls:
Press the VIDEOCONFERENCE button on the TASKBAR. This will take you to the ‘Call Control’ Screen.
From the ‘Call Control’ screen, and only from the ‘Call Control’ screen, touch the TANDBERG LOGO
on the TASKBAR.
The ‘IR Controls’ will
appear in the place of
the ‘Address Book’.
Pressing the
TANDBERG LOGO
again will toggle
between the ‘Address
Book’ and ‘IR
Controls’.
Using the IR Controls
you can navigate the
codec’s menu
structure to configure
the codec.
REMEMBER TO EXIT ANY MENUS BEFORE LEAVING
NOTE
‘IR CONTROL PAGE’. FOR MORE INFORMATION
THE
THE TANDBERG REMOTE CONTROL CONSULT
ON
THE ‘TANDBERG 6000 USER’S GUIDE’.
32
Page 33

Codec Basics
The TANDBERG ‘Welcome Screen’ screen will appear in the ‘Remote View’ panel. This screen
should provide you with the most important system
information. The three color-coded commands shown
correspond with the QUICK KEYS on the IR control. This means
that to make a call, you can press the green QUICK KEY on the
IR control. Before you proceed you must configure the
TANDBERG codec in order to place videoconference calls.
Menu structure
The codec’s on-screen menu structure is shown below. Press the MENU key on the IR control to
enter/leave the ‘Main Menu’.
Getting StartedTANDBERG Director Videoconferencing System
Main Menu
Call
Quality
Advanced
Settings
Presentations Utilities
Quick
Menu
Request
Floor
Release
Floor
Terminal
Names
View
Site #
End
View
Chair
Control
Inputs
Outputs
Echo
Control
AGC
Settings
Tones &
Volumes
Restore Audio
Defaults
Take
Chair
Release
Chair
Floor to
Site #
Release Floor
to Site #
Disconnect
Site #
Terminate
Meeting
MCU
Settings
Level
Settings
Level
Settings
Network
LAN
Settings
Call
Settings
Network
Profiles
Data Port 1
Data Port 2
Language
Software
Options
Auto
Settings
Whitebalance
Keyboard
Setup
Video
Settings
Focus
Brightness
Video
Name
VGA
Settings
VNC
Settings
Streaming
Settings
H.323
Settings
Adv. H.323
Settings
IP
Settings
SNMP
Terminal
Settings
ISDN-BRI
Settings
Leased E1/T1
Settings
Ext. Network
Settings
ISDN-PRI
Settings
IP
Precedence
DiffServ
Diagnostics Exit
System
Info
Channel
Status
Call
Status
Test
Subsystem
System
Selftest
View Current
Settings
Restore
Defaults
ISDN
Switch Type
Line 1
Setup
Line 2
Setup
Line 3
Setup
Line 4
Setup
Line 5
Setup
Line 6
Setup
Adv. ISDN
Settings
PRI
Switch Type
Channel
Hunting
Line
Settings
Adv. PRI
Settings
33
Page 34

Getting Started TANDBERG Director Videoconferencing System
General Codec Configuration
The control system communicates with the codec through Data 1 at 9600 baud, No parity bit, 8
data bits, and 1 stop bit. The codec should be left in its default configuration with the following
exceptions. Using the IR control, the following settings should be addressed:
THESE SETTINGS ARE ESSENTIAL
NOTE
FOR OPTIMAL SYSTEM SETUP.
• Enabled but unused ISDN lines (lines not active) should be disabled.
• Select the QUICK KEY ‘System Info’ (IR control) to view line status.
• To disable unused ISDN lines, press MENU on the remote control.
• Select the menu ‘Terminal Settings’ > ‘Network’ > ‘ISDN-BRI settings’.
• Select the relevant ‘Line Setup’ menu and set ‘Enabled: Off’.
• Enter System Name to identify the system during an MCU conference.
• Select ‘Utilities’ > ‘System Name’
• Enter the name using the NUMBER KEYS (as on a mobile phone).
• Select the language you want to use in ‘Terminal Settings’ > ‘Language’.
• If you are using two monitors, set ‘Utilities’ > ‘Dual Monitor: On’.
• To activate AES Encryption, MultiSite
paperwork accompanying your system). See ‘Terminal Settings’ > ‘Software Options’.
TF
and/or Presenter, enter an option key (see
• Press CONNECT on the IR control. A dial tone should be heard if the network is active.
• Using the monitor remote control, adjust the VOLUME on the monitor to a level of your choice.
This volume will be the default volume for all calls.
It is critical that the following settings are configured:
• All network and LAN information (SPIDS, IP Addresses, etc. )
• DuoVideo Mode “Manual”
TF - TANDBERG FIRST
34
Page 35

Network and LAN Settings
ISDN configuration
For each installation of the system it is necessary to configure the unit. All configuration parameters
are available via the menu system. If you are using an external IMUX or special networks, the
external equipment may also need to be configured.
• Press MENU on the IR control. Select the menu ‘TERMINAL SETTINGS’ > ‘NETWORK’.
Getting StartedTANDBERG Director Videoconferencing System
• Set ‘Current Network’ to the network you want to use.
• Specify the settings for the selected network in one of the menus.
For details, follow the instructions in ‘TERMINAL SETTINGS’ > ‘NETWORK CONFIGURATION’ in this
manual.
For further information refer to the examples in:
APPENDIX 1: CONNECTING THE SYSTEM TO ISDN USING NT1 NETWORK ADAPTERS
APPENDIX 2: CONNECTING THE SYSTEM TO THE SWITCHED 56 NETWORK
LAN configuration
• Press MENU on the remote control. Select the menu ‘Terminal Settings’ > ‘LAN Settings’.
• Specify the necessary LAN settings according to the instructions from your LAN
administrator. If there is an H.323 Gatekeeper present on your LAN, see also ‘H.323
Settings’.
For details, follow the instructions in chapter ‘LAN SETTINGS’ in this manual.
35
Page 36

Getting Started TANDBERG Director Videoconferencing System
DUOVideoTF Mode
DuoVideoTF is a very useful presentation tool that enables the presenter to display live video from a
document camera or another source in addition to the live video of the preenter.
The Director system is set-up to utilize the DuoVideoTF feature, however, it requires that the far end
videoconferencing system is DuoVideoTF enabled. When DuoVideoTF operation is possible, a
DUOVIDEO button will be present on the TASKBAR next to the VEW button. Selecting the DUOVIDEO
button will change the display to a “traditional” dual screen view where the video screens will be
presented side-by-side.
See ‘VIDEOCONFERENCE OPERATION’ > ‘DUOVIDEO OPERATION’ for screen description and
operation.
TF - TANDBERG FIRST
36
Page 37

General use
Adjusting volume
Use the [ + ] and [ - ] on the TASKBAR to adjust the volume level; the IR CONTROLS can be used as
well. An on-screen indicator in the TASKBAR (red meter) will show the current volume level.
Microphone on/off
To mute your microphone during a call, press MIC MUTE on the TASKBAR. An on screen indicator
will appear in the ‘remote view’ when the microphone is off, and you will see the MIC MUTE button
flash red. In a call, if audio is detected, the on-screen symbol will start to flash. Pressing MIC MUTE
one more time will activate the microphone again.
MIC MUTE WILL MUTE AUDIO
NOTE
MIC1-3 AND AUDIO4. IT
INPUTS
NOT MUTE AUDIO FROM THE
WILL
AUX AND VCR INPUTS.
General UseTANDBERG Director Videoconferencing System
Directory
The TANDBERG Director system has a DIRECTORY, similar to a local phone book, that stores up to
100 directory entries including the last number dialed. The entries are sorted alphabetically.
All directory entries and updates should be done through the touch screen interface. Although it is
possible to create and update directory entries directly via the codec, any additions or
modifications must be “synchronized” with the Director Applications Module through TOOLS >
UPDATE DIRECTORY.
It is also recommended that you synchronize the directories after any codec upgrades.
When the system receives an incoming call and the calling party’s number is found in the directory,
the calling party’s name will be displayed instead of the number on the status line.
See ‘VIDEOCONFERENCE OPERATION’ > ‘EDITING SPEED DAIL DIRECTORY’ for adding and editing
directory entries.
*OPTIONAL FEATURE
37
Page 38

General Use TANDBERG Director Videoconferencing System
Projector Standby Button
Press this button to power on the projector lamp.
When finished, press it to put the projector into reversible standby mode for five minutes. The
screen appears black, but the projector lamp remains on so you can restore the image by pressing
any button on the Control Panel. After five minutes, the lamp begins to power down. After an
additional 90 seconds, full standby mode is reached.
If you prefer, you can skip the five-minute reversible period: Press and hold the P
ROJECTOR
STANDBY button for a few seconds until you see “Please Wait a Moment” appear on the bottom of
the screen. Release the button and the lamp starts powering down, reaching full standby mode in
90 seconds.
For the current status of the lamp, check the LED indicator immediately to the left of this button.
The table below correlates the behavior of this LED and the status of the projector lamp.
LED Behavior
Blinking
Remains steady green
Blinking very fast
Blinking slowly
Blinking very slowly
Projector Lamp Status
Lamp is powering up
Lamp is on
Lamp is in reversible standby mode
Lamp is powering down
Lamp is off and in full standby mode
IF THE PROJECTOR IS ON
NOTE
STANDBY
OR RECEIVED.
PRESSING THE GREEN POWER
NOTE
BUTTON
CALLS ACTIVE AT THAT TIME.
, NO CALLS CAN BE MADE
WILL DISCONNECT ANY
38
Page 39

MultiSiteTF (MCU)
The system has a built-in multipoint conference unit (MCU), MultiSiteTF, which has the capability to
establish meetings with up to 4 video sites (5 if at least one site is a telephone call, ISDN/analogue/
mobile).
All video calls in a conference must be connected using the same bandwidth.
A conference can consist of any combination of ISDN/IP sites.
It is possible to have telephone meetings with up to 5 participants.
General UseTANDBERG Director Videoconferencing System
The MultiSite
TF
supports both Voice Switched and Continuous Presence mode (see ‘MCU Services’
in ‘Advanced Use’ for description of these modes).
Establishing a conference is done by first
making a call to one site. When a call is
established with the first site, the other
sites are connected one by one.
It is possible to either dial out to the sites
or the sites can dial in to the MultiSiteTF.
Both ISDN, IP and mixed ISDN/IP
conferences can be encrypted if all
systems supports encryption.
For encrypted calls, there is a maximum
bandwidth of 768 Kbps for the whole
conference. This means that a 3-site
conference will have a maximum
bandwidth of 384Kbps per connection,
while a 4-site conference will have a
maximum bandwidth of 256 Kbps per
connection.
SEE ‘UTILITIES’, ‘CONTINUOUS PRESENCE’ TO
TIP
CHANGE MODE.
TF - TANDBERG FIRST
MULTISITE - WHICH QUALITY CAN BE USED ON EACH SITE?
(2MBPS VERSION) +1 PHONE 1-2 PHONES 1-3 PHONES
BRI (768 KBPS) 256 KBPS 192 384 320 512
PRI-E1(1920 K) 512 512 768 768 1472
PRI-T1(1472 K) 384 384 512 512 1152
LAN (3MB) 768 768 * 1152 1152 * 1920 *
MIX ISDN/LAN EXAMPLE: IF 4 SITES ARE CONNECTED, TWO LAN SITES AND ONE ISDN SITE CAN BE CONNECTED ON 512 KBPS
(2MBPS VERSION) OR 256 KBPS (768 KBPS VERSION). NOTE - 4 SITES INDICATES YOURSELF + THREE OTHER SITES.
* - REQUIRES 1-3 ISDN CHANNELS AVAILABLE.
4 SITES 4 SITES 3 SITES 3 SITES+ P-TO-P +
WHEN MIXING ISDN AND LAN
NOTE
SITES, THE TOTAL BANDWIDTH
LIMITATION
THE ISDN BANDWIDTH.
IS THE SAME AS FOR
39
Page 40

General Use TANDBERG Director Videoconferencing System
MultiSiteTF cascading
By connecting four MultiSiteTF systems together, it is possible to connect up to 10 video sites
(including the four MultiSiteTF sites) plus 4 audio sites (telephones), see drawing below.
The host can connect up to 3 other video systems with MultiSiteTF functionality. The host can use
Voice Switched or Continuous Presence mode.
The cascaded systems connect to two other video sites plus one audio site each. These systems
will automatically run Voice Switched mode and transmit a full screen image to the host when
calling on ISDN. When calling on IP, Voice Switched Mode must be selected manually.
MultiSite
- Cascaded
MultiSite
- Host
ALL CONNECTIONS CAN BE
NOTE
COMBINATION OF
ANY
ISDN/IP.
Establishing MultiSiteTF meetings using Directory
It is possible to pre-define meetings using Directory. All sites will then be connected automatically
instead of having to add each site individually.
• Press DIRECTORY.
• Highlight a MultiSite
See ‘VIDEOCONFERENCE OPERATION’ > ‘MAKING A M ULTISITE CALL’ section for further information.
TF - TANDBERG FIRST
40
TF
entry and press CONNECT.
Page 41

PC SoftPresenter
PC SoftPresenter is used to display PC images on your system without using a VGA cable (PC
Presenter). The TANDBERG video conferencing system and your PC must be connected to a LAN. In
addition, VNC (Virtual Network Computing) server software must be installed on the PC.
To show the PC image:
General UseTANDBERG Director Videoconferencing System
• Start the VNC software on your PC.
• Press PC on your remote control. Use UP/DOWN to
activate PAGE UP/PAGE DOWN on the PC.
For setup information and details, see ‘VNC SETTINGS’ in ‘ADVANCED USE’.
Web-interface
It is possible to access and maintain the system remotely via a local area network (LAN) using a
standard Web-browser.
Connect your system from the LAN socket, found on the codec interface panel, to a local area
network. Then configure your codec:
• Press MENU, select ‘Terminal Settings’ > ‘LAN Settings’
• Specify IP-assignment ‘DHCP’ or ‘Static’. If DHCP is selected no other settings are needed.
If Static is selected, ‘IP-address’, ‘IP-subnet mask’ and ‘Gateway’ must be specified.
EXAMPLE:
IP-ASSIGNMENT:STATIC
IP-ADDRESS: 196.9.200.129
IP-SUBNET MASK: 255.255.255.0
GATEWAY: 196.9.200.21
‘PC: VNC’ MUST BE SET IN
NOTE
‘VIDEO SETTINGS’.
THE SYSTEM MUST BE RESTARTED BEFORE
NOTE
CHANGES
TAKE
RESTART QUICK KEY OPTION.
IN THE ‘LAN SETTINGS’ MENU CAN
EFFECT. NOTICE THE ON-SCREEN
See ‘ADVANCED USE’ > ‘LAN SETTINGS’ for further information.
• Start your Web-browser. In the address field type the IP-address of the codec. The Web-page
of the codec will be shown.
Text Chat / Closed Captioning
While in an ISDN or IP call to another system supporting Text Chat (T.140), select ‘Text Chat’ from
the Web-page of the codec. Enter text in the window displayed. When selecting ‘Send Text’, the
text will be displayed on the local and far-end monitor as shown below:
The local Text Chat window can be closed
manually from the Web-interface by pressing
‘Close Window’. It will also close
automatically after a few minutes without
activity.
Streaming
To view streaming, select ‘Streaming’ from the Webpage of the codec. See separate ‘Streaming’ section
in this manual for further information.
STREAMING CAN ONLY BE INITIATED ONLY IF IS
NOTE
‘ON’.
41
Page 42

Display Operation TANDBERG Videoconferencing System
6
6
6
6
6
6
6
6
6
6
6
Display Operation
Local Display Operation
When the system is not in a videoconference call, the default screen is
the ‘Local Video Display’. This mode of operation utilizes the Director
system’s audio and video functionality as a room presentation tool.
Screen Basics
The controls will work either on the right or left hand side of the screen, depending on the
‘Opening Screen’ control selection. In this case where the left side of the opening screen was
selected, and the Director Module had been installed in a SMART Board™ system, the user would
be right-handed.
Local Video Display
Device Control
23456789012345
23456789012345
23456789012345
23456789012345
Camera
23456789012345
Control
23456789012345
23456789012345
23456789012345
23456789012345
Video
23456789012345
Sources
23456789012345
Task Bar
Local Video
Source Selection
Task Bar
The screen has four sections:
VIDEO DISPLAY WINDOW where the chosen video source will be displayed.
DEVICE CONTROL where controls specific the chosen video source will be displayed.
If the device has no associated controls this area will be blank.
SOURCE SELECTION where the available video sources can be selected.
TASKBAR where the functions relevant to the current system operation will
be displayed.
42
Page 43

Source Selection
Press a VIDEO SOURCE button to show its image in the display window. The User can change the
source selection at any time, the selected source button changes from blue to green when active.
Any device controls associated with that source will be displayed in the Video Display Window
after its selection.
Display OperationTANDBERG Videoconferencing System
AIN
M
Sends the Main source to the video display.
If this source has either the TANDBERG WAVE or Sony EVI
camera connected it can be controlled. See DEVICE
CONTROL.
Device Control
The Main and Aux sources can be positioned manually using the camera control buttons or by
using the presets.
AUX
DOC CAM
VCR / DVD
PC
Sends the Aux source to the video display.
If this source has either the TANDBERG WAVE or Sony EVI
camera connected it can be controlled. See DEVICE
CONTROL.
Sends the Document camera to the video display.
No device control are available for this source.
Sends the VCR or DVD to the video display.
No device control are available for this source.
Sends the PC to the video display.
If the Director module is installed within the Rear
Projection SMART Board 3000i and the PC is running the
SMART Board software, annotation and PC operation will
be possible.
Left and Right arrow buttons pan (move horizontally) the
camera image.
Up and Down arrow buttons tilt (move vertically) the
camera image.
Camera controls will be available for both Main and Aux
sources
Zooms in (enlarges the view of a participant).
Zoom out (reduces the view of a participant).
Moves and zooms either the Main or Aux camera to a
predefined room view.
To Store a preset: Move the camera to the view required.
Press and hold the PRESET button you want to set until the
red “preset stored” text appears.
43
Page 44

Display Operation TANDBERG Videoconferencing System
Taskbar
The grey TANDBERG TASKBAR present at the bottom of the
screen provides controls relevant to local presentation
operation. The buttons will change according to the display
status. The button border and text will illuminate red when it is
activated.
HIDE / TASKBAR
EXIT
ENLARGE / REDUCE
HIDE removes the taskbar from the screen, a single Taskbar button replaces it.
TASKBAR displays the taskbar on the bottom of the screen
EXIT from the local display operation to the Opening screen.
ENLARGE increases the size of the video display to full screen, thus covering the source
selection and device controls. The taskbar will remain available.
REDUCE returns the video display to the standard size allowing access to the source
selection and device control.
It is also possible to enlarge and reduce the video display by touching the video
window itself. This function works for all video sources except the PC source
TASKBAR REFERENCES ARE FOR
NOTE
TANDBERG INTERFACE AND
THE
PC OPERATING SYSTEM
NOT
TASKBARS
WINDOWS, MACINTOSH)
(I.E. MICROSOFT
VIDEOCONFERENCE
VOLUME
Video Display Window
Shows the currently selected VIDEO SOURCE.
It is possible to enlarge certain video display windows by touching the video window itself.
The PC source is configured for on-screen annotation, therefore the ENLARGE/REDUCE buttons
must be used in this case.
Touching the window again will return it to the previous size.
Select this function to access the VIDEOCONFERENCE CALL CONTROLS and initiate a call.
Increases or decreases the local volume level within the room by using the plus or
minus buttons. The level bar indicates the current level setting.
44
Page 45

Videoconference Operation
0
0
0
0
0
0
0
0
0
0
Display OperationTANDBERG Videoconferencing System
When the Director receives/initiates a video/audio call.
When an incoming call connects the user will be automatically taken
to the Videoconference Main Screen, otherwise on the TASKBAR
select the VIDEOCONFERENCE button to access the Call Control
Screen.
Display Screens
The LEFT screen will
be the REMOTE SITE.
The RIGHT screen is
the local display of the
currently selected
VIDEO SOURCE
Address Book
Speed dials and call
controls
Remote Video
23456789
23456789
23456789
23456789
23456789
Address Book
Task Bar
You Are Sending
23456789
23456789
23456789
23456789
23456789
Taskbar
Making Calls
From the Call Control screen there are two methods that you can use to make a call: SPEED
DIALING
Speed Dialing
To call a previously set speed dial number:
and MANUAL DIALING.
1. In the ADDRESS BOOK select a speed dial site; its call details will be displayed in the white text
bar. You can use the UP/DOWN ARROWS to scroll or page through all the available speed dials.
2. If this is the site you wish to call press the green CONNECT button. The call will be established
as defined.
3. If the remote site is not answering select the red HANG UP button to disconnect the call.
4. When the call is established the Videoconference Main Screen will be displayed.
45
Page 46

Manual Dialing
To manually dial a number:
1. In the ADDRESS BOOK select the MANUAL DIAL button.
TANDBERG Director Videoconferencing System
2. Enter the number of the desired site using the KEYPAD. Press DELETE to remove the last
character or CLEAR to start again.
3. Press SELECT QUALITY to change the call bandwidth from the default. Use the UP/DOWN
ARROWS to scroll through the available call bandwidths.
4. Press the green CONNECT button. The call will be established as defined.
5. If the remote site is not answering select the red HANG UP button to disconnect the call.
6. When the call is established the Videoconference Main Screen will be displayed.
On the Manual Dial screen the following controls are also available:
REDIAL will attempt to call the last manually dialed number.
CALL STATUS will display information on the currently connected calls. Press the
BACK button to exit from this screen.
DIRECTORY will bring you back to the Address Book screen.
Disconnecting a Call
An active videoconference call can be disconnected at any time.
1. On the TASKBAR select CALL CONTROL to access the Call Control screen.
2. Select the red HANG UP button.
3. You will be asked to confirm: ‘Yes, Hang up.’
46
Page 47

TANDBERG Director Videoconferencing System
Editing Speed Dial Directory
From the Directory Setup it is possible to create a new speed dial site or edit an existing one.
Creating a new speed dial number
1. In the Address Book select EDIT DIRECTORY to access the directory set up.
2. Select ADD NEW ENTRY
3. Selecting the white text boxes will allow you to enter the name and phone number(s) within that
field. The currently selected field will be circled in red. The CALL QUALITY can be changed using
the ARROW buttons.
4. When complete select SAVE ENTRY.
5. The speed dial can be edited or removed by selecting it the pressing the DELETE ENTRY
button. See also EDITING AN EXISTING SPEED DIAL NUMBER.
6. Select the BACK when complete to return to the Address Book.
47
Page 48

Display Operation TANDBERG Videoconferencing System
Editing an existing speed dial number
1. In the Address Book select
EDIT DIRECTORY to access the directory set up.
2. Select a speed dial site; its details (if any) will be displayed in the white text boxes below the
speed dials.
3. Pressing the white text box will allow you to edit its contents, either the name or phone
number. The CALL QUALITY can be changed using the arrow buttons.
4. Select
SAVE ENTRY to save and overwrite the existing information.
5. Selecting CANCEL, another speed dial, or leaving the directory setup will ignore any edits made
to that speed dial.
6. Select BACK when complete to return to the Address Book.
Making a MultiSiteTF Call
If the codec has the MultiSiteTF option installed it will be possible to make a MultiSiteTF call using the
codec’s built in MCU feature. Up to 3 sites can be connected with video, and an additional 4th site
can be added as an audio only site.
1. On the Main Videoconference screen select the CALL CONTROL button on the TASKBAR.
2. From the Address Book Screen follow the previously described procedure to either select a
Speed Dial.
3. Press the green CONNECT button. The call will be established as defined.
4. To manually add another site, select MANUAL DIAL and press the ADD SITE TO CONFERENCE
button:
5. If the remote site is not answering select the red HANG UP button to disconnect the call.
On Screen Symbols
The system has a number of symbols indicating different settings that will be present in the topright corner of the remote site video window.
This symbol will be shown when the volume is turned off on the system.
This symbol will be shown when the microphone is muted/turned off. It will also start to flash if
audio is detected in the room during a call.
A double padlock symbol will be shown when AES encryption (Secure ConferenceTF) is
active.
A single padlock symbol will be shown when DES encryption (Secure ConferenceTF) is active.
An open padlock symbol is shown during the initialization phase for encryption. During this
period the call is not secure.
When the system is On Air in a MultiSiteTF conference, this symbol will be shown.
TF - TANDBERG FIRST
48
Page 49

Videoconference Main Screen
6
6
6
6
6
6
6
6
6
6
6
4
Display OperationTANDBERG Videoconferencing System
When a call has been established the conference operation is run from
this screen. The fundamentals of SOURCE SELECTION and DEVICE
CONTROL
mirror that of Local Display Operation.
Confidence
Display
Main Video
Display
Device
Controls
Source
Selection
You Are Sending
23456789012345
23
23456789012345
23456789012345
23456789012345
Camera
23456789012345
Control
23456789012345
23456789012345
23456789012345
23456789012345
23456789012345
Video
23456789012345
Sources
Task Bar
Local Video
Task Bar
The screen has five sections:
MAIN VIDEO DISPLAY shows either the LOCAL VIDEO SOURCE or the REMOTE SITE(S)
depending on the conference requirements
CONFIDENCE DISPLAY shows either the currently selected VIDEO SOURCE or the REMOTE
(S). This source confirms to the user that the remote is still
SITE
connected or the status of the local source selection.
DEVICE CONTROL presents controls specific the chosen video source will be displayed.
If the device has no associated controls this area will be blank.
SOURCE SELECTION allows the available video sources to be selected.
TASKBAR is where the functions relevant to the current system operation will be
displayed.
Video Window Display Control
Touching the smaller confidence video window will bring its image to prominence in the Main
Video Display with the main screen image moving to the Confidence display. The ‘Remote View’
and ‘You are sending’ headings will change to follow the appropriate video sources.
49
Page 50

Display Operation TANDBERG Videoconferencing System
Touching the main screen will enlarge the image to fill the screen. This function works for the video
sources only and not the PC source. The PC source is configured for annotation, therefore use the
ENLARGE/REDUCE button in this case.
Touching the video display again will return it to the previous size.
Videoconferencing Taskbar
The gray TASKBAR present at the bottom of the screen provides controls relevant to the
videoconference operation. The text on the button can change depending on the display status.
The button border and text will illuminate red when it is activated.
IDE / TASKBAR
H
HIDE removes the taskbar from the screen, a single Taskbar button replaces it.
TASKBAR displays the taskbar on the bottom of the screen
CALL CONTROL
VOLUME
MIC MUTE
PIP
ENLARGE / REDUCE
VIEW
Returns to Call Control screen to disconnect current call or add a MultiSiteTF Call.
Increases or decreases the local volume level within the room by using the arrow
buttons. The level bar indicates the current level setting.
Disables sound from all microphones within the room. While the mute is active the
button border and text is blinking red and an on screen, mic off icon appears. Deactivate by pressing Mic Mute again.
This inserts, moves and removes the picture in picture image on the remote site
screen.
ENLARGE increases the size of the video display to full screen, thus covering the source
selection and device controls. The taskbar will remain available.
REDUCE returns the video display to the standard size allowing access to the source
selection and device control.
It is also possible to enlarge and reduce the video display by touching the video
window itself. This function works for the video sources only and not the PC source.
This changes the screen view from the default main screen and smaller confidence
screen to the more traditional dual screen view.
Default Dual
50
MULTIPOINT
DUOVIDEO
Gives the user access to Multipoint control screen.
TF
When DuoVideoTF is possible this button will be displayed. Selecting this will initiate the
DuoVideoTF connection and take the user to the DuoVideoTF control screen. See
DUOVIDEOTF OPERATION.
Page 51

Far End Camera Control
When in a videoconferencing call, it is possible to assume camera control for the far end site’s
system. When the local camera controls are selected press the FAR END CONTROL button. If the far
end site is configured for far end camera control, the camera control and source selection will
change to red indicating that FAR END CONTROL is selected.
Display OperationTANDBERG Videoconferencing System
The available far end sources will also be displayed and can be controlled if the far end complies.
If the far end does not comply, or has this feature disabled, there will be a ‘Not Available’
indication displayed under the controls. To return to control of local cameras, press button NEAR END
CONTROL
.
51
Page 52

Display Operation TANDBERG Videoconferencing System
0
0
0
0
0
0
0
0
0
0
6
6
DuoVideoTF Operation
When DuoVideoTF operation is possible a DuoVideoTF button will
appear on the TASKBAR beside the VIEW button. Selecting this button
will change the display to a more traditional dual screen view.
Remote Video
23456789
23456789
23456789
23456789
23456789
Task Bar
Main
Source
DUO
Source
You Are Sending (Duo Video)
23456789
2345
2345
23456789
23456789
23456789
23456789
Two groups of source selection are now displayed, the Main source selection and Duo source
selection.
The Main source selection controls the image that may be seen on the main screen of the remote
system, this image is usually the presenter (the Main or Aux camera).
The Duo source selection controls the image that will be seen on the second (local display)
monitor of the remote system, this image is usually the content being presented (the document or
PC source). The DEVICE CONTROLS that appear function for the Duo source only.
It is still possible by pressing the required video window to view one of the images as the main
video display, at which point the screen will reconfigure to the main display and confidence
display view.
To stop transmitting DuoVideoTF, select the END DUO button on the taskbar. The screen will
automatically revert back to the default main and confidence view.
TF - TANDBERG FIRST
52
Page 53

Multipoint Operation
0
0
0
0
0
0
0
0
0
0
If connected to a multipoint conference by either hosting a TANDBERG MultiSiteTF conference or
connecting to a third party MCU that supports chair control, a Multipoint button will appear on the
taskbar. When selected, the following page will be displayed.
Display OperationTANDBERG Videoconferencing System
23456789
23456789
23456789
23456789
23456789
MultiSite Controls
Task Bar
23456789
23456789
23456789
23456789
23456789
REQUEST FLOOR
Requests the floor during a conference. When granted the site will be seen by
all the other participants.
VIEW SITE
TAKE CHAIR
[EXTERNAL MCU]
TRANSMIT SITE
[EXTERNAL MCU]
DROP SITE
[EXTERNAL MCU]
END VIEW
END MEETING
[EXTERNAL MCU]
VOICE SWITCHED
[MULTISITE CALL]
CONTINUOUS PRES.
[MULTISITE CALL]
TF - TANDBERG FIRST
Select this button then the site to be viewed. This effects the local site only.
Allows the user to act as Chairman for the conference. If granted the Chair has
the ability to Transmit Sites, Drop Sites, or terminate the meeting.
Select this button then the site that will be viewed by all other participants. This
function requires Chairman control.
Select this button, then the site name, and that site will be dropped from the
conference. This function requires Chairman control.
If you are the Chair, and a site has been selected to be seen by all other
participants, selecting this will return the conference back to a Voice Switched
or Continuous Presence conference.
Press and hold the button to end the current conference -- all participants will be
disconnected. This function requires Chairman control.
Set the conference to the voice activated video switching. This function is
only available at the host site.
Set the conference to be viewed in the Continuous Presence format. This
function is only available at the host site.
53
Page 54

Advanced Use TANDBERG Director Videoconferencing System
Advanced use
Main menu
The menu system can be used to select available functions and utilities for the system.
To enter the menu system and the main menu, press the MENU key. You may leave the menu
system at any time by pressing the MENU key.
A MENU STRUCTURE MAP IS
TIP
PROVIDED
STRUCTURE
THIS MANUAL.
IN THE FOLLOWING MENU
NOTE
DIAGRAMS
ARE HIGHLIGHTED.
IN THE SECTION ‘MENU
’ AT THE FRONT OF
THE DEFAULT SETTINGS
Menu Password
It is possible to password protect the menus on the TANDBERG system. To activate this feature,
specify a Menu Password in the ‘Utilities’ menu. By doing this, only dialing and camera control
commands will be available. When pressing the MENU key, the user will be asked to enter the Menu
Password as can be seen below.
54
Page 55

Call quality
The ‘Call Quality’ menu allows you to select the preferred quality of your call.
Audio
NOTE
AUTO Optimized audio quality depending on bandwidth.
HIGH High audio quality (G.722) regardless of bandwidth.
NORMAL Telephone quality (G.728) regardless of bandwidth.
Advanced UseTANDBERG Director Videoconferencing System
AUTO:
TIP
1-4
CHANNELS:
G722.1 IS SELECTED.
5-30 CHANNELS:
G722 IS SELECTED.
DUE TO ACTIONS OR LIMITATIONS
THE FAR END YOU MAY NOT
AT
BE ABLE TO ACHIEVE THE
ALWAYS
SELECTIONS YOU WANT.
Video
AUTO Will select ‘Motion’ or ‘Sharpness’ depending on selected video source**.
MOTION Optimized for smooth motion video for all video inputs.
SHARPNESS Optimized for sharp video for all video inputs.
Natural Video
Choose at what level Interlaced video capabilities (iCIF) will be transmitted and enabled.
When set to:
AUTO Natural VideoTF will be transmitted from 768Kbps.
OFF Interlaced capabilities will not be transmitted. This is useful if far end cannot
handle these capabilities.
VGA Resolutions
AUTO VGA capabilities (VGA/SVGA/XGA) and SIF capabilities will be transmitted and
enabled.
OFF VGA capabilities will not be transmitted. Useful if far end can not handle these
capabilities.
SIF CAPABILITIES WILL ENABLE
TIP
VIDEO QUALITY FOR
BETTER
NTSC SYSTEMS (SIF: 352X240,
ISIF: 352X480, 4SIF: 704X480).
TF - TANDBERG FIRST
55
Page 56

Advanced Use TANDBERG Director Videoconferencing System
Advanced call quality
THE SELECTIONS MADE IN THIS
NOTE
Audio
AUTO The setting of ‘Audio: Auto/High/Normal’ in ‘Call Quality’ will be used.
G.722.1 Compressed high quality audio (7 kHz).
G.722 High quality audio (7 kHz).
G.728 Compressed normal quality audio (telephone quality, 3.1 kHz).
G.711 Normal quality audio (telephone quality, 3.1 kHz).
OFF No audio is transmitted.
Video
AUTO Optimized video quality depending on available bandwidth.
H.263 Bandwidth efficient video compression and decompression.
H.261 Normal video compression and decompression.
OFF No video is transmitted.
WILL OVERRIDE THE
MENU
SELECTIONS
QUALITY’ MENU. IF ‘AUTO’ IS
SELECTED
‘CALL QUALITY’ WILL BE USED.
MADE IN THE ‘CALL
, THE SETTINGS IN
Resolution
AUTO The setting of ‘Video: Auto/Motion/Sharpness’ in ‘Call Quality’ will be used,
see tip above.
4CIF Digital ClarityTF (704 x 576 pixels), only
for H.263.
iCIF Natural VideoTF (352 x 576 pixels for PAL,
352x480 pixels for NTSC), only for
H.263.
CIF High resolution video (352 x 288 pixels).
RESOLUTION, AUTO
TIP
FUNCTIONALITY
FAR END):
BY
WHEN ‘VIDEO: MOTION’ :
LOW BANDWIDTHS: CIF, SIF
HIGH BANDWIDTHS: ICIF, ISIF
WHEN ‘VIDEO: SHARPNESS’ :
CIF, 4SIF, VGA, SVGA, XGA**
QCIF Low resolution video (176 x 144 pixels).
H.331
OFF Standard two-way communication with quality negotiation between both sides.
ON Used when broadcasting a video conference from one site to many others, e.g.
via satellite, where there is no possibility to negotiate quality between the
receivers and the originator due to one-way communication.
Status Format
Provides call quality feedback on the status line.
AUTO Video off/on; Audio off/normal/high
ADVANCED Shows video/audio standards (Example: Video: H.261 CIF, Audio: G.722).
(IF SUPPORTED
TF - TANDBERG FIRST
56
Page 57

Presentations
Presentation Mode
To send a snapshot immediately after pressing SNAPSHOT select ‘Presentation Mode: Normal’.
To preview the image before it is transferred as a snapshot, select ‘Presentation Mode: Preview’.
When pressing SNAPSHOT you will be allowed to view your snapshot, e.g. from the document
camera, before sending it as a snapshot by pressing SNAPSHOT again. The far end will not see the
snapshot while you are adjusting it.
Advanced UseTANDBERG Director Videoconferencing System
DuoVideo Quality
AUTO Optimized video depending on selected video source and bandwidth in use**.
MOTION DuoVideoTF is optimized for smooth motion video. This mode is ideal if the image
from two W.A.V.E II cameras should be simultaneously transmitted to the far end.
SHARPNESS DuoVideoTF is optimized for sharp video, Digital ClarityTF. This mode is ideal when
using a document camera or a PC on DuoVideoTF. If the far end does not support
4CIF live video, CIF will be selected.
DuoVideo Mode
AUTO Pressing any video source during a call will automatically open DuoVideoTF (if the
far end supports the automatic DuoVideoTF functionality).
MANUAL DuoVideoTF must be opened by pressing CONNECT during a call and selecting
‘Add Duo Video’.
DuoVideo Number
AUTO When adding DuoVideoTF in a conference, DuoVideoTF is connected automatically
if supported by the far end.
MANUAL When adding DuoVideoTF in a conference and connected towards a system with
no DuoVideoTF capabilities, enter the DuoVideoTF Number into the ‘Number’ field
in the ‘Add DuoVideo’ menu. This can be the number to another system (only
video will be transmitted to the system receiving DuoVideoTF).
TF - TANDBERG FIRST
57
Page 58

Advanced Use TANDBERG Director Videoconferencing System
DuoVideo / Snapshot Source
Select which video source DuoVideoTF transmits.
If you want the document camera to be the default source when using DuoVideoTF / snapshot,
select ‘DuoVideo / Snapshot Source: DocCam’.
To use the same video source as on the first connection for DuoVideoTF / snapshot, select ‘Duo
Video / Snapshot Source: Current’.
Auto-Display Snapshot
Select On to automatically display a received snapshot. If this selection is Off, you will have to
press SELFVIEW to display a snapshot.
Snapshot Filter
Select On to remove any instability in the high quality snapshot.
Utilities
Autoanswer
Far end camera control
TF - TANDBERG FIRST
58
ON The system will automatically answer all incoming calls.
ON+MICOFF The system will automatically answer all incoming calls and switch the
microphone off when the call is connected. Press MIC OFF to switch the
microphone on.
OFF You must manually answer all incoming calls by pressing the CONNECT key.
ON The far end will be able to:
- Control your camera
- Select your video sources
- Activate your presets
- Request snapshots
OFF None of the four features above on the local system can be accessed by the far
end, however you will still be able to control the camera on the far end.
Page 59

Advanced UseTANDBERG Director Videoconferencing System
Dual Monitor
ON Selfview, snapshots and DuoVideoTF will be displayed on the 2nd monitor.
OFF The 2nd monitor shows Selfview only.
Auto-PIP
ON Your selfview will automatically be displayed (as a Picture-in-picture) whenever
the camera position or video source is changed. Picking up the remote control
will also display your selfview.
Welcome Menu
The Welcome menu can be shown when the system is not in use, and when sleep-mode is not
activated.
O
N The Welcome Menu is shown when the system is not in sleep mode.
OFF The Welcome Menu is not shown.
LOGO If a logo is uploaded to the system, it will be shown when this button is selected.
See also APPENDIX 5.
Continuous Presence
ON The screen is divided into three or four
blocks, each displaying the video image of
a different participant.
OFF The active site will be displayed in full
screen during a MultiSiteTF conference. Also
called Voice Switched mode.
TO DISPLAY YOUR SITE IN FULL
TIP
WHEN ‘ON’ IS SELECTED,
SCREEN
PRESS THE QUICK KEY ‘REQUEST
FLOOR’.
MCU status line
ON The MultiSiteTF/MCU/DuoVideoTF indicators will be displayed and provide
information about the conference.
OFF The MultiSiteTF/MCU/DuoVideoTF indicators will not be displayed.
AUTO The MultiSiteTF/MCU/DuoVideoTF indicators will be displayed for a few seconds
and then timed out. When grabbing the remote control, the indicators will be
shown again.
System Name
Identifies the system:
• during an MCU conference call.
• when using the Web-interface.
• when the codec is acting as an SNMP Agent.
• towards a DHCP server.
• as an H.323 ID. Other systems can call us using this name instead of IP-number/IP-address.
Menu Password
Enter the code which should be entered to get access to the menu system on the TANDBERG
system. When pressing the MENU button on the remote control, the user will be asked to enter the
Password written here.
TF - TANDBERG FIRST
59
Page 60

Advanced Use TANDBERG Director Videoconferencing System
MCU services
A Multipoint Control Unit (MCU) enables several sites to participate in the same conference.
An MCU conference can have different modes:
Voice Switched
Means that the image of the person currently speaking
will be broadcast to all the other conference
participants. This will remain the case until another
participant starts to speak.
Continuous Presence
Shows several participants on the same screen at the
same time.
Chairman Control
functionality enables one participant to control the
meeting by selecting which of the conference
participants is to be broadcast to the other participants.
The system can also control external MCUs in a very flexible
manner using the functions described below.
THIS SYSTEM HAS AS AN
NOTE
OPTIONAL
M
TO
ONE
MULTISITE SUPPORTS BOTH
VOICE SWITCHED AND
CONTINUOUS PRESENCE MODE,
SEE SECTION ‘MULTISITE’.
DURING AN MCU CONFERENCE, A
TIP
STATUS
INFORMATION
CONFERENCE
STATUS
‘MCU STATUS LINE: OFF’.
BUILT-IN MCU,
ULTISITE, WHICH SUPPORTS UP
3 VIDEO CALLS (4 SITES) AND
TELEPHONE CALL. THE
LINE WILL PROVIDE
ABOUT THE
. TO REMOVE THIS
LINE, SELECT ‘UTILITIES’,
Quick Menu
When connected to an MCU
PRESS ANY QUICK KEY WHEN IN A
TIP
MULTIPOINT
ACTIVATE THE QUICK M ENU.
This menu provides access to the most commonly used MCU functions.
If ‘Request Floor’ is selected, ‘Request Floor’ will change to ‘Release Floor’.
If ‘View Site#’ is selected, ‘View Site #’ will change to ‘End View’.
Selecting ‘Take Chair’ will send a request to take chair. If granted, the QUICK KEYS will be:
CONFERENCE TO
If ‘Floor to Site#’ is selected, ‘Floor to Site#’ will change to ‘Rel. Floor To Site’.
If ‘Release Chair’ is selected, you will return to the original ‘Quick Menu’.
60
Page 61

Advanced UseTANDBERG Director Videoconferencing System
When MultiSite
TF
If ‘Voice Switched’ is selected, ‘Voice Switched’ will change to ‘Cont. Presence’. This setting can
also be changed in the ‘Utilities’ menu.
Request floor
When requesting the floor, the MCU will broadcast your video in full screen to all other participants
in the conference. If the MCU conference has a chairman, a floor request is sent to the chairman.
You will remain ‘On Air’ until either you select ‘Release Floor’ or the chairman decides to release the
floor to another participant.
Release floor
You choose ‘Release Floor’ to take you ‘Off Air’. You should do this when you wish to make the floor
available to the other participants in the conference.
Terminal Names
Allows you to see the site numbers or name (if supported) of other sites connected in the conference.
View site #
Allows you to view any participant in the conference other than the participant currently ‘On Air’.
End view
Allows you to stop viewing the site previously chosen with ‘View Site #’, and returns your view to
the site that is currently ‘On Air’.
‘VIEW SITE’ AND ‘END VIEW’
TIP
CAN BE USED BY ALL
CONFERENCE PARTICIPANTS.
TF - TANDBERG FIRST
61
Page 62

Advanced Use TANDBERG Director Videoconferencing System
Chair control
IN ORDER TO MAKE USE OF CHAIR
TIP
CONTROL FEATURES THE MCU
MUST SUPPORT CHAIR CONTROL
(H.243).
You select ‘Chair Control’ and ‘Take Chair’ to assume the role of chairman of the ‘meeting’. As
chairman, you may control which site you and the other sites see.
Take chair
Allows you to request chairmanship of the conference. If no one else is currently chairman the
MCU will give you the chair.
Release chair
Allows you to relinquish the privileges of chairmanship of the conference.
Floor to site #
Allows the chairman to select which of the conference participants is to be broadcast to all other
participants.
Release Floor To Site
Allows the chairman to release the floor.
Disconnect site #
Allows the chairman to disconnect any participant in the conference.
Terminate meeting
Allows the chairman to terminate the conference altogether.
62
Page 63

Audio Settings
Audio Inputs
Advanced UseTANDBERG Director Videoconferencing System
By default, all inputs are enabled. Just plug in an audio source and it is active. Audio inputs that are
‘On’ will automatically be mixed. Select ‘Off’ to prevent audio/noise from unused inputs or if you
want to disable a specific input. The activated audio sources are stored on presets.
Mic1, Mic2 and Mic3 are intended for electret type microphones. The microphone inputs are
balanced with 24V phantom power.
Audio4 is intended for connection to an external microphone amplifier or an external fixed mixer.
Audio5 is intended for connection to external playback devices or to telephone add-on hybrids.
As there is no acoustic echo canceller on this input it should not be connected to any
microphones. The audio entering this input will be heard from the local speaker.
EXTERNAL MIXER
NOTE
WHEN USING AN EXTERNAL MIXER, IT IS VERY
IMPORTANT
SMART AND OTHER TYPES OF ADAPTIVE MIXERS
MIGHT
MALFUNCTION.
THAT THIS IS A FIXED MIXER. AUTOMATIC,
CAUSE THE ECHO CANCELLER TO
Audio6 is intended for connection to a VCR. It can also be connected to other external playback
devices. As there is no acoustic echo canceller on this input it should not be connected to any
microphones. The audio entering this input will be heard from the local speaker. If ‘Auto’ is
selected, the audio from the VCR will only be heard when VCR is selected as videosource.
63
Page 64

Advanced Use TANDBERG Director Videoconferencing System
Mix Mode
‘Auto’ automatically adjusts the weighting of each microphone to obtain the best possible audio
and minimizes the background noise. ‘Auto’ will also attenuate the VCR audio level when
someone talks into a microphone. ‘Fixed’ will maintain a constant weighting for all microphones.
Level Settings - Inputs
Adjust the audio input levels according to which external audio equipment is connected. The onscreen audio level indicator will make it easier to set the correct input level settings. The input
level should be adjusted so that the average level reaches the preferred level marker. The audio
inputs are adjustable in steps of 1.5 dB from 0 dB to 22.5 dB.
The default levels for Mic 1 ,2 and 3 are set for use with an Audio Technica AT871 microphone in an
average videoconferencing room. The gain can be adjusted correctly for a wide range of
microphones.
A few examples of microphone levels are:
Audio Technica AT871 +3dB (default with system)
Audio Technica AT851R +7dB
TANDBERG Audio Science +19.5dB
Audio inputs 4, 5 and 6 are set to a default level which is adhered to by most manufacturers of
audiovisual equipment and is a level at which most audiovisual equipment (CD-players, VCRs) will
work.
64
Page 65

Advanced UseTANDBERG Director Videoconferencing System
Audio Outputs
Out1 is intended for connection to TANDBERG Natural Audio, televisions or audio amplifiers.
Out2 is intended for connection to audio recording equipment or to a telephone add-on hybrid. The
signal is a mix of audio from both the far end and local end (not from Audio in 5).
Out3 is intended for connection to a VCR or other
recording equipment. The signal is a mix of audio from far
end and local end (not from Audio in 6).
Audio Module: Select Natural Audio Module (NAM or NAM
II) according to the type of Audio Module installed.
If an output is ‘Off’, no audio will be sent to that output.
NEVER CONNECT AUDIO OUT 2 OR
NOTE
OUT 3 TO A LOUDSPEAKER
AUDIO
IN THE SAME ROOM AS
PLACED
MICROPHONES CONNECTED
THE
THE SYSTEM. DOING THIS WILL
TO
“HOWLING” AND POSSIBLE
CAUSE
TO THE SPEAKER
DAMAGE
SYSTEM.
Level Settings - Outputs
Adjust the audio output levels according to the parameters of the external audio equipment
connected. These levels should only be adjusted when installing new audio equipment. The default
settings are correct for most consumer electronics devices (televisions, VCRs, etc.).
The volume buttons on the IR control adjust the level of output 1 (the speaker output). The volume
control has no effect on outputs 2 and 3.
65
Page 66

Advanced Use TANDBERG Director Videoconferencing System
Echo Control
Each of the 3 microphone inputs and Audio input 4 have a separate echo canceller.
One echo
canceller per input provides more sophisticated control than having one common canceller for all
microphones.
Echo control is normally set to ‘On’ to prevent the far end from
hearing their own audio. Once selected, echo cancellation is active
at all times. The echo canceller continuously adjusts itself to the
audio characteristics of the room and compensates for any
changes it detects in the audio environment. If the changes in the
audio conditions are very significant
the echo canceller may take
a second or two to readjust.
You can choose to switch off the echo canceller for the
NOTE
SWITCHED
ECHO
PLAYBACK
IS
IMPROVES
EXPERIENCED
WHEN YOU HEAR AN ECHO OF
YOUR
LIKELY
CANCELLER
MALFUNCTIONING.
‘OFF’ IF EXTERNAL
CANCELLATION OR
EQUIPMENT IS USED. IT
YOUR ECHO CANCELLER THAT
THE AUDIO QUALITY
BY THE OTHER SITE.
OWN AUDIO IT IS MOST
THE FA R END’S ECHO
THAT IS
ECHO CONTROL SHOULD BE
available audio sources.
Noise Reduction
In addition to echo cancellation, the system has built-in noise reduction (NR).
NR reduces constant background noise (e.g. noise from air-conditioning systems, cooling fans
etc.). In addition, a highpass filter (Humfilter) reduces very low frequency noise.
Choose ‘On+NR’ to activate both Echo Control and Noise Reduction.
Room Size
This setting allows optimization of the echo canceller to the acoustic size of the room. Hard walls,
many windows etc. might require higher settings than expected. Carpets, curtains etc. might
require lower settings. Adjust the setting (NOTE: on the far end) if one of the following symptoms
occur:
• There is still some echo of your own audio. Increase the setting.
• The system adapts slowly to acoustic changes in the room. Decrease the setting.
After a change, the system will need a few seconds to re-adjust.
Motion
If you experience echo caused by movements in the room, increase the value.
66
Page 67

Advanced UseTANDBERG Director Videoconferencing System
Automatic Gain Control (AGC) Settings
Select ‘On’ to allow automatic adjustments (Automatic Gain Control) of audio levels. When ‘On’,
the AGC maintains the audio signal level at a fixed value by attenuating strong signals and
amplifying weak signals. Very weak signals, i.e. noise alone, will not be amplified.
EXAMPLE:
IN MOST CONFERENCES, THE PARTICIPANTS WILL SPEAK AT
DIFFERENT LEVELS, AND BE AT DIFFERENT DISTANCES FROM THE
MICROPHONES. AS A RESULT, SOME OF THE PARTICIPANTS WOULD
BE HARDER TO HEAR THAN OTHERS. THE AGC CORRECTS THIS
PROBLEM BY AUTOMATICALLY INCREASING THE MICROPHONE
LEVELS WHEN “QUIET” OR “DISTANT” PEOPLE SPEAK, AND BY
DECREASING THE MICROPHONE LEVELS WHEN “LOUDER” PEOPLE
SPEAK.
TO ENSURE CORRECT BEHAVIOR
NOTE
THE AGC, IT IS CRUCIAL THAT
OF
LEVELS ON THE INPUT
THE
CONNECTORS
CORRECTLY
INPUT
WILL NOT COMPENSATE FOR
SEVERE
INPUT LEVELS.
USING THE AUDIO
LEVEL SETTINGS. THE AGC
MISADJUSTMENT OF
ARE ADJUSTED
When applying a weak signal in the presence of strong background noise, the leveller might
amplify the background noise as well as the signal. Therefore, in noisy environments, it is advisable
to turn the leveller off.
Tips for improving the echo canceller performance:
• Place all microphones as far as possible from the loudspeaker. Minimum loudspeakermicrophone distance should be 1 meter.
• Place all microphones as close as possible to the persons speaking. By using several
microphones, the ratio distance loudspeaker-to-mic/mic-to-speaker can be increased.
Increasing this ratio improves the echo canceller performance. Avoid distances above two
meters from any participant to his/her closest microphone. If necessary, use several
microphones. Also avoid placing microphones less than one meter from any person.
• Place all microphones as far as possible from noise sources.
• Reduce the volume setting. Ensure that the loudspeaker does not distort the audio.
• The echo canceller tries to estimate the echo path from the speaker system to the
microphones. Moving objects change this path, therefore try to avoid moving objects. Be
especially aware of large objects and objects placed close to either the microphone or the
speaker system as these objects will cause severe changes to the echo path.
• Avoid putting paper sheets etc. on the microphone.
• Avoid moving the microphone or loudspeaker.
• In the event of poor echo cancelling, allow the canceller to adapt. After each change, the
echo canceller requires a few seconds to adapt. Do not change the settings without allowing
the echo canceller to adapt to the new audio environment.
• In the presence of low frequency noise, enable the noise reduction (NR).
67
Page 68

Advanced Use TANDBERG Director Videoconferencing System
Alert Tones & Volume
To help distinguish between incoming video calls and ordinary telephone calls, different ringing
tones may be selected. You may also select different volume levels for the ringing tone.
Alert Speaker
The codec also has an internal, call alerting speaker.
ON The internal speaker will warn you of an incoming call even though the monitor
may not be switched on.
Restore Audio Defaults
There are many audio settings. It is easy for the user to configure the codec to be unusable.
Therefore it is possible to return all audio settings to their factory default settings by using ‘Restore
Audio Defaults’.
Video Settings
Camera Tracking Mode
Select the camera tracking mode:
SLOW The system waits a while before zooming in on a single person speaking.
NORM Should be used in regular meetings.
FAST The system quickly zooms in on a single person speaking. Suitable when close-
THE CAMERA T RACKING MODE
NOTE
WILL NOT BE AVAILABLE IF
ENTRY
NOT USING THE WAVE CAMERA.
Suitable when wide-angle images are preferred over close-up images.
ups are preferred over wide-angle images.
68
Page 69

Advanced UseTANDBERG Director Videoconferencing System
Document Camera
Users of a document camera with an S-video output can configure the system to activate an Svideo input when pressing DOC CAM on the remote control.
VIDEO2 Video Input 2 (S-video) will be activated when pressing DOC CAM on the remote
control.
VIDEO3 Video Input 3 (Composite) will be activated when pressing DOC CAM on the
remote control.
PC
Configure what should be activated when pressing PC.
VGA Pressing PC will activate the VGA input on the system (default).
VNC Pressing PC will use VNC to show images from your PC (see ‘VNC Settings’ for
further information).
Focus
To manually adjust the focus select ‘Manual’ and use the ARROW KEYS to adjust.
Brightness
To manually adjust the brightness select ‘Manual’ and use the ARROW KEYS to adjust.
Whitebalance
In ‘Auto’ mode the whitebalance is continuously updated. To update the whitebalance manually,
select ‘Manual’ and press OK.
A WHITE OBJECT SHOULD BE HELD
TIP
FRONT OF THE CAMERA A FEW
IN
SECONDS
SELECTING
WHITEBALANCE.
BEFORE AND AFTER
MANUAL
69
Page 70

Advanced Use TANDBERG Director Videoconferencing System
Video Name
Each video input defaults to the same name used on the remote control to select a video input.
To edit the name, use the number keys on the remote control to select letters. Press DELETE to
erase a letter.
VGA Settings
IF YOU SET ‘VGA OUT’ TO
NOTE
‘MAIN’, MAKE SURE YOU HAVE A
VGA-MONITOR CONNECTED TO
VGA-OUTPUT ON THE
THE
. IF YOU DO NOT HAVE A
SYSTEM
VGA-MONITOR CONNECTED,
YOU WILL NOT BE ABLE TO SEE
THE MENU SYSTEM!
iCIF WILL NOT BE AVAILABLE
NOTE
VGA OUT IS MAIN OR
WHEN
DUAL.
VGA Out
To enhance the local video quality, a VGA monitor may be connected.
MAIN Should be used if you want to use a VGA monitor as your main monitor. Video
outputs 1 & 3 will be disabled.
DUAL Should be used if you want to use a VGA monitor as your dual monitor. Video
outputs 2 & 4 will be disabled.
LOOP Should be used if you want to use a TV monitor as your main monitor.
VGA Out Quality
VGA Out Quality changes the resolution of the VGA signal available on the ‘VGA Out’ connector at
the rear of the codec.
AUTO Will sense the resolution on the ‘VGA input’ port and use the same resolution on
the ‘VGA Out’ port.
VGA Will force ‘VGA out’ to VGA (640X480).
SVGA Will force ‘VGA out’ to SVGA (800X600).
XGA* Will force ‘VGA out’ to XGA (1024X768).
* E1 ONLY
70
Page 71

VNC Settings
Advanced UseTANDBERG Director Videoconferencing System
Address
The IP-address of the PC with the VNC
software installed. To find the IP-address of
the PC, select ‘Command Prompt’ from the
Windows Start menu. Type ‘ipconfig’ and
press ENTER.
Display Number
The display number for VNC is 0 and
upwards. If you are using WinVNC, doubleclick on the icon on the toolbar to view
‘WinVNC properties’. This number should
correspond with ‘Display Number’ in this
VNC SERVER SOFTWARE SETUP
NOTE
• BOTH THE PC AND THE VIDEOCONFERENCING
SYSTEM MUST BE CONNECTED TO THE SAME LAN.
• A VNC SERVER MUST BE INSTALLED ON THE PC.
FREE SOFTWARE CAN BE DOWNLOADED FROM
HTTP://WWW.UK.RESEARCH.ATT .COM/VNC
• INSTALL THE SOFTWARE BY RUNNING THE
DOWNLOADED FILE.
• TO CONFIGURE THE VNC SERVER SOFTWARE:
- SELECT “ACCEPT SOCKET CONNECTIONS”.
- SELECT “AUTO” FOR “DISPLAY NUMBER”.
‘DISPLAY NUMBER’ IN THE SYSTEM MUST THEN
HAVE THE VALUE 0.
- ENTER A PASSWORD IN THE “PASSWORD”-FIELD.
MUST CORRESPOND WITH THE ‘VNC SETTINGS’
ON YOUR SYSTEM.
menu.
Password
Enter the same password as specified in WinVNC properties. The password will be shown as
asterisk signs (*) the next time you enter the menu.
Start using VNC
To activate VNC, press PC on the remote control. Please make sure that ‘PC’ is set to ‘VNC’ in the
‘Video Settings Menu’. See also ‘PC SOFTPRESENTER’ section for further information.
71
Page 72

Advanced Use TANDBERG Director Videoconferencing System
Terminal Settings
This menu provides basic network setup for the unit and should be used when installing the
system.
Network Configuration
Before using the system it is necessary to specify which network to use and define its settings.
If you want to use your system via ISDN-BRI you should select ‘Current Network: ISDN-BRI’ and
enter the ‘ISDN-BRI Settings’ menu to set the BRI parameters.
If you want to use your system via ISDN-PRI you should select ‘Current Network: ISDN-PRI’ and
enter the ‘ISDN-PRI Settings’ menu to set the PRI parameters.
If you want to use your system via Leased E1/T1, you should select ‘Current Network: Leased
E1/T1’ and enter the ‘Leased E1/T1 Settings’ menu to set the Leased E1/T1 parameters.
BOTH ‘LEASED E1/T1’ AND
NOTE
‘ISDN-PRI’ USES THE SAME
PHYSICAL
CODEC MARKED ‘E1/T1’.
INTERFACE ON THE
If you want to use special networks and connect using RS449, V.35, X.21 or connect to ISDN via
an external IMUX you should select ‘Current Network: External’ and enter the ‘External Network
Settings’ menu to set the External Network parameters.
72
Page 73

ISDN-BRI Settings
MANDATORY ISDN-BRI SETTINGS:
NOTE
TO MAKE SURE YOUR SYSTEM WILL WORK PROPERLY USING ISDN-BRI, MAKE THE FOLLOWING SETTINGS:
- SET ISDN SWITCH TYPE
- ENTER ISDN LINE NUMBERS (+ SPIDS IF REQUIRED)
- DISABLE UNUSED LINES
SOME SOFTWARE VERSIONS DO
NOTE
NOTE
SUPPORT 6 ISDN LINES,
NOT
THEREFORE SOME OF THE LINE
SETUP LINES MAY BE GRAYED
OUT.
IF NATIONAL ISDN IS SELECTED,
PRESS THE QUICK KEY ‘AUTO
BRI CONFIG’ TO REQUEST AN
AUTOMATIC
THE
(SWITCH MUST SUPPORT GR-
2941-CORE).
CONFIGURATION OF
LINE & SPID SETTINGS
Advanced UseTANDBERG Director Videoconferencing System
ISDN switch type
Select the type of ISDN network connected to your unit.
1TR6 SHOULD ONLY BE USED IF
NOTE
YOU
BEHIND A PABX.
Line setup
This menu allows you to program the numbers associated with your ISDN line.
ARE OPERATING THE SYSTEM
73
Page 74

Advanced Use TANDBERG Director Videoconferencing System
If you want to use this ISDN line, you need to set ‘Enabled: On’ and enter the numbers of your
ISDN line. If some of the ISDN lines are not to be used, set ‘Enabled: Off’. Line 1 should always
be enabled.
National ISDN and AT&T Custom ISDN might require SPID numbers associated with your ISDN
numbers. If you have received two different SPID numbers for each ISDN line from your telephone
company, you must program both.
Example:
ISDN BRI 1: 67838498 016783849800
ISDN BRI 2: 23478060 012347806000
ISDN BRI 3: 23478420 012347842000
ISDN BRI 4: 23478520 012347852000
ISDN BRI 5: 23478540 012347854000
ISDN BRI 6: 23478560 012347856000
Numbers SPIDS
67838498 016783849810
23478070 012347807000
23478430 012347843000
23478530 012347853000
23478550 012347855000
23478570 012347857000
Advanced ISDN settings
Subaddress
Using a subaddress enables you to connect up to eight ISDN terminals to the same ISDN telephone
number and line. The terminals are addressed by using different subaddresses.
ISDN line number 123456789 Call 12345678
Sub Off
Ringing
Sub Off
Ringing
Sub 3
Ringing
To call a terminal with a subaddress, separate the ISDN telephone number and the subaddress with
a ‘*’.
EXAMPLE: 12345678*2 (UP TO FOUR DIGIT SUBADDRESSES ARE POSSIBLE)
ISDN line number 123456789 Call 12345678*2
NOTE
Sub 1
74
Sub 2 Sub 3
Ringing
THIS SERVICE HAS
ACCESS ON
LIMITED
ISDN
SOME
NETWORKS.
Page 75

Advanced UseTANDBERG Director Videoconferencing System
MSN (Multiple Subscriber Number)
The use of MSN (Multiple Subscriber Number) enables you to attach different ISDN terminals, with
different numbers, to the same physical ISDN telephone line. If ‘Validate Numbers’ is set to ‘On’
only calls to those numbers specified in the ‘Line Setup’ menus will be answered. This service can
be ordered from your telephone company.
Parallel dial
ISDN line number 12345600 / 601 / 602 Call
12345601
Line 1 Setup, Number1: 600
Validate Numbers (MSN): On
Line 1 Setup, Number1: 601
Validate Numbers (MSN): On
Ringing
Line 1 Setup, Number1: 602
Validate Numbers (MSN): On
ON Channels will be dialed and connected in parallel when setting up a BONDING
call.
OFF Channels will be dialed one by one which may increase the dialing time.
Send Own Numbers
ON The system will send its own numbers to the far end.
OFF The system will not send its own numbers to the far end, but please note that the
network may still send your numbers to the far end.
Sending Complete
ON The system will send the ISDN message information element ‘Sending Complete’.
OFF The system will not send ‘Sending Complete’.
ISDN-PRI Settings
THE T1 FORMAT IS PREDEFINED TO
NOTE
ESF AND THE LINE CODE IS
B8ZS. THIS IS NOT
CONFIGURABLE.
MANDATORY ISDN-PRI SETTINGS
NOTE
TO MAKE SURE YOUR SYSTEM WILL WORK PROPERLY
ISDN-PRI, CONFIGURE THE FOLLOWING SETTINGS:
USING
- SET PRI SWITCH TYPE
- ENTER PRI LINE NUMBER
Number
Enter the main number for your PRI line. If this number is programmed and ‘MSN: On’ (see
‘Validate numbers’ in ‘Advanced ISDN Settings’) only calls to this number will be answered.
75
Page 76

Advanced Use TANDBERG Director Videoconferencing System
PRI Switch Type
Select the type of PRI switch to which your unit is connected.
Below is a list of common ISDN-PRI/T1 switches.
Type Manufacturer PRI Switch Type setting
ATT 4 ESS AT&T AT&T ISDN
ATT 5 ESS AT&T/Lucent AT&T ISDN or National ISDN*
DMS 100 Northern Telecom National ISDN
DMS 250 Northern Telecom National ISDN
* SETTINGS WILL DEPEND ON CONFIGURATION OF THE SWITCH. PRI SWITCH TYPE IS NOT CHANGED WHEN RESTORING DEFAULTS.
Channel Hunting
MAX CHANNELS Maximum number of channels the unit may use at any given time.
LOW CHANNEL The lowest numbered B-channel that may be used by the unit when
selecting channels for outgoing calls.
HIGH CHANNEL The highest numbered B-channel that may be used by the unit when
selecting channels for outgoing calls.
SEARCH Specifies where the system will start searching for available B-channels
for outgoing calls.
Channel hunting is normally used in conjunction with PRI daisychaining with TANDBERG units in the daisy-chain. If only
TANDBERG units are used in the daisy-chain, default setting should
be used, as these units will find available B-channels automatically.
‘Max Channels’ may be used for PRIs that are provisioned for a
lower number of channels.
‘Max Channels’ may be used as mechanism to ensure that there
is bandwidth available to codecs further down the chain when
Daisy-Chaining.
‘High Channel’, ‘Low Channel’ and ‘Search’ may be used for
PRIs provisioned with specific requirements for B-channel usage.
76
PRI line
Codec 2
or
PBX
Codec 1
Low Channel: 10
High Channel: 20
Max Channel: 6
PRI 1
PRI 2
Channels: 1-9
will be available for
the codec/PBX
Page 77

Advanced UseTANDBERG Director Videoconferencing System
In the example on the previous page, the unit will start searching for available B-channels at channel
20, since ‘Search’ is set to ‘High’ and ‘High Channel’ is set to 20. The unit will not search for
channels below 10, since ‘Low Channel’ is set to 10. Furthermore if the user tries to make an 8
channel call, the call will be established with 6 channel, since ‘Max Channels’ is set to 6.
Line Settings
‘T1 Cable Length 1’ specifies the distance to the CSU connected to the ‘E1/T1 1’ port on codec 1.
‘T1 Cable Length 2’ specifies the cascading distance from the ‘E1/T1 2’ port on codec 1 to the ‘E1/
T1 1’ port on codec 2. Possible values are 0-115 feet, 80-215 feet, 180-310 feet, 280-410 feet, 375510 feet, 475-605 feet, 575-690 feet.
E1 CRC-4 is used for most E1-PRI configurations. You can turn it off if not supported by your E1
network equipment.
For further information refer to Appendix 3: Connecting the system to PRI/T1
Advanced ISDN Settings
This is the same menu as for ISDN-BRI. The settings will be common for ISDN BRI and ISDN PRI.
Please refer to section ‘ISDN-BRI Settings’.
Advanced ISDN-PRI Settings
NSF - Non Standard Facility. Your network provider may require a service selection in your ISDN
configuration. Enter the Service code here.
Valid NSF service codes are from 1 to 31. Enter 0 to disable NSF service codes.
EXAMPLE:
OFFERS SEVERAL DIGITAL SWITCHED SERVICES. THESE INCLUDE SDN WITH SERVICE CODE 1 AND
AT&T
ACCUNET WITH SERVICE CODE 6.
77
Page 78

Advanced Use TANDBERG Director Videoconferencing System
Example:
Below is a list of common service profiles. As these profiles may change, contact your service
provider to get the correct profile.
Service profiles for AT&T:
NSF Service
Disable 0
SDN (including GSDN) 1
Megacom 800 2
Megacom 3
Accunet 6
Long Distance 7
International 800 8
MultiQuest 16
Call Redirection Service 23
Leased E1/T1 Settings
Service profiles for Sprint:
NSF Service
Reserved 0
Private 1
Inwatts 2
Outwatts 3
FX 4
TieTrunk 5
Service profiles for MCI:
NSF Service
VNET/Vision 1
800 2
PRISM1, PRISMII, WATS 3
900 4
DAL 5
Network Interface
Indicates if the network is of type E1 (30 channels) or T1 (24 channels). E1 will be default for PAL
versions, T1 default for NTSC versions.
Max Channels
Indicates the maximum number of channels the codec is allowed to use on the E1/T1 interface.
When E1 is selected, maximum is 30 channels. When T1 is selected, maximum is 24 channels.
Start Channel
Indicates the first E1/T1 channel the codec is allowed to use. This setting might be used if the E1/
T1 line is shared with other equipment.
T1 Line Coding
Indicates how the signals on the line should be coded. If parts of the line between the systems use
restricted coding, this should be selected,
ALL SETTINGS MUST BE IDENTICAL
NOTE
BOTH SIDES OF THE L EASED
ON
E1/T1 CONNECTION.
Line Settings
This is the same menu as for ISDN-PRI. Please refer to section ‘ISDN-PRI SETTINGS’.
78
Page 79

Advanced UseTANDBERG Director Videoconferencing System
External network settings
THE PHYSICAL INTERFACE ON
NOTE
EXTERNAL NETWORKS IS ONE NON-
STANDARD 26 PIN CONNECTOR.
SPECIAL CABLES ARE REQUIRED.
Before using the system together with external network equipment, you must specify the network
parameters on this page.
THE SYSTEM HAS SUPPORT FOR
NOTE
TO 768KBPS/2MBPS USING
UP
EXTERNAL N ETWORK
THE
(RS449/V.35/X.21) INTERFACE.
Call control
‘RS366 Dialing’ is the only dialing protocol and would normally be used together with network
clocking ‘RS449/V35 Compatible’ when the external equipment uses RS366 ports.
‘Leased Line’ is a non-dialing protocol and should be used when two codecs are connected in a
point to point connection. Use ‘Leased Line’ when the handshaking signals DTR and CD are
available. DTR and CD correspond to the X.21 network’s C and I signals.
‘Data Triggered’ mode uses TxData (transmit data), RxData (receive data) and clock signals only.
Use ‘Data Triggered’ when no handshake signals are available.
‘Manual’ should be used when no handshake signals are available, and the external equipment
requires a constantly connected line.
TO MAKE AN IP CALL WHEN
TIP
‘LEASED LINE’ IS SELECTED,
ENTER A NUMBER BEFORE
PRESSING
ACTIVATE THE DIAL MENU.
CONNECT TO
79
Page 80

Advanced Use TANDBERG Director Videoconferencing System
Network clocking
The network clock setting specifies the number of physical external clock signals.
Use ‘RS449/V35 Compatible’ when the external equipment provides two clock signals, one for
transmit and one for receive. The difference between RS449 and V35 is the cable only.
Use ‘X21 Compatible’ when the external equipment provides a common clock signal for both
transmit and receive.
Cable Specification, V.35
V.35/RS-366 cable
Signal Name Female Male 34pin Male 25pin Comments
Frame ground 1 A
Signal ground 19,23 B
TX(A), transmit data 11 P Twisted pair
TX(B) 12 S
RX(A), receive data 13 R Twisted pair
RX(B) 14 T
RCLK(A), rcv clock 15 V Twisted pair
RCLK(B) 16 X
TCLK(A), xmt clock 17 Y Twisted pair
TCLK(B) 18 AA
DTR 26 H, C
RI 24 L, J
RLSD 22 F
RS366 DPR 2 2
RS366 ACR 3 3
RS366 CRQ 4 4
RS366 PND 5 5
RS366 DLO 6 22
RS366 NB1 7 14
RS366 NB2 8 15
RS366 NB4 9 16
RS366 NB8 10 17
RS366 GND 19 7
26pin DSUB Winchester DSUB
Pin number Pin number
80
Cable Marking NET DSU V.35 DSU RS366
Page 81

LAN Settings
Streaming*
WHEN STREAMING, A MULTISITE
NOTE
A DUO VIDEO CALL CAN NOT
OR
BE MADE.
Advanced UseTANDBERG Director Videoconferencing System
AN ON-SCREEN INDICATOR IS
NOTE
WHEN STREAMING IS
SHOWN
ACTIVE.
Address
Address is defined as the IP-address of a streaming client, streaming server or a multicast address.
Giving an address in the range 224.0.0.1-239.255.255.255 will broadcast the stream to any host that
has joined the specified multicast group. Specifying normal broadcast address 255.255.255.255 will
broadcast to any members on the LAN.
Address Port
If several codecs are streaming to the same IP-address, different ports have to be used in order for
the client to know which stream to receive. If the first codec streams on port 2240 and the second
codec on port 2250, the client has to specify which port to listen to. Video is transmitted on the
specified port, audio is transmitted on the port number 4 above the specified video port, in this case
2244 and 2254.
TTL/Router Hops
This is used for streaming data to limit how many routers the data should pass before it is rejected.
If TTL is set to two, data will not traverse more than 2 router hops.
* PLEASE CONTACT YOUR TANDBERG REPRESENTATIVE FOR FURTHER INFORMATION.
81
Page 82

Advanced Use TANDBERG Director Videoconferencing System
Streaming Source
UTO Enables streaming of both local and far end video. Selection of which site to be
A
streamed is done using voice switching (the site that speaks is streamed).
L
OCAL Only the local video will be streamed.
REMOTE Only the far end video will be streamed.
Local and far end audio is always streamed.
Allow Remote Start
ON Streaming can be started from external user interfaces like the Web-browser or
Telnet session.
OFF Streaming can only be started from the Videoconferencing System using the
remote control, or by using the Dataport. This will prevent activation of
streaming using Web browser or Telnet sessions. See also ‘Password’ section
below
Announcements
ON The codec will announce to the network that it is streaming. This enables a
streaming client (e.g. a PC) to connect to the codec’s streaming session. Used
by Cisco IP/TV.
OFF No announcement packets will be transmitted.
Video Rate
Defines the Video streaming rate from the system. Range is 16kbps - 320kbps. In addition, audio
(G.711) streaming rate is 64kbps, providing a maximum streaming rate of 384kbps.
Password
Set password so that only participants entering correct password will be able to view the streaming
session. Entering a password will prevent unauthorized people from accessing the streaming
session.
Start/Stop Streaming
By pressing the QUICK KEY labeled ‘Start Streaming’, the Streaming session will start. To stop the
stream, press the same QUICK KEY, which will be labeled ‘Stop Streaming’ while the streaming-
session is active. Pressing DISCONNECT will also stop the streaming session.
How to view streaming
After streaming is started, an easy way to view the streamed audio/video is to start your Webbrowser and enter the IP-address of the streaming system. After the Web page of the codec is
shown, click on ‘Streaming’. Alternatively, enter http://<codec ip-address>/stream.sdp.
82
Page 83

Advanced UseTANDBERG Director Videoconferencing System
H.323 Settings
E.164 alias
This is the E.164 address of the codec. The E.164 address is equivalent to a telephone number,
sometimes combined with access codes. Valid characters are 0-9,* and #.
When using a gatekeeper the codec will send a message to the gatekeeper containing both the
E.164 address and the system name of the codec. The codec will not register with the gatekeeper
if the E.164 alias is not set.
Use Gatekeeper
AUTO The codec will automatically try to register on any available gatekeeper. If a
gatekeeper responds to the request sent from the codec within 30 seconds this
specific gatekeeper will be used. If no gatekeeper responds, the codec will not
use a gatekeeper for making H.323 calls and hence an IP-address must be
specified manually.
MANUAL The codec will use a specific gatekeeper identified by ‘Gatekeeper IP-
address’.
OFF The codec will not use a gatekeeper and an IP-address must be used in order
to make an H.323 call.
Gatekeeper IP-address
This is the gatekeeper IP-address if you specify ‘Use Gatekeeper: Manual’.
H.323 Prefix
When dialing a number prefixed with digits specified by ‘H.323 Prefix’, and with ‘Net: Auto’, an
H.323 call will be placed.
EXAMPLE: H.323 PREFIX IS ‘555’. DIALLING ‘55582’ WITH ‘NET:AUTO’ WILL SELECT LAN.
Register
Pressing ‘Register’ will send a gatekeeper registration request. This request will also be sent when
leaving the menu.
83
Page 84

Advanced Use TANDBERG Director Videoconferencing System
Advanced H.323 Settings
THESE SETTINGS ONLY HAVE AN
NOTE
RSVP (Resource Reservation Protocol)
AUTO RSVP enables the endpoints to request the optimal amount of bandwidth for
the duration of an IP video conference.
OFF RSVP is switched off.
NAT (Network Address Translation)
NAT is used in small LAN’s, often home offices, when a PC and a videoconferencing system is
connected to a router with NAT support. NAT support in the videoconferencing system enables
proper exchange of audio/video data when connected to an external videoconferencing system
(when the IP traffic goes through an NAT router.
IF THEY ARE SUPPORTED
EFFECT
BY YOUR IP INFRA STRUCTURE.
When NAT is ‘On’, the NAT Server Address will be shown in the startup-menu: ‘My IP Address:
10.0.2.1 (NAT)’
NAT Address
This must be the external/global IP-address to the Router with NAT support. Packets sent to the
Router will then be routed to the codec.
In the router, the following ports must be routed to the codec’s IP-address:
Port 1720
Port 5555-5560
Port 2326-2365
Please contact your TANDBERG representative for further information.
QoS Type
OFF No QoS is used
DIFFSERV Diffserv QoS method is used. Please see below for details.
IP PRECEDENCE IP Precedence QoS method is used. Please see below for details.
84
Page 85

Advanced UseTANDBERG Director Videoconferencing System
IP Precedence
Used to define which priority audio, video, data and signalling should have in the network. The
higher the number, the higher the priority. The priority ranges from 0(off) - 7 for each type of packets.
AUTO WILL PROVIDE THE
NOTE
FOLLOWING
AUDIO 4
VIDEO 4
DATA 3
SIGNALING 6
PRIORITY:
IP Type of Service (TOS)
Helps a router select a routing path when multiple paths are available.
DELAY Tells the router to minimize the delay
THROUGHPUT Tells the router to maximize the throughput
RELIABILITY Tells the router to maximize the reliability
COST Tells the router to minimize the cost
Diffserv
Used to define which priority Audio, Video, Data and Signaling packets should have in an IP
network. The priority ranges from 0 to 63 for each type of packets.
85
Page 86

Advanced Use TANDBERG Director Videoconferencing System
IP Settings
CHANGES IN THIS MENU WILL NOT
NOTE
IP-assignment
DHCP (Dynamic Host Configuration Protocol) can be selected when a DHCP server is present.
DHCP IP-address, IP-subnet mask and Gateway are not used because these
parameters are assigned by the DHCP server.
STATIC The codec’s IP-address and IP-subnet mask must be specified in the IP-address
field.
IP-address
IP-address defines the network address of the codec. This address is only used in static mode. In
DHCP-mode, the assigned IP-address can be found on the Welcome Menu.
ANY EFFECT BEFORE THE
HAVE
SYSTEM IS RESTARTED.
IP-subnet mask
IP-subnet mask defines the type of network. This address is only used in static mode. Your LANadministrator will provide the correct value for this field.
Gateway
When using DHCP, the default gateway will be set automatically. If the LAN utilizes static IP
addresses, IP address, subnet mask, and default gateway must be specified by the LAN
administrator.
Ethernet Speed
AUTO The codec will auto-detect the speed/duplex on the LAN.
10/HALF The codec will connect to the LAN using 10Mbps speed/Half Duplex.
10/FULL 10 Mbps speed/Full Duplex.
100/HALF 100 Mbps speed/Half Duplex.
100/FULL 100 Mbps speed/Full Duplex.
Restart
Pressing the QUICK KEY ‘Restart’ will restart your system without having to use the On/Off switch on
the codec. If IP-assignment is changed, it is sufficient to use this QUICK KEY to restart the system.
86
Page 87

Advanced UseTANDBERG Director Videoconferencing System
SNMP Settings
SNMP Trap Host
SNMP (Simple Network Management Protocol) is used for monitoring and configuring of different
units in a network. The codec’s SNMP Agent responds to requests from SNMP Managers (a PC
program etc.). SNMP traps are generated by the agent to inform the manager about important
events.
SNMP Trap Host identifies the IP-address of the SNMP manager.
Traps can be sent to multiple SNMP Trap Hosts. Enter the IP address of up to three SNMP managers.
All traps will then be sent to the hosts listed.
SNMP Community
SNMP Community names are used to authenticate of SNMP requests. SNMP requests must have a
‘password’ in order to receive a response from the SNMP agent in the codec.
Call Settings
THE SNMP COMMUNITY NAME IS
NOTE
CASE SENSITIVE.
Incoming MCU calls
ON When you are in a call, the system will provide a visual/audio indication of an
incoming call and ask you to accept/reject the call.
OFF The system will not accept incoming calls when you are in a call.
87
Page 88

Advanced Use TANDBERG Director Videoconferencing System
Incoming telephone calls
ON The system will accept incoming telephone calls.
OFF The system will not accept incoming telephone calls. This is useful to prevent
incoming calls from systems other than videoconferencing systems.
Fallback to telephony
ON Enables fallback from video calls to telephony/speech calls.
OFF Disables fallback.
Access Code
ON When pressing CONNECT or any number to make a call, an ‘Access Code’
menu will be shown. The user will then have to enter the correct Access Code in
order to make a call.
OFF No Access Code is necessary to make a call.
Encryption (Secure Conference)
AUTO The system will try to set up calls using encryption.
Point to point calls: If the far end system supports encryption, the call will be
encrypted. If not, the call will proceed without encryption.
MultiSiteTF calls: In order to have encrypted MultiSiteTF calls, all sites must
support encryption. The padlock symbol will indicate encryption mode (AES or
DES). If there is a mix of AES and DES encryption, only the symbol for DES
encryption (single padlock) will be displayed.
IP MultiSiteTF calls: Sites supporting encryption will be encrypted and sites not
supporting encryption will not be encrypted. The padlock symbol will be shown
on the MultiSiteTF if all sites support encryption. The padlock symbol will be
shown on the site connected to the MultiSiteTF if this connection to the
MultiSiteTF is encrypted.
If the far end supports encryption, the systems will initiate encryption after the
call is connected (an ‘open padlock’ symbol will be displayed). When encryption
has been established, a ‘closed padlock’ symbol will be displayed.
OFF The system will not send or receive encrypted data.
Technical encryption information like encryption algorithm and encryption check code can be
found in the ‘Call Status’ menu.
88
Page 89

Advanced UseTANDBERG Director Videoconferencing System
Encryption Mode
AUTO The system will try to use the most secure
encryption - AES, dependent on the
capabilities of the other sites. If AES
encryption is not supported by all the other
sites, DES encryption will be tried.
AES* The system will try to use AES with 128 bits
encryption when setting up calls. If AES is
not supported by the other site(s), no other
type of encryption will be initiated.
DES The system will always try to set up the call
using DES with 56 bits encryption on ISDN
and IP. If DES is not supported by all other
sites, no other type of encryption will be
initiated.
BOTH AES AND DES
TIP
E
NCRYPTION IS SUPPORTED FOR
ISDN/IP CALLS. IN
MIXED
ADDITION
ENCRYPTED SITES CAN BE
CONNECTED AT THE SAME TIME.
THE MULTISITE CAN RUN 4
TIP
ENCRYPTED SITES AT 128 KBPS
AND
256KBPS.
AES -AND DES
3 ENCRYPTED SITES AT
Max Call Length
This feature will automatically end both incoming and outgoing calls when the call time exceeds
the specified ‘Max Call Length’.
‘Max Call Length’ can have the following values: 0-999 (minutes), where 0 is ‘Off’.
A few minutes before the specified time is reached, a QUICK KEY menu will appear. Users will be
asked if he/she wants to extend the ‘Max Call Length’ that is specified:
Network Profiles
This menu defines the settings listed when pressing the QUICK KEY ‘Net:’ while in the ‘Dial’ menu.
This menu consists of 6 network profiles, a prefix can be added for each profile. If you add a
prefix to a profile, this prefix can be automatically added to the number being dialed.
EXAMPLE:
TIP
0 IS ADDED AS A CALL PREFIX TO
2ND PROFILE, ISDN. IF YOU
THE
12345678 IN THE DIAL
ENTER
AND SELECT ‘ISDN’, THE
MENU
DIALED WILL BE
NUMBER
012345678.
Using the three last profiles you can enter the name of a profile, prefix and network selection. This is
useful if you have a fixed prefix for your service provider.
89
Page 90

Advanced Use TANDBERG Director Videoconferencing System
Dataport configuration
The system provides two standard RS232 serial ports to
allow a computer to be connected for data transfer and
control purposes.
WHEN CONNECTING TO A PC THE
NOTE
CONNECTING
STRAIGHT
CABLE.
CABLE MUST BE A
THROUGH RS232
Dataport 1
If you wish to connect a PC to Dataport 1, you must ensure that the PC and the system are
identically configured. The available settings are:
Dataport 1 supports 4 different modes:
Data
Provides a transparent data channel. This channel can be used for many different purposes such
as file transfer, application sharing and more. When using this mode, it is necessary to have a
TANDBERG system at the far end.
Control
The control interface provided by the Dataport supports a subset of the Hayes command set as
well as a comprehensive set of system specific commands.
This mode maintains communication with the Dataport’s command interpreter at all times. All
features available from the hand-held remote control can be accessed through the dataport.
Modem
Allows you to control the system externally via a PC as in Control Mode. Once a call is established,
Dataport 1 will automatically switch to Data mode. When the call disconnects, Dataport 1 switches
back to Control Mode.
T.120
Provides a data channel supporting the T.120 standard for data communication. Using T.120
software on your PC, you can communicate with other T.120 systems using your PC and your
system.
90
Page 91

Language
Advanced UseTANDBERG Director Videoconferencing System
Dataport 2
Dataport 2 is dedicated to the main camera and will not be available in standard configuration.
The codec will automatically
detect W.A.V.E II cameras. If you
are using a camera supporting
the VISCA protocol, select
‘Mode: VISCA’. The Dataport 2
settings will then be enabled.
For more details on connecting
to the Dataport, see ‘Peripheral
Equipment’.
The system supports 10 different
languages for its on-screen
menus.
Software Options
All Director systems have Security (contains Secure Conference AES), Natural Presenter PackageTF,
and MultiSiteTF options enabled.
All TANDBERG systems require a valid option key to activate the various options. A restart of the
system is required after entering a new option key. If the option key is invalid, the original key will
be used.
The following options are available
1. No option
2. NPP (Presenter)
3. MultiSite + NPP
4. Security + NPP
5. Security + NPP + MS
Select the preferred language,
and then press OK to save.
TF - TANDBERG FIRST
91
Page 92

Advanced Use TANDBERG Director Videoconferencing System
Diagnostics
Allows testing of individual system components and displays the current system settings.
System info
Select ‘System Info’ to view system numbers, line status, software version and other useful
information.
Channel status
Comprehensive information about the call progress is available through the Channel Status window.
This window indicates the various stages each B-channel goes through whilst establishing a
connection.
Status - BRI Comments
Idle the channel is idle
Calling when calling — the network has acknowledged the call
Connected when connection is established
Sync when the channels are synchronized
Active when all available channels are connected
Releasing waiting for the network to confirm a release of the call
Released when disconnected - the network has acknowledged the disconnection
92
Page 93

Advanced UseTANDBERG Director Videoconferencing System
The numbers used to call out
to the far end are shown in the
window. If an error occurs a
cause code will be displayed
on the right hand side of the
window.
PRESS MENU AND THEN ’CALL
TIP
STATUS’ TO BRING THIS MENU UP
WHEN NOT IN THE MENU SYSTEM.
Cause codes
The most common cause codes (for ISDN) are:
1 - Unallocated (unassigned) number
2 - No route to specified transit network (WAN)
16 - Normal clearing
17 - User busy
18 - No user responding
21 - Call rejected
28 - Invalid number format (incomplete number)
29 - Facility rejected
31 - Normal, unspecified
34 - No circuit/channel available
41 - Temporary failure
58 - Bearer capability not presently available
65 - Bearer service not implemented
69 - Requested facility not implemented
81 - Invalid call reference value
88 - Incompatible destination
100 - Invalid information element contents
102 - Recovery on timer expiry
127 - Internetworking, unspecified
255 - TANDBERG specific. undefined cause code
Call status
Comprehensive information about the call is available through the ‘Call Status’ window. The
menu has two columns, one for transmitted and one for received audio/video/data information.
If Duo VideoTF or MultiSiteTF is used, pressing the LEFT/RIGHT KEYS will show one page per
connected site. Some of the information fields will vary dependent on if H.320 (ISDN calls) or
H.323(IP calls) are made.
TF - TANDBERG FIRST
93
Page 94

Advanced Use TANDBERG Director Videoconferencing System
You can test the different
subsystems of your
videoconferencing equipment.
Far End Loop (ISDN only)
SETLOCAL This system will loop all
incoming audio and video.
- The far end will see its own
video and hear its own audio.
- The local side will see and hear the far end.
An on-screen indicator will indicate ‘Local Loop’.
REQUESTREMOTE A request will be sent to set
the far end in loop.
- The far end will see and hear
the local side (varies depending on implementation of loop functionality).
- The local side will see its own video and hear its own audio (if the far
end supports loop).
If ‘Far End Loop’ is set to ‘RequestRemote’ while in a call and the call is subsequently
disconnected, ‘Far End Loop’ will be set to ‘Off’.
System Selftest
The system performs a check to determine internal hardware integrity. Test Network is useful when
you want to check if your network connection is active.
View Current Settings
This window will display all the
system settings. Use the arrow
key on the remote control to
scroll through the list.
THIS DEFAULT SETTING WILL NOT
Restore defaults
NOTE
You may restore all system settings to the factory default using
this function.
YOUR CALL DIRECTORY
AFFECT
INFORMATION
LINE SETUP NUMBERS OR YOUR
SPID NUMBERS
, NETWORK TYPE,
94
Page 95

Appendices
Appendix 1: Connecting the system to ISDN using NT1 network adapters
Appendix 2: Connecting the system to the Switched 56 network
Appendix 3: Connecting the system to PRI/T1
Appendix 4: Environmental considerations
Appendix 5: Using the file system
Appendix 6: Security
Appendix 7: 12” Touch Panel Interface
AppendixTANDBERG Director Videoconferencing System
95
Page 96

Appendix TANDBERG Director Videoconferencing System
Appendix 1: Connecting to ISDN using network adapters
Connecting
When network terminating units are required, Inter-Tel Inc. models NT1 or NT384 are installed
within the enclosed area at the bottom of the cart, as illustrated below.
Connect the first ISDN cable from ISDN 1 on the codec to the S-interface on your first NT1 network
adapter. Connect the other ISDN cables to the appropriate NT1 network adapters.
Connect the U-interface of your NT1 adapter to the line provided from your network provider.
TANDBERG can provide NT-adapters.
For convenience the NT1 adapters could be placed inside the cabinet. If needed, use the shorter
Wall
U-interface
NT- 384
(NT-1 triple)
NT1
U S/T
NT1
U S/T
NT1
U S/T
NT1
U S/T
NT1
U S/T
NT1
U S/T
NT- 384
(NT-1 triple)
S/T-interface
Director / 3000i
6000 Codec
1
2
3
ISDN
4
5
6
ISDN cable (RJ45 connectors) delivered with the NT1 between the codec and the NT1 and the
longer ISDN cable between the NT1 and the connector (RJ45) at the wall socket.
Configuring
The configuration of the codec is performed in the same manner as described in ISDN BRI
Settings.
The NT1 should be powered up and you should check that the network is active. Please check
your NT1 User Manual.
96
Page 97

Appendix 2: Connecting to the Switched 56 network
Using Telesync TS-256 SW56/ISDN adapter
Connecting the system to the SW56 network using a Telesync Adapter is described below.
NOTE: There are different Telesync Adapters for different configurations of SW56 networks. The
network types tested with the system are SW56 2Wire and 4Wire.
Connecting
Connect the system ISDN1 cable to the BRI S/T interface on the Telesync Adapter. Connect the two
SW56 cables from the Telesync adapter Line 1 and Line 2 to the SW56 network.
AppendixTANDBERG Director Videoconferencing System
Circuit #1
Circuit #2
SW56
Line 1
BRI S/T
Line 2
Telesync Adapter
Configuration of Telesync Adapter
No configuration of the Telesync Adapter is necessary.
Configuration of the system
Select network type to ‘National ISDN’.
LINE 1 SETUP
NUMBER1: program with number from the first SW56 line
NUMBER2: program with number from the second SW56 line
SPID1: program with number from the first SW56 line
SPID2 Leave blank
LINE 2 SETUP
NUMBER1: number from the third SW56 line
NUMBER2: number from the fourth SW56 line
SPID1: Leave blank
SPID2 Leave blank
And so on for the other lines.
ISDN1
TANDBERG
How to call
Important: Use the Quick key ‘Set Restrict (56k)’ in the Quality menu to specify a restricted call
(56k) when you dial a number.
Set Restrict
(56k)
EXAMPLE:
ONE NUMBER DIALING ENTER:NUMBER: 1703111222 (56K)
TWO NUMBER DIALING ENTER:NUMBER: 1703111222 (56K)
2ND: 1703111223
97
Page 98

Appendix TANDBERG Director Videoconferencing System
Appendix 3: Connecting to PRI/T1
Using CSU adapter
Connecting the system to the ISDN network via the E1/T1-interface using an Adtran T1 ESF CSU
ACE will allow up to 1.54 Mbps transmission. The E1/T1-interface must be connected to a CSU
approved according to IEC 60950, UL 1950 or equivalent standard.
NOTE: The PRI-line will run the AT&T 4ESS, 5ESS and National ISDN protocols in addition to
Euro ISDN (E1).
Director
NET*
Adtran
CSU
CPE*
PRI-interface
ISDN E1/T1 (1)
ISDN E1/T1 (2)
Director
Wall
ISDN E1/T1 (1)
*RJ-48C type interface
Connecting to Adtran T1 ESF CSU ACE
Connect the PRI cable from the Codec to the input marked CPE on the Adtran CSU (straight
through category 5 cable is recommended). Connect to the network via the NET connector on the
Adtran CSU. When two Codecs are cascaded, connect the second Codec to the E1/T1 port 2 on
the first Codec using a T1 crossover cable.
Configuration of the system
Press MENU on the remote control. Select ‘Terminal Settings’, ‘Network’.
Select ‘Current Network: PRI’
and specify your PRI number,
max. channels, cable length
(between Codec and CSU) and
switch type:
CASCADED CONNECTION:
NOTE
REMEMBER TO PROGRAM
NUMBERS
OTHERWISE, THE FIRST CODEC
WILL ANSWER ALL CALLS.
AND MSN.
Configuration of Adtran T1 ESF CSU ACE
Enter ‘2)CONFIG’ menu using SCROLL and ENTER buttons.
• Enter ‘3)TERMINAL’ menu. Check ‘1)FORMAT:ESF’, ‘2)CODE: B8ZS’ , ‘3)SET LBO: 0-133’
(Corresponding to ‘Cable Length’ setting on the Codec.
• Go to main menu and enter ‘1)NETWORK’ menu. ‘7)SET LBO: 0.0 (According to information
from Telco).
• Also, other network parameters should be set according to information from your Telco.
98
Page 99

Appendix 4: Environmental & operational considerations
Guidelines for Optimal Videoconferencing Environments
The following are a set of guidelines to consider when either building a videoconferencing room, or
using an existing room for videoconferencing.
AppendixTANDBERG Director Videoconferencing System
LIGHTING
- Low Contrast desired for light intensity.
- No dark spots.
- Intensity @ table 800 - 1400 Lux as measured
with an Incident light meter.
- Intensity @ back wall: minimum ˚ of that
measured at table, Max ∫ of that measured at
table.
- Color temperature: Depends upon wall color and
camera.
- Typically 3200 - 3600 degrees Kelvin
- Block sunlight from entering room.
SEATING AREA (TABLE)
- Should allow all participants to see Monitors.
- Should allow camera to “see” all participants.
- Should allow participants to see each other.
- Should allow 3 linear feet for each participant.
- Non-shiny non-patterned preferably light grey
surface (if table used).
WALLS
- Color: Depends on participants skin tones,
cameras, and lighting. Generally high contrast
color desired . Light blue is commonly used.
- Acoustically reflective surfaces (such as glass or
concrete) should be covered with curtains or
sound treatment.
AUDIO
- Noise Floor Maximum 50dBC.
- Noise Floor preferred less than 44dBC.
- Reverb Time .3 to .5 sec.
- Absorption Coefficient .25 to .45.
- No flutter echoes.
VENTILATION
- Keep in mind Noise Floor.
- 300W (1024 BTU/HR) per person.
- 400W (1365 BTU/HR) for equipment.
- Intake and exhaust should be located near
equipment.
- Velocity = Noise. Therefore keep velocity of air
low.
MONITOR SIZE
- Optimal distance from monitor for viewing people
is about 7.5 x monitor size.
- Optimal distance from monitor for viewing
documents is about 3.25 x monitor size.
- Viewing Angle: 45 degrees off axis maximum.
ROOM
- Should be located away from noise
- Should not have windows
- Doors should be located off camera - A “diamond”
shape gives best viewing angles, camera
angles, and can seat the most people.
LIGHTING
Type Temp
Bright Daylight near equator 10 000K to 30 000K
Metal Halide Lamp 10 000K
Verilux Reptile Daylight 6 500K
Daylight White Fluorescent 6 300K
Verilux Full spectrum Fluor 6 280K
Verilux Reptile D-light 5 600K
Average Daylight 5 500K
Cool White 4 200K
Lite White 4 150K
3500K Fluorescent 3 500K
Warm White 3000-3200K
100W Light bulb 2 850K
Candlelight 1 900K
Source Intensity
Sunlight 30 000 to 100 000Lux
TV Studio 2000Lux
Average office 400Lux
By my Computer 600Lux
Moonlight 1Lux
Note: As measured with an incident light meter.
99
Page 100

Appendix TANDBERG Director Videoconferencing System
Iris Control and Lighting
By default the Director camera will use an automatic iris to compensate for changes in lighting. In
addition to this feature you may further assist the Director to maintain the best possible image
quality by paying special attention to environmental lighting and background colors as described
below. Remember the Director will send live images of yourself and your immediate surroundings.
• Avoid direct sunlight on the subject matter i.e. yourself, the background or onto the camera
lens as this will create harsh contrasts.
• If light levels are too low you may need to consider using artificial lighting. Again, avoid direct
illumination of the subject matter and camera lens.
• When using artificial lighting, ‘daylight’ type lamps will produce the most effective results.
Avoid colored lighting.
• Indirect light from shaded sources or reflected light from pale walls, often produces excellent
results.
• Avoid harsh side lighting or strong light from above, for example: strong sunlight from a
window or skylight, as this may put part or all of the subject matter in shadow or cause
silhouetting.
• If you still have problems with the iris and lighting, manual adjustment of the camera
parameters might help - see the ‘Video Settings’ menu:
• If a subject is backlit, e.g. a person in front of a window, it will appear dark. This can be
corrected by switching on the backlight function (automatic on some cameras).
• Dim scenes can also be improved by manually adjusting the brightness.
Brightness Control
For adjusting brightness, colors or other adjustments of the monitor, you must use the controls
monitor’s front panel. Adjust the monitor to suit the conditions of the room. More adjustments can
be made using the on-screen menu. Refer to the monitor’s user manual for more information.
Loudspeaker Volume
The audio system uses the built-in high quality loudspeakers and amplifier specifically designed for
this system. The volume of the audio system is controlled by the volume control keys on the HCS
III remote control. The volume control on the monitor is not used.
Background
The appearance of the picture background is very important but easily overlooked. It is important
to remember that the camera also shows what’s behind you when in a videoconference. To ensure
a suitable background we recommend you consider the following:
• Use a neutral colored background with a medium contrast and a soft texture, e.g. a plain
curtain with no heavy patterns or strong colors that may adversely tint the whole scene.
• Avoid moving backgrounds, for example: curtains in a draft, moving objects, or people
walking behind you, as this may both reduce image quality and distract the attention of the
calling party.
• Do not place the camera facing a doorway.
100
 Loading...