


Digital 4K Video Camera Recorder/Digital HD Video Camera Recorder FDR-
X3000/HDR-AS300/HDR-AS50
Read This First
Identifying the parts
Identifying the parts (FDR-X3000/HDR-AS300) [1]
Identifying the parts (HDR-AS50) [2]
Screen display [3]
Getting Started
Checking the bundled items [4]
Inserting the battery pack [5]
Charging the battery pack [6]
Inserting a memory card
Inserting a memory card [7]
The memory cards that can be used with the camera [8]
Setting the date and time [9]
Using the Underwater Housing
Identifying the parts (Underwater Housing) [10]

Using the Underwater Housing [11]
On waterproof performance of the Underwater Housing [12] Notes on use for the Underwater Housing [13]
Water leakage [14] Waterproof packing [15]
How to check for water leaks [16] Maintenance [17]
Using accessories
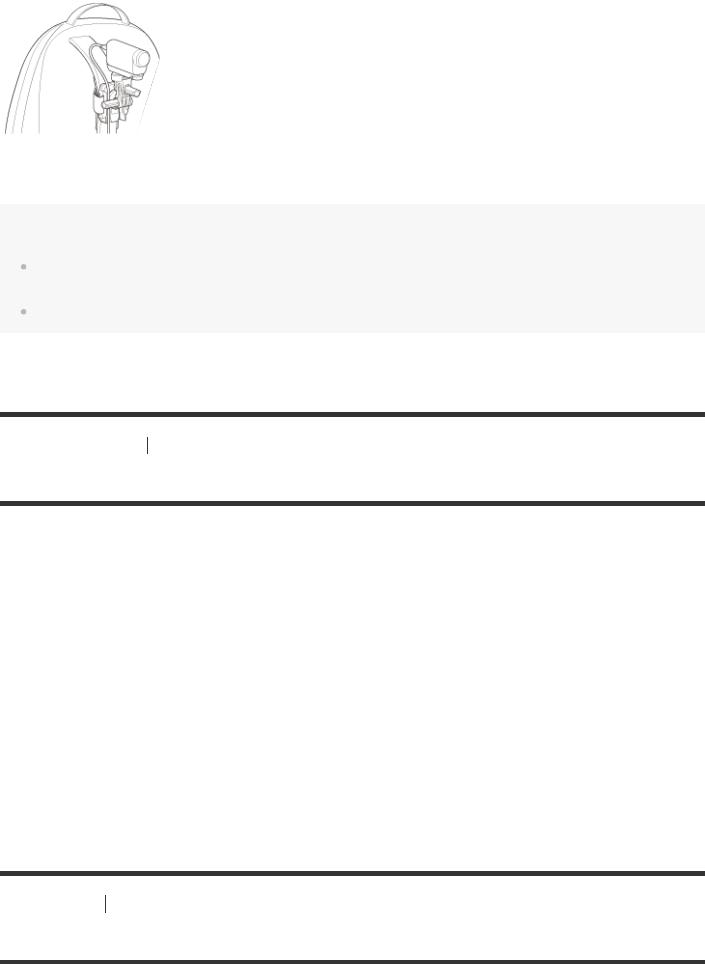
Using the attachment buckle [18]
Notes on using the adhesive mount (sold separately) [19]
Shooting
Shooting movies and still images
Shooting movies (Movie mode) [20]
Shooting still images (Photo mode) [21]
Time-lapse capture mode [22]
Loop recording mode [23]
Using the zoom [24]
Notes on long-time recording [25]
Changing the Settings
List of setting items
List of setting items [26]
How to set the setting items [27]
Shooting settings

Image quality setting [28] Movie format [29]
Time-lapse capture image size [30] Loop recording time [31]
Still image mode switching [32] Still image shooting interval [33] Self-timer [34]
Time-lapse shooting interval [35] Time-lapse shot number [36] SteadyShot (Movie) [37]
SteadyShot (Still) (FDR-X3000/HDR-AS300) [38] Angle setting [39]
Zoom setting [40] Flip [41]
AE shift [42]
Time-lapse AE mode [43] Scene [44]
White balance [45] Color mode [46]
Audio recording setting [47] Wind noise reduction [48]
Camera settings
Airplane mode [49]
Wi-Fi connection setting [50] Wi-Fi Hi power setting [51] Bluetooth setting [52]
Bluetooth remote controller power setting [53] GPS log (FDR-X3000/HDR-AS300) [54] Format [55]
Time code/user bit (FDR-X3000) [56] IR remote (FDR-X3000) [57]
HDMI settings (FDR-X3000/HDR-AS300) [58] USB power supply [59]
Beep [60]
Beep volume [61] Lamp setting [62]

One touch recording [63]
Auto power off [64]
Switching NTSC/PAL [65]
Date & time setting [66]
Area setting [67]
Daylight saving time (summer time) setting [68]
Version [69]
Resetting the settings [70]
Viewing
Viewing images on a TV (FDR-X3000/HDR-AS300) [71]
Viewing using the Live-View Remote [72]
Delete [73]
Create your movie
Highlight Movie Maker
Creating the highlight movie [74]
Importing the BGM [75]
Stream real-time movie to a movie streaming site
Live Streaming with your camera (Real time movie streaming)
Live Streaming [76]
Preparing for Live Streaming [77]
Performing Live Streaming [78]
Restrictions [79]

Using the camera connected to other devices via Wi-Fi
Connecting to your smartphone
Preparation for connecting to your smartphone [80] Sample smartphone screen display [81]
Using One-touch Functions to Connect to an NFC-enabled Android Smartphone (FDR-X3000/HDR- AS300) [82]
Connecting a smartphone to Wi-Fi via QR Code (Android device) [83] Performing the Wi-Fi setting on a smartphone via QR Code (iPhone/iPad) [84] Connecting to a smartphone using ID/password (Android device) [85] Connecting to a smartphone using ID/password (iPhone/iPad) [86]
Connecting to the Live-View Remote
Connecting a single camera to Live-View Remote (Single connection) [87]
Connecting multiple cameras to Live-View Remote (Multi connection) [88]
Connecting to Handycam
Connecting a single camera to Handycam (Single connection) [89]
Connecting multiple cameras to Handycam (Multi connection) [90]
Editing images imported to your computer
Using the Action Cam Movie Creator
Useful functions of Action Cam Movie Creator [91]
Installing Action Cam Movie Creator on your computer [92]

Editing images imported to your smartphone/tablet
Using the Action Cam App
Useful functions of Action Cam App [93]
Installing Action Cam App [94]
Information
Recordable time
Estimated duration of recording and playback for supplied battery pack [95] Estimated recording time of movies [96]
Estimated number of recordable still images [97]
Battery pack
On charging the battery pack [98]
Effective use of the battery pack [99]
About the remaining battery charge [100]
How to store the battery pack [101]
On battery pack life [102]
To reduce the battery consumption [103]
Using the camera abroad
On TV color systems (FDR-X3000/HDR-AS300) [104]
Countries and regions where NTSC TV is used [105]
Countries and regions where PAL TV is used [106]
The list of time differences for world capitals [107]
Precautions

Do not use/store the camera in the following places [108] On carrying [109]
Care and storage of the lens [110] On cleaning [111]
On operating temperatures [112] On moisture condensation [113] Notes on optional accessories [114]
On using the camera in close proximity to vibrating motors and engines (FDR-X3000/HDR-AS300) [115]
Note on disposal/transfer of the memory card [116] On GPS (FDR-X3000/HDR-AS300) [117]
On GPS errors (FDR-X3000/HDR-AS300) [118]
On GPS use restriction (FDR-X3000/HDR-AS300) [119]
Specifications [120]
Trademarks [121]
Notes on License
On GNU GPL/LGPL applied software [122]
List of Default Setting [123]
Troubleshooting
Troubleshooting [124]
Battery pack and power
Cannot turn on the camera. [125]
The power turns off suddenly. [126]
Battery life is short. [127]
Cannot charge the camera. [128]

The remaining charge indicator is incorrect. [129]
Memory card
Operations using the memory card cannot be performed. [130]
Shooting images
Cannot record images. [131]
Cannot insert dates on images. [132]
Viewing images
Cannot playback images. [133]
The image does not appear on the TV. (FDR-X3000/HDR-AS300) [134]
GPS
The camera is not receiving a GPS signal. (FDR-X3000/HDR-AS300) [135] Excessive error in location information. (FDR-X3000/HDR-AS300) [136]
It takes time to triangulate although the GPS assist data is taken in. (FDR-X3000/HDR-AS300) [137]
The location information has not been recorded. (FDR-X3000/HDR-AS300) [138]
Computers
Your computer does not recognize the camera. [139]
Cannot import images. [140]
Action Cam Movie Creator cannot be installed. [141]
Action Cam Movie Creator does not work correctly. [142]
Cannot play back images on your computer. [143]
Wi-Fi

It takes too much time to transfer an image. [144]
Others
The lens gets fogged. [145]
The camera becomes warm when you use it for a long time. [146]
The date or time is incorrect. [147]
Warning indicators and messages
Warning indicators and error messages [148]
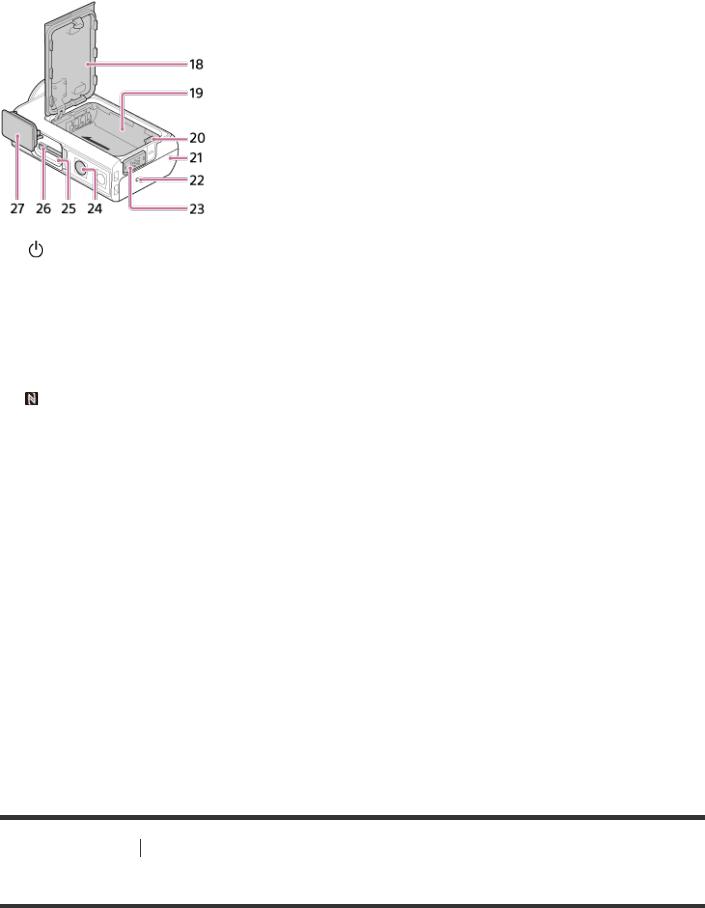
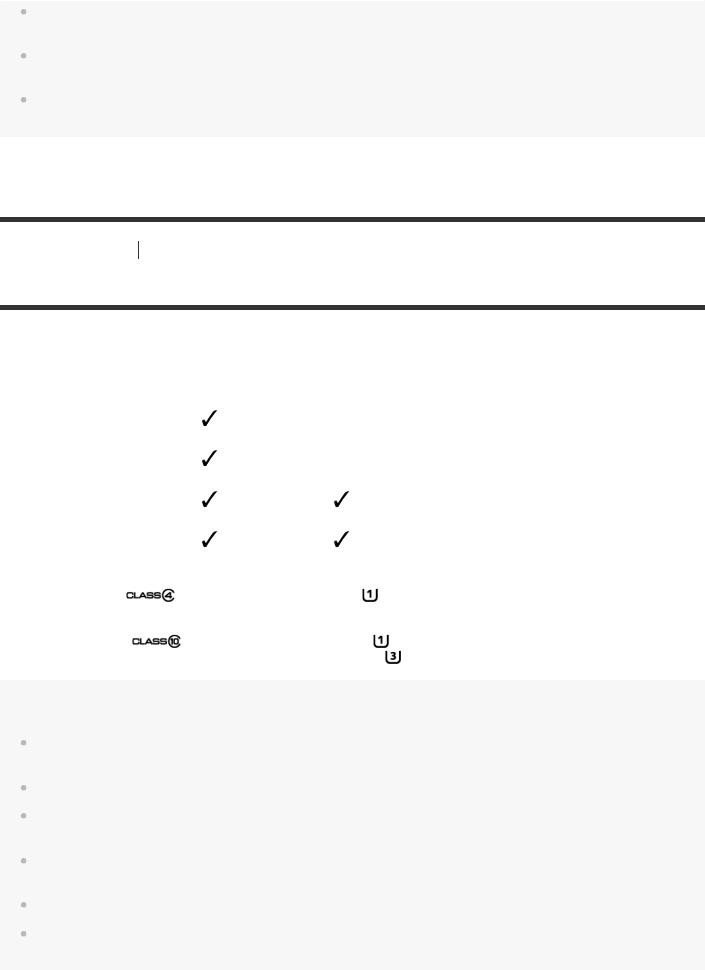
[1] Read This First Identifying the parts
Identifying the parts (FDR-X3000/HDR-AS300)
1. |
(on/standby) button |
2. |
GPS sensor |
3. |
IR remote receiver (FDR-X3000) |
4. |
MENU button |
5. |
Display panel |
6. |
UP button/DOWN button |
7. |
REC lamp |
8. |
REC (Movie/still image) button/ENTER (Menu execute) button |
9. |
REC/LIVE lamp |
10 |
(N Mark) |
11 |
Lens |
12. |
Speaker |
13. |
Microphones |
14. |
HDMI OUT jack |
15. |
Multi/Micro USB terminal |
16. |
Mic jack*1 |
17. |
CHG (Charge) lamp |
. |
Battery cover |
18 |
|
19. |
Battery housing |
20. |
Battery ejection lever |
21. |
Connector cover (HDMI OUT jack, Multi/Micro USB Terminal/Mic jack) |
22. |
REC lamp |
23. |
Lock lever |
24. |
Screw hole for tripod*2 |
25. |
Access lamp |
. |
Memory card insertion slot |
26 |
|
27. |
Memory card cover |
. |
|
*1 . When an external microphone (sold separately) is connected, audio cannot be recorded through the built-in microphone. |
|
*2 |
The length of the corresponding tripod screw should be less than 5.5 mm (7/32 in.). |
[2] Read This First Identifying the parts
Identifying the parts (HDR-AS50)
1. (on/standby) button
2. MENU button
3. Display panel
4. UP button/DOWN button
5. REC lamp
6. REC (Movie/still image) button/ENTER (Menu execute) button
7. REC/LIVE lamp
8. Lens
9. Speaker
10 Microphones
11. Multi/Micro USB terminal
12. CHG (Charge) lamp
13. Battery cover
14. Battery housing
15. Battery ejection lever
16. Connector cover (Multi/Micro USB terminal)
17. REC lamp
18. Lock lever
19. Screw hole for tripod*
20. Access lamp
21. Memory card insertion slot
22. Memory card cover
* . The length of the corresponding tripod screw should be less than 5.5 mm (7/32 in.).

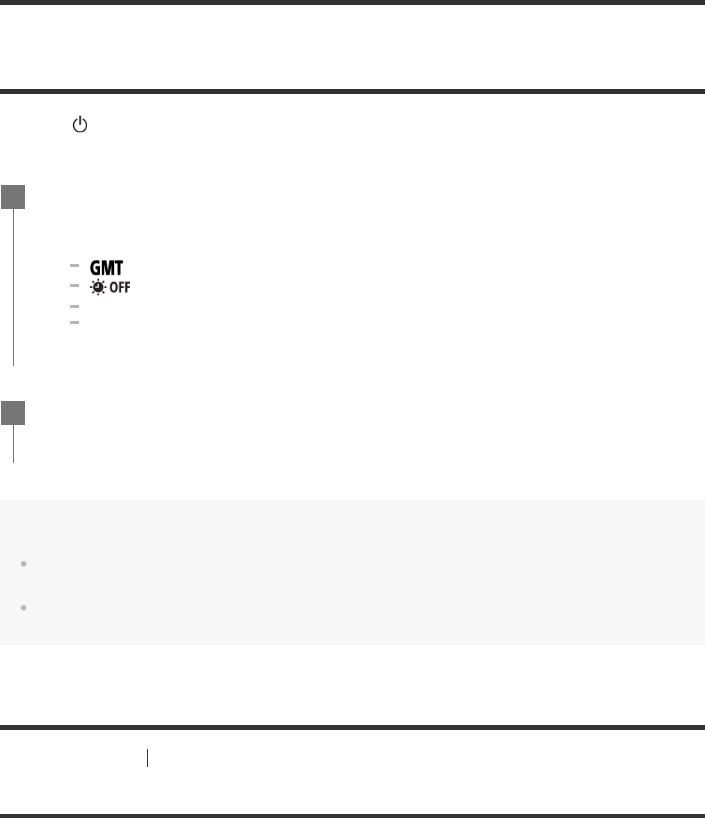
[3] Read This First
Screen display
The indicators described below are displayed on the camera. This screen display is an example of when shooting movies.
Display icons at 1
: Wi-Fi connection setting (single connection)
: Wi-Fi connection setting (multi connection)
: Bluetooth is connected
: Searching for GPS satellites to receive GPS signals. Location information cannot be received.
(FDR-X3000/HDR-AS300)
: Recording location information available by triangulating (FDR-X3000/HDR-AS300)
: Temperature of the camera is increased
 : Battery level indicator of camera
 : Airplane mode enabled
Display icons and value at 2
: Movie format
: Frame rate during movie shooting
: SteadyShot
: Time-lapse shot number
: Streaming viewers
 Numbers of streaming viewers
 : Still image mode
 : Self-timer
Display items at 3
: Audio recording is set to OFF
 Recordable time, recording time, loop recording time
 Number of recordable still images, time-lapse shot number
 ON AIR: Streaming start
 Warning/Error message
Display icons at 4
 : Movie mode
 : Photo mode
: Time-lapse capture mode
: Live streaming mode
: Loop recording mode
: Angle setting
: Zoom ratio
 : UP button/DOWN button operation guide (zoom switching, shooting mode switching, invalid operation)
[4] Getting Started
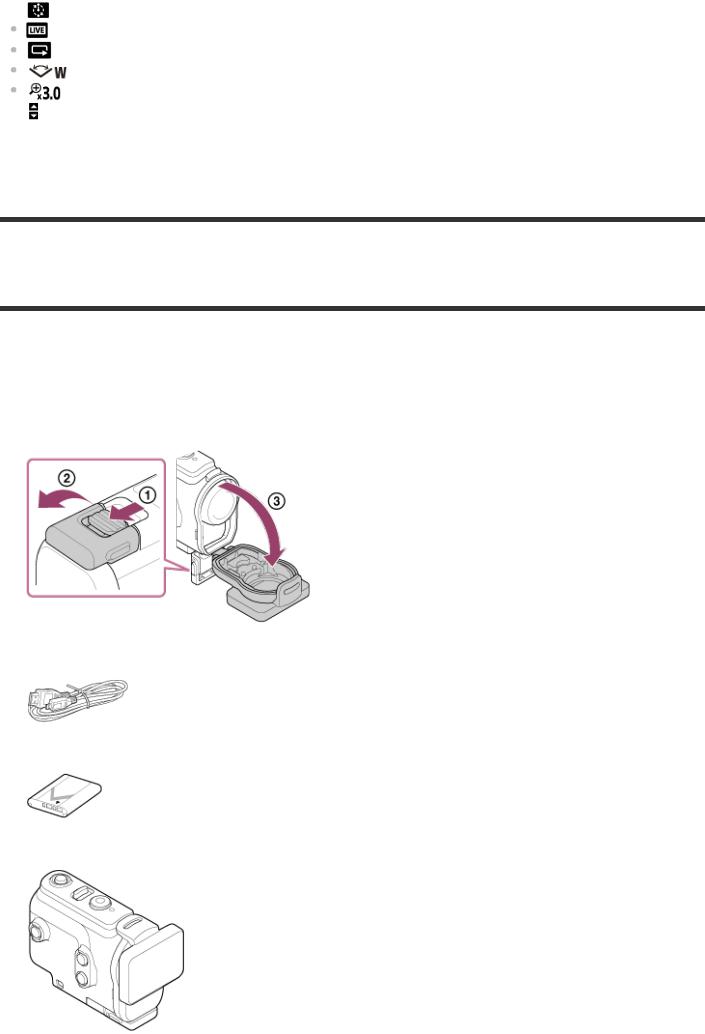
Checking the bundled items
Make sure that you have following bundled items.
The number in parentheses indicates the quantity of that item bundled.
 Camera (1)
The camera is set in the Underwater Housing. Open the cover of the case as illustrated below.
 Micro USB cable (1)
 Rechargeable battery pack (NP-BX1) (1)
 Underwater Housing (1)

 Attachment Buckle (1)
 Startup Guide (1)
 Reference Guide (1)
[5] Getting Started
Inserting the battery pack
1 Slide down the lock lever to open the battery cover.
2 Insert the battery pack.
 Align the direction of the arrow on the camera and the battery pack.
3 Close the battery cover and slide the lock lever up to lock.
 Confirm that the yellow mark on the lock lever is not visible.
 Close the battery cover securely. Not doing so may cause a water leakage.
To remove the battery pack
Open the cover and slide the battery ejection lever, then remove the battery pack.
To set auto power off function
It is recommended that you set the camera to turn off automatically, in order to decrease the battery consumption.
Press the MENU button, then press the UP button or DOWN button to select the |
(Camera |
||
Settings) - |
(Auto power off) - time until the power is turned off, then press the REC/ENTER |
||
button. |
|
|
|
The default setting is |
(60 seconds). Change the setting as necessary. For details, see “Auto |
||
power off”. |
|
|
|
[6] Getting Started
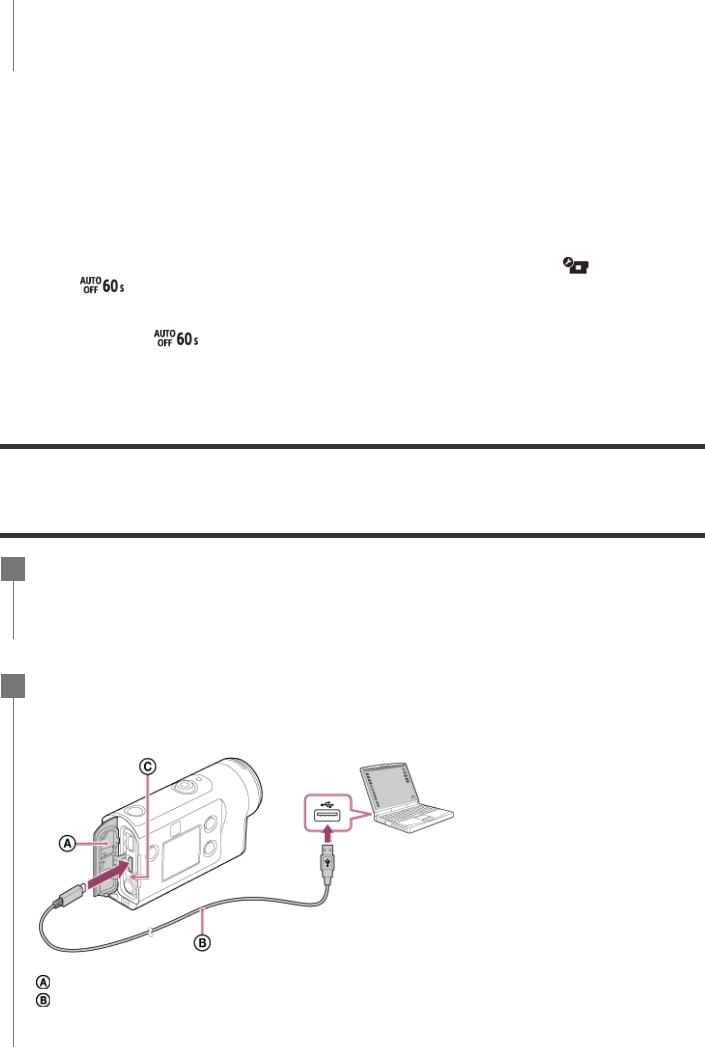
Charging the battery pack
1 Turn off the power of the camera.
 Charging is not possible when the camera is turned on.
2Open the connector cover, connect the camera to an activated computer with the micro USB cable (supplied).
 The CHG (Charge) lamp lights in amber.
:Connector cover
:Micro USB cable
 : CHG (Charge) lamp
3When charging is finished, disconnect the micro USB cable between the camera and the computer.
 Charging is complete when the CHG (Charge) lamp turns off (full charge).
The time takes for charging
Supplied battery pack (NP-BX1)
 Via a computer: Approx. 265 minutes
*Time required to charge a fully depleted battery pack at a temperature of 25°C (77°F). Charging may take longer under certain circumstances or conditions.
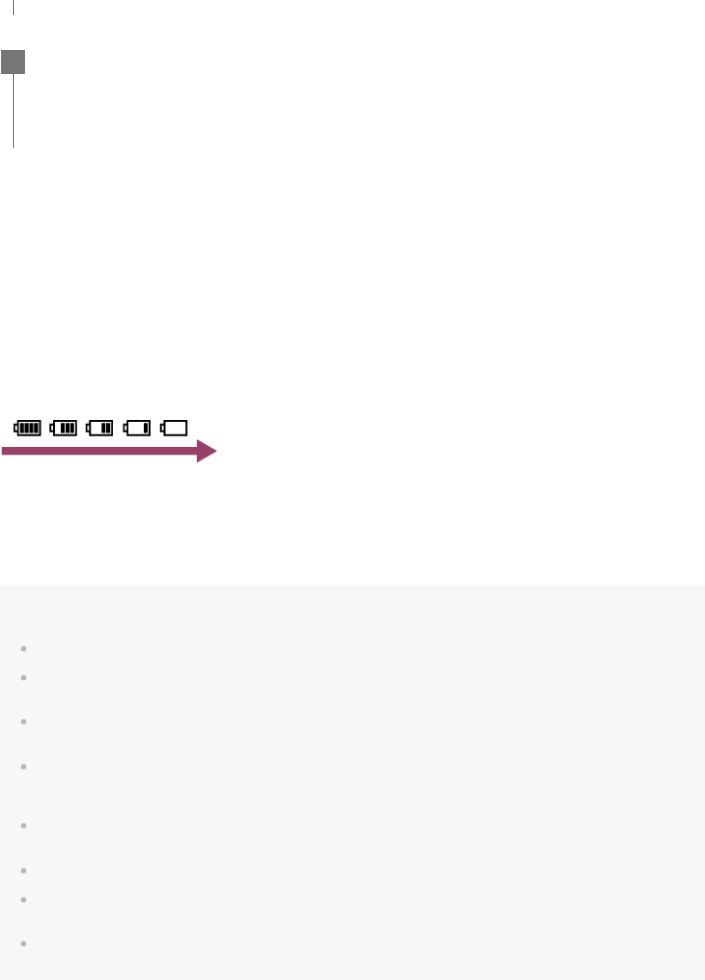
Checking the remaining battery charge
A remaining charge indicator appears on the upper right of the display panel.
The displayed remaining charge indicator may not be correct under certain circumstances.
 It takes about one minute until the correct remaining charge indicator appears.
Note
You can use only type X battery with this camera.
Turn off the camera while charging the battery. The charging stops when you turn on the camera while charging.
Do not apply force to the camera when you connect the camera to a computer. This may cause damage to the camera or the computer.
When you connect the camera to a notebook computer that is not connected to an AC power source, the battery of the notebook computer may be depleted rapidly. Do not leave the camera connected to the computer for a long time.
Charging the battery pack or the connection with customized or hand-built computers is not guaranteed. Depending on the type of USB device used, charging may not function properly.
Operation with all computers is not assured.
If you do not intend to use the camera for an extended period, charge the camera once every 6 to 12 months or remove the battery pack from the camera to maintain battery performance.
Rapid charging is possible by using the AC adaptor (sold separately). To connect the AC adaptor, use the micro USB cable (supplied).

[7] Getting Started Inserting a memory card
Inserting a memory card
1Open the memory card cover.
2Insert the memory card until it clicks.
 microSD card/microSDHC card/microSDXC card: Insert in the direction of .
  Memory Stick Micro (M2) media: Insert in the direction of
  .
.
: Printed side  : Terminal side
3 Close the memory card cover.
To eject the memory card
Open the cover, then lightly push the memory card once.
Note
Insert the memory card properly, confirming each side is facing the correct direction.
Confirm the direction of the memory card. If you forcibly insert the memory card in the wrong direction, the memory card, memory card slot, or image data may be damaged.
Format the memory card in the camera before use.
Save important data on the memory card on other media such as a computer, before formatting the memory card.
Do not insert anything other than the compliant size of memory card into the memory card slot. Otherwise, a malfunction may result.
When inserting or ejecting the memory card, be careful to prevent the memory card from popping out and dropping.
[8] Getting Started Inserting a memory card
The memory cards that can be used with the camera
The memory cards that can be used with the camera are listed below.
Memory card |
MP4 |
XAVC S |
|
|
|
Memory stick micro (M2) |
(Mark2 only) |
— |
|
|
|
microSD memory card |
*1 |
— |
|
|
|
microSDHC memory card |
*1 |
*2 |
|
|
|
microSDXC memory card |
*1 |
*2 |
|
|
|
*1 |
SD speed class4: |
or faster, or UHS speed class1: |
or faster. |
*2 |
Memory card that satisfies all the conditions below. |
|
|
|
4 GB or more capacity. |
or faster, or UHS speed class1 : |
or faster. |
|
SD speed class10: |
||
|
If you want to record more than 100 Mbps, UHS speed class 3: |
is necessary. (FDR-X3000) |
|
Note
When you shoot long time with XAVC S or MP4 to the SDHC memory card, the file will be divided into 4 GB files. By using the Action Cam Movie Creator, you can unify the data and treat as 1 file.
To playback the divided files with the camera, it will be played back continuously. (FDR-X3000/HDR-AS300)
Operation with all memory cards is not assured. For details about memory cards other than cards manufactured by Sony, contact the individual makers.
Confirm the direction of the memory card. If you forcibly insert the memory card in the wrong direction, the memory card, memory card slot, or image data maybe damaged.
Format the memory card with the camera before use.
Confirm that the connector cover and the battery pack/memory card cover are securely closed and any foreign matter is not stuck in the cover before use. Otherwise, it may result in water immersion.
[9] Getting Started
Setting the date and time
Press the (on/standby) button to turn on the camera for the first time, the setting for
area/summer time/date and time will be displayed on the screen. Use the camera after setting the date and time.
1Press the UP button or DOWN button to select the setting, then press the REC/ENTER button.
 The following items are displayed on the screen in order.
: Area setting
: Daylight saving time (summer time) setting
Year/Month/Day Time setting
2When the date and time/area confirmation screen is displayed, press the REC/ENTER button.
Hint
The area is determined by the time difference in your area and Greenwich Mean Time (GMT). For the time difference, see “The list of time differences for world capitals”.
These settings can be performed on the camera settings. See “Date & time setting”, “Area setting” and “Daylight saving time (summer time) setting”.
[10] Getting Started |
Using the Underwater Housing |
Identifying the parts (Underwater Housing)

FDR-X3000/HDR-AS300
HDR-AS50
1.(on/standby) button
2.Case body
3. Leash attachment hole
4. (on/standby)/REC HOLD switch
5. REC (movie/still image) button/ENTER (menu execute) button
6. Case cover
7. MENU button
8. Tripod screw hole
9. UP button
10 DOWN button
11. Buckle lock
12. Buckle
13. Lead
14. Adaptor (HDR-AS50)
15. Waterproof packing
.
[11] Getting Started |
Using the Underwater Housing |
Using the Underwater Housing
By inserting the camera in the Underwater Housing, you can shoot images underwater up to a depth of 60 m (197 feet) for 30 minutes continuously.
|
Slide the buckle lock in the direction of and hold it, then hold the circled parts |
|
1 |
||
|
|
and swing out the buckle in the direction of . |
|
|
|
|
|
|
2 Open the case cover.
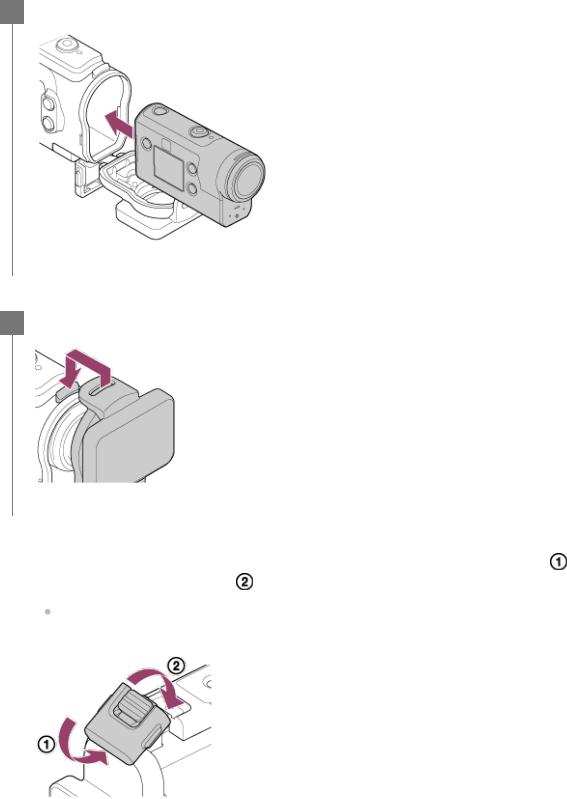
3 Insert the camera in the case body.
4 Insert the tab of the case body into the slot of the case cover.
|
Hook the buckle over the tab on the lower part of the case cover , then close the |
|
5 |
||
|
|
buckle in the direction of . |
|
|
|
|
|
Make sure the buckle and buckle lock are firmly locked. (If you do not lock it securely, water |
|
|
may leak, or the camera may fall out.) |
|
|
|

Note
You cannot operate the |
(on/standby) button and REC/ENTER button when the REC HOLD switch is set to |
the lock position. Release the lock in the direction of the arrow below, before operation.
When using FDR-X3000/HDR-AS300 with the Underwater Housing supplied with HDR-AS50, detach the adaptor ( ) from the Underwater Housing.
When using HDR-AS50, be sure that the adaptor is attached to the Underwater Housing. If the adaptor is not attached, the images that you shoot may be affected.
You can record audio while the camera is in the Underwater Housing, but the sound level is reduced.
Thread a suitable cord through the leash attachment hole of the Underwater Housing, then attach the cord

to an item you intend to use with the camera.
[12] Getting Started |
Using the Underwater Housing |
On waterproof performance of the Underwater Housing
 When the camera is inserted in the supplied Underwater Housing, the camera can shoot up to a water depth of 60 m (197 feet) for 30 minutes continuously.
 The waterproof performance is based on the testing standards of our company.
 Do not subject the Underwater Housing to pressurized water, such as from a tap.
 Do not use the Underwater Housing in hot springs.
 Use the Underwater Housing in water that is less than 40°C (194°F).
 Sometimes waterproof performance is lost if the Underwater Housing is subjected to a strong shock such as from being dropped. We recommend the Underwater Housing be inspected at an authorized repair shop (chargeable).
 Waterproof performance in all situations is not guaranteed.
Anti-fog sheet (AKA-AF1 (sold separately))
 Insert the anti-fog sheet indoors with low humidity.
 Insert the anti-fog sheet in the camera a couple of hours before shooting.
 If you do not use the anti-fog sheet, place it in a bag and keep the top sealed.
 By drying the anti-fog sheet sufficiently, you can use it approximately 200 times repeatedly.
Note
When inserting the anti-fog sheet (AKA-AF1), place the camera into the Underwater Housing, then place the anti-fog sheet in the gap on the bottom of the camera and the Underwater Housing.
If you place the anti-fog sheet before placing the camera, the anti-fog sheet may be sandwiched and make it difficult to take out the camera.
 : Anti-fog sheet

[13] Getting Started Using the Underwater Housing
Notes on use for the Underwater Housing
 Do not throw the Underwater Housing into the water.
 Avoid using the Underwater Housing under the following situations. In these situations moisture condensation or water leakage may occur and damage the camera.
In a very hot or humid place
In water hotter than +40°C (104°F)
At temperatures lower than –10°C (14°F)
 Do not leave the Underwater Housing under direct sunlight or in a very hot and humid place for a long period of time. If you cannot avoid leaving the Underwater Housing under direct sunlight, be sure to cover the Underwater Housing with a towel or other protection.
 When the camera overheats, it may be automatically turned off or recording may malfunction. To use the camera again, leave it in the cool place for a while to cool down.
 If sun oil is on the Underwater Housing, be sure to wash it off thoroughly using lukewarm water. If the Underwater Housing is left with sun oil on its body, the surface of the Underwater Housing may become discolored or damaged (such as cracks on the surface).
[14] Getting Started |
Using the Underwater Housing |
Water leakage
In the unlikely event that a malfunction of the Underwater Housing causes damage due to water leakage, Sony does not guarantee against damages to the equipment contained in it (camera, battery pack, etc.) and the recorded contents, nor expenses entailed in the photography.
[15] Getting Started |
Using the Underwater Housing |
Waterproof packing
The camera uses an waterproof packing to maintain its water resistance. The waterproof packing maintenance is very important. Failure to do waterproof packing maintenance according to the instructions may lead to water leaks and cause the camera to sink.
Inspecting the waterproof packing
 Carefully check that there is any dirt, sand, hair, dust, salt, threads, etc., on the waterproof packing. If found, be sure to wipe off with a soft cloth.
 Lightly run your fingertip around the waterproof packing to check for any invisible dirt.
 Be careful not to leave any cloth fibers on the waterproof packing after wiping it.
 Check the waterproof packing for cracks, skewing, distortion, fine splitting, scratches, embedded sand, etc.
 Inspect the waterproof packing contact surface on the case body in the same way.

[16] Getting Started |
Using the Underwater Housing |
How to check for water leaks
Before installing the camera, always close the Underwater Housing and immerse it in water to make sure no water leaks in.
When finding a malfunction of Underwater Housing
If a malfunction is found by inspection of the waterproof packing or check for water leaks, stop using the camera immediately and take it to the nearest Sony dealer.
[17] Getting Started |
Using the Underwater Housing |
Maintenance
 After recording in a location with a sea breeze, wash the camera thoroughly in fresh water with the buckle fastened to remove salt and sand, then wipe with a soft dry cloth. It is recommended that you submerge the Underwater Housing in fresh water for about 30 minutes. If it is left with salt on it, metal portions may be damaged or rust may form and cause water leakage.
 If sun oil is on the Underwater Housing, be sure to wash it off thoroughly using lukewarm water.
  Wipe the inside of the Underwater Housing with a soft dry cloth. Do not wash it with water.
Be sure to perform the above maintenance each time you use the Underwater Housing. Do not use any type of solvent such as alcohol, benzine or thinner for cleaning, as this might damage the surface finish of the Underwater Housing.
When storing the Underwater Housing
 To prevent deterioration of the waterproof packing, store the Underwater Housing in a cool, wellventilated location. Do not fasten the buckle.
 Prevent dust from collecting on the waterproof packing.
 Avoid storing the Underwater Housing in a cold, very hot or humid place, or together with naphthalene or camphor, as these conditions might damage the Underwater Housing.
[18] Getting Started |
Using accessories |
Using the attachment buckle
The attachment buckle is used for fixing the camera or Underwater Housing to an optional accessory you intend to use.
The procedure for fixing the attachment buckle to the Underwater Housing is explained here.
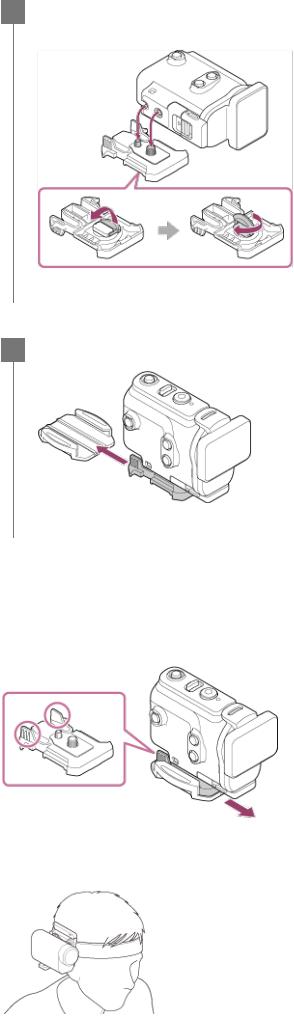
1Align the tripod screw hole in the bottom of the Underwater Housing with the tripod screw of the attachment buckle, and fix firmly with the tripod screw.
2 Attach the attachment buckle to the accessory by sliding it until it clicks into place.
To detach the attachment buckle from the accessory
Press and hold the circled parts of the attachment buckle to unlock, then slide it in the opposite direction of step 2.
Example of optional accessory attachment
Universal head mount kit
BLT-UHM1
Backpack Mount
VCT-BPM1
Note
Thread a suitable leash through the leash attachment hole of the Underwater Housing, then attach the leash to an item you intend to use with the camera.
Before use, confirm that the screw on the attachment buckle is not loose.
[19] Getting Started |
Using accessories |
Notes on using the adhesive mount (sold separately)
The adhesive mount is used for fixing the camera to an item you intend to use. The adhesive mount is general term for the attachment buckle, flat adhesive mount, and curved adhesive mount.
 Press firmly on the adhesive portion.
 The adhesive strength is greatest 24 hours after the item has been attached.
 The flat adhesive mount and curved adhesive mount cannot be used again once they are detached from the location surface.
 When detaching, peel off slowly. If peeled off forcibly, the surface on which the mount is fixed might be damaged.
 Before attaching, check the surface of the item to be used. If it is dirty, or dust, moisture or oily substances are attached, adhesive strength may be impaired and the item could detach with slight impact.
 Use the appropriate adhesive mount (flat or curved) for the surface where the camera will be located. If the mount is not suitable for the surface, it may detach by slight impact.
 Before use, confirm that the screw hole on the attachment buckle is not loose, and the flat or curved adhesive mount is securely attached to the surface.
[20] Shooting |
Shooting movies and still images |
Shooting movies (Movie mode)

Record movies.
1Press the  (on/standby) button to turn on the power.
2Press the MENU button.
|
Press the UP button or DOWN button to select |
* (shooting mode) - |
|
3 |
(Movie |
||
|
mode), then press the REC/ENTER button. |
|
|
*The icon of the current selected shooting mode is displayed.
4 Press the REC/ENTER button to start shooting.
To stop shooting
Press the REC/ENTER button during shooting.
Hint
While the one touch recording is set to ON, if you press the REC/ENTER button when the power is turned off, shooting starts in the previously selected shooting mode.
[21] Shooting |
Shooting movies and still images |
Shooting still images (Photo mode)
Record still images.
1Press the  (on/standby) button to turn on the power.
2Press the MENU button.
|
Press the UP button or DOWN button to select |
* (shooting mode) - |
|
|
3 |
(Photo |
|||
|
|
mode), then press the REC/ENTER button. |
|
|
|
|
|
|
|

*The icon of the current selected shooting mode is displayed.
4 Press the REC/ENTER button to shoot.
[22] Shooting |
Shooting movies and still images |
Time-lapse capture mode
The camera records still images at regular intervals and stops shooting when it reaches the set number.
1Press the  (on/standby) button to turn on the power.
2Press the MENU button.
|
Press the UP button or DOWN button to select |
* (shooting mode) - |
|
3 |
(Time- |
||
|
lapse capture mode), then press the REC/ENTER button. |
|
|
*The icon of the current selected shooting mode is displayed.
4 Press the REC/ENTER button to start shooting.
To stop shooting
 Shooting stops when the number set in the “Time-lapse shot number” has finished.
If you select |
in the “Time-lapse shot number”, press the REC/ENTER button during |
shooting. |
|
Hint
To change the image size, see “Time-lapse capture image size.”
To change the shooting interval, see “Time-lapse shooting interval.”
To change the shot number, see “Time-lapse shot number.”
When the Time-lapse shot number is set to |
, the shooting continues until you press REC/ENTER |
button to stop shooting. |
|
 Loading...