

Page 1
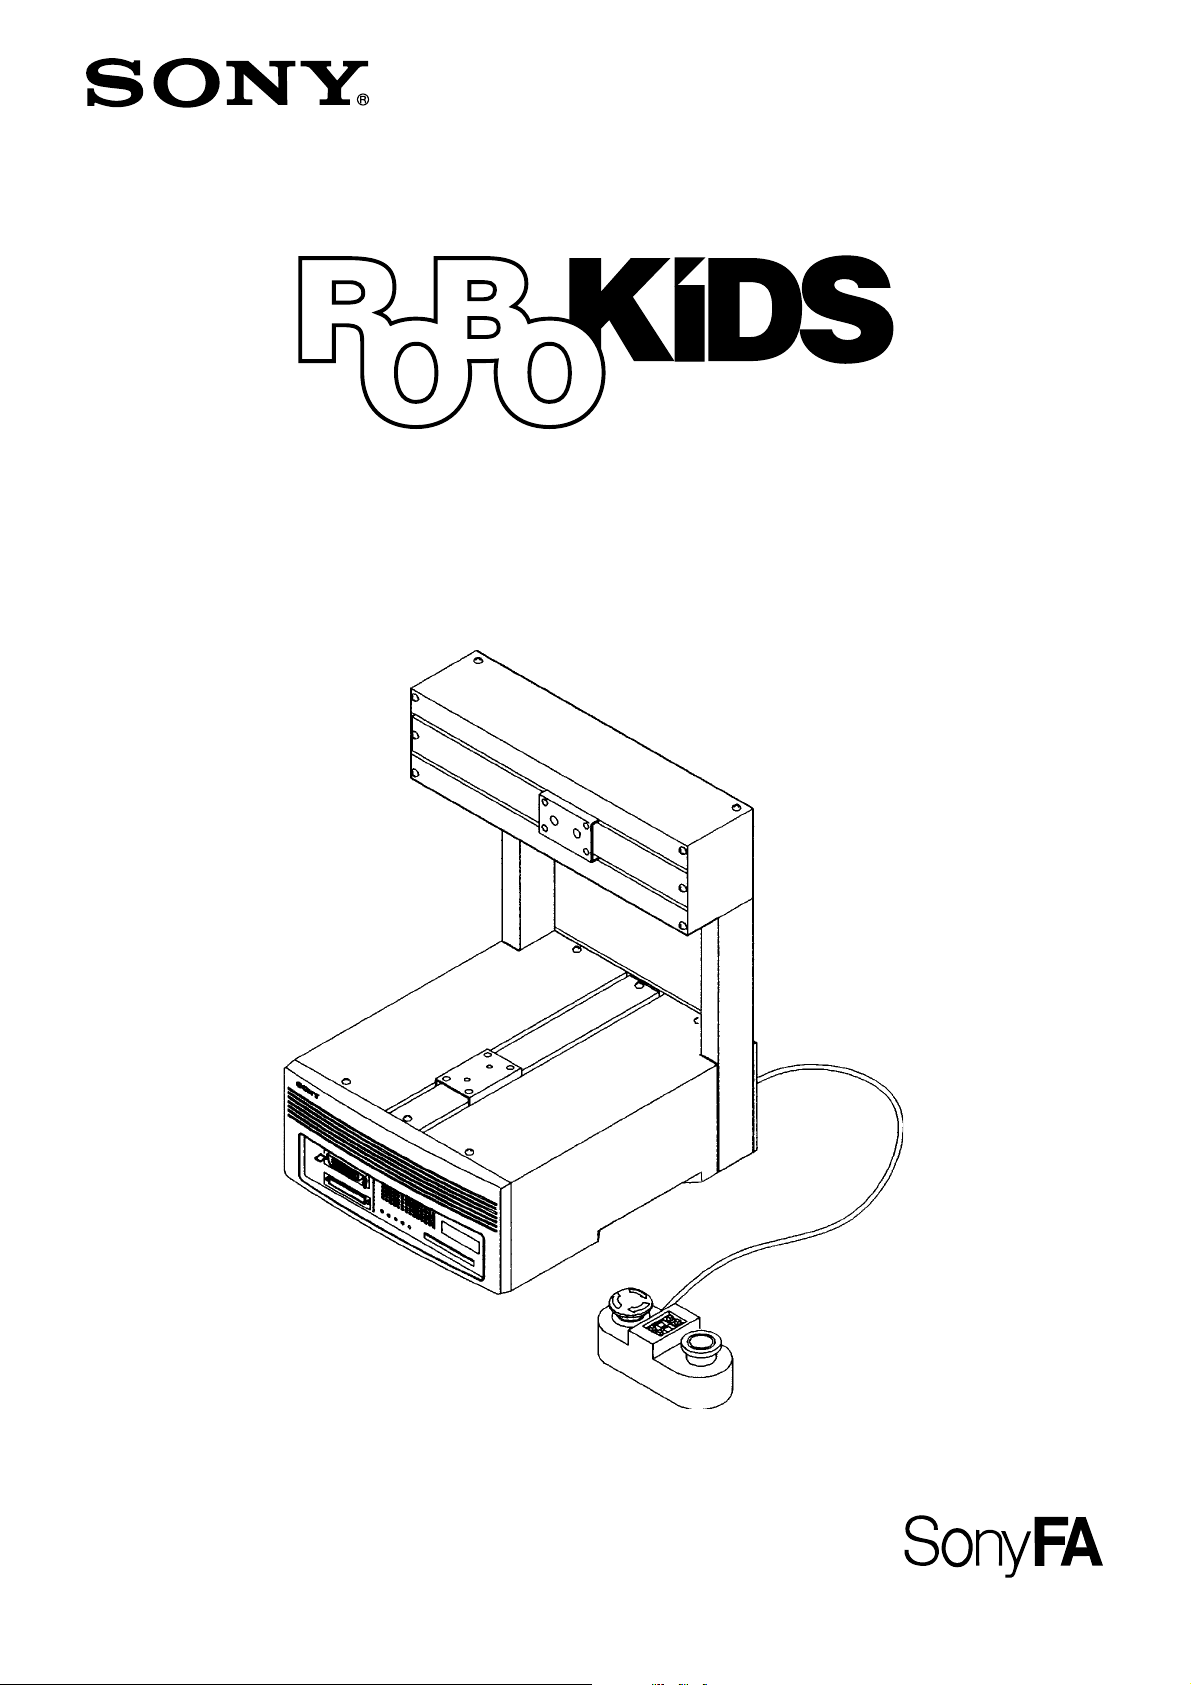
Sony Desktop Robot
OPERATION MANUAL
CAST-AU4/B2521E
GA
Page 2

About this Operation Manual
This Operation Manual is intended as a guide for users of the Sony Desktop Robot ROBOKIDS.
Before operating this system, you should first throughly read this manual. You may not understand all of the
explanations the first time through, but be on the lookout for any special directions.
It should be used in conjuction with the RK card manual for your specifications.
• This manual may not be replicated in whole or in part without the prior written authorization of Sony
Corporation.
• The information described herein is subject to change without notice.
• The information described herein has been checked for both reliability and accuracy. However, if you
have any questions, or notice any errors or omissions in this manual, please contact the following offices
of Sony Corporation.
[Singapore]
Sony Electronics (Singapore) Pte. Ltd
SPEC, No.52 Tuas Avenue 9, Singapore 639193
TEL : 8615858 FAX : 8621521
[Europe]
Sony Wega Produktions GmbH
Production Technology Division Europe
Hedelfinger Str. 61
D-70327 Stuttgart Germany
TEL : +49 (0)711 5858-420 FAX : +49 (0)711 574153
[Japan]
Sony Manufacturing Systems Corporation
FA Service Department
1-10, Kiyoku-cho, Kuki-shi
Saitama, 346-0035 JAPAN
TEL : 0480-23-1956 FAX : 0480-23-1706
CAST-AU4/B2521E
Page 3

How to Use this Operation Manual
First Time Users
Read this manual form chapter 1 through chapter 4 before starting any operation. The manual describes the
procedures required in setting up ROBOKIDS for users who have little experience with FA (Factory
Automation) equipment.
Routine Assembly
Follow the respective application manuals for routine assembly task operations.
Replacing the Unit or Memory Card
Remove the existing unit. Attach the new unit and replace the memory card. References of the memory card
may be found in this Operation manual or the respective application manuals.
This manual describes the ROBOKIDS base machine. Details for application unit installations may be
found in the operation manuals that are attached when purchasing the application units.
CAST-AU4/B2521E
Page 4

Manual Configuration
This operation manual describes the procedures required to operate the desktop robot ROBOKIDS Various
types of applications such as dispensing and soldering may be accomplished by exchanging the memory
cards (RK card) which stores the programs required to run an application. The semi-programmable
specification allows the user to modify an operation program and peripheral task program to perform a
specific work. The full open programmable specification enables the use to freely write any program to
perform an unique application. This manual contains the common contents between dispensing, soldering,
semi-programmable and the full open programmable specification. For further details refer to the memory
card (RK Card) operation manual (or the Full Open Programmable operation manual for the full open
programmable specifications.)
Safety Instruction
Describes the safety precautions for user’s safety.
Unpacking
Describes the precautions during unpacking, and lists the supplied accessories.
1. Outline
Outlines features, names and functions of controls, and its specifications.
2. Preparation
Helps you set up the base machine. Beside the supplied accessories, you also may need to purchase the
dispensing unit, soldering unit, air compressor, workpiece fixing tool (including fixing screws)
depending on the configuration.
3. Maintenance
Describes daily maintenance.
4. Troubleshooting
Describes countermeasure (only the contents which are in common in applications) when an error
occurs during operation. The Operation Manual of each memory card (RK card) describes
countermeasures for dispensing errors and soldering errors.
5. Replacement Parts
Shows list of main replacement parts of the base machine.
6. Appendix
Described input and output specifications of each connector.
CAST-AU4/B2521E
Page 5

Contents
Safety Instruction ............................................................................................................... S-1
Unpacking ........................................................................................................................... U-1
1. Outline
1-1 Nomenclature.................................................................................................................... 1-2
1-2 Outline Drawings .............................................................................................................. 1-4
1-3 Specifications.................................................................................................................... 1-9
1-3-1 Machine Specification ........................................................................................ 1-9
1-3-2 Control Specifications ...................................................................................... 1-10
2. Preparation
2-1 Attaching the Units ........................................................................................................... 2-1
2-1-1 Attaching the Z-unit ........................................................................................... 2-1
2-1-2 Attaching the ZR-unit ......................................................................................... 2-4
2-2 Connecting the External Signal ........................................................................................ 2-7
2-3 Connecting to an Electrical Outlet.................................................................................. 2-12
2-4 Starting Up the Base Machine ........................................................................................ 2-13
2-4-1 Full-open Programmable Specification ............................................................ 2-13
2-4-2 When Using Memory Card “RK card” ............................................................ 2-13
3. Maintenance
3-1 Maintaining the Machine .................................................................................................. 3-1
3-2 Greasing the Machine and Removing Fallen Materials ................................................... 3-1
3-3 Cleaning and Replacing the Air Filter .............................................................................. 3-4
3-4 Replacing the Battery ....................................................................................................... 3-6
4. Troubleshooting
4-1 Common Items.................................................................................................................. 4-1
4-1-1 Stepping Out ....................................................................................................... 4-1
4-1-2 External Noise .................................................................................................... 4-3
4-1-3 Abnormal Sound from Unit’s Motors ................................................................ 4-3
4-2 Full-open Programmable Specifications........................................................................... 4-4
4-3 When Memory Card (RK Card) is Used .......................................................................... 4-7
Trouble Check Sheet ................................................................................................................. 4-10
5. Repair Parts Lists
5-1 ROBOKIDS Body ............................................................................................................ 5-1
5-2 Z-axis Unit ........................................................................................................................ 5-1
5-3 ZR-axis Unit ..................................................................................................................... 5-2
6. Appendix .................................................................................................................................... 6-1
CAST-AU4/B2521E
Page 6
Safety Instruction
Safety Instruction
Sony Corporation designs and manufactures all its equipment with strict attention to safety. However, if the
machine is operated or maintained without regard to the safety guidelines, damage or injury to the machine
or operator may occur.
To prevent accidents, those in charge of operation and maintenance must follow the safety work rules when
using the machine. Always read the safety precautions carefully before reading the Operation Manual, and
carefully note the following safety rules.
Observe all precautions to ensure safety.
Read the precautions on pages 3 to 6 thoroughly.
Perform regular inspections.
Inspect the machine referring to chapter “3. Maintenance”.
In the event of accidents....
Consult with the dealer that is indicated on warranty card after filling in the trouble check
sheet which is attached to the end of the Operation Manual.
CAST-AU4/B2521E
S-1
Page 7
Definition of warning symbols
Pay particular attention to the following symbols and conventions shown on the machine and on the
Operation Manual. Fully understand the contents of symbols and conventions before reading the Operation
Manual.
《Machine Symbols》
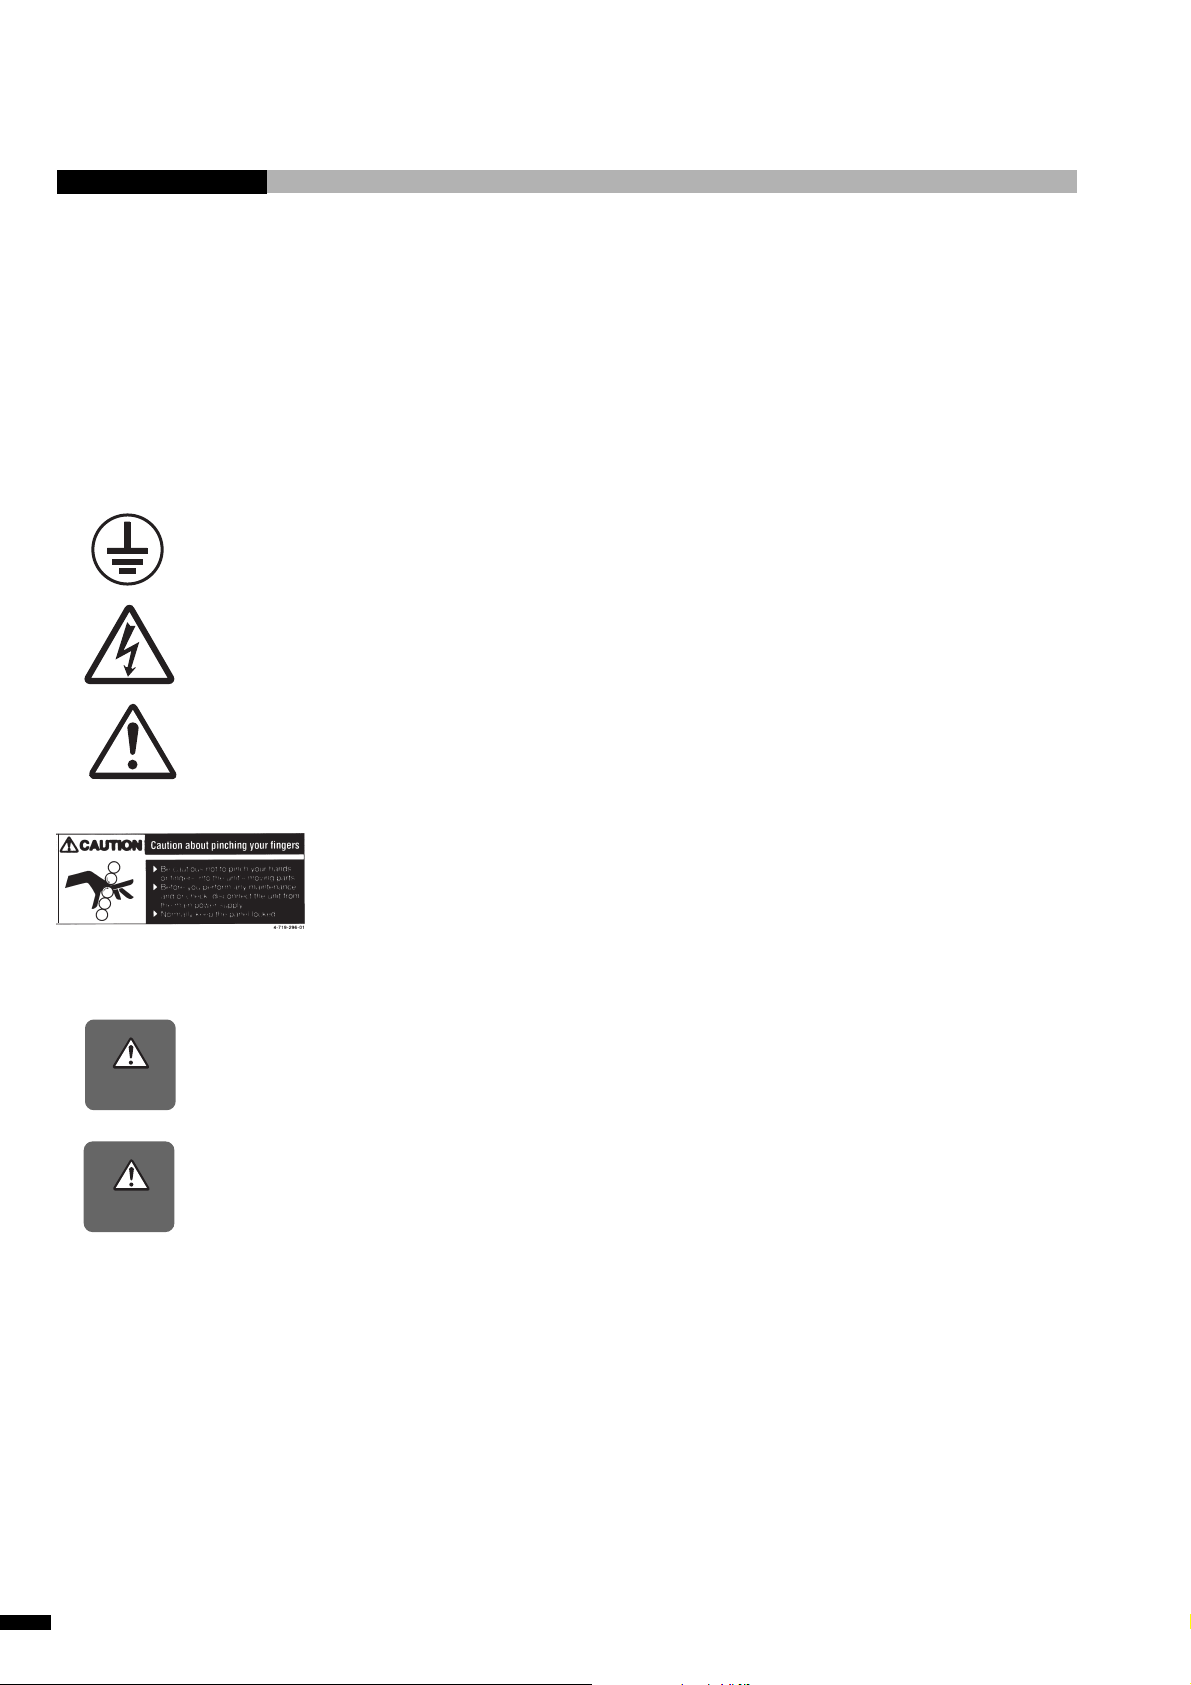
Indicates a protective terminal of mechanical parts to which an external protective earth wire
is connected.
When the part with this mark is removed, the high voltage appears.
Check the operation manual before using the part with this mark.
Be cautious not to pinch your hands or fingers into the units moving parts.
Before you perform any maintenance and/or check, disconnect the unit from
the main power supply.
《Operation Manual Symbols》
Indicates that mis-operations or mis-handling may result in unexpected danger (fire, etc.,)
Warning
and the that operator is at risk (of major injury).
Indicates that mis-handling may result in unexpected danger (electric shock, etc.,) and that
Caution
the operator is at risk of injury or the equipment at risk of damage.
S-2
CAST-AU4/B2521E
Page 8
■ Important Safeguards
◆
The tool driving mechanism are subject to unexpected movement. Pay attention to safety
measures.
◆
Turn off the main power prior to performing maintenance or inspections. Failure to
observe this may result in severe injury through electric shocks or unexpected movement
of the machine.
◆
Mistakes during maintenance and inspections may result in accidents.
Observe the followings prior to starting maintenance or inspections:
1.
Warning
Read the Operation Manual thoroughly and following all instructions and warnings closely.
2.
Implement inspections on a daily basis to prevent accidents arising from damaged equipment.
3. Pay attention so that the power cord is not pinched by the machine and the peripheral
equipment when installing the machine system.
Safety Instruction
Caution
◆
Ensure to connect the primary power supply to the three-pin AC power outlet using the
power cord (supplied with earth wire) supplied with the equipment. Electrical potential
difference will occur with surrounding equipment if the electrical earth is not connected
and may result in electrical leakage or electrical shocks.
◆
Heavy object. Move and transport with two or more persons, and pay attention to safety measures.
◆
To maintain safety do not make any modifications to the equipment in order.
◆
Be careful so that hands must not be pinched by the movable blocks.
(Movable parts of each axis, tool attachment block, table block, belt beneath the units,
tools, works, etc.)
◆
Avoid installing in the following locations:
○
In places which receive direct sunlight or which experience temperature ranges
exceeding 0 degrees °C and 40 degrees °C.
○
In places which experience relative humidity ranges exceeding 35% and 90%, and
places in which condensation is generated by rapidly changing humidity.
○
In places where corrosive gas or inflammable gas exists.
○
In places where the unit will be subject to direct vibrations or impact.
○
Close to machinery which emits electrical noise, such as welders, electric dischargers
or high-frequency generators.
○
In places where any obstacles are anticipated during maintenance and inspection.
◆
◆
◆
CAST-AU4/B2521E
Precautions during operation, movement, maintenance and inspection
During operation the machine may look as if it has stopped. Be careful when certain
conditions are met, the machine will resume motion automatically.
Connect the earth wiring (FG) to the tools.
Electrical potential difference will occur with surrounding equipment if the electrical
earth is not connected and may result in electrical shocks.
Be careful that motor gets very hot.
S-3
Page 9

Precautions on Usage
Operate on the specified voltage
Operate the ROBOKIDS only on AC power voltage as specified on the label of the machine. The power
cord must be directly connected to the electrical output, and grounded. The ROBOKIDS conforms with the
safety requirements of the target country to which it is shipped.
When a machine will not be used for extended period of time
If the machine is not in use for a long period, unplug the power cord from the electrical output. To unplug,
pull on the plug. Never pull on the cord.
Do not drop any foreign material into the machine
Dropping any flammable liquid or metal, object into the machine can cause errors and trouble of the machine.
Should any of them drop into the machine, unplug the power cord and contact your local Sony dealer.
Do not place any obstacles in front of the fans.
Heat dissipation will be insufficient and the accumulated heat can cause malfunctions.
Precautions on Transportation
• Avoid excessive shock. Excessive shock such as dropping the machine may cause damage.
• Do not hit the units or work table during operation. Also be careful so that hands and/or clothes are not
pinched by the machine. It can cause unexpected physical injury.
• Be sure to hold the bottom panel when moving the machine.
S-4
CAST-AU4/B2521E
Page 10
Safety Instruction
Precaution on memory cards
Before inserting or removing a memory card, always turn the power off.
The data stored in the memory card may be damaged if a memory card is inserted or removed while the
power is on.
Precaution on the teaching pendant
ROBOKIDS uses a teaching pendant for the CAST-PRO or SRX. The CAST-U teaching pendant and
CAST-PRO teaching pendant are not compatible. Do not use the CAST-U teaching pendant with the
ROBOKIDS.
If the CAST-U teaching pendant is used with the ROBOKIDS., the ROBOKIDS cannot exit the
emergency stop state and can be damaged. Do not use the CAST-U teaching pendant with the
ROBOKIDS.
Caution
If the SRX teaching pendant (SRX-P006) is used with the ROBOKIDS.
the ROBOKIDS can be damaged. Do not use the SRX teaching pendant
with the ROBOKIDS.
Precaution on maintenance
Periodic inspection of the following items is recommended once every six months.
Operation check of the fan attached to the controller
Be sure to check the operation of the fan attached to the controller before starting operation.
Equipment can be seriously damaged by heat accumulated in ICs in certain operating environments in
which equipment is used without sufficient heat dissipation.
CAST-AU4/B2521E
S-5
Page 11
On handling batteries
The following battery is used in the base machine controller.
Lithium battery (primary battery) of type : CR17335SE-CN21 Manufactured by Sanyo Electric Co.
Incorrect handling of the battery may result in dangerous situation.
Do not perform the actions as listed below for safety. Sony Corporation is not responsible for
the troubles related to the operation of the following precautions.
(1) Shorting
Do not short the batteries.
Shorting the battery may damage the equipment or may result in thermal injury due to
overheating.
(2) Disassembling
Do not disassemble the batteries.
Gas will be generated irritating the throat. Lithium metal may be generated. The batteries
can be heated internally resulting in explosion or fire if the batteries are subject to shock.
(3) Throwing into fire or water
The battery may explode, generate fire due to liquid leakage or internal shorting if the
Caution
battery is heated. Never throw the battery into fire. The batteries can explode if they are
thrown into fire. Throwing the batteries into water may lose the battery function.
(4) Soldering
Do not make any soldering directly to the batteries. The batteries can explode or generate
fire due to liquid leakage or internal shorting inside the batteries caused by heat.
(5) Do not connect the batteries with reverse polarities between (+) and (-)
(6) Using the batteries for other applications
Do not use the batteries for other applications. The batteries may be damaged or the
equipment can be damaged due to specification differences.
(7) Charging
Do not charge the lithium battery (primary battery). Gas will be generated inside causing
explosion and fire.
Life and replacement of batteries
The nominal life of the lithium battery (primary battery) used in the controller is 3 to 5 years. Replace it
every 3 years as a guide line. (Refer to section “3-4 Replacing the Battery” for the replacement procedure.)
Life, however, can be shorter than the nominal life depending upon the ambient environments.
The front POWER indicator changes from green to red when a battery runs out.
S-6
CAST-AU4/B2521E
Page 12
Unpacking
ds
Transport it to the installation position while taking care not to drop or fall. Pay extra
Caution
attention not to give any vibration or shock because the controller contains precision
electronic parts.
Unpacking
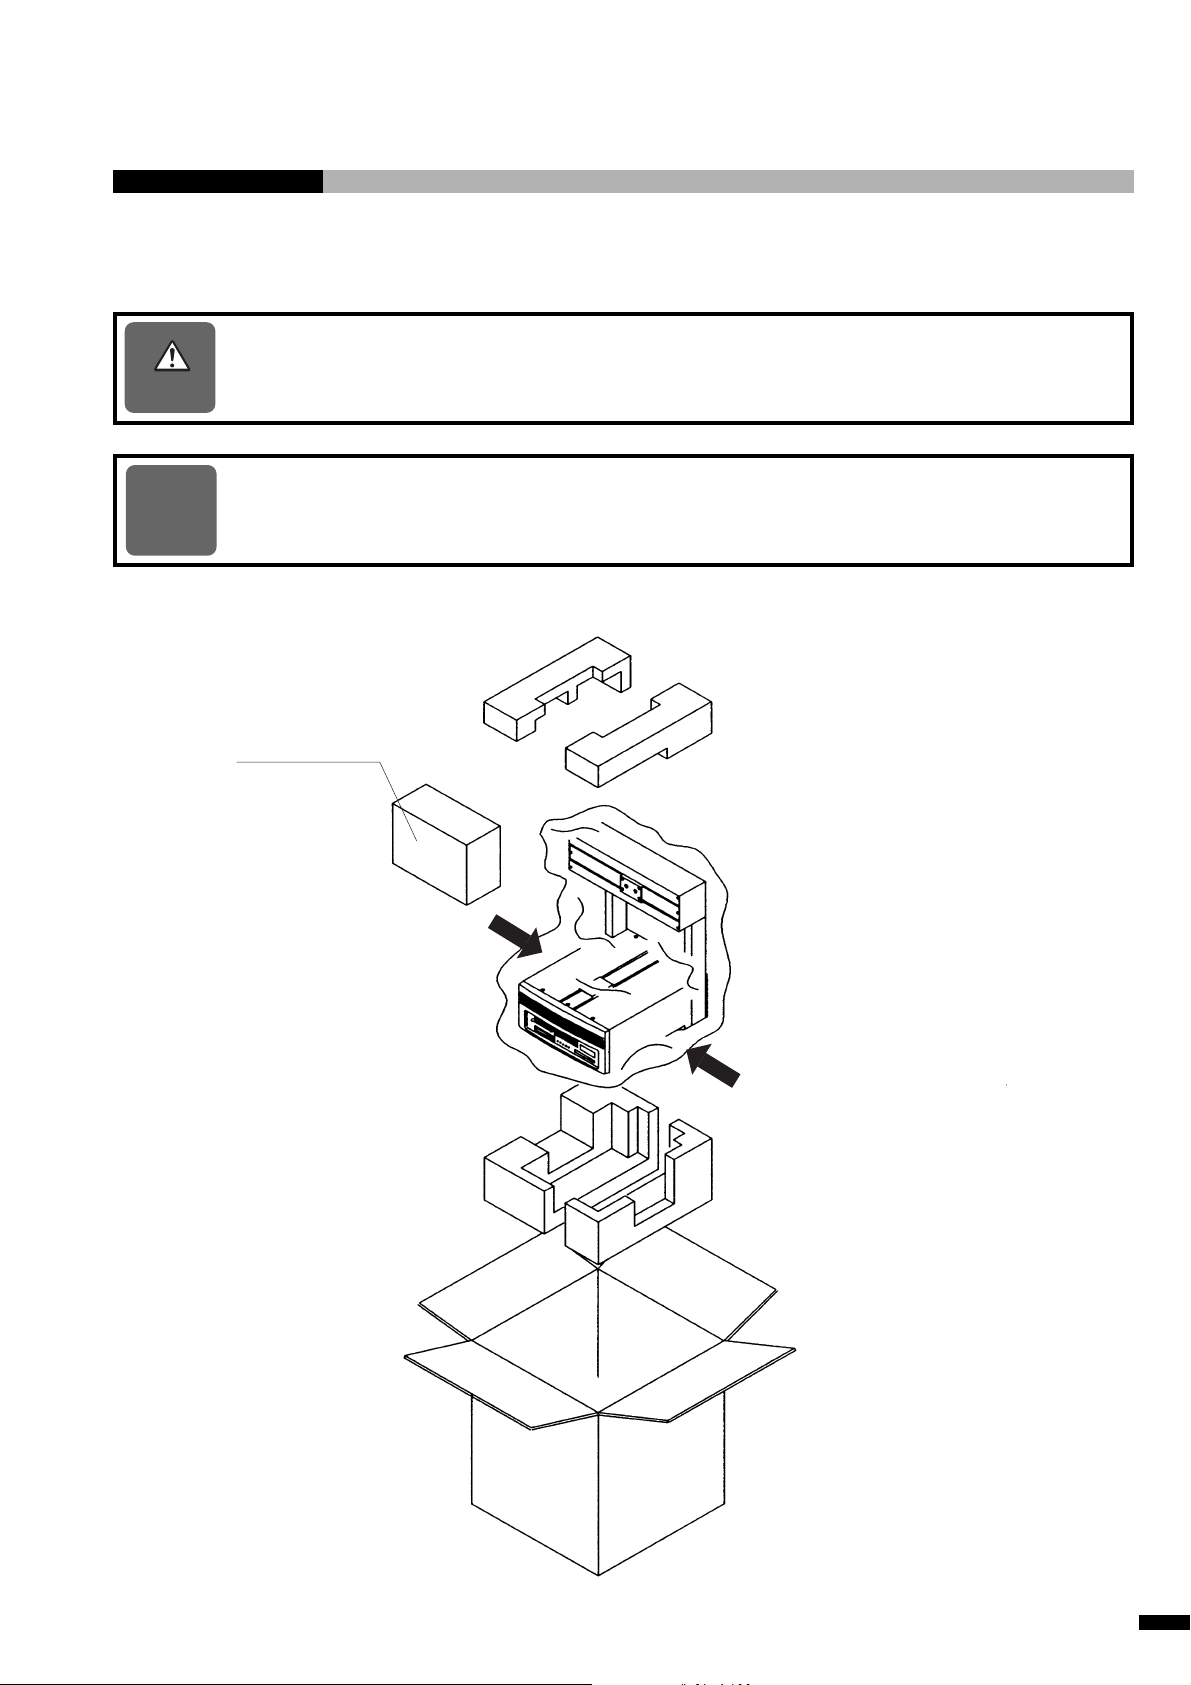
NOTE
Be sure to use the packaging material specified by Sony Corporation when transporting the
machine.
Accsesorybox
CAST-AU4/B2521E
Removebyholdinghan
atthebottomasshown
bythearrows.
U-1
Page 13
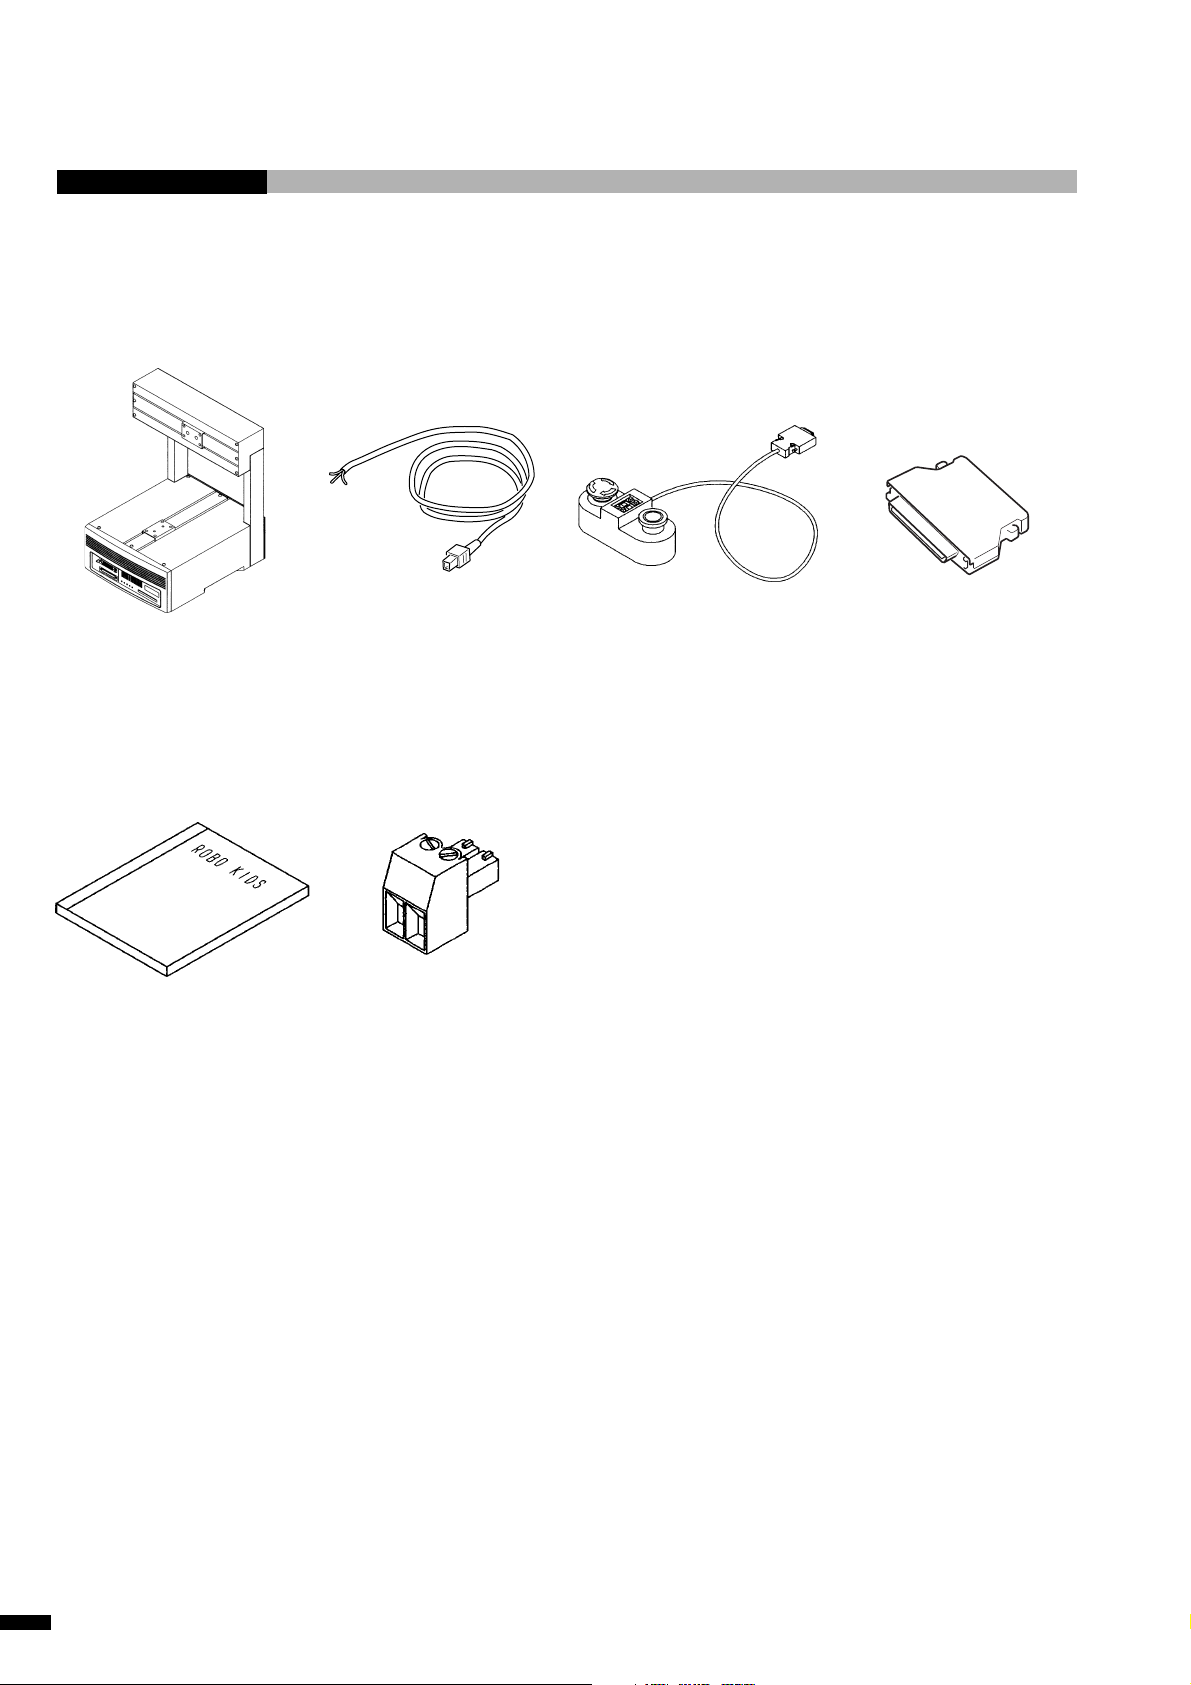
When the machine is unpacked, make sure the following items are in the package.
Base machine Power cable Operation box USER I/O connector
(For AC 200V to 240 V) PCR-E68FS (connector)
PCS-E68LA (connector cover)
(Honda Communications Company)
Operation Manual External supply power
connector for USER I/O
MC 1.5/2-ST-3.81
(Phoenix Contact Inc.)
U-2
CAST-AU4/B2521E
Page 14
1. Outline
1. Outline
ROBOKIDS is a desktop assembly tool designed to automate cell production systems saving a significant
amount of power consumed by assembly lines. It may be used in a variety of applications by simply
exchanging the work unit and memory card. The basic operation procedures are common throughout the
applications enabling a smooth migration from one work to another.
• The programs required for an application are stored in the memory card “RK Card”.
Operation is started by inserting the specific memory card into the base machine and teaching the work
points. The machine may be switched to perform a different application be exchanging the memory card.
• The work points and the working speed may be set by using the simple operation teaching pendant
(option) even by someone who has just purchased ROBOKIDS.
• The power supply and controller are built inside the machine thus making the system transportable to the
place where it is needed.
• The machine is equipped with an external switch connector and also an USER I/O connector allowing
synchronous operation with external equipment. Remote operation is also possible.
NOTE
■ Product Configuration
The base machine consists of two axes X-axis and Y-axis. It may be upgraded to three and four axes by
installing the optional Z-unit and ZR-unit respectively.
The external switch and connector enabling operation of the machine by two operators, must
be prepared by the user.
CAST-AU4/B2521E
1-1
Page 15
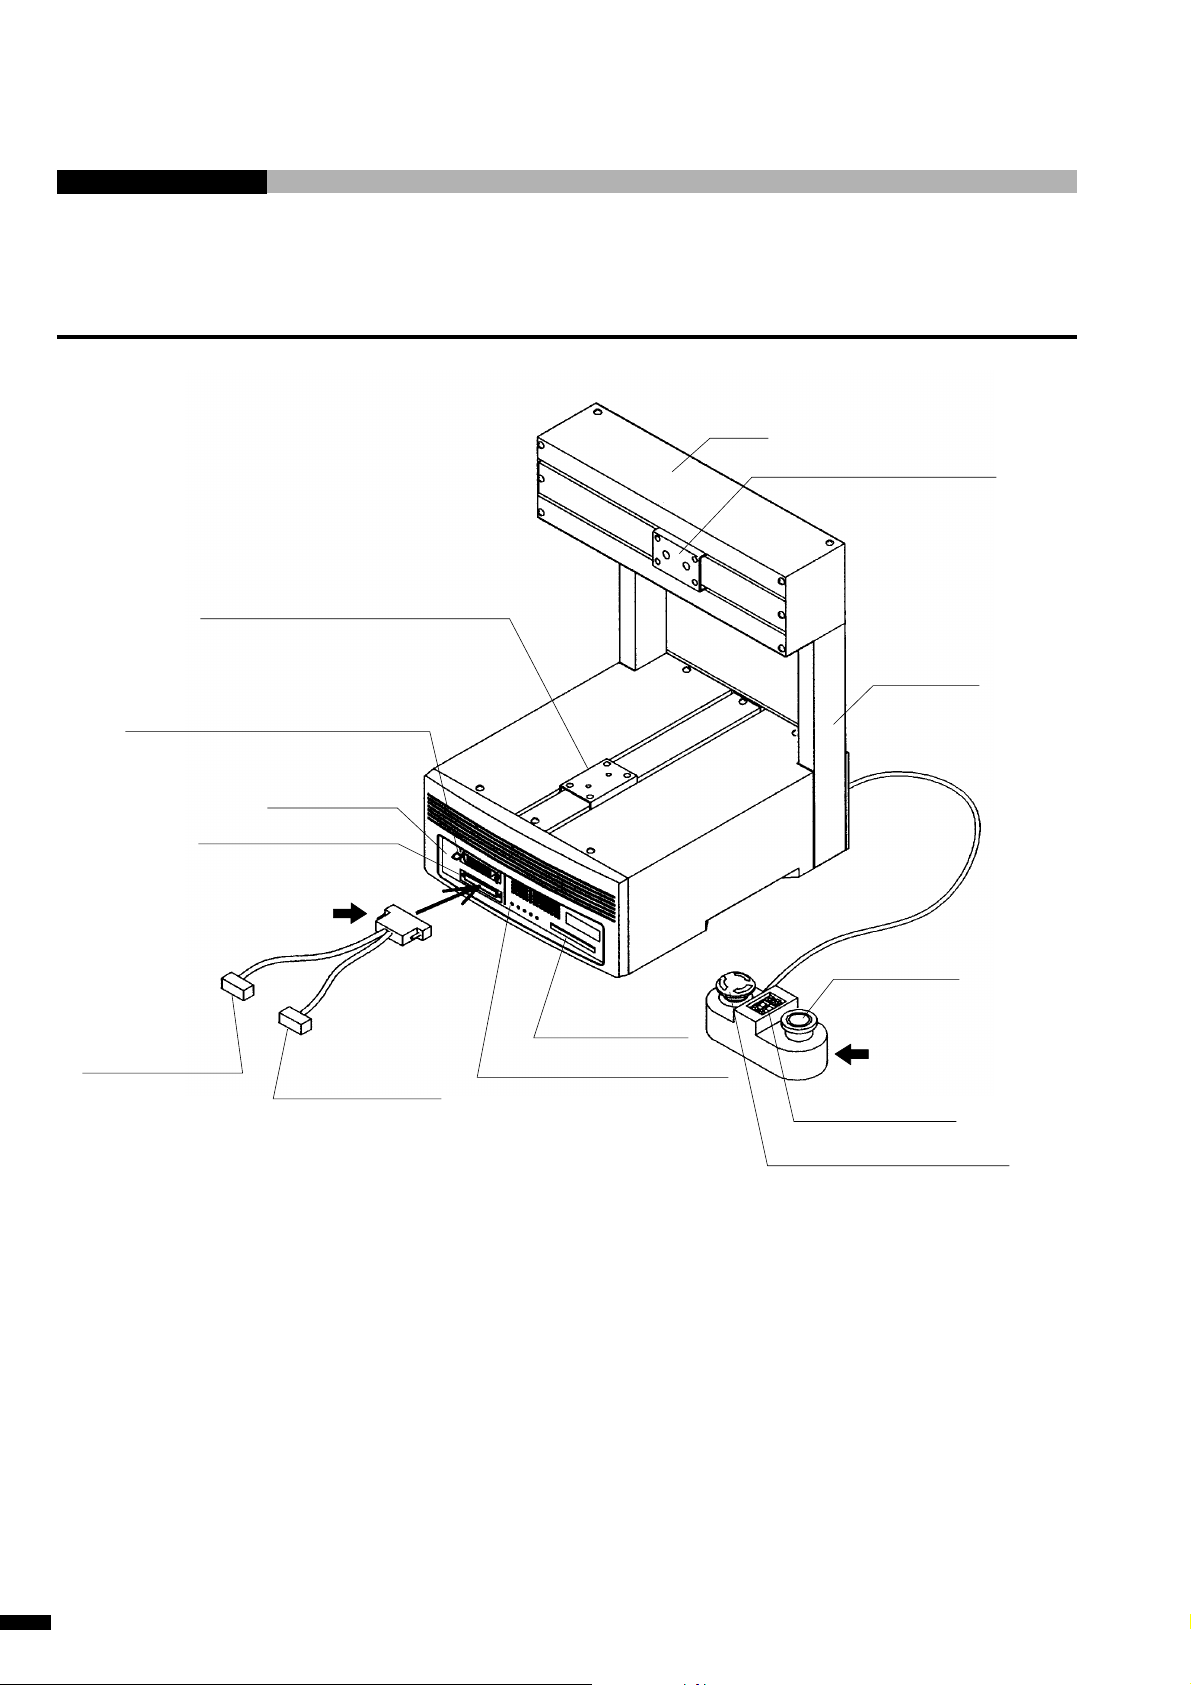
1-1 Nomenclature
Front View
Work table mounting bracket (Y-axis)
X-axis
Unit or tool mounting bracket
TECH. PEN. connector
(for teaching pendant of CAST-PRO)
*EJECT button
Debug station connector
*To debug station
SRX teaching
pendant connector
RS 232C program
transfer connector
Memory card slot
5-gang LED display
(POWER, TASK, ROBOT,
ONLINE, ERROR indications
from the left)
PROGRAM switch
STOP button
X-axis stand
START button
Operation box
* Debug station • • • Option
Either the “SRX teaching pendant” or the program transfer cable can be directly connected to the debug
station connector.
* EJECT button • • • When inserting or removing the CAST-PRO teaching pendant, insert it or remove it
while pressing the EJECT button.
5-gang LED Display
The following machine conditions are indicated on the 5-gang LED display.
1. ERROR ........Illuminates during the error state.
2. ONLINE.......Illuminates during the on-line state. (Illuminates normally.)
3. ROBOT ........Illuminates while the servo is on. (Illuminates continually after home position is checked.
Turned off during stop.)
4. TASK ...........Illuminates while any of the robot task, or PLC task, or peripheral task is being executed.
5. POWER .......Illuminates in green while power is on. Illuminates in red when a battery runs out.
1-2
CAST-AU4/B2521E
Page 16
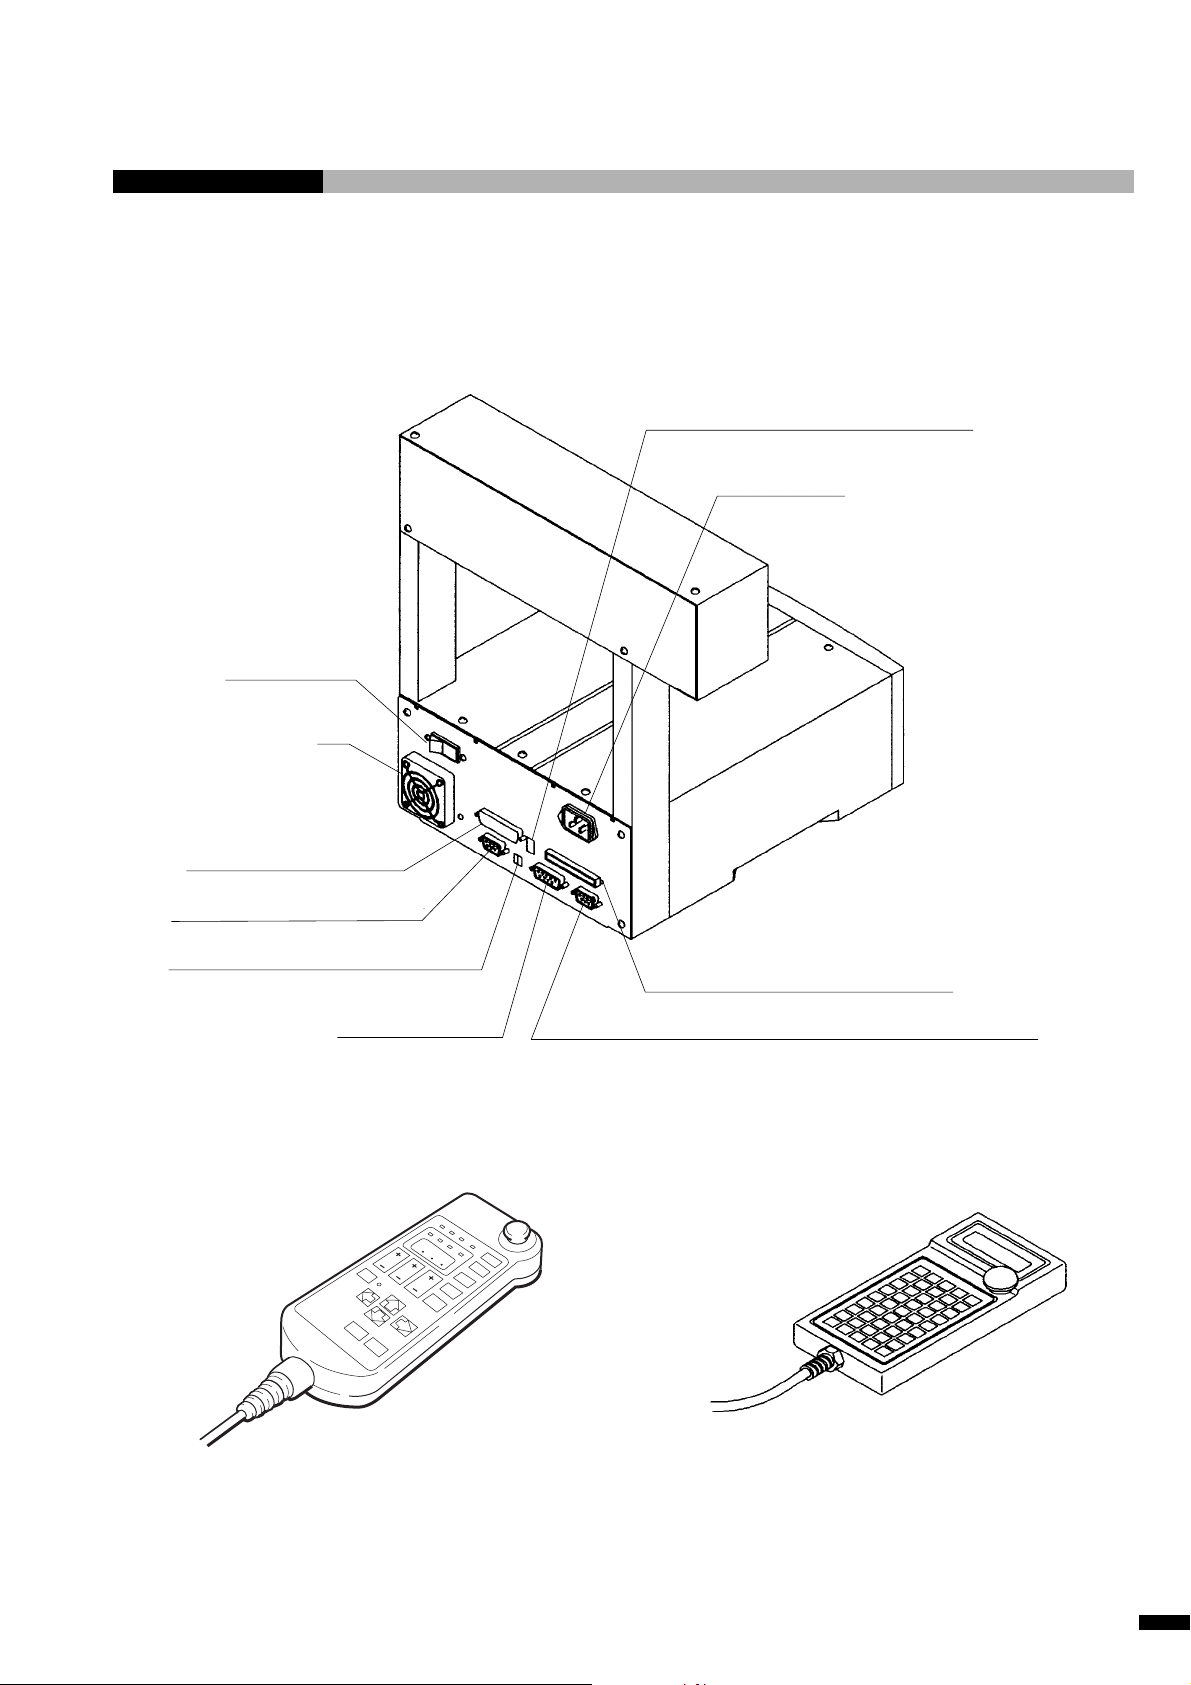
Rear View
1. Outline
Internal/external selecting switch for I/O
(Upper : OUTSIDE, Lower : INSIDE)
INLET (power)
POWER switch
Fan
Z- and ZR-axis connector
OPERATION BOX connector
DC24V INPUT (I/O power) connector
(Up to maximum 1.5 A)
SAFETY connector
RS232C connector
(Used only when the full open programmable specification
is used.)
USER INPUT/OUTPUT connector
(External I/O connector)
CAST-PRO Teaching Pendant SRX Teaching pendant
8
8
8
CAST-AU4/B2521E
CAST-P06 (option) SRX-P005/S (option)
1-3
Page 17
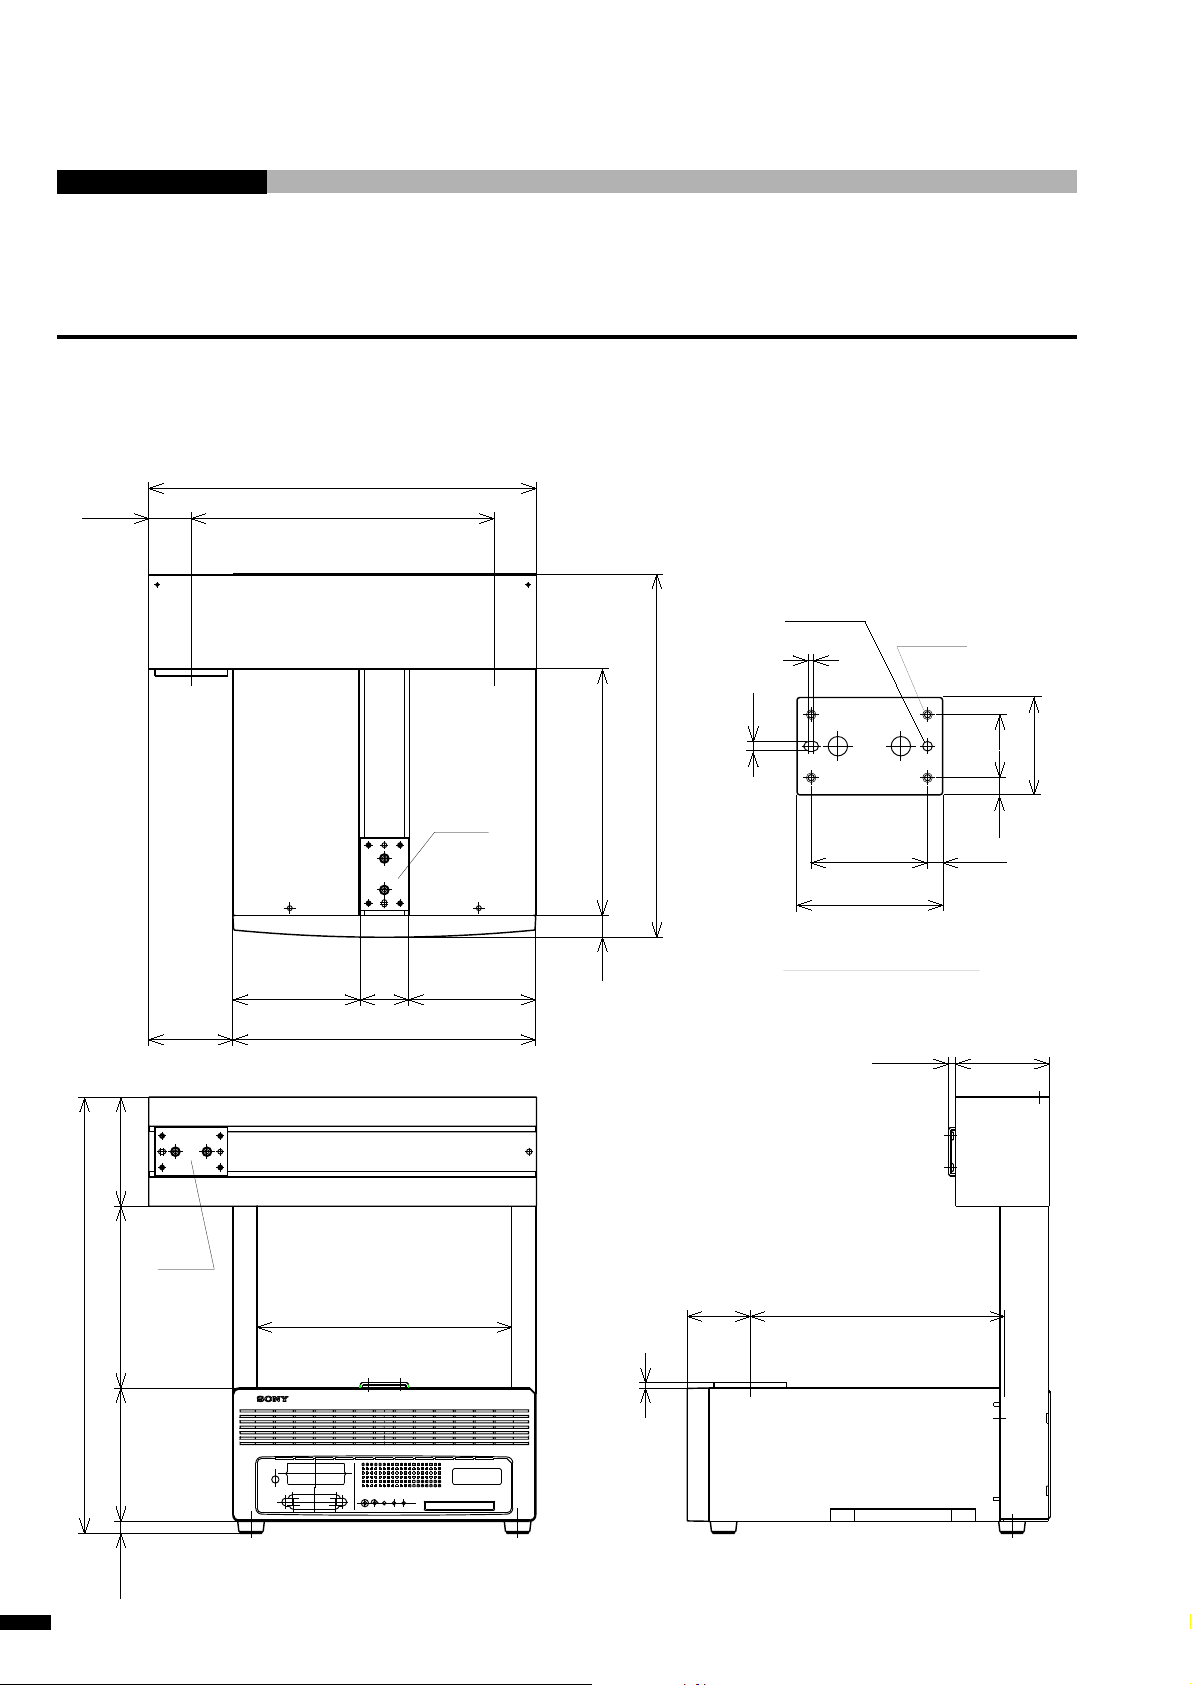
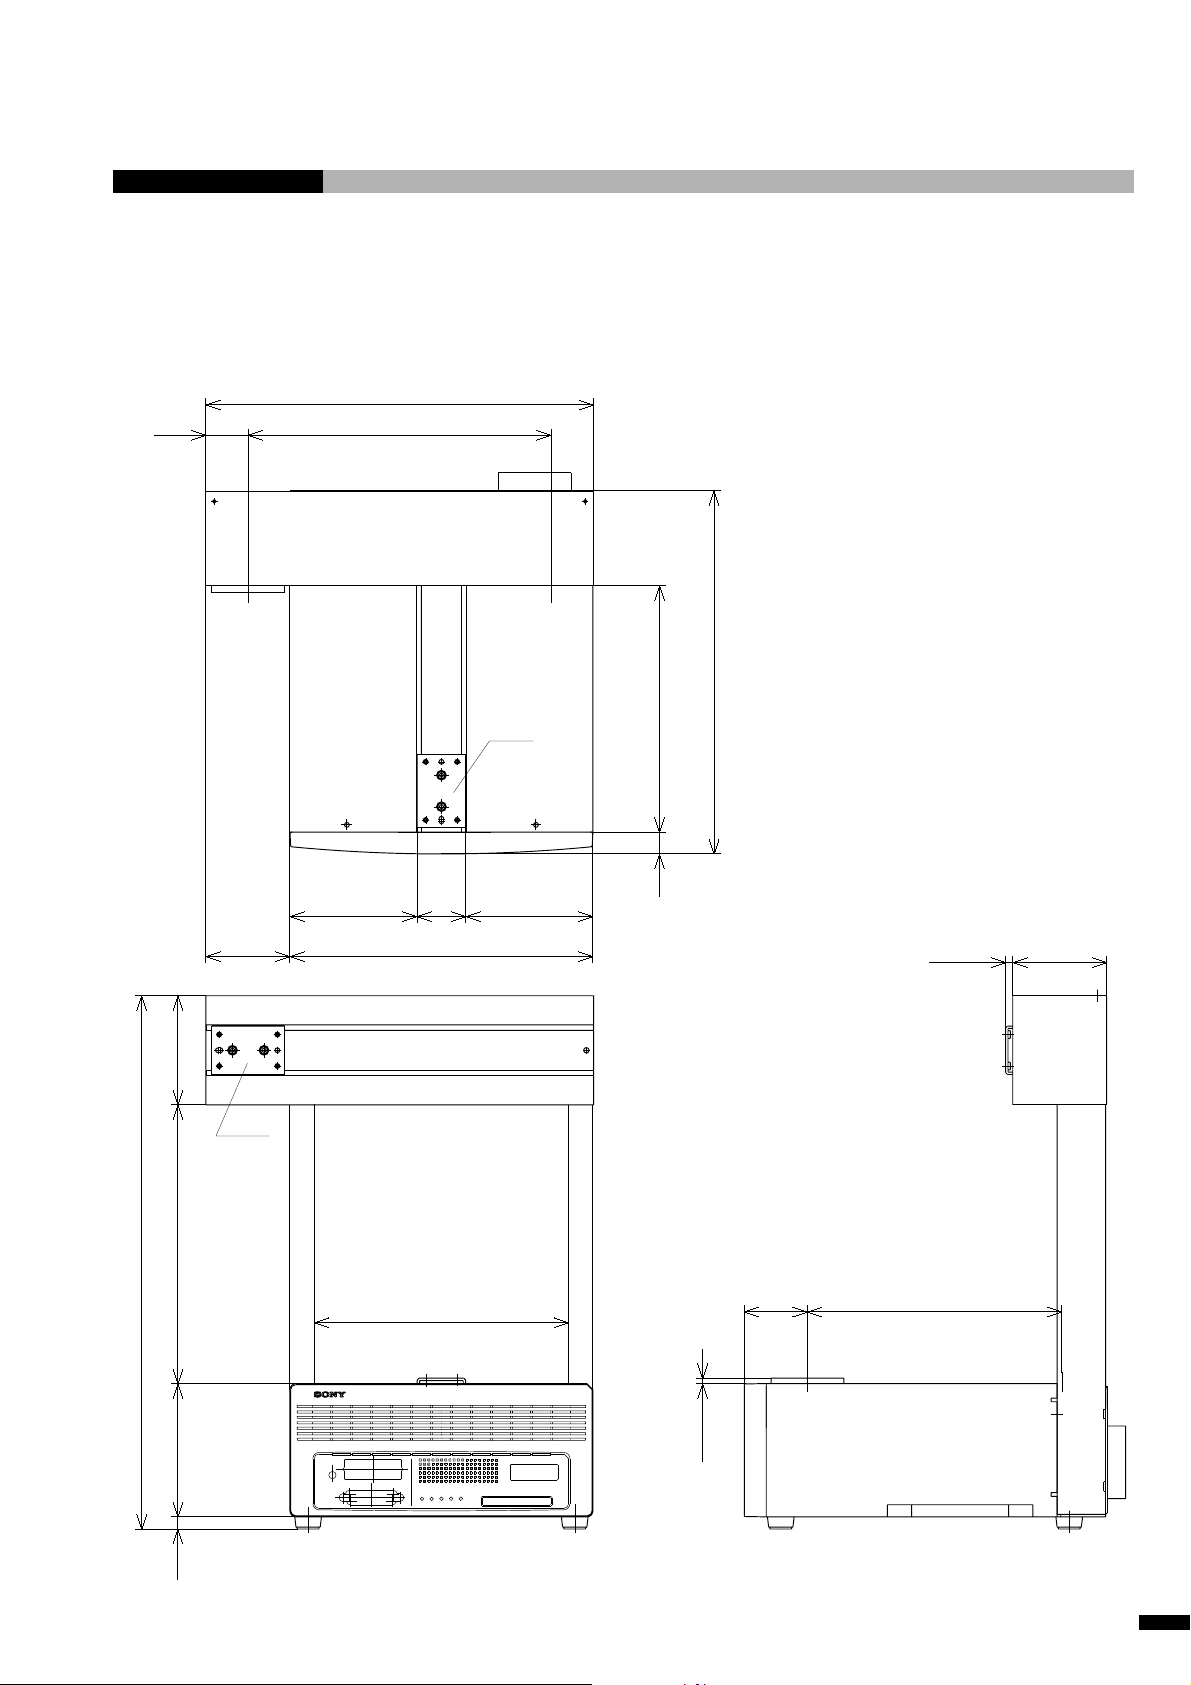
1-2 Outline Drawings
■ ROBOKIDS
Standard Type (CAST-AU4/B2521E)
320
(35)
250
(Stroke)
(300)
+ 0.03
+ 0.03
φ4
0
2
0
4
4-M4
26
(40)
(360)
(69)
A
A
105 40 105
(250)
210
203
18
(52)
48
(60)
Detailed view of "A"
(6) (78)
210
(Stroke)
(7)
(6)
1-4
(4.5)
110 150 90
10
CAST-AU4/B2521E
Page 18
Height Adjustable Type (CAST-AU4/BT2521E)
320
(35)
250
(Stroke)
1. Outline
90
230
(69)
A
A
105 40 105
(250)
203
18
(300)
(6)
(78)
(440)
110
10
CAST-AU4/B2521E
210
(4.5)
(52)
210
(Stroke)
1-5
Page 19
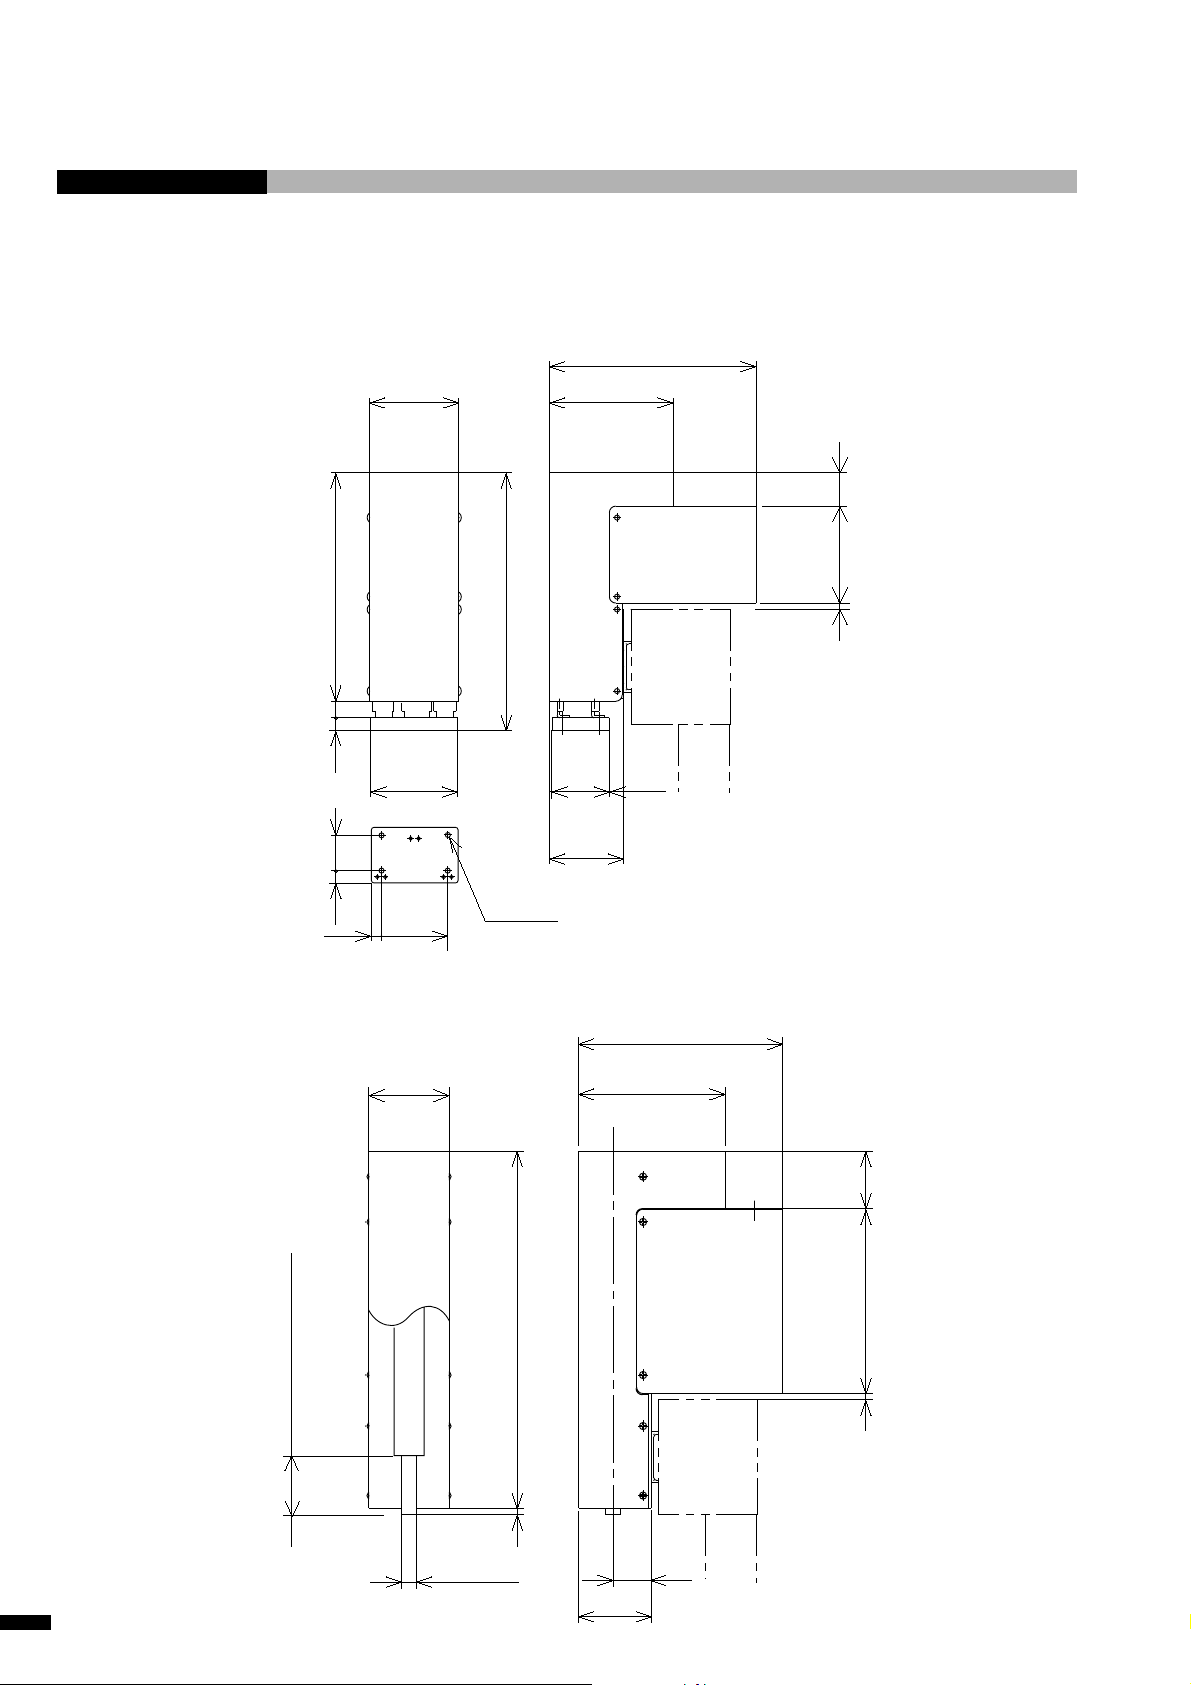
■ 3-Axes Model
Z-unit
70
162
97
26
76
■ 4-Axes Model
ZR-unit
179
(13)
10
26
14
48
63
68
(202)
4-M4
45
5
11
58
162
97
45
1-6
50 Tool attachment position
φ12h7
144.5
280
5
5
30
57
CAST-AU4/B2521E
Page 20
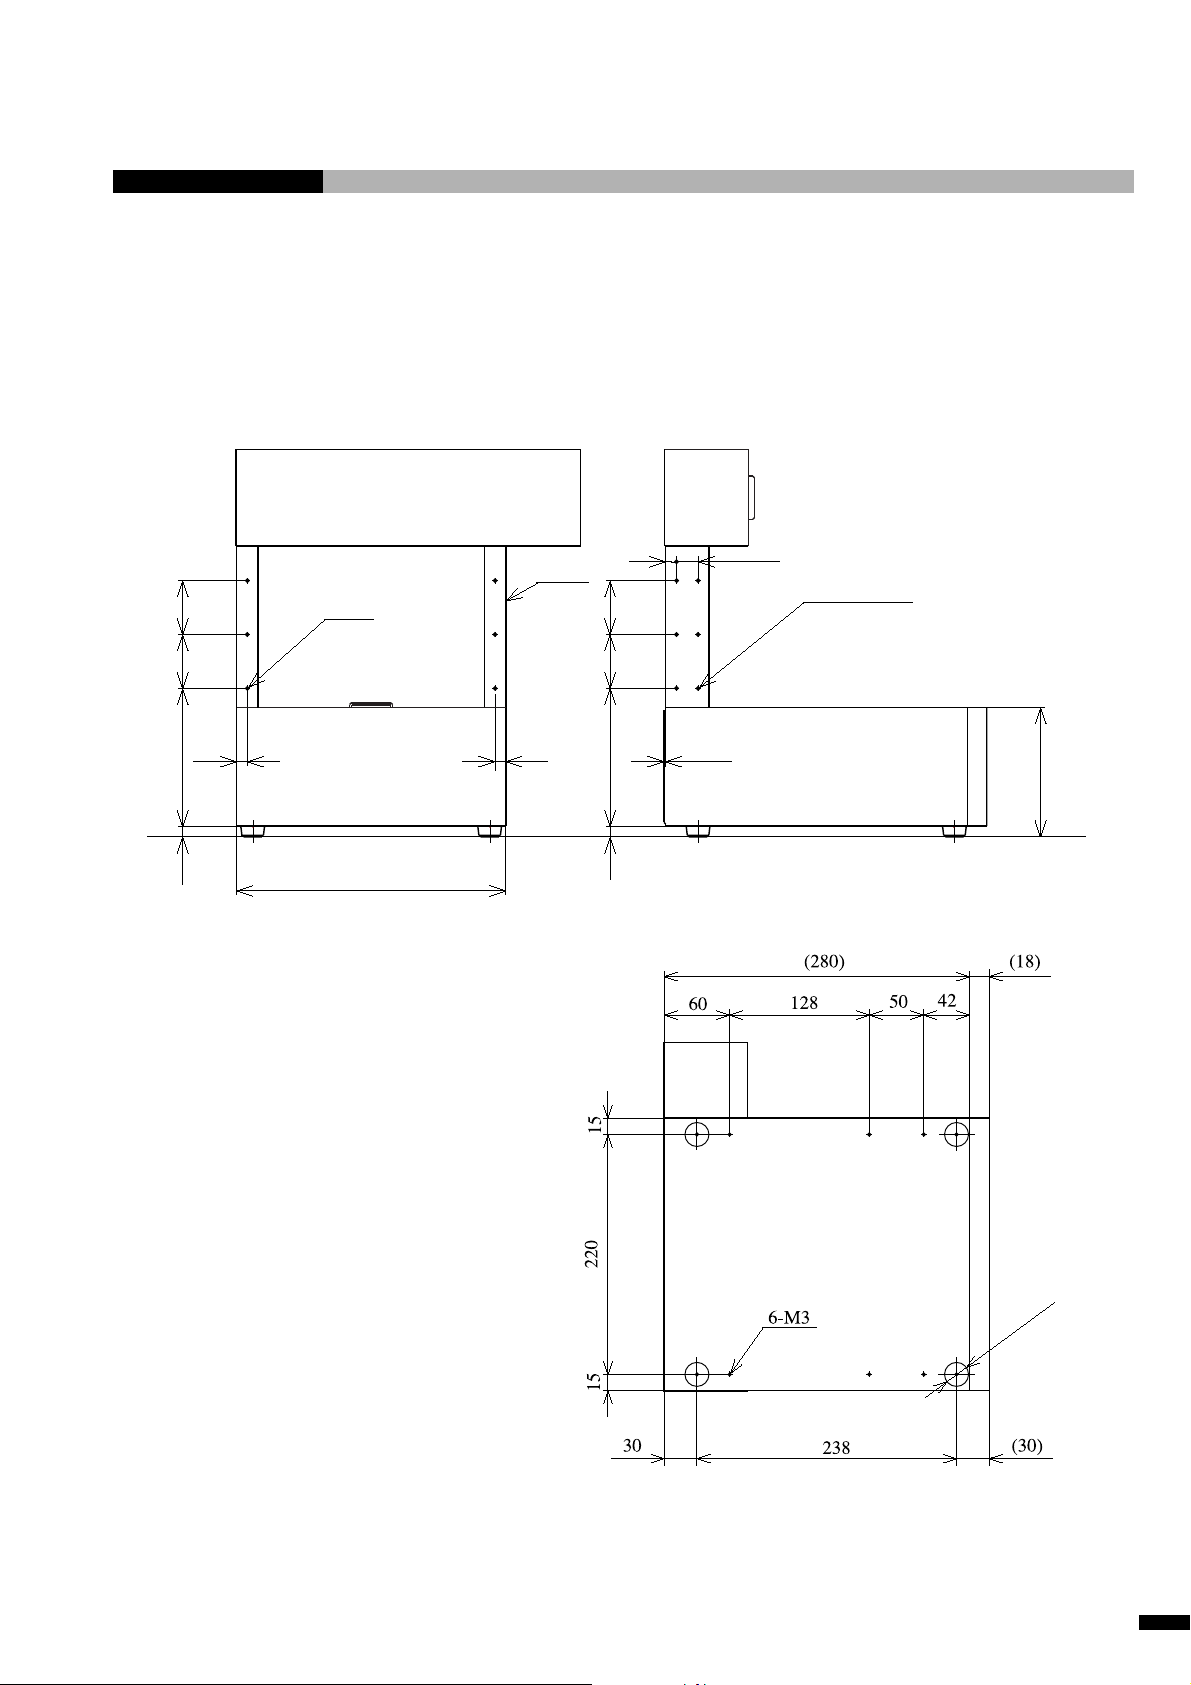
Service Tapped-Hole Position
1. Outline
50 50
128
10
10
6-M3
(250)
Side A
10
50
50
128
10
10
(1.6)
20
6-M3
(Side A only)
(120)
CAST-AU4/B2521E
4-φ22
1-7
Page 21
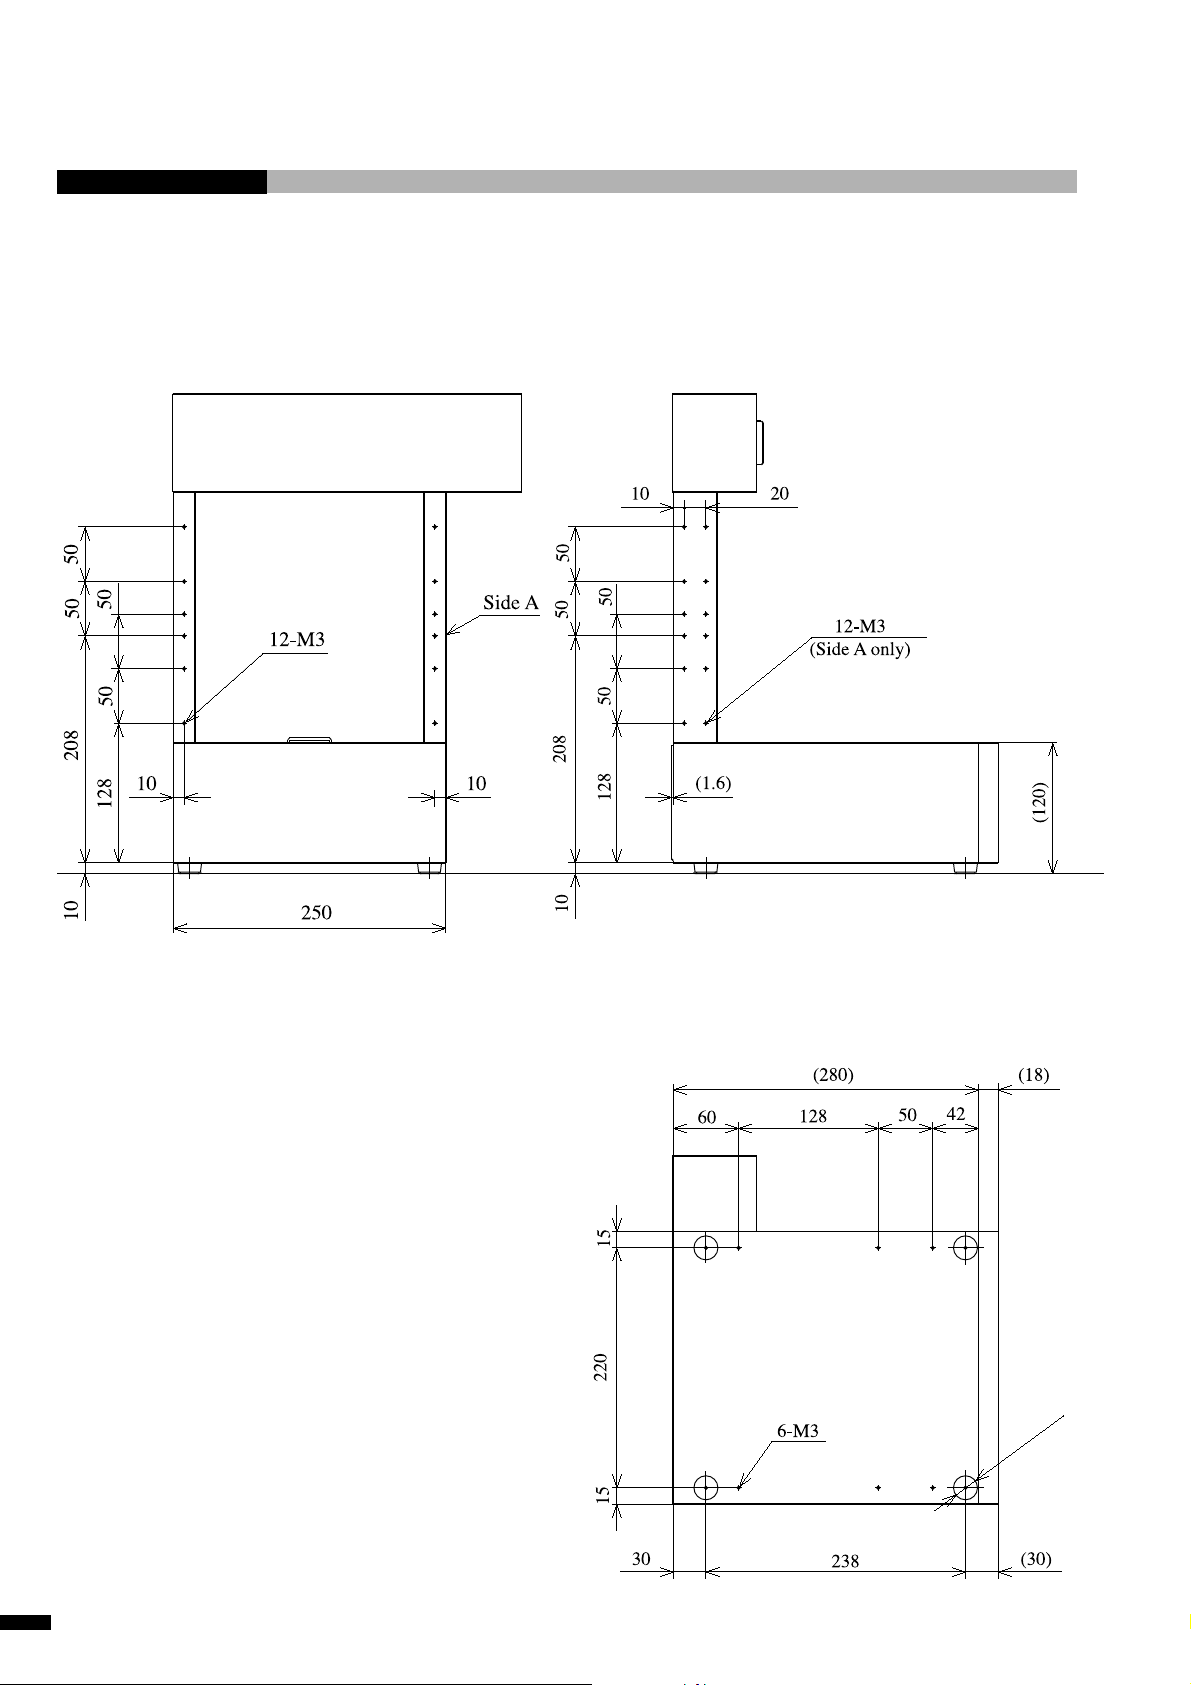
Service Tapped-Hole Position (Tall Model)
1-8
4-φ22
CAST-AU4/B2521E
Page 22
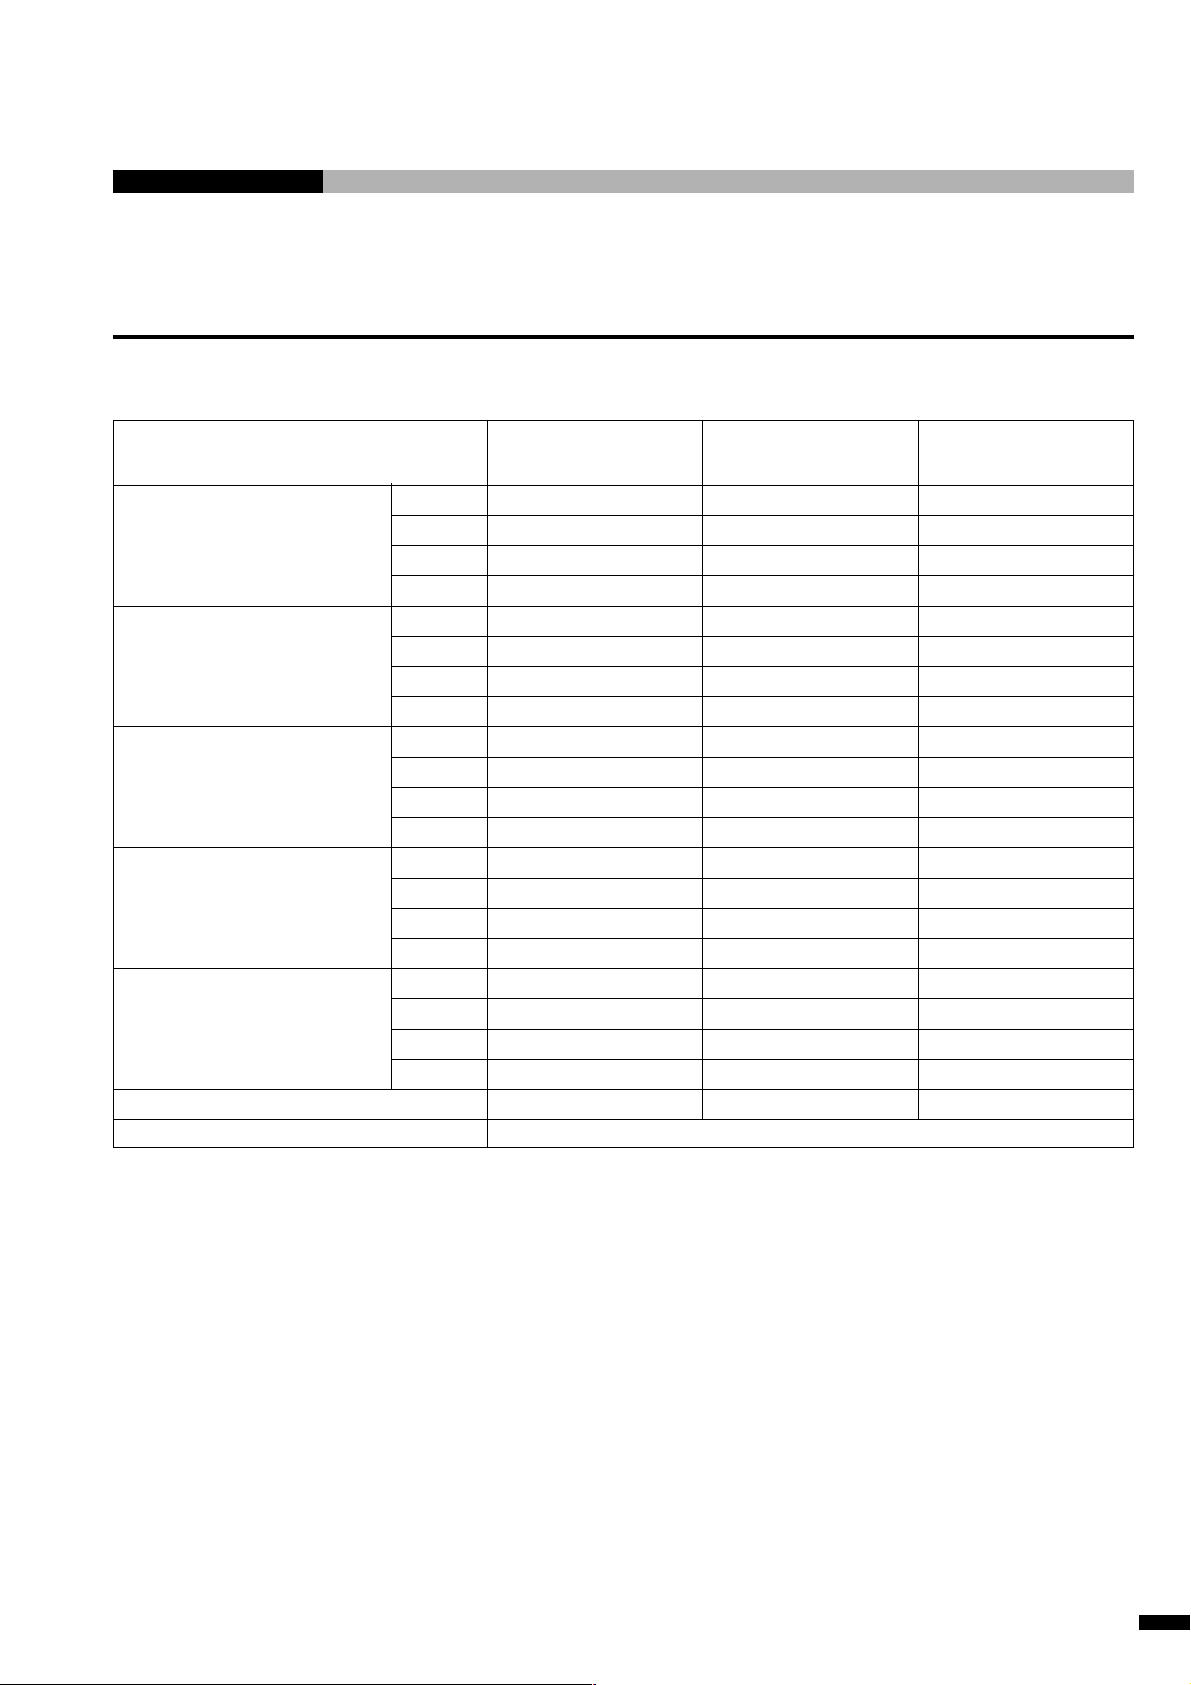
1-3 Specifications
1-3-1 Machine Specifications
1. Outline
Item
X-axis
Work envelope Y-axis
Z-axis
R-axis
X-axis
Maximum speeds Y-axis
Z-axis
R-axis
X-axis
Pose-repeatability Y-axis
(positioning accuracy) Z-axis
R-axis
X-axis
Maximum payload Y-axis
Z-axis
R-axis
X-axis
Resolution (*5) Y-axis
Z-axis
R-axis
Robot mass (including units)
Operating ambient temperature
Two axes specification
250 mm
210 mm
300 mm/s
(*4)
300 mm/s
±0.05 mm
± 0.05 mm
0.014 mm
0.014 mm
About 13 kg
–
–
–
–
–
–
5kg
5kg
–
–
–
–
(*1)
Three axes specification
with Z-axis
250 mm
210 mm
70 mm
–
300 mm/s
300 mm/s
100 mm/s
±0.05 mm
± 0.05 mm
±0.05 mm
0.014 mm
0.014 mm
0.006 mm
About 15 kg
0 to 40 °C
(*2)
(*2)
–
–
–
5kg
2kg
–
–
Four axes specification
with ZR-axis
250 mm
210 mm
70 mm
0° to 360°
300 mm/s
300 mm/s
70 mm/s
550°/s
±0.05 mm
± 0.05 mm
±0.05 mm
0.014 mm
0.014 mm
0.003 mm
About 16 kg
(*3)
(*3)
(*3)
±0.1°
–
5kg
–
1.8 kg
0.04°
*1) The maximum value is subject to the payload of 4.5 kg or less. Set the speed value lower than the
maximum value when the payload exceeds 4.5 kg.
*2) The maximum value is subject to the payload of 1.5 kg or less. Set the speed value lower than the
maximum value when the payload exceeds 1.5 kg.
*3) The maximum value is subject to the payload of 1.5 kg or less. Set the speed value lower than the
maximum value when the payload exceeds 1.5 kg.
*4) The maximum value is subject to the payload of 3.0 kg or less. Set the speed value lower than the
maximum value when the payload exceeds 3.0 kg.
*5) The resolution does not indicate the absolute position accuracy. It indicates the amount of movement
(round-off function) per every pulse that is theoretically calculated from the machine structure.
This value changes especially when direction of movement or speed is changed.
The resolution value can change depending on the card when the RK card is used.
CAST-AU4/B2521E
1-9
Page 23
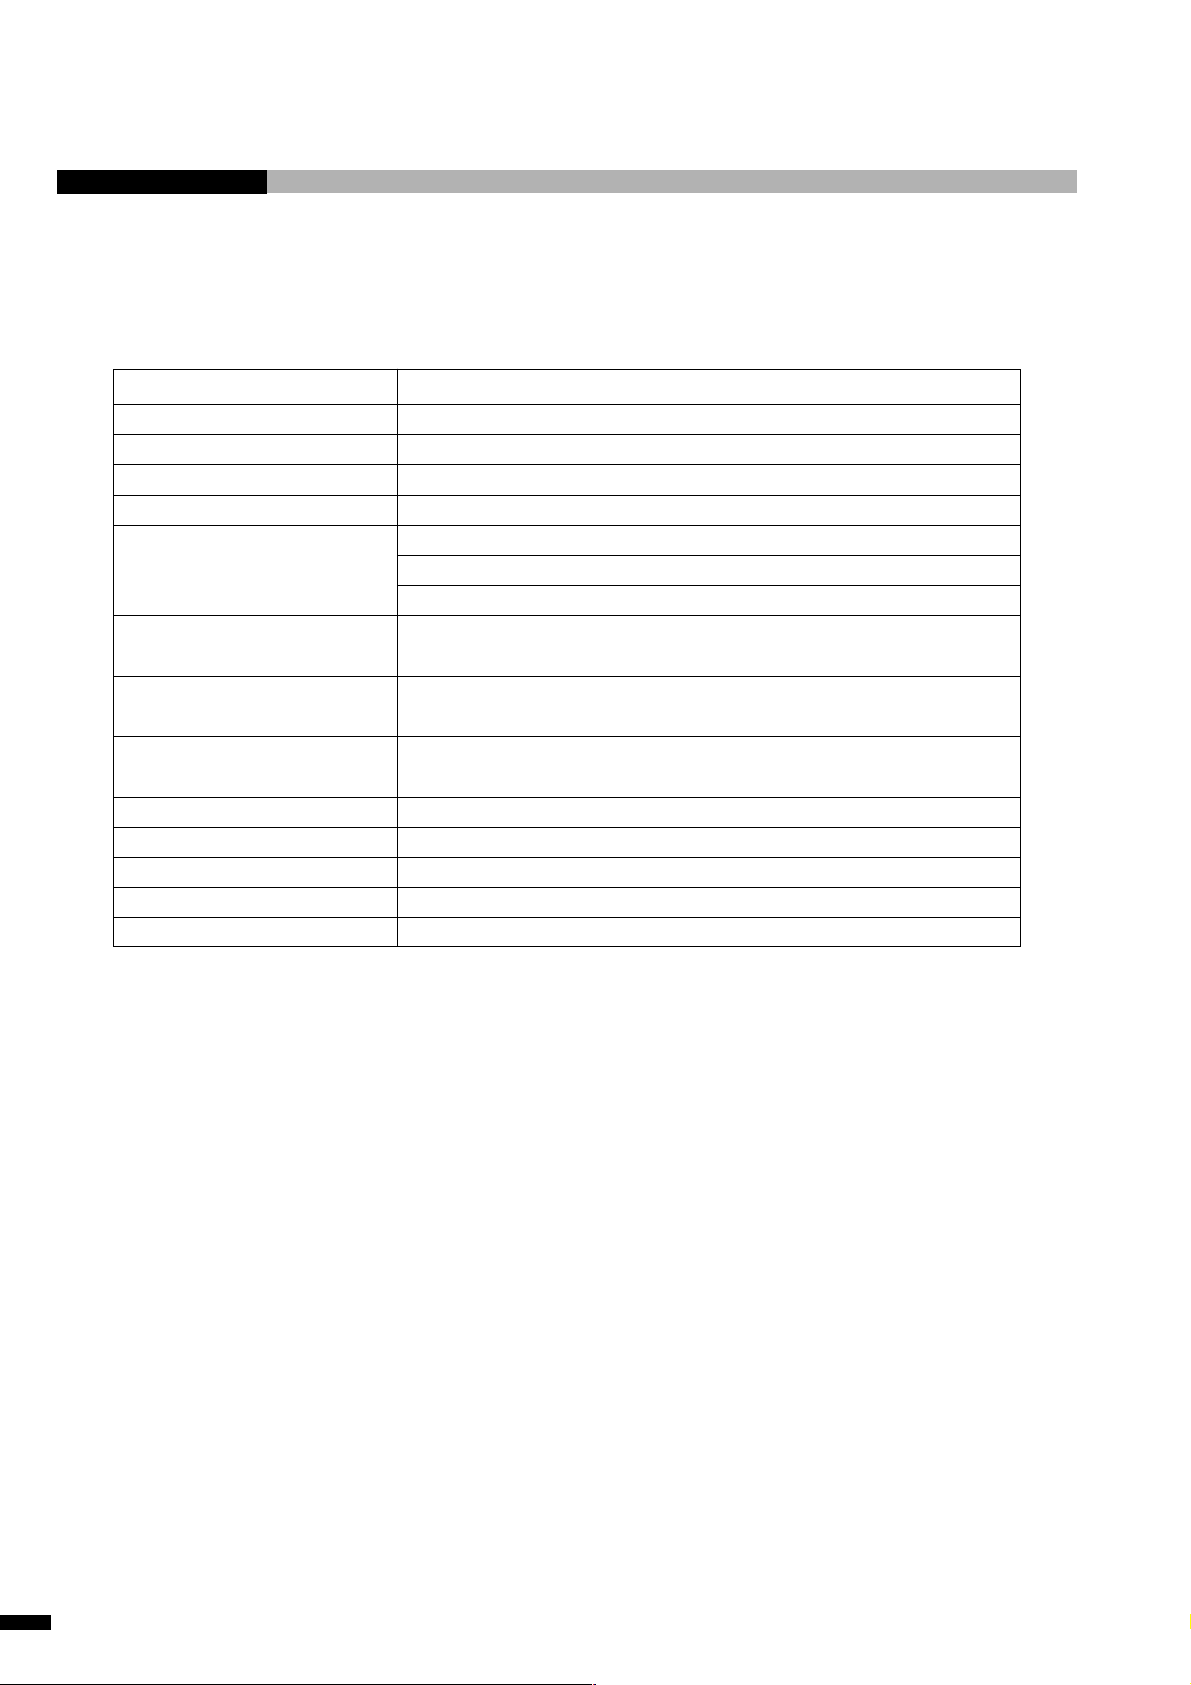
1-3-2 Control Specifications
Drive method
Movement method
Control axis count
Interpolation function
CP control speed
Teaching method
Program capacity
Point data storage capacity
Programming method
General-purpose I/O
Serial I/F
Power supply voltage
Power consumption
Ground
Pulse motor drive (open loop control)
PTP, CP
Up to four axes (all axes simultaneous control)
3-dimensional linear interpolation and 3-dimensioal circular interpolation
1 to 100 mm/s
Direct teaching via teaching pendant (option)
Point program
Direct data input
Full open : Total 176 Kbytes
RK card : Maximum 20 work programs for one operation program.
Full open : 3072 points for one program
RK card : 2500 points
Full open : Described by the machine language LUNA
RK card : The standard software is supplied (option)
22 inputs and 22 outputs
RS232C : One channel (general-purpose)
Single-phase 100 to 240 V ±10% 50/60 Hz
300 VA
Class 3 ground
(*)
* The 20 work programs of the program capacity item means that the 20 kinds of programs having different
point number and different position can be stored.
Refer to the Operation Manual of the memory card (RK card) for the work program assignment.
1-10
CAST-AU4/B2521E
Page 24
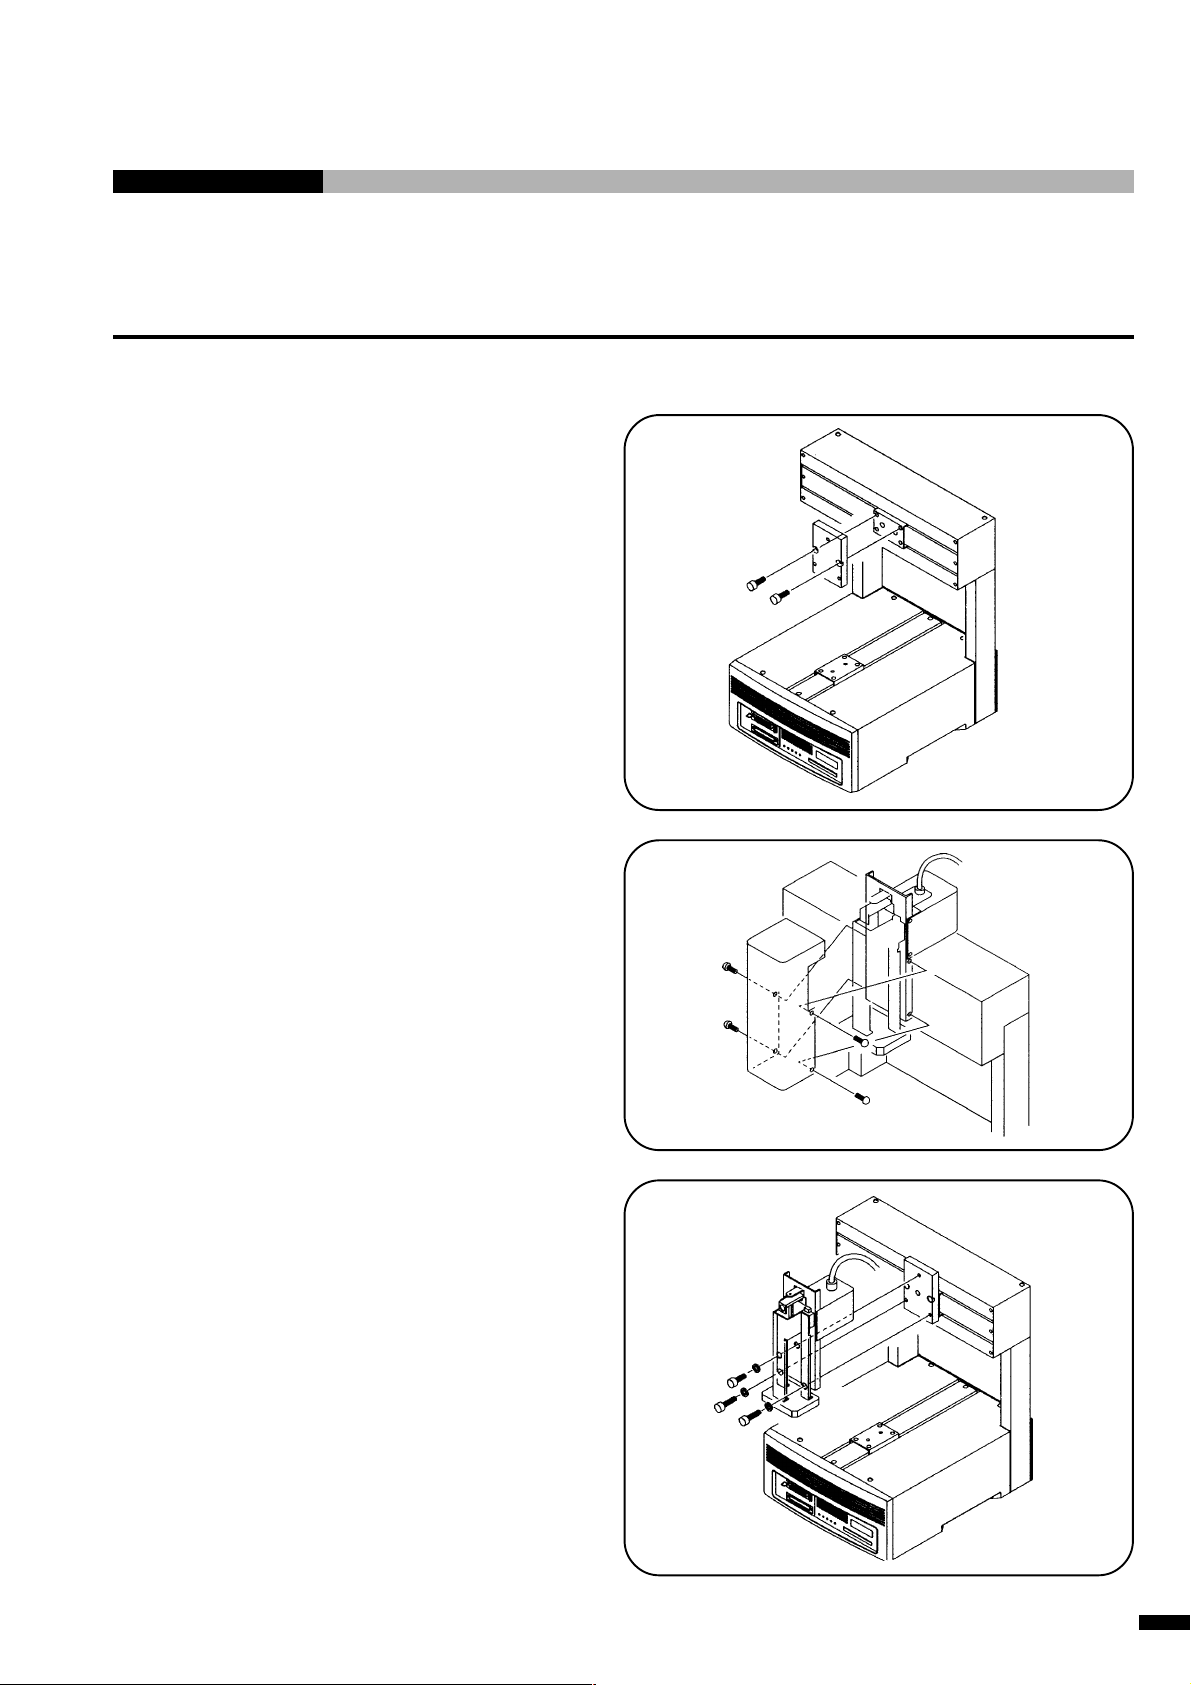
2. Preparation
2-1 Attaching the Units
2-1-1 Attaching the Z-unit
1. Fix the supplied mounting plate to the
work table. (Two positions)
Hexagon socket head cap screws
M4 × 10, 2 pieces
Tightening torque 15 kgfcm
2. Preparation
2. Remove the Z-unit front cover.
(The cover to which Sony logo mark is
attached.)
(Four positions)
3. Fix the Z-unit to the mounting plate.
(Three positions)
Determine the fixing position using the
positioning pin that is supplied with the
equipment.
Hexagon socket head cap screw
M4 × 10, 1 piece
Hexagon socket head cap screws
M4 × 18, 2 pieces
Spring washer SW4, 3 pieces
Flat washer W4, 3 pieces
Tightening torque 15 kgfcm
CAST-AU4/B2521E
2-1
Page 25
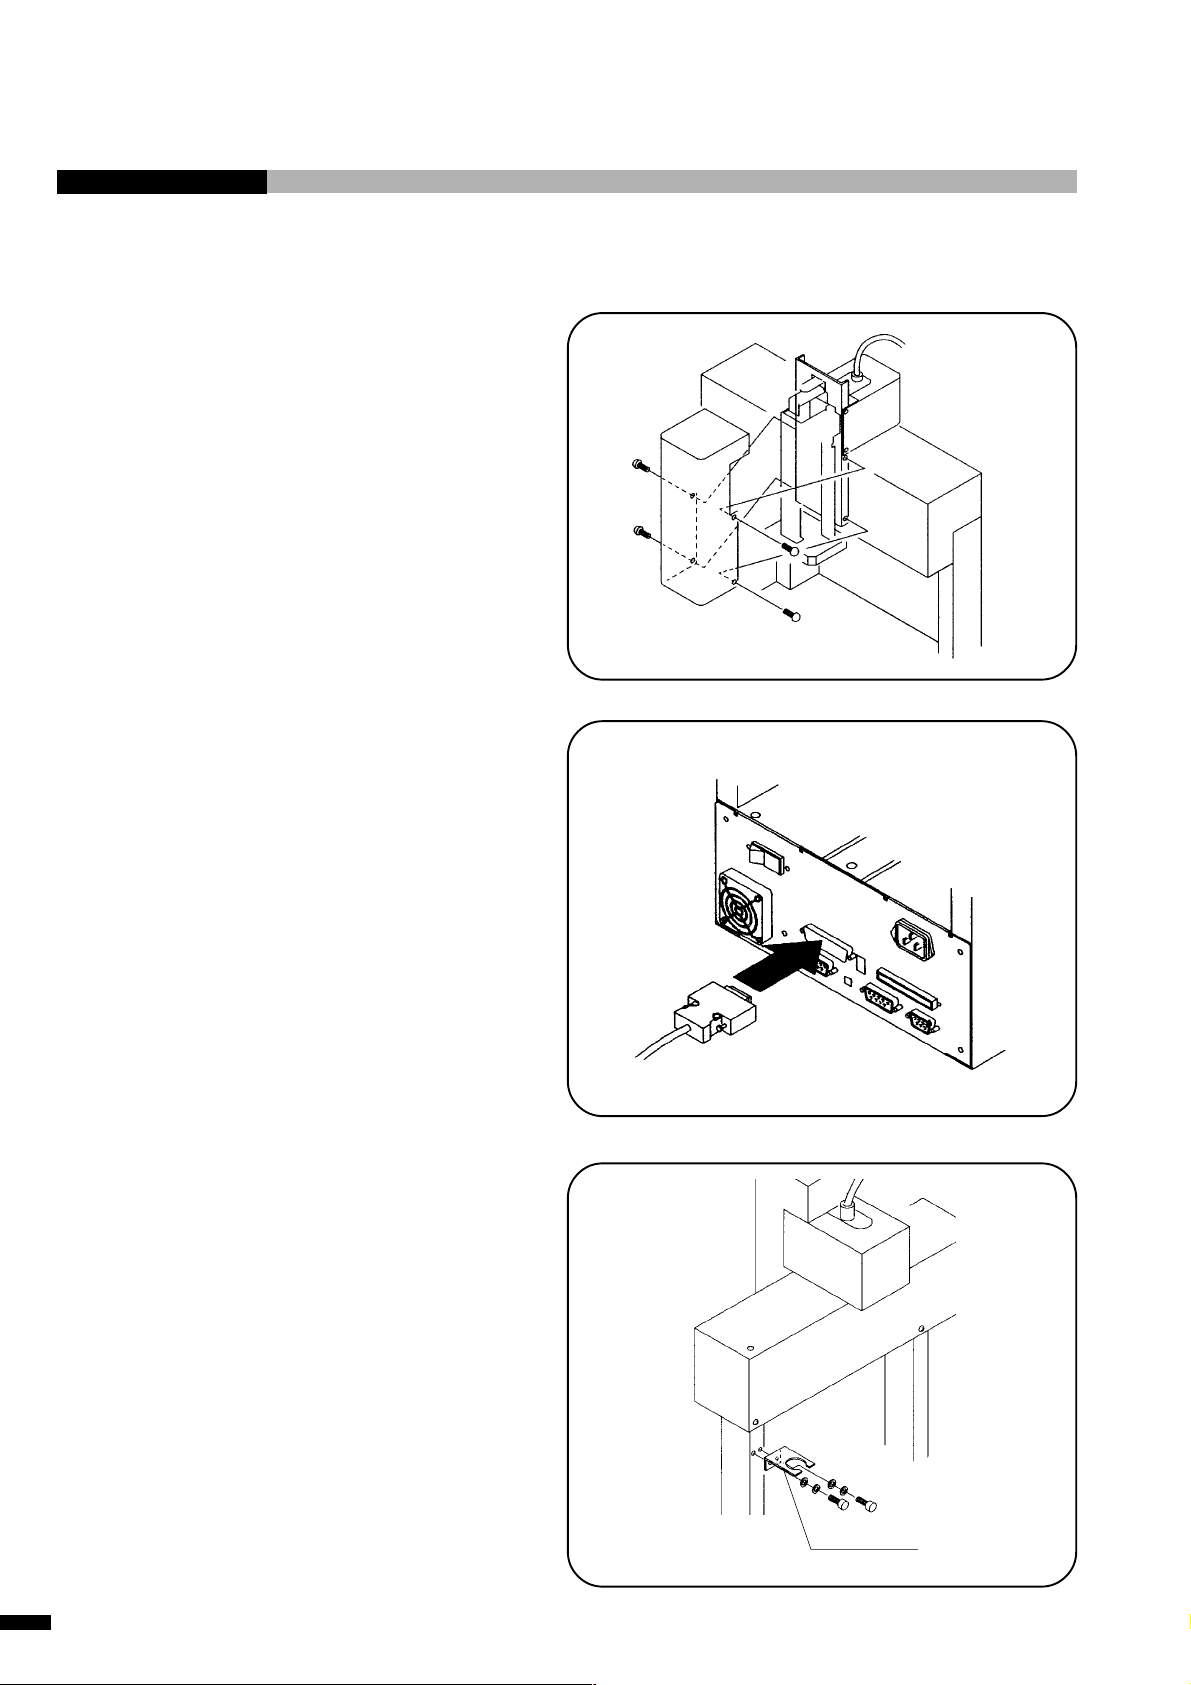
4. Attach the removed front cover. (Four
positions)
Tightening torque 8 kgfcm
5. Connect the connectors to the Z-/ZRunit connectors.
Be sure to fix the connector by tightening the
screws.
6. Attach the cable holder supplied, to the
post.
Hexagon socket head cap screws
M3 × 6, 2 pieces
Spring washer SW3, 2 pieces
Flat washer W3, 2 pieces
Tightening torque 10 kgfcm
2-2
Cable holder
(supplied)
CAST-AU4/B2521E
Page 26
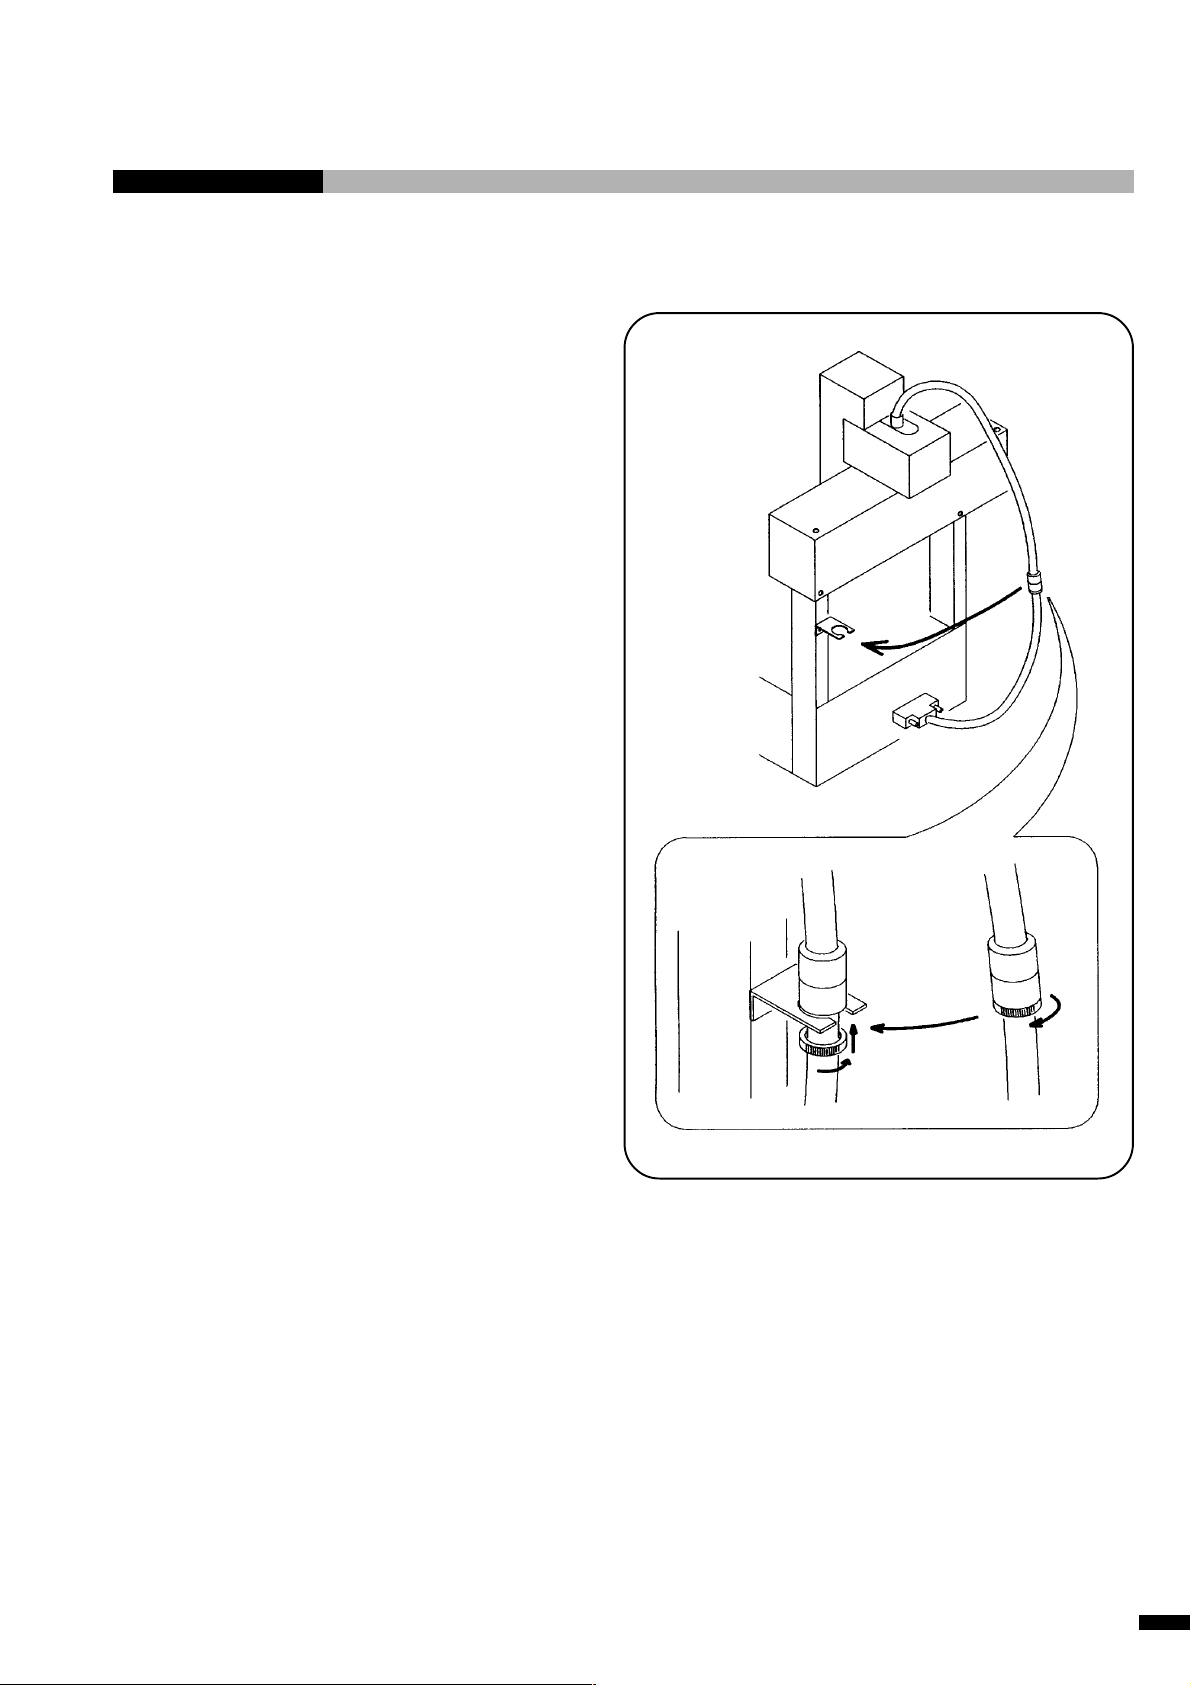
7. Fix the cable clamp of the cable to the
cable holder.
2. Preparation
CAST-AU4/B2521E
2-3
Page 27
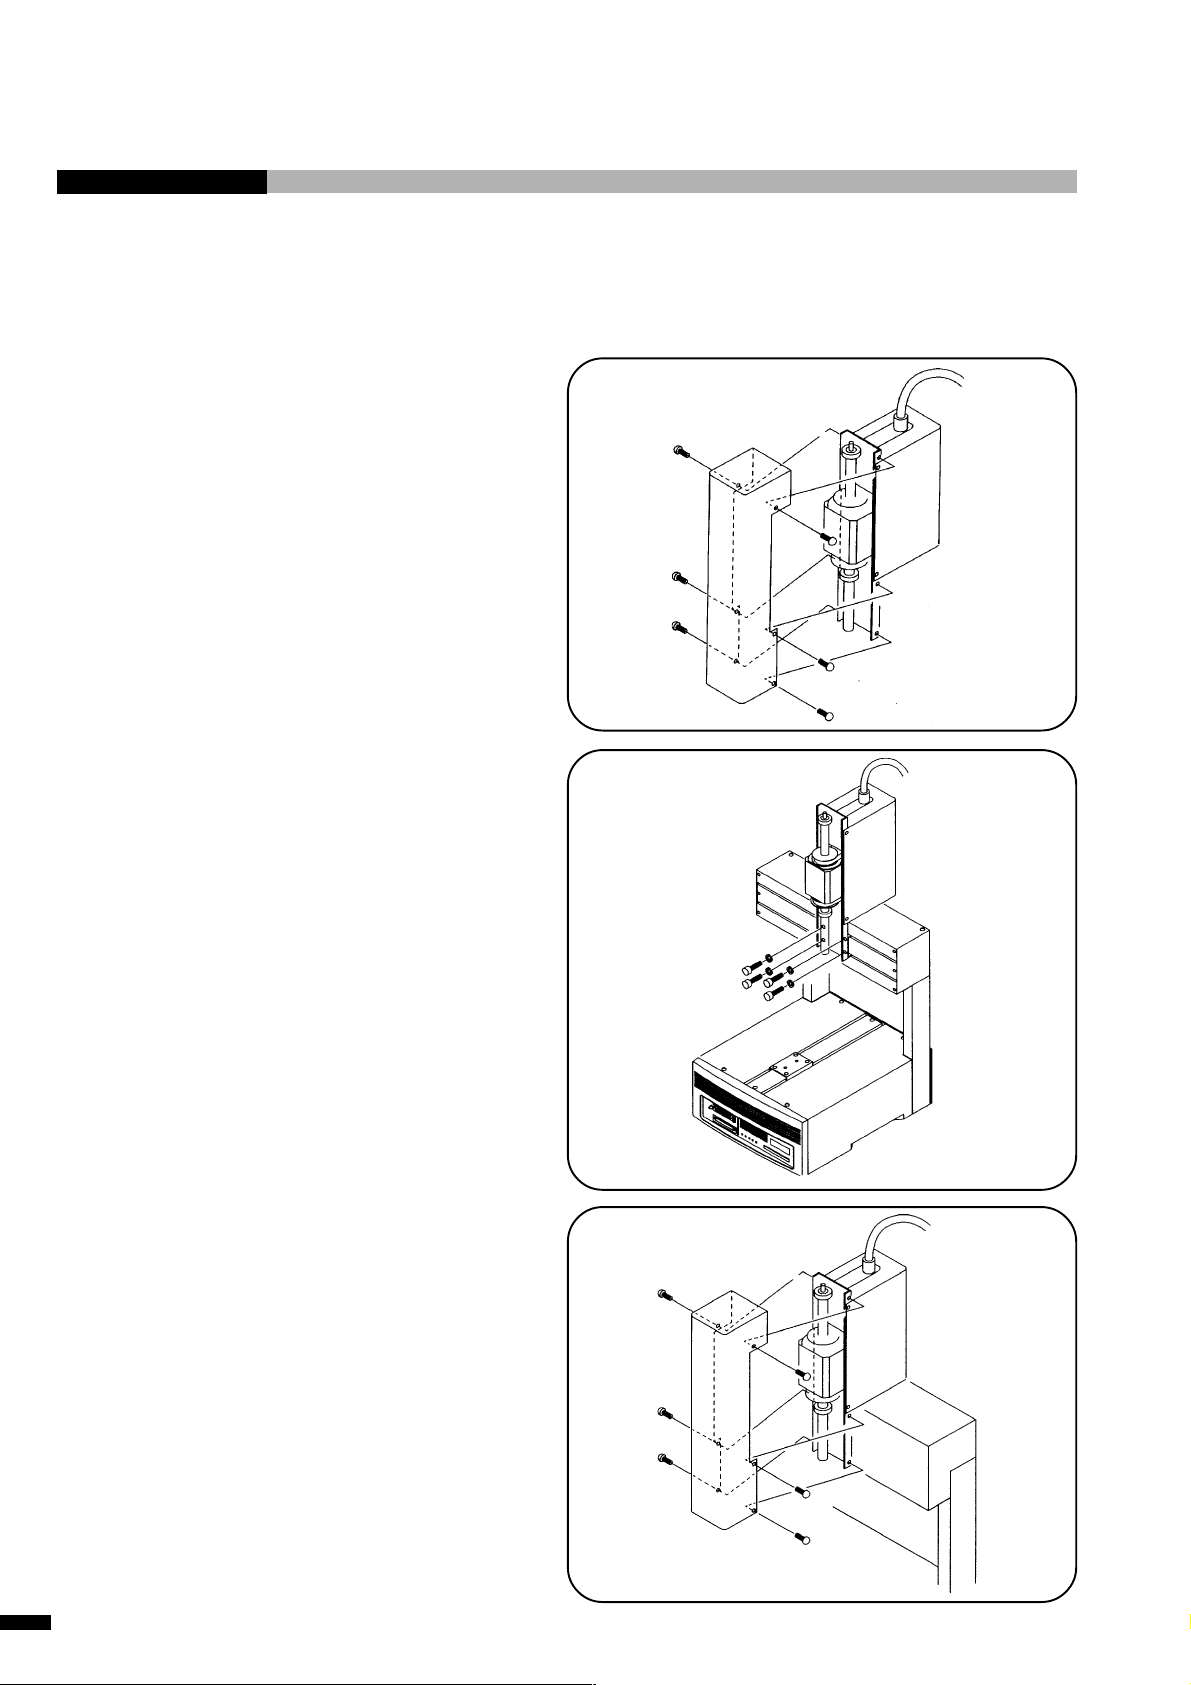
2-1-2 Attaching the ZR-unit
1. Remove the front cover. (The cover to
which Sony logo mark is attached.) (Six
positions)
2. Fix the ZR-unit to the mounting plate.
(Four positions)
Determine the fixing position using the
positioning pin that is supplied with the
equipment.
Hexagon socket head cap screw
M4 × 6, 4 pieces
Spring washer SW4, 4 pieces
Flat washer W4, 4 pieces
Tightening torque 15 kgfcm
3. Attach the front cover. (Six positions)
Tightening torque 8 kgfcm
2-4
CAST-AU4/B2521E
Page 28
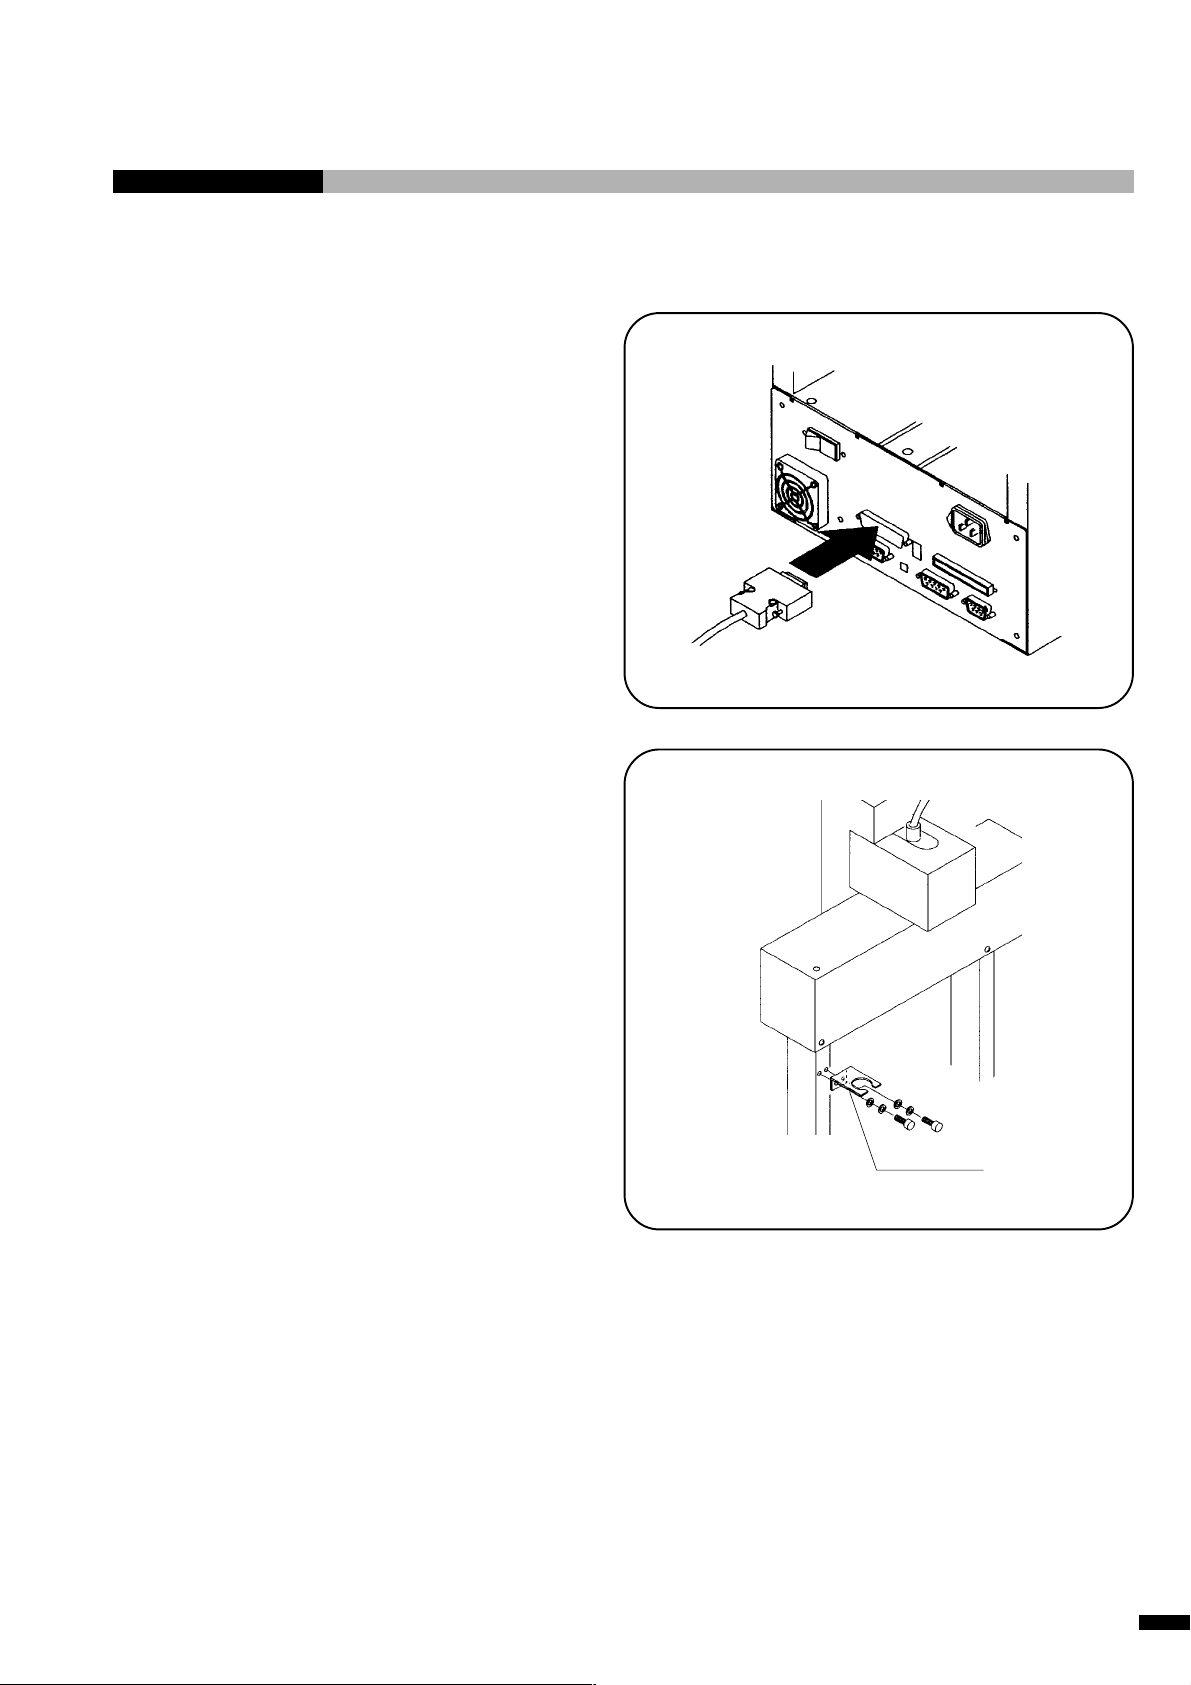
4. Connect the connectors to the Z-/ZRunit connectors.
Be sure to fix the connector by tightening the
screws.
2. Preparation
5. Attach the cable holder supplied, to the
post.
Hexagon socket head cap screws
M3 × 6, 2 pieces
Spring washer SW3, 2 pieces
Flat washer W3, 2 pieces
Tightening torque 10 kgfcm
Cable holder
(supplied)
CAST-AU4/B2521E
2-5
Page 29
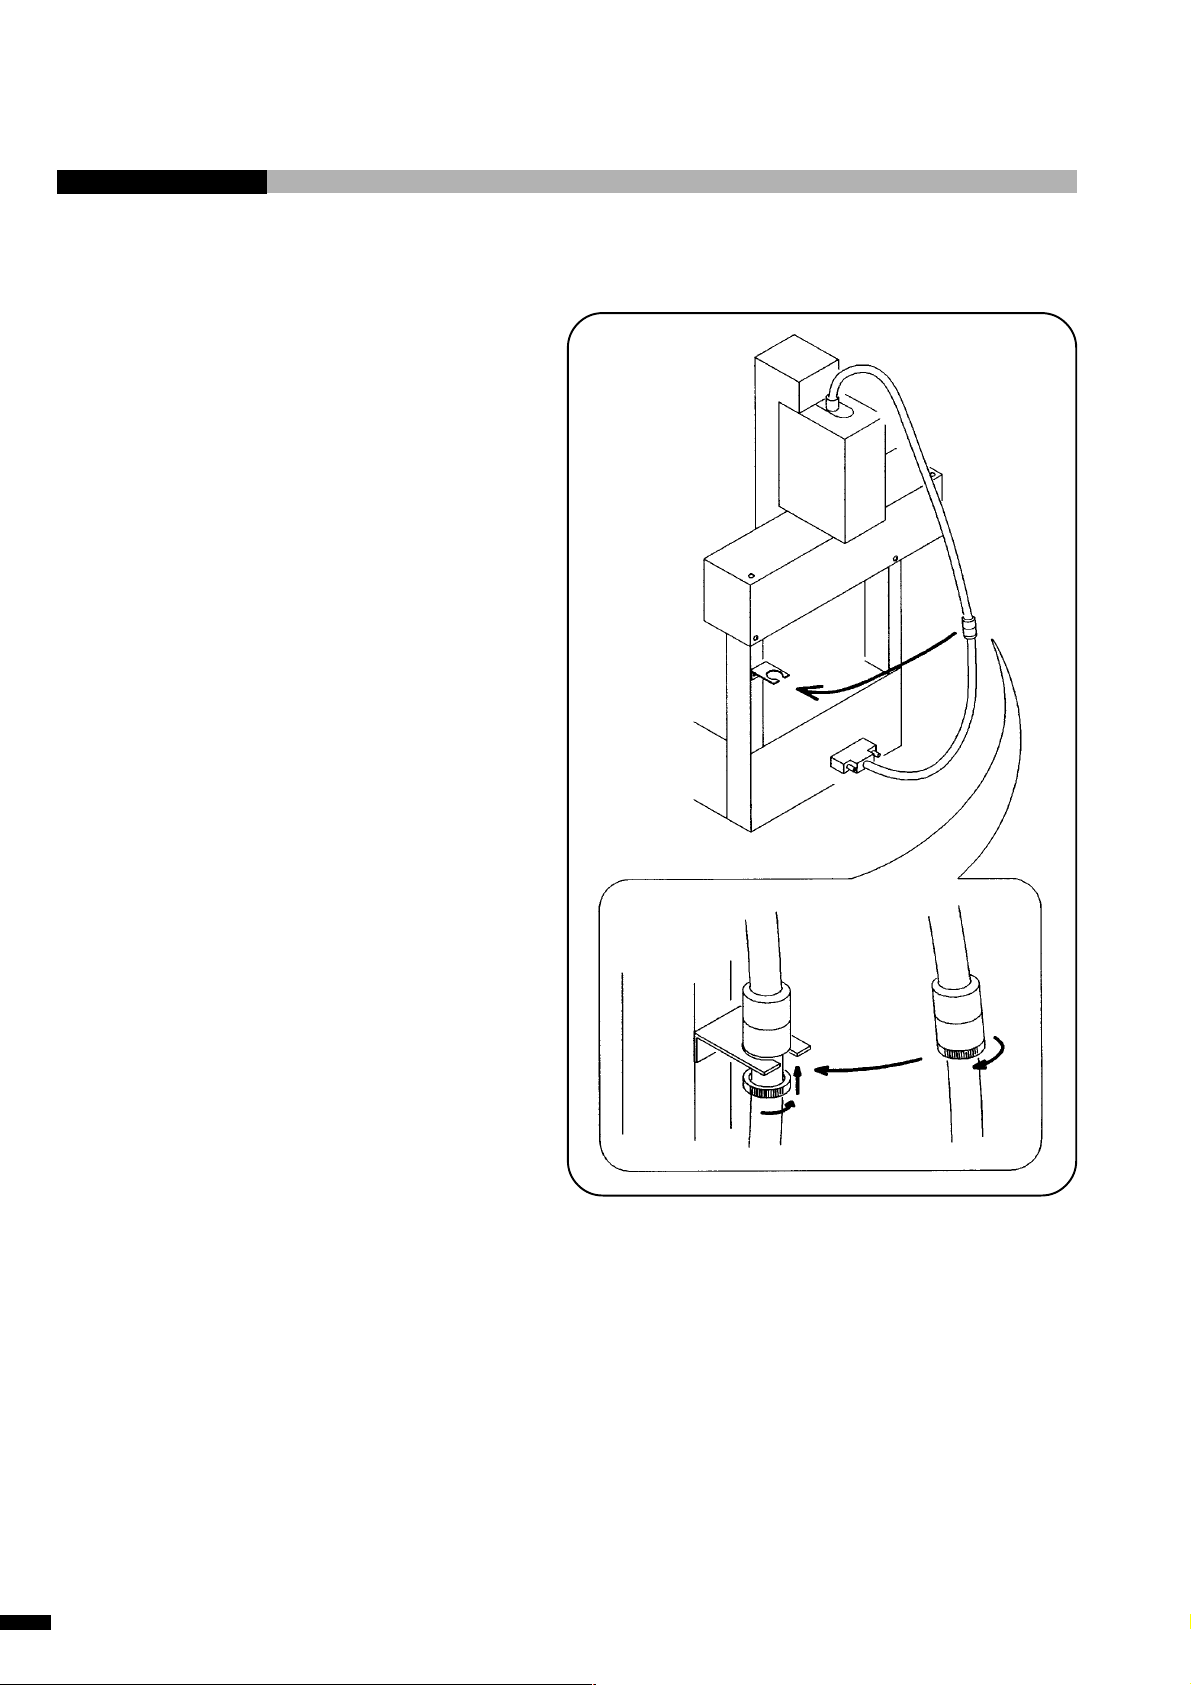
5. Fix the clamp of the cable on the cable
holder.
2-6
CAST-AU4/B2521E
Page 30
2. Preparation
2-2 Connecting the External Signal
The base machine is equipped with the following connectors for external signal communication.
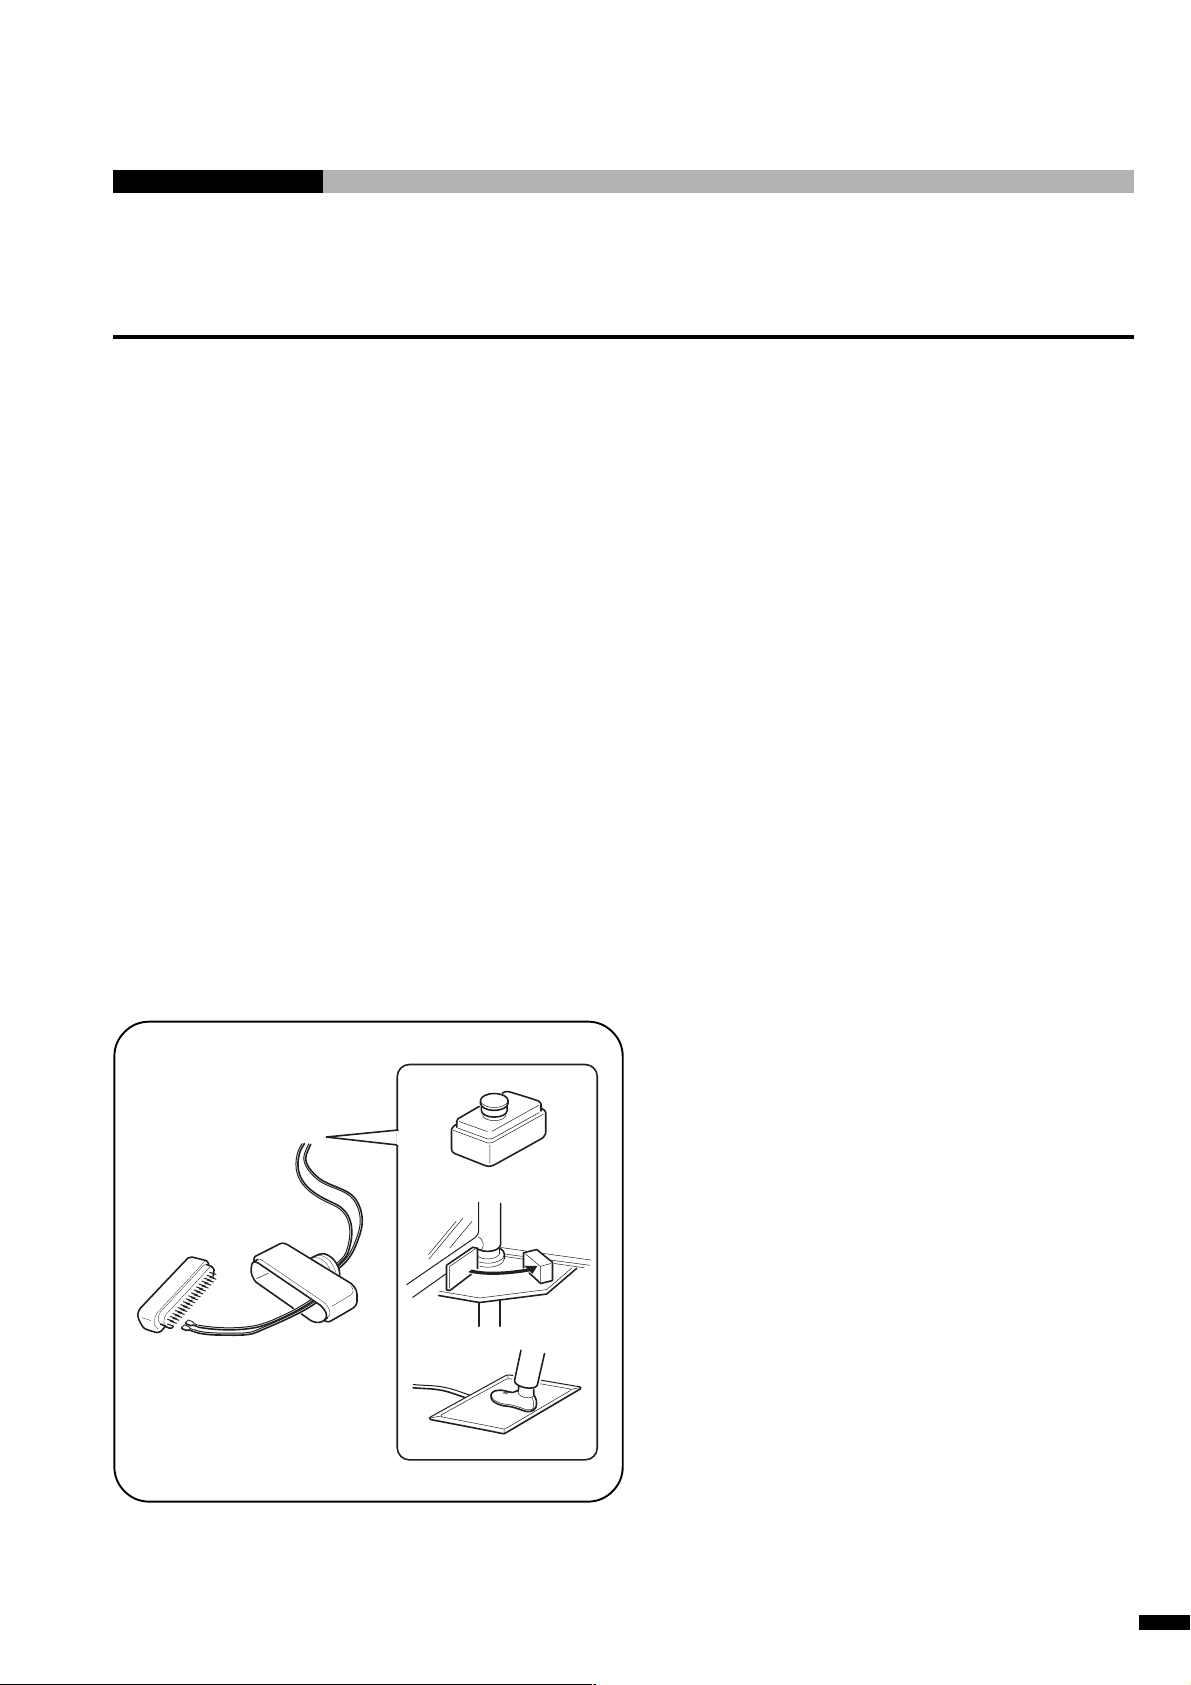
• SAFETY (for external switch) connector (rear)
• External Stop (same function as the STOP button of the main unit)
• Door, barrier
• External return (same operation as the RETURN button in the two operators line mode operation)
• USER INPUT/OUTPUT (EXTERNAL I/O) connector (rear)
• Selecting programs (same operation as the PROGRAM switch of the main unit) : (I3 ~ I10)
• Error reset (There is no switch corresponding to this function.) : (I11)
• External start (same operation as the START button of the main unit) : (I1)
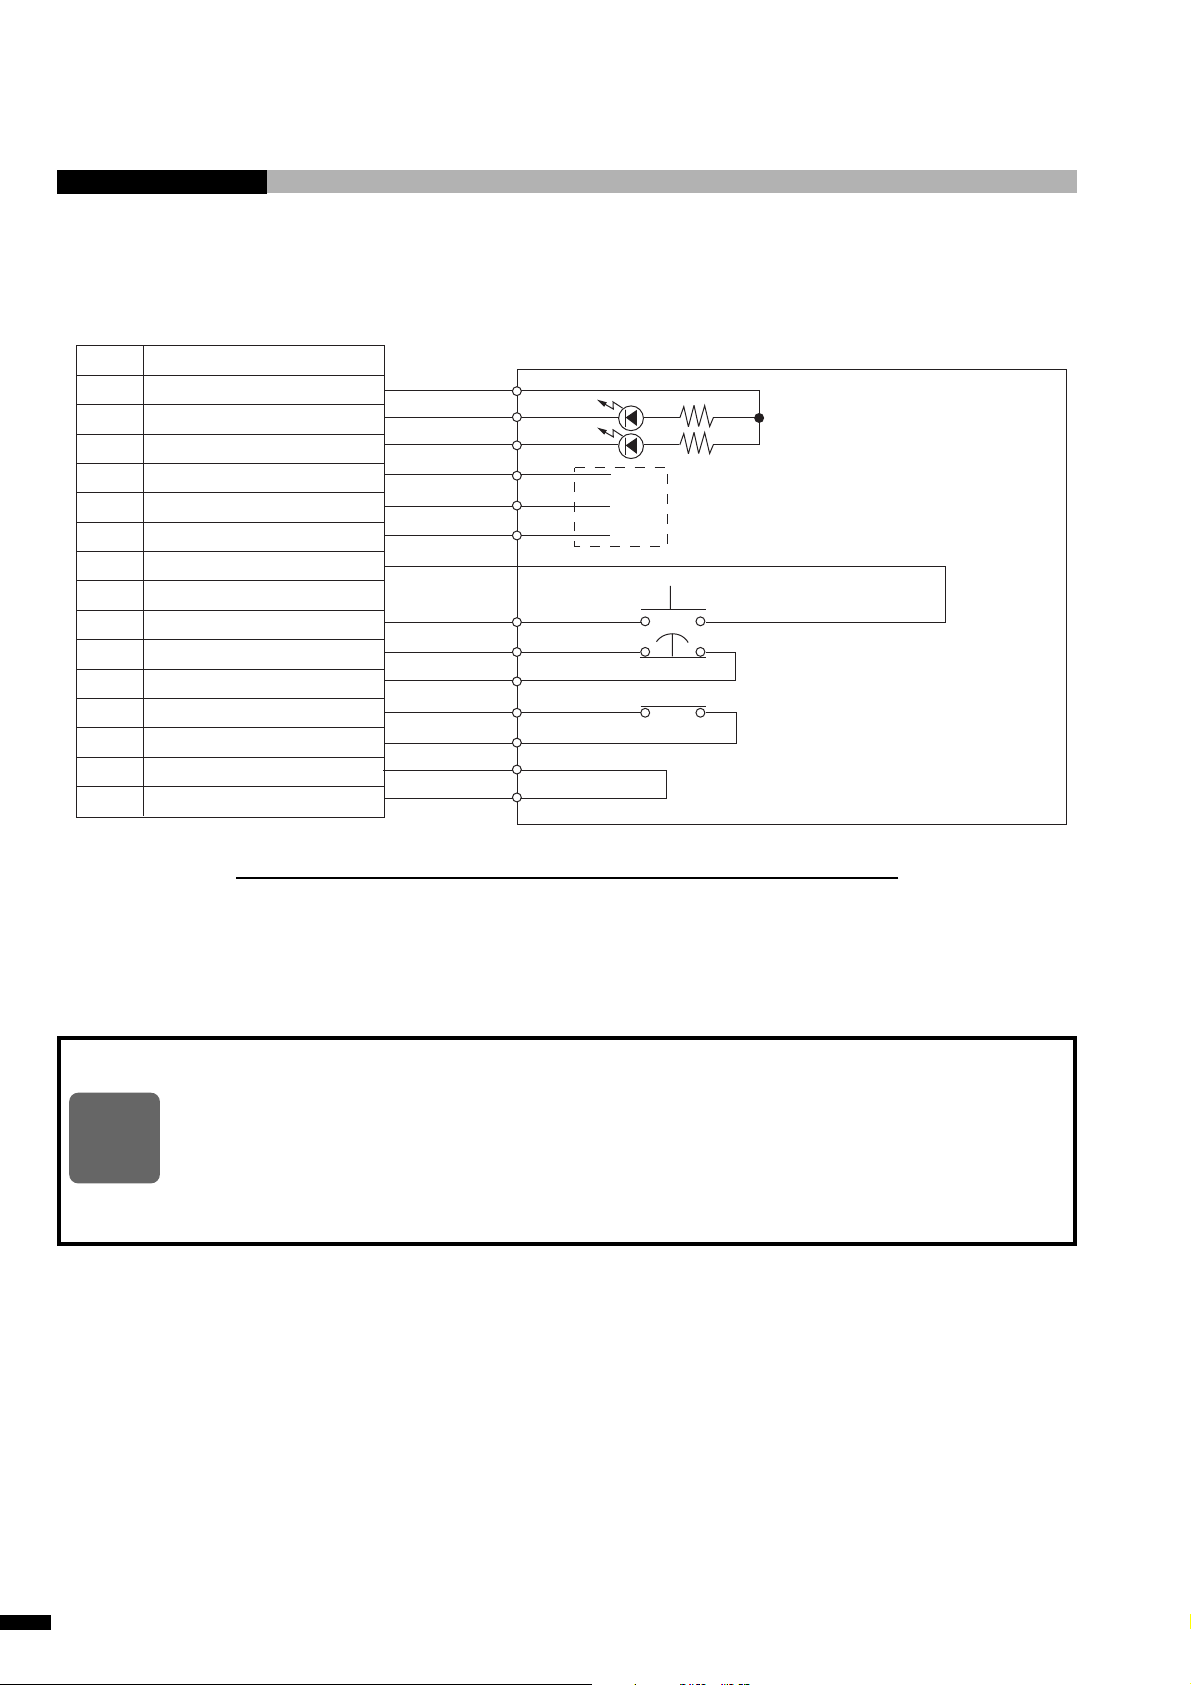
1. Connect an external switch to the SAFETY connector by soldering.
Connect the wires to the corresponding pins of the external switch connector.
Refer to the connector diagram for external switch, for the signals at the respective pins and type of
mating connector.
How to control the stop:
• Connect pin-10 and pin-11 to the respective switches.
• Connect pin-14 to pin-15. (or to pin-7)
How to control the RETURN :
• Connect pin-9 and pin-7 (or pin-15) to the respective switches.
Example of external
stop switch
Switch box
Door switch
Floor mat switch
CAST-AU4/B2521E
2-7
Page 31
Connector for external switch (SAFETY) Safety box
Pin No.
1
2
3
4
5
6
7
8
9
10
11
12
13
14
15
Stop RELAY OUT (NO)
Stop RELAY OUT (NC)
Contents
24 V
SA RETURN OUT
SA EMG OUT
Stop RELAY OUT (C)
0V
FG
SA RETURN IN
SA Stop IN (C)
SA Stop IN (NC)
BAR (C)
BAR (NC)
SA Stop ENABLE
0V
Max 0.1 A
Connect shield
of the cable
Wiring diagram of connector for external switch (SAFETY)
Applicable plug Type : DA-15PF-N (pin connector)
Applicable shell Type : DA-C4-J10
RETURN indicator
Stop indicator
These lines can be freely used by users because
these lines are prepared for independent relay
to be energized at the time of stop.
(Pins-4 and -6 are normally closed.
In a stop, pins-4 and -5 are closed.)
RETURN button
Stop button
Barrier switch, door switch, etc.
NOTE
2-8
◆
An external stop button can be inserted between pins-14 and –15, or between
pins-14 and –7.
◆
Be sure to use a shielded cable. The maximum length of a shielded cable is 1.5 m. The
external shield must be connected to pin No. 8.
◆
The external equipment (switch, indicator, box, etc.,) to be used for external operation
must be prepared by users.
CAST-AU4/B2521E
Page 32
2. Preparation
2. Connect the external signals to the USERl I/O connector by soldering.
Connect the wires to the corresponding pins of the USER I/O connector.
For the signal names and pin numbers of the respective pins, refer to the I/O connector input/output
specifications, Operation Manual (or Operation Manual of Full Open Programmable in the case of the
full open programmable specifications) of memory card (RK card).
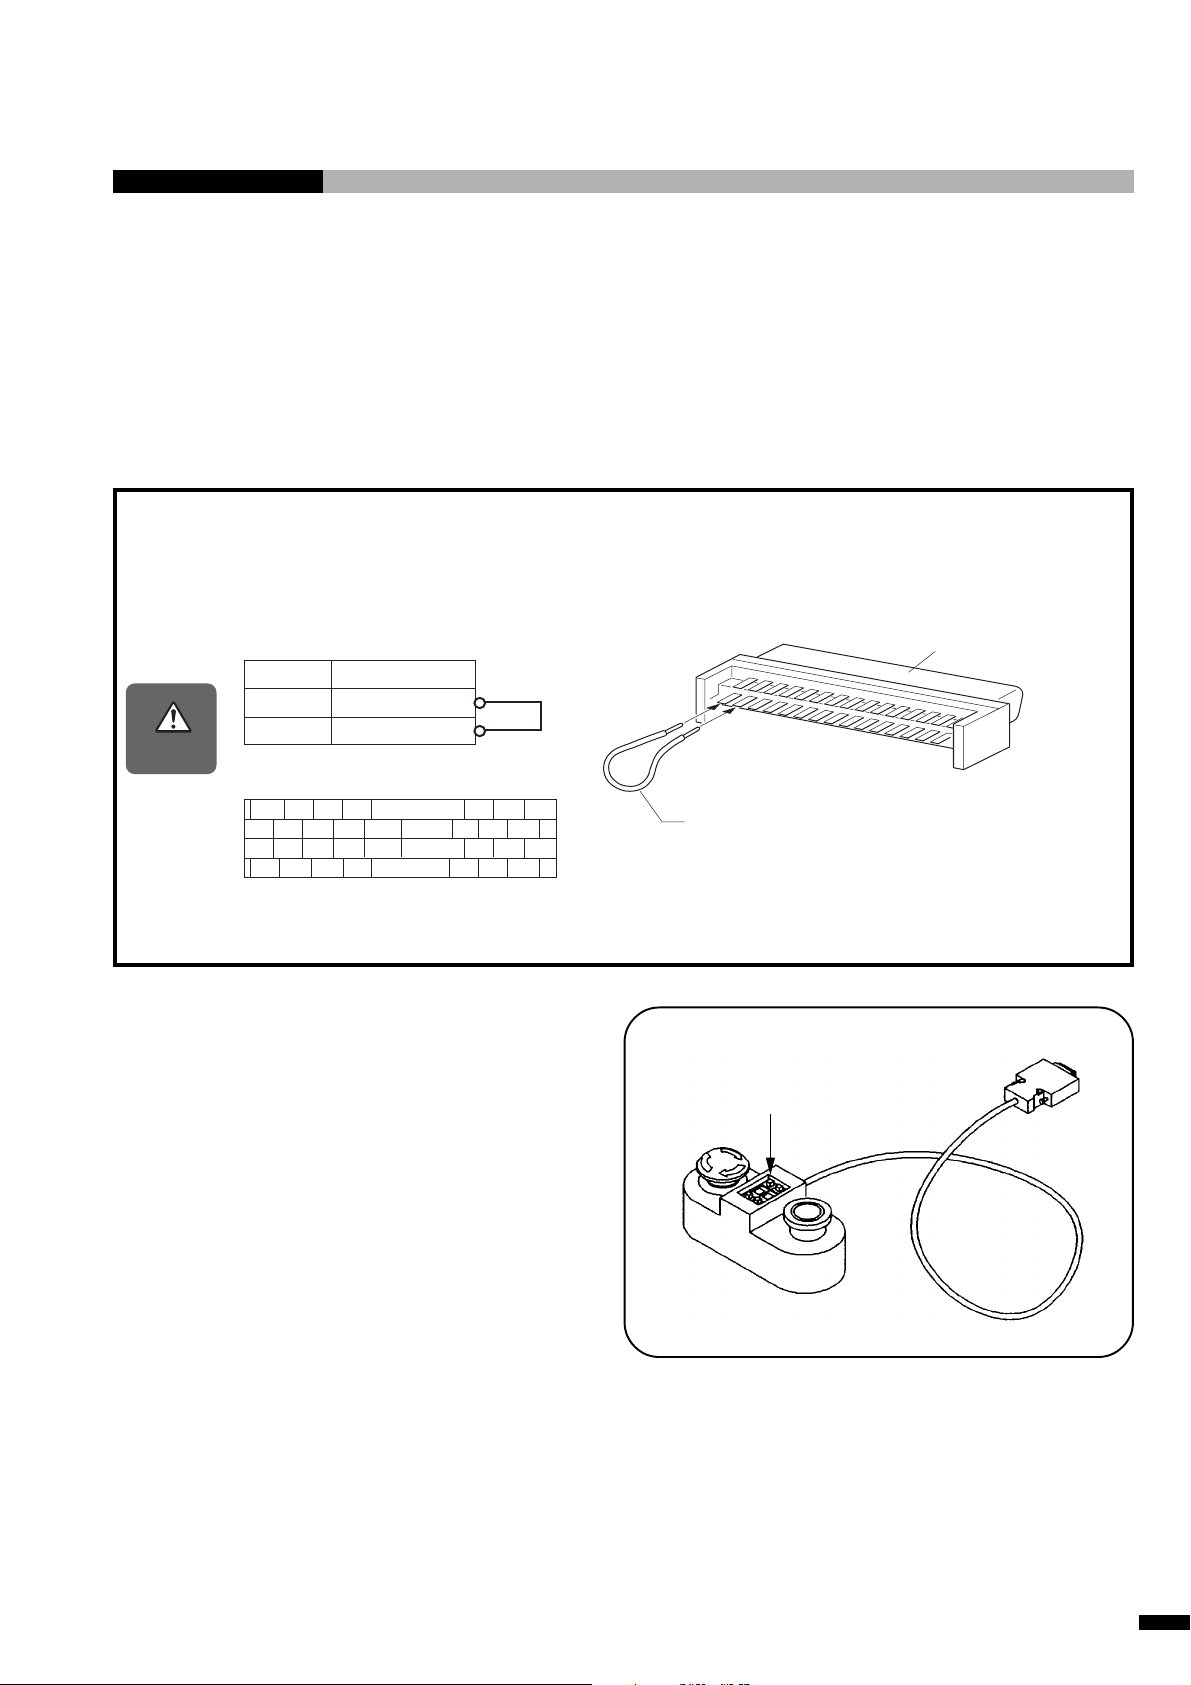
Precautions on operating the ROBOKIDS
When using the RK card, connect the I/O connector supplied to the USER I/O connector SI1
(SYSRUN) of the machine as shown.
• USER I/O connector (supplied)
Pin No. Name
1
3
0 V
SYSRUN
Connection
Caution
• Pin arrangement
2 468
1357 9
36 38 40 42
35 37 39
41
* Connect a jumper wire to the USER I/O connector (supplied), with soldering, attach the
connector supplied (accessory) to the connector.
3. Controlling the program selector from
external location. (RK card only)
Connect the wires to the pins of the USER I/O
connector corresponding to the external
signals, by soldering. (I3 to I10)
Set the first digit of the PROGRAM switch to
“F” when controlling the program selector
from external location.
If the second digit of the PROGRAM switch is
set to “F”, the application program is set to
external mode.
~
~
~
~
30 32 34
29 31 33
64
66 68
63
67
65
USER I/O connector
(supplied)
Pin No.1
Pin No.3
Connect a jumper wire with soldering
(AWG30 or equivalent)
PROGRAM switch
Controlling the program selector
from external location • • • Set to “F”
CAST-AU4/B2521E
2-9
Page 33
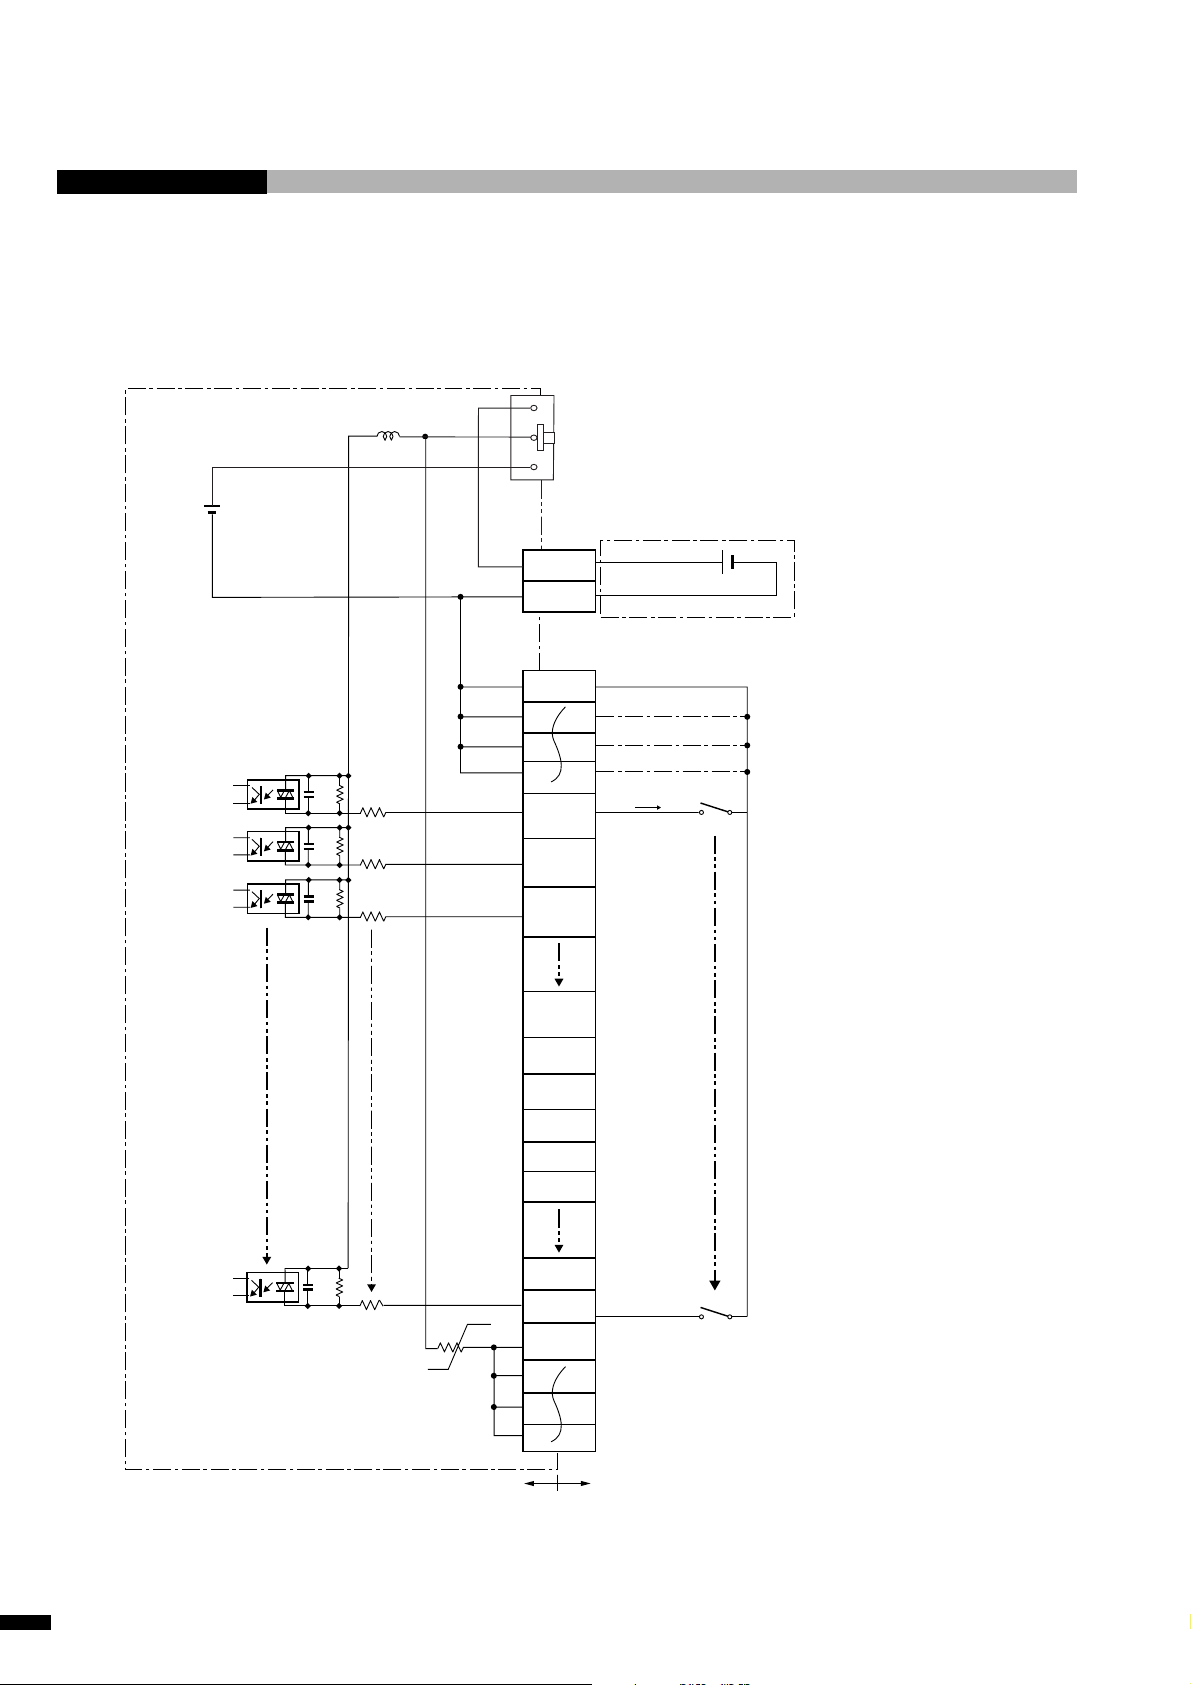
■ Input Circuit
USER I/O power supply source selector slide switch
Up position:
Externally supplied 24V
Down position:
Internal 24V (default setting)
24V
0V
TLP280
470Ω
680pF
3.3kΩ
3.3kΩ
3.3kΩ
S1
Pin No.
1
35
2
36
3
37
4
User external power supply connector
PC board side:
MC1.5/2-G-3.81 (Phoenix Contact Inc.)
24V IN
Note1) 24V 0V
0V IN
I/O connector
PC board side PCR-E68LMDA
(Honda communication)
0V
Direction of
SI1
(SYSRUN)
current
Maximum 7mA
SW1
SI1 operates when
SW1 is ON.
SI2
Reservation
(
SI3
(
SI8
(
input
Reservation
input
Reservation
input
)
)
)
I 1
2-10
Thermistor
(1A)
51
18
52
19
53
I 2
I 3
I 4
I 5
I 21
I 22
COM1
SW30
Note1) When USER I/O power supply
source selector slide switch
is set to 24V.
User sideController side
CAST-AU4/B2521E
Page 34
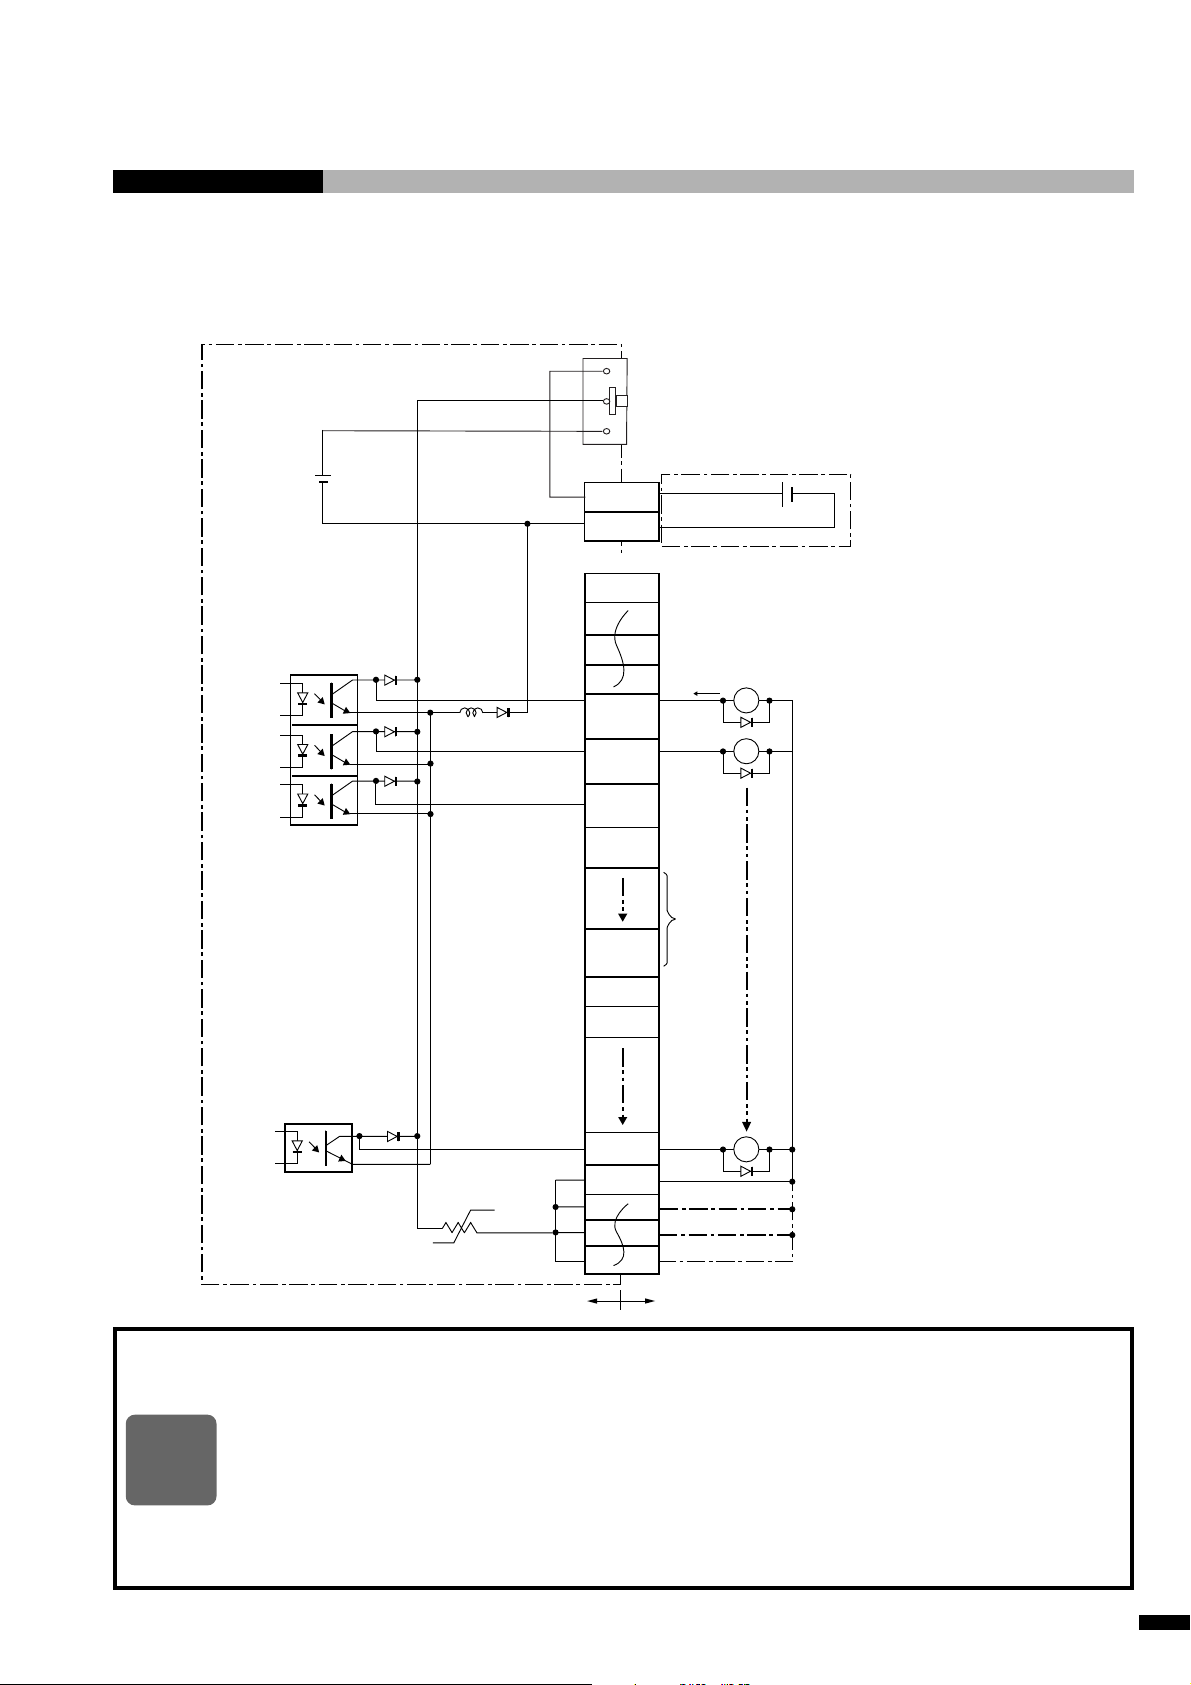
■ Output Circuit
24V
0V
S1
USER I/O power supply source selector slide switch
Up position:Externally supplied 24V
Down position: Internal 24V (default setting)
User external power supply connector
PC board side: MC1.5/2-G-3.81
(Phoenix Contact Inc.)
24V IN
0V IN
0V
Note1) 24V 0V
I/O connector
PC board side PCR-E68LMDA
(Honda communication)
2. Preparation
TLP127
Thermistor (1A)
20
SO1
(EMC-OUT)
54
SO2
(ERROR)
21
SO3
(BARRIER)
SO4
(DRIVE)
SO8
Reservation
(
output
L 1
L 2
68
L 22
18
COM1
52
19
53
Direction of
current
Maximum
0.1A
Reservation
output
)
X1
Diode
X2
X30
Relay coil voltage
(DC 24V)
Note1) When USER I/O power supply
source selector slide switch
is set to 24V.
◆
◆
NOTE
◆
◆
CAST-AU4/B2521E
User sideController side
Add the diodes as shown when relay coils are connected as the load.
Be careful that the thermistor operates to shut down the +24 V power supply when 24 V
output is used and the current of 1 A or more flows. Modify the external circuit to reduce
the current capacity to 1 A or less. Thermistor shuts down the +24 V power supply and
returns when the main power is turned on again.
(The maximum current capacity of internal power supply is 1 A.)
Be careful that current capacity is maximum 0.1 A per one output point.
Be sure to use a shielded cable for I/O connection. The maximum length of a shielded
cable is 1.0 m. Use the core conductor of the shielded cable.
2-11
Page 35
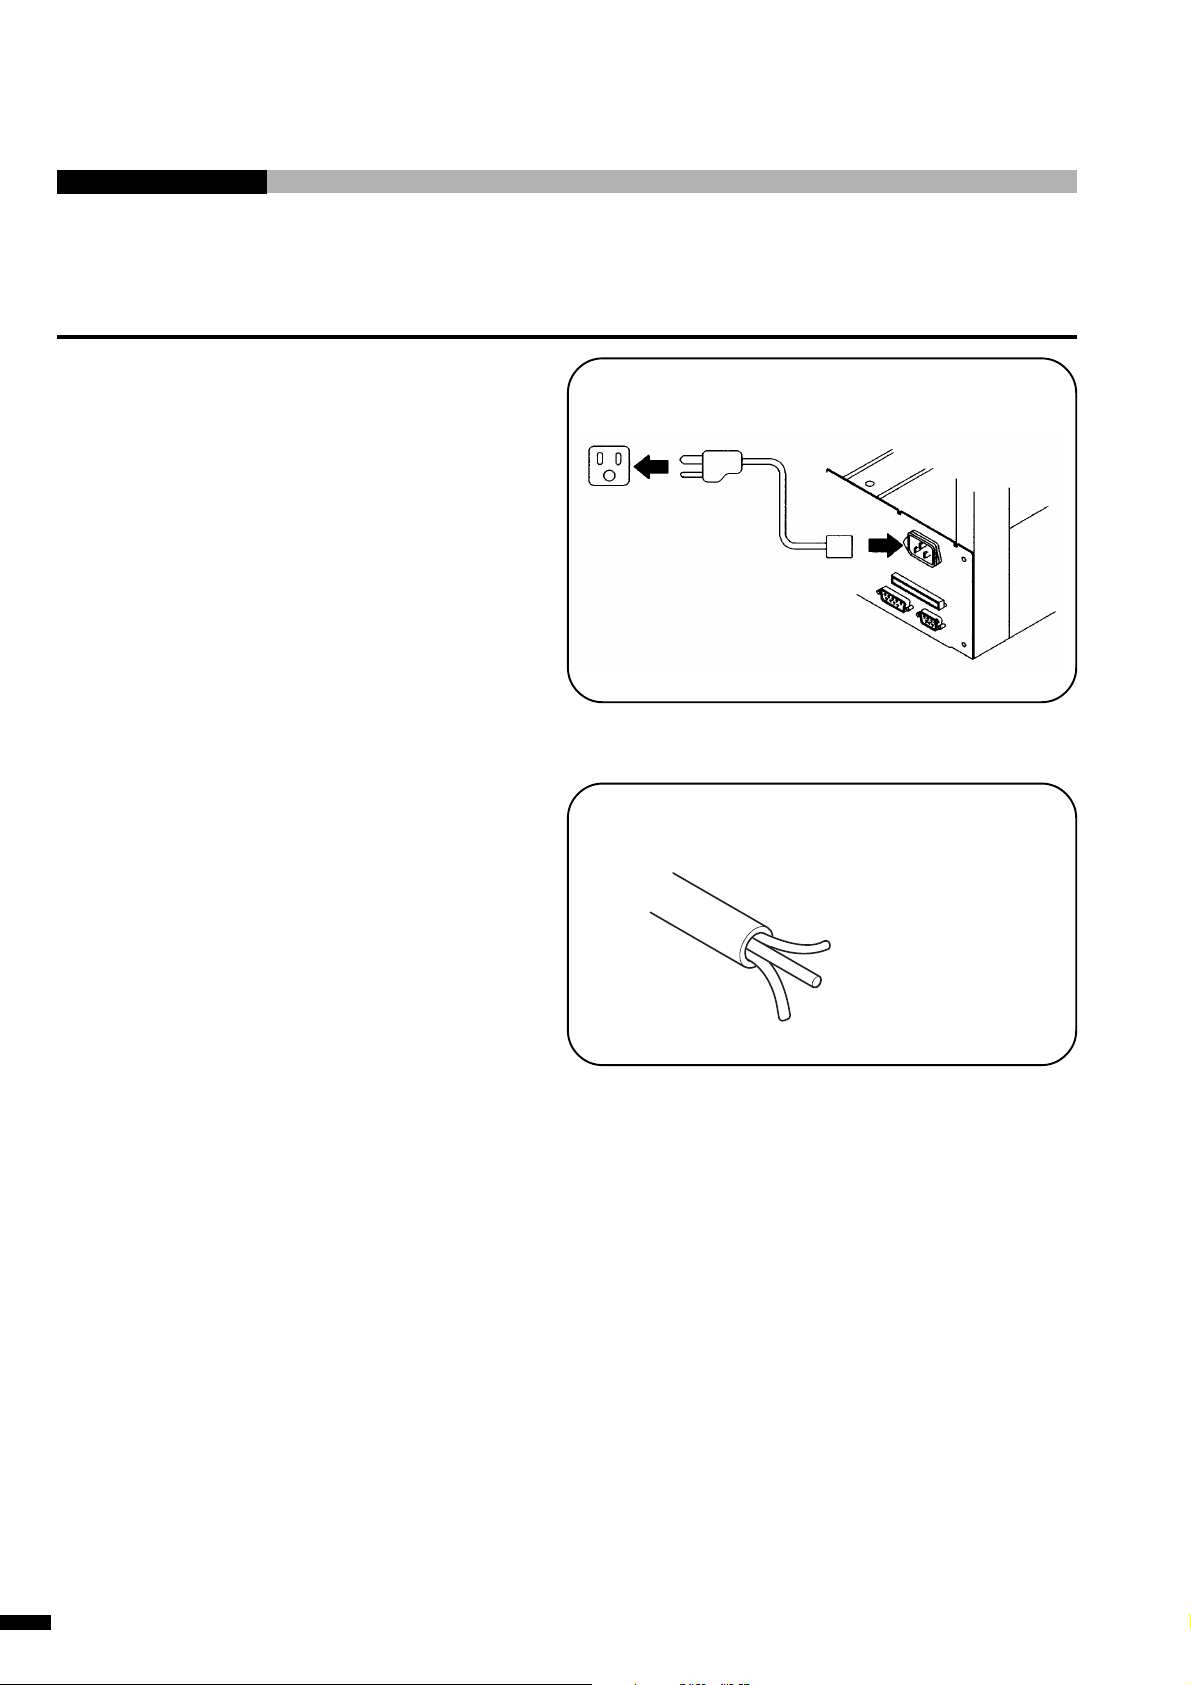
2-3 Connecting to an Electrical Outlet
Prepare the power cable for AC 200 V to 240 V
referring to the following connection diagram.
The user must provide and wire an AC power plug
to connect to the AC outlet.
To the three-pin electrical outlet
Power cable (supplied)
To the machine INLET
Connection diagram of the AC power cable for 200 V to 240 V
Power cable end
Brown
Blue
Green/Yellow
L
N
Earth
Plug end
2-12
CAST-AU4/B2521E
Page 36
2. Preparation
2-4 Starting Up the Base Machine
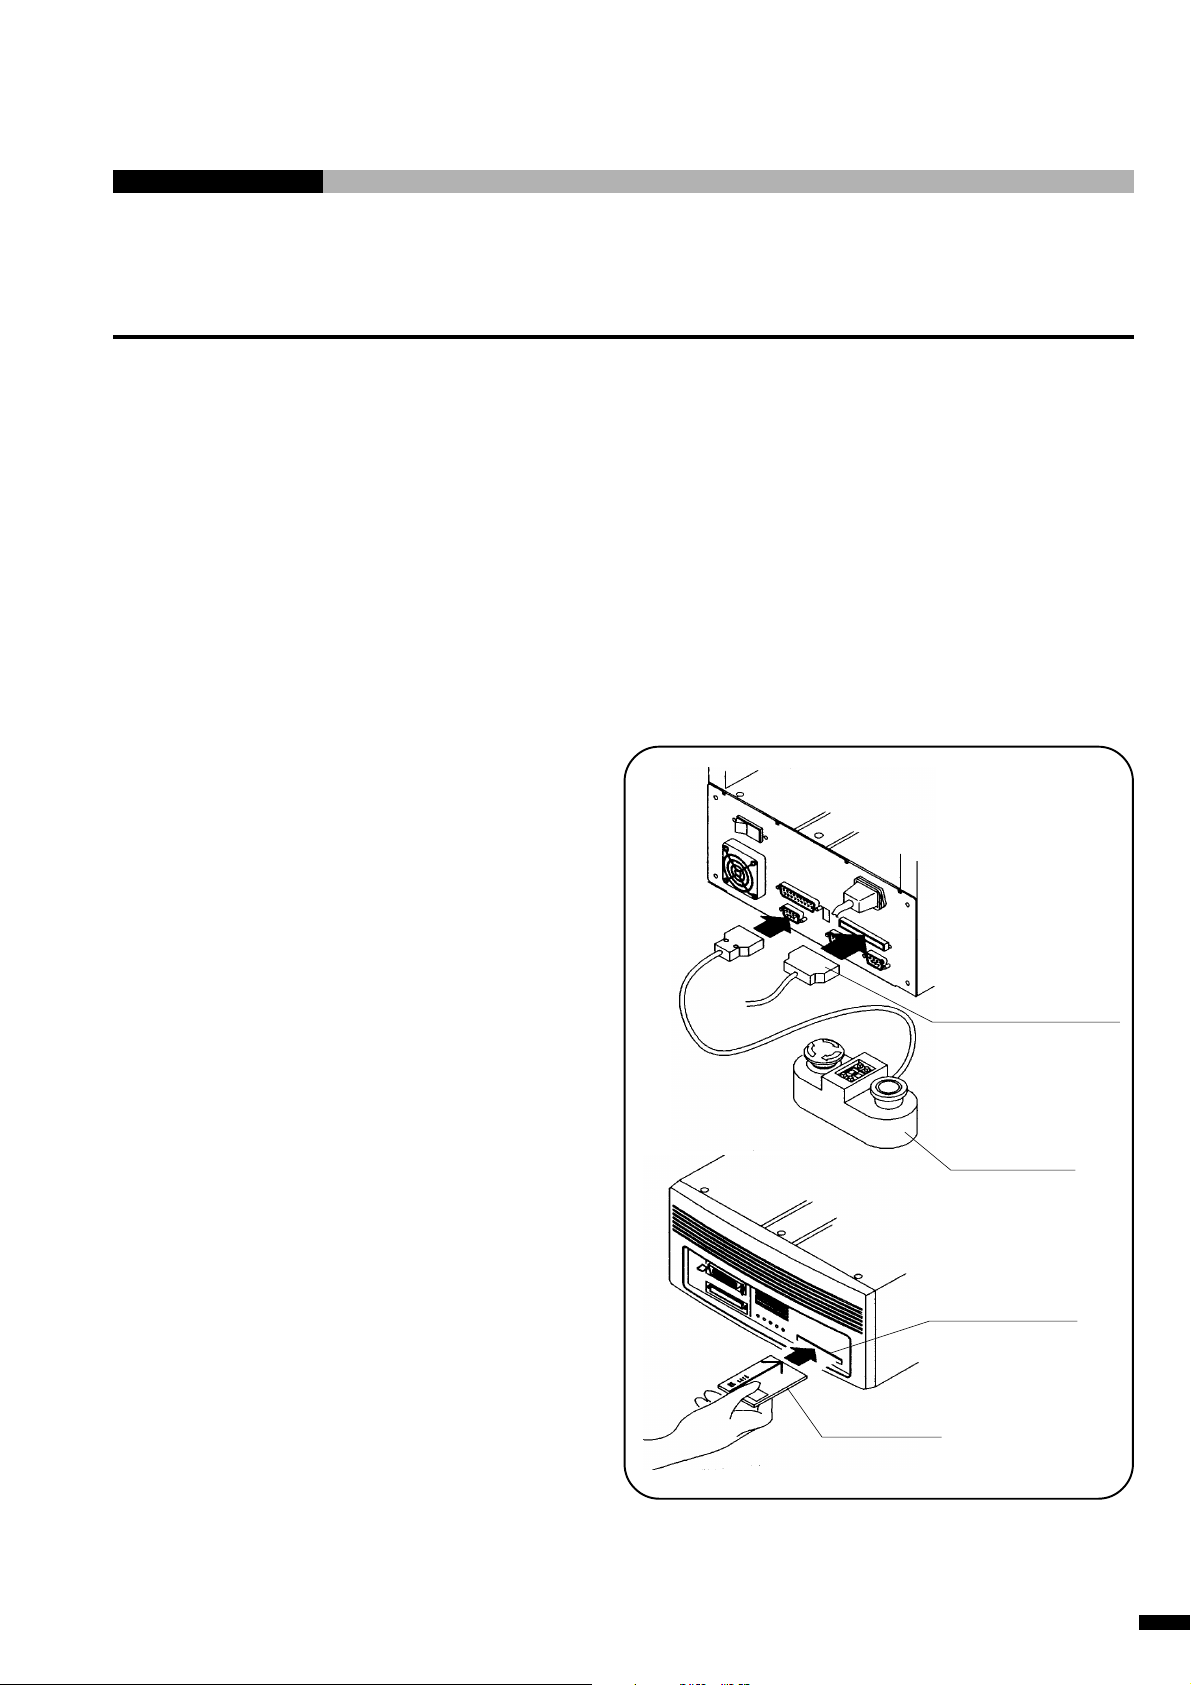
Make sure that the main power is turned off.
Connect the operation box.
2-4-1 Full-open Programmable Specification
Turn on the power switch on the rear panel. Subsequent operating procedure changes depending on the
application created by user.
2-4-2 When Using Memory Card “RK card”
Before operation ensure that an application memory card (RK card) is inserted in the memory card slot.
When you have purchased another type of optional memory card in order to use the robot in another
assembly type, re-insert the new card to the memory card slot.
1. Make sure that the main power is turned
off. Insert the memory card into the
memory card slot.
Do not remove or insert a memory card while
power is turned on. It may cause trouble.
2. Connect the USER I/O connector (in
which SYSRUN is shorted) to the rear
panel of the ROBOKIDS. (Refer to page
2-6.)
USER I/O connector
Operation box
Memory card slot
CAST-AU4/B2521E
Memory card
2-13
Page 37
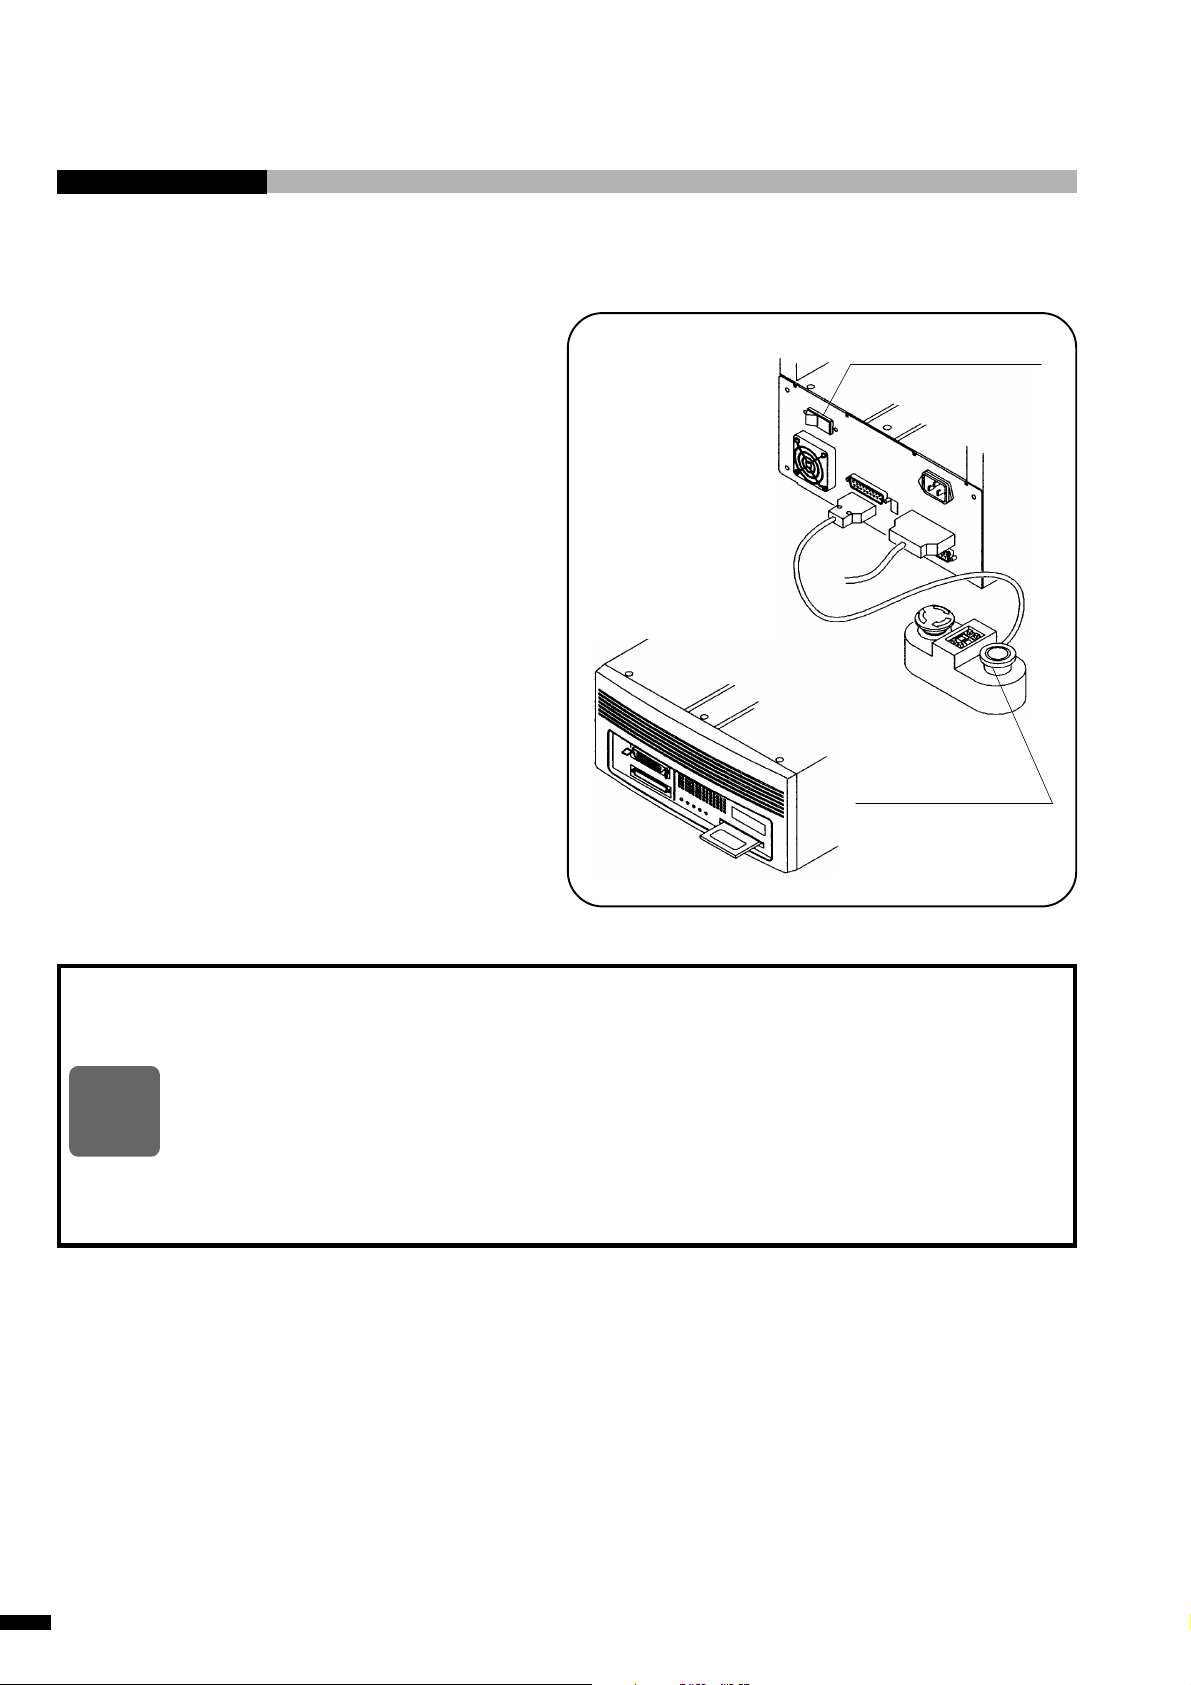
3. Turn the base machine on.
POWER switch · · · ON
The START indicator
lights in green.
About five seconds later, the white indicator of
START button starts flashing in green.
4. Press the START button.
The machine starts returning home.
The green indicator of the START button turns
on and changes to slow flashing after completing
home return. (About 30 seconds later)
5. Press the START button again.
The green indicator of START button turns on
and the machine starts assembling work.
NOTE
◆
Do not remove or insert a memory card while the power is turned on.
The machine will not work if the memory card is removed.
◆
Before turning on the machine, always insert the memory card in the memory card slot
first. The main assembly control program (the teaching pendant software only in the
semi-programmable specification) will then be loaded automatically into the unit
whenever the machine is turned on.
◆
This operation does not load the point programs: such design prevents the internal point
programs (created as a result of a teaching) from being overwritten by mistake.
2-14
CAST-AU4/B2521E
Page 38
3. Maintenance
3. Maintenance
3-1 Maintaining the Machine
Clean the surfaces of the machine with a soft dry cloth. If the stain is difficult to remove, use cloth
moistened with a mild detergent solution, followed by using a dry cloth. Do not use volatile solvents such
as alcohol, benzene or thinner, as they may mar the finish.
Consult your local Sony dealer for the consumable parts, jigs and tools which are required for maintenance.
3-2 Greasing the Machine and Removing the Fallen Materials
When shipped, the machine is greased along the guide rails of the X- and Y-axes. This ensures smooth
operation of the work table. To maintain the machine in top condition, grease the rails and remove the fallen
materials every 6 months. Use the NSK grease No. 1 (Nippon Seiko or Multemp LRL3 equivalent).
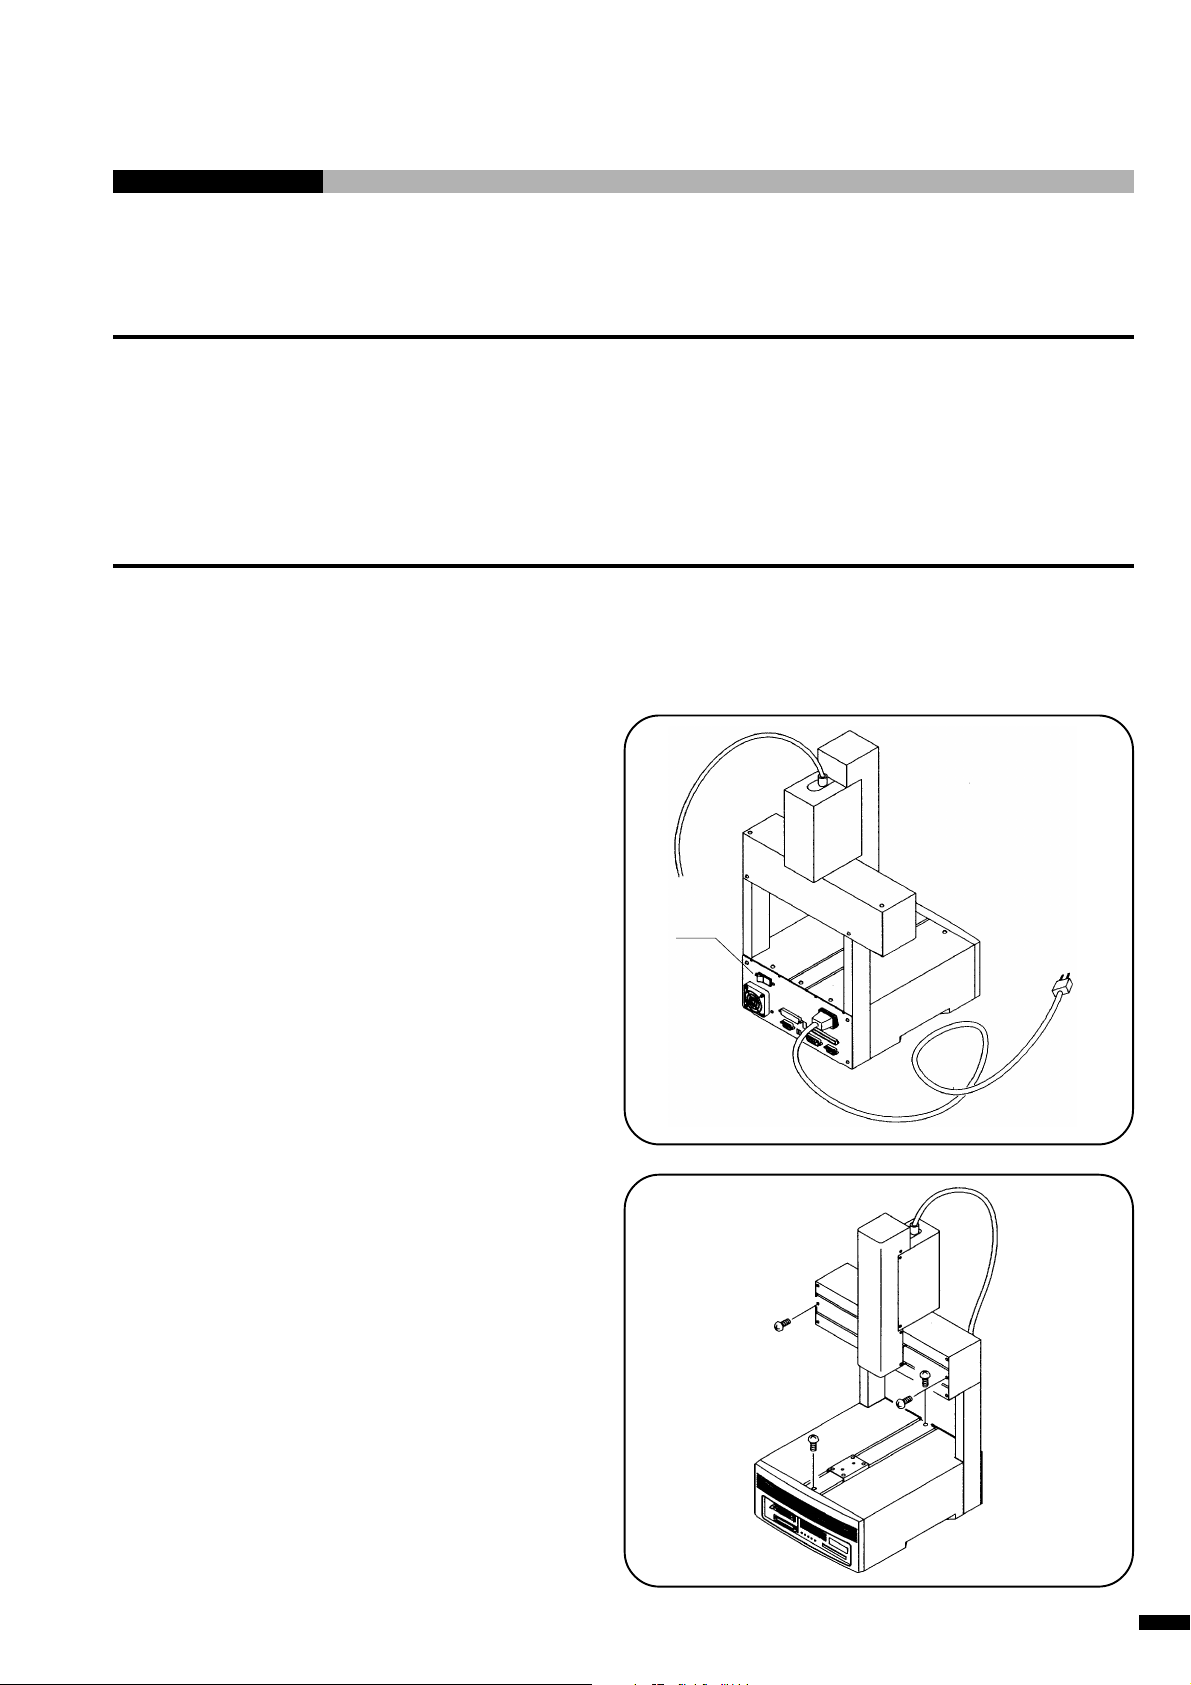
1. Turn off the power of machine, and
unplug the power cord from an
electrical outlet.
When the Z unit is used, move down the Z-axis
to the bottom and turn off the POWER switch.
2. Remove the screws securing the X-axis
and Y-axis cover, and also the front
cover of Z unit and ZR unit (also Z-axis
cover for the 3 axes specification).
OFF
CAST-AU4/B2521E
3-1
Page 39
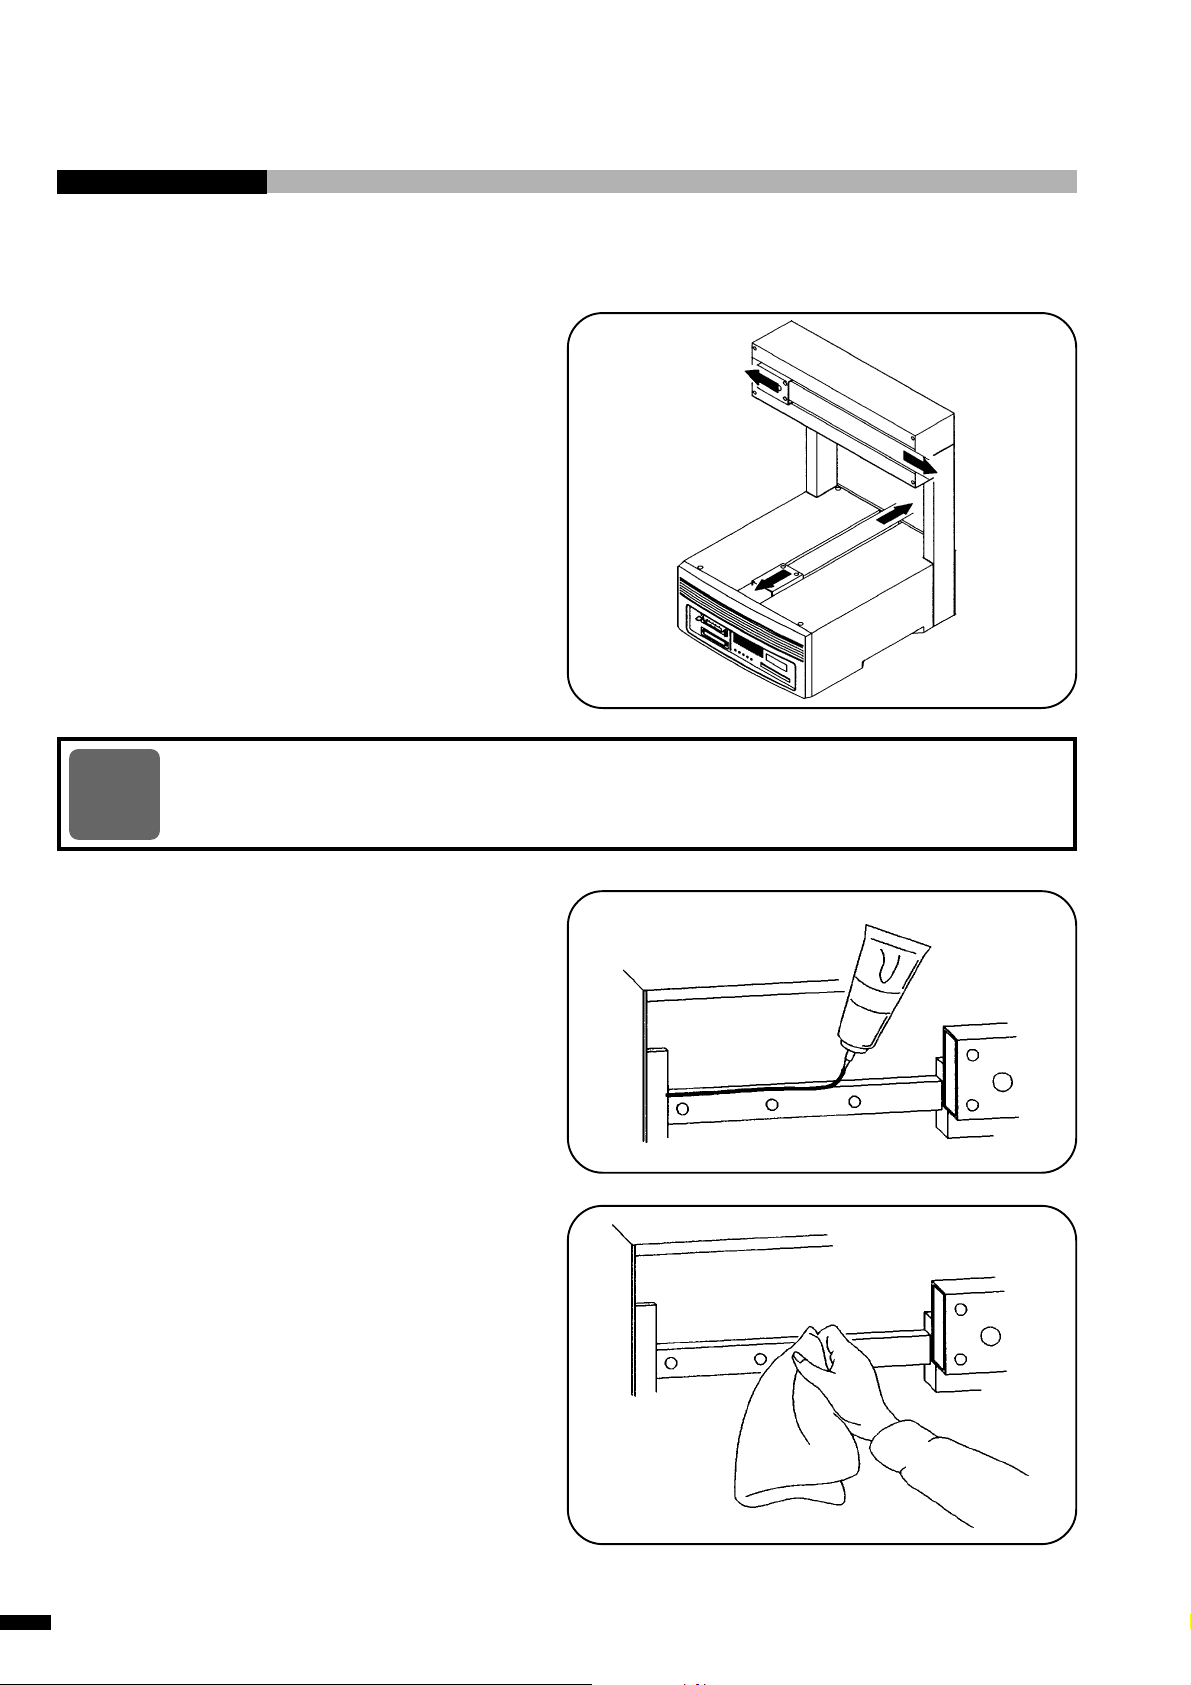
3. Move the work table and the work unit
to the ends by hand, remove the X-axis
and Y-axis covers by pulling them, then
remove the fallen materials such as
screws.
Remove the front cover of the Z-unit and ZRunit also.
NOTE
If the work table and the work unit are not moved to the ends as indicated, they may cause
damage to the covers.
4. Wipe of the old grease and apply grease
at the center of each side of the X-axis
and Y-axis guide rails.
Apply about 0.2 g of grease.
Be careful not to apply grease to the drive belts.
5. Move the work table and the work unit
to the left and to the right several times
to spread the grease over the length of
each rail.
Wipe off extra grease at the ends of each rail
with a cloth. (Extra grease will be solidified
causing malfunction.)
3-2
CAST-AU4/B2521E
Page 40
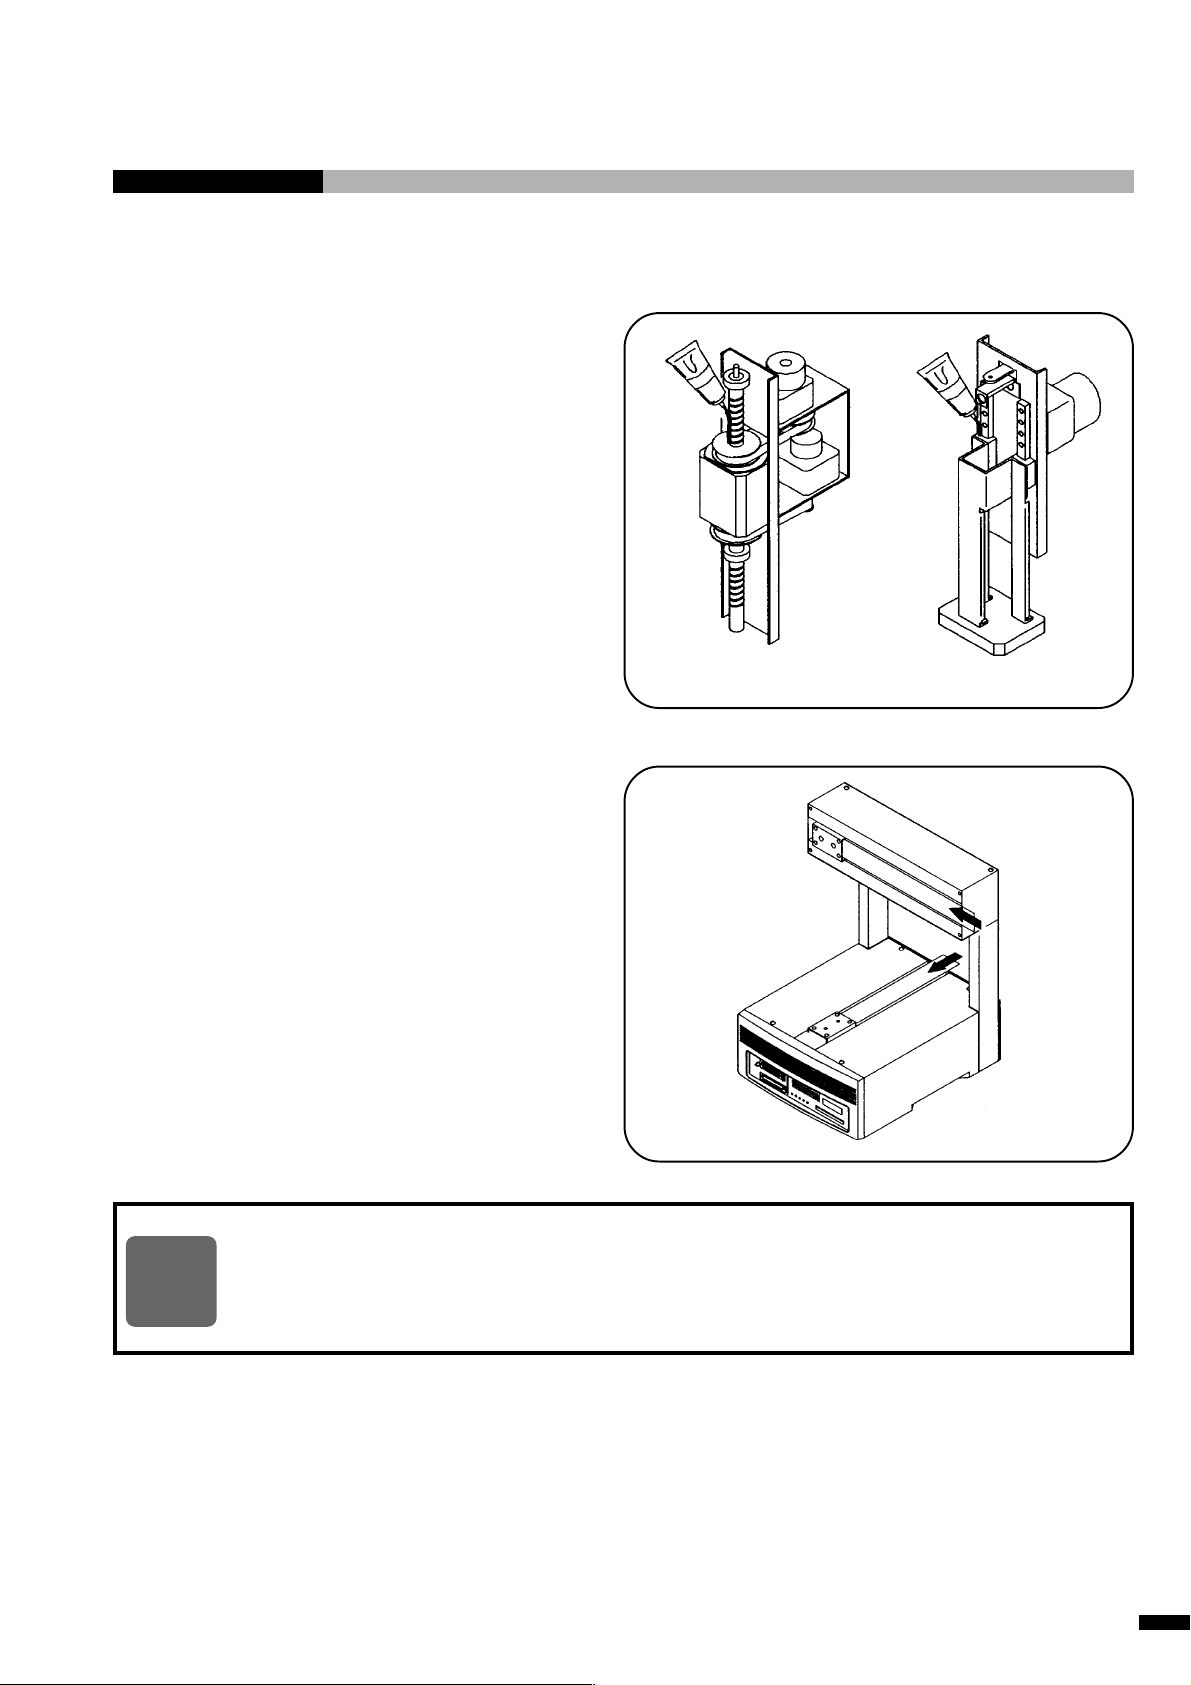
6. Apply grease to the Z unit and the ZR
4 axes specification model 3 axes specification model
unit as shown in the same manner.
3. Maintenance
7. Attach the covers of the X-axis, Y-axis,
Z unit and ZR unit to their original
positions.
◆
Be careful not to damage the covers when they are reinstalled.
◆
NOTE
After the covers are attached, move the respective axes using the teaching pendant until
grease covers all necessary part.
◆
Be careful that the motors get very hot immediately after the operation is stopped.
CAST-AU4/B2521E
3-3
Page 41
3-3 Cleaning and Replacing the Air Filter
Air is circulated in the controller of the base
machine to cool the controller. The cooling air is
introduced through the air filter on the rear of the
machine. Dust may be accumulated choking the
air filter which decreases the cooling power
causing serious damage such as thermal
breakdown of ICs if the air filter is not properly
maintained. Clean the air filter once every six
months. If the air filter is heavily clogged, replace
the air filter.
1. Turn off the POWER switch and unplug
the power cord from an electrical outlet.
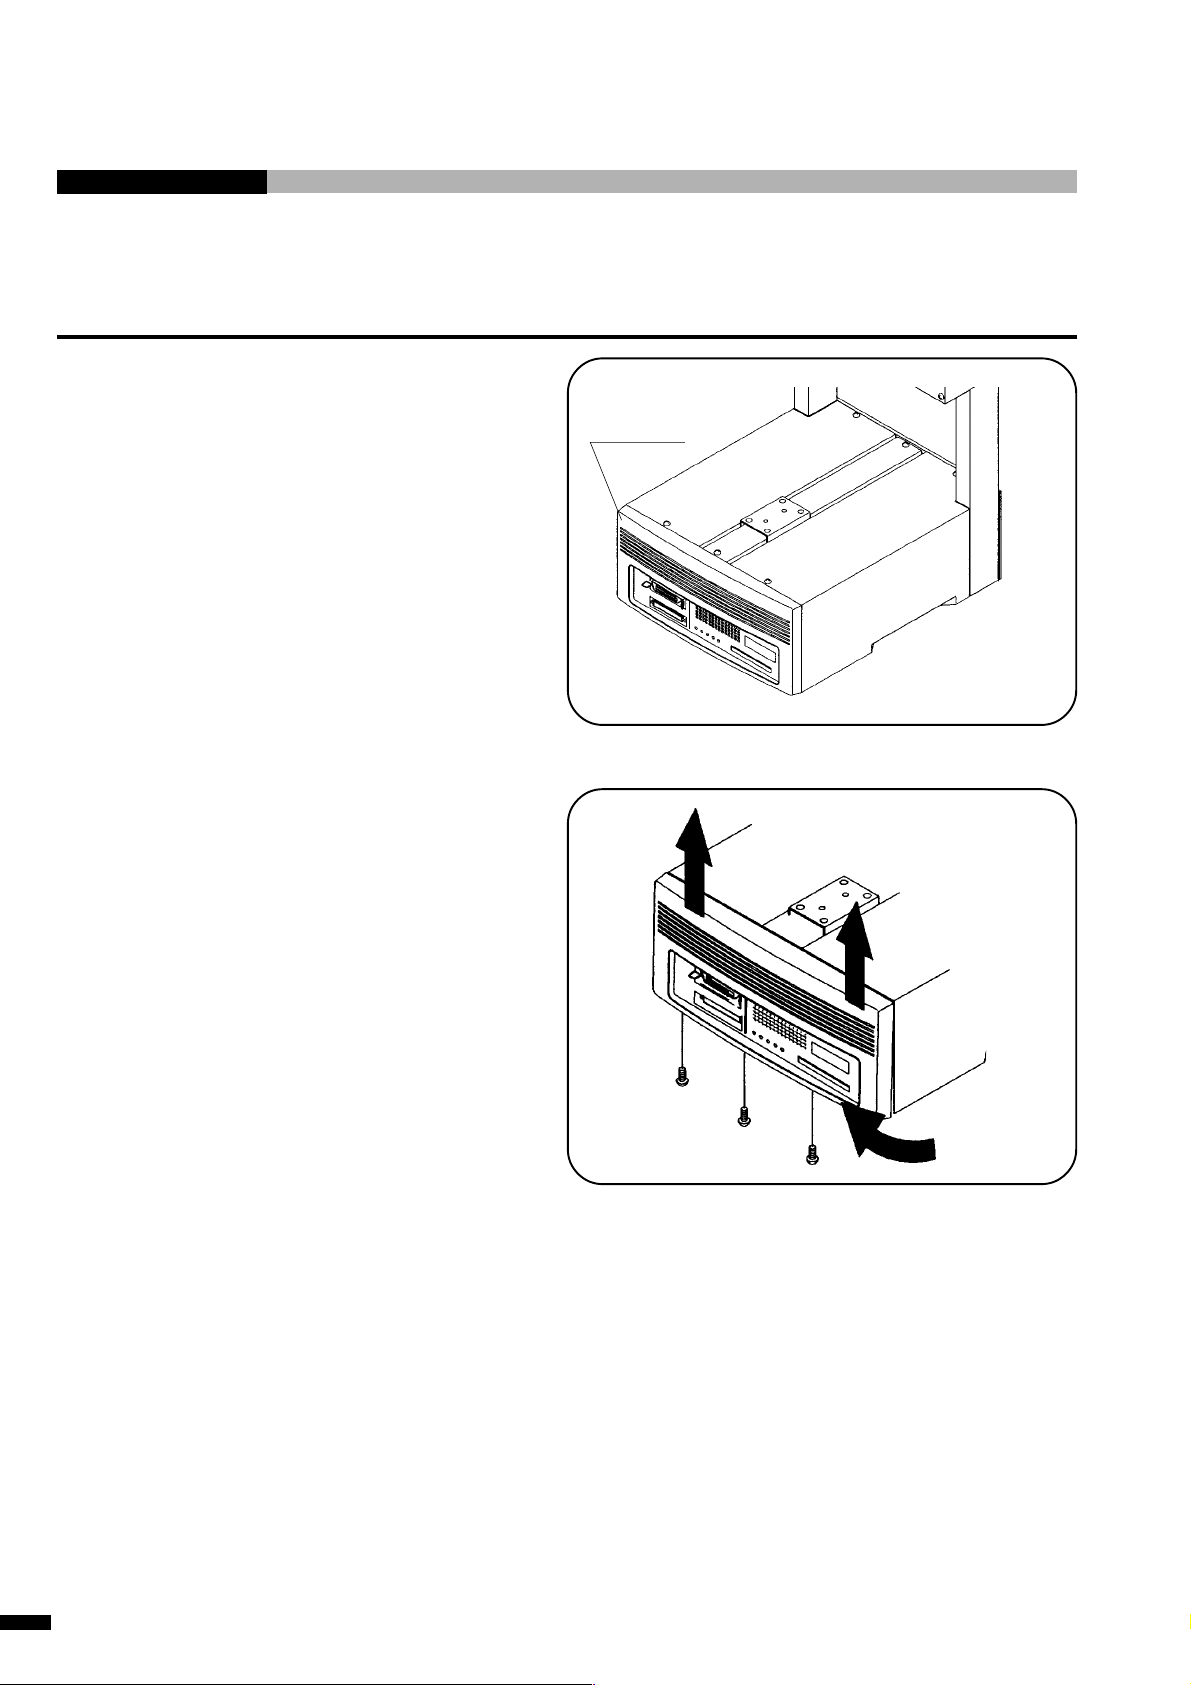
2. Remove the front cover.
Remove the bottom screws. While pulling the
bottom of the cover to the front, raise the
catches on the top.
Front cover
Air filter is inside
the front cover.
3-4
CAST-AU4/B2521E
Page 42
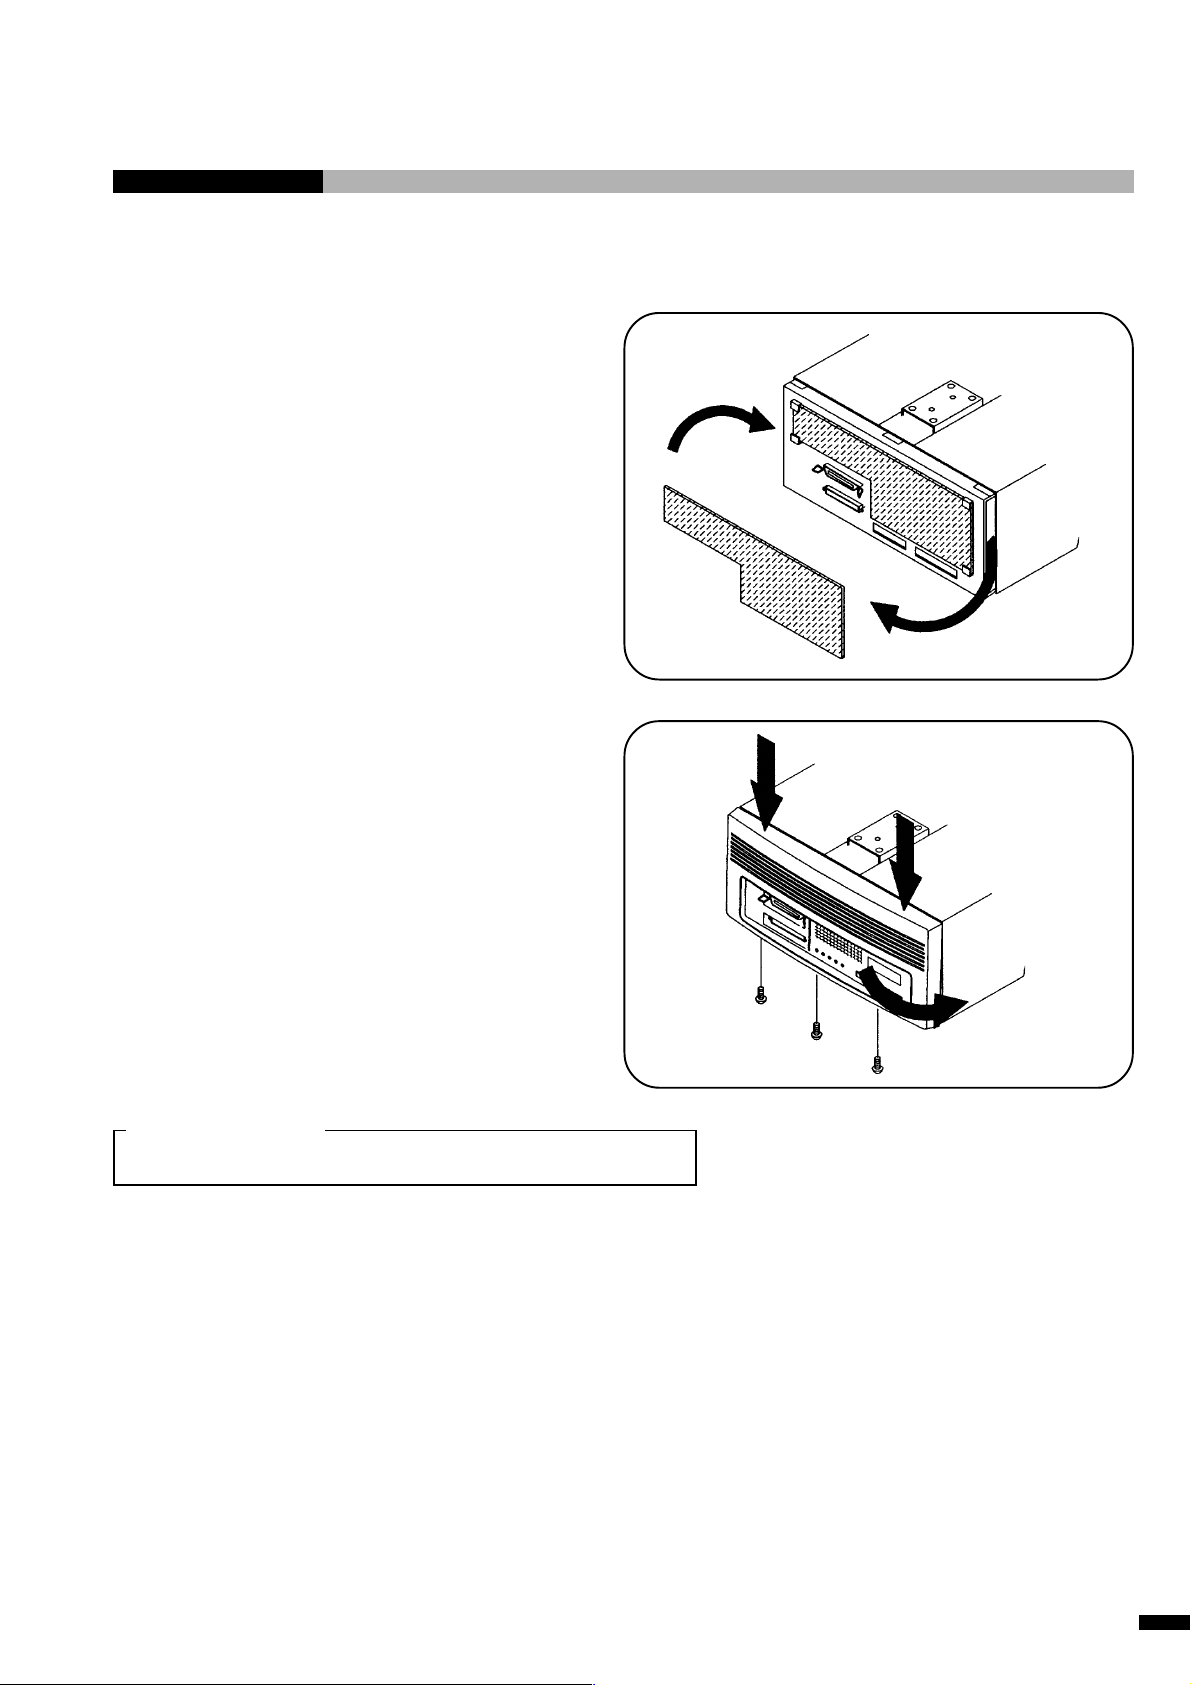
3. Replace the media (filter).
3. Maintenance
4. Reinstall the front cover as before.
Replacement media
Sony Order No. .........4-761-607-01
CAST-AU4/B2521E
3-5
Page 43
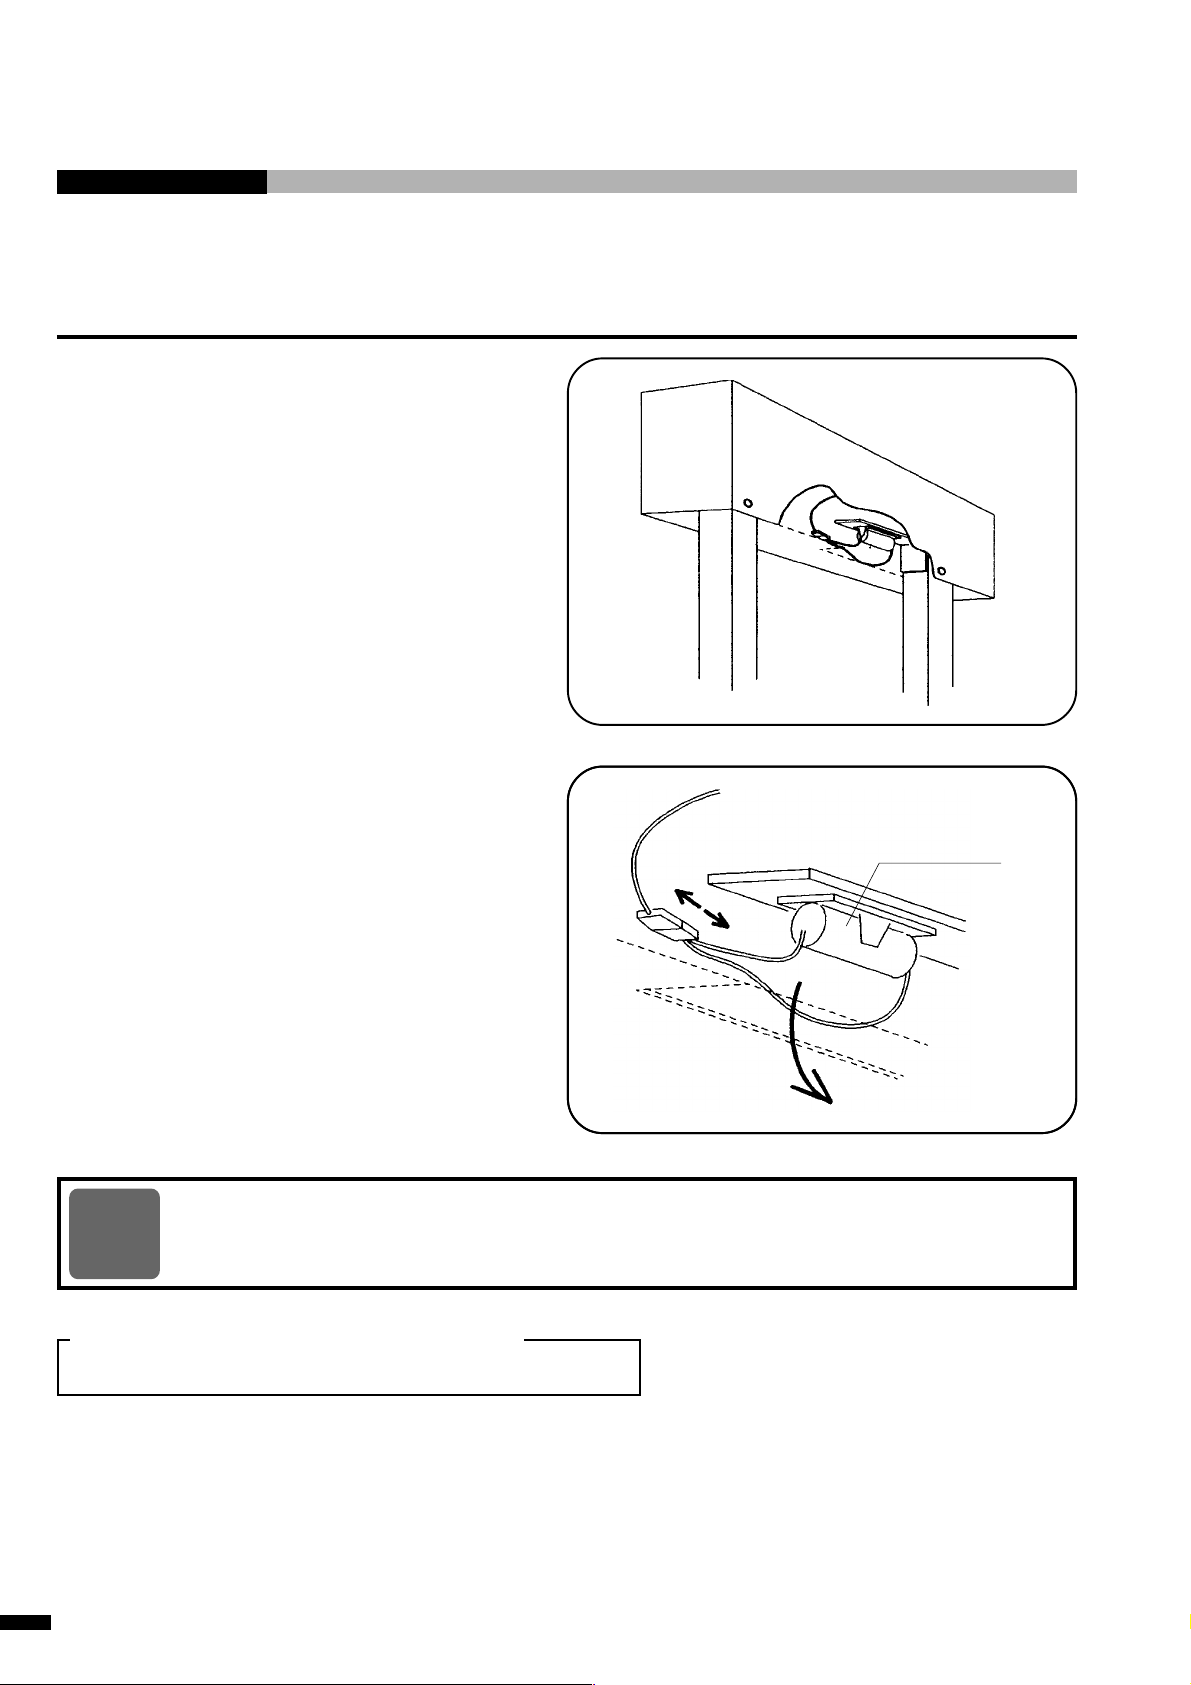
3-4 Replacing the Battery
1. Turn off the POWER switch and unplug
the AC power cord from the AC outlet.
The battery is located in the recess at the
bottom on the rear of the Z-axis.
2. Exchange the battery with the new
lithium battery.
lithium battery
NOTE
If not, internal data can be damaged.
Replacement lithium battery (primary battery)
Sony Order No. .........1-528-932-11
3-6
Battery replacement must be completed within eight hours after the main power is turned off.
CAST-AU4/B2521E
Page 44
4. Troubleshooting
4. Troubleshooting
4-1 Common Items
4-1-1 Stepping Out (Note 1)
The machine performs open loop servo control using a pulse motor (stepping motor) without positional
feedback. The machine thus continues to operate with positional error even if it steps out due to overloading
of the retaining torque of the motor.
When the base machine steps out, or when it operates with positional errors, check the
following items first.
(1) Overloaded
The base machine has a limited carrying loading. Check whether the load exceeds the maximum payload
that the respective axes can carry by referring to page 1-6, section 1-3, “Specifications.”
The payload with which the machine can operate at 100% speed is smaller than the maximum payload, and
varies for each axis. Check the actual load weight before operating the machine.
(2) External force
External forces from cables and pipes are normally larger than anticipated, and can easily exceed the
retaining torque of the motor. Be careful of unexpected external forces when using stiff wires or pipes that
cannot be easily bent.
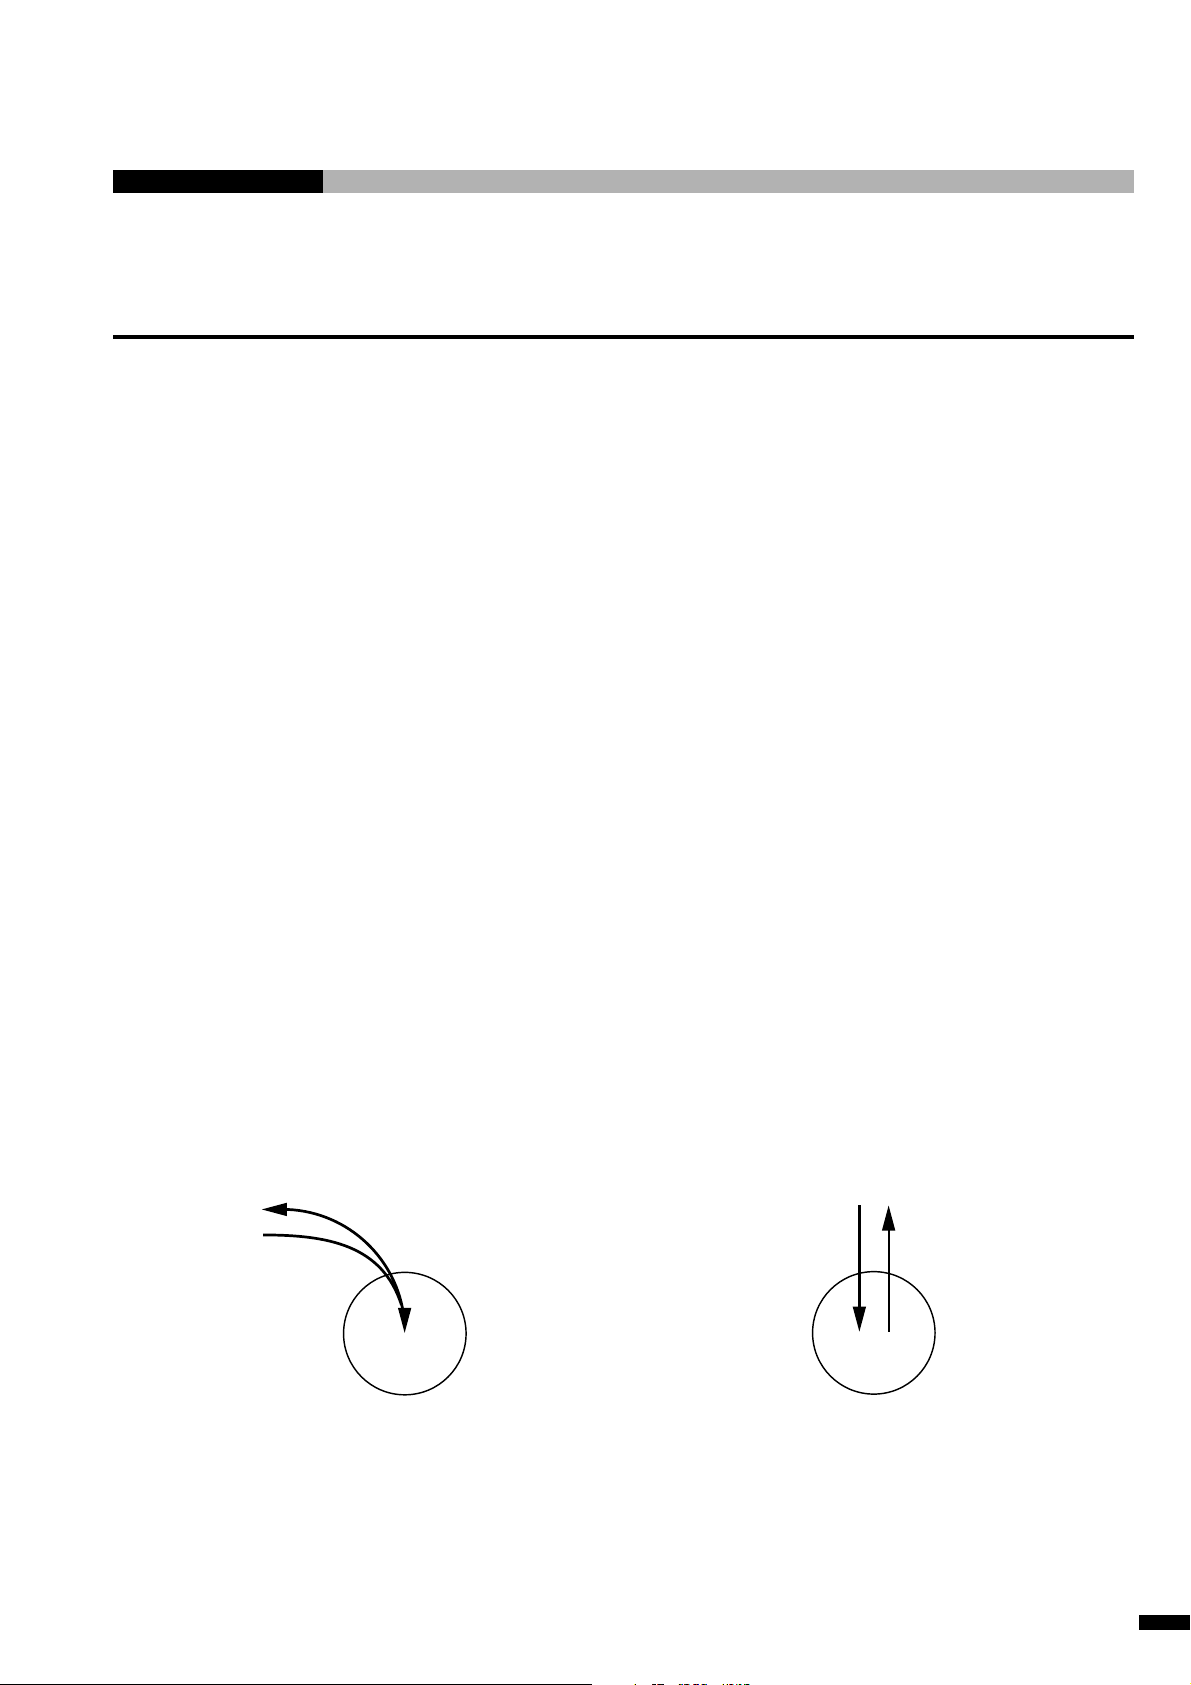
(3) Rapid speed change
When a rapid speed change occurs such as an immediate returning movement while an interpolation
operation is being performed, the load inertia may exceed the retaining torque of the motor, causing the
motor to step out.
Before performing such a movement, reduce the operating speed.
Example : Returning movement of the circular Example : Returning movement of the Z-axis
interpolation operation operation
(Movements are synthesized sometimes.)
Note 1 : What is “stepping out”?
When the drive shaft of a motor is overloaded beyond the torque of the motor, the drive shaft spins (revolves
swiftly without control) regardless of the control that is applied to the motor.
This is called “stepping out”.
This term is sometimes used incorrectly for tooth-skipping (between pulley and belt), but stepping out and
tooth-skipping are actually entirely different phenomena.
CAST-AU4/B2521E
4-1
Page 45

(4) Synthesis of movements in the same direction
In some programs, the machine is operated by synthesizing two movements (the FOS and PFOS with the
AWAKE instruction of LUNA).
When the teaching points to be synthesized are aligned on the same line, the machine can step out.
When such a movement is experienced, the application program must be modified.
(5) Eccentric loading
When a load (tool, work, etc.) is very eccentric or far from the mounting surface, stepping out can occur
even though the load is lower than the maximum payload. If the weight balance cannot be improved,
reduce the operating speed.
(6) Mounting screw
When a mounting screw is so long that the tip of the screw touches the cover or other object, it can cause
stepping out. You can detect this trouble by listening for a rubbing sound or looking for scars. Check for
these before use.
(7) Belt tension
If the belt tension becomes abnormal, contact your Sony dealer from which you purchased the machine,
or contact Sony Max Corporation FA Service.
(8) When the machine is operated at low temperature
In early morning during winter, the room temperature may fall to 0°C or lower. The temperature inside
the machine takes time to rise even though the temperature of the room can be increased by using a
heater.
In this case, run the machine for half an hour at half the specified speed, or wait until the temperature of
the machine rises to the temperature of the room.
4-2
CAST-AU4/B2521E
Page 46

4. Troubleshooting
4-1-2 External Noise
External electrical noise is a difficult problem because it is invisible. Take the following remedial measures.
If the symptom disappears, electrical noise was probably the cause of the trouble.
(1) Earthing the power supply
Always connect the earth of the AC output to ground (Class 3 ground).
If the earth is not connected, the equipment is susceptible to electrical noise.
(2) Separation of AC connections
Connect the AC power of the machine to a separate AC outlet from any equipment that generates
significant electrical noise.
(3) Cable length
The cables connected to the machine can function as antenna and pick up
electrical wave noise. Make the cable length as short as possible, and use shielded cables where
possible.
The teaching pendant is connected by a long cable to the ROBOKIDS, so disconnect the teaching
pendant when not in use.
4-1-3 Abnormal Sound from Unit’s Motors
The Z unit motor and the ZR unit motor are equipped with brakes; these motors may
occasionally produce abnormal sounds such as scratching or crunching noises. These sounds are caused by
the structure of the brakes and are not a problem.
Also, a squeaking or creaking sound may be heard when the emergency stop switch is pressed during AUTO
operation. These are the stepping out sound that is generated when the Z-axis is forcibly stopped by
stepping it out in order to prevent the Z-axis from moving down during an emergency stop. These sounds
cause no problem in terms of reliability.
CAST-AU4/B2521E
4-3
Page 47
4-2 Full-open Programmable Specifications
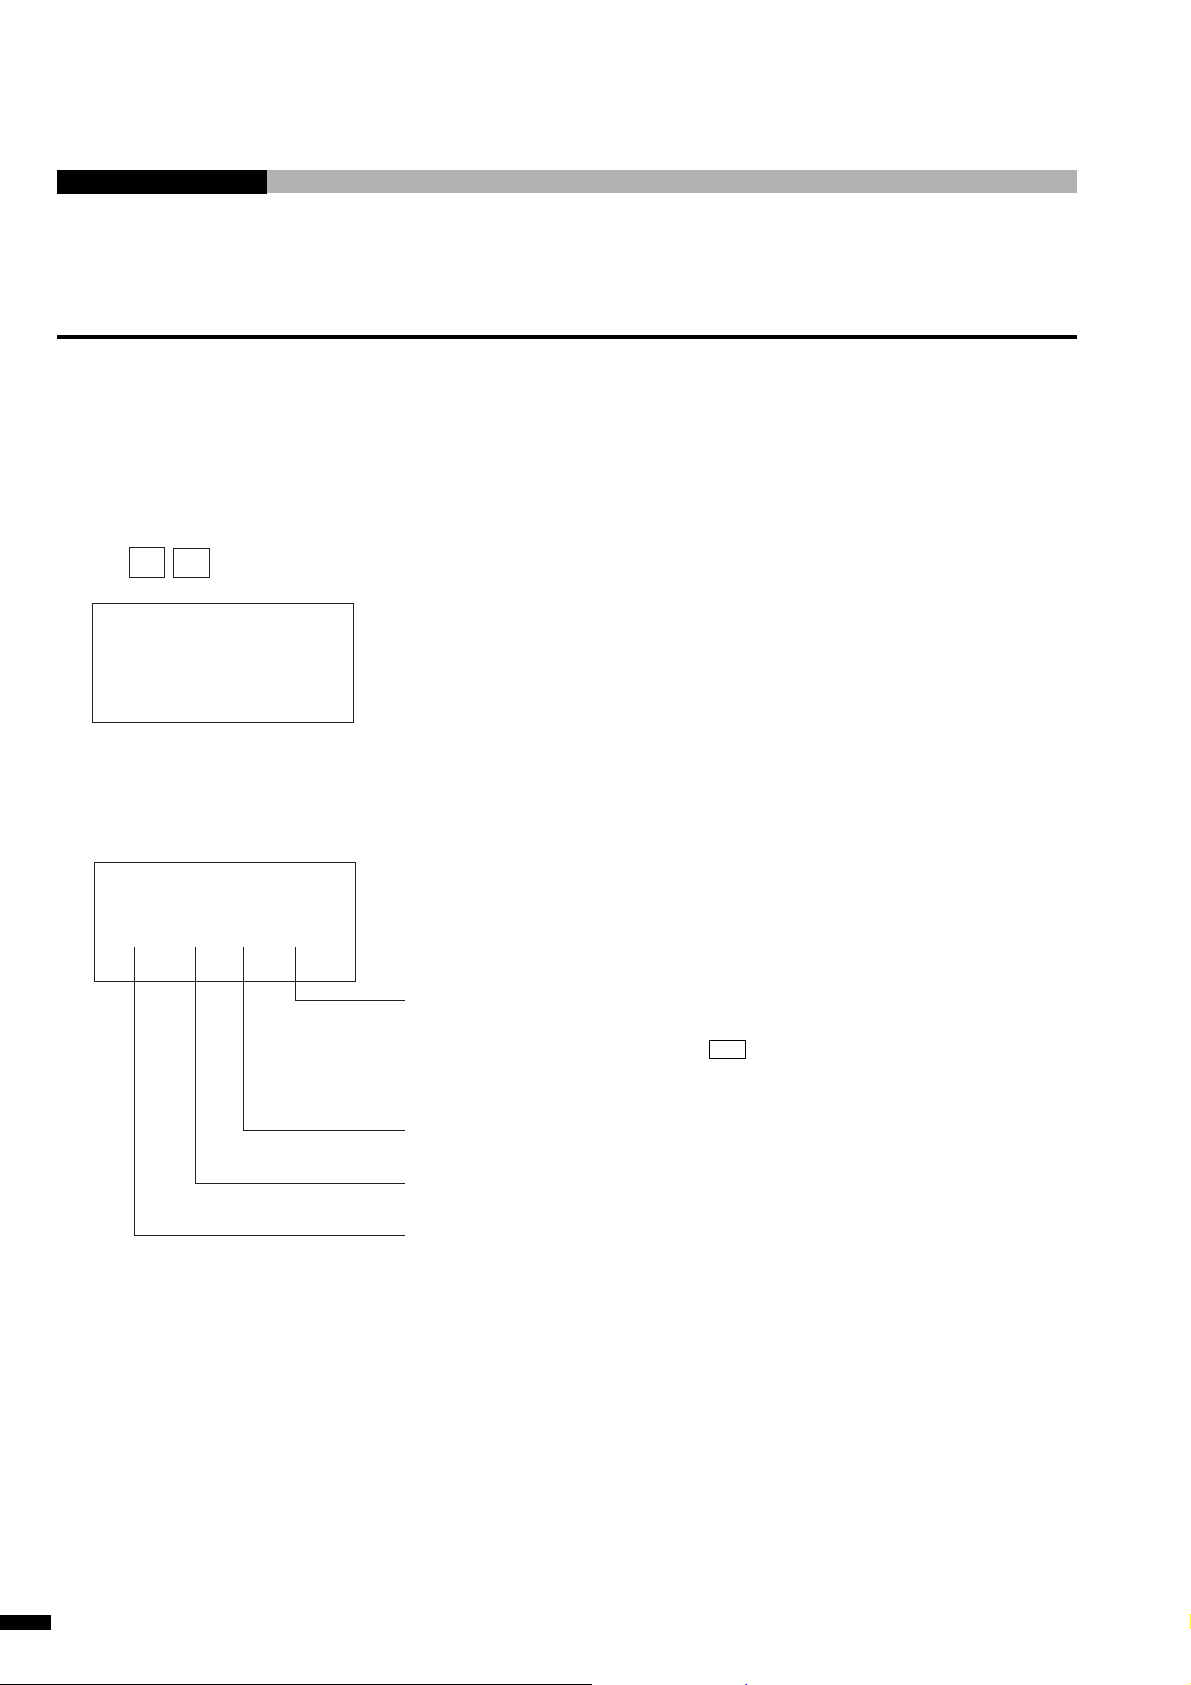
Connect the SRX teaching pendant via a debug station and check the error codes and error history using the
following procedure.
1 Connect a debug station.
2 Connect the SRX teaching pendant.
3 Press the MANAGEMENT key and select “Error History” with the F4 key by scrolling the cursor using
↑ ↓
the
MANAGE ↑ ↓
sHOME RETURN
CONSTANT
❙ SELECT
F1 F2 F3 F4
4 The error history is displayed.
key.
ERR HISTORY← →↑ ↓
s E110 R1 L1045 199
E120 R2 L346 199
Date and time of occurrence
Display is possible in a 1998/07/01 14:43:19
format by scrolling right with the → key.
Program line number in which the error
occurred
Task name in which the error occurred
Error number
A list of errors is displayed starting from the most recent occurrence.
When an error occurs, it is registered in the top (the topmost line) and the oldest error is deleted.
4-4
CAST-AU4/B2521E
Page 48
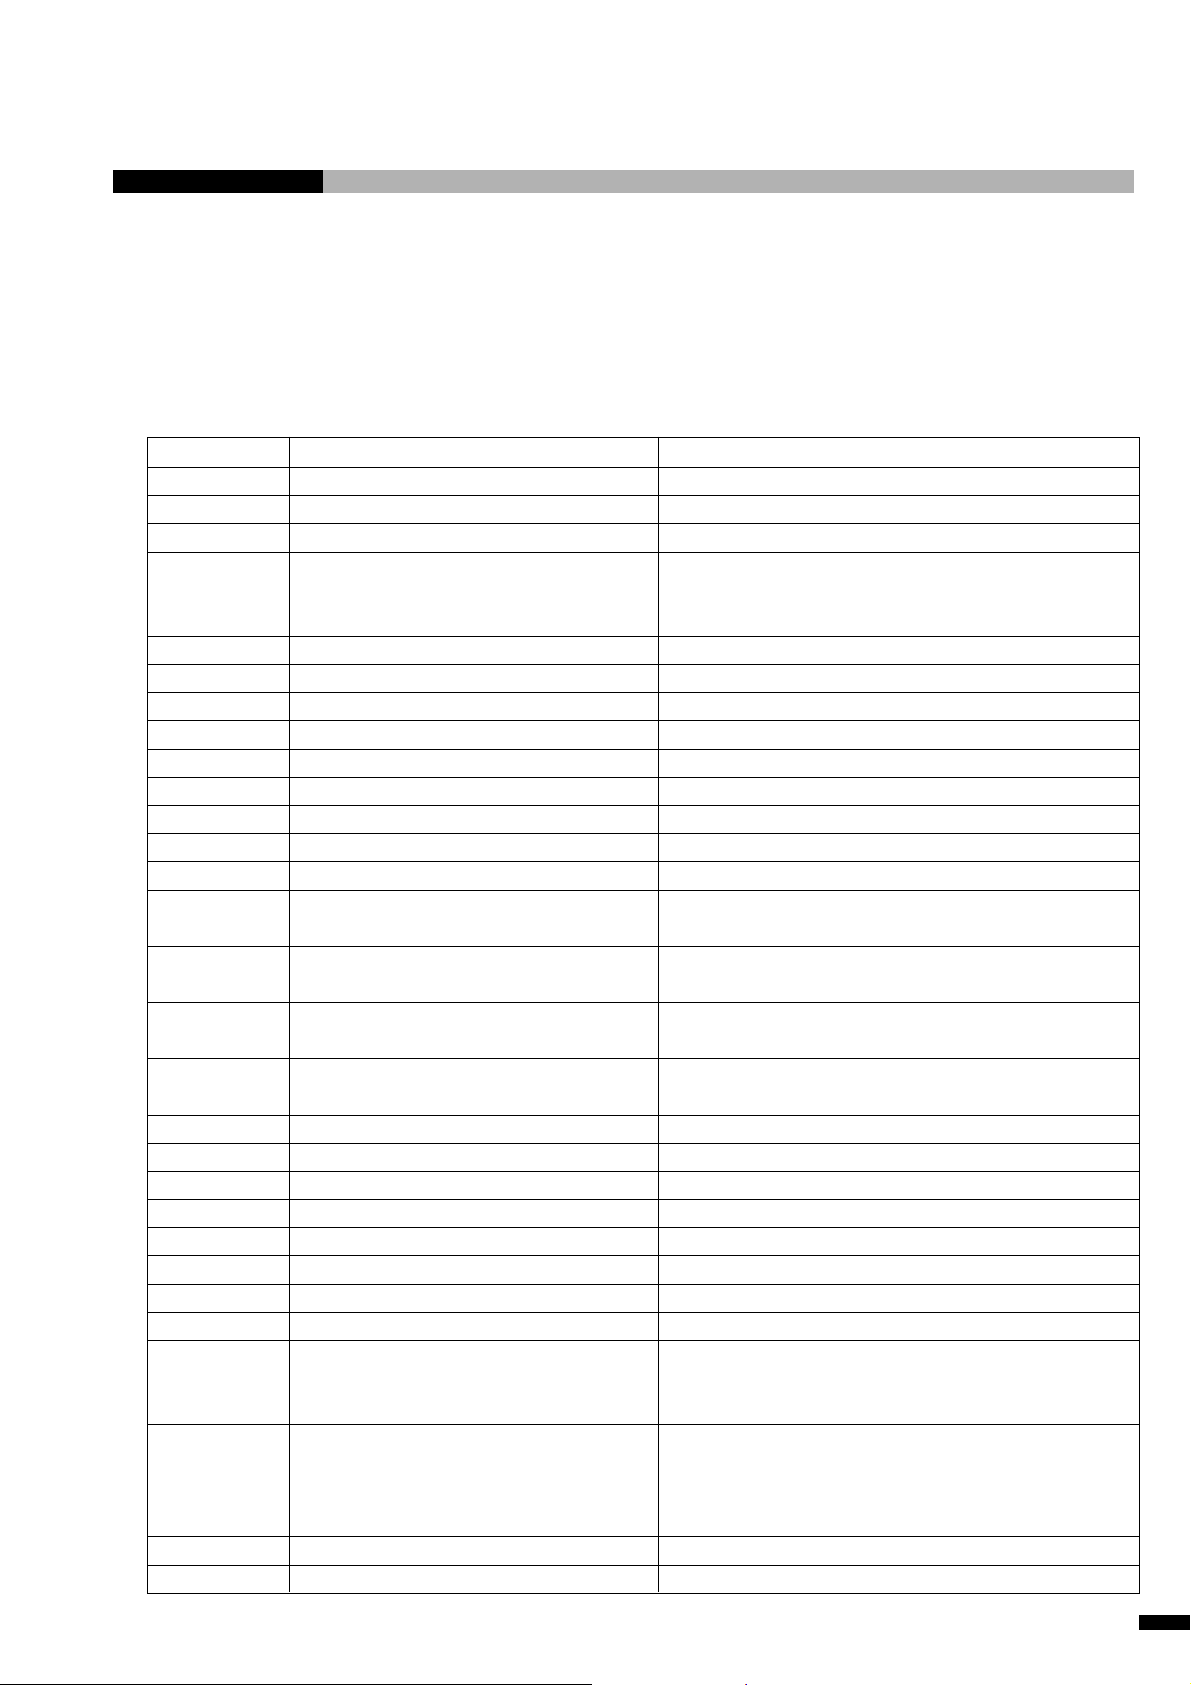
4. Troubleshooting
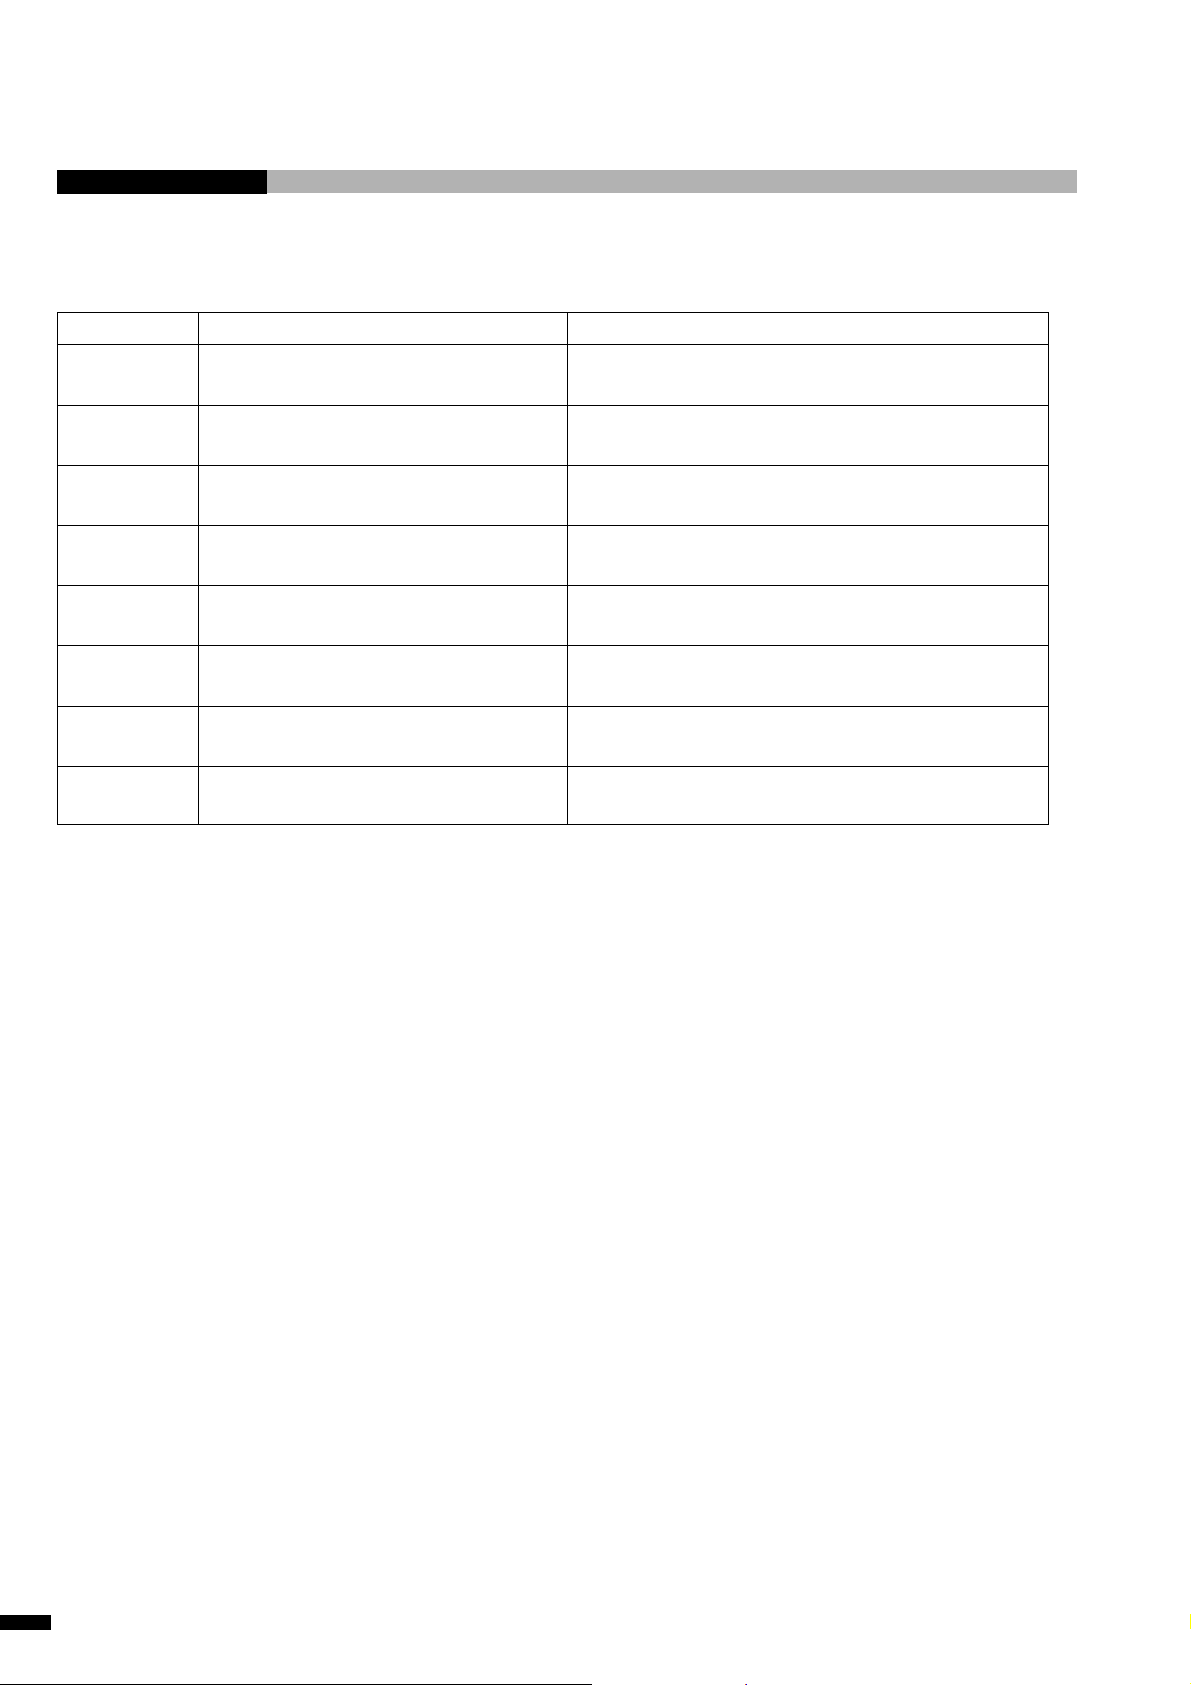
5 Check the error code number E*** on display and find out causes and countermeasures referring to the
following table.
When the machine does not operate normally, check the error contents referring to the following table.
For the contents that are unique to the respective applications, refer to the Operation Manual of the
memory card (RK card), and take the appropriate measures.
Error No.
E000 ~ E030
E031
E100
E110
E111
E112
E113
E114
E115
E116
E117
E118
E119 ~ E124
E130
E131
E132
E133
E134
E135
E136
E137
E138
E139
E140
E141
E154
E155
E200 ~ E204
E300
Causes
CPU board is defective
Internal memory overflows
System task not present error (full open)
Object code error
System task command error (full open)
Robot command error
I/O number error
Point data not present error
Error of point number specified
Parameter error
Array number error
Integer value out of range error
Syntax error
X-axis (tool axis) out of operation range
error
Y-axis (work axis) out of operation range
error
Z-axis (tool axis) out of operation range
error
R-axis (tool axis) out of operation range
error
X-axis system limit error
Y-axis system limit error
Z-axis system limit error
R-axis system limit error
X-axis point limit error
Y-axis point limit error
Z-axis point limit error
R-axis point limit error
Speed is too fast for the distance between
the two points during interpolation
operation
The circular auxiliary point (ENTER B)
and start point/end point are aligned on a
straight line during circular interpolation
operation. Circle is taught in 360 degrees
PLC program error (full open)
Emergency stop is triggered
Solutions
Replace the Base board
Delete the unnecessary programs
Install the system task
When the Power lamp lights up in red, replace the battery.
If it does not corresponds to any of the above contents,
contact Sony sales or service office.
Correct the program
Correct the program of system task or peripheral task
Correct the I/O number
Load the point number. Replace the CPU board
Correct the point number
Correct the variables specified
Correct the array number
Correct the integer value
Correct syntax
Correct the target point to which the tool moves
Correct the target point to which the tool moves
Correct the target point to which the tool moves
Correct the target point to which the tool moves
Correct the speed so as not to exceed the range
Correct the speed so as not to exceed the range
Correct the speed so as not to exceed the range
Correct the speed so as not to exceed the range
Correct the speed so as not to exceed the range
Correct the speed so as not to exceed the range
Correct the speed so as not to exceed the range
Correct the speed so as not to exceed the range
Increase the distance between the two points, or decrease
the speed
Correct the position of the circular auxiliary point, or
divide the movement into smaller segments of less then
360 degrees
Correct the program
Cancel the emergency stop switch
CAST-AU4/B2521E
4-5
Page 49
Error No.
E301
E302
E303
E304
E314
E315
E316
E317
Causes
X-axis limit sensor error
Y-axis limit sensor error
Z-axis limit sensor error
R-axis limit sensor error
X-axis command position error
Y-axis command position error
Z-axis command position error
R-axis command position error
Solutions
Correct the speed so as not to exceed the range.
Replace the sensor
Correct the speed so as not to exceed the range.
Replace the sensor
Correct the speed so as not to exceed the range.
Replace the sensor
Correct the speed so as not to exceed the range.
Replace the sensor
Correct the speed so as not to exceed the range.
Correct the target point
Correct the speed so as not to exceed the range.
Correct the target point
Correct the speed so as not to exceed the range.
Correct the target point
Correct the speed so as not to exceed the range.
Correct the target point
4-6
CAST-AU4/B2521E
Page 50
4. Troubleshooting
4-3 When Memory Card (RK Card) is Used
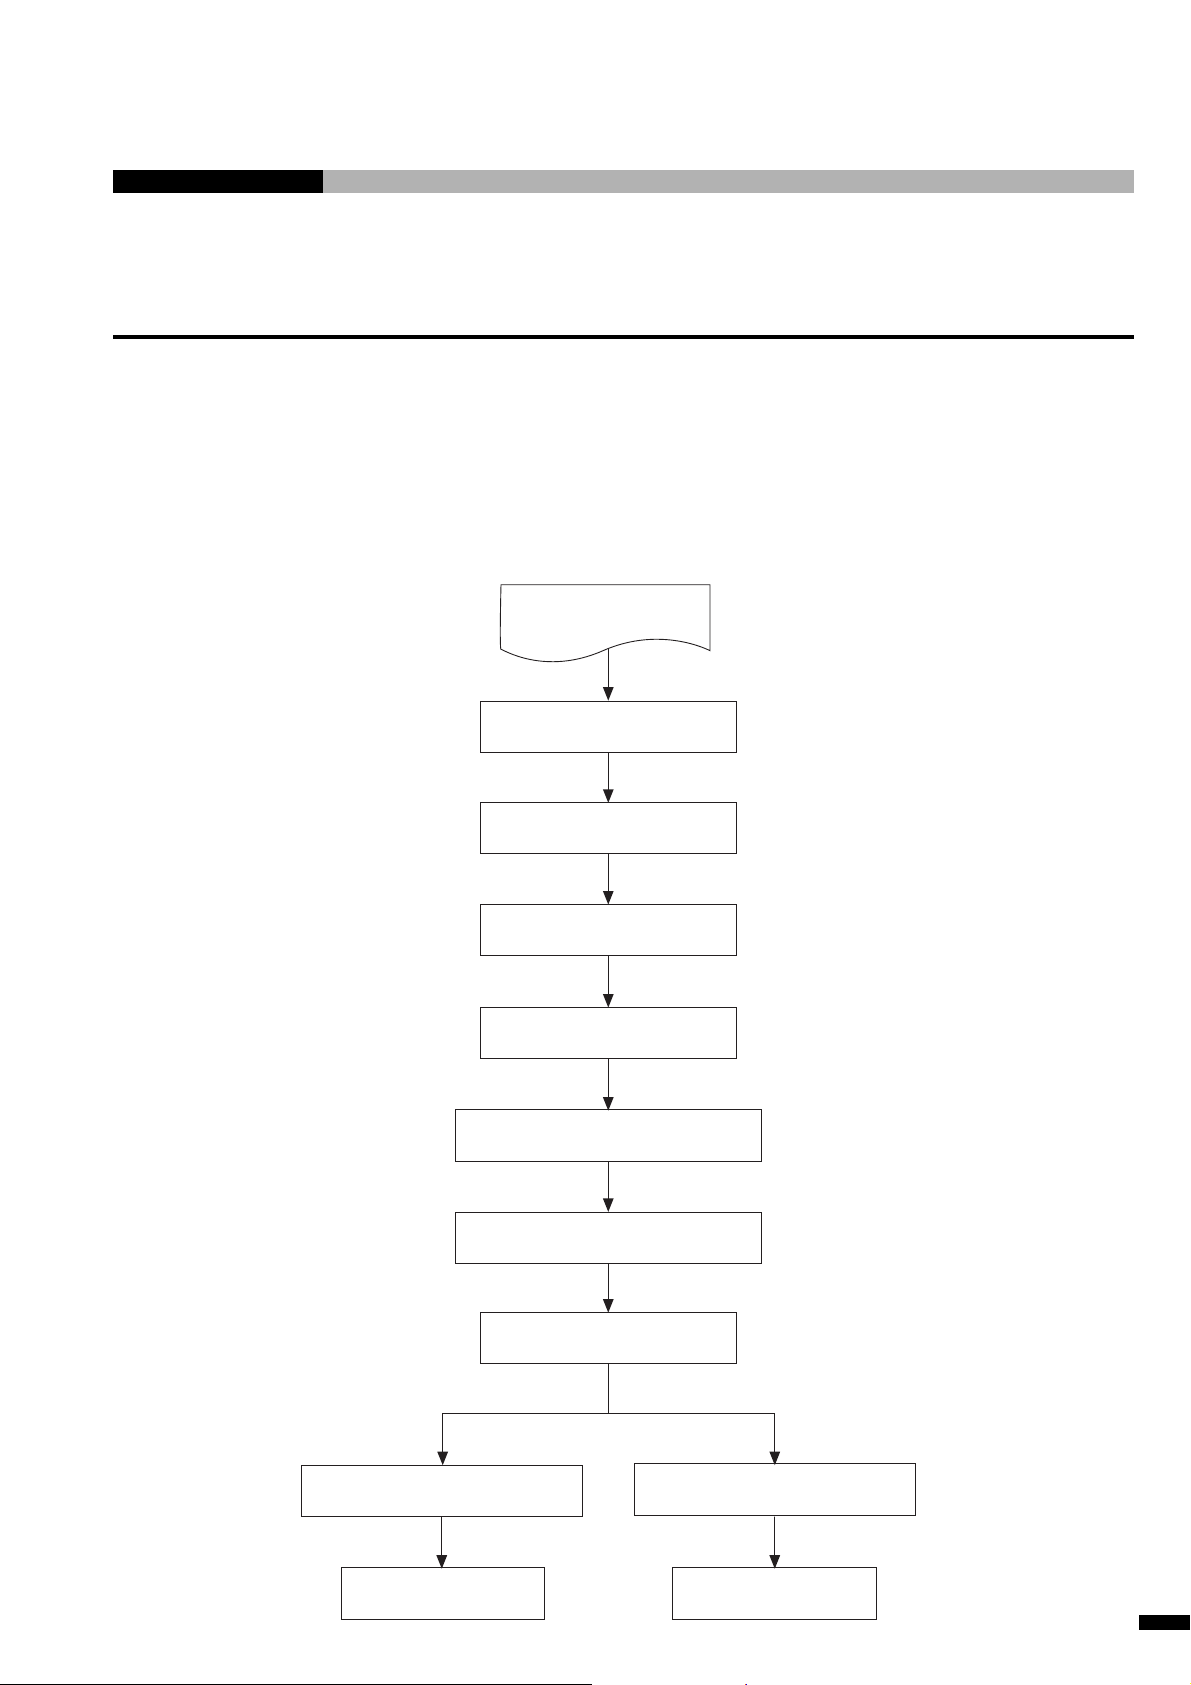
The operational flow starting from turning on the main power of the machine until the programmed
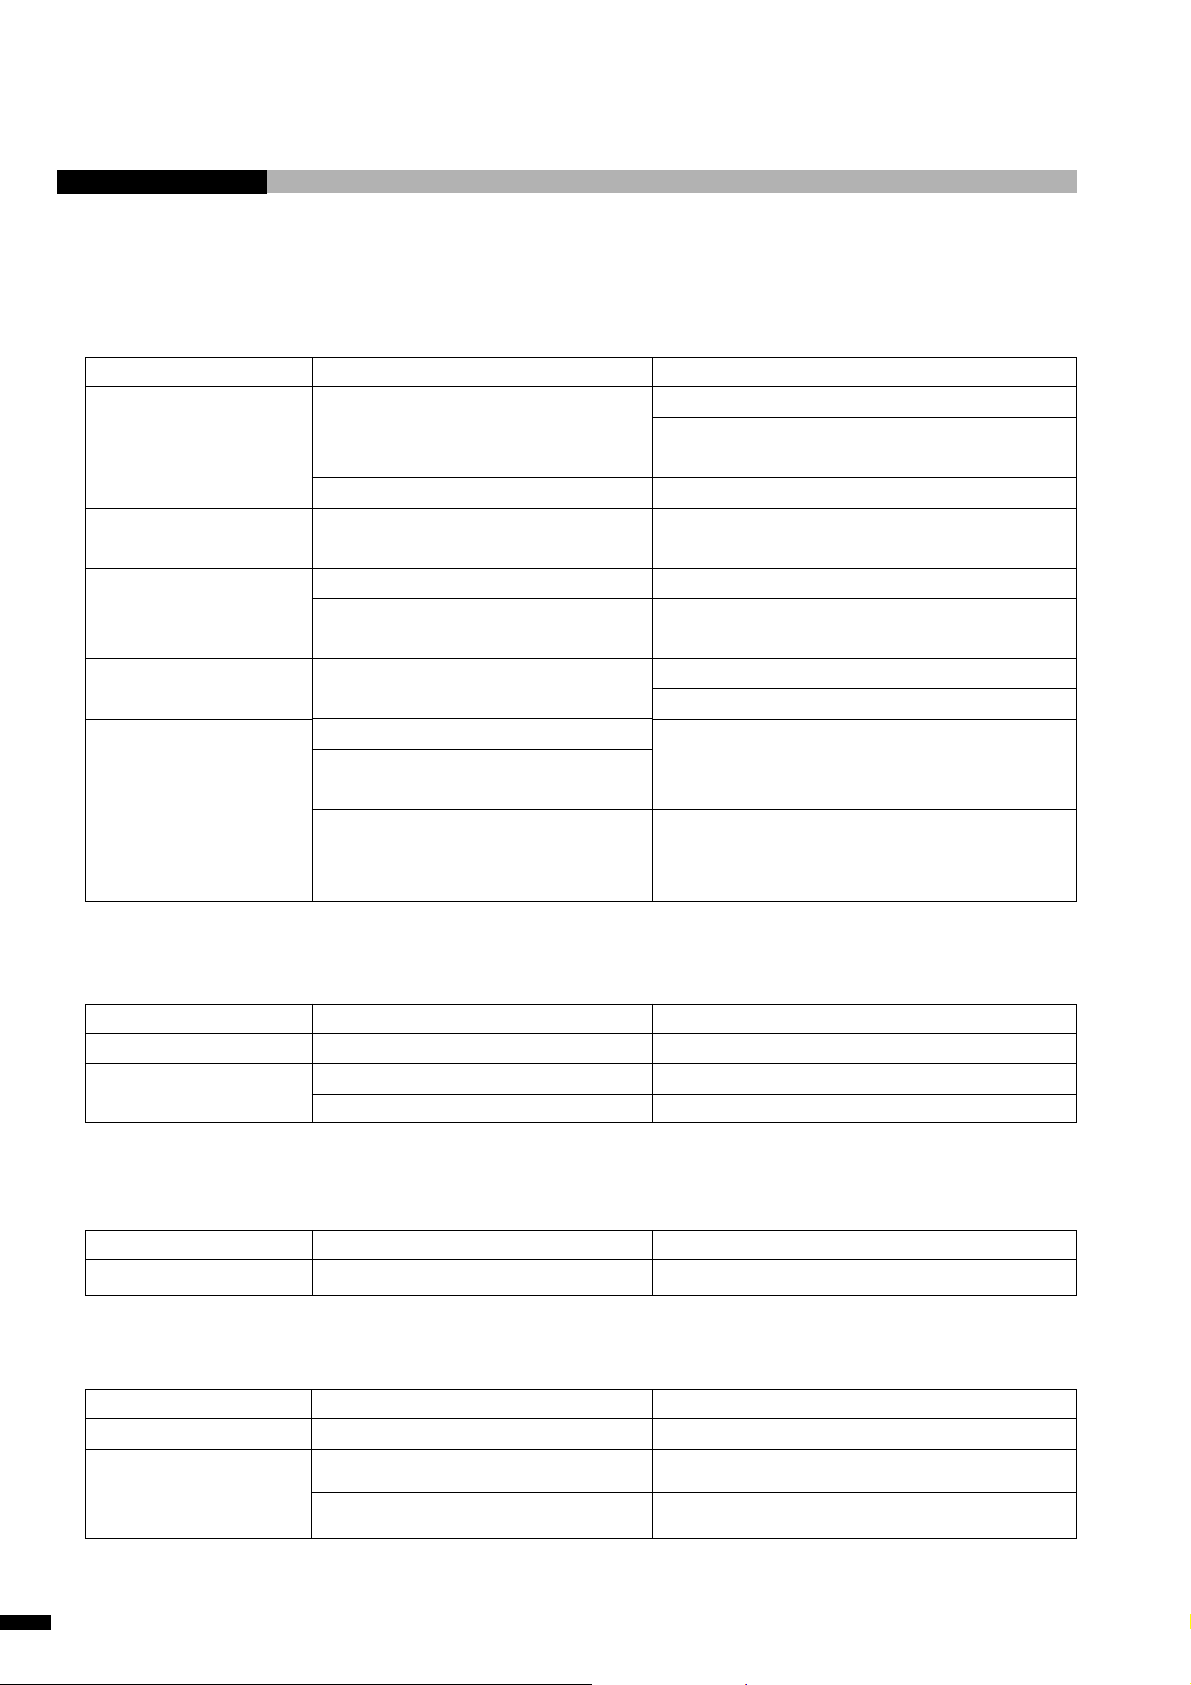
operation or teaching is started, is shown as follows. Causes and countermeasures when trouble occurs in
the respective state from 1) to 9) are shown on the next page. Use these tables for troubleshooting.
There may be a case when an error number is displayed on the teaching pendant. When “EEE” and “error
number” appear alternately, it indicates that the trouble is the robot error. The robot errors which can occur
in the ROBOKIDS are shown as follows. When any error number other than those listed below appears,
consult your Sony dealer for more details.
Main power of
ROBOKIDS is turned on
1)
System task number appears
2)
START indicator flashes
3)
START button is pressed
4)
Performed Homing
5)
START indicator flashes slowly
Application program switches are set
CAST-AU4/B2521E
Work program switches are set
Application program
"0"
6)
HOME key of
teaching pendant is pressed
7)
To teaching mode
Application program
"1" ~ "E"
8)
START button is pressed
9)
To running mode
4-7
Page 51
Fault-Finding Chart of 1)
Symptoms
The simple operation
teaching pendant keeps
displaying “666”
“E01” appears on the
simplified TP.
“E02” appears on the
simplified TP.
The main power cannot
be turned on.
The stop indicator keeps
turning on.
Causes
OFF LINE is selected
Internal PC board is defective
Card is not inserted
The card has no program
The CAST specification setting is set to
NO
The main AC power is not turned on
The POWER switch is broken
The STOP button is kept locked.
(Including the teaching pendant)
The external stop signal is being
connected
Solutions
Connect the SYSRUN
Set the machine system to “ONLINE” from the
TP of the SRX
Exchange the internal PC board
Insert the memory card securely
Insert a memory card in which program is stored
Set the CAST specification setting to “YES” from
the TP of the SRX
Connect the AC main power
Exchange the POWER switch
Release the lock
Release the external emergency stops
Alternatively, short pin-1 and pin-2 of the
external switch connector
Fault-Finding Chart of 2)
Symptoms
START indicator does not illuminate
START indicator keeps flashing
Fault-Finding Chart of 3)
Symptoms
START button does not function
Fault-Finding Chart of 4)
Symptoms
“E07” appears on display
Machine movement does
not stop (It moves in the
reverse direction.)
Causes
START indicator is defective
START button has the short circuit
External START switch has the short circuit
Causes
START button is defective
Causes
Returning home failed
Sensor cable is defective
Controller data is abnormal
Replace the START indicator
Replace the START button
Replace the external START button
Replace the START button
Start operation from the very beginning
Confirm the sensor cable connection
Correct the controller data from TP of the SRX
Solutions
Solutions
Solutions
4-8
CAST-AU4/B2521E
Page 52
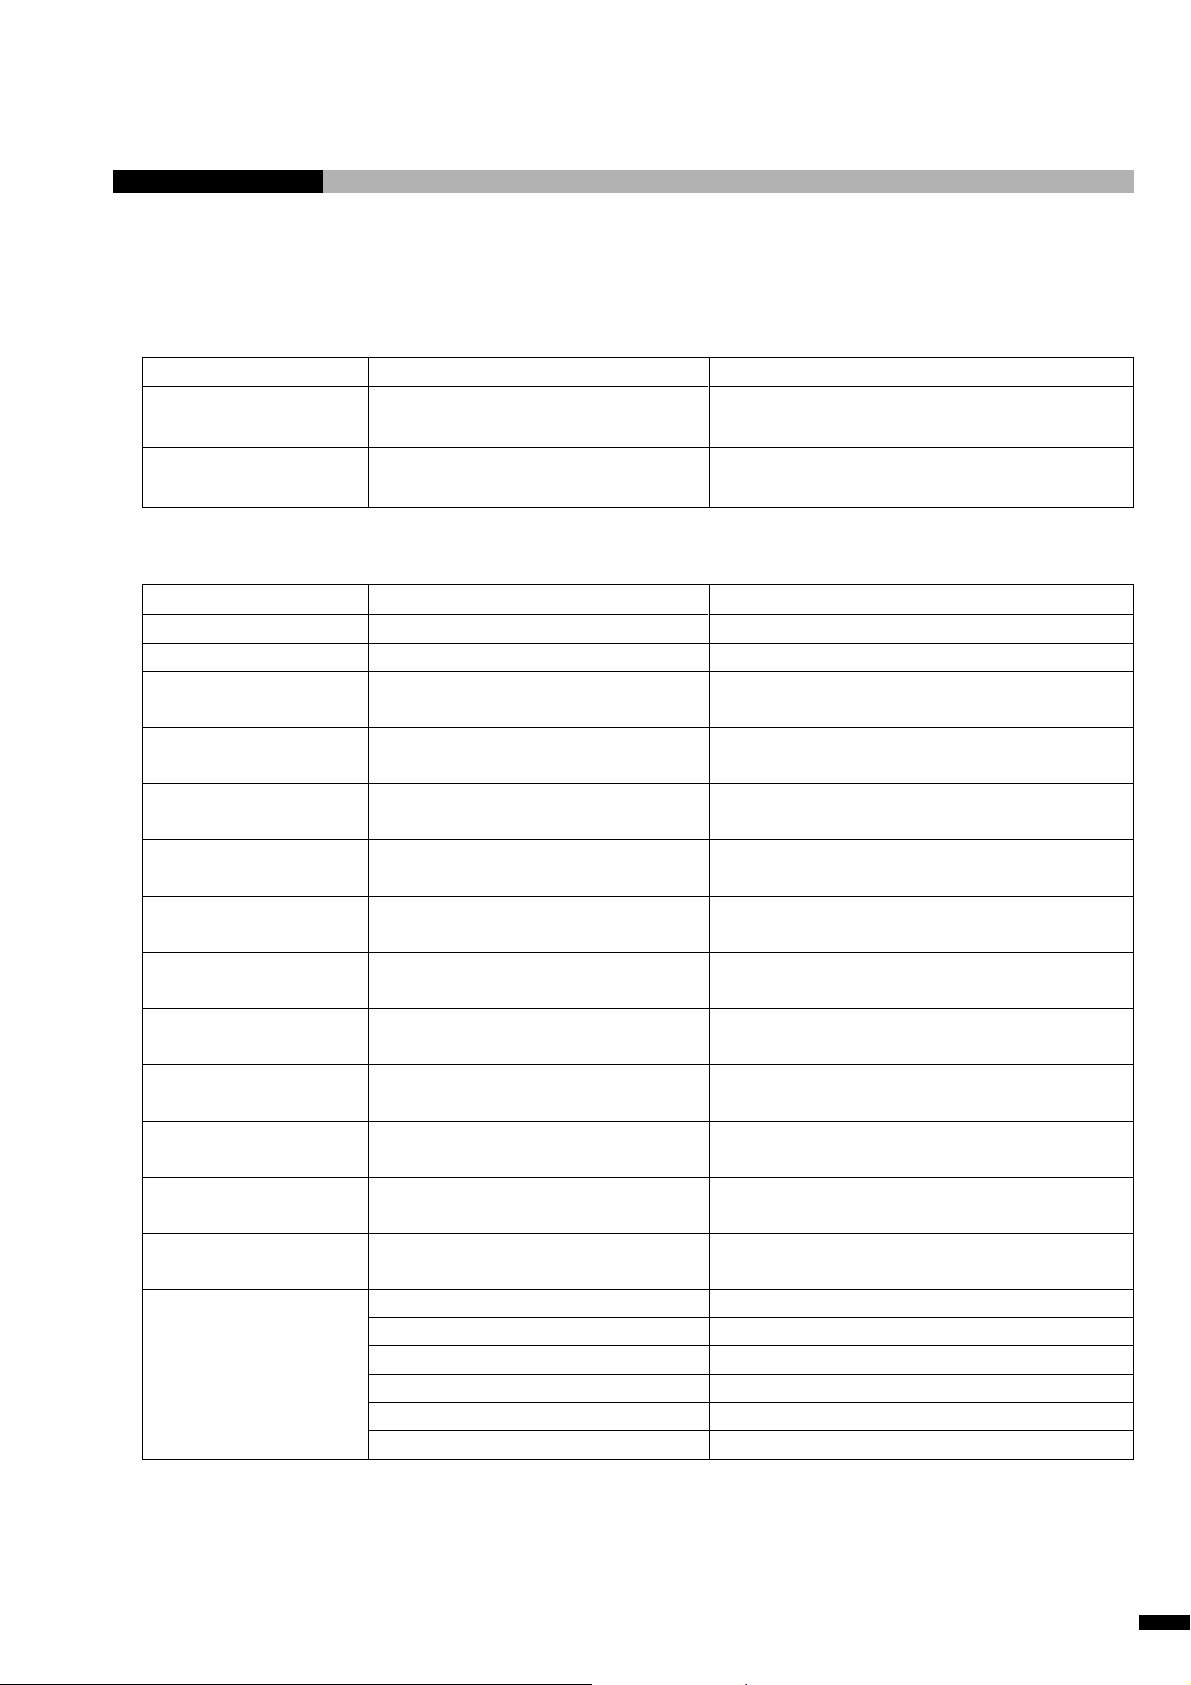
Fault-Finding Chart of 5)
4. Troubleshooting
Symptoms
“E08” appears on display
“E09” appears on display
TYPESET failed
START failed
Fault-Finding Chart of 6) or 7) or 8)
Symptoms
START indicator keeps flashing
“HOME” key does not function
“E10” appears on display
during teaching
“E11” appears on display
during teaching
“E12” appears on display
during teaching
“E30” appears on display
“E31” appears on display
“E32” appears on display
“E33” appears on display
“E34” appears on display
“E35” appears on display
“E36” appears on display
“E37” appears on display
The machine does not
operate normally
Application program switch is defective
Teaching pendant is defective
A point outside the work envelope is
specified by INSERT/DELETE
The target coordinate of copy has exceeded
the work envelope during COPY.
Number of point storage capacity of the target
point of copy is insufficient during COPY
Step-out of the X-axis in the opposite
direction to home position has occurred
Step-out of the X-axis in the home
position direction has occurred
Step-out of the Y-axis in the opposite
direction to home position has occurred
Step-out of the Y-axis in the home
position direction has occurred
Step-out of the Z-axis in the opposite
direction to home position has occurred
Step-out of the Z-axis in the home
position direction has occurred
Step-out of the R-axis in the opposite
direction to home position has occurred
Step-out of the R-axis in the home
position direction has occurred
Teaching has not been done correctly
Machine is loaded with excessive weight
Cover is contacting with moving object
Dropped parts such as screws are choking.
External unit is defective
External noise is affecting
Causes
Causes
Solutions
Turn on the main power of the machine system
and start operation from the very beginning
Turn on the main power of the machine system
and start operation from the very beginning
Solutions
Replace the application program switch
Replace the teaching pendant
Specify the point inside the area and try again
Perform COPY so as not to exceed the work
envelope
Perform COPY within the storage capacity of
point
Check weight of the tool and check also if there is
any interfering obstacles around the point
Check weight of the tool and check also if there is
any interfering obstacles around the point
Check weight of the work and check also if there
is any interfering obstacles around the point
Check weight of the work and check also if there
is any interfering obstacles around the point
Check weight of the tool and check also if there is
any interfering obstacles around the point
Check weight of the tool and check also if there is
any interfering obstacles around the point
Check weight of the tool and check also if there is
any interfering obstacles around the point
Check weight of the tool and check also if there is
any interfering obstacles around the point
Perform teaching again.
Refer to section “1-3-1 Machine specifications”.
Correct the cover position
Remove anything dropped
Repair or replace the external unit
Remove the source of noise
The belt tension adjustment
Consult your Sony dealer from which you purchased the machine or the nearest Sony FA offices for the
actual adjustment of the belt tension.
CAST-AU4/B2521E
4-9
Page 53
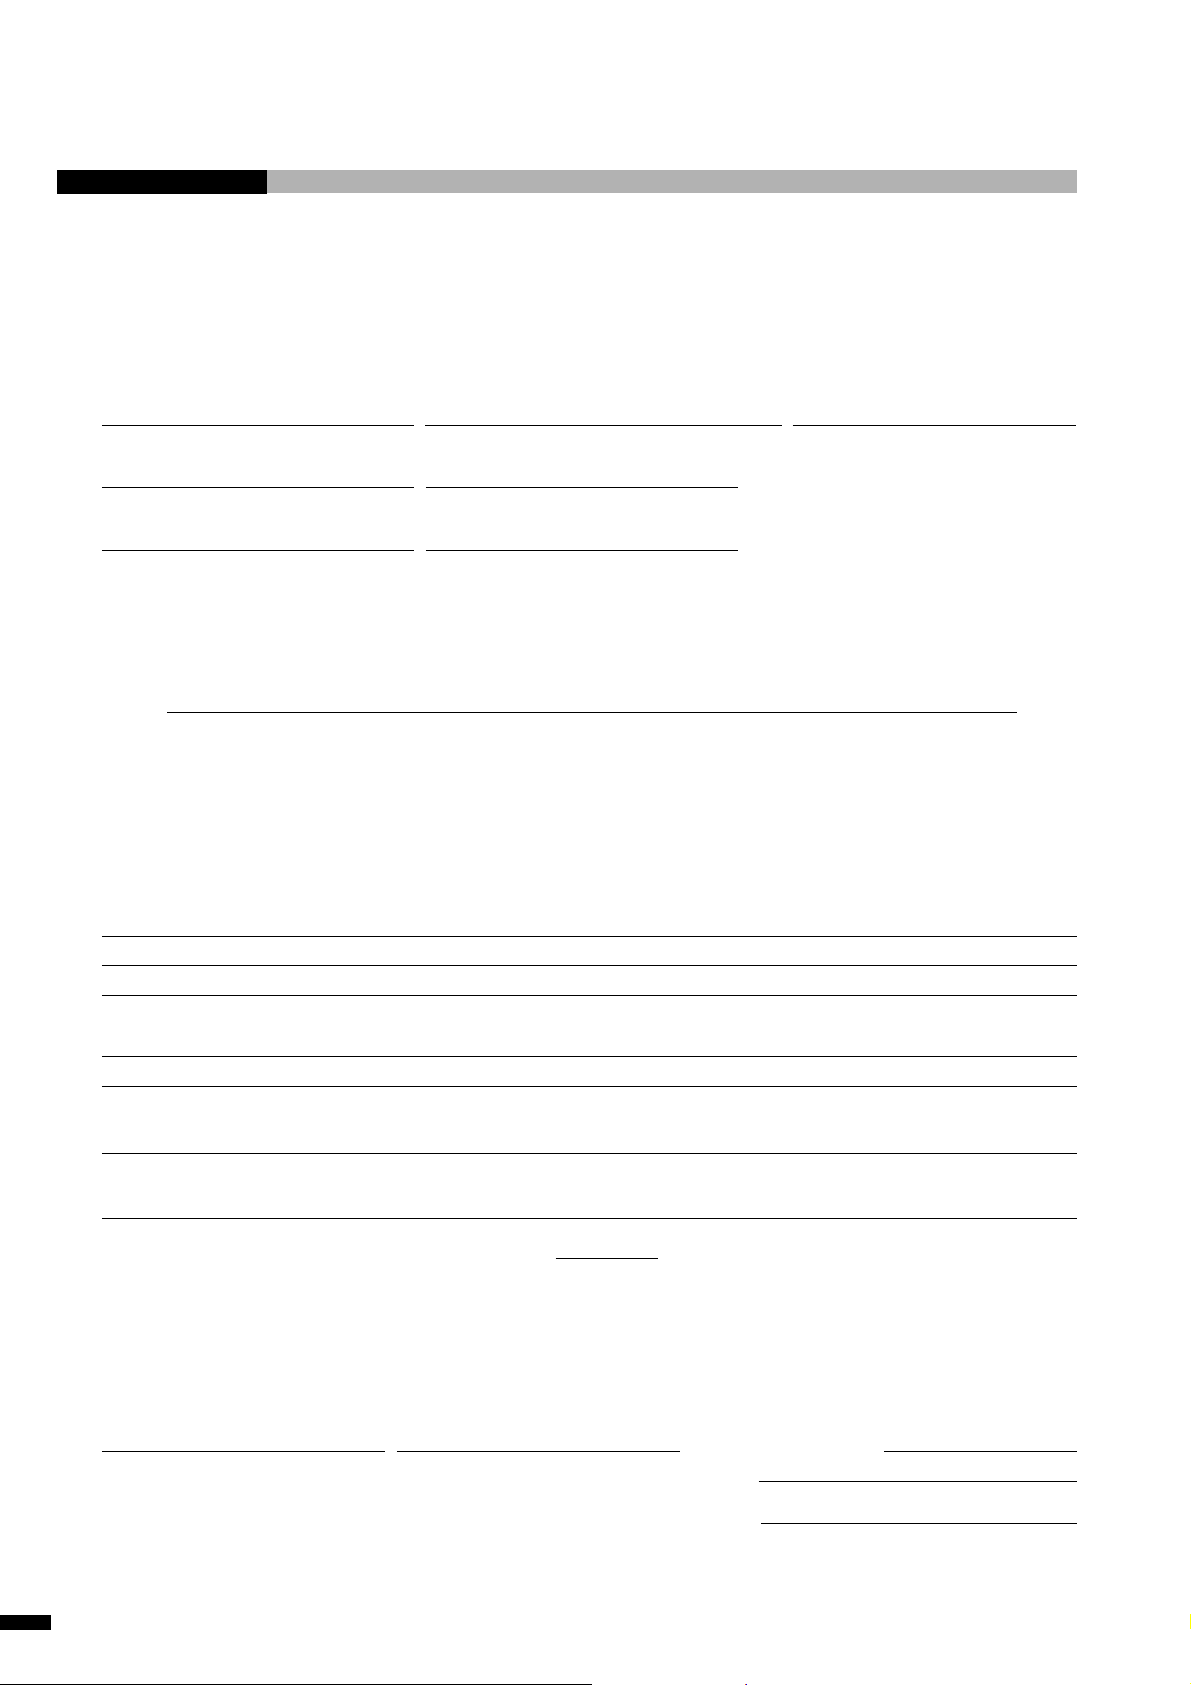
Trouble Check Sheet
If a trouble occurs, check the following items before contacting your Sony dealer or the nearest Sony FA offices.
1) Name of dealer from which you purchased the ROBOKIDS
Company name : Person in charge : Tel:
2) What is the serial number of your ROBOKIDS? (It is marked on the sticker of the rear cover.)
M No. R No.
3) What type of memory card are you using ? (It is marked on the memory card.)
TYPE NAME
4) When did the trouble occur?
1. Has the trouble occurred since you purchased the ROBOKIDS?
2. The ROBOKIDS ran normally, but then troubles suddenly occurred.
3. The machine has gradually become worse.
4. Others
In case of 1, what was the condition of the ROBOKIDS?
1. How was the condition during initial operation after purchase?
2. The main power has not been turned on for a long time (for days).
3. The main power has not been turned on for a short time (for days).
4. What was the condition when the main power was turned on?
5) Describe the details of the trouble (such as error code, etc.).
6) Compared with normal operation, at what timing does the error occur?
7) If you have two or more ROBOKIDS, compare them. What are the results of the comparison?
8) What happens if you replace parts (such as the memory card)?
9) Is there any noise source near the ROBOKIDS? Yes / No
10) What is the condition of the ROBOKIDS at present?
• The ROBOKIDS is not being used.
• The ROBOKIDS is still being used.
11) Customer
Company name : Department : Person in charge :
Tel :
Fax :
Fill in the above items, and send this form to your Sony dealer or the nearest Sony FA offices by fax.
4-10
CAST-AU4/B2521E
Page 54
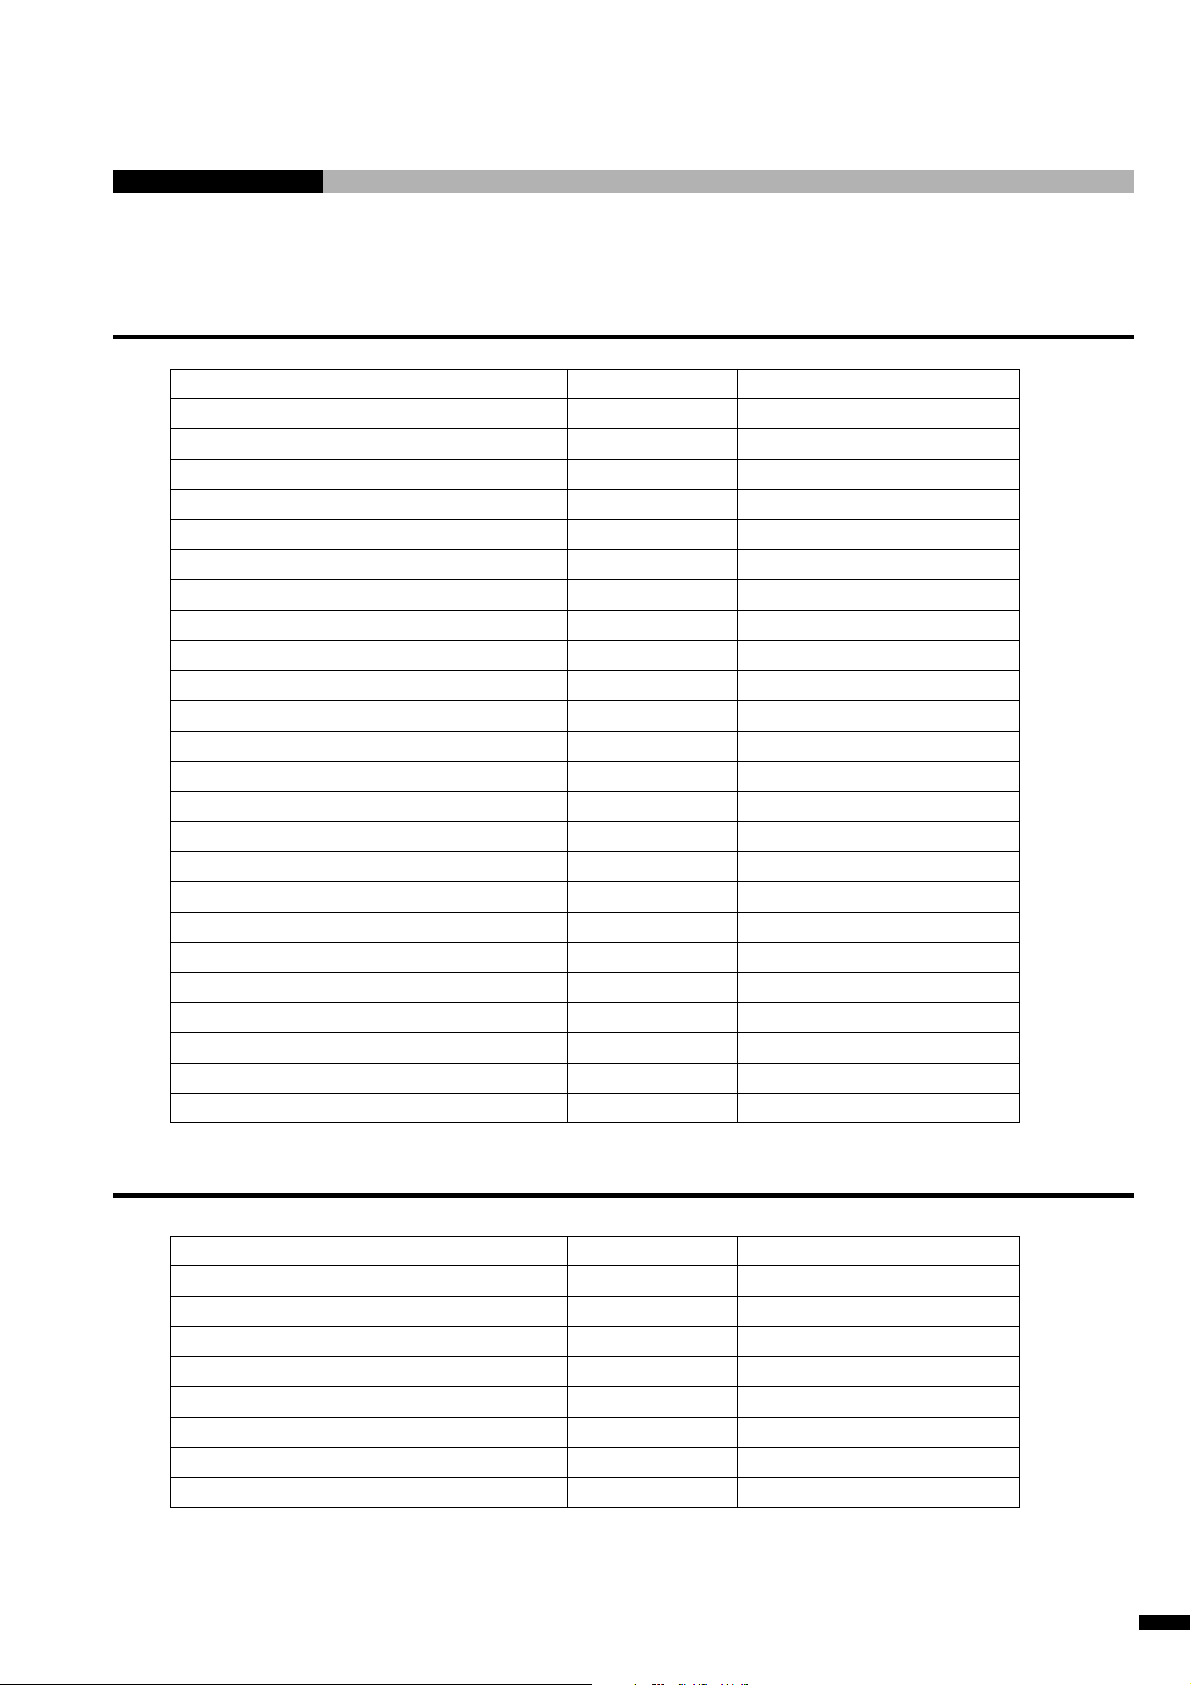
5. Repair Parts Lists
5-1 ROBOKIDS Body
5. Repair Parts Lists
Descriptions
TASK board
BASE board
Battery
DC switching power supply ZWS30-5/J
DC switching power supply ZWS150PF-24/J
Circuit protector
Fan harness
Self-illuminating stop switch
Self-illuminating stop switch
Digital switch
X-axis motor
Y-axis motor
X-axis home position sensor harness
Y-axis home position sensor harness
X-axis liner guide
Y-axis liner guide
X-axis timing belt
Y-axis timing belt
Media
Cable harness
Electrical fitting assembly
Control block assembly
Y-axis assembly
X-axis assembly
Part No.
A-8338-047-A
A-8338-048-A
1-528-932-11
1-468-348-11
1-468-349-11
1-576-271-11
1-959-099-11
1-572-977-11
1-771-539-11
1-771-538-11
1-763-186-11
1-763-186-11
1-959-094-11
1-959-095-11
4-760-637-01
4-760-638-01
4-760-635-02
4-760-636-02
4-761-607-01
1-959-100-11
A-8338-050-A
A-8338-046-A
A-8336-316-A
A-8336-315-A
Remarks
Built-in board “Small”
Built-in board “Large”
For DC 5 V
For DC 24 V
POWER switch
Inside the ROBOKIDS
Operation box
Operation box
Operation box
Air filter
5-2 Z-axis Unit
Z-axis motor
Z-axis home position sensor harness
Z-axis linear guide
Z-axis timing belt
Z-axis relay cable harness
Z-axis timing belt
Bearing
Mechanism block assembly
CAST-AU4/B2521E
Descriptions
Part No.
1-763-187-11
1-959-096-11
4-760-643-01
4-760-641-01
1-790-017-11
4-760-642-01
4-760-650-01
A-8336-325-A
Remarks
Long
Short
5-1
Page 55
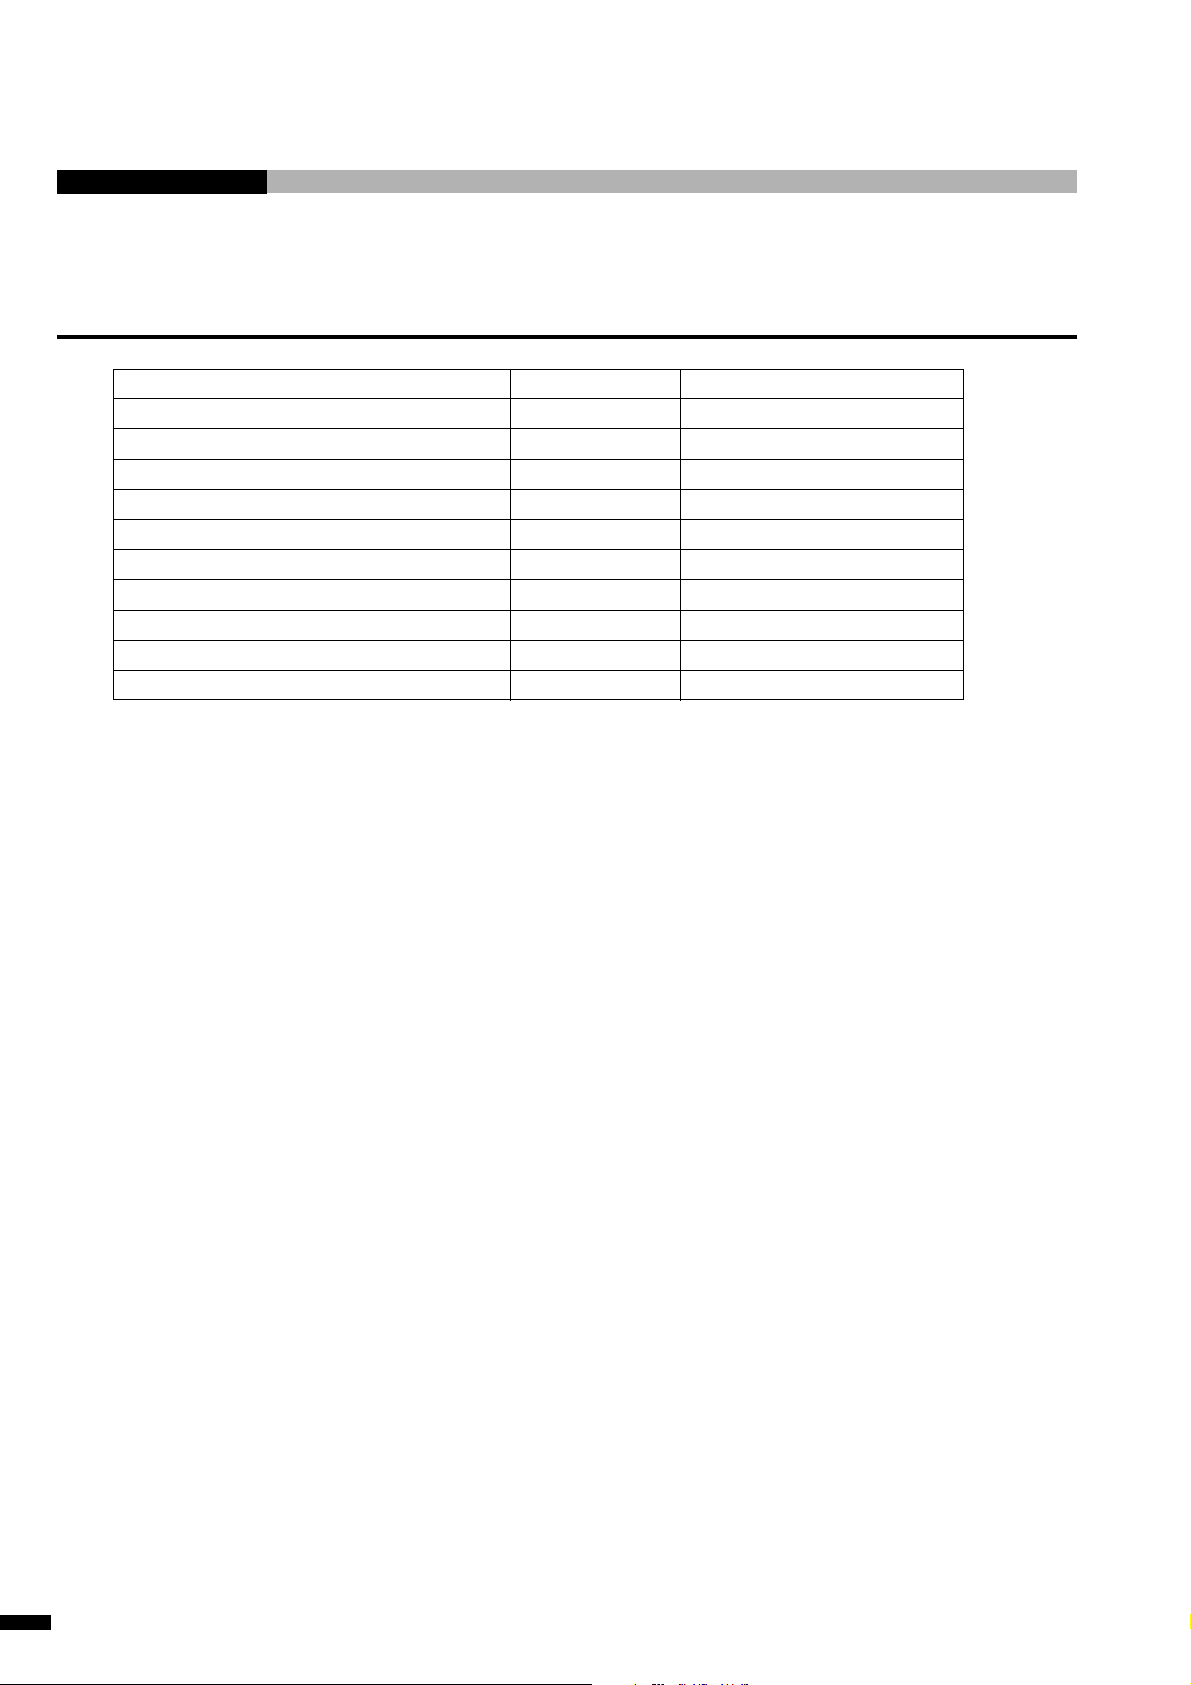
5-3 Z/R-axis Unit
Descriptions
Z-axis motor
R-axis motor
Z-axis home position sensor harness
R-axis home position sensor harness
Spline ball screw
Z-axis timing belt
R-axis timing belt
Z/R-axis relay cable harness
Bearing
Mechanism block assembly
Part No.
1-763-187-11
1-763-187-11
1-959-101-11
1-959-097-12
4-760-605-01
4-760-645-01
4-760-644-01
1-959-098-12
4-760-650-01
A-8336-314-A
Remarks
5-2
CAST-AU4/B2521E
Page 56
6. Appendix
■ User Input/Output Specifications of USER I/O Connector
Input
6. Appendix
Connector pin No.
3
37
4
38
5
39
6
40
7
41
8
42
9
43
10
44
11
45
12
46
13
47
14
48
15
49
16
50
17
51
I/O names in terms
of software
SI1
SI2
SI3
SI4
SI5
SI6
SI7
SI8
I1
I2
I3
I4
I5
I6
I7
I8
I9
I10
I11
I12
I13
I14
I15
I16
117
I18
I19
I20
I21
I22
Contents
RK card specification
(including semi-programmable specification)
SYSRUN
Reserved by system (User cannot use it.)
Reserved by system (User cannot use it.)
Reserved by system (User cannot use it.)
Reserved by system (User cannot use it.)
Reserved by system (User cannot use it.)
Reserved by system (User cannot use it.)
Reserved by system (User cannot use it.)
START
RETRUN
Work program No. 1
Work program No. 2
Work program No. 4
Work program No. 8
Application program No. 1
Application program No. 2
Application program No. 4
Application program No. 8
Error reset
*
*
*
*
*
*
*
*
*
*
*
Full-open programmable
specification
User input
User input
User input
User input
User input
User input
User input
User input
User input
User input
User input
User input
User input
User input
User input
User input
User input
User input
User input
User input
User input
User input
* The allocation at I12 to I22 differs depending upon applications. Refer to the Operation Manual of
memory card (RK card) for more details.
The switch SI1 (SYSRUN) must always be connected. The ROBOKIDS cannot be operated
NOTE
unless the SI1 is turned on.
Turn on or off SI1 as required. (Refer to page 2-6.)
CAST-AU4/B2521E
6-1
Page 57
Output
Connector pin No.
20
54
21
55
22
56
23
57
24
58
25
59
26
60
27
61
28
62
29
63
30
64
31
65
32
66
33
67
34
68
I/O names in terms
of software
SO1
SO2
SO3
SO4
SO5
SO6
SO7
SO8
L1
L2
L3
L4
L5
L6
L7
L8
L9
L10
L11
L12
L13
L14
L15
L16
L17
L18
L19
L20
L21
L22
Contents
RK card specification
(including semi-programmable specification)
EMG-OUT, stop switch, stop status output
ERROR, robot error signal
Reserved by system (User cannot use it.)
Drive servo ON signal
ONLINE signal
Reserved by system (User cannot use it.)
Reserved by system (User cannot use it.)
Reserved by system (User cannot use it.)
End of cycle output
Standby output
Error output
During operation output
Unloading position output (during line mode)
*
*
*
*
*
*
*
*
*
*
*
*
*
*
*
*
*
Full-open programmable
specification
User output
User output
User output
User output
User output
User output
User output
User output
User output
User output
User output
User output
User output
User output
User output
User output
User output
User output
User output
User output
User output
User output
* The allocation at L6 to L22 differs depending upon applications. Refer to the Operation Manual of
memory card (RK card) for more details.
■ Pin assignment
~
~
~
~
30 32 34
29 31 33
64
66 68
63
65
67
CAST-AU4/B2521E
6-2
2 468
1357 9
36 38 40 42
35 37 39
41
Page 58
■ Specifications of the Connected I/O (Used only in the semi-programmable
specifications and the full open programmable specifications)
Input
6. Appendix
I/O names in terms
of software
I23
I24
I25
I26
I27
I28
I29
I30
I31
I32
Output
I/O names in terms
of software
L23
L24
L25
L26
L27
L28
L29
Contents
START button (White button of operation box)
RETURN button (To be connected from the rear SAFETY connector by user)
Work program No. 1 (First digit of the PROGRAM switch of the operation box (1))
Work program No. 2 (First digit of the PROGRAM switch of the operation box (2))
Work program No. 4 (First digit of the PROGRAM switch of the operation box (4))
Work program No. 8 (First digit of the PROGRAM switch of the operation box (8))
Application program No. 1 (Second digit of the PROGRAM switch of the operation box (1))
Application program No. 2 (Second digit of the PROGRAM switch of the operation box (2))
Application program No. 4 (Second digit of the PROGRAM switch of the operation box (4))
Application program No. 8 (Second digit of the PROGRAM switch of the operation box (8))
Contents
START LED (White indicator)
Stop LED (Red indicator)
RETURN indicator (To be connected from the rear SAFETY connector by user)
Stop indicator (To be connected from the rear SAFETY connector by user)
The barrier signal from the rear SAFETY connector becomes valid when the barrier is enabled.
User cannot use it.
User cannot use it.
■ User external power supply connector
Power connector for I/O
Pin No. Name
1 24 V
2GND
CAST-AU4/B2521E
12
6-3
Page 59
■ Connector for Debug Station
Pin No.
1
2
3
4
5
6
7
8
9
10
11
12
13
14
15
16
17
18
19
20
21
22
23
24
25
Signal
FG
TP-RXD
TP-TXD
TP-CTS
TP-RTS
TP-DTR
C GND
SIO-DSR
SIO-RXD
C GND
NC
C GND
SIO-CTS
NC
SIO-RTS
EXS5
EXS2
/TP CN1
NC
TP-DSR
SIO-TXD
PC05V
SIO-DTR
C GND
PC05V
Contents
Frame ground
Connector for SRX teaching pendant (Receive data)
Connector for SRX teaching pendant (Transmit data)
Connector for SRX teaching pendant (Clear to send)
Connector for SRX teaching pendant (Request to send)
Connector for SRX teaching pendant (Data terminal ready)
Signal ground
Connector for program transfer (Data set ready)
Connector for program transfer (Receive data)
Signal ground
–
Signal ground
Connector for program transfer (Clear to send)
–
Connector for program transfer (Request to send)
Connector for SRX teaching pendant (Emergency stop)
Connector for SRX teaching pendant (Emergency stop)
SRX teaching pendant is connected or not
–
Connector for SRX teaching pendant (Data set ready)
Connector for program transfer (Transfer data)
+5V for SRX teaching pendant
Connector for program transfer (Data terminal ready)
Signal ground
+5V for SRX teaching pendant
Type : DBLC-J25SAF-10L9 Manufacturer : JAE
Applicable plug : DBSP-JB25PF Manufacturer : JAE
Applicable shell : DB-C8-J10-F4-1 Manufacturer : JAE
6-4
CAST-AU4/B2521E
Page 60
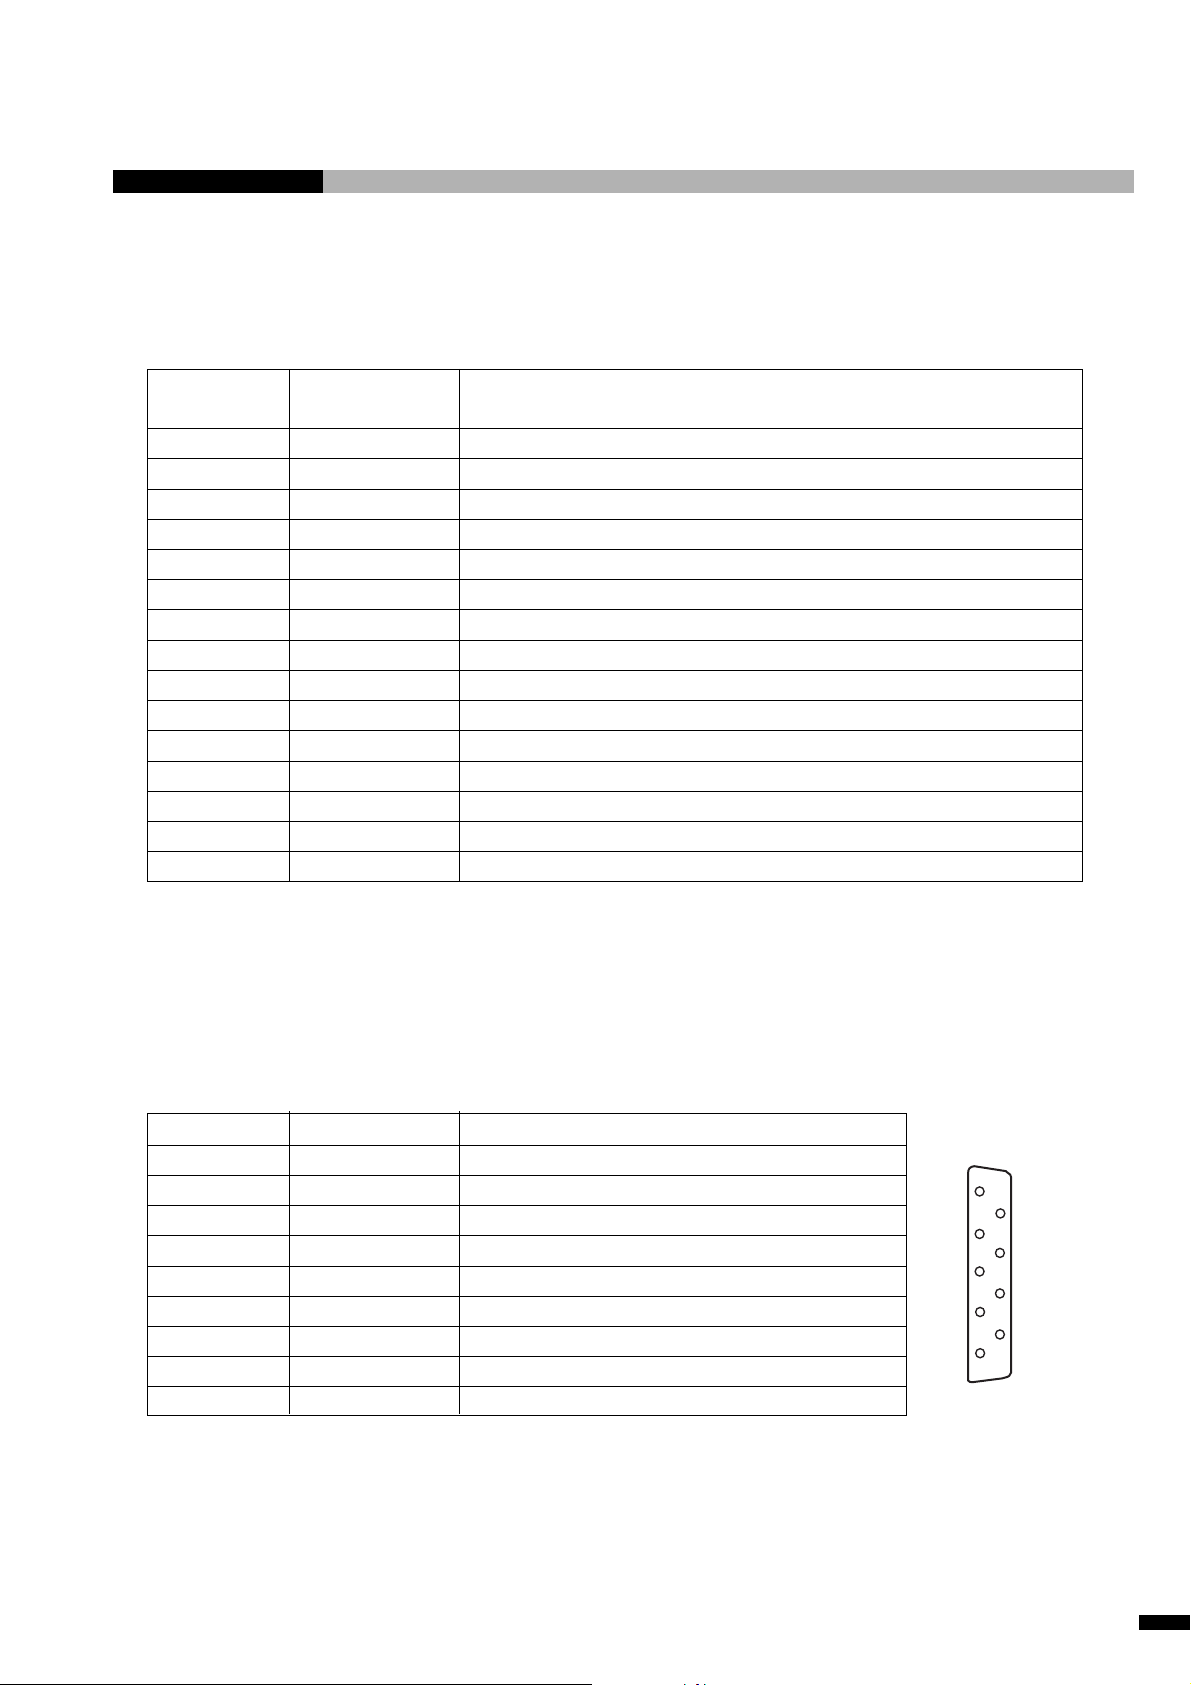
■ Connector for Operation Box
6
7
8
6. Appendix
Pin No.
1
2
3
4
5
6
7
8
9
10
11
12
13
14
15
I/O names in terms
of software
I25
L23
L24
–
I32
I23
–
–
–
I31
I26
I27
I28
I29
I30
Contents
Work program No. 1 (First digit of the PROGRAM switch (1))
START LED
Stop LED
0 V
Application program No. 8 (Second digit of the PROGRAM switch (8))
START button
Stop button
Stop button
24 V
Application program No. 4 (Second digit of the PROGRAM switch (4))
Work program No. 2 (First digit of the PROGRAM switch (2))
Work program No. 4 (First digit of the PROGRAM switch (4))
Work program No. 8 (First digit of the PROGRAM switch (8))
Application program No. 1 (Second digit of the PROGRAM switch (1))
Application program No. 2 (Second digit of the PROGRAM switch (2))
Type : 17HE-13150-73 Manufacturer : DDK
Applicable plug : 17HE-23150-CD8A Manufacturer : DDK
Applicable shell : 17H-7PCR-102 Manufacturer : DDK
■ RS232C connector (Rear Panel)
Pin No.
1
2
3
4
5
6
7
8
9
Signal
NC
TXD
RXD
DSR
SG
DTR
CTS
RTS
NC
Type : CDS-3109-0122 Manufacturer : SMK
Applicable plug : 17JE-23090-02 Manufacturer : DDK
Applicable shell : 17JE-09H-1A Manufacturer : DDK
CAST-AU4/B2521E
Contents
−
Transmit data
Receive data
Data set ready
Signal ground
Data terminal ready
Clear to send
Request to send
−
1
2
3
4
6-5
Page 61
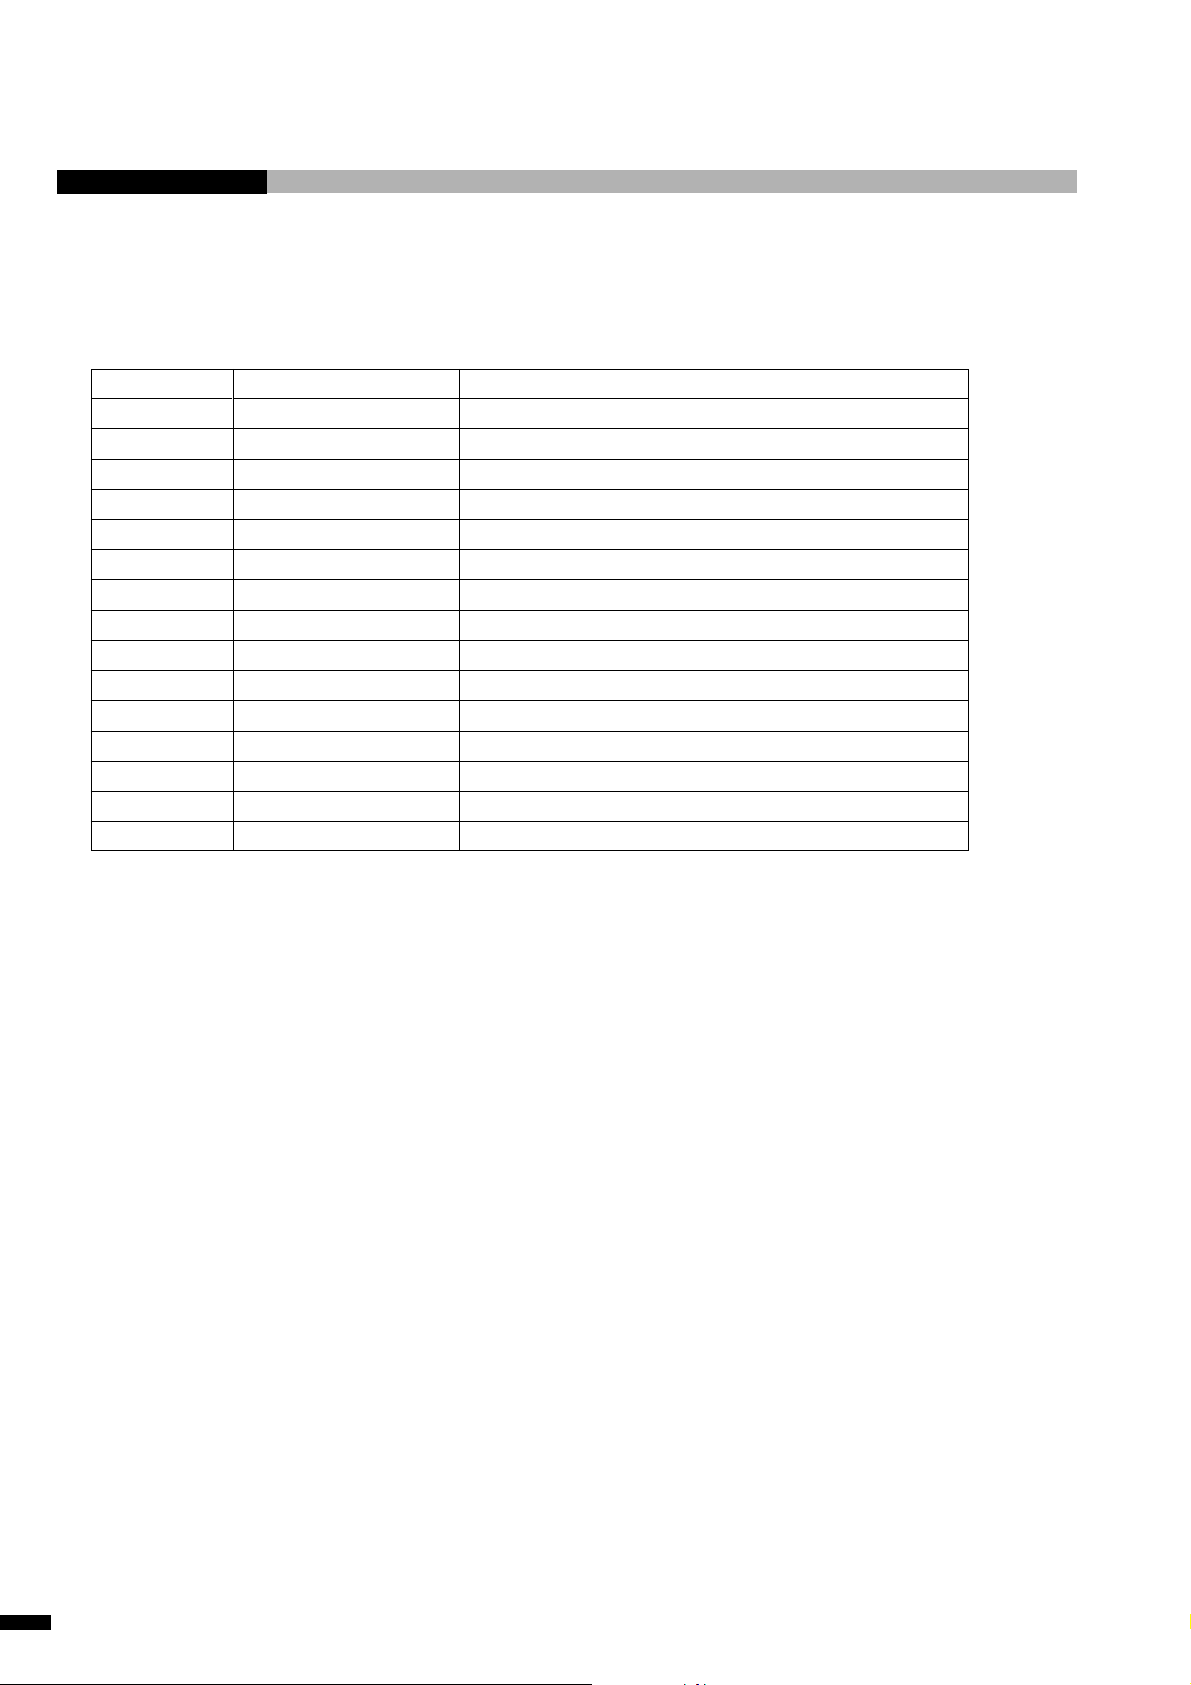
■ SAFETY Connector
Pin No.
1
2
3
4
5
6
7
8
9
10
11
12
13
14
15
STOP RELAY OUT (C)
STOP RELAY OUT (NO)
STOP RELAY OUT (NC)
Stop BAR RELEASE
Signal
24V
SA START OUT
SA STOP OUT
0V
FG
SA RETURN IN
SA Stop IN (C)
SA Stop IN (NC)
BAR (C)
BAR (NC)
0V
Contents
+24 V
RETURN indicator
Stop indicator
Stop output common
Stop output (NO)
Stop output (NC)
–
FG (Shielded wire, etc.)
RETURN switch
Stop switch
Stop switch
Barrier (safety door, etc.)
Barrier (safety door, etc.)
External stop switch and barrier are enabled
–
Type : DA-J15PF1L9 Manufacturer : JAE
Applicable plug : DA-15PF-N Manufacturer : JAE
Applicable shell : DA-C4-J10 Manufacturer : JAE
6-6
CAST-AU4/B2521E
Page 62
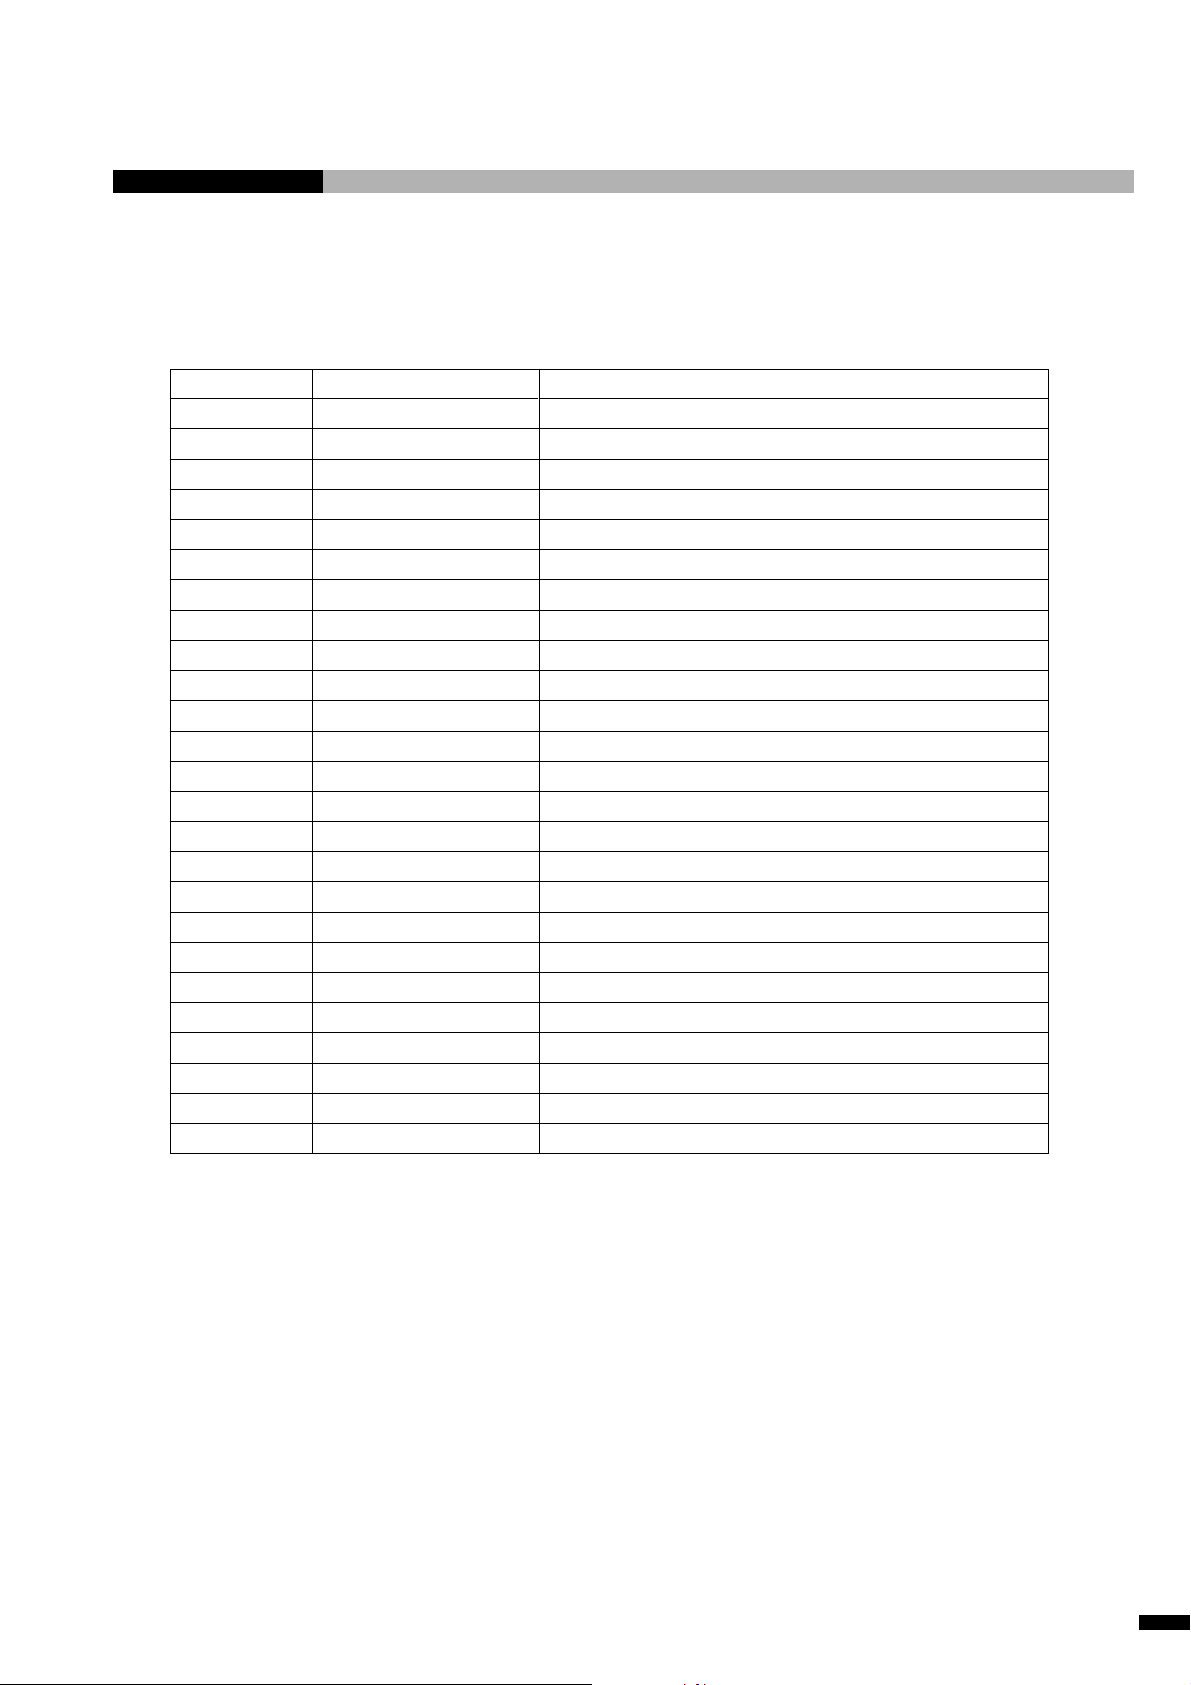
■ Connector for ZR-axis Cable
6. Appendix
Pin No.
1
2
3
4
5
6
7
8
9
10
11
12
13
14
15
16
17
18
19
20
21
22
23
24
25
Signal
FG
ZR_COM
Z_DET
ZR_DET
Z_24V
Z_LIM
Z_GND
Z_A
Z_B_C
Z_/B
R_A
R_B_C
R_/B
BRK+
BRK–
R24V
R_LIM
R_GND
FG
Z_A_C
Z_/A
Z_B
R_A_C
R_/A
R_B
Contents
Frame ground
Unit signal common (GND)
Z-unit signal
ZR-unit signal
DC 24 V for Z sensor
Z-sensor signal
Ground for Z-sensor
Z-axis phase A signal
Z-axis -phase B common (DC 24 V)
Z-axis phase/B
R-axis phase A
Z-axis -phase B common (DC 24 V)
R-axis phase/B
Brake (+, DC 24 V)
Brake (-, ground)
DC 24 V for R sensor
R sensor signal
Ground for R sensor
Frame ground
Z-axis phase A common (DC 24 V)
Z-axis phase /A
Z-axis phase B
R-axis phase A common (DC 24 V)
R-axis phase/A
R-axis phase B
Model : DBLC-J25SAF-10L9 Manufacturer : JAE
Applicable plug : DB-25PF-IN Manufacturer : JAE
Applicable shell : DB-C4-J11 Manufacturer : JAE
CAST-AU4/B2521E
6-7
Page 63

Supply Period of Repair Parts
The functional repair parts (parts needed to maintain product performance) of this
machine will be supplied for up to seven years in principle after production is
discontinued.
Because it may be possible to repair the machines depending upon the location of
the problem even after this period, consult the service or sales representative from
where you purchased the machine.
〔Singapore〕
Sony Electroncs (Singapore) Pte. Ltd
TEL : 8615858 FAX : 8621521
〔Europe〕
Sony Wega Produktions GmbH
Production Technology Division Europe
TEL : +49 (0)711 5858-420 FAX : +49 (0)711 574153
〔Japan〕
Sony Manufacturing Systems Corporation,
FA service Department.
TEL : 0480-23-1956 FAX : 0480-23-1706
Page 64

1st Edition November, 1998
3rd Edition October, 2001
Page 65

Sony Manufacturing Systems Corporation
Printed in Japan © 2001.10
3-864-811-13
 Loading...