

Page 1
kÉï=~ë=çÑW=
MPKOMNS
pfabufp=Q
pзСнп~кЙ=оЙклбзе=sQKNKP
pЙкобЕЙ=j~ем~д
SIDEXIS 4 service manual
bеЦдблЬ
bеЦдблЬ
=
Page 2

Page 3

Sirona Dental Systems GmbH Table of contents
Service Manual SIDEXIS 4
Table of contents
1
2
About this Service Manual....................................................................................... 5
1.1 Structure of the document ............................................................................ 5
1.1.1 Identification of the danger levels.................................................... 5
1.1.2 Formats and symbols used ............................................................. 6
1.2 Scope ........................................................................................................... 6
1.3 Other relevant documents ............................................................................ 6
Configuring software................................................................................................ 7
2.1 Configuration menu ...................................................................................... 7
2.1.1 "General settings"............................................................................ 10
2.1.2 "Patient settings" ............................................................................. 21
2.1.3 "Exposure"....................................................................................... 22
2.1.4 "Output" ........................................................................................... 29
2.1.5 "SIDEXIS Manager" ........................................................................ 32
2.2 Call up the configuration menu..................................................................... 35
2.3 Personalizing SIDEXIS 4.............................................................................. 36
2.3.1 Setting the program language......................................................... 36
2.3.2 Practice-specific settings................................................................. 38
2.3.2.1 Enter practice information................................................. 39
2.3.2.2 Define practice logo.......................................................... 40
2.3.2.3 Configure headers for printing.......................................... 42
2.3.2.4 Selecting the dental notation ............................................ 45
2.3.3 Set up communication partners....................................................... 47
2.3.4 User set up/administration............................................................... 49
bеЦдблЬ
3
4
64 58 983 D3592
D3592.076.01.03.02 03.2016
Configuring the computer ........................................................................................ 51
3.1 Free hard disk space for PDATA.................................................................. 51
Data and database .................................................................................................. 52
4.1 Data migration .............................................................................................. 53
4.2 Data backup ................................................................................................. 53
4.2.1 Data backup via "Windows task scheduler" .................................... 54
4.2.2 Data backup via the "SQL Management Studio"............................. 55
4.3 Restoring database ...................................................................................... 59
4.4 Installing database ....................................................................................... 64
4.5 Database movement .................................................................................... 65
4.5.1 Moving the SQL server.................................................................... 65
4.5.1.1 Prepare the “new” SQL server.......................................... 65
4.5.1.2 Backing up the “old” SQL server ...................................... 65
3
Page 4

Table of contents Sirona Dental Systems GmbH
Service Manual SIDEXIS 4
4.5.1.3 Restoring database to the "new" SQL server.................... 65
4.5.1.4 Execute provisioning ......................................................... 66
4.5.2 Moving the PDATA folder................................................................. 68
4.5.2.1 Move the PDATA folder to a bigger hard disk “within the
computer”
4.5.2.2 Migrate the data (PDATA) to a new “remote” file server ...68
4.6 Disconnecting CEREC database (if available).............................................. 72
68
5
6
7
Special features with 64bit operating systems ......................................................... 73
5.1 Astra Plugin................................................................................................... 73
Troubleshooting........................................................................................................ 75
6.1 Errors during installation ............................................................................... 75
6.1.1 DVD setup........................................................................................ 75
6.1.2 SQL server installation ..................................................................... 75
6.1.3 Server provisioning .......................................................................... 75
6.2 Error during reference run............................................................................. 76
6.2.1 On the SIDEXIS 4 workstation ......................................................... 76
6.3 Errors when establishing exposure readiness .............................................. 79
6.4 Errors when executing TWAIN devices......................................................... 80
6.5 Errors during SLIDA communication............................................................. 80
Other ........................................................................................................................ 81
7.1 Uninstalling X-ray log book ........................................................................... 81
7.2 Changing the SQL database port.................................................................. 82
7.3 Switching service ports ................................................................................. 85
4 D3592.076.01.03.02 03.2016
64 58 983 D3592
Page 5
Sirona Dental Systems GmbH 1About this Service Manual
Service Manual SIDEXIS 4 1.1Structure of the document
About this Service Manual
1
1.1
Structure of the document
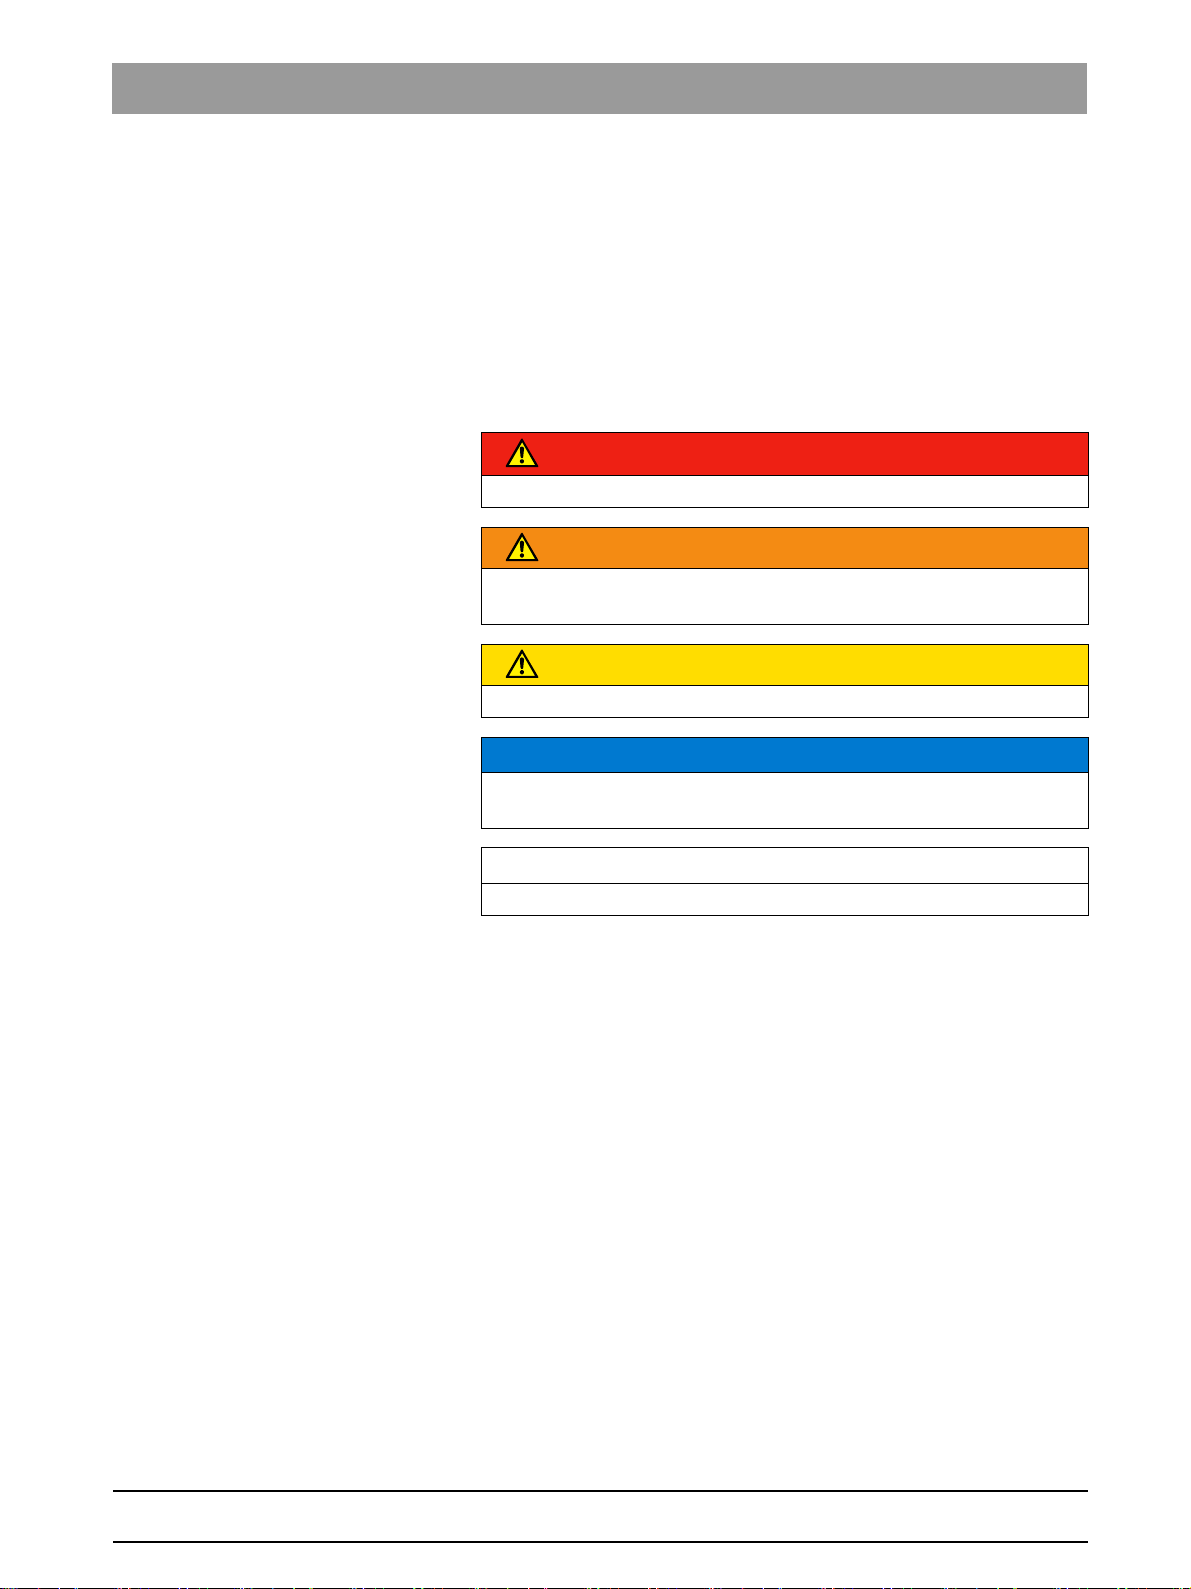
1.1.1 Identification of the danger levels
To prevent personal injury and material damage, please observe the
warning and safety information provided in these operating instructions.
Such information is highlighted as follows:
DANGER
An imminent danger that could result in serious bodily injury or death.
WARNING
A possibly dangerous situation that could result in serious bodily injury
or death.
CAUTION
A possibly dangerous situation that could result in slight bodily injury.
NOTICE
A possibly harmful situation which could lead to damage of the product
or an object in its environment.
bеЦдблЬ
IMPORTANT
Application instructions and other important information.
Tip: Information on making work easier.
64 58 983 D3592
D3592.076.01.03.02 03.2016
5
Page 6
1About this Service Manual Sirona Dental Systems GmbH
1.2Scope Service Manual SIDEXIS 4
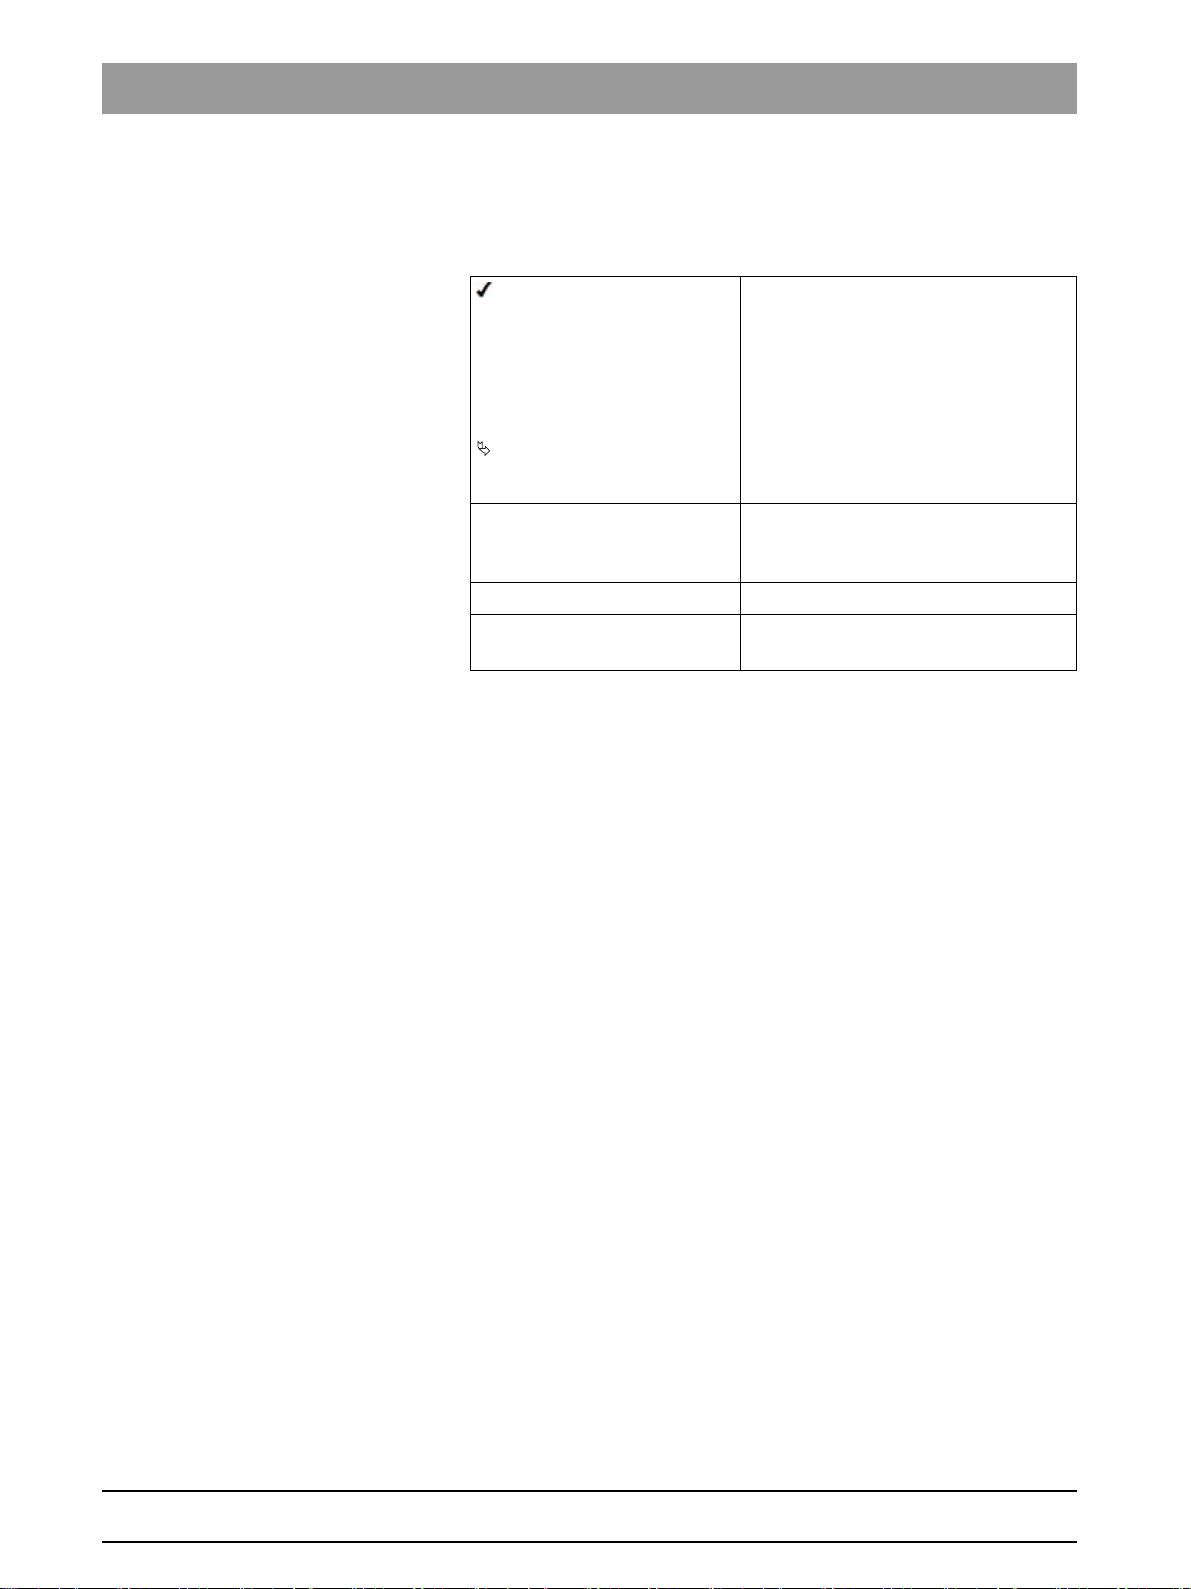
1.1.2 Formats and symbols used
The formats and symbols used in this document have the following
meaning:
1.2
1.3
Prerequisite
1. First action step
2. Second action step
or
➢ Alternative action
Result
➢ Individual action step
See "Formats and symbols
used [ → 6]"
● List Designates a list.
"Command / menu item" Indicates commands, menu items or
Prompts you to do something.
Identifies a reference to another text
passage and specifies its page
number.
quotations.
Scope
This Service Manual describes the servicing of the software SIDEXIS 4.
It is intended for use exclusively by trained and authorized distributors
and service technicians.
Other relevant documents
In addition to this manual, you need the following documents:
Installation Instructions
● SIDEXIS 4 Installation Instructions: REF 64 47 200
DVD text
Current service documentation, such as the Service Manual, can be
downloaded from the Sirona dealer website.
System requirements can be found in the
SIDEXIS 4 DVD.
"readme.html"
file on the
6 D3592.076.01.03.02 03.2016
64 58 983 D3592
Page 7
Sirona Dental Systems GmbH 2Configuring software
Service Manual SIDEXIS 4 2.1Configuration menu
Configuring software
2
Configuration of SIDEXIS 4 takes place via a Configuration menu [→7],
which you SIDEXIS 4can open [ → 35] via the cog symbol in the headline.
2.1
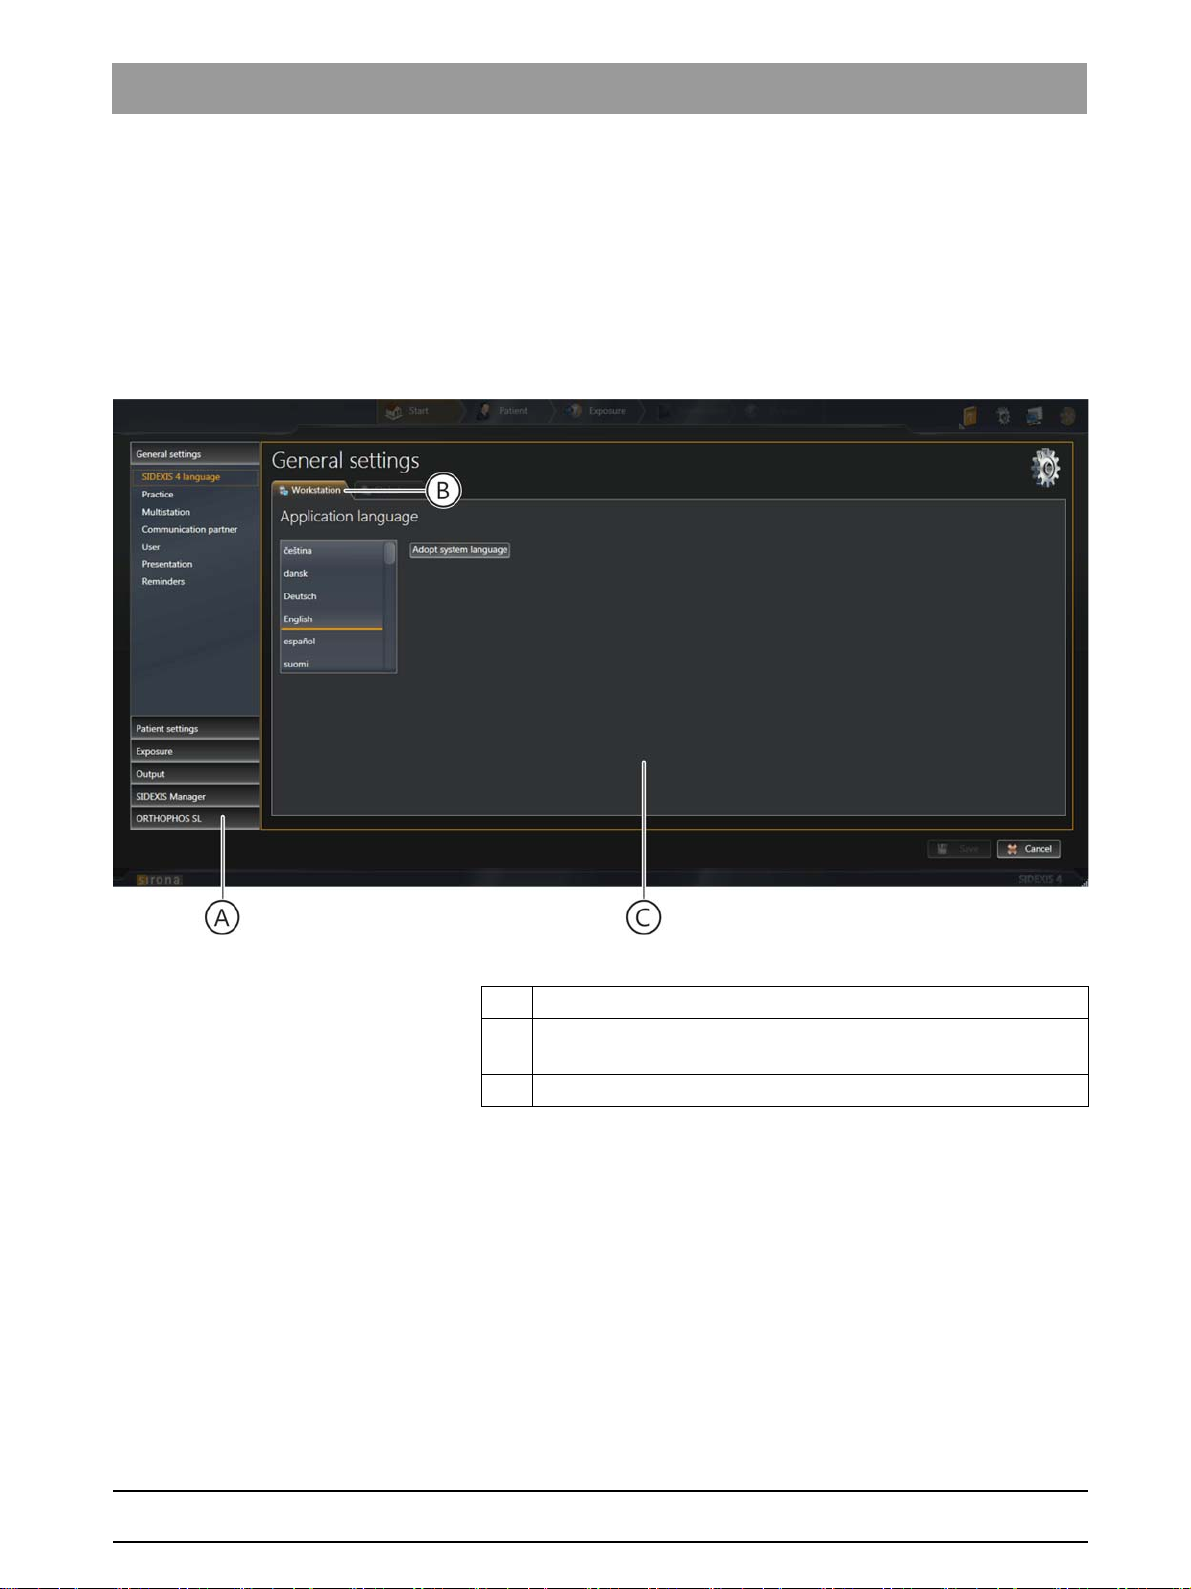
Configuration menu
You can adjust SIDEXIS 4 according to the requirements of your practice.
To do this, you are provided with a clear configuration menu
bеЦдблЬ
Configuration menu, e.g. the "Application language" menu
A Structure tree with buttons for menu selection
B Display tab: displays whether the menu contains global, user-
specific, or workstation-related settings.
C Menu
The menus for presetting the program are compiled into groups.
●
"General Settings"
●
"Patient Settings"
●
"Acquisition"
●
"Output"
●
"SIDEXIS Tools"
NOTE: If plug-ins for treatment units that require settings are installed in
SIDEXIS 4, these are also displayed as buttons here.
64 58 983 D3592
D3592.076.01.03.02 03.2016
7
Page 8

2Configuring software Sirona Dental Systems GmbH
2.1Configuration menu Service Manual SIDEXIS 4
By clicking on the group name (E) (e.g.
"General Settings"
(F) for the relevant menu become visible.
When you click on a button, the corresponding menu opens.
) the buttons
8 D3592.076.01.03.02 03.2016
64 58 983 D3592
Page 9

Sirona Dental Systems GmbH 2Configuring software
Service Manual SIDEXIS 4 2.1Configuration menu
Identifying changes to the configuration
Identifying a change to the configuration that has not yet been saved
If you have made changes in the configuration menu and these have not
yet been saved, the corresponding buttons in the structure tree (H) are
labeled with an * (I). This identification is deleted again once the
configuration is saved.
Saving the changes To save the changes to the configuration click on the
on the bottom right of the configuration menu. The changes are saved
and the menu closes.
Closing the configuration menu with no
changes
If you wish to close the configuration menu without saving the changes to
the configuration, click on the
discarded and the menu closes.
"Cancel"
button (G). The changes are
"Save"
bеЦдблЬ
button (J)
64 58 983 D3592
D3592.076.01.03.02 03.2016
9
Page 10
2Configuring software Sirona Dental Systems GmbH
2.1Configuration menu Service Manual SIDEXIS 4
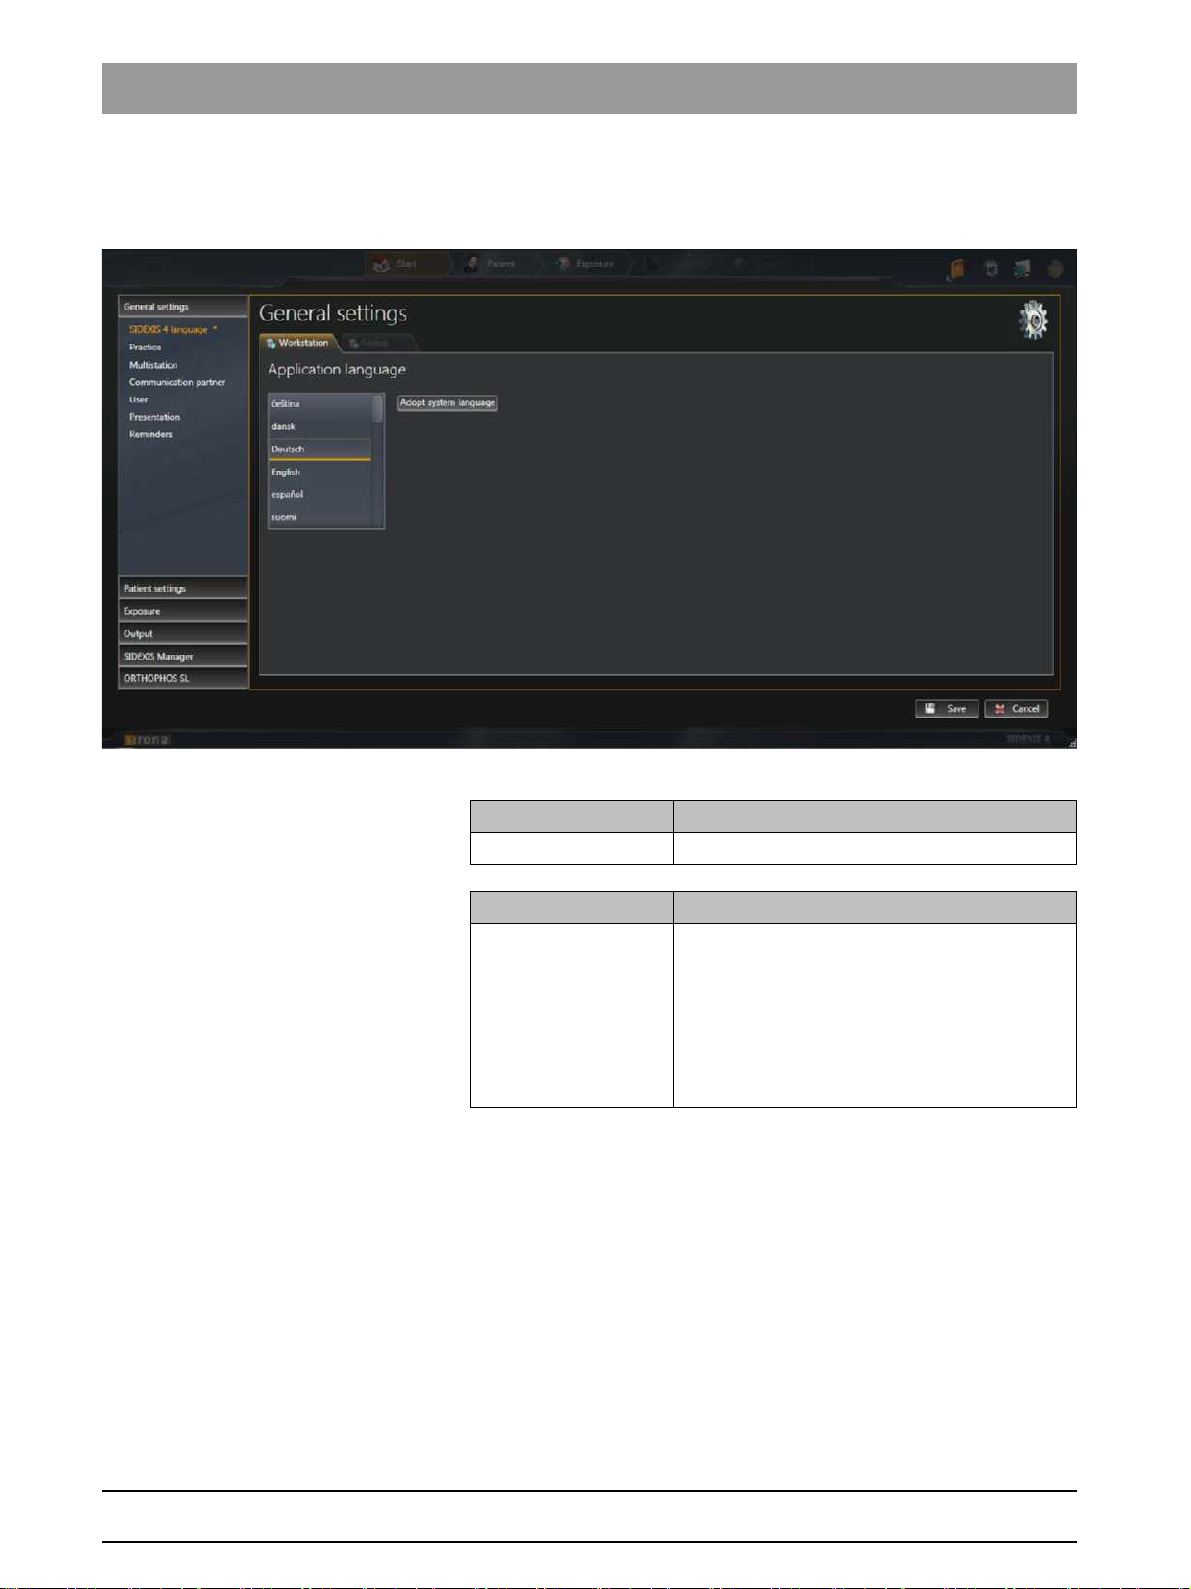
2.1.1 "General settings"
"Language SIDEXIS 4" User-specific
"Application language" menu
settings for the program language
List field Function
Application language Selecting the program language
Button Function
"Adopt system
language"
Select system language as the program
language.
The currently set system language is adopted
as the program language. If the system
language is not available as program language,
English is automatically used as the program
language.
10 D3592.076.01.03.02 03.2016
64 58 983 D3592
Page 11

Sirona Dental Systems GmbH 2Configuring software
Service Manual SIDEXIS 4 2.1Configuration menu
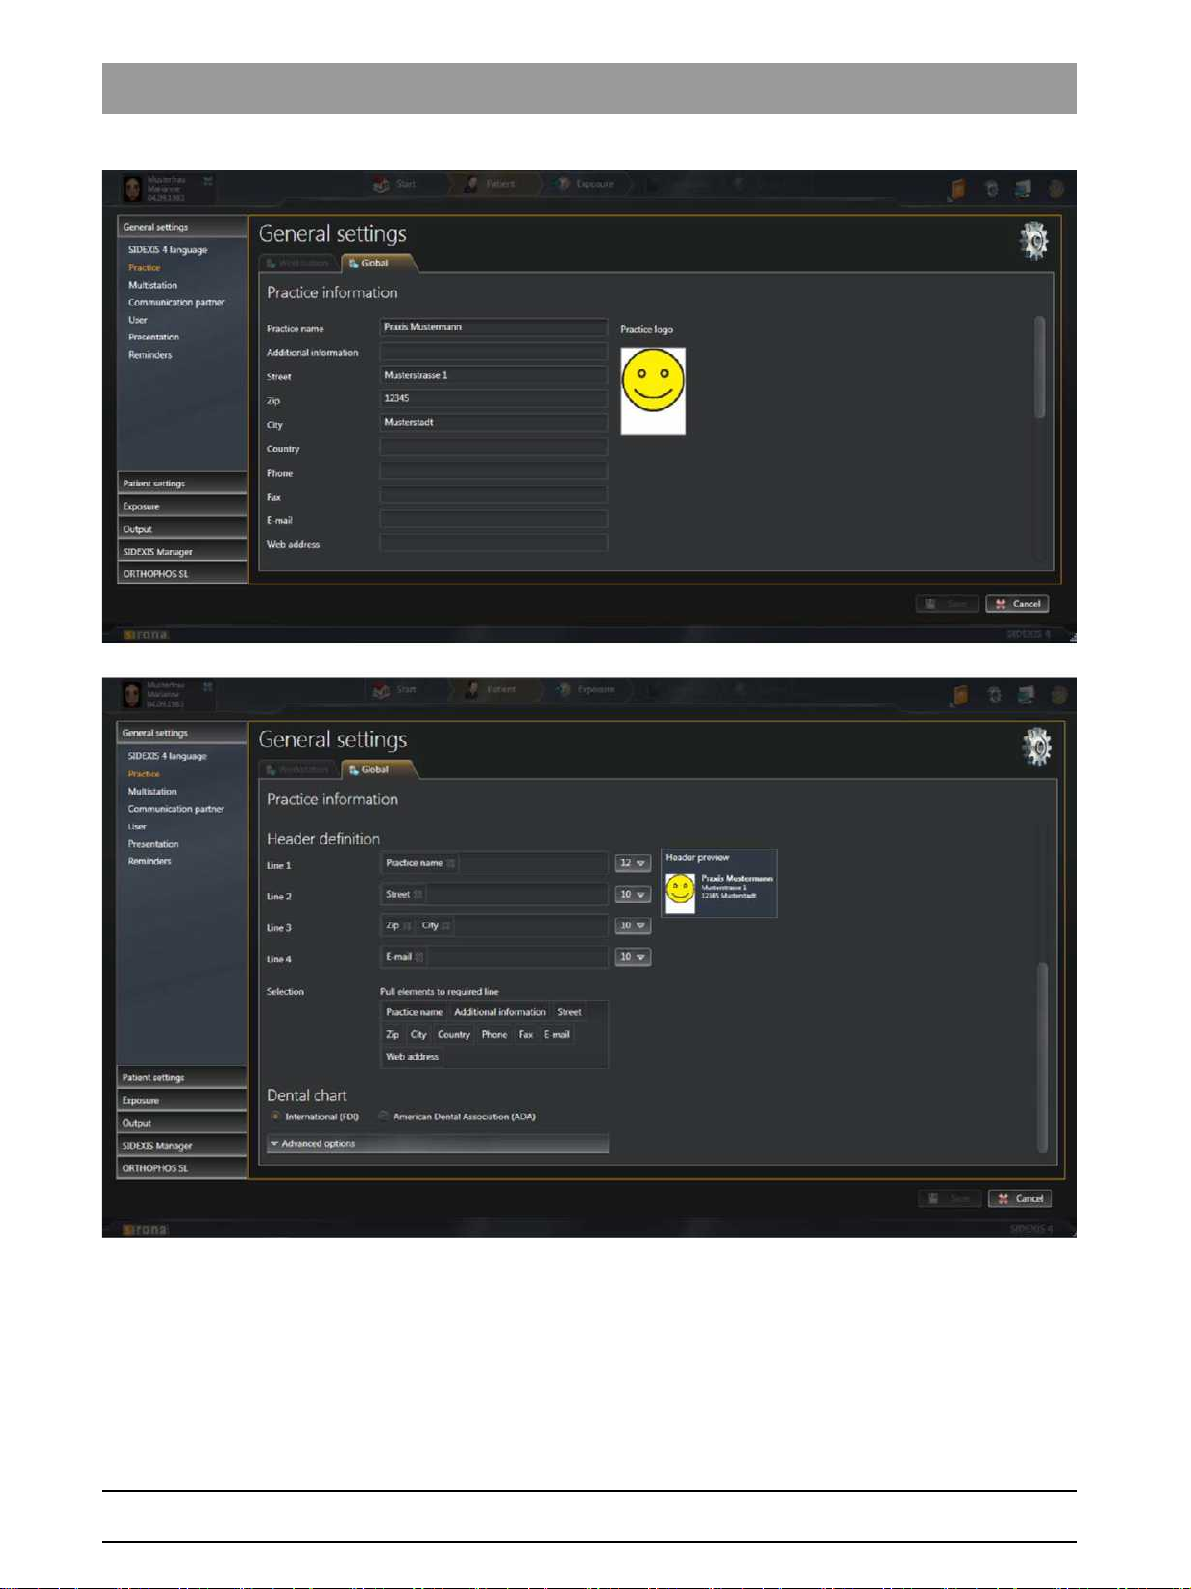
"Praxis" Global
printout
"General Settings"
The
●
"Praxis Settings"
●
"Header definition"
●
"Dental chart"
You can move the menu up or down in the window using the scrollbar to
the right of the menu.
settings for the practice data; e.g. how data is displayed on a
menu contains the following sub-areas:
bеЦдблЬ
64 58 983 D3592
D3592.076.01.03.02 03.2016
11
Page 12
2Configuring software Sirona Dental Systems GmbH
2.1Configuration menu Service Manual SIDEXIS 4
"Praxis Settings" menu
12 D3592.076.01.03.02 03.2016
64 58 983 D3592
Page 13

Sirona Dental Systems GmbH 2Configuring software
Service Manual SIDEXIS 4 2.1Configuration menu
Example of a practice address in a printout
Entry fields Entry
"Praxis name"
"Additional
Name of the practice
Any additional information
information"
"Street"
"Zip"
"City"
"Country"
"Phone"
"Fax"
"E-Mail"
"Web address"
Option button Option button activated
"International (FDI)"
"American Dental
Street
Zip code
City
Country
Phone number
Fax number
Email address
Website
International dental notation is used
American dental notation is used
Association (ADA)"
bеЦдблЬ
Button Function
"Praxis logo"
"Show preview"
Another check box appears by clicking on the
Check box Function
"Temporarily show
deleted media"
The configuration for displaying the practice address in the printout is
described in the Personalizing SIDEXIS 4 ⇒ Practice-specific
settings [ → 38] section.
SH multi-user
Define practice logo for printouts
Preview the display of practice data;
e.g. on printouts
"Advanced options"
Display deleted media temporarily in
for reactivation.
button.
"Timeline"
64 58 983 D3592
D3592.076.01.03.02 03.2016
13
Page 14
2Configuring software Sirona Dental Systems GmbH
2.1Configuration menu Service Manual SIDEXIS 4
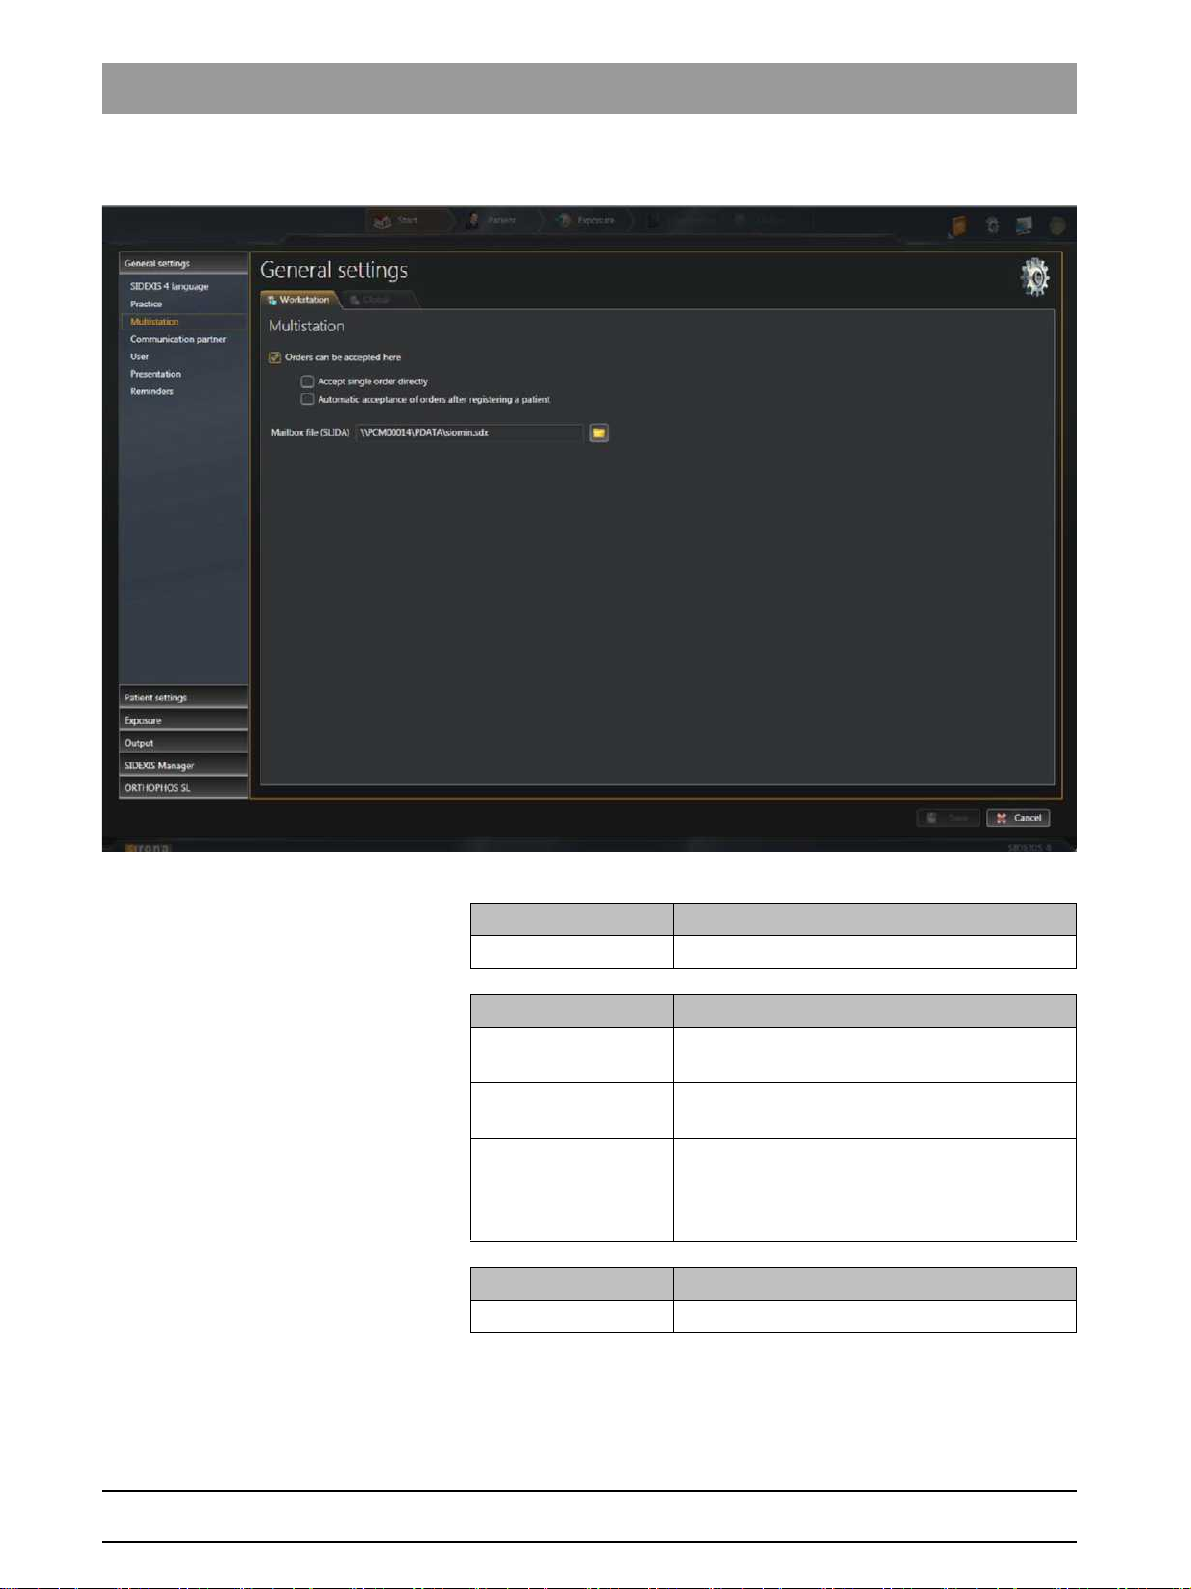
"Multistation" Workstation-related
settings for multi-user operation
"Multistation capability" menu
Entry fields Entry
"Mailbox File (SLIDA)"
Path to the PAS mailbox file
Check box Check box activated
"Orders can be
accepted here"
"Accept a single order
X-ray jobs are taken automatically from the
PAS
X-ray jobs are added to the job list
directly"
"Automatic
acceptance of orders
X-ray jobs are added to the job list once the
patient is logged in
after registering a
patient"
Button Function
Folder icon Path selection
SH communication partner
14 D3592.076.01.03.02 03.2016
64 58 983 D3592
Page 15
Sirona Dental Systems GmbH 2Configuring software
Service Manual SIDEXIS 4 2.1Configuration menu
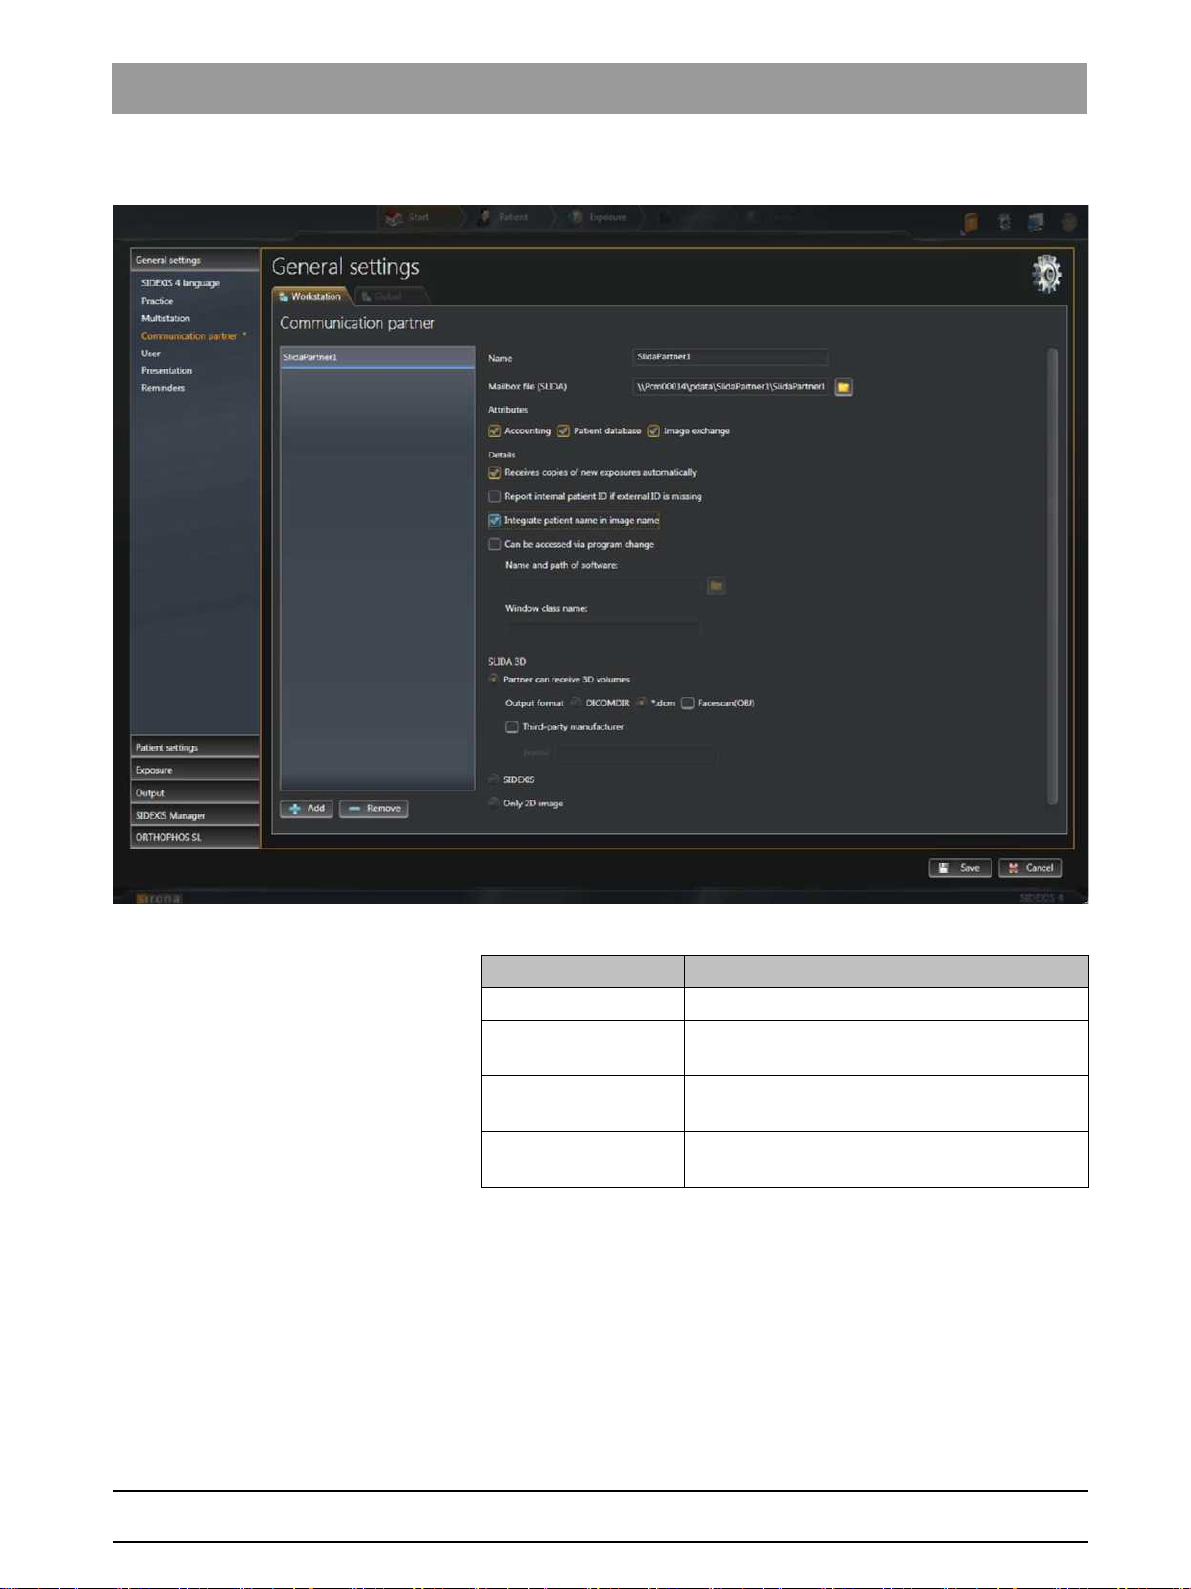
"Communication partners" Workstation-related
setup of a communication partner
bеЦдблЬ
Menu "Communication partners"
Entry fields Entry
"Name"
"Mailbox File (SLIDA)"
"Name and path of the
Name of communication partner
Path to the practice mailbox file for the
communication partner
Name and path of the communication program
SW"
"Window class name"
Identification key for the communication
program
64 58 983 D3592
D3592.076.01.03.02 03.2016
15
Page 16

2Configuring software Sirona Dental Systems GmbH
2.1Configuration menu Service Manual SIDEXIS 4
Check box Check box activated
"Accounting"
Attributes are defined for communication
"Patient database"
"Image exchange"
"Automatically
receives a copy of new
With each exposure a copy is placed in the
folder in which the mailbox file is located.
exposures"
"Report internal patient
ID if external is
missing"
"Integrate patient
name in image file
If there is no external file card index number
available from the PAS for a patient, the
internal SIDEXIS 4 card index number is
transmitted to the communication partner to
identify the patient.
Patient name is integrated into the file name
during media transfer
name"
"Can be accessed by
program change"
Activates the entry fields
and
SW"
"Window class name"
"Name and path of the
Option buttons Function
"Remove"
"Add"
Button Function
"Remove"
"Add"
Menu area
Entry fields Entry
"SLIDA 3D"
"Profile"
Check box Check box activated
"Third-patry
Remove communication partners
Add communication partners
Remove communication partners
Add communication partners
:
Profile of the external manufacturer
External manufacturer available
manufacturer"
"Facescan(OBJ)"
The Facescan OBJ file (if available) is also
exported.
16 D3592.076.01.03.02 03.2016
64 58 983 D3592
Page 17

Sirona Dental Systems GmbH 2Configuring software
Service Manual SIDEXIS 4 2.1Configuration menu
Option buttons Function
"Partner can receive
3D volumes"
"DICOMDIR"
"*.dcm"
"Sidexis"
"Only 2D image"
The communication partner can receive 3D
volumes.
DICOMDIR
Gathering DCM files
Exporting the 3D volumes as DICOMDIR.
3D volumes that are exported in this type, can
be reimported in SIDEXIS 4.
Only 2D thumbnail.
Communication partners who cannot receive
the 3D volumes receive a 2D thumbnail in tiff
format.
bеЦдблЬ
64 58 983 D3592
D3592.076.01.03.02 03.2016
17
Page 18
2Configuring software Sirona Dental Systems GmbH
2.1Configuration menu Service Manual SIDEXIS 4
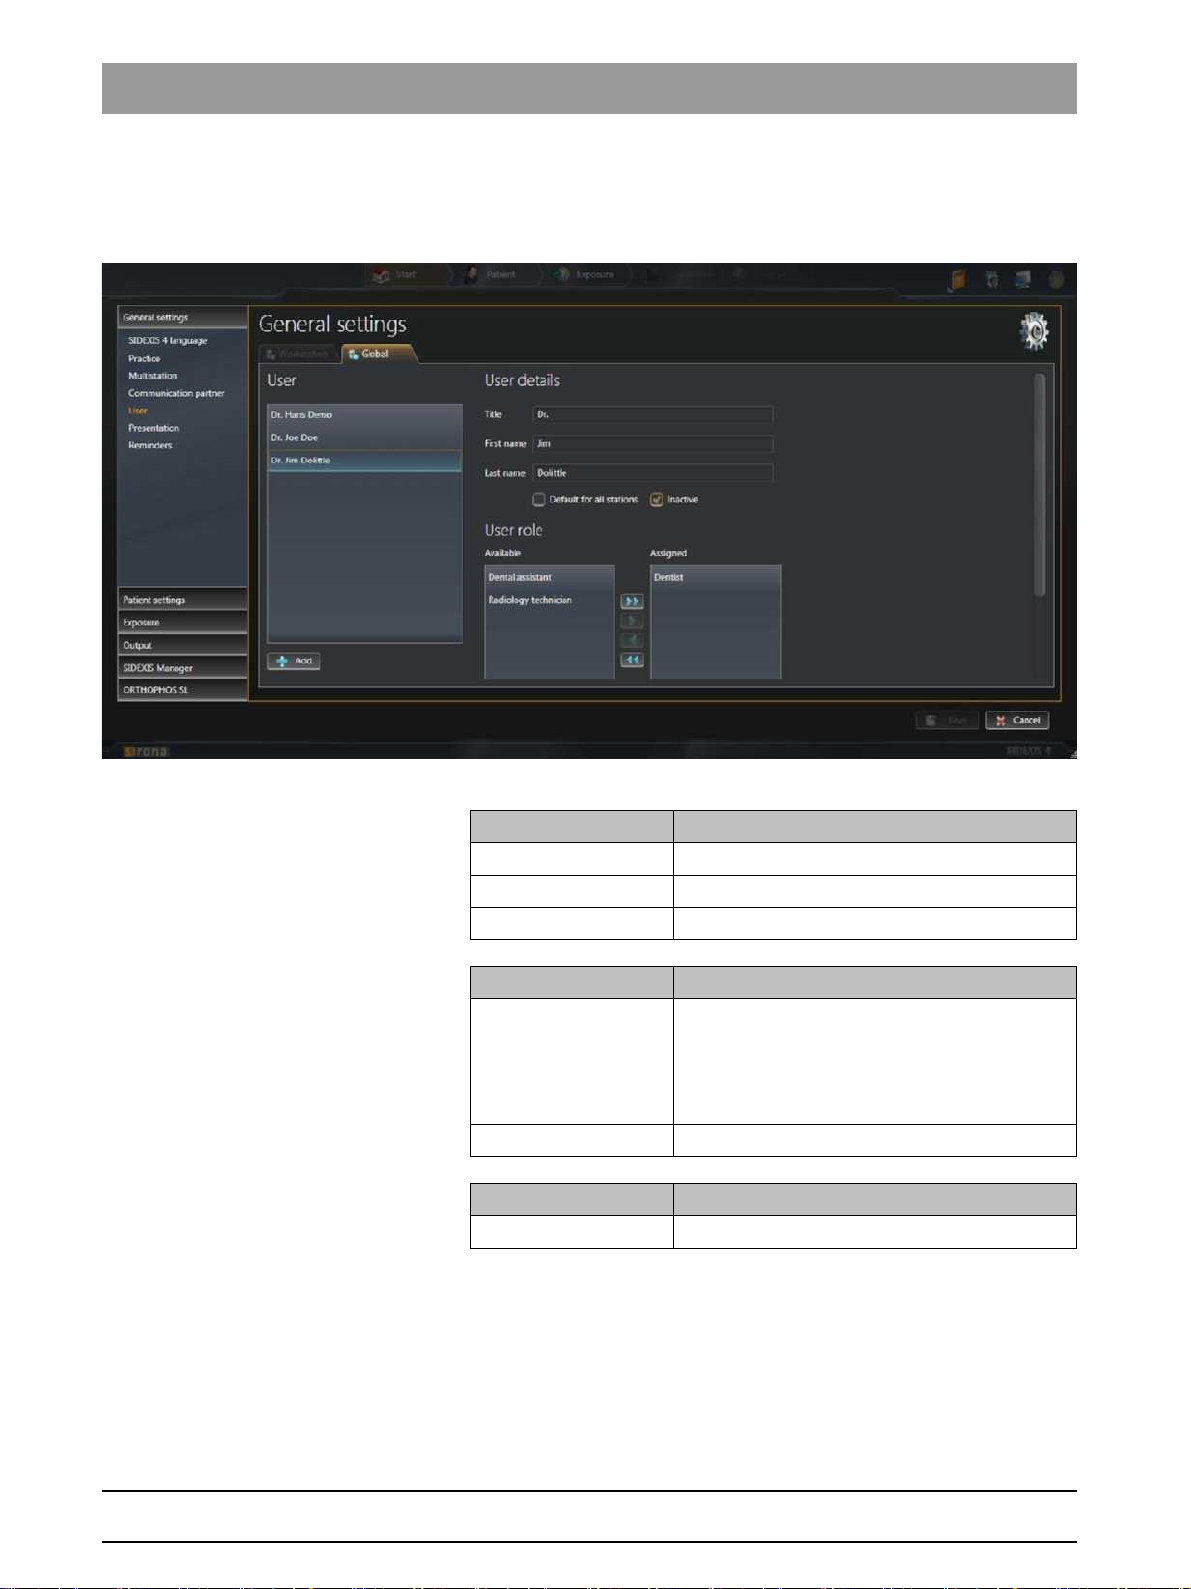
"User" Global
Users set up here are entered into different list fields of SIDEXIS 4 (e.g.
when entering the indication prior to exposure) and can be selected there.
user setup.
"User/User details/User role" menu
Entry fields Entry
"Title"
"First name"
"Last name"
Check box Check box activated
"Default for all
stations"
"Inactive"
Button Function
"Add"
Title of the user
First name of the user
Surname of the user
Selected users are defined as standard
consultants.
If a patient is not assigned to a consultant, this
standard consultant is suggested as the main
consultant in the menus.
Deactivate user
Add new user
18 D3592.076.01.03.02 03.2016
64 58 983 D3592
Page 19
Sirona Dental Systems GmbH 2Configuring software
Service Manual SIDEXIS 4 2.1Configuration menu
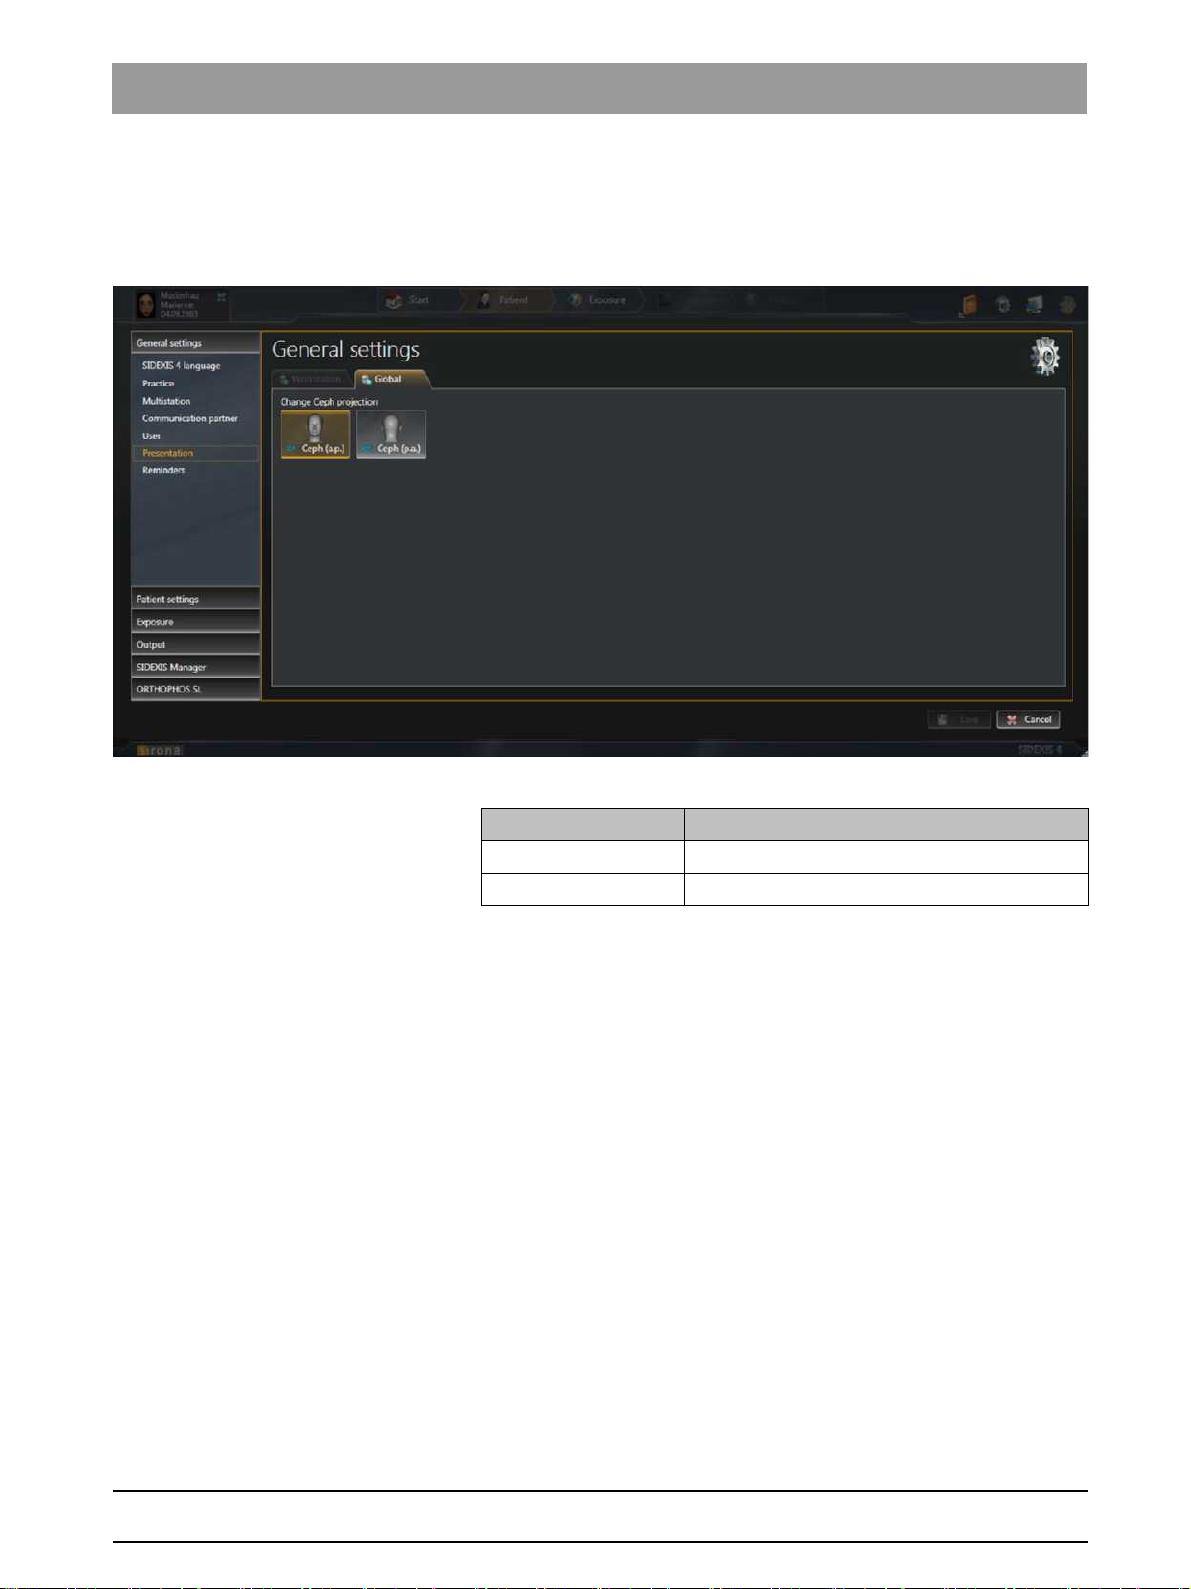
"Presentation" Global
The
"Presentation"
ceph projection from
(p.a.)"
settings for the ceph projection.
configuration menu can be used to switch the
"CA Ceph (a.p.)"
.
(factory settings) to
"CA"
"CP Ceph
bеЦдблЬ
"Presentation" menu
Button Function
"CA Ceph (a.p.)" "CA"
"CP Ceph (p.a.)" "CA"
anterior – posterior projection
posterior – anterior projection
64 58 983 D3592
D3592.076.01.03.02 03.2016
19
Page 20

2Configuring software Sirona Dental Systems GmbH
2.1Configuration menu Service Manual SIDEXIS 4
"Reminder" Global
Via the
as reminders in the list of appointments in the
"Reminder" menu
settings for the diary.
"Reminder"
configuration menu, entries are defined that appear
"Start"
work area.
Entry fields Entry
"Name"
"Interval (in days)"
"Executing Program"
"Next reminder"
Check box Check box activated
"Set automatically to
done"
"Enable Reminder"
Button Function
"Add"
"Remove"
Folder icon Path selection
Appointment title
Interval for automatically creating regular
appointments in the diary
Selecting the program that should be started
when clicking on an appointment in the diary.
Date of the next appointment
Appointments are automatically set to the
"Completed" status after clicking on them in the
diary.
The defined appointment is activated and
appears in the diary
Add new appointment
Delete existing appointment
20 D3592.076.01.03.02 03.2016
64 58 983 D3592
Page 21
Sirona Dental Systems GmbH 2Configuring software
Service Manual SIDEXIS 4 2.1Configuration menu
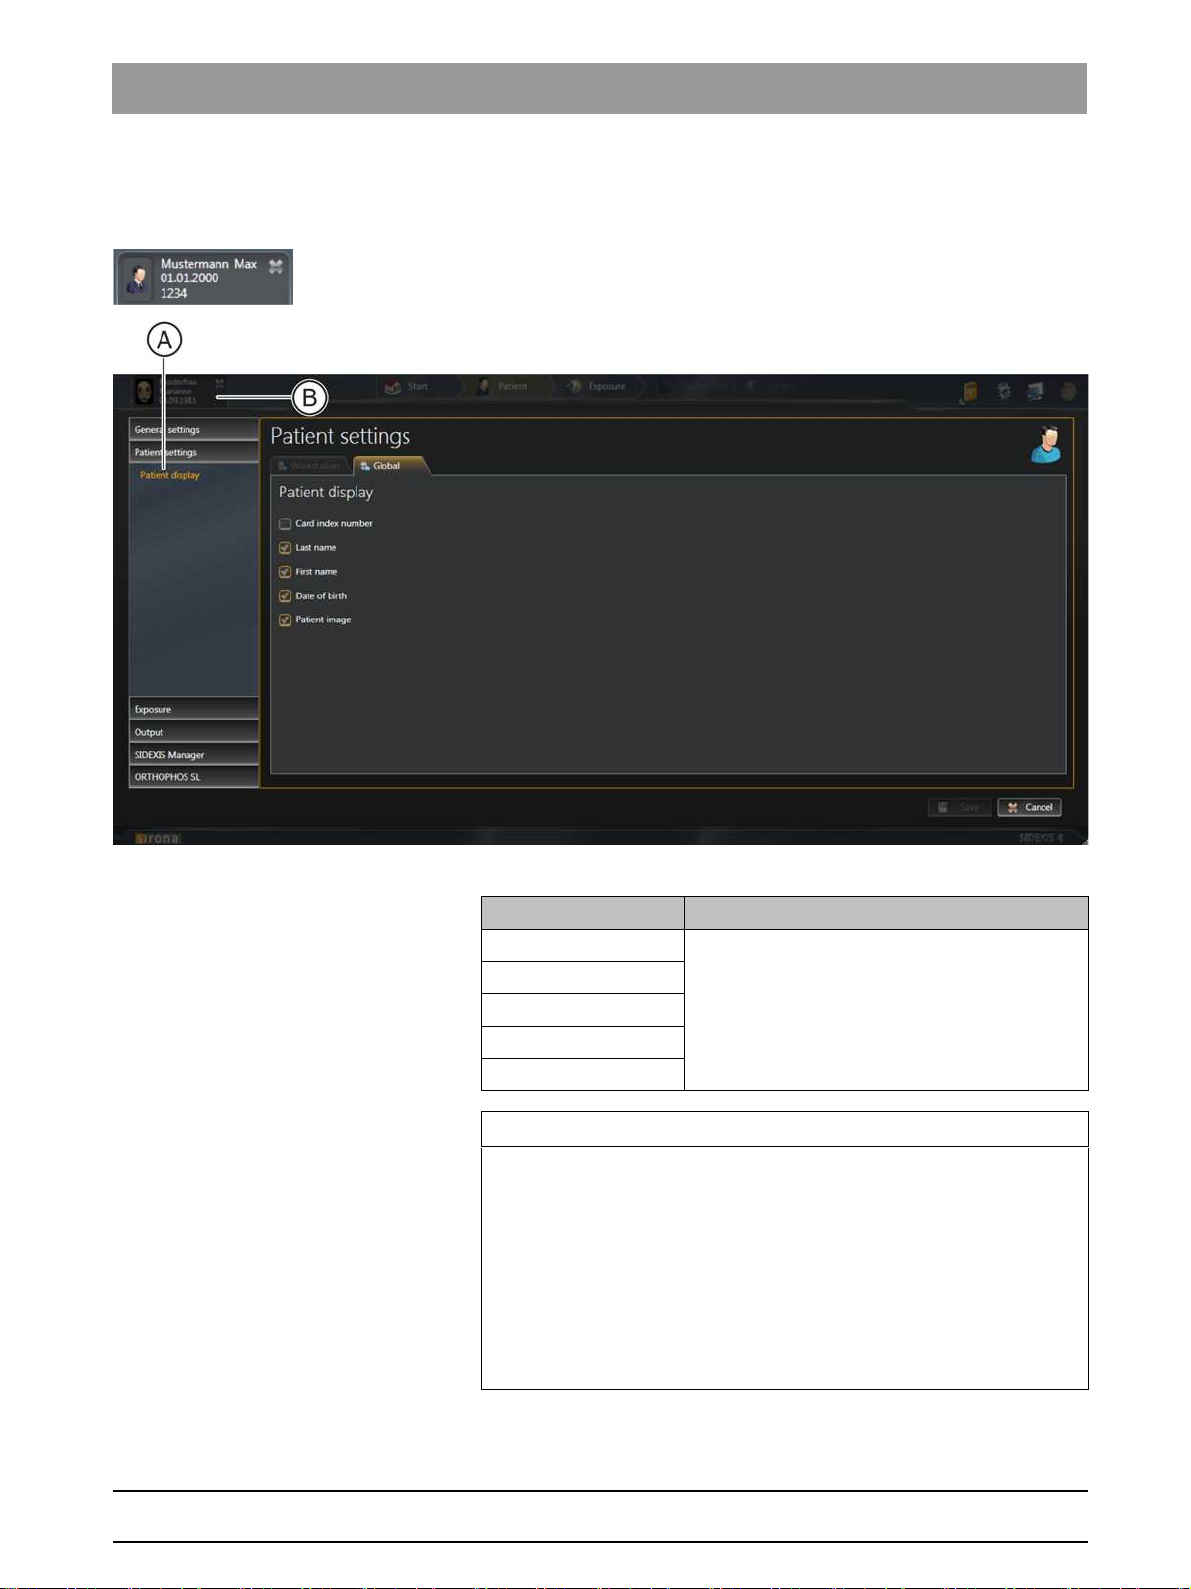
2.1.2 "Patient settings"
"Patient display"
Global
settings for displaying the logged in patient in the header line
"Patient display" menu
Check box Check box activated
"Card-index no."
Information is displayed in the header line
"Last name"
"First name"
"Date of birth"
"Patient image"
Card index number
IMPORTANT
At least the
,
"First name"
a patient.
If just the
must be entered for each patient.
If a patient is logged in for whom this does not apply (no card index
number, even though only the
the configuration, with the exception of check box
red text
in patient.
"Card-index no."
, and
"Date of birth"
"Card-index no."
check box or the check boxes
check box is checked, a card index number
"Card-index no."
"Not clearly identifiable"
"Last name"
must be checked to uniquely identify
check box is ticked in
"Patient image"
appears in the display for the logged-
bеЦдблЬ
), the
64 58 983 D3592
D3592.076.01.03.02 03.2016
21
Page 22
2Configuring software Sirona Dental Systems GmbH
2.1Configuration menu Service Manual SIDEXIS 4
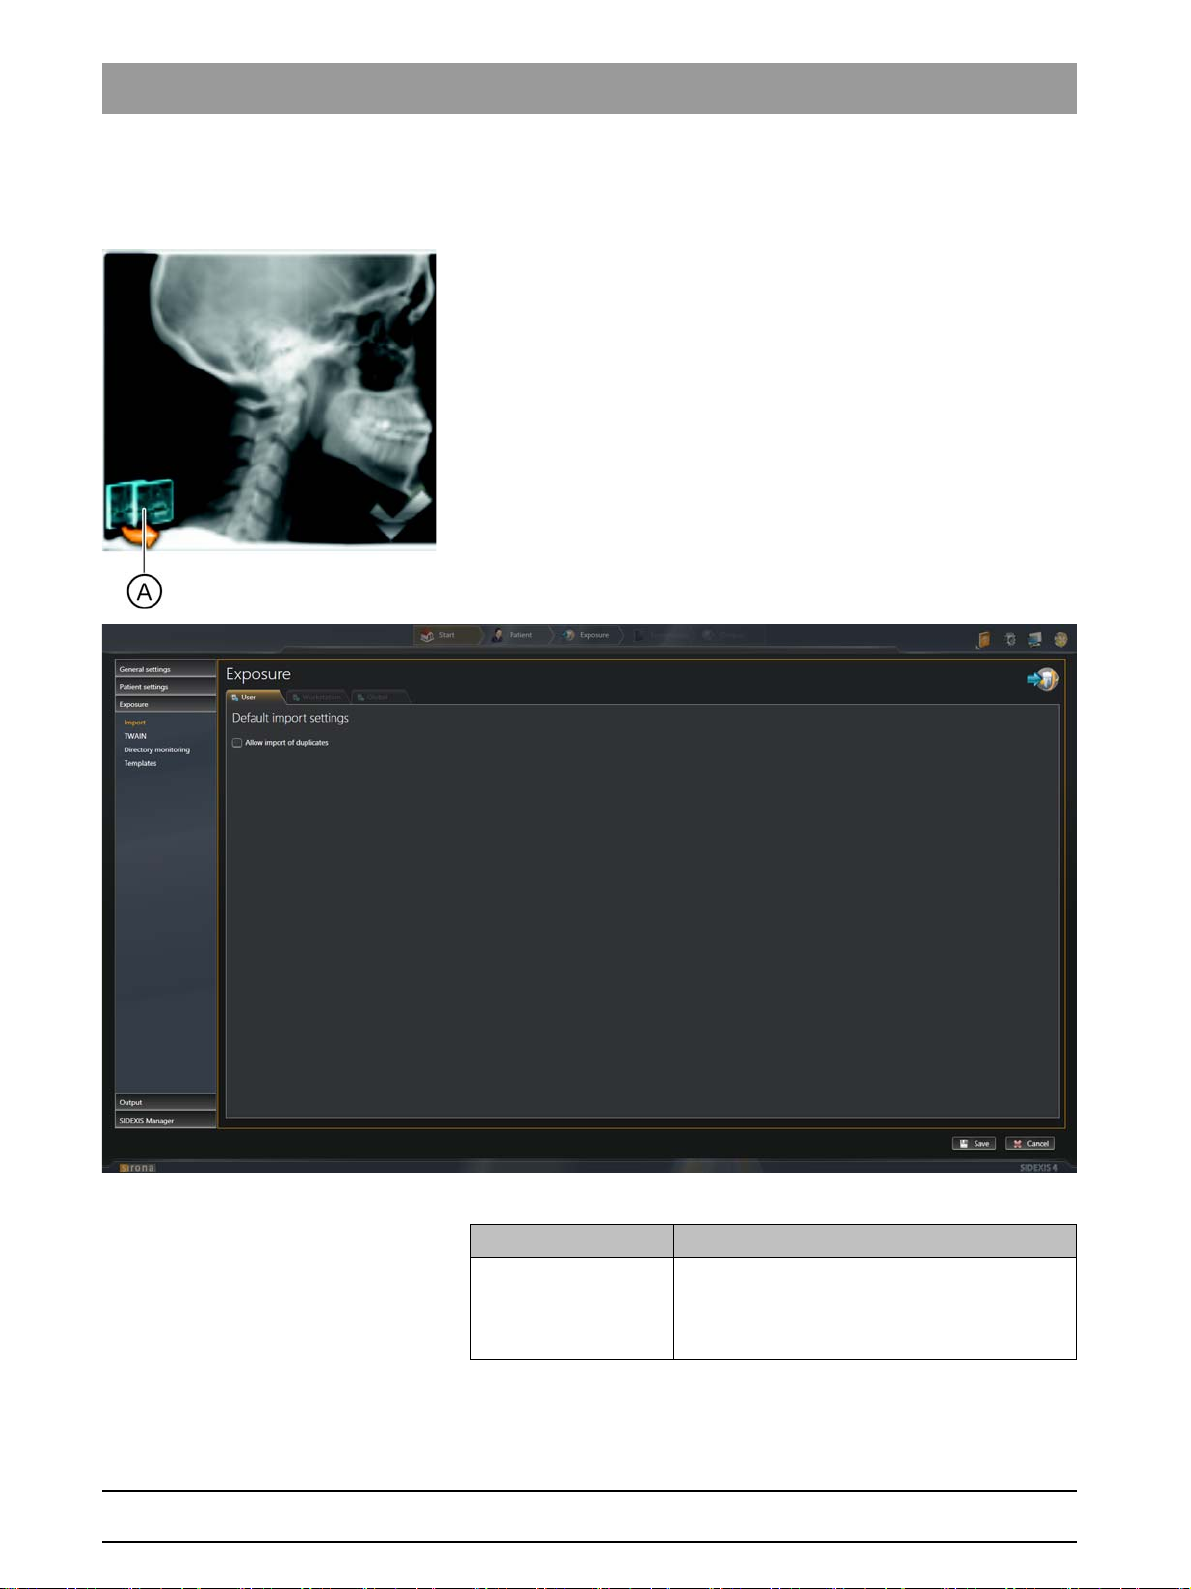
2.1.3 "Exposure"
"Import" User-specific
When importing media items, a check is performed to see whether the
media item is already in the SIDEXIS 4 database. If the check box is
deactivated (factory setting), an icon (A) is displayed to signal that an
import is not possible when attempts are made to import media items that
are already available.
"File Import"
In the
through the
database)"
check box.
settings for importing available media
menu you can cancel the import of the duplicate once
"Allow import of duplicates (if image already exists in
"Default Import Settings" menu
Check box Check box activated
"Allow import of
duplicates (if image
already exists in
If a media item to be imported is already
present in the database, this is still imported as
a duplicate.
database)"
22 D3592.076.01.03.02 03.2016
64 58 983 D3592
Page 23

Sirona Dental Systems GmbH 2Configuring software
Service Manual SIDEXIS 4 2.1Configuration menu
"TWAIN" Workstation-related
settings for TWAIN devices
bеЦдблЬ
"TWAIN devices" menu
You can set the TWAIN connection via the check boxes in the
devices"
menu.
"TWAIN
64 58 983 D3592
D3592.076.01.03.02 03.2016
23
Page 24
2Configuring software Sirona Dental Systems GmbH
2.1Configuration menu Service Manual SIDEXIS 4
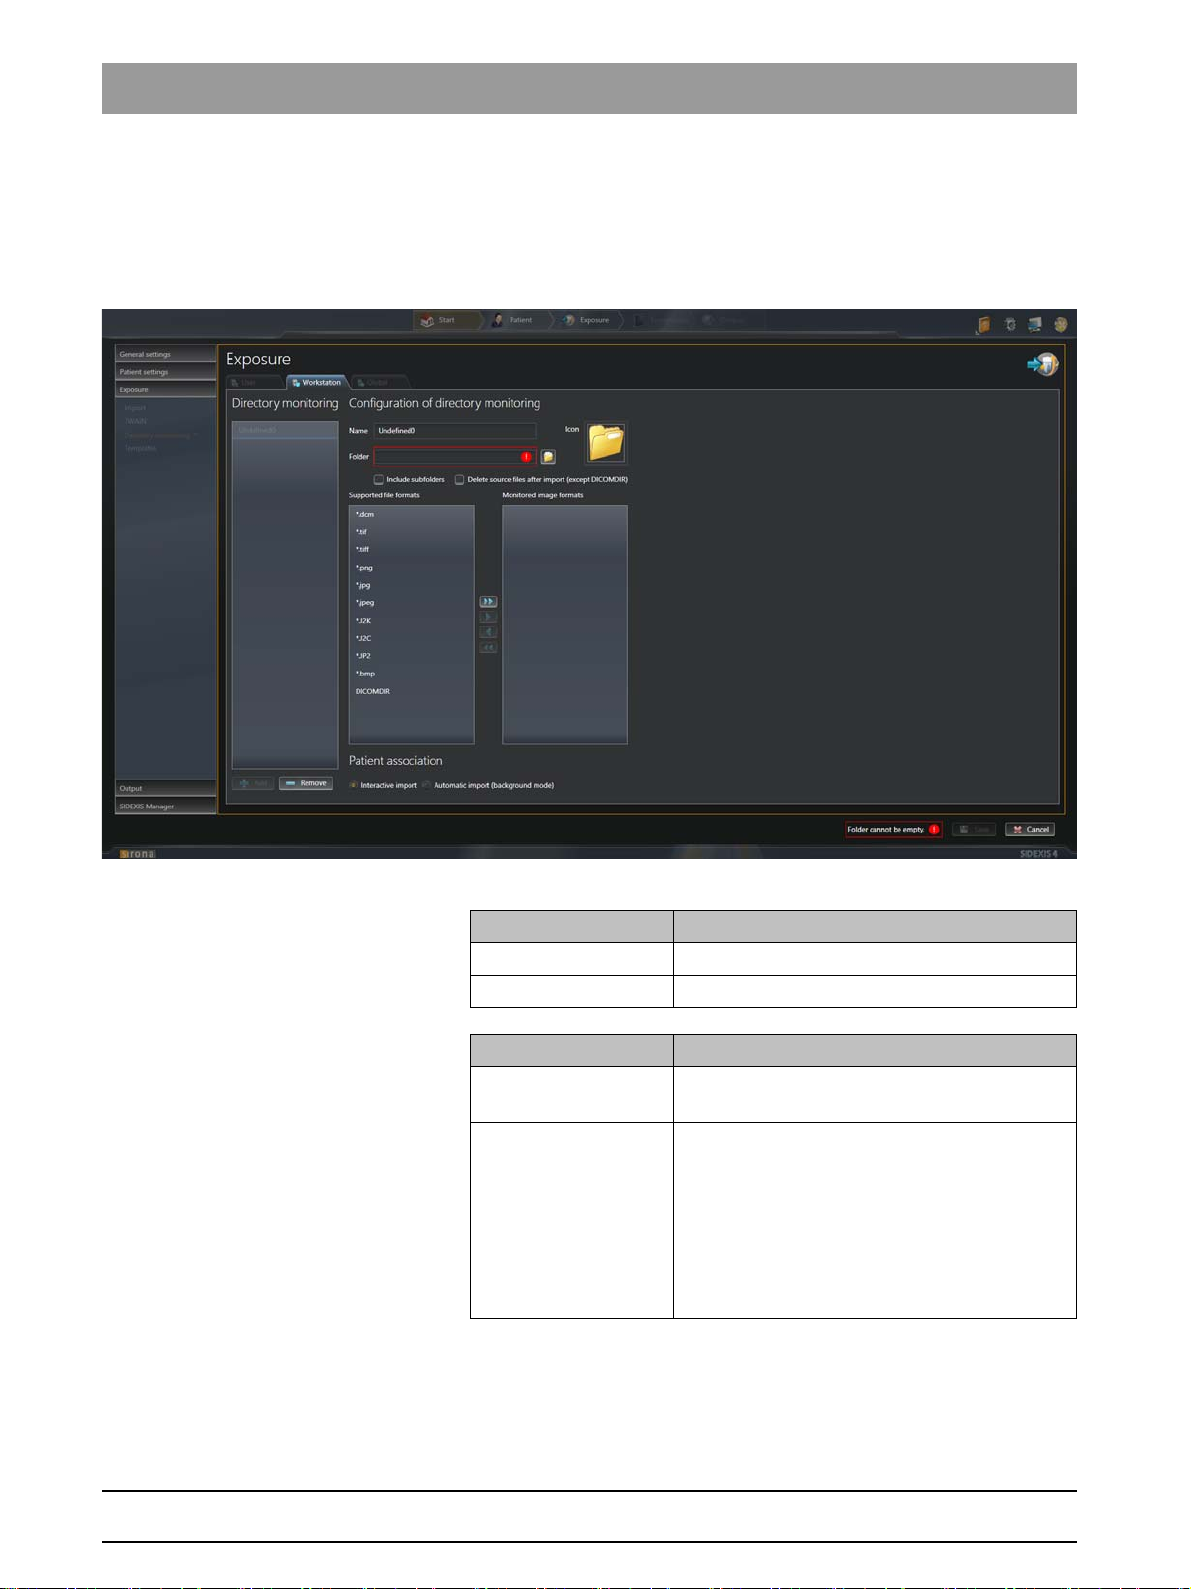
"File watcher" Workstation-related
Via the directory monitoring, you can set up an automatic import of media
items from a "monitored" folder. Via the
create and delete "monitored" folders and specify which media items are
to be automatically imported with which patient assignment.
settings for directory monitoring for media imports
"File watchers"
menu, you can
"File watchers" menu
Entry fields Entry
"Name"
"Folder"
Check box Check box activated
"include subfolders"
"delete source files
after import"
Name of the practice
Any additional information
Media items that sit in subfolders of monitored
folders are also imported.
The original files are deleted in the monitored
folder after the import.
NOTE: The "deleted" files are not actually
deleted, but are moved from the import to the
"temp" folder. The temp folder must therefore
be deleted every now and then. You can
access the required directory using the
environment variable "%TMP%".
24 D3592.076.01.03.02 03.2016
64 58 983 D3592
Page 25

Sirona Dental Systems GmbH 2Configuring software
Service Manual SIDEXIS 4 2.1Configuration menu
Option button Option button activated
"interactive import"
"automatic import
(background mode)"
Button Function
"Add"
"Remove"
"Icon"
Folder icon Path selection
Media items are assigned manually to patients
during imports.
The assignment of media items (tif, tiff) to
patients is done automatically through DICOM.
Add monitored folder
Delete monitored folder
Define icon for the monitored folder
bеЦдблЬ
64 58 983 D3592
D3592.076.01.03.02 03.2016
25
Page 26

2Configuring software Sirona Dental Systems GmbH
2.1Configuration menu Service Manual SIDEXIS 4
"Templates" Global
settings for the exposure series
"Templates" menu
Entry fields Entry
"Holding time for
viewing the exposure
Time interval between the exposure appearing
and the request for triggering the next exposure
(sec.)"
Check box Check box activated
"Show positioning aid"
Activate positioning aid for the exposure series
26 D3592.076.01.03.02 03.2016
64 58 983 D3592
Page 27
Sirona Dental Systems GmbH 2Configuring software
Service Manual SIDEXIS 4 2.1Configuration menu
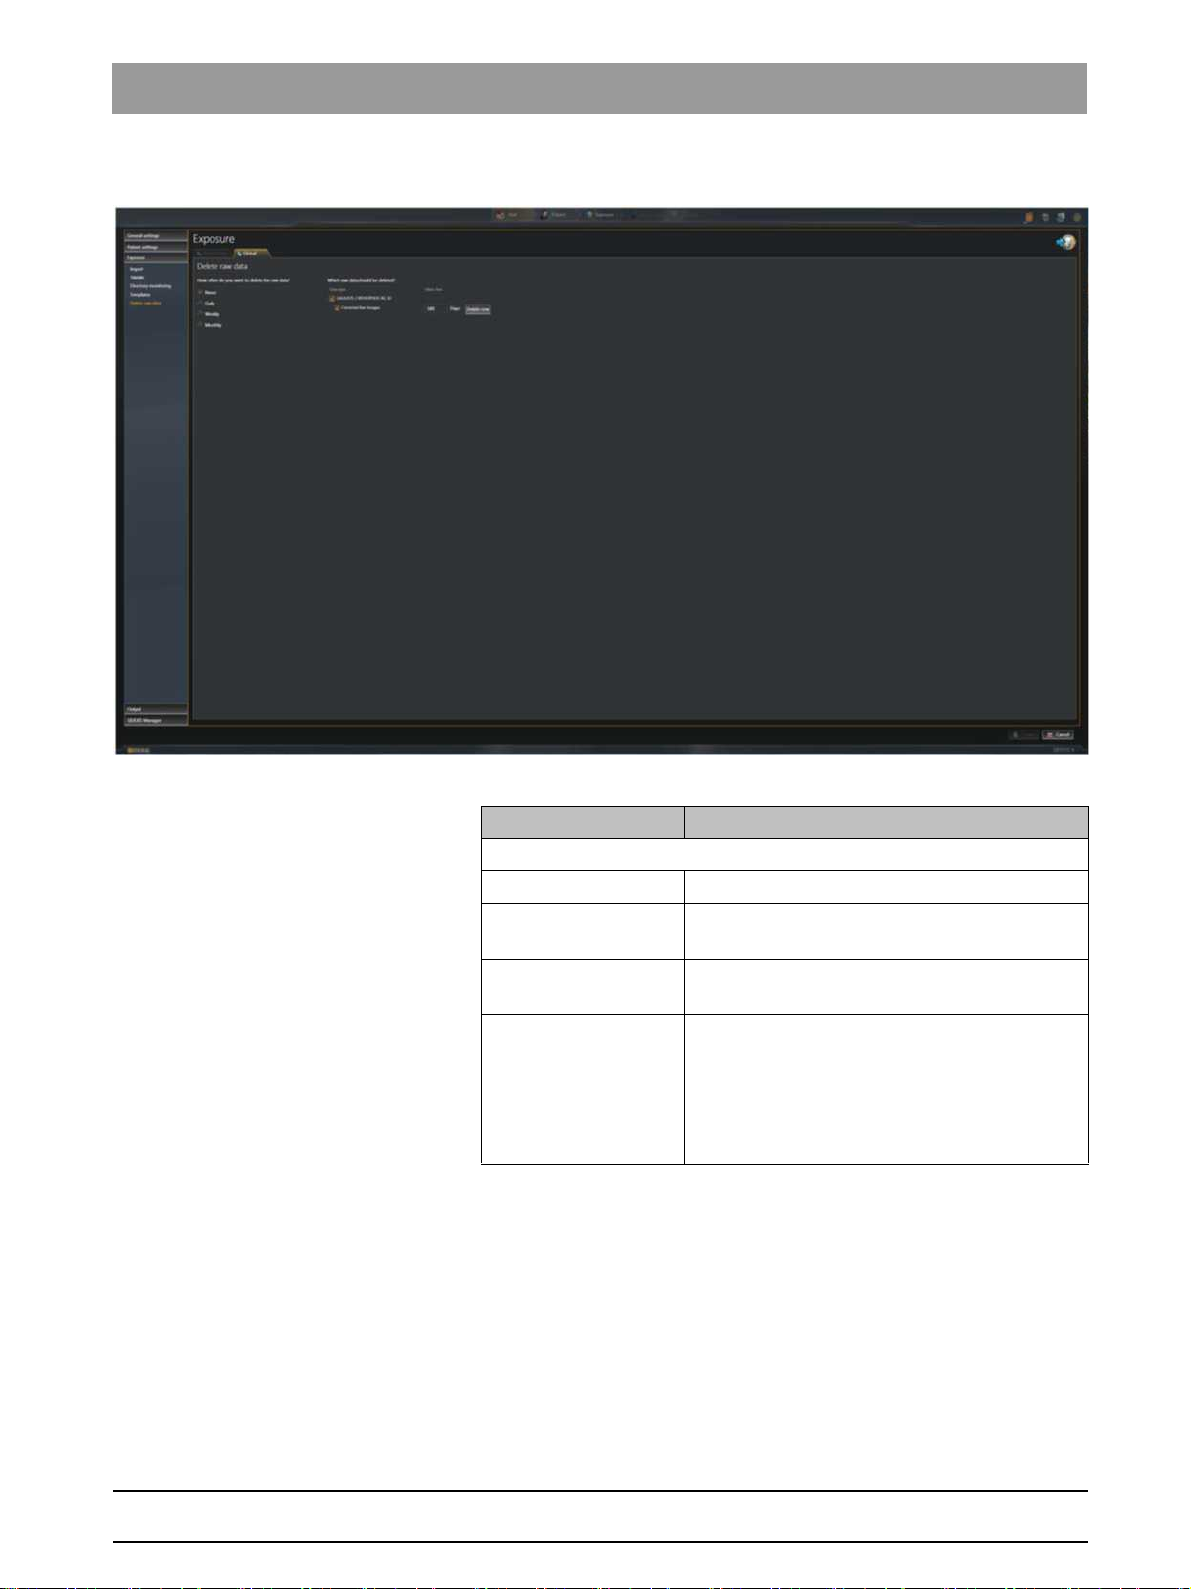
"Delete raw data" Global
settings for deleting raw data
bеЦдблЬ
"Delete raw data" menu
Option buttons Entry
Configuration of the deletion frequency
"Never"
"Daily"
"Weelky"
"Monthly"
No raw data is deleted.
Raw data is deleted daily;
time can be adjusted
Raw data is deleted weekly;
weekday and time can be adjusted
Raw data is deleted monthly;
day of the month (1-31) and time can be
adjusted
NOTE: If a month has less days than the set
day, the raw data is deleted on the last day of
the month.
64 58 983 D3592
D3592.076.01.03.02 03.2016
27
Page 28

2Configuring software Sirona Dental Systems GmbH
2.1Configuration menu Service Manual SIDEXIS 4
Further options can be defined depending on which option button is
selected:
"Daily"
●
"Weelky"
●
●
"Monthly"
time
Further settings in the menu include:
Check box Check box activated
Selection of the data group and data type for the data to be deleted
"GALILEOS /
ORTHOPHOS XG 3D"
deletion frequency: Set the time
deletion frequency: Set the weekday and time
deletion frequency: Set the day of the month (1-31) and
GALILEOS / ORTHOPHOS XG 3D data group
NOTE: This data group with the
Raw Images"
selected. Further check boxes may be
displayed here, depending on whether other
device plugins for SIDEXIS 4 are installed.
data type can always be
"Corrected
Entry fields Entry
"Days"
Buttons Entry
"Delete now"
Minimum age of the data that can be deleted.
NOTE: The input field always relates to the
adjacent check box.
Delete data directly (regardless of the
automatic deletion cycle)
NOTE: The button always relates to the
adjacent check box.
64 58 983 D3592
28 D3592.076.01.03.02 03.2016
Page 29

Sirona Dental Systems GmbH 2Configuring software
Service Manual SIDEXIS 4 2.1Configuration menu
2.1.4 "Output"
"Output Profiles" Global
"Output Profiles" menu
settings for the output profiles
bеЦдблЬ
Entry fields Entry
"Profile Name"
List fields Entry
"Profile Type"
"Export raster images
as"
Check box Check box activated
"Anomymize"
Button Function
"2D Export Profile"
"E-Mail Profile"
Name of output profile
Selected type of profile
Choose format for the export of
2D images
Without patient data, media items are thus
forwarded anonymously.
The definitions in the menu are performed for
the export of 2D media items.
The definitions in the menu are performed for
the export of 2D media items as an attachment
in an email.
JPEG
BMP
PNG
TIFF (8 bit)
64 58 983 D3592
D3592.076.01.03.02 03.2016
29
Page 30

2Configuring software Sirona Dental Systems GmbH
2.1Configuration menu Service Manual SIDEXIS 4
"Export options" Workstation-related
"Export options" menu
Check box Check box activated
"E-mail"
"2D export"
"DICOM Export Wrap&Go"
"DICOM exam export"
"Volume for third party
manufacturer (DICOM)"
"Facescan (OBJ) Export"
"DICOM Media export (to dcm
file)"
settings for the availability of export formats
These formats are displayed in the
"Output"
NOTE: No examination can be
exported or output if none of the check
boxes are activated. The
button is then deactivated in the phase
bar.
work phase.
"Output"
30 D3592.076.01.03.02 03.2016
64 58 983 D3592
Page 31

Sirona Dental Systems GmbH 2Configuring software
Service Manual SIDEXIS 4 2.1Configuration menu
"2D Settings" Workstation-related
"2D Settings" menu
Entry fields Entry
"Default target
destination"
settings for the output of 2D media items
bеЦдблЬ
Standard target directory for the output of 2D
media items
List fields Entry
"Default Output
Output profile for the output of 2D media items
Profile"
Check box Check box activated
"In 2D Export mit
The raw data is included in the 2D export.
einschliessen"
64 58 983 D3592
D3592.076.01.03.02 03.2016
31
Page 32

2Configuring software Sirona Dental Systems GmbH
2.1Configuration menu Service Manual SIDEXIS 4
2.1.5 "SIDEXIS Manager"
"Devices" Global
"Devices" menu
Button Function
"SiXABCon"
"SiConst"
Other Depending on which X-ray components or
device settings
Configuration of the X-ray components
Constancy test
intraoral sensors are available on the
network, other buttons for opening the
relevant configuration programs are displayed
in this menu.
SH Miscellaneous
64 58 983 D3592
32 D3592.076.01.03.02 03.2016
Page 33

Sirona Dental Systems GmbH 2Configuring software
Service Manual SIDEXIS 4 2.1Configuration menu
"Miscellaneous" Global
Tools for software updates and plug-in management
Button Function
"XGNetDeploy"
"NGLogCollect"
"NGPluginManager"
"Sirona Control Admin
License"
tools for software updates and plug-in management
bеЦдблЬ
Updating software components
Compiling log files
Managing plug-ins
Managing licenses
64 58 983 D3592
D3592.076.01.03.02 03.2016
SH database
33
Page 34

2Configuring software Sirona Dental Systems GmbH
2.1Configuration menu Service Manual SIDEXIS 4
"Database" Global
Functions for the database connection
Button Function
"NGStationMgr"
"NGSQL Connect"
functions for the database connection
Managing
Connects
database
"SIDEXIS 4"
"SIDEXIS 4"
stations
to another SQL Server
34 D3592.076.01.03.02 03.2016
64 58 983 D3592
Page 35

Sirona Dental Systems GmbH 2Configuring software
Service Manual SIDEXIS 4 2.2Call up the configuration menu
2.2
Call up the configuration menu
➢ Click on the toothed wheel icon (A) in the header line of the software.
bеЦдблЬ
Configuration menu
The configuration menu [ → 7] opens.
64 58 983 D3592
D3592.076.01.03.02 03.2016
35
Page 36

2Configuring software Sirona Dental Systems GmbH
2.3Personalizing SIDEXIS 4 Service Manual SIDEXIS 4
2.3
Personalizing SIDEXIS 4
2.3.1 Setting the program language
✔ The configuration menu is opened [ → 35].
1. Click the
structure tree (A).
"General Settings"
⇒
"Language SIDEXIS 4"
buttons in the
Menu "Application language"
The
2. Select the desired program language by clicking on one of the
buttons (B).
or
➢ Adopt the current system language as the program language by
"Application language"
clicking the
NOTE: If the system language is not available as program
language, English is automatically used as the program
language.
"Adopt system language"
menu is displayed.
button.
36 D3592.076.01.03.02 03.2016
64 58 983 D3592
Page 37

Sirona Dental Systems GmbH 2Configuring software
Service Manual SIDEXIS 4 2.3Personalizing SIDEXIS 4
3. Click on the
The message window opens. It points out to you that the setting
for the program language has been changed, but that the change
to the program language requires the software to be restarted.
4. Confirm the message window by clicking the
5. Exit SIDEXIS 4 and restart the software.
SIDEXIS 4 starts in the new program language.
"Save"
button.
"OK"
button.
bеЦдблЬ
64 58 983 D3592
D3592.076.01.03.02 03.2016
37
Page 38

2Configuring software Sirona Dental Systems GmbH
2.3Personalizing SIDEXIS 4 Service Manual SIDEXIS 4
2.3.2 Practice-specific settings
Via the configuration menu for
carry out the following practice-specific adjustments in SIDEXIS 4:
● Enter [ → 39] practice information
● Define [ → 40] practice logo
● Configure [ → 42] headers for printing
● Select [ → 45] the dental notation
"General Settings"
⇒
"Praxis"
you can
When examinations are printed the individual practice data (A) and the
practice logo (B) are shown in the examination. Proceed as described in
the Enter practice information [ → 39], Define practice logo [ → 40] and
Configure headers for printing [ → 42] sections to define this practicespecific presentation..
64 58 983 D3592
38 D3592.076.01.03.02 03.2016
Page 39

Sirona Dental Systems GmbH 2Configuring software
Service Manual SIDEXIS 4 2.3Personalizing SIDEXIS 4
2.3.2.1
Enter practice information
✔ The configuration menu is opened [ → 35].
1. Click the
(C).
The
"General Settings"
"Praxis Settings"
⇒
"Praxis"
menu area is displayed.
buttons in the structure tree
bеЦдблЬ
"Praxis Settings" menu area
2. Enter the practice data into the entry fields (D) using the keyboard.
NOTE: The
there must be an entry made in this field. Entering data into the other
entry fields is optional.
3. Click the
The changes are now activated. If you have opened a print
preview, this must be reopened in order to update the display.
"Praxis name"
"Save"
button to save the settings.
field is a mandatory field. This means that
64 58 983 D3592
D3592.076.01.03.02 03.2016
39
Page 40

2Configuring software Sirona Dental Systems GmbH
2.3Personalizing SIDEXIS 4 Service Manual SIDEXIS 4
2.3.2.2
Define practice logo
NOTE: The SIDEXIS 4 logo is defined as the practice logo when the
program is supplied.
✔ The
"General Settings"
opened [ → 39].
⇒
"Praxis"
configuration menu is
Define practice logo display
1. Place the mouse pointer over the practice logo (H).
64 58 983 D3592
40 D3592.076.01.03.02 03.2016
Page 41

Sirona Dental Systems GmbH 2Configuring software
Service Manual SIDEXIS 4 2.3Personalizing SIDEXIS 4
The
2. Click on the
The Windows file browser opens.
3. Select the desired file (practice logo) and confirm the selection via the
"Open"
The selected practice logo is displayed in the preview window
4. Click the
The changes are now activated. If you have opened a print
"Folder"
button.
(G).
"Save"
preview, this must be reopened in order to update the display.
(I) and
"Folder"
button to save the settings.
"Delete"
button.
(J) buttons are shown.
bеЦдблЬ
64 58 983 D3592
D3592.076.01.03.02 03.2016
41
Page 42

2Configuring software Sirona Dental Systems GmbH
2.3Personalizing SIDEXIS 4 Service Manual SIDEXIS 4
2.3.2.3
Configure headers for printing
✔ The
"General Settings"
opened [ → 39].
⇒
"Praxis"
configuration menu is
1. Scroll further down to the
scrollbar (E).
The practice information that should appear in the header of your
practice printouts is determined in rows 1-4 (F).
The following information is defined as a factory setting:
– Row 1 =
– Row 2 =
– Row 3 =
– Row 4 =
In the list fields (H) you can select the font size for the
corresponding row (in point).
"Praxis name"
"Street"
"Zip" "City"
"E-Mail"
"Header definition"
menu area via the
64 58 983 D3592
42 D3592.076.01.03.02 03.2016
Page 43

Sirona Dental Systems GmbH 2Configuring software
Service Manual SIDEXIS 4 2.3Personalizing SIDEXIS 4
2. Move the mouse pointer over an element in the
define the row contents.
The mouse pointer changes its form.
3. Press the left mouse button.
The mouse pointer changes its form.
4. Move the element to the desired row and to the desired position with
the mouse key held down.
"Selection"
area to
bеЦдблЬ
64 58 983 D3592
D3592.076.01.03.02 03.2016
43
Page 44

2Configuring software Sirona Dental Systems GmbH
2.3Personalizing SIDEXIS 4 Service Manual SIDEXIS 4
5. Release the mouse button.
The element appears in the row at the desired position.
NOTE: You can move multiple elements in succession in a row.
The elements can be moved at any time via the same way
(Drag&Drop) within the row or to other rows.
The modified header is displayed in the preview window (I).
To delete an element from a row click on the cross in the element
with the right mouse button.
6. Click the
"Save"
button to save the settings.
The changes are now activated. If you have opened a print
preview, this must be reopened in order to update the display.
44 D3592.076.01.03.02 03.2016
64 58 983 D3592
Page 45

Sirona Dental Systems GmbH 2Configuring software
Service Manual SIDEXIS 4 2.3Personalizing SIDEXIS 4
2.3.2.4
Selecting the dental notation
NOTE: The
is supplied.
This is not the case for deliveries to the USA.
Association (ADA)"
✔ The
opened [ → 39]..
"International (FDI)"
is set as the factory setting there.
"General Settings"
dental notation is set when the software
⇒
"Praxis"
configuration menu is
"American Dental
bеЦдблЬ
Selecting the dental notation
1. Select the desired dental notation.
You can choose between the following dental notations (K):
"International (FDI)"
–
–
"American Dental Association (ADA)"
Activate the corresponding option field (K) to select the desired dental
notation.
2. Click the
A message window opens. You will be notified that the setting
3. Confirm the message window by clicking the
The changes are activated once the software is restarted.
"Save"
has been changed, but that the change requires the software to
be restarted.
button to save the settings.
"OK"
button.
64 58 983 D3592
D3592.076.01.03.02 03.2016
45
Page 46

2Configuring software Sirona Dental Systems GmbH
2.3Personalizing SIDEXIS 4 Service Manual SIDEXIS 4
"International (FDI)"
"American Dental Association (ADA)"
"Permanent Dention"
Dention"
und
"Mixed
Switching between transitional and permanent dentitions
You can switch between
activating the option fields (L) in the
"Permanent Dention"
"Timeline"
and
.
"Mixed Dention"
by
46 D3592.076.01.03.02 03.2016
64 58 983 D3592
Page 47

Sirona Dental Systems GmbH 2Configuring software
Service Manual SIDEXIS 4 2.3Personalizing SIDEXIS 4
2.3.3 Set up communication partners
✔ The configuration menu is opened [ → 35].
1. Click the
the structure tree (A).
The
"General Settings"
"Communication partners"
⇒
"Communication partners"
menu is displayed.
buttons in
Add communication partners
2. Click on the
"Add (+)"
bеЦдблЬ
button.
64 58 983 D3592
D3592.076.01.03.02 03.2016
47
Page 48

2Configuring software Sirona Dental Systems GmbH
2.3Personalizing SIDEXIS 4 Service Manual SIDEXIS 4
Define name and mailbox file (Slida)
3. Enter the name of the communication partner and select the pathway
for the mailbox file (Slida) (B).
NOTE: These are mandatory input fields. This means that there must
be an entry or selection made in this field.
4. Define the attributes and details (C) for the communication partner
(see "Configuring software [ → 7]"/"Configuration menu [ → 7]"/
"General settings" [ → 10] section.
5. Click on the
"Save"
button.
The communication partner is saved.
48 D3592.076.01.03.02 03.2016
64 58 983 D3592
Page 49

Sirona Dental Systems GmbH 2Configuring software
Service Manual SIDEXIS 4 2.3Personalizing SIDEXIS 4
2.3.4 User set up/administration
User administration is performed in the
details/User role"
Users set up here are entered into different list fields of SIDEXIS 4 (e.g.,
when entering the indication prior to exposure) and can be selected there.
configuration menu.
"General Settings"
⇒
"User/User
✔ The configuration menu is opened [ → 35].
➢ Click the
(G).
The
"General Settings"
"User/User details/User role"
⇒
"User"
buttons in the structure tree
menu is displayed.
bеЦдблЬ
"User/User details/User role" menu
64 58 983 D3592
D3592.076.01.03.02 03.2016
1. Click the
The entry field
2. Enter the surname of the new user in the
3.
Optional:
name"
If the new user who has been set up is supposed to be preset as a
4.
"Add"
button (A).
"Last name"
required (mandatory field).
Enter the user's title and first name into the
entry fields.
(B) is marked in red as an entry is
"Last name"
"Title"
entry field.
and
main consultant at all workstations:
Select the
5.
If the new user who has been set up is supposed to appear in the list
"Default for all stations"
check box (C).
fields for consultants:
Select the
NOTE: If the
displayed with existing data records (e.g. with exposures) but no
longer in the list fields.
"Inactive"
"Inactive"
check box (D).
check box is selected the user is still
"First
49
Page 50

2Configuring software Sirona Dental Systems GmbH
2.3Personalizing SIDEXIS 4 Service Manual SIDEXIS 4
6. Click in the left
"Dental Assistant"
assigned to the new user.
The selected user role is highlighted orange.
7. Transfer the
button with the single arrow (E) in the right
or
➢ Assign
with the double arrow (F) in the right
8. The user role(s) are assigned to the new user and appear in the right
"Assigned"
NOTE: By clicking on the user roles in the right
and then clicking on the buttons with the arrows, you can deselect the
user roles for the user again and put them back in the
window.
9. Click the
A message window opens. It points out to you that the setting for
the user administration has been changed, but that the change
requires the software to be restarted.
10. Confirm the message window by clicking the
The changes in the user administration are active once the
software is restarted.
"Available"
or
"Radiology Tech"
selected user role
all user roles
window.
"Save"
button to save the settings.
window on the user role (
) which is supposed to be
by clicking with the mouse on the
"Assigned"
by clicking with the mouse on the button
"Assigned"
"Dentist"
window.
window.
"Assigned"
,
window
"Available"
"OK"
button.
50 D3592.076.01.03.02 03.2016
64 58 983 D3592
Page 51

Sirona Dental Systems GmbH 3Configuring the computer
Service Manual SIDEXIS 4 3.1Free hard disk space for PDATA
Configuring the computer
3
3.1
Free hard disk space for PDATA
The amount of free hard disk space may not fall below the minimum size
in order to complete exposures. This is currently set to 1GB. You can
adjust this minimum size if required. The parameters for this can be found
in the relevant client PCs in the
"MinimumPDataSizeOnAcquisitionInByte"
bytes.
"Sidexis4.exe.config"
. The values must be stated in
under
bеЦдблЬ
64 58 983 D3592
D3592.076.01.03.02 03.2016
51
Page 52

4Data and database Sirona Dental Systems GmbH
6HUYHU
64/
6,'(;,6
6HUYHU&OLHQW
6,'(;,6
&OLHQW
6,'(;,6
&OLHQW
6,'(;,6
&OLHQW
5&8
';UD\V\VWHPV
'';UD\V\VWHPV
6,'(;,6
,QVWDOODWLRQ
'HYLFHVRIWZDUH
3OXJLQ
,QVWDOODWLRQ
6
/
W
6
6,'(;,6
&OLHQW
&OLHQW
V
V
YL
DOODWL
/RFDOQHWZRUN
Service Manual SIDEXIS 4
Data and database
4
IMPORTANT
In order to perform maintenance or service work on the MS SQL
database, you should possess detailed knowledge of installation and
configuration of databases.
6,'(;,6
64
6HUYHU&OLHQ
HUYHU
';UD\V\VWHP
,'(;,6
&OLHQW
6,'(;,6
,'(;,6
QVWDOODWLRQ
FHVRIWZDUH
3OXJLQ
VW
RQ
System overview
'';UD\V\VWHP
64 58 983 D3592
52 D3592.076.01.03.02 03.2016
Page 53

Sirona Dental Systems GmbH 4Data and database
Service Manual SIDEXIS 4 4.1Data migration
4.1
4.2
Data migration
The data migration is completed once during an upgrade from SIDEXIS
XG to SIDEXIS 4. Information on this can be found in the
Installation Instructions"
(REF 64 47 200).
"SIDEXIS 4
Data backup
Regular backup of data is the responsibility of the user (doctor, medical
center, etc.).
The data backup must include both the regular backup of the SIDEXIS 4
SQL databases as well as the backup of the image data stored in the
PDATA directory.
"Server Provisioning Assistent"
The
Server databases. The database backups are managed by the Windows
task scheduler. The data is backed up once daily. The time as well as the
number of data backups to be stored can be selected upon initial set-up
"Server Provisioning Assistent"
in the
Instructions"
Following initial set-up, the backup plan can be found in the Windows task
scheduler under the name
also be edited [ → 54].
The backup of the image data in the PDATA directory does not form part
of the backup plan and has to be set up with standard market tools for
backups.
(REF 64 47 200).
"SIDEXIS 4 Database Backup"
installs a backup plan for the SQL
(see
"SIDEXIS 4 Installation
where it can
bеЦдблЬ
64 58 983 D3592
D3592.076.01.03.02 03.2016
53
Page 54

4Data and database Sirona Dental Systems GmbH
4.2Data backup Service Manual SIDEXIS 4
4.2.1 Data backup via "Windows task scheduler"
1. On the database server, call "Windows task scheduler" (start menu ⇒
"Control Panel"
⇒
"Administrative Tools"
⇒
"Task Scheduler"
).
2. In the structure tree, click on the
3. Right-click on the
in the context menu on the
The data backup is performed. The data is stored in the
/
"Backup"
"SIDEXIS 4 Database Backup"
directory.
"Task Scheduler Library"
"Run"
button.
NOTICE
Ensure that the backups of all databases (
"SIDEXIS"
accessible.
Alternatively, you can perform the data backup via the
Management Studio"
, and
"Master"
. [ → 55]
) have been correctly performed and are
"PDATA_SQLEXPRESS"
element.
list entry and then
"PDATA"
,
"SQL Server
54 D3592.076.01.03.02 03.2016
64 58 983 D3592
Page 55

Sirona Dental Systems GmbH 4Data and database
Service Manual SIDEXIS 4 4.2Data backup
4.2.2 Data backup via the "SQL Management Studio"
1. Log on to the database server.
2. Open the
(start menu ⇒
Management Studio"
The
"SQL Server Management Studio"
"Microsoft SQL Server Express"
).
"Connect to Server"
dialog box opens.
⇒
"SQL Server
3. Enter "<source database server name>\SIDEXIS_SQL,42916" into
the
"Server name"
Replace <source database server name> with the real name of the
source database server.
4. In the
"Authentication"
Authentication"
5. Enter "sxadmin" in the
"Password"
entry field.
list field, select the entry
.
"Login"
entry field, and click on the
entry field and "boards" in the
"SQL Server
"Connect"
button.
bеЦдблЬ
64 58 983 D3592
D3592.076.01.03.02 03.2016
The connection is established with the database server.
The database server is displayed in the
Management Studio"
6. Right-click on
"PDATA_SQLEXPRESS"
structure tree.
"SQL Server
in the structure tree.
55
Page 56

4Data and database Sirona Dental Systems GmbH
4.2Data backup Service Manual SIDEXIS 4
A context menu opens.
7. Left-click on the
"Tasks"
The backup menu then opens.
The
"General"
submenu is displayed.
⇒
"Backup..."
button in the context menu.
56 D3592.076.01.03.02 03.2016
64 58 983 D3592
Page 57

Sirona Dental Systems GmbH 4Data and database
Service Manual SIDEXIS 4 4.2Data backup
8. In the
9. Click on
"Backup type"
The
"Options"
"Options"
list field, select the entry
in the structure tree.
submenu is displayed.
"Full"
bеЦдблЬ
.
64 58 983 D3592
D3592.076.01.03.02 03.2016
57
Page 58

4Data and database Sirona Dental Systems GmbH
4.2Data backup Service Manual SIDEXIS 4
10. Activate the
11. Click on the
Backup of the
12. Now perform a backup of the
(steps 6 to 11).
13. Now perform a backup of the
(steps 6 to 11).
"Overwrite all existing backup sets"
"OK"
button.
"PDATA_SQLEXPRESS"
"SIDEXIS"
"Master"
database in the same way
check box.
database is performed.
database in the same way
58 D3592.076.01.03.02 03.2016
64 58 983 D3592
Page 59

Sirona Dental Systems GmbH 4Data and database
Service Manual SIDEXIS 4 4.3Restoring database
4.3
Restoring database
You can restore the SIDEXIS 4 database from the data backup [ → 53]. To
do this, proceed as follows:
1. Log on to the SIDEXIS 4 database server.
2. Copy the backup files from the backups (
"SIDEXIS"
and
the database server backup directory.
3. Click on the
"Connect"
button in the submenu).
The
) from the source database server backup directory to
"SQL Server Management Studio"
(via the structure tree and then the
"Connect to Server"
connection dialog opens.
"PDATA_SQLEXPRESS"
button in the
"Database Engine..."
bеЦдблЬ
64 58 983 D3592
D3592.076.01.03.02 03.2016
4. Enter "<database server name>\SIDEXIS_SQL" into the
name"
Replace <database server name> with the real name of the database
server.
5. In the
Authentication"
6. Click on the
entry field.
"Authentication"
.
"Connect"
list field, select the entry
button.
"Windows
"Server
59
Page 60

4Data and database Sirona Dental Systems GmbH
4.3Restoring database Service Manual SIDEXIS 4
The connection is established with the database server.
The database server is displayed in the
Management Studio"
7. Right-click on
"Databases"
structure tree.
in the database server structure tree.
"SQL Server
A context menu opens.
8. Left-click on the
The restore menu opens.
The
"General"
"Database..."
submenu is displayed.
button in the context menu.
64 58 983 D3592
60 D3592.076.01.03.02 03.2016
Page 61

Sirona Dental Systems GmbH 4Data and database
Service Manual SIDEXIS 4 4.3Restoring database
"To database"
"To a point in time"
"From database"
list field
"From device"
9. In the
list field
list field Point in time at which the new database
option and
list field Path to the backup file
"To database"
"PDATA_SQLEXPRESS"
10. Activate the
with the three dots.
"From device"
bеЦдблЬ
Name with which the new database
should be restored.
should be restored.
Name of database (backup file) to be
restored.
list field, select the entry
.
option field and then click on the button
64 58 983 D3592
D3592.076.01.03.02 03.2016
61
Page 62

4Data and database Sirona Dental Systems GmbH
4.3Restoring database Service Manual SIDEXIS 4
The
11. Click on the
The
12. Select the backup file for the
confirm the selection by clicking the
The restore task for
13. Activate the check box in front of the restore task.
14. In the structure tree, click on the
The
"Specify Backup"
"Add"
button.
"Locate Backup File"
dialog box opens.
dialog box opens.
"PDATA_SQLEXPRESS"
"OK"
"PDATA_SQLEXPRESS"
"Select the bachup sets to restore"
list in the restore menu.
"Options"
"Options"
submenu is displayed.
button.
element.
database and
is inserted in the
62 D3592.076.01.03.02 03.2016
64 58 983 D3592
Page 63

Sirona Dental Systems GmbH 4Data and database
Service Manual SIDEXIS 4 4.3Restoring database
15. Activate the
check box and start the restore via the
16. Repeat this procedure for the
"Overwrite the existing database (WITH REPLACE)"
"OK"
"SIDEXIS"
bеЦдблЬ
button.
database.
64 58 983 D3592
D3592.076.01.03.02 03.2016
63
Page 64

4Data and database Sirona Dental Systems GmbH
4.4Installing database Service Manual SIDEXIS 4
4.4
Installing database
The database installation is completed as part of the SIDEXIS 4 server
installation and it installs a Microsoft SQL Server 2008 R2 instance with
the name
The name of the SQL Server instance cannot be changed in the current
SIDEXIS 4 version, i.e. SIDEXIS 4 mandatorily requires the SQL Server
instance
It is permitted for the SQL Server 2008 R2 instance
be installed by the SIDEXIS 4 setup DVD on a computer...
● with no existing SQL Server instance
● with one or more existing SQL Server 2008 or SQL Server 2008 R2
● with one or more existing SQL Server 2005 instances
● with existing SQL Server 2005, 2008, and / or 2008 R2 instances
It is not permitted for the SQL Server 2008 R2 instance SIDEXIS_SQL to
be installed on a computer...
● with older SQL Server instances (SQL Server 2000 or older)
● with later SQL Server instances (SQL Server 2012, 2014, or later)
The SQL Server installation is mandatory with...
"SIDEXIS_SQL"
"SIDEXIS_SQL"
instances
.
.
"SIDEXIS_SQL"
to
● Initial installation of a SIDEXIS 4 server
● Upgrade (migration) from SIDEXIS XG to SIDEXIS 4
Not required: the SQL Server installation is not required with updates of
a previous SIDEXIS 4 version to the current SIDEXIS 4 version.
If there is an existing SQL Server instance
Server setup is mistakenly started again by the SIDEXIS 4 DVD then this
will not have any impact. The setup terminates immediately with a
corresponding message.
"SIDEXIS_SQL"
and the SQL
64 D3592.076.01.03.02 03.2016
64 58 983 D3592
Page 65

Sirona Dental Systems GmbH 4Data and database
Service Manual SIDEXIS 4 4.5Database movement
4.5
Database movement
4.5.1 Moving the SQL server
4.5.1.1
Prepare the “new” SQL server
"Database: MS SQL Server Express"
installed on the same computer (server)
For more detailed information on the following installation steps please
refer to the
1. Install the
2. Install the
3. CAUTION! Terminate the installation after performing the server
provisioning job. The client provisioning job must never be performed
at this point.
Execute the server provisioning.
"SIDEXIS 4 Installation Instructions"
"Database: MS SQL Server Express"
"SIDEXIS 4 Server"
"Database: MS SQL Server Express"
installed on different computers (servers)
For more detailed information on the following installation steps please
refer to the
1. Prepare the “new SQL server” as described in the
"SIDEXIS 4 Installation Instructions"
Installation Instructions"
"Important information concerning a new installation" ⇒ "MS SQL
Server on a remote computer”.
2. Install the
3. Install the
4. CAUTION! Terminate the installation after performing the server
provisioning job. The client provisioning job must never be performed
at this point. Execute the server provisioning.
"Database: MS SQL Server Express"
"SIDEXIS 4 Server"
and
"SIDEXIS 4 Server"
on the server.
and
"SIDEXIS 4 Server"
(REF 64 47 200).
on the server.
(REF 64 47 200).
are
are
"SIDEXIS 4
section “New installation of SIDEXIS4" ⇒
on the server.
on a second server.
bеЦдблЬ
64 58 983 D3592
D3592.076.01.03.02 03.2016
4.5.1.2
4.5.1.3
Backing up the “old” SQL server
IMPORTANT
Ensure that you have the backup files for both databases
"PDATA_SQLEXPRESS"
(
➢ Perform a data backup from the "old" source database server via
“Windows task scheduler”, as described in the Data backup [ → 53]
section
The data backup is saved in the “Backup” directory in the PDATA
directory.
and
"SIDEXIS"
).
Restoring database to the "new" SQL server
1. Copy the
the new SQL server.
2. Complete the database restore using the current backup files as
described in the Restoring database [ → 59] section.
"PDATA_SQLEXPRESS"
and
"SIDEXIS"
backup files to
65
Page 66

4Data and database Sirona Dental Systems GmbH
4.5Database movement Service Manual SIDEXIS 4
4.5.1.4
Execute provisioning
Server provisioning
1. Start the
To do so, double-click in the
"...\Sirona\SIDEXIS4\Installation\Provisioning" directory on the
"ServerProvisioningWizard.exe"
"Server Provisioning Assistent"
file.
on the SIDEXIS 4 server.
2. Enter the name of the “new” SQL server in the
server"
text box.
"Name of database
66 D3592.076.01.03.02 03.2016
64 58 983 D3592
Page 67

Sirona Dental Systems GmbH 4Data and database
Service Manual SIDEXIS 4 4.5Database movement
3.
If the "Database: MS SQL Server Express" and "SIDEXIS 4 Server"
have been installed on different computers (servers):
Disable the
4. Enter "sa” in the
"2BeChanged!" in the
5. Click on the
6. Continue with the server provisioning, as described in
Installation Instructions"
The server provisioning enters the changes into the system.
7. Execute the client provisioning also if required after the server
provisioning.
"Use the existing logon data"
"Database administrator user"
"Database administrator password"
"Next"
button.
(REF 64 47 200).
check box.
text box and enter
text box.
"SIDEXIS 4
Client provisioning
1. Start the
workstations.
To do so, double-click in the
"...\Sirona\SIDEXIS4\Installation\Provisioning" directory on the
"ClientProvisioningWizard.exe"
2. Execute the client provisioning, as described in
Installation Instructions"
The client provisioning enters the changes into the system for the
"Client Provisioning Assistant"
(REF 64 47 200).
workstations.
consecutively on all
file.
"SIDEXIS 4
bеЦдблЬ
64 58 983 D3592
D3592.076.01.03.02 03.2016
67
Page 68

4Data and database Sirona Dental Systems GmbH
4.5Database movement Service Manual SIDEXIS 4
4.5.2 Moving the PDATA folder
4.5.2.1
4.5.2.2
Move the PDATA folder to a bigger hard disk “within the computer”
If the amount of data is too large for your storage medium and this needs
to be increased, you can migrate your data to a bigger hard disk “within
your computer”. To do this, proceed as follows:
"Start"
1. Stop the "Sidexis Rest Service" on the SIDEXIS 4 Server (
"Control Panel"
2. Move the existing PDATA directory to the new hard disk. The existing
\PDATA enable is deleted in this process.
3. Enable the new PDATA directory under the name PDATA.
Authorize
NOTE: The local user
rights, group memberships or other rights on the computer with the
PDATA directory, they just need full access to the share.
4. Start the "Sidexis Rest Service" on the SIDEXIS 4 server once again
"Start"
(
⇒
⇒
"Administrative Tools"
"Jeder"
for the enable as well as in the file system.
sidexis4service
"Control Panel"
⇒
"Services"
does not need any admin
⇒
"Administrative Tools"
).
⇒
"Services"
⇒
).
Migrate the data (PDATA) to a new “remote” file server
IMPORTANT
PDATA on a "remote" computer
When setting up the PDATA directory on a new “remote” file server, you
must follow the notes provided in SIDEXIS 4 Installation Instructions
(REF 64 47 200) in the section “Preparatory work” (“New installation of
SIDEXIS 4“ / “Remote PDATA” / “SIDEXIS 4 Server” / “Preparatory
work”).
68 D3592.076.01.03.02 03.2016
64 58 983 D3592
Page 69

Sirona Dental Systems GmbH 4Data and database
Service Manual SIDEXIS 4 4.5Database movement
Preparations ➢ Copy the PDATA directory to its new position on the “remote” file
server.
How to proceed on the SIDEXIS 4 server
Execute the following work steps on the SIDEXIS 4 server:
1. Start the
To do so, double-click in the
"...\Sirona\SIDEXIS4\Installation\Provisioning" directory on the
"ServerProvisioningWizard.exe"
"Server Provisioning Assistent"
file.
on the SIDEXIS 4 server.
bеЦдблЬ
64 58 983 D3592
D3592.076.01.03.02 03.2016
2. In the
3. Enter the location of the new PDATA directory in the entry field.
4. Continue with the server provisioning, as described in
5. Execute the client provisioning also if required after the server
6. Launch the
"Directory share images (PDATA) provisioning"
"The Media Share is located on a different computer"
the
NOTICE! Note that only the computer name is required for entries
related to a “remote” computer.
Installation Instructions"
The server provisioning enters the changes into the system.
provisioning.
"NGStationMgr"
(C: ⇒ Programs ⇒ Sirona ⇒ SIDEXIS4 ⇒ XG ⇒ NGStationMgr.exe).
(REF 64 47 200).
program
menu select
option field.
"SIDEXIS 4
69
Page 70

4Data and database Sirona Dental Systems GmbH
4.5Database movement Service Manual SIDEXIS 4
7. Click on the
8. Enter the new UNC pathway to the PDATA directory in the
data path"
9. Activate the
10. Confirm your entries by clicking the
The old "SIDEXIS XG" database has now also been updated for
the constancy tests.
"Change…"
and
"Master datapath"
button.
entry fields.
"Apply data path to all stations"
"OK"
check box.
button.
"Image
70 D3592.076.01.03.02 03.2016
64 58 983 D3592
Page 71

Sirona Dental Systems GmbH 4Data and database
Service Manual SIDEXIS 4 4.5Database movement
How to proceed at the SIDEXIS 4 clients
Execute the following work steps at each workstation:
1. At the workstation, call the "Windows Registry Editor".
"Start"
To do so, click on the
field and then double-click on
The "Windows Registry Editor" opens.
button, enter "Regedit“ into the search
"Regedit.exe"
in the results list.
2. In the structure tree, select the "Provisioning" element
(HKEY_LOCAL_MACHINE/SOFTWARE/Sirona/SIDEXIS4/
Provisioning).
3. In the "Name" column, double-click on the
parameter.
The input window opens.
4. Enter the new directory path for the PDATA directory into the input
field and confirm your entry with the
The new PDATA directory path is saved.
Tip: Export these changes and save the file in the PDATA enable.
You can now import these on the additional workstations.
5. Start the Client Provisioning Assistant on the workstation.
To do so, double-click in the
"...\Sirona\SIDEXIS4\Installation\Provisioning" directory on the
"ClientProvisioningWizard.exe"
6. Execute the client provisioning, as described in
Installation Instructions"
The provisioning transmits changes to the workstation.
file.
(REF 64 47 200).
"DeploymentShare"
"OK"
button.
"SIDEXIS 4
bеЦдблЬ
64 58 983 D3592
D3592.076.01.03.02 03.2016
IMPORTANT: The "SIFileDB.ini” must be entered manually; this is
required in order to ensure that no practice-specific settings are lost.
71
Page 72

4Data and database Sirona Dental Systems GmbH
4.6Disconnecting CEREC database (if available) Service Manual SIDEXIS 4
"Patient Database"
Open
CEREC SW
Change directory path
menu in
4.6
Disconnecting CEREC database (if available)
If a CEREC connection is detected during the SIDEXIS 4 installation then
this is displayed in a message window during the installation. If this is the
case, you must follow the instructions below before starting the
installation:
1. Start the CEREC SW software
(see CEREC SW Operating Manual).
2. Open the
settings.
IMPORTANT
The directory must have enough available storage space
The directory selected in the settings must have enough available
storage space.
If this is not the case change the directory path accordingly.
✔ The
SW.
1. Open the
disconnect the SIDEXIS XG database.
2. Click on
3. Open the
4. Click on
5. Open the
disconnect the SIDEXIS XG database.
6. Click on
"Patient Database"
"Patient Database"
menu command in the CEREC SW
menu command is called up in the CEREC
"Patient Database Location:"
"NO"
.
"Connect with Sidexis Database:"
"NO"
.
"Patient Database Location:"
"YES"
.
menu command to
menu command.
menu command again to
Once you have successfully copied the CEREC data to a local CEREC
database you may continue with the SIDEXIS 4 installation.
72 D3592.076.01.03.02 03.2016
64 58 983 D3592
Page 73

Sirona Dental Systems GmbH 5Special features with 64bit operating systems
Service Manual SIDEXIS 4 5.1Astra Plugin
Special features with 64bit operating
5
systems
5.1
Astra Plugin
The following issues occur when installing the Astra Plugin on a 64bit
operating system.
The Astra Plugin is installed in the directory
"c:\Program Files [x86]” as a 32bit setup, but is registered under
"c:\Program Files" in the "NGPIman".
This results in the Astra Plugin not being available in SIDEXIS 4 even
though it is installed. It does not then appear in the tool kit in SIDEXIS 4.
To resolve this issue, proceed as follows:
✔ Astra Plugin is installed.
1. Move the entire content from the directory "c:\Program Files
[x86]\sirona\SIDEXIS4" (i.e. the entire XG sub-folder) to "c:\Program
Files\sirona\SIDEXIS4".
NOTE: No files may be overwritten when moving the directory.
2. Logged in as Administrator, start the program "NGPIManUI.exe" in
the directory "c:\Program Files\Sirona\SIDEXIS4\XG"
bеЦдблЬ
64 58 983 D3592
D3592.076.01.03.02 03.2016
3. Activate the
4. Select the Astra Plugin in the list.
The
"Show hidden plug-ins"
"Remove"
button becomes selectable.
check box.
73
Page 74

5Special features with 64bit operating systems Sirona Dental Systems GmbH
5.1Astra Plugin Service Manual SIDEXIS 4
5. Click the
"Remove"
button to delete the Astra Plugin from the list.
NOTE: If the Astra Plugin is not stated in the list then the registration
has not worked as a result of the incorrect path.
6. Click the
"Add"
button and register the Astra Plugin as new
(c:\Program Files\Sirona\SIDEXIS4\XG\PLUGINS\SIRONA\ASTRA
Plugin\zfilter.exe).
74 D3592.076.01.03.02 03.2016
64 58 983 D3592
Page 75

Sirona Dental Systems GmbH 6Troubleshooting
Service Manual SIDEXIS 4 6.1Errors during installation
Troubleshooting
6
6.1
Errors during installation
6.1.1 DVD setup
Errors Cause Rectification
.NET Framework 3.5
SP1
If .NET 3.5 is not installed on the
server then a message appears
during the server setup stating that
.NET 3.5 must be installed via the
control panel (the dialog then gives a
misleading statement, such as
"Asia").
NOTE: This error message can
initially be ignored.
➢ Install the .NET 3.5 Framework
on the SIDEXIS 4 server and
restart the server setup.
6.1.2 SQL server installation
Errors Cause Rectification
SQL server installation
Error code: -2067922940
SQL server installation
Error code: -2067922408
If this error occurs during the SQL
Server installation the system is
unable to open the file and error
0x84BE0004 is logged in the SQL
Server installation log.
If this error occurs during the
installation of the SQL server then
SQL Management Studio 2005 is
already installed.
1. Execute the Microsoft file
"SQL2008R2patch.exe"
Administrator
NOTE: You will find the patch on
the SIDEXIS 4 DVD in the folder
"Tools\Other\BUG12936\SQL20
08R2patch.exe".
2. Close the patch and repeat the
SQL Server installation.
1. Uninstall SQL Management
Studio 2005.
2. Then repeat the SQL server
installation.
bеЦдблЬ
as
.
6.1.3 Server provisioning
Various jobs steps are run when executing the
or the
Assistant"
incapable of being properly executed this is marked by a red status
indicator next to the job name.
Typical errors which may arise during the job execution process are list e d
below with measures to rectify the errors:
Job step Cause Action
"populating media share"
64 58 983 D3592
D3592.076.01.03.02 03.2016
The SIDEXIS 4 installation DVD is
not available on the computer drive.
This is required to update the basic
filling of the PDATA directory.
"Server Provisioning Assistent"
Insert the SIDEXIS 4 installation DVD
into the computer drive and restart
"Server Provisioning Assistent"
"Client Provisioning
. If a job step was
.
75
Page 76

6Troubleshooting Sirona Dental Systems GmbH
6.2Error during reference run Service Manual SIDEXIS 4
6.2
Error during reference run
6.2.1 On the SIDEXIS 4 workstation
Error message Comment Rectification
"The available storage space
(PDATA) is insufficient"
SIDEXIS 4 no longer supported Occurs on remote connections, if
The graphics card is unsuitable for
SIDEXIS 4.
Falls below the minimum free disk
space required in PDATA (min.
10GB). The warning message
appears when the client is started or
when the disk space requirement is
not met for the first time during the
client runtime.
SIDEXIS 4 is already started.
It is known that the
Mirror Driver"
errors.
In unfortunate cases, the wrong
graphics card was tested here.
"DesktopAuthority
device can cause
Provide more disk space
Terminate the SIDEXIS 4 and start
the program.
Deactivate the
Mirror Driver"
manager"
adapters"
in sub-point
.
"DesktopAuthority
device in
"device
"Display
76 D3592.076.01.03.02 03.2016
64 58 983 D3592
Page 77

Sirona Dental Systems GmbH 6Troubleshooting
Service Manual SIDEXIS 4 6.2Error during reference run
Error message Comment Rectification
"A fatal error occured. The program
will exit and must be restarted."
This error can have various causes.
These are saved on the SIDEXIS 4
server in the log file under the
"%programdata%\Sidexis\log\Sidexi
s4.log" file.
If the log file contains the error: “[…]
Network-related or instance-specific
error when establishing a connection
to the SQL server. The server was
not found or it cannot be
accessed.[…]”, this indicates that
there is no network connection
between the SIDEXIS 4 server and
the MS SQL server.
Check the following requirements:
● The computer upon which the
MS SQL server is located must
be switched on.
● If the MS SQL server is on a
different computer to the
SIDEXIS 4 server then there
must be a network connection to
it.
● The Windows Service "SQL
Server Service (SIDEXIS SQL)"
must be running on the computer
upon which this is installed.
● T he S Q L Server Por t must be s e t
up in accordance with the
"SIDEXIS 4 Installation
Instructions"
(REF 64 47 200).
● The "SQL Server Browser"
service must be running for
remote SQL servers with multiple
instances. This service should
include an exception in the
firewall for incoming connections.
● The MS SQL server service
should contain a firewall
exception in accordance with
"SIDEXIS 4 Installation
Instructions"
● The SQL server instance
(SIDEXIS_SQL) must be capable
of being reached via SQL Server
Management Studio by the
computer upon which the
SIDEXIS 4 server is running.
(REF 64 47 200).
bеЦдблЬ
64 58 983 D3592
D3592.076.01.03.02 03.2016
77
Page 78

6Troubleshooting Sirona Dental Systems GmbH
6.2Error during reference run Service Manual SIDEXIS 4
Error message Comment Rectification
"The SIDEXIS server cannot be
reached. The program will exit.
Please try again in a few minutes."
There is no network connection
between the SIDEXIS 4 client and the
SIDEXIS 4 server.
Check the following requirements:
● If the SIDEXIS 4 server is on a
different computer then there
must be a network connection to
the latter.
● The computer upon which the
SIDEXIS 4 server is located must
be switched on.
● The Windows firewall exception
for the SIDEXIS 4 service should
be set up on the SIDEXIS 4
server in accordance with
"SIDEXIS 4 Installation
Instructions"
● The Windows "Sidexis Service"
should be available and active on
the SIDEXIS 4server. If this
service is missing then this is an
indication that the SIDEXIS 4
installation is incomplete.
Please execute a new server
installation in accordance with
(REF 64 47 200).
"SIDEXIS 4 Installation
Instructions"
(REF 64 47 200).
● If the SIDEXIS 4 server is on a
different computer then the
SIDEXIS 4 client must not be
blocked by a firewall.
78 D3592.076.01.03.02 03.2016
64 58 983 D3592
Page 79

Sirona Dental Systems GmbH 6Troubleshooting
Service Manual SIDEXIS 4 6.3Errors when establishing exposure readiness
6.3
Problem When starting an RCU the
Errors when establishing exposure readiness
NOTE: The error can occur if Windows 8 or Windows 8.1 is installed on
the RCU and the RCU has just been restarted or is used for the first time.
"Sirona Control Server"
If the
readiness is inactive or could not be started as a result of the issues
stated below, the following error message appears in
Error message
automatically at the system start-up time. This is the standard
configuration following installation of the
process the
the COM Server. This COM Server is also installed with a SIDEXIS 4
installation and is activated upon initial access (via the
"OptionsManager"
occurs in the program, since certain system components are not yet
available at this time. This results in a failure of the
up, and the RCU functions on the affected PC remain completely
deactivated as a result.
"Sirona Control Server"
starts up directly upon system start-up an exception
service required to establish exposure
"SIDEXIS 4"
"Sirona Control Server" ("SCS"
"SCS"
. During the start-up
accesses the
"OptionsManager"
) service starts
"SCS"
"SCS"
service start-
.
). If the
on
bеЦдблЬ
Troubleshooting measure ➢ Close the error message window.
Different behaviors may occur after the window is closed:
● The SIDEXIS 4 user interface is automatically unblocked after a few
seconds and SIDEXIS can then be used as normal.
● The SIDEXIS 4 user interface remains permanently blocked.
SIDEXIS can no longer be used in this state.
In this case proceed as follows:
● the Windows Task Manager must be started and the "CBClient.exe"
(for exposure with GALILEOS) or "XG3D.exe" process (for exposure
with ORTHOPHOS XG3D) needs to be terminated manually. Sidexis
should then be capable of being operated again. If the Sidexis
interface still remains blocked then the "Sidexis4.exe" itself must be
terminated manually in the Task Manager. Sidexis must then be
restarted.
1. Start the Windows Task Manager.
2. Terminate the
process (for ORTHOPHOS XG3D) manually via the Windows Task
Manager.
SIDEXIS 4 Should normally now be capable of being operated
again.
3.
If the
SIDEXIS 4
also terminate the
Task Manager and restart SIDEXIS 4.
"CBClient.exe"
user interface still remains blocked:
"Sidexis4.exe"
(for GALILEOS) or
"XG3D.exe"
process manually via the Windows
64 58 983 D3592
D3592.076.01.03.02 03.2016
79
Page 80

6Troubleshooting Sirona Dental Systems GmbH
6.4Errors when executing TWAIN devices Service Manual SIDEXIS 4
6.4
Errors when executing TWAIN devices
The set up when executing TWAIN devices can be adjusted via the
configuration menu [ → 22].
Configuration menu "TWAIN devices"
Depending on the driver and TWAIN device, here you can configure the
corresponding settings.
If a device cannot be operated in SIDEXIS 4 or if is not compatible with
SIDEXIS 4, then it can be disabled via the TWAIN configuration menu:
➢ To do this, turn off the check box next to the corresponding device
name.
6.5
Errors Cause Rectification
Outgoing tokens cannot be read or
processed (RKB/communication
partner)
Errors during SLIDA communication
Lengths of tokens are incorrect. The country-specific settings (code
page) must be identical for all
affected computers.
80 D3592.076.01.03.02 03.2016
64 58 983 D3592
Page 81

Sirona Dental Systems GmbH 7Other
Service Manual SIDEXIS 4 7.1Uninstalling X-ray log book
Other
7
7.1
Uninstalling X-ray log book
NOTE: To uninstall the x-ray log book you must be logged on to the
computer with administrator rights.
1. Log on to the computer with administrator rights.
2. Move the "..\Sirona\SIDEXIS4\XG\siroectl\Install.log" file to the
computer's desktop.
3. Start a command prompt.
4. Enter "%WINDIR%\unwise32.exe /A Install.log" .
The entry in the "program" folder is deleted.
Another three files are located in the "siroectl" folder.
5. Open the "siroectl" folder and manually delete the three remaining
files.
bеЦдблЬ
64 58 983 D3592
D3592.076.01.03.02 03.2016
81
Page 82

7Other Sirona Dental Systems GmbH
7.2Changing the SQL database port Service Manual SIDEXIS 4
7.2
Changing the SQL database port
On the
1. Terminate the “Sidexis Rest Service” (Sidexis Service).
2. Start the
3. Click on the
SIDEXIS 4
"ServerProvisioningWizard.exe"
These are located in the directory...
...\Sirona\SIDEXIS4\Installation\Provisioning
The
installation needs to be repaired and it switches to
server:
"Server Provisioning Assistent"
file.
"Server Provisioning Assistent"
"Next"
button.
by double-clicking on the
detects that an existing
Repair
mode.
"SIDEXIS 4 database provisioning"
The
"SIDEXIS 4 database provisioning"
menu opens.
On the database server:
1. Open the
2008R2 or 2014, corresponding to your installation)
(
"Start"
"Configuration Tools"
2. Select
SIDEXIS_SQL"
"SQL Server Configuration Manager"
⇒
"All Programs"
⇒
"Microsoft SQL Server Express"
).
(for SQL Server
"SQL Server Network Configuration" /"Protocols for
in the tree chart.
64 58 983 D3592
⇒
82 D3592.076.01.03.02 03.2016
Page 83

Sirona Dental Systems GmbH 7Other
Service Manual SIDEXIS 4 7.2Changing the SQL database port
3. In the right hand window, select the
"SIDEXIS_SQL"
4. Right-click the selected rows to choose the
The “Properties of TCP/IP” menu opens.
5. Enter the port envisaged by you in the
instance.
"TCP/IP"
"TCP Port"
row for the
"Properties"
entry field.
submenu.
bеЦдблЬ
6. Restart the
For this purpose, select
Mark the
and then click on the
header of the
7. Close the
"SIDEXIS_SQL"
"SQL Server (SIDEXIS_SQL)"
"SQL Server Configuration Manager"
"SQL Server Configuration Manager"
instance.
"SQL Server Services"
line in the adjacent window
"Restart Service"
button (blue arrow) in the
in the tree diagram.
.
.
64 58 983 D3592
D3592.076.01.03.02 03.2016
83
Page 84

7Other Sirona Dental Systems GmbH
7.2Changing the SQL database port Service Manual SIDEXIS 4
On the
1. In the entry field (on the right, near the name of the database server)
2. Click on the
3. If you wish to use the SIDEXIS 4 server as well as SIDEXIS 4 Client,
On all
1. Start the
2. Execute the
SIDEXIS 4
enter the port selected by you in the
provisioning"
NOTICE! Observe the valid login data for your installation (see
installation instructions).
Provisioning Assistent"
instructions.
then following successful execution of the
Assistent"
according to the installation instructions.
SIDEXIS 4
"ClientProvisioningWizard.exe"
These are located in the directory...
...\Sirona\SIDEXIS4\Installation\Provisioning
SIDEXIS 4 installation instructions.
server:
"SIDEXIS 4 database
menu.
"Next"
button and continue to execute the
, as described the SIDEXIS 4 installation
, start the
"Client Provisioning Assistant"
work stations:
"Client Provisioning Assistant"
file.
"Client Provisioning Assistant"
"Server
"Server Provisioning
and execute this
by double-clicking on the
, as described in the
84 D3592.076.01.03.02 03.2016
64 58 983 D3592
Page 85

Sirona Dental Systems GmbH 7Other
Service Manual SIDEXIS 4 7.3Switching service ports
7.3
Switching service ports
SIDEXIS 4 Web Services are set up as part of a
installation, and these can be reached under the ports 42927 (http Port)
and 42928 (https Port) as standard.
The ports cannot be changed during set-up of the SIDEXIS 4 Web
Services via the
Installation Instructions, REF64 47 200). However, they can
subsequently be adapted.
If you already know that different ports should be used before starting the
"SIDEXIS 4 Server"
change described here following completion of the
installation and execution of the
before the initial
However, you can also carry out the port change at any later point in time,
although in that case you can expect a greater number of repair runs.
To change the port, proceed as follows:
"Server Provisioning Assistent"
installation, it makes sense to carry out the port
"Server Provisioning Assistent"
"SIDEXIS 4 Client"
installation is performed.
✔ SIDEXIS 4 must be closed on all workstations in the network.
1. Log on to the database server.
2. Open the
(start menu ⇒
Management Studio"
The
"SQL Server Management Studio"
"Microsoft SQL Server Express"
).
"Connect to Server"
dialog box opens.
"SIDEXIS 4 Server"
(see SIDEXIS 4
"SIDEXIS 4 Server"
but
⇒
"SQL Server
bеЦдблЬ
64 58 983 D3592
D3592.076.01.03.02 03.2016
3. Enter "<source database server name>\SIDEXIS_SQL,42916" into
the
"Server name"
Replace <source database server name> with the real name of the
source database server.
4. In the
"Authentication"
Authentication"
5. Enter "sxadmin" in the
"Password"
entry field.
list field, select the entry
.
"Login"
entry field, and click on the
entry field and "boards" in the
"SQL Server
"Connect"
button.
85
Page 86

7Other Sirona Dental Systems GmbH
7.3Switching service ports Service Manual SIDEXIS 4
The connection is made with the source database server.
The source database server is displayed in the
Management Studio"
6. Double-click on
The structure tree opens.
7. Right-click on
A context menu opens.
8. Right-click on the
"SIDEXIS"
"dbo.ProvisioningJob"
"Edit Top 200 Rows"
structure tree.
⇒
"Tables"
in the opened structure tree.
in the structure tree.
button in the context menu.
"SQL Server
86 D3592.076.01.03.02 03.2016
64 58 983 D3592
Page 87

Sirona Dental Systems GmbH 7Other
Service Manual SIDEXIS 4 7.3Switching service ports
The window opens to edit the table content.
The table contains exactly one data set for the
Server"
The data set for the
"TargetType"
have the value "1" in the
column contains the name of the computer upon which the
and one data set for each
column. The data sets for the
"SIDEXIS 4 Server"
9. Click on the row...
– which in the
entered, and
– which has the value "0" in the
The row is marked.
"Target"
"SIDEXIS 4 Client"
"SIDEXIS 4 Server"
"TargetType"
or the
"SIDEXIS 4 Client"
column has the name of the SIDEXIS Server
column. The
"TargetType"
"SIDEXIS 4
installed.
has the value "0" in the
"SIDEXIS 4 Client"
"Target"
is installed.
column.
s
10. In the Editor window scroll to both of the
"ServiceUriSslPort"
columns.
"ServiceUriPort"
and
IMPORTANT
Please also ensure that the ports selected by you are not being used by
other services or other processes. For this you may e.g. execute
"netstat–a"
11. Enter the desired ports in the entry fields of the table.
"ServiceUriPort"
"ServiceUriSslPort"
NOTE: You only need to adjust the ports in the Server data set
"TargetType"
(
= 1) can remain unchanged. The ports are then automatically
adjusted there.
12. Ensure that the changes made by you in the table have also actually
been adopted.
To do this close the Table Editor and open it again by clicking the
"Edit Top 200 Rows"
13. Close the
14. Start the
"ServerProvisioningWizard.exe"
These are located in the directory...
...\Sirona\SIDEXIS4\Installation\Provisioning
The
in a command row window opened with administrator rights.
= Port for http communication
= Port for https communication
= 0), the values in the Client data sets (
button.
"SQL Server Management Studio"
"Server Provisioning Assistent"
file.
"Server Provisioning Assistent"
installation needs to be repaired and it switches to
.
by double-clicking on the
detects that an existing
"TargetType"
Repair
mode.
bеЦдблЬ
64 58 983 D3592
D3592.076.01.03.02 03.2016
15. Click on the
The menu for starting the Server Provisioning (repair) Jobs
opens.
16. Click on the
The individual Server Provisioning Job steps are automatically
executed in sequence. The status display shows a green status
display once a job step has been executed successfully. The
"Next"
successfully.
"Next"
button.
"Apply"
button appears once all job steps have been executed
button.
87
Page 88

7Other Sirona Dental Systems GmbH
7.3Switching service ports Service Manual SIDEXIS 4
IMPORTANT
If one or more Server Provisioning job steps should fail a message
window appears and the failed steps are red in the status displays.
Furthermore, you can open the log file which contains details on the
errors via the
17.
If the repair job has completed successfully and there is still no
"Show Log"
"SIDEXIS 4 Client" installed,
install the SIDEXIS 4 Clients now as described in the SIDEXIS 4
Installation Instructions (REF 64 47 200).
18.
If the repair job has completed successfully and the SIDEXIS 4
Server was also previously set up as SIDEXIS 4 Client,
start the
the
These are located in the directory...
...\Sirona\SIDEXIS4\Installation\Provisioning
The
"Client Provisioning Assistant"
"ClientProvisioningWizard.exe"
"Client Provisioning Assistant"
installation needs to be repaired and it switches to
button.
now by double-clicking on
file.
detects that an existing
Repair
mode.
19. Click on the
The menu for starting the Client Provisioning
(repair) Jobs opens.
20. Click on the
The individual Client Provisioning Jobs are automatically
executed in sequence. The status display shows a green status
display once a job has been executed successfully. The
button appears once all jobs have been executed successfully.
"Next"
"Apply"
button.
button.
"Next"
IMPORTANT
If one or more Client Provisioning Jobs should fail a message window
appears and the failed steps are red in the status displays. Furthermore,
you can open the log file which contains details on the errors via the
"Show Log"
21. Execute the
computer upon which a
before changing the port.
button.
"Client Provisioning Assistant"
"SIDEXIS 4 Client"
in succession on every
was already installed
88 D3592.076.01.03.02 03.2016
64 58 983 D3592
Page 89

Page 90

tЙ=кЙлЙкоЙ=нЬЙ=кбЦЬн=нз=г~вЙ=~еу=~днЙк~нбзел=пЬбЕЬ=г~у=ДЙ=кЙимбкЙЗ=ЗмЙ=нз=нЙЕЬебЕ~д=бгйкзоЙгЙенлK
«=pбкзе~=aЙен~д=pулнЙгл=dгДe=OMNS pйк~ЕЬЙW ЙеЦдблЕЬ mкбенЙЗ=бе=dЙкг~еу
aPRVOKMTSKMNKMPKMO MPKOMNS ûKJkêKW= NON=UMN
pбкзе~=aЙен~д=pулнЙгл=dгДe `çåí~Åí=áå=íÜÉ=rp^W
pбкзе~=aЙен~дI=fеЕK
c~Дкбвлнк~≈Й=PN
aJSQSOR=_ЙелЬЙбг
dЙкг~еу
пппKлбкзе~KЕзг
QUPR=páêçå~=aêáîÉ
`Ь~кдзннЙI=k`=OUOTP
rp^
lêÇÉê=kç
SQ=RU=VUP=aPRVO
 Loading...