

Page 1
ebiflabkq=ap
D
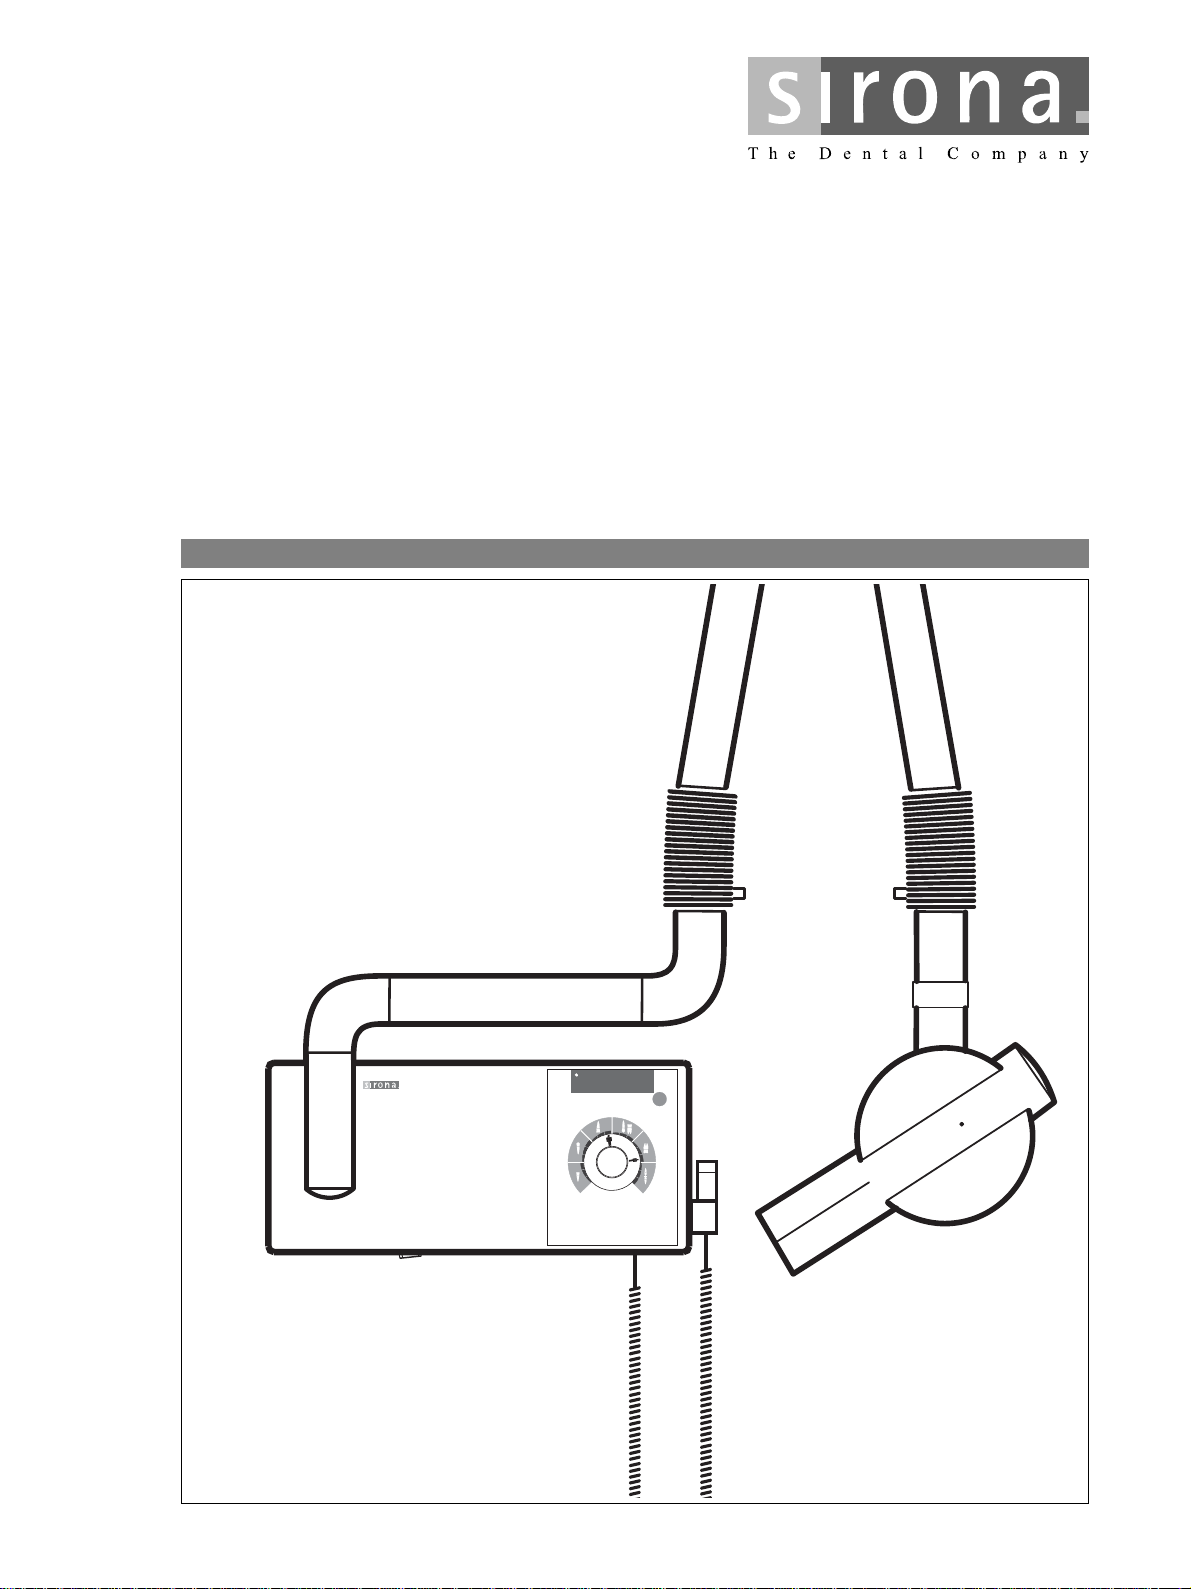
SX-ray
Digital
lйЙк~нбеЦ=fелнкмЕнбзел=
bеЦдблЬ
0.06
7 mA 60 kV DC
WARNING:
This X-ray unit may be dangerous to patient and operator unless
safe exposure factors and operating instructions areobserved.
Unauthorized use is prohibited.
HELIODENT DS
Page 2

General information Sirona Dental Systems GmbH
Operating Instructions HELIODENT DS
General information
Dear customer, Thank you for purchasing your HELIODENT DS.
Both intraoral and mandibular joint radiography can be
performed with this unit.
The technical documentation included in delivery, i.e.
operating instructions, installation instructions,
Installation report / Warranty passport, customer installation description and X-ray system file (only in the
FRG), are also an integral part of this product.
Keep these documents nearby for quick and easy reference at all times (in the FR of Germany: in your X-ray
system file).
In order to protect your warranty rights, please complete
the enclosed Installation report / Warranty passport,
together with the service technician, immediately after
installation of your system.
Read the Operating Instructions to familiarize yourself
with the product before taking X-rays on the patient.
Always be sure to observe the currently valid Radiation
Protection Guidelines and the Safety Notes in these
Operatingf Instructions.
The ordinance governing the use of radiation emitting
equipment in the Federal Republic of Germany requires
the operator to perform regular constancy tests to
ensure the safety of operating personnel and patients.
Your HELIODENT team
Maintenance To ensure the safety and health of patients, operators
and third parties, inspections and maintenance calls
must be carried out at the specified intervals in order to
guarantee the operational safety and functional reliability
of your product (IEC 601-1 / DIN EN 60601-1 etc.).
It is the responsibility of the operator to ensure that the
required inspections and maintenance work are carried
out.
In the event that the operator fails to fulfill the obligation
to carry out inspections and maintenance or ignores
error messages, Sirona Dental Systems GmbH and/or
its authorized dealers can not assume liability for any
damage attributable to this.
This product bears the CE label in accordance with the
provisions of the
Council Directive 93/42/EWG of June 14,1993 concern-
0123
2 D 3302.201.01.25.02
ing medical devices.
60 81 744 D 3302
Page 3

Sirona Dental Systems GmbH Contents
Operating Instructions HELIODENT DS
Contents
1 Warning and safety information ................................................................................... 4
2 Technical Description .................................................................................................... 6
3 Controls and display elements ................................................................................... 10
4 Accessories .................................................................................................................. 11
5 Preparing an exposure ................................................................................................ 12
5.1 Switching the unit ON ........................................................................................................................ 12
5.2 Selecting the radiographic technique................................................................................................. 13
5.3 Basic setting at factory....................................................................................................................... 14
5.4 Adjusting the basic setting................................................................................................................. 15
5.5 Setting the exposure data.................................................................................................................. 16
6 Positioning the patient/x-ray tube unit....................................................................... 17
7 Bite-wing exposure ...................................................................................................... 18
8 Exposure of the mandibular joint ............................................................................... 18
9 Releasing an exposure ................................................................................................ 19
10 Mobile stand / overhead model / Centro Column / Split Concept (optional) .......... 20
11 Exposure times............................................................................................................. 22
11.1 Possible exposure times.................................................................................................................... 22
11.2 Exposure times with 8" source-skin distance tube - Class E film ......................................................22
11.3 Exposure times with 12" source-skin distance tube - Class E film
(Round or square cone)..................................................................................................................... 22
11.4 Exposure times for Sirona Full Size / Universal X-ray sensors with 8"FHA tube ...............................23
11.5 Exposure times for Sirona Full Size / Universal X-ray sensors with 12"FHA tube
(Round or square cone)..................................................................................................................... 23
11.6 Exposure times using tube with 8" SSD - General X-ray sensors .....................................................24
11.7 Exposure times using tube with 12" SSD - General X-ray sensors (Round or square cone) ............ 24
12 Care of surfaces ........................................................................................................... 25
bеЦдблЬ
13 List of error codes........................................................................................................ 26
14 Inspection and maintenance ....................................................................................... 27
14.1 Annual inspection performed by the operator or other authorized personnel.................................... 27
14.2 Maintenance performed by the service technician ............................................................................ 27
14.3 Checking image quality...................................................................................................................... 27
60 81 744 D 3302
D 3302.201.01.25.02
3
Page 4

1 Warning and safety information Sirona Dental Systems GmbH
Operating Instructions HELIODENT DS
1 Warning and safety information
Marking of warning and
safety information
To prevent personal injury and damage to property,
please observe the warning and safety information provided in these operating instructions. They are specially
marked with a warning symbol and ATTENTION.
Symbols used Observe accompanying documents (on name
plate)
Proper use This unit is designed for the preparation of intraoral
X-rays and X-rays of the mandibular joint.
The unit must not be used in explosion hazard areas.
General safety information Patient X-ray exposures may be performed only when
the unit is functioning flawlessly.
The patient must not be left unattended at the unit.
Modifications to the system Modifications to this system which could impair the
safety of operators, patients or third persons are prohibited by law!
For reasons of product safety, this product may be
operated only with original Sirona accessories or
third-party accessories expressly approved by Sirona.
The user is responsible for dangers resulting from the
use of non-approved accessories.
Disturbance of electronic equipment worn by the
patient.
To prevent the malfunction of electronic devices and
loss of stored data in connection with radio controlled
clocks, telephone cards, etc. all such items must be
removed from the patient prior to the X-ray exposure.
Radiation protection The applicable radiation protection regulations must be
observed. The prescribed radiation protection accessories must be used.
If the release button is equipped with a cable, the operator must leave the vicintiy of the X-ray tube unit before
triggering an exposure.
No one except the patient may remain in the exposure
room. In exceptional cases a third party who is not a
member of the practice staff may assist the patient.
Visual contact with the patient and the unit must be
maintained during every X-ray exposure.
In case of malfunction, interrupt the exposure immediately by letting go of the release button.
4 D 3302.201.01.25.02
60 81 744 D 3302
Page 5
Sirona Dental Systems GmbH 1 Warning and safety information
Operating Instructions HELIODENT DS
Electromagnetic compatibility (EMC) The HELIODENT DS complies with the requirements of
IEC 60601-1-2:2001.
Medical electrical devices are subject to special precautionary measures regarding EMC. They must be
installed and operated as specified in the document
"Installation Requirements".
Portable and mobile HF communication devices can
influence medical electrical equipment. The use of
mobile telephones in the practice or hospital area therefore must be prohibited.
Disposal It applies generally that the national regulations have to
be complied with when disposing of this product. Please
observe the regulations applying in your country.
Within the European Economic Community the directive
2002/96/EEC (WEEE) for electrical and electronic
devices requires environmentally compatible recycling /
disposal.
Your product is marked with the adjacent symbol. With
the goal of environmentally compatible recycling / disposal, your product must not be disposed of with the
domestic refuse.
The black bar under the "refuse bin" symbol means that
it has been put onto the market after 13.08.2005. (See
EN 50419:2005)
bеЦдблЬ
Please note that this product is subject to the directive
2002/96/EEC (WEEE) and laws applicable in your country and must be sent for environmentally compatible
recycling / disposal.
The X-ray tube assembly of this product contains a
tube with a potential implosion hazard, a lead lining and
mineral oil.
Please contact your dealer if your product should be
finally disposed of.
Dismantling and reassembly When dismantling and reassembling the unit, always
proceed as outlined in the instructions for reassembly.
This is necessary to ensure the unit’s proper functioning
and stability.
60 81 744 D 3302
D 3302.201.01.25.02
5
Page 6
2 Technical Description Sirona Dental Systems GmbH
Operating Instructions HELIODENT DS
2 Technical Description
Technical Data
Nominal voltage:
Permissible line voltage fluctuations:
Nominal current: at 230V: 4.6A
Rated line frequency: 50Hz / 60Hz
Line impedance: at 230V: 0.8 Ohm
House wiring fuse: 16A
Power requirement: < 1.5kW
Tube voltage: 60kV
Tube current: 7mA
High-voltage curve: Multipulse X-ray tube
Radiation times: 0.01 – 3.s
Mark-to-space ratio: 1:30 (radiation-time-dependent overheating protection)
Total filtration in X-ray tube unit:
Focal spot size acc. to IEC 336:
Petrick P470/6.30/12G 0.4mm
Focal spot mark:
200 – 230V or 127V
+ 6% –10% (200 – 230V), ± 10% (127V)
at 127V: 11A
at 127V: 0.3 Ohm
> 2mm Al / 70 kV IEC 60 522
SSD 8” (203mm) or 12” (305mm) = source-skin distance
Diameter of radiation field at tube end: < 60 mm
Type of protection against electric shock: Protection class I
Degree of protection against electric shock: Type B
Degree of protection against penetration of water: Conventional unit
(w/o protection against penetration of water)
Year of manufacture: (on the rating plate)
Operating mode: Continuous operation
Continuous power rating: 30W max
Rating (60kV, 7mA) 420W max
Anode material: Tungsten
Exposure data to determine leakage radiation: 0.25mA/60kV
Leakage radiation
Filament
Nominal line voltage: 6,6V
Nominal current: 1,6A
6 D 3302.201.01.25.02
< 0.25 mGy/h
60 81 744 D 3302
Page 7

Sirona Dental Systems GmbH 2 Technical Description
Operating Instructions HELIODENT DS
Technical Data
Nominal frequency: DC
Duty cycle: 1:30
Operating conditions (compliant with IEC 601-1) Ambient temperature: 10°C – 40°C (50°F – 104°F)
Relative humidity: 30% – 75%
Transport and storage conditions (compliant with IEC 601-1) Temperature: -40° C – +70° C (-40°F – 158°F)
Relative humidity: 10% – 95%
HELIODENT DS has been inspected by the VDE Testing and Certification Institute for compliance with:
• IEC 60 601-1
• IEC 60 601-2-28 / 1993
• IEC 60 601-1-3 / 1994
• IEC 60 601 -2-7 / 1998
HELIODENT DS has been found to comply with these regulations.
The HELIODENT DS X-ray unit complies with AS / NZS 3200.1.0
Reg. No.: China
Reg. No.: China
SFDA (I) 20053301170
Original language of Operating Instructions: German
bеЦдблЬ
60 81 744 D 3302
D 3302.201.01.25.02
7
Page 8
2 Technical Description Sirona Dental Systems GmbH
Operating Instructions HELIODENT DS
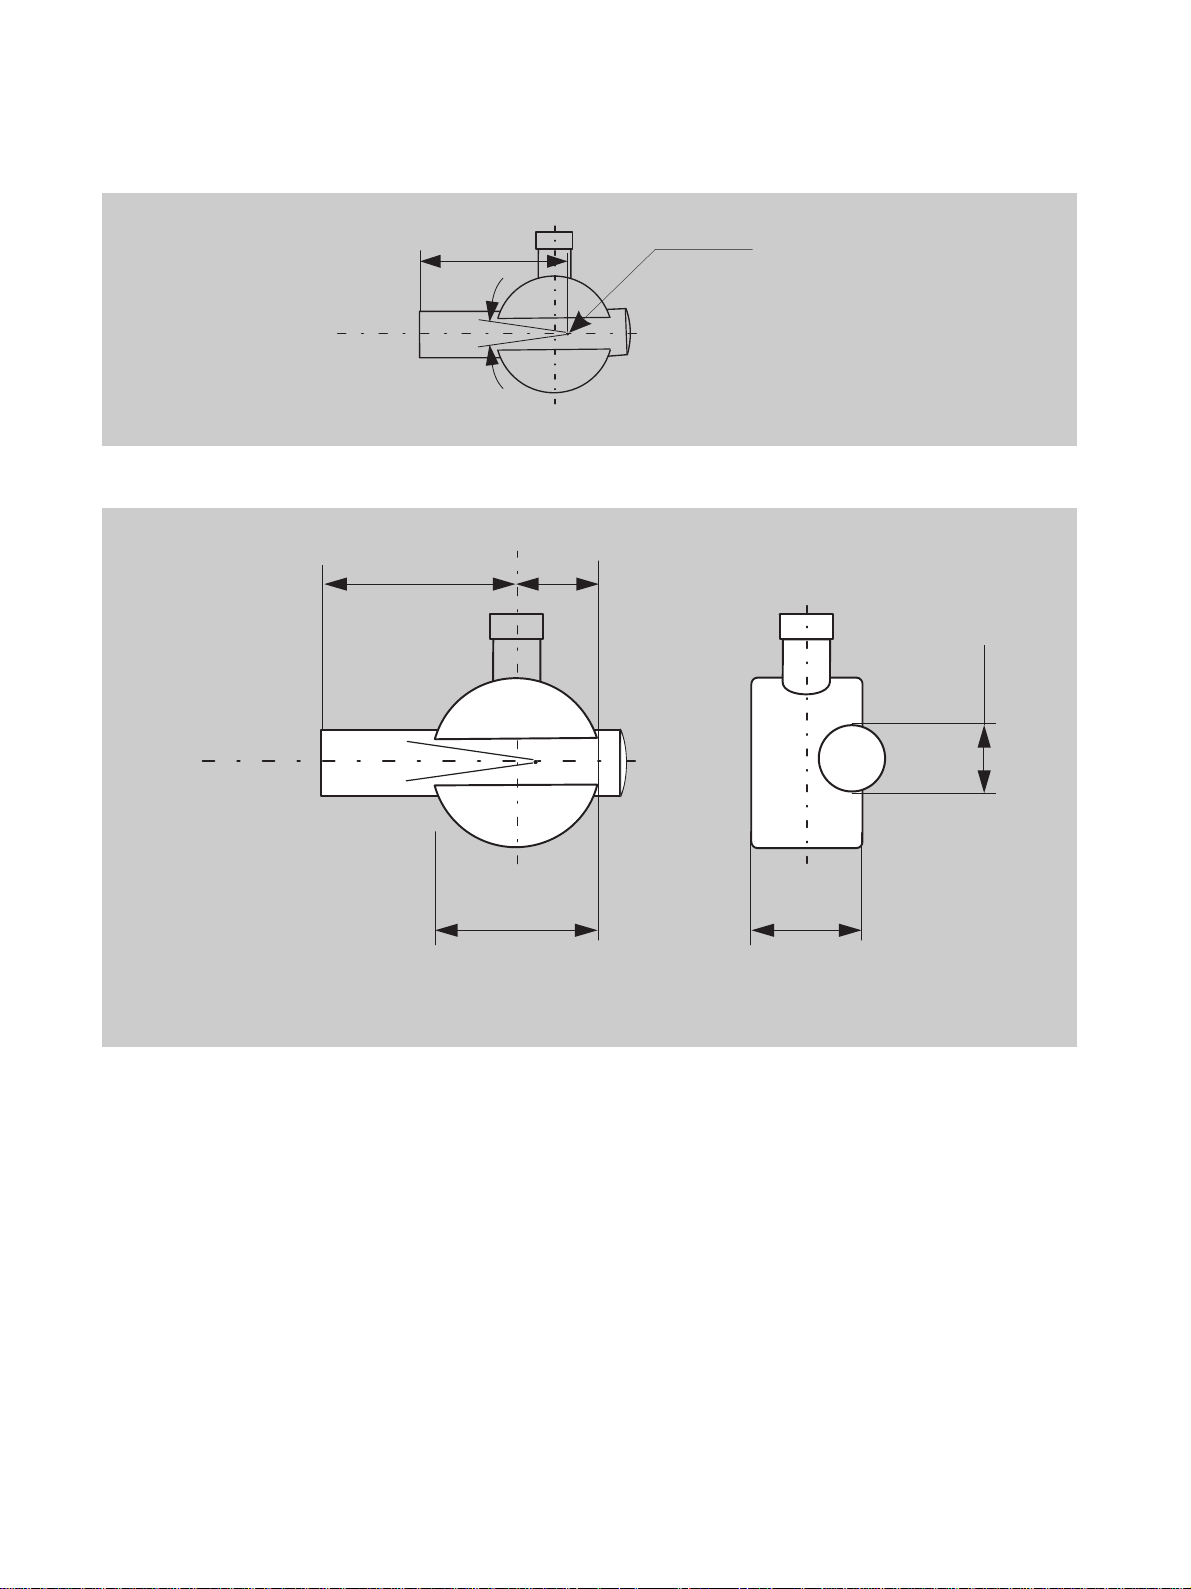
Illumination
Central ray
Sizes and Weight
FHA
Anode angle 24° ± 1°
132
Focal spot marc
102
∅64.5
∅161 169.3
No true scale.
Approx. length values.
Weight: approx. 3.4kg
8 D 3302.201.01.25.02
60 81 744 D 3302
Page 9
Sirona Dental Systems GmbH 2 Technical Description
Operating Instructions HELIODENT DS
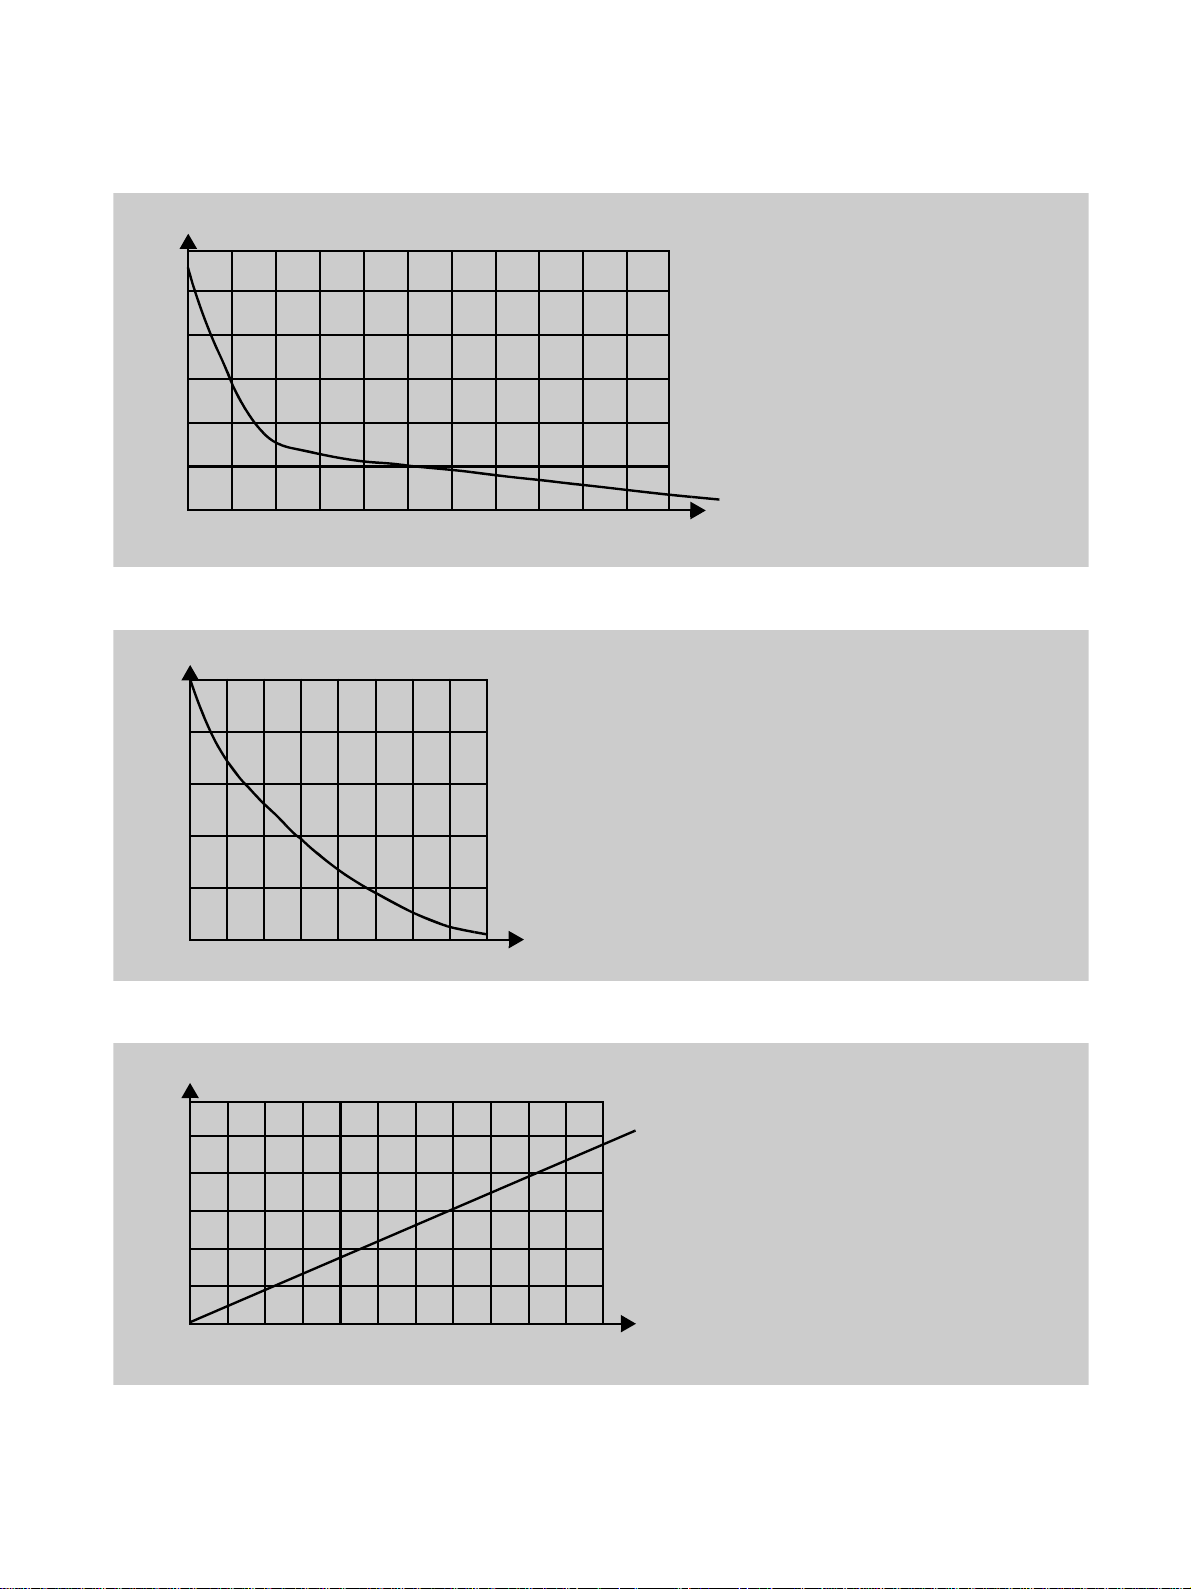
Cool-down curve for X-ray tube housing
Joule x10
120
100
80
60
40
20
3
0
20 40 60 80 100 120 140 160 180 200 220 t (min)
Cool-down curve for X-ray tube
Joule
5000
4000
3000
bеЦдблЬ
2000
1000
0
1234t(min)
Warm-up curve for X-ray tube housing
Joule x10
120
100
80
60
40
20
0
3
20 40 60 80 100 120 140 160 180 200 220 t (min)
60 81 744 D 3302
D 3302.201.01.25.02
9
Page 10

3 Controls and display elements Sirona Dental Systems GmbH
D
S
X-ray
Digital
Operating Instructions HELIODENT DS
3 Controls and display elements
60
90
X-ray
7 mA 60 kV DC
0.06
8
9
60
WARNING:
This X-ray unit may be dangerous to patient and operator unless
safe exposure factors and operating instructions areobser ved.
Unauthorized use is prohibited.
2
1
4
3
5
1. Power switch
2. Standby (ready) indicator lamp (LED)
3. X-radiation indicator lamp (LED)
4. Digital exposure time display
5. Object selector switch
6. Digital mode indicator lamp
7. Selector button: digital/conventional exposure
8. Release button
9. Scale for setting angle of inclination
10. X-ray field limitation
11. X-ray tube unit
30
HELIODENT DS
7
6
10
11
• Mobile stand / Overhead model / Centro column / Split Concept: see page 20/21
60 81 744 D 3302
10 D 3302.201.01.25.02
Page 11

Sirona Dental Systems GmbH 4 Accessories
Operating Instructions HELIODENT DS
4 Accessories
1
2
3
4
1. Test specimen for constancy test
for conventional radiographic technique
Order no. 59 69 779
2. Test specimen for constancy test
for universal and full-size sensors
Order no. 51 68 062
3. Tube extension to 12" SSD (30cm)
Order no. 33 14 742
bеЦдблЬ
4. Square cone extension on 12" SSD (30cm)
Order No. 58 61 468
5
6
7
5. X-ray field limitation blue with twist grip
for Full Size sensor
and for conventional radiographic technique 3x4 cm
Order no. 46 81 974
6. X-ray field limitation black with twist grip
for Universal sensor
and for conventional radiographic technique 2x3 cm
Order no. 60 00 579
7. Sensor holder set with sighting rings and guide rods
manufactured by DENTSPLY RINN
Sirona order no: 58 58 522
i
NOTE
Not all of the accessories shown here are included in the
scope of delivery.
60 81 744 D 3302
D 3302.201.01.25.02
11
Page 12

5 Preparing an exposure Sirona Dental Systems GmbH
5.1 Switching the unit ON Operating Instructions HELIODENT DS
5 Preparing an exposure
5.1 Switching the unit ON
Set the main power switch to position I .
When doing so, be sure not to press the release button
(8) or button D (7).
Following switch-on, a self-test executes. A short acoustic signal is then emitted and a a 3-digit software status
display appears. Then the standby indicator lamp (2)
2
7
starts flashing and the selected exposure time lights up.
After approx. 20 sec. have elapsed, the standby indicator lamp lights up continuously.
When the Digital mode indicator also lights up, the digital radiographic technique is selected (see next page).
ON
1
OFF
8
The unit is ready for operation.
i
NOTE
If an error is detected during the self-test, a number ranging from 1 to 4 will appear on the digital display. (see
chapter entitled ”List of error codes”).
The LED (2) then flashes.
The unit is not ready for operation!
Switch the unit OFF and ON again.
i
NOTE
If the same error occurs again, please contact your service technician.
12 D 3302.201.01.25.02
60 81 744 D 3302
Page 13

Sirona Dental Systems GmbH 5 Preparing an exposure
Operating Instructions HELIODENT DS 5.2 Selecting the radiographic technique
5.2 Selecting the radiographic technique
Digital
If you are working with a digital radiographic system (e.g.
SIDEXIS), the Digital mode indicator lamp (6) on the
unit must be lit up.
6
You can switch back and forth between the conventional
and the digital radiographic technique by briefly holding
down the D button. The resulting reduction in the exposure time will then be displayed.
Use an X-ray field limitation for the digital radiographic
technique.
i
NOTE
To set the recommended exposure times for adults, always set the patient symbol to the highest exposure level
within the relevant tooth symbol.
If you are working with children, always set to the lowest
exposure level within the relevant tooth symbol!
Conventional
If you want to take conventional (film) exposures, the
Digital mode indicator (6) must not be lit up.
You can switch back and forth between the conventional
and digital radiographic technique by briefly pressing the
D button. The Digital mode indicator (6) then switches
off.
The exposure time for conventional exposures is then
displayed.
Insert the X-ray field limitation for the conventional radiographic technique.
bеЦдблЬ
60 81 744 D 3302
D 3302.201.01.25.02
13
Page 14

5 Preparing an exposure Sirona Dental Systems GmbH
5.3 Basic setting at factory Operating Instructions HELIODENT DS
5.3 Basic setting at factory
Digital with 8“ tube
Conventional with 8“ tube
Example:
Exposure times with Class E film.
14 D 3302.201.01.25.02
60 81 744 D 3302
Page 15

Sirona Dental Systems GmbH 5 Preparing an exposure
Operating Instructions HELIODENT DS 5.4 Adjusting the basic setting
5.4 Adjusting the basic setting
2
6
2
The exposure times are factory set for the use of Class
E film:
7
e.g. Kodak Ekta Speed, Agfa-Dentus M2.
i
NOTE
Digital and conventional exposure times are programmed separately. The factory adjusted DIGITAL programming is adjusted specifically for SIDEXIS.
In case of varying exposure conditions (see below) the
basic setting must be altered as follows:
Example:
7
Change over of the basic setting from Class E to Class
D film for the conventional radiographic technique.
1. Set the large patient symbol to the center area of the
object selector switch (5) (maxillary bicuspid/mandibular molar).
2. Press button D (7) (approximately 4 sec.) until the
standby LED (2) and the Digital mode indicator (6)
start flashing.
Let go of button D.
3. By turning the object selector switch (5), you can
now increase
step-by-step (max. 8 steps).
+ , or decrease – the basic setting
bеЦдблЬ
Tub e
Tub e
4. Press the D button (7) to save the selected setting.
The Ready LED (2) is lit up continuously.
5
5. Reset the object selector switch (5) to its original po-
sition. The basic setting is now displayed 3 steps
higher.
Do not press the D button (7) if you do not want to save
the setting. In this case, switch the unit OFF and then ON
again.
Varying exposure conditions
E for Class E films such as
Kodak Ekta Speed and
Agfa-Dentus M2
D for Class D films such as
Kodak Ultra Speed
For Class D films:
Set object selector switch (5) three steps higher.
Film and developing conditions
Due to varying film and developing conditions, it may be
necessary to increase or decrease the exposure setting
by one step.
Please refer to the Exposure times tables.
60 81 744 D 3302
D 3302.201.01.25.02
15
Page 16

5 Preparing an exposure Sirona Dental Systems GmbH
5.5 Setting the exposure data Operating Instructions HELIODENT DS
5.5 Setting the exposure data
Legend
Set the patient symbol for a
adult patient
or
child
to the tooth to be X-rayed.
Mandibular front tooth
bicuspid / canine tooth
also used for bite-wing exposures
Maxillary front tooth
Maxillary bicuspid / canine tooth and mandibular molar
Maxillary molar
Occlusal exposure
3 exposure levels
For conventional X-rays only:
Each tooth symbol is divided into 3 exposure levels
(exposure times) to suit stronger or weaker jaw regions.
The corresponding exposure time is digitally displayed.
Exposure times: see table.
Upper illustration:
8" SSD tube for conventional exposures
Class E film:
Adult,
maxillary molar,
exposure time: 0.40 s.
Lower illustration:
8" SSD tube for conventional exposures
Class E film:
Adult,
weak maxillary molar,
exposure time: 0.32 s.
60 81 744 D 3302
16 D 3302.201.01.25.02
Page 17

Sirona Dental Systems GmbH 6 Positioning the patient/x-ray tube unit
Operating Instructions HELIODENT DS 5.5 Setting the exposure data
6 Positioning the patient/x-ray tube unit
Adjust the X-ray tube unit
Have the patient sit down on the chair.
Right-angle technique (with X-ray field limitation)
The film or X-ray sensor is positioned with a holding system.
Sirona X-ray sensors may be used only with the holding
systems recommended by us.
Always follow the Operating Instructions for intraoral
radiography supplied with SIDEXIS.
45° angle technique (without X-ray field
limitation)
The film or X-ray sensor must be held by the patient.
Angle of inclination
Exposure tube for the occlusal plane
Supramaxillary teeth
Molars 35×
Bicuspids and canine teeth 45×
Front teeth 55×
Occlusal exposure 80×
Occlusal exposure -90×
Front teeth -20×
Bicuspids and canine teeth -10×
Molars -5×
Submaxillary teeth
bеЦдблЬ
60 81 744 D 3302
D 3302.201.01.25.02
17
Page 18

7 Bite-wing exposure Sirona Dental Systems GmbH
5.5 Setting the exposure data Operating Instructions HELIODENT DS
7 Bite-wing exposure
Bite-wing exposures are performed with the settings for
submaxillary exposures.
Example with 8" SSD tube for a conventional (film)
exposure (Class E film):
Adult,
tooth in bicuspid region,
exposure time: 0.20 s.
8 Exposure of the mandibular joint
Possible only in conventional exposure technique.
We recommend using 9x12cm or 13x18cm cassettes
with intensifying screens (available from specialized
dealers) for exposures of the mandibular joint.
The correct exposure time will vary according to the
film-screen system used.
18 D 3302.201.01.25.02
60 81 744 D 3302
Page 19

Sirona Dental Systems GmbH 9 Releasing an exposure
Operating Instructions HELIODENT DS 5.5 Setting the exposure data
9 Releasing an exposure
3
2
CAUTION
Observe radiation protection regulations,
see page 4.
Check for correct exposure data.
• An exposure can be triggered by holding down the
release button (8).
The X-RAY LED (3) remains lit up during the entire
exposure.
The exposure time is also indicated by an acoustic signal.
During operation via remote control, the X-ray LED on
the remote control is also lit up.
• The exposure is finished when the radiation auto-
matically switches off.
The Ready LED (2) flashes until the automatic tube cooling delay has expired (automatic exposure interlock).
Interrupting an exposure
bеЦдблЬ
8
The exposure can be interrupted by simply letting go of
the release button.
The previously elapsed exposure time will then flash.
The unit is again ready for operation following the automatic tube cooling delay.
If necessary repeat the exposure. For film exposures,
Not removable
in USA/CAN
3
first load a new film. For digital exposures, the system
must first be in the Ready state.
The unit may remain switched on until you have finished working.
Remote control
60 81 744 D 3302
D 3302.201.01.25.02
Error message
If an error or fault is detected during an exposure, the
exposure will be automatically interrupted. The error
code will then appear on the digital display and the
Ready LED (2) will simultaneously switch off.
If error code 1 or 2 appears, please contact your local
service technician.
19
Page 20

10 Mobile stand / overhead model / Centro Column / Split Concept (optional) Sirona Dental Systems GmbH
5.5 Setting the exposure data Operating Instructions HELIODENT DS
10 Mobile stand / overhead model /
Centro Column / Split Concept (optional)
Mobile stand
Use the two handles at the rear to move the mobile
stand.
The mobile stand may be moved only slowly and over
an even floor surface.
CAUTION
Danger of injury.
Move the mobile stand only when the X-ray tube unit is in
its home position and secured by the fastening strap
(with support arm retracted ¨ ).
The mobile stand has 4 casters with brakes.
Press the locking levers down
↑ to unlock them.
up
CAUTION
Always lock the brakes ↓ before setting the X-ray tube
unit.
Overhead (ceiling-mounted) model with
SIROLUX FANTASTIC
↓ to lock the casters and
20 D 3302.201.01.25.02
60 81 744 D 3302
Page 21

Sirona Dental Systems GmbH 10 Mobile stand / overhead model / Centro Column / Split Concept (optional)
Operating Instructions HELIODENT DS 5.5 Setting the exposure data
Centro Column with HELIODENT DS wall
model
Kit:
Adapter for HELIODENT DS X-ray unit on Centro Column of KaVo company, with long support arm (1810mm)
and HELIODENT DS wall model only, separate control
electronics with timer and release.
Split Concept with HELIODENT DS wall model
Split Concept adapter only for long support arm
(1810mm) with x-ray tube and HELIODENT DS wall
model only, separate control electronics with timer and
release.
bеЦдблЬ
60 81 744 D 3302
D 3302.201.01.25.02
21
Page 22

22 D 3302.201.01.25.02
11 Exposure times
11.1 Possible exposure times
0.01 0.02 0.03 0.04 0.05 0.06 0.08 0.10 0.12 0.16 0.20 0.25 0.32 0.40 0.50 0.64 0.80 1.00 1.25 1.60 2.00 2.50 3.20 3.20 3.20 3.20
11.2 Exposure times with 8" source-skin distance tube - Class E film
Seconds 0.08 0.10 0.12 0.10 0.12 0.16 0.12 0.16 0.20 0.16 0.20 0.25 0.20 0.25 0.32 0.25 0.32 0.40 0.32 0.40 0.50 0.40 0.50 0.64
Supramaxillary
Submaxillary
11.3 Exposure times with 12" source-skin distance tube - Class E film (Round or square cone)
11 Exposure times Sirona Dental Systems GmbH
Supramaxillary
Submaxillary
Seconds 0.20 0.25 0.32 0.25 0.32 0.40 0.32 0.40 0.50 0.40 0.50 0.64 0.50 0.64 0.80 0.64 0.80 1.00 0.80 1.00 1.25 1.00 1.25 1.60
Supramaxillary
Submaxillary
Supramaxillary
60 81 744D 3302
NOTE: Set one to two steps lower when using class F film types.
Set three steps higher when using Class D film types. Example: select 0.40 s instead of 0.20 s. Set 1-2 steps higher when using a film holder.
Submaxillary
Page 23

60 81 744D 3302
D 3302.201.01.25.02
11.4 Exposure times for Sirona Full Size / Universal X-ray sensors with 8"FHA tube
The recommended exposure times are limited to the following values from the range of possible exposure times:
0,04 0,05 0,06 0,08
Breakdown of recommended exposure times by tooth region
Mandibular
Maxillary front tooth
front tooth, canine tooth
Mandibular molars
Maxillary
canine tooth, occlusal exposure of molars
0.06 s 0.08 s
0.04 s 0.05 s
11.5 Exposure times for Sirona Full Size / Universal X-ray sensors with 12"FHA tube (Round or square cone)
The recommended exposure times are limited to the following values from the range of possible exposure times:
0,08 0,10 0,12 0,16
Sirona Dental Systems GmbH 11 Exposure times
Breakdown of recommended exposure times by tooth region
Mandibular
Maxillary front tooth
front tooth, canine tooth
0.12 s 0.16 s
0.08 s 0.10 s
ATTENTION: The two tables below give only examples for the X-ray sensor exposure times.
23
Please refer to the operating instructions for the X-ray sensors for the correct exposure times.
Mandibular molars
Maxillary
canine tooth, occlusal exposure of molars
Page 24

24 D 3302.201.01.25.02
11.6 Exposure times using tube with 8" SSD - General X-ray sensors
Seconds 0.01 0.02 0.03 0.02 0.03 0.04 0.03 0.04 0.05 0.04 0.05 0.06 0.05 0.06 0.08 0.06 0.08 0.10 0.08 0.10 0.12 0.10 0.12 .
Supramaxillary
Submaxillary
11 Exposure times Sirona Dental Systems GmbH
Supramaxillary
*
*
Submaxillary
*These parameters enable an especially high dose reduction for children resulting in increased image noise. If you perceive this noise to be disturbing, we recommend
manually increasing the exposure time 1 - 2 steps.
11.7 Exposure times using tube with 12" SSD - General X-ray sensors (Round or square cone)
Seconds 0.04 0.05 0.06 0.05 0.06 0.08 0.06 0.08 0.10 0.08 0.10 0.12 0.10 0.12 0.16 0.12 0.16 020 0.16 0.20 0.25 0.20 0.25 0.32
Supramaxillary
Submaxillary
Supramaxillary
Submaxillary
NOTE: When altering the basic setting (see Section 5.4) a new SIDEXIS system setting is required. Please contact your nearest service technician.
60 81 744D 3302
Page 25

Sirona Dental Systems GmbH 12 Care of surfaces
Operating Instructions HELIODENT DS 11.7 Exposure times using tube with 12" SSD - General X-ray sensors (Round or square cone)
12 Care of surfaces
Cleaning Remove dirt, grime and disinfectant residue with mild,
household detergent. Do not allow fluids to enter the
ventilation slits!
Any medicinal agents accidentally spilled onto surfaces
should be wiped off immediately.
Disinfecting Disinfect using either spray-on or wipe-on surface disin-
fectants. Be sure to observe all instructions and restrictions specified by the manufacturer. Use only tested and
approved agents!
Never use: agents containing active ingredients or additives such as carbolic acid, peracetic acid, peroxide or
other oxygen-cleaving agents, sodium hypochlorite or
any iodine-cleaving agents.
bеЦдблЬ
Caring for the film holder Please observe the hygiene instructions of the film
holder manufacturer.
Caring for the SIDEXIS sensor holder system Please observe the disinfection and sterilization instruc-
tions of DENTSPLY RINN.
60 81 744 D 3302
D 3302.201.01.25.02
25
Page 26

13 List of error codes Sirona Dental Systems GmbH
11.7 Exposure times using tube with 12" SSD - General X-ray sensors (Round or square cone) Operating Instructions HELIODENT DS
13 List of error codes
Errors occurring during the self-test are indicated by a numeric error code of 1 - 4.
Error number
No. 1 The cable connecting the X-ray tube unit
No. 2 X-ray was not exposed
No. 3 D button was pressed during switch-on
No. 4 Release button was pressed during
Description of cause
to the generator may be interrupted (kV
line).
max
error).
(mA/kV
phase.
switch-on phase.
Corrective action
Switch unit OFF.
Contact your service technician.
Switch unit OFF.
Contact your service technician.
Switch unit OFF and ON again.
Be sure not to press the D button while doing so.
Switch unit OFF and ON again.
Be sure not to press the release button while doing so.
CAUTION
If an error is displayed again after switching the unit off
and then on again, please contact your service technician.
26 D 3302.201.01.25.02
60 81 744 D 3302
Page 27

Sirona Dental Systems GmbH 14 Inspection and maintenance
Operating Instructions HELIODENT DS 14.1 Annual inspection performed by the operator or other authorized personnel
14 Inspection and maintenance
Inspection and maintenance work must be performed at
regular intervals to protect the safety and health of
patients, users and third parties.
14.1 Annual inspection performed by the operator or other authorized personnel
As the operator, you should ensure the safety and reliability of your system by performing maintenance on it at
regular intervals (at least once annually) or having this
work performed by your dental dealership.
The information in the document ’Inspection and main-
tenance’ supplied will be of help to you here.
14.2 Maintenance performed by the service technician
In addition to the scheduled annual inspection by the
user or persons contracted to perform this, a maintenance inspection must be performed after 4, 7 10 and
then every two years.
bеЦдблЬ
14.3 Checking image quality
The information in the document ’Inspection and maintenance’ supplied will be of help to the service techni-
cian here.
At regular intervals, however at least once a year, the
user must evaluate the image quality.
With the use of digital image receptors, the increase in
image post-processing effort making use of the brightness or contrast control (e.g. for SIDEXIS) can be taken
as an evaluation criterion.
For X-rays requiring developing of films, an increase in
the exposure time serves as the evaluation criterion.
If these evaluation criteria are fulfilled independently of
the patient anatomy and of possible sources of error,
such as developing of film or patient positioning, contact
a service technician immediately in order to eliminate
possible unit faults.
In addition it is necessary to observe country-specific
requirements.
Furthermore, we would like to call your attention to the
brochures of film manufacturers and also to our Quality
Image Service. For this, please contact your dental
dealer or the manufacturer directly.
60 81 744 D 3302
D 3302.201.01.25.02
27
Page 28

tЙ=кЙлЙкоЙ=нЬЙ=кбЦЬн=нз=г~вЙ=~еу=~днЙк~нбзел=пЬбЕЬ=г~у=ДЙ=кЙимбкЙЗ=ЗмЙ=нз=нЙЕЬебЕ~д=бгйкзоЙгЙенлK
«=pбкзе~=aЙен~д=pулнЙгл=dгДe=NVVUJOMMU pйк~ЕЬЙW=ЙеЦдблЕЬ= mкбенЙЗ=бе=dЙкг~еу
a=PPMOKOMNKMNKORKMO===MNKOMMU ûKJkêKW= NMV=SOT fгйкбг¨=Йе=^ддЙг~ЦеЙ
pбкзе~=aЙен~д=pулнЙгл=dгДe
áå=íÜÉ=rp^W
c~Дкбвлнк~≈Й=PN
SQSOR=_ЙелЬЙбг
dЙкг~еу
пппKлбкзе~KЕзг
pбкзе~=aЙен~д=pулнЙгл=ii`
QUPR=pбкзе~=aкбоЙI=pмбнЙ=NMM
`Ь~кдзннЙI=k`=OUOTP
rp^
lêÇÉê=kç
SM=UN=TQQ=a=PPMO
 Loading...