


ELECTRIC OVEN & GRILL SGBR 1500 A1
ELECTRIC OVEN & GRILL
Operating instructionss
GRILL- OCH BAKUGN
Bruksanvisning
GRILL- UND BACKAUTOMAT
Bedienungsanleitung
MINIUUNI JA GRILLI
Käyttöohje
GRILL- EN BAKAUTOMAAT
Gebruiksaanwijzing
IAN 102464

Before reading, unfold the page containing the illustrations and familiarise yourself with all functions of
the device.
Käännä ennen lukemista kuvallinen sivu esiin ja tutustu seuraavaksi laitteen kaikkiin toimintoihin.
Vik ut bildsidan och ha den till hands när du läser igenom anvisningarna och gör dig bekant med
apparatens / maskinens funktioner.
Vouw vóór het lezen de pagina met de afbeeldingen open en maak u vertrouwd met alle functies van het
apparaat.
Klappen Sie vor dem Lesen die Seite mit den Abbildungen aus und machen Sie sich anschließend mit allen
Funktionen des Gerätes vertraut.
GB / IE Operating instructions Page 1
FI Käyttöohje Sivu 15
SE Bruksanvisning Sidan 29
NL / BE Gebruiksaanwijzing Pagina 43
DE / AT / CH Bedienungsanleitung Seite 57
A
9
1
2
B
8
7
6
3
4
5
0
q
w
z
e
tr

Contents
Introduction . . . . . . . . . . . . . . . . . . . . . . . . . . . . . . . . . . . . . . . . . . . . . . . . . . . . . . . . . . . .2
Proper use . . . . . . . . . . . . . . . . . . . . . . . . . . . . . . . . . . . . . . . . . . . . . . . . . . . . . . . . . . . . .2
Package contents . . . . . . . . . . . . . . . . . . . . . . . . . . . . . . . . . . . . . . . . . . . . . . . . . . . . . . .2
Appliance description . . . . . . . . . . . . . . . . . . . . . . . . . . . . . . . . . . . . . . . . . . . . . . . . . . . .2
Technical data . . . . . . . . . . . . . . . . . . . . . . . . . . . . . . . . . . . . . . . . . . . . . . . . . . . . . . . . . .2
Safety instructions . . . . . . . . . . . . . . . . . . . . . . . . . . . . . . . . . . . . . . . . . . . . . . . . . . . . . .3
Setting up . . . . . . . . . . . . . . . . . . . . . . . . . . . . . . . . . . . . . . . . . . . . . . . . . . . . . . . . . . . . .6
Using the appliance . . . . . . . . . . . . . . . . . . . . . . . . . . . . . . . . . . . . . . . . . . . . . . . . . . . . .6
Glass door . . . . . . . . . . . . . . . . . . . . . . . . . . . . . . . . . . . . . . . . . . . . . . . . . . . . . . . . . . . . . . . . . . . . . . . . . 6
Inserting the crumb tray . . . . . . . . . . . . . . . . . . . . . . . . . . . . . . . . . . . . . . . . . . . . . . . . . . . . . . . . . . . . . . . 6
Using the rotisserie . . . . . . . . . . . . . . . . . . . . . . . . . . . . . . . . . . . . . . . . . . . . . . . . . . . . . . . . . . . . . . . . . . . 7
Using the baking tray/rack . . . . . . . . . . . . . . . . . . . . . . . . . . . . . . . . . . . . . . . . . . . . . . . . . . . . . . . . . . . . 8
Before fi rst use . . . . . . . . . . . . . . . . . . . . . . . . . . . . . . . . . . . . . . . . . . . . . . . . . . . . . . . . .8
Operating the appliance . . . . . . . . . . . . . . . . . . . . . . . . . . . . . . . . . . . . . . . . . . . . . . . . .9
Function switch . . . . . . . . . . . . . . . . . . . . . . . . . . . . . . . . . . . . . . . . . . . . . . . . . . . . . . . . . . . . . . . . . . . . . . 9
Temperature control . . . . . . . . . . . . . . . . . . . . . . . . . . . . . . . . . . . . . . . . . . . . . . . . . . . . . . . . . . . . . . . . . . 9
Timer . . . . . . . . . . . . . . . . . . . . . . . . . . . . . . . . . . . . . . . . . . . . . . . . . . . . . . . . . . . . . . . . . . . . . . . . . . . . . 9
GB
IE
Grilling and baking . . . . . . . . . . . . . . . . . . . . . . . . . . . . . . . . . . . . . . . . . . . . . . . . . . . . .9
Grilling with the rotisserie . . . . . . . . . . . . . . . . . . . . . . . . . . . . . . . . . . . . . . . . . . . . . . .10
Cleaning and care . . . . . . . . . . . . . . . . . . . . . . . . . . . . . . . . . . . . . . . . . . . . . . . . . . . . . .12
Storage . . . . . . . . . . . . . . . . . . . . . . . . . . . . . . . . . . . . . . . . . . . . . . . . . . . . . . . . . . . . . .12
Troubleshooting . . . . . . . . . . . . . . . . . . . . . . . . . . . . . . . . . . . . . . . . . . . . . . . . . . . . . . .13
Warranty and service . . . . . . . . . . . . . . . . . . . . . . . . . . . . . . . . . . . . . . . . . . . . . . . . . .14
Disposal . . . . . . . . . . . . . . . . . . . . . . . . . . . . . . . . . . . . . . . . . . . . . . . . . . . . . . . . . . . . . .14
Importer . . . . . . . . . . . . . . . . . . . . . . . . . . . . . . . . . . . . . . . . . . . . . . . . . . . . . . . . . . . . .14
SGBR 1500 A1
1

Introduction
GB
Congratulations on the purchase of your new
IE
appliance.
You have selected a high-quality product.
The operating instructions are part of this product.
They contain important information on safety, usage
and disposal. Before using the product, familiarise
yourself with all handling and safety guidelines.
Use the product only as described and for the
range of applications specifi ed. Please also pass
these operating instructions on to any future
owner(s).
Proper use
The automatic oven and grill is intended for the
heating, cooking and grilling of food.
This appliance is intended solely for use in private
homes. Do not use it for commercial applications.
All other uses are deemed to be improper and may
result in property damage or even in personal injury.
Package contents
♦ Electric Oven & Grill
♦ 1 baking tray
♦ 1 rack
♦ 2 tongs
♦ Rotisserie with 2 clamps
♦ 1 crumb tray
♦ Operating instructions
Appliance description
Figure A:
1 Drive
2 Temperature control
3 Function switch
4 Timer
5 Control lamp
6 Glass door
7 Crumb tray
8 Lower heating element
9 Spit fi tting
Figure B:
0 Tongs (baking tray or rack)
q Baking tray
w Tongs (for spit)
e rack
r Restrainer
t Skewer clamps
z Rotisserie
Technical data
Rated voltage: 220 - 240 V ~,
50/60 Hz
Max. power consumption: 1500 W
NOTE
Check contents for completeness and damage
immediately after unpacking. Contact Customer
vices if necessary.
Ser
2
SGBR 1500 A1

Safety instructions
DANGER – RISK OF ELECTRIC SHOCK!
► Do not open the housing of the appliance or attempt to repair it.
Doing so can lead to risks and also invalidates the warranty.
Defective appliances should be repaired by the retailer or
authorized personnel only.
► Arrange for defective power plugs and/or cables to be replaced
as soon as possible by a qualifi ed technician or by our Customer
Service Department to avoid the risk of injury.
► Do not allow any liquids to penetrate the housing. Do not expose
the appliance to moisture and do not use it outdoors. Additionally,
do not place fl uid-fi lled receptacles such as fl ower vases on the
appliance. This increases the risk of fi re and of receiving an electric
shock! If liquids permeate into the housing, unplug the appliance
immediately and arrange for it to be repaired by a qualifi ed
technician.
► Never touch the appliance, power cable or power plug with wet
hands. There is a risk of electric shock!
GB
IE
NEVER immerse the appliance in water or other liquids!
Risk of electrocution if residual liquids come into contact with
live components during operation.
SGBR 1500 A1
3

GB
IE
WARNING – RISK OF INJURY!
► This appliance may be used by children of the age of 8 years or
more and by persons with reduced physical, sensory or mental
capabilities or lack of experience and/or knowledge if they are
being supervised or have been instructed with regard to the safe
use of the appliance and have understood the potential risks.
► Children must not use the appliance as a plaything.
► Cleaning and user maintenance must not be performed by children
unless they are older than 8 years of age and are supervised.
► Children younger than 8 years of age must be kept away from
the appliance and the power cable.
► Route the power cable in such a way that no one can tread on it
or trip over it.
► Never touch the glass door or the housing during use, these can
get very hot. Use oven gloves or something similar to open the
glass door to avoid being burnt!
► Never touch the heating elements or the viewing window when
the appliance is in use, or before it has cooled down completely.
Do not reach into the cooking chamber when the appliance is in
use. Wait until the appliance has cooled down. Otherwise, you
could be burnt.
► Allow the appliance to cool down after use before transporting it.
► Always use oven gloves or a pot holder if you need to take hold
of the appliance.
Caution! Hot surface!
4
SGBR 1500 A1

CAUTION – PROPERTY DAMAGE!
► Do not use an external timer switch or a separate remote control
system to operate the appliance.
► Never leave the appliance unattended during operation.
► Ensure that the appliance, the power cable and the plug do not
come into contact with heat sources such as hotplates or naked
fl ames.
► Only operate the appliance with the original accessories supplied.
► Do not kink or crush the mains cable.
► To disconnect, always remove the plug itself from the mains
power socket, do not pull on the power cable.
► When the appliance is in use, ensure that there are no easily
infl ammable materials in the immediate vicinity (e.g. dishcloths,
oven cloths, etc.).
► Never dry textiles or other objects on or above the appliance.
This increases the risk of fi re!
GB
IE
SGBR 1500 A1
5

GB
IE
Setting up
WARNING! RISK OF FIRE!
► Never place the appliance beneath wall cup-
boards or ne
other fl ammable objects.
► Always ensure a minimum distance between
the appliance and hanging cupboards, ceilings,
walls or similar of at least 10 cm above the
appliance and 5 cm at the sides. For this
reason the appliance may not be used, for
example, in cupboards or similar. Otherwise
there is likely to be insuffi cient ventilation for
the appliance, which could cause a fi re or
damage.
► Always place the appliance on a heat-resistant
surface. F
fi re or of it being damaged. The area under
the bottom can discolour and be damaged.
Additionally, if placed on a soft upper surface,
the appliance could cause permanent damage
to it due to pressure indentations.
DANGER – ELECTRIC SHOCK!
► Do not place the appliance immediately ad-
jacent to sour
or in damp cellar areas. Otherwise, there is
a risk of receiving an electric shock.
■ Place the appliance on a solid, level and heat-
resistant sur
or natural stone worktops such as granite).
Ensure there is suffi cient ventilation around the
appliance.
■ Clean all components as described in the
section “Cleaning and care”.
xt to curtains, cupboard walls or
ailure to do so increases the risk of
ces of water, e.g. sinks or basins,
face (e.g. stainless steel worktops
Using the appliance
Glass door
ATTENTION! DAMAGE TO PROPERTY!
► Do not lean on the glass door 6. Do not
place any objects on the glass door 6
This can cause damage to the hinges.
■ If you are cooking especially fatty foodstuff s, this
can result in incr
case, do not close the glass door 6 completely;
instead, leave it slightly open:
The glass door 6 has a latching position so that
it remains open a little: if you carefully push the
glass door 6 closed, it clicks into this position
shortly before closing completely.
eased smoke production. In this
Inserting the crumb tray
■ Push the crumb tray 7 under the lower heating
element 8 so that it rests fl at on the bottom of
the appliance.
.
6
SGBR 1500 A1

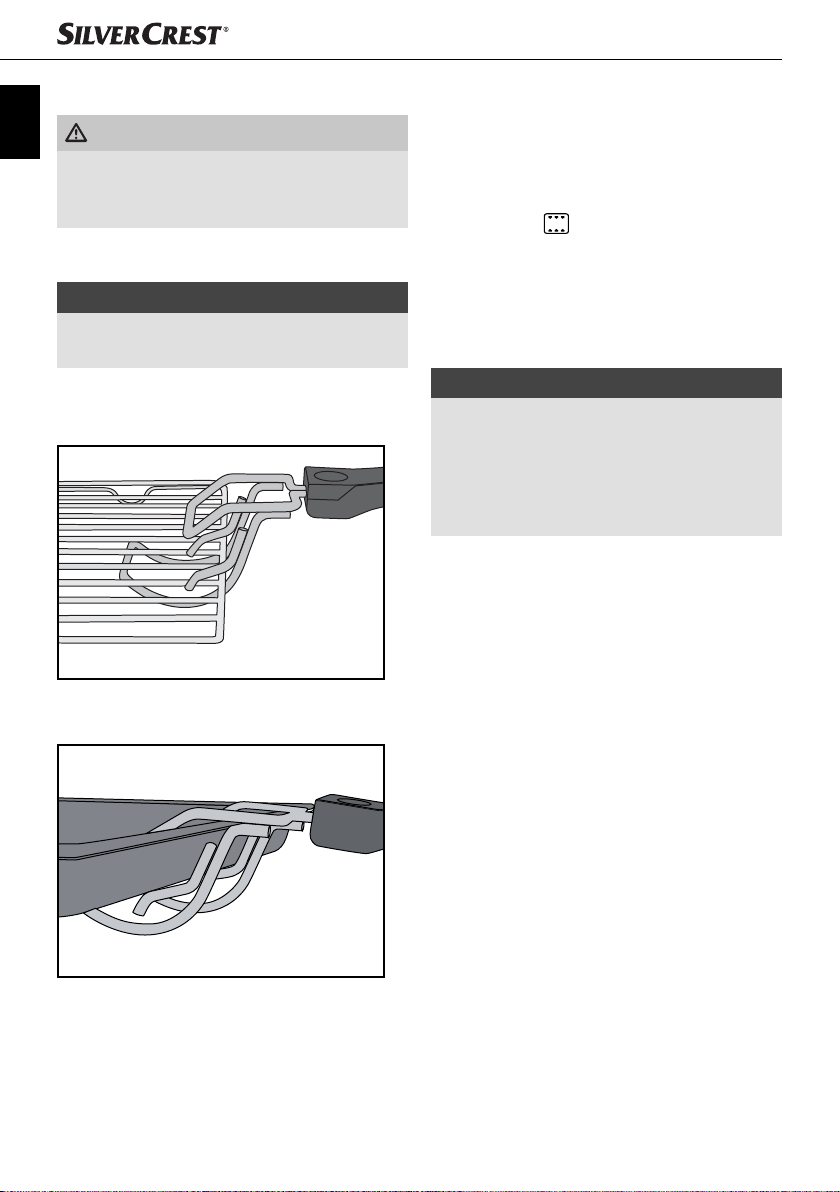
Using the rotisserie
WARNING! RISK OF INJURY!
► Always use the tongs w to insert the hot r
serie z into the appliance or to remove it.
■ You can use the two skewer clamps t to fi
food onto the rotisserie z. Loosen the restrainer r
on the skewer clamps t, push them so that the
food is fi xed fi rmly in between the clamps and
then screw the restrainer r tight again.
■ First push the end of the rotisserie z without
notch into the drive 1 (Figure 1):
otis-
x the
the
NOTE
► Always slide the baking tray q into the low
rail when you use the rotisserie z.
This will collect any drips.
■ To remove the hot rotisserie z, grip with
the hooks at the end of the tongs w
recesses on the rotisserie z (Figure 3):
Fig. 3: Hooking the tongs w onto the rotisserie z
into the
er
GB
IE
Fig. 1: Push the rotisserie z into the drive 1.
■ Then insert the other end of the rotisserie z with
the deep groo
Fig. 2: Insert the rotisserie z in the spit fi tting 9.
ve in the spit fi tting 9 (Figure 2):
SGBR 1500 A1
■ First lift the left-hand side of the rotisserie z out
of the spit fi
from the drive 1.
tting 9 and then pull the rotisserie z
7
Using the baking tray/rack
GB
IE
WARNING! RISK OF INJURY!
► Always use the tongs 0 to insert the hot
ay q/the hot rack e into the appli-
baking tr
ance or to remove it.
■ Push the baking tray q/the rac
the 3 rails in the cooking chamber of the appliance.
ATTENTION! DAMAGE TO PROPERTY!
► Never place the baking tray q/the ra
directly onto the heating elements 8.
■ To remove the hot baking tray q or the ra
hook the tongs 0 onto them as follows:
Fig. 4: Hooking the tongs 0 onto the rack e
k e into one of
ck e
ck e,
Before fi rst use
1) Insert the plug into a mains power socket.
2) Turn the temperature control 2 clockwise to
the maximum temperature (to the stop).
3) Turn the function switch 3 to “upper and
lower heat”
4) Open the glass door 6 leave this open for this
operation.
5) Remove any installed accessories from the
cooking chamber.
6) Turn the timer 4 to 20 minutes.
NOTE
► The fi rst time the appliance heats up, a
small amount of smoke and odour may be
ated due to production-related residue.
gener
This is normal and is completely harmless.
Provide suffi cient ventilation by opening a
window, for example.
The appliance switches off automatically
after 20 minutes.
If you want to interrupt the heating process
prematurely, turn the temperature control 2
counter-clockwise to the stop and set the
timer 4 to “OFF - 0”.
7) Allow the appliance to cool down, then clean
the appliance as described in the chapter
“Cleaning and care”.
The appliance is now ready for use.
.
Fig. 5: Hooking the tongs 0 onto the baking
tray q
8
SGBR 1500 A1

Operating the appliance
Function switch
You can switch on the appliance with the function
switch 3, and also set 5 diff erent functions:
Symbol Meaning
"Upper heat"
e.g. to gratinate
"Lower heat"
e.g. for baking
"Upper & lower heat"
e.g. for baking a pizza
"Upper & lower heat/hot air/
rotisserie"
e.g. to roast poultry
"Upper & lower heat/hot air"
e.g. to reheat rolls
OFF
Temperature control
Use the temperature control 2 to set the desired
temperature.
■ If you set the temperature for the functions
“Upper heat”
& lower heat”
”.
■ If you set the temperature for the functions
“Upper & lower heat/hot air/rotisserie”
or “Upper & lower heat/hot air” use the
scale marked with “ ”.
"OFF" the appliance is
switched off .
, “Lower heat” or “Upper
use the scale marked with “
Timer
User the timer 4 to set the cooking time.
■ Set the timer 4 to the desired cooking time.
Af
ter expiry of the set time a signal tone sounds
and the appliance stops heating.
If the function “Upper & lower heat/hot air/
rotisserie” is selected, the rotisserie z
will also stop turning.
Grilling and baking
1) Put the crumb tray 7 into the appliance.
2) Remove the rack e and baking tray q from
the appliance. If required, cover these with
baking paper or lightly grease the baking tray q
with suitable baking fat.
NOTE
► Depending on the meal, the oven must be
preheated. R
respective recipe. Preheating is useful for:
– very short baking times,
– crisp crusts,
– sensitive meals that require a constant
temperatur
► If no preheating is required, skip step 3).
w the appliance to heat up for approx.
3) Allo
10 minutes (depending on the temperature
setting) to the required temperature:
– Select the required temperature using the
temperatur
the correct scale (see chapter “Temperature
control”).
– Select the required function with the function
switch 3.
efer to the guidelines in the
e, such as souffl és.
e control 2. Ensure that you use
GB
IE
SGBR 1500 A1
9

NOTE
GB
IE
► As a general rule, if you are baking or grilling
with hot air you can dispense with a pr
of the grilling/cooking space.
– Use the timer 4 to set the preheat time
(appr
ox. 10 minutes).
– Close the glass door 6.
4) Once the warm-up period is fi nished, place
the foodstuff s on the rack e or the baking
tray q and slide it in on one of the rails.
Ensure that there is suffi cient space between
the foodstuff s and the inner walls/heating
elements of the appliance.
NOTE
► If you wish to prepare food on the rack e
that drips ex
tray q onto the bottom rail. By doing this,
dripping fat for example will be caught and
the appliance is then easier to clean.
5) Close the glass door 6 before starting the
grilling or baking process.
6) Use the timer 4 to set the required grilling or
baking time. The maximum grilling or baking
time is 120 minutes.
NOTE
► If the cooking time for the food is less than
20 minutes, fi
and then turn it back to the required grilling
or baking time.
cessively, then slide the baking
rst set the timer 4 to 40 minutes
eheating
The appliance switches off automatically after the
set period, there is a beep and the control lamp 5
switches off .
NOTE
If you want to interrupt the heating process
prematur
counter-clockwise to the stop and set the timer 4
to "OFF - 0".
7) After cooking, remove the rack e or the baking
8) Set the function switch 3 to “OFF”.
ely, turn the temperature control 2
tray q using the tongs 0.
Grilling with the rotisserie
1) Put the crumb tray 7 into the appliance.
2) If inserted, remove the rotisserie z from the
appliance.
3) Push the baking tray q onto the lower rail.
4) Fix the food to be grilled with the skewer
clamps t. Ensure that the food in the cooking
chamber can turn freely without touching the
sides. The rotisserie z may change its direction
of rotation if the food strikes against a resistance.
The two depressions on the rotisserie z must
remain freely accessible, otherwise you will
not be able to grasp the rotisserie z with the
tongs w.
5) Fit the rotisserie z in the cooking chamber
(see chapter “Using the rotisserie”)
6) Close the glass door 6.
The control lamp 5 indicates that the appliance is
now switched on. The switch of the timer 4 now
rotates itself anti-clockwise to “OFF - 0”.
10
SGBR 1500 A1

NOTE
If you want to interrupt the heating process pre-
, turn the temperature control 2 counter-
maturely
clockwise to the stop and set the timer 4 to
"OFF - 0".
7) Adjust the temperature control 2 to the desired
temperature.
8) Set the function switch 3 to “Upper & lower
heat/hot air/rotisserie”
to the desired grill time.
The appliance starts the grilling process and
the rotisserie z starts turning.
The control lamp 5 indicates that the appliance is
now switched on. The switch of the timer 4 now
rotates itself anti-clockwise to “OFF - 0”.
The appliance switches off automatically after the
set period, there is a beep and the control lamp 5
switches off .
NOTE
If you want to interrupt the heating process pre-
, turn the temperature control 2 counter-
maturely
clockwise to the stop and set the timer 4 to
"OFF - 0".
9) After the grilling process is completed remove
the rotisserie z with the help of the tongs w.
10) Set the function switch 3 to “OFF”.
. Set the timer 4
EXAMPLE: GRILLED CHICKEN
Ingredients
♦ Grilling chicken (approx. 1.3 kg,
guts remo
♦ Spices (salt, paprika)
♦ Cooking oil
1)
2) Push the chicken onto the spit and fi x it in
3) Push the baking tray q onto the lower rail.
4) Preheat the appliance for about 10 minutes
5) Put the chicken on the rotisserie into the
6) Set the function switch to "Upper & lower
7) Set the timer 4 approx. 90 minutes. The
8) Brush the chicken every now and again with
9) Once the set time is up, carefully remove the
ved)
Season the chick
with salt and paprika powder. Brush it from
the outside with heat resistant cooking oil.
place with the skewer clamps t. Ensure that
the notches on the rotisserie z remain free
so that you can remove the rotisserie z with
the help of the tongs w. Depending on the
shape of the chicken, it may be necessary
to fasten the wings and legs with a fi reproof
string to stop them impacting the sides when
turning.
using the function "Upper & lower heat/hot
to 210°C.
air"
appliance using the tongs w.
heat/hot air/rotisserie"
door.
cooking time can vary depending on the
size and nature of the chicken.
some cooking oil. This will make it crispy.
rotisserie with the chicken using the tongs w.
Loosen the skewer clamps t and pull the
chicken off the rotisserie z.
en on the inside and outside
and close the
GB
IE
SGBR 1500 A1
11

Cleaning and care
GB
IE
DANGER – ELECTRIC SHOCK!
► Before cleaning the appliance, disconnect the
plug from the mains po
Risk of electric shock!
NEVER immerse the appliance in water or
any other liquid!
WARNING! RISK OF INJURY!
► Always allow the appliance to cool down
before cleaning it. Other
of burns!
■ It is best to clean the appliance and accessories
as soon as they hav
food residues easier to remove.
ATTENTION! DAMAGE TO PROPERTY!
► Do not use abrasive or aggressive cleaning
materials. These could damage the sur
the appliance!
► Do not clean the components of the appliance
in a dishwasher!
► Do not clean the cooking chamber with an
en spray as this may make residues on the
ov
heating elements impossible to remove.
wer socket!
e cooled down. This makes
wise there is a risk
face of
■ Wipe the appliance with a damp cloth. If neces-
sary
, put a little mild detergent on the cloth and
wipe this off afterwards with a cloth dampened
with clean water. Dry everything properly.
■ Clean the cooking chamber and the glass door 6
with a moist cloth. If necessary, put a little mild
detergent on the cloth and wipe this off afterwards with a cloth dampened with clean water.
Dry everything properly.
■ Clean the tongs 0/w, the ro
skewer clamps t, the restrainer r, the baking
tray q, the rack e and the crumb tray 7 in
warm soapy water. Dry all parts properly after
cleaning.
tisserie z, the
Storage
■ Store the cleaned appliance and its accessories
in a clean, dust-free and dry location.
12
SGBR 1500 A1

Troubleshooting
Fault Cause Solution
GB
IE
The mains plug is not connected to the
mains power.
The appliance is not
working.
The control lamp 5
comes on and but the
appliance does not
heat up.
The cooking time of
the food seems very
long
Smoke and smells
develop during use.
If the malfunction cannot be corrected with the above suggestions, or if you have found some other
kind of malfunction, please contact our Customer Service.
The mains power socket is defective.
The appliance is defective. Contact Customer Services.
The function switch 3 is set to OFF.
The glass door 6 has been opened often
to check the cooking progress.
The wrong temperature level has been set. Check the temperature settings.
There is detergent or food residue on the
heating elements.
Insert the plug into a mains power
socket.
Use a diff erent mains power
socket.
Turn the function switch 3 to the
desired function.
Do not open the glass door 6
any more often than is absolutely
necessary.
Remove the food from the appliance and continue cooking
process with the glass door 6
open until the smoke stops.
SGBR 1500 A1
13

Warranty and service
GB
The warranty provided for this appliance is
IE
3 years from the date of purchase. This appliance
has been manufactured with care and inspected
meticulously prior to delivery. Please retain your
receipt as proof of purchase. In the event of a
warranty claim, please contact your Customer
Service unit by telephone. This is the only way to
guarantee free return of your goods.
The warranty only covers claims for material and
manufacturing defects, not for transport damage,
wearing parts or for damage to fragile components
such as switches or batteries. This appliance is
intended solely for private use and not for commercial purposes.
The warranty shall be deemed void in the case
of misuse or improper handling, use of force and
interventions which have not been carried out by
one of our authorised Service centres.
Your statutory rights are not restricted by this warranty.
The warranty period is not prolonged by repairs
eff ected under the warranty. This also applies to
replaced and repaired components. Any damage
and defects present at the time of purchase must
be reported immediately after unpacking, but no
later than two days after the date of purchase.
Repairs made after expiry of the warranty period
are chargeable.
Disposal
Under no circumstance should
the appliance be disposed of
as standard domestic waste.
This product is subject to the
provisions of European Directive 2012/19/EU.
Dispose of the appliance via an approved waste
disposal company or your municipal waste disposal facility. Please observe applicable regulations.
Please contact your waste disposal facility
if you are in any doubt.
The packaging is made of environmen-
tally friendly materials which you can
dispose of at your local recycling centre.
Importer
KOMPERNASS HANDELS GMBH
BURGSTRASSE 21
44867 BOCHUM
GERMANY
www.kompernass.com
Service Great Britain
Tel.: 0871 5000 720 (£ 0.10/Min.)
E-Mail: kompernass@lidl.co.uk
IAN 102464
Service Ireland
Tel.: 1890 930 034
(0,08 EUR/Min., (peak))
(0,06 EUR/Min., (off peak))
E-Mail: kompernass@lidl.ie
IAN 102464
Hotline availability:
Monday to Friday 08:00 - 20:00 (CET)
14
SGBR 1500 A1

Sisällysluettelo
Johdanto . . . . . . . . . . . . . . . . . . . . . . . . . . . . . . . . . . . . . . . . . . . . . . . . . . . . . . . . . . . . .16
Määräystenmukainen käyttö . . . . . . . . . . . . . . . . . . . . . . . . . . . . . . . . . . . . . . . . . . . .16
Toimitussisältö . . . . . . . . . . . . . . . . . . . . . . . . . . . . . . . . . . . . . . . . . . . . . . . . . . . . . . . . .16
Laitteen kuvaus . . . . . . . . . . . . . . . . . . . . . . . . . . . . . . . . . . . . . . . . . . . . . . . . . . . . . . .16
Tekniset tiedot . . . . . . . . . . . . . . . . . . . . . . . . . . . . . . . . . . . . . . . . . . . . . . . . . . . . . . . . .16
Turvallisuusohjeet . . . . . . . . . . . . . . . . . . . . . . . . . . . . . . . . . . . . . . . . . . . . . . . . . . . . . .17
Sijoittaminen . . . . . . . . . . . . . . . . . . . . . . . . . . . . . . . . . . . . . . . . . . . . . . . . . . . . . . . . . .20
Laitteen käyttö . . . . . . . . . . . . . . . . . . . . . . . . . . . . . . . . . . . . . . . . . . . . . . . . . . . . . . . .20
Lasiluukku . . . . . . . . . . . . . . . . . . . . . . . . . . . . . . . . . . . . . . . . . . . . . . . . . . . . . . . . . . . . . . . . . . . . . . . . . 20
Murualustan asettaminen paikoilleen . . . . . . . . . . . . . . . . . . . . . . . . . . . . . . . . . . . . . . . . . . . . . . . . . . . 20
Paistovartaan käyttäminen . . . . . . . . . . . . . . . . . . . . . . . . . . . . . . . . . . . . . . . . . . . . . . . . . . . . . . . . . . . . 21
Paistopellin/uuniritilän käyttäminen . . . . . . . . . . . . . . . . . . . . . . . . . . . . . . . . . . . . . . . . . . . . . . . . . . . . . 22
Ennen ensimmäistä käyttöä . . . . . . . . . . . . . . . . . . . . . . . . . . . . . . . . . . . . . . . . . . . . .22
Laitteen käyttäminen . . . . . . . . . . . . . . . . . . . . . . . . . . . . . . . . . . . . . . . . . . . . . . . . . . .23
Toimintokytkin . . . . . . . . . . . . . . . . . . . . . . . . . . . . . . . . . . . . . . . . . . . . . . . . . . . . . . . . . . . . . . . . . . . . . 23
Lämpötilansäädin. . . . . . . . . . . . . . . . . . . . . . . . . . . . . . . . . . . . . . . . . . . . . . . . . . . . . . . . . . . . . . . . . . . 23
Ajastin . . . . . . . . . . . . . . . . . . . . . . . . . . . . . . . . . . . . . . . . . . . . . . . . . . . . . . . . . . . . . . . . . . . . . . . . . . . 23
Grillaaminen ja leipominen . . . . . . . . . . . . . . . . . . . . . . . . . . . . . . . . . . . . . . . . . . . . . .23
Grillaaminen paistovartaalla . . . . . . . . . . . . . . . . . . . . . . . . . . . . . . . . . . . . . . . . . . . .24
FI
Puhdistus ja hoito . . . . . . . . . . . . . . . . . . . . . . . . . . . . . . . . . . . . . . . . . . . . . . . . . . . . . .26
Säilytys . . . . . . . . . . . . . . . . . . . . . . . . . . . . . . . . . . . . . . . . . . . . . . . . . . . . . . . . . . . . . .26
Vian korjaus . . . . . . . . . . . . . . . . . . . . . . . . . . . . . . . . . . . . . . . . . . . . . . . . . . . . . . . . . .27
Takuu ja huolto . . . . . . . . . . . . . . . . . . . . . . . . . . . . . . . . . . . . . . . . . . . . . . . . . . . . . . . .28
Hävittäminen . . . . . . . . . . . . . . . . . . . . . . . . . . . . . . . . . . . . . . . . . . . . . . . . . . . . . . . . .28
Maahantuoja . . . . . . . . . . . . . . . . . . . . . . . . . . . . . . . . . . . . . . . . . . . . . . . . . . . . . . . . .28
SGBR 1500 A1
15

Johdanto
Onnittelut uuden laitteen hankinnasta.
Olet valinnut laadukkaan tuotteen. Käyttöohje on
osa tätä tuotetta. Se sisältää tärkeitä turvallisuutta,
käyttöä ja hävittämistä koskevia ohjeita. Tutustu
FI
ennen tuotteen käyttöä kaikkiin käyttö- ja turvallisuusohjeisiin. Käytä tuotetta vain kuvatulla tavalla
ja vain mainittuihin käyttötarkoituksiin. Kun luovutat
tuotteen eteenpäin, liitä mukaan kaikki tuotetta
koskevat asiakirjat.
Määräystenmukainen käyttö
Miniuuni ja grilli on tarkoitettu yksinomaan ruokien
kuumentamiseen, kypsentämiseen ja grillaamiseen.
Tämä laite on tarkoitettu ainoastaan yksityiskäyttöön.
Älä käytä sitä ammattitarkoituksessa.
Muunlainen käyttö on määräystenvastaista ja voi
aiheuttaa esine- tai jopa henkilövahinkoja.
Toimitussisältö
♦ Miniuuni ja grilli
♦ 1 paistopelti
♦ 1 uuniritilä
♦ 2 pihdit
♦ Paistovarras 2 pidikkeellä
♦ 1 murualusta
♦ Käyttöohje
Laitteen kuvaus
Kuva A:
1 Varrasmoottori
2 Lämpötilansäädin
3 Toimintokytkin
4 Ajastin
5 Merkkivalo
6 Lasiluukku
7 Paikalleen asetettu murualusta
8 Alemmat lämpövastukset
9 Paistovartaan kiinnitysteline
Kuva B:
0 Pihdit (paistopeltiä ja uuniritilää varten)
q Paistopelti
w Pihdit (paistovarrasta varten)
e Uuniritilä
r Lukitsin
t Paistovartaan pidikkeet
z Paistovarras
Tekniset tiedot
Nimellisjännite: 220 - 240 V ~,
50/60 Hz
Suurin tehontarve: 1500 W
OHJE
Tarkista toimituksen täydellisyys ja mahdolliset
vauriot heti, k
sesta. Käänny tarvittaessa huollon puoleen.
un olet poistanut laitteen pakkauk-
16
SGBR 1500 A1

Turvallisuusohjeet
VAARA – SÄHKÖISKU!
► Laitteen kotelon avaaminen tai korjaaminen on kielletty. Tämä
vaarantaa turvallisuuden ja aiheuttaa takuun raukeamisen.
Toimita vioittunut laite laitteen myyjän tai valtuutetun korjaamon
huollettavaksi.
► Anna vaarojen välttämiseksi vialliset verkkopistokkeet ja virtajohdot
heti valtuutetun ammattihenkilöstön tai huoltopalvelun
vaihdettavaksi.
► Varmista, ettei laitteen sisään pääse nesteitä. Älä altista laitetta
kosteudelle, äläkä käytä sitä ulkona. Laitteen päälle ei myöskään
saa asettaa mitään nestettä sisältäviä esineitä, kuten esim. maljakoita. On olemassa palovaara ja sähköiskun vaara! Mikäli laitteen
sisään pääsee kuitenkin jostain syystä nestettä, laitteen verkkopistoke on irrotettava pistorasiasta ja laite on vietävä korjattavaksi.
► Älä milloinkaan koske laitteeseen, virtajohtoon tai verkkopistok-
keeseen märin käsin. Muuten on olemassa sähköiskun vaara.
Älä koskaan upota laitetta veteen tai muihin nesteisiin! Nesteen
joutuminen laitteen jännitettä johtaviin osiin käytön aikana voi
aiheuttaa sähköiskun ja siten hengenvaaran.
FI
SGBR 1500 A1
17

VAROITUS – LOUKKAANTUMISVAARA!
► Tätä laitetta voivat käyttää 8 vuotta täyttäneet ja sitä vanhemmat
lapset sekä henkilöt, joiden fyysiset, aistimukselliset tai henkiset
FI
kyvyt ovat rajalliset, tai joilla ei ole riittävää kokemusta tai tietoa
laitteen käytöstä, kun heitä valvotaan tai heitä on opastettu
laitteen turvalliseen käyttöön, ja he ovat ymmärtäneet laitteen
käyttöön liittyvät vaarat.
► Lapset eivät saa leikkiä laitteella.
► Lapset eivät saa suorittaa puhdistusta eivätkä käyttäjähuoltoa,
paitsi jos he ovat täyttäneet 8 vuotta ja heitä valvotaan.
► Pidä alle 8-vuotiaat lapset poissa laitteen ja liitäntäjohdon luota.
► Vedä virtajohto siten, ettei kukaan pääse astumaan sen päälle
tai kompastumaan siihen.
► Älä milloinkaan koske lasiluukkua tai uunin ulkopintaa uunin ollessa
päällä. Käytä lasiluukun avaamiseen pannulappua tai vastaavaa
palovammoilta välttyäksesi!
► Älä milloinkaan koske lämpövastuksiin, tai lasiluukkuun uunin
ollessa päällä tai vielä kuuma. Älä koske uunin sisätilaan uunin
ollessa päällä. Odota, kunnes laite on jäähtynyt. Voit saada
muuten palovammoja.
► Anna laitteen jäähtyä käytön jälkeen, ennen kuin kuljetat sitä.
► Käytä aina patakintaita tai -lappuja käsitellessäsi kuumaa laitetta!
Varo! Kuuma pinta!
18
SGBR 1500 A1

HUOMIO – AINEELLISET VAHINGOT!
► Älä käytä laitteen kanssa ulkoista ajastinta tai erillistä kauko-ohja-
usjärjestelmää.
► Älä jätä laitetta käytön aikana ilman valvontaa.
► Varmista, etteivät laite, virtajohto ja verkkopistoke joudu kosketuk-
siin lämpölähteiden, kuten keittolevyjen tai avotulen kanssa.
► Käytä laitetta vain mukana tulevien alkuperäistarvikkeiden kanssa.
► Varmista, ettei virtajohto taitu tai joudu puristuksiin.
► Irrota virtajohto pistorasiasta aina vetämällä pistokkeesta, älä
vedä johdosta.
► Käytön aikana miniuunin/grillin välittömässä läheisyydessä ei
saa olla helposti syttyviä materiaaleja (esim. astiapyyhkeitä,
patalappuja jne.).
► Älä koskaan kuivaa tekstiilejä tai esineitä laitteen päällä, sen
yläpuolella tai itse laitteessa. On olemassa tulipalovaara.
FI
SGBR 1500 A1
19

Sijoittaminen
Laitteen käyttö
VAROITUS! TULIPALON VAARA!
► Älä koskaan aseta laitetta yläkaappien ala-
FI
puolelle tai verhojen, k
syttyvien esineiden viereen.
► Laitteen etäisyyden yläkaappeihin, kattoon,
seiniin tai muihin rak
ylöspäin vähintään 10 cm ja kullakin sivulla
vähintään 5 cm. Laitetta ei siis saa sijoittaa
esim. kaappiin tai vastaavaan paikkaan.
Muutoin laitteen riittävä tuuletus estyy, mikä
voi aiheuttaa tulipalon, tai laite voi vaurioitua.
► Aseta laite vain kuumuutta kestävälle alustal-
le. Muutoin on olemassa palov
voi vaurioitua. Laitteen alle jäävä alue voi
värjäytyä ja vaurioitua. Lisäksi pehmeään
alustaan voi jäädä pysyviä painaumajälkiä.
VAARA - SÄHKÖISKU!
► Älä sijoita laitetta veden välittömään läheisyy-
teen, esim. pesualtaiden, pesuammeiden tai
kosteiden k
on olemassa sähköiskun vaara.
■ Aseta laite tukevalle, tasaiselle ja kuumuutta
kestäv
teräksestä tai luonnonkivestä, kuten graniitista,
valmistetulle työtasolle). Huolehdi aina riittävästä
tuuletuksesta laitteen ympärillä.
■ Puhdista kaikki osat kohdassa "Puhdistus ja
hoito" kuvatulla tavalla.
ellaritilojen läheisyyteen. Muutoin
älle alustalle (esim. ruostumattomasta
aapistojen tai muiden
enteisiin on oltava
aara ja laite
Lasiluukku
HUOMIO! AINEELLISET VAHINGOT!
► Älä nojaa lasioveen 6. Älä ripusta mitään
un 6 päälle. Se voi vaurioittaa
lasiluuk
saranoita.
■ Jos valmistat erittäin rasvaisia ruokia, savua
voi muodostua tav
tapauksessa sulje lasiluukkua 6 täysin, vaan
jätä se raolleen:
Lasiovessa 6 on nk. lepoasento, jossa luukku
jää hieman raolleen: Kun suljet lasiluukun 6
varovasti, se lukittuu tähän asemaan ja jää
hieman raolleen.
allista enemmän. Älä tässä
Murualustan asettaminen paikoilleen
■ Työnnä murualusta 7 alempien lämpövastus-
ten 8 alle niin, että se on suorassa laitteen
pohjalla.
20
SGBR 1500 A1
 Loading...