

Page 1
H O M E T E C H
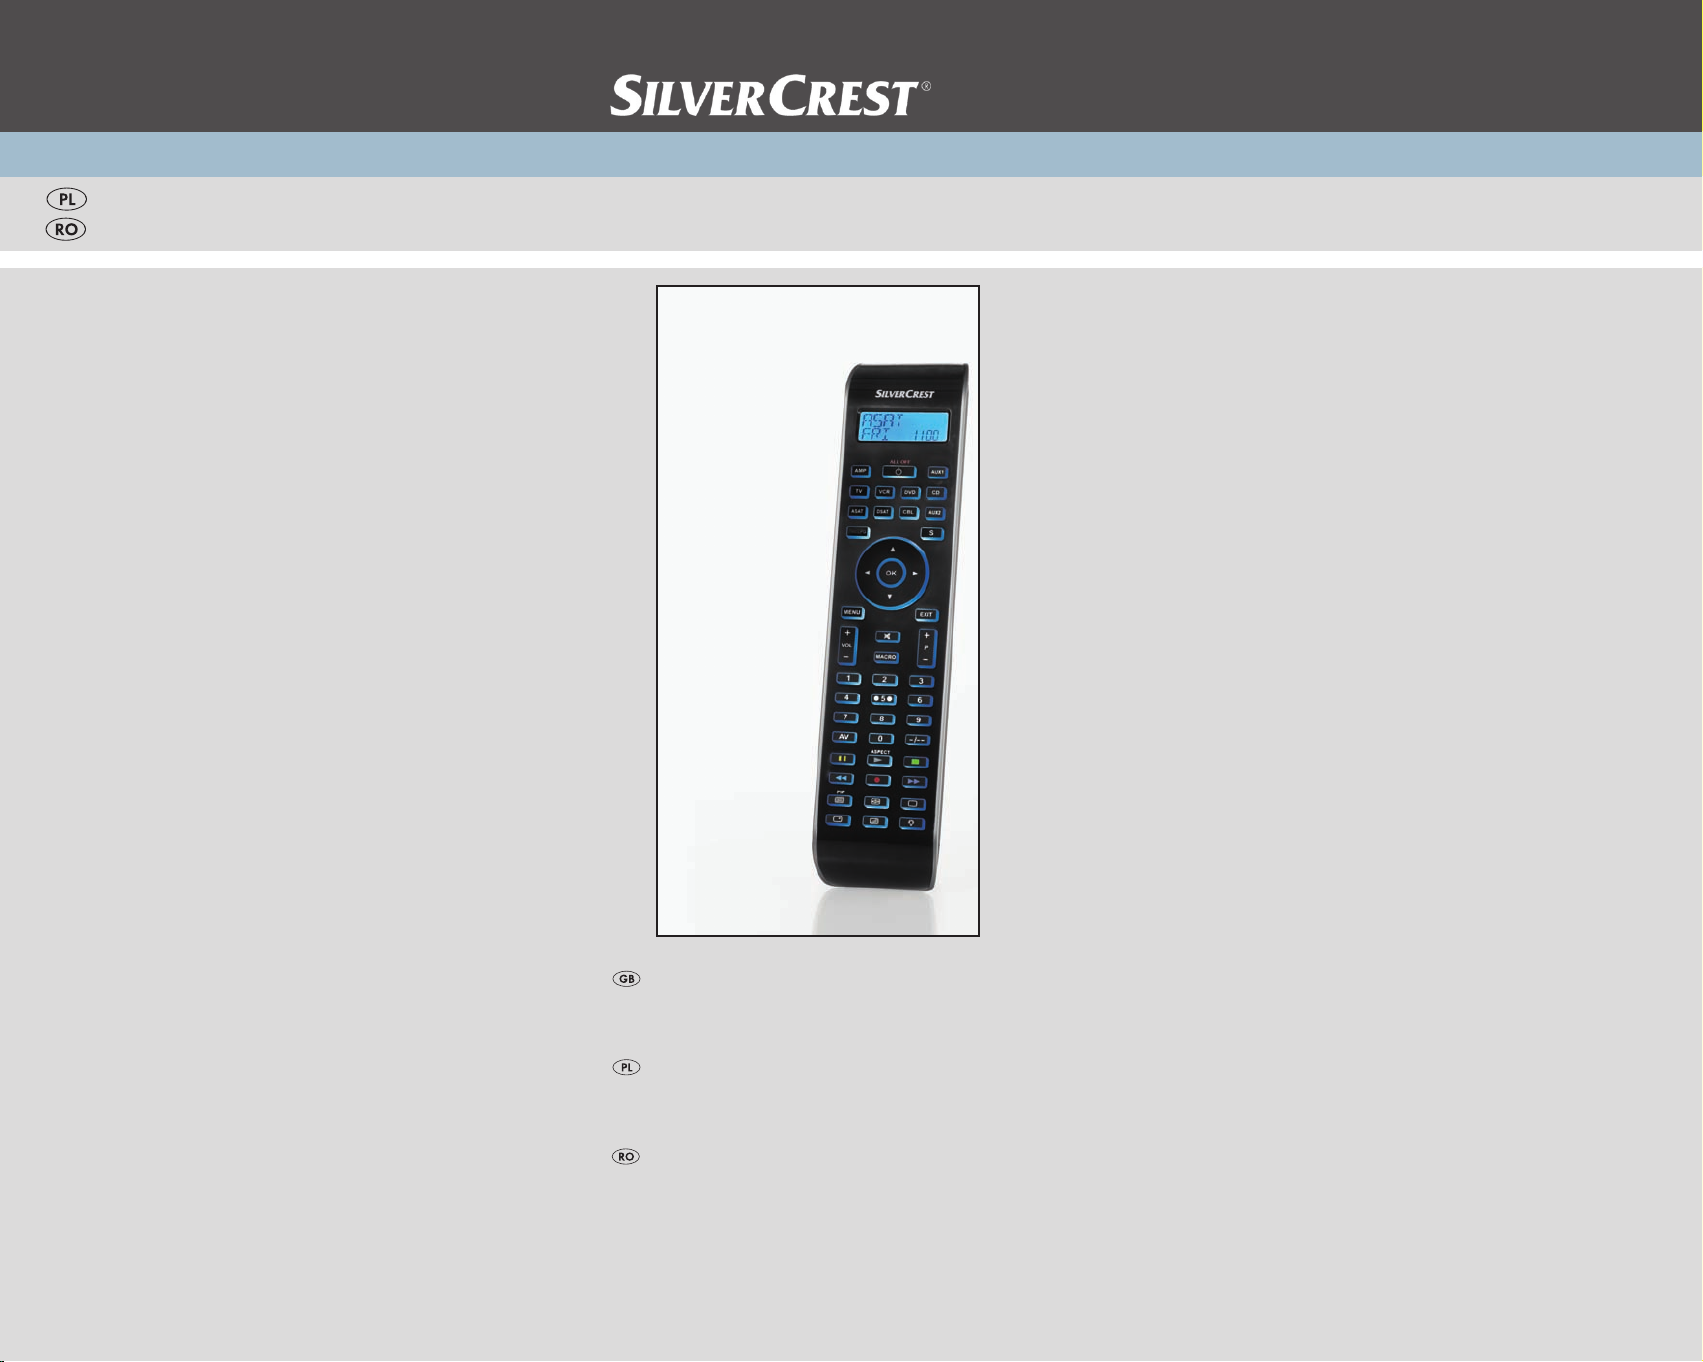
10-in-1 Remote Control
KOMPERNASS GMBH
BURGSTRASSE 21 ⋅ D-44867 BOCHUM
www.kompernass.com
ID-Nr.: SFB 10.1 A1-12/10-V1
SFB 10.1 A1
10-in-1 Remote Control
Operating manual
Pilot uniwersalny
Instrukcja obsługi
Telecomandă universală
Instructiuni de utilizare
Page 2
SFB 10.1 A1
Page 3

INDEX PAGE
Important safety instructions 2
Device summary 3
Initial use 4
Unpacking the device/checking the package contents 4
Inserting the batteries 4
Operating components 5
LCD display 5
Buttons 6
SETUP - System settings 9
Code Setup (Programming the remote control) 11
Programming by brand code search 11
Programming by manual code input 12
Programming by automatic code search 12
System-Setup 14
Setting the time 14
Setting the date 14
Adjust contrast 15
Background Illumination 15
Setting the global volume/mute switching 15
Setting the lock function 16
System reset 17
Timer Setup 17
Sleep timer 17
Event timer 17
Learn Setup 18
Code learn function 19
Macro Setup 20
Favourites channel 21
Volume control 23
Vol +/—, (Mute switching) 23
For operation 23
All OFF 23
Cleaning and storage 24
Faults / Remedies 24
Disposal 25
Technical data 25
Note regarding conformity 26
Importer 26
Warranty & Service 26
- 1 -
Page 4
UNIVERSAL REMOTE CONTROL SFB 10.1 A1
This documentation is copyright protected. All rights including those of photographic reproduction, duplication and
distribution by means of particular methods (for example
data processing, data carriers and data networks), wholly
or partially as well as substantive and technical changes are
reserved.
Read the operating instructions carefully before using the device for the rst time and preserve this booklet for later reference. Pass this manual on to whoever might acquire
the device at a future date.
Important safety instructions
Proper use
Children may only operate the remote control under adult
supervision.
The universal remote control can replace a maximum of ten
remote controls. It can only be used for entertainment electronics with infrared receivers. The functions of the Universal
remote control essentially correspond to those of the original
remote control. The universal remote control is intended for
private use. It is not suitable for commercial use.
Any other use is considered improper use. The manufacturer
accepts no responsibility for damage caused by improper
handling or unauthorized reconstruction.
Warning
A warning of this danger level signies a possible dangerous
situation. If the dangerous situation is not avoided it can lead
to injuries. The directives in this warning are there to avoid
personal injuries.
Important
A warning of this danger level signies possible property
damage. If the situation is not avoided it can lead to property
damage. The directives in this warning are there to avoid
property damage.
Note
A note signies additional information that assists in the
handling of the device.
Warning of injury danger as a result of
improper handling of batteries!
Batteries must be handled with special care. Take note of the
following safety instructions:
• Keep batteries well away from children. Children can
put batteries into their mouths and swallow them. If a battery is swallowed medical assistance must be sought IMMEDIATELY.
• Do not throw batteries into a re. Never subject batteries
to high temperatures.
- 2 -
Page 5

• Explosion hazard! Non-rechargeable batteries must never
be recharged.
• Do not open the batteries or short-circuit them.
•
Batteryacidleakingfromabatterycancauseinamma-
tion of the skin. In event of contact with the skin, rinse with
large amounts of water. If the liquid comes into contact
with your eyes, rinse thoroughly with water, do not rub
and immediately consult a doctor.
Attention!
The Universal remote control contains an infrared diode
of laser class 1. In order to avoid eye injuries do not look at
the diode with optical devices.
Damage to the device
• If the device is defective, do not attempt to repair it your-
self. In case of damage, contact the manufacturer or the
manufacturer's service hotline (see Warranty information).
• If liquid escapes from the device or if the device has been
otherwise damaged, it must be inspected by the manufacturer or the manufacturer's service hotline. Contact the
manufacturer or the manufacturer's service hotline (see
Warranty information).
• Take the batteries out of the battery compartment as soon
as they are depleted.
• If you will not be using the device for a long period of time,
remove the batteries to prevent them from discharging.
• Always change all batteries at the same time and always
use batteries of the same type.
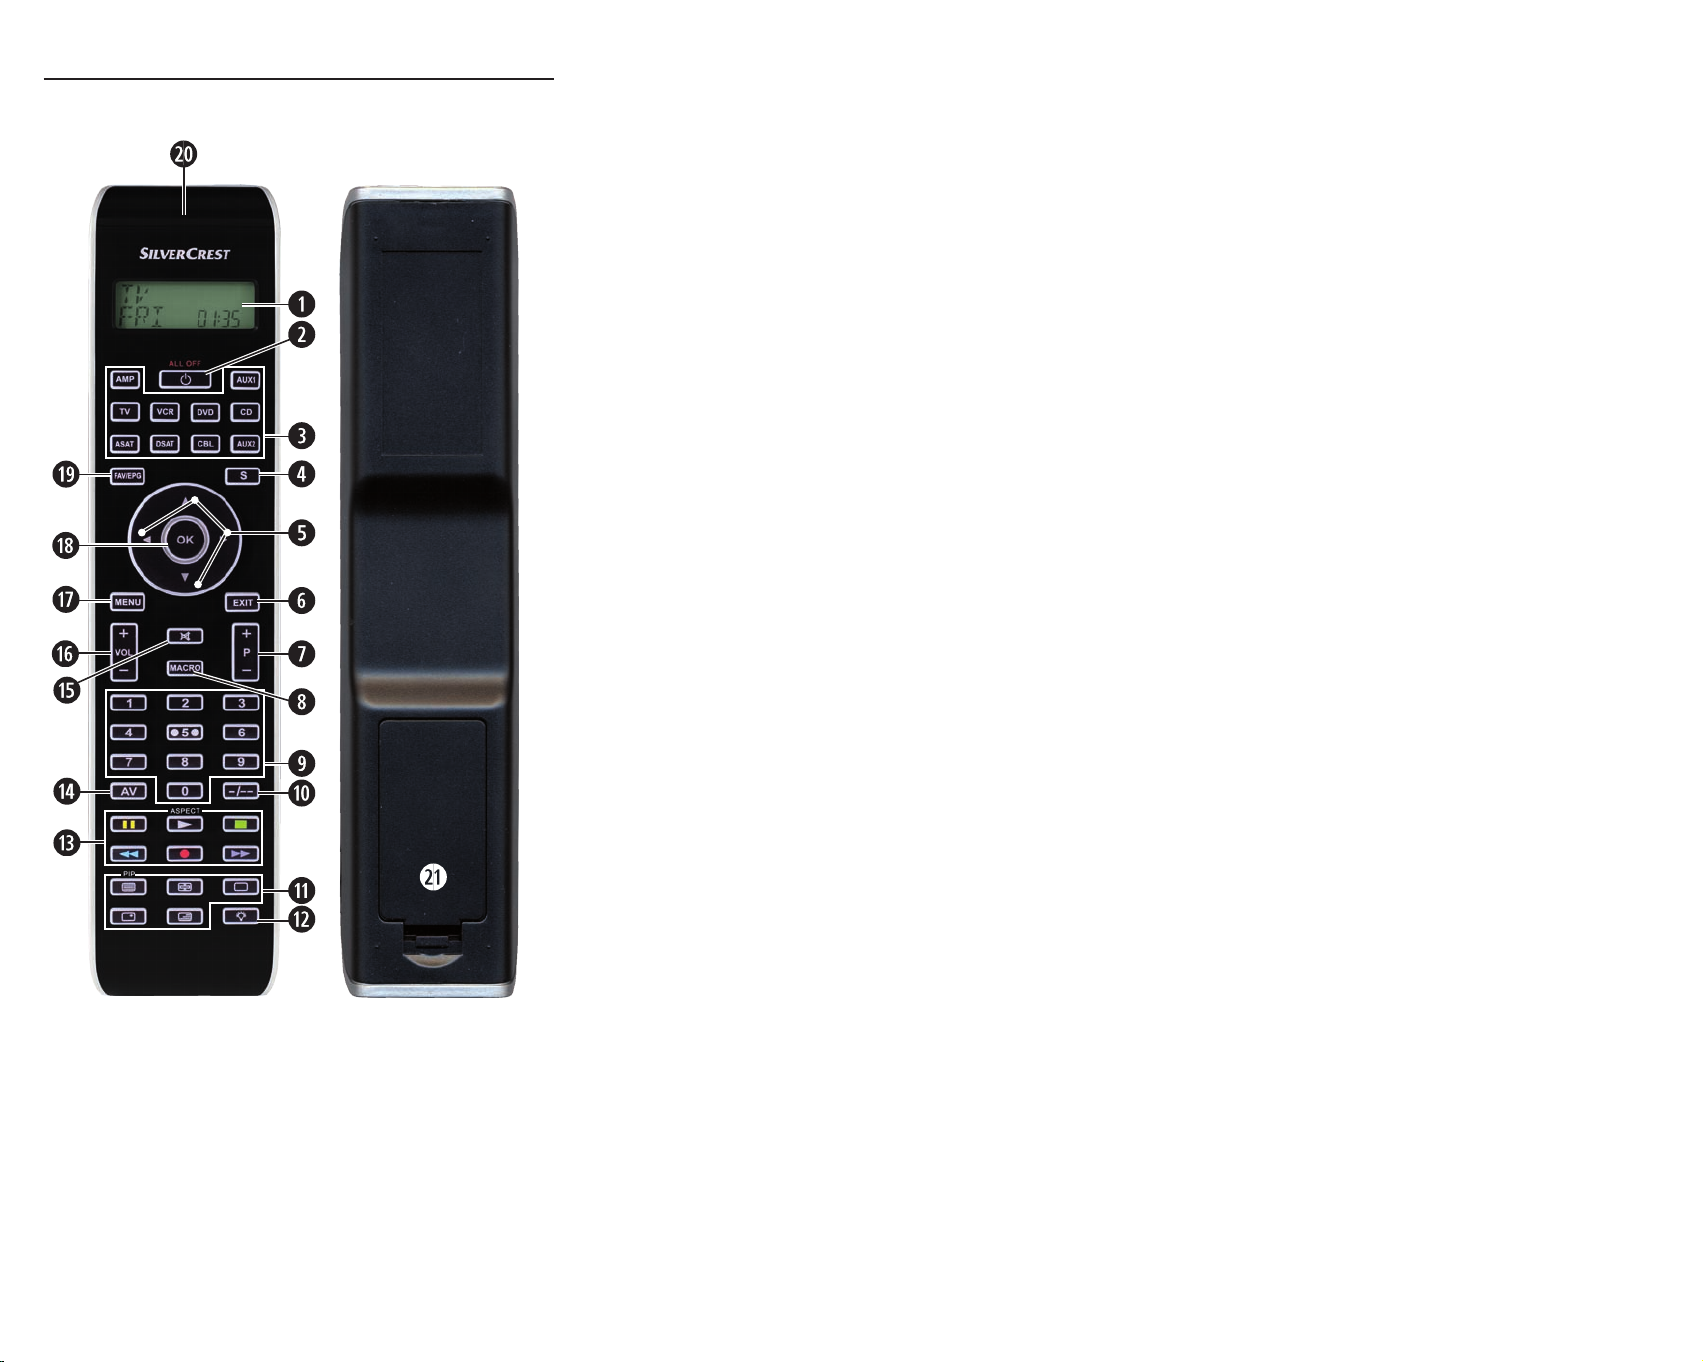
Device summary
q LCD display
w /ALL OFF button
e Device buttons
r S button
t Arrow buttons
y EXIT button
u P +/— buttons
i MACRO button
o Number buttons
a Button for one or two digit programme numbers
s Teletext function buttons
d Illumination button
f Record/Playback buttons
g AV button
h Mute switching
VOL +/— buttons
j
k MENU button
l OK button
1( FAV / EPG button
2) Infrared sender/receiver
2! Battery compartment cover
- 3 -
Page 6
Tips:
• The functions described here pertain to the theoretically
ideal circumstance that the button structure of the respective original remote control is identical to this universal
remote control. This only occurs, however, in rare cases. If,
therefore, not all of the original remote control's functions
can be reproduced it is not due to a diciency in the Universal remote control.
• All the brand names used in these instructions or in the
accompanying code list are trademarks of the corresponding companies.
Initial use
Unpacking the device/checking the package
contents
Warning!
Keep the plastic packaging well away from small children.
There is a risk of suocation!
• Unpack the device and accessories.
• Check the package contents
- Universal remote control (URC),
- Operating instructions,
- Manufacturers directory with device code list:
- 2 x 1,5 V Batteries, type AAA/LR03 (Micro)
Note: Transport damage
If you notice any transport damage contact the manufacturer or
the manufacturer's Service-Hotline (see warranty information).
Inserting the batteries
Attention!
The Universal remote control must only be operated with
1.5 Volt batteries (Type AAA, LR03).
Carry out the battery change as quickly as possible. Preset
settings will remain saved for approx. 1 minute. If new batteries have not been installed within this time all of the settings
will have to be carried out again. The time of day and date
will, however, be lost in either case.
- 4 -
Page 7
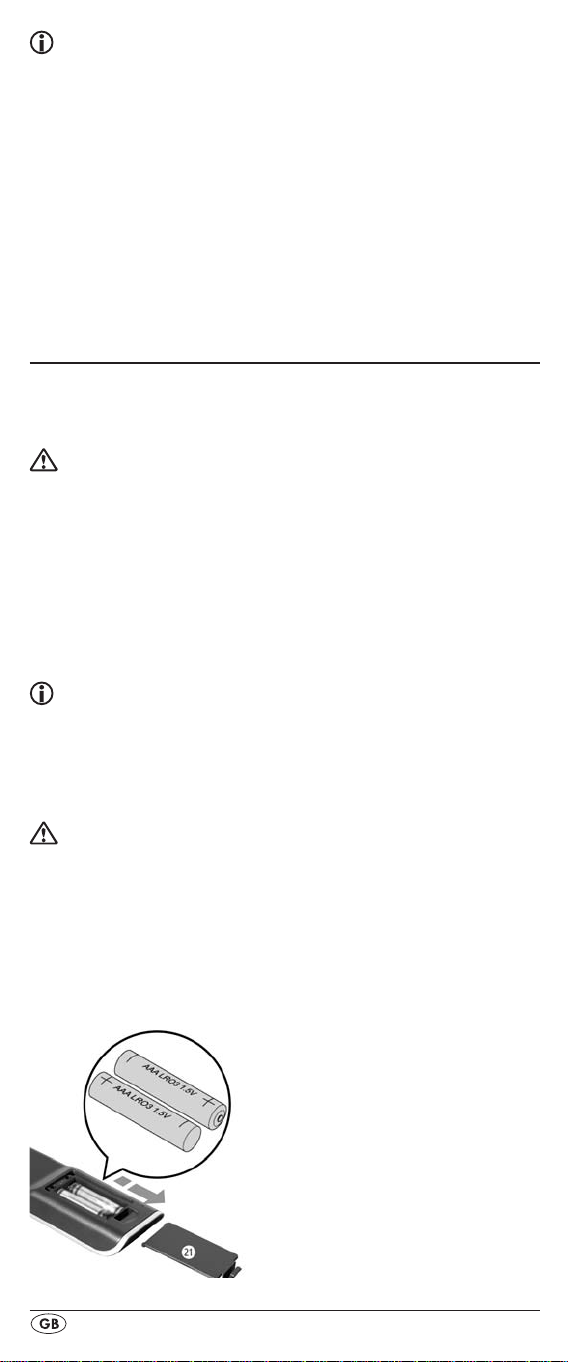
1. Open the battery compartment cover 2! in the direction
of the arrow.
2. Insert the batteries as shown in the diagram and close the
battery compartment.
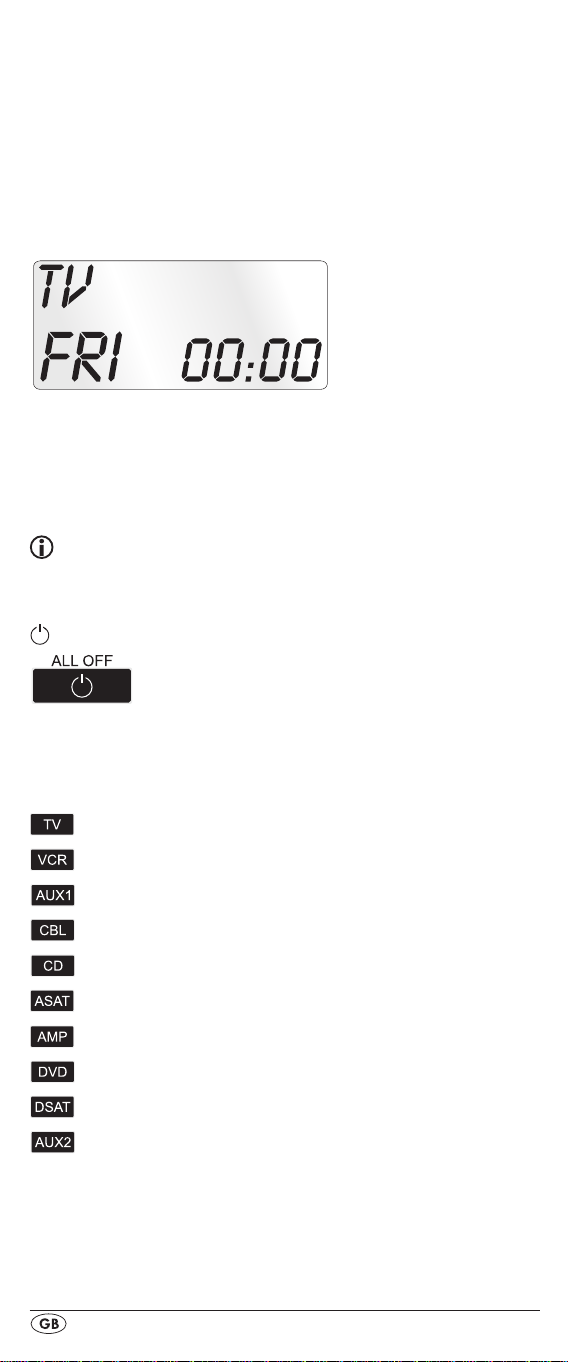
The LCD display q is activated as long as batteries are
installed. The following diagram shows the LCD display q
after the batteries have been installed or changed.
Note:
If no LCD display q is visible check the polarity of the
batteries or install new ones.
Operating components
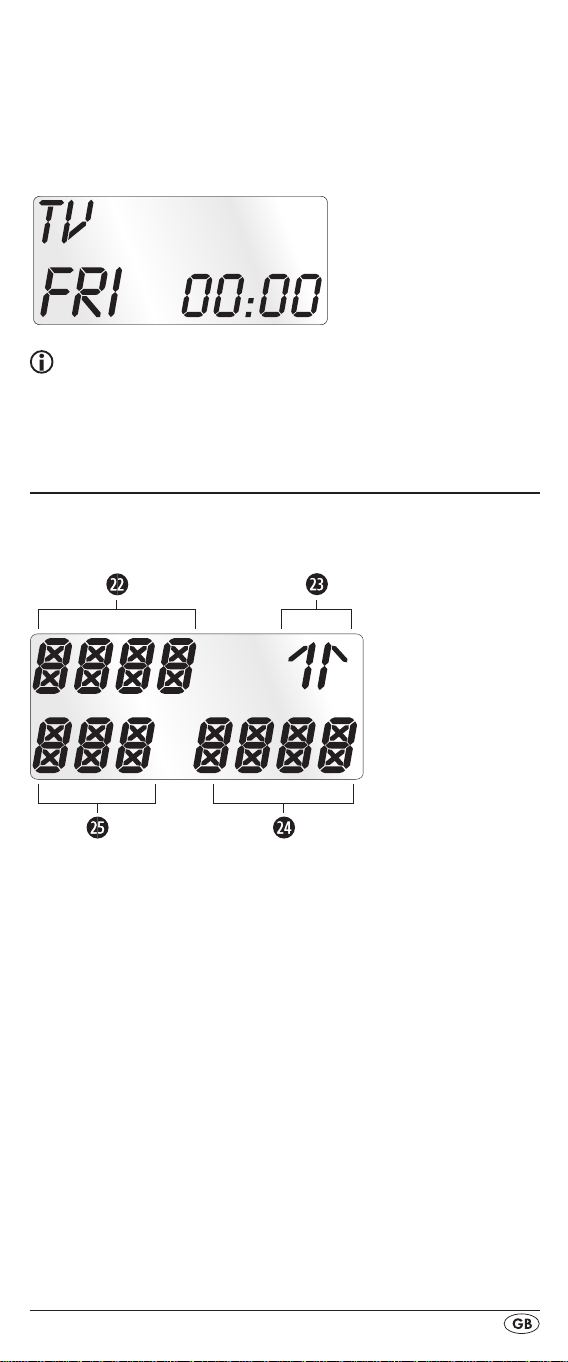
LCD display
The LCD display q is divided into elds.
Text field 2@
Here is shown the currently selected device, for example
DVD, TV VCR etc.
Infrared symbol 2#
Every time a button is pressed, with which an infrared signal
is to be sent the Infrared symbol illuminates.
Code/Time field 2$
Here is shown the device code of the relevent selected device or the time of day. With the time of day indicator "
numbers blink in the middle.
Day of the week field 2%
Here you can read the English shortened form of the current
day of the week after you have entered the date.
- 5 -
:" the
Page 8
MON = Monday
Tue = Tuesday
WED
= Wednesday
THU
= Thursday
FRI = Friday
= Saturday
SAT
SUN = Sunday
Standard display:
The standard readout of the LCD display q consists of the
details for the relevent device, for example, "TV", the initial
for the day of the week and the time of day indicator.
Buttons
Note:
All the functions described here can, of course, only be used
if they are supported by the device being controlled.
/ALL OFF button. w
Switch device on/o. hold down for approx.
5 seconds to switch all devices on/o.
Device buttons e
The device buttons are used to select the device that should
be operated.
Television
Video recorder
Accessory unit 1
Cable receiver
CD player
Analogue satellite receiver
Audio amplier
DVD player
Digital satellite receiver
Accessory unit 2
The mentioned button allocation is not compulsory. You can,
for example, also save the code for the video recorder on
the TV slot.
- 6 -
Page 9
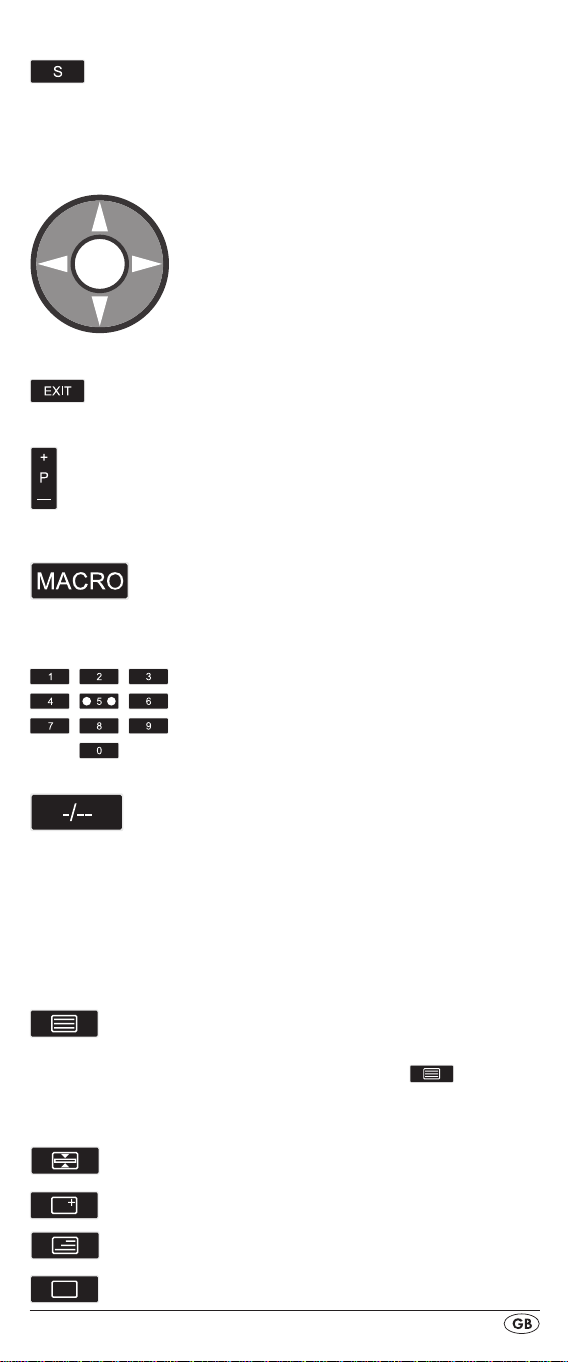
"S" button r
Hold down for 3 seconds to access the
SETUP menu, press briefly to superimpose
the date and/or to open access to additional functions such as EPG or PIP.
Arrow buttons t
Move up, right, left and down in menus.
EXIT button y
Move a level backward in the menu.
P +/— buttons u
Change the reception channel.
MACRO button i
MACRO button i followed by a number
button o 1-6 activates a previously saved
chain of commands.
Number buttons o
Enter programme and device code numbers.
Button for one/two digit programme numbers a
For two digit programme numbers (depend-
ing on the device type) rst press
the a button then via the number buttons o
enter the programme number.
When pressed again the display becomes
single digit once more.
Teletext function buttons s
In teletext operation the buttons have the following functions:
Access the teletext function.
In normal TV operation first press the
S button r followed by the button to
control the “PIP” function (picture in
picture) of your television set.
Stop automatic paging forward for
multi-page teletexts.
Enlarge page presentation
Screen text and TV image one upon the
other
To end the teletext function.
- 7 -
Page 10
Note:
• The teletext function is only available in the European TV
mode and your TV device must have a teletext module.
• In addition the P +/- buttons u control the following
teletext functions:
Leaf one page forward
P +
P — Leaf one page backwards
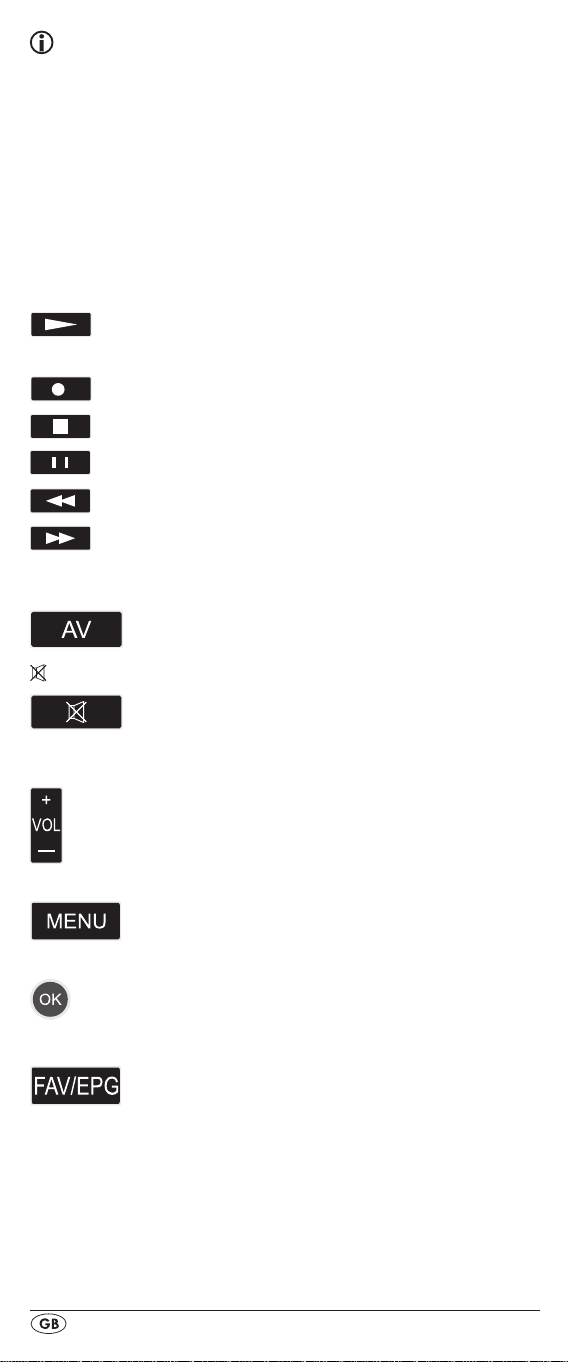
Record/playback buttons f
The playback buttons f control devices such as DVD/CD
players and video recorders:
Start playback
ASPECT Image format switching with TV operation.
Record
Stop Playback/Record/Wind
Pause playback
Rewind
Wind forward
AV button g
Switch to the AV input.
Mute switching h
Switch sound on/o.
VOL+/— buttons j
Set volume (Volume).
MENU button k
Access the menu of the controlled device.
OK button l
You can conrm a menu selection with the OK
button.
FAV/EPG button 1(
Press the FAV/EPG button to access your
previously programmed favourite station.
To access the electronic programme guide
of the target device first press briefly the
S button r and then the FAV/EPG button.
- 8 -
Page 11
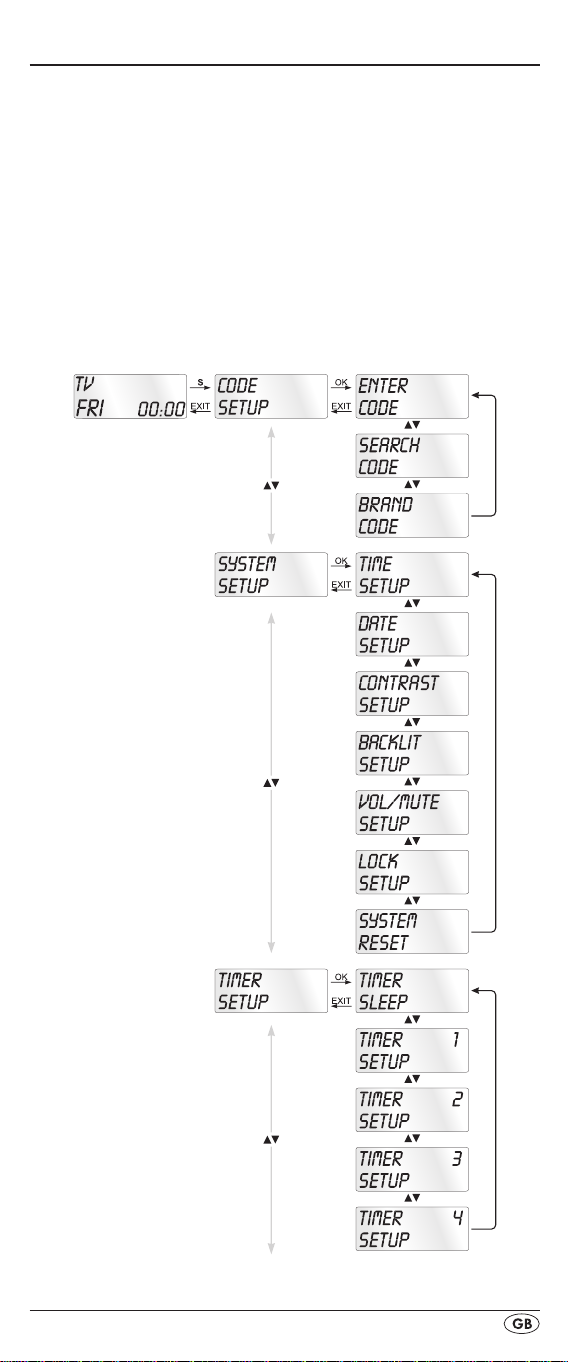
SETUP - System settings
In the system settings you undertake the following:
• Programming the remote control to the devices to be con-
trolled
• Setting the time of day, date, display contrast, background
illumination, volume, lock function as well as system reset.
• Timer settings
• The "learning" of designated button commands
• Setting up Macros
• Assigning favourites
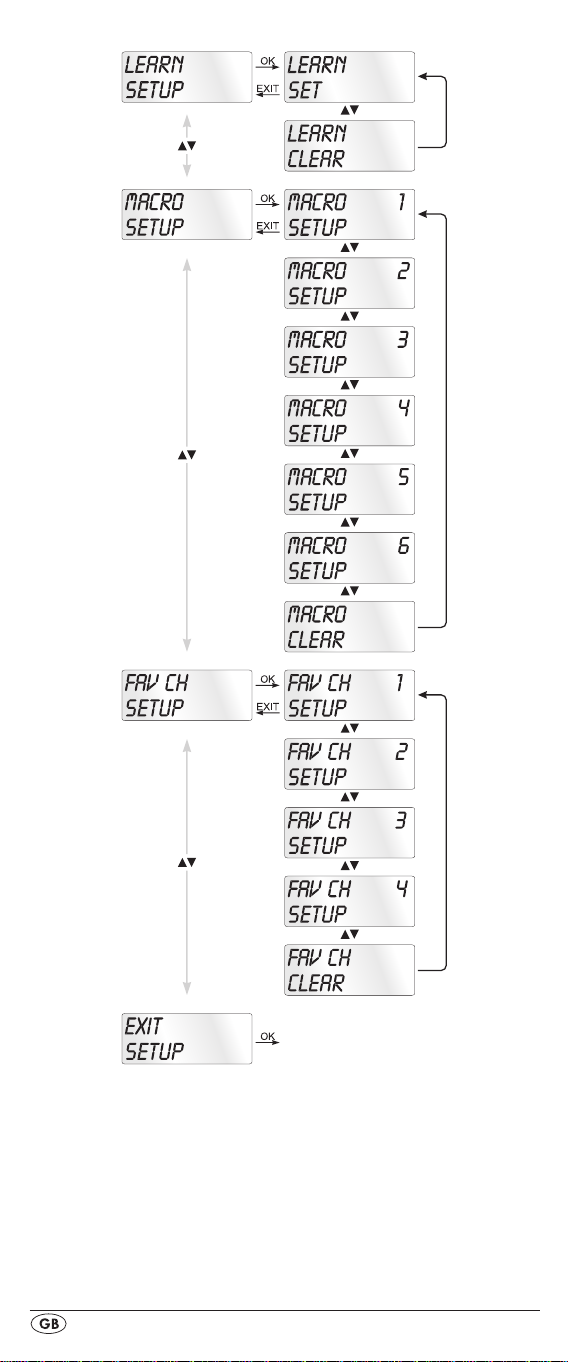
On the following page you can see a summary of the menu
structure.
- 9 -
Page 12
- 10 -
Page 13

Code Setup (Programming the remote control)
3 Programming methods are available for the remote control:
Programming by brand code search, by automatic code
search and by direct code input (manual).
First you should use the brand code search since this method is
the fastest way of programming if the manufacturer of your device is itemized in the code list. As second is recommended the
direct code input followed by the automatic code search.
Programming by brand code search
With this method you select the brand and code direct via
the LCD display q.
Observe the following operational references to programme
the remote control:
1.
Press the device button e for the device that you want to
programme the remote control.
Hold down the S button r for a little longer than 3 sec-
2.
onds. Carry out entries in the menu quickly because after
approx. 15 seconds without an entry the menu will be
ended.
3. In the LCD display q "CODE SETUP" appears. Press the
OK button l. "ENTER CODE" now appears in the LCD
display q. With the buttons t select "BRAND
CODE" and conrm with the OK button l.
4. Now appears the alphabetical rst brand name from the
list of pre-programmed devices.
With the 34 buttons t select the various brand names.
5.
To make access easier you can skip directly to specic let-
6.
ters of the alphabet with the number buttons o:
2 => A 3 => D 4 => G 5 => J
6 => M 7 => P 8 => T 9 => W
Example With button number 5 the display skips to the
letter "J". The rst brand is "JVC"*. If, for example, you
own a "Kenwood"* brand device, continue leang with
the 4 button t until this brand name appears. (* All
brand names used here are trademarks of the corresponding manufacturer.)
The majority of manufacturers use several dierent codes
7.
for the remote control. You must now ascertain which of
the available codes is best suited to your device. On the
right underneath the brand name the relevent code will
be shown in the LCD display q.
Point the remote control to the relevent device and press
8.
the function buttons to test the code (except
OK l, EXIT y, or the number buttons o).
34t,
- 11 -
Page 14

9. If most of the buttons function press the OK button l to
save the setting. In the LCD display q "OK" appears.
Subsequently the menu will close automatically.
10. If, however, none or only a few of the buttons function
select with the
again as described in step 8.
11.
With the EXIT button y you will move one level upwards
in the menu.
Repeat these operational steps for all devices that you would
like to control with the remote control.
or button t the next code and test
Programming by manual code input
In this mode the remote control can be programmed by direct
input of a code number. You can obtain the necessary code
number from the enclosed manufacturers directory with device
code list. In the event that the new code is invalid the last valid
programmed code will be restored.
Press the device button e for the device that you want to
1.
programme the remote control.
Hold down the S button r for a little longer than 3 sec-
2.
onds.
In the LCD display q "CODE SETUP" appears. Press the
3.
OK button l. "ENTER CODE" now appears in the LCD
display q. To access this function press the OK button l.
4.
In the LCD display q appears the presently used code for
the selected device. Now the rst digit of the code blinks
and waits for your code input. Enter the new four digit
code via the number buttons o.
5.
If the entered CODE is valid the code will be saved. In
the LCD display q "OK" appears briey. Subsequently
the menu will close automatically. In the event of failure
the LCD display q shows briey "ERROR" and waits for a
new code entry. Then you repeat step 4.
6. With the EXIT button y you will move one level upwards
in the menu.
Programming by automatic code search
This process can take several minutes per device since all
codes for the selected device have to be gone through.
Therefore this method should only be used when the device
cannot be programmed via brand code search or direct
code input or if your device is not listed at all in the manufacturers directory with device code list.
Follow the steps listed below to carry out programming by
means of the automatic code search.
- 12 -
Page 15

1. Press the device button e for the device that is to be con-
trolled (i.e. VCR).
2. Switch the device that is to be controlled with the remote
control on. With VCR/DVD/CD devices please insert a
tape and/or disc.
Hold down the S button r for a little longer than 3 sec-
3.
onds.
In the LCD display q "CODE SETUP" appears. Press the
4.
OK button l. "ENTER CODE" now appears in the LCD
display q. Press the or button t until "SEARCH
CODE" is shown in the LCD display q. Point the remote
control to the device and then press the OK button l to
access the mode "automatic code search".
The search begins. Thereby the device sends, one after
5.
the other, the code numbers in ascending order. The infrared symbol 2# indicates this.
When the device reacts by switching o press immedi-
6.
ately the OK button l to save the relevent code. The LCD
display q shows briey "OK".
7.
Check to see if the majority of your device's functions can
now be controlled with the remote contol. If yes you have
most probably found the correct code. In the event that a
few functions are not working you can start the automatic
code search again beginning with step 1.
Note:
However, with a renewed code search, point the URC
first to the target device after the previously found inadequate code has run its course.
8.
However if the device does not react any more you prob-
ably did not press the OK button l quick enough in step
6. Then press repeatedly the EXIT button y to exit the
menu and return to the standard display.
Now hold down the device button e of the device for
9.
which you have just sought the relevent code. Below on
the right in the LCD display q will thereby be shown the
relevent code. Make a note of this number.
10. Then proceed as described in the preceding chapter
"Programming by manual code entry" and check to see
if the code with the next lowest number combination will
function.
Tips:
1. When code search is activated all buttons except OK l
and EXIT y are ignored.
2. If the automatic search has reached the end of the code
list it stops there. The display then returns to "SEARCH
CODE".
- 13 -
Page 16

System-Setup
Setting the time
The LCD display q shows you the time of day. You set this as
follows:
1.
Hold down the S button r for a little longer than 3
seconds. The notice "CODE SETUP" appears. If appox.
15 seconds passes without an entry the device exits the
menu and returns to the standard display.
2. With the or button t select "SYSTEM SETUP" and
conrm with the OK button l.
In the LCD display q "TIME SETUP" appears. Conrm
3.
with the OK button l. The LCD display q now shows
"TIME" and the time format (24 HR) blinks.
With the or button t you can switch to the other
4.
time format (12 HR). After which the time display for the
time of day will show an “A” or “P” before the time. „A“
stands fpr “AM” = “ante meridium” (Morning, 0:00
o’clock midnight to 12:00 o’clock midday). „P“ stands for
“PM” = “post meridium” (Afternoon and evening, 12:00
o’clock midday to 0:00 o’clock midnight). Press the OK
button l to conrm.
Now the hour indicator blinks. With the or button t
5.
select the hour number for the present time of day and
press the OK button l.
Now the minute indicator blinks. With the or button
6.
t select the minute number for the present time of day
and press the OK button l to save. The "TIME SETUP"
notice appears again.
To exit this or the following menus press repeatedly the
7.
EXIT button y until the standard display appears in the
LCD display q.
Setting the date
The LCD display q shows you the date when you press the S
button r. You set the date in this way:
1.
Hold down the S button r for a little longer than 3 sec-
onds. The notice "CODE SETUP" appears.
With the or button t select "SYSTEM SETUP" and
2.
conrm with the OK button l.
In the LCD display q "TIME SETUP" appears. Press the
3.
button t to change to "DATE SETUP". Conrm with the
OK button l.
In the display the year "2010" blinks. With the or
4.
button t you can change the year and conrm with
the OK button l. With the or button t you can
change the now blinking month and conrm with the OK
button l. Now the day indicator blinks which you can
also change with the or button t.
To save press the OK button l. The "DATE SETUP"
5.
notice appears again.
- 14 -
Page 17

Adjust contrast
You can set the display's contrast as follows:
1.
Hold down the S button r for a little longer than 3 sec-
onds. The notice "CODE SETUP" appears.
With the or button t select "SYSTEM SETUP" and
2.
conrm with the OK button l.
With the or button t select "CONTRAST SETUP"
3.
and conrm with the OK button l.
In the LCD display q the contrast value now blinks which
4.
you can set with the or button t.
Display readout:
0 = highest contrast:
15 = lowest contrast
With the OK button l you can save the desired setting.
5.
The notice "CONTRAST SETUP" appears again.
Background Illumination
You can set how long the LCD display’s q background and
the button illuminations remain alight after completion of the
operation.. Thereby taking into account that the longer the illumination remains lit the shorter the battery life will be.
1.
Hold down the S button r for a little longer than 3 sec-
onds. The notice "CODE SETUP" appears.
With the or button t select "SYSTEM SETUP" and
2.
conrm with the OK button l.
With the or button t select "BACKLIT SETUP" and
3.
conrm with the OK button l.
In the LCD display q now blinks the second count for the
4.
length of time that the light is to be left on which you can
set with the buttons t from 0 to 60. If you select
"0" the background illumination will shut o completely.
With the OK button l you can save the desired setting.
5.
The notice "BACKLIT SETUP" appears again.
Setting the global volume/mute switching
So that you don’t always have to first press a device button
for the volume control and mute switching, for these functions
the URC always only responds to an individual device,
by default the television set. You can determine this target
device yourself.
Hold the S button r down for a little longer than
1.
3 seconds. The notice „CODE SETUP“ appears.
With the or button t select “SYSTEM SETUP” and
2.
confirm with the OK button l.
With the or button t select “VOL/MUTE SETUP”
3.
and confirm with the OK button l.
The LCD display q shows “ALL VOL SET”. Press the OK
4.
button l, the display changes to „ALL VOL MODE“.
5. Now press the device button e for the device that is to be
controlled by the global volume control.
- 15 -
Page 18

6. If the specified device is equipped with a volume control,
“SUCCESS” will be displayed briefly and the menu will
close. From now on the volume control functions on the
device just specified.
7. If this device is not equipped with its own volume control
the URC will not allow this selection and shows “VOLUME
ERROR”. Even then the menu will close. The volume control will then continue to function on the former device.
You can also deactivate the global volume control for specific
devices.
1. For this purpose select in the VOL/MUTE SETUP with the
or button t the function MODE VOL SET and
confirm with the OK button l.
Now press the device button e for the device that is to
2.
be excluded from the global volume control. The LCD
display q shows „SUCCESS“ and the global volume
control is deactivated if the URC is working in the operational mode of one of the selected devices.
You can also cancel the settings again in VOL/MUTE SETUP.
1. For this purpose select in the VOL/MUTE SETUP with the
or button t the function VOL/MUTE RESET and
confirm with the OK button l.
The LCD display q prompts you, with CONFIRM RESET,
2.
to a confirmation which is done by pressing the OK button l. Press the OK button l If you want to delete the
settings, the SUCCESS indicator then confirms the deletion. Otherwise you press the EXIT button y to abort the
deletion.
Note:
If you press, in this menu, the EXIT button y the entire menu
will close immediately.
Setting the lock function
With the lock function you can block access to all setup
menus.
1.
Hold down the S button r for a little longer than 3 sec-
onds.
2. With the or button t select „SYSTEM SETUP“ and
confirm with the OK button l.
With the or button t select “LOCK SETUP and
3.
confirm with the OK button l. The LCD display q shows
the current settings.
With the or button t now select between „LOCK“
4.
(Block) or „UNLOCK“ (Unblock).
With the OK button l you save the setting. In the LCD
5.
display q „LOCK SETUP“ then appears again.
- 16 -
Page 19

System reset
Via this function you can reset the URC to its factory default
settings. Thereby all settings made by you will be deleted.
1.
Hold down the S button r for a little longer than 3 sec-
onds. The notice "CODE SETUP" appears.
With the or button t select "SYSTEM SETUP" and
2.
conrm with the OK button l.
With the or button t select "SYSTEM RESET" and
3.
conrm with the OK button l.
In the LCD display q now appears "CONFIRM RESET".
4.
Conrm the reset with the OK button l. Then the LCD
display q shows “SUCCESS RESET”. All settings are
now deleted and the menu is closed. Otherwise you can
exit the menu by pressing the EXIT button y. Then the settings remain preserved.
Timer Setup
The URC oers 2 timer modes, sleep timer and event timer.
Sleep timer
1. Press the device button e for the device that is to be con-
trolled (i.e. VCR).
Hold down the S button r for a little longer than 3 sec-
2.
onds. The notice "CODE SETUP" appears.
Press the or button t until "TIMER SETUP" is
3.
shown. Press the OK button l "TIMER SLEEP" appears in
the LCD display q. Conrm the selection of this function
with the OK button l.
Now, below to the right in the LCD display q blinks the
4.
minutes for the remaining time of the selected device.
Set with the or button t the desired value from 1
to 99 minutes. Press the OK button l to conrm. With
programmed sleep-timer the LCD display q shows “
on the right next to the time.
5. Position the remote control in such a way that your infra-
red signal can reach the device to be switched o. After
expiration of the set time the remote control will switch the
device o.
6. If you now press the S button r “SL” is shown in the dis-
play q below on the left.
z
z
”
Event timer
The remote control has 4 event timers available via which
you are allowed to send out specic series of button combinations at designated times.
Hold down the S button r for a little longer than 3 sec-
1.
onds. The notice "CODE SETUP" appears.
With the or button t select "TIMER SETUP" and
2.
conrm with the OK button l. "TIMER SLEEP" appears
in the LCD display q. With the or button t select
the desired memory slot "TIMER SETUP 1" to "TIMER
SETUP 4" and conrm with the OK button l.
- 17 -
Page 20

3. Now the hour of the time of day, to which the desired
button combinations are to be carried out, blinks. Set with
the or button t the desired hour and press for conrmation the OK button l.
4. Now the minutes of the time of day, to which the desired
button combinations are to be carried out, blinks. Set with
the or button t the desired minutes and press for
conrmation the OK button l.
In the LCD display q you will see "TIMER X KEY" (X
5.
stands for the desired timer). Now press the desired
device button e followed by the desired sequence of the
button commands.
Press the S button r to save your entry and to return to
6.
the timer menu.
7. Procede in a similar manner in order to, if required,
programme the other timer memory slots also.
With programmed event timer the LCD display q shows
8.
the timer symbol „
Tips:
1. Per timer memory slot a maximum of 14 buttons can be
programmed. After entry of the 14th button the sequence
will be automatically saved and "FULL" is shown in the
LCD display q.
2. In this menu also the device will return to the standard dis-
play after approx. 15 seconds without an entry.
” on the right next to the time.
Learn Setup
The Universal remote control (URC) can learn and save button signals of an original remote control. If the URC does not
work after applying the programming methods already described or cannot carry out all commands please attempt to
teach the URC with the help of the original remote control.
• Use new batteries for the URC and the original remote
control.
• Maintain a distance of at least one metre from other light
sources. The light sources could disrupt the infrared transmission.
• Place the URC and the original remote control at a dis-
tance of 20 to 50 mm from each other on an even surface
so that the infrared diodes 2) are facing each other.
Tips:
1. Do not use the following buttons for the learn function: all
device buttons e, MACRO i, S button r, EXIT y.
2. Press briefly the button of the original RC. When “SUC-
CESS” appears in the LCD display q the button command has been successfully learnt. However, if „LEARN
ERROR” (Failure) appears you must repeat the procedure.
3. If when teaching, during the notice "LEARNING", no
button is pressed on the original RC after 25 seconds the
learn menu will end. This mode can not be ended
by pressing a button on the URC.
- 18 -
Page 21

4. The memory can accommodate 150 button commands.
If the memory is full the LCD display q shows "LEARN
FULL" and the learn mode will end.
With the EXIT button y you return to the previous status
5.
(except with a notice of "LEARN KEY" and/or "LEARNING").
Code learn function
1. Press the device button e for the device that the URC
should learn a button code.
Hold down the S button r for a little longer than 3 sec-
2.
onds. The notice "CODE SETUP" appears.
3. With the or button t select the menu "LEARN
SETUP" and then press the OK button l.
In the LCD display q "LEARN SET" appears. Then press
4.
the OK button l. In the LCD display q "LEARN KEY" appears.
First press the button on the URC that is to be taught. In the
5.
LCD display q "LEARNING" appears. The URC now waits
for the infrared signal from the original remote control.
Note:
Should the notice not change to "LEARNING" you have
selected a button for which no button code can be
taught.
Point the infrared sensors 2) of both remote controls
6.
towards each other.
Now hold down the desired button of the original
7.
remote control until "SUCCESS" or "LEARN ERROR"
appears in the display q of the URC.
If in the LCD display q "SUCCESS" appears (process
8.
successful), you can teach further buttons begining with
step 5. If "LEARN ERROR" appears (process unsuccessful)
repeat the process in any case from step 5.
To cancel/terminate the learning process, during the
9.
display “LEARN SET”, repeatedly the EXIT button y until
the standard display is show in the LCD display q. During the notice "LEARN KEY" and/or "LEARNING" simply
allow 30 seconds to pass without any operation then the
device will end the menu.
Delete all programmed buttons of all devices
Hold down the S button r for a little longer than 3 sec-
1.
onds. The notice "CODE SETUP" appears.
With the or button t select the menu "LEARN
2.
SETUP" and then press the OK button l. In the LCD
display q "LEARN SET" appears.
With the or button t select "LEARN CLEAR"
3.
(taught delete) and conrm with the OK button l. In
the LCD display q "CONFIRM CLEAR" (conrm delete)
appears.
Conrm with the OK button l. In the LCD display q
4.
"SUCCESS" appears. All programmed buttons are de-
leted. Finally the menu will automatically end.
- 19 -
Page 22
Note:
When the LCD display shows “CONFIRM CLEAR” you can
stop the deletion with the EXIT button y.
Macro Setup
With the MACRO function up to 16 button commands can
be carried out with the press of a single button, that is to say,
several previously saved control commands can be deleted
with one MACRO button. There are 6 Macro memory slots
available for you.
To programme a Macro
For Macro programming proceed as follows:
Hold down the S button r for a little longer than 3 sec-
1.
onds. The notice "CODE SETUP" appears.
With the or button t select "MACRO SETUP" and
2.
conrm with the OK button l. In the display "MACRO
SETUP 1" appears.
With the or button t select the memory slot to be
3.
programmed (MACRO SETUP 1 - 6) and conrm with the
OK button l.
4. In the LCD display q "MACRO STEP" appears. Now
press, one after the other, the desired buttons (max. 16).
The sequence should begin with a device button e.
By default the Macro commands are sent in intervals of
5.
1 every second. Since many devices react sluggishly it is
possible that the sequence of the Macro commands are
sent too quickly to the device. Then you have the option
of programming, before a button command, a pause
of between 5 - 21 seconds. For this purpose press, if necessary repeatedly, the MACRO button i. Below
and to the right the LCD display q shows the current
pause length in seconds.
When the maximum number of button commands is
6.
reached the LCD display q shows "FULL".
Save the entry with the S button r. In the LCD display q
7.
"MACRO SETUP" appears.
8. If, with the selection of the Macros to be programmed
(step 3), you select a memory slot that is already occupied
the existing Macro will be overwritten.
9. Repeat the process from step 3 to create further Macros.
10. With the EXIT button y you move a level upwards in the
menu except during the entry of the button commands.
Tips:
1. A maximum of 16 button commands can be saved in a
Macro. After input of the 16th button command, “FULL”
appears in the LCD display q.
2. To exit the mode without saving allow approx. 15 sec-
onds to pass without an entry.
In the mode "MACRO STEP" you can only return to the
3.
previous status with the S button r.
- 20 -
Page 23
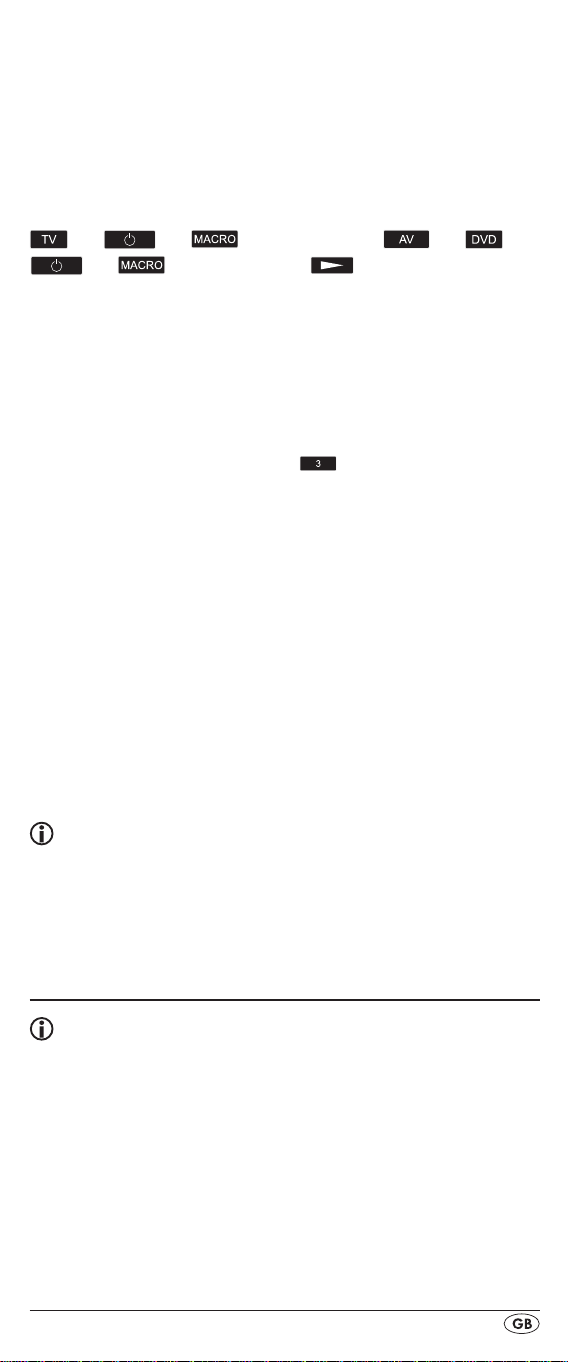
Example: You want to save a command chain in a Macro.
We begin in the mode "MACRO STEP".
Desired command chain: Switch on TV => PAUSE => switch
to the AV input => switch on DVD => PAUSE => Playback
DVD.
In the mode "MACRO STEP", for this you enter the following
button commands:
=> => (Pause time) => => =>
=> (Pause time) =>
Execute a Macro
To execute a pre-programmed Macro proceed as follows:
1.
Press the MACRO button i.
With the corresponding number button o you access the
2.
desired Macro (1-6). Example: If Macro 3 is to be implemented press rst the Macro button i and then, within 5
seconds, the number button "
To delete all Macros
To delete all pre-programmed Macros proceed as follows:
1.
Hold down the S button r for a little longer than 3 sec-
onds. The notice "CODE SETUP" appears.
With the or button t select "MACRO SETUP" and
2.
conrm with the OK button l. In the display "MACRO
SETUP 1" appears.
With the or button t select "MACRO CLEAR" and
3.
conrm with the OK button l.
In the LCD display q "CONFIRM CLEAR" (conrm
4.
delete) appears. Conrm the delete process with the
OK button l. The LCD display q shows "SUCCESS".
All Macros are now deleted and the menu will end.
".
Tips:
1. When the LCD display q shows "CONFIRM CLEAR" you
can stop the delete process with the EXIT button y.
2. Individual Macros can not be deleted they can only be
overwritten.
Favourites channel
Note:
With this function you can save your preferred stations as
favourites.
To programme favourites
Your favourite stations are saved as follows:
1.
Press the device button e for the device that you want to
save a favourite.
Hold down the S button r for a little longer than 3 sec-
2.
onds. The notice "CODE SETUP" appears.
- 21 -
Page 24

3. With the or button t select "FAV CH SETUP" and
conrm with the OK button l. In the display "FAV CH
SETUP 1" appears.
With the or button t select the memory slot to be
4.
programmed (FAV CH SETUP 1 - 4) and conrm with the
OK button l.
In the LCD display q "FAV CH STEP" appears. Now
5.
press, one after the other, the buttons (max. 4) for access
to your desired favourite stations.
When the maximum number of button commands is
6.
reached the LCD display q shows "FULL".
Save the entry with the S button r. In the LCD display q
7.
"FAV CH SETUP" appears.
8. If, with the selection of the favourites to be programmed
(step 4), you select a memory slot that is already occupied the existing favourite will be overwritten.
9. Repeat the steps to apply further favourites.
10. With the EXIT button y you move a level backwards in the
menu except during the entry of the button commands.
Note:
The input of the channel numbers can vary according to
the model and brand of the selected devices. If necessary,
with multi-digit channel numbers you must rst press the
button a.
To access favourites
To access a pre-programmed favourite press the FAV/EPG
button 1( followed by the corresponding number button for
the desired memory slot (1 - 4).
Delete All FAV channels
To delete all pre-programmed favourites proceed as follows:
Hold down the S button r for a little longer than 3 sec-
1.
onds.
With the or button t select "FAV CH SETUP" and
2.
conrm with the OK button l. In the display "FAV CH
SETUP 1" appears.
With the or button t select "FAV CH CLEAR" and
3.
conrm with the OK button l.
In the LCD display q "CONFIRM CLEAR" (conrm delete)
4.
appears. Conrm the delete process with the OK button l.
The LCD display q shows "SUCCESS". All favourites are
now deleted and the menu will end.
Tips:
1. When the LCD display q shows "CONFIRM CLEAR" you
can stop the delete process with the EXIT button y.
2. Individual favourites can not be deleted they can only be
overwritten.
- 22 -
Page 25
Volume control
Vol +/—, (Mute switching)
Press the "VOL+" button to increase the volume. With the
"VOL —" button you reduce the volume. To mute the sound
press the
the sound back on.
When you activate the VOL +/— buttons j on the URC basically the volume adjustment on the TV device is addressed,
regardless thereof, which device button e was pressed
previously. However, this does not apply to the following
devices: “AMP”, “DVD”, “ASAT”, and “DSAT” since it can
be assumed that these devices are equipped with their own
volume control.
-button h. A further press of this button turns
For operation
> To operate one of the programmed devices with the URC
rst press the corresponding device button e.
Then point the URC to this device and press the desired
button.
> Put the number buttons o exactly as you do with the
original remote control. Before you make a two digit
entry press, if necessary, the
> Press the FAV/EPG button 1( to start the electronic pro-
gramme guide of a device equipped with this function.
> If you press the S button r the date is superimposed for
10 seconds in the LCD display q below and on the right.
> Whilst you hold down one of the device buttons e the
active code for this device will be superimposed below to
the right in the LCD display q.
> Via the MENU button k you access the dialogue for the
setting of the respective target device.
> Press the illumination button d to switch the display and
button illuminations on and/or off.
button a.
All OFF
Tips:
With the button ALL OFF (all o) w all devices that
are switched on can be automatically switched o. This func-
tion can switch on again devices that have already been
switched o (depending on the device). For this hold down
the ALL OFF button w for approx. 5 seconds. This will only
function under the following circumstances:
1. A visible connection exists between all the devices and
the URC.
2. Automatic code search, brand code search and MACRO
function are not active.
3. All target devices must be suitable for remote control
switch o.
- 23 -
Page 26
To again switch on all devices automatically hold down once
more the button
w until all devices are switched on.
Cleaning and storage
Attention!
Ensure that moisture cannot permeate into the device
during cleaning! Otherwise there is the danger of
causing irreparable damage to the device!
> Clean the housing of the device exclusively with a soft
moist cloth and a mild dishwashing detergent.
> Store the device exclusively in an environment that com-
plies with the specications given in the technical data.
> Before storing remove the batteries so that they will not
cause damage to the device if, during storage, they
happen to leak.
Faults / Remedies
Your device does not react to the URC.
> Check the batteries. They must have enough voltage and
be properly installed.
> Firstly have you pressed the correct device button e for
the desired target device?
> Check to see that the correct code is programmed in for
the target device (see section "Code Setup").
The URC is transmitting the commands incorrectly.
> Press the corresponding device button e to set the URC
to the correct mode.
> The batteries must have enough voltage and be properly
installed.
> It is possible that you are using the wrong code. Start the
brand code search, the automatic code search or the direct code input (manual).
The URC does not change the station on the device.
> Press the corresponding device button e to set the URC
to the correct mode.
> In the event that the original RC does not have a "-/- -"
button, change the programme with the P +/— buttons u or
the number buttons o.
> If this also does not work the child protection for the
target device could be activated.
Some buttons on the URC do not function properly.
> It is possible that your URC does not have all of the func-
tions that are on the device's original remote control.
> It is possible that you have not programmed in the optimal
code. Search for a code that supports more of the target
device's functions.
- 24 -
Page 27

The URC stops reacting after a button is pressed.
> The batteries must have enough voltage and be properly
installed.
> Point the URC towards your device.
The LCD display q shows nothing.
> The batteries must have enough voltage and be properly
installed.
> The contrast could be set too low. Increase the contrast
setting.
Disposal
Do not dispose of the device in your normal
domestic waste. This product is subject to the
European directive 2002/96/EC.
Universal remote control
• Have the universal remote control or parts of it disposed
of by a professional disposal company or by your communal disposal facility.
• Observe the currently applicable regulations. In case of
doubt contact your disposal facility.
Batteries/rechargeable batteries
• Used batteries/rechargeable batteries may not be dis-
posed of in household waste.
• Batteries can contain poisons which are damaging to the
environment. Therefore, dispose of the batteries/rechargeable batteries in accordance with statutory regulations.
• Every consumer is legally obliged to surrender batteries/
rechargeable batteries to a community collection centre
in their district or to a dealer. The purpose of this obligation is to ensure that batteries are disposed of in a nonpolluting manner.
• Only dispose of batteries when they are fully discharged.
Dispose of packaging materials in an environmentally
responsible manner.
Technical data
Controllable devices: 10
Dimensions
L x W x H: 217 x 50 x 22 mm
Weight : 102 g (without batteries)
Infrared LED: Laser class 1
Power supply
Batteries: 2 x 1.5 V, type AAA/LR03 (micro)
(supplied)
Operating temperature: + 5 – +35°C
Storage temperature : -20 - +50 °C
Humidity: 5 - 90 % (No condensation)
- 25 -
Page 28

Note regarding conformity
This device satises the fundamental requirements and other
relevant regulations of the EMC Directive 2004/108/EC.
Importer
KOMPERNASS GMBH
BURGSTRASSE 21
44867 BOCHUM, GERMANY
www.kompernass.com
Warranty & Service
You receive a 3-year warranty for this appliance as of the
purchase date. This appliance has been manufactured with
care and meticulously examined before delivery.
Please retain your receipt as proof of purchase. In the case
of a warranty claim, please make contact by telephone with
our service department. Only in this way can a post-free despatch for your goods be assured.
The warranty covers only claims for material and manufacturing defects, but not for transport damage, wearing parts or
for damage to fragile components, e.g. buttons or batteries.
This product is for private use only and is not intended for
commercial use. The warranty is void in the case of abusive
and improper handling, use of force and internal modications not carried out by our authorized Service Centre.
Your statutory rights are not restricted in any way by this warranty.
The warranty period is not extended through repairs made
under warranty. This applies also for replaced or repaired
parts. Any damages or deciencies found on purchase must
be reported as soon as possible after unpacking, at the latest two days after purchase. On expiry of the warranty, all
repairs carried out are subject to payment.
DES UK LTD
Tel.: 0871 5000 700 (£ 0.10 / minute)
e-mail: support.uk@kompernass.com
- 26 -
Page 29

SPIS TREŚCI STRONA
Ważne zasady bezpieczeństwa 28
Przegląd urządzenia 30
Uruchomienie 30
Rozpakowanie urządzenia/sprawdzenie zakresu
dostawy 30
Wkładanie baterii 31
Elementy obsługi 32
Wyświetlacz LCD 32
Przyciski 33
SETUP - ustawienia systemowe 35
Code Setup (programowanie pilota zdalnego sterowania) 37
Programowanie przez wyszukiwanie kodu marki 37
Programowanie przez ręczne wpisywanie kodu 38
Programowanie przez automatyczne wyszukiwanie kodu 38
System-Setup 40
Ustawianie godziny 40
Ustawianie daty 40
Ustawianie kontrastu 41
Podświetlenie 41
Ustawianie wspólnej głośności/wyłączenia dźwięku 42
Ustawianie funkcji Lock 43
System-Reset 43
Timer Setup 44
Licznik funkcji Sleep 44
Licznik zdarzenia 44
Learn Setup 45
Funkcja uczenia kodów 46
Makro Setup 47
Ulubiony kanał 49
Regulacja głośności 50
Vol +/-, (wyciszenie) 50
Informacje dotyczące obsługi 51
Wyłącz wszystkie (ALL OFF) 51
Czyszczenie i przechowywanie 51
Błędy i sposoby ich usuwania 52
Utylizacja 53
Dane techniczne 53
Wskazówka dotycząca zgodności 54
Importer 54
Gwarancja i serwis 54
- 27 -
Page 30
UNIWERSALNY PILOT ZDALNEGO
STEROWANIA SFB 10.1 A1
Niniejsza dokumentacja jest prawnie chroniona. Wszelkie
prawa, także te dotyczące odtwarzania fotomechanicznego, powielania i rozpowszechniania innymi metodami
(np. obróbka danych, nośniki danych i sieci danych), także
częściowo, jak również zmian zawartości i techniki zastrzeżone.
Przed pierwszym użyciem zapoznaj się z instrukcją obsługi
i zachowaj ją w celu późniejszego wykorzystania. W przypadku przekazania urządzenia osobom trzecim należy
przekazać im także instrukcję.
Ważne zasady bezpieczeństwa
Użycie zgodne z przeznaczeniem
Dzieci mogą korzystać z pilota zdalnego sterowania wyłącznie pod nadzorem osoby dorosłej.
Uniwersalny pilot zdalnego sterowania może zastępować
maksymalnie dziesięć różnych pilotów zdalnego sterowania.
Można go używać wyłącznie do sprzętu elektronicznego wyposażonego w odbiornik na podczerwień. Funkcje w uniwersalnym pilocie zdalnego sterowania odpowiadają przeważnie funkcjom w oryginalnych pilotach zdalnego sterowania.
Uniwersalny pilot zdalnego sterowania jest przeznaczony do
użytku prywatnego. Nie można go używać do celów komercyjnych.
Zastosowanie do jakiegokolwiek innego celu niż opisany
uważane jest za niezgodne z przeznaczeniem. Producent nie
ponosi odpowiedzialności za szkody, spowodowane użytkowaniem urządzenia niezgodnie z jego przeznaczeniem
lub samodzielnymi przeróbkami.
Ostrzeżenie
Wskazówka ostrzegawcza tego stopnia zagrożenia oznacza
możliwą do wystąpienia sytuację niebezpieczną. W razie
braku możliwości uniknięcia niebezpiecznej sytuacji, może to
doprowadzić do odniesienia obrażeń. Instrukcje w niniejszej
wskazówce ostrzegawczej stosuje się, by uniknąć odniesienia
obrażeń osób.
Uwaga
Wskazówka ostrzegawcza tego stopnia zagrożenia oznacza możliwą szkodę materialna. W razie braku możliwości
uniknięcia niebezpiecznej sytuacji, może to doprowadzić
do szkód materialnych. Instrukcje w niniejszej wskazówce
ostrzegawczej stosuje się, by uniknąć szkód materialnych.
Wskazówka
Wskazówka oznacza dodatkowe informacje, ułatwiające
korzystanie z urządzenia.
- 28 -
Page 31

Ostrzeżenie przed odniesieniem obrażeń
na skutek niewłaściwego obchodzenia się
z bateriami!
Przy wymianie baterii należy postępować z największą
ostrożnością. Należy przestrzegać następujących wskazówek bezpieczeństwa:
• Baterie należy trzymać w miejscu niedostępnym dla
dzieci. Dziecko może połknąć baterię. W wypadku
połknięcia baterii należy jak najszybciej skorzystać
z pomocy medycznej.
• Nie wrzucaj baterii do ognia. Nie wystawiaj baterii na
działanie wysokich temperatur.
• Niebezpieczeństwo wybuchu! Baterii nie można ponow-
nie ładować.
• Nie podgrzewać i nie zwierać baterii
• Kwas wydostający się z baterii może powodować po-
drażnienia skóry. W przypadku kontaktu ze skórą, spłukać obficie wodą. W przypadku przedostania się cieczy
do oczu, spłukać obficie wodą, nie trzeć i jak najszybciej
skorzystać z pomocy lekarza.
Uwaga!
Uniwersalny pilot zdalnego sterowania jest wyposażony
w diodę podczerwieni o klasie lasera 1. W celu uniknięcia
obrażeń oczu, nie używaj w połączeniu z urządzeniami
optycznymi.
Uszkodzenia urządzenia
• Jeżeli urządzenie nie działa prawidłowo, nie należy pró-
bować naprawiać go samodzielnie. W razie uszkodzenia
skontaktuj się z producentem lub jego infolinią serwisową
(patrz karta gwarancyjna).
• W razie dostania się cieczy do wnętrza urządzenia lub
jeżeli urządzenie zostało uszkodzone w inny sposób, konieczne jest sprawdzenie urządzenia przez producenta
lub jego serwis. Skontaktuj się z producentem lub jego infolinią serwisową (patrz wskazówki dotyczące gwarancji).
• Wyjmij baterie z komory baterii, jeżeli są zużyte.
• Jeżeli nie będziesz używał urządzenia przez dłuższy
czas, to wyjmij baterie, aby zapobiec rozładowaniu.
• Przy wymianie należy wymieniać wszystkie baterie za
jednym razem i nie należy używać jednocześnie różnego
typu baterii.
- 29 -
Page 32

Przegląd urządzenia
q Wyświetlacz LCD
w Przycisk /ALL OFF
e Przyciski urządzeń
r Przycisk S
t Przyciski strzałek
y Przycisk EXIT
u Przyciski P +/—
i Przycisk MACRO
o Przyciski cyfrowe
a Przycisk do jedno- lub dwumiejscowych numerów
programów
s
Przyciski funkcyjne wideotekstu
d Przycisk podświetlany
f Przyciski nagrywania/odtwarzania
g Przycisk AV
h Wyciszanie
j
Przyciski VOL +/—
k Przycisk MENU
l Przycisk OK
1( Przycisk FAV / EPG
2) Nadajnik i odbiornik podczerwieni
2! Klapka komory na baterie
Wskazówki:
• Opisane tutaj funkcje dotyczą teoretycznego, wyideali-
zowanego przypadku, w którym struktura przycisków
oryginalnego pilota zdalnego sterowania jest zgodna z
przyciskami tego pilota uniwersalnego. Będzie to jednak
miało miejsce tylko w sporadycznych przypadkach. Brak
możliwości imitacji wszystkich funkcji oryginalnego pilota
zdalnego sterowania nie stanowi więc wady pilota uniwersalnego.
• Wszystkie marki, użyte w tej instrukcji lub w dołączonej
liście kodów, są znakami handlowymi odpowiednich firm.
Uruchomienie
Rozpakowanie urządzenia/sprawdzenie
zakresu dostawy
Ostrzeżenie!
Folię opakowaniową należy trzymać z dala od dzieci.
Występuje zagrożenie uduszeniem!
• Rozpakuj urządzenie i akcesoria.
• Sprawdź zakres dostawy
- uniwersalny pilot zdalnego sterowania (UFB),
- instrukcja obsługi,
- spis producentów z listą kodów urządzeń
- 2 x 1,5 V baterie, typ AAA/LR03 (Micro)
- 30 -
Page 33

Wskazówka: Uszkodzenia podczas
transportu
W przypadku stwierdzenia uszkodzenia transportowego
skontaktuj się z producentem lub udostępnianą przez niego
infolinią (patrz informacje dotyczące gwarancji).
Wkładanie baterii
Uwaga!
Pilot uniwersalny może być użytkowany wyłącznie z bateriami
1,5 V (wielkości AAA, LR03).
Wymianę baterii przeprowadź szybko. Dokonane ustawienia pozostają zapamiętane przez ok. 1 minutę. Jeżeli
w przeciągu tego czasu nie włożysz nowych baterii, to
konieczne będzie ponowne przeprowadzenie wszystkich
ustawień. Ustawienie czasu i daty zawsze zostanie utracone.
1. Otwórz klapkę komory na baterie 2! w kierunku strzałki.
2. Włóż baterie zgodnie z ilustracją, a następnie zamknij
komorę baterii.
Wyświetlacz q jest aktywny, dopóki włożone są baterie.
Poniższa ilustracja pokazuje wyświetlacz LCD q po włożeniu
lub wymianie baterii.
Wskazówka:
Jeżeli wyświetlacz LCD q pozostanie nieaktywny, sprawdź
biegunowość baterii lub załóż nowe baterie.
- 31 -
Page 34

Elementy obsługi
Wyświetlacz LCD
Wyświetlacz LCD q jest podzielony na pola.
Pole tekstowe 2@
Pokazywane jest tutaj aktualnie wybrane urządzenie, na
przykład DVD, TV, VCR itp.
Symbol podczerwieni 2#
Przy każdym naciśnięciu przycisku, powodującym wysłanie
podczerwonego sygnału, zaświeca symbol podczerwieni.
Pole z kodem/czasem 2$
Tutaj wyświetla się kod wybranego urządzenia lub czas.
Przy wyświetlaniu czasu miga „
Pole dni tygodnia 2%
Tutaj wyświetlają się skrócone nazwy angielskich dni
tygodnia po wprowadzeniu daty.
MON
= Monday = Poniedziałek
TUE = Tuesday = Wtorek
WED = Wednesday = Środa
= Thursday = Czwartek
THU
FRI = Friday = Piątek
SUN = Saturday = Sobota
Sun = Sunday = Niedziela
Wskazanie standardowe:
Standardowe wskazanie na wyświetlaczu LCD q składa
się z informacji o aktualnym urządzeniu, np. „TV”, skrótowej
nazwy dnia tygodnia i wskazania godziny.
:” między cyframi.
- 32 -
Page 35

Przyciski
Wskazówka:
Wszystkie opisane tutaj funkcje mogą być oczywiście używane tylko pod warunkiem, że są one obsługiwane przez
sterowane urządzenie.
Przycisk
/ALL OFF w
Włączanie/wyłączanie urządzenia; naciśnij
i przytrzymaj przez 5 sekund, by włączyć/
wyłączyć urządzenie.
Przyciski urządzeń e
Za pomocą przycisków urządzeń możesz wybrać to urządzenie, które będzie obsługiwane:
telewizor
magnetowid
urządzenie dodatkowe 1
dekoder telewizji kablowej
odtwarzacz płyt CD
analogowy dekoder telewizji satelitarnej
wzmacniacz dźwiękowy
odtwarzacz płyt DVD
cyfrowy dekoder telewizji satelitarnej
urządzenie dodatkowe 2
Przedstawione przyporządkowanie klawiszy nie jest obligatoryjne. Tak więc możesz też przykładowo zaprogramować kod magnetowidu również na miejscu odbiornika
telewizyjnego.
Przycisk „S” r
Naciśnij przycisk i przytrzymaj 3 sekundy,
by wybrać menu SETUP (KONFIGURACJA),
naciśnij krótko, by wyświetlić datę, wzgl.
wybrać funkcję dodatkowe, takie jak EPG
lub PIP.
Przyciski strzałek t
Poruszanie po menu do góry, w prawo,
w dół i w lewo.
Przycisk EXIT y
W menu powrót o jeden poziom.
Przyciski P +/— u
Zmienia kanał odbioru.
- 33 -
Page 36

Przycisk MACRO i
Naciśnięcie przycisku MACRO i, a na-
stępnie po nim przycisku cyfrowego o 1-6,
uruchamia poprzednio zarejestrowany ciąg
poleceń.
Przyciski cyfrowe o
Wprowadź numery programu i kodu
urządzenia.
Przycisk do jedno/lub dwumiejscowych numerów
programów a
W celu wpisania dwumiejscowego numeru
programu (w zależności od typu urządzenia), naciśnij przycisk a, a następnie przyciskami cyfrowymi o wpisz numer programu.
Ponowne naciśnięcie tego przycisku przełącza wyświetlacz z powrotem na wskazania jednocyfrowe.
Przyciski funkcyjne wideotekstu s
W trybie teletekstu przyciski mają następujące funkcje:
Wyświetl funkcję wideotekstu.
Podczas zwykłego oglądania telewizji
naciśnij najpierw przycisk S r, a
następnie przycisk , by móc korzystać
z funkcji „PIP” (obraz w obrazie)
odbiornika telewizyjnego.
Zatrzymaj automatyczne przechodzenie
do następnej strony wideotekstu.
Powiększenie widoku strony.
Widok tekstu nałożonego na obraz.
Zakończenie funkcji wideotekstu.
Wskazówki:
• Funkcja wideotekstu jest dostępna tylko w europejskim
trybie TV, a odbiornik TV musi posiadać moduł teletekstu.
• Ponadto przyciski P +/- u sterują następującymi funkcja-
mi teletekstu:
Przejście na następną stronę.
P +
P — Przejście na poprzednią stronę.
Przyciski nagrywania/odtwarzania f
Przyciski odtwarzania f sterują urządzeniami takimi jak
odtwarzacze DVD/CD czy magnetowidy:
Odtwarzanie
ASPECT Zmiana formatu obrazu w obsłudze TV
- 34 -
Page 37

Nagrywanie
Zatrzymywanie odtwarzania/nagrywania
Zatrzymanie odtwarzania
Cofanie
Przewijanie do przodu
Przycisk AV g
Przełączanie na wejście AV.
Wyciszanie h
Włącz/wyłącz dźwięk.
Przyciski VOL+/— j
Ustawianie głośności (Volume).
Przycisk MENU k
Wywołuje menu sterowanego urządzenia.
Przycisk OK l
Za pomocą przycisku OK zatwierdź wybór menu.
Przycisk FAV/EPG 1(
Naciśnij przycisk FAV/EPG, by wybrać wcześnie
zaprogramowane ulubione stacje. Następnie naciśnij krótko przycisk S r, a następnie przycisk FAV/
EPG, by wybrać funkcję elektronicznego przewodnika programowego (EPG).
SETUP - ustawienia systemowe
Ustawienia systemowe zawierają następujące możliwości:
• Zaprogramowanie pilota zdalnego sterowania do stero-
wanych urządzeń
• Ustawianie czasu, daty, kontrastu wyświetlacza,
podświetlenia, głośności, funkcji Lock i resetu
• Ustawienia licznika czasu
• ”Uczenie” określonych poleceń przycisków
• Tworzenie poleceń makro
• Ustalanie ulubionych
Na następnej stronie przedstawiono przegląd struktury menu.
- 35 -
Page 38

- 36 -
Page 39

Code Setup (programowanie pilota zdalnego
sterowania)
Programowanie pilota jest możliwe na trzy sposoby:
Programowanie przez wyszukiwanie kodu marki, przez
automatyczne wyszukiwanie kodu lub przez bezpośrednie
(ręczne) wprowadzenie kodu.
Na początek najlepiej skorzystaj z kodu marki, gdyż jest to
najszybsza metoda programowania, jeżeli producent Twojego urządzenia znajduje się na liście kodów. W drugiej
kolejności zalecane jest bezpośrednie wprowadzenie kodu,
a dopiero na końcu automatyczne wyszukiwanie kodu.
Programowanie przez wyszukiwanie kodu
marki
W przypadku tej metody wybierasz na wyświetlaczu LCD q
markę i kod.
Aby zaprogramować pilota zdalnego sterowania wykonaj
poniższe operacje:
1.
Naciśnij przycisk tego urządzenia e, do którego chcesz
zaprogramować pilota.
Naciśnij i przytrzymaj przycisk S r przez nieco ponad
2.
3 sekundy. Nie przerywaj edycji menu, ponieważ po około
15 sekundach bezczynności menu zostanie zamknięte.
3. Na wyświetlaczu LCD q pojawia się napis „CODE SE-
TUP”. Naciśnij przycisk OK l. Na wyświetlaczu LCD q
wyświetla się teraz napis „ENTER CODE”. Za pomocą
przycisków t wybierz pozycję „BRAND CODE”
i zatwierdź wybór przyciskiem OK l.
4. Pojawia się pierwsza nazwa marki z posegregowanej
alfabetycznie listy predefiniowanych urządzeń.
5. Za pomocą przycisków 34 t możesz wybrać po-
szczególne marki.
6. Dla ułatwienia dostępu za pomocą przycisków cyfro-
wych o możesz przejść bezpośrednio do wybranej
litery początkowej:
2 => A 3 => D 4 => G 5 => J
6 => M 7 => P 8 => T 9 => W
Przykład: Przycisk 5 przesuwa wskazanie do litery „J”.
Pierwszą marką jest „JVC”*. Jeżeli posiadasz na przykład urządzenie marki „Kenwood”*, to przyciskiem 4
t poruszaj się w do przodu, aż pojawi się ta nazwa
marki. (* Wszystkie wymienione tutaj nazwy marek są
znakami handlowymi odpowiednich firm.)
Większość producentów stosuje kilka różnych kodów
7.
dla pilotów zdalnego sterowania. Musisz teraz stwierdzić, który z dostępnych kodów najlepiej pasuje do
Twojego urządzenia. Z prawej strony pod nazwą marki
na wyświetlaczu LCD q wyświetla się aktualny kod.
- 37 -
Page 40

8. Skieruj pilota zdalnego sterowania na dane urządzenie
i naciskaj przyciski funkcyjne, aby przetestować kod (za
wyjątkiem przycisków
przycisków cyfrowych o).
Jeżeli większość przycisków działa, naciśnij OK l, aby
9.
zapisać ustawienia. Na wyświetlaczu LCD q wyświetla
się „OK”. Na końcu menu automatycznie się zamyka.
10. Jeżeli nie działają żadne przyciski lub działa tylko kilka
z nich, to za pomocą przycisku
wybierz następny kod i przeprowadź test, opisany
w punkcie 8.
11.
Przyciskiem EXIT y możesz przejść w menu o jeden
poziom wyżej.
Powtarzaj te operacje dla wszystkich urządzeń, które
chcesz sterować za pomocą pilota.
34t, OK l, EXIT y lub
lub przycisku t
Programowanie przez ręczne wpisywanie kodu
W tym trybie możesz zaprogramować pilota zdalnego sterowania przez bezpośrednie wprowadzenie numeru kodu.
Potrzebny numer kodu możesz sprawdzić w dołączonym
spisie producentów z listą kodów urządzeń. Jeżeli nowy
kod jest niedopuszczalny, to urządzenie odtworzy ostatnio
zaprogramowany, dopuszczalny kod.
Naciśnij przycisk tego urządzenia e, do którego chcesz
1.
zaprogramować pilota.
Naciśnij i przytrzymaj przycisk S r przez nieco ponad
2.
3 sekundy.
Na wyświetlaczu LCD q pojawia się „CODE SETUP”.
3.
Naciśnij przycisk OK l. Na wyświetlaczu LCD q wyświetla się teraz napis. W celu wyświetlenia tej funkcji
naciśnij przycisk OK l.
Na wyświetlaczu LCD q wyświetla się dotychczasowy
4.
kod wybranego urządzenia. Miga teraz pierwsze
miejsce kodu, które czeka na wprowadzenie cyfry. Za
pomocą przycisków cyfrowych o wpisz nowy czteromiejscowy kod.
5. Po wprowadzeniu prawidłowego KODU, zostanie on
zapamiętany. Na wyświetlaczu LCD q wyświetla się na
chwilę napis „OK”. Na końcu menu automatycznie się
zamyka. W razie niepowodzenia na wyświetlaczu q
wyświetla się na chwilę napis „ERROR” (błąd) i czeka
na ponowne wpisanie kodu. Powtórz wtedy krok 4.
Za pomocą przycisku EXIT y możesz przejść w menu
6.
o jeden poziom wyżej.
Programowanie przez automatyczne
wyszukiwanie kodu
Ten proces może potrwać do kilku minut na urządzenie, gdyż
konieczne jest wypróbowanie wszystkich kodów dla wybranego urządzenia. Dlatego powinieneś korzystać z tej metody tylko wtedy, jeżeli zaprogramowanie urządzenia przez
wyszukiwanie kodu marki lub bezpośrednie wprowadzanie
- 38 -
Page 41

kodu jest niemożliwe, albo jeżeli Twoje urządzenie nie jest
w ogóle podane na wykazie producentów z listą kodów
urządzeń.
Wykonaj poniższe operacje, aby przeprowadzić programowanie za pomocą automatycznego wyszukiwania kodu.
1.
Naciśnij przycisk urządzenia e, którym chcesz sterować
(np. VCR).
2. Włącz urządzenie, które ma być sterowane za pomocą
pilota zdalnego sterowania. W przypadku urządzeń VCR/
DVD/CD włóż ponadto kasetę lub płytę do urządzenia.
Naciśnij i przytrzymaj przycisk S r przez nieco ponad
3.
3 sekundy.
Na wyświetlaczu LCD q pojawia się „CODE SETUP”.
4.
Naciśnij przycisk OK l. Na wyświetlaczu LCD q
wyświetla się teraz napis „ENTER CODE”. Naciskaj
przycisk lub przycisk t, aż na wyświetlaczu q
wyświetli się napis „SEARCH CODE”. Skieruj pilota
zdalnego sterowania na dane urządzenie, a następnie
naciśnij przycisk OK l, by wyświetlić tryb „automatycznego wyszukiwania kodu”.
Wyszukiwanie rozpoczyna się. Urządzenie rozpocznie
5.
wysyłanie kolejno liczb kodów w kolejności rosnącej. Jest
to sygnalizowane miganiem symbolu podczerwieni 2#.
Gdy urządzenie zareaguje wyłączeniem się, naciśnij od
6.
razu przycisk OK l, by zapisać aktualny kod. Na wyświetlaczu LCD q wyświetla się na chwilę napis „OK”.
7.
Sprawdź, czy teraz większość funkcji urządzenia może
być sterowana za pomocą pilota. Jeśli tak jest, prawdopodobnie wybrałeś prawidłowy kod. Jeżeli kilka funkcji
nie działa, to możesz ponownie rozpocząć automatyczne wyszukiwanie kodu od kroku 1.
Wskazówka:
Przy ponownym wyszukiwaniu kodu skieruj pilota zdal-
nego sterowania na urządzenie docelowe dopiero
wtedy, gdy wcześniej znaleziony, nieodpowiedni kod
będzie już nieaktualny.
8.
Gdy jednak urządzenie nie będzie reagowało, prawdo-
podobnie w kroku 6 nie nacisnąłeś dostatecznie szybko
przycisku OK l. Następnie naciśnij kilka razy przycisk
EXIT y, by zakończyć menu i powrócić do standardowego widoku wyświetlacza.
Teraz naciśnij i przytrzymaj przycisk urządzenia e, do
9.
którego szukasz pasującego kodu. Na dole z prawej
strony na wyświetlaczu LCD q wyświetla się aktualny
kod. Zapamiętaj tę liczbę.
10. Następnie postępuj zgodnie z opisem podanym w po-
przednim rozdziale „Programowanie przez ręczne wpi-
sywanie kodu” i sprawdź, czy działa kod z następną
niższą kombinacją liczb.
- 39 -
Page 42

Wskazówki:
1. Przy wybranej funkcji wyszukiwania kodu wszystkie przy-
ciski z wyjątkiem przycisku OK l i EXIT y nie działają.
2. Gdy automatyczne wyszukiwanie dotrze do końca listy, to
proces zostaje tam zatrzymany. Widok na wyświetlaczu
powraca do napisu „SEARCH CODE”.
System-Setup
Ustawianie godziny
Wyświetlacz LCD q pokazuje godzinę. Sposób ustawiania
godziny:
1.
Naciśnij i przytrzymaj przycisk S r przez nieco ponad
3 sekundy. Na wyświetlaczu wyświetla się napis „CODE
SETUP”. Jeżeli przerwiesz edycję na około 15 sekund,
menu zostanie zamknięte i ponownie wyświetli się widok
standardowy.
2. Za pomocą przycisku lub przycisku t wybierz
„SYSTEM SETUP” i zatwierdź wybór przyciskiem OK l.
Na wyświetlaczu LCD q pojawia się „TIME SETUP”.
3.
Zatwierdź wybór przyciskiem OK l. Na wyświetlaczu
LCD q wyświetla się teraz napis „TIME” i miga format
czasu (24 HR).
4. Za pomocą przycisku lub przycisku t możesz
przełączyć na inny format czasu (12 HR). Następnie w
widoku czasu przed godziną wyświetla się wskazanie
pory dnia „A” lub „P”. „A” oznacza „AM” = „ante meridium” (przedpołudnie, 0:00–12:00 godz.). „P” oznacza „PM” = „post meridium” (popołudniu, 12:00–0:00
godz.). Naciśnij przycisk OK l, by zatwierdzić wybór.
W tym momencie miga wskazanie godzin. Za pomocą
5.
przycisku lub przycisku t wybierz liczbę godzin
aktualnego czasu, a następnie naciśnij przycisk OK l.
W tym momencie miga wskazanie minut. Za pomocą
6.
przycisku lub przycisku t wybierz liczbę minut
aktualnego czasu, a następnie naciśnij przycisk OK l.
Ponownie wyświetla się napis „TIME SETUP”.
By zakończyć to lub następne menu, naciskaj przycisk
7.
EXIT y dotąd, aż na wyświetlaczu LCD q wyświetli się
widok standardowy.
Ustawianie daty
Na wyświetlaczu LCD q wyświetla się data po naciśnięciu
przycisku S r. Ustawianie daty:
1.
Naciśnij i przytrzymaj przycisk S r przez nieco ponad
3 sekundy. Na wyświetlaczu wyświetla się napis „CODE
SETUP”.
Za pomocą przycisku lub przycisku t wybierz
2.
menu „SYSTEM SETUP” i zatwierdź wybór przyciskiem
OK l.
Na wyświetlaczu LCD q pojawia się „TIME SETUP”.
3.
Naciśnij przycisk t, aby przejść do menu „DATE
- 40 -
Page 43

SETUP”. Zatwierdź wybór przyciskiem OK l.
Na wyświetlaczu miga liczba roku „2010”. Za pomocą
4.
przycisku lub przycisku t możesz zmienić liczbę
roku i zatwierdzić przyciskiem OK l. Za pomocą przycisku lub przycisku t możesz teraz zmienić migającą liczbę miesięcy i zatwierdzić wybór przyciskiem
OK l. Zaczyna migać wskazanie dni, które również
możesz zmienić za pomocą przycisku lub przycisku
t.
Naciśnij przycisk OK l w celu zapisania nowych usta-
5.
wień. Ponownie wyświetla się napis „DATE SETUP”.
Ustawianie kontrastu
Kontrast wyświetlacza możesz ustawić w następujący sposób:
1.
Naciśnij i przytrzymaj przycisk S r przez nieco ponad
3 sekundy. Na wyświetlaczu wyświetla się napis „CODE
SETUP”.
Za pomocą przycisku lub przycisku t wybierz
2.
menu „SYSTEM SETUP” i zatwierdź wybór przyciskiem
OK l.
Za pomocą przycisku lub przycisku t wybierz
3.
menu „CONTRAST SETUP” i zatwierdź wybór przyciskiem OK l.
Na wyświetlaczu LCD q miga teraz wartość kontrastu,
4.
którą możesz ustawić za pomocą przycisku lub przycisku t:
Wskazanie na wyświetlaczu:
0 = największy kontrast
15 = najniższy kontrast
Przyciskiem OK l zapisz wybrane ustawienie. Ponownie
5.
wyświetla się napis „CONTRAST SETUP”.
Podświetlenie
Możesz ustawić czas podświetlenia wyświetlacza LCD q
i przycisków po zakończeniu obsługi. Pamiętaj, że dłuższy
czas podświetlenia oznacza krótszy czas pracy baterii.
1.
Naciśnij i przytrzymaj przycisk S r przez nieco ponad
3 sekundy. Na wyświetlaczu wyświetla się napis „CODE
SETUP”.
Za pomocą przycisku lub przycisku t wybierz
2.
menu „SYSTEM SETUP” i zatwierdź wybór przyciskiem
OK l.
Za pomocą przycisku lub przycisku t wybierz
3.
menu „BACKLIT SETUP” i zatwierdź wybór przyciskiem
OK l.
Na wyświetlaczu LCD q miga teraz wskazanie sekund
4.
czasu podświetlenia, które możesz ustawić za pomocą
przycisków t w zakresie od 0 do 60 sekund.
W przypadku wybrania ustawienie „0”, podświetlenie
jest wyłączone.
Przyciskiem OK l zapisz wybrane ustawienie. Ponownie
5.
wyświetla się napis „BACKLIT SETUP”.
- 41 -
Page 44

Ustawianie wspólnej głośności/wyłączenia
dźwięku
Aby za każdym razem podczas ustawiania głośności i
wyłączania głosu nie trzeba było dodatkowo najpierw
naciskać przycisku urządzenia, piolot zdalnego sterowania w tych funkcjach będzie zawsze uruchamiał jedno i
to samo urządzenie, standardowo odbiornik telewizyjny.
Urządzenie docelowe w tych funkcjach możesz dowolnie
zdefiniować.
Naciśnij i przytrzymaj przycisk S r przez nieco ponad
1.
3 sekundy. Na wyświetlaczu wyświetla się napis „CODE
SETUP”.
2. Za pomocą przycisku lub przycisku t wybierz
menu „SYSTEM SETUP” i zatwierdź wybór przyciskiem
OK l.
3. Za pomocą przycisku lub przycisku t wybierz
menu „VOL/MUTE SETUP” i zatwierdź wybór przyciskiem
OK l.
4. Wyświetlacz LCD q wyświetla napis „ALL VOL SET”.
Naciśnij przycisk OK l, na wyświetlaczu wyświetla
się „ALL VOL MODE”.
5. Teraz naciśnij przycisk e w urządzeniu, które będzie
sterowane za pośrednictwem funkcji wspólnej regulacji
głośności.
6. Gdy podane urządzenie będzie wyposażone w funkcję
regulacji głośności, przez chwilę wyświetli się napis
„SUCCESS” (= POWODZENIE) u menu zostanie zamknięte. Od tej chwili regulacja głośności będzie działała na zdefiniowane urządzenie.
7. Gdy zdefiniowane urządzenie nie będzie wyposażone
w niezależną regulację głośności, pilot zdalnego sterowania nie zezwoli na wybranie tego urządzenia i wyświetli
się komunikat „VOLUME ERROR” (= BŁĄD). Wtedy również menu zostanie zamknięte. Od tej chwili regulacja
głośności będzie działała na dotychczas zdefiniowane
urządzenie.
Możesz też wyłączyć funkcję wspólnej regulacji głośności
w konkretnych urządzeniach.
1. W tym celu w menu VOL/MUTE SETUP przyciskiem
lub przyciskiem t wybierz funkcję MODE VOL SET
i zatwierdź wybór przyciskiem OK l.
Teraz naciśnij przycisk e w urządzeniu, które będzie
2.
wyłączone ze sterowania za pośrednictwem funkcji
wspólnej regulacji głośności. Na wyświetlaczu LCD q
wyświetla się komunikat „SUCCESS” (POWODZENIE)
i funkcja wspólnej regulacji głośności wyłączy się, gdy
pilot zdalnego sterowania będzie pracował w trybie
pracy jednego z wybranych urządzeń.
W menu VOL/MUTE SETUP możesz też ponownie skasować
ustawienia.
- 42 -
Page 45

1. W tym celu w menu VOL/MUTE SETUP przyciskiem
lub przyciskiem t wybierz funkcję VOL/MUTE
RESET i zatwierdź wybór przyciskiem OK l.
Komunikat na wyświetlaczu LCD q CONFIRM RESET
2.
informuje o konieczności zatwierdzenia skasowania
ustawień przyciskiem OK l. Naciśnij przycisk OK l, by
usunąć ustawienia, wyświetlenie komunikatu SUCCESS
oznacza pomyślne usunięcie ustawień. Albo też naciśnij
przycisk EXIT y, by anulować usuwanie.
Wskazówka:
W przypadku naciśnięcia w tym menu przycisku EXIT y,
nastąpi zamknięcie całego menu.
Ustawianie funkcji Lock
Za pomocą funkcji Lock możesz zablokować dostęp do
wszystkich menu konfiguracji.
1.
Naciśnij i przytrzymaj przycisk S r przez nieco ponad
3 sekundy.
2. Za pomocą przycisku lub przycisku t wybierz
menu „SYSTEM SETUP” i zatwierdź wybór przyciskiem l.
Za pomocą przycisku lub przycisku t wybierz
3.
menu „LOCK SETUP” i zatwierdź wybór przyciskiem
OK l. Na wyświetlaczu LCD q wyświetla się aktualne
ustawienie.
Za pomocą przycisku lub przycisku t wybierz
4.
teraz opcję „LOCK” (blokada włączona) lub „UNLOCK”
(blokada wyłączona).
Przyciskiem OK l zapisz ustawienie. Na wyświetlaczu
5.
LCD q wyświetla się ponownie napis „LOCK SETUP”.
System-Reset
Za pomocą tej funkcji możesz przywrócić ustawienia
fabryczne uniwersalnego pilota zdalnego sterowania.
Wszystkie dotychczas dokonane ustawienia zostaną skasowane.
1.
Naciśnij i przytrzymaj przycisk S r przez nieco ponad
3 sekundy. Na wyświetlaczu wyświetla się napis „CODE
SETUP”.
Za pomocą przycisku lub przycisku t wybierz
2.
menu „SYSTEM SETUP” i zatwierdź wybór przyciskiem
OK l.
Za pomocą przycisku lub przycisku t wybierz
3.
menu „SYSTEM RESET” i zatwierdź wybór przyciskiem
OK l.
Na wyświetlaczu LCD q wyświetla się teraz napis
4.
„CONFIRM RESET”. Skasowanie zatwierdź przyciskiem
OK l. Następnie na wyświetlaczu LCD q wyświetla
się komunikat „SUCCESS RESET”. Wszystkie ustawienia
zostaną teraz skasowane a menu zamknięte. Lub też
zamknij menu, naciskając przycisk EXIT y. Ustawienia
pozostaną wtedy zachowane.
- 43 -
Page 46

Timer Setup
W uniwersalnym pilocie zdalnego sterowania są dostępne
2 tryby licznika czasu, licznik funkcji Sleep i licznik zdarzenia.
Licznik funkcji Sleep
1. Naciśnij przycisk urządzenia e, którym chcesz sterować
(np. VCR).
Naciśnij i przytrzymaj przycisk S r przez nieco ponad
2.
3 sekundy. Na wyświetlaczu wyświetla się napis „CODE
SETUP”.
Naciskaj przycisk lub przycisk t dotąd, aż wy-
3.
świetli się napis „TIMER SETUP”. Naciśnij przycisk OK l,
na wyświetlaczu LCD q wyświetla się napis „TIMER
SLEEP”. Wybór tej funkcji zatwierdź przyciskiem OK l.
Teraz w prawym dolnym rogu wyświetlacza LCD q
4.
miga liczba minut pozostałego czasu pracy wybranego
urządzenia. Za pomocą przycisku lub przycisku t
ustaw odpowiednią wartość w zakresie od 1 do 99 minut. Naciśnij przycisk OK l, by zatwierdzić wybór. Przy
zaprogramowanym zegarze funkcji Sleep na wyświetlaczu LCD q wyświetla się z prawej strony czasu symbol
z
z
”.
„
5. Skieruj pilota w taki sposób, by jego sygnały podczer-
wieni mogły dojść do wyłączanego urządzenia. Po
upływie ustawionego czasu pilot zdalnego sterowania
wyłączy urządzenie.
6. Gdy teraz naciśniesz przycisk S r, w lewym dolnym
rogu wyświetlacza LCD wyświetli się napis q „SL”.
Licznik zdarzenia
Pilot zdalnego sterowania obsługuje 4 liczniki zdarzenia,
za pośrednictwem których można o określonym czasie
wysłać ustalone serie kombinacje przycisków.
Naciśnij i przytrzymaj przycisk S r przez nieco ponad
1.
3 sekundy. Na wyświetlaczu wyświetla się napis „CODE
SETUP”.
2. Za pomocą przycisku lub przycisku t wybierz
menu „TIMER SETUP” i zatwierdź wybór przyciskiem
OK l. Na wyświetlaczu LCD q. Wyświetla się teraz
napis „ENTER CODE”. Za pomocą przycisku lub
przycisku t wybierz wolne miejsce w pamięci od
„TIMER SETUP 1” do „TIMER SETUP 4” i zatwierdź
wybór przyciskiem OK l.
3. Teraz miga liczba godzin czasu, po upływie którego
uruchomi się żądana kombinacja przycisków. Za pomocą przycisku lub przycisku t ustaw godzinę i
naciśnij przycisk OK l w celu zatwierdzenia wyboru.
4. Teraz miga liczba minut czasu, po upływie którego uru-
chomi się żądana kombinacja przycisków. Za pomocą
przycisku lub przycisku t ustaw minuty i naciśnij
przycisk OK l w celu zatwierdzenia wyboru.
- 44 -
Page 47

5. Na wyświetlaczu LCD q wyświetla się napis „TIMER X
KEY” (X oznacza żądany licznik czasu). Teraz naciśnij
żądany przycisk urządzenia e i zaraz po tym żądaną
sekwencję poleceń przycisków.
Naciśnij przycisk S r, by zapisać zmiany i powrócić do
6.
przeglądu licznika czasów.
7. Wykonaj analogiczne czynności, by w razie potrzeby za-
programować pozostałe miejsca w pamięci licznika czasu.
Przy zaprogramowanym zegarze funkcji przypinania o
8.
zdarzeniach, na wyświetlaczu q wyświetla się z prawej
strony czasu symbol zegara „
Wskazówki:
1. W każdym miejscu pamięci licznika czasu możesz za-
programować maksymalnie 14 przycisków. Po wprowadzeniu 14 przycisku sekwencja zostanie automatycznie
zaprogramowania i na wyświetlaczu LCD q wyświetla
się napis „FULL”.
2. Również tym menu urządzenie po upływie około 15
sekund przerwy w edycji powróci do widoku standardowego.
”.
Learn Setup
Uniwersalny pilot zdalnego sterowania (PU) może odczytać
i zapamiętać sygnały oryginalnego pilota zdalnego sterowania. Jeżeli opisane powyżej metody nie zapewnią działania
PU lub nie pozwolą mu wykonywać wszystkich funkcji, to
spróbuj nauczyć PU odpowiednich poleceń przy użyciu
oryginalnego pilota lub pilotów.
• Załóż nowe baterie do PU i do oryginalnego pilota zdal-
nego sterowania.
• Zachowaj co najmniej jeden metr odstępu od innych
źródeł światła. Źródła światła mogą zakłócić wysyłanie
promieni podczerwieni.
• Połóż uniwersalnego pilota zdalnego sterowania i ory-
ginalnego pilot urządzenia w odległości 20–50 cm od
siebie na płaskim podłożu tak, by diody podczerwieni
2) były skierowane do siebie.
Wskazówki:
1. Podczas funkcji uczenia nie używaj następujących przy-
cisków: wszystkie przyciski urządzenia e, MACRO i,
przycisk S r, EXIT y.
2. Naciśnij krótko przycisk na oryginalnym pilocie zdalne-
go sterowania. Gdy na wyświetlaczu LCD q wyświetli
się ponownie komunikat „SUCCESS”, polecenie przycisku zostało pomyślnie zaprogramowane. Gdy jednak
wyświetli się komunikat „LEARN ERROR” (BŁĄD PROGRAMOWANIA), musisz powtórzyć operację.
3. Gdy podczas trwania uczenia i wyświetlania napisu
„LEARNING” (uczenie) po 30 sekundach nie zostanie
naciśnięty żaden przycisk na oryginalnym pilocie zdal-
- 45 -
Page 48

nego sterowania, menu uczenia zostanie zakończone.
Tego menu nie można zakończyć poprzez naciśnięcie
przycisku na uniwersalnym pilocie zdalnego sterowania.
W pamięci mieści się łącznie 150 poleceń. Jeżeli pa-
4.
mięć jest pełna, to na wyświetlaczu LCD q wyświetli się
napis „MEM FULL”, a tryb uczenia zostaje zakończony.
Za pomocą przycisku EXIT y przywróć poprzedni stan
5.
(wyjątek stanowi wyświetlanie napisu „LEARN KEY”
wzgl. „LEARNING”).
Funkcja uczenia kodów
1. Naciśnij przycisk urządzenia e, do którego uniwersalny
pilot zdalnego sterowania nauczy się kodu przycisku.
Naciśnij i przytrzymaj przycisk S r przez nieco ponad
2.
3 sekundy. Na wyświetlaczu wyświetla się napis „CODE
SETUP”.
3. Za pomocą przycisku lub przycisku t wybierz
menu „LEARN SETUP” (uczenie) i naciśnij przycisk OK l.
Na wyświetlaczu LCD q wyświetla się napis „LEARN
4.
SET”. Następnie naciśnij przycisk OK l. Na wyświetlaczu LCD q wyświetla się napis „LEARN KEY” (wybierz
przycisk).
Naciśnij najpierw ten przycisk PU, który ma zostać za-
5.
programowany (”nauczony”). Na wyświetlaczu LCD q
wyświetla się napis „LEARNING”. Uniwersalny pilot zdalnego sterowania czeka teraz na sygnał podczerwieni od
oryginalnego pilota zdalnego sterowania.
Wskazówka:
Jeżeli napis na wyświetlaczu nie zmieni się na „LEARNING”, wybrałeś przycisk, do którego uniwersalny pilot
zdalnego sterowania nie może się nauczyć kodu.
Ustaw czujniki podczerwieni 2) obu pilotów zdalnego
6.
sterowania naprzeciwko siebie.
Naciśnij i przytrzymaj teraz wymagany przycisk orygi-
7.
nalnego pilota, aż na wyświetlaczu LCD q uniwersalnego pilota zdalnego sterowania wyświetli się napis
„SUCCESS” lub „LEARN ERROR”.
Gdy na wyświetlaczu LCD q pojawi się „SUCCESS”
8.
(operacja zakończona pomyślnie), to możesz programować następne przyciski, rozpoczynając od kroku 5.
Jeżeli pojawi się „LEARN ERROR” (proces nie powiódł
się), to powtórz operację również od kroku 5.
W celu przerwania/zakonczenia operacji programowa-
9.
nia, przy wskazaniu „LEARN SET” naciskaj przycisk EXIT
y dotąd, aż na wyświetlaczu q wyświetli się wskazanie standardowe. Przy wyświetlanym napisie „LEARN
KEY” wzgl. „LEARNING” zaczekaj 30 sekund bez naciskania żadnego przycisku, aż do zamknięcia menu.
Usunac wszystkie zaprogramowane przyciski wszystkich urzadzen
Naciśnij i przytrzymaj przycisk S r przez nieco ponad
1.
3 sekundy. Na wyświetlaczu wyświetla się napis „CODE
SETUP”.
- 46 -
Page 49

2. Za pomocą przycisku lub przycisku t wybierz
menu „LEARN SETUP” i naciśnij przycisk OK l. Na wyświetlaczu LCD q wyświetla się napis „LEARN SET”.
Za pomocą przycisku lub przycisku t wybierz
3.
menu „LEARN CLEAR” (usuń nauczone) i zatwierdź
wybór przyciskiem OK l. Na wyświetlaczu LCD q
wyświetla się napis „CONFIRM CLEAR” (zatwierdź usunięcie).
Zatwierdź wybór przyciskiem OK l. Na wyświetlaczu
4.
LCD q wyświetla się napis „SUCCESS”. Wszystkie
zaprogramowane przycisku zostały usunięte. Na końcu
menu automatycznie się zamyka.
Wskazówka:
Gdy na wyświetlaczu LCD wyświetli się napis „CONFIRM
CLEAR”, możesz przerwać usuwanie przyciskiem EXIT y.
Makro Setup
Za pomocą funkcji MAKRO można wykonywać razem do
16 pojedynczych poleceń przez naciśnięcie jednego przycisku. Oznacza to, że jeden przycisk MAKRO może wykonać kilka zapamiętanych wcześniej poleceń sterujących.
Masz do dyspozycji 6 pamięci makr.
Rejestrowanie makra
W celu zaprogramowania makro postępuj w następujący
sposób:
Naciśnij i przytrzymaj przycisk S r przez nieco ponad
1.
3 sekundy. Na wyświetlaczu wyświetla się napis „CODE
SETUP”.
Za pomocą przycisku lub przycisku t wybierz
2.
menu „MACRO SETUP” i zatwierdź wybór przyciskiem
OK l. Na wyświetlaczu wyświetla się napis „MACRO
SETUP 1”.
Za pomocą przycisku lub przycisku t wybierz
3.
miejsce w pamięci do zarejestrowania makra (MACRO
SETUP 1 - 6) i zatwierdź wybór przyciskiem OK l.
Na wyświetlaczu LCD q wyświetla się napis „MACRO
4.
STEP”. Następnie naciśnij kolejno żądane przyciski
(maks. 16). Sekwencja powinna rozpoczynać się od
przycisku urządzenia e.
Standardowo polecenia makr są wysyłane w odstępach
5.
czasowych co 1 sekundę. Ponieważ niektóre urządzenia reagują z pewnym opóźnieniem, może się zdarzyć,
że sekwencja poleceń makro będzie wysyłana do urządzenia zbyt szybko. Można wtedy zaprogramować
przerwę 5–21 sekund przed wysłaniem polecenia
przyciskiem. W tym celu ponownie naciśnij przycisk
MACRO i. W dolnym prawym rogu wyświetlacza LCD
q wyświetla się bieżąca długość przerwy w sekundach.
Po osiągnięciu maksymalnej ilości poleceń przycisków,
6.
na wyświetlaczu LCD q wyświetla się napis „FULL”.
- 47 -
Page 50

7. Zapisz wprowadzoną sekwencję przyciskiem S r.
Na wyświetlaczu LCD q wyświetla się napis „MACRO
SETUP”.
8. Jeżeli wybierając zarejestrowane makro (krok 3) za-
znaczysz już zajęte miejsce w pamięci, istniejące makro
zostanie nadpisane.
9. Powtarzaj operacje od kroku 3, aby zaprogramować
inne makra.
10.
Za pomocą przycisku EXIT y przejdziesz do poziomu
wyżej menu, z wyjątkiem funkcji wprowadzania pole-
ceń przycisków.
Wskazówki:
1. W ramach jednego makro możesz zapamiętać maksy-
malnie 16 pojedynczych poleceń przycisków. Po wprowadzeniu 16 polecenia przycisku, na wyświetlaczu LCD
wyświetla się komunikat „FULL” q.
2. By zakończyć tryb bez wprowadzenia zmian, zaczekaj
około 15 sekund bez naciskania żadnego przycisku.
W trybie „MACRO STEP” możesz teraz za pomocą
3.
przycisku S r powrócić do poprzedniego stanu.
Przykład: Chcesz zapisać ciąg poleceń w makro. Zacznij
od trybu „MACRO STEP”.
Wymagany ciąg poleceń: Włącz TV => PRZERWA =>
przełącz na wejście AV => włącz DVD => PRZERWA =>
odtwarzaj DVD.
W trybie „MACRO STEP” wprowadź w tym celu przyciskami
następujące polecenia:
=> => (czas przerwy) => =>
=> => (czas przerwy) =>
Wykonywanie makra
Aby wykonać zaprogramowane wcześniej makro postępuj
w następujący sposób:
1.
Naciśnij przycisk MACRO i.
Za pomocą odpowiedniego przycisku cyfrowego o
2.
otwórz żądane makro (1-6). Przykład: By wykonać makro
3, naciśnij przycisk MACRO i, a następnie w ciągu
5 sekund przycisk cyfrowy „
”.
Usuwanie wszystkich makr
Aby skasować zaprogramowane wcześniej wszystkie makra
postępuj w następujący sposób:
1.
Naciśnij i przytrzymaj przycisk S r przez nieco ponad
3 sekundy. Na wyświetlaczu wyświetla się napis „CODE
SETUP”.
Za pomocą przycisku lub przycisku t wybierz
2.
menu „MACRO SETUP” i zatwierdź wybór przyciskiem
OK l. Na wyświetlaczu wyświetla się napis „MACRO
SETUP 1”.
- 48 -
Page 51

3. Za pomocą przycisku lub przycisku t wybierz
menu „MACRO CLEAR” i zatwierdź wybór przyciskiem l.
Na wyświetlaczu LCD q wyświetla się napis „CON-
4.
FIRM CLEAR” (zatwierdź usunięcie). Zatwierdź usunięcie przyciskiem OK l. Na wyświetlaczu LCD q wyświetli się napis „SUCCESS”. Wszystkie makra zostaną
skasowane a menu zamknięte.
Wskazówki:
1. Gdy na wyświetlaczu LCD q wyświetli się napis „CON-
FIRM CLEAR”, możesz przerwać usuwanie przyciskiem
EXIT y.
2. Pojedynczych makr nie możesz usuwać, tylko możesz je
nadpisywać.
Ulubiony kanał
Wskazówka:
Za pomocą tej funkcji możesz zapisywać wybrane stacje
jako ulubione.
Programowanie ulubionych
Ulubione stacje możesz zapamiętać w następujący sposób:
Naciśnij przycisk tego urządzenia e, do którego chcesz
1.
zapisać ulubione stacje.
Naciśnij i przytrzymaj przycisk S r przez nieco po-
2.
nad 3 sekundy. Na wyświetlaczu wyświetla się napis
„CODE SETUP”.
Za pomocą przycisku lub przycisku t wybierz
3.
menu „FAV CH SETUP” i zatwierdź wybór przyciskiem
OK l. Na wyświetlaczu wyświetla się napis „FAV CH
SETUP 1”.
Za pomocą przycisku lub przycisku t wybierz
4.
miejsce w pamięci do zarejestrowania makra (FAV CH
SETUP 1 - 4) i zatwierdź wybór przyciskiem OK l.
Na wyświetlaczu LCD q wyświetla się napis „FAV CH
5.
STEP”. Teraz naciśnij kolejno przyciski (maks. 4) w celu
wybrania ulubionej stacji.
Po osiągnięciu maksymalnej ilości poleceń przycisków,
6.
na wyświetlaczu LCD q wyświetla się napis „FULL”.
Zapisz wprowadzoną sekwencję przyciskiem S r.
7.
Na wyświetlaczu LCD q wyświetla się napis „FAV CH
SETUP”.
8. Jeżeli wybierając zapamiętaną ulubioną stację (krok 4)
zaznaczysz już zajęte miejsce w pamięci, istniejąca
ulubiona stacja zostanie nadpisana.
9. Powtórz kolejne kroki przy tworzeniu dalszych ulubionych.
10. Za pomocą przycisku EXIT y przejdziesz do poziomu
niżej menu, z wyjątkiem funkcji wprowadzania poleceń
przycisków.
- 49 -
Page 52

Wskazówka:
W zależności od modelu i marki wybranego urządzenia
sposób wprowadzania numerów kanałów może być różny.
Ewentualnie w przypadku kanałów o złożonych numerach
najpierw musisz nacisnąć przycisk
Wybieranie ulubionych
W celu wybrania uprzednio zapamiętanej ulubionej stacji,
naciśnij przycisk FAV/EPG 1(, a następnie odpowiedni
przycisk cyfrowy żądanego miejsca w pamięci (1 - 4).
Kasowanie wszystkich kanałów FAV
Aby skasować zaprogramowane ulubione stacje, postępuj
w następujący sposób:
Naciśnij i przytrzymaj przycisk S r przez nieco ponad
1.
3 sekundy.
Za pomocą przycisku lub przycisku t wybierz
2.
menu „FAV CH SETUP” i zatwierdź wybór przyciskiem
OK l. Na wyświetlaczu wyświetla się napis „FAV CH
SETUP 1”.
Za pomocą przycisku lub przycisku t wybierz
3.
menu „FAV CH CLEAR” i zatwierdź wybór przyciskiem
OK l.
Na wyświetlaczu LCD q wyświetla się napis „CON-
4.
FIRM CLEAR” (zatwierdź usunięcie). Zatwierdź usunięcie przyciskiem OK l. Na wyświetlaczu LCD q wyświetli się napis „SUCCESS”. Wszystkie ulubione stacje
zostaną skasowane a menu zamknięte.
a.
Wskazówki:
1. Gdy na wyświetlaczu LCD q wyświetli się napis „CON-
FIRM CLEAR”, możesz przerwać usuwanie przyciskiem
EXIT y.
2. Pojedynczych ulubionych stacji nie możesz usuwać, tylko
możesz je nadpisywać.
Regulacja głośności
Vol +/-, (wyciszenie)
Naciśnij przycisk „VOL +”, aby zwiększyć głośność.
Przyciskiem „VOL -” możesz zmniejszać głośność. W celu
wyciszenia dźwięku, naciśnij przycisk
naciśnięcie tego przycisku włącza dźwięk z powrotem.
Naciśnięcie przycisków VOL +/— j na uniwersalnym pilocie zdalnego sterowania powinno uruchamiać regulację
głośności odbiornika TV, niezależnie od tego, który przycisk urządzeń e został uprzednio naciśnięty. Nie dotyczy
to jednakże urządzeń „AMP”, „DVD”, „ASAT” i „DSAT”,
gdy można wyjść z założenia, że urządzenia te mają własną regulację głosu.
h. Ponowne
- 50 -
Page 53

Informacje dotyczące obsługi
> Aby móc obsługiwać jedno z zaprogramowanych urzą-
dzeń za pomocą uniwersalnego pilota zdalnego sterowania musisz najpierw nacisnąć odpowiedni przycisk
urządzenia e. Następnie skieruj pilota na urządzenie i
naciśnij wymagany przycisk.
> Korzystaj z przycisków cyfrowych o dokładnie w taki
sam sposób, jak przy korzystaniu z oryginalnego pilota.
Przed wprowadzeniem dwucyfrowej pozycji naciśnij
ewentualnie przycisk
> Naciśnij przycisk FAV/EPG 1(, aby uruchomić elektro-
niczny przewodnik programowy urządzenia, wyposażonego w tę funkcję.
> Gdy naciśniesz przycisk S r, w prawym dolnym rogu
wyświetlacza LCD q przez 10 sekund będzie wyświetlała się data.
> Przy naciśniętym i przytrzymanym przycisku urządzenia
e, w prawym dolnym rogu wyświetlacza LCD q wy-
świetla się kod uaktywniony do tego urządzenia.
> Przyciskiem MENU k możesz wyświetlić ekran usta-
wień danego urządzenia docelowego.
> Naciśnij przycisk podświetlany d, by włączyć wzgl.
wyłączyć podświetlenie wyświetlacza i przycisków.
a.
Wyłącz wszystkie (ALL OFF)
Wskazówki:
Przyciskiem ALL OFF (wyłącz wszystkie) w możesz
automatycznie wyłączyć wszystkie włączone urządzenia.
Za pomocą tej funkcji możesz ponownie włączyć wyłączone wcześniej urządzenia (w zależności od urządzenia). W
tym celu naciśnij i przytrzymaj przez około 5 sekund przycisk ALL OFF w. Powyższe działa tylko pod następującymi
warunkami:
1. Uniwersalny pilot zdalnego sterowania ma zapewnioną
widzialność wszystkich urządzeń.
2. Funkcje automatycznego wyszukiwania kodu, wyszuki-
wania kodu marki i funkcje MAKRO nie są aktywne.
3. Wszystkie urządzenia docelowe muszą obsługiwać
wyłączanie za pomocą pilota zdalnego sterowania.
By ponownie włączyć automatycznie wszystkie urządzenia, ponownie naciśnij i przytrzymaj przycisk
wszystkie urządzenia zostaną włączone.
w, aż
Czyszczenie i przechowywanie
Uwaga!
Podczas czyszczenia należy pamiętać o tym, aby
do wnętrza obudowy nie przedostała się wilgoć!
W przeciwnym razie powstaje niebezpieczeństwo
nieodwracalnego uszkodzenia urządzenia!
- 51 -
Page 54

> Obudowę urządzenia czyść wyłącznie lekko wilgotną
szmatką z delikatnym płynem do mycia.
> Urządzenie przechowuj wyłącznie w otoczeniu spełniają-
cym wymogi podane w rozdziale Dane techniczne.
> Przed odłożeniem urządzenia na dłuższy czas, wyjmij
baterie, by nie spowodowały uszkodzenia urządzenia
gdy wyleją w trakcie przerwy w użytkowaniu.
Błędy i sposoby ich usuwania
Urządzenie nie reaguje na działanie uniwersalnego
pilota zdalnego sterowania.
> Sprawdzić baterie. Muszą mieć wystarczające napięcie
i być prawidłowo włożone.
> Nacisnąłeś wcześniej prawidłowy przycisk e urządze-
nia docelowego?
> Sprawdź, czy dla urządzenie docelowego został za-
programowany prawidłowy kod (patrz rozdział „Code
Setup”).
Uniwersalny pilot zdalnego sterowania nieprawidłowo
przesyła polecenia.
> Naciśnij odpowiedni przycisk urządzenia e, aby prze-
łączyć uniwersalnego pilota zdalnego sterowania na
prawidłowy tryb.
> Baterie muszą mieć wystarczające napięcie i być prawi-
dłowo włożone.
> Być może używasz nieprawidłowego kodu. Rozpocznij
wyszukiwanie kodu marki, automatyczne wyszukiwanie
kodu lub bezpośrednie (ręczne) wprowadzenie kodu.
Uniwersalny pilot zdalnego sterowania nie przełącza
stacji w urządzeniu.
> Naciśnij odpowiedni przycisk urządzenia e, aby prze-
łączyć uniwersalnego pilota zdalnego sterowania na
prawidłowy tryb.
> Jeżeli oryginalny pilot zdalnego sterowania nie posiada
przycisku „-/- -“, to przełączaj programy przyciskami
P +/— u lub przyciskami cyfrowymi o.
> Jeżeli to nie działa, to być może jest aktywna blokada
rodzicielska danego urządzenia.
Niektóre przyciski uniwersalnego pilota zdalnego
sterowania nie działają prawidłowo.
> Uniwersalny pilot zdalnego sterowania może nie obsłu-
giwać wszystkich funkcji oryginalnego pilota.
> Być może nie zaprogramowałeś optymalnego kodu.
Wyszukaj kodu, który będzie obsługiwał więcej funkcji
docelowego urządzenia.
Uniwersalny pilot zdalnego sterowania nie reaguje
na naciskanie przycisków.
> Baterie muszą mieć wystarczające napięcie i być prawi-
dłowo włożone.
- 52 -
Page 55

> Skieruj pilota na urządzenie.
Wyświetlacz LCD q niczego nie pokazuje.
> Baterie muszą mieć wystarczające napięcie i być prawi-
dłowo włożone.
> Ustawiony jest zbyt niski kontrast. Zwiększ ustawienie
kontrastu.
Utylizacja
W żadnym przypadku nie należy wyrzucać
urządzenia do normalnych śmieci domowych.
Produkt jest zgodny z dyrektywą 2002/96/EC.
Uniwersalny pilot zdalnego sterowania
• Uniwersalnego pilota zdalnego sterowania należy utyli-
zować tylko przez właściwe przedsiębiorstwo utylizacji
odpadów lub przez komunalny zakład oczyszczania.
• Przestrzegaj aktualnie obowiązujących przepisów. W
razie pytań i wątpliwości należy skontaktować się z miejscowym przedsiębiorstwem usuwania odpadów.
Baterie i akumulatorki
• Baterii i akumulatorów nie wolno wyrzucać razem ze
śmieciami domowymi.
• Baterie mogą zawierać substancje trujące, szkodliwe dla
środowiska naturalnego. Bateria/akumulatory utylizuj
zawsze zgodnie z obowiązującymi przepisami.
• Każdy konsument jest ustawowo zobowiązany do od-
dawania wszystkich baterii i akumulatorów w punktach
zbiorczych gminy, dzielnicy lub w sklepie. Obowiązek ten
został wprowadzony, aby baterie/akumulatory były usuwane w sposób nieszkodliwy dla środowiska naturalnego.
• Baterie / akumulatory oddawaj zawsze w stanie całko-
witego rozładowania.
Wszystkie materiały wchodzące w skład opakowania należy przekazać do odpowiednich punktów
zbiórki odpadów.
Dane techniczne
Obsługiwane urządzenia: 10
Wymiary
D x S x W: 217 x 50 x 22 mm
Masa: 102 g (bez baterii)
Dioda podczerwieni: Klasa lasera 1
Zasilanie baterie: 2 x 1,5 V typ AAA/
LR03 (Micro)
(znajdują się w zestawie)
Temperatura robocza : + 5 – +35°C
Temperatura przechowywania: -20 – +50 °C
Wilgotność: 5 - 90 %
(przy braku kondensacji)
- 53 -
Page 56

Wskazówka dotycząca zgodności
Urządzenie zostało przetestowane i posiada dopuszczenie w zakresie podstawowych wymagań
i innych obowiązujących przepisów dyrektywy
w sprawie kompatybilności elektromagnetycznej
2004/108/EC .
Importer
KOMPERNASS GMBH
BURGSTRASSE 21
44867 BOCHUM, GERMANY
www.kompernass.com
Gwarancja i serwis
Urządzenie objęte jest trzyletnią gwarancją, licząc od daty
zakupu. Urządzenie zostało starannie wyprodukowane
i poddane skrupulatnej kontroli przed wysyłką. Paragon
należy zachować jako dowód dokonania zakupu. W przypadku napraw gwarancyjnych skontaktuj się telefonicznie
z najbliższym punktem serwisowym. Tylko w ten sposób
można zagwarantować bezpłatną wysyłkę zakupionego
produktu.
Gwarancja obejmuje wyłącznie wady materiałowe i fabryczne, natomiast nie obejmuje części ulegających zużyciu ani uszkodzeń części łatwo łamliwych, np. wyłącznika
lub akumulatorów.
Produkt przeznaczony jest wyłącznie do użytku domowego, a nie do zastosowań przemysłowych i profesjonalnych.
Gwarancja traci ważność w przypadku niewłaściwego używania urządzenia, używania niezgodnego z przeznaczeniem, użycia siły lub ingerencji w urządzenie, dokonywanej
poza naszymi autoryzowanymi punktami serwisowymi.
Niniejsza gwarancja nie ogranicza ustawowych praw nabywcy urządzenia.
Usługa gwarancyjna nie przedłuża czasu trwania gwarancji. Dotyczy to również wymienionych i naprawionych
części. Szkody
i wady wykryte ewentualnie podcza zakupu należy zgłosić
niezwłocznie po rozpakowaniu urządzenia, nie później niż
dwa od daty zakupu. Wszystkie naprawy wykonane po
upływie okresu gwarancyjnego będą wykonywane odpłatnie.
Kompernass Service Polska
Tel.: 022 / 3972212
E-mail: support.pl@kompernass.com
- 54 -
Page 57

CUPRINS PAGINA
Indicaţii de siguranţă importante 56
Prezentarea aparatului 57
Punerea în funcţiune 58
Dezambalarea / inspecţia la livrare 58
Introducerea bateriilor 58
Elemente de operare 59
Aşaj LCD 59
Butoanele 60
SETUP - setări sistem 63
Setarea codului (Programarea telecomenzii) 65
Programarea prin căutarea codului mărcii 65
Programarea prin introducerea manuală a codului 66
Programarea prin căutarea automată a codului 66
Setarea sistemului 68
Setarea orei 68
Setarea datei 68
Setarea contrastului 69
Lumina de fundal 69
Reglarea intensităţii sonore globale/modului silenţios 69
Setarea funcţiei Lock 70
Resetarea sistemului 71
Setarea temporizatorului 71
Temporizator de oprire 71
Temporizator comenzi 71
Setarea funcţiei de învăţare 72
Codul funcţiei de învăţare 73
Setarea macrourilor 74
Canale favorite 76
Reglarea intensităţii sonore 77
Vol +/—, (mod silenţios) 77
Despre operare 77
Toate OPRITE 78
Curăţarea şi îngrijirea 78
Defecţiuni / remedii 78
Eliminarea aparatelor uzate 79
Date tehnice 80
Informaţii privind conformitatea 80
Importator 80
Garantia & service-ul 80
- 55 -
R
Page 58

TELECOMANDĂ
UNIVERSALĂ SFB 10.1 A1
Această documentaţie este protejată de legea privind drepturile de autor. Toate drepturile, inclusiv acelea de reproducere
fotomecanică, de multiplicare şi răspândire prin procedee
speciale (de exemplu, prelucrarea datelor, suporturi de date
şi reţele de date), chiar şi parţial, precum şi dreptul de modicări tehnice, sunt rezervate.
Citiţi cu atenţie instrucţiunile de utilizare înainte de prima utilizare şi păstraţi-le pentru o consultare ulterioară. Dacă înmânaţi aparatul unor terţi, ataşaţi şi instrucţiunile de utilizare.
Indicaţii de siguranţă importante
Utilizarea conform destinaţiei
Copiilor le este permisă utilizarea telecomenzii numai sub
supravegherea unui adult.
Telecomanda universală poate înlocui maxim zece telecomenzi de la aparate diferite. Poate utilizată numai pentru
aparatele electronice de divertisment cu receptor de infraroşu.
Funcţiile telecomenzii universale corespund în mare parte
acelora ale telecomenzilor originale ale aparatelor respective. Telecomanda universală este destinată utilizării private.
Nu poate folosită pentru uz profesional.
Orice altă utilizare este contravenţională. Producătorul nu
acordă garanţie pentru pagube rezultate în urma utilizării
neconforme sau a modicărilor arbitrare aduse telecomenzii.
AVERTIZARE
Avertizările pentru acest grad de pericol marchează o situaţie
potenţial periculoasă. Dacă situaţia periculoasă nu este evitată, aceasta poate provoca răniri. Respectaţi indicaţiile din
această avertizare pentru a evita rănirea persoanelor.
ATENŢIE
Avertizările pentru acest grad de pericol marchează potenţiale pagube materiale. Dacă situaţia periculoasă nu este
evitată, aceasta poate provoca pagube materiale. Respectaţi
indicaţiile din această avertizare pentru a evita pagubele
materiale.
Indicaţie
Indicaţiile marchează informaţii suplimentare care uşurează
lucrul cu aparatul.
Avertizare contra pericolului de răniri prin
manipularea incorectă a bateriilor!
Bateriile trebuie tratate cu deosebită atenţie. Respectaţi următoarele indicaţii de siguranţă:
• bateriile nu trebuie să ajungă pe mâna copiilor. S-ar putea
ca aceştia să pună bateriile în gură şi să le înghită. Dacă
s-a înghiţit o baterie, consultaţi imediat un medic;
R
- 56 -
Page 59

• nu aruncaţi bateriile în foc. Nu expuneţi bateriile tempera-
turilor ridicate;
• pericol de explozie! Este interzisă reîncărcarea bateriilor;
• nu deschideţi şi nu scurtcircuitaţi bateriile;
• acizii scurşi din baterii pot provoca iritaţii ale pielii. La
contactul cu pielea spălaţi cu apă din abundenţă. Dacă
lichidul ajunge în ochi, clătiţi temeinic cu apă, nu frecaţi,
şi consultaţi imediat un medic.
Atenţie!
Telecomanda universală dispune de o diodă laser clasa 1.
Pentru a evita afecţiunile oculare, nu priviţi în această diodă
cu aparate optice.
Defecte ale telecomenzii
• Dacă telecomanda este defectă, nu încercaţi să o reparaţi
singuri. În caz de defecte luaţi legătura cu producătorul
sau linia telefonică directă pusă la dispoziţie de acesta
(vezi bonul de garanţie).
• Dacă în telecomandă se inltrează lichide sau dacă pre-
zintă defecte, acestea trebuie remediate de către producător sau cu ajutorul primit prin intermediul liniei telefonice
directe. Luaţi legătura cu producătorul sau cu personalul
de la linia telefonică directă (vezi garanţia).
• Scoateţi bateriile consumate din telecomandă.
• Dacă nu utilizaţi telecomanda un timp mai lung, scoateţi
bateriile pentru a evita descărcarea acestora.
• Înlocuiţi toate bateriile în acelaşi timp şi nu utilizaţi baterii
de tipuri diferite.
Prezentarea aparatului
q Aşaj LCD
w Buton /ALL OFF
e Butoane aparat
r Buton S
t Butoane cu săgeţi
y Buton EXIT
u Butoan P +/—
i Buton MACRO
o Butoane numerice
a Buton pentru numere de program formate din una sau
două cifre
Butoane funcţionale pentru teletext
s
d Buton de luminare
f Butoane înregistrare / redare
g Buton AV
h Mod silenţios
Butoane VOL +/—
j
k Buton MENU
l Buton OK
1( Buton FAV / EPG
- 57 -
R
Page 60

2) Emiţător / receptor infraroşu
2! Capac compartiment de baterii
Indicaţii:
• Funcţiile descrise aici se referă la cazul teoretic ideal în
care structura butoanelor acestei telecomenzi universale
este identică cu aceea a telecomenzii originale. Acest
lucru se va întâmpla însă numai în cazuri extrem de rare.
Dacă telecomanda universală nu permite executarea tuturor
funcţiilor disponibile pe telecomanda originală, acest lucru
nu înseamnă că telecomanda este defectă.
• Toate numele de modele utilizate în acest manual sau în
lista de coduri alăturată reprezintă mărci comerciale ale
respectivelor rme.
Punerea în funcţiune
Dezambalarea / inspecţia la livrare
Avertizare!
Nu lăsaţi foliile de ambalare la îndemâna copiilor.
Pericol de asxiere.
• Dezambalaţi aparatul şi componentele accesorii.
• Vericaţi dacă au fost livrate toate componentele
- Telecomandă universală (TU)
- Instrucţiuni de utilizare
- Lista cu codurile aparatelor oferită de producător
- 2 baterii de 1,5 V, tip AAA/LR03 (micro)
Indicaţie: daune în timpul transportului
Dacă observaţi pagube în urma transportului, adresaţi-vă
producătorului sau luaţi legătura cu linia telefonică directă
(vezi garanţia).
Introducerea bateriilor
Atenţie!
Este permisă utilizarea telecomenzii universale numai cu
baterii de 1,5 V (dimensiune AAA, LR03).
Înlocuiţi repede bateriile. Setările sunt păstrate cca 1 minut.
Dacă în interval de un minut nu sunt introduse alte baterii,
va trebui să realizaţi din nou toate setările telecomenzii.
În oricare caz, ora şi data vor trebui resetate.
R
- 58 -
Page 61

1. Deschideţi capacul compartimentului de baterii 2! în
direcţia săgeţii.
2. Introduceţi bateriile conform imaginii şi închideţi capacul.
Aşajul LCD q rămâne activat, atât timp cât în telecomandă
există baterii. Următoarea imagine prezintă aşajul LCD q
după introducerea sau schimbarea bateriilor.
Indicaţie
Dacă pe aşajul LCD q nu se aşează date, vericaţi
polaritatea bateriilor sau înlocuiţi bateriile.
Elemente de operare
Afişaj LCD
Aşajul LCD q este împărţit în mai multe câmpuri.
Câmp de text 2@
Aici este aşat aparatul selectat în momentul de faţă, de
exemplu, DVD, TV, VCR etc.
Simbolul infraroşu 2#
Simbolul se va aprinde la ecare apăsare de buton în urma
căreia se emite un semnal infraroşu.
- 59 -
R
Page 62

Câmp cod / oră 2$
Aici este aşat codul aparatului selectat în momentul respectiv
sau ora. La aşarea orei, între numere pâlpâie „
Câmp ziua săptămânii 2%
După introducerea datei în acest câmp se pot observa formele
prescurtate, în engleză, ale zilelor săptămânii.
MON
= Monday = Luni
TUE = Tuesday = Marţi
WED = Wednesday = Miercuri
THU = Thursday = Joi
FRI = Friday = Vineri
SAT = Saturday = Sâmbătă
SUN = Sunday = Duminică
Afişaj standard
Aşajul standard de pe LCD q conţine date despre aparatul
setat în respectivul moment, de exemplu, „TV“, prescurtarea
pentru ziua săptămânii şi ora.
:“.
Butoanele
Indicaţie
Funcţiile descrise aici pot executate numai dacă aparatul
respectiv deţine respectivele funcţii.
Buton
Butoane aparat e
Cu ajutorul butoanelor pentru aparate selectaţi aparatul pe
care doriţi să-l utilizaţi:
/ALL OFF w
Pornirea / oprirea aparatului; ţineţi butonul
apăsat cca 5 secunde pentru a porni / opri
toate aparatele.
Televizor
Videorecorder
Periferic 1
Receptor TV cablu
CD Player
Receptor satelit analog
Amplicator audio
DVD Player
Receptor satelit digital
Periferic 2
R
- 60 -
Page 63

Această alocare a butoanelor nu este obligatorie. Puteţi, spre
exemplu, memora codul pentru videorecorder în locul pentru
televizor.
Butonul „S“ r
Ţineţi apăsat 3 secunde pentru apelarea
meniului SETUP, apăsaţi scurt pentru aşarea
datei, resp. pentru apelarea funcţiilor auxiliare ca EPG sau PIP
Butoanele cu săgeţi t
Navigaţi în meniuri în sus, la dreapta, în jos
sau la stânga.
Butonul EXIT y
Reveniţi la nivelul anterior din meniu.
Butoanele P +/— u
Schimbarea canalului.
Butonul MACRO i
Butonul MACRO i urmat de apăsarea
unuia dintre butoanele numerice o 1-6, acti-
vează un şir de comenzi memorate anterior.
Butoanele numerice o
Introducerea numerelor de program şi
codurilor aparatului.
Butonul pentru numere de program formate din una
sau două cifre a
Pentru numerele de program formate din două
cifre (în funcţie de tipul aparatului) apăsaţi mai
întâi butonul a, iar apoi cu ajutorul butoanelor
numerice o introduceţi numărul programului.
După o nouă apăsare a butonului, aşajul va
din nou pentru o singură cifră.
Butoane funcţionale pentru teletext s
În modul teletext, butoanele au următoarele funcţii:
Apelaţi funcţia teletext Când aparatul funcţio-
nează în modul TV apăsaţi mai întâi butonul
S r urmat de butonul
pentru a utiliza
funcţia „PIP“ (imagine în imagine) a televizorului dumneavoastră.
- 61 -
R
Page 64

Pauză schimbare automată în cazul paginilor
teletext cu mai multe le.
Mărire aşaj pagină
Aşare suprapusă a imaginii cu textul şi
imaginii televizorului
Oprirea funcţiei teletext.
Indicaţii
• Funcţia teletext este disponibilă numai dacă televizorul
este setat pentru programe din Europa şi dacă dispune
de un modul teletext.
• Butoanele P +/- u execută următoarele funcţii de teletext:
P + răsfoiere înainte
— răsfoiere înapoi
P
Butoanele înregistrare / redare f
Butoanele de redare f comandă aparate ca DVD/CD Player
şi videorecordere:
Începere redare
ASPECT Schimbare format imagine la utilizarea
televizorului
Înregistrare
Redare / Înregistrare / Oprire derulare
Pauză derulare
Derulare înapoi
Derulare înainte
Butonul AV g
Comutare pe intrare AV.
Silenţios h
Pornire / oprire sunet.
Butoane VOL+/— j
Reglare intensitate sonoră (volum).
Butonul MENU k
Apelarea meniului aparatului utilizat.
Butonul OK l
Cu butonul OK conrmaţi o selecţie din meniu.
Butonul FAV/EPG 1(
Apăsaţi butonul FAV/EPG pentru a apela postul
preferat pre-programat. Pentru a apela ghidul de programe electronic a respectivului aparat, apăsaţi mai
întâi scurt butonul S r şi apoi butonul FAV/EPG.
R
- 62 -
Page 65

SETUP - setări sistem
În meniul setări sistem realizaţi următoarele setări:
• programarea telecomenzii pentru aparatul pe care doriţi
să-l controlaţi;
• setarea orei, datei, contrastului aşajului, iluminării de
fundal, intensităţii sonore, funcţiei de blocare (Lock)
precum şi resetare sistem (System-Reset);
• Setările temporizatorului
• „Învăţarea“ anumitor comenzi de butoane
• Crearea de macrouri
• Salvarea canalelor favorite
Pe pagina următoare este prezentată o imagine cu structura
meniului.
- 63 -
R
Page 66

- 64 -R- 65 -
Page 67

Setarea codului (Programarea telecomenzii)
Pentru programarea telecomenzii aveţi la dispoziţie 3 metode
de programare: programarea prin căutarea codului mărcii, prin
căutarea automată a codului sau prin introducere manuală a
codului.
Mai întâi utilizaţi căutarea codului mărcii pentru că este
metoda cea mai rapidă de programare, dacă producătorul
respectivului aparat se găseşte în lista de coduri livrată împreună cu telecomanda. Ca a doua variantă se recomandă
metoda de introducere manuală a codului, urmată de căutarea
automată a acestuia.
Programarea prin căutarea codului mărcii
În cazul acestei metode, selectaţi direct marca şi codul aparatului de pe aşajul LCD q.
Pentru programarea telecomenzii urmaţi următoarele indicaţii:
1.
Apăsaţi butonul pentru aparatul e corespunzător pe
care doriţi să-l programaţi la telecomandă.
Ţineţi apăsat butonul S r pentru mai mult de 3 secunde.
2.
Introduceţi date în meniu fără să faceţi pauză, pentru că,
după cca 15 secunde în care nu aţi introdus nimic, meniul
va dispărea de pe ecran.
3.
Pe aşajul LCD q apare „CODE SETUP“. Apăsaţi butonul
OK l. Pe aşajul LCD q apare acum „ENTER CODE“. Cu
butoanele t selectaţi „BRAND CODE“ şi conrmaţi
cu butonul OK l.
4. Acum va aşată lista cu numele mărcilor de aparate
pre-programate.
Cu 34butoanele t selectaţi diferitele nume de mărci.
5.
Pentru a uşura accesul, prin utilizarea butoanelor numerice
6.
o puteţi ajunge direct la o anumită literă:
2 => A
6 => M 7 => P 8 => T 9 => W
Exemplu: cu butonul 5 ajungeţi la aşarea mărcilor care
încep cu „J“. Prima marcă este „JVC“*. Dacă, de exemplu,
sunteţi posesorul unui aparat marca „Kenwood“*, răsfoiţi
cu 4 butonul t mai departe, până când apare numele
acestei mărci. (* Toate numele de produse utilizate aici
sunt mărci comerciale ale respectivelor rme.)
7.
Majoritatea producătorilor utilizează mai multe coduri
pentru telecomandă. Acum trebuie să aaţi care dintre
codurile disponibile este cel mai bun pentru aparatul
dumneavoastră. În dreapta, sub numele mărcii este aşat
codul actual pe aşajul LCD q.
8. Îndreptaţi telecomanda spre aparatul pentru care este
setată în momentul de faţă şi apăsaţi butoanele de funcţii
pentru a testa codul (exceptând
EXIT y sau butoanele numerice o).
3 => D 4 => G 5 => J
34t, OK l,
R
Page 68

9. Dacă funcţionează majoritatea butoanelor, apăsaţi
butonul OK l, pentru a salva setările. Pe aşajul LCD q
apare „OK“. În nal meniul dispare automat.
10. Dacă nu funcţionează niciun buton sau doar foarte puţine
butoane, selectaţi cu
cod şi testaţi din nou în modul descris la punctul 8.
11.
Cu butonul EXIT y ajungeţi la următorul nivel din meniu.
Repetaţi aceşti paşi pentru toate aparatele pe care doriţi să
le operaţi cu telecomanda.
sau , butonul t, următorul
Programarea prin introducerea manuală a
codului
În acest mod telecomanda poate programată prin introducerea directă a codului numeric. Codul numeric îl găsiţi în
indicele de producători ce conţine lista de coduri. Dacă noul
cod introdus nu este valid, va preluat din nou ultimul cod
valid programat.
Apăsaţi butonul pentru aparatul e corespunzător pe
1.
care doriţi să-l programaţi la telecomandă.
2.
Ţineţi apăsat butonul S r pentru mai mult de 3 secunde.
Pe aşajul LCD q apare „CODE SETUP“. Apăsaţi butonul
3.
OK l. Pe aşajul LCD q apare acum „ENTER CODE“.
Pentru apelarea acestei funcţii apăsaţi butonul OK l.
4.
Pe aşajul LCD q apare codul utilizat momentan pentru
aparatul selectat. Acum se aprinde şi se stinge prima parte din corpul codului şi se aşteaptă să introduceţi codul.
Introduceţi noul cod din patru cifre cu ajutorul butoanelor
numerice o.
5. Dacă CODUL introdus este valid, va salvat. Pe aşajul
LCD q apare un moment „OK“, apoi meniul va dispărea.
Dacă operaţia eşuează, pe aşaj q apare „ERROR“
(eroare) şi se aşteaptă să introduceţi un nou cod. În acest
caz repetaţi pasul 4.
6. Cu butonul EXIT y ajungeţi la următorul nivel din meniu.
Programarea prin căutarea automată a
codului
Acest proces poate dura mai multe minute pentru ecare aparat, deoarece trebuie parcurse toate codurile pentru aparatul
selectat. De aceea, această metodă ar trebui utilizată, dacă
aparatul nu poate programat prin celelalte două metode
descrise mai sus, sau dacă aparatul dumneavoastră nu se
regăseşte în lista cu coduri.
Urmaţi paşii prezentaţi mai jos, pentru a realiza programarea
prin căutarea automată a codului.
R
- 66 -
Page 69

1. Apăsaţi butonul e corespunzător aparatului dvs. (de ex.
VCR).
2. Porniţi aparatul pe care doriţi să-l utilizaţi cu telecomanda.
În cazul aparatelor VCR/DVD/CD introduceţi o casetă,
resp. un disc.
Ţineţi apăsat butonul S r pentru mai mult de 3 secunde.
3.
Pe aşajul LCD q apare „CODE SETUP“. Apăsaţi butonul
4.
OK l. Pe aşajul LCD q apare acum „ENTER CODE“.
Apăsaţi acum sau , butonul t, până când pe aşaj
q apare „SEARCH CODE“. Îndreptaţi telecomanda spre
aparat şi apăsaţi butonul OK l, pentru a apela modul
„căutare automată a codului“.
Începe căutarea. Acum aparatul trimite consecutiv nume-
5.
rele de coduri în ordine crescătoare. Simbolul infraroşu 2#
indică executarea acestei operaţiuni.
Dacă există reacţie din partea aparatului, adică dacă se
6.
opreşte, apăsaţi imediat butonul OK l, pentru a salva
codul actual. Pe aşajul LCD q apare pentru scurt timp
„OK“.
7.
Vericaţi în mare dacă funcţiile aparatului dumneavoastră
pot executate de la telecomandă. Dacă da, înseamnă
că aţi găsit codul corect. Dacă nu se pot executa anumite
funcţii, puteţi reîncepe de la pasul 1 căutarea automată a
codului.
Indicaţie
Pentru o nouă căutare, îndreptaţi telecomanda spre aparat
numai după ce aţi trecut de codul invalid găsit anterior.
Dacă aparatul nu mai reacţionează, înseamnă că la pasul
8.
6 nu aţi apăsat destul de repede butonul OK l.
Apăsaţi de mai multe ori butonul EXIT y, pentru a părăsi
meniul şi pentru a reveni la aşarea standard.
Ţineţi acum apăsat butonul pentru aparatul e pentru care
9.
încercaţi să căutaţi codul potrivit. Acum, în dreapta jos,
este aşat codul actual pe aşajul LCD q. Ţineţi minte
această cifră.
10. Acum procedaţi în modul descris în capitolul „Progra-
marea prin introducerea manuală a codului“ şi vericaţi
dacă codul funcţionează cu următoarea cea mai mică
combinaţie de cifre.
Indicaţii
1. Dacă căutarea codului este activată, sunt ignorate toate
butoanele, cu excepţia butoanelor OK l şi EXIT y.
2. Procesul de căutare automată se opreşte în momentul în
care a ajuns la sfârşitul listei de coduri. Aşajul revine la
„SEARCH CODE“.
- 67 -
R
Page 70

Setarea sistemului
Setarea orei
Aşajul LCD q vă arată ora. Ora se setează astfel:
1.
Ţineţi apăsat butonul S r pentru mai mult de 3 secunde.
Apare „CODE SETUP“. Aşteptaţi cca 15 sec. fără a face
nicio introducere, pentru ca aparatul să părăsească meniul
şi pentru a reveni la modul standard de aşare.
Cu sau , butonul t, selectaţi „SYSTEM SETUP“ şi
2.
conrmaţi cu butonul OK l.
Pe aşajul LCD q apare „TIME SETUP“. Conrmaţi cu
3.
butonul OK l. Aşajul LCD q arată acum „TIME“, iar
formatul datei (24 HR) clipeşte.
Cu sau , butonul t, puteţi schimba în celălalt mod
4.
de aşare al orei (12 HR). Apoi, mai târziu, pe aşajul
orei, înainte de oră veţi vedea un „A“ sau un „P“. „A“ înseamnă „AM“ = „ante meridium“ (dimineaţa, între orele
0:00 şi 12:00). „P“ înseamnă „PM“ = „post meridium“
(după-masă, între orele 12:00 şi 0:00). Apăsaţi butonul
OK l pentru a conrma.
Acum clipeşte aşajul orei. Cu sau , butonul t,
5.
selectaţi ora exactă şi apăsaţi butonul OK l.
Acum clipeşte aşajul minutelor. Cu sau , butonul t,
6.
selectaţi minutele exacte şi apăsaţi butonul OK l pentru
a salva. Acum va apărea din nou „TIME SETUP“.
Pentru a părăsi acest meniu sau meniurile următoare,
7.
apăsaţi butonul EXIT y de atâtea ori până pe aşajul
LCD q apare modul standard de aşare.
Setarea datei
Aşajul LCD q vă arată data, dacă apăsaţi butonul S r.
Astfel setaţi data:
1.
Ţineţi apăsat butonul S r pentru mai mult de 3 secunde.
Apare „CODE SETUP“.
Cu sau , butonul t, selectaţi „SYSTEM SETUP“ şi
2.
conrmaţi cu butonul OK l.
Pe aşajul LCD q apare „TIME SETUP“. Apăsaţi , buto-
3.
nul t, pentru a schimba pe „DATE SETUP“. Conrmaţi cu
butonul OK l.
Pe aşaj clipeşte numărul corespunzător anului „2010“.
4.
Cu sau , butonul t, puteţi modica anul. Conrmaţi
modicarea cu butonul OK l. Cu sau , butonul t,
puteţi modica acum luna. Conrmaţi cu butonul OK l.
Acum clipeşte aşajul zilei, pe care o puteţi, de asemenea,
modica cu sau , butonul t.
Pentru conrmare, apăsaţi butonul OK l. Acum va apărea
5.
din nou „DATE SETUP“.
R
- 68 -
Page 71

Setarea contrastului
Setarea contrastului aşajului se realizează în modul următor:
1.
Ţineţi apăsat butonul S r pentru mai mult de 3 secunde.
Apare „CODE SETUP“.
Cu sau , butonul t, selectaţi „SYSTEM SETUP“ şi
2.
conrmaţi cu butonul OK l.
Cu sau , butonul t, selectaţi „CONTRAST SETUP“
3.
şi conrmaţi cu butonul OK l.
Pe aşajul LCD q clipeşte acum valoarea contrastului,
4.
pe care îl puteţi seta cu sau , butonul t:
Pe ecran sunt aşate:
0 = contrast maxim
15 = contrast minim
Cu butonul OK l salvaţi setările dorite. Acum va apărea
5.
din nou „CONTRAST SETUP“.
Lumina de fundal
Puteţi seta timpul de luminare a fundalului aşajului LCD q şi
a butoanelor după executarea unei comenzi. Amintiţi-vă că
o durată de iluminare mai lungă reduce durata de viaţă a
bateriilor.
1.
Ţineţi apăsat butonul S r pentru mai mult de 3 secunde.
Apare „CODE SETUP“.
Cu sau , butonul t, selectaţi „SYSTEM SETUP“ şi
2.
conrmaţi cu butonul OK l.
Cu sau , butonul t selectaţi „BACKLIT SETUP“ şi
3.
conrmaţi cu butonul OK l.
Pe aşajul LCD q clipesc secundele pentru timpul de ilumi-
4.
nare rămas, secunde pe care le puteţi seta cu butoanele
t între 0 şi 60. Dacă selectaţi „0“, iluminarea de
fundal este dezactivată.
Cu butonul OK l salvaţi setările dorite. Acum va apărea
5.
din nou „BACKLIT SETUP“.
Reglarea intensităţii sonore globale / modului
silenţios
Pentru a vă scuti de apăsarea unui buton de aparat de ecare
dată când doriţi să modicaţi sonorul sau să-l opriţi de tot, telecomanda efectuează această comandă numai pentru un singur aparat, în mod standard pentru televizor. Dumneavoastră
puteţi modica setarea standard şi să alegeţi un alt aparat.
Ţineţi apăsat butonul S r pentru mai mult de 3 secunde.
1.
Apare „CODE SETUP“.
Cu sau , butonul t, selectaţi „SYSTEM SETUP“ şi
2.
conrmaţi cu butonul OK l.
Cu sau , butonul t, selectaţi „VOL/MUTE SETUP“
3.
şi conrmaţi cu butonul OK l.
Aşajul LCD q indică „ALL VOL SET“. Apăsaţi butonul
4.
OK l, aşajul comută pe „ALL VOL MODE“.
Acum apăsaţi butonul de aparat e corespunzător apara-
5.
tului căruia doriţi să-i modicaţi volumul sonor.
- 69 -
R
Page 72

6. Dacă aparatul respectiv dispune de un sistem de reglare
a volumului sonor, se aşează scurt „SUCCESS“ (= reuşită),
iar meniul dispare de pe ecran. Reglarea volumului sonor
va avea efect de acum înainte asupra aparatului ales de
dvs.
7. Dacă aparatul respectiv nu dispune de sistem de reglare
a volumului sonor, telecomanda nu va permite această
selecţie şi va indica „VOLUME ERROR“ (= eroare). Şi în
acest caz meniul va dispărea de pe ecran. Reglarea volumului sonor va avea efect în continuare asupra aparatului
de până acum.
Puteţi, de asemenea, dezactiva reglarea volumului sonor
pentru anumite aparate.
Pentru aceasta selectaţi în VOL/MUTE SETUP cu sau
1.
, butonul t, funcţia MODE VOL SET şi conrmaţi cu
butonul OK l.
Acum apăsaţi butonul de aparat e pentru aparatul pe
2.
care doriţi să-l excludeţi. Aşajul LCD q indică „SUCCESS“,
iar reglarea volumului sonor este dezactivată când telecomanda lucrează în modul de operare al unuia dintre
aparatele selectate.
Puteţi revoca din nou setările din VOL/MUTE SETUP.
1.
Pentru aceasta selectaţi în VOL/MUTE SETUP cu sau
, butonul t, funcţia VOL/MUTE RESET şi conrmaţi cu
butonul OK l.
Aşajul LCD q vă solicită prin intermediul CONFIRM
2.
RESET să conrmaţi cu butonul OK l. Apăsaţi butonul
OK l, dacă doriţi să ştergeţi setările, iar aşarea cuvântului SUCCESS vă conrmă ştergerea. Sau apăsaţi butonul
EXIT y, pentru a întrerupe ştergerea.
Indicaţie
Dacă, în acest meniu, apăsaţi butonul EXIT y, meniul va
dispărea de pe ecran.
Setarea funcţiei Lock
Cu ajutorul funcţiei Lock, puteţi bloca accesul la toate meniurile
de setare.
1.
Ţineţi apăsat butonul S r pentru mai mult de 3 secunde.
Cu sau , butonul t, selectaţi „SYSTEM SETUP“ şi
2.
conrmaţi cu butonul OK l.
Cu sau , butonul t, selectaţi „LOCK SETUP“ şi con-
3.
rmaţi cu butonul OK l. Aşajul LCD q vă arată setările
actuale.
Cu sau , butonul t, selectaţi acum „LOCK“ (blocat)
4.
sau „UNLOCK“ (liber).
Cu butonul OK l salvaţi setarea. Pe aşajul LCD q apare
5.
din nou „LOCK SETUP“.
R
- 70 -
Page 73

Resetarea sistemului
Această funcţie vă permite să readuceţi telecomanda la setările din momentul livrării. Setările realizate de dumneavoastră
vor şterse.
1.
Ţineţi apăsat butonul S r pentru mai mult de 3 secunde.
Apare „CODE SETUP“.
Cu sau , butonul t, selectaţi „SYSTEM SETUP“ şi
2.
conrmaţi cu butonul OK l.
Cu sau , butonul t, selectaţi „SYSTEM RESET“ şi
3.
conrmaţi cu butonul OK l.
Pe aşajul LCD q apare acum „CONFIRM RESET“.
4.
Conrmaţi resetarea cu OK l. Apoi, aşajul q vă arată
„SUCCESS RESET“. Setările au fost şterse şi meniul dispare
de pe ecran. Sau puteţi părăsi meniul prin apăsarea
butonului EXIT y. Setările vor păstrate în continuare.
Setarea temporizatorului
Telecomanda vă oferă două moduri de temporizare, pentru
oprire şi pentru rezultate.
Temporizator de oprire
1. Apăsaţi butonul e corespunzător aparatului dvs. (de ex.
VCR).
Ţineţi apăsat butonul S r pentru mai mult de 3 secunde.
2.
Apare „CODE SETUP“.
Apăsaţi sau , butonul t, până este aşat „TIMER
3.
SETUP“. Apăsaţi butonul OK l, „TIMER SLEEP“ apare
pe aşajul LCD q. Conrmaţi selectarea acestei funcţii
cu butonul OK l.
Acum, în partea de jos dreapta a aşajului LCD q, clipesc
4.
minutele rămase până la oprirea aparatului selectat. Cu
sau , butonul t, setaţi valoarea dorită între 1 şi 99
de minute. Apăsaţi butonul OK l pentru a conrma. În
cazul temporizatorului deja programat, timpul este aşat
în partea dreaptă, lângă oră, a aşajului LCD q
5. Poziţionaţi telecomanda astfel încât undele infraroşii să
poată ajunge la aparat. După expirarea timpului setat,
telecomanda va opri aparatul.
Dacă apăsaţi acum butonul S r, în partea stângă de jos
6.
a aşajului LCD q va aşat „SL“.
z
„
z
“.
Temporizator comenzi
Telecomanda dispune de 4 temporizatoare pentru comenzi, pe
care le puteţi programa să emită, la o oră precisă, comenzile
unor serii de combinaţii de butoane.
Ţineţi apăsat butonul S r pentru mai mult de 3 secunde.
1.
Apare „CODE SETUP“.
Cu sau , butonul t, selectaţi „TIMER SETUP“ şi
2.
conrmaţi cu butonul OK l. Pe aşaj q apare „TIMER
SLEEP“. Cu sau , butonul t, selectaţi locul de salvare
dorit „TIMER SETUP 1“ până la „TIMER SETUP 4“ şi conrmaţi cu butonul OK l.
- 71 -
R
Page 74

3. Acum clipeşte ora, la care trebuie executată combinaţia
de butoane dorită. Cu sau , butonul t, setaţi ora
dorită şi apăsaţi butonul OK l pentru conrmare.
Acum clipesc minutele, la care trebuie executată combi-
4.
naţia de butoane dorite. Cu sau , butonul t, setaţi
minutele dorită şi apăsaţi butonul OK l pentru conrmare.
Pe ecranul LCD q apare „TIMER X KEY“ (X reprezintă
5.
temporizatorul dorit). Apăsaţi acum butonul pentru aparatul
dorit e, iar apoi secvenţa dorită de comenzi de butoane.
Apăsaţi butonul S r, pentru a salva datele introduse şi
6.
pentru a reveni la meniul general pentru temporizatoare.
7. Procedaţi în mod analog pentru a programa şi celelalte
temporizatoare.
Când temporizatoarele de comenzi sunt programate,
8.
aşajul LCD q arată simbolul pentru temporizator „
“,
în dreapta, lângă ceas.
Indicaţii
1. Pentru ecare temporizator pot programate 14 butoane.
După introducerea celui de-al 14-lea buton, secvenţa este
salvată automat, iar pe aşaj q va apărea „FULL“.
2. Şi în acest meniu, dacă nu aţi introdus nicio dată, după
15 secunde aparatul revine la modul standard de aşare.
Setarea funcţiei de învăţare
Telecomanda universală (TU) poate învăţa şi salva semnale
ale butoanelor unei telecomenzi originale. Dacă TU nu
funcţionează după aplicarea uneia dintre metodele de programare ilustrate mai sus sau dacă nu poate executa toate
comenzile, încercaţi să învăţaţi TU aceste comenzi cu ajutorul
telecomenzii/telecomenzilor originale.
• Utilizaţi baterii noi pentru TU şi pentru telecomanda origi-
nală.
• Păstraţi o distanţă de cel puţin un metru faţă de alte surse
de lumină. Sursele de lumină pot perturba transferul undelor
infraroşii.
• Aşezaţi TU şi telecomanda originală pe o suprafaţă plană,
la o distanţă de 20 - 50 de mm una faţă de cealaltă, astfel
încât diodele laser 2) ale celor două telecomenzi să e
îndreptată una spre cealaltă.
Indicaţii
1. Nu utilizaţi următoarele butoane pentru funcţia de învăţare:
toate butoanele de aparate e, MACRO i, butonul S r,
EXIT y.
Apăsaţi scurt butonul telecomenzii originale. Dacă pe
2.
aşajul LCD q apare „SUCCESS“, comanda butonului
a fost învăţată. Dacă apare „LEARN ERROR“ (eşuare),
trebuie să repetaţi procedeul.
R
- 72 -
Page 75

3. Dacă la învăţare, în timp ce este aşat „LEARNING“
(învăţare) nu se apasă niciun buton al telecomenzii originale în 30 de secunde, meniul de învăţare este terminat.
Acest mod nu poate terminat prin apăsarea unui buton
de pe TU.
Memoria poate înmagazina în total 150 de comenzi
4.
pentru diferite butoane. Dacă memoria este plină, aşajul
LCD q indică „LEARN FULL“, iar modul de învăţare este
terminat.
Cu butonul EXIT y reveniţi la statusul precedent (excepţie
5.
la aşarea „LEARN KEY“, resp. „LEARNING“).
Codul funcţiei de învăţare
1. Apăsaţi butonul de aparat e corespunzător aparatului
pentru care doriţi să învăţaţi telecomanda un cod de
butoane.
Ţineţi apăsat butonul S r pentru mai mult de 3 secunde.
2.
Apare „CODE SETUP“.
Cu sau , butonul t, selectaţi meniul „LEARN
3.
SETUP“ (învăţare) şi apăsaţi apoi butonul OK l.
Pe aşajul LCD q apare „LEARN SET“. Apăsaţi apoi
4.
butonul OK l. Pe aşajul LCD q apare „LEARN KEY“
(selectaţi butonul).
Apăsaţi mai întâi butonul de pe TU pe care doriţi să-l
5.
programaţi. Pe aşajul LCD q apare „LEARNING“.
Telecomanda universală aşteaptă acum semnalul infraroşu
de la telecomanda originală.
Indicaţie
Dacă aşajul nu comută pe „LEARNING“, înseamnă că
aţi selectat un buton pentru care nu se poate programa
un cod de butoane.
Depărtaţi unul de celalalt senzorii infraroşii 2) ai celor
6.
două telecomenzi.
Acum ţineţi apăsat butonul dorit de pe telecomanda
7.
originală, până când pe aşajul LCD q al telecomenzii
universale apare „SUCCESS“ sau „LEARN ERROR“.
Dacă pe aşajul LCD q apare „SUCCESS“ (procedură
8.
încheiată cu succes), începând cu pasul 5 puteţi programa
şi alte butoane. Dacă apare „LEARN ERROR“ (procedură
eşuată), repetaţi procedura începând de la pasul 5.
Pentru a întrerupe/termina procesul de învăţare, în timp
9.
ce este aşat „LEARN SET“ apăsaţi butonul EXIT y până
când pe aşajul LCD q apare modul normal de aşare.
În timp ce este aşat „LEARN KEY“, resp. „LEARNING“
nu executaţi nicio comandă timp de 30 de secunde şi
aparatul va închide meniul.
Ştergerea tuturor butoanelor programate pentru toate
aparatele
Ţineţi apăsat butonul S r pentru mai mult de 3 secunde.
1.
Apare „CODE SETUP“.
Cu sau , butonul t, selectaţi meniul „LEARN
2.
SETUP“ şi apăsaţi butonul OK l. Pe aşajul LCD q apare
„LEARN SET“.
- 73 -
R
Page 76

3. Cu sau , butonul t, selectaţi „LEARN CLEAR“ (şter-
gere comenzi învăţate) şi conrmaţi cu butonul OK l. Pe
aşajul LCD q apare „CONFIRM CLEAR“ (conrmare
ştergere).
Conrmaţi cu butonul OK l. Pe aşajul LCD q apare
4.
„SUCCESS“. Toate butoanele programate au fost şterse.
În nal meniul dispare automat.
Indicaţie
Dacă pe aşaj apare „CONFIRM CLEAR“, puteţi întrerupe
ştergerea cu butonul EXIT y.
Setarea macrourilor
Cu funcţia MACRO pot executate până la 16 comenzi
printr-o singură apăsare de buton, adică mai multe comenzi
salvate anterior pot executate cu un buton MACRO. Sunt
disponibile 6 locuri de salvare.
Programarea unui macrou
Pentru programarea unui macrou procedaţi în modul următor:
Ţineţi apăsat butonul S r pentru mai mult de 3 secunde.
1.
Apare „CODE SETUP“.
Cu sau , butonul t, selectaţi „MACRO SETUP” şi
2.
conrmaţi cu butonul OK l. Pe ecran apare „MACRO
SETUP 1”.
Cu sau , butonul t, selectaţi locul de salvare pe
3.
care doriţi să-l programaţi (MACRO SETUP 1 - 6) şi
conrmaţi cu butonul OK l.
Pe aşajul LCD q apare „MACRO STEP”. Apăsaţi acum
4.
unul după celalalt butoanele dorite (max. 16). Secvenţa
trebuie începută prin apăsarea unui buton de aparat e.
Standard, comenzile de macrouri sunt emise la intervale
5.
de câte 1 secundă. Deoarece unele aparate reacţionează
prea încet, este posibil ca succesiunea comenzilor de
macrouri să e transmisă prea repede către aparat. Aveţi
însă posibilitatea de a programa o pauză de 5 - 21 de
secunde înainte de emiterea unei comenzi. Pentru aceasta
apăsaţi, eventual repetat, butonul MACRO i. În partea
dreaptă jos a aşajului LCD q apare durata pauzei actuale în secunde.
Când s-a ajuns la numărul maxim de comenzi de butoane,
6.
aşajul LCD q indică „FULL“.
Salvaţi cu butonul S r. Pe aşajul LCD q apare „MACRO
7.
SETUP”.
8. Dacă pentru macroul pe care doriţi să-l programaţi (pasul
3) selectaţi un loc de salvare deja ocupat, macroul existent
este suprascris.
9. Repetaţi apoi procedeul începând cu pasul 3 pentru crea-
rea altor macrouri.
R
- 74 -
Page 77

10. Cu butonul EXIT y mergeţi un pas înainte în meniu, cu
excepţia cazului în care introduceţi comenzi de butoane.
Indicaţii
1. Pentru un macrou pot salvate maxim 16 comenzi de
butoane. După salvarea celei de-a 16-a comandă pe
aşajul LCD q apare „FULL”.
2. Pentru a părăsi modul fără a salva, nu executaţi nici o
comandă cca 15 secunde.
În modul „MACRO STEP“ cu butonul S r puteţi reveni la
3.
statusul anterior.
Exemplu: doriţi să salvaţi un şir de comenzi într-un macrou.
Începem în modul „MACRO STEP”.
Şir de comenzi dorit: pornire TV => PAUZĂ => comutare pe
ieşire AV => pornire DVD => PAUZĂ => rulare DVD.
În modul „MACRO STEP“ introduceţi următoarea comandă
de butoane:
=> => (Timp pauză) => => =>
=> (Timp pauză) =>
Executare macrou
Pentru executarea unui macrou programat anterior, procedaţi
astfel:
1.
Apăsaţi butonul MACRO i.
Cu butonul numeric o corespunzător apelaţi macroul
2.
dorit (1-6). Exemplu: dacă doriţi executarea macroului 3,
apăsaţi mai întâi butonul MACRO i şi apoi, în interval
de 5 secunde, butonul numeric „
“.
Ştergerea tuturor macrourilor
Pentru ştergerea tuturor macrourilor programate anterior,
procedaţi astfel:
1.
Ţineţi apăsat butonul S r pentru mai mult de 3 secunde.
Apare „CODE SETUP“.
Cu sau , butonul t, selectaţi „MACRO SETUP” şi
2.
conrmaţi cu butonul OK l. Pe ecran apare „MACRO
SETUP 1”.
Cu sau , butonul t, selectaţi „MACRO CLEAR“ şi
3.
conrmaţi cu butonul OK l.
Pe aşajul LCD q apare „CONFIRM CLEAR“ (conrmare
4.
ştergere). Conrmaţi ştergerea cu butonul OK l. Pe aşajul LCD q apare „SUCCESS“. Macrourile au fost şterse
şi meniul dispare de pe ecran.
Indicaţii
1. Dacă pe LCD q apare „CONFIRM CLEAR“, puteţi între-
rupe ştergerea cu butonul EXIT y.
2. Nu este posibilă ştergerea separată a macrourilor, ci
doar suprascrierea acestora.
- 75 -
R
Page 78

Canale favorite
Indicaţie
Cu această funcţie puteţi salva canalul preferat la favorite.
Programarea canalelor favorite
Canalul favorit se salvează astfel:
Apăsaţi butonul pentru aparatul e pentru care doriţi să
1.
salvaţi un canal favorit.
Ţineţi apăsat butonul S r pentru mai mult de 3 secunde.
2.
Apare „CODE SETUP“.
Cu sau , butonul t, selectaţi „FAV CH SETUP” şi
3.
conrmaţi cu butonul OK l. Pe ecran apare „FAV CH
SETUP 1”.
Cu sau , butonul t, selectaţi locul de salvare dorit
4.
(FAV CH SETUP 1 - 4) şi conrmaţi cu butonul OK l.
Pe aşajul LCD q apare „FAV CH STEP”. Apăsaţi acum
5.
unul după celălalt butoanele (max. 4) pentru apelarea
canalului dvs. favorit.
Când s-a ajuns la numărul maxim de comenzi de butoane,
6.
aşajul LCD q indică „FULL“.
Salvaţi cu butonul S r. Pe aşajul LCD q apare „FAV CH
7.
SETUP”.
8. Dacă pentru canalul favorit pe care doriţi să-l programaţi
(pasul 4) selectaţi un loc de salvare deja ocupat, canalul
existent este suprascris.
9. Repetaţi paşii pentru salvarea altor canale favorite.
10. Cu butonul EXIT y mergeţi un pas înapoi în meniu, cu
excepţia cazului în care introduceţi comenzi de butoane.
Indicaţie
Introducerea numărului canalului poate varia în funcţie de
model şi marca aparatului selectat. Pentru numerele formate
din 2 cifre trebuie să apăsaţi mai întâi
butonul a.
Apelarea canalelor favorite
Pentru apelarea unui canal favorit salvat anterior, apăsaţi
butonul FAV/EPG 1( urmat de butonul numeric corespunzător
pentru locul de salvare dorit (1 - 4).
Ştergerea tuturor canalelor FAV
Pentru ştergerea tuturor canalelor favorite programate anterior,
procedaţi astfel:
Ţineţi apăsat butonul S r pentru mai mult de 3 secunde.
1.
Cu sau , butonul t, selectaţi „FAV CH SETUP” şi
2.
conrmaţi cu butonul OK l. Pe ecran apare „FAV CH
SETUP 1”.
Cu sau , butonul t, selectaţi „FAV CH CLEAR“ şi
3.
conrmaţi cu butonul OK l.
Pe aşajul LCD q apare „CONFIRM CLEAR“ (conrmare
4.
ştergere). Conrmaţi ştergerea cu butonul OK l. Pe aşajul LCD q apare „SUCCESS“. Canalele favorite au fost
şterse şi meniul dispare de pe ecran.
R
- 76 -
Page 79

Indicaţii
1. Dacă pe LCD q apare „CONFIRM CLEAR“, puteţi între-
rupe ştergerea cu butonul EXIT y.
2. Nu este posibilă ştergerea separată a canalelor favorite,
ci doar suprascrierea acestora.
Reglarea intensităţii sonore
Vol +/—, (mod silenţios)
Apăsaţi butonul „VOL +“ pentru a mări intensitatea sonoră.
Cu butonul „VOL —“ reduceţi intensitatea sonoră. Pentru modul silenţios, apăsaţi butonul
Dacă apăsaţi din nou acest buton, sunetul porneşte din nou.
Dacă apăsaţi butoanele VOL +/— j ale telecomenzii univer-
sale, va reacţiona setarea intensităţii sonore de la TV, indiferent ce buton de aparat e a fost apăsat înainte. Acest lucru
nu este valabil pentru aparatele „AMP“, „DVD“, „ASAT“
şi „DSAT“, deoarece se pleacă de la premisa că aceste
aparate dispun de un sistem propriu de reglare a intensităţii
sonore.
h.
Despre operare
> Pentru a comanda cu telecomanda universală unul dintre
aparatele programate, apăsaţi mai întâi butonul e pentru
aparatul respectiv.
> Apoi îndreptaţi telecomanda universală spre acest aparat
şi apăsaţi butonul dorit.
> Utilizaţi butoanele numerice o la fel ca cele ale teleco-
menzii originale. Înainte de a introduce o combinaţie de
două cifre, apăsaţi butonul
> Apăsaţi butonul FAV/EPG 1(, pentru a porni ghidul de
programe al unui aparat care deţine această funcţie.
> Dacă apăsaţi butonul S r, în partea dreaptă de jos a
aşajului LCD q va apărea data timp de 10 secunde.
> Dacă ţineţi apăsat unul dintre butoanele de aparate e,
în partea dreaptă de jos a aşajului LCD q va apărea
codul activ pentru acest aparat.
> Cu butonul MENU k apelaţi fereastra pentru setările
respectivului aparat.
> Apăsaţi butonul de iluminare d, pentru dezactivarea
iluminării ecranului, resp. butoanelor.
a.
- 77 -
R
Page 80

Toate OPRITE
Indicaţii:
Cu butonul ALL OFF (toate oprite) w se pot opri
automat toate aparatele active. Această funcţie poate, de
asemenea, porni aparate stinse în momentul apăsării butonului (în funcţie de aparat). Pentru aceasta ţineţi apăsat cca
5 secunde butonul ALL OFF w. Acest lucru funcţionează în
următoarele condiţii:
1. Dacă între toate aparatele şi telecomanda universală
există contact „vizual“.
2. Dacă nu sunt active căutarea automată a codului, căutarea
codului mărcii şi funcţia MACRO.
3. Dacă aparatele respective pot oprite de la telecomandă.
Pentru pornirea automată a aparatelor, ţineţi din nou apăsat
butonul
w până ce pornesc toate aparatele.
Curăţarea şi îngrijirea
Atenţie!
Asiguraţi-vă că la curăţarea telecomenzii în aceasta
nu se va inltra umezeală! În caz contrar telecomanda
poate suferi daune iremediabile!
> Curăţaţi carcasa aparatului numai cu un prosop puţin
umed şi un detergent slab.
> Păstraţi telecomanda într-un mediu corespunzător speci-
caţiilor din datele tehnice.
> Înainte de a o pune la păstrare scoateţi bateriile din tele-
comandă, pentru a evita scurgerea acestora şi defectarea
telecomenzii.
Defecţiuni / remedii
Aparatul dvs. nu răspunde la comenzile telecomenzii.
> Vericaţi bateriile. Trebuie să aibă sucientă tensiune şi să
e aşezate corect.
> Aţi apăsat butonul e corect pentru aparatul pe care doriţi
să-l utilizaţi?
> Vericaţi dacă acest aparat a fost programat cu codul
corect (vezi secţiunea „Setarea codului“).
Telecomanda nu transmite corect comenzile.
> Apăsaţi butonul e pentru aparatul corespunzător pentru
a comuta telecomanda în modul corect.
> Bateriile trebuie să aibă sucientă tensiune şi să e aşezate
corect.
> Este posibil să utilizaţi un cod fals. Porniţi căutarea pentru
codul mărcii, căutarea automată a codului sau introduceţi
codul manual.
R
- 78 -
Page 81

> Telecomanda nu comută transmiţătorul pe aparat.
> Apăsaţi butonul e pentru aparatul corespunzător pentru
a comuta telecomanda în modul corect.
> Dacă telecomanda originală nu conţine butonul „-/- -“,
schimbaţi programele cu butoanele P+/— u sau cu
butoanele numerice o.
> Dacă nici acum nu funcţionează, poate este activată
protecţia pentru copii a aparatului.
Anumite butoane ale telecomenzii universale nu
funcţionează corect.
> Este posibil ca telecomanda universală să nu posede toate
funcţiile telecomenzii originale.
> Probabil nu aţi programat codul corect. Căutaţi un cod
care suportă mai multe funcţii ale aparatului.
Telecomanda nu reacţionează după apăsarea unui
buton.
> Bateriile trebuie să aibă sucientă tensiune şi să e aşezate
corect.
> Îndreptaţi telecomanda universală spre aparat.
Pe afişajul LCD q nu apare nimic.
> Bateriile trebuie să aibă sucientă tensiune şi să e aşezate
corect.
> Contrastul este prea redus. Măriţi valoare setării.
Eliminarea aparatelor uzate
Nu aruncaţi aparatul sub nicio formă în
gunoiul menajer obişnuit. Acest produs cade
sub incidenţa directivei europene 2002/96/EC
Telecomandă universală
• Eliminaţi telecomanda universală sau componentele aces-
teia printr-o rmă de reciclare autorizată sau la instalaţia
locală de eliminare a deşeurilor.
• Respectaţi reglementările actuale în vigoare. În caz de
dubii, luaţi legătura cu instalaţia locală de reciclare
Bateriile/acumulatoarele
• Bateriile / acumulatoarele nu se elimină împreună cu
resturile menajere.
• Bateriile pot conţine substanţe nocive care pot afecta mediul
înconjurător. De aceea, eliminaţi bateriile / acumulatoarele
neapărat conform dispoziţiilor legale în vigoare.
• Orice utilizator are obligaţia legală de a preda bateriile /
acumulatoarele la centrul local de colectare sau la magazinele unde acestea pot returnate. Această obligaţie are
scopul de a asigura eliminarea ecologică a bateriilor /
acumulatoarelor.
- 79 -
R
Page 82

• Predaţibateriile/acumulatoarelenumaidacăsunt
descărcaţi.
Eliminaţitoatematerialeledeambalareîntr-unmod
ecologic.
Date tehnice
Aparatecomandate: 10
DimensiuniLxlxÎ: 217x50x22mm
Greutate: 102g(fărăbaterii)
LEDinfraroşii: clasalaser1
Alimentarebaterii: 2x1,5VtipAAA/LR03(Micro)
(cuprinseînfurnitură)
Temperaturadeoperare:+5–+35°C
Temperaturadepăstrare:-20-+50°C
Umiditatea: 5–90%(fărăcondens)
Informaţii privind conformitatea
Înprivinţaconformităţii,acestaparatcorespundecerinţelor
fundamentaleşialtorprevederialeDirectiveiCEM2004/
108/EC.
Importator
KOMPERNASSGMBH
BURGSTRASSE21
44867BOCHUM,GERMANY
www.kompernass.com
Garantia & service-ul
Pentruacestaparatseacordăogaranţiede3aniîncepând
cudatacumpărării.Aparatulafostproduscugrijăşivericat
cuscrupulozitateînaintealivrării.Păstraţibonuldecasăpentru
adovedicumpărarea.Dacăaveţisolicităriprivindgaranţia,
contactaţitelefoniccentruldumneavoastrădeservice.Numai
astfelpoateasiguratăoexpedieregratuităaprodusului
dumneavoastră.
Garanţiaacoperănumaidefecteledematerialsaudefabricaţie,nuşideteriorărilerezultateînurmatransportului,piesele
deuzurăsaudeteriorărileapărutelacomponentelefragile,
deex.comutatoaresauacumulatoare.
R
- 80 -
Page 83

Aparatul este destinat numai pentru uz privat şi nu pentru o
utilizare profesională. În cazul manevrării abuzive sau necorespunzătoare, uzului de forţă şi intervenţiilor care nu au
fost realizate de către liala noastră autorizată de service,
garanţia îşi pierde valabilitatea.
Drepturile dumneavoastră legale nu sunt limitate prin această
garanţie.
Perioada de garanţie nu este prelungită după realizarea
reparaţiilor realizate în perioada garanţie. Acest lucru este
valabil şi pentru piesele înlocuite şi reparate. Deteriorările şi
decienţele prezente deja la cumpărare trebuie semnalate
imediat după dezambalare sau cel târziu în două zile de la
data cumpărării. Reparaţiile necesare după expirarea perioadei de garanţie se efectuează contra cost.
R
Kompernass Service Romania
Tel.: 031/82 70 1 70
e-mail: support.ro@kompernass.com
- 81 -
R
Page 84

- 82 -R- 83 -R- 84 -
Page 85

Page 86

R
Page 87

H O M E T E C H
Universal Remote Control SFB 10.1 A1
Herstellerverzeichnis mit Gerätecodeliste
Register van producenten met lijst van
apparaatcodes
Index des fabricants avec liste des
codes appareil
Registro produttori con elenco codici
apparecchi
Índice de fabricantes con lista de
códigos de aparatos
Fabricantes Diretório com lista de
códigos de dispositivo
Manufacturer List with Device Code List
KOMPERNASS GMBH
BURGSTRASSE 21 ⋅ D-44867 BOCHUM
www.kompernass.com
ID-Nr.: SFB 10.1 A1-12/10-V1
Producentfortegnelse med apparat-kodeliste
Valmistajahakemisto ja laitekoodiluettelo
Förteckning över tillverkare med lista
över apparatkoder
Κατάλογος κατασκευαστή µε λίστα
κωδικών συσκευών
Wykaz producentów z listą kodów urządzeń
Gyártók készülékkódját tartalmazó jegyzék
Spisak proizvođača sa listom code-ova uređaja
Seznam proizvajalcev s kodami aparatov
Zoznam výrobcov s kódmi prístrojov
Adresář výrobců se seznamem kódů pro přístroj
Index producători cu lista de coduri ale
aparatelor
Описнапроизводителитесъссписъкна
кодовенауреди
Page 88

A.R.SYSTEMS
ACME
ACURA
ADC
ADMIRAL
ADYSON
AGASHI
AGAZI
AGB
AIKO
AIM
AIWA
AKAI
AKIBA
AKURA
ALARON
ALBA
ALCYON
ALLORGAN
ALLSTAR
AMPLIVISION
AMSTRAD
ANAM
ANGLO
ANITECH
ANSONIC
ARC EN CIEL
ARCAM
ARCAM DELTA
ARISTONA
ARTHUR MATRIN
ASA
ASBERG
ASTRA
ASUKA
ATLANTIC
1223
1211
1212 1219
1210
1209 1210 1214
1215
1211 1225 1226
1232 1233
1232 1233
1210
1238
1211 1212 1219
1223 1225 1226
1232 1233
1223
1193
1212 1213 1216
1218 1219 1223
1226 1227 1231
1232 1233 1238
1213 1223 1227
1228
1210 1213 1219
1223 1227 1228
1232
1211 1212 1213
1218 1219 1222
1223 1225 1227
1232 1237
1224
1226 1233
1216 1223
1211 1226 1230
1233 1237
1210 1212 1213
1219 1223 1227
1238
1212
1212 1219
1210 1212 1219
1223 1224
1212 1219 1221
1223 1236 1237
1229
1225 1226 1232
1233
1211
1216 1218 1221
1223 1231
1230
1209 1215
1216 1223 1224
1212
1210 1211 1213
1225 1226 1227
1228 1232 1233
1211 1216 1218
ATORI
AUCHAN
AUDIO TON
AUDIOSONIC
AUSIND
AUTOVOX
AWA
BAIRD
BANG & OLUFSEN
BASIC LINE
BASTIDE
BAUR
BAZIN
BEKO
BEON
BEST
BESTAR
BINATONE
BLACKTRON
BLACKWAY
BLUE SKY
BLUE STAR
BOOTS
BPL
BRANDT
BRINKMANN
BRIONVEGA
BRITANNIA
BRUNS
BSR
BTC
BUSH
CAPSONIC
CARENA
CARREFOUR
CASCADE
CATHAY
CCE
CENTURION
CENTURY
CGE
- 1 -
1223 1225 1232
1212 1219
1230
1211 1226 1233
1237
1211 1212 1213
1216 1218 1223
1226 1227 1233
1237
1224
1209 1210 1211
1224 1226 1233
1232 1233
1226 1233
1209
1212 1213 1216
1219 1223 1227
1228 1233
1211 1226 1233
1218 1220 1223
1226 1233
1065 1077 1223
1237
1216 1218 1223
1237
1216 1223 1237
1211 1226 1233
1228
1228
1213 1223 1227
1228
1228
1211 1226 1233
1223 1228
1003 1006 1007
1229
1223
1209 1216 1218
1223
1211 1225 1226
1232 1233
1209
1217
1213 1227
1034 1180 1184
1193 1212 1213
1214 1216 1217
1218 1219 1222
1223 1226 1227
1228 1233
1210
1223
1222
1212 1219 1223
1216 1218 1223
1233
1216 1218 1223
1209
1217 1224 1237
Page 89

CIMLINE
CITY
CLARIVOX
CLATRONIC
CMS
CMS HIGHTEC
CONCORDE
CONDOR
CONTEC
CONTINENTAL
EDISON
COSMEL
CROSLEY
CROWN
CS ELECTRONICS
CYBERTRON
DAEWOO
DAINICHI
DANSAI
DANTAX
DAWA
DAYTRON
DE GRAAF
DECCA
DESMET
DIAMANT
DIAMOND
DIXI
DTS
DUAL
DUAL-TEC
DUMONT
DUX
DYNATRON
ELBE
1212 1219 1227
1212 1219
1218
1210 1211 1212
1213 1216 1219
1223 1224 1226
1227 1233 1237
1232
1233
1212 1219
1221 1216 1219
1223 1225 1228
1232 1237
1211 1212 1219
1222 1225 1232
1229
1212 1219
1209 1217 1224
1212 1216 1218
1219 1223 1224
1237
1211 1213 1225
1227 1232
1213 1227
1018 1035 1066
1240 1182 1192
1194 1211 1212
1216 1219 1223
1225 1226 1227
1232 1233
1213 1225 1227
1232
1210 1216 1218
1223 1225 1232
1233
1218 1237
1223
1212 1219
1214
1211 1216 1218
1223 1226 1233
1238
1216 1218 1223
1223
1232
1212 1216 1218
1219 1223 1233
1212 1219
1211 1217 1223
1226 1233
1211 1212 1217
1226
1209 1211 1226
1233
1218
1216 1218 1223
1223 1227 1233
1236 1237 1238
ELBE-SHARP
ELCIT
ELECTRO TECH
ELEKTRA
ELIN
ELITE
ELMAN
ELTA
EMERSON
EMPEROR
ERRES
ESC
ETRON
EUROFEEL
EURO-FEEL
EUROLINE
EUROMAN
EUROMANN
EUROPHON
EXPERT
EXQUISIT
FENNER
FERGUSON
FIDELITY
FILSAI
FINLANDIA
FINLUX
FIRST LINE
FISHER
FLINT
FORMENTI
FORMENTIPHOENIX
FORTRESS
FRABA
FRIAC
FRONTECH
FUJITSU
FUJITSU GENERAL
FUNAI
- 2 -
1238
1209 1238
1212
1228
1211 1216 1218
1219 1223 1225
1232
1213 1216 1223
1227
1217
1212 1219 1232
1209 1223 1237
1228
1216 1218 1221
1223
1233
1212
1233
1210
1218
1228 1232 1233
1237
1210 1211 1216
1223 1225 1226
1211 1216 1217
1223 1226 1232
1233 1238
1230
1223
1212 1219
1031 1060 1218
1211 1214 1223
1225 1232
1233
1214
1209 1211 1216
1217 1218 1223
1224 1226 1233
1238
1211 1212 1216
1219 1223 1225
1226 1232 1233
1209 1211 1217
1222 1226 1233
1237
1216 1223 1227
1209 1211 1217
1218 1224 1225
1232
1232
1209
1223 1237
1237
1210 1212 1214
1215 1219 1233
1226 1233
1233
1210
Page 90

GALAXI
GALAXIS
GBC
GEANT CASINO
GEC
GELOSO
GENERAL
TECHNIC
GENEXXA
GIANT
GOLDHAND
GOLDLINE
GOLDSTAR
GOODMANS
GORENJE
GPM
GRAETZ
GRANADA
GRANDIN
GRONIC
GRUNDIG
HALIFAX
HAMPTON
HANSEATIC
HANTAREX
HANTOR
HARWOOD
HCM
HEMA
HIGASHI
HILINE
HINARI
1223
1223 1237
1212 1217 1219
1227
1230
1211 1215 1216
1218 1223 1226
1233 1238
1212 1214 1217
1219
1212 1219
1213 1215 1216
1223 1227
1233
1232
1223
1211 1212 1214
1216 1217 1218
1219 1223 1225
1226 1232 1233
1234 1237
1203 1210 1212
1216 1218 1219
1222 1223 1226
1231 1233 1234
1238 1240
1237
1213 1227
1215
1211 1214 1216
1218 1221 1222
1223 1224 1226
1230 1233 1238
1212 1213 1218
1228
1233
1010 1075 1200
1223 1224 1231
1237
1210 1211 1225
1226 1232 1233
1211 1225 1226
1232 1233
1211 1212 1216
1217 1218 1219
1223 1226 1228
1233 1236 1237
1212 1219 1223
1238
1223
1219 1223
1210 1211 1212
1219 1223 1226
1227 1228 1233
1219 1226 1233
1232
1223
1212 1213 1216
HISAWA
HITACHI
HORNYPHON
HORNYPHONE
HOSHAI
HUANYU
HYGASHI
HYPER
HYPSON
IBERIA
ICE
ICES
IMPERIAL
INDIANA
INGELEN
INGERSOL
INNO HIT
INNOVATION
INTERACTIVE
INTERBUY
INTERFUNK
INTERNATIONAL
INTERVISION
IRRADIO
ISUKAI
ITC
ITS
ITT
ITV
JVC
- 3 -
1218 1219 1222
1223 1227
1213 1227 1228
1230
1058 1061 1240
1238 1211 1214
1215 1217 1222
1223 1226 1233
1216
1223
1213 1227
1211 1225 1232
1211 1225 1226
1232 1233
1211 1212 1217
1219 1225 1226
1232 1233
1210 1211 1216
1218 1223 1226
1228 1230 1233
1223
1210 1211 1212
1213 1216 1219
1223 1225 1226
1227 1232 1233
1225 1227 1232
1215 1216 1217
1223 1224 1237
1216 1218 1223
1215
1212 1219
1211 1212 1213
1216 1218 1219
1223 1224 1226
1227 1233 1234
1238
1210 1212
1237
1212 1219
1209 1215 1216
1218 1221 1223
1237
1232
1210 1211 1223
1226 1227 1228
1233 1237
1212 1213 1216
1218 1219 1223
1224 1227 1234
1213 1223 1227
1228
1211 1217 1226
1233
1213 1216 1223
1225 1227 1228
1232
1212 1215
1212 1218 1223
1216 1222 1227
Page 91

KAISUI
KAMOSONIC
KAMP
KAPSCH
KARCHER
KAWASHO
KENDO
KENNEDY
KIC
KINGSLEY
KNEISSEL
KOLSTER
KONKA
KORPEL
KORTING
KOSMOS
KOYODA
KTV
KYOTO
LASAT
LENCO
LENOIR
LEYCO
LG
LIESENK
LIESENKOTTER
LIFE
LIFETEC
LLOYDS
LOEWE
LOEWE OPTA
LUMA
LUMATRON
LUX MAY
LUXOR
M ELECTRONIC
MAGNADYNE
MAGNAFON
MAGNUM
MANDOR
MANESTH
1211 1212 1213
1219 1223 1225
1226 1227 1228
1232 1233
1211
1211 1225 1232
1215
1211 1212 1218
1223 1228 1237
1232
1214 1223 1237
1217
1233
1211 1225 1232
1223 1236 1237
1216 1223
1213 1227
1216 1218 1223
1209 1237
1223
1212
1211 1233
1232 1233
1237
1212 1219
1211 1212 1219
1210 1216 1218
1223
1234 1237 1233
1195 1211 1212
1214 1216 1217
1218 1219 1223
1225 1226 1232
1218
1223
1210 1212
1210 1212 1219
1223 1227
1219
1014 1055 1223
1236 1237 1238
1209 1216 1218
1214 1218 1219
1223
1214 1216 1218
1223 1226 1233
1216
1211 1214 1233
1234
1211 1212 1215
1216 1218
1209 1217 1218
1238
1211 1224 1225
1232 1238
1210 1212
1210
1210 1211 1216
1218 1223 1226
MARANTZ
MARELLI
MARK
MASUDA
MATSUI
MEDIATOR
MEDION
M-ELECTRONIC
MELVOX
MEMOREX
MEMPHIS
MERCURY
METZ
MICROMAXX
MICROSTAR
MINERVA
MINOKA
MITSUBISHI
MIVAR
MOTION
MTC
MULTI SYSTEM
MULTITECH
MURPHY
NAONIS
NEC
NECKERMANN
NEI
NEUFUNK
NEW TECH
NEW WORLD
NEWTECH
NICAMAGIC
NIKKAI
NOBLIKO
- 4 -
1233
1216 1218 1223
1209
1216 1218 1219
1223 1225 1226
1232 1233
1233
1238 1211 1212
1214 1216 1218
1219 1222 1223
1226 1231 1233
1216 1218 1221
1223 1231
1210 1212 1223
1219 1223 1225
1226 1232 1233
1230
1212 1219
1212 1219
1219 1223
1209
1210 1212
1210 1212
1224 1238
1216 1223
1209 1216 1222
1223
1211 1224 1225
1232 1233 1234
1235 1236 1237
1238 1239
1224
1232 1237
1218
1211 1212 1214
1217 1218 1219
1223 1225 1226
1232 1233 1237
1211 1225 1232
1214
1222 1233
1209 1211 1214
1216 1218 1220
1223 1226 1231
1233 1237
1216 1218 1223
1219 1223 1231
1212 1216 1219
1223 1226 1231
1213 1227
1233
1211 1225 1232
1210 1211 1213
1216 1218 1219
1222 1223 1225
1226 1227 1232
1233
1211 1224 1225
1232
Page 92

NOKIA
NORDIC
NORDMENDE
NORDVISION
NOVATRONIC
OCEANIC
OKANO
ONCEAS
ONWA
OPERA
ORBIT
ORION
ORLINE
ORSOWE
OSAKI
OSIO
OSO
OSUME
OTTO VERSAND
PAEL
PALLADIUM
PALSONIC
PANAMA
PANASONIC
PANAVISION
PATHE CINEMA
PATHE MARCONI
PAUSA
PERDIO
PERFEKT
PHILCO
PHILHARMONIC
PHILIPS
1215
1233
1209 1215 1216
1218
1223
1215 1230
1223 1237
1211
1227
1223
1216 1223
1062 1203 1212
1216 1218 1219
1223 1238
1223 1227
1238
1210 1211 1213
1223 1226 1227
1233
1234
1213 1227
1222 1227
1211 1216 1217
1218 1220 1222
1223 1226 1231
1233 1238
1211 1225 1232
1211 1220 1223
1226 1231 1233
1237
1233
1210 1211 1212
1219 1223 1225
1226 1232 1233
1004 1013 1020
1024 1026 1044
1050 1057 1073
1185 1198 1215
1223 1238
1223
1211 1217 1225
1230 1232 1236
1237
1229
1212 1219
1223 1232
1223
1209 1217 1223
1224 1237
1211 1226 1233
1002 1005 1009
1012 1016 1019
1021 1022 1023
1029 1033 1036
1037 1038 1041
1042 1045 1052
1059 1069 1076
1231 1221 1223
1181 1186 1187
PHOENIX
PHONOLA
PIONEER
PLANTRON
PLAYSONIC
POPPY
PRANDONIPRINCE
PRECISION
PRIMA
PROFEX
PROFI-TRONIC
PROLINE
PROSONIC
PROTECH
PROVISION
PYE
PYMI
QUANDRA VISION
QUELLE
QUESTA
RADIALVA
RADIOLA
RADIOMARELLI
RADIOSHACK
RADIOTONE
RECOR
REDSTAR
REFLEX
REVOX
REX
RFT
RHAPSODY
R-LINE
ROADSTAR
ROBOTRON
ROWA
- 5 -
1188 1189 1190
1191 1196 1197
1209 1211 1216
1217 1218
1209 1216 1218
1223 1225 1232
1237
1209 1216 1218
1221 1223 1225
1231 1232
1215 1216 1218
1223 1237
1210 1216 1219
1223
1226 1233
1212 1219
1214 1224 1238
1211 1226 1233
1212 1215 1219
1212 1219
1216 1223
1216 1221 1223
1211 1218 1223
1225 1232 1233
1237
1210 1211 1212
1216 1217 1218
1233
1218 1223 1240
1216 1218 1221
1223 1231
1212 1219
1230
1210 1211 1216
1217 1218 1220
1222 1223 1226
1233 1234
1222
1223 1227
1216 1218 1221
1223 1231 1233
1209 1223 1238
1223
1216 1219 1223
1237
1223
1223
1223
1216 1218 1223
1237
1210 1214 1215
1209 1236 1237
1232
1216 1218 1223
1193 1210 1212
1213 1219 1227
1209
1232 1233
Page 93

ROYAL LUX
RTF
SABA
SAISHO
SALORA
SAMBERS
SAMSUNG
SANDRA
SANSUI
SANYO
SBR
SCHAUBLORENTZ
SCHNEIDER
SEG
SEI
SEI-SINUDYNE
SELECO
SENCORA
SENTRA
SERINO
SHARP
SIAREM
SIERRA
SIESTA
SILVA
SILVER
SILVERCREST
1237
1209
1006 1060 1068
1172 1209 1215
1238
1210 1211 1212
1219 1226 1233
1238
1214 1215 1217
1234 1238
1224 1238
1039 1043 1056
1063 1070 1237
1234 1201 1210
1211 1212 1216
1218 1219 1223
1225 1226 1231
1232 1233
1211 1225 1226
1232 1233
1216 1223
1049 1211 1217
1219 1222 1225
1226 1232 1233
1236 1237
1218 1221 1223
1231
1215
1211 1213 1216
1217 1218 1221
1223 1226 1227
1231 1233
1210 1211 1217
1218 1219 1222
1223 1225 1226
1232 1233
1220 1223 1238
1209 1215 1238
1214 1215 1217
1212 1219
1219 1227
1232
1017 1028 1048
1051 1072 1222
1238
1209 1217 1223
1238
1216 1221 1223
1231
1237
1225 1232
1222
1270 1271 1273
1274 1275 1276
1277 1278 1279
1280 1281 1282
1283 1295 1296
1297 1298 1299
1300 1301 1303
SINGER
SINUDYNE
SKANTIC
SOLAVOX
SONITRON
SONOKO
SONOLOR
SONTEC
SONY
SOUND & VISION
SOUNDWAVE
STANDARD
STAR LITE
STARLIGHT
STENWAY
STERN
STRATO
STYLANDIA
SUNKAI
SUNSTAR
SUNWOOD
SUPERLA
SUPERTECH
SUPRA
SUSUMU
SUTRON
SYDNEY
SYSLINE
SYTONG
TANDY
TARGA
TASHIKO
TATUNG
- 6 -
1306 1308 1309
1310 1290 1291
1292 1293 1294
1209 1217 1230
1209 1217 1218
1220 1223 1238
1215
1215
1226 1233 1237
1210 1211 1212
1216 1218 1219
1223 1226 1228
1233
1215 1220 1230
1216 1218 1223
1237
1000 1001 1008
1011 1015 1025
1030 1040 1054
1071 1199 1202
1212 1220 1222
1213 1227
1216 1218 1223
1211 1212 1213
1216 1219 1223
1226 1227 1233
1219 1223
1218
1227 1228
1214 1215
1219 1223
1233
1212 1227
1219 1223
1212 1216 1219
1223
1211 1225 1232
1233 1238
1219 1223 1225
1231 1232
1212 1219
1213
1212 1219
1211 1225 1226
1232 1233
1218
1225 1232
1211 1213 1215
1226 1227 1233
1273 1274 1275
1276 1277 1278
1302 1304 1305
1307 1284 1285
1286 1287 1288
1289
1211 1214 1222
1225 1226 1232
1233
1193 1211 1216
Page 94

TCM
TEAC
TEC
TEDELEX
TELEAVIA
TELECOR
TELEFUNKEN
TELEGAZI
TELEMEISTER
TELESONIC
TELESTAR
TELETECH
TELETON
TELEVIDEON
TELEVISO
TENSAI
TESMET
TEVION
TEXET
THOMSON
THORN
TOKAI
TOKYO
TOMASHI
TOSHIBA
TOWADA
TRAKTON
TRANS CONTINENS
TRANTEC
TRIDENT
TRISTAR
TRIUMPH
1218 1223 1226
1233 1238
1204 1205 1206
1207 1208 1210
1212 1241 1242
1243 1244 1245
1246 1247 1248
1249 1250 1251
1252 1253 1254
1255 1256 1257
1258 1259 1260
1261 1262 1263
1264 1265 1266
1267 1268
1223 1233
1211 1212 1217
1219 1226 1233
1233
1229
1223 1226 1227
1233
1216 1223
1223 1227
1223
1223
1223
1212 1218 1219
1223
1211 1222 1226
1233
1225 1232
1230
1212 1213 1216
1219 1223 1226
1227 1233
1216
1210 1212
1211 1219 1226
1232 1233
1003 1006 1032
1060 1067 1172
1211 1216 1223
1229
1218 1223 1240
1216 1223 1226
1233
1211 1225 1232
1228
1027 1046 1047
1053 1064 1074
1090 1233 1183
1193 1203 1222
1215 1217 1233
1233
1223 1226 1233
1232
1226 1233 1238
1227
1223 1231 1238
UHER
ULTRAVOX
UNIC LINE
UNITED
UNIVERSUM
UNIVOX
VESTEL
VEXA
VICTOR
VIDEOLOGIC
VIDEOLOGIQUE
VIDEOSYSTEM
VIDEOTECHNIC
VISIOLA
VISION
VORTEC
VOXSON
WALTHAM
WATSON
WATT RADIO
WEGA
WEGAVOX
WELTBLICK
WESTON
WHITE WESTINGHOUSE
WINDSTAR
XRYPTON
YAMISHI
YOKAN
YOKO
YORX
ZANUSSI
- 7 -
1215 1216 1223
1224 1237
1209 1211 1217
1223 1225 1232
1223
1218
1210 1216 1217
1218 1220 1222
1223 1224 1226
1233 1234 1237
1223
1214 1215 1216
1217 1218 1223
1226 1233
1212 1218 1219
1223
1216
1232
1211 1213 1225
1226 1227 1232
1233
1216 1223
1225 1226 1232
1233
1211 1225 1232
1216 1223 1233
1216 1218 1223
1209 1214 1215
1216 1223 1224
1211 1223 1226
1233
1216 1218 1223
1227
1211 1217 1225
1232
1209 1222 1223
1219
1216 1218 1223
1233
1217
1211 1218 1223
1225 1232
1228
1223
1223 1226 1227
1228 1233
1223
1210 1211 1212
1213 1216 1218
1219 1223 1226
1227 1232 1233
1237
1213 1227
1214 1226 1233
Page 95

Digital TV
Philips
Samsung
Sony
HT Projector
Mitsubishi
Panasonic
Philips
Sanyo
Sharp
Sony
Toshiba
LCD Projection TV
Sharp
Sony
Toshiba
LCD TV
Bush
Daewoo
Denver
Goodmans
Hitachi
JVC
LG
Matsui
Panasonic
Philips
Samsung
Sharp
Sony
Toshiba
Viewsonic
LCD TV/Radio
Tuner Combo
Philips
Plasma Display
Hitachi
Panasonic
Philips
1173 1176 1178
1177
1174 1175 1179
1170
1161
1167
1160
1162
1158 1159
1169
1131
1108
1130
1101
1106
1096
1123
1089
1132
1081 1084 1094
1095 1098 1105
1110 1111 1114
1118 1126 1136
1168
1133
1091 1102 1112
1078 1079
1080 1082 1083
1087 1093 1097
1104 1113 1116
1121
1092 1103 1109
1115 1119 1120
1122 1127 1128
1085 1086 1088
1107 1117
1099 1100 1124
1125 1129
1078
1139 1144
1137 1147
1134 1152
Pioneer
Samsung
Plasma TV
LG
Philips
Samsung
Toshiba
Plasma TV Monitor
Daewoo
Hitachi
JVC
LG
Philips
Thomson
Projection TV
Hitachi
LG
Pioneer
Samsung
Telefunken
TV/Tuner
Philips
AIWA
AKAI
AKURA
ALBA
BEST BUY
BRANDT
BUSH
CAMBRIDGE AUDIO
CENTREX
CGV
CLASSIC
CLATRONIC
CONIA
C-TECH
CYBERHOME
DAEWOO
DANSAI
DAYTEK
DEC
DENON
DENVER
- 8 -
1141 1146 1149
1151
1150
1136
1142
1135
1153
1138
1154
1155
1140 1148
1143 1156
1145 1157
1171
1164 1168
1163
1166
1165
1079
2049 2175
2139
2153
2015 2023 2050
2152
2013 2040 2146
2025 2050 2051
2122 2124 2130
2147 2151
2149
2154
2149
2144
2151
2147
2150
2003 2029 2032
2046
2030 2109 2115
2127
2070
2005 2026
2151
2061 2063 2068
2151 2153
Page 96

DENZEL
DIAMOND
DK DIGITAL
DUAL
DVX
EASY HOME
ECLIPSE
ELTA
ELTAX
ENZER
FINLUX
GERICOM
GLOBAL SOLUTIONS
GLOBAL SPHERE
GOLDSTAR
GOODMANS
GRAETZ
GRUNDIG
H&B
HAAZ
HIMAX
HITACHI
INNOVATION
JVC
KENWOOD
KINGAVON
KISS
KODA
KXD
LAWSON
LENCO
LG
LIFE
LIFETEC
LIMIT
LOEWE
LOGICLAB
LUXOR
MAGNAVOX
MAGNUM
MARANTZ
MATSUI
MEDION
METZ
MICO
MICROMAXX
MICROMEDIA
MICROSTAR
MIZUDA
MONYKA
MUSTEK
MX ONDA
NAIKO
NEUFUNK
2148
2149 2150
2042 2159
2148
2150
2152
2149
2045
2157
2148
2149
2054
2150
2150
2017
2056 2151 2154
2148
2048 2143 2154
2151
2149 2150
2152
2012 2058 2145
2148 2152 2168
2181
2140 2145
2020 2052 2118
2119 2146 2160
2047 2067 2171
2151
2148
2151
2152
2150
2151
2017 2024 2031
2126 2169
2140
2140 2145 2189
2150
2055
2150
2154
2146 2151 2155
2145
2060 2064 2065
2142
2040 2071
2140 2145 2189
2138
2149
2140 2145
2146
2140 2145
2151 2152
2148
2001 2144 2163
2149
2154
2148
NU-TEC
ONKYO
ORAVA
ORION
ORITRON
P&B
PACIFIC
PANASONIC
PHILIPS
PIONEER
PROLINE
PROVISION
RAITE
REDSTAR
REOC
ROADSTAR
ROWA
SABA
SABAKI
SAMSUNG
SANSUI
SANYO
SCANMAGIC
SCHNEIDER
SCIENTIFIC LABS
SCOTT
SEG
SHARP
SIGMATEK
SILVA
SILVERCREST
SINGER
SKYMASTER
SKYWORTH
SM ELECTRONIC
SONY
SOUNDMASTER
SOUNDMAX
STANDARD
- 9 -
2147
2141 2146 2155
2151
2069 2122
2140
2151
2150
2014 2016 2039
2111 2117 2131
2162 2166 2167
2176
2000 2006 2027
2034 2037 2043
2060 2108 2125
2142 2146 2155
2158
2007 2008 2011
2035 2057 2138
2172
2154
2151
2148
2153
2150
2066 2151
2147 2154
2013 2040
2150
2012 2019 2112
2114 2116 2165
2149 2150
2036 2044 2123
2161 2170
2001
2140
2150
2021
2015 2033 2148
2150
2038 2113 2120
2152
2153
2183 2184 2186
2185 2195 2196
2205 2218 2219
2222 2223 2224
2225 2226 2227
2228
2149 2150
2033 2144 2150
2153
2150
2004 2009 2010
2018 2022 2028
2041 2110 2156
2164 2173 2174
2150
2150
2150
Page 97

STAR CLUSTER
STARMEDIA
SUPERVISION
SYNN
TARGA
TCM
TEAC
TEC
TEVION
THOMSON
TOKAI
TOSHIBA
TRUVISION
WHARTFEDALE
XLOGIC
YAKUMO
YAMADA
YAMAKAWA
YUKAI
ZENITH
DVD Recorder
JVC
LG
Panasonic
Philips
Samsung
Sony
TCM
Toshiba
Yukai
SAT/DVD
Humax
2150
2151
2150
2150
2185 2186 2197
2198 2199 2200
2201 2202 2203
2204 2206 2207
2208 2209 2210
2211 2212 2213
2214 2215 2216
2217 2220 2221
2193 2194
2132 2134 2135
2136 2137 2140
2145 2177 2178
2179 2180 2187
2188 2189 2190
2191 2192
2062 2138 2147
2150
2153
2140 2145 2150
2189
2013 2128
2148 2153
2002 2121 2129
2146 2155
2152
2149 2150
2150
2154
2053 2154 2182
2148
2001
2146 2155
2085 2086 2087
2088
2095
2081 2090 2092
2079 2080 2089
2091 2093 2094
2075 2099 2107
2072 2073 2074
2076 2077 2078
2082 2083 2084
2133
2096 2097 2098
2100
2059
DVD-DVR
Panasonic
Philips
Pioneer
Samsung
Toshiba
ADELSOUND
ADYSON
AIWA
AKAI
AKIBA
AKURA
ALBA
AMBASSADOR
AMSTRAD
ANITECH
ANSONIC
ASA
ASUKA
AUDIOSONIC
AUDIOTON
BAIRD
BASIC LINE
BAUR
BESTAR
BLACK PANTHER LINE
BLAUPUNKT
BLUE SKY
BONDSTEC
BRANDT
BUSH
CASIO
CATHAY
CATRON
CGE
CIMLINE
CLATRONIC
CONDOR
CROWN
- 10 -
2081 2090
2101 2105
2102 2103 2104
2106
2096
3041
3046
3040 3044 3045
3082 3086 3087
3088
3043 3045 3087
3046 3093
3045 3046 3087
3093
3040 3043 3046
3047 3088 3089
3090 3093
3043 3090
3040 3046 3047
3086
3046 3093
3041
3044 3091 3092
3040 3044 3046
3086 3091 3092
3093
3047
3043
3040 3045 3047
3086 3087 3089
3043 3046 3047
3088 3089 3090
3093
3092
3043 3045 3047
3089 3090
3047 3089
3029 3042 3092
3044
3043 3046 3090
3045
3040 3046 3047
3064 3074 3082
3088 3089 3093
3040
3047
3043 3090
3040 3045 3086
3087
3046 3088 3093
3043 3046 3090
3043 3047 3089
3090
3043 3046 3047
Page 98

DAEWOO
DANSAI
DANTAX
DAYTRON
DE GRAAF
DECCA
DENKO
DIAMANT
DUAL
DUMONT
ELBE
ELCATECH
ELSAY
ELTA
EMERSON
ESC
ETZUKO
EUROPHON
FERGUSON
FIDELITY
FINLANDIA
FINLUX
FIRST LINE
FIRSTLINE
FISHER
FLINT
FORMENTI/
PHOENIX
FROTECH
FUJITSU
FUNAI
GALAXY
GBC
GEC
GELOSO
GENERAL
GENERAL
TECHNIC
GOLDHAND
GOLDSTAR
GOODMANS
GRAETZ
GRANADA
GRANDIN
GRUNDIG
3089 3090 3093
3028 3043 3047
3050 3056 3073
3075 3089 3090
3046 3047 3093
3088
3047 3089
3092
3040 3045 3086
3087 3092
3046
3044
3040 3045 3047
3087 3092
3040 3086 3092
3047
3046
3046
3046 3047 3093
3046
3043 3047 3089
3046 3093
3043
3040 3045 3087
3040 3046 3086
3040 3092
3040 3086 3087
3092
3088 3091 3093
3044 3046
3043
3088
3092
3043 3090
3040 3086
3040 3086
3040 3086
3043 3090 3093
3092
3093
3043 3090
3029 3088
3046 3093
3040 3044 3086
3091
3040 3043 3044
3046 3047 3085
3086 3089 3090
3091 3093
3045 3087
3040 3042 3044
3092
3040 3043 3044
3046 3047 3086
3089 3090 3091
3093
3042 3081 3092
HANSEATIC
HANTOR
HARWOOD
HCM
HINARI
HISAWA
HITACHI
HYPSON
IMPEGO
IMPERIAL
INGERSOL
INNO HIT
INNOVATION
INTERBUY
INTERFUNK
INTERVISION
IRRADIO
ITT
ITV
JVC
KAISUI
KARCHER
KENDO
KENWOOD
KORPEL
KYOTO
LENCO
LEYCO
LG
LIFETEC
LOEWE
LOEWE OPTA
LOGIK
LUMATRON
LUXOR
M ELECTRONIC
MAGNUM
MANESTH
MARANTZ
MARK
MATSUI
MEDIATOR
- 11 -
3093
3044 3047 3091
3092
3043
3046
3046 3093
3041 3045 3046
3047 3088 3093
3088
3021 3040 3041
3045 3065 3086
3087 3092
3046 3047 3088
3093
3043 3090
3040 3086
3041
3043 3046 3047
3089 3090 3092
3093
3029 3088 3094
3044 3046 3091
3092
3040 3044 3047
3086
3044 3046 3091
3093
3045 3087
3043 3044 3047
3089 3091
3009 3027 3045
3061 3062 3087
3046 3093
3092
3044 3046 3088
3089 3090
3045 3087
3046 3093
3046
3089
3046 3093
3013 3019 3040
3044 3057 3060
3076 3086 3091
3029 3088 3094
3029
3041 3042 3044
3091 3092
3041 3046 3093
3047 3089
3046
3086
3094
3046 3093
3042 3092
3047
3040 3041 3044
3088 3091
3092
Page 99

MEDION
M-ELECTRONIC
MEMOREX
MEMPHIS
METZ
MICROMAXX
MICROSTAR
MIGROS
MITSUBISHI
MULTITECH
MURPHY
NATIONAL
NEC
NECKERMANN
NEI
NESCO
NIKKAI
NOKIA
NORDMENDE
OCEANIC
OKANO
ORION
ORSON
OSAKI
OTTO VERSAND
PALLADIUM
PANASONIC
PATHE CINEMA
PATHE MARCONI
PERDIO
PHILCO
PHILIPS
PHONOLA
PIONEER
PORTLAND
PRINZ
PROFEX
PROLINE
PROSONIC
3029 3088 3094
3040 3044
3040 3044 3086
3091
3046 3093
3029 3042
3029 3088 3094
3029 3088 3094
3040 3086
3086 3092
3040 3043 3046
3086 3090 3092
3093
3040 3086
3029
3045 3087
3042 3045 3087
3092
3092
3040 3046 3093
3043 3046 3047
3090
3045 3047 3087
3045 3087
3040 3045 3086
3087
3046 3047 3088
3041 3064 3085
3088
3040 3086
3040 3044 3046
3086 3091 3093
3092
3041 3042 3044
3045 3046 3087
3091 3093
3002 3007 3010
3011 3016 3017
3025 3029 3033
3052 3059 3079
3041
3045 3087
3040 3086
3046
3006 3008 3014
3022 3024 3026
3030 3034 3035
3042 3049 3067
3068 3069 3070
3071 3072 3077
3078 3092
3092
3092
3043 3047 3089
3090
3040 3086
3093
3040 3086
3040 3047 3088
PYE
QUELLE
RADIALVA
RADIOLA
REX
RFT
ROADSTAR
ROYAL
SABA
SAISHO
SAMSUNG
SAMURAI
SANSUI
SANWA
SANYO
SAVILLE
SBR
SCHAUB LORENZ
SCHNEIEDER
SEG
SEI-SINUDYNE
SELECO
SENTRA
SENTRON
SHARP
SHINTOM
SHIVAKI
SHORAI
SIEMENS
SILVA
SILVER
SILVERCREST
SINUDYNE
SOLAVOX
SOLOVOX
SONNECLAIR
SONOKO
SONTEC
SONY
SOUNDWAVE
STANDARD
STARLITE
STERN
SUNKAI
SUNSTAR
SUNTRONIC
- 12 -
3006 3092
3042 3086 3092
3044 3046
3092
3045 3087
3043 3046 3090
3092
3044 3046 3047
3082 3089 3091
3093
3046
3045 3087
3041 3088 3093
3000 3032 3048
3053 3055 3058
3083 3094
3045 3046 3090
3087
3041
3066
3047
3092
3040 3045 3086
3087
3040 3044 3046
3047 3086 3088
3089 3090 3091
3092 3093
3046 3047 3093
3041 3092
3043 3044 3045
3087
3043 3046 3090
3046 3093
3001 3020 3054
3046 3093
3044 3091
3041
3042 3044 3091
3044 3091
3047
3102 3103 3104
3106
3041 3092
3090
3043
3046
3047 3089
3044 3091
3003 3004 3005
3018 3031 3036
3051 3080 3084
3044
3047 3089
3044
3047
3088
3040 3086
3040 3086
Page 100

SUNWOOD
SUPRA
SYMPHONIC
TAISHO
TANDBERG
TARGA
TASHIKO
TATUNG
TCM
TEAC
TEC
TECHNICS
TELEAVIA
TELEFUNKEN
TELETECH
TENOSAL
TENSAI
TEVION
THOMSON
THORN
TOKAI
TONSAI
TOSHIBA
TOWADA
TOWIKA
TVA
UHER
ULTRAVOX
UNITED QUICK
STAR
UNIVERSUM
VIDEON
WELTBLICK
WETBLICK
YAMISHI
YOKAN
YOKO
ABC
ALCATEL
ARCON
AXIS
CABLETIME
3046 3093
3044
3040 3046
3041 3088
3047
3105 3104
3040 3044 3086
3040 3045 3082
3086 3087 3092
3029 3037 3038
3039 3088 3094
3095 3096 3097
3098 3099 3100
3101
3040 3045 3047
3043 3046 3047
3090
3029
3045 3087
3045 3087
3046 3047
3046 3093
3040 3041 3044
3046 3086 3091
3093
3029 3088 3094
3012 3045 3087
3044 3045 3087
3044 3045 3046
3091 3093
3093
3015 3023 3045
3063 3074 3085
3087 3092
3046 3093
3046 3093
3043 3090
3044 3091
3047
3047 3089
3040 3042 3044
3086 3091 3092
3029 3088
3091
3044
3046 3093
3046 3093
3043 3044 3046
3090 3091 3093
4025
4023 4024
4000
4000
4001 4002 4019
4021
CLYDE CABLEVISION
COMCRYPT
CRYPTOVISION
FIDELITY
FILMNET
FILMNET
CABLECRYPT
FILMNET COMCRYPT
FINLUX
FOXTEL
FRANCE TELECOM
FREEBOX
GEC
GENERAL INTRUMENT
GOODING
GRUNDIG
HIRSCHMANN
ITT NOKIA
JERROLD
JVC
MACAB
MASPRO
MATSUI
MINERVA
MNET
M-NET
MOVIE TIME
MR ZAPP
MULTICHOICE
NOKIA
NOOS
PALLADIUM
PHILIPS
PIONEER
PVP STEREO
VISUAL MATRIX
SAGEM
SAT
SCIENTIFIC ATLANTA
STARCOM
TELE 1
TELEPIU
TORX
UNITED CABLE
UNIVERSUM
VIDEOWAY
VISIOPASS
WITTENBERG
DTV Setup Box
Panasonic
- 13 -
4003
4026
4004
4000
4026
4005 4020
4005
4007
4028
4022 4027
4029
4003
4018 4025
4006
4000 4006
4007
4007
4008 4014 4016
4018 4025
4006
4027
4006
4006
4006
4026
4020
4013
4027
4026
4007
4027
4006
4006 4015 4022
4027
4000 4009 4010
4016
4027
4000
4011 4012
4025
4005 4020 4026
4020 4026
4025
4016
4006 4007
4017
4007 4022 4027
4000
5001
 Loading...