


MACCHINA PER CAFFÈ ESPRESSO SEMS 1100 A1
MACCHINA PER CAFFÈ ESPRESSO
Istruzioni per l'uso
ESPRESSO MACHINE
Operating instructions
MÁQUINA DE CAFÉ EXPRESSO
Manual de instruções
ESPRESSOMASCHINE
Bedienungsanleitung
IAN 313486

Prima di leggere aprire la pagina con le immagini e prendere confidenza con le diverse funzioni
dell'apparecchio.
Antes de começar a ler abra na página com as imagens e, de seguida, familiarize-se com todas as
funções do aparelho.
Before reading, unfold the page containing the illustrations and familiarise yourself with all functions of
the device.
Klappen Sie vor dem Lesen die Seite mit den Abbildungen aus und machen Sie sich anschließend mit allen
Funktionen des Gerätes vertraut.
IT / MT Istruzioni per l'uso Pagina 1
PT Manual de instruções Página 25
GB / MT Operating instructions Page 49
DE / AT / CH Bedienungsanleitung Seite 73

A
6
0
.
!
3
-
B
1 % + ,

Indice
Introduzione ...................................................2
Diritto d’autore ............................................................2
Limitazione di responsabilità .................................................2
Avvertimenti ..............................................................2
Uso conforme ............................................................3
Volume della fornitura/ispezione per eventuali danni da trasporto ...................4
Smaltimento della confezione ................................................4
Indicazioni relative alla sicurezza ..................................5
Componenti dell’apparecchio .....................................8
Dati tecnici .....................................................8
La visualizzazione della temperatura ...............................9
Prima messa in funzione .........................................9
Funzionamento ............................................... 10
Riempimento del serbatoio dell’acqua ........................................10
Riscaldamento dopo un lungo periodo di inutilizzo/alla prima messa in esercizio ......11
Riscaldamento prima di ogni uso. . . . . . . . . . . . . . . . . . . . . . . . . . . . . . . . . . . . . . . . . . . . . 12
Preparazione dell’espresso .................................................13
Preparazione del cappuccino ...............................................14
Consigli per la schiuma di latte ..............................................16
Pulizia e manutenzione ........................................ 16
Pulizia dello schiumatore per il latte ..........................................17
Pulizia dell’area di fuoriuscita dell’acqua bollente ...............................18
Pulizia degli accessori .....................................................18
Pulizia dell’apparecchio ...................................................18
Decalcificazione dell’apparecchio ...........................................19
Eliminazione dei guasti ......................................... 21
Smaltimento ................................................. 22
Smaltimento dell’apparecchio ...............................................22
Garanzia della Kompernass Handels GmbH ....................... 23
Assistenza ..............................................................24
Importatore .............................................................24
IT│MT
│
1 ■SEMS 1100 A1

Introduzione
Congratulazioni per l’acquisto del Suo nuovo apparecchio.
È stato scelto un prodotto di alta qualità. Il manuale di istruzioni è parte integran-
te del presente prodotto. Esso contiene importanti indicazioni per la sicurezza,
l’uso e lo smaltimento. Prima di utilizzare il prodotto, familiarizzare con tutte le
indicazioni relative ai comandi e alla sicurezza. Utilizzare il prodotto solo come
descritto e per i campi d’impiego indicati. In caso di cessione del prodotto a
terze persone, consegnare anche tutta la relativa documentazione.
Diritto d’autore
La presente documentazione è tutelata dal diritto d’autore.
Qualsiasi riproduzione o ristampa, anche parziale, ovvero la riproduzione delle
immagini, anche se modificate, è consentita solo previo permesso scritto del
produttore.
Limitazione di responsabilità
Tutte le informazioni tecniche contenute nel presente manuale di istruzioni, così
come tutti i dati e le indicazioni relativi all’uso, corrispondono alle ultime informazioni disponibili al momento dell’invio in stampa, fornite in buona fede tenendo
conto delle nostre attuali esperienze e conoscenze.
I dati, le illustrazioni e le descrizioni contenute nel presente manuale di istruzioni
non costituiscono una base valida per alcun tipo di rivendicazione.
Il produttore non si assume alcuna responsabilità per i danni derivanti dalla
mancata osservanza delle istruzioni, dall’uso non conforme, dalle riparazioni
non eseguite in modo professionale, dalle modifiche eseguite senza permesso o
dall’impiego di pezzi di ricambio non omologati.
Avvertimenti
Nel presente manuale di istruzioni vengono utilizzati i seguenti avvertimenti:
AVVERTENZA
Un avvertimento contrassegnato da questo livello di pericolo
indica una situazione potenzialmente pericolosa.
Qualora fosse impossibile evitare tale situazione pericolosa, questo può dare
luogo a lesioni.
► Seguire le istruzioni contenute in questa avvertenza per evitare lesioni
personali.
■ 2 │ IT
│
MT SEMS 1100 A1

ATTENZIONE
Un avvertimento contrassegnato da questo livello di pericolo
indica la possibilità di riportare danni materiali.
Qualora fosse impossibile evitare tale situazione pericolosa, questo può dare
luogo a danni materiali.
► Seguire le indicazioni di questa avvertenza per evitare danni materiali.
AVVERTENZA
► Un'avvertenza comprende ulteriori informazioni volte a facilitare l'uso
dell'apparecchio.
Uso conforme
Questo apparecchio serve esclusivamente alla preparazione di espresso/cappuccino e alla montatura del latte. Esso è destinato esclusivamente all’uso in
ambito privato. Non utilizzarlo per fini commerciali.
Un uso diverso o esulante da quanto sopra è considerato non conforme.
AVVERTENZA
Pericolo derivante da uso non conforme!
In caso di uso non conforme o diverso da quello previsto, possono verificarsi
situazioni di pericolo.
► L'apparecchio deve essere impiegato esclusivamente per l'uso previsto.
► Attenersi alle procedure descritte nel presente manuale di istruzioni.
Sono escluse rivendicazioni di qualsiasi genere in caso di danni derivanti da uso
non conforme.
Il rischio è esclusivamente a carico dell’utente.
IT│MT
│
3 ■SEMS 1100 A1

Volume della fornitura/ispezione per eventuali danni da
trasporto
AVVERTENZA
Pericolo di soffocamento!
► Il materiale di imballaggio non deve essere utilizzato come giocattolo.
Pericolo di soffocamento.
La fornitura standard dell’apparecchio comprende i seguenti componenti:
▯ Macchina per caffè espresso
▯ Portafiltro
▯ Filtro per espresso grande
▯ Filtro per espresso piccolo
▯ Misurino con pressino
▯ Istruzioni brevi
▯ Manuale di istruzioni
AVVERTENZA
► Controllare se la fornitura è integra e se presenta danni visibili.
► In caso di fornitura incompleta o in presenza di danni derivanti da imballag-
gio insufficiente o causati dal trasporto, rivolgersi alla hotline di assistenza.
Smaltimento della confezione
L’imballaggio protegge l’apparecchio dai danni da trasporto. I materiali
d’imballaggio sono stati selezionati in relazione alla loro ecocompatibilità e alle
caratteristiche di smaltimento e pertanto sono riciclabili.
Il riciclo dell’imballaggio consente di risparmiare materie prime e riduce la generazione di rifiuti. Smaltire il materiale di imballaggio non più necessario in conformità alle vigenti norme locali.
Tenere conto dei codici presenti sui vari materiali di imballaggio ed eventualmente
separare i materiali effettuando una raccolta differenziata. I materiali di imballaggio presentano codici costituiti da abbreviazioni (a) e numeri (b) con il
seguente significato:
1–7: materie plastiche,
20–22: carta e cartone,
80–98: materiali compositi.
■ 4 │ IT
AVVERTENZA
► Durante il periodo di validità della garanzia, se possibile, conservare
l'imballaggio originale per poter imballare adeguatamente l'apparecchio in
caso di intervento in garanzia.
│
MT SEMS 1100 A1

Indicazioni relative alla sicurezza
Per l’uso sicuro dell’apparecchio, rispettare le seguenti avvertenze
di sicurezza:
AVVERTENZA! PERICOLO DI LESIONI!
► Controllare l’apparecchio prima dell’uso per rilevare even-
tuali danni visibili. Non mettere in funzione un apparecchio
danneggiato o caduto.
► Tenere lontani i bambini di età inferiore a 8 anni dall’appa-
recchio e dal relativo cavo.
► L’apparecchio può essere utilizzato dai bambini di almeno
8anni di età solo se sorvegliati o istruiti sull’uso sicuro
dell’apparecchio e qualora ne abbiano compreso i pericoli
associati.
► L’apparecchio può essere utilizzato da persone con capacità
fisiche, sensoriali o mentali ridotte o insufficiente esperienza
o conoscenza, solo se sorvegliate o istruite sull’uso sicuro
dell’apparecchio e qualora ne abbiano compreso i pericoli
associati.
► La pulizia e la manutenzione a cura dell’utente non devono
essere eseguite dai bambini a meno che non abbiano
almeno 8 anni e non vengano sorvegliati.
► I bambini non devono giocare con l’apparecchio.
► Fare eseguire le riparazioni solo da aziende specializzate o
dall’assistenza ai clienti. Le riparazioni effettuate in modo
non conforme possono causare gravi pericoli per l’utente.
Inoltre la garanzia decade.
Non immergere l’apparecchio in acqua o altri liquidi.
Pericolo di scossa elettrica!
► Non toccare mai l’apparecchio con mani bagnate o umide.
IT│MT
│
5 ■SEMS 1100 A1

AVVERTENZA! PERICOLO DI LESIONI!
► Al fine di evitare pericoli, fare sostituire immediatamente
spine o cavi danneggiati da personale specializzato autorizzato o dal centro di assistenza clienti.
► Pericolo di ustioni! Durante l’uso alcune parti si surriscaldano!
► Durante l’uso dell’apparecchio si formano sbuffi di vapore
bollente. Fare attenzione a non riportare ustioni! Mantenersi
a sufficiente distanza di sicurezza dal vapore.
► Collegare l’apparecchio esclusivamente a una presa in-
stallata a norma e provvista di messa a terra.
► Dopo l'uso, la superficie dell'elemento riscaldante presenta
ancora del calore residuo.
► Impedire il contatto di liquidi con la connessione a spina.
► Utilizzare l'apparecchio solo conformemente alla destina-
zione d'uso. Eventuali errori di utilizzo potrebbero dare
luogo a lesioni.
ATTENZIONE! DANNI MATERIALI!
► I componenti difettosi devono essere sostituiti esclusivamente
da pezzi di ricambio originali. Solo con questi pezzi di ricambio è garantita la conformità ai requisiti di sicurezza.
► Proteggere l’apparecchio dall’umidità e dalla penetrazione
di liquidi.
► Proteggere l’apparecchio dagli urti, dalla polvere, dagli
agenti chimici, da forti oscillazioni di temperatura e da fonti
di calore troppo ravvicinate (forni, termosifoni).
► Non immergere mai l’apparecchio in acqua o altri liquidi.
► Staccare sempre l’apparecchio dalla presa di corrente pren-
dendolo per la spina, mai per il cavo.
► Non lasciare mai l’apparecchio incustodito durante l’uso.
■ 6 │ IT
│
MT SEMS 1100 A1

ATTENZIONE! DANNI MATERIALI!
► Non utilizzare timer esterni o un sistema di telecomando
separato per azionare l’apparecchio.
► Non utilizzare mai l’apparecchio in ambienti con temperature
inferiori o vicine allo 0° C. L’apparecchio può danneggiarsi
in caso di congelamento dell’acqua nelle condutture o nel
serbatoio.
► Non utilizzare mai l’apparecchio all’aperto. Questo appa-
recchio è previsto solo per l’uso in ambienti interni.
AVVERTENZA
► La riparazione dell'apparecchio in periodo di garanzia può
avere luogo solo tramite l'assistenza ai clienti autorizzata dal
produttore; altrimenti in caso di successivi danni la garanzia
non sarà ritenuta valida.
IT│MT
│
7 ■SEMS 1100 A1

Componenti dell’apparecchio
Figura A:
Visualizzazione della temperatura
Regolatore di vapore
Superficie di appoggio
Maniglia
Serbatoio dell’acqua
Montalatte
Vaschetta di raccolta gocce
Incavo per il galleggiante rosso
Griglia di scolo
Doccia di acqua bollente
- Spia di controllo del vapore verde
3 Spia di controllo “Power” rossa
! Spia di controllo del riscaldamento verde
. Interruttore ON/OFF
0 Tasto “Espresso”
6 Tasto “Vapore”
Figura B:
1 Bloccafiltro
% Portafiltro
+ Filtro per espresso grande
, Filtro per espresso piccolo
Misurino con pressino
Dati tecnici
Tensione di rete 220 – 240 V ∼ (corrente alternata), 50 Hz
Tensione nominale 1100 W
Pressione pompa ca. 1,5 MPa (15 bar)
■ 8 │ IT
│
MT SEMS 1100 A1
adatto per alimenti

La visualizzazione della temperatura
La visualizzazione della temperatura indica a quale temperatura si è riscaldato
l’apparecchio.
Non appena l’apparecchio viene acceso, comincia a riscaldarsi fino a quando
la lancetta non si trova all’incirca al centro tra 80°C e “
Quando la lancetta raggiunge la parte rossa della scala, la temperatura è sufficientemente alta per preparare un espresso. La spia di controllo del riscaldamento
verde !“ ” si accende.
Quando si preme il tasto “Vapore”
verde !“ ” si spegne, l’apparecchio continua a riscaldarsi e la lancetta sale
fino a raggiungere la zona della scala compresa tra “ ” e “ ”.
Quando la lancetta raggiunge la zona compresa tra “
è sufficientemente alta per generare vapore. La spia di controllo del vapore verde
-“ ” si accende.
6 la spia di controllo del riscaldamento
” e “ ” la temperatura
”.
Prima messa in funzione
1) Pulire il portafiltro %, il misurino , i filtri per espresso+,, la griglia di
scolo e il serbatoio dell’acqua come descritto al capitolo “Pulizia e
manutenzione”.
2) Posizionare l’apparecchio su una superficie piana e resistente al calore.
Assicurarsi che la presa di rete sia vicina e facilmente raggiungibile.
3) Inserire la griglia di scolo in modo tale che il galleggiante rosso possa
spuntare attraverso l’incavo che si trova nella griglia di scolo .
4) Inserire il portafiltro % nell’apparecchio introducendolo dalla tacca “
INSERT” che si trova di lato accanto alla doccia di acqua bollente e poi
ruotare in senso antiorario fino a quando l’impugnatura del portafiltro % non
viene a trovarsi rivolta in avanti (tacca „
5) Inserire la spina in una presa di corrente.
LOCK“).
IT│MT
│
9 ■SEMS 1100 A1

6) Prima del primo impiego, procedere come segue per pulire le linee interne:
Fare scorrere attraverso l’apparecchio circa 5 tazze di espresso (che corrispondono a ca. 100 ml). Rispettare le indicazioni del capitolo “Uso”.
7) Fare produrre vapore dall’apparecchio per circa 30 secondi. Rispettare le
indicazioni del capitolo “Uso”.
AVVERTENZA
► Nel corso del primo impiego può succedere che la pompa funzioni udibil-
mente, si sentano dei rumori ma non si vede ancora uscire acqua dall'apparecchio. In questo caso ruotare il regolatore di vapore nella direzione "
in modo tale che l'aria possa fuoriuscire dai condotti dell'apparecchio (il tasto
"Vapore" 6 è premuto). Dopo circa 20 secondi l'aria sarà fuoriuscita, i
rumori scompariranno e l'acqua uscirà dall'apparecchio.
Funzionamento
AVVERTENZA
► Per effetto della pressione i due tasti "Espresso"
innestano in posizione. Se si preme nuovamente il tasto, esso si sblocca.
Riempimento del serbatoio dell’acqua
AVVERTENZA
► Per la preparazione dell'espresso/cappuccino utilizzare esclusivamente
acqua potabile fresca.
1) Estrarre il serbatoio dell’acqua e riempirlo di acqua:
versare acqua fino alla tacca Min.
Non superare la tacca Max.
2) Reinserire il serbatoio dell’acqua nell’apparecchio. Badare a mettere anche il tubo flessibile nel serbatoio dell’acqua .
"
0 e "Vapore" 6 si
■ 10 │ IT
│
MT SEMS 1100 A1
Riscaldamento dopo un lungo periodo di inutilizzo/alla
prima messa in esercizio
Se l’apparecchio è rimasto inutilizzato per un periodo di tempo prolungato,
riscaldarlo come segue:
1) Versare acqua nel serbatoio dell’acqua .
2) Collocare il filtro per espresso grande + o piccolo , nel portafiltro %.
– Badare che il piccolo intaglio presente sul filtro per espresso grande +
o piccolo ,all’atto dell’inserimento si trovi sopra l’intaglio presente sul
portafiltro %.
– Ruotare poi leggermente il filtro per espresso grande + o piccolo , in
modo tale che non possa più cadere fuori.
AVVERTENZA
► Rimuovere il filtro per espresso +, inserito solo dopo che si è raffreddato!
► Per estrarre nuovamente il filtro per espresso +, dal portafiltro %, ruotare
il filtro per espresso +, inserito fino a quando l’intaglio presente sul filtro
per espresso +, non viene a trovarsi sopra l’intaglio presente sul portafiltro %. Ora si può sfilare il filtro per espresso +,.
IT│MT
│
11 ■SEMS 1100 A1

3) Inserire il portafiltro % nell’apparecchio introducendolo dalla tacca “
INSERT” che si trova di lato accanto alla doccia di acqua bollente e poi
ruotare in senso antiorario fino a quando l’impugnatura del portafiltro % non
viene a trovarsi rivolta in avanti (tacca „
4) Collocare una tazza sotto il portafiltro %.
5) Aprire/chiudere il regolatore del vapore portandolo su “0”.
6) Accendere l’apparecchio dall’interruttore On/Off
7) La spia di controllo rossa „Power“
lancetta nella visualizzazione della temperatura inizia a salire.
8) Non appena la spia di controllo del riscaldamento verde
premere il tasto “Espresso” 0. Fare scorrere l’acqua per 1 minuto.
AVVERTENZA
► Potrebbe essere necessario svuotare la tazza di tanto in tanto. A tale scopo
fermare l'operazione premendo il tasto "Espresso" 0. Svuotare la tazza
e premere nuovamente il tasto "Espresso"
scorrere attraverso l'apparecchio.
9) Dopo circaa 1 minuto fermare la pompa premendo nuovamente il tasto
“Espresso”
10) Attendere fino alla riaccensione della spia verde di controllo del riscaldamento
!. Il riscaldamento è concluso. A questo punto è possibile preparare
un espresso/cappuccino.
0.
Riscaldamento prima di ogni uso
Prima di preparare l’espresso o il cappuccino, riscaldare l’apparecchio.
1) Accendere l’apparecchio dall’interruttore On/Off
rossa „Power“ 3 si accende. I due tasti “Espresso” 0 e “Vapore” 6
non devono essere premuti. Accertarsi che il regolatore di vapore sia completamente ruotato su “0“ fino al fermo.
2) Inserire il portafiltro % nell’apparecchio introducendolo dalla tacca “
INSERT” che si trova di lato accanto alla doccia di acqua bollente e poi
ruotare in senso antiorario fino a quando l’impugnatura del portafiltro % non
viene a trovarsi rivolta in avanti (tacca „
3) Premere il tasto “Espresso”
acqua dal serbatoio . Non appena l’acqua comincia a fuoriuscire dai fori
del portafiltro, premere nuovamente il tasto “Espresso” 0 in modo tale
che la pompa si fermi.
4) Attendere fino all’accensione della spia verde di controllo del riscaldamento
5) Premere nuovamente il tasto “Espresso”
bollente per 20 secondi prima di fermare di nuovo la pompa.
Il preriscaldamento è ora terminato. A questo punto è possibile preparare un
espresso/cappuccino.
!.
0 in modo tale che l’apparecchio possa tirare
LOCK“).
..
3 si accende. Dopo pochi istanti la
! si accende,
0 affinché l'acqua continui a
.. La spia di controllo
LOCK“).
0 e lasciar fuoriuscire l’acqua
■ 12 │ IT
│
MT SEMS 1100 A1

Preparazione dell’espresso
AVVERTENZA
► Assicurarsi sempre che il filtro per espresso+, sia pulito e privo di residui
di miscela in polvere per espresso.
1) Se l’apparecchio è riscaldato:
Per preparare un espresso, collocare il filtro per espresso piccolo , nel
portafiltro %.
Per preparare due espressi, collocare il filtro per espresso grande + nel
porta filtro %.
2) Riempire il filtro per espresso piccolo , fino alla tacca Max con miscela in
polvere per espresso. La quantità corrisponde a circa 7 g di miscela in polvere
o a un misurino raso di caffè.
oppure:
Riempire il filtro per espresso grande + fino alla tacca Max con miscela in
polvere per espresso. Ciò corrisponde a circa 7 g + 7 g di miscela in polvere,
ovvero due misurini rasi di caffè.
3) Comprimere la miscela in polvere per espresso con l’ausilio del pressino del
misurino . Se necessario, inserire altra miscela in polvere per espresso, fino a
riempire il filtro per espresso +, fino alla tacca Max. Comprimere nuovamente la miscela in polvere per espresso.
AVVERTENZA
► La compressione della miscela in polvere per espresso è un procedimento
fondamentale per la preparazione di un espresso. Se la miscela in polvere
per espresso viene compressa adeguatamente, l'espresso verrà filtrato lentamente, con una maggiore produzione di crema. Se la miscela in polvere
per espresso non viene compressa adeguatamente, l'espresso verrà filtrato
più rapidamente, con una scarsa produzione di crema.
4) Inserire il portafiltro % nell’apparecchio introducendolo dalla tacca
INSERT” che si trova sull’apparecchio e poi ruotare in senso antiorario
“
fino a quando l’impugnatura del portafiltro % non viene a trovarsi rivolta in
avanti (tacca „
5) Collocare una (o due) tazza(e) sotto le aperture del portafiltro. Consigliamo
di sciacquare precedentemente le tazze da caffè con acqua bollente, per
rallentare il raffreddamento dell’espresso. Le tasse possono venire intanto
posate sull’apposita superficie .
6) Quando la spia di controllo del riscaldamento verde
ora premere il tasto “Espresso” 0. L’espresso scorrerà nella tazza(e).
LOCK“).
! si accende, si può
IT│MT
│
13 ■SEMS 1100 A1

AVVERTENZA
Non rimuovere mai il portafiltro %u durante la fuoriuscita
dell'espresso!
Gli spruzzi di espresso bollente possono provocare lesioni!
► Prima di rimuovere il portafiltro %, accertarsi sempre che il tasto
"Espresso"
7) Quando la/le tazza/e è/sono riempita/e fino alla quantità desiderata (ca.
20 ml per tazza), premere nuovamente il tasto “Espresso” 0 in modo tale
che non venga più pompata acqua.
A questo punto è possibile consumare l’espresso.
8) Spegnere l’apparecchio dall’interruttore On/Off
AVVERTENZA
► Dopo 30 minuti l'apparecchio si spegne automaticamente.
9) Dopo ogni uso rimuovere la miscela in polvere per espresso dal filtro per
espresso +,. Rimuovere il portafiltro % dall’apparecchio. Aprire il bloccafiltro 1 verso l’alto, in modo da impedire che il filtro per espresso +, cada
dal portafiltro %. Ora svuotare il filtro per espresso +, voltando il portafiltro % con filtro per espresso +, bloccato e picchiettando per scaricare
la miscela in polvere per espresso. Smaltire la miscela in polvere per espresso
sempre nel rispetto dell’ambiente, ad esempio nei rifiuti organici.
AVVERTENZA
► Pulire assolutamente la doccia di acqua bollente (da cui fuoriesce
l'acqua bollente) dopo ogni uso. Leggere al riguardo il capitolo "Pulizia
emanutenzione“.
0 non sia premuto.
..
AVVERTENZA
► Svuotare regolarmente la vaschetta raccogligocce , al più tardi quando
si riesce a intravedere il galleggiante rosso nell'intaglio della griglia di
scolo .
Preparazione del cappuccino
AVVERTENZA
Prestare attenzione nell'uso del vapore per la preparazione
della schiuma di latte!
Il vapore bollente o gli spruzzi di liquidi bollenti possono causare lesioni!
► Premere sempre lentamente il regolatore di vapore .
1) Riempire con latte freddo un contenitore per la schiuma (preferibilmente di
acciaio inox) per un terzo della capacità.
2) Assicurarsi che il regolatore di vapore sia chiuso (ruotare fino all’arresto
■ 14 │ IT
│
MT SEMS 1100 A1

in direzione “0“).
3) Espellere lo schiumatore per il latte dal lato. Afferrarlo solo dalla
maniglia .
4) Premere il tasto “Vapore”
della spia di controllo del vapore verde
5) Collocare un contenitore vuoto sotto lo schiumatore per il latte . Ruotare
lentamente il regolatore di vapore in direzione “
condensa/spruzzi d’acqua. In tal modo si ottiene la pulizia dell’ugello e del
circuito idrico dell’apparecchio.
6) Aspettare 15 secondi e poi ruotare il regolatore del vapore verso “0” fino
a quando il vapore non cessa di fuoriuscire dall’ugello. Gettare via l’acqua
svuotando il recipiente.
7) Tenere il contenitore per la schiuma in mano, per sentire la temperatura del
latte, e inserire lievemente l’ugello dello schiumatore per il latte nel latte.
Nel farlo mantenere il contenitore in posizione leggermente obliqua.
8) Ruotare lentamente il regolatore del vapore verso “
9) Muovere il contenitore per la schiuma con movimento circolare tenendo la
punta dell’ugello appena al di sotto della superficie del latte e comunque a
una profondità sufficiente in modo che il latte non spruzzi e a un’altezza sufficiente in modo che si formi una spessa schiuma. Se il procedimento viene
effettuato correttamente, si udrà un caratteristico borbottio.
10) Quando comincia a formarsi la schiuma, immergere ulteriormente l’ugello, per
ottenere la schiumatura dello “strato” successivo ed evitare che la schiuma già
formata si bruci.
11) Immergere quindi completamente l’ugello e chiudere il regolatore di vapore
più o meno per metà in modo che il latte si riscaldi. Tenere il contenitore in
posizione leggermente obliqua per girare il latte delicatamente, mentre lo si
mescola con l’ugello.
12) Quando la schiuma di latte ha raggiunto la consistenza e temperatura desiderate,
chiudere il regolatore del vapore (ruotandolo verso “0” fino alla battuta).
13) Estrarre prima l’ugello dal latte.
14) Premere il tasto “Vapore”
spegne e la spia di controllo del riscaldamento ! si accende.
AVVERTENZA
► Per la preparazione del cappuccino utilizzare sempre tazze più grandi di
quelle usate per l'espresso, visto che sarà necessario ancora aggiungere il
latte con la schiuma.
6 verso il basso. Attendere fino all’accensione
-.
“. Dall’ugello usciranno
”.
6. La spia di controllo del vapore - si
IT│MT
│
15 ■SEMS 1100 A1

15) Per la preparazione del cappuccino procedere esattamente come si farebbe
per preparare un espresso (v. capitolo “Preparazione dell’espresso”/il riscaldamento non è più necessario). Fare però scorrere l’acqua per un tempo
doppio rispetto all’espresso (circa 40 ml).
16) Spegnere l’apparecchio azionando l’interruttore ON/OFF ..
AVVERTENZA
► Dopo 30 minuti l’apparecchio si spegne automaticamente.
17) Versare quindi il latte con la schiuma nell’espresso precedentemente preparato. Il
cappuccino è pronto. Zuccherarlo a piacere o cospargerlo di cacao in polvere.
AVVERTENZA
► Pulire lo schiumatore per il latte sempre immediatamente dopo l'uso.
Leggere al riguardo il capitolo "Pulizia e manutenzione“.
Consigli per la schiuma di latte
■ È possibile ottenere la schiuma da qualsiasi tipo di latte, anche di soia o riso.
Alcuni tipi di latte possono tuttavia essere riscaldati solo entro certi limiti.
■ Il latte scremato (latte magro) non brucia facilmente come il latte intero ma
acausa dello scarso contenuto di grasso c’è il rischio che non si riesca a
schiumare bene. Pertanto utilizzare latte con una percentuale di grasso del
3,5% o dell’1,5%.
■ Il latte ben raffreddato può essere schiumato meglio del latte non molto
freddo. Si ottengono i risultati migliori a una temperatura di circa 7°C.
■ Non schiumare il latte per la seconda volta altrimenti brucerà.
■ Fare riposare il latte con la schiuma per circa 30 secondi, prima di versarlo
nell’espresso. In tal modo, le bolle d’aria più grosse scoppiano e il latte
ancora liquido scende sul fondo. Così sarà possibile versare la schiuma fine
sull’espresso.
Pulizia e manutenzione
AVVERTENZA! PERICOLO DI LESIONI!
► Prima di pulire l’apparecchio, staccare sempre la spina dalla presa di corrente.
Pericolo di scossa elettrica!
► Fare sempre raffreddare completamente l’apparecchio prima di pulirlo.
Pericolo di ustioni!
Non immergere mai l’apparecchio in acqua o altri liquidi. Pericolo di
scossa elettrica!
■ 16 │ IT
│
MT SEMS 1100 A1

Pulizia dello schiumatore per il latte
ATTENZIONE! DANNI MATERIALI!
► Non utilizzare mai detergenti abrasivi, aggressivi o chimici per la pulizia
dell’apparecchio. Essi attaccano la superficie dell’apparecchio.
1) Collocare un contenitore vuoto sotto lo schiumatore per il latte .
2) Subito dopo l’uso ruotare il regolatore del vapore portandolo su “
e lasciar fuoriuscire il vapore per alcuni secondi.
3) Chiudere il regolatore del vapore (ruotandolo verso “0” fino alla battuta),
spegnere l’apparecchio e sfilare la spina dalla presa di rete.
4) Fare raffreddare l’ugello.
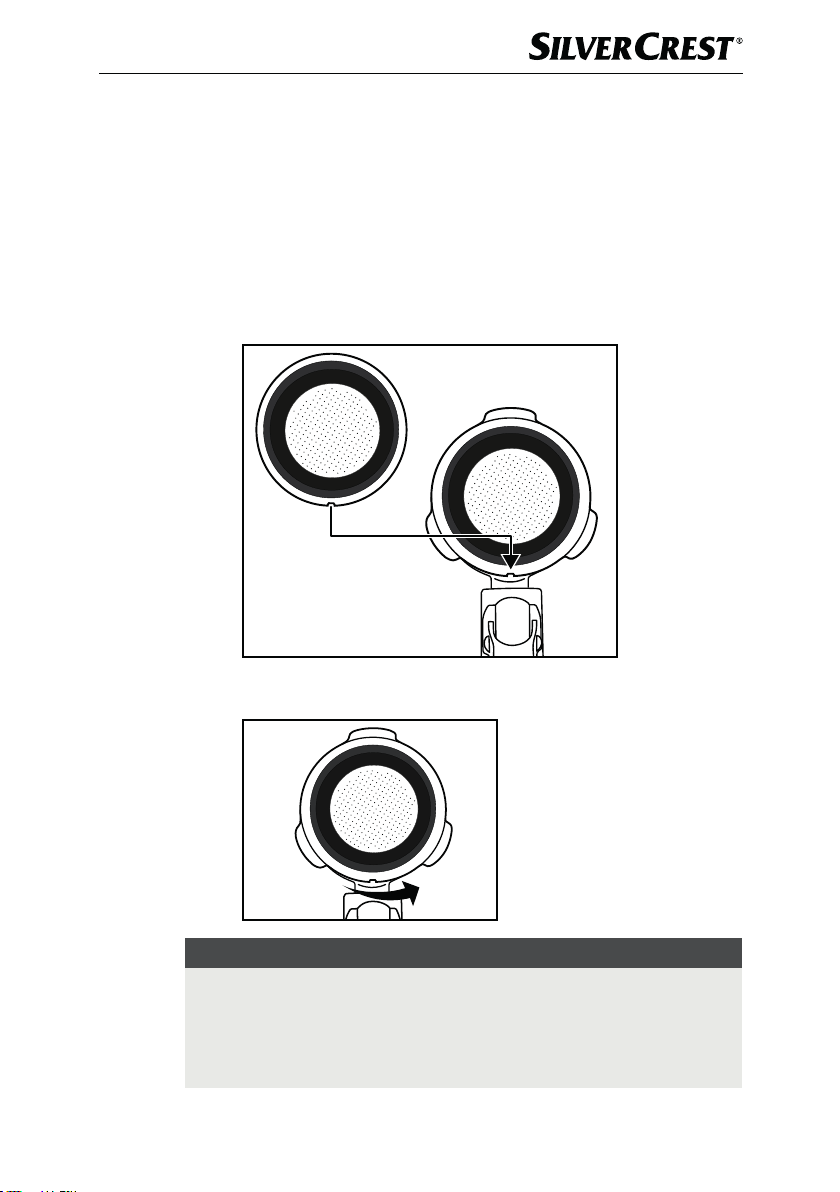
5) Sfilare l’involucro dello schiumatore per latte (Figura 1) e pulirlo accuratamente in acqua calda.
6) Strofinare l’ugello che si trova sotto l’involucro con un panno umido. All’occorrenza
aggiungere sul panno qualche goccia di detersivo delicato. Ma dopo la pulizia
con un detersivo occorre passare ancora un panno inumidito con acqua pulita.
Accertarsi che sull’ugello non si trovino residui di detersivo.
7) Far scorrere nuovamente l’involucro sull’ugello (Figura 1).
”
Figura 1
IT│MT
│
17 ■SEMS 1100 A1

Pulizia dell’area di fuoriuscita dell’acqua bollente
Pulire sempre l’area di fuoriuscita dell’acqua bollente dopo l’uso.
1) Dopo la preparazione di espresso/cappuccino e dopo aver rimosso il portafiltro%, pulire tutta l’area di fuoriuscita dell’acqua bollente con un panno
umido, in modo da eliminare i residui di miscela in polvere.
2) Reinserire il portafiltro % senza filtri per espresso +,.
3) Collocare poi una tazza vuota sotto il portafiltro % e premere il tasto
“Es presso”
dalla doccia di acqua bollente risciacquando via gli ultimi residui di
miscela in polvere.
4) Dopo circa 20 secondi premere nuovamente il tasto “Espresso” 0 e
spegnere l’apparecchio dall’interruttore On/Off ..
5) Rimuovere nuovamente il portafiltro %.
0 in modo tale che si innesti in posizione. L’acqua fuoriesce
Pulizia degli accessori
1) Pulire il portafiltro %, i due filtri per espresso +,, il serbatoio dell’acqua , il
misurino e la griglia di scolo in acqua calda.
AVVERTENZA
► Se si versano dei detergenti nell'acqua, questi potrebbero influenzare il sapore
dell'espresso. Se le impurità possono essere rimosse solo con l'ausilio di detergenti, risciacquare le parti sempre con abbondante acqua pulita.
2) Asciugare tutte le parti.
3) La vaschetta di raccolta delle gocce è idonea al lavaggio in lavastoviglie.
Prima della pulizia rimuovere però nella lavastoviglie il galleggiante rosso
dalla vaschetta di raccolta delle gocce :
– A tale scopo rimuovere i blocchi infilati sulle due asticelle di sostegno ai
lati del galleggiante.
– Sfilare il galleggiante dalle asticelle di sostegno.
– Pulire il galleggiante e i blocchi in acqua calda.
– Dopo la pulizia della vaschetta di raccolta delle gocce reinserire il
galleggiante pulito sulle asticelle di sostegno e infilare i blocchi.
Pulizia dell’apparecchio
Pulire l’apparecchio con un panno umido. Se necessario versare un po’ di
detergente sul panno.
Prima del successivo impiego accertarsi che l’apparecchio sia completamente
asciutto.
■ 18 │ IT
│
MT SEMS 1100 A1

Decalcificazione dell’apparecchio
Decalcificare regolarmente l’apparecchio. Dopo circa 1 – 2 mesi (con una media
di 4 preparazioni di espresso al giorno) si consiglia di decalcificare l’apparecchio.
Questo valore potrebbe cambiare a seconda del grado di durezza dell’acqua
della propria zona di residenza.
Per la decalcificazione, utilizzare i prodotti normalmente presenti in commercio
destinati all’uso con le macchine per espresso. Procedere come descritto nel
manuale di istruzioni riportato sul prodotto.
Se non si possiede un decalcificante, si può in alternativa decalcificare con acido
citrico e procedere come segue:
1) Riempire il serbatoio dell’acqua fino alla tacca Max.
2) Sciogliere 2 cucchiai (circa 30 grammi) di acido citrico (reperibile in drogheria
o farmacia).
3) Inserire il serbatoio dell’acqua nell’apparecchio.
4) Accendere l’apparecchio dall’interruttore ON/OFF
vapore è chiuso.
5) Inserire il portafiltro % senza filtro per espresso +, nell’apparecchio e
collocare una tazza sotto il potrafiltro %.
6) Non appena la spia di controllo del riscaldamento verde
premere il tasto “Espresso” 0 in modo tale che si innesti in posizione.
7) Lasciar scorrere circa 2 tazze (ca. 250 ml) di acqua e fermare poi l’operazione premendo nuovamente il tasto “Espresso”
8) Collocare un contenitore sotto lo schiumatore per il latte .
9) Premere il tasto “Vapore”
posizione e attendere fino a quando la spia di controllo del vapore verde
- non si accende. Ruotare lentamente il regolatore del vapore portandolo
su “ ”. Lasciare che l’apparecchio produca vapore per circa 2 minuti.
10) Dopo 2 minuti chiudere il regolatore di vapore e premere nuovamente il
tasto “Vapore” 6 in modo tale che non venga più generato vapore.
11) Fare agire il decalcificante per circa 15 minuti.
12) Ripetere i passi da 6 a 11 per tre volte.
13) Premere poi il tasto “Espresso”
fare scorrere l’acqua fino a svuotare completamente il serbatoio dell’acqua .
14) Risciacquare il serbatoio dell’acqua con acqua pulita e riempirlo di acqua
pulita fino alla tacca Max.
15) Non appena la spia di controllo del riscaldamento verde
premere il tasto “Espresso” 0 in modo tale che si innesti in posizione.
16) Fare scorrere l’acqua.
17) Ripetere i passi da 14 a 16 per tre volte.
6 verso il basso in modo tale che si innesti in
0 in modo tale che si innesti in posizione e
.. Il regolatore di
! si accende,
0.
! si accende,
IT│MT
│
19 ■SEMS 1100 A1

18) Versare ancora una volta acqua nel serbatoio dell’acqua .
19) Premere il tasto “Vapore”
20) Tenere un recipiente sotto il montalatte e ruotare lentamente il regolatore
del vapore portandolo su “
del vapore verde
21) Dopo circa 1 minuto chiudere il regolatore del vapore (ruotandolo verso
“0” fino alla battuta), premere nuovamente il tasto “Vapore” 6 e spegnere l’apparecchio.
AVVERTENZA
► Dopo 30 minuti l’apparecchio si spegne automaticamente.
6 in modo tale che si innesti in posizione.
” non appena si accende la spia di controllo
-.
■ 20 │ IT
│
MT SEMS 1100 A1

Eliminazione dei guasti
Guasto Causa Soluzione
Preparare nuovamente l'espresso,
evitando di comprimere eccessivamente la miscela in polvere, o
sostituendola completamente.
Riempire con acqua il serbatoio
dell'acqua .
Pulire il portafiltro %.
Inserire correttamente il portafiltro%.
Pulire il portafiltro %.
Rimuovere i residui di miscela dai
margini del portafiltro %.
Preriscaldare l'apparecchio.
L'espresso non
fuoriesce più.
L'espresso gocciola
sui bordi del portafiltro % invece di
colare attraverso
le aperture.
La miscela in polvere per l'espresso
è troppo umida e/o compressa
eccessivamente.
Il serbatoio dell'acqua è privo
d'acqua.
I fori delle aperture del portafiltro
sono otturati.
Il portafiltro % non è stato inserito
correttamente.
I fori delle aperture del portafiltro
sono otturati.
Sul margine del portafiltro % si
trovano residui di miscela in polvere
per espresso.
L'apparecchio non è stato preriscaldato.
L'espresso è
freddo.
La pompa fa
rumore durante il
funzionamento.
La crema è troppo
chiara (l'espresso
scorre troppo rapidamente attraverso
il portafiltro %).
La crema è troppo
scura (l'espresso
scorre troppo lentamente attraverso
il portafiltro %).
Il latte non
produce schiuma.
La spia verde di controllo del riscaldamento
accesa.
Le tazze non sono state preriscaldate. Preriscaldare le tazze.
Il serbatoio dell'acqua è vuoto.
La miscela in polvere per espresso
è troppo scarsa.
La miscela in polvere per espresso è
macinata troppo grossolanamente.
La miscela in polvere per espresso è
eccessiva.
La miscela in polvere per espresso è
macinata troppo finemente o è umida.
Il filtro è otturato. Pulire il filtro.
Il latte non è sufficientemente freddo.
Lo schiumatore per il latte è sporco. Pulire lo schiumatore per il latte .
! non si è ancora
Attendere fino all'accensione della
spia verde di controllo del riscaldamento
Riempire con acqua il serbatoio
dell'acqua .
Utilizzare una maggiore quantità
di miscela in polvere per espresso.
Utilizzare solo miscela in polvere
specifica per la preparazione
dell'espresso.
Utilizzare una minore quantità di
miscela in polvere per espresso.
Utilizzare solo miscela in polvere
specifica per la preparazione
dell'espresso.
Utilizzare latte appena prelevato
dal frigorifero.
!.
IT│MT
│
21 ■SEMS 1100 A1

Smaltimento
Smaltimento dell’apparecchio
Non gettare per alcun motivo l’apparecchio insieme ai normali
rifiuti domestici. Questo prodotto è soggetto alla Direttiva europea RAEE 2012/19/EU (Rifiuti da Apparecchiature Elettriche ed
Elettroniche).
Far smaltire l’apparecchio da un’azienda di smaltimento autorizzata o dall’ente
di smaltimento comunale. Rispettare le norme attualmente in vigore. In caso di
dubbi mettersi in contatto con l’ente di smaltimento competente.
Per lo smaltimento del prodotto una volta che ha terminato la sua funzione,
informarsi presso l’amministrazione comunale.
■ 22 │ IT
│
MT SEMS 1100 A1

Garanzia della Kompernass Handels GmbH
Egregio Cliente,
Questo apparecchio ha una garanzia di 3 anni dalla data di acquisto. Qualora
questo prodotto presentasse vizi, Le spettano diritti legali nei confronti del venditore
del prodotto. La garanzia qui di seguito descritta non costituisce alcun limite a
tali diritti legali.
Condizioni di garanzia
Il periodo di garanzia decorre dalla data dell’acquisto. Si prega di conservare lo
scontrino di cassa originale. Tale documento è necessario come prova di acquisto.
Qualora entro tre anni a partire dalla data dell’acquisto di questo prodotto si
presentasse un vizio del materiale o di fabbricazione, provvederemo, a nostra
discrezione, a riparare o a sostituire gratuitamente il prodotto. Questa prestazione
di garanzia ha come presupposto che l’apparecchio difettoso e la prova di acquisto
(scontrino di cassa) vengano presentati entro il termine di tre anni e che si descriva
per iscritto in cosa consiste il vizio e quando si è presentato.
Se il vizio rientra nell’ambito della nostra garanzia, il Suo prodotto verrà riparato
o sostituito da uno nuovo. Con la riparazione o la sostituzione del prodotto non
decorre un nuovo periodo di garanzia.
Periodo di garanzia e diritti legali di rivendicazione di vizi
Il periodo di garanzia non viene prolungato da interventi in garanzia. Ciò vale
anche per le parti sostituite e riparate. Danni e vizi eventualmente già presenti al
momento dell’acquisto devono venire segnalati immediatamente dopo che l’apparecchio è stato disimballato. Le riparazioni eseguite dopo la scadenza del
periodo di garanzia sono a pagamento.
Ambito della garanzia
L’apparecchio è stato prodotto con cura secondo severe direttive qualitative e
debitamente collaudato prima della consegna.
La garanzia viene prestata in caso di vizi del materiale o di fabbricazione. Questa garanzia non si estende a componenti del prodotto che sono esposti al normale logorio e possono pertanto essere considerati come componenti soggetti a
usura o a danni che si verificano su componenti delicati, per es. interruttori, batterie,
stampi da forno o parti realizzate in vetro.
Questa garanzia decade se il prodotto è stato danneggiato oppure utilizzato o
sottoposto a interventi di manutenzione in modo non conforme. Per un utilizzo
adeguato del prodotto si devono rigorosamente rispettare tutte le istruzioni esposte
nel manuale di istruzioni per l’uso. Si devono assolutamente evitare modalità di
utilizzo e azioni che il manuale di istruzioni per l’uso sconsiglia o da cui esso mette
in guardia.
Il prodotto è destinato esclusivamente all’uso domestico e non a quello commerciale. La garanzia decade in caso di impiego improprio o manomissione, uso
della forza e interventi non eseguiti dalla nostra filiale di assistenza autorizzata.
IT│MT
│
23 ■SEMS 1100 A1

Trattamento dei casi di garanzia
Per garantire una rapida evasione della Sua richiesta, La preghiamo di seguire le
seguenti istruzioni:
■ Tenga a portata di mano per qualsiasi richiesta lo scontrino di cassa e il
codice dell’articolo (per es. IAN 12345) come prova di acquisto.
■ Il codice dell’articolo è indicato sulla targhetta di modello, su un’incisione,
sul frontespizio del manuale di istruzioni per l’uso (in basso a sinistro) o
come adesivo sul lato posteriore o inferiore.
■ Qualora si presentassero malfunzionamenti o altri tipi di vizi, contatti innanzi-
tutto il reparto assistenza clienti qui di seguito indicato telefonicamente o
via e-mail.
■ Una volta che il prodotto è stato registrato come difettoso, lo può poi spedi-
re a nostro carico, provvedendo ad allegare la prova di acquisto (scontrino
di cassa), una descrizione del vizio e l’indicazione della data in cui si è
presentato, all’indirizzo del servizio di assistenza clienti che Le è stato comunicato.
Al sito www.lidl-service.com si possono scaricare questo e molti altri manuali
di istruzioni per l’uso, filmati sui prodotti e software.
Assistenza
Assistenza Italia
Tel.: 02 36003201
E-Mail: kompernass@lidl.it
Service Malta
Tel.: 80062230
E-Mail: kompernass@lidl.com.mt
IAN 313486
Importatore
Badi che il seguente indirizzo non è quello del servizio di assistenza clienti.
Contatti innanzitutto il servizio di assistenza clienti indicato.
KOMPERNASS HANDELS GMBH
BURGSTRASSE 21
DE - 44867 BOCHUM
GERMANIA
www.kompernass.com
■ 24 │ IT
│
MT SEMS 1100 A1

Índice
Introdução ................................................... 26
Direitos de autor .........................................................26
Limitação da responsabilidade ..............................................26
Indicações de aviso .......................................................26
Utilização correta ........................................................27
Conteúdo da embalagem/Inspeção de transporte ...............................28
Eliminação da embalagem .................................................28
Instruções de segurança ........................................ 29
Elementos do aparelho. . . . . . . . . . . . . . . . . . . . . . . . . . . . . . . . . . . . . . . . . 32
Dados técnicos ................................................ 32
Indicação da temperatura ...................................... 33
Primeira colocação em funcionamento ............................ 33
Operação .................................................... 34
Enchimento do depósito de água ............................................34
Aquecer após longos períodos de paragem/durante a primeira colocação em funcionamen-
to .....................................................................35
Aquecimento antes de cada utilização ........................................36
Preparação de expresso ...................................................37
Preparação de cappuccino .................................................38
Dicas para a espuma do leite ...............................................40
Limpeza e conservação ........................................ 40
Limpeza do espumador de leite .............................................41
Limpar o jato de água quente ...............................................42
Limpar acessórios ........................................................42
Limpar o aparelho ........................................................42
Descalcificação do aparelho ................................................43
Eliminação de erros ........................................... 45
Eliminação ................................................... 46
Eliminação do aparelho ...................................................46
Garantia da Kompernass Handels GmbH ......................... 47
Assistência Técnica .......................................................48
Importador ..............................................................48
│
PT
25 ■SEMS 1100 A1

Introdução
Parabéns pela compra do seu novo aparelho.
Optou por um produto de elevada qualidade. O manual de instruções é parte
integrante deste produto. Este contém instruções importantes para a segurança,
utilização e eliminação. Antes de utilizar o produto, familiarize-se com todas as
instruções de operação e segurança. Utilize o produto apenas como descrito e
nas áreas de aplicação indicadas. Ao transferir o produto para terceiros, entregue
todos os respetivos documentos.
Direitos de autor
Esta documentação está protegida por direitos de autor.
Não é permitido duplicar ou reimprimir, total ou parcialmente, o presente docu-
mento, bem como reproduzir imagens, mesmo que alteradas, sem a autorização
por escrito do fabricante.
Limitação da responsabilidade
Todos os dados, informações e indicações técnicos relativos à operação, presentes
neste manual de instruções, correspondem ao último desenvolvimento técnico à
data da impressão e são elaborados com base nos nossos melhores conhecimentos
e tendo em consideração as nossas experiências e descobertas até ao momento.
As informações, ilustrações e descrições contidas neste manual não poderão
servir de pretexto para reclamar direitos de qualquer espécie.
O fabricante não assume qualquer responsabilidade por danos resultantes da
inobservância do manual, de uma utilização incorreta, de reparações inadequadas, alterações não autorizadas ou da utilização de peças de reposição
não aprovadas.
Indicações de aviso
No presente manual de instruções são utilizadas as seguintes indicações de
aviso:
AVISO
Uma indicação de aviso deste nível de perigo identifica uma
possível situação perigosa.
Se a situação perigosa não for evitada, existe o perigo de ferimentos.
► Seguir as instruções desta indicação de aviso para evitar ferimentos de pessoas.
■ 26 │ PT SEMS 1100 A1

ATENÇÃO
Uma indicação de aviso deste nível de perigo identifica
possíveis danos materiais.
Se a situação não for evitada, existe o perigo de danos materiais.
► Seguir as instruções desta indicação de aviso para evitar danos materiais.
NOTA
► Uma nota fornece informações adicionais que facilitam o manuseamento do
aparelho.
Utilização correta
Este aparelho foi concebido exclusivamente para a preparação de expresso/
cappuccino e espuma de leite, destinando-se apenas para a utilização privada.
Não o utilize para fins comerciais.
Qualquer utilização diferente ou fora do âmbito descrito é considerada incorreta.
AVISO
Perigo devido a utilização incorreta!
Podem surgir perigos resultantes de uma utilização incorreta e/ou não
adequada do aparelho.
► O aparelho deve ser utilizado apenas para a finalidade descrita.
► Cumprir os procedimentos descritos neste manual de instruções.
Excluem-se quaisquer direitos de garantia relativos a danos resultantes de uma
utilização incorreta.
O risco é da responsabilidade exclusiva do utilizador.
PT
│
27 ■SEMS 1100 A1

Conteúdo da embalagem/Inspeção de transporte
AVISO
Perigo de asfixia!
► Os materiais de embalagem não devem ser utilizados para brincar.
Perigo de asfixia.
Por norma, o aparelho é fornecido com os seguintes componentes:
▯ Máquina de café expresso
▯ Suporte do filtro
▯ Filtro de café grande
▯ Filtro de café pequeno
▯ Colher de medição com calcador
▯ Manual de instruções breve
▯ Manual de instruções
NOTA
► Verifique a integralidade do produto fornecido e a existência de eventuais
danos visíveis.
► No caso de um fornecimento incompleto ou de danos resultantes de uma
embalagem incompleta ou do transporte, contacte a linha direta de
assistência técnica.
Eliminação da embalagem
A embalagem protege o aparelho contra danos durante o transporte.
Os materiais da embalagem são selecionados, tendo em conta os aspetos ambientais e técnicos relativamente à eliminação e são, por isso, recicláveis.
A reciclagem da embalagem permite a preservação de matérias-primas e reduz
a formação de resíduos. Elimine os materiais da embalagem, que já não são
necessários, de acordo com as prescrições locais em vigor.
´ Elimine a embalagem de modo ecológico.
Tenha em atenção a marcação nos diversos materiais de embalagem e separeos convenientemente. Os materiais de embalagem estão identificados com
abreviaturas (a) e algarismos (b), com os seguintes significados:
1–7: plásticos,
20–22: papel e cartão,
80–98: compostos.
NOTA
► Se possível, conserve a embalagem original durante o período de garantia
do aparelho, para que possa embalar o aparelho corretamente em caso
de acionamento da mesma.
■ 28 │ PT SEMS 1100 A1

Instruções de segurança
Para um manuseamento seguro do aparelho, respeite as seguintes
instruções de segurança:
AVISO! PERIGO DE FERIMENTOS!
► Antes da utilização, verifique a existência de eventuais da-
nos exteriores visíveis no aparelho. Não tente colocar em
funcionamento um aparelho avariado ou que tenha sofrido
uma queda.
► O aparelho e o respetivo cabo de ligação devem ser manti-
dos afastados de crianças com idades inferiores a 8 anos.
► O aparelho pode ser utilizado por crianças com idades
superiores a 8 anos, caso sejam vigiadas ou instruídas sobre a utilização segura do aparelho e tenham compreendido os perigos daí resultantes.
► O aparelho pode ser utilizado por pessoas com capaci-
dades físicas, sensoriais ou mentais reduzidas ou com falta
de experiência e/ou conhecimento, caso sejam vigiadas
ou instruídas sobre a utilização segura do aparelho e
tenham compreendido os perigos daí resultantes.
► A limpeza e a manutenção por parte do utilizador não
podem ser efetuadas por crianças, salvo se tiverem idades
superiores a 8 anos e forem vigiadas.
► As crianças não podem brincar com o aparelho.
► Solicite as reparações do aparelho apenas a empresas au-
torizadas ou ao Serviço de Assistência Técnica. Reparações
inadequadas podem originar perigos consideráveis para o
utilizador. Além disso, a garantia extingue-se.
Não mergulhe o aparelho em água ou noutros líquidos.
Perigo de choque elétrico!
► Nunca toque no aparelho com as mãos molhadas ou
húmidas.
│
PT
29 ■SEMS 1100 A1

AVISO! PERIGO DE FERIMENTOS!
► Cabos ou fichas danificados devem ser imediatamente
substituídos por técnicos autorizados ou pelo Serviço de
Apoio ao Cliente, de modo a evitar situações de perigo.
► Perigo de queimaduras! Algumas peças ficam muito quentes
durante a utilização!
► Durante a utilização do aparelho forma-se vapor quente.
Certifique-se de que não entra em contacto com este!
Mantenha uma distância segura relativamente ao vapor.
► Ligue o aparelho apenas a uma tomada devidamente
instalada e ligada à terra.
► Após a utilização, a superfície do elemento de aquecimento
ainda dispõe de aquecimento residual.
► Não pode escorrer líquido para a ligação de encaixe do
aparelho.
► Utilize o aparelho apenas de forma correta. Utilizações in-
corretas do mesmo podem levar à ocorrência de ferimentos.
ATENÇÃO! DANOS MATERIAIS!
► Os componentes avariados devem ser substituídos apenas
por peças sobresselentes originais. Apenas a utilização
destas peças garante o cumprimento dos requisitos de
segurança.
► Proteja o aparelho contra humidade e infiltração de
líquidos.
► Proteja o aparelho contra embates, pó, químicos, oscila-
ções fortes de temperatura e fontes de calor demasiado
próximas (fornos, radiadores).
► Nunca mergulhe o aparelho em água ou noutros líquidos.
■ 30 │ PT SEMS 1100 A1

ATENÇÃO! DANOS MATERIAIS!
► Retire sempre a ficha da tomada, puxando pela própria
ficha e nunca pelo cabo.
► Nunca deixe o aparelho sem vigilância durante o funcio-
namento.
► Não utilize um temporizador externo ou um sistema de
controlo remoto para operar o aparelho.
► Nunca utilize o aparelho em espaços com temperaturas
iguais ou inferiores a 0 °C. Em caso de congelamento da
água na canalização ou no depósito de água, o aparelho
pode ser danificado.
► Nunca opere o aparelho ao ar livre. Este aparelho destina-
se apenas à utilização em espaços interiores.
NOTA
► A reparação do aparelho dentro do período de garantia
deve ser efetuada apenas por um serviço de assistência
técnica autorizado pelo fabricante, caso contrário extinguese o direito à garantia em caso de danos subsequentes.
PT
│
31 ■SEMS 1100 A1

Elementos do aparelho
Figura A:
Indicação da temperatura
Regulador de vapor
Superfície de colocação
Pega
Depósito de água
Espumador de leite
Recipiente de recolha de gotas
Entalhe para o flutuador vermelho
Grelha apara gotas
Jato de água quente
- Luz de controlo de vapor verde
3 Luz de controlo vermelha “Power”
! Luz de controlo de aquecimento verde
. Interruptor Ligar/desligar
0 Botão “Expresso”
6 Botão “Vapor”
Figura B:
1 Bloqueador do filtro
% Suporte do filtro
+ Filtro de café grande
, Filtro de café pequeno
Colher de medição com calcador
Dados técnicos
Tensão de alimentação 220 – 240 V ∼ (corrente alternada), 50 Hz
Potência nominal 1100 W
Pressão da bomba aprox. 1,5 MPa (15 bar)
próprio para produtos alimentares
■ 32 │ PT SEMS 1100 A1

Indicação da temperatura
A indicação da temperatura indica o nível de aquecimento do aparelho.
Assim que ligar o aparelho, este começa a aquecer até que o indicador esteja
mais ou menos no meio, entre 80 °C e " ".
Se o indicador alcançar a parte vermelha da escala, a temperatura está suficientemente alta para preparar um café. A luz de controlo de aquecimento
verde
Se carregar no botão "Vapor"
da escala entre "
! acende-se.
6, a luz de controlo de aquecimento verde
! apaga-se, o aparelho continua a aquecer e o indicador sobe até à zona
" e " ".
Se o indicador alcançar a zona entre "
cientemente elevada para produzir vapor. A luz de controlo de vapor verde
- acende-se.
" e " ", a temperatura esta sufi-
Primeira colocação em funcionamento
1) Limpe o suporte do filtro %, a colher de medição , os filtros de café+,,
a grelha apara gotas e o depósito de água como descrito no capítulo
"Limpeza e conservação".
2) Coloque o aparelho sobre uma superfície plana e resistente ao calor.
Certifique-se de que a tomada se encontra a uma distância acessível.
3) Coloque a grelha apara gotas de modo que o flutuador vermelho possa
sobressair do entalhe na grelha apara gotas .
4) Coloque o suporte do filtro % no aparelho, encaixando-o na marcação "
INSERT", instalada junto ao jato de água quente , e rode depois no sentido
contrário ao dos ponteiros do relógio, até que a pega do suporte do filtro %
fique orientada para a frente (marcação „ LOCK“).
5) Insira a ficha numa tomada.
PT
│
33 ■SEMS 1100 A1

6) Antes da primeira utilização, proceda do seguinte modo para limpar os tubos
internos:
Deixe que o aparelho seja percorrido por água suficiente para aprox.
5(aprox. 100 ml) chávenas de café. A este respeito, consulte o capítulo
"Utilização".
7) Deixe o aparelho produzir vapor durante aprox. 30 segundos. A este respeito,
consulte o capítulo "Utilização".
NOTA
► Durante a primeira utilização, é possível que a bomba já funcione audivel-
mente, gerando ruídos, sem que no entanto saia água do aparelho. Neste
caso, rode o regulador de vapor no sentido "
possa sair dos tubos do aparelho (o botão "Vapor" 6 está pressionado).
Após cerca de 20 segundos, o ar sai completamente, os ruídos desaparecem
e a água é extraída do aparelho.
Operação
NOTA
► Os dois botões "Expresso"
pressionados. Se o botão for novamente pressionado, desencaixa.
Enchimento do depósito de água
NOTA
► Utilize exclusivamente água canalizada fresca para a preparação de
expressos/cappuccinos.
0 e "Vapor" 6 encaixam quando são
", de forma que o ar
1) Retire o depósito de água e encha-o com água:
Encha o depósito de água, pelo menos, até à marcação Min.
Nunca o encha além da marcação Max.
2) Coloque o depósito de água novamente no aparelho. Verifique se
a mangueira está colocada dentro do depósito de água .
■ 34 │ PT SEMS 1100 A1

Aquecer após longos períodos de paragem/durante a
primeira colocação em funcionamento
Se não utilizar o aparelho durante um longo período de tempo, proceda do
seguinte modo para o aquecer:
1) Encha o depósito de água .
2) Coloque o filtro de café grande + ou pequeno , no suporte do filtro %.
– Ao colocar, verifique se o pequeno entalhe no filtro de café grande +
ou pequeno , fica por cima do entalhe do suporte do filtro %.
– Rode então um pouco o filtro de café grande + ou pequeno ,, de
modo que não possa cair.
NOTA
► Retire o filtro de café +, colocado apenas após ter arrefecido!
► Para remover novamente o filtro de café +, do suporte do filtro %, rode
o filtro de café +, colocado, até que o entalhe do filtro de café +, se
encontre sobre o entalhe do suporte do filtro %. Pode remover agora o filtro
de café +,.
│
PT
35 ■SEMS 1100 A1

3) Coloque o suporte do filtro % no aparelho, encaixando-o na marcação
INSERT", instalada junto ao jato de água quente , e rode depois no
"
sentido contrário ao dos ponteiros do relógio, até que a pega do suporte do
filtro % fique orientada para a frente (marcação „
4) Coloque uma chávena debaixo do suporte do filtro %.
5) Feche/rode o regulador de vapor para a posição “0”.
6) Ligue o aparelho no interruptor Ligar/Desligar
7) A luz de controlo vermelha „Power“
tempo, o indicador começa a subir na indicação da temperatura .
8) Assim que a luz de controlo de aquecimento verde
pressione o botão "Expresso"
durante aprox. 1 minuto.
NOTA
► Pode ser que, entretanto, necessite de esvaziar a chávena. Para tal, inter-
rompa o processo durante breves momentos, pressionando o botão
"Expresso"
presso" 0, para que a água continue a percorrer o aparelho.
9) Depois de aprox. 1 minuto pare a bomba, pressionando novamente o botão
"Expresso"
10) Aguarde até que a luz de controlo de aquecimento verde
novamente. O aquecimento está concluído. Pode agora preparar um café.
0. Esvazie a chávena e pressione novamente o botão "Ex-
0.
3 acende-se. Depois de pouco
0. Deixe a água percorrer o aparelho
Aquecimento antes de cada utilização
O aparelho tem de aquecer antes de poder preparar um expresso ou um
cappuccino.
LOCK“).
..
! estiver acesa,
! acenda
1) Ligue o aparelho no interruptor Ligar/Desligar
vermelha „Power“ 3 acende-se. Os dois botões "Expresso" 0 e
"Vapor"
lador de vapor foi rodado para "0", até ao batente.
2) Coloque o suporte do filtro % no aparelho, encaixando-o na marcação "
INSERT", instalada junto ao jato de água quente , e rode depois no sentido
contrário ao dos ponteiros do relógio, até que a pega do suporte do filtro %
fique orientada para a frente (marcação „
3) Pressione o botão "Expresso" 0, para que o aparelho puxe água do
depósito de água . Assim que sair água do orifício do suporte do filtro,
pressione o botão "Expresso" 0 mais uma vez, para que a bomba pare.
4) Aguarde até que a luz de controlo de aquecimento verde
5) Pressione novamente o botão "Expresso"
durante 20 segundos, antes de voltar a parar a bomba.
O preaquecimento está assim terminado. Pode agora preparar um expresso/
cappuccino.
6 não podem estar pressionados. Certifique-se de que o regu-
.. A luz de controlo
LOCK“).
! acenda.
0 e deixe sair água quente
■ 36 │ PT SEMS 1100 A1

Preparação de expresso
NOTA
► Certifique-se sempre de que o filtro de café +, não possui resíduos de
café em pó.
1) Quando o aparelho está quente:
Para preparar um expresso, coloque o filtro de café pequeno , no suporte
do filtro %.
Para preparar dois expressos, coloque o filtro de café grande + no suporte
do filtro %.
2) Encha o filtro de café pequeno ,, até à marcação Max, com café em pó.
Isto corresponde a aprox. 7g de pó ou uma colher de medição rasa.
ou:
Encha o filtro de café grande +, até à marcação Max, com café em pó. Isto
corresponde a aprox. 7g + 7g de pó ou duas colheres de medição rasas.
3) Comprima o café em pó com o auxílio do calcador da colher de medição .
De seguida, coloque, se necessário, mais café em pó de modo que o filtro de
café +, fique cheio até à marcação Max. Comprima o café em pó novamente.
NOTA
► A compressão do café em pó é um processo importante na preparação de
um expresso. Caso o café em pó seja demasiado comprimido, o café sairá
lentamente e produzirá mais espuma. Caso o café em pó não seja muito
comprimido, o café sairá rapidamente e formar-se-á pouca espuma.
4) Coloque o suporte do filtro % no aparelho, encaixando-o na marcação
INSERT" e rode depois no sentido contrário ao dos ponteiros do
"
relógio, até que a pega do suporte do filtro % fique orientada para a frente
(marcação "
5) Coloque uma (ou duas) chávena(s) sob os orifícios do suporte do filtro.
Recomendamos que escalde as chávenas previamente para que o café não
arrefeça tão rapidamente. Pode depositar as chávenas sobre a superfície de
colocação para um assento seguro.
6) Se a luz de controlo de aquecimento verde
pressionar o botão "Expresso" 0 para baixo. O café corre para a(s)
chávena(s).
AVISO
Nunca retire o suporte do filtro % durante a saída do café!
Os salpicos do café quente podem causar ferimentos!
► Garanta sempre que o botão "Expresso"
baixo, antes de retirar o suporte do filtro %.
LOCK").
! se acender, pode agora
0 não está pressionado para
PT
│
37 ■SEMS 1100 A1

7) Quando tiver enchido a(s) chávena(s) com a quantidade desejada (aprox.
20 ml por chávena), pressione novamente o botão "Expresso" 0, para
que não seja bombeada mais água.
Pode agora beber o café.
8) Desligue o aparelho com o interruptor Ligar/Desligar
NOTA
► O aparelho desliga-se automaticamente após 30 minutos.
9) Após cada utilização, remova o café em pó do filtro de café +,. Retire o
suporte do filtro % do aparelho. Levante o bloqueador do filtro 1, de modo
que o filtro do café +, não possa cair do suporte do filtro %. Esvazie o
filtro de café +,, virando o suporte do filtro % com o filtro de café +,
bloqueado e batendo para que o café em pó saia. Elimine café em pó para
expresso sempre de forma ecologicamente correta, por exemplo, no lixo biodegradável.
NOTA
► Limpe o jato de água quente (deste sai a água muito quente) sempre depois
de cada utilização. Para tal, leia o capítulo "Limpeza e conservação".
NOTA
► Esvazie regularmente o recipiente de recolha de gotas ou, o mais
tardar, quando o flutuador vermelho for visível no entalhe da grelha
apara gotas .
..
Preparação de cappuccino
AVISO
Seja cauteloso no manuseamento do vapor para produção de
espuma de leite!
O vapor quente ou salpicos quentes causam ferimentos!
► Utilize o regulador de vapor sempre lentamente.
1) Encha um terço de um recipiente próprio (de preferência em aço inoxidável)
com leite frio.
2) Certifique-se de que o regulador de vapor se encontra fechado (rode-o no
sentido do "0", até ao encosto).
3) Desloque o espumador de leite para o lado. Segure-o apenas pela pega .
4) Pressione o botão “Vapor”
de vapor verde - se acender.
■ 38 │ PT SEMS 1100 A1
6 para baixo. Aguarde até a luz de controlo

5) Coloque um recipiente vazio debaixo do espumador de leite . Rode lentamente o regulador de vapor no sentido do " ". O bocal expele água
condensada/salpicos. Deste modo, o bocal e o circuito de água no interior
do aparelho são limpos.
6) Aguarde 15 segundos e rode depois o regulador de vapor no sentido do
“0”, até não sair mais vapor do bocal. Despeje a água do recipiente.
7) Segure agora o recipiente para medir a temperatura do leite e introduza o
bocal do espumador de leite ligeiramente no leite, mantendo o recipiente
um pouco inclinado.
8) Rode lentamente o regulador de vapor no sentido do “
9) Movimente o recipiente de forma circular e mantenha a ponta do bocal debaixo da superfície do leite a pouca profundidade: suficientemente profundo
para que o leite não salpique em todas as direções e suficientemente alto
para produzir uma espuma espessa. Se o fizer corretamente, ouvir-se-á um
zunido grave.
10) Caso a espuma do leite suba, introduza um pouco mais o bocal para criar a
próxima "camada" e evitar queimar a espuma.
11) Por fim, mergulhe o bocal completamente e feche um pouco o regulador de
vapor , de modo a aquecer o leite. Mantenha o recipiente ligeiramente na
diagonal, de modo que o leite faça movimentos circulares enquanto o mistura
com o bocal.
12) Caso a espuma do leite apresente a consistência e temperatura pretendidas,
rode o regulador de vapor (rode na direção do “0”, até ao batente).
13) Só então poderá retirar o bocal do leite.
14) Pressione o botão “Vapor”
-se e a luz de controlo de aquecimento ! acende-se.
NOTA
► Para a preparação de cappuccino utilize sempre chávenas maiores do
que as utilizadas para expresso, uma vez que ainda é adicionado leite com
espuma.
15) Para a preparação do cappuccino proceda do mesmo modo que para a preparação de expresso (ver capítulo "Preparação de Expresso"/o aquecimento
já não é necessário). Deixe passar a água pelo aparelho, no entanto, aprox.
o dobro do tempo do que para um expresso (aprox. 40 ml).
16) Desligue o aparelho com o interruptor Ligar/desligar
NOTA
► O aparelho desliga-se automaticamente após 30 minutos.
6. A luz de controlo de vapor - apaga-
”.
..
PT
│
39 ■SEMS 1100 A1

17) Adicione então o leite com espuma previamente preparado, ao café.
O cappuccino está agora pronto. Pode adicionar açúcar a gosto ou
polvilhá-lo com cacau em pó.
NOTA
Limpe o espumador de leite sempre após cada utilização. Para tal, leia o
►
capítulo "Limpeza e conservação".
Dicas para a espuma do leite
■ Por norma, qualquer tipo de leite pode ser submetido a este processo,
mesmo leite de soja e leite de arroz. Alguns tipos de leite, no entanto, podem
formar espuma apenas sob certas restrições.
■ O leite desnatado (leite magro) não ferve tão facilmente quanto o leite
gordo, portanto em caso de teor de gordura demasiado reduzido, existe o
risco de o leite não formar espuma. Por esta razão, utilize, se possível, um
leite com 3,5% ou 1,5% de gordura.
■ Leite bem arrefecido forma melhor espuma do que leite menos frio. Os
melhores resultados são obtidos com uma temperatura de aprox. 7 °C.
■ Não produza espuma uma segunda vez, caso contrário, esta queima-se.
■ Reserve o leite com espuma durante aprox. 30 segundos, antes de o
adicionar ao café. Deste modo, formam-se bolhas maiores e o leite ainda
líquido assenta no fundo. Pode então adicionar a espuma ao café.
Limpeza e conservação
AVISO! PERIGO DE FERIMENTOS!
► Antes de limpar o aparelho, retire sempre a ficha da tomada. Perigo de
choque elétrico!
► Deixe sempre o aparelho arrefecer antes de o limpar. Perigo de queimaduras!
Nunca mergulhe o aparelho em água ou noutros líquidos. Perigo de
choque elétrico!
■ 40 │ PT SEMS 1100 A1

Limpeza do espumador de leite
ATENÇÃO! DANOS MATERIAIS!
► Nunca utilize produtos de limpeza abrasivos, agressivos ou químicos para a
limpeza do aparelho. Estes danificam a superfície do aparelho.
1) Coloque um recipiente vazio debaixo do espumador de leite .
2) Rode o regulador de vapor para “
deixe sair vapor durante alguns segundos.
3) Feche o regulador de vapor (rode no sentido do “0”, até ao batente), des-
ligue o aparelho e retire a ficha da tomada.
4) Deixe o bocal arrefecer.
5) Retire a capa do espumador de leite (figura 1) e limpe-a cuidadosamente
com água quente.
6) Limpe o bocal, que se encontra debaixo da capa, com um pano húmido. Se
necessário, adicione um detergente suave no pano. Após a lavagem com
detergente, passe um pano húmido com água limpa. Certifique-se de que não
se encontram quaisquer resíduos de leite no bocal.
7) Coloque novamente a capa sobre o bocal (figura 1).
” imediatamente após a utilização e
Figura 1
PT
│
41 ■SEMS 1100 A1

Limpar o jato de água quente
Limpe o jato de água quente após cada utilização:
1) Depois de ter preparado o expresso/cappuccino e retirado o suporte do
filtro%, limpe toda a área do jato de água quente com um pano húmido,
de modo que todos os resíduos de pó sejam removidos.
2) Volte a colocar o suporte do filtro % sem os filtros de café +, montados.
3) Coloque depois uma chávena vazia por baixo do suporte do filtro % e
pressione o botão "Expresso"
A água sai do jato de água quente e elimina os restos do pó de café.
4) Após aprox. 20 segundos, pressione novamente o botão "Expresso" 0 e
desligue o aparelho no interruptor Ligar/Desligar ..
5) Retire novamente o suporte do filtro %.
Limpar acessórios
1) Lave o suporte do filtro %, os dois filtros de café +,, o depósito de
água , a colher de medição e a grelha apara gotas em água
quente.
NOTA
► Se adicionar detergentes à água, é possível que o sabor do café seja afetado.
Caso a sujidade só possa ser removida com detergente, passe sempre as
peças por água limpa abundante.
2) Seque todas as peças.
3) O recipiente de recolha de gotas pode ser lavado na máquina de lavar
loiça. No entanto, antes de colocar o recipiente de recolha de gotas na
máquina de lavar a loiça, retire o flutuador vermelho:
– Para tal, retire o retentor encaixado lateralmente nas duas barras de
retenção do flutuador.
– Retire o flutuador das barras de retenção.
– Limpe o flutuador e o retentor em água quente.
– Depois de lavar o recipiente de recolha de gotas , coloque o flutuador
novamente sobre as barras de retenção e encaixe o retentor.
0 para baixo, para que este encaixe.
Limpar o aparelho
Limpe o aparelho com um pano. Se necessário, coloque um pouco de detergente
no pano.
Certifique-se de que, antes de uma próxima utilização, o aparelho está completamente seco.
■ 42 │ PT SEMS 1100 A1

Descalcificação do aparelho
Descalcifique o aparelho regularmente. Depois de aprox. 1 – 2 meses (com
preparação de aprox. 4 cafés por dia), o aparelho deve ser descalcificado. Este
valor pode divergir em função do grau de dureza da água na sua região.
Utilize um produto anticalcário convencional para descalcificar máquinas de
café expresso. Proceda tal como descrito no manual de instruções do produto
anticalcário.
Caso não tenha um produto anticalcário, pode descalcificar com ácido cítrico
do seguinte modo:
1) Encha o depósito de água até à marcação Max.
2) Dissolva 2 colheres (aprox. 30 gramas) de sumo de limão (disponível em
drogarias) na água.
3) Coloque o depósito de água dentro do aparelho.
4) Ligue o aparelho no interruptor Ligar/Desligar
vapor está fechado.
5) Coloque o suporte do filtro %, sem filtro de café +,, no aparelho e
coloque uma chávena debaixo do suporte do filtro %.
6) Assim que a luz de controlo de aquecimento verde
o botão "Expresso" 0 para baixo, para que este encaixe.
7) Deixe passar pelo aparelho aprox. 2 chávenas (aprox. 250 ml) de água e
pare depois o processo, pressionando novamente o botão "Expresso"
8) Coloque um recipiente debaixo do espumador de leite .
9) Pressione o botão “Vapor”
aguarde até a luz de controlo de vapor verde - se acender. Rode lentamente o regulador de vapor para “ ”. Deixe o aparelho produzir vapor
durante aprox. 2 minutos.
10) Depois de 2 minutos, feche o regulador de vapor , pressione novamente o
botão "Vapor"
11) Deixe o produto anticalcário atuar durante aprox. 15 minutos.
12) Repita os passos 6 a 11 três vezes.
13) De seguida, pressione o botão "Expresso"
e deixe a água correr até que o depósito de água esteja vazio.
14) Passe o depósito de água por água limpa e encha-o com água limpa até
à marcação Max.
15) Pressione o botão "Expresso"
a luz de controlo de aquecimento verde ! estiver acesa.
16) Deixe a água passar.
17) Repita os passos 14 a 16 três vezes.
18) Encha novamente o depósito de água com água.
6, para que deixe de ser produzido vapor.
.. O regulador de
! acender, pressione
0.
6 para baixo, de forma a ficar encaixado, e
0 para baixo, para que encaixe
0 para baixo, para que encaixe, assim que
PT
│
43 ■SEMS 1100 A1

19) Pressione o botão "Vapor" 6, para que encaixe.
20) Coloque um recipiente por baixo do espumador de leite e rode lentamente
o regulador de vapor para “
verde - se acender.
21) Após aprox. 1 minuto, feche o regulador de vapor (rode no sentido do
“0”, até ao batente), pressione novamente o botão “Vapor”
o aparelho.
NOTA
► O aparelho desliga-se automaticamente após 30 minutos.
” assim que a luz de controlo de vapor
6 e desligue
■ 44 │ PT SEMS 1100 A1

Eliminação de erros
Avaria Causa Solução
O café deixa
de sair.
O café salpica
por fora dos rebordos do suporte do filtro % em
vez de sair pelos
orifícios.
O café está frio.
Funcionamento
ruidoso da bomba.
A espuma está
demasiado clara
(o café sai rapidamente do suporte
do filtro %)
A espuma está
demasiado escura
(o café sai lentamente do suporte
do filtro %)
O café em pó está demasiado húmido e/ou demasiado compri mido.
Sem água no depósito de água .
Os orifícios das aberturas do
suporte do filtro estão obstruídos.
O suporte do filtro % não foi
corretamente colocado.
Os orifícios do suporte do filtro
estão obstruídos.
Encontram-se resíduos de café em pó
no rebordo do suporte do filtro %.
O aparelho não foi preaquecido. Preaquecer o aparelho.
A luz de controlo de aquecimento
verde
As chávenas não foram escaldadas. Escaldar as chávenas.
O depósito de água está vazio.
Quantidade insuficiente de café em pó.
A moagem do café em pó
é demasiado grossa.
Quantidade excessiva de café em pó.
A moagem do café está demasiado
fina ou húmida.
O filtro está obstruído. Limpar o filtro.
! ainda não se acendeu.
Preparar novamente o expresso,
sem comprimir tanto o café em pó
ou substitui-lo totalmente.
Encher o depósito de água
com água.
Limpar o suporte do filtro %.
Colocar corretamente o suporte
do filtro %.
Limpar o suporte do filtro %.
Limpar o rebordo do suporte do
filtro %de resíduos de café em pó.
Aguarde até que a luz de controlo
de aquecimento verde
acenda.
Encher o depósito de água
com água.
Utilizar mais café em pó.
Utilizar apenas café em pó especialmente concebido para expresso.
Utilizar menos café em pó.
Utilizar apenas café em pó especialmente concebido para expresso.
! se
O leite não
cria espuma.
O leite não está suficientemente frio. Utilize leite do frigorífico.
O espumador de leite está sujo. Limpe o espumador de leite .
│
PT
45 ■SEMS 1100 A1

Eliminação
Eliminação do aparelho
Nunca deposite o aparelho no lixo doméstico comum.
Este produto está sujeito à Diretiva Europeia 2012/19/EU-REEE
(Resíduos de Equipamentos Elétricos e Eletrónicos).
Entregue o aparelho num Ponto Eletrão autorizado ou num Centro de Receção
de REEE do seu município. Respeite os regulamentos atualmente em vigor. Em
caso de dúvida, entre em contacto com o Centro de Receção de REEE.
Relativamente às possibilidades de eliminação do produto em fim de vida, informe-se na junta de freguesia ou câmara municipal da sua área de residência.
■ 46 │ PT SEMS 1100 A1

Garantia da Kompernass Handels GmbH
Estimada Cliente, Estimado Cliente,
Este aparelho tem uma garantia de 3 anos a contar da data de compra. No caso
deste produto ter defeitos, tem direitos legais contra o vendedor do produto. Estes
direitos legais não são limitados pela nossa garantia que passamos a transcrever.
Condições de garantia
O prazo de garantia tem início na data da compra. Por favor, guarde bem o talão
de compra original. Este documento é necessário como comprovativo da compra.
Se dentro de três anos a partir da data de compra deste produto, ocorrer um
defeito de material ou fabrico, o produto será reparado ou substituído por nós –
consoante a nossa preferência – gratuitamente. Esta garantia parte do princípio
que o aparelho defeituoso e o comprovativo da compra (talão de compra) são
apresentados dentro do prazo de três anos e é descrito brevemente, por escrito,
em que consiste o defeito e quando ocorreu.
Se o defeito estiver coberto pela nossa garantia, receberá o produto reparado
ou um novo produto.
Prazo de garantia e direitos legais
O período de garantia não é prolongado pelo acionamento da mesma. Isto
também se aplica a peças substituídas e reparadas. Danos e defeitos que possam
eventualmente já existir no momento da compra devem ser imediatamente comunicados, após retirar o aparelho da embalagem. Expirado o período da garantia,
quaisquer reparações necessárias estão sujeitas a pagamento.
Âmbito da garantia
O aparelho foi fabricado segundo diretivas de qualidade rigorosas, com o maior
cuidado, e testado escrupulosamente antes da sua distribuição.
A garantia abrange apenas defeitos de material ou de fabrico. Esta garantia não
abrange peças do produto, que estão sujeitas ao desgaste normal e podem ser
consideradas desta forma peças de desgaste, ou danos em peças frágeis, p. ex.
interruptores, acumuladores, formas para bolos ou peças de vidro.
Esta garantia perde a validade, se o produto for danificado, utilizado incorretamente ou se a manutenção tenha sido realizada indevidamente. Para garantir
uma utilização correta do produto, é necessário cumprir todas as instruções contidas
no manual de instruções. Ações ou fins de utilização que são desaconselhados,
ou para os quais é alertado no manual de instruções, têm de ser impreterivelmente
evitados.
O produto foi concebido apenas para uso privado e não para uso comercial. A
garantia extingue-se em caso de utilização incorreta, uso de força e intervenções
que não tenham sido efetuadas pela nossa Filial de Assistência Técnica autorizada.
PT
│
47 ■SEMS 1100 A1

Procedimento em caso de acionamento da garantia
Para garantir um processamento rápido do seu pedido, siga, por favor, as seguintes
instruções:
■ Para todos os pedidos de esclarecimento, tenha à mão o talão de compra e
o número do artigo (p. ex. IAN 12345) como comprovativo da compra.
■ O número do artigo consta na placa de características, numa impressão, na
capa do seu manual de instruções (em baixo à esquerda) ou, como autocolante, no verso ou no lado inferior.
■ Caso ocorram falhas de funcionamento ou outros defeitos, contacte primeiro
o Serviço de Assistência Técnico, indicado em seguida, telefonicamente
ou por e-mail.
■ De seguida, pode enviar gratuitamente o produto registado como defeituoso,
incluindo o comprovativo da compra (talão de compra) e indique o defeito e
quando este ocorreu, para a morada do Serviço de Assistência Técnica que
lhe foi indicada.
Em www.lidl-service.com poderá descarregar este manual de instruções e
muitos outros, bem como vídeos sobre os produtos e software.
Assistência Técnica
Assistência Portugal
Tel.: 70778 0005 (0,12 EUR/Min.)
E-Mail: kompernass@lidl.pt
IAN 313486
Importador
Por favor, observe que a seguinte morada não é a morada do Serviço de Assistência Técnica. Primeiro entre em contacto com o Serviço de Assistência Técnica.
KOMPERNASS HANDELS GMBH
BURGSTRASSE 21
DE - 44867 BOCHUM
ALEMANHA
www.kompernass.com
■ 48 │ PT SEMS 1100 A1

Contents
Introduction .................................................. 50
Copyright ...............................................................50
Limitation of liability .......................................................50
Warnings ...............................................................50
Intended use ............................................................51
Package contents/Transport inspection ........................................52
Disposal of the packaging ..................................................52
Safety instructions ............................................ 53
Appliance elements. . . . . . . . . . . . . . . . . . . . . . . . . . . . . . . . . . . . . . . . . . . . 56
Technical data ................................................ 56
Temperature display .......................................... 57
First use ..................................................... 57
Operation ................................................... 58
Filling the water tank ......................................................58
Heating after a long time of inactivity/during first use ............................59
Heating up before every use ................................................60
Preparing espresso .......................................................61
Preparing cappuccino .....................................................62
Tips for the milk froth ......................................................64
Cleaning and care ............................................. 64
Cleaning the milk frother ...................................................65
Cleaning the hot water shower ..............................................66
Cleaning the accessories ...................................................66
Cleaning the appliance ....................................................66
Descaling the appliance ...................................................67
Troubleshooting .............................................. 69
Disposal ..................................................... 70
Disposal of the appliance ..................................................70
Kompernass Handels GmbH warranty ............................ 71
Service .................................................................72
Importer ................................................................72
GB│MT
│
49 ■SEMS 1100 A1

Introduction
Congratulations on the purchase of your new appliance.
You have selected a high-quality product. The operating instructions are part of
this product. They contain important information on safety, usage and disposal.
Before using the product, familiarise yourself with all operating and safety
instructions. Use the product only as described and for the specified areas of
application. Please also pass on these operating instructions to any future owner.
Copyright
This documentation is protected by copyright.
Any copying or reproduction, including in the form of extracts, or any
reproduction of images (even in a modified state), is permitted only with the
written authorisation of the manufacturer.
Limitation of liability
All technical information, data and information for installation and operation
contained in these operating instructions corresponds to the latest version(s) at the
time of printing and, to the best of our knowledge, takes into account our previous
experience and know-how.
No claims can be derived from the details, illustrations and descriptions in these
instructions.
The manufacturer assumes no responsibility for damage caused by failure to
observe these instructions, improper use, incompetent repairs, unauthorised
modifications or for the use of non-approved replacement parts.
Warnings
The following warning notice types are used in these operating instructions:
■ 50 │ GB
WARNING
A warning notice at this hazard level indicates a potentially
hazardous situation.
Failure to avoid this hazardous situation could result in injury.
► Follow the instructions in this warning notice to prevent injury.
│
MT SEMS 1100 A1

CAUTION
A warning notice at this hazard level indicates a potential for
property damage.
Failure to avoid this situation could result in property damage.
► Follow the instructions in this warning notice to prevent property damage.
NOTE
► A note provides additional information that will assist you in using the
appliance.
Intended use
The device is designed exclusively for the preparation of espresso/cappuccino
and for frothing milk. It is exclusively intended for use in private households.
Do not use it for commercial applications.
The appliance is not intended for any other purpose, nor for use beyond the
scope described.
WARNING
Danger if not used for intended purpose!
Failure to use the appliance for its intended purpose and/or any other type of
use can be hazardous.
► Use the appliance only for its intended purpose.
► Observe the procedures described in these operating instructions.
No claims of any kind will be accepted for damage arising as a result of
incorrect use.
The risk shall be borne solely by the user.
GB│MT
│
51 ■SEMS 1100 A1

Package contents/Transport inspection
WARNING
Risk of suffocation!
► Do not allow children to play with packaging materials.
There is a risk of suffocation.
The appliance is supplied with the following components as standard:
▯ Espresso machine
▯ Sieve holder
▯ Large espresso sieve
▯ Small espresso sieve
▯ Measuring spoon with compactor
▯ Short operating instructions
▯ Operating instructions
NOTE
► Check the package for completeness and for signs of visible damage.
► If the contents are incomplete or damaged due to defective packaging or
through transportation, contact the Service Hotline.
Disposal of the packaging
The packaging protects the appliance from transport damage. The packaging
materials are selected from the point of view of their environmental friendliness
and disposal technology and are therefore recyclable.
The recirculation of packaging into the material circuit saves on raw material and
reduces the amount of waste generated. Dispose of packaging material that is no
longer needed according to the regionally established regulations.
Dispose of the packaging in an environmentally friendly manner.
Note the labelling on the packaging and separate the packaging material
components for disposal if necessary. The packaging material is labelled with
abbreviations (a) and numbers (b) with the following meanings:
1–7: Plastics,
20–22: Paper and cardboard,
80–98: Composites.
■ 52 │ GB
NOTE
► If possible, keep the appliance's original packaging during the warranty
period so that the appliance can be packed properly for return shipment in
the event of a warranty claim.
│
MT SEMS 1100 A1

Safety instructions
To ensure safe operation of the appliance, follow the safety
guidelines set out below:
WARNING! RISK OF INJURY!
► Prior to use, check the appliance for visible external damage.
Do not operate an appliance that has been damaged or
dropped.
► The appliance and its connecting cable must be kept away
from children younger than 8 years old.
► This appliance may be used by children aged 8 years or
over if they are supervised or have been instructed how to
use the appliance safely and have understood the potential
risks.
► This appliance may be used by people with reduced
physical, sensory or mental capabilities or lack of experience
and/or knowledge if they are supervised and have been
instructed in how to use the appliance safely and have
understood the potential risks.
► Cleaning and user maintenance must not be carried out by
children, unless they are aged 8 or over and are supervised.
► Children must not use the appliance as a plaything.
► All repairs must be carried out by authorised specialist
companies or by the Customer Service department. Improper
repairs can pose significant risks to the user. It will also
invalidate any warranty claims.
Never submerge the appliance in water or other
liquids! Danger of electric shock!
► Never touch the appliance with wet or moist hands.
► To avoid risks, arrange for defective plugs and/or power
cables to be replaced at once by qualified technicians or our
Customer Service Department.
GB│MT
│
53 ■SEMS 1100 A1

WARNING! RISK OF INJURY!
► Risk of burns! During use, some parts become very hot!
► Hot vapour plumes are formed when the product is in use.
Take care to ensure that you do not scald yourself! Keep a
safe distance away from the steam.
► The appliance should only be connected to correctly
installed and earthed mains power sockets.
► After use, the surfaces of the heating elements will still have
some residual heat.
► Do not allow any liquid to get onto the appliance's plug
connections.
► Use the appliance only for its intended purpose. Misuse can
lead to injuries.
CAUTION! PROPERTY DAMAGE!
► Defective components must always be replaced with original
replacement parts. Compliance with safety requirements can
only be guaranteed if original replacement parts are used.
► Protect the appliance from penetration by moisture and
liquids.
► Protect the appliance against knocks, dust, chemicals,
extreme temperatures, etc. and keep it away from sources of
heat (ovens, radiators).
► NEVER submerse the appliance in water or other liquids!
► Always remove the mains adapter from the mains outlet;
never pull on the power cable.
► Never leave the appliance unattended during operation.
► Do not use an external timer switch or a separate remote
control system to operate the appliance.
■ 54 │ GB
│
MT SEMS 1100 A1

CAUTION! PROPERTY DAMAGE!
► Do not operate the appliance in rooms where the
temperatures are below or around 0°C. If the water in the
pipes or the water tank freezes, the appliance could be
damaged.
► Never operate the appliance outdoors. This appliance is
intended for indoor use only.
NOTE
► Repairs to the appliance during the warranty period may
only be carried out by a customer service department
authorised by the manufacturer, otherwise no warranty
claims can be considered for subsequent damage.
GB│MT
│
55 ■SEMS 1100 A1

Appliance elements
Figure A:
Temperature indicator
Steam control
Storage space
Handle
Water tank
Milk frother
Drip tray
Opening for the red float
Drip grille
Hot water shower
- Green steam control lamp
3 Red “Power” control lamp
! Green heat-up control lamp
. On/Off switch
0 “Espresso” button
6 “Steam” button
Figure B:
1 Sieve block
% Sieve holder
+ Large espresso sieve
, Small espresso sieve
Measuring spoon with compactor
Technical data
Mains voltage 220 – 240 V ∼ (alternating current), 50 Hz
Rated power 1100 W
Pump pressure approx. 1.5 MPa (15 bar)
■ 56 │ GB
│
MT SEMS 1100 A1
Food-safe

Temperature display
The temperature indicator indicates how far the appliance has heated up.
As soon as you switch the appliance on, it starts heating up until the pointer is
approximately in the middle between 80°C and “ ”.
When the pointer reaches the red portion of the scale, the temperature is high
enough to prepare an espresso. The green heating-up control lamp
lights up.
If you press the “Steam” button
goes out, and the appliance continues heating up until it reaches the range on
the scale between “
Once the pointer reaches the range between “
is high enough to produce steam. The green steam control lamp
” and “ ”.
6 the green heating-up control lamp
” and “ ”, the temperature
- lights up.
!
!
First use
1) Clean the sieve holder %, the measuring spoon , the espresso sieve +,,
2) Place the appliance on a level and heat-resistant surface. Ensure that a mains
3) Insert the drip grille so that the red float can protrude through the hole
4) Place the sieve holder % in the appliance by inserting the “
the drip grille and the water tank as described in the section “Cleaning
and Care”.
power socket is in the vicinity.
in the drip grille .
INSERT”
mark, which is located next to the hot water shower , into the appliance and
then turning it clockwise until the handle of the sieve holder % is facing the
front (“
LOCK” mark).
GB│MT
│
57 ■SEMS 1100 A1

5) Insert the plug into a mains power socket.
6) Proceed as follows before the first use, so as to clean the internal pipelines:
Allow sufficient water for about 5 cups of espresso (about 100 ml) to flow
through the appliance. Refer to the section “Operation”.
7) Let the appliance generate steam for about 30 seconds. Refer to the section
“Operation”.
NOTE
► When using the appliance for the first time, it is possible that you can hear
the pump working, even though no water comes out of the appliance. If this
is the case, turn the steam control in the direction of the "
air can escape from the pipes of the appliance (the "Steam" button 6 is
pressed). After approx. 20 seconds the air will have escaped, the noises
disappear and water flows from the appliance.
Operation
NOTE
► Both the "Espresso"
pressed in. If the button is pressed again, it is released.
Filling the water tank
NOTE
► Use only fresh drinking water for making espresso/cappuccino.
1) Pull out the water tank out and fill it with water:
Fill it with water to at least the Min marking.
Never fill it past the Max marking.
2) Push the water tank back into the appliance. Ensure that the hose is inside
the water tank .
", so that the
0 and the "Steam" 6 buttons engage when
■ 58 │ GB
│
MT SEMS 1100 A1

Heating after a long time of inactivity/during first use
If you have not used it for some time, preheat the appliance as follows:
1) Fill the water tank with tap water.
2) Place either the large + or the small espresso sieve , in the sieve holder %:
– Make sure that the small indentation on the large +or small espresso
sieve , is located above the indentation on the sieve holder % when
inserted.
– Then turn the large + or small espresso sieve , slightly to ensure it
cannot fall out.
NOTE
► Wait until the espresso sieve + ,has cooled down before taking it out!
► In order to remove the espresso sieves + , from the sieve holder %, turn
the inserted espresso sieve + , until the indentation on the espresso
sieve% + is located directly above the indentation on the sieve holder %.
You can now remove the espresso sieve + ,.
GB│MT
│
59 ■SEMS 1100 A1

3) Place the sieve holder % in the appliance by inserting the “ INSERT”
mark, which is located next to the hot water shower , into the appliance and
then turning it clockwise until the handle of the sieve holder % is facing the
front (“
4) Place a cup under the sieve holder %.
5) Turn the steam control to “0”.
6) Switch the appliance on with the on/off switch
7) The red control lamp „Power“ 3 lights up. After a short time, the pointer in
the temperature indicator will begin to rise.
8) As soon as the green heating-up control lamp
“Espresso” button
NOTE
► You may need to empty the cup in between. Interrupt the process by
9) After about 1 minute, stop the pump by pressing the “Espresso” button
again.
10) Wait until the green heating-up control lamp
warming-up is concluded. You can now prepare espresso.
LOCK” mark).
0. Allow the water to flow for about 1 minute.
pressing the "Espresso" button
"Espresso" button 0 again so that water flows through the appliance.
Heating up before every use
Before you can prepare an espresso or cappuccino, the appliance must be
heated up.
1) Switch the appliance on using the on/off switch
„Power“
6 buttons should be pressed in. Ensure that the steam control is turned
towards “0“ as far as possible.
2) Place the sieve holder % in the appliance by inserting the “
mark, which is located next to the hot water shower , into the appliance and
then turning it clockwise until the handle of the sieve holder % is facing the
front (“ LOCK” mark).
3) Press the “Espresso” button 0 so that the appliance draws water from the
water tank . As soon as water starts exiting the openings in the sieve holder,
press the “Espresso” button 0 again to stop the pump.
4) Wait until the green heating-up control lamp
5) Press the “Espresso” button
for 20 seconds before stopping the pump again.
The preheating process is completed. You can now make an espresso/cappuccino.
3 lights up. Neither the “Espresso” 0 nor the “Steam”
..
! lights up, press the
0. Empty the cup and press the
0
! lights up again. The
.. The red control lamp
INSERT”
! lights up.
0 again and allow hot water to flow through
■ 60 │ GB
│
MT SEMS 1100 A1

Preparing espresso
NOTE
► Always ensure that the espresso sieve +, is clean and free of coffee
powder residues.
1) When the appliance is heated up:
To prepare an espresso, place the small espresso sieve , into the sieve
holder%.
To prepare two espressos, place the large espresso sieve + into the sieve
holder %.
2) Fill the small espresso sieve , with espresso powder up to the Max marking.
This corresponds to approx. 7 g of powder or a level measuring spoon .
Or:
Fill the large espresso sieve + with espresso powder up to the Max marking.
This equates to about 7g + 7g of powder or two level measuring spoons .
3) Tamp down the espresso powder using the compactor on the measuring
spoon . Add more espresso powder, if required, until the espresso sieve +
, is full up to the Max marking. Tamp the coffee powder down once again.
NOTE
► Compaction of the coffee powder is an essential process for the preparation
of an espresso. If the espresso powder is compacted very strongly, the
espresso runs through more slowly and more crema is generated. If the
espresso powder is not so strongly compacted, the espresso runs through
more quickly and it creates very little crema.
4) Place the sieve holder % in the appliance at the “
turn it clockwise until the handle of the sieve holder % is facing the front
(“
LOCK” mark).
5) Place one (or two) cup(s) under the sieve holder openings. We recommend
that you rinse the cups out with hot water beforehand, so that the espresso
does not cool so quickly. You can place the cups onto the storage space .
6) As soon as the green heating-up control lamp
down the “Espresso” button
WARNING
Never remove the sieve holder % while the espresso is coming
out!
The resulting spray of hot espresso would lead to injury!
► Always check to make sure that the "Espresso" button
in before removing the sieve holder %.
0. The espresso flows into the cup(s).
INSERT” mark, then
! lights up, you can press
0 is not pressed
GB│MT
│
61 ■SEMS 1100 A1

7) Once the cups are filled up to the required amount (about 20 ml per cup),
press the “Espresso” button 0 to stop the water being pumped through.
You can now drink the espresso.
8) Switch the appliance off with the on/off switch
NOTE
► The appliance turns off automatically after 30 minutes.
9) After every use, remove the used espresso powder from the espresso sieve +
,. Remove the sieve holder % from the appliance. To do this, fold the sieve
blocker 1 upwards so that the espresso sieve +, cannot fall out of the sieve
carrier %. Now empty the espresso sieve +, by turning the sieve holder %
and the blocked espresso sieve +, over and knocking the espresso powder
out. Always dispose of the espresso powder in an environmentally friendly
manner, e.g. with the organic waste.
NOTE
► Clean the hot water shower (the hot water comes out of this) after each
use. See also the section "Cleaning and Care".
NOTE
► Empty the drip tray regularly, at the latest when the red float is visible in
the hole of the drip grille .
Preparing cappuccino
..
1) Fill a container for frothing (preferably made of stainless steel) to one third with
2) Ensure that the steam control is closed (turn it as far as it will go in the
3) Push the milk frother out to the side. Always hold it by the handle .
4) Press the “Steam” button
5) Hold an empty container under the milk frother . Slowly turn the steam
6) Wait 15 seconds and then turn the steam control towards “0” until no more
■ 62 │ GB
WARNING
Be careful when working with steam for the milk froth production!
The hot steam or hot splashes can lead to injuries!
► Always operate the steam control slowly.
cold milk.
direction “0“).
6 down. Wait for the green steam control lamp
- to light up.
control in the direction “
nozzle. This cleans the nozzle and the water circuit inside the appliance.
steam comes out of the nozzle. Pour the water out of the container.
│
MT SEMS 1100 A1
“. Pressurised water/spray comes from the

7) Now hold the frothing container in your hand to feel the milk temperature and
guide the nozzle of the milk frother gently into the milk. Hold the frothing
container at a slight angle.
8) Slowly turn the steam control towards
9) Move the frothing container around in a circular motion while keeping the tip
of the nozzle under the surface of the milk: deep enough that the milk does not
spray out, but shallow enough to create a thick froth. Done properly, a deep
buzzing sound is audible.
10) As the milk froth rises, push the nozzle deeper into the milk to froth up the next
“layer” and to avoid a burnt taste in the froth.
11) Finally, insert the nozzle completely and close the steam control
approximately halfway, so that the milk is heated. Hold the frothing container
at a slight angle, so that the milk gently swirls around while it is being stirred
with the nozzle.
12) When the milk froth has the desired consistency and temperature, close the
steam control (turn it towards “0” as far as it will go).
13) Now you can remove the nozzle from the milk.
14) Press the “Steam” button
the heat-up control lamp !lights up.
NOTE
► For the preparation of cappuccino, always use bigger cups than for espresso
to leave space for the frothed milk.
15) When preparing cappuccino, proceed exactly as you would for an espresso
(see section “Preparing espresso”: the preheating is no longer necessary).
Allow the water to flow through for about twice as long as an espresso (about
40 ml).
16) Switch off the appliance using the On/Off switch
NOTE
► The appliance turns off automatically after 30 minutes.
6. The steam control lamp - goes out and
.
..
17) Now add the frothed milk into the previously prepared espresso. The
cappuccino is now ready. You can add sugar or sprinkle it with cocoa powder
according to taste.
NOTE
► Always clean the milk frother after every use. See also the section
"Cleaning and Care".
GB│MT
│
63 ■SEMS 1100 A1

Tips for the milk froth
■ Generally, any type of milk can be frothed, including soy and rice milk.
However, some types of milk can only be frothed to a certain extent.
■ Low fat or skimmed milk does not burn as easily as whole milk, however, a
too low fat content adds to the risk that the milk will not be well frothed.
Therefore use a milk with a fat content of 3.5% or 1.5%, if possible.
■ Well-cooled milk can be better frothed than less cold. For the best results,
use milk at a temperature of about 7°C.
■ Do not froth the milk a second time, otherwise it may burn.
■ Allow frothed milk to stand for about 30 seconds before you pour it onto the
espresso. This allows the larger bubbles to burst; the still liquid milk sinks to
the bottom. You can then pour the fine froth onto the espresso.
Cleaning and care
WARNING! RISK OF INJURY!
► Always remove the plug from the mains power socket before you clean the
appliance. Danger of electric shock!
► Always allow the appliance to cool down before you start to clean it. Risk of
burns!
NEVER submerse the appliance in water or other liquids! Danger of
electric shock!
■ 64 │ GB
│
MT SEMS 1100 A1

Cleaning the milk frother
CAUTION! PROPERTY DAMAGE!
► NEVER use abrasive, corrosive or chemical agents to clean the appliance.
These could damage the outer surfaces of the appliance.
1) Place an empty container under the milk frother .
2) Turn the steam control to
for a few seconds.
3) Close the steam control (turn it towards “0” as far as it will go), switch the
appliance off and remove the plug from the mains power socket.
4) Allow the nozzle to cool down.
5) Pull the casing of the milk frother off (Figure 1) and clean it thoroughly in
warm water.
6) Wipe the nozzle under the casing with a damp cloth. If necessary, add a little
mild detergent onto the cloth. After cleaning with detergent, always wipe off
with a cloth moistened with clean water. Ensure that there is no detergent
residue left on the nozzle.
7) Push the casing back onto the nozzle (Figure 1).
immediately after use and let the steam escape
Figure 1
GB│MT
│
65 ■SEMS 1100 A1

Cleaning the hot water shower
Clean the hot water shower after each use:
1) After you have prepared the espresso/cappuccino and removed the sieve
holder %, wipe the entire surface of the hot water shower with a moistened
cloth to remove all powder residues.
2) Replace the sieve holder % without the espresso filters +,.
3) Place an empty cup under the sieve holder % and press the “Espresso”
button
shower rinsing out the remaining powder residue.
4) After about 20 seconds, press the “Espresso” button 0 again and switch
the appliance off with the On/Off switch ..
5) Remove the sieve holder % again.
0 down until it clicks in. Water flows out of the hot water
Cleaning the accessories
1) Clean the sieve holder %, the two espresso sieves +,, water tank , the
measuring spoon and the drip grille in warm water.
NOTE
► If you put detergent into the water, it may effect the taste of the espresso. If
the stains can only be removed with detergent, always rinse the items
afterwards with lots of clean water.
2) Dry all parts well.
3) The drip tray is suitable for cleaning in the dishwasher. However, always
remove the red float from the drip tray before cleaning:
– To do this, remove the stoppers attached to the two retaining bars to
the side of the float.
– Pull the float from the retaining bars.
– Clean the float and stoppers.
– After cleaning the drip tray , push the cleaned float back onto the
retaining bars and replace the stoppers.
Cleaning the appliance
Clean the appliance with a moist cloth. If necessary, use a little detergent
on the cloth.
Ensure that the appliance is completely dry before the next use.
■ 66 │ GB
│
MT SEMS 1100 A1

Descaling the appliance
Descale the appliance regularly. The appliance should be descaled after about
1 – 2 months (at approx. 4 espresso preparations per day). Depending on the
hardness of the water in your area, this figure may differ.
For descaling, use a commercially available descaler for espresso machines.
Proceed as described in the instructions for usage of the descaler.
If you do not have any descaling products, you can use citric acid and proceed
as follows:
1) Fill the water tank to the marking MAX.
2) Dissolve 2 tablespoons (about 30 grams) of citric acid (available in drugstores
or chemists) into the water.
3) Replace the water tank into the appliance.
4) Switch on the appliance using the On/Off switch
is closed.
5) Insert the sieve holder % without the espresso sieves +, back into the
appliance and place a cup under the sieve holder %.
6) As soon as the green heat-up indicator lamp
“Espresso” button
7) Allow around 2 cups (approx. 250 ml) of water to run through and then stop
the process by pressing the “Espresso” button
8) Hold a container under the milk frother .
9) Press the “Steam” button 6 so that it clicks into place and wait until the
green steam control lamp
to
. Allow the appliance to generate steam for approx. 2 minutes.
10) After 2 minutes, close the steam control , then press the “Steam”
button
11) Let the scaling agent take effect for about 15 minutes.
12) Repeat steps 6 –11 three times.
13) Then press the “Espresso” button
run through until the water tank is empty.
14) Rinse the water tank with clean water and then fill it with clean water up to
the Max marking.
15) Press the “Espresso” button
until the green heat-up indicator lamp
16) Allow the water to run through.
17) Repeat steps 14 –16 three times.
18) Refill the water tank with water.
6 again so that no more steam is generated.
.. The steam control
! lights up, press the
0 so that it clicks in.
- lights up. Slowly turn the steam control
0 down so that it clicks in, let the water
0 down so that it clicks into place and wait
0 again.
! lights up.
GB│MT
│
67 ■SEMS 1100 A1

19) Push in the “Steam” button 6 so that it clicks into place.
20) Hold a container under the milk frother and slowly turn the steam control
to
as soon as the green steam control lamp - lights up.
21) After approx. 1 minute, close the steam control (turn it towards “0” as far
as it will go), then press the “Steam” button again
appliance.
NOTE
► The appliance turns off automatically after 30 minutes.
6 and switch off the
■ 68 │ GB
│
MT SEMS 1100 A1

Troubleshooting
Malfunction Cause Solution
The espresso no
longer flows out.
The espresso drips
over the edges of
the sieve holder%,
not from the
openings.
The espresso is
cold.
The pump is
unusually noisy.
The crema is too
light (the espresso
runs out of the sieve
holder % quickly).
The espresso powder is too moist
and/or compressed too tightly.
No water in the water tank . Fill the water tank with water.
The holes of the sieve holder
openings are blocked.
The sieve holder % is not correctly
inserted.
The sieve holder openings are
blocked.
There are espresso powder residues
on the edges of the sieve holder %.
The appliance was not preheated. Preheat the appliance.
The green heating-up control
lamp
The cups were not pre-warmed. Pre-warm the cups.
The water tank is empty. Fill the water tank with water.
Not enough espresso powder. Use more espresso powder.
The espresso powder is too
coarsely ground.
! has not yet glowed.
Re-prepare the espresso without
compressing the powder as firmly; if
necessary, use new powder.
Clean the sieve holder %.
Insert the sieve holder % correctly.
Clean the sieve holder %.
Clean the espresso powder residues
from the edges of the sieve holder %.
Wait until the green heating-up
control lamp ! lights up.
Use only espresso powder specially
manufactured for espresso.
The crema is too
dark (the espresso
runs out of the sieve
carrier % slowly).
The milk does
not froth.
Too much espresso powder. Use less espresso powder.
The powder is too finely ground or
moist.
The sieve is blocked. Clean the sieve.
The milk is not cold enough. Use milk from the refrigerator.
The milk frother is dirty. Clean the milk frother .
Use only espresso powder specially
manufactured for espresso.
GB│MT
│
69 ■SEMS 1100 A1

Disposal
Disposal of the appliance
Do not dispose of the appliance in your normal domestic waste.
This product is subject to the provisions of the European WEEE
(Waste Electrical and Electronic Equipment) Directive 2012/19/EU.
Dispose of the appliance via an approved waste disposal company or your
municipal waste disposal facility. Please comply with all applicable regulations.
Please contact your waste disposal facility if you are in any doubt.
Your local community or municipal authorities can provide information on how to
dispose of the worn-out product.
■ 70 │ GB
│
MT SEMS 1100 A1

Kompernass Handels GmbH warranty
Dear Customer,
This appliance has a 3-year warranty valid from the date of purchase. If this product
has any faults, you, the buyer, have certain statutory rights. Your statutory rights
are not restricted in any way by the warranty described below.
Warranty conditions
The validity period of the warranty starts from the date of purchase. Please keep
your original receipt in a safe place. This document will be required as proof of
purchase.
If any material or production fault occurs within three years of the date of purchase
of the product, we will either repair or replace the product for you at our discretion.
This warranty service is dependent on you presenting the defective appliance and
the proof of purchase (receipt) and a short written description of the fault and its
time of occurrence.
If the defect is covered by the warranty, your product will either be repaired or
replaced by us. The repair or replacement of a product does not signify the
beginning of a new warranty period.
Warranty period and statutory claims for defects
The warranty period is not prolonged by repairs effected under the warranty. This
also applies to replaced and repaired components. Any damage and defects
present at the time of purchase must be reported immediately after unpacking.
Repairs carried out after expiry of the warranty period shall be subject to a fee.
Scope of the warranty
This appliance has been manufactured in accordance with strict quality guidelines
and inspected meticulously prior to delivery.
The warranty covers material faults or production faults. The warranty does not
extend to product parts subject to normal wear and tear or fragile parts such as
switches, batteries, baking moulds or parts made of glass.
The warranty does not apply if the product has been damaged, improperly used
or improperly maintained. The directions in the operating instructions for the product
regarding proper use of the product are to be strictly followed. Uses and actions
that are discouraged in the operating instructions or which are warned against
must be avoided.
This product is intended solely for private use and not for commercial purposes.
The warranty shall be deemed void in cases of misuse or improper handling, use
of force and modifications / repairs which have not been carried out by one of
our authorised Service centres.
GB│MT
│
71 ■SEMS 1100 A1

Warranty claim procedure
To ensure quick processing of your case, please observe the following instructions:
■ Please have the till receipt and the item number (e.g. IAN 12345) available
as proof of purchase.
■ You will find the item number on the type plate, an engraving on the front
page of the instructions (bottom left), or as a sticker on the rear or bottom of
the appliance.
■ If functional or other defects occur, please contact the service department
listed either by telephone or by e-mail.
■ You can return a defective product to us free of charge to the service address
that will be provided to you. Ensure that you enclose the proof of purchase
(till receipt) and information about what the defect is and when it occurred.
You can download these instructions along with many other manuals, product
videos and software on www.lidl-service.com.
Service
Service Great Britain
Tel.: 0800 404 7657
E-Mail: kompernass@lidl.co.uk
Service Malta
Tel.: 80062230
E-Mail: kompernass@lidl.com.mt
IAN 313486
Importer
Please note that the following address is not the service address. Please use the
service address provided in the operating instructions.
KOMPERNASS HANDELS GMBH
BURGSTRASSE 21
DE - 44867 BOCHUM
GERMANY
www.kompernass.com
■ 72 │ GB
│
MT SEMS 1100 A1

Inhaltsverzeichnis
Einführung ................................................... 74
Urheberrecht ............................................................74
Haftungsbeschränkung ....................................................74
Warnhinweise ...........................................................74
Bestimmungsgemäße Verwendung ...........................................75
Lieferumfang/Transportinspektion ............................................76
Entsorgung der Verpackung ................................................76
Sicherheitshinweise ........................................... 77
Geräteelemente .............................................. 80
Technische Daten .............................................. 80
Die Temperaturanzeige ........................................ 81
Erste Inbetriebnahme .......................................... 81
Bedienung ................................................... 82
Wassertank befüllen ......................................................82
Aufheizen nach längerer Standzeit/bei erster Inbetriebnahme ......................83
Aufheizen vor jedem Gebrauch ..............................................84
Espresso zubereiten .......................................................85
Cappuccino zubereiten ....................................................86
Tipps für den Milchschaum .................................................88
Reinigen und Pflegen .......................................... 88
Milchaufschäumer reinigen .................................................89
Heißwasserdusche reinigen .................................................90
Zubehörteile reinigen ......................................................90
Gerät reinigen ...........................................................90
Gerät entkalken ..........................................................91
Fehlerbehebung .............................................. 93
Entsorgung. . . . . . . . . . . . . . . . . . . . . . . . . . . . . . . . . . . . . . . . . . . . . . . . . . . 94
Gerät entsorgen ..........................................................94
Garantie der Kompernaß Handels GmbH ......................... 95
Service .................................................................96
Importeur ...............................................................96
DE│AT│CH
│
73 ■SEMS 1100 A1

Einführung
Herzlichen Glückwunsch zum Kauf Ihres neuen Gerätes.
Sie haben sich damit für ein hochwertiges Produkt entschieden. Die Bedienungs-
anleitung ist Bestandteil dieses Produkts. Sie enthält wichtige Hinweise für Sicherheit, Gebrauch und Entsorgung. Machen Sie sich vor der Benutzung des Produkts
mit allen Bedien- und Sicherheitshinweisen vertraut. Benutzen Sie das Produkt nur
wie beschrieben und für die angegebenen Einsatzbereiche. Händigen Sie alle
Unterlagen bei Weitergabe des Produkts an Dritte mit aus.
Urheberrecht
Diese Dokumentation ist urheberrechtlich geschützt.
Jede Vervielfältigung bzw. jeder Nachdruck, auch auszugsweise, sowie die
Wieder gabe der Abbildungen, auch im veränderten Zustand, ist nur mit schriftlicher Zustimmung des Herstellers gestattet.
Haftungsbeschränkung
Alle in dieser Bedienungsanleitung enthaltenen technischen Informationen, Daten
und Hinweise für die Bedienung entsprechen dem letzten Stand bei Drucklegung
und erfolgen unter Berücksichtigung unserer bisherigen Erfahrungen und Erkenntnisse nach bestem Wissen.
Aus den Angaben, Abbildungen und Beschreibungen in dieser Anleitung können
keine Ansprüche hergeleitet werden.
Der Hersteller übernimmt keine Haftung für Schäden aufgrund von Nichtbeachtung der Anleitung, nicht bestimmungsgemäßer Verwendung, unsachgemäßen
Reparaturen, unerlaubt vorgenommener Veränderungen oder Verwendung nicht
zugelassener Ersatzteile.
Warnhinweise
In der vorliegenden Bedienungsanleitung werden folgende Warnhinweise verwendet:
WARNUNG
Ein Warnhinweis dieser Gefahrenstufe kennzeichnet eine mög
liche gefährliche Situation.
Falls die gefährliche Situation nicht vermieden wird, kann dies zu Verletzungen
führen.
► Die Anweisungen in diesem Warnhinweis befolgen, um Verletzungen von
Personen zu vermeiden.
■ 74 │ DE
│AT│
-
CH SEMS 1100 A1

ACHTUNG
Ein Warnhinweis dieser Gefahrenstufe kennzeichnet einen möglichen Sachschaden.
Falls die Situation nicht vermieden wird, kann dies zu Sachschäden führen.
► Die Anweisungen in diesem Warnhinweis befolgen, um Sachschäden zu
vermeiden.
HINWEIS
► Ein Hinweis kennzeichnet zusätzliche Informationen, die den Umgang mit
dem Gerät erleichtern.
Bestimmungsgemäße Verwendung
Dieses Gerät dient ausschließlich dem Zubereiten von Espresso/Cappuccino und
dem Aufschäumen von Milch. Es ist ausschließlich für die Nutzung in privaten
Haushalten bestimmt. Nutzen Sie es nicht gewerblich.
Eine andere oder darüber hinausgehende Benutzung gilt als nicht bestimmungsgemäß.
WARNUNG
Gefahr durch nicht bestimmungsgemäße Verwendung!
Von dem Gerät können bei nicht bestimmungsgemäßer Verwendung und/oder
andersartiger Nutzung Gefahren ausgehen.
► Das Gerät ausschließlich bestimmungsgemäß verwenden.
► Die in dieser Bedienungsanleitung beschriebenen Vorgehensweisen einhalten.
Ansprüche jeglicher Art wegen Schäden aus nicht bestimmungsgemäßer Verwendung sind ausgeschlossen.
Das Risiko trägt allein der Benutzer.
DE│AT│CH
│
75 ■SEMS 1100 A1

Lieferumfang/Transportinspektion
WARNUNG
Erstickungsgefahr!
► Verpackungsmaterialien dürfen nicht zum Spielen verwendet werden.
Es besteht Erstickungsgefahr.
Das Gerät wird standardmäßig mit folgenden Komponenten geliefert:
▯ Espressomaschine
▯ Siebträger
▯ großes Espressosieb
▯ kleines Espressosieb
▯ Messlöffel mit Stopfer
▯ Kurzanleitung
▯ Bedienungsanleitung
HINWEIS
► Prüfen Sie die Lieferung auf Vollständigkeit und auf sichtbare Schäden.
► Bei einer unvollständigen Lieferung oder Schäden infolge mangelhafter Ver-
packung oder durch Transport wenden Sie sich an die Service-Hotline.
Entsorgung der Verpackung
Die Verpackung schützt das Gerät vor Transportschäden. Die Verpackungsmaterialien sind nach umweltverträglichen und entsorgungstechnischen Gesichtspunkten ausgewählt und deshalb recyclebar.
Die Rückführung der Verpackung in den Materialkreislauf spart Rohstoffe und
verringert das Abfallaufkommen. Entsorgen Sie nicht mehr benötigte Verpackungsmaterialien gemäß den örtlich geltenden Vorschriften.
Beachten Sie die Kennzeichnung auf den verschiedenen Verpackungsmaterialien
und trennen Sie diese gegebenenfalls gesondert. Die Verpackungsmaterialien
sind gekennzeichnet mit Abkürzungen (a) und Ziffern (b) mit folgender Bedeutung:
1–7: Kunststoffe,
20–22: Papier und Pappe,
80–98: Verbundstoffe.
■ 76 │ DE
HINWEIS
► Heben Sie, wenn möglich, die Originalverpackung während der Garantie-
zeit des Gerätes auf, um das Gerät im Garantiefall ordnungsgemäß verpacken zu können.
│AT│
CH SEMS 1100 A1

Sicherheitshinweise
Beachten Sie für einen sicheren Umgang mit dem Gerät die
folgenden Sicherheitshinweise:
WARNUNG! VERLETZUNGSGEFAHR!
► Kontrollieren Sie das Gerät vor der Verwendung auf äußere,
sichtbare Schäden. Nehmen Sie ein beschädigtes oder heruntergefallenes Gerät nicht in Betrieb.
► Das Gerät und seine Anschlussleitung sind von Kindern
jünger als 8 Jahren fernzuhalten.
► Das Gerät kann von Kindern ab 8 Jahren benutzt werden,
wenn sie beaufsichtigt oder bezüglich des sicheren Gebrauchs des Gerätes unterwiesen wurden und die daraus
resultierenden Gefahren verstanden haben.
► Das Gerät kann von Personen mit reduzierten physischen,
sensorischen oder mentalen Fähigkeiten oder Mangel an
Erfahrung und/oder Wissen benutzt werden, wenn sie beaufsichtigt oder bezüglich des sicheren Gebrauchs des Gerätes unterwiesen wurden und die daraus resultierenden
Gefahren verstanden haben.
► Reinigung und Benutzer-Wartung dürfen nicht von Kindern
durchgeführt werden, es sei denn, sie sind 8 Jahre oder älter
und beaufsichtigt.
► Kinder dürfen nicht mit dem Gerät spielen.
► Lassen Sie Reparaturen am Gerät nur von autorisierten Fach-
betrieben oder dem Kundenservice durchführen. Durch unsachgemäße Reparaturen können erhebliche Gefahren für
den Benutzer entstehen. Zudem erlischt der Garantieanspruch.
Tauchen Sie das Gerät nicht in Wasser oder andere
Flüssigkeiten. Gefahr eines elektrischen Schlages!
DE│AT│CH
│
77 ■SEMS 1100 A1

WARNUNG! VERLETZUNGSGEFAHR!
► Fassen Sie das Gerät niemals mit nassen oder feuchten
Händen an.
► Lassen Sie beschädigte Netzstecker oder Netzkabel sofort
von autorisiertem Fachpersonal oder dem Kundenservice
austauschen, um Gefährdungen zu vermeiden.
► Verbrennungsgefahr! Einige Teile werden während der Be-
nutzung sehr heiß!
► Bei der Benutzung des Gerätes entstehen heiße Dampf-
schwaden. Achten Sie darauf, dass Sie sich nicht daran verbrühen! Halten Sie ausreichenden Abstand zum Dampf.
► Schließen Sie das Gerät nur an eine vorschriftsmäßig instal-
lierte und geerdete Netzsteckdose an.
► Nach der Anwendung verfügt die Oberfläche des Heizele-
ments noch über Restwärme.
► Es darf keine Flüssigkeit auf die Gerätesteckverbindung laufen.
► Benutzen Sie das Gerät nur bestimmungsgemäß. Fehlanwen-
dungen können zu Verletzungen führen.
ACHTUNG! SACHSCHADEN!
► Defekte Bauteile dürfen nur gegen Original-Ersatzteile aus-
getauscht werden. Nur bei diesen Teilen ist gewährleistet,
dass sie die Sicherheitsanforderungen erfüllen werden.
► Schützen Sie das Gerät vor Feuchtigkeit und dem Eindringen
von Flüssigkeiten.
► Schützen Sie das Gerät vor Stößen, Staub, Chemikalien,
starken Temperaturschwankungen und zu nahen Wärmequellen (Öfen, Heizkörper).
► Tauchen Sie das Gerät niemals in Wasser oder andere
Flüssig keiten.
■ 78 │ DE
│AT│
CH SEMS 1100 A1

ACHTUNG! SACHSCHADEN!
► Ziehen Sie immer den Netzstecker aus der Netzsteckdose;
ziehen Sie niemals am Kabel.
► Lassen Sie das Gerät während des Betriebes niemals unbe-
aufsichtigt.
► Benutzen Sie keine externe Zeitschaltuhr oder ein separates
Fernwirksystem, um das Gerät zu betreiben.
► Betreiben Sie das Gerät niemals in Räumen, in denen sich
Temperaturen unter oder um 0°C befinden. Bei Gefrieren
des Wassers in den Leitungen oder im Wassertank kann das
Gerät beschädigt werden.
► Betreiben Sie das Gerät niemals im Freien. Dieses Gerät ist
nur für die Verwendung in Innenräumen vorgesehen.
HINWEIS
► Eine Reparatur des Gerätes während der Garantiezeit darf
nur von einem vom Hersteller autorisierten Kundendienst vorgenommen werden, sonst besteht bei nachfolgenden Schäden
kein Garantieanspruch mehr.
DE│AT│CH
│
79 ■SEMS 1100 A1

Geräteelemente
Abbildung A:
Temperaturanzeige
Dampfregler
Stellfläche
Griff
Wassertank
Milchaufschäumer
Tropfenauffangschale
Aussparung für den roten Schwimmer
Abtropfgitter
Heißwasserdusche
- grüne Dampfkontrollleuchte
3 rote Kontrollleuchte „Power“
! grüne Aufheizkontrollleuchte
. Ein-/Aus-Schalter
0 Taste „Espresso“
6 Taste „Dampf“
Abbildung B:
1 Siebblockierer
% Siebträger
+ großes Espressosieb
, kleines Espressosieb
Messlöffel mit Stopfer
Technische Daten
Netzspannung 220 – 240 V ∼ (Wechselstrom), 50 Hz
Nennleistung 1100 W
Pumpendruck ca. 1,5 MPa (15 bar)
■ 80 │ DE
│AT│
CH SEMS 1100 A1
lebensmittelecht

Die Temperaturanzeige
Die Temperaturanzeige zeigt an, wie hoch das Gerät aufgeheizt hat.
Sobald Sie das Gerät einschalten, beginnt das Gerät aufzuheizen, bis der Zeiger
ungefähr in der Mitte zwischen 80°C und „ “ steht.
Erreicht der Zeiger den roten Teil der Skala, ist die Temperatur hoch genug, um
einen Espresso zuzubereiten. Die grüne Aufheizkontrollleuchte !
leuchtet.
Wenn Sie die Taste „Dampf“
leuchte !
Bereich der Skala zwischen „
Erreicht der Zeiger den Bereich zwischen „ “ und „ “, ist die Temperatur hoch
genug, um Dampf zu erzeugen. Die grüne Dampfkontrollleuchte -
, das Gerät heizt weiter auf und der Zeiger steigt höher bis in den
Erste Inbetriebnahme
1) Reinigen Sie den Siebträger %, den Messlöffel , die Espressosiebe +,,
das Abtropfgitter und den Wassertank wie im Kapitel „Reinigen und
Pflegen“ beschrieben.
2) Stellen Sie das Gerät auf eine ebene und hitzebeständige Unterlage. Achten
Sie darauf, dass die Netzsteckdose in erreichbarer Nähe ist.
3) Setzen Sie das Abtropfgitter so ein, dass der rote Schwimmer durch die
Aussparung im Abtropfgitter ragen kann.
4) Setzen Sie den Siebträger % in das Gerät ein, indem Sie ihn an der Markierung „
ist, am Gerät einsetzen und dann gegen den Uhrzeigersinn, bis der Griff des
Siebträgers % nach vorne weist (Markierung „
5) Stecken Sie den Netzstecker in eine Netzsteckdose.
INSERT“, die seitlich neben der Heißwasserdusche angebracht
6 drücken, erlischt die grüne Aufheizkontroll-
“ und „ “.
leuchtet.
LOCK“), drehen.
DE│AT│CH
│
81 ■SEMS 1100 A1

6) Gehen Sie vor der ersten Verwendung folgendermaßen vor, um die internen
Leitungen zu reinigen:
Lassen Sie Wasser für ca. 5 Tassen Espresso (etwa 100 ml) durch das Gerät
laufen. Lesen Sie hierzu das Kapitel „Bedienung“.
7) Lassen Sie für ca. 30 Sekunden Dampf erzeugen. Lesen Sie hierzu das Kapitel
„Bedienung“.
HINWEIS
► Bei der ersten Benutzung kann es sein, dass die Pumpe schon hörbar arbeitet,
Geräusche entstehen, jedoch noch kein Wasser aus dem Gerät kommt. In
diesem Fall drehen Sie den Dampfregler in Richtung „
Luft aus den Leitungen des Gerätes entweichen kann (die Taste „Dampf“
6 ist gedrückt). Nach etwa 20 Sekunden ist die Luft entwichen, die Geräusche verschwinden und Wasser tritt aus dem Gerät aus.
Bedienung
HINWEIS
► Die beiden Tasten „Espresso“ 0 und „Dampf“ 6 rasten beim
Drücken ein. Wird die Taste erneut gedrückt, wird die Taste gelöst.
Wassertank befüllen
HINWEIS
► Verwenden Sie für die Zubereitung von Espresso/Cappuccino ausschließlich
frisches Trinkwasser.
“, so dass die
1) Ziehen Sie den Wassertank heraus und füllen Sie ihn mit Wasser:
2) Schieben Sie den Wassertank wieder in das Gerät. Achten Sie darauf, den
■ 82 │ DE
Füllen Sie mindestens Wasser bis zur Min-Markierung ein.
Füllen Sie nie mehr Wasser als bis zur Max-Markierung ein.
Schlauch mit in den Wassertank zu legen.
│AT│
CH SEMS 1100 A1

Aufheizen nach längerer Standzeit/bei erster
Inbetriebnahme
Heizen Sie das Gerät, wenn Sie es längere Zeit nicht benutzt haben, folgendermaßen auf:
1) Füllen Sie Wasser in den Wassertank .
2) Legen Sie das große + oder das kleine Espressosieb , in den Siebträger %:
– Achten Sie darauf, dass die kleine Einkerbung am großen + oder
kleinem Espressosieb , beim Einsetzen über der Einkerbung am Siebträger % liegt.
– Drehen Sie dann das große + oder kleine Espressosieb ,etwas, so
dass dieses nicht mehr herausfallen kann.
HINWEIS
► Entfernen Sie das eingesetzte Espressosieb +, erst, wenn es sich abge-
kühlt hat!
► Um die Espressosiebe +, wieder aus dem Siebträger % herauszunehmen,
drehen Sie das eingesetzte Espressosieb +, so weit, bis sich die Einkerbung am Espressosieb +, über der Einkerbung am Siebträger % befin-
det. Sie können das Espressosieb +, nun herausnehmen.
DE│AT│CH
│
83 ■SEMS 1100 A1

3) Setzen Sie den Siebträger % in das Gerät ein, indem Sie ihn an der Markierung „
INSERT“, die seitlich neben der Heißwasserdusche angebracht ist, am
Gerät einsetzen und dann gegen den Uhrzeigersinn, bis der Griff des Siebträgers % nach vorne (Markierung „
4) Stellen Sie eine Tasse unter den Siebträger %.
5) Drehen Sie den Dampfregler zu / auf „0“.
6) Schalten Sie das Gerät am Ein-/Aus-Schalter
7) Die rote Kontrollleuchte „Power“
Zeiger in der Temperaturanzeige zu steigen.
8) Sobald die grüne Aufheizkontrollleuchte
„Espresso“ 0. Lassen Sie das Wasser ca. 1 Minute durchlaufen.
HINWEIS
► Es kann sein, dass Sie zwischendurch die Tasse leeren müssen. Stoppen Sie
dafür kurz den Vorgang, indem Sie die Taste „Espresso“
Leeren Sie die Tasse und drücken Sie erneut die Taste „Espresso“
damit das Wasser weiter durch das Gerät läuft.
9) Nach ca. 1 Minute stoppen Sie die Pumpe, indem Sie die Taste „Espresso“
0 noch einmal drücken.
10) Warten Sie, bis die grüne Aufheizkontrollleuchte
Aufheizen ist abgeschlossen. Sie können nun Espresso zubereiten.
Aufheizen vor jedem Gebrauch
Bevor Sie einen Espresso oder Cappuccino zubereiten können, muss das Gerät
aufheizen.
LOCK“) weist, drehen.
. an.
3 leuchtet. Nach kurzer Zeit beginnt der
! leuchtet, drücken Sie die Taste
0 drücken.
0,
! wieder leuchtet. Das
1) Schalten Sie das Gerät am Ein-/Aus-Schalter
2) Setzen Sie den Siebträger % in das Gerät ein, indem Sie ihn an der Markie-
3) Drücken Sie die Taste „Espresso“
4) Warten Sie, bis die grüne Aufheizkontrollleuchte ! leuchtet.
5) Drücken Sie erneut die Taste „Espresso“ 0 und lassen Sie 20 Sekunden
■ 84 │ DE
. an. Die rote Kontrollleuchte
„Power“
6 dürfen dabei nicht gedrückt sein. Stellen Sie sicher, dass der Dampfregler
bis zum Anschlag auf „0“ gedreht ist.
rung „ INSERT“, die seitlich neben der Heißwasserdusche angebracht
ist, am Gerät einsetzen und dann gegen den Uhrzeigersinn, bis der Griff des
Siebträgers % nach vorne weist (Markierung „
Wassertank zieht. Sobald Wasser aus den Siebträger-Öffnungen tritt, drü-
cken Sie die Taste „Espresso“ 0 noch einmal, so dass die Pumpe stoppt.
heißes Wasser austreten, bevor Sie die Pumpe wieder stoppen.
Das Vorheizen ist nun abgeschlossen. Sie können nun einen Espresso/Cappuccino
zubereiten.
│AT│
3 leuchtet. Die beiden Tasten „Espresso“ 0 und „Dampf“
LOCK“), drehen.
0, damit das Gerät Wasser aus dem
CH SEMS 1100 A1

Espresso zubereiten
HINWEIS
► Stellen Sie immer sicher, dass das Espressosieb +, sauber und von
Espressopulver-Resten befreit ist.
1) Wenn das Gerät aufgeheizt ist:
Um einen Espresso zuzubereiten, setzen Sie das kleine Espressosieb , in den
Siebträger % ein.
Um zwei Espressi zuzubereiten, setzen Sie das große Espressosieb + in den
Siebträger % ein.
2) Füllen Sie das kleine Espressosieb , bis zur Max-Markierung mit Espressopulver. Dies entspricht ca. 7g Pulver oder einem gestrichenem Messlöffel .
Oder:
Füllen Sie das große Espressosieb + bis zur Max-Markierung mit Espressopulver. Das entspricht ca. 7g + 7g Pulver oder zwei gestrichenen Messlöffeln .
3) Verdichten Sie das Espressopulver mit Hilfe des Stopfers am Messlöffel .
Füllen Sie danach, falls nötig, weiteres Espressopulver nach, so dass das Espressosieb +, bis zur Max-Markierung gefüllt ist. Verdichten Sie das Espressopulver danach erneut.
HINWEIS
► Das Verdichten des Espressopulvers ist ein wesentlicher Vorgang bei der Zu-
bereitung eines Espressos. Wird das Espressopulver sehr stark gepresst, so
läuft der Espresso langsam durch und es gibt mehr Crema. Ist das Espressopulver nicht so stark verdichtet, läuft der Espresso schnell durch, es entsteht
nur wenig Crema.
4) Setzen Sie den Siebträger % in das Gerät ein, indem Sie ihn an der Markierung „
bis der Griff des Siebträgers % nach vorne weist (Markierung „
drehen.
5) Stellen Sie eine (oder zwei) Tasse(n) unter die Siebträger-Öffnungen. Wir
empfehlen, die Tassen vorher mit heißem Wasser auszuspülen, damit der Espresso nicht so schnell abkühlt. Die Tassen können Sie zur Aufbewahrung auf
der Stellfläche abstellen.
6) Wenn die grüne Aufheizkontrollleuchte
Taste „Espresso“ 0 herunter drücken. Der Espresso läuft in die Tasse(n).
INSERT“ am Gerät einsetzen und dann gegen den Uhrzeigersinn,
LOCK“),
! leuchtet, können Sie nun die
DE│AT│CH
│
85 ■SEMS 1100 A1

WARNUNG
Entnehmen Sie niemals den Siebträger % während der Espressoausgabe!
Die entstehenden Spritzer des heißen Espressos führen zu Verletzungen!
► Stellen Sie immer sicher, dass die Taste „Espresso“
gedrückt ist, bevor Sie den Siebträger % entfernen.
7) Wenn die Tasse(n) bis zur gewünschten Menge gefüllt sind (ca. 20 ml je
Tasse), drücken Sie erneut die Taste „Espresso“ 0, so dass kein weiteres
Wasser gepumpt wird.
Sie können den Espresso nun trinken.
0 nicht herunter
8) Stellen Sie das Gerät am Ein-/Aus-Schalter
HINWEIS
► Nach 30 Minuten schaltet sich das Gerät automatisch aus.
9) Entfernen Sie nach jedem Gebrauch das Espressopulver aus dem Espressosieb
+,. Entnehmen Sie den Siebträger % aus dem Gerät. Klappen Sie den
Siebblockierer 1 nach oben, so dass das Espressosieb +, nicht aus dem
Siebträger % herausfallen kann. Entleeren Sie nun das Espressosieb +,, indem
Sie den Siebträger % mit blockiertem Espressosieb +, umdrehen und das
Espressopulver herausklopfen. Entsorgen Sie das Espressopulver immer umweltgerecht, zum Beispiel im Bioabfall.
HINWEIS
► Reinigen Sie die Heißwasserdusche (aus dieser tritt das heiße Wasser
aus) unbedingt nach jedem Gebrauch. Lesen Sie hierzu das Kapitel
„Reinigen und Pflegen“.
HINWEIS
► Entleeren Sie regelmäßig die Tropfenauffangschale , spätestens jedoch,
wenn der rote Schwimmer in der Aussparung des Abtropfgitters zu
sehen ist.
Cappuccino zubereiten
WARNUNG! VERLETZUNGSGEFAHR!
Seien Sie vorsichtig im Umgang mit dem Dampf zur Milchschaum erzeugung!
Der heiße Dampf oder heiße Spritzer führen zu Verletzungen!
► Bedienen Sie den Dampfregler immer langsam.
. aus.
■ 86 │ DE
│AT│
CH SEMS 1100 A1

1) Füllen Sie einen Aufschäumbehälter (vorzugsweise aus rostfreiem Stahl) zu
einem Drittel mit kalter Milch.
2) Stellen Sie sicher, dass der Dampfregler zugedreht ist (bis zum Anschlag in
Richtung „0“ drehen).
3) Schieben Sie den Milchaufschäumer zur Seite heraus. Fassen Sie ihn dabei
nur am Griff an.
4) Drücken Sie die Taste „Dampf“
Dampfkontrollleuchte
5) Halten Sie ein leeres Gefäß unter den Milchaufschäumer . Drehen Sie lang-
sam den Dampfregler in Richtung „
aus der Düse. So wird die Düse und der Wasserkreislauf im Inneren des Gerätes gereinigt.
6) Warten Sie 15 Sekunden und drehen Sie dann den Dampfregler in Richtung „0“, bis kein Dampf mehr aus der Düse kommt. Schütten Sie das Wasser
aus dem Gefäß weg.
7) Halten Sie nun den Aufschäumbehälter in der Hand, um die Milchtemperatur
zu fühlen und führen Sie die Düse des Milchaufschäumers leicht in die
Milch. Halten Sie den Aufschäumbehälter dabei ein wenig schräg.
8) Drehen Sie langsam den Dampfregler in Richtung „
9) Bewegen Sie den Aufschäumbehälter kreisförmig und halten Sie dabei die
Spitze der Düse knapp unter die Milchoberfläche: tief genug, dass die Milch
nicht in alle Richtungen spritzt und hoch genug, dass ein dicker Schaum erzeugt wird. Machen Sie es richtig, ist dabei ein tiefes Brummgeräusch zu hören.
10) Wenn der Milchschaum hochsteigt, führen Sie die Düse tiefer ein, um die
nächste „Schicht“ aufzuschäumen und ein Anbrennen des Schaums zu vermeiden.
11) Tauchen Sie schließlich die Düse vollständig ein und drehen Sie den Dampfregler etwa bis zur Hälfte zu, so dass die Milch erhitzt wird. Halten Sie den
Aufschäumbehälter leicht schräg, so dass die Milch sanft herumwirbelt, während sie mit der Düse umgerührt wird.
12) Wenn der Milchschaum die gewünschte Konsistenz und Temperatur hat, drehen Sie den Dampfregler zu (bis zum Anschlag in Richtung „0“ drehen).
13) Ziehen Sie erst dann die Düse aus der Milch.
14) Drücken Sie die Taste „Dampf“
lischt und die Aufheizkontrollleuchte
HINWEIS
► Benutzen Sie zur Zubereitung von Cappuccino immer größere Tassen als für
Espresso, da noch aufgeschäumte Milch hinzugefügt wird.
- leuchtet.
6 herunter. Warten Sie, bis die grüne
“. Kondenswasser/Spritzer kommen
“.
6. Die Dampfkontrollleuchte - er ! leuchtet auf.l
DE│AT│CH
│
87 ■SEMS 1100 A1

15) Gehen Sie für die Zubereitung des Cappuccinos genauso vor, als würden Sie
einen Espresso zubereiten (siehe Kapitel „Espresso zubereiten“/das Aufheizen
ist nicht mehr nötig). Lassen Sie das Wasser jedoch ca. doppelt so lange
durchlaufen, wie bei einem Espresso (ca. 40 ml).
16) Stellen Sie das Gerät am Ein-/Aus-Schalter
HINWEIS
► Nach 30 Minuten schaltet sich das Gerät automatisch aus.
17) Geben Sie nun die aufgeschäumte Milch in den zuvor vorbereiteten Espresso.
Der Cappuccino ist nun fertig. Sie können ihn nach Belieben zuckern oder ihn
mit Kakaopulver bestreuen.
HINWEIS
► Reinigen Sie den Milchaufschäumer unbedingt nach jedem Gebrauch.
Lesen Sie hierzu das Kapitel „Reinigen und Pflegen“.
Tipps für den Milchschaum
■ Jede Art von Milch lässt sich prinzipiell aufschäumen, auch Soja- und Reis-
milch. Einige Milchsorten lassen sich allerdings nur mit Einschränkungen aufschäumen.
■ Entrahmte Milch (Magermilch) brennt nicht so leicht an wie Vollmilch, bei zu
geringem Fettgehalt besteht allerdings das Risiko, dass sich die Milch nicht
gut aufschäumen lässt. Benutzen Sie daher möglichst eine Milch mit 3,5 %
oder 1,5 % Fettanteil.
■ Gut gekühlte Milch lässt sich besser aufschäumen als weniger kalte. Beste
Ergebnisse erzielen Sie bei einer Temperatur von ca. 7 °C.
■ Schäumen Sie die Milch kein zweites Mal auf, da sie sonst anbrennt.
■ Lassen Sie aufgeschäumte Milch ca. 30 Sekunden lang stehen, bevor Sie den
Schaum auf den Espresso geben. So platzen größere Blasen und noch flüssige Milch sinkt nach unten. Sie können dann den feinen Schaum auf den Espresso geben.
. aus.
Reinigen und Pflegen
WARNUNG! VERLETZUNGSGEFAHR!
► Ziehen Sie immer den Netzstecker aus der Netzsteckdose, bevor Sie das
Gerät reinigen. Gefahr eines elektrischen Schlages!
► Lassen Sie das Gerät immer erst abkühlen, bevor Sie das Gerät reinigen.
Verbrennungsgefahr!
Tauchen Sie das Gerät niemals in Wasser oder andere Flüssigkeiten.
Gefahr eines elektrischen Schlages!
■ 88 │ DE
│AT│
CH SEMS 1100 A1

Milchaufschäumer reinigen
ACHTUNG! SACHSCHADEN!
► Benutzen Sie niemals scheuernde, aggressive oder chemische Reinigungs-
mittel zur Reinigung des Gerätes. Diese greifen die Oberfläche des
Gerätes an.
1) Stellen Sie einen leeren Behälter unter den Milchaufschäumer .
2) Drehen Sie den Dampfregler direkt nach dem Gebrauch auf
“ und lassen Sie einige Sekunden Dampf entweichen.
„
3) Drehen Sie den Dampfregler zu (bis zum Anschlag in Richtung „0“
drehen), schalten Sie das Gerät aus und ziehen Sie den Netzstecker.
4) Lassen Sie die Düse abkühlen.
5) Ziehen Sie die Hülle des Milchaufschäumers ab (Abbildung 1) und
reinigen Sie diese sorgfältig im warmen Wasser.
6) Wischen Sie die Düse, die sich unter der Hülle befindet, mit einem feuchten
Tuch ab. Geben Sie gegebenenfalls ein mildes Spülmittel auf das Tuch.
Wischen Sie jedoch nach der Reinigung mit Spülmittel mit einem mit klarem
Wasser befeuchteten Tuch nach. Stellen Sie sicher, dass sich keine Spülmittelreste an der Düse befinden.
7) Schieben Sie die Hülle wieder auf die Düse (Abbildung 1).
Abbildung 1
DE│AT│CH
│
89 ■SEMS 1100 A1

Heißwasserdusche reinigen
Reinigen Sie die Heißwasserdusche nach jedem Gebrauch:
1) Nachdem Sie den Espresso/Cappuccino zubereitet haben und den Siebträger %
abgenommen haben, wischen Sie die gesamte Fläche der Heißwasserdusche
mit einem feuchten Tuch ab, so dass alle Pulverreste entfernt werden.
2) Setzen Sie den Siebträger % ohne eingesetzte Espressosiebe +, wieder ein.
3) Stellen Sie dann eine leere Tasse unter den Siebträger % und drücken Sie die
Taste „Espresso“
Heißwasserdusche aus, und spült letzte Pulverreste heraus.
4) Drücken Sie nach ca. 20 Sekunden erneut die Taste „Espresso“ 0 und
schalten Sie das Gerät am Ein-/Aus-Schalter
5) Nehmen Sie den Siebträger % wieder ab.
0 herunter, so dass diese einrastet. Wasser tritt aus der
Zubehörteile reinigen
1) Reinigen Sie den Siebträger %, die beiden Espressosiebe +,, den Wassertank , den Messlöffel und das Abtropfgitter in warmen Wasser.
HINWEIS
►
Wenn Sie Spülmittel in das Wasser geben, kann es sein, dass der Geschmack des Espressos beeinflusst wird. Falls die Verschmutzungen sich nur
mit Spülmittel beseitigen lassen, spülen Sie die Teile hinterher immer mit viel
klarem Wasser ab.
2) Trocknen Sie alle Teile.
3) Die Tropfenauffangschale ist zur Reinigung in der Spülmaschine geeignet.
Nehmen Sie jedoch vor dem Reinigen in der Spülmaschine den roten Schwimmer aus der Tropfenauffangschale :
– Entfernen Sie dazu an beiden Haltestäben seitlich des Schwimmers die
aufgesteckten Stopper.
– Ziehen Sie den Schwimmer von den Haltestäben.
– Reinigen Sie Schwimmer und Stopper in warmem Wasser.
– Nach der Reinigung der Tropfenauffangschale , schieben Sie den
gereinigten Schwimmer wieder auf die Haltestäbe und stecken die Stop-
per auf.
. aus.
Gerät reinigen
Reinigen Sie das Gerät mit einem feuchten Tuch. Geben Sie gegebenenfalls
etwas Spülmittel auf das Tuch.
Stellen Sie sicher, dass das Gerät vor einer erneuten Benutzung vollständig
getrocknet ist.
■ 90 │ DE
│AT│
CH SEMS 1100 A1

Gerät entkalken
Entkalken Sie das Gerät regelmäßig. Nach ca. 1 – 2 Monaten (bei ca. 4 Espressozubereitungen pro Tag) sollte das Gerät entkalkt werden. Je nach Härtegrad des
Wassers in Ihrer Region kann dieser Wert abweichen.
Verwenden Sie zum Entkalken handelsüblichen Entkalker für Espressomaschinen.
Gehen Sie so vor, wie in der Bedienungsanleitung des Entkalkers beschrieben.
Wenn Sie keinen Entkalker haben, können Sie alternativ mit Zitronensäure entkalken
und wie folgt vorgehen:
1) Füllen Sie den Wassertank bis zur Max-Markierung.
2) Lösen Sie darin 2 Löffel (ca. 30 Gramm) Zitronensäure (erhältlich in Drogerien
oder Apotheken) auf.
3) Setzen Sie den Wassertank in das Gerät ein.
4) Schalten Sie das Gerät am Ein-/Aus-Schalter
ist zugedreht.
5) Setzen Sie den Siebträger % ohne Espressosieb +,in das Gerät ein und
stellen Sie eine Tasse unter den Siebträger %.
6) Sobald die grüne Aufheizkontrollleuchte
„Espresso“ 0 herunter, so dass diese einrastet.
7) Lassen Sie ca. 2 Tassen (ca. 250 ml) Wasser durchlaufen und stoppen Sie
dann den Vorgang durch erneutes Drücken der Taste „Espresso“ 0.
8) Halten Sie ein Gefäß unter den Milchaufschäumer .
9) Drücken Sie die Taste „Dampf“
warten Sie, bis die grüne Dampfkontrollleuchte
langsam den Dampfregler auf „
ten Dampf erzeugen.
10) Drehen Sie nach 2 Minuten den Dampfregler zu, drücken Sie erneut die
Taste „Dampf“
11) Lassen Sie den Entkalker für ca. 15 Minuten einwirken.
12) Wiederholen Sie die Schritte 6 bis 11 dreimal.
13) Drücken Sie dann die Taste „Espresso“
und lassen Sie das Wasser solange durchlaufen, bis der Wassertank leer ist.
14) Spülen Sie den Wassertank mit klarem Wasser aus und füllen Sie klares
Wasser bis zur Max-Markierung ein.
15) Drücken Sie die Taste „Espresso“ 0 herunter, so dass diese einrastet,
sobald die grüne Aufheizkontrollleuchte ! leuchtet.
16) Lassen Sie das Wasser durchlaufen.
17) Wiederholen Sie die Schritte 14 - 16 dreimal.
18) Füllen Sie noch einmal Wasser in den Wassertank .
19) Drücken Sie die Taste „Dampf“
. ein. Der Dampfregler
! leuchtet, drücken Sie die Taste
6 herunter, so dass diese einrastet und
- leuchtet. Drehen Sie
“. Lassen Sie das Gerät für ca. 2 Minu-
6, so dass kein Dampf mehr erzeugt wird.
0 herunter, so dass diese einrastet
6, so dass diese einrastet.
DE│AT│CH
│
91 ■SEMS 1100 A1

20) Halten Sie ein Gefäß unter den Milchaufschäumer und drehen Sie langsam
den Dampfregler auf „
leuchtet.
21) Drehen Sie nach ca. 1 Minute den Dampfregler zu (bis zum Anschlag in
Richtung „0“ drehen), drücken Sie erneut die Taste „Dampf“
Sie das Gerät aus.
HINWEIS
► Nach 30 Minuten schaltet sich das Gerät automatisch aus.
“, sobald die grüne Dampfkontrollleuchte -
6 und schalten
■ 92 │ DE
│AT│
CH SEMS 1100 A1

Fehlerbehebung
Störung Ursache Abhilfe
Den Espresso neu zubereiten,
dabei das Espressopulver jedoch
nicht so fest verdichten, oder es
ganz austauschen.
Der Espresso läuft
nicht mehr heraus.
Das Espressopulver ist zu feucht
und/oder zu fest gepresst.
Kein Wasser im Wassertank . Wasser in den Wassertank füllen.
Der Espresso tropft
über die Ränder
des Siebträgers%
anstatt aus den
Öffnungen.
Der Espresso
ist kalt.
Geräuschvoller
Betrieb der Pumpe.
Die Crema ist zu
hell (der Espresso
läuft schnell aus
dem Siebträger %).
Die Crema ist zu
dunkel (der Espresso
läuft langsam aus
dem Siebträger %).
Die Löcher der SiebträgerÖffnungen sind verstopft.
Der Siebträger % wurde nicht
korrekt eingesetzt.
Die Siebträger-Öffnungen sind
v erstopft.
Es befinden sich Espressopulverreste
auf dem Rand des Siebträgers %.
Das Gerät wurde nicht vorgeheizt. Gerät vorheizen.
Die grüne Aufheizkontrollleuchte
! hat noch nicht geleuchtet.
Die Tassen wurden nicht vorgewärmt.
Der Wassertank ist leer. Wasser in den Wassertank füllen.
zu wenig Espressopulver. Mehr Espressopulver verwenden.
Das Espressopulver ist zu grob
gemahlen.
zu viel Espressopulver. Weniger Espressopulver verwenden.
Das Pulver ist zu fein gemahlen
oder feucht.
Das Sieb ist verstopft. Sieb reinigen.
Siebträger % reinigen.
Siebträger % richtig einsetzen.
Siebträger %reinigen.
Rand des Siebträgers %von
Espressopulverresten befreien.
Warten, bis die grüne Aufheizkontrollleuchte ! leuchtet.
Tassen vorwärmen.
Nur speziell für Espresso hergestelltes Espressopulver verwenden.
Nur speziell für Espresso hergestelltes Espressopulver verwenden.
Die Milch schäumt
nicht auf.
Die Milch ist nicht kalt genug.
Der Milchaufschäumer ist verschmutzt.
Verwenden Sie Milch aus dem
Kühlschrank.
Reinigen Sie den Milchaufschäumer .
DE│AT│CH
│
93 ■SEMS 1100 A1

Entsorgung
Gerät entsorgen
Werfen Sie das Gerät keinesfalls in den normalen Hausmüll.
Dieses Produkt unterliegt der europäischen Richtlinie 2012/19/EUWEEE (Waste Electrical and Electronic Equipment).
Entsorgen Sie das Gerät über einen zugelassenen Entsorgungsbetrieb oder über
Ihre kommunale Entsorgungseinrichtung. Beachten Sie die aktuell geltenden
Vorschriften. Setzen Sie sich im Zweifelsfall mit Ihrer Entsorgungseinrichtung in
Verbindung.
Möglichkeiten zur Entsorgung des ausgedienten Produkts erfahren Sie bei Ihrer
Gemeinde- oder Stadtverwaltung.
■ 94 │ DE
│AT│
CH SEMS 1100 A1

Garantie der Kompernaß Handels GmbH
Sehr geehrte Kundin, sehr geehrter Kunde,
Sie erhalten auf dieses Gerät 3 Jahre Garantie ab Kaufdatum. Im Falle von
Mängeln dieses Produkts stehen Ihnen gegen den Verkäufer des Produkts gesetzliche Rechte zu. Diese gesetzlichen Rechte werden durch unsere im Folgenden
dargestellte Garantie nicht eingeschränkt.
Garantiebedingungen
Die Garantiefrist beginnt mit dem Kaufdatum. Bitte bewahren Sie den OriginalKassenbon gut auf. Diese Unterlage wird als Nachweis für den Kauf benötigt.
Tritt innerhalb von drei Jahren ab dem Kaufdatum dieses Produkts ein Materialoder Fabrikationsfehler auf, wird das Produkt von uns – nach unserer Wahl – für
Sie kostenlos repariert oder ersetzt. Diese Garantieleistung setzt voraus, dass
innerhalb der Drei-Jahres-Frist das defekte Gerät und der Kaufbeleg (Kassenbon)
vorgelegt und schriftlich kurz beschrieben wird, worin der Mangel besteht und
wann er aufgetreten ist.
Wenn der Defekt von unserer Garantie gedeckt ist, erhalten Sie das reparierte
oder ein neues Produkt zurück. Mit Reparatur oder Austausch des Produkts beginnt kein neuer Garantiezeitraum.
Garantiezeit und gesetzliche Mängelansprüche
Die Garantiezeit wird durch die Gewährleistung nicht verlängert. Dies gilt auch
für ersetzte und reparierte Teile. Eventuell schon beim Kauf vorhandene Schäden
und Mängel müssen sofort nach dem Auspacken gemeldet werden. Nach Ablauf
der Garantiezeit anfallende Reparaturen sind kostenpflichtig.
Garantieumfang
Das Gerät wurde nach strengen Qualitätsrichtlinien sorgfältig produziert und vor
Auslieferung gewissenhaft geprüft.
Die Garantieleistung gilt für Material- oder Fabrikationsfehler. Diese Garantie
erstreckt sich nicht auf Produktteile, die normaler Abnutzung ausgesetzt sind und
daher als Verschleißteile angesehen werden können oder für Beschädigungen an
zerbrechlichen Teilen, z. B. Schalter, Akkus, Backformen oder Teile die aus Glas
gefertigt sind.
Diese Garantie verfällt, wenn das Produkt beschädigt, nicht sachgemäß benutzt
oder gewartet wurde. Für eine sachgemäße Benutzung des Produkts sind alle in
der Bedienungsanleitung aufgeführten Anweisungen genau einzuhalten.Verwendungszwecke und Handlungen, von denen in der Bedienungsanleitung abgeraten
oder vor denen gewarnt wird, sind unbedingt zu vermeiden.
Das Produkt ist nur für den privaten und nicht für den gewerblichen Gebrauch
bestimmt. Bei missbräuchlicher und unsachgemäßer Behandlung, Gewaltanwendung und bei Eingriffen, die nicht von unserer autorisierten Service-Niederlassung
vorgenommen wurden, erlischt die Garantie.
DE│AT│CH
│
95 ■SEMS 1100 A1

Abwicklung im Garantiefall
Um eine schnelle Bearbeitung Ihres Anliegens zu gewährleisten, folgen Sie bitte
den folgenden Hinweisen:
■ Bitte halten Sie für alle Anfragen den Kassenbon und die Artikelnummer
(z. B. IAN 12345) als Nachweis für den Kauf bereit.
■ Die Artikelnummer entnehmen Sie bitte dem Typenschild, einer Gravur, auf
dem Titelblatt Ihrer Anleitung (unten links) oder als Aufkleber auf der Rückoder Unterseite.
■ Sollten Funktionsfehler oder sonstige Mängel auftreten kontaktieren Sie zunächst
die nachfolgend benannte Serviceabteilung telefonisch oder per E-Mail.
■ Ein als defekt erfasstes Produkt können Sie dann unter Beifügung des Kauf-
belegs (Kassenbon) und der Angabe, worin der Mangel besteht und wann er
aufgetreten ist, für Sie portofrei an die Ihnen mitgeteilte Service-Anschrift
übersenden.
Auf www.lidl-service.com können Sie diese und viele weitere Handbücher,
Produktvideos und Software herunterladen.
Service
Service Deutschland
Tel.: 0800 5435 111 (Kostenfrei aus dem dt. Festnetz/Mobilfunknetz)
E-Mail: kompernass@lidl.de
Service Österreich
Tel.: 0820 201 222 (0,15 EUR/Min.)
E-Mail: kompernass@lidl.at
Service Schweiz
Tel.: 0842 665566 (0,08 CHF/Min., Mobilfunk max. 0,40 CHF/Min.)
E-Mail: kompernass@lidl.ch
IAN 313486
Importeur
Bitte beachten Sie, dass die folgende Anschrift keine Serviceanschrift ist.
Kontaktieren Sie zunächst die benannte Servicestelle.
KOMPERNASS HANDELS GMBH
BURGSTRASSE 21
DE - 44867 BOCHUM
DEUTSCHLAND
www.kompernass.com
■ 96 │ DE
│AT│
CH SEMS 1100 A1

KOMPERNASS HANDELS GMBH
BURGSTRASSE 21
DE - 44867 BOCHUM
GERMANY
www.kompernass.com
Versione delle informazioni · Estado das informações · Last Information Update
Stand der Informationen: 12 / 2018 · Ident.-No.: SEMS1100A1-112018-2
IAN 313486
 Loading...