

Page 1
www.lidl-service.com
Typ 1388A
GB IE
Before reading, open the page with the images and learn about the different functions of the
appliance.
GR CY
Πριν διαβάσετε, ανοίξτε τη σελίδα με τις εικόνες και εξοικειωθείτε με τις διάφορες λειτουργίες
της συσκευής.
DE
Klappen Sie vor dem Lesen die Seite mit den Abbildungen aus und machen Sie sich anschließend mit allen Funktionen des Gerätes vertraut.
IT
Prima di leggere aprire la pagina con le immagini e prendere confidenza con le diverse funzioni dell’apparecchio.
DE’LONGHI APPLIANCES S.r.l.
Via L. Seitz, 47
31100 Treviso, Italy
Tel. +39-0422-4131
Fax +39-0422-413736
Stand der Informationen · Πληροφορίες έκδοσης ·
Version information · Versione delle informazioni:
12 / 2014 · Ident.-No.: cod. 4055108030 rev. 0
IAN 106103
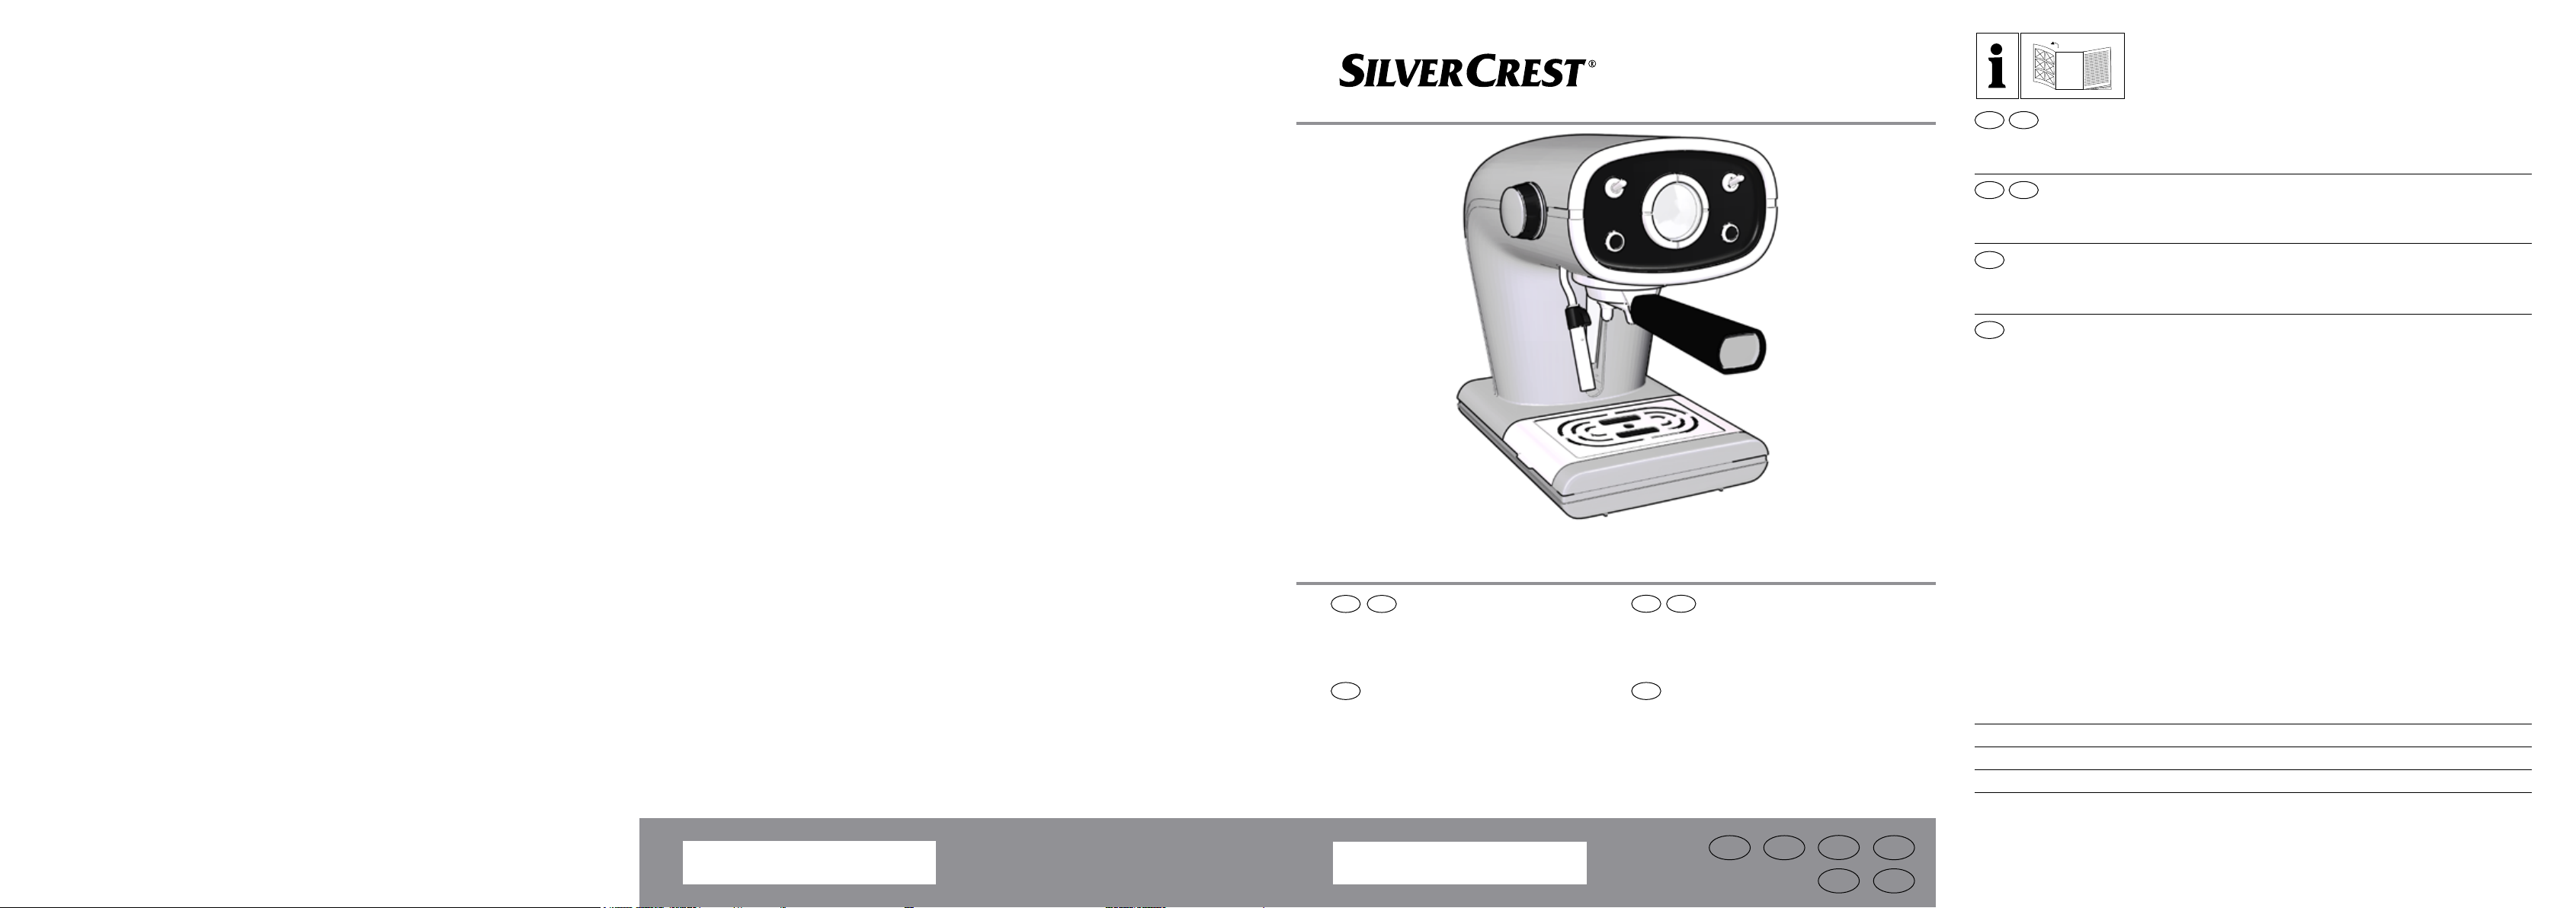
ESPRESSO MACHINE
IE
GB
ESPRESSO MACHINE
SEMR 850 A1
Operating Instructions
DE
ESPRESSOMASCHINE
SEMR 850 A1
Bedienungsanleitung
IAN 106103
GR CY
ΜΗΧΑΝΉ ΚΑΦΈ ΕΣΠΡΈΣΟ
SEMR 850 A1
Οδηγίες χρήσης
IT
MACCHINA PER CAFFÉ ESPRESSO
SEMR 850 A1
Istruzioni per l’uso
GB
IE
GR
DE
CY
IT
GB / IE Operating Instructions Page 3
GR / CY Οδηγίες για τη χρήση και την ασφάλεια Σελίδα 16
DE Bedienungs- und Sicherheitshinweise Seite 29
IT Indicazioni per l’uso e per la sicurezza Pagina 42
Page 2
E
J
K
D
C
L M
B
A
N
G
F
G1
H
O P
Fig. 2 Fig. 3
I
Fig. 1
Fig. 6
Fig. 7
Fig. 9
Fig. 11 Fig. 12
Fig. 10
Fig. 8
Fig. 4 Fig. 5
Fig. 13
Fig. 14
Page 3
IT
GB / IE
CONTENTS
SYMBOLS 3
IMPORTANT SAFEGUARDS 4
DESCRIPTION OF THE APPLIANCE 7
INTENDED USE 7
PRELIMINARY PHASES FOR USE 7
HOW TO MAKE COFFEE 8
HOW TO MAKE CAPPUCCINO 9
MAKING FURTHER CUPS OF COFFEE 9
USEFUL TIPS FOR OBTAINING A GOOD ITALIAN ESPRESSO 9
CLEANING THE APPLIANCE 10
DECALCIFICATION 11
PUTTING OUT OF SERVICE 11
DISPOSAL 12
TECHNICAL DATA 12
TROUBLESHOOTING 13
WARRANTY 14
SYMBOLS
The information in this manual is labelled as follows:
DANGER for children
DANGER from electricity
DANGER from other causes
WARNING: risk of burns from high temperature steam
IMPORTANT possible damage to materials
3GB / IE
Page 4
GB / IE
IMPORTANT SAFEGUARDS
READ THESE INSTRUCTIONS BEFORE USE.
ALWAYS KEEP THESE INSTRUCTIONS.
In case of transfer of the appliance, also hand this manual.
• This appliance is designed only for private use, and is therefore to be
considered unsuitable for commercial or industrial purposes.
• We decline any responsibility resulting from misuse or any use other
than those covered in this booklet.
• We suggest you keep the original box and packaging, as our free-ofcharge service does not cover any damage resulting from inadequate
packaging of the product when this is sent back to an Authorised
Service Centre.
DANGER for children
• The appliance can be used by children aged 8 years and up only if
they are monitored by a responsible person or if they have received
instructions regarding the appliance safe use and if they have understood the dangers which may arise during the appliance use.
• Cleaning and maintenance by the user must not be carried out by
children unless they are older than 8 years and are monitored during
the operation. Children must be supervised at all times to ensure they
do not play with the appliance.
• Do not leave the packaging near children because it is potentially
dangerous.
• In the event that this appliance is to be disposed of, it is suggested that
the power chord is cut off. It is also recommended that all potentially
dangerous components are rendered harmless to prevent children
hurting themselves when playing with the apparatus.
DANGER from electricity
• This appliance can be used by persons who have reduced physical
sensory or mental capabilities, or lack of experience and knowledge,
only if they are monitored by a responsible person or if they have
received and understood instructions regarding the appliance safe
4
GB / IE
Page 5
IT
GB / IE
use and if they have understood the dangers which may arise during
the appliance use.
• Before connecting the appliance to the power supply, make sure that
the voltage indicated on the plate on the bottom of the machine corresponds to the local mains voltage.
• The use of extension leads, which have not been authorised by the
appliance manufacturer, may cause damage and accidents.
• If the electric cable is damaged it must be replaced by the manufacturer or its Technical Assistance Service, or in any case by a person
with similar qualifications, in order to avoid any risk.
• Never let the live parts come into contact with water: this may cause
a short circuit.
• Unplug before any cleaning or maintenance operations.
• Do not immerse the appliance in water or other liquids.
• Always turn off the appliance and remove the power cable plug from
the socket-outlet before filling the tank with water.
DANGER from other causes
• Do not lift the appliance by grasping its water tank or its tray, but only
by grasping its body.
• Choose a sufficiently well lit and clean environment, with an easily
accessible electric socket.
• Avoid putting excessive quantities of water into the tank.
• Never leave the appliance unattended when it is connected to the
power supply.
• The appliance must be used and rested on a stable surface.
• The appliance is not to be used if it has been dropped, if there are
visible sign of damage or if it is leaking. Do not use the appliance if
the power cord or the plug are damaged, or if the appliance is faulty.
To prevent any accident, all repairs, including the replacement of the
power cord, must be carried out by an Authorised Service Centre or,
in any case, by qualified personnel.
5GB / IE
Page 6
GB / IE
WARNING: risk of burns
from high temperature steam
• Never direct the steam or hot water jet towards parts of the body;
handle the steam/hot water spout with care: risk of scalding!
• The outer metallic parts of the appliance and of the filter holder must
not be touched with the appliance in operation, because it could
cause burns.
• If water does not come out of the filter holder, it may be because the
filter is clogged. Stop the brewing and wait ten seconds. Remove and
disconnect the filter holder because any remaining pressure could
cause splashes or squirts. Then clean as explained in the relevant
paragraph.
IMPORTANT possible damage to materials
• Place the machine on a stable surface where it cannot be knocked
over.
• Never use the machine without water because the pump will burn out.
• Never fill the water tank with hot or boiling water.
• Do not place the machine on very hot surfaces or near open flames
in order to prevent damage to the body.
• The cable must not touch any hot parts of the machine.
• Do not use sparkling (carbonated) water.
• Never put in the filter substances other than coffee powder. They
could cause serious damage to the appliance.
• Do not leave the machine at a room temperature below 0 °C because
the water remaining in the boiler could freeze and cause damage.
• Never use the appliance outdoors.
• Do not expose the appliance to atmospheric agents (rain, sun, etc...).
• Before cleaning the appliance always unplug it and allow it cool
down. Clean only with a non-abrasive cloth that has been slightly
dampened with water, adding a few drops of mild, non-aggressive
detergent (never use solvents that damage plastic).
6
GB / IE
Page 7
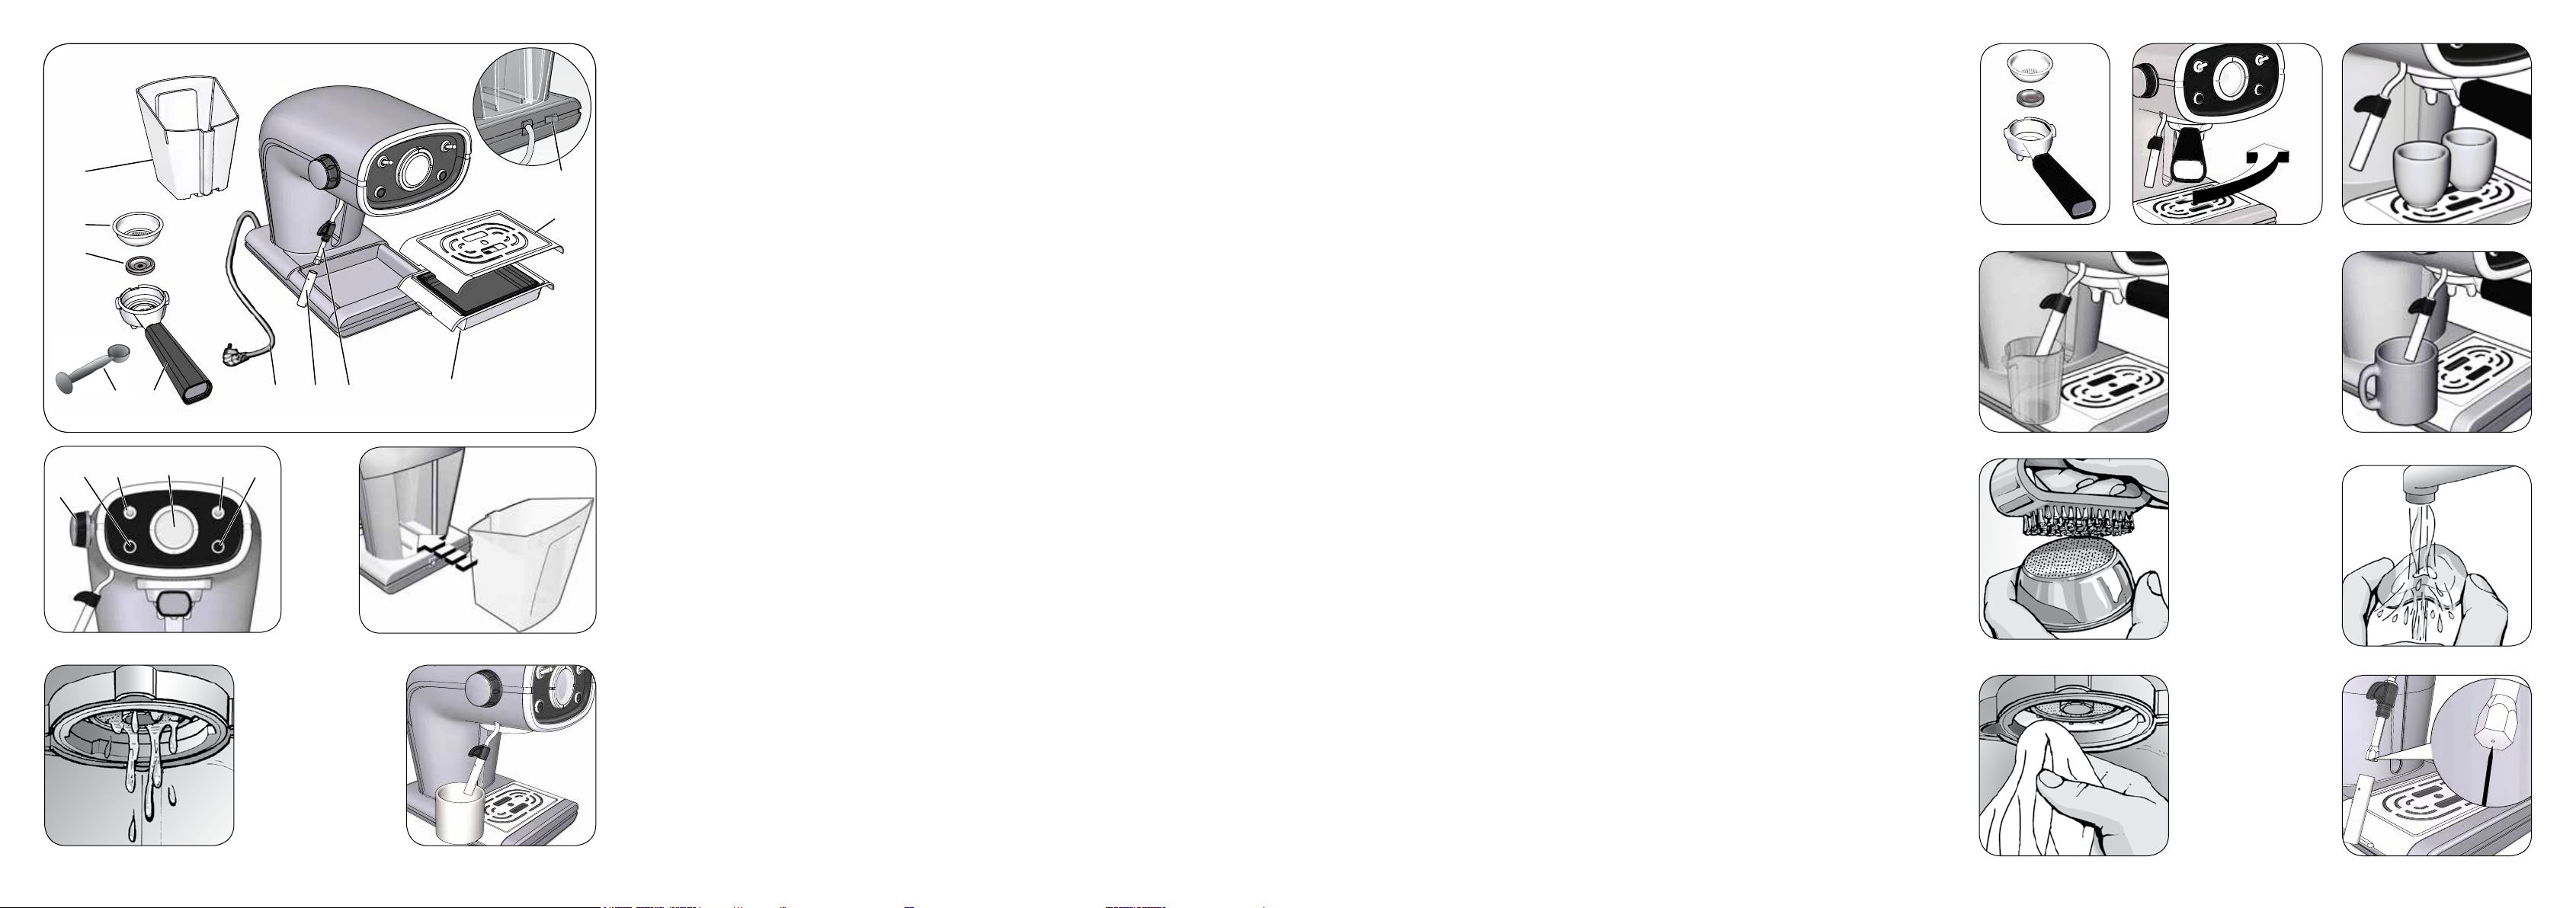
DESCRIPTION OF THE APPLIANCE
IT
GB / IE
Filter holder for ground coffee
A
Coffee measure/presser
B
Perforated silicone disc (Thermocream®)
C
Filter for ground coffee
D
Removable water tank
E
Power cord + Plug
F
Cappuccino maker
G
Steam tube
G1
Drip tray
H
Removable cup grille
I
ON/OFF switch
J
Steam dispensing knob
K
Boiler temperature indicator lamp
L
Steam function switch
M
Boiler temperature thermometer (C°
N
and F°)
Coffee brewing switch
O
“ON” indicator light
P
INTENDED USE
• You can use your appliance to prepare coffee and cappuccino; and
thanks to the possibility of dispensing hot water, you can also prepare
tea and tisanes. This appliance is designed only and solely for private
use, and is therefore to be considered unsuitable for industrial or professional purposes.
• No other use of the machine is contemplated by the manufacturer,
which is exempt from any liability for all types of damages caused by
improper use of the machine. Improper use also results in any form of
warranty being forfeited.
PRELIMINARY PHASES FOR USE
Using the appliance for the first time
Check that the voltage of the domestic network is the same as that indicated on the technical
information plate of the appliance. Place the appliance on a stable surface. When using it
the first time, wash the tank and fill it with cool tap water – (1 liter MAX) – and then carefully
fit it firmly into its seat (Fig. 3).
Check that the tank is properly inserted; otherwise, the machine may not dispense
coffee.
Insert the plug into the socket, which must be earthed.
Starting the first time
After having filled the tank with cool tap water, start the machine. Press the on/off switch (J)
(Fig. 1) for a few seconds. The indicator light (P) will turn on to indicate that the machine is on.
If you are starting the machine for the first time or after a period of time during
which it has not been used, it is recommended that at least one cup of water be
allowed to pass through the boiler’s hydraulic circuit.
7GB / IE
Page 8
GB / IE
Place a container with a capacity of at least half a litre under the coffee spout and cappuccino
maker (Fig. 5). Put the coffee brewing switch (O) on the coffee position ( ). Wait that water
comes out from the coupling seat of the filter holder. Open the steam dispensing knob (K) and
make water come out of the cappuccino maker.
Stop dispensing by putting the coffee brewing switch (O) in the high position. Close the steam
knob. Wait for the boiler temperature indicator lamp (L) to turn on. At this point the coffee
maker is ready to brew coffee.
HOW TO MAKE COFFEE
Put the perforated silicone disc (C) and the filter for ground coffee (D) into the filter holder (A)
in the order indicated (Fig. 6). Measure out the coffee in the filter and lightly press with the
specially provided presser: completely fill two measures for two cups of coffee, and fill only
one for one cup. Insert the filter holder into its seat.
Tighten well by turning it from left to right while making sure you have hooked it
properly onto the flange (Fig. 7).
Warning!
If too much ground coffee is put inside the filter, turning the filter holder may
prove difficult and/or you may get leaks from the filter holder when the coffee is being dispensed.
The filter ring should be preheated for a few minutes to ensure a nice, hot cup of coffee. This
will not be necessary for the cups of coffee that follow.
Wait for the
(O) to coffee brewing ( ): the coffee will start coming out of the spouts of the filter holder. To
stop the flow move the coffee brewing switch (O) to the high position. The minimum serving of
coffee is 50 ml.
When warming up, your appliance may release small puffs of steam from the filter
holder; this is perfectly normal.
The boiler temperature indicator lamp (L) will go on and off at regular intervals indicating that
the boiler’s thermostat is keeping the water at the right temperature. When using the coffee
maker for the first time and thereafter, it is best to begin brewing coffee only when the boiler
temperature indicator lamp (L) is on.
boiler temperature indicator lamp
Warning!
Like professional coffee makers, do not remove the filter ring when the coffee
brewing switch is turned on (in coffee brewing position ).
Warning!
Wait about ten seconds after the coffee has been dispensed before removing
the filter holder. To remove it, turn it slowly from right to left so as to prevent
splashes or spurts of water or coffee.
(L) to turn on. Position the coffee brewing switch
Auto-off function
If the machine is turned on but not in use, the auto-off function operates after 30 minutes. This
function puts the machine in standby. The ON indicator light (P) is off. To restart the machine
press again the on/off switch (J).
8
GB / IE
Page 9
IT
GB / IE
Filling the water tank during use
No special operation is necessary when the water in the tank runs out as the machine is
equipped with a special self-priming device. Just unplug the machine, pull out the tank and
fill it with fresh cool water again.
HOW TO MAKE CAPPUCCINO
To make cappuccino, hot chocolate or heat any beverage, move the steam function switch
(M) to the steam position ( ) and wait until the boiler temperature indicator lamp (L) goes
on, which indicates that the heating unit has reached the right temperature to produce steam.
When warming up, your appliance may release small puffs of steam from the filter
holder; this is perfectly normal.
Turn the steam dispensing knob (K), having the foresight to position a cup underneath the
cappuccino maker (G): at first a little water will come out, immediately followed by a strong
jet of steam.
Close the steam dispensing knob (K) to stop the jet of steam and put the pot of milk to be
whipped under the cappuccino maker (Fig. 10). Plunge the wand all the way into the pot of
milk and again open the steam dispensing knob (K) until you get the result you want. During
these operations you may notice that the boiler temperature indicator lamp (L) goes on and
off from time to time, indicating that the boiler thermostat is keeping the water required for
the steam supply at the right temperature.
It is opportune you start dispensing the steam only when the lamp is on. Dispense
the steam for a few seconds after every use in order to free the hole of any milk
residue.
Close the steam dispensing knob (K). After the cappuccino is prepared, move the steam function switch (M) to the high position to cut out the steam function.
MAKING FURTHER CUPS OF COFFEE
To prepare a cup of coffee right after making cappuccino, it is necessary to bring the boiler
back to the coffee preparation temperature by performing these operations: put the steam
function switch (M) in the high position to cool down the boiler, wait for the boiler temperature
indicator lamp (L) to turn off and then turn on again. To cool the heating unit more quickly,
proceed as follows: after having placed a container underneath the cappuccino maker (G),
put the coffee brewing switch (O) in position (
will cause water to flow out, until the boiler temperature indicator lamp (L) turns back off.
Now close the steam dispensing knob (K) and put the coffee brewing switch (O) in the high
position. Wait until the boiler temperature indicator lamp (L) turns back on. The coffee maker
is now ready to brew coffee again.
); turn the steam dispensing knob (K): this
USEFUL TIPS FOR OBTAINING A GOOD ITALIAN ESPRESSO
The ground coffee in the filter holder has to be pressed lightly. Whether the coffee is stronger
or weaker depends on the degree the coffee is ground, the quantity put into the filter holder
and the pressing. Just a few seconds are needed for the coffee to flow down into the cups. If
the dispensing time is longer, this means that the coffee is ground too fine or that the coffee
put into the filter holder has been pressed too much.
9GB / IE
Page 10
GB / IE
CLEANING THE APPLIANCE
Warning!
All cleaning operations described below must be performed with the machine
off and with the electric plug disconnected from the socket-outlet.
Warning!
Regular maintenance and cleaning preserve and keep the machine efficient
for a longer amount of time. Never wash machine components in the dish
washer. Do not use direct jets of water.
Warning!
All operations must be performed when the machine is cold.
Cleaning the filter containing the grounds
Check that the holes are not clogged and if so, clean them with a small brush (Fig. 11).
Dispense boiling water from the filter holder with the filter inside, without coffee grounds, after
placing a glass underneath the dispenser in order to dissolve or remove any coffee residue
or impurities.
Warning!
Slowly remove and disconnect the filter holder because any remaining pres-
sure could cause splashes or squirts.
It is advisable to thoroughly clean the filter about every 3 months using detergent tabs, which
can be found at retail stores and the Authorised Service Centres, following the instructions
inside the package. As an alternative, you can use a simple dishwasher detergent tab (without
added rinse aid or other chemical additives) as follows:
• Put a dishwasher detergent tab into the filter (without coffee) when the machine is hot (after
heating for at least five minutes).
• Couple the filter holder to the machine and put a container underneath the filter holder.
• Put the coffee brewing switch (O) in the coffee position (
dispense water for 15-20 seconds.
• Stop the water supply and let the tab act for at least 15 minutes while keeping the filter
holder coupled on the machine.
• Repeat the water dispensing operation by operating the pump for about 15-20 seconds,
and then letting it rest for another 15-20 seconds, until two tanks of water are used up.
• Remove the filter holder from the machine, remove the filter and rinse it well under running
tap water.
• Turn off the machine, disconnect the power cable from the socket-outlet and clean the
coupling seat of the filter holder with a sponge in order to remove any detergent residue
from the shower disc.
• Turn the machine back on, couple the filter holder once again and dispense at least 2 cups
of water again to complete the rinsing.
If the coffee machine is used daily, it is advisable to carry out the cleaning operation at least
every three months.
) to start dispensing water, then
-
Cleaning the silicone disc
Wash the silicone disc (C) under running water, bending it slightly on the sides in order to
10
GB / IE
Page 11
IT
GB / IE
free the centre hole of any residue of coffee grounds that could clog it (Fig. 12).
Cleaning the filter holder seat
With time, coffee residue may accumulate on the filter holder seat. It can be removed with a
toothpick, a sponge (Fig. 13), or by letting water run through without fitting the filter holder
(Fig. 4).
Cleaning the cappuccino maker
Warning!
Perform this operation when the chrome-plated pipe is cold so as to prevent
burns.
Unscrew the cappuccino maker (G) from the steam tube (G1) (Fig. 14) and wash it with
running water. The steam tube (G1) can be cleaned with a non-abrasive cloth. If necessary,
clean the small steam outlet hole again with a pin (Fig. 14). Screw the cappuccino maker
back on as far as it will go. After use, always let the steam nozzle run for a few seconds so
to free the outlet from any possible residue.
Cleaning the tank
Periodically clean the inside of the tank with a sponge or damp cloth.
Cleaning the grill and the drip tray
Remember to empty the drip tray from time to time (H).
Remove the grill (I) and wash it under running water; remove the drip tray (H) from the
machine, empty it and wash it under running water.
Cleaning the machine body
Warning!
Clean the fixed parts of the machine using only a damp, non-abrasive cloth
so as to not damage the body.
DECALCIFICATION
Good maintenance and regular cleaning preserve and keep the machine efficient for a longer
amount of time, considerably limiting the risks of lime deposits forming inside the appliance.
However, should your coffee machine fail to work properly as a result of the frequent use of
hard, high calcium content water, you may perform a decalcification procedure to restore
its operational efficiency. Should you need to decalcify your appliance, please follow the
instructions which come with the decalcifying product.
PUTTING OUT OF SERVICE
If you want to put the machine out of service, you must disconnect it electrically, empty the
water tank and drip tray and clean it (see the paragraph on “Cleaning the appliance”).
In the case of scrapping, you must separate the various materials used in making the machine
and dispose of them based on their composition and on the legal provisions in force in the
country of use.
11GB / IE
Page 12
GB / IE
DISPOSAL
Packaging
The product is packaged using recyclable materials, which must be disposed of in the proper
containers.
Electronic equipment
Do not dispose of electronic equipment in normal household waste.
Compliant with EU directive 2012/19/EC, at the end of its useful life, the appliance
must be disposed of in a suitable manner. This will make it possible to re-use recyclable
material, limiting the impact on the environment.
Dispose of the appliance at a collection centre for electrical waste or a recycling centre.
For more information, please contact your local disposal company or local authority.
TECHNICAL DATA
Mains Power: 220-240 V ~ 50/60 Hz
Power: 850 Watt
12
GB / IE
Page 13
IT
GB / IE
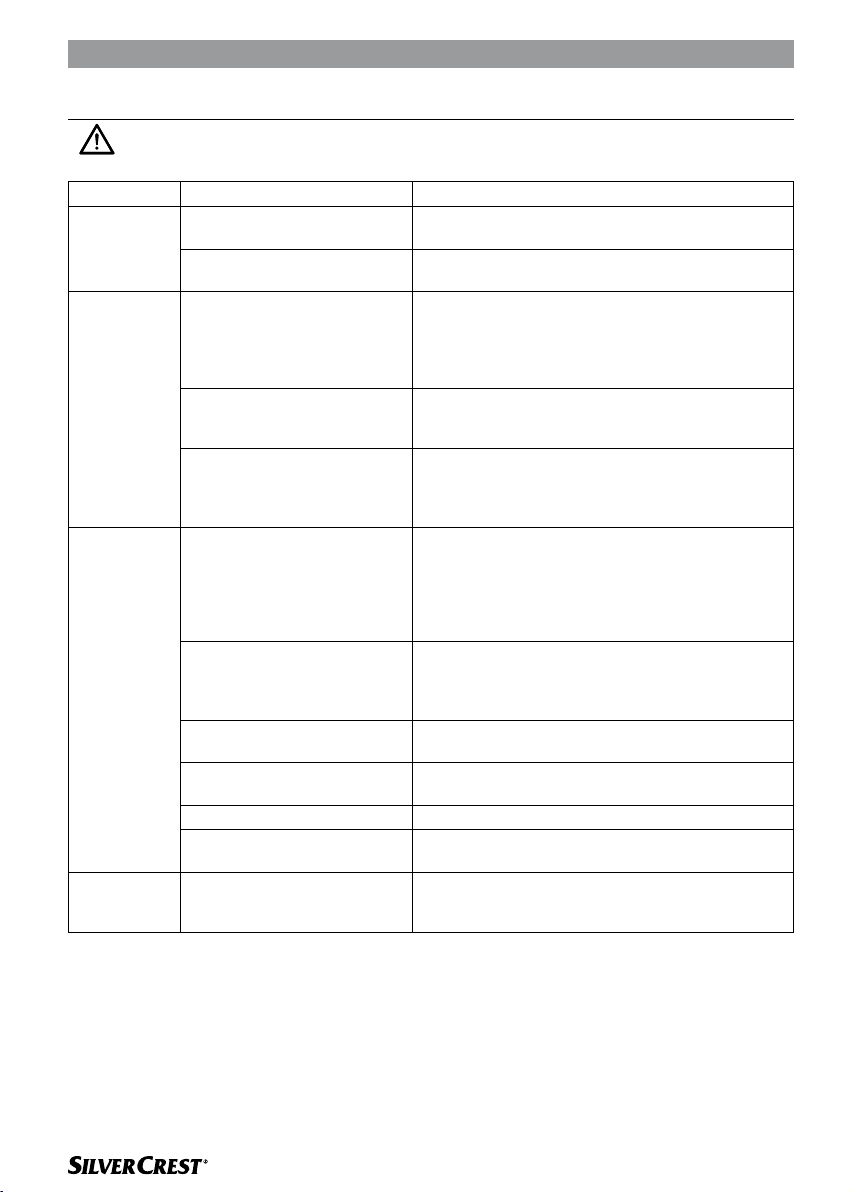
TROUBLESHOOTING
If there are problems with operation, immediately turn off the machine and
unplug it from the socket-outlet.
PROBLEMS CAUSES SOLUTIONS
The coffee
maker does
not supply
steam.
Coffee over
flowing from
the edges of
the filter ring.
The coffee is
not supplied
or flows too
slowly.
The coffee is
too watery
and cold.
There is little water and the
pump does not suck it up.
The steam exit hole on the dis
penser wand is clogged.
-
Probably an excess amount of
ground coffee has been placed
in the filter ring preventing the
filter ring from being correctly
tightened into its housing.
Residues of ground coffee have
remained on the gasket of the
filter holder coupling seat.
The exit holes of the filter
containing coffee grounds are
clogged.
The holes of the perforated disc
in the filter holder coupling seat
are clogged.
The exit holes of the filter
containing coffee grounds are
clogged.
The coffee blend is ground too
fine.
The coffee blend is pressed
down too much.
The tanks is not inserted well. Fit the tank securely by pushing it as far as it will go.
There is little water and the
pump does not suck it up.
The blend has been ground too
coarsely.
Check that the water level in the tank is correct. If
necessary, fill it with cool tap water.
-
Unclog any deposits that may have formed in the
hole of the steam tube with a pin (Fig. 14).
Slowly remove and disconnect the filter holder
because any remaining pressure could cause splashes or squirts. Clean the coupling seat with a sponge
(Fig. 13). Repeat the operation placing the correct
quantity of coffee in the filter.
Clean the seal with a toothpick or a sponge (Fig.
13).
Slowly remove and disconnect the filter holder
because any remaining pressure could cause splash
es or squirts. Clean the clogged filter holes with a
small brush or a pin.
Turn on the machine without the filter holder, making
the water run. Turn on the machine without the filter
holder, making the water run. If the water still does
not come out from all the holes evenly, carry out the
descaling cleaning operation, following the instruc
tions provided in the package.
Slowly remove and disconnect the filter holder
because any remaining pressure could cause splash
es or squirts. Clean the clogged filter holes with a
small brush or a pin.
Try using coarser coffee blends.
amper coffee inside the filter using less pressure.
Check that the water level in the tank is correct. If
necessary, fill it with cool tap water.
A more finely ground blend must be used to obtain a
more concentrated and hotter coffee.
-
-
-
13GB / IE
Page 14

GB / IE
WARRANTY
Dear Customer,
This appliance is provided with a 3-year warranty (statutory warranty) from the date of purchase.
In case of a faulty product, the purchaser is covered by statutory consumer rights, which are not
limited by the following warranty.
Warranty conditions
The warranty period commences at the date of purchase. Keep the original receipt as proof of
purchase.
In case of defects in material or workmanship found within three years (statutory warranty) from the
date of purchase of the product, we will, at our discretion, repair or replace the appliance free of
charge. This intervention, under warranty requires that within the period of three years (statutory
warranty), that the faulty appliance and proof of purchase (receipt) be presented together with a
short description of the fault, including the date on which the problem was found.
In the event that the fault is covered by warranty, the appliance will be repaired or replaced. The
repair or replacement of the product does not imply the start of a new warranty period.
Warranty period and legal right to complaint due to fault
The warranty period is not extended by the legal warranty. The above also refers to parts that are
replaced or repaired. Report damage or any faults found at the time of purchase immediately after
unpacking. Repairs requested after the warranty period has expired will be charged.
Warranty application
This product has been made with care and according to strict quality standards; it is also scrupulously inspected before delivery.
The warranty applies to defects in material and workmanship. The warranty does not extend to
parts of the product that are subject to normal wear and tear and which, as a result, can be considered wear parts; it also does not cover fragile parts such as switches, breakers and accumulators
in glass, or damage caused during transport.
This warranty will become null and void in the event that the product is damaged or not used or
subjected to maintenance as appropriate. For suitable product use, abide by the guidelines in the
instructions for use. Avoid all use or operations that are advised against in the instructions for use
or which are the subject of warnings.
This product is destined exclusively for private use and not for business purposes. The warranty
will become null and void in the event of abuse, improper use, use of force or interventions carried
out by persons other than our authorised assistance services.
Warranty procedures
To allow rapid processing of the problem, please proceed as follows:
• Any request must be accompanied by a receipt and by the code no. (IAN 106103) as proof
of purchase
• The code number is shown on the rating plate or front of the instructions for use (bottom left).
• In case of operating errors or other faults, contact the following assistance service by tele-
phone or email.
• If the product is found to be faulty, it can be sent, carriage paid, to the address provided by
the assistance centre, attaching proof of purchase (receipt), a description of the fault and the
date on which the problem was found.
• Package the faulty appliance with care before sending it to the assistance service.
14
GB / IE
Page 15

Warranty card
IT
GB / IE
Company and seller‘s headquarters:
LIDL
Service address:
GB
Jaleno Europe Limited
Roe Head House
Far Common Road
Mirfield
West Yorkshire
WF14 0DQ
England
IE
Kenilworth Electrical
Electrolux Complex
Longmile road
Dublin 12
Phone hotline:
01924 481053 (GB)
014508703 / 014508705 (IE)
E-mail:
-
Name of manufacturer/importer:
De‘Longhi Appliances S.r.l.
Via L. Seitz, 47
31100 Treviso - Italy
Tel. +39-0422-4131
Fax +39-0422-413736
Product name:
Espresso Machine IAN 106103
Product/manufacturer ID no.:
SEMR 850 A1
Buyer’s name:
..............................................................
Postal Code/City:
..............................................................
Street:
..............................................................
Phone/E-mail:
..............................................................
Signature:
..............................................................
Fault description:
..............................................................
..............................................................
..............................................................
..............................................................
..............................................................
..............................................................
15GB / IE
Page 16
GR / CY
ΠΕΡΙΕΧΟΜΕΝΑ
ΣΥΜΒΟΛΙΣΜΌ 16
ΣΗΜΑΝΤΙΚΈΣ ΠΡΟΕΙΔΟΠΟΙΉΣΕΙΣ 17
ΠΕΡΙΓΡΑΦΉ ΤΗΣ ΣΥΣΚΕΥΉΣ 20
ΠΡΟΒΛΕΠΌΜΕΝΗ ΧΡΉΣΗ 20
ΠΡΟΚΑΤΑΡΚΤΙΚΈΣ ΕΡΓΑΣΊΕΣ ΓΙΑ ΤΗ ΧΡΉΣΗ 21
ΠΩΣ ΝΑ ΦΤΙΆΞΕΤΕ ΚΑΦΈ 21
ΠΏΣ ΝΑ ΦΤΙΑΞΕΤΕ ΚΑΠΟΥΤΣΙΝΟ 22
ΕΠΑΝΑΧΡΗΣΙΜΟΠΟΊΗΣΗ ΓΙΑ ΚΑΦΈ 23
ΣΥΜΒΟΥΛΈΣ ΓΙΑ ΝΑ ΕΠΙΤΎΧΕΤΕ ΈΝΑΝ ΚΑΛΌ ΙΤΑΛΙΚΌ ΚΑΦΈ 23
ΚΑΘΑΡΙΣΜΌΣ ΣΥΣΚΕΥΉΣ 23
ΑΦΑΊΡΕΣΗ ΑΛΆΤΩΝ 25
ΑΧΡΉΣΤΕΥΣΗ ΣΥΣΚΕΥΉΣ 25
ΔΙΑΘΕΣΗ 25
ΤΕΧΝΙΚΑ ΧΑΡΑΚΤΗΡΙΣΤΙΚΑ 25
ΟΔΗΓΟΣ ΓΙΑ ΤΗΝ ΕΠΙΛΥΣΗ ΜΕΡΙΚΩΝ ΠΡΟΒΛΗΜΑΤΩΝ 26
ΕΓΓΥΗΣΗ 27
ΣΥΜΒΟΛΙΣΜΌ
Οι πληροφορίες που περιέχονται σε αυτό το εγχειρίδιο είναι χαρακτηρισμένα ως εξής:
Κίνδυνος για τα μικρά παιδιά
Κίνδυνος ηλεκτροπληξίας
Κίνδυνος ζημιάς από διάφορες άλλες αιτίες
Προειδοποίηση: Προειδοποίηση για εγκαύματα
Προσοχή – υλικές ζημιές
16
GR / CY
Page 17

IT
GR / CY
ΣΗΜΑΝΤΙΚΈΣ ΠΡΟΕΙΔΟΠΟΙΉΣΕΙΣ
ΔΙΑΒΑΣΤΕ ΤΙΣ ΠΑΡΟΥΣΕΣ ΟΔΗΓΙΕΣ ΠΡΙΝ ΤΗ ΧΡΗΣΗ.
Φυλάξτε τις οδηγίες αυτές.
Στην περίπτωση μεταβίβασης της συσκευής σε άλλους, παραδώστε και το
παρόν εγχειρίδιο.
• Η συσκευή προορίζεται αποκλειστικά για οικιακή χρήση και δεν
πρέπει να χρησιμοποιείται για εμπορικούς ή βιομηχανικούς σκοπούς.
• Δεν αναλαμβάνουμε καμία ευθύνη για λανθασμένη χρήση της
συσκευής, ή για κάποια άλλη χρήση που δεν αναφέρεται στο
παρόν.
• Συνιστούμε να φυλάσσετε τα υλικά συσκευασίας του εργοστασίου,
δεδομένου ότι δεν προβλέπεται δωρεάν τεχνική υποστήριξη για
τις ζημιές που προκλήθηκαν από ακατάλληλη συσκευασία του
προϊόντος κατά την αποστολή από ένα εξουσιοδοτημένο Κέντρο
Τεχνικής Υποστήριξης (Σέρβις).
Κίνδυνος για τα μικρά παιδιά
• Η χρήση της συσκευής επιτρέπεται σε παιδιά πάνω από 8 ετών,
μονάχα αν επιτηρούνται από έναν ενήλικα, ή αν έχουν εκπαιδευτεί
και έχουν κατανοήσει τις οδηγίες και τους κινδύνους που παρουσιάζονται κατά την χρήση της συσκευής.
• Οι εργασίες καθαρισμού και συντήρησης της συσκευής που είναι
αρμοδιότητα του χρήστη, δεν επιτρέπονται σε παιδιά κάτω των 8
ετών χωρίς την επίβλεψη ενός ενήλικα. Μην επιτρέπετε στα παιδιά
να παίζουν με τη συσκευή.
• Τα υλικά συσκευασίας δεν πρέπει να εγκαταλείπονται στη διάθεση
μικρών παιδιών, δεδομένου ότι αποτελούν πηγή κινδύνου.
• Αν αποφασίσετε να πετάξετε τη συσκευή, πρέπει να την αχρηστεύσετε κόβοντας το καλώδιο τροφοδοσίας. Συνιστάται επίσης να
καταστήσετε ακίνδυνα τα μέρη της συσκευής που μπορεί να αποτελέσουν πηγή κινδύνου, ιδιαίτερα για μικρά παιδιά που μπορεί να
παίξουν με τη συσκευή.
17GR / CY
Page 18

GR / CY
Κίνδυνος ηλεκτροπληξίας
• Η χρήση της συσκευής επιτρέπεται σε άτομα με ειδικές ανάγκες,
ή άτομα με ελλιπείς γνώσεις και ανεπαρκή πείρα, μονάχα αν επιτηρούνται από έναν υπεύθυνο, ή αν έχουν εκπαιδευτεί και έχουν
κατανοήσει τις οδηγίες και τους κινδύνους που παρουσιάζονται
κατά την χρήση της συσκευής.
• Πριν συνδέσετε τη συσκευή στο ηλεκτρικό δίκτυο, βεβαιωθείτε πως
η τάση που αναφέρεται στην πινακίδα κάτω από τη συσκευή, αντιστοιχεί με την τάση του δικτύου της περιοχής σας.
• Η χρήση ηλεκτρικών μπαλαντέζων μη εξουδιοτημένων από το
εργοστάσιο μπορεί να προκαλέσει ζημιές ή ατυχήματα.
• Αν είναι χαλασμένο το καλώδιο ηλεκτροδότησης, πρέπει να αντικατασταθεί από τον κατασκευαστικό οίκο ή από ένα εξουσιοδοτημένο
Κέντρο Τεχνικής Υποστήριξης (Σέρβις) ή από κάποιο άτομο που
έχει την απαιτούμενη τεχνική κατάρτιση, ώστε να αποφύγετε κάθε
κίνδυνο.
• Μην βρέχετε ποτέ τα μέρη της συσκευής που έχουν ηλεκτρική
τάση: γιατί μπορεί να γίνει βραχυκύκλωμα!
• Να βγάζετε το φις από την πρίζα πριν από οποιαδήποτε επέμβαση
καθαρισμού ή συντήρησης.
• Μην βυθίζετε τη συσκευή σε νερό ή άλλα υγρά.
• Να σβήνετε πάντα τη συσκευή και να βγάζετε το φις από την πρίζα,
πριν γεμίσετε το δοχείο με νερό.
Κίνδυνος ζημιάς από διάφορες άλλες αιτίες
• Μην ανασηκώνετε τη συσκευή, πιάνοντάς την από το δοχείο νερού
ή το λεκανάκι. Πιάστε την από το σώμα της.
• Επιλέξτε ένα χώρο με επαρκή φωτισμό και αερισμό και με μια
πρίζα εύκολα προσπελάσιμη.
• Αποφύγετε να βάλετε στο δοχείο υπερβολική ποσότητα νερού.
• Μην αφήνετε τη συσκευή στην πρίζα, όταν απομακρύνεστε από το
χώρο που βρίσκεται.
• Πρέπει να χρησιμοποιείτε και να ακουμπάτε τη συσκευή σε μια
18
GR / CY
Page 19

IT
GR / CY
σταθερή επιφάνεια.
• Δεν πρέπει να χρησιμοποιείτε τη συσκευή αν έπεσε κάτω, αν
υπάρχουν εμφανείς ζημιές ή να παρουσιάζει διαρροή νερού. Μην
χρησιμοποιείτε τη συσκευή αν παρουσιάζει κάποια ανωμαλία, ή
υπάρχει ζημιά ή φθορά στο ηλεκτρικό καλώδιο ή το φις του. Όλες
οι επισκευές, ακόμα και η αντικατάσταση του ηλεκτρικού καλωδίου,
πρέπει να εκτελούνται σε ένα Εξουσιοδοτημένο Κέντρο Τεχνικής
Υποστήριξης (Σέρβις), ή οπωσδήποτε από έναν ηλεκτρολόγο,
ώστε να αποφύγετε οποιονδήποτε κίνδυνο.
Προειδοποίηση: Προειδοποίηση για εγκαύματα
• Μην κατευθύνετε ποτέ το ζεστό νερό ή τον ατμό πάνω σας; Να
πιάνετε και να μετακινείτε προσεκτικά το σωληνάκι ατμού/ζεστού
νερού: κίνδυνος εγκαυμάτων
• Όταν λειτουργεί η μηχανή, μην αγγίζετε τα εξωτερικά μεταλλικά τμήματά της και την υποδοχή φίλτρου, γιατί μπορεί να πάθετε έγκαυμα.
• Αν δεν εκρέει νερό από την υποδοχή του φίλτρου, μπορεί να έχει
φράξει το φίλτρο. Διακόψτε την παροχή και περιμένετε για δέκα
δευτερόλεπτα. Στη συνέχεια, αφαιρέστε αργά την υποδοχή φίλτρου
από τη συσκευή, ώστε να μην δημιουργηθούν πιτσιλίσματα ή εκτόξευση ζεστού νερού λόγω της εναπομένουσας πίεσης. Στη συνέχεια
καθαρίστε την, σύμφωνα με τις οδηγίες της σχετικής παραγράφου.
Προσοχή – υλικές ζημιές
• Τοποθετήστε τη συσκευή σε ένα σταθερό επίπεδο, όπου δεν υπάρχει κίνδυνος να αναποδογυρίσει.
• Μην χρησιμοποιείτε τη συσκευή χωρίς νερό, γιατί θα καεί η αντλία.
• Μην γεμίζετε ποτέ το δοχείο του νερού με ζεστό ή καυτό νερό.
• Μην τοποθετείτε τη συσκευή πάνώ σε ζεστές επιφάνειες ή κοντά σε
γυμνές φλόγες για να μην γίνει ζημιά στο περίβλημά της.
• Το καλώδιο ηλεκτροδότησης δεν πρέπει να ακουμπάει σε ζεστές
επιφάνειες.
• Μην χρησιμοποιείτε αεριούχο νερό (που περιέχει διοξείδιο του
άνθρακα).
19GR / CY
Page 20

GR / CY
• Μην βάζετε στο φίλτρο καμία άλλη ουσία, εκτός από καφέ σε
σκόνη. Μπορεί να γίνει σοβαρή ζημιά στην συσκευή.
• Μην αφήνετε τη συσκευή σε θερμοκρασία περιβάλλοντος χαμηλότερη από 0 °C, δεδομένου ότι μπορεί να παγώσει το νερό στο
λέβητα και να επακολουθήσει ζημιά.
• Μην χρησιμοποιείτε τη συσκευή σε υπαίθριο χώρο.
• Μην αφήνετε τη συσκευή εκτεθειμένη στους ατμοσφαιρικούς παράγοντες (βροχή, ήλιο, κλπ...).
• Αφού βγάλετε το φις από την πρίζα και αφού κρυώσουν τα ζεστά
εξαρτήματα, η συσκευή πρέπει να καθαριστεί αποκλειστικά με ένα
μαλακό πανί, μόλις βουτηγμένο στο νερό με λίγες σταγόνες ουδέτερου απορρυπαντικού κουζίνας (μην χρησιμοποιείτε ποτέ διαλύτες
που μπορεί να κάνουν ζημιά στα πλαστικά).
ΠΕΡΙΓΡΑΦΉ ΤΗΣ ΣΥΣΚΕΥΉΣ
Υποδοχή φίλτρου για αλεσμένο καφέ
A
Μεζούρα/πιεστηράκι καφέ
B
Διάτρητο πιατάκι από σιλικόνη
C
(Thermocream®)
Φίλτρο καφέ σε σκόνη
D
Αφαιρούμενο δοχείο νερού
E
Καλώδιο ηλεκτροδότησης + φις
F
Εξάρτημα να καπουτσινο
G
Κάνουλα εκροής νερού / ατμού
G1
Συρτάρι συλλογής σταγόνων
H
ΠΡΟΒΛΕΠΌΜΕΝΗ ΧΡΉΣΗ
Αφαιρούμενη σχάρα για φλιτζάνια
I
Κουμπί που ανάβει τη συσκευή
J
Χειριστήριο χορήγησης ατμού
K
Ενδεικτικό λαμπάκι θερμοκρασίας λέβητα
L
Διακόπτης λειτουργίας ατμού
M
Θερμόμετρο θερμοκρασίας λέβητα (°C
N
και °F)
Διακόπτης παροχής καφέ
O
Ενδεικτικό λαμπάκι λειτουργίας
P
• Μπορείτε να χρησιμοποιήσετε τη μηχανή καφέ για να φτιάξετε καφέ
ή καπουτσίνο; Επιπλέον, χάρις στη δυνατότητα παροχής ζεστού
νερού, μπορείτε να φτιάξετε τσάι ή άλλα αφεψήματα. Η συσκευή
αυτή είναι σχεδιασμένη αποκλειστικά για οικιακή χρήση και κατά
συνέπεια θεωρείται ακατάλληλη οποιαδήποτε χρήση για βιομηχανικούς ή επαγγελματικούς σκοπούς.
• Οποιαδήποτε άλλη χρήση δεν προβλέπεται από τον κατασκευαστικό οίκο, που συνεπώς απαλλάσσεται από οποιαδήποτε ευθύνη
για ζημιές κάθε φύσης, που οφείλονται στην ακατάλληλη χρήση της
20
GR / CY
Page 21

IT
GR / CY
μηχανής. Η ακατάλληλη χρήση έχει σαν συνέπεια την ακύρωση
οποιασδήποτε μορφής εγγύησης.
ΠΡΟΚΑΤΑΡΚΤΙΚΈΣ ΕΡΓΑΣΊΕΣ ΓΙΑ ΤΗ ΧΡΉΣΗ
Θέση σε λειτουργία
Βεβαιωθείτε πως η τάση του ηλεκτρικού δικτύου, αντιστοιχεί με την τάση που αναγράφεται στην
πινακίδα της συσκευής. Τοποθετήστε τη συσκευή σε μια επίπεδη επιφάνεια. Κατά την πρώτη χρήση,
πλύνετε το δοχείο και γεμίστε το με δροσερό νερό (1 λίτρα MAX), προσέχοντας να το ξαναβάλετε
σωστά στην έδρα του (Fig. 3).
Βεβαιωθείτε πως είναι σωστά τοποθετημένο το δοχείο, διαφορετικά η μηχανή
μπορεί να μην φτιάχνει καφέ.
Βάλτε το φις στην ηλεκτρική πρίζα που πρέπει να είναι γειωμένη.
Πρώτο άναμμα
Αφού γεμίσετε το δοχείο με νωπό φυσικό νερό, ανάψτε τη συσκευή. Πατήστε το πλήκτρο λειτουργίας
(J) (Fig. 1). Θα ανάψει το ενδεικτικό λαμπάκι (P), που σημαίνει πως η μηχανή είναι αναμμένη.
Αν πρόκειται για την πρώτη φορά που ανάβετε τη συσκευή, ή μετά από μακροχρό
νια αδράνεια, συνιστούμε να αφήσετε να τρέξει τουλάχιστον ένα φλιτζάνι νερό για
να καθαρίσει το υδραυλικό κύκλωμα του λέβητα.
Τοποθετήστε ένα δοχείο ελάχιστης χωρητικότητας μισού λίτρου, κάτω από το εξάρτημα παροχής καφέ
και το εξάρτημα να καπουτσινο (Fig. 5). Μετακινήστε τον διακόπτη (O) στην θέση καφέ ( ). Περιμένετε
την εκροή νερού από την έδρα της βάσης της υποδοχής φίλτρου. Ανοίξτε τον διακόπτη παροχής ατμού
(K) και αφήστε να τρέξει νερό από το εξάρτημα να καπουτσινο.
Σταματήστε την παροχή ανεβάζοντας τον διακόπτη (O). Κλείστε τον διακόπτη παροχής ατμού. Περιμένετε
να ανάψει το ενδεικτικό λαμπάκι (L). Τώρα η συσκευή είναι έτοιμη να φτιάξει έναν καφέ.
-
ΠΩΣ ΝΑ ΦΤΙΆΞΕΤΕ ΚΑΦΈ
Τοποθετήστε την υποδοχή φίλτρου (A), τον διάτρητο δίσκο από σιλικόνη (C) και το φίλτρο καφέ σε
σκόνη (D) με την υποδεικνυόμενη σειρά (Fig. 6). Βάλτε τον καφέ στο φίλτρο και πατήστε ελαφρά με
το ειδικό πιεστηράκι: για δύο καφέδες, γεμίστε πλήρως δύο μεζούρες, ενώ για έναν καφέ, γεμίστε μια
μεζούρα. Ασφαλίστε την υποδοχή φίλτρου στην έδρα της. Συσφίξτε την καλά, περιστρέφοντάς την από
τα αριστερά προς τα δεξιά και βεβαιωθείτε πως έχετε ασφαλίσει καλά τη φλάντζα (Fig. 7).
Προσοχή!
Αν βάλετε στο φίλτρο υπερβολική ποσότητα καφέ, μπορεί να καταστεί δυσχερής η περιστροφή της υποδοχής φίλτρου ή/και κατά την παροχή του
καφέ μπορεί να παρουσιαστούν διαρροές από την υποδοχή.
Συνιστούμε να αφήσετε την υποδοχή φίλτρου να ζεσταθεί στην έδρα της για μερικά λεπτά πριν φτιάξε
τε καφέ, ώστε να είναι αρκετά ζεστός και ο πρώτος καφές. Η διαδικασία αυτή δεν χρειάζεται για τους
επόμενους καφέδες.
Περιμένετε να ανάψει το ενδεικτικό λαμπάκι (L). Γυρίστε το διακόπτη (O) στη θέση παροχής καφέ
( ): ο καφές θα αρχίσει να εκρέει από τα ράμφη της υποδοχής φίλτρου. Σταματήστε την παροχή
ανεβάζοντας τον διακόπτη (O). Η μέγιστη δόση για έναν καφέ είναι 50 ml.
21GR / CY
-
Page 22

GR / CY
Προσοχή!
Όπως και στις επαγγελματικές μηχανές καφέ, δεν πρέπει να αφαιρείτε την
υποδοχή του φίλτρου, όσο είναι ενεργοποιημένος ο διακόπτης (στη θέση
Προσοχή!
Όταν τελειώσει η παροχή του καφέ, περιμένετε δέκα δευτερόλεπτα περίπου
πριν αφαιρέσετε την υποδοχή φίλτρου. Στη συνέχεια αφαιρέστε την υποδοχή φίλτρου, γυρίζοντάς την αργά από δεξιά προς τα αριστερά, ώστε να
αποφύγετε πιτσιλίσματα και εκτοξεύσεις νερού ή καφέ.
αν κατά την αναμονή του ατμού παρουσιαστούν μικρές διαφυγές ατμού από την
υποδοχή του φίλτρου, πρόκειται για ένα απόλυτα φυσιολογικό φαινόμενο.
Το ενδεικτικό λαμπάκι (L) θα αναβοσβήνει περιοδικά, δείχνοντας την επέμβαση του θερμοστάτη του
λέβητα, που χρησιμεύει για τη διατήρηση της βέλτιστης θερμοκρασίας του νερού.
Για τον πρώτο καφέ, αλλά και για τους επόμενους, συνιστάται η ενεργοποίηση της παροχής, μονάχα
όταν ανάψει το ενδεικτικό λαμπάκι (L).
Λειτουργία αυτόματου σβησίματος
Αν είναι αναμμένη η μηχανή, αλλά δεν την χρησιμοποιείτε, μετά από 30 λεπτά επεμβαίνει η λειτουργία
αυτόματου σβησίματος. Αυτή η λειτουργία θέτει τη μηχανή σε αναμονή. Είναι σβηστό το ενδεικτικό
λαμπάκι (P). Για να ανάψετε τη μηχανή πατήστε ξανά το κουμπί (J).
Γέμισμα δοχείου νερού κατά τη χρήση
Όταν τελειώσει το νερό στο δοχείο, δεν χρειάζεται καμία ιδιαίτερη εργασία, δεδομένου ότι η συσκευή
διαθέτει μια ειδική βαλβίδα αυτο - ενεργοποίησης. Στη συνέχεια, αρκεί να βγάλετε το φις από την
πρίζα, να αφαιρέσετε το δοχείο και να το ξαναγεμίσετε με νωπό φυσικό νερό.
).
ΠΏΣ ΝΑ ΦΤΙΑΞΕΤΕ ΚΑΠΟΥΤΣΙΝΟ
Για να φτιάξετε έναν καπουτσίνο, μία ζεστή σοκολάτα, ή για να ζεστάνετε κάποιο άλλο ρόφημα, μετατοπίστε το διακόπτη (M) στη θέση ατμού ( ) και περιμένετε να ανάψει το ενδεικτικό λαμπάκι (M), που
θα δείξει πως ο λέβητας έχει τη σωστή θερμοκρασία για την παροχή ατμού.
αν κατά την αναμονή του ατμού παρουσιαστούν μικρές διαφυγές ατμού από την
υποδοχή του φίλτρου, πρόκειται για ένα απόλυτα φυσιολογικό φαινόμενο.
Περιστρέψτε τον διακόπτη παροχής ατμού (K), φροντίζοντας να τοποθετήσετε ένα ποτήρι κάτω από
το εξάρτημα να καπουτσινο (G): στην αρχή θα τρέξει λίγο νερό και θα ακολουθήσει μια δυνατή εκτό
ξευση ατμού.
Κλείστε τον διακόπτη παροχής ατμού (K) για να διακόψετε την εκροή του ατμού και τοποθετήστε το
μπρίκι με το γάλα που θέλετε να κτυπήσετε κάτω από το εξάρτημα να καπουτσινο (Fig. 10). Βυθίστε
το σωληνάκι στο μπρίκι του γάλακτος και ανοίξτε πάλι τον διακόπτη παροχής ατμού (K) μέχρι να
επιτύχετε το επιθυμητό αποτέλεσμα. Κατά τη διάρκεια αυτής της διαδικασίας το ενδεικτικό λαμπάκι
(L) θα αναβοσβήνει περιοδικά, δείχνοντας πως ο λέβητας έχει τη σωστή θερμοκρασία για την παροχή
του ατμού.
Συνιστάται η ενεργοποίηση παροχής του ατμού μονάχα όταν είναι αναμμένο το
ενδεικτικό λαμπάκι. Μετά από κάθε χρήση, αφήστε τον ατμό να τρέξει για μερικά
δευτερόλεπτα, ώστε να καθαρίσει η κάνουλα από τα τυχόν κατάλοιπα γάλακτος.
Κλείστε τον διακόπτη παροχής ατμού (K). Όταν γίνει το καπουτσίνο, ανεβάστε τον διακόπτη (M) για
να αποκλείσετε τη λειτουργία ατμού.
22
GR / CY
-
Page 23

IT
GR / CY
ΕΠΑΝΑΧΡΗΣΙΜΟΠΟΊΗΣΗ ΓΙΑ ΚΑΦΈ
Για να φτιάξετε έναν καφέ, αμέσως μετά από έναν καπουτσίνο, πρέπει να αποκαταστήσετε τη θερμοκρασία του λέβητα για καφέ, εκτελώντας τις παρακάτω εργασίες: Ανεβάστε τον διακόπτη (M) για
να κρυώσει ο λέβητας και περιμένετε μέχρι να σβήσει και να ξανανάψει το ενδεικτικό λαμπάκι (L). Αν
θέλετε να κρυώσει γρηγορότερα ο λέβητας, μπορείτε να εκτελέσετε την εξής διαδικασία: Αφού βάλετε
ένα δοχείο κάτω από το σωληνάκι (G), μετατοπίστε τον διακόπτη (O) στην θέση (
τον διακόπτη παροχής ατμού (K): θα προκληθεί εκροή νερού, μέχρι να σβήσει το ενδεικτικό λαμπάκι
(L). Στη συνέχεια κλείστε το κουμπί παροχής ατμού (K) και ανεβάστε τον διακόπτη (O). Περιμένετε να
ανάψει το ενδεικτικό λαμπάκι (L). Η συσκευή θα είναι έτοιμη για να φτιάξει τον καφέ.
); περιστρέψτε
ΣΥΜΒΟΥΛΈΣ ΓΙΑ ΝΑ ΕΠΙΤΎΧΕΤΕ ΈΝΑΝ ΚΑΛΌ ΙΤΑΛΙΚΌ ΚΑΦΈ
Ο αλεσμένος καφές μέσα στην υποδοχή φίλτρου, πρέπει να πιέζεται ελαφρά. Ο καφές θα είναι πιο
δυνατός ή πιο ελαφρύς, ανάλογα με το βαθμό άλεσης του καφέ και την ποσότητά του στην υποδοχή
του φίλτρου. Λίγα δευτερόλεπτα είναι αρκετά για να γεμίσει το φλιτζανάκι με καφέ. Αν η παροχή γίνεται
πιο αργά, σημαίνει πως είναι εξαιρετικά ψιλοκομμένος ή συμπιεσμένος ο καφές.
ΚΑΘΑΡΙΣΜΌΣ ΣΥΣΚΕΥΉΣ
Προσοχή!
Όλες οι εργασίες καθαρισμού που περιγράφονται παρακάτω πρέπει να εκτελούνται με σβηστή μηχανή και έχοντας βάλει το φις από την πρίζα.
Προσοχή!
Η τακτική καθαριότητα και συντήρηση διατηρούν σε καλή κατάσταση τη
μηχανή για μεγαλύτερο χρονικό διάστημα. Μην πλένετε ποτέ τα εξαρτήματα
της μηχανής στο πλυντήριο πιάτων. Μη χρησιμοποιείτε απευθείας εκτόξευση νερού.
Προσοχή!
Οποιαδήποτε επέμβαση πρέπει να εκτελείται όταν η μηχανή είναι κρύα.
Καθαρισμός φίλτρου αλεσμένου καφέ
Βεβαιωθείτε πως οι οπές δεν είναι φραγμένες και καθαρίστε τις με ένα βουρτσάκι, αν χρειάζεται (Fig.
11). Για να διαλυθούν ή να απομακρυνθούν τα τυχόν κατάλοιπα καφέ και οι ακαθαρσίες, αφήστε να
τρέξει καυτό νερό από την υποδοχή φίλτρου, έχοντας τοποθετήσει το φίλτρο χωρίς καφέ και αφού
βάλετε κάτω από τα ράμφη ένα ποτήρι.
Προσοχή!
Αφαιρέστε αργά την υποδοχή φίλτρου γιατί η ενδεχόμενη υπολειμματική
πίεση μπορεί να προκαλέσει πιτσιλίσματα.
Συνιστούμε να καθαρίζετε προσεκτικά το φίλτρο κάθε 3 μήνες, χρησιμοποιώντας τις ταμπλέτες καθα
ρισμού, που μπορείτε να προμηθευτείτε στα καταστήματα και στα Εξουσιοδοτημένα Κέντρα Τεχνικής
Υποστήριξης (Σέρβις), ακολουθώντας τις οδηγίες που περιέχονται στη συσκευασία:
• Βάλτε στο φίλτρο (χωρίς καφέ) μια ταμπλέτα απορρυπαντικού για πλυντήρια πιάτων, όταν η μηχα
νή είναι καλά ζεστή (δηλαδή μετά από τουλάχιστον 5λεπτη θέρμανση).
• Τοποθετήστε την υποδοχή φίλτρου στη μηχανή και βάλτε από κάτω ένα δοχείο.
• Μετατοπίστε τον διακόπτη (O) στην θέση καφέ (
15-20 δευτερόλεπτα.
) για να αρχίσει να τρέχει το νερό και περιμένετε
-
-
23GR / CY
Page 24

GR / CY
• Διακόψτε τη ροή νερού και αφήστε την ταμπλέτα απορρυπαντικού να ενεργήσει για τουλάχιστον 15 λεπτά, αφήνοντας την υποδοχή φίλτρου τοποθετημένη στη συσκευή.
• Επαναλάβετε την διαδικασία εκροής νερού, αφήνοντας την αντλία να λειτουργήσει για 15-20 δευτερόλεπτα και ύστερα να σταματήσει για 15-20 δευτερόλεπτα, μέχρι να τελειώσει το νερό στα δύο δοχεία.
• Αφαιρέστε την υποδοχή φίλτρου από τη συσκευή, βγάλτε το φίλτρο και ξεπλύντε το καλά με το νερό
της βρύσης.
• Σβήστε τη συσκευή, αποσυνδέστε το καλώδιο τροφοδοσίας από την πρίζα ρεύματος και καθαρίστε
με ένα σφουγγαράκι την έδρα που προσαρμόζεται η υποδοχή του φίλτρου για να απομακρύνετε
απορρυπαντικού από τις οπές εκροής του νερού.
• Ανάψτε τη συσκευή, βάλτε την υποδοχή φίλτρου και αφήστε να τρέξει νερό για τουλάχιστον 2 φλι
τζάνια, ώστε να ολοκληρωθεί το ξέβγαλμα.
Αν χρησιμοποιείτε καθημερινά τη μηχανή καφέ, συνιστούμε να κάνετε την παραπάνω διαδικασία
καθαρισμού τουλάχιστον κάθε τρεις μήνες.
Καθαρισμός στο πιατάκι από σιλικόνη
Πλύντε το πιατάκι σιλικόνης (C) σε τρεχούμενο νερό της βρύσης, λυγίζοντάς το ελαφρά στα
πλευρά για να ελευθερώσετε την κεντρική οπή από τυχόν κατάλοιπα σκόνης καφέ που μπορεί
να τη φράζουν (Fig. 12).
Καθαρισμός έδρας υποδοχής φίλτρου
Με τη χρήση μπορεί να συσσωρευτούν κατακάθια καφέ στην έδρα τοποθέτησης της υποδοχής του φίλτρου, τα οποία μπορείτε να αφαιρέσετε με μια οδοντογλυφίδα (Fig. 13), με ένα
σφουγγαράκι ή αφήνοντας το νερό να τρέξει χωρίς την υποδοχή του φίλτρου (Fig. 4).
Καθαρισμός εξαρτήματος να καπουτσινο
Προσοχή!
Εκτελέστε την εργασία αυτή όταν είναι κρύο το μεταλλικό σωληνάκι, για να
αποφύγετε τα εγκαύματα.
Ξεβιδώστε το εξάρτημα
14). Το σωληνάκι (G1) μπορεί να καθαριστεί με ένα μαλακό πανί. Αν χρειάζεται καθαρίστε με μια
βελόνα την οπή εξόδου του ατμού (Fig. 14). Ξαναβιδώστε τέρμα το εξάρτημα. Μετά από κάθε χρήση
αφήστε να βγει ατμός για λίγα δευτερόλεπτα, ώστε να καθαρίσει η οπή από τυχόν κατάλοιπα.
να καπουτσινο
(G) από το σωληνάκι (G1) και πλύνετέ το στη βρύση (Fig.
-
Καθαρισμός του δοχείου
Συνιστάται να καθαρίζετε περιοδικά το εσωτερικό του δοχείου με ένα σφουγγάρι ή ένα υγρό
πανί.
Καθαρισμός σχάρας και συρταριού συλλογής σταγόνων
Υπενθυμίζουμε να αδειάζετε κάθε τόσο το συρτάρι συλλογής σταγόνων (H).
Αφαιρέστε τη σχάρα (I) και πλύντε την κάτω από τη βρύση; Τραβήξτε έξω από τη συσκευή το συρτάρι
συλλογής σταγόνων (H), αδειάστε το και πλύντε το κάτω από τη βρύση.
Καθαρισμός σώματος μηχανής
Προσοχή!
Καθαρίστε τα σταθερά μέρη της μηχανής, χρησιμοποιώντας ένα απαλό υγρό
πανί, για να μην κάνετε ζημιά.
24
GR / CY
Page 25

IT
GR / CY
ΑΦΑΊΡΕΣΗ ΑΛΆΤΩΝ
Η τακτική συντήρηση και καθαριότητα διατηρούν τη μηχανή σε καλή κατάσταση για μεγαλύτερο χρονικό διάστημα, μειώνοντας σημαντικά τον κίνδυνο σχηματισμού αλάτων στη συσκευή. Αν όμως με την
πάροδο του χρόνου η λειτουργία της συσκευής παρουσιάσει κάποιες ανωμαλίες, εξαιτίας της χρήσης
ιδιαίτερα σκληρού νερού (με μεγάλη περιεκτικότητα αλάτων), μπορείτε να προβείτε στην αφαίρεσή
τους, ώστε να αποκαταστήσετε την κανονική λειτουργία. Για την διαδικασία αφαίρεσης των αλάτων,
συμβουλευθείτε το έντυπο οδηγιών που θα βρείτε στη συσκευασία του προϊόντος.
ΑΧΡΉΣΤΕΥΣΗ ΣΥΣΚΕΥΉΣ
Σε περίπτωση που δεν πρόκειται να ξαναχρησιμοποιήσετε τη συσκευή, πρέπει να την αποσυνδέσετε
από το ηλεκτρικό δίκτυο, να αδειάσετε το δοχείο νερού και το λεκανάκι συλλογής σταγόνων και να
την καθαρίσετε (βλέπε παράγραφο “Καθαρισμός συσκευής”). Σε περίπτωση διάλυσης, πρέπει να
ξεχωρίσετε τα διάφορα υλικά της μηχανής και να τα διαθέσετε σύμφωνα με τις κείμενες διατάξεις της
χώρας σας.
ΔΙΑΘΕΣΗ
Συσκευασία
Η συσκευασία του προϊόντος αποτελείται από ανακυκλώσιμα υλικά. Μεριμνήστε για τη σωστή διάθεση
στους ειδικούς κάδους.
Ηλεκτρονικές συσκευές
Μην πετάτε τις ηλεκτρονικές συσκευές μαζί με τα κοινά οικιακά απόβλητα.
Η διάθεση της συσκευής στο τέλος της διάρκειας ζωής της πρέπει να γίνεται με κατάλληλο
τρόπο, σύμφωνα με την οδηγία CE 2012/19/EΚ. Με αυτόν τον τρόπο γίνεται δυνατή η επα-
ναχρησιμοποίηση του περιεχομένου στη συσκευή ανακυκλώσιμου υλικού, περιορίζοντας τις
επιπτώσεις στο περιβάλλον. Παραδώστε τη χρησιμοποιημένη συσκευή σε ένα κέντρο περισυλλογής
ηλεκτρικών αποβλήτων ή ένα κέντρο ανακύκλωσης. Για περισσότερες διευκρινήσεις απευθυνθείτε
στην τοπική εταιρία ανακύκλωσης ή στη Δημοτική σας Αρχή.
ΤΕΧΝΙΚΑ ΧΑΡΑΚΤΗΡΙΣΤΙΚΑ
Τροφοδοσία: 220-240 V ~ 50/60 Hz
Ισχύς: 850 Watt
25GR / CY
Page 26

GR / CY
ΟΔΗΓΟΣ ΓΙΑ ΤΗΝ ΕΠΙΛΥΣΗ ΜΕΡΙΚΩΝ ΠΡΟΒΛΗΜΑΤΩΝ
Σε περίπτωση λειτουργικών ανωμαλιών, σβήστε αμέσως τη μηχανή και
βγάλτε το φις από την πρίζα.
ΠΡΟΒΛΗΜΑΤΑ ΑΙΤΙΕΣ ΔΙΟΡΘΩΤΙΚΕΣ ΕΠΕΜΒΑΣΕΙΣ
Η μηχανή δεν
βγάζει ατμό.
Εκροή καφέ
από τα άκρα
της υποδοχής
φίλτρου.
Δεν βγαίνει
καφές ή βγαίνει
πολύ αργά.
Ο καφές
είναι πολύ
κρύος ή πολύ
“νερουλός”.
Το νερό είναι λίγο και η
αντλία δεν τραβάει.
Φραγμένη οπή εξόδου
ατμού στην κάνουλα.
Πιθανόν να υπάρχει
υπερβολική ποσότητα καφέ
που εμποδίζει τη σωστή
σύσφιξη της υποδοχής
φίλτρου στη θέση της.
Κατάλοιπα αλεσμένου καφέ
στη φλάντζα της έδρας
εφαρμογής της υποδοχής
του φίλτρου.
Το φίλτρο που περιέχει
αλεσμένο καφέ, έχει
φραγμένες τις οπές εξόδου.
Φραγμένες οπές στο
διάτρητο πιατάκι που
υπάρχει στην έδρα
εφαρμογής της υποδοχής
του φίλτρου.
Το φίλτρο που περιέχει
αλεσμένο καφέ, έχει
φραγμένες τις οπές εξόδου.
Πολύ λεπτό χαρμάνι
αλεσμένου καφέ.
Πολύ πιεσμένο χαρμάνι
καφέ.
Το δοχείο δεν είναι καλά
τοποθετημένο.
Το νερό είναι λίγο και η
αντλία δεν τραβάει.
Χοντραλεσμένος καφές. Για να επιτύχετε πυκνότερο και πιο ζεστό καφέ,
Βεβαιωθείτε πως η στάθμη του νερού στο δοχείο είναι
κανονική, διαφορετικά γεμίστε το με νωπό φυσικό
νερό.
Καθαρίστε με μια βελόνα τα τυχόν κατάλοιπα που
φράζουν την οπή της κάνουλας (Fig. 14).
Αφαιρέστε αργά την υποδοχή φίλτρου γιατί η
ενδεχόμενη υπολειμματική πίεση μπορεί να
προκαλέσει πιτσιλίσματα. Καθαρίστε την έδρα
στήριξης με ένα σφουγγαράκι (Fig. 13). Επαναλάβετε
την διαδικασία, βάζοντας στην υποδοχή του φίλτρου
τη σωστή ποσότητα καφέ.
Καθαρίστε τη φλάντζα με μια οδοντογλυφίδα ή ένα
σφουγγαράκι (Fig. 13).
Αφαιρέστε αργά την υποδοχή φίλτρου γιατί η
ενδεχόμενη υπολειμματική πίεση μπορεί να
προκαλέσει πιτσιλίσματα. Καθαρίστε με ένα βουρτσάκι
ή μια βελόνα τις φραγμένες οπές του φίλτρου.
Θέστε σε λειτουργία τη μηχανή χωρίς υποδοχή
φίλτρου, αφήνοντας να τρέξει το νερό. Αν το νερό
συνεχίσει να μην εκρέει ομοιόμορφα από όλες τις
οπές, καθαρίστε τα άλατα με: συμβουλευθείτε το
έντυπο οδηγιών που θα βρείτε στη συσκευασία του
προϊόντος.
Αφαιρέστε αργά την υποδοχή φίλτρου γιατί η
ενδεχόμενη υπολειμματική πίεση μπορεί να
προκαλέσει πιτσιλίσματα. Καθαρίστε με ένα βουρτσάκι
ή μια βελόνα τις φραγμένες οπές του φίλτρου.
Δοκιμάστε να χρησιμοποιήσετε χαρμάνια καφέ
χοντρότερους κόκκους.
Πιέστε λιγότερο τον καφέ με το πιεστηράκι.
IΩθήστε το τέρμα στην έδρα του.
Βεβαιωθείτε πως η στάθμη του νερού στο δοχείο είναι
κανονική, διαφορετικά γεμίστε το με νωπό φυσικό
νερό.
πρέπει να χρησιμοποιήσετε ένα πιο ψιλοκομμένο
χαρμάνι.
26
GR / CY
Page 27

IT
GR / CY
ΕΓΓΥΗΣΗ
Αγαπητέ Πελάτη,
Η παρούσα συσκευή είναι εγγυημένη για 3 χρόνια (νομική εγγύηση) από την ημερομηνία απόκτησης.
Στην περίπτωση ενός ελαττωματικού προϊόντος, ο αγοραστής είναι καλυμμένος από τα δικαιώματα
του καταναλωτή, που δεν περιορίζονται από τους ακόλουθους όρους εγγύησης.
Όροι εγγύησης
Η περίοδος της εγγύησης αρχίζει από την ημερομηνία αγοράς. Φυλάξτε την πρωτότυπη απόδειξη
ως απόδειξη αγοράς. Στην περίπτωση ελαττωμάτων των υλικών ή την κατασκευή που διαπιστωθούν
εντός τριών ετών (νομική εγγύηση) από την ημερομηνία αγοράς του προϊόντος, μεριμνήστε, ανάλογα
με τη διακριτική μας ευχέρεια, να επισκευάσετε ή να αντικαταστήσετε τη συσκευή δωρεάν. Αυτή η
χρήση της εγγύησης απαιτεί, μέσα στο διάστημα των τριών ετών (νομική εγγύηση), η ελαττωματική
συσκευή και η απόδειξη αγοράς (απόκομμα απόδειξης) να παρουσιαστούν μαζί με μια σύντομη
περιγραφή της βλάβης, συμπεριλαμβανομένης της ημερομηνίας στην οποία διεπιστώθη το πρόβλη
μα. Στην περίπτωση που η βλάβη καλύπτεται από την εγγύηση, η συσκευή θα επισκευαστεί ή θα
αντικατασταθεί. Η επισκευή ή η αντικατάσταση του προϊόντος δεν συνεπάγεται την απαρχή μιάς νέας
περιόδου εγγύησης.
Περίοδος εγγύησης και έννομο δικαίωμα απαίτησης λόγω βλάβης
Η περίοδος εγγύησης δεν επεκτείνεται από τη νομική εγγύηση. Τα ανωτέρω αναφέρονται και για
τα μέρη που αντικατεστάθησαν ή επισκευάσθησαν. Ανακοινώστε αμέσως βλάβες ή ανωμαλίες που
διαπιστώσατε τη στιγμή της αγοράς αμέσως μετά το άνοιγμα της συσκευασίας. Οι επισκευές που
ζητηθούν μετά την περίοδο λήξης εγγύησης, θα βαρύνουν τον καταναλωτή.
Εφαρμογή της εγγύησης
Το παρόν προϊόν έχει κατασκευαστεί επιμελώς και σύμφωνα με όλα τα πρότυπα ποιότητας καιέχει
ελεγχθεί σχολαστικά πριν την παράδοση. Η εγγύηση εφαρμόζεται στα ελαττώματα των υλικών και
την κατασκευή. Η εγγύηση δεν επεκτείνεται στα μέρη του προϊόντος που υπόκεινται σε φυσιολογική
φθορά και δεν καλύπτει τα εύθραυστα μέρη όπως διακόπτες, ή υάλινα μέρη, ή ζημιέςπου προκληθούν
κατά τη μεταφορά. Η παρούσα εγγύηση εκπίπτει στην περίπτωση που στοπροϊόν προκληθεί ζημιά,
χρησιμοποιηθεί ακατάλληλα ή έχει υποβληθεί σε λανθασμένη συντήρηση. Για τη σωστή χρήση του
προϊόντος, τηρήστε τις ενδείξεις που εμπεριέχονται στις οδηγίεςχρήσης. Αποφύγετε οποιαδήποτε
χρήση ή λειτουργίες που δεν συνιστώνται στις οδηγίες χρήσηςή που είναι αντικείμενο προειδοποιήσε
ων. Το παρόν προϊόν προορίζεται αποκλειστικά για ιδιωτική χρήση και όχι για εμπορικούς σκοπούς.
Η εγγύηση εκπίπτει στην περίπτωση κατάχρησης,ακατάλληλης χρήσης, χρήση υπέρμετρης δύναμης,
ή για επισκευές που πραγματοποιήθησαναπό πρόσωπα διαφορετικά από τα εξουσιοδοτημένα τεχνικά
κέντρα μας.
Διαδικασίες εγγύησης
Για να καταστεί δυνατή η ταχεία επίλυση του προβλήματος, προχωρήστε ως ακολούθως:
• Κάθε αίτηση πρέπει να συνοδεύεται από μια απόδειξη και τον κωδικό του προϊόντος (IAN 106103)
ως απόδειξη αγοράς.
• Ο κωδικός αριθμός είναι τυπωμένος στην ετικέτα τεχνικών χαρακτηριστικών ή στο εξώφυλλο του
φυλλαδίου οδηγιών ( κάτω αριστερά ) .
• Στην περίπτωση προβλημάτων λειτουργίας ή άλλων ανωμαλιών, επικοινωνήστε τηλεφωνικά ή
μέσω e-mail την τεχνική υπηρεσία που αναγράφεται στην επόμενη σελίδα.
• Αν το προϊόν ανευρέθη ελαττωματικό, μπορεί να αποσταλεί με προπληρωμένο ναύλο, στη διεύ
θυνση της τεχνικής υπηρεσίας, συνάπτοντας την απόδειξη αγοράς (απόκομμα απόδειξης), μια
περιγραφή της βλάβης και την ημερομηνία στην οποία διεπιστώθη το πρόβλημα.
• Συσκευάστε προσεκτικά την ελαττωματική συσκευή πριν την αποστείλετε στην τεχνική υπηρεσία.
-
-
-
27GR / CY
Page 28

GR / CY
Κάρτα εγγύησης
Εταιρία και έδρα του πωλητή:
LIDL
Διεύθυνση Τεχνικής Υπηρεσίας:
GR
SVS Co.
Street : 5 Siniosoglou & 8 Filikis Etaireias
City: Nea Ionia, Attica
Zip Code: 14234
CY
Emilio Eliades Trading Ltd
21, Akademias Avenue
Kema Bldg
Nicosia 2107
Fax: +357 22 336 808
Τηλέφωνο hotline:
+30 2102725250 (GR)
+357 22 550 400 (CY)
E-mail:
svs@otenet.gr
Όνομα του κατασκευαστή /
εισαγωγέα:
De‘Longhi Appliances S.r.l.
Via L. Seitz, 47
31100 Treviso - Italy
Fon +39-0422-4131
Fax +39-0422-413736
Όνομα του προϊόντος:
Μηχανή καφέ εσπρέσο IAN 106103
Αριθμός ID του προϊόντος /
κατασκευαστή:
SEMR 850 A1
Όνομα του αγοραστή:
....................................................................
Τ.Κ. / Πόλη:
....................................................................
Οδός:
....................................................................
Τηλέφωνο/E-mail:
....................................................................
Υπογραφή:
....................................................................
Περιγραφή της βλάβης:
....................................................................
................................ ...................................
....................................................................
....................................................................
....................................................................
....................................................................
28
GR / CY
Page 29

IT
INHALTVERZEICHNIS
SYMBOLE 29
WICHTIGE SICHERHEITSHINWEISE 30
TEILEBEZEICHNUNG UND LIEFERUMFANG 33
BESTIMMUNGSGEMÄSSE VERWENDUNG 33
BENUTZUNGANLEITUNG 33
ZUBEREITUNG EINES ESPRESSOS 34
MILCHSCHAUM-ZUBEREITUNG 35
WIEDEREINSTELLEN AUF KAFFEEZUBEREITUNG 35
WIE SIE EINEN GUTEN ITALIENISCHEN ESPRESSO ZUBEREITEN 36
REINIGUNG DES FILTERS 36
ENTKALKUNG 38
AUSSBETRIEBNAHME 38
ENTSORGUNG 38
TECHNISCHE DATEN 38
WAS TUN, WENN ES PROBLEME GIBT 39
GARANTIE 40
DE
SYMBOLE
Die in diesem Handbuch enthaltenen Informationen sind wie folgt gekennzeichnet:
GEFAHR für Kinder
GEFAHR wegen Strom
Auf andere Ursachen rückführbare Gefahr
Hinweise zu Verbrühungsgefahr
ACHTUNG - Sachschäden
29DE
Page 30

DE
WICHTIGE SICHERHEITSHINWEISE
BITTE LESEN SIE DIESE BEDIENUNGSANLEITUNG, BEVOR SIE
DAS GERÄT VERWENDEN.
BEWAHREN SIE DIESE ANLEITUNG AUF.
• Das Gerät ist nur für den Hausgebrauch vorgesehen und darf nicht für
gewerbliche oder industrielle Zwecke verwendet werden.
• Wir übernehmen keine Haftung bei einem falschen oder in dieser
Anleitung nicht vorgesehenen Einsatz.
• Wir empfehlen die Originalverpackungen aufzubewahren, da ein
Gratis-Kundendienst nicht für Schäden vorgesehen ist, die durch falsche Verpackung bei der Spedition zum Kundendienst entstehen.
GEFAHR für Kinder
• Das Gerät darf von Kindern ab dem 8. Lebensjahr nur unter der
Aufsicht einer verantwortlichen Person verwendet werden oder wenn
sie Anweisungen über die sichere Bedienung des Geräts erhalten
haben und die während der Bedienung vorhandenen Gefahren verstanden haben.
• Die Kindern ab dem 8. Jahr dürfen Reinigungs- und Wartungseingriffe
nur unter Aufsicht von Erwachsenen ausüben. Kinder dürfen nicht mit
dem Gerät spielen.
• Die Verpackungsteile von Kindern fernhalten, da diese eine mögliche
Gefahrenquelle bilden.
• Soll das Gerät als Abfall entsorgt werden, empfehlen wir es durch
Abschneiden des Netzkabels unbrauchbar zu machen. Wir empfehlen außerdem die Geräteteile unschädlich zu machen, die besonders
für Kinder beim Spielen mit dem Gerät gefährlich sein könnten.
Gefahr wegen Strom
• Dieses Gerät kann von Personen mit reduzierten physischen, sonsorischen oder mentalen Fähigkeiten oder Mangel an Erfahrung und/
oder Wissen benutzt werden, wenn sie beaufsichtigt oder bezüglich
des sicheren Gebrauchs des Gerätes unterwiesen wurden und die
daraus resultierenden Gefahren verstanden haben.
30
DE
Page 31

IT
DE
• Bevor das Gerät an das Stromnetz angeschlossen wird, muss kontrolliert werden, ob die Netzspannung den Angaben auf dem Typenschild
des Geräts entspricht.
• Der Einsatz von nicht vom Hersteller zugelassenen Verlängerungskabeln
kann Schäden und Unfälle verursachen.
• Ist das Netzkabels beschädigt, muss es ausgetauscht werden. Um
jedes Risiko zu vermeiden, bringen Sie in diesem Fall das Gerät zum
Hersteller, zum Kundendienst oder zu einem Fachelektriker.
• Die unter Spannung stehenden Geräteteile dürfen nicht in Kontakt mit
Wasser kommen: es besteht Kurzschlussgefahr!
• Vor Reinigungs- oder Wartungsarbeiten stets den Stecker aus der
Steckdose ziehen.
• Das Gerät nie in Wasser oder andere Flüssigkeiten tauchen.
• Vorm Füllen des Wassertanks das Gerät immer ausschalten und den
Stecker aus der Steckdose ziehen.
Auf andere Ursachen rückführbare Gefahr
• Zum Aufheben des Gerätes, das Gerät nicht am Wassertank oder am
Sammelbehälter, sondern am Körper greifen.
• Zum Aufstellen einen ausreichend beleuchteten und sauberen Platz
mit einer leicht zugänglichen Steckdose wählen.
• Niemals zuviel Wasser in den Wassertank füllen.
• Das Gerät nie unbeaufsichtigt lassen solange es am Stromnetz angeschlossen ist.
• Das Gerät muss auf einer festen Unterlage benutzt und abgestellt werden.
• Das Gerät darf nicht benutzt werden, wenn es runtergefallen ist, wenn
es sichtbare Schäden aufweist oder wenn Wasser austritt. Das Gerät
darf nicht benutzt werden, wenn das Netzkabels, der Stecker oder das
Gerät beschädigt sind. Um jegliches Risiko vorzubeugen, dürfen alle
Reparaturen, einschließlich des Netzkabelswechsels, nur durch das
Service-Center bzw. autorisierte Fachtechniker durchgeführt werden.
31DE
Page 32

DE
Hinweise zu Verbrühungsgefahr
• Den Dampfstrahl oder das heiße Wasser nie auf Körperteile richten;
Vorsicht beim Umgang mit dem Dampfröhrchen/ Heißwasserröhrchen:
Verbrühungsgefahr!
• Die äußeren Metallteile des Gerätes und des Filterhalters dürfen während des Gerätebetriebs nicht angefasst werden, weil sie Verbrennungen
verursachen können.
• Tritt kein Wasser aus dem Filterhalter aus, kann es sein, dass der Filter
verstopft ist. Die Abgabe unterbrechen und etwa zehn Sekunden warten. Anschließend den Filterhalter langsam entfernen, weil ein eventueller Restdruck zu einem Herausspritzen von Wasser führen könnte.
Anschließend wie im entsprechenden Abschnitt angegeben reinigen.
Achtung - Sachschäden
• Das Gerät auf einer festen Unterlage aufstellen, wo es nicht kippen kann.
• Die Maschine nie ohne Wasser verwenden, da sonst die Pumpe
durchbrennen könnte.
• Den Wassertank nie mit heißem oder kochendem Wasser auffüllen.
• Um zu vermeiden, dass das Gehäuse beschädigt wird, das Gerät nie
auf heiße Flächen oder in der Nähe von offenen Flammen aufstellen.
• Das Netzkabels darf nicht mit heißen Flächen der Maschine in Berührung
kommen.
• Kein Sprudelwasser verwenden (mit hinzugefügtem Kohlendioxyd).
• Den Filter darf man ausschließlich mit Pulverkaffee auffüllen. Andernfalls
könnte das Gerät schwer beschädigt werden.
• Nie die Maschine in Räumen mit Temperaturen unter 0 °C aufstellen.
Das Restwasser im Heizsystem könnte gefrieren und Schäden verursa
-
chen.
• Das Gerät darf nicht im Freien benutzt werden.
• Das Gerät nicht im Freien stehen lassen (Regen, Sonne usw...).
• Nachdem der Stecker aus der Steckdose gezogen worden ist und
die heißen Teile abgekühlt sind, kann die Maschine mit einem weichen, nicht kratzenden und leicht feuchtem Tuch gereinigt werden.
32
DE
Page 33

IT
DE
Es können einige Tropfen mildes Spülmittel verwendet werden (nie
Lösungsmittel benutzen, die Plastikteile beschädigen können).
TEILEBEZEICHNUNG UND LIEFERUMFANG
Filterhalter für Kaffeepulver
A
Messlöffel/ Kaffeedrücker
B
Silikon-Lochscheibe Thermocream®
C
Filter für Kaffeepulver
D
Herausnehmbarer Wassertank
E
Netzkabel + Stecker
F
Dampröhrchen
G
Schwenkbare Aufschäumdüse
G1
Auffangschale
H
Abtropfgitter
I
Einschalttaste
J
Dampfregler
K
Temperaturkontrollleuchte
L
Schalter Dampffunktion
M
Heizkessel-Thermometer (°C und °F)
N
Schalter zum Kaffee
O
Kontrollleuchte Betrieb
P
BESTIMMUNGSGEMÄSSE VERWENDUNG
• Das Gerät ist zur Vorbereitung von Kaffee und Cappuccino bestimmt;
außerdem können wegen der Möglichkeit zur Heißwasserabgabe
auch Tee und Aufgüsse zubereitet werden. Das Gerät ist ausschließlich für den privaten Gebrauch vorgesehen.
• Jeder andere Einsatz ist nicht vom Hersteller vorgesehen. Der Hersteller
übernimmt daher keinerlei Haftung für jegliche Art von Schäden, die
durch einen ungeeigneten Einsatz des Gerätes verursacht werden. Bei
einem ungeeigneten Einsatz verfallen alle Garantieansprüche.
BENUTZUNGANLEITUNG
Inbetriebnahme
Überprüfen ob die Netzspannung den Angaben auf dem Typenschild am Gerät entspricht.
Das Gerät auf einer ebenen, stabilen und rutschfesten Fläche stellen. Den Wassertank vor der
erstmaligen Benutzung spülen und mit 1 Liter kaltem, stillem Wasser bis zum MAX-Füllstand
füllen, überfüllen Sie den Wassertank nicht. Anschließend darauf achten, dass er richtig in
seinen Sitz eingesetzt wird (Fig. 3).
Das korrekte Einfügen des Wassertank überprüfen, weil das Gerät sonst keinen
Kaffee abgeben könnte. Verbinden Sie anschließend den Stecker mit einer geerdeten Steckdose.
Erstes Einschalten
Nach dem Auffüllen des Wassertanks mit kaltem stillem Wasser, das Gerät mit dem
Einschlattaste (J) einschalten. Den Einschalttaste (J) (Fig. 1) einige Sekunden lang drücken. Die
Kontrollleuchte (P) leuchtet auf und signalisiert, dass das Gerät eingeschaltet ist.
33DE
Page 34

DE
Bei erstmaliger Inbetriebnahme oder nach längerem Stillstand empfehlen wir Ihnen
mindestens eine Tasse Wasser aus dem Wasserkreislauf austreten zu lassen.
Unter der Aufschäumdüse einen Halben-Liter-Behälter stellen (Fig. 5). Den Schalter zum Kaffee
(O) auf Kaffee-Position ( ) stellen. Warten, bis das Wasser aus der Filterhalter austritt.
Den Dampfregler (K) öffnen und das Wasser aus der Aufschäumdüse ausfließen lassen.
Um die Abgabe zu beenden, den Schalter zum Kaffee (O) wieder nach oben drücken. Den
Dampfregler schließen. Warten bis die Temperaturkontrollleuchte (L) sich einschaltet. Das
Gerät ist jetzt für die Kaffeezubereitung bereit.
ZUBEREITUNG EINES ESPRESSOS
Den Filterhalter (A), die Silikon-Lochscheibe Thermocream® (C) und den Filter für Kaffeepulver
(D) in der angegebenen Reihenfolge einsetzen (Fig. 6). Den Kaffee in den Filter geben, und
leicht mit dem Kaffeepresser festdrücken. Für einen Espresso nehmen Sie einen Dosierlöffel
Kaffee. Für zwei Espresso nehmen Sie zwei Dosierlöffel Kaffee. Um den Filterhalter an dem
Gerät einzuhaken, bringen Sie ihn unter die Austrittsstelle am Heizkessel. Dann drücken Sie
den Filterhalter nach oben und drehen den Filterhalter von links nach rechts drehen, bis er
blockiert (Fig. 7). Der Griff des Filterhalters muß nicht unbedingt zentral zur Maschine stehen.
Es ist vielmehr erforderlich, daß der Filterhalter richtig in seiner Aufnahme eingesetzt ist.
WICHTIG!
Wird zuviel Kaffeepulver in den Filter eingefüllt, kann es sein, dass sich der
Filterhalter nur schwer drehen lässt bzw. bei der Kaffeeabgabe Kaffee aus
dem Filterhalter austritt. Entfernen Sie das eventuell überschüssige Kaffee
pulver.
Der Filterhalter sollte vor der Kaffeezubereitung in seiner Aufnahme einige Minuten fixiert
damit mit aufgewärmt wird, so dass bereits der Espresso richtig heiß ist. Für den anschließenden Kaffee ist das nicht nötig.
Warten bis die Kontrollleuchte (L) sich einschaltet. Den
Position (
die Abgabe zu beenden, den
male Menge für einen Kaffee ist 50 ml.
Es ist normal, dass beim Warten auf den Dampf kleine Dampfstöße aus dem Filter
halter austreten können.
Die Temperaturkontrollleuchte (L) schaltet sich regelmäßig ein und aus, damit wird das Einund Ausschalten des Thermostats angezeigt, der dafür sorgt, dass die Wassertemperatur stets
konstant bleibt.
Für die Zubereitung des ersten und der nachfolgenden Kaffee sollte bei der Kaffeeausgabe
) stellen: der Kaffee fängt an aus den Öffnungen des Filterhalters auszutreten. Um
Schalter zum Kaffee
WICHTIG!
Wie bei professionellen Espressomaschinen darf der Filterhalter nicht abge-
nommen werden, solange der Schalter zum Kaffee (O) (auf Kaffee-Position)
eingeschaltet ist.
WICHTIG!
Vor dem Lösen des Filterhalters, einge Sekunden warten, um ein Heraussprit-
zen von Wasser oder Kaffee zu vermeiden, den Filterhalter zum Entfernen
langsam gegen den Uhrzeigersinn drehen.
Schalter zum Kaffee
(O) wieder nach oben drücken. Die maxi-
(O) auf Kaffee-
-
-
34
DE
Page 35

IT
die Temperaturkontrollleuchte (L) stets eingeschaltet sein.
DE
Funktion für das automatische Ausschalten
Ist das Gerät eingeschaltet, wird aber nicht gebraucht, so aktiviert sich, nach 30 Minuten
von der letzten Kaffeeproduktion oder Dampfbenutzung, die Funktion für automatisches
Ausschalten. Diese Funktion aktiviert den Standby-Zustand für das Gerät. Die Kontrollleuchte
Betrieb (P) ausgeschaltet ist. Um die Maschine wieder einzuschalten, den Einschalttaste wieder drücken (J).
Auffüllen des Wassertanks bei Gebrauch
Wenn das Wasser im Wassertank aufgebraucht worden ist, sind keine besonderen
Aufmerksamkeiten nötig, weil die Kaffeemaschine mit einem speziellen Ventil ausgestattet ist,
das verhindert, dass Luft in den Wasserkreislauf eintreten kann. Einfach den Stecker aus der
Steckdose ziehen, den Wassertank herausnehmen und mit kaltem, stillem Wasser auffüllen.
MILCHSCHAUM-ZUBEREITUNG
Zum Zubereiten von Capuccino oder heißer Schokolade mit Milchschaum oder zum
Aufwärmen jedes anderen Getränkes, den Schalter (M) auf Position Dampf ( ) stellen
und warten bis die Temperaturkontrollleuchte (L) sich einschaltet. Dies zeigt an, dass der
Heizkessel die richtige Temperatur zur Dampfabgabe erreicht hat.
Es ist normal, dass beim Warten auf den Dampf kleine Dampfstöße aus dem Filterhalter austreten können!
Den Dampfregler (K) drehen, dabei jedoch ein Glas unter der Aufschäumdüse (G1) stellen: Zuerst tritt etwas heißes Wasser aus, anschließend erhalten Sie sofort einen starken
Dampfstrahl.
Den Dampfregler (K) schließen, um den Dampfstrahl zu unterbrechen und die Milchkanne mit
der aufzuschäumenden Milch (Fig. 10) unter die Aufschäumdüse stellen. Die Aufschäumdüse
tief in die Milchkanne eintauchen und den Dampfregler (K) bis zur Erreichung des gewünschten Ergebnisses wieder öffnen. Die Temperaturkontrollleuchte (L) schaltet sich regelmäßig ein
und aus. Ein Thermostat hält das Wasser auf optimaler Temperatur für die Dampferzeugung.
Die Dampfabgabe sollte nur bei eingeschalteter Temperaturkontrollleuchte gestartet werden. Nach jedem Gebrauch für einige Sekunden Dampf austreten lassen, so
dass eventuelle Milchreste aus der Aufschäumdüse beseitigt werden.
Den Dampfregler (K) schließen. Nach der Vorbereitung des Cappuccinos, den Schalter (M)
wieder nach oben drücken, um die Dampffunktion auszuschalten.
WIEDEREINSTELLEN AUF KAFFEEZUBEREITUNG
Soll direkt nach der Zubereitung eines Cappuccino ein Kaffee zubereitet werden, muss der
Heizkessel auf Temperatur zur Kaffeezubereitung gebracht werden, wie folgt vorgehen:
Den Schalter (M) nach oben schieben, um den Heizkessel abkühlen zu lassen und warten
bis die Kontrollleuchte (L) sich ausschaltet und wieder einschaltet. Soll das Abkühlen des
Heizkessels beschleunigt werden, kann wie folgt vorgegangen werden:
eines Behälters unter dem Dampfröhrchen (G), den Schalter zum Kaffee (O) in Position ( )
bringen.
sich ausschaltet. Jetzt den Dampfregler (K) schließen und den Schalter zum Kaffee (O) wieder
nach oben drücken. Warten bis die Kontrollleuchte (L) sich einschaltet. Die Kaffeemaschine
Den Dampfregler (K) drehen: Dadurch tritt Wasser aus, bis die Kontrollleuchte (L)
Nach dem Einstellen
35DE
Page 36

DE
ist jetzt wieder für die Kaffeezubereitung bereit.
WIE SIE EINEN GUTEN ITALIENISCHEN ESPRESSO ZUBEREITEN
Für optimale Ergebnisse empfehlen wir, nur ausdrücklich für die Zubereitung in
Espressomaschinen zusammengestellte Mischungen zu verwenden. Das Kaffeepulver im
Filterhalter leicht andrücken. Nach wenigen Sekunden fließt der Kaffee bereits in die Tasse.
Die Geschwindigkeit des Austritts des Kaffees kann geändert werden, indem der Umfang
der Kaffeeportion im Filter leicht variiert und/oder ein Kaffee mit einem anderen Mahlgrad
verwendet wird.
REINIGUNG DES FILTERS
WICHTIG!
Bei allen nachstehend aufgeführten Reinigungs- und Pflegearbeiten muss das
Gerät ausgeschaltet und der Stecker aus der Steckdose gezogen sein.
WICHTIG!
Eine gute Pflege und regelmäßige Reinigung schützen das Gerät und garantieren eine lange Lebensdauer. Die Geräteteile niemals in der Geschirrspülmaschine spülen und nicht in Wasser tauchen. Keinen direkten Wasserstrahl
verwenden.
WICHTIG!
Alle Reinigungsarbeiten müssen bei kaltem Gerät vorgenommen werden.
Reinigung des Filters
Um eventuelle Kaffeereste oder Verunreinigungen aus den Öffnungen des Filters zu lösen,
verwenden sie eventuell eine kleine Bürste (Fig. 11). Sie können auch Wasser durch den
Filterhalter (ohne Kaffee) ausströmen lassen, und somit Verunreinigungen lösen.
WICHTIG!
Den Filterhalter langsam entfernen, weil ein eventueller Restdruck zu einem
Herausspritzen von Wasser führen kann. Verbrennungsgefahr!
Der Filter kann sich mit der Zeit nach mehrmaligem Gebrauch möglicherweise verstopfen.
Um seine Haltbarkeit zu verlängern und ein vollständiges Verstopfen zu vermeiden, wird
empfohlen folgende Anweisungen auszuführen, die zur normalen Gerätewartung gehören:
1) Am Ende des Tages den Heizkessel mit heißem Wasser ausspülen. Folgende Anweisungen
beachten:
• Den Filterhalter am Gerät anhängen, sicherstellen, dass sich kein Kaffeepulver / Kaffeesatz
im Filter befindet, und dass das Gerät richtig heiß ist. Einen Behälter unter dem Filterhalter
aufstellen.
• Den Schalter zum Kaffee (O) in die Position Kaffeeabgabe stellen, um die Wasserabgabe
einzuschalten und für ca. 15 – 20 Sekunden Wasser abzugeben.
• Die Wasserabgabe unterbrechen.
• Den Filterhalter aus dem Gerät entfernen. Indem Sie ihn gegen den Uhrzeigersinn vom
Gerät drehen.
2) Alle 2 – 3 Monate eine handelsübliche Geschirr-spülmittel Tablette, für die Reinigung des
Filters verwenden. Folgende Anweisungen beachten:
36
DE
Page 37

IT
• In den Filter (ohne Kaffee) eine Geschirr-spülmittel Tablette einlegen.
• Abwarten, bis das Gerät richtig heiß ist (mindestens 5 Minuten Aufheizzeit).
• Den Filterhalter am Gerät befestigen und einen Behälter unter dem Filterhalter aufstellen.
• Den Schalter zum Kaffee (O) in die Position Kaffeeabgabe stellen, um die Wasserabgabe
für ca. 15 – 20 Sekunden einzuschalten.
• Die Wasserabgabe unterbrechen und die Tablette mindestens 15 Minuten wirken lassen.
Während dieser Zeit muss der Filterhalter am Gerät befestigt bleiben.
• Jetzt erneut Wasser abgeben. Die Pumpe jeweils ca. 15 – 20 Sekunden einschalten und
dann ca. 15 – 20 Sekunden ruhen lassen. Dieser Vorgang muss solange wiederholt werden, bis die Wassermenge zweier Wassertanks verbraucht ist.
• Den Filterhalter vom Gerät abnehmen, den Filter ausbauen und gründlich unter fließendem
Wasser ausspülen.
• Das Gerät ausschalten, das Netzkabel aus der Steckdose ziehen und abkühlen lassen.
Danach die Aufnahme des Filterhalters von eventuellen Spülmittelresten reinigen.
• Das Gerät wieder mit einer Steckdose verbinden und einschalten, den Filter erneut ohne
Kaffeepulver einsetzen und nochmals mindestens zwei Tassen Wasser durchlaufen lassen,
um das Nachspülen zu beenden.
Wird die Kaffeemaschine täglich benutzt, wird empfohlen den Reinigungsvorgang mindestens
alle drei Monate auszuführen.
DE
Reinigung der Silikon-Lochscheibe Thermocream®
Die Silikon-Lochscheibe Thermocream® (C) unter fließendem Wasser spülen, dabei die
Scheibe seitlich leicht biegen, so dass die mittlere Öffnung von eventuellen Kaffeeresten
befreit werden kann, die sonst die Silikon-Lochscheibe Thermocream® verstopfen würden
(Fig. 12).
Reinigung der Aufnahme des Filters
Wenn das Gerät längere Zeit benutzt worden ist oder falls zuviel Kaffeepulver im Filter gewesen ist, kann sich Kaffeesatz auf der Aufnahme des Filterhalters absetzen. Der Kaffeesatz kann
mit einem Zahnstocher, einem kleinen Schwamm oder durch Durchlaufen von Wasser (Fig.
13), ohne den Filterhalter in die Aufnahme einzusetzen, entfernt werden (Fig. 4).
Reinigen der Aufschäumdüse
WICHTIG!
Heiße Oberflächen. Um Verbrennungen zu vermeiden, muss die verchromte
Düse bei der Reinigung kalt sein.
Die Dampfröhrchen (G) von der Aufschäumdüse (G1) ziehen (Fig. 14) und mit fließendem
Wasser spülen. Die Aufschäumdüse (G1) kann mit einem nicht scheuernden Lappen gereinigt werden. Gegebenenfalls die Aufschäumdüse mit einer Nadel reinigen (Fig. 14). Das
Dampfröhrchen wieder bis zum Anschlag festschrauben. Nach jedem Gebrauch, um eventuelle Reste aus der Austrittsöffnung zu beseitigen, einige Sekunden Dampf austreten lassen.
Reinigung des Wassertanks
Es wird angeraten das Innere des Behälters regelmäßig mit einem Schwamm oder einem
feuchten Tuch zu reinigen. Wenn nötig verwenden Sie ein mildes Spülmittel.
37DE
Page 38

DE
Reinigung des Abtropfgitters und der Auffangschale
Beachten Sie, dass die Auffangschale (H) von Zeit zu Zeit entleert werden muss.
Das Abtropfgitter (I) entfernen und unter fließendem Wasser spülen; die Auffangschale (H) aus
dem Gerät ziehen und unter fließendem Wasser spülen.
Reinigung des Gerätegehäuses
WICHTIG!
Um das Gehäuse nicht zu beschädigen, müssen alle festen Geräteteile mit
einem feuchten, nicht scheuernden Lappen gereinigt werden.
ENTKALKUNG
Eine gute Pflege und eine regelmäßige Reinigung schützen das Gerät, lassen es längere
Zeit funktionieren und verringern die Gefahr der Bildung von Kalkablagerungen im Gerät.
Sollte trotzdem die Gerätefunktion nach einiger Zeit beeinträchtigt sein, weil häufig hartes
und sehr kalkhaltiges Wasser verwendet wurde, kann das Gerät zur Behebung der Störung
entkalkt werden. Befolgen Sie bei einer notwendigen Entkalkung die Anweisungen auf dem
Beipackzettel des Entkalkungsmittels.
AUSSBETRIEBNAHME
Bei einer Außerbetriebnahme des Geräts muss es von der Stromversorgung getrennt werden.
Den Wassertank und die Auffangschale entleeren und reinigen (siehe Abschnitt “Reinigung
und Pflege”).
Soll das Gerät als Abfall entsorgt werden, müssen die einzelnen Materialien, aus denen das
Gerät besteht, sortiert und entsprechend der im Einsatzland geltenden Gesetzesvorschriften
nach ihrer Zusammensetzung getrennt entsorgt werden.
ENTSORGUNG
Verpackung
Die Produktverpackung besteht aus recyclingfähigen Materialien. Entsorgen Sie diese umweltgerecht und sortenrein in den bereitgestellten Sammelbehältern.
Elektrogerät
Altgeräte dürfen nicht im normalen Hausmüll entsorgt werden.
Entsprechend EG-Richtlinie 2012/19/EG ist das Gerät am Ende seiner Lebensdauer
einer geordneten Entsorgung zuzuführen. Dabei werden im Gerät enthaltene
Wertstoffe der Wiederverwertung zugeführt und die Belastung der Umwelt vermieden.
Geben Sie das Altgerät an einer Sammelstelle für Elektroschrott oder einem Wertstoffhof ab.
Wenden Sie sich für nähere Auskünfte an Ihr örtliches Entsorgungsunternehmen oder Ihre
kommunale Verwaltung.
TECHNISCHE DATEN
Stromversorgung: 220-240 V ~ 50/60 Hz
Leistung: 850 Watt
38
DE
Page 39

IT
WAS TUN, WENN ES PROBLEME GIBT
Bei Betriebsstörungen sofort das Gerät ausschalten und den Stecker aus der
Steckdose ziehen.
Probleme Ursachen Abhilfe
Es kommt kein
Dampf.
Es tritt Wasser
an der Seite des
Filterhalters aus.
Der Kaffee
kommt zu
langsam oder
kommt überhaupt
nicht.
Der Kaffee ist
nicht stark genug
und kalt.
Zu wenig Wasser im
Wassertank und die Pumpe
kann nicht ansaugen.
Dampföffnung an der
Aufschäumdüse ist verstopft.
Es befindet sich zuviel
Kaffeepulver im Filter.
Es befinden sich Reste von
gemahlenem Kaffee auf der
Dichtung der KaffeefilterAufnahme.
Die Öffnung am Auslass
des Kaffeepulversiebs ist
verstopft.
Die Löcher an der
Lochscheibe an der
Aufnahme des Filterhalters
sind verstopft.
Die Öffnungen am Auslass
des Kaffeepulver-Filters sind
verstopft.
Zu fein gemahlene
Kaffeemischung.
Zu stark angedrückte
Kaffeemischung.
Der Wassertank ist nicht
richtig eingesetzt.
Zu wenig Wasser im
Behälter und die Pumpe
kann nicht ansaugen.
Das Kaffeepulver ist zu grob
gemahlen.
Kontrollieren, ob der Wassertank richtig eingesetzt
ist und den richtigen Wasser-Füllstand im Wassertank
überprüfen. Mit kaltem stillem Wasser bis zum
angegebenen MAX-Füllstand auffüllen.
Mit einer Nadel eventuelle Kesselsteinbildung aus den
Löchern der Aufschäumdüse entfernen (Fig. 14).
Den Filterhalter entfernen und die Aufnahme mit einem
kleinen Schwamm reinigen (Fig. 13). Nochmals mit der
richtigen Kaffeemenge versuchen.
Nochmals mit der richtigen Kaffeemenge versuchen.
Den Filterhalter langsam entfernen, weil ein eventueller
Restdruck zu einem Herausspritzen von Wasser führen
kann.Gegebenfalls den Filter mit einer Bürste reinigen.
Lassen Sie Wasser aus der Maschine fließen, ohne
dabei den Filterhalter einzusetzen. Fließt das Wasser
weiterhin ungleichmäßig aus allen Löchern aus, muss
eine Entkalkung vorgenommen werden.
Den Filterhalter langsam entfernen, weil ein eventueller
Restdruck zu einem Herausspritzen von Wasser führen
kann. Gegebenfalls den Filter mit einer Bürste reinigen.
Eventuell grobe gemahlene Kaffeemischung
verwenden. Den Filterhalter langsam entfernen, weil
ein eventueller Restdruck zu einem Herausspritzen von
Wasser führen kann. Gegebenfalls den Filter mit einer
Bürste reinigen.
Den Kaffee mit weniger Druck in den Filter drücken.
Den Wassertank richtig bis zum Anschlag einsetzen.
Kontrollieren, ob der Wassertank richtig eingesetzt
ist und den richtigen Wasser-Füllstand im Wassertank
überprüfen. Mit kalten stillem Wasser bis zum
angegebenen MAX-Füllstand auffüllen.
Um einen stärkeren und heißeren Kaffee zu erhalten,
sollte ein feineres Kaffeepulver benutzt werden.
DE
39DE
Page 40

DE
GARANTIE
Sehr geehrte Kundin, sehr geehrter Kunde,
Sie erhalten auf dieses Gerät 3 Jahre Garantie [bzw. wie vereinbarte Garantie] ab Kaufdatum.
Im Falle von Mängeln dieses Produkts stehen Ihnen gegen den Verkäufer des Produkts gesetzliche
Rechte zu. Diese gesetzlichen Rechte werden durch unsere im Folgenden dargestellte Garantie
nicht eingeschränkt.
Garantiebedingungen
Die Garantiefrist beginnt mit dem Kaufdatum. Bitte bewahren Sie den Original Kassenbon gut auf.
Diese Unterlage wird als Nachweis für den Kauf benötigt. Tritt innerhalb von drei Jahren [bzw.
wie vereinbarte Garantie] ab dem Kaufdatum dieses Produkts ein Material- oder Fabrikationsfehler
auf, wird das Produkt von uns – nach unserer Wahl – für Sie kostenlos repariert oder ersetzt. Diese
Garantieleistung setzt voraus, dass innerhalb der Drei-Jahres-Frist [bzw. wie vereinbarte Garantie]
das defekte Gerät und der Kaufbeleg (Kassenbon) vorgelegt und schriftlich kurz beschrieben wird,
worin der Mangel besteht und wann er aufgetreten ist. Wenn der Defekt von unserer Garantie
gedeckt ist, erhalten Sie das reparierte oder ein neues Produkt zurück. Mit Reparatur oder
Austausch des Produkts beginnt kein neuer Garantiezeitraum.
Garantiezeit und gesetzliche Mängelansprüche
Die Garantiezeit wird durch die Gewährleistung nicht verlängert. Dies gilt auch für ersetzte und
reparierte Teile. Eventuell schon beim Kauf vorhandene Schäden und Mängel müssen sofort nach
dem Auspacken gemeldet werden. Nach Ablauf der Garantiezeit anfallende Reparaturen sind
kostenpflichtig.
Garantieumfang
Das Gerät wurde nach strengen Qualitätsrichtlinien sorgfältig produziert und vor Anlieferung
gewissenhaft geprüft. Die Garantieleistung gilt für Material- oder Fabrikationsfehler. Diese
Garantie erstreckt sich nicht auf Produktteile, die normaler Abnutzung ausgesetzt sind und daher
als Verschleissteile angesehen werden können oder für Beschädigungen an zerbrechlichen Teilen,
z. B. Schalter, Akkus oder die aus Glas gefertigt sind oder wegen Transportschäden. Diese
Garantie verfällt, wenn das Produkt beschädigt, nicht sachgemäß benutzt oder gewartet wurde.
Für eine sachgemäße Benutzung des Produkts sind alle in der Bedienungsanleitung aufgeführten
Anweisungen genau einzuhalten. Verwendungszwecke und Handlungen, von denen in der
Bedienungsanleitung abgeraten oder vor denen gewarnt wird, sind unbedingt zu vermeiden. Das
Produkt ist lediglich für den privaten und nicht für den gewerblichen Gebrauch bestimmt. Bei missbräuchlicher und unsachgemäßer Behandlung, Gewaltanwendung und bei Eingriffen, die nicht von
unserer autorisierten Service-Niederlassung vorgenommen wurden, erlischt die Garantie.
Abwicklung im Garantiefall
Um eine schnelle Bearbeitung ihres Anliegens zu gewährleisten, folgen Sie bitte den
folgenden Hinweisen:
• Bitte halten Sie für alle Anfragen den Kassenbon und die Artikelnummer (IAN 106103) als
Nachweis für den Kauf bereit.
• Die Artikelnummer entnehmen Sie auch dem Typenschild oder auf den Titelblatt Ihrer Anleitung
(unten links).
• Sollten Funktionsfehler oder sonstige Mängel auftreten, kontaktieren Sie zunächst die benannte
Servicestelle telefonisch oder per E-Mail.
• Ein als defekt erfasstes Produkt können Sie dann unter Beifügung des Kaufbelegs (Kassenbon)
und der Angabe, worin der Mangel besteht und wann er aufgetreten ist, für Sie portofrei an
die Ihnen mitgeteilte Service Anschrift übersenden.
• Verpacken Sie Ihr defektes Gerät sorgfältig, bevor Sie es an die Servicestelle einsenden.
40
DE
Page 41

Garantiekarte
Firma und Sitz des Verkäufers:
LIDL
Serviceadresse:
DE
NETSEND GmbH
Nachtwaid 8
D-79206 Breisach
Telefon Hotline:
+49 (0) 7667 - 9069493 (DE)
E-Mail:
service@mynetsend.de (DE)
Hersteller- / Importeurbezeichnung:
De‘Longhi Appliances S.r.l.
Via L. Seitz, 47
31100 Treviso - Italy
Tel. +39-0422-4131
Fax +39-0422-413736
Produktbezeichnung:
Espressomaschine IAN 106103
Produkt- /
Herstellerkennzeichnungsnummer:
SEMR 850 A1
IT
Name des Käufers:
..............................................................
PLZ/Ort:
..............................................................
Straße:
..............................................................
Tel.-Nr. / E-Mail:
..............................................................
Unterschrift:
..............................................................
Fehlerbeschreibung:
..............................................................
..............................................................
..............................................................
..............................................................
..............................................................
..............................................................
DE
41DE
Page 42

IT
INDICE
SIMBOLOGIA 42
AVVERTENZE IMPORTANTI 43
DESCRIZIONE DELL’APPARECCHIO 46
USO PREVISTO 46
FASI PRELIMINARI PER L’USO 47
COME FARE IL CAFFÈ 47
COME FARE IL CAPPUCCINO 48
RIUTILIZZO PER CAFFÈ 49
CONSIGLI UTILI PER OTTENERE UN BUON ESPRESSO ALL’ITALIANA 49
PULIZIA DELL’APPARECCHIO 49
DECALCIFICAZIONE 51
MESSA FUORI SERVIZIO 51
SMALTIMENTO 51
DATI TECNICI 51
COME RIMEDIARE AI SEGUENTI INCONVENIENTI 52
GARANZIA 53
SIMBOLOGIA
Le informazioni contenute nel presente manuale sono etichettate come segue:
PERICOLO per i bambini
PERICOLO dovuto a elettricità
PERICOLO derivante da altre cause
AVVERTENZA: rischio di ustione causato dal vapore ad alta temperatura
ATTENZIONE possibili danni materiali
42
IT
Page 43

IT
IT
AVVERTENZE IMPORTANTI
LEGGERE QUESTE ISTRUZIONI PRIMA DELL’USO.
CONSERVARE SEMPRE QUESTE ISTRUZIONI.
In caso di trasferimento dell’apparecchio ad altri, consegnare anche
il presente manuale.
• L’apparecchio è destinato solo ad uso domestico, e non deve essere
adibito ad uso commerciale o industriale.
• Non si assumono responsabilità per uso errato o per impieghi diversi
da quelli previsti dal presente libretto.
• Si consiglia di conservare gli imballi originali, poiché l’assistenza
gratuita non è prevista per i guasti causati da imballo non adeguato
del prodotto al momento della spedizione ad un Centro di Assistenza
autorizzato.
PERICOLO per i bambini
• L’apparecchio può essere usato dai bambini con un età superiore a
8 anni solo se sono seguiti da una persona responsabile o se hanno
ricevuto le istruzioni riguardanti l’utilizzo dell’apparecchio in sicurezza ed hanno compreso i pericoli presenti durante l’uso.
• Le operazioni di pulizia e di manutenzione da parte dell’utilizzatore
non devono essere effettuate dai bambini a meno che non abbiano
un’età superiore a 8 anni e operino sotto sorveglianza. Assicurarsi
che i bambini non giochino con l’apparecchio.
• Gli elementi dell’imballaggio non devono essere lasciati alla portata
dei bambini in quanto potenziali fonti di pericolo.
• Allorché si decida di smaltire come rifiuto questo apparecchio, si
raccomanda di renderlo inoperante tagliandone il cavo di alimentazione. Si raccomanda inoltre di rendere innocue quelle parti dell’apparecchio suscettibili di costituire un pericolo, specialmente per i
bambini che potrebbero servirsi dell’apparecchio per i propri giochi.
PERICOLO dovuto a elettricità
• L’apparecchio può essere usato da persone che hanno capacità fisiche, sensoriali o mentali ridotte, oppure con mancanza di esperienza
43IT
Page 44

IT
o di conoscenza, solo se sono seguiti da una persona responsabile
o se hanno ricevuto e compreso le istruzioni riguardanti l’utilizzo
dell’apparecchio in sicurezza ed hanno compreso i pericoli presenti
durante l’uso.
• Prima di collegare l’apparecchio alla rete di alimentazione controllare
che la tensione indicata sulla targhetta posta al di sotto della macchina corrisponda a quella della rete locale.
• L’uso di prolunghe elettriche non autorizzate dal fabbricante dell’apparecchio può provocare danni e incidenti.
• Se il cavo di alimentazione è danneggiato, esso deve essere sostituito
dal costruttore o dal suo servizio Assistenza Tecnica o comunque da
una persona con qualifica similare, in modo da prevenire ogni rischio.
• Non mettere mai le parti sotto tensione a contatto con l’acqua: può
generarsi un cortocircuito!
• Togliere la spina dalla presa prima di ogni intervento di pulizia o di
manutenzione.
• Non immergere l’apparecchio in acqua o altri liquidi.
• Spegnere sempre l’apparecchio e staccare la spina del cavo di
alimentazione dalla presa di corrente elettrica prima di riempire il
serbatoio con acqua.
PERICOLO derivante da altre cause
• Non sollevare l’apparecchio afferrandolo per il serbatoio dell’acqua
o per la vaschetta, ma afferrarlo per il corpo.
• Scegliere un ambiente sufficientemente illuminato, pulito e con la
presa di corrente facilmente accessibile.
• Evitare di immettere nel serbatoio una quantità eccessiva di acqua.
• Non lasciare incustodito l’apparecchio mentre è collegato alla rete
elettrica.
• L’apparecchio deve essere utilizzato e lasciato a riposo su una superficie stabile.
• L’apparecchio non deve essere utilizzato se è stato fatto cadere, se
vi sono segni di danni visibili o se ha perdite di acqua. Non usare
l’apparecchio se il cavo elettrico o la spina risultano danneggiati, o
se l’apparecchio stesso risulta difettoso. Tutte le riparazioni, compre-
44
IT
Page 45

IT
IT
sa la sostituzione del cavo di alimentazione, devono essere eseguite
solamente dal Centro Assistenza o da tecnici autorizzati, in modo da
prevenire ogni rischio.
AVVERTENZA: rischio di ustione
causato dal vapore ad alta temperatura
• Non dirigere mai il getto di vapore o acqua calda verso parti del
corpo; manipolare con precauzione il tubo vapore/acqua calda:
pericolo ustioni!
• Le parti metalliche esterne dell’apparecchio e del portafiltro non devono essere toccate con l’apparecchio in funzione, in quanto potrebbero causare delle scottature.
• La mancata fuoriuscita di acqua dal portafiltro potrebbe essere dovuta ad un intasamento del filtro. Interrompere l’erogazione ed attendere una decina di secondi. Successivamente rimuovere e disinserire
lentamente il portafiltro perché l’eventuale pressione residua potrebbe
provocare spruzzi o schizzi. Procedere quindi con la pulizia come
indicato nell’apposito paragrafo.
ATTENZIONE possibili danni materiali
• Collocare la macchina su un piano stabile dove non possa essere
rovesciata.
• Non usare la macchina senza acqua, poiché in tale caso la pompa
si brucerebbe.
• Non riempire mai il serbatoio dell’acqua con acqua calda o bollente.
• Non posizionare la macchina su superfici molto calde o nelle vicinanze di fiamme libere per evitare che la carrozzeria possa essere
danneggiata.
• Il cavo non deve toccare le parti calde della macchina.
• Non utilizzare acqua gassata (addizionata di anidride carbonica).
• Non introdurre mai nel filtro sostanze diverse dal caffè in polvere. Si
potrebbero causare gravi danni all’apparecchio.
• Non lasciare la macchina a temperatura ambiente inferiore a 0 °C,
in quanto il residuo d’acqua nella caldaia potrebbe ghiacciare e
45IT
Page 46

IT
provocare dei danni.
• Non usare l’apparecchio all’aperto.
• Non lasciare l’apparecchio esposto ad agenti atmosferici (pioggia,
sole, ecc...).
• Dopo aver staccato la spina di alimentazione e dopo che le parti
calde si saranno freddate, l’apparecchio dovrà essere pulito esclusivamente con un panno non abrasivo appena inumidito aggiungendo
poche gocce di detergenti neutri non aggressivi (non usare mai solventi che danneggiano la plastica).
DESCRIZIONE DELL’APPARECCHIO
Portafiltro per caffè in polvere
A
Misurino/pressino per caffè
B
Disco forato in silicone
C
(Thermocream®)
Filtro per caffè in polvere
D
Serbatoio acqua estraibile
E
Cavo alimentazione + spina
F
Cappuccinatore
G
Tubo vapore
G1
Cassetto raccogligocce
H
USO PREVISTO
Griglia appoggiatazze estraibile
I
Pulsante di accensione
J
Manopola di erogazione vapore
K
Spia temperatura caldaia
L
Interruttore funzione vapore
M
Termometro temperatura caldaia (°C e °F)
N
Interruttore di erogazione caffè
O
Spia accensione
P
• Potete usare la macchina per preparare caffè e cappuccino; inoltre
grazie alla possibilità di erogare acqua calda si possono preparare
anche tè e infusi. Questo apparecchio è stato concepito solo ed esclusivamente per un uso privato ed è quindi da considerarsi inadeguato
l’uso per scopi industriali o professionali.
• Ogni altro utilizzo della macchina non è previsto dal Costruttore che
si esime da qualsiasi responsabilità per danni di ogni natura, generati da un impiego improprio della macchina stessa. L’uso improprio
determina inoltre l’annullamento di ogni forma di garanzia.
46
IT
Page 47

IT
IT
FASI PRELIMINARI PER L’USO
Messa in funzione
Controllare che la tensione della rete domestica sia uguale a quella indicata sulla targhetta
dati tecnici dell’apparecchio. Posizionare poi la macchina su una superficie piana. Lavare il
serbatoio al primo utilizzo e riempirlo con acqua naturale fresca (MAX 1 litro), avendo poi
cura di inserirlo bene nella sua sede (Fig. 3).
Verificare il corretto inserimento del serbatoio altrimenti la macchina potrebbe non
erogare caffè.
Inserire la spina nella presa di corrente elettrica, che deve essere dotata di messa a terra.
Prima accensione
Dopo aver riempito il serbatoio con acqua naturale fresca, mettere in funzione la macchina.
Premere per alcuni secondi il pulsante di accensione (J) (Fig. 1). Si accenderà la spia di
accensione (P), ad indicare che la macchina è accesa.
In caso di prima accensione, o dopo un periodo di inutilizzo, si raccomanda di far
fuoriuscire almeno una tazza di acqua dal circuito idraulico della caldaia.
Posizionare sotto l’erogatore caffè e sotto il cappuccinatore un recipiente della capacità di
almeno mezzo litro (Fig. 5). Portare l’interruttore di erogazione caffè (O) sulla posizione
caffè ( ). Attendere la fuoriuscita di acqua dalla sede di aggancio del portafiltro. Aprire la
manopola di erogazione vapore (K) e far fuoriuscire acqua dal cappuccinatore.
Terminare l’erogazione riportando l’interruttore di erogazione caffè (O) in alto. Chiudere la
manopola di erogazione vapore. Attendere che la spia temperatura caldaia (L) si accenda.
A questo punto la macchina è pronta per fare il caffè.
COME FARE IL CAFFÈ
Inserire nel portafiltro (A), il disco forato in silicone (C) e il filtro per caffè in polvere (D)
nell’ordine indicato (Fig. 6). Dosare il caffè nel filtro e pressare leggermente con l’apposito
pressino: per due caffè riempire completamente due misurini, mentre per un caffè riempirne
uno solo. Innestare il portafiltro nell’apposita sede. Serrarlo bene ruotandolo da sinistra verso
destra, assicurandosi di averlo ben agganciato alla flangia (Fig. 7).
Attenzione!
Se viene inserita una quantità eccessiva di polvere di caffè all’interno del
filtro, può risultare difficoltoso stringere a fondo nella sua sede il portafiltro
e/o durante l’erogazione del caffè si possono avere perdite dal portafiltro.
È consigliabile lasciar riscaldare il portafiltro, inserito nella sua sede, per qualche minuto in
modo da avere anche il primo caffè ben caldo. Questo non sarà necessario per i successivi
caffè.
Attendere che la spia temperatura caffè (L) si accenda. Posizionare l’interruttore di erogazione caffè (O) sulla posizione caffè (
portafiltro. Terminare l’erogazione riportando l’interruttore di erogazione caffè (O) in alto. La
dose massima per un caffè è di 50 ml.
Attenzione!
Come nelle macchine da caffè professionali, non togliere il portafiltro quando
): inizierà la fuoriuscita del caffè dai beccucci del
47IT
Page 48

IT
l’interruttore di erogazione è inserito (in posizione caffè ).
Attenzione!
Al termine dell’erogazione del caffè attendere una decina di secondi prima
di disinserire il portafiltro. Per rimuovere il portafiltro ruotarlo lentamente da
destra verso sinistra onde evitare spruzzi o schizzi di acqua o caffè.
Se si dovessero verificare piccoli sbuffi di vapore dalla sede di aggancio del porta
filtro, il fenomeno è da ritenersi assolutamente normale.
La spia temperatura caldaia (L) si spegnerà e accenderà periodicamente, mostrando l’intervento del termostato della caldaia, che serve a mantenere ottimale la temperatura dell’acqua.
È opportuno, sia per il primo caffè sia per i successivi, avviare l’erogazione del caffè solo
quando la spia temperatura caldaia (L) è accesa.
Funzione di autospegnimento
Se la macchina è accesa ma non viene utilizzata, dopo circa 30 minuti interviene la funzione
di autospegnimento. Questa funzione mette in standby la macchina. La spia di accensione
(P) è spenta. Per riaccendere la macchina premere nuovamente il pulsante di accensione (J).
Riempimento del serbatoio d’acqua durante l’uso
Non è necessaria alcuna operazione particolare quando si esaurisce l’acqua nel serbatoio,
perché la macchina possiede una speciale valvola di auto-innesco. Basterà, dopo aver disinserito la spina dalla presa della corrente, estrarre il serbatoio e riempirlo nuovamente.
COME FARE IL CAPPUCCINO
Per preparare un cappuccino, una cioccolata calda, o riscaldare qualsiasi altra bevanda,
portare l’interruttore funzione vapore (M) in posizione vapore (
da la spia di accensione (L), la quale indica che la caldaia è giunta alla giusta temperatura
per erogare vapore.
Se si dovessero verificare piccoli sbuffi di vapore dalla sede di aggancio del portafiltro, il fenomeno è da ritenersi assolutamente normale.
Ruotare la manopola di erogazione vapore (K), avendo l’accortezza di posizionare un bicchiere sotto al cappuccinatore (G): dapprima uscirà un po’ d’acqua e subito dopo un forte
getto di vapore.
Chiudere la manopola di erogazione (K) per interrompere il getto di vapore e porre sotto il
cappuccinatore il bricco del latte da montare (Fig. 10). Immergere a fondo il cappuccinatore
nel bricco del latte ed aprire nuovamente la manopola di erogazione vapore (K) fino ad
ottenere il risultato voluto. Durante queste operazioni si potrà notare che la spia temperatura
caldaia (L) si spegne e riaccende periodicamente, indicando gli interventi del termostato che
mantiene la giusta temperatura della caldaia per l’erogazione del vapore.
È opportuno avviare l’erogazione del vapore solo quando la spia è accesa. Dopo
ogni utilizzo erogare il vapore per alcuni secondi per liberare il foro da eventuali
residui di latte.
Chiudere la manopola di erogazione vapore (K). Terminata la preparazione del cappuccino
riportare l’interruttore funzione vapore (M) in alto per escludere la funzione vapore.
) ed attendere che si accen-
-
48
IT
Page 49

IT
IT
RIUTILIZZO PER CAFFÈ
Per preparare un caffè subito dopo aver fatto il cappuccino sarà necessario riportare la
caldaia alla temperatura di preparazione caffè compiendo queste operazioni: riportare
l’interruttore funzione vapore (M) in alto per far raffreddare la caldaia ed attendere che la
spia temperatura caldaia (L) si spenga e si accenda di nuovo. Volendo affrettare il raffreddamento della caldaia, è possibile operare come segue: dopo aver posto un recipiente sotto
al cappuccinatore (G), portare l’interruttore erogazione caffè (O) in posizione (
la manopola di erogazione vapore (K): si provocherà la fuoriuscita di acqua, fino a quando
non si spegnerà la spia temperatura caldaia (L). A questo punto chiudere la manopola di erogazione vapore (K) e riportare l’interruttore di erogazione caffè (O) in alto. Attendere che la
spia temperatura caldaia (L) si accenda. La macchina è nuovamente pronta per fare il caffè.
); ruotare
CONSIGLI UTILI PER OTTENERE UN BUON ESPRESSO ALL’ITALIANA
Un caffè più forte o meno forte dipende dal grado di macinatura del caffè, dalla quantità di
esso immessa nel portafiltro, e dalla pressatura. Il caffè macinato nel portafiltro dovrà essere
pressato leggermente. Pochi secondi sono il tempo sufficiente perché il caffè scenda nelle
tazzine. La velocità di erogazione del caffè può essere cambiata modificando la quantità di
caffè nel portafiltro o utilizzando una macinatura diversa.
PULIZIA DELL’APPARECCHIO
Attenzione!
Tutte le operazioni di pulizia sotto indicate devono essere effettuate a macchi-
na spenta e con la spina elettrica scollegata dalla presa di corrente.
Attenzione!
Una manutenzione ed una pulizia regolari preservano e mantengono efficiente la macchina per un periodo maggiore. Non lavare mai i componenti
della macchina in lavastoviglie. Non utilizzare getti di acqua diretta.
Attenzione!
Ogni intervento va eseguito a macchina fredda.
Pulizia del filtro contenente il macinato
Verificare che i forellini sottostanti non si otturino e nel caso ripulirli con uno spazzolino (Fig.
11). Far erogare acqua bollente dal portafiltro con il filtro inserito senza la polvere, per sciogliere o rimuovere eventuali residui di caffè o impurità.
Attenzione!
Rimuovere e disinserire lentamente il portafiltro perché l’eventuale pressione
residua potrebbe provocare spruzzi o schizzi.
Si consiglia di pulire accuratamente il filtro ogni circa 3 mesi, utilizzando le pastiglie detergenti reperibili presso i punti vendita ed i Centri Assistenza Autorizzati seguendo le istruzioni
contenute nella confezione, oppure, in alternativa, utilizzando una pastiglia di detersivo
semplice (senza aggiunta di brillantante o altri additivi chimici) per lavastoviglie nel seguente
modo:
• Inserire una pastiglia di detersivo da lavastoviglie nel filtro (senza caffè) quando la mac-
49IT
Page 50

IT
china è ben calda (dopo almeno 5 minuti di riscaldamento).
• Agganciare il portafiltro alla macchina e mettere un recipiente sotto il portafiltro.
• Posizionare l’interruttore erogazione caffè (O) nella posizione caffè (
rogazione dell’acqua ed erogare acqua per 15-20 secondi.
• Interrompere l’erogazione e lasciare agire la pastiglia per almeno 15 minuti mantenendo il
portafiltro inserito sulla macchina.
• Ripetere l’operazione di erogazione dell’acqua facendo funzionare la pompa per circa
15-20 secondi e poi lasciando riposare per altri 15-20 secondi fino ad esaurire due serbatoi di acqua.
• Rimuovere il portafiltro dalla macchina, estrarre il filtro e sciacquarlo bene sotto l’acqua
corrente del rubinetto.
• Spegnere la macchina, scollegare il cavo di alimentazione dalla presa di corrente e pulire
con una spugnetta la sede di aggancio del portafiltro per rimuovere eventuali residui di
detersivo dalla doccia.
• Riaccendere la macchina, agganciare nuovamente il portafiltro ed erogare ancora almeno
2 tazze di acqua per completare il risciacquo.
Se la macchina da caffè viene utilizzata quotidianamente si consiglia di effettuare l’operazione di pulizia almeno ogni tre mesi.
Pulizia del disco in silicone
Lavare il disco in silicone (C) sotto l’acqua corrente piegandolo leggermente ai lati in modo da
liberare il foro centrale da eventuali residui di polvere di caffè che potrebbero ostruirlo (Fig. 12).
Pulizia della sede del portafiltro
Con l’uso si può verificare nella sede di aggancio del portafiltro una sedimentazione di fondi
di caffè, che possono essere rimossi con uno stuzzicadenti, con una spugnetta (Fig. 13), oppure lasciando scorrere acqua senza portafiltro inserito (Fig. 4).
Pulizia del cappuccinatore
Attenzione!
Eseguire l’operazione quando il tubo vapore è freddo per evitare scottature.
Svitare il cappuccinatore (G) dal tubo vapore (G1) (Fig. 14), e lavarlo con acqua corrente.
Il tubo vapore (G1) può essere pulito con un panno non abrasivo. Se necessario ripulire con
uno spillo il foro di uscita del vapore (Fig. 14). Riavvitare il cappuccinatore al tubo vapore
fino alla fine della corsa. Dopo ogni utilizzo erogare il vapore per alcuni secondi per liberare
il foro da eventuali residui.
) per avviare l’e-
Pulizia del serbatoio
Si consiglia di pulire periodicamente l’interno del serbatoio con una spugna o un panno umido.
Pulizia della griglia e del cassetto raccogligocce
Ricordarsi di svuotare di tanto in tanto il cassetto raccogligocce (H).
Togliere la griglia (I) e lavarla sotto l’acqua corrente; sfilare il cassetto raccogligocce (H) dalla
macchina, svuotarlo e lavarlo sotto l’acqua corrente.
50
IT
Page 51

IT
IT
Pulizia del corpo macchina
Attenzione!
Pulire le parti fisse della macchina usando un panno umido non abrasivo per
non danneggiare la carrozzeria.
DECALCIFICAZIONE
Una buona manutenzione ed una regolare pulizia preservano e mantengono efficiente la
macchina per un periodo maggiore limitando notevolmente i rischi di formazione di depositi
calcarei nell’apparecchio. Se nonostante ciò, dopo qualche tempo, la funzione dell’apparecchio dovesse essere compromessa, in seguito all’uso frequente di acqua dura e molto
calcarea, si può procedere alla decalcificazione della macchina per eliminare il malfunzionamento. In caso di necessità di una decalcificazione, osservate le indicazioni sul foglio di
istruzioni del prodotto decalcificante.
MESSA FUORI SERVIZIO
In caso di messa fuori servizio della macchina occorre sconnetterla elettricamente, svuotare il
serbatoio dell’acqua e la vaschetta raccogligocce e ripulirla (vedi paragrafo “Pulizia dell’apparecchio”). In caso di rottamazione si dovrà provvedere alla separazione dei vari materiali
utilizzati nella costruzione della macchina e provvedere al loro smaltimento in base alla loro
composizione e alle disposizioni di legge vigenti nel Paese di utilizzo.
SMALTIMENTO
Imballo
L’imballo del prodotto è composto da materiali riciclabili. Provvedere allo smaltimento corretto
negli appositi contenitori.
Apparecchiature elettroniche
Non smaltire le apparecchiature elettroniche tra i normali rifiuti domestici.
In conformità alla direttiva 2012/19/CE, smaltire l’apparecchio alla fine della propria durata in modo appropriato. In tal modo si rende possibile il riutilizzo del mate-
riale riciclabile contenuto nell’apparecchio limitando l’impatto sull’ambiente. Smaltire
l’apparecchio usato presso un centro di raccolta per rifiuti elettrici o un centro di riciclaggio.
Per ulteriori chiarimenti rivolgersi alla ditta di smaltimento locale o alla propria amministrazione comunale.
DATI TECNICI
Alimentazione: 220-240 V ~ 50/60 Hz
Potenza: 850 Watt
51IT
Page 52

IT
COME RIMEDIARE AI SEGUENTI INCONVENIENTI
In caso di anomalie di funzionamento, spegnere immediatamente la macchina, e sfilare la spina dalla presa elettrica.
PROBLEMI CAUSE RIMEDI
La macchina non
eroga vapore.
Fuoriuscita di
caffè dai bordi
del portafiltro.
L’erogazione
del caffè non
avviene o
avviene troppo
lentamente.
Il caffè è troppo
acquoso e
freddo.
C’è poca acqua e la pompa
non aspira.
Foro di uscita vapore del
tubo vapore è ostruito.
Probabilmente nel portafiltro
è stata immessa una quantità
eccessiva di caffè macinato
che ha impedito di stringere
a fondo il portafiltro nella
sua sede.
Sulla guarnizione della sede
di aggancio del portafiltro
sono rimasti residui di caffè
macinato.
Il filtro contenente macinato
ha i fori di uscita ostruiti.
La sede di aggancio del
portafiltro ha i fori ostruiti.
Il filtro contenente macinato
ha i fori di uscita ostruiti.
Miscela di caffè macinata
troppo fine.
Miscela di caffè troppo
pressata.
Il serbatoio non è ben
inserito.
C’è poca acqua e la pompa
non aspira.
La miscela è stata macinata
troppo grossa.
Controllare che il livello dell’acqua nel serbatoio sia
regolare e in caso riempire con acqua naturale fresca.
Stasare con uno spillo eventuali incrostazioni formatosi
nel foro del tubo vapore (Fig. 14).
Rimuovere e disinserire lentamente il portafiltro perché
l’eventuale pressione residua potrebbe provocare
spruzzi o schizzi. Ripulire la sede di aggancio con una
spugnetta (Fig. 13). Ripetere l’operazione, immettendo
nel filtro la giusta quantità di caffè.
Provvedere a ripulire la guarnizione con uno
stuzzicadenti o con una spugnetta (Fig. 13).
Rimuovere e disinserire lentamente il portafiltro perché
l’eventuale pressione residua potrebbe provocare
spruzzi o schizzi. Ripulire con uno spazzolino o uno
spillo i forellini otturati del filtro.
Azionare la macchina senza portafiltro facendo
defluire l’acqua. Se l’acqua continua a non uscire
uniformemente da tutti i fori, eseguire la pulizia
anticalcare seguendo le istruzioni riportate nella
confezione.
Rimuovere e disinserire lentamente il portafiltro perché
l’eventuale pressione residua potrebbe provocare
spruzzi o schizzi. Ripulire con uno spazzolino o uno
spillo i forellini otturati del filtro.
Provare ad utilizzare miscele di caffè a grana più
grossa.
Pressare il caffè nel filtro con minor pressione.
Inserire bene il serbatoio spingendolo a fondo.
Controllare che il livello dell’acqua nel serbatoio sia
regolare e in caso riempire con acqua naturale fresca.
Per ottenere un caffè più concentrato e più caldo, si
deve usare una miscela più finemente macinata.
52
IT
Page 53

IT
GARANZIA
Gentile Cliente,
Questo apparecchio è dotato di una garanzia di 3 anni (garanzia legale) dalla data di acquisto.
In caso di un prodotto difettoso, l’acquirente è coperto da diritti del consumatore, che non sono
limitati dalle seguenti condizioni di garanzia.
IT
Condizioni di garanzia
Il periodo di garanzia inizia alla data di acquisto. Conservare lo scontrino originale come prova
di acquisto.
In caso di difetti di materiale o di lavorazione trovati entro tre anni (garanzia legale) dalla data
di acquisto del prodotto, provvedere, a nostra discrezione, a riparare o sostituire l’apparecchio
gratuitamente. Questo intervento in garanzia richiede entro il termine di tre anni (garanzia legale),
che l’apparecchio difettoso e la prova d’acquisto (scontrino) siano presentati insieme ad una breve
descrizione del guasto, compresa la data in cui è stato riscontrato il problema.
Nel caso in cui il guasto sia coperto da garanzia, l’apparecchio sarà riparato o sostituito. La
riparazione o la sostituzione del prodotto non implica l’inizio di un nuovo periodo di garanzia.
Periodo di garanzia e il diritto legale di reclamo a causa di guasto
Il periodo di garanzia non viene esteso dalla garanzia legale. Quanto sopra si riferisce anche
a parti che vengono sostituite o riparate. Segnalare danni o anomalie riscontrate al momento
dell’acquisto subito dopo l’apertura della confezioni. le riparazioni richieste dopo che il periodo
di garanzia è scaduto saranno a carico del consumatore.
Applicazione della garanzia
Questo prodotto è stato realizzato con cura e secondo gli standard di qualità, ed è stato scrupolosamente controllato prima della consegna.
La garanzia si applica ai difetti di materiale e manodopera. La garanzia non si estende alle parti
del prodotto che sono soggette a normale usura e non copre le parti fragili come interruttori,o parti
in vetro, o danni causati durante il trasporto.
Questa garanzia decade nel caso in cui il prodotto sia stato danneggiato, sia stato utilizzato in
maniera impropria o sottoposto a manutenzione in modo inappropriato. Per l’uso corretto del
prodotto, rispettare le indicazioni contenute nelle istruzioni per l’uso. Evitare qualsiasi utilizzo od
operazioni che vengono sconsigliate nelle istruzioni per l’uso o che sono oggetto di avvertimenti.
Questo prodotto è destinato esclusivamente per uso privato e non per scopi commerciali. La garanzia decade in caso di abuso, uso improprio, uso della forza o di interventi effettuati da persone
diverse dai nostri centri di assistenza autorizzati.
Procedure di garanzia
Per consentire la rapida risoluzione del problema, procedere come segue:
• O gni richiesta deve essere accompagnata da una ricevuta e dal codice del prodotto (IAN
106103) come prova di acquisto.
• Il numero di codice è riportato sull’etichetta dati tecnici o sulla copertina del libretto istruzioni
(in basso a sinistra).
• In caso di problemi di funzionamento o di altre anomalie, contattare via telefono o e-mail
il servizio assistenza riportato nella pagina successiva.
• Se il prodotto è stato trovato difettoso, può essere inviato in porto franco, all’indirizzo fornito
dal centro di assistenza, allegando la prova d’acquisto (scontrino), una descrizione del guasto
e la data in cui è stato riscontrato il problema.
• Imballare l’apparecchio difettoso con cura prima di inviarlo al servizio di assistenza.
53IT
Page 54

IT
Scheda di garanzia
Società e la sede del venditore:
LIDL
Indirizzo assistenza:
De‘Longhi Appliances S.r.l.
Via L. Seitz, 47
31100 Treviso - Italy
Fax +39-0422-413736
Telefono:
199 202 250
E-mail:
-
Nome del produttore / importatore:
De‘Longhi Appliances S.r.l.
Via L. Seitz, 47
31100 Treviso - Italy
Tel. +39-0422-4131
Fax +39-0422-413736
Nome del prodotto:
Macchina per caffè espresso IAN 106103
Numero ID del prodotto / produttore:
SEMR 850 A1
Il nome del compratore:
..............................................................
CAP / Città:
..............................................................
Via:
..............................................................
Telefono / e-mail:
..............................................................
Firma:
..............................................................
Descrizione del guasto:
..............................................................
..............................................................
..............................................................
..............................................................
..............................................................
..............................................................
54
IT
 Loading...