

Page 1
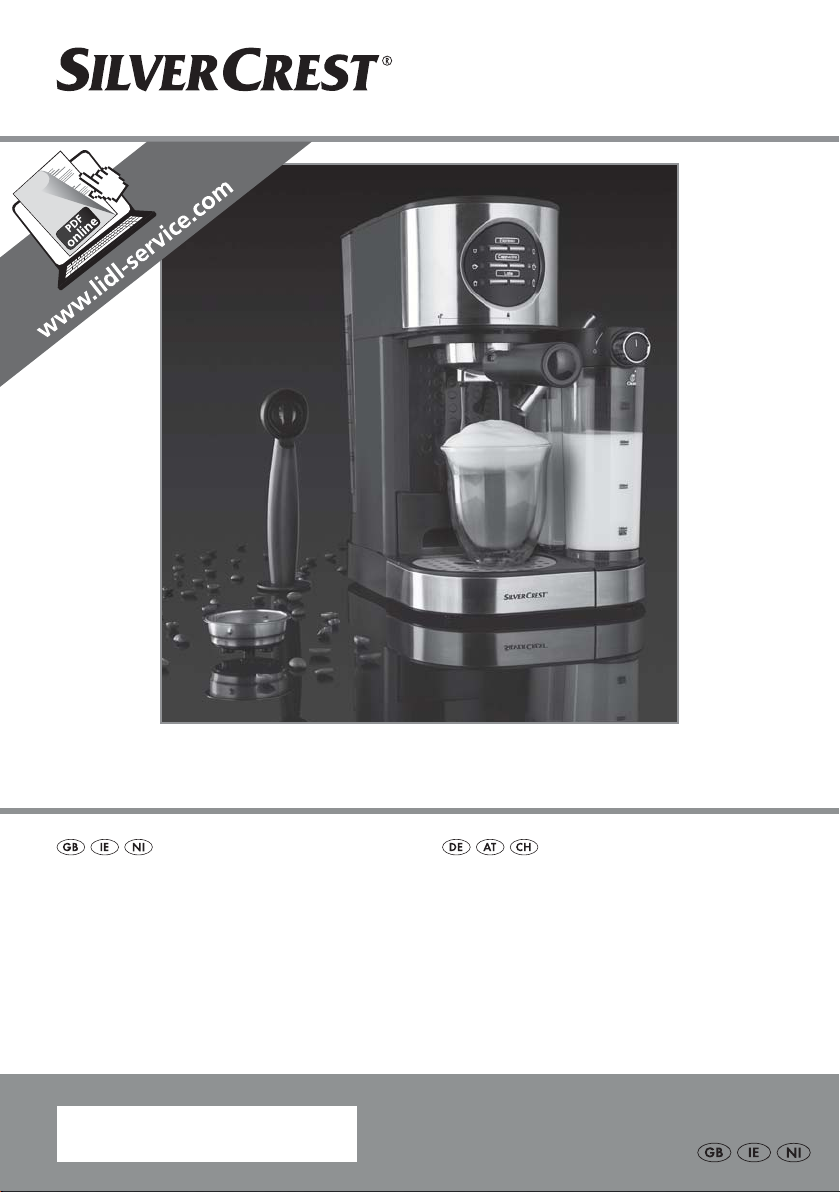
ESPRESSO MACHINE SEMM 1470 A1
ESPRESSO MACHINE
Operating instructions
IAN 277727
ESPRESSOMASCHINE
Bedienungsanleitung
Page 2
Before reading, unfold the page containing the illustrations and familiarise yourself with all functions of
the device.
Klappen Sie vor dem Lesen die Seite mit den Abbildungen aus und machen Sie sich anschließend mit allen
Funktionen des Gerätes vertraut.
GB / IE / NI Operating instructions Page 1
DE / AT / CH Bedienungsanleitung Seite 31
Page 3
A
C
B
.
!
3
0
,
/
+
6
1
%
"
Page 4

Contents
Introduction ..............................................2
Copyright ..........................................................2
Limitation of liability ..................................................2
Warnings ..........................................................2
Proper use. . . . . . . . . . . . . . . . . . . . . . . . . . . . . . . . . . . . . . . . . . . . . . . . . . . . . . . . . .3
Package contents / Transport inspection ..................................4
Disposal of the packaging .............................................4
Safety information .........................................5
Appliance elements ........................................8
Before first use ............................................9
Operation ...............................................10
Filling the water tank. . . . . . . . . . . . . . . . . . . . . . . . . . . . . . . . . . . . . . . . . . . . . . . . .10
Filling the milk tank ..................................................10
Inserting the espresso sieves in the sieve holder ............................11
Adding espresso powder .............................................12
Inserting the sieve holder .............................................12
Setting the milk nozzle ...............................................13
Preparing drinks .........................................14
Selecting a suitable cup ..............................................14
Preparing espresso ..................................................15
Preparing cappuccino ...............................................17
Preparing latte macchiato .............................................19
Frothed milk .......................................................22
Cleaning and care ........................................23
Cleaning the milk nozzle and milk tank ..................................23
Cleaning the espresso sieves, sieve holder and espresso outlet ................25
Cleaning the water tank ..............................................26
Cleaning the housing ................................................26
Cleaning the accessories .............................................27
Troubleshooting ..........................................27
Technical details ..........................................28
Disposal .................................................28
Kompernass Handels GmbH warranty .......................29
Service ...........................................................30
Importer ..........................................................30
SEMM 1470 A1
GB│IE│NI │ 1 ■
Page 5
Introduction
Congratulations on the purchase of your new appliance.
You have selected a high-quality product. The operating instructions are part
of this product. They contain important information about safety, usage and
disposal. Before using the product, please familiarise yourself with all operating
and safety instructions. Use the product only as described and for the range of
applications specified. Please also pass these operating instructions on to any
future owner.
Copyright
This documentation is protected by copyright.
Any copying or reproduction, including in the form of extracts, or any reproduction
of images (even in a modified state), is permitted only with the written authorisation of the manufacturer.
Limitation of liability
All technical information, data and information for installation and operation
contained in these operating instructions corresponds to the latest version(s) at
the time of printing and, to the best of our knowledge, takes into account our
previous experience and know-how.
No claims can be derived from the details, illustrations and descriptions in these
instructions.
The manufacturer assumes no responsibility for damage caused by failure to
observe these instructions, improper use, incompetent repairs, unauthorised
modifications or for the use of non-approved replacement parts.
Warnings
The following types of warning are used in these operating instructions:
■ 2 │ GB
│IE│
WARNING
A warning at this hazard level indicates a potentially hazardous
situation.
Failure to avoid this hazardous situation could result in injury.
► Follow the instructions in this warning notice to prevent injury.
NI
SEMM 1470 A1
Page 6
CAUTION
A warning notice at this hazard level indicates a risk of material
damage.
Failure to avoid this situation could result in material damage.
NOTE
Proper use
This appliance is intended exclusively for preparing drinks in domestic households. It is exclusively intended for use in private households. Do not use it for
commercial applications.
The appliance is not intended for any other purpose, nor for use beyond the
scope described.
WARNING
Danger if not used as intended!
Failure to use the appliance for its intended purpose and/or any other type of
use can be hazardous.
No claims of any kind will be accepted for damage arising as a result of incorrect use.
The risk shall be borne solely by the user.
► Follow the instructions in this warning notice to prevent material damage.
► A note provides additional information which will assist you in using the
appliance.
► Use the appliance only for its intended purpose.
► Observe the procedures described in these operating instructions.
SEMM 1470 A1
GB│IE│NI │ 3 ■
Page 7

Package contents / Transport inspection
WARNING
Risk of suffocation!
► Do not allow children to play with packaging materials. There is a risk of
suffocation.
The appliance is supplied with the following components as standard:
▯ Espresso machine
▯ Sieve holder
▯ Large espresso sieve
▯ Small espresso sieve
▯ Measuring spoon with compactor
▯ Operating instructions
NOTE
► Check the package for completeness and signs of visible damage.
► If the contents are incomplete or damaged due to defective packaging or
through transportation, contact the Service Hotline.
Disposal of the packaging
The packaging protects the appliance from damage during transport.
The packaging materials have been selected for their environmental friendliness
and ease of disposal, and are therefore recyclable.
Returning the packaging to the material cycle conserves raw materials and
reduces the amount of waste that is generated. Dispose of packaging materials
that are no longer needed in accordance with applicable local regulations.
■ 4 │ GB
NOTE
► If possible, keep the original packaging of the appliance for the entire
duration of the warranty period so that the appliance can be packed
properly for return shipment in the event of a warranty claim.
│IE│
NI
SEMM 1470 A1
Page 8
Safety information
To ensure safe operation of the appliance, follow the safety
guidelines set out below:
WARNING – RISK OF INJURY!
■ Check the appliance for visible external damage before use.
Do not operate a appliance which has been damaged or
dropped.
■ The appliance and its connecting cable must be kept away
from children younger than 8 years old.
■ This appliance may be used by children aged 8 years or over
if they are supervised or have been instructed how to use the
appliance safely and have understood the potential risks.
■ This appliance may be used by people with reduced physical,
sensory or mental capabilities or lack of experience and/or
knowledge if they are supervised and have been instructed
in how to use the appliance safely and have understood the
potential risks.
■ Cleaning and user maintenance must not be carried out by
children, unless they are aged 8 or over and are supervised.
■ Do not allow children to use the appliance as a plaything.
■ All repairs must be carried out by authorised specialist companies
or by the Customer Service department. Improper repairs can
pose significant risks to the user. It will also invalidate any
warranty claims.
Never submerse the appliance in water or other liquids!
Danger of electric shock!
SEMM 1470 A1
GB│IE│NI │ 5 ■
Page 9

■ Never touch the appliance with wet or moist hands.
■ To avoid risks, arrange for defective plugs and/or power
cables to be replaced at once by qualified technicians or
our Customer Service Department.
■ Risk of burns! Some parts can become very hot during use!
■ Hot steam is produced while using the appliance. Ensure that
you do not scald yourself. Keep a safe distance away from the
steam.
■ The appliance should only be connected to correctly installed
and earthed mains power sockets.
CAUTION – PROPERTY DAMAGE
■ Defective components must always be replaced with original
replacement parts. Compliance with safety requirements can
only be guaranteed if original replacement parts are used.
■ Protect the appliance from penetration by moisture and liquids.
■ Protect the appliance against knocks, dust, chemicals, extremes
of temperature, etc. and keep it away from sources of heat
(ovens, radiators).
■ 6 │ GB
│IE│
NI
SEMM 1470 A1
Page 10

■ Never immerse the appliance in water or other liquids!
■ Always remove the mains plug from the mains outlet; never
pull on the power cable.
■ Never leave the appliance unattended during operation.
■ Do not use an external timer switch or a separate remote
control system to operate the appliance.
■ Never operate the appliance in rooms in which the tempera-
ture is under or around 0°C. If water freezes in the pipes or
the water tank, the appliance could be damaged.
■ Never operate the appliance outdoors. This appliance is
intended for indoor use only.
NOTE
► Repairs to the appliance during the warranty period may
only be carried out by a customer service department
authorised by the manufacturer. Otherwise, no warranty
claims will be held for any subsequent damages.
SEMM 1470 A1
GB│IE│NI │ 7 ■
Page 11

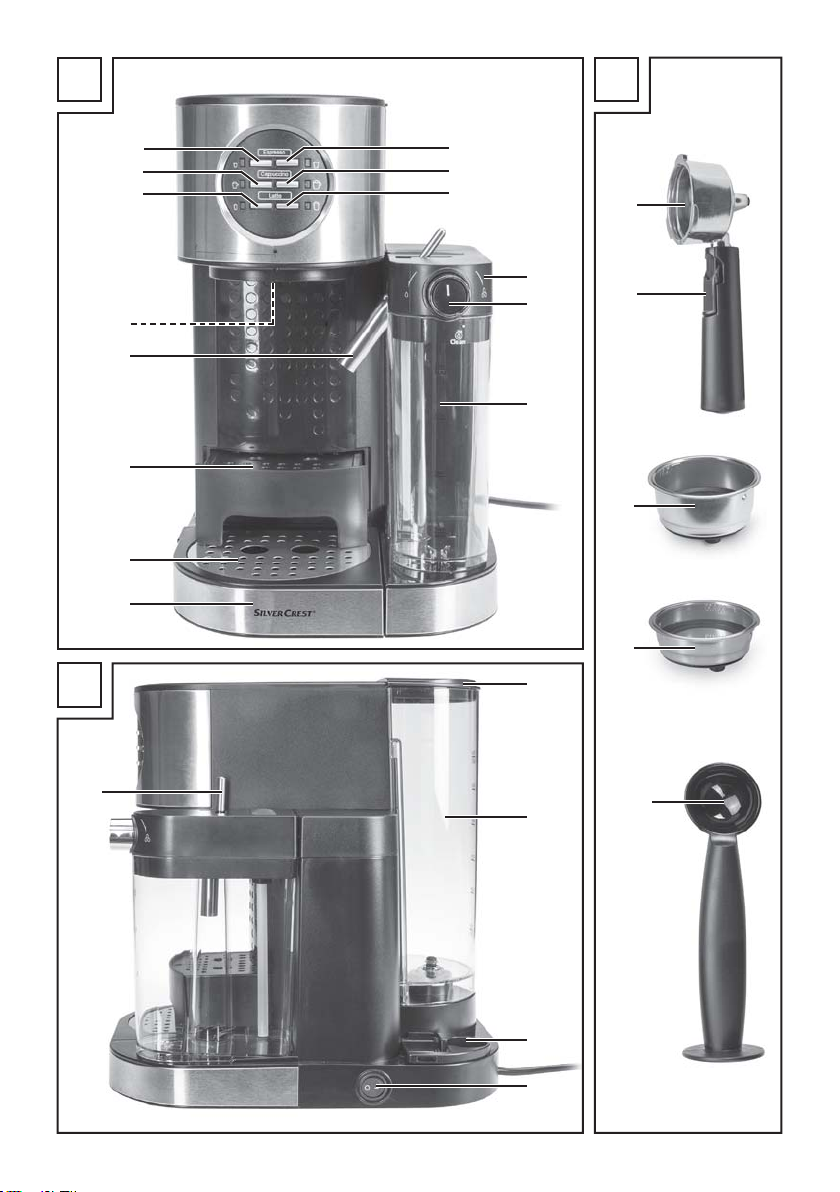
Appliance elements
Figure A:
“Double” espresso button
“Large” cappuccino button
“Large” latte button
Milk tank lid
“Milk quantity” knob
Milk tank
Drip tray
Drip grille
Extendable tray for small cups
Milk nozzle
- Espresso outlet
3 “Small” latte button
! “Small” cappuccino button
. “Small” espresso button (with adjacent control lamp)
Figure B:
0 Water tank lid
6 Water tank
1 Holders
% On/off switch
+ Lever for positioning the milk nozzle
(with adjacent control lamp)
(with adjacent control lamp)
(with adjacent control lamp)
(with adjacent control lamp)
(with adjacent control lamp)
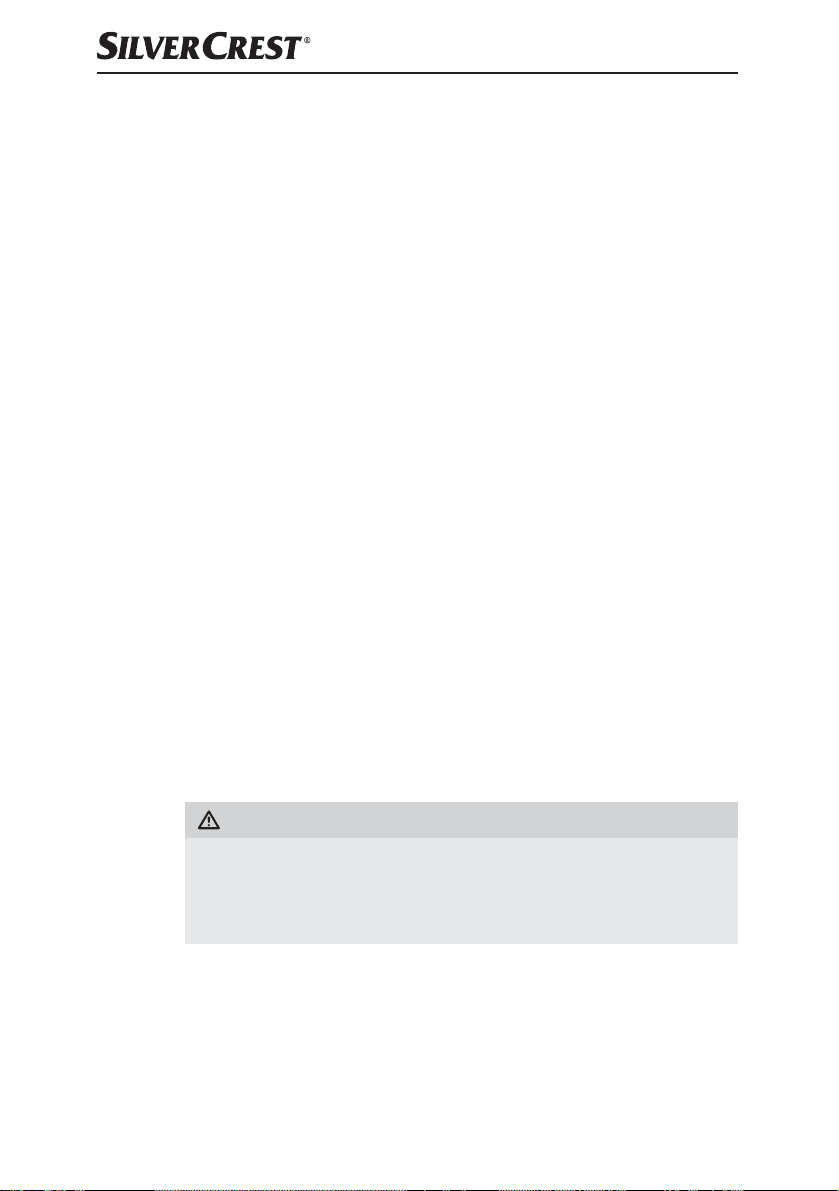
Figure C:
, Sieve holder
Sieve block
/ Large espresso sieve
Small espresso sieve
" Measuring spoon with compactor
■ 8 │ GB
│IE│
NI
SEMM 1470 A1
Page 12
Before first use
1) Clean the sieve holder ,, the measuring spoon ", the espresso sieves / ,
the drip grille , the drip tray , the tray for small cups the milk
tank , the milk tank lid , the water tank lid 0 and the water tank 6
as described in the section “Cleaning and care”.
2) Place the appliance on a level and heat-resistant surface. Ensure that the
mains outlet is in easy reach.
3) Insert the drip tray and place the drip grille on it.
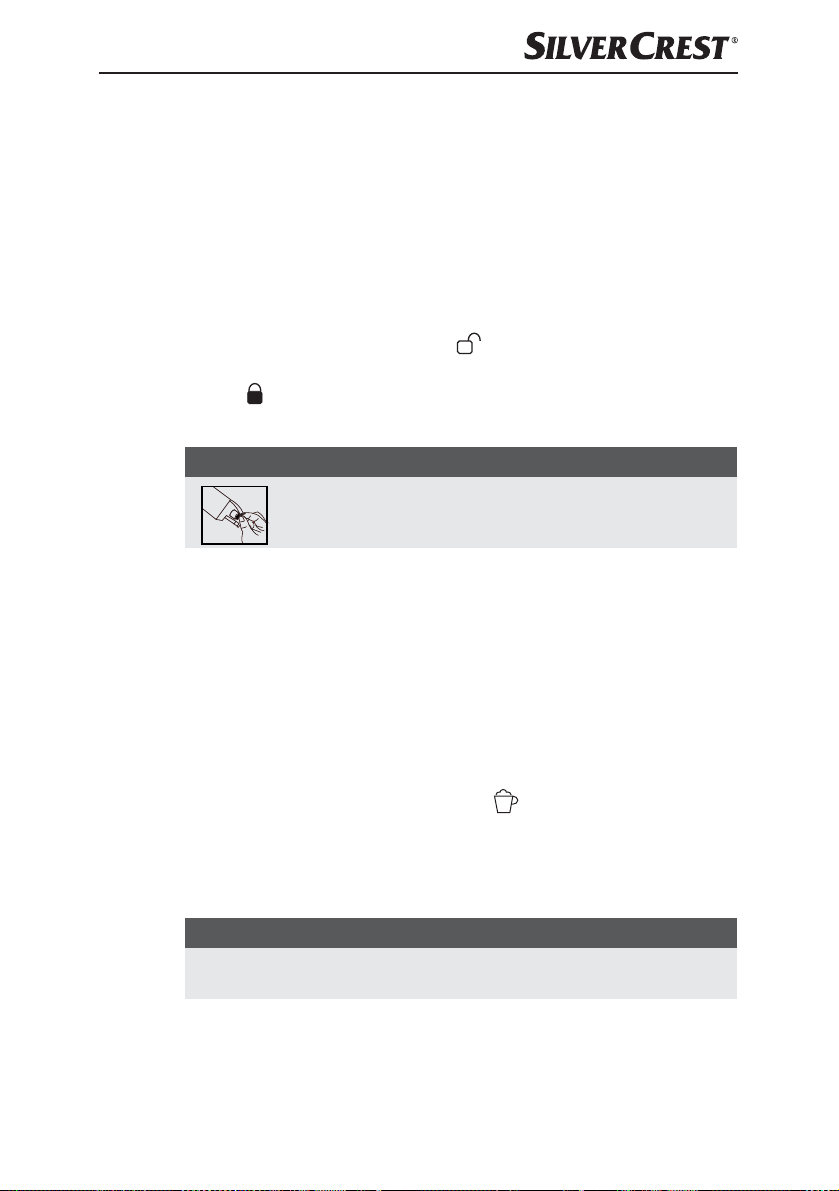
4) Insert the sieve holder , together with the espresso sieve (/or ) into
the appliance by inserting it at the “
turning it anticlockwise until the handle of the sieve holder , is pointing to
the “
” symbol.
5) Insert the plug into a mains power socket.
NOTE
Remove the orange transport restraint from the bottom of the
water tank 6!
6) Before first use, proceed as follows to clean the internal pipes:
– fill the water tank 6 with water (approx. 200 ml), and also the milk
tank (approx. 100 ml).
– Insert the water tank 6 and the milk tank in the appliance.
– Place a large cup on the drip grille .
– Set the milk nozzle so that the milk nozzle is pointing into the cup.
– Switch the appliance on using the on/off switch % (position I). All the
control lamps begin to flash. As soon as all the lamps light up permanently the appliance has heated up.
– Press the “Large” cappuccino button
coming out of the espresso outlet - and all control lamps light up
permanently. Repeat this process 2x.
– Switch the appliance off using the on/off switch % (position O).
– Empty the remaining water from the water tank 6 and the milk tank .
NOTE
► You should also clean the appliance as described here after long periods
out of use.
The appliance is now ready for use.
” marking on the appliance and then
. Wait until water stops
SEMM 1470 A1
GB│IE│NI │ 9 ■
Page 13

Operation
Filling the water tank
NOTE
► Use only fresh drinking water to prepare espresso/cappuccino/latte
macchiatto.
1) Remove the water tank lid 0 and pull the water tank 6 upwards and out
of the appliance.
2) Fill it with water to at least the Min marking. Never fill it with more water than
up to the Max marking.
3) Push the water tank 6 back onto the appliance. Ensure that the water tank 6
clicks back into place on the appliance.
4) Put the water tank lid 0 back on.
Filling the milk tank
If you want to prepare drinks that contain milk froth, such as cappuccino or latte
macchiato, you must fill the milk tank with milk.
NOTE
► You can use full fat milk, long-life milk or soya milk for this appliance.
1) Tilt the milk tank lightly upwards and, at the same time, pull it upwards
and forwards out of the appliance.
2) Take off the milk tank lid .
3) Fill it with milk to at least the Min marking. Never fill it with more milk than
up to the Max marking.
4) Replace the milk tank lid on the milk tank .
5) Push the milk tank back into the appliance so that it clicks into place.
■ 10 │ GB
NOTE
► After preparing your drink, if you want to keep the milk in the milk tank ,
put the milk tank into the refrigerator for storage.
NOTE
► If the milk tank is not in place or not properly inserted, both of the es-
presso control lamps /. light up. This shows that you can only prepare
espresso, as this does not require any milk.
│IE│
NI
SEMM 1470 A1
Page 14

Inserting the espresso sieves in the sieve holder
1) Place the large / or the small espresso sieve in the sieve holder ,:
– Make sure that the small indentation on the large / or small espresso
sieve lies on the indentation on the sieve holder , when you put it in.
– Then turn the large / or small espresso sieve a little so that it cannot
fall out.
NOTE
► Do not remove the used espresso sieve / until it has cooled down!
► To remove the espresso sieve / from the sieve holder , turn the
espresso sieve / until the indentation on the espresso sieve /
is over the indentation on the sieve holder ,. You can now remove the
espresso sieve / .
SEMM 1470 A1
GB│IE│NI │ 11 ■
Page 15
Adding espresso powder
1) Fill the small espresso sieve to the Max marking with espresso powder.
This corresponds to around 7g of powder or a level measuring spoon ".
Or...
Fill the large espresso sieve / to the Max marking with espresso powder.
This corresponds to around 7g + 7g of powder or two level measuring
spoons ".
2) Push down the espresso powder using the compactor on the measuring
spoon ". Add more espresso powder, if required, until the espresso sieve /
is filled up to the Max marking. Then compact the espresso powder again.
NOTE
► Compacting the espresso powder is a fundamentally important process
during the preparation of an espresso. If the espresso powder is compacted
very strongly, the espresso runs through more slowly and there is more
crema. If the espresso powder is not so strongly compacted, the espresso
runs through more quickly and it creates very little crema.
Inserting the sieve holder
1) Insert the sieve holder , together with the espresso sieve (/or ) in the
appliance by inserting it at the “
turning it anticlockwise until the handle of the sieve holder , is pointing to
the “
” symbol.
NOTE
► To remove the sieve holder , after preparing a drink, turn it slowly back
to the "
" position to prevent any coffee from spraying out.
” marking on the appliance and then
■ 12 │ GB
│IE│
NI
SEMM 1470 A1
Page 16
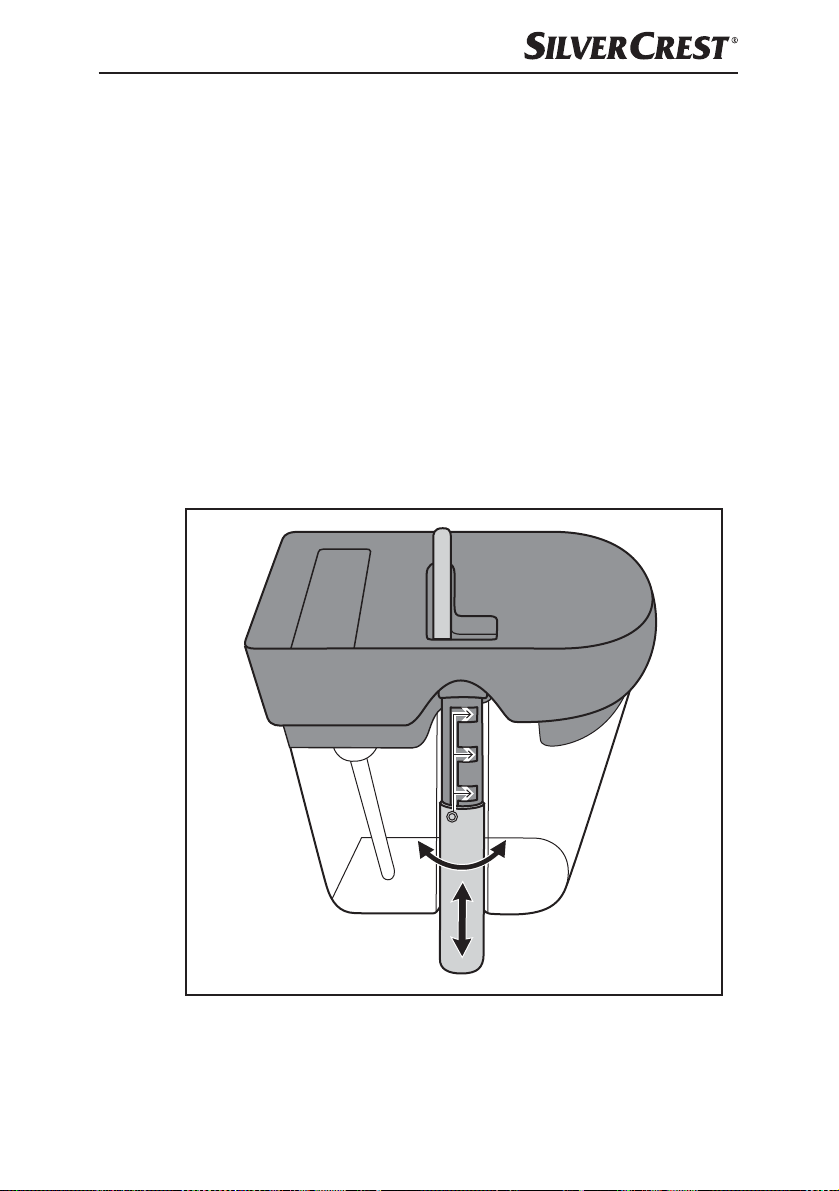
Setting the milk nozzle
For cappuccino and latte macchiato you will need to adjust the milk nozzle
depending on the cup size.
1) Swing the milk nozzle so that it is pointing into the glass/cup. Always use
the milk nozzle lever + to position the milk nozzle .
2) Turn the silver attachment on the milk nozzle a little to the rear so that it is
released.
3) Depending on the size of the glass/cup, push the silver attachment on the
milk nozzle downwards a little (or upwards, depending on its previous
position). The milk nozzle should extend down into the glass/cup to
prevent splashes. You can choose between 3 heights.
4) Once you have selected a height, turn the silver attachment on the milk
nozzle back to the front so that it clicks into place and no longer moves.
For the purpose of clarity, the adjustment of the milk nozzle is shown here
with the milk tank removed. There is, however, no need to remove the milk
tank from the appliance if you want to adjust the length of the milk nozzle .
SEMM 1470 A1
GB│IE│NI │ 13 ■
Page 17
Preparing drinks
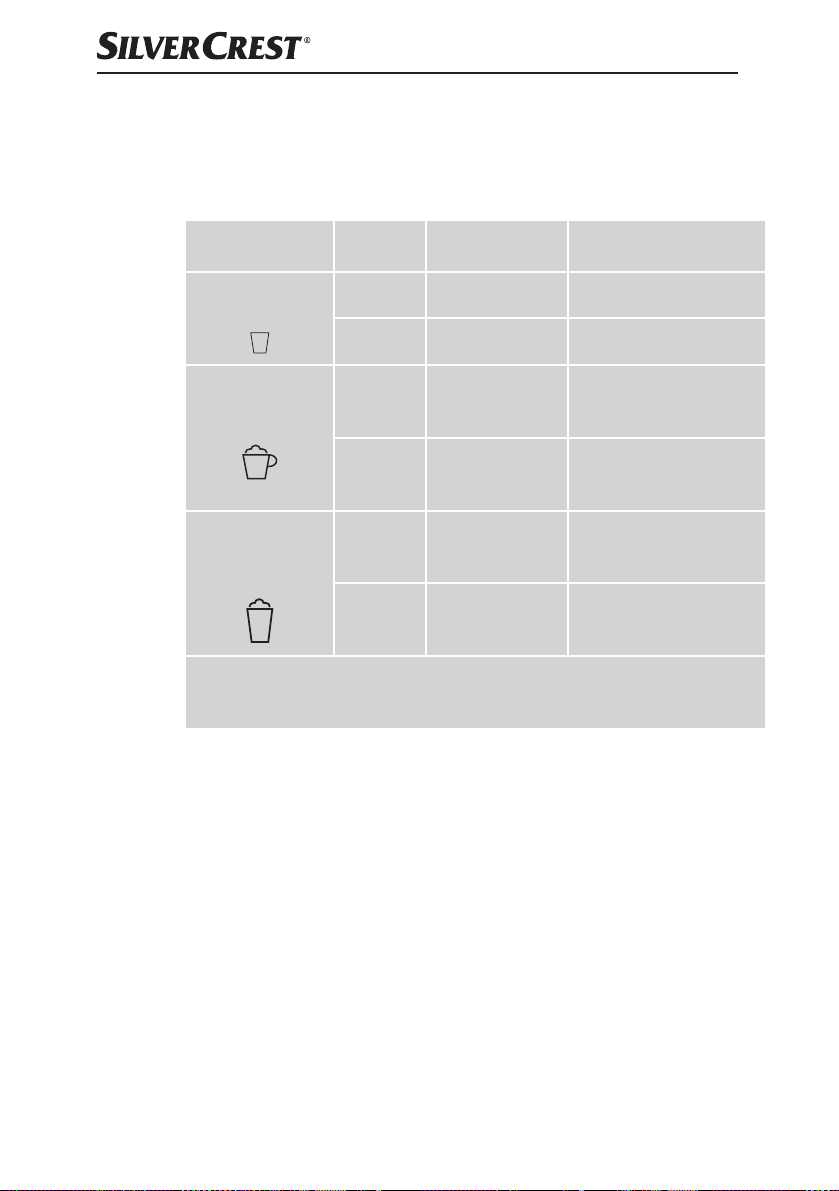
Selecting a suitable cup
Select a suitable cup for the kind of drink you are preparing.
Drink Size
Espresso
Cappuccino
Latte
macchiato
Note: The various drink quantities are controlled via the duration of the drink
output. In other words, for a double espresso the espresso flows for twice as
long out of the espresso outlet - as for a single espresso.
1) For small espresso or coffee cups, pull the tray for small cups out of the
appliance and place the cup on it.
2) For large cups or glasses, push the tray for small cups into the appliance
and place the glasses/cups on the drip grille .
3) If there is not enough room, remove the drip tray from the appliance and
place the glass directly on the base of the appliance.
Single approx. 40 ml approx. 20 - 70 ml
Double approx. 80 ml approx. 40 - 150 ml
Single approx. 170 ml
Double approx. 280 ml
Single approx. 350 ml
Double approx. 450 ml
Preset
quantity
Programmable
Time for preparation
of frothed milk:
5 - 40 sec
Time for preparation
of frothed milk:
5 - 70 sec
Time for preparation
of frothed milk:
5 - 70 sec
Time for preparation
of frothed milk:
5 - 90 sec
■ 14 │ GB
│IE│
NI
SEMM 1470 A1
Page 18
Preparing espresso
1) Ensure that there is enough water in the water tank 6. Add more water if
necessary.
2) Select whether you want a single or double espresso and fit the corresponding
espresso sieve /or in the sieve holder ,.
3) Add the espresso powder to the espresso sieve / and fit the sieve
holder ,.
4) Pull the tray for small cups out of the appliance.
5) Place a suitable cup on the tray for small cups .
6) Switch the appliance on using the on/off switch % and wait until all control
lamps light up permanently. The appliance has now heated up.
7) Press the “Small” espresso button .
The control lamp for the “Small” espresso button . lights up. Press the
“Double” espresso button
The control lamp for the “Double” espresso button
8) The appliance starts the brewing process; the corresponding control lamp
flashes during the preparation.
9) Wait until the espresso has stopped flowing out of the espresso outlet - and
all control lamps light up. You can now remove your espresso.
NOTE
► You can stop the preparation at any time by pressing any button.
10) Switch the appliance off using the on/off switch %.
11) Clean the appliance as described in the section “Cleaning and Care”.
if you want to prepare a single espresso.
if you want to prepare a double espresso.
lights up.
NOTE
► If you do not turn off the appliance with the on/off switch %, the appliance
will switch itself into power saving mode automatically after approx. 15
minutes if no other button is pushed. If you want to make another drink,
simply press any button. The appliance heats back up.
SEMM 1470 A1
GB│IE│NI │ 15 ■
Page 19
Setting the amount of espresso
You can set the quantity of espresso for the programmes “Small espresso” and
“Double espresso” individually:
“Small” espresso
– If you want to set a custom amount of espresso for the “Small” espresso
button .
about 3 seconds until the pump starts working. Espresso starts flowing
from the espresso outlet -.
– Stop the flow of espresso by pressing the “Small” espresso button .
again as soon as the required amount has flowed out. You can set a
quantity between 20 and 70ml.
The next time you prepare an espresso using the “Small” espresso button .
the new amount of espresso will be made.
NOTE
► If you want to reset the setting to the preprogrammed 40 ml, switch the
appliance off using the on/off switch %. When you switch the appliance
back on using the on/off switch % press and hold the "Small" espresso
button .
flashes 5 times. You can now release the button .. The programme has
been reset to 40 ml.
“Double” espresso
– If you want to set a custom amount of espresso for the “Double”
espresso button
flowing from the espresso outlet -.
– Stop the flow of espresso by pressing the “Double” espresso button
again as soon as the required amount has flowed out. You can set a
quantity between 40 and 150ml.
The next time you prepare an espresso using the “Double” espresso button
the new amount of espresso will be made.
, press and hold the “Small” espresso button . for
until the control lamp for the "Small" espresso button .
, press and hold the “Double” espresso button
for about 3 seconds until the pump starts working. Espresso starts
■ 16 │ GB
NOTE
► If you want to reset the setting to the preprogrammed 80 ml, switch the
appliance off using the on/off switch %. When you switch the appliance
back on using the on/off switch % press and hold the "Double" espresso
button until the control lamp for the "Double" espresso button flashes
5 times. You can now release the button . The programme has been
reset to 80 ml.
│IE│
NI
SEMM 1470 A1
Page 20

Preparing cappuccino
1) Ensure that there is enough water in the water tank 6. Add more water if
necessary.
2) Ensure that there is enough milk in the milk tank . Add more milk if necessary.
3) Select whether you want prepare a cappuccino with a single or double espresso and fit the corresponding espresso sieve / in the sieve holder ,.
4) Add the espresso powder to the espresso sieve / and fit the sieve
holder ,.
5) Place a suitable cup on the drip grille . Depending on the size of the cup,
you may also want to pull out the tray for small cups and place the cup
on this.
6) Set the milk nozzle so that it is pointing into the cup.
7) Use the “Milk quantity” knob to set how much milk you want to use for
your cappuccino:
Turn the “Milk quantity” knob to the left to reduce the amount of milk. Turn
the “Milk quantity” knob to the right to increase the amount of milk. Make
sure you do not turn the knob further than the “
will be in cleaning mode (see section “Cleaning and care”).
NOTE
► You can even correct the amount of milk during preparation by turning the
"Milk quantity" knob .
8) Switch the appliance on using the on/off switch % and wait until all control
lamps light up permanently. The appliance has now heated up.
9) Press the “Small” cappuccino button !
cappuccino. The control lamp for the “Small” cappuccino button !lights
up. Press the “Large” cappuccino button
large cappuccino. The control lamp for the “Large” cappuccino button
lights up.
10) The appliance starts the brewing process; the corresponding control lamp
flashes during the preparation.
11) Wait until the espresso has stopped flowing out of the espresso outlet -, the
milk has stopped flowing out of the milk nozzle and all control lamps light
up. You can now remove your cappuccino.
” marking. Otherwise you
if you want to prepare a single
if you want to prepare a
SEMM 1470 A1
GB│IE│NI │ 17 ■
Page 21

NOTE
► You can stop the preparation at any time by pressing any button.
NOTE
►
If you want to add a little extra frothed milk to your drink: press the "Large"
cappuccino button
cappuccino button !
button light up and frothed milk comes out of the milk nozzle .
Stop the milk output by pressing any button. The milk will stop coming out
automatically after 70 seconds.
12) Switch the appliance off using the on/off switch %.
13) Clean the appliance as described in the section “Cleaning and Care”.
NOTE
► If you do not turn off the appliance with the on/off switch %, the appliance
will switch itself into power saving mode automatically after approx. 15
minutes if no other button is pushed. If you want to make another drink,
simply press any button. The appliance heats back up.
2x in a row. The control lamp for the "Small"
and the control lamp for the "Large" cappuccino
Changing the duration of the milk froth output
NOTE
► You can adjust the amount of the milk froth by turning the "Milk quantity"
knob and also the duration of the milk output. The further you turn the
"Milk quantity" knob toward "
out of the milk nozzle over the same amount of time. Make sure you
do not turn the "Milk quantity" knob further than the "
Otherwise you will be in cleaning mode (see section "Cleaning and care").
You can customise the duration of the milk froth output for the “Small cappuccino” and “Large cappuccino” programmes:
" the more milk/milk froth will come
" marking.
■ 18 │ GB
│IE│
NI
SEMM 1470 A1
Page 22

“Small” cappuccino
– Press and hold the “Small” cappuccino button !
until the pump starts to work. Milk froth comes out of the milk nozzle.
– Once the desired quantity of milk froth has been produced, stop milk
froth production by pressing the “Small” cappuccino button !
again. You can set a duration of 5–40 seconds.
– Following the milk froth production, the espresso comes out of the
espresso outlet - to prepare the cappuccino.
– The next time you prepare a cappuccino using the “Small “ cappuccino
button !
output.
“Large” cappuccino
the newly programmed duration will be used for milk
for about 3 seconds
– Press and hold the “Large” cappuccino button
seconds until the pump starts to work. Milk froth comes out of the milk
nozzle.
– Once the desired quantity of milk froth has been produced, stop milk
froth production by pressing the “Large” cappuccino button
again. You can set a duration of 5–70 seconds.
– Following the milk froth production, the espresso comes out of the
espresso outlet - to prepare the cappuccino.
– The next time you prepare a cappuccino using the “Large” cappuccino
button
output.
the newly programmed duration will be used for milk
Preparing latte macchiato
1) Ensure that there is enough water in the water tank 6. Add more water if
necessary.
2) Ensure that there is enough milk in the milk tank . Add more milk if necessary.
3) Select whether you want prepare a latte macchiato with a single or double
espresso and fit the corresponding espresso sieve / in the sieve holder ,.
4) Add the espresso powder to the espresso sieve / and fit the sieve
holder ,.
5) Place a suitable cup on the drip grille .
6) Set the milk nozzle so that it is pointing into the cup.
for about 3
SEMM 1470 A1
GB│IE│NI │ 19 ■
Page 23

7) Use the “Milk quantity” knob to set how much milk you want to use for your
latte macchiato. Turn the “Milk quantity” knob to the left to reduce the amount
of milk. Turn the “Milk quantity” knob to the right to increase the amount
of milk. Make sure you do not turn the knob further than the “
Otherwise you will be in cleaning mode (see section “Cleaning and care”).
NOTE
► You can even correct the amount of milk during preparation by turning the
"Milk quantity" knob .
8) Switch the appliance on using the on/off switch % and wait until all control
lamps light up permanently. The appliance has now heated up.
9) Press the “Small” latte button 3
chiato. The control lamp for the “Small” latte button 3
Press the “Large” latte button
chiato. The control lamp for the “Large” latte button
10) The appliance starts the brewing process; the corresponding control lamp
flashes during the preparation.
11) Wait until the espresso has stopped flowing out of the espresso outlet -, the
milk has stopped flowing out of the milk nozzle and all control lamps light
up. You can now remove your latte macchiato.
NOTE
► You can stop the preparation at any time by pressing any button.
if you want to prepare a small latte mac-
if you want to prepare a large latte mac-
” marking.
lights up.
lights up.
■ 20 │ GB
NOTE
► If you want to add a little extra frothed milk to your drink: Press the "Large"
cappuccino button
cappuccino button !
button
Stop the milk output by pressing any button. The milk will stop coming out
automatically after 70 seconds.
│IE│
NI
light up and frothed milk comes out of the milk nozzle .
2x in a row. The control lamp for the "Small"
and the control lamp for the "Large" cappuccino
SEMM 1470 A1
Page 24

12) Switch the appliance off using the on/off switch %.
13) Clean the appliance as described in the section “Cleaning and Care”.
NOTE
►
If you do not turn off the appliance with the on/off switch %, the appliance
will switch itself into power saving mode automatically after approx. 15
minutes if no other button is pushed. If you want to make another drink,
simply press any button. The appliance heats back up.
Changing the duration of the milk froth output
NOTE
► You can adjust the amount of the milk froth by turning the "Milk quantity"
knob and also the duration of the milk output. The further you turn the
"Milk quantity" knob toward "
out of the milk nozzle during the same amount of time. Make sure you
do not turn the "Milk quantity" knob further than the "
Otherwise you will be in cleaning mode (see section "Cleaning and care").
You can customise the duration of the milk froth output for the programmes
“Small latte” and “Large latte”.
“Small” latte
" the more milk/milk froth will come
" marking.
SEMM 1470 A1
– Press and hold the “Small” latte button 3
the pump starts to work. Milk froth comes out of the milk nozzle.
– Once the desired quantity of milk froth has been produced, stop milk
froth production by pressing the “Small” latte button 3 again. You
can set a duration of 5–70 seconds.
– Following the milk froth production, the espresso comes out of the
espresso outlet - to prepare the latte macchiato.
– The next time you prepare a latte macchiato using the “Small” latte but-
ton 3
the newly programmed duration will be used for milk output.
for about 3 seconds until
GB│IE│NI │ 21 ■
Page 25

“Large” latte
Frothed milk
You can also produce only frothed milk, for instance, to make hot chocolate.
1) Fit the sieve holder ,.
2) Ensure that there is enough milk in the milk tank . Add more milk if neces-
sary.
3) Place a suitable cup on the drip grille . If you are using a small container,
pull out the tray for small cups and place the container on it.
4) Set the milk nozzle so that it is pointing into the cup.
5) Switch the appliance on using the on/off switch % and wait until all control
lamps light up permanently. The appliance has now heated up.
6) Press the “Large” cappuccino button
for the “Small” cappuccino button !
“Large” cappuccino button
the milk nozzle .
7) Stop the milk output by pressing any button. The milk will stop coming out
automatically after 70 seconds.
8) Switch the appliance off using the on/off switch %.
9) Clean the appliance as described in the section “Cleaning and Care”.
– Press and hold the “Large” latte button
the pump starts to work. Milk froth comes out of the milk nozzle.
– Once the desired quantity of milk froth has been produced, stop milk
froth production by pressing the “Large” latte button
can set a duration of 5–90 seconds.
– Following the milk froth production, the espresso comes out of the
espresso outlet - to prepare the latte macchiato.
– The next time you prepare a latte macchiato using the “Large” latte but-
ton
the newly programmed duration will be used for milk output.
light up and frothed milk comes out of
for about 3 seconds until
again. You
2x in a row. The control lamp
and the control lamp for the
■ 22 │ GB
NOTE
► If you do not turn off the appliance with the on/off switch %, the appliance
will switch itself into power saving mode automatically after approx. 15
minutes if no other button is pushed. If you want to make another drink,
simply press any button. The appliance heats back up.
│IE│
NI
SEMM 1470 A1
Page 26

Cleaning and care
WARNING – RISK OF INJURY!
■ Always remove the plug from the mains power socket before you clean the
appliance. Danger of electric shock!
Never immerse the appliance in water or other
liquids. Danger of electric shock!
■ Always allow the appliance to cool down before cleaning it. Risk of burns!
Cleaning the milk nozzle and milk tank
CAUTION – PROPERTY DAMAGE
■ Never use abrasive, aggressive or chemical cleaning agents to clean the
appliance. These could damage the outer surfaces of the appliance.
1) Switch the appliance off using the on/off switch % and pull the mains plug
from the wall socket.
2) Remove the milk tank from the appliance and take off the milk tank lid .
3) Clean the milk tank lid and the milk tank in warm water with a little
mild washing-up liquid.
4) Rinse both parts off with clear water and then dry them well.
5) Fill the milk tank with water (approx. 100 ml), replace the milk tank lid
and push the milk tank back into the appliance.
6) Place a suitably large, empty container onto the drip grille and move the
milk nozzle so that it points into the container.
7) Insert the plug into a mains power socket and switch on the appliance using
the on/off switch %.
8) Wait until all control lamps light up permanently.
9) Set the “Milk quantity” knob to the position “Clean”
10) Press the “Large” latte button
the “Large”
“Large”
steam comes out of the milk nozzle .
SEMM 1470 A1
.
2x in a row. The control lamps of
and “Small” cappuccino buttons ! , as well as the
and “Small” latte buttons 3 flash alternately and hot
GB│IE│NI │ 23 ■
Page 27

11) Wait until no more steam comes out of the milk nozzle . If you want to
stop the cleaning process at anytime, press the “Large” latte button
12) Remove the milk tank and empty out any remaining water.
13) Switch the appliance off using the on/off switch %.
NOTE
► If you want to descale the milk nozzle and the milk tank add a little
standard commercial descaler for coffee machines to the milk tank and
proceed as described above. You should also observe the instructions for
the descaler.
► After descaling, clean once again using clean water only.
NOTE
► The milk tank is suitable for cleaning in the dishwasher. Make sure that
the milk tank does not get jammed in the dishwasher.
For additional cleaning, you can remove the milk nozzle :
1) Take off the milk tank lid .
2) Move the milk nozzle into an upright position so that the milk nozzle lever +
is pointing directly upwards.
3) Then press the positioning lever + and the milk nozzle at the same time
towards the recess on the milk tank lid so that they disconnect.
.
■ 24 │ GB
│IE│
NI
SEMM 1470 A1
Page 28

4) Pull the milk nozzle with the positioning lever + downwards and out of
the milk tank lid .
5) Undo the silver attachment on the milk nozzle (see section “Setting the
milk nozzle”) and pull it downwards and off.
6) Clean the silver attachment and the milk nozzle that you have removed
from the milk tank lid along with the positioning lever + in warm water
with a little washing-up liquid. Rinse all parts afterwards with plenty of clean
water.
7) Afterwards, replace the silver attachment onto the milk nozzle and set it
at the desired height (see section “Setting the milk nozzle”).
8) Push the milk nozzle and the positioning lever +back into the milk tank
lid and push the connector assembly all the way back into the appliance.
Cleaning the espresso sieves, sieve holder and
espresso outlet
Remove all used powder from the espresso sieves / after every drink preparation.
Clean the espresso sieves / , the sieve holder , and the espresso outlet -
regularly.
1) After you have prepared espresso/cappuccino/latte macchiato and removed
the sieve holder ,:
– Fix the espresso sieve in place by flipping the sieve blocker upwards
and holding it in place.
– Knock the espresso powder out of the espresso sieve / .
– Flip the sieve blocker back down again.
– Remove the espresso sieve / from the sieve holder ,.
– Clean the espresso sieve / and the sieve holder , in warm water
with a little mild washing-up liquid. Rinse all the parts off afterwards
using clean water.
NOTE
► The espresso sieves / are also suitable for cleaning in the dishwasher.
2) Replace the sieve holder , in the appliance without the espresso sieve / .
3) Fill the water tank 6 with water (approx. 200ml).
4) Place a suitably large, empty container onto the drip grille .
5) Switch the appliance on using the on/off switch % and wait until all control
lamps light up permanently.
6) Press the “Small” espresso button .
outlet - and rinses out the pipes. As soon as the water stops coming out of
the espresso outlet -, the cleaning process is complete.
. The water comes out of the espresso
SEMM 1470 A1
GB│IE│NI │ 25 ■
Page 29

NOTE
► If you want to descale the water tank 6 and the pipes, add a little stand-
ard commercial descaler for coffee machines to the water tank 6 and
proceed as described above. You should also observe the instructions for
the descaler.
► After descaling, clean once again using clean water only.
NOTE
► You can store the sieve holder , and the espresso sieves / in the
holders 1 next to the water tank.
Cleaning the water tank
1) Pull the plug from the mains socket and switch the appliance off using the
on/off switch %.
2) Remove the water tank 6 from the appliance and pour out any remaining
water.
3) Clean the water tank 6 and the water tank lid 0 in warm water with a little
mild washing-up liquid. Rinse both parts off with clear water to remove any
remaining detergent and then dry them well.
4) Dry the parts thoroughly and replace them in the appliance.
Cleaning the housing
Clean the housing with a damp cloth. For stubborn soiling use a mild detergent
on the cloth.
Ensure that the appliance is completely dry before the next use.
■ 26 │ GB
│IE│
NI
SEMM 1470 A1
Page 30

Cleaning the accessories
1) Pull the tray for small cups forwards out of the appliance to clean it.
2) Clean the measuring spoon ", the drip tray , the extendable tray for
small cups and the drip grille in warm water with a little washing-up
liquid. Rinse all parts afterwards with plenty of clean water.
3) Dry all parts thoroughly, before replacing them in the appliance.
NOTE
► The drip tray and the tray for small cups are also suitable for clean-
ing in the dishwasher. Make sure that the parts do not get jammed in the
dishwasher.
Troubleshooting
Malfunction Cause Remedy
• The espresso powder is too
moist and/or compressed too
tightly.
• Re-prepare the espresso.
However, this time do not
compress it so tightly, or
replace it completely.
The espresso no longer
flows out
The espresso drips over
the edges of the sieve
holder , instead of
from the openings.
The pump is unusually
noisy.
SEMM 1470 A1
• No water in the water tank 6.
• The holes of the sieve holder
openings are blocked.
• The sieve holder , is not
correctly inserted.
• The sieve holder openings
are blocked.
• There are espresso powder
residues on the edges of the
sieve holder ,.
• The water tank 6 is empty.
• Fill the water tank 6
with water.
• Clean the sieve holder ,.
• Insert the sieve holder ,
correctly.
• Clean the sieve holder ,.
• Clean the espresso
powder residues from
the edges of the sieve
holder ,.
• Fill the water tank 6
with water.
GB│IE│NI │ 27 ■
Page 31

The crema is too light
(the espresso runs out
of the sieve holder ,
quickly)
• Not enough espresso powder.
• The espresso powder is too
coarsely ground.
• Use more espresso
powder.
• Use only espresso
powder that is specially
produced for making
espresso.
The crema is too dark
(the espresso runs out
of the sieve carrier ,
slowly)
• Too much espresso powder.
• The powder is too finely
Technical details
Mains voltage 220 - 240 V ∼ / 50 Hz
Rated power 1230 - 1470 W
Pump pressure approx. 1.5 MPa (15 bar)
Disposal
Never dispose of the appliance in your normal domestic waste.
This product is subject to the provisions of European Directive
2012/19/EU-WEEE (Waste Electrical and Electronic Equipment).
Dispose of the appliance via an approved disposal company or your municipal
waste facility. Please comply with all applicable regulations. Please contact your
waste disposal facility if you are in any doubt.
ground.
• Use less espresso
powder.
• Use only espresso
powder that is specially
produced for making
espresso.
Food-safe
■ 28 │ GB
│IE│
NI
SEMM 1470 A1
Page 32

Kompernass Handels GmbH warranty
Dear Customer,
This appliance has a 3-year warranty valid from the date of purchase. If this product
has any faults, you, the buyer, have certain statutory rights. Your statutory rights are
not restricted in any way by the warranty described below.
Warranty conditions
The validity period of the warranty starts from the date of purchase. Please keep your
original receipt in a safe place. This document will be required as proof of purchase.
If any material or production fault occurs within three years of the date of purchase
of the product, we will either repair or replace the product for you at our discretion.
This warranty service is dependent on you presenting the defective appliance and
the proof of purchase (receipt) and a short written description of the fault and its time
of occurrence.
If the defect is covered by the warranty, your product will either be repaired or replaced
by us. The repair or replacement of a product does not signify the beginning of a
new warranty period.
Warranty period and statutory claims for defects
The warranty period is not prolonged by repairs effected under the warranty. This also
applies to replaced and repaired components. Any damage and defects present at
the time of purchase must be reported immediately after unpacking. Repairs carried out
after expiry of the warranty period shall be subject to a fee.
Scope of the warranty
This appliance has been manufactured in accordance with strict quality guidelines
and inspected meticulously prior to delivery.
The warranty covers material faults or production faults. The warranty does not extend
to product parts subject to normal wear and tear or fragile parts such as switches,
batteries, baking moulds or parts made of glass.
The warranty does not apply if the product has been damaged, improperly used or
improperly maintained. The directions in the operating instructions for the product
regarding proper use of the product are to be strictly followed. Uses and actions that
are discouraged in the operating instructions or which are warned against must be
avoided.
This product is intended solely for private use and not for commercial purposes. The
warranty shall be deemed void in cases of misuse or improper handling, use of force
and modifications/repairs which have not been carried out by one of our authorised
Service centres.
SEMM 1470 A1
GB│IE│NI │ 29 ■
Page 33

Warranty claim procedure
To ensure quick processing of your case, please observe the following instructions:
▯ Please have the till receipt and the item number (e.g. IAN 12345) available as
proof of purchase.
▯ You will find the item number on the type plate, an engraving on the front page of
the instructions (bottom left), or as a sticker on the rear or bottom of the appliance.
▯ If functional or other defects occur, please contact the service department listed
either by telephone or by e-mail.
▯ You can return a defective product to us free of charge to the service address
that will be provided to you. Ensure that you enclose the proof of purchase (till
receipt) and information about what the defect is and when it occurred.
You can download these instructions along with many other manuals, product
videos and software on www.lidl-service.com.
Service
Service Great Britain
Tel.: 0871 5000 720 (£ 0.10/Min.)
E-Mail: kompernass@lidl.co.uk
Service Ireland
Tel.: 1890 930 034
(0,08 EUR/Min., (peak))
(0,06 EUR/Min., (off peak))
E-Mail: kompernass@lidl.ie
IAN 277727
Importer
Please note that the following address is not the service address. Please use the
service address provided in the operating instructions.
KOMPERNASS HANDELS GMBH
BURGSTRASSE 21
44867 BOCHUM
GERMANY
www.kompernass.com
■ 30 │ GB
│IE│
NI
SEMM 1470 A1
Page 34

Inhaltsverzeichnis
Einführung ...............................................32
Urheberrecht. . . . . . . . . . . . . . . . . . . . . . . . . . . . . . . . . . . . . . . . . . . . . . . . . . . . . . .32
Haftungsbeschränkung ...............................................32
Warnhinweise ......................................................32
Bestimmungsgemäße Verwendung .....................................33
Lieferumfang / Transportinspektion .....................................34
Entsorgung der Verpackung ...........................................34
Sicherheitshinweise .......................................35
Geräteelemente ..........................................38
Vor der ersten Inbetriebnahme ..............................39
Inbetriebnahme ..........................................40
Wassertank befüllen .................................................40
Milchtank befüllen ..................................................40
Espressosiebe in Siebträger einsetzen ...................................41
Espressopulver einfüllen ..............................................42
Siebträger einsetzen .................................................42
Milchdüse einstellen .................................................43
Getränk zubereiten .......................................44
Geeignete Tasse auswählen ...........................................44
Espresso zubereiten .................................................45
Cappuccino zubereiten ..............................................47
Latte Macchiato zubereiten ...........................................49
Aufgeschäumte Milch ................................................52
Reinigen und Pflegen ......................................53
Milchdüse und Milchtank reinigen ......................................53
Espressosiebe, Siebträger und Espressoauslauf reinigen .....................55
Wassertank reinigen .................................................56
Gehäuse reinigen ...................................................56
Zubehörteile reinigen ................................................57
Fehlerbehebung ..........................................57
Technische Daten .........................................58
Entsorgung ..............................................58
Garantie der Kompernaß Handels GmbH .....................59
Service ...........................................................60
Importeur .........................................................60
SEMM 1470 A1
DE│AT│CH
│
31 ■
Page 35

Einführung
Herzlichen Glückwunsch zum Kauf Ihres neuen Gerätes.
Sie haben sich damit für ein hochwertiges Produkt entschieden. Die Bedienungsan-
leitung ist Bestandteil dieses Produkts. Sie enthält wichtige Hinweise für Sicherheit,
Gebrauch und Entsorgung. Machen Sie sich vor der Benutzung des Produkts mit
allen Bedien- und Sicherheitshinweisen vertraut. Benutzen Sie das Produkt nur
wie beschrieben und für die angegebenen Einsatzbereiche. Händigen Sie alle
Unterlagen bei Weitergabe des Produkts an Dritte mit aus.
Urheberrecht
Diese Dokumentation ist urheberrechtlich geschützt.
Jede Vervielfältigung, bzw. jeder Nachdruck, auch auszugsweise, sowie die
Wiedergabe der Abbildungen, auch im veränderten Zustand, ist nur mit schriftlicher
Zustimmung des Herstellers gestattet.
Haftungsbeschränkung
Alle in dieser Bedienungsanleitung enthaltenen technischen Informationen, Daten
und Hinweise für die Bedienung entsprechen dem letzten Stand bei Drucklegung
und erfolgen unter Berücksichtigung unserer bisherigen Erfahrungen und Erkenntnisse nach bestem Wissen.
Aus den Angaben, Abbildungen und Beschreibungen in dieser Anleitung können
keine Ansprüche hergeleitet werden.
Der Hersteller übernimmt keine Haftung für Schäden aufgrund von Nichtbeachtung der Anleitung, nicht bestimmungsgemäßer Verwendung, unsachgemäßen
Reparaturen, unerlaubt vorgenommener Veränderungen oder Verwendung nicht
zugelassener Ersatzteile.
Warnhinweise
In der vorliegenden Bedienungsanleitung werden folgende Warnhinweise
verwendet:
WARNUNG
Ein Warnhinweis dieser Gefahrenstufe kennzeichnet eine mögliche gefährliche Situation.
Falls die gefährliche Situation nicht vermieden wird, kann dies zu Verletzungen
führen.
► Die Anweisungen in diesem Warnhinweis befolgen, um Verletzungen von
Personen zu vermeiden.
■ 32 │ DE
│AT│
CH
SEMM 1470 A1
Page 36

ACHTUNG
Ein Warnhinweis dieser Gefahrenstufe kennzeichnet einen
möglichen Sachschaden.
Falls die Situation nicht vermieden wird, kann dies zu Sachschäden führen.
► Die Anweisungen in diesem Warnhinweis befolgen, um Sachschäden zu
vermeiden.
HINWEIS
► Ein Hinweis kennzeichnet zusätzliche Informationen, die den Umgang mit
dem Gerät erleichtern.
Bestimmungsgemäße Verwendung
Dieses Gerät dient ausschließlich der Zubereitung von Getränken für den häuslichen Gebrauch. Es ist ausschließlich für die Nutzung in privaten Haushalten
bestimmt. Nutzen Sie es nicht gewerblich.
Eine andere oder darüber hinausgehende Benutzung gilt als nicht bestimmungsgemäß.
WARNUNG
Gefahr durch nicht bestimmungsgemäße Verwendung!
Von dem Gerät können bei nicht bestimmungsgemäßer Verwendung und/
oder andersartiger Nutzung Gefahren ausgehen.
► Das Gerät ausschließlich bestimmungsgemäß verwenden.
► Die in dieser Bedienungsanleitung beschriebenen Vorgehensweisen
einhalten.
Ansprüche jeglicher Art wegen Schäden aus nicht bestimmungsgemäßer Verwendung sind ausgeschlossen.
Das Risiko trägt allein der Benutzer.
SEMM 1470 A1
DE│AT│CH
│
33 ■
Page 37

Lieferumfang / Transportinspektion
WARNUNG
Erstickungsgefahr!
► Verpackungsmaterialien dürfen nicht zum Spielen verwendet werden.
Es besteht Erstickungsgefahr.
Das Gerät wird standardmäßig mit folgenden Komponenten geliefert:
▯ Espressomaschine
▯ Siebträger
▯ großes Espressosieb
▯ kleines Espressosieb
▯ Messlöffel mit Stopfer
▯ Bedienungsanleitung
HINWEIS
► Prüfen Sie die Lieferung auf Vollständigkeit und auf sichtbare Schäden.
► Bei einer unvollständigen Lieferung oder Schäden infolge mangelhafter
Verpackung oder durch Transport wenden Sie sich an die Service-Hotline.
Entsorgung der Verpackung
Die Verpackung schützt das Gerät vor Transportschäden. Die Verpackungsmaterialien sind nach umweltverträglichen und entsorgungstechnischen Gesichtspunkten ausgewählt und deshalb recyclebar.
Die Rückführung der Verpackung in den Materialkreislauf spart Rohstoffe und
verringert das Abfallaufkommen. Entsorgen Sie nicht mehr benötigte Verpackungsmaterialien gemäß den örtlich geltenden Vorschriften.
■ 34 │ DE
HINWEIS
► Heben Sie wenn möglich die Originalverpackung während der Garan-
tiezeit des Gerätes auf, um das Gerät im Garantiefall ordnungsgemäß
verpacken zu können.
│AT│
CH
SEMM 1470 A1
Page 38

Sicherheitshinweise
Beachten Sie für einen sicheren Umgang mit dem Gerät die
folgenden Sicherheitshinweise:
WARNUNG - VERLETZUNGSGEFAHR!
■ Kontrollieren Sie das Gerät vor der Verwendung auf äußere,
sichtbare Schäden. Nehmen Sie ein beschädigtes oder heruntergefallenes Gerät nicht in Betrieb.
■ Das Gerät und seine Anschlussleitung sind von Kindern jünger
als 8 Jahren fernzuhalten.
■ Das Gerät kann von Kindern ab 8 Jahren benutzt werden,
wenn sie beaufsichtigt oder bezüglich des sicheren Gebrauchs
des Gerätes unterwiesen wurden und die daraus resultierenden Gefahren verstanden haben.
■ Das Gerät kann von Personen mit reduzierten physischen,
sensorischen oder mentalen Fähigkeiten oder Mangel an
Erfahrung und/oder Wissen benutzt werden, wenn sie beaufsichtigt oder bezüglich des sicheren Gebrauchs des Gerätes
unterwiesen wurden und die daraus resultierenden Gefahren
verstanden haben.
■ Reinigung und Benutzer-Wartung dürfen nicht von Kindern
durchgeführt werden, es sei denn, sie sind 8 Jahre oder älter
und beaufsichtigt.
■ Kinder dürfen nicht mit dem Gerät spielen.
■ Lassen Sie Reparaturen am Gerät nur von autorisierten Fach-
betrieben oder dem Kundenservice durchführen. Durch unsachgemäße Reparaturen können erhebliche Gefahren für
den Benutzer entstehen. Zudem erlischt der Garantieanspruch.
Tauchen Sie das Gerät nicht in Wasser oder andere Flüs-
sigkeiten. Gefahr eines elektrischen Schlages!
SEMM 1470 A1
DE│AT│CH
│
35 ■
Page 39

■ Fassen Sie das Gerät niemals mit nassen oder feuchten Hän-
den an.
■ Lassen Sie beschädigte Netzstecker oder Netzkabel sofort
von autorisiertem Fachpersonal oder dem Kundenservice austauschen, um Gefährdungen zu vermeiden.
■ Verbrennungsgefahr! Einige Teile werden während der Benut-
zung sehr heiß!
■ Bei der Benutzung des Gerätes entstehen heiße Dampfschwa-
den. Achten Sie darauf, dass Sie sich nicht daran verbrühen!
Halten Sie ausreichenden Abstand zum Dampf.
■ Schließen Sie das Gerät nur an eine vorschriftsmäßig installierte
und geerdete Netzsteckdose an.
ACHTUNG - SACHSCHÄDEN
■ Defekte Bauteile dürfen nur gegen Original-Ersatzteile ausge-
tauscht werden. Nur bei diesen Teilen ist gewährleistet, dass
sie die Sicherheitsanforderungen erfüllen werden.
■ Schützen Sie das Gerät vor Feuchtigkeit und dem Eindringen
von Flüssigkeiten.
■ Schützen Sie das Gerät vor Stößen, Staub, Chemikalien, star-
ken Temperaturschwankungen und zu nahen Wärmequellen
(Öfen, Heizkörper).
■ 36 │ DE
│AT│
CH
SEMM 1470 A1
Page 40

■ Tauchen Sie das Gerät niemals in Wasser oder andere Flüs-
sigkeiten.
■ Ziehen Sie immer den Netzstecker aus der Netzsteckdose;
ziehen Sie niemals am Kabel.
■ Lassen Sie das Gerät während des Betriebes niemals unbeauf-
sichtigt.
■ Benutzen Sie keine externe Zeitschaltuhr oder ein separates
Fernwirksystem um das Gerät zu betreiben.
■ Betreiben Sie das Gerät niemals in Räumen, in denen sich
Temperaturen unter oder um 0°C befinden. Bei Gefrieren des
Wassers in den Leitungen oder im Wassertank kann das Gerät
beschädigt werden.
■ Betreiben Sie das Gerät niemals im Freien. Dieses Gerät ist
nur für die Verwendung in Innenräumen vorgesehen.
HINWEIS
► Eine Reparatur des Gerätes während der Garantiezeit darf
nur von einem vom Hersteller autorisierten Kundendienst
vorgenommen werden, sonst besteht bei nachfolgenden
Schäden kein Garantieanspruch mehr.
SEMM 1470 A1
DE│AT│CH
│
37 ■
Page 41

Geräteelemente
Abbildung A:
Taste Espresso „doppelt“
Taste Cappuccino „groß“
Taste Latte „groß“
Milchtankdeckel
Drehregler „Milchmenge“
Milchtank
Tropfenauffangschale
Abtropfgitter
herausziehbare Standfläche für kleine Tassen
Milchdüse
- Espressoauslauf
3 Taste Latte „klein“
! Taste Cappuccino „klein“
. Taste Espresso „klein“
Abbildung B:
0 Wassertankdeckel
6 Wassertank
1 Halterungen
% Ein-/Aus-Schalter
+ Hebel zum Positionieren der Milchdüse
(mit nebensteheder Kontrolleuchte)
(mit nebensteheder Kontrolleuchte)
(mit nebensteheder Kontrolleuchte)
(mit nebensteheder Kontrolleuchte)
(mit nebensteheder Kontrolleuchte)
(mit nebensteheder Kontrolleuchte)
Abbildung C:
, Siebträger
Siebblockierer
/ großes Espressosieb
kleines Espressosieb
" Messlöffel mit Stopfer
■ 38 │ DE
│AT│
CH
SEMM 1470 A1
Page 42

Vor der ersten Inbetriebnahme
1) Reinigen Sie den Siebträger ,, den Messlöffel ", die Espressosiebe / ,
das Abtropfgitter , die Tropfenauffangschale , die Stellfläche für kleine
Tassen den Milchtank , den Milchtankdeckel , den Wassertankdeckel 0 und den Wassertank 6 wie im Kapitel „Reinigen und Pflegen“
beschrieben.
2) Stellen Sie das Gerät auf eine ebene und hitzebeständige Unterlage. Achten
Sie drauf, dass die Netzsteckdose in erreichbarer Nähe ist.
3) Setzen Sie die Tropfenauffangschale ein und legen Sie das Abtropfgitter
darauf.
4) Setzen Sie den Siebträger , mit eingesetzem Espressosieb (/oder ) in
das Gerät ein, indem Sie ihn an der Markierung „
und dann gegen den Uhrzeigersinn, bis der Griff des Siebträgers , zum
Symbol „
5) Stecken Sie den Netzstecker in eine Netzsteckdose.
HINWEIS
Entfernen Sie die orangene Transportsicherung aus dem
6) Gehen Sie vor der ersten Verwendung folgendermaßen vor, um die internen
Leitungen zu reinigen:
– Füllen Sie Wasser in den Wassertank 6 (ca. 200 ml), sowie in den
– Setzen Sie den Wassertank 6 und den Milchtank in das Gerät ein.
– Stellen Sie eine große Tasse auf das Abtropfgitter .
– Stellen Sie die Milchdüse so ein, dass die Milchdüse in die Tasse
– Schalten Sie das Gerät am Ein-/Aus-Schalter % an (Position I). Alle Kon-
– Drücken Sie die Taste Cappuccino „groß“
– Schalten Sie das Gerät am Ein-/Aus-Schalter % (Position O) aus.
– Entleren Sie das verbliebene Wasser aus dem Wasser- 6 und aus dem
HINWEIS
► Reinigen Sie das Gerät wie hier beschrieben auch nach längerer Standzeit.
“ weist, drehen.
Boden des Wassertanks 6!
Milchtank (ca. 100 ml).
weist.
trollleuchten beginnen zu blinken. Sobald alle Kontrollleuchten dauerhaft
leuchten, ist das Gerät aufgeheizt.
Wasser mehr aus dem Espressoauslauf - austritt und alle Kontrollleuchten dauerhaft leuchten. Wiederholen Sie diesen Vorgang 2x.
Milchtank .
“, am Gerät einsetzen
. Warten Sie, bis kein
Das Gerät ist nun betriebsbereit.
SEMM 1470 A1
DE│AT│CH
│
39 ■
Page 43

Inbetriebnahme
Wassertank befüllen
HINWEIS
► Verwenden Sie für die Zubereitung von Espresso/Cappuccino/Latte Mac-
chiatto ausschließlich frisches Trinkwasser.
1) Nehmen Sie den Wassertankdeckel 0 ab und ziehen Sie den Wassertank 6
nach oben aus dem Gerät.
2) Füllen Sie mindestens Wasser bis zur Min-Markierung ein.
Füllen Sie nie mehr Wasser als bis zur Max-Markierung ein.
3) Schieben Sie den Wassertank 6 wieder auf das Gerät. Achten Sie darauf,
dass der Wassertank 6 korrekt am Gerät einrastet.
4) Setzen Sie den Wassertankdeckel 0 wieder auf.
Milchtank befüllen
Wenn Sie Getränke zubereiten wollen, die Milchschaum enthalten, wie Cappuccino oder Latte Macchiato, müssen Sie Milch in den Milchtank füllen.
HINWEIS
► Sie können Vollmilch, H-Milch oder Sojamilch für dieses Gerät verwenden.
1) Kippen Sie den Milchtank leicht nach oben und ziehen Sie diesen gleichzeitig nach oben und vorne aus dem Gerät heraus.
2) Nehmen Sie den Milchtankdeckel ab.
3) Füllen Sie mindestens Milch bis zur Min-Markierung ein.
Füllen Sie nie mehr Milch als bis zur Max-Markierung ein.
4) Setzen Sie den Milchtankdeckel wieder auf den Milchtank .
5) Schieben Sie den Milchtank wieder in das Gerät, so dass dieser einrastet.
■ 40 │ DE
HINWEIS
► Wenn Sie nach der Zubereitung des Getränkes noch Milch im Milchtank
aufbewahren wollen, stellen Sie den Milchtank zur Aufbewahrung in
den Kühlschrank.
HINWEIS
► Wenn der Milchtank nicht oder nicht korrekt eingesetzt ist, leuchten
nur die beiden Espresso-Kontrollleuchten /.. Dies zeigt an, dass Sie
ausschließlich Espresso zubereiten können, denn dafür wird keine Milch
benötigt.
│AT│
CH
SEMM 1470 A1
Page 44

Espressosiebe in Siebträger einsetzen
1) Legen Sie das große / oder das kleine Espressosieb in den Siebträger ,:
– Achten Sie darauf, dass die kleine Einkerbung am großen / oder kleinem
Espressosieb beim Einsetzen über der Einkerbung am Siebträger , liegt.
– Drehen Sie dann das große / oder kleine Espressosieb etwas, so
dass dieses nicht mehr herausfallen kann.
HINWEIS
► Entfernen Sie das eingesetzte Espressosieb / erst, wenn es sich abge-
kühlt hat!
► Um die Espressosiebe / wieder aus dem Siebträger , herauszuneh-
men, drehen Sie das eingesetzte Espressosieb / so weit, bis sich die
Einkerbung am Espressosieb / über der Einkerbung am Siebträger ,
befindet. Sie können das Espressosieb / nun herausnehmen.
SEMM 1470 A1
DE│AT│CH
│
41 ■
Page 45

Espressopulver einfüllen
1) Füllen Sie das kleine Espressosieb bis zur Max-Markierung mit Espressopulver. Dies entspricht ca. 7g Pulver oder einem gestrichenem Messlöffel ".
oder...
Füllen Sie das große Espressosieb / bis zur Max-Markierung mit Espressopulver. Das entspricht ca. 7g + 7g Pulver, oder zwei gestrichenen Messlöffeln ".
2) Verdichten Sie das Espressopulver mit Hilfe des Stopfers am Messlöffel ".
Füllen Sie danach, falls nötig, weiteres Espressopulver nach, so dass das
Espressosieb / bis zur Max-Markierung gefüllt ist. Verdichten Sie das
Espressopulver danach erneut.
HINWEIS
► Das Verdichten des Espressopulvers ist ein wesentlicher Vorgang bei der
Zubereitung eines Espressos. Wird das Espressopulver sehr stark gepresst,
so läuft der Espresso langsam durch und es gibt mehr Crema. Ist das Espressopulver nicht so stark verdichtet, läuft der Espresso schnell durch, es entsteht
nur wenig Crema.
Siebträger einsetzen
1) Setzen Sie den Siebträger , mit eingesetzem Espressosieb (/oder ) in
das Gerät ein, indem Sie ihn an der Markierung „
und dann gegen den Uhrzeigersinn, bis der Griff des Siebträgers , zum
Symbol „
HINWEIS
► Um den Siebträger , nach der Getränkezubereitung abzunehmen, dre-
hen Sie diesen langsam zurück zur Position „
Herausspritzen zu vermeiden.
“ weist, drehen.
“, am Gerät einsetzen
“, um ein nachträgliches
■ 42 │ DE
│AT│
CH
SEMM 1470 A1
Page 46

Milchdüse einstellen
Je nach Getränk müssen Sie die Milchdüse zur Tassengröße passend einstellen.
1) Schwenken Sie die Milchdüse so, dass diese in das Glas/die Tasse weist.
Benutzen Sie zum Bewegen der Milchdüse immer den Hebel zum Positio-
nieren der Milchdüse +.
2) Drehen Sie den silbernen Aufsatz der Milchdüse etwas nach hinten, so
dass dieser entriegelt ist.
3) Je nach Größe der Tasse/des Glases, schieben Sie den silbernen Aufsatz
der Milchdüse etwas nach unten (oder nach oben, je nach vorheriger
Einstellung). Die Milchdüse sollte bis in das Glas/die Tasse ragen, um
Spritzer zu vermeiden. Sie haben 3 Höhen zur Auswahl.
4) Wenn Sie sich für eine Höhe entschieden haben, drehen Sie den silbernen
Aufsatz der Milchdüse wieder nach vorne, so dass dieser spürbar einrastet
und fest sitzt.
Zur einfacheren Darstellung ist das Verstellen der Milchdüse hier mit abgenommenen Milchtank gezeigt. Der Milchtank muss jedoch nicht unbedingt
aus dem Gerät entnommen werden, wenn Sie die Länge der Milchdüse
einstellen.
SEMM 1470 A1
DE│AT│CH
│
43 ■
Page 47

Getränk zubereiten
Geeignete Tasse auswählen
Je nach gewünschtem Getränk wählen Sie eine passende Tasse aus.
Getränk Größe
Espresso
Cappuccino
Latte
Macchiato
Hinweis: Die unterschiedlichen Getränkemengen werden über die Dauer der
Getränkeausgabe gesteuert. D. h. bei einem doppelten Espresso fließt der Espresso länger aus dem Espressoauslauf - als bei einem einfachen Espresso.
1) Für kleine Espresso- oder Kaffeetassen ziehen Sie die Standfläche für kleine
Tassen aus dem Gerät und stellen Sie die Tasse darauf.
2) Für große Tassen oder Gläser schieben Sie die Standfläche für kleine Tassen
in das Gerät und plazieren die Gläser/Tassen auf dem Abtropfgitter .
3) Sollte der Platz immer noch nicht ausreichend sein, nehmen Sie die Tropfenauffangschale aus dem Gerät und plazieren Sie das Glas direkt auf dem
Boden des Gerätes.
Einfach ca. 40 ml ca. 20 - 70 ml
Doppelt ca. 80 ml ca. 40 - 150 ml
Einfach ca. 170 ml
Doppelt ca. 280 ml
Einfach ca. 350 ml
Doppelt ca. 450 ml
voreingestellte
Menge
Programmierbar
Zeit der Zugabe von
aufgeschäumter Milch:
5 Sek. - 40 Sek.
Zeit der Zugabe von
aufgeschäumter Milch:
5 Sek. - 70 Sek.
Zeit der Zugabe von
aufgeschäumter Milch:
5 Sek. - 70 Sek.
Zeit der Zugabe von
aufgeschäumter Milch:
5 Sek. - 90 Sek.
■ 44 │ DE
│AT│
CH
SEMM 1470 A1
Page 48

Espresso zubereiten
1) Stellen Sie sicher, dass noch genügend Wasser im Wassertank 6 vorhanden
ist, füllen Sie ggf. Wasser nach.
2) Wählen Sie aus, ob Sie einen normalen oder einen doppelten Espresso
zubereiten möchten und legen Sie das passende Espressosieb /oder
in den Siebträger ,.
3) Füllen Sie das Espressopulver in das Espressosieb / und setzen Sie den
Siebträger , ein.
4) Ziehen Sie die Standfläche für kleine Tassen aus dem Gerät.
5) Stellen Sie eine passende Tasse auf die Standfläche für kleine Tassen .
6) Schalten Sie das Gerät am Ein-/Aus-Schalter % ein und warten Sie, bis alle
Kontrollleuchten dauerhaft leuchten. Das Gerät ist dann aufgeheizt.
7) Drücken sie die Taste Espresso „klein“ .
Espresso zubereiten wollen. Die Kontrollleuchte der Taste Espresso „klein“ .
leuchtet.
Drücken Sie die Taste Espresso „doppelt“
ten Espresso zubereiten wollen. Die Kontrollleuchte der Taste Espresso
„doppelt“
8) Das Gerät startet den Brühvorgang, die jeweilige Kontrollleuchte blinkt
während der Zubereitung.
9) Warten Sie, bis kein Espresso mehr aus dem Espressoauslauf - fließt und
alle Kontrollleuchten leuchten. Sie können dann den Espresso entnehmen.
HINWEIS
► Sie können jederzeit die Zubereitung unterbrechen, indem Sie eine beliebige
Taste drücken.
10) Schalten Sie das Gerät am Ein-/Aus-Schalter % aus.
11) Reinigen Sie das Gerät wie im Kapitel „Reinigen und Pflegen“ beschrieben.
, wenn Sie einen einfachen
, wenn Sie einen doppel-
leuchtet.
HINWEIS
► Wenn Sie das Gerät nicht am Ein-/Aus-Schalter % ausschalten und keine
weitere Taste drücken, schaltet sich das Gerät nach ca. 15 Minuten in den
Energiesparmodus. Wenn Sie wieder ein Getränk zubereiten möchten,
drücken Sie eine beliebige Taste. Das Gerät heizt wieder auf.
SEMM 1470 A1
DE│AT│CH
│
45 ■
Page 49

Menge des Espressos programmieren
Sie können für die Menge des ausgegeben Espressos für die Programme „Espresso klein“ und „Espresso doppelt“ individuell speichern:
Espresso „klein“
– Wenn Sie die Espressomenge für die Taste Espresso „klein“ .
individuell bestimmen wollen, drücken und halten Sie die Taste Espresso „klein“ . ca. 3 Sekunden, bis die Pumpe anfängt zu arbeiten.
Espresso tritt aus dem Espressoauslauf -.
– Stoppen Sie die Espressoausgabe durch erneutes Drücken der Taste
Espresso „klein“ .
ist. Sie können eine Menge von 20 - 70 ml einstellen.
Bei der nächsten Espressozubereitung mit der Taste Espresso „klein“ .
nun die neu programmierte Menge an Espresso ausgegeben.
HINWEIS
► Wenn Sie die Einstellung wieder auf die vorprogrammierten 40 ml
zurückstellen wollen, schalten Sie das Gerät mit dem Ein-/Aus-Schalter %
aus. Während Sie das Gerät am Ein-/Aus-Schalter % wieder einschalten,
drücken und halten Sie die Taste Espresso „klein“ .
Kontrollleuchte der Taste Espresso „klein“ . 5 x aufleuchtet. Sie können
die Taste . nun lösen, die Programmierung wurde zurück auf 40 ml
gesetzt.
Espresso „doppelt“
– Wenn Sie die Espressomenge für die Taste Espresso „doppelt“
individuell bestimmen wollen, drücken und halten Sie die Taste Espresso
„doppelt“
Espresso tritt aus dem Espressoauslauf -.
– Stoppen Sie die Espressoausgabe durch erneutes Drücken der Taste
Espresso „groß“ , sobald die gewünschte Menge durchgelaufen ist.
Sie können eine Menge von 40 - 150 ml einstellen.
Bei der nächsten Espressozubereitung mit der Taste Espresso „groß“ wird nun
die neu programmierte Menge an Espresso ausgegeben.
, sobald die gewünschte Menge durchgelaufen
ca. 3 Sekunden, bis die Pumpe anfängt zu arbeiten.
wird
solange, bis die
■ 46 │ DE
HINWEIS
► Wenn Sie die Einstellung wieder auf die vorprogrammierten 80 ml
zurückstellen wollen, schalten Sie das Gerät mit dem Ein-/Aus-Schalter %
aus. Während Sie das Gerät am Ein-/Aus-Schalter % wieder einschalten,
drücken und halten Sie die Taste Espresso „groß“ solange, bis die Kon-
trollleuchte der Taste Espresso „groß“ 5 x aufleuchtet. Sie können die
Taste nun lösen, die Programmierung wurde zurück auf 80 ml gesetzt.
│AT│
CH
SEMM 1470 A1
Page 50

Cappuccino zubereiten
1) Stellen Sie sicher, dass noch genügend Wasser im Wassertank 6 vorhanden ist, füllen Sie ggf. Wasser nach.
2) Stellen Sie sicher, dass noch genügend Milch im Milchtank vorhanden ist,
füllen Sie ggf. Milch nach.
3) Wählen Sie aus, ob Sie einen Cappuccino mit einem normalen oder einem
doppelten Espresso zubereiten möchten und legen Sie das passende Espressosieb / in den Siebträger ,.
4) Füllen Sie das Espressopulver in das Espressosieb / und setzen Sie den
Siebträger , ein.
5) Stellen Sie eine passende Tasse auf das Abtropfgitter . Je nach Größe der
Tasse, können Sie auch die Standfläche für kleine Tassen herausziehen
und die Tasse darauf plazieren.
6) Stellen Sie die Milchdüse so ein, dass diese in die Tasse weist.
7) Stellen Sie mit Hilfe des Drehschalters „Milchmenge“ ein, wieviel ge-
schäumte Milch Sie für Ihren Cappuccino verwenden wollen:
Drehen Sie den Drehschalter „Milchmenge“ nach links, um die Milchmenge
zu verringern.
Drehen Sie den Drehschalter „Milchmenge“ nach rechts, um die
Milchmenge zu erhöhen. Drehen Sie diesen jedoch nicht weiter als bis zur
Markierung „
Kapitel „Reinigen und Pflegen“).
HINWEIS
► Sie können die Milchmenge auch während der Zubereitung durch Drehen
des Drehschalters „Milchmenge“ korrigieren.
8) Schalten Sie das Gerät am Ein-/Aus-Schalter % ein und warten Sie, bis alle
Kontrollleuchten dauerhaft leuchten. Das Gerät ist dann aufgeheizt.
9) Drücken Sie die Taste Cappuccino „klein“ !
Cappuccino zubereiten wollen. Die Kontrollleuchte der Taste Cappuccino
klein“ ! leuchtet.
Drücken Sie die Taste Cappuccino „groß“ , wenn Sie einen doppelten
Cappuccino zubereiten wollen. Die Kontrollleuchte der Taste Cappuccino
„groß“ leuchtet.
10) Das Gerät startet den Brühvorgang, die jeweilige Kontrollleuchte blinkt
während der Zubereitung.
11) Warten Sie, bis kein Espresso mehr aus dem Espressoauslauf - fließt, keine
Milch aus der Milchdüse austritt und alle Kontrollleuchten dauerhaft
leuchten. Sie können dann den Cappuccino entnehmen.
“. Ansonsten befinden Sie sich ich Reinigungs-Modus (siehe
, wenn Sie einen einfachen
SEMM 1470 A1
DE│AT│CH
│
47 ■
Page 51

HINWEIS
Sie können jederzeit die Zubereitung unterbrechen, indem Sie eine beliebi-
►
ge Taste drücken.
HINWEIS
► Wenn Sie nachträglich noch mehr aufgeschäumte Milch Ihrem Getränk
zugeben wollen:
Drücken Sie die Taste Cappuccino „groß“
Kontrollleuchte der Taste Cappuccino „klein“ !
der Taste Cappuccino „groß“
tritt aufgeschäumte Milch. Stoppen Sie die Milchausgabe durch Drücken
einer beliebigen Taste. Die Milchausgabe stoppt nach 70 Sekunden
automatisch.
12) Schalten Sie das Gerät am Ein-/Aus-Schalter % aus.
13) Reinigen Sie das Gerät wie im Kapitel „Reinigen und Pflegen“ beschrieben.
HINWEIS
► Wenn Sie das Gerät nicht am Ein-/Aus-Schalter % ausschalten und keine
weitere Taste drücken, schaltet sich das Gerät nach ca. 15 Minuten in den
Energiesparmodus. Wenn Sie wieder ein Getränk zubereiten möchten,
drücken Sie eine beliebige Taste. Das Gerät heizt wieder auf.
leuchten und aus der Milchdüse
2x hintereinander. Die
und die Kontrollleuchte
Dauer der Milchschaumzugabe programmieren
HINWEIS
► Die Menge des Milchschaumes können Sie durch Drehen am Drehschalter
„Milchmenge“ beeinflussen, sowie durch die Dauer des Milchausgabe.
Je weiter Sie den Drehschalter „Milchmenge“ in Richtung „
desto mehr Milch/Milchschaum tritt bei gleichbleibender Dauer aus der
Milchdüse aus. Drehen Sie den Drehschalter „Milchmenge“ jedoch
nicht weiter als bis zur Markierung „
Reinigungs-Modus (siehe Kapitel „Reinigen und Pflegen“).
Sie können für die Dauer der Milchschaumzugabe für die Programme „Cappuccino klein“ und „Cappuccino groß“ individuelle Zeiten speichern:
“. Ansonsten befinden Sie sich ich
“ drehen,
■ 48 │ DE
│AT│
CH
SEMM 1470 A1
Page 52

Cappuccino „klein“
– Drücken und halten Sie die Taste Cappuccino „klein“ !
Sekunden, bis die Pumpe anfängt zu arbeiten. Milchschaum tritt aus der
Milchdüse aus.
– Wenn die gewünschte Menge an Milchschaum ausgegeben ist, stoppen
Sie die Milchschaumausgabe durch erneutes Drücken der Taste Cappuccino „klein“ !
einstellen.
– Nach der Milchschaumausgabe läuft der Espresso aus dem Espresso-
auslauf -, um den Cappuccino zuzubereiten.
– Bei der nächsten Cappuccinozubereitung mit der Taste Cappuccino
„klein“ !
angewendet.
Cappuccino „groß“
. Sie können eine Dauer von 5 - 40 Sekunden
wird nun die neu programmierte Dauer der Milchausgabe
ca. 3
– Drücken und halten Sie die Taste Cappuccino „groß“
Sekunden, bis die Pumpe anfängt zu arbeiten. Milchschaum tritt aus der
Milchdüse aus.
– Wenn die gewünschte Menge an Milchschaum ausgegeben ist, stoppen
Sie die Milchschaumausgabe durch erneutes Drücken der Taste Cappuccino „groß“ . Sie können eine Dauer von 5 - 70 Sekunden
einstellen.
– Nach der Milchschaumausgabe läuft der Espresso aus dem Espresso-
auslauf -, um den Cappuccino zuzubereiten.
– Bei der nächsten Cappuccinozubereitung mit der Taste Cappuccino
„groß“
be angewendet.
wird nun die neu programmierte Dauer der Milchausga-
Latte Macchiato zubereiten
1) Stellen Sie sicher, dass noch genügend Wasser im Wassertank 6 vorhanden
ist, füllen Sie ggf. Wasser nach.
2) Stellen Sie sicher, dass noch genügend Milch im Milchtank vorhanden ist,
füllen Sie ggf. Milch nach.
3) Wählen Sie aus, ob Sie einen Latte Macchiato mit einem normalen oder
einem doppelten Espresso zubereiten möchten und legen Sie das passende
Espressosieb / in den Siebträger ,.
4) Füllen Sie das Espressopulver in das Espressosieb / und setzen Sie den
Siebträger , ein.
5) Stellen Sie eine passende Tasse auf das Abtropfgitter .
6) Stellen Sie die Milchdüse so ein, dass diese in die Tasse weist.
ca. 3
SEMM 1470 A1
DE│AT│CH
│
49 ■
Page 53

7) Stellen Sie mit Hilfe des Drehschalters „Milchmenge“ ein, wieviel geschäumte
Milch Sie für Ihren Latte Macchiato verwenden wollen:
Drehen Sie den Drehschalter „Milchmenge“ nach links, um die Milchmenge
zu verringern.
Drehen Sie den Drehschalter „Milchmenge“ nach rechts, um die
Milchmenge zu erhöhen. Drehen Sie diesen jedoch nicht weiter als bis zur
Markierung „
Kapitel „Reinigen und Pflegen“).
HINWEIS
► Sie können die Milchmenge auch während der Zubereitung durch Drehen
des Drehschalters „Milchmenge“ korrigieren.
8) Schalten Sie das Gerät am Ein-/Aus-Schalter % ein und warten Sie, bis alle
Kontrollleuchten dauerhaft leuchten. Das Gerät ist dann aufgeheizt.
9) Drücken Sie die Taste Latte „klein“ 3 , wenn Sie einen einfachen Latte
Macchiato zubereiten wollen. Die Kontrollleuchte der Taste Latte „klein“ 3
leuchtet.
Drücken Sie die Taste Latte „groß“
Macchiato zubereiten wollen. Die Kontrollleuchte der Taste Latte „groß“
leuchtet.s
10) Das Gerät startet den Brühvorgang, die jeweilige Kontrollleuchte blinkt
während der Zubereitung.
11) Warten Sie, bis kein Espresso mehr aus dem Espressoauslauf - fließt, keine
Milch aus der Milchdüse austritt und alle Kontrollleuchten dauerhaft
leuchten. Sie können dann den Latte Macchiato entnehmen.
“. Ansonsten befinden Sie sich ich Reinigungs-Modus (siehe
, wenn Sie einen doppelten Latte
■ 50 │ DE
HINWEIS
► Sie können jederzeit die Zubereitung unterbrechen, indem Sie eine beliebi-
ge Taste drücken.
HINWEIS
► Wenn Sie nachträglich noch mehr aufgeschäumte Milch Ihrem Getränk
zugeben wollen:
Drücken Sie die Taste Cappuccino „groß“
Kontrollleuchte der Taste Cappuccino „klein“ !
der Taste Cappuccino „groß“
tritt aufgeschäumte Milch. Stoppen Sie die Milchausgabe durch Drücken
einer beliebigen Taste. Die Milchausgabe stoppt nach 70 Sekunden
automatisch.
│AT│
CH
leuchten und aus der Milchdüse
2x hintereinander. Die
und die Kontrollleuchte
SEMM 1470 A1
Page 54

12) Schalten Sie das Gerät am Ein-/Aus-Schalter % aus.
13) Reinigen Sie das Gerät wie im Kapitel „Reinigen und Pflegen“ beschrieben.
HINWEIS
►
Wenn Sie das Gerät nicht am Ein-/Aus-Schalter % ausschalten und keine
weitere Taste drücken, schaltet sich das Gerät nach ca. 15 Minuten in den
Energiesparmodus. Wenn Sie wieder ein Getränk zubereiten möchten,
drücken Sie eine beliebige Taste. Das Gerät heizt wieder auf.
Dauer der Milchschaumzugabe programmieren
HINWEIS
► Die Menge des Milchschaumes können Sie durch Drehen am Drehschalter
„Milchmenge“ beeinflussen, sowie durch die Dauer des Milchausgabe.
Je weiter Sie den Drehschalter „Milchmenge“ in Richtung „
desto mehr Milch/Milchschaum tritt bei gleichbleibender Dauer aus der
Milchdüse aus. Drehen Sie den Drehschalter „Milchmenge“ jedoch
nicht weiter als bis zur Markierung „
Reinigungs-Modus (siehe Kapitel „Reinigen und Pflegen“).
Sie können für die Dauer der Milchschaumzugabe für die Programme „Latte
klein“ und „Latte groß“ individuelle Zeiten speichern:
Latte „klein“
“. Ansonsten befinden Sie sich ich
“ drehen,
SEMM 1470 A1
– Drücken und halten Sie die Taste Latte „klein“ 3
die Pumpe anfängt zu arbeiten. Milchschaum tritt aus der Milchdüse aus.
– Wenn die gewünschte Menge an Milchschaum ausgegeben ist, stoppen
Sie die Milchschaumausgabe durch erneutes Drücken der Taste Latte
„klein“ 3 . Sie können eine Dauer von 5 - 70 Sekunden einstellen.
– Nach der Milchschaumausgabe läuft der Espresso aus dem Espresso-
auslauf -, um den Latte Macchiato zuzubereiten.
– Bei der nächsten LatteMacchiato - Zubereitung mit der Taste Latte
„klein“ 3 wird nun die neu programmierte Dauer der Milchausgabe
angewendet.
ca. 3 Sekunden, bis
DE│AT│CH
│
51 ■
Page 55

Latte „groß“
– Drücken und halten Sie die Taste Latte „groß“
bis die Pumpe anfängt zu arbeiten. Milchschaum tritt aus der Milchdüse
aus.
– Wenn die gewünschte Menge an Milchschaum ausgegeben ist, stoppen
Sie die Milchschaumausgabe durch erneutes Drücken der Taste Latte
„groß“
– Nach der Milchschaumausgabe läuft der Espresso aus dem Espresso-
auslauf -, um den Latte Macchiato zuzubereiten.
– Bei der nächsten Latte Macchiato - Zubereitung mit der Taste Latte
„groß“
angewendet.
Aufgeschäumte Milch
Sie können auch ausschließlich aufgeschäumte Milch zubereiten, zum Beispiel
zur Herstellung von Kakao.
1) Setzen Sie den Siebträger , ein.
2) Stellen Sie sicher, dass noch genügend Milch im Milchtank vorhanden ist,
füllen Sie ggf. Milch nach.
3) Stellen Sie eine passende Tasse auf das Abtropfgitter . Falls Sie ein kleines
Gefäß verwenden, ziehen Sie die Standfläche für kleine Tassen heraus
und plazieren Sie das Gefäß darauf.
4) Stellen Sie die Milchdüse so ein, dass diese in die Tasse weist.
5) Schalten Sie das Gerät am Ein-/Aus-Schalter % ein und warten Sie, bis alle
Kontrollleuchten dauerhaft leuchten. Das Gerät ist dann aufgeheizt.
6) Drücken Sie die Taste Cappuccino „groß“
Kontrollleuchte der Taste Cappuccino „klein“ !
der Taste Cappuccino „groß“
tritt aufgeschäumte Milch.
7) Stoppen Sie die Milchausgabe durch Drücken einer beliebigen Taste. Die
Milchausgabe stoppt nach 70 Sekunden automatisch.
8) Schalten Sie das Gerät am Ein-/Aus-Schalter % aus.
9) Reinigen Sie das Gerät wie im Kapitel „Reinigen und Pflegen“ beschrieben.
ca. 3 Sekunden,
. Sie können eine Dauer von 5 - 90 Sekunden einstellen.
wird nun die neu programmierte Dauer der Milchausgabe
2x hintereinander. Die
und die Kontrollleuchte
leuchten und aus der Milchdüse
■ 52 │ DE
HINWEIS
► Wenn Sie das Gerät nicht am Ein-/Aus-Schalter % ausschalten und keine
weitere Taste drücken, schaltet sich das Gerät nach ca. 15 Minuten in den
Energiesparmodus. Wenn Sie wieder ein Getränk zubereiten möchten,
drücken Sie eine beliebige Taste. Das Gerät heizt wieder auf.
│AT│
CH
SEMM 1470 A1
Page 56

Reinigen und Pflegen
WARNUNG - VERLETZUNGSGEFAHR!
■ Ziehen Sie immer den Netzstecker aus der Netzsteckdose, bevor Sie das
Gerät reinigen. Gefahr eines elektrischen Schlages!
Tauchen Sie das Gerät niemals in Wasser oder
andere Flüssigkeiten. Gefahr eines elektrischen
Schlages!
■ Lassen Sie das Gerät immer erst abkühlen, bevor Sie das Gerät reinigen.
Verbrennungsgefahr!
Milchdüse und Milchtank reinigen
ACHTUNG - SACHSCHÄDEN
■ Benutzen Sie niemals scheuernde, aggressive oder chemische Reinigungsmit-
tel zur Reinigung des Gerätes. Diese greifen die Oberfläche des Gerätes an.
1) Stellen Sie das Gerät am Ein-/Aus-Schalter % aus und ziehen Sie den Netzstecker aus der Netzsteckdose.
2) Nehmen Sie den Milchtank aus dem Gerät und entfernen Sie den
Milchtankdeckel .
3) Reinigen Sie den Milchtankdeckel und den Milchtank in warmem
Wasser und einem milden Spülmittel.
4) Spülen Sie beides mit viel klarem Wasser ab und trocken Sie sie.
5) Füllen Sie den Milchtank mit Wasser (ca. 100 ml), setzen Sie den
Milchtankdeckel auf und schieben Sie den Milchtank in das Gerät.
6) Stellen Sie ein ausreichend großes, leeres Gefäß auf das Abtropfgitter
und plazieren Sie die Milchdüse so, dass diese in das Gefäß weist.
7) Stecken Sie den Netzstecker in eine Netzsteckdose und schalten Sie das
Gerät am Ein-/Aus-Schalter % ein.
8) Warten Sie, bis alle Kontrollleuchten dauerhaft leuchten.
9) Stellen Sie den Drehregler „Milchmenge“ auf die Position „Clean“
10) Drücken Sie 2x hintereinander die Taste Latte „groß“
leuchten der Tasten Cappuccino „groß“
der Tasten Latte „groß“
heißer Wasserdampf tritt aus der Milchdüse aus.
SEMM 1470 A1
. Die Kontroll-
und „klein“ ! , sowie
und „klein“ 3 leuchten abwechselnd und
DE│AT│CH
│
53 ■
.
Page 57

11) Warten Sie, bis kein Wasserdampf mehr aus der Milchdüse austritt.
Wenn Sie den Reinigungsvorgang vorher stoppen wollen, drücken Sie ein
weiteres Mal die Taste Latte „groß“
12) Entnehmen Sie den Milchtank und entfernen Sie eventuelles Restwasser.
13) Schalten Sie das Gerät am Ein-/Aus-Schalter % aus.
HINWEIS
► Wenn Sie die Milchdüse und den Milchtank auch entkalken wollen,
geben Sie einen handelsüblichen Entkalker für Kaffeemaschinen mit in den
Milchtank und gehen Sie vor, wie zuvor beschrieben. Beachten Sie
jedoch auch die Bedienungsanleitung des Entkalkers.
► Nach dem Entkalken führen Sie noch einmal eine Reinigung nur mit klarem
Wasser durch.
HINWEIS
► Der Milchtank ist zur Reinigung in der Spülmaschine geeignet. Achten
Sie darauf den Milchtank in der Spülmaschine nicht einzuklemmen.
Für eine zusätzliche Reinigung der Milchdüse können Sie diese abnehmen:
1) Nehmen Sie den Milchtankdeckel ab.
2) Bringen Sie die Milchdüse in eine aufrechte Position, so dass der Hebel
zum Positionieren der Milchdüse + grade nach oben weist.
3) Drücken Sie gleichzeitig den Hebel zum Positionieren + und die Milchdüse
in Richtung der Aussparung im Milchtankdeckel , so dass sich die
Steckverbindung löst.
.
■ 54 │ DE
│AT│
CH
SEMM 1470 A1
Page 58

4) Ziehen Sie die Milchdüse mit dem Hebel zum Positionieren + nach unten
aus dem Milchtankdeckel heraus.
5) Lösen Sie den silbernen Aufsatz der Milchdüse (siehe Kapitel „Milchdüse
einstellen“) und ziehen Sie diesen nach unten ab.
6) Reinigen Sie den silbernen Aufsatz und die vom Milchtankdeckel gelöste
Milchdüse mit dem Hebel zum Positionieren + in warmem Wasser mit
etwas Spülmittel. Spülen Sie die Teile danach mit klarem Wasser ab.
7) Stecken Sie den silbernen Aufsatz wieder auf die Milchdüse und fixieren
Sie diesen in der gewünschten Höhe (siehe Kapitel „Milchdüse einstellen“).
8) Stecken Sie die Milchdüse mit dem Hebel zum Positionieren + wieder
in den Milchtankdeckel und schieben Sie die Steckverbindung wieder
vollständig in das Gerät.
Espressosiebe, Siebträger und Espressoauslauf reinigen
Entfernen Sie nach jeder Getränkezubereitung die Pulverreste aus dem Espressosieb / .
Reinigen Sie die Espressosiebe / , den Siebträger , und den Espressoauslauf - regelmäßig.
1) Nachdem Sie den Espresso/Cappuccino/Latte Macchiato zubereitet haben
und den Siebträger , abgenommen haben:
– Fixieren Sie das Espressosieb, indem Sie den Siebblockierer nach
oben klappen und festhalten.
– Klopfen Sie das Espressopulver aus dem Espressosieb / heraus.
– Klappen Sie den Siebblockierer zurück.
– Nehmen Sie das Espressosieb / aus dem Siebträger ,.
– Reinigen Sie Espressosieb / und Siebträger , in warmem Wasser
und einem milden Spülmittel. Spülen sie danach alle Teile mit klarem
Wasser ab.
HINWEIS
► Die Espressosiebe / sind auch zur Reinigung in der Spülmaschine
geeignet.
2) Setzen Sie den Siebträger , ohne Espressosieb / wieder in das Gerät ein.
3) Füllen Sie Wasser in den Wassertank 6 (ca. 200 ml).
4) Stelle Sie ein ausreichend großes Gefäß auf das Abtropfgitter .
5) Stellen Sie das Gerät am Ein-/Aus-Schalter % ein und warten Sie, bis alle
Kontrollleuchten dauerhaft leuchten.
6) Drücken Sie die Taste Espresso „klein“ .
Espressoauslauf - und durchspült die Leitungen. Sobald kein Wasser mehr
aus dem Espressoauslauf - austritt, ist die Reinigung abgeschlossen.
. Das Wasser läuft aus dem
SEMM 1470 A1
DE│AT│CH
│
55 ■
Page 59

HINWEIS
► Wenn Sie die Leitungen und den Wassertank 6 auch entkalken wollen,
geben Sie einen handelsüblichen Entkalker für Kaffeemaschinen mit in den
Wassertank 6 und gehen Sie vor, wie zuvor beschrieben. Beachten Sie
jedoch auch die Bedienungsanleitung des Entkalkers.
► Nach dem Entkalken führen Sie noch einmal eine Reinigung nur mit klarem
Wasser durch.
HINWEIS
► Sie können den Siebträger , und die Espressosiebe / zur Aufbewah-
rung in die Halterungen 1 neben dem Wassertank stecken.
Wassertank reinigen
1) Ziehen Sie den Netzstecker aus der Netzsteckdose und schalten Sie das
Gerät am Ein-/Aus-Schalter % aus.
2) Nehmen Sie den Wassertank 6 aus dem Gerät und entleeren Sie eventuelles
Restwasser.
3) Reinigen Sie den Wassertank 6 und den Wassertankdeckel 0 in warmem
Wasser und etwas mildem Spülmittel. Spülen Sie beide Teile mit viel klarem
Wasser ab, um Spülmittelreste zu beseitigen.
4) Trocknen Sie die Teile gut ab und setzten Sie diese wieder in das Gerät ein.
Gehäuse reinigen
Reinigen Sie das Gehäuse mit einem leicht angefeuchteten Tuch. Bei hartnäckigeren Verschmutzungen geben Sie ein mildes Spülmittel auf das Tuch.
Stellen Sie sicher, dass das Gerät vor einer erneuten Benutzung vollständig
getrocknet ist.
■ 56 │ DE
│AT│
CH
SEMM 1470 A1
Page 60

Zubehörteile reinigen
1) Ziehen Sie die Standfläche für kleine Tassen zur Reinigung nach vorne
aus dem Gerät heraus.
2) Reinigen Sie den Messlöffel ", die Tropfenauffangschale , die herausziehba-
re Standfläche für kleine Tassen und das Abtropfgitter im warmen Wasser
und etwas Spülmittel. Spülen Sie die Teile danach mit klarem Wasser ab.
3) Trocknen Sie alle Teile gut ab, bevor Sie diese wieder in das Gerät einsetzen.
HINWEIS
► Die Tropfenauffangschale und die Standfläche für kleine Tassen sind
auch zur Reinigung in der Spülmaschine geeignet. Achten Sie darauf die
Teile in der Spülmaschine nicht einzuklemmen.
Fehlerbehebung
Störung Ursache Abhilfe
• Den Espresso neu
• Das Espressopulver ist zu feucht
und/oder zu fest gepresst.
Der Espresso läuft nicht
mehr heraus.
• Kein Wasser im Wassertank 6.
• Wasser in den Wasser-
zubereiten, dabei das Espressopulver jedoch nicht
so fest verdichten, oder
es ganz austauschen.
tank 6 füllen.
Der Espresso tropft über
die Ränder des Siebträgers , anstatt aus den
Öffnungen.
Geräuschvoller Betrieb
der Pumpe.
SEMM 1470 A1
• Die Löcher der SiebträgerÖffnungen sind verstopft.
• Der Siebträger , wurde nicht
korrekt eingesetzt.
• Die Siebträger-Öffnungen sind
verstopft.
• Es befinden sich Espressopulverreste auf dem Rand des
Siebträgers ,.
• Der Wassertank 6 ist leer.
• Siebträger , reinigen.
• Siebträger , richtig
einsetzen.
• Siebträger ,reinigen.
• Rand des Siebträgers ,
von Espressopulverresten
befreien.
• Wasser in den Wassertank 6 füllen.
DE│AT│CH
│
57 ■
Page 61

Die Crema ist zu hell
(der Espresso läuft
schnell aus dem
Siebträger ,).
• zu wenig Espressopulver.
• Das Espressopulver ist zu grob
gemahlen.
• Mehr Espressopulver
verwenden.
• Nur speziell für Espresso
hergestelltes Espressopulver verwenden.
Die Crema ist zu
dunkel (der Espresso
läuft langsam aus dem
Siebträger ,).
• zuviel Espressopulver.
• Das Pulver ist zu fein gemahlen
oder feucht.
Technische Daten
Netzspannung 220 - 240 V ∼ / 50 Hz
Nennleistung 1230 - 1470 W
Pumpendruck ca. 1,5 MPa (15 bar)
Entsorgung
Werfen Sie das Gerät keinesfalls in den normalen Hausmüll.
Dieses Produkt unterliegt der europäischen Richtlinie
2012/19/EU-WEEE (Waste Electrical and Electronic Equipment).
Entsorgen Sie das Gerät über einen zugelassenen Entsorgungsbetrieb oder über
Ihre kommunale Entsorgungseinrichtung. Beachten Sie die aktuell geltenden
Vorschriften. Setzen Sie sich im Zweifelsfall mit Ihrer Entsorgungseinrichtung in
Verbindung.
• Weniger Espressopulver
verwenden.
• Nur speziell für Espresso
hergestelltes Espressopulver verwenden.
lebensmittelecht
■ 58 │ DE
│AT│
CH
SEMM 1470 A1
Page 62

Garantie der Kompernaß Handels GmbH
Sehr geehrte Kundin, sehr geehrter Kunde,
Sie erhalten auf dieses Gerät 3 Jahre Garantie ab Kaufdatum. Im Falle von Mängeln
dieses Produkts stehen Ihnen gegen den Verkäufer des Produkts gesetzliche Rechte zu.
Diese gesetzlichen Rechte werden durch unsere im Folgenden dargestellte Garantie
nicht eingeschränkt.
Garantiebedingungen
Die Garantiefrist beginnt mit dem Kaufdatum. Bitte bewahren Sie den Original-Kassenbon gut auf. Diese Unterlage wird als Nachweis für den Kauf benötigt.
Tritt innerhalb von drei Jahren ab dem Kaufdatum dieses Produkts ein Material- oder
Fabrikationsfehler auf, wird das Produkt von uns – nach unserer Wahl – für Sie
kostenlos repariert oder ersetzt. Diese Garantieleistung setzt voraus, dass innerhalb
der Drei-Jahres-Frist das defekte Gerät und der Kaufbeleg (Kassenbon) vorgelegt und
schriftlich kurz beschrieben wird, worin der Mangel besteht und wann er aufgetreten ist.
Wenn der Defekt von unserer Garantie gedeckt ist, erhalten Sie das reparierte oder
ein neues Produkt zurück. Mit Reparatur oder Austausch des Produkts beginnt kein
neuer Garantiezeitraum.
Garantiezeit und gesetzliche Mängelansprüche
Die Garantiezeit wird durch die Gewährleistung nicht verlängert. Dies gilt auch für
ersetzte und reparierte Teile. Eventuell schon beim Kauf vorhandene Schäden und
Mängel müssen sofort nach dem Auspacken gemeldet werden. Nach Ablauf der
Garantiezeit anfallende Reparaturen sind kostenpflichtig.
Garantieumfang
Das Gerät wurde nach strengen Qualitätsrichtlinien sorgfältig produziert und vor Auslieferung gewissenhaft geprüft.
Die Garantieleistung gilt für Material- oder Fabrikationsfehler. Diese Garantie erstreckt
sich nicht auf Produktteile, die normaler Abnutzung ausgesetzt sind und daher als
Verschleißteile angesehen werden können oder für Beschädigungen an zerbrechlichen
Teilen, z. B. Schalter, Akkus, Backformen oder Teile die aus Glas gefertigt sind.
Diese Garantie verfällt, wenn das Produkt beschädigt, nicht sachgemäß benutzt oder
gewartet wurde. Für eine sachgemäße Benutzung des Produkts sind alle in der Bedienungsanleitung aufgeführten Anweisungen genau einzuhalten. Verwendungszwecke
und Handlungen, von denen in der Bedienungsanleitung abgeraten oder vor denen
gewarnt wird, sind unbedingt zu vermeiden.
Das Produkt ist nur für den privaten und nicht für den gewerblichen Gebrauch bestimmt.
Bei missbräuchlicher und unsachgemäßer Behandlung, Gewaltanwendung und bei
Eingriffen, die nicht von unserer autorisierten Service-Niederlassung vorgenommen
wurden, erlischt die Garantie.
SEMM 1470 A1
DE│AT│CH
│
59 ■
Page 63

Abwicklung im Garantiefall
Um eine schnelle Bearbeitung ihres Anliegens zu gewährleisten, folgen Sie bitte den
folgenden Hinweisen:
▯ Bitte halten Sie für alle Anfragen den Kassenbon und die Artikelnummer
(z. B. IAN 12345) als Nachweis für den Kauf bereit.
▯ Die Artikelnummer entnehmen Sie bitte dem Typenschild, einer Gravur, auf dem
Titelblatt ihrer Anleitung (unten links) oder als Aufkleber auf der Rück- oder
Unterseite.
▯ Sollten Funktionsfehler oder sonstige Mängel auftreten kontaktieren Sie zunächst
die nachfolgend benannte Serviceabteilung telefonisch oder per E-Mail.
▯ Ein als defekt erfasstes Produkt können Sie dann unter Beifügung des Kaufbelegs
(Kassenbon) und der Angabe, worin der Mangel besteht und wann er aufgetreten ist, für Sie portofrei an die Ihnen mitgeteilte Service-Anschrift übersenden.
Auf www.lidl-service.com können Sie diese und viele weitere Handbücher,
Produktvideos und Software herunterladen.
Service
Service Deutschland
Tel.: 0800 5435 111 (Kostenfrei aus dem dt. Festnetz/Mobilfunknetz)
E-Mail: kompernass@lidl.de
Service Österreich
Tel.: 0820 201 222 (0,15 EUR/Min.)
E-Mail: kompernass@lidl.at
Service Schweiz
Tel.: 0842 665566 (0,08 CHF/Min., Mobilfunk max. 0,40 CHF/Min.)
E-Mail: kompernass@lidl.ch
IAN 277727
Importeur
Bitte beachten Sie, dass die folgende Anschrift keine Serviceanschrift ist.
Kontaktieren Sie zunächst die benannte Servicestelle.
KOMPERNASS HANDELS GMBH
BURGSTRASSE 21
44867 BOCHUM
GERMANY
www.kompernass.com
■ 60 │ DE
│AT│
CH
SEMM 1470 A1
Page 64

KOMPERNASS HANDELS GMBH
BURGSTRASSE 21
44867 BOCHUM
DEUTSCHLAND / GERMANY
www.kompernass.com
Last Information Update · Stand der Informationen:
06 / 2016 · Ident.-No.: SEMM1470A1-042016-3
IAN 277727
 Loading...