


ESPRESSOMASCHINE / ESPRESSO MACHINE /
MACHINE À EXPRESSO SEM 1100 C3
ESPRESSO MACHINE
Operating instructions
MACHINE À EXPRESSO
Mode d’emploi
ESPRESSO KÁVOVAR
Návod k obsluze
KÁVOVAR
Návod na obsluhu
ESPRESSOMASKINE
Betjeningsvejledning
IAN 353468_2007
ESPRESSOMASCHINE
Bedienungsanleitung
ESPRESSOMACHINE
Gebruiksaanwijzing
EKSPRES DO KAWY
Instrukcja obsługi
CAFETERA ESPRESSO
Instrucciones de uso

Before reading, unfold the page containing the illustrations and familiarise yourself with all functions of the
device.
Klappen Sie vor dem Lesen die Seite mit den Abbildungen aus und machen Sie sich anschließend mit
allen Funktionen des Gerätes vertraut.
Avant de lire le mode d‘emploi, ouvrez la page contenant les illustrations et familiarisez-vous ensuite avec
toutes les fonctions de l‘appareil.
Vouw vóór het lezen de pagina met de afbeeldingen open en maak u vertrouwd met alle functies van het
apparaat.
Před čtením si otevřete stranu s obrázky a potom se seznamte se všemi funkcemi přístroje.
Przed przeczytaniem proszę rozłożyć stronę z ilustracjami, a następnie proszę zapoznać się z wszystkimi
funkcjami urządzenia.
Pred čítaním si odklopte stranu s obrázkami a potom sa oboznámte so všetkými funkciami prístroja.
Antes de empezar a leer abra la página que contiene las imágenes y, en seguida, familiarícese con todas
las funciones del dispositivo.
Før du læser, vend siden med billeder frem og bliv bekendt med alle apparatets funktioner.
GB / IE Operating instructions Page 1
DE / AT / CH Bedienungsanleitung Seite 25
FR / BE Mode d’emploi Page 51
NL / BE Gebruiksaanwijzing Pagina 79
CZ Návod k obsluze Strana 103
PL Instrukcja obsługi Strona 127
SK Návod na obsluhu Strana 151
ES Instrucciones de uso Página 175
DK Betjeningsvejledning Side 201

LOCK
LOCK
A
z
t
1
2
6543
7
8
B
r
e
u i
a
9
0
q
w
s
o
p

Contents
Introduction ..............................................2
Copyright ..........................................................2
Limitation of liability ..................................................2
Warnings ..........................................................2
Intended use ........................................................3
Package contents/Transport inspection ...................................4
Disposal of the packaging .............................................4
Safety instructions .........................................5
Appliance elements ........................................8
Technical data .............................................8
Temperature display .......................................9
First use ..................................................9
Operation ...............................................10
Filling the water tank. . . . . . . . . . . . . . . . . . . . . . . . . . . . . . . . . . . . . . . . . . . . . . . . .10
Heating after a long time of inactivity / during first use ......................10
Heating up before every use ..........................................12
Preparing espresso ..................................................12
Preparing cappuccino ...............................................14
Tips for the milk froth ................................................16
Drawing hot water ..................................................16
Cleaning and care ........................................17
Cleaning the milk frother .............................................17
Cleaning the hot water shower .........................................18
Cleaning the accessories .............................................18
Cleaning the appliance ..............................................19
Descaling the appliance ..............................................19
Ordering replacement parts ................................20
Troubleshooting ..........................................21
Disposal .................................................22
Disposal of the appliance .............................................22
Kompernass Handels GmbH warranty .......................23
Service ...........................................................24
Importer ..........................................................24
SEM 1100 C3
GB│IE
│
1 ■

Introduction
Congratulations on the purchase of your new appliance.
You have selected a high-quality product. The operating instructions are part of
this product. They contain important information on safety, usage and disposal.
Before using the product, familiarise yourself with all operating and safety instructions. Use the product only as described and for the specified areas of application.
Please also pass on these operating instructions to any future owner.
Copyright
This documentation is protected by copyright.
Any copying or reproduction, including in the form of extracts, or any reproduction
of images (even in a modified state), is permitted only with the written authorisation
of the manufacturer.
Limitation of liability
All technical information, data and information for installation and operation
contained in these operating instructions corresponds to the latest version(s) at
the time of printing and, to the best of our knowledge, takes into account our
previous experience and know-how.
No claims can be derived from the details, illustrations and descriptions in these
instructions.
The manufacturer assumes no responsibility for damage caused by failure to
observe these instructions, improper use, incompetent repairs, unauthorised
modifications or for the use of non-approved replacement parts.
Warnings
The following warning notice types are used in these operating instructions:
■ 2 │ GB
│
WARNING
A warning notice at this hazard level indicates a potentially
hazardous situation.
Failure to avoid this hazardous situation could result in injury.
► Follow the instructions in this warning notice to prevent injury.
IE
SEM 1100 C3

CAUTION
A warning notice at this hazard level indicates a potential for
property damage.
Failure to avoid this situation could result in property damage.
► Follow the instructions in this warning notice to prevent property damage.
NOTE
► A note provides additional information that will assist you in using the
appliance.
Intended use
The device is designed exclusively for the preparation of espresso/cappuccino
and for frothing milk. It is exclusively intended for use in private households.
Do not use it for commercial applications.
The appliance is not intended for any other purpose, nor for use beyond the
scope described.
WARNING
Danger if not used for intended purpose!
Failure to use the appliance for its intended purpose and/or any other type
of use can be hazardous.
► Use the appliance only for its intended purpose.
► Observe the procedures described in these operating instructions.
No claims of any kind will be accepted for damage arising as a result of incorrect use.
The risk shall be borne solely by the user.
SEM 1100 C3
GB│IE
│
3 ■

Package contents/Transport inspection
WARNING
Risk of suffocation!
► Do not allow children to play with packaging materials.
There is a risk of suffocation.
The appliance is supplied with the following components as standard:
▯ Espresso Machine
▯ Sieve holder
▯ Large espresso sieve
▯ Small espresso sieve
▯ Measuring spoon with compactor
▯ Descaler (125 ml)
▯ Short operating instructions
▯ Operating instructions
NOTE
► Check the package for completeness and for signs of visible damage.
► If the contents are incomplete or damaged due to defective packaging
or through transportation, contact the Service Hotline.
Disposal of the packaging
The packaging protects the appliance from damage during transport.
The packaging materials have been selected for their environmental friendliness
and ease of disposal, and are therefore recyclable.
The recirculation of packaging into the material circuit saves on raw material and
reduces the amount of waste generated. Dispose of packaging material that is
no longer needed according to the regionally established regulations.
Dispose of the packaging in an environmentally friendly manner.
Note the labelling on the packaging and separate the packaging material
components for disposal if necessary. The packaging material is labelled with
abbreviations (a) and numbers (b) with the following meanings:
1–7: Plastics,
20–22: Paper and cardboard,
80–98: Composites.
■ 4 │ GB
NOTE
► If possible, keep the appliance's original packaging during the warranty
period so that the appliance can be packed properly for return shipment
in the event of a warranty claim.
│
IE
SEM 1100 C3

Safety instructions
To ensure safe operation of the appliance, follow the safety
guidelines set out below:
WARNING! RISK OF INJURY!
► Prior to use, check the appliance for visible external dam-
age. Do not operate an appliance that has been damaged
or dropped.
► The appliance and its connecting cable must be kept away
from children younger than 8 years old.
► This appliance may be used by children aged 8 years or
over if they are supervised or have been instructed how to
use the appliance safely and have understood the potential
risks.
► This appliance may be used by people with reduced physi-
cal, sensory or mental capabilities or lack of experience
and/or knowledge if they are supervised and have been
instructed in how to use the appliance safely and have
understood the potential risks.
► Cleaning and user maintenance must not be carried out
by children, unless they are aged 8 or over and are supervised.
► Children must not use the appliance as a plaything.
► All repairs must be carried out by authorised specialist com-
panies or by the Customer Service department. Improper
repairs can pose significant risks to the user. It will also
invalidate any warranty claims.
Never submerge the appliance in water or other
liquids! Danger of electric shock!
SEM 1100 C3
GB│IE
│
5 ■

WARNING! RISK OF INJURY!
► Never touch the appliance with wet or moist hands.
► To avoid risks, arrange for defective plugs and/or power
cables to be replaced at once by qualified technicians or
our Customer Service Department.
► Risk of burns! During use, some parts become very hot!
► Hot vapour plumes are formed when the product is in use.
Take care to ensure that you do not scald yourself! Keep a
safe distance away from the steam.
► The appliance should only be connected to correctly in-
stalled and earthed mains power sockets.
► After use, the surfaces of the heating elements will still have
some residual heat.
► Do not allow any liquid to get onto the appliance's plug
connections.
► Use the appliance only for its intended purpose. Misuse
can lead to injuries.
CAUTION! PROPERTY DAMAGE!
► Defective components must always be replaced with origi-
nal replacement parts. Compliance with safety requirements can only be guaranteed if original replacement parts
are used.
► Protect the appliance from penetration by moisture and
liquids.
► Protect the appliance against knocks, dust, chemicals, ex-
treme temperatures, etc. and keep it away from sources of
heat (ovens, radiators).
► NEVER submerse the appliance in water or other liquids!
► Always remove the mains adapter from the mains outlet;
never pull on the power cable.
■ 6 │ GB
│
IE
SEM 1100 C3

CAUTION! PROPERTY DAMAGE!
► Never leave the appliance unattended during operation.
► Do not use an external timer switch or a separate remote
control system to operate the appliance.
► Do not operate the appliance in rooms where the tempera-
tures are below or around 0°C. If the water in the pipes or
the water tank freezes, the appliance could be damaged.
► Never operate the appliance outdoors. This appliance is
intended for indoor use only.
► Do not generate steam when the descaler solution is in the
water tank!
NOTE
► Repairs to the appliance during the warranty period may
only be carried out by a customer service department authorised by the manufacturer, otherwise no warranty claims
can be considered for subsequent damage.
SEM 1100 C3
GB│IE
│
7 ■

Appliance elements
Figure A:
1 On/Off switch „ON / OFF“
2 Temperature indicator
3 “Espresso” button
4 “Steam” button
5 Green control lamp “Steam”
6 Storage space
7 Steam control
8 Handle
9 Water tank
0 Milk frother
q Drip grille
w Drip tray
e Opening for the red float
r Hot water shower
t Green control lamp “Espresso”
z Red operating lamp
Figure B:
u Sieve block
i Portafilter
o Large espresso sieve
p Small espresso sieve
a Measuring spoon with compactor
s Descaler
Technical data
Mains voltage
Rated power 1100 W
Pump pressure approx. 1.5 MPa (15 bar)
■ 8 │ GB
│
IE
220 – 240 V ∼ (alternating
current), 50‒60 Hz
Food-safe
SEM 1100 C3

Temperature display
The temperature indicator 2 indicates how far the appliance has heated up.
As soon as you switch the appliance on, it starts heating up until the pointer is
approximately in the middle between 80°C and “ ”. The red operating lamp
z lights up. The “Espresso” control lamp t flashes green.
Once the pointer reaches the red portion of the scale, the temperature is high enough
to prepare an espresso. The “Espresso” control lamp t lights up permanently.
When you press the “Steam” button 4, the “Steam” control lamp 5 flashes
green. The appliance continues to heat up and the pointer rises higher until it
reaches the range of the scale between “
Once the pointer reaches the range between “ ” and “ ” the temperature is
high enough to produce steam. The “Steam” control lamp 5 lights up permanently.
” and “ ”.
First use
1) Pull out the water tank 9 and remove the orange transport lock
2) Clean the sieve holder i, the measuring spoon a, the espresso sieve o p,
3) Place the appliance on a level and heat-resistant surface. Ensure that a mains
4) Insert the drip grille q so that the red float e can protrude through the hole
SEM 1100 C3
from the water outlet.
the drip grille q and the water tank 9 as described in the section “Cleaning
and Care”.
power socket is in the vicinity.
in the drip grille q.
GB│IE
│
9 ■
5) Place the sieve holder i in the appliance by inserting the “INSERT” mark,
which is located next to the hot water shower r, into the appliance and then
turning it clockwise until the handle of the sieve holder i is facing the front
(“LOCK” mark).
6) Insert the plug into a mains power socket.
7) Proceed as follows before the first use, so as to clean the internal pipelines:
Allow sufficient water for about 5 cups of espresso (about 100 ml) to flow
through the appliance. Refer to the section “Operation”.
8) Let the appliance generate steam for about 30 seconds. Refer to the section
“Operation”.
NOTE
► When using the appliance for the first time, it is possible that you can hear
the pump working, even though no water comes out of the appliance. If this
is the case, turn the steam control 7 in the direction of the „
that the air can escape from the pipes of the appliance (the "Steam" button
4 is pressed). After approx. 20 seconds the air will have escaped, the
noises disappear and water flows from the appliance.
Operation
Filling the water tank
NOTE
► Use only fresh drinking water for making espresso/cappuccino.
1) Remove the water tank 9 and fill it with water:
Fill it with water to at least the Min marking.
Never fill it past the Max marking.
2) Replace the water tank 9 in the machine.
“, so
Heating after a long time of inactivity / during first use
If you have not used it for some time, preheat the appliance as follows:
1) Fill the water tank 9 with tap water.
2) Place either the large o or the small espresso sieve p in the sieve holder i:
– Make sure that the small indentation on the large o or small espresso
sieve p is located above the indentation on the sieve holder i when
inserted.
■ 10 │ GB
│
IE
SEM 1100 C3
– Then turn the large o or small espresso sieve p slightly to ensure it
cannot fall out.
NOTE
► Wait until the espresso sieve o p has cooled down before taking it out!
► In order to remove the espresso sieves o p from the sieve holder i,
turn the inserted espresso sieve o p until the indentation on the espresso
sieve o p is located directly above the indentation on the sieve holder i.
You can now remove the espresso sieve o p.
3) Place the sieve holder i in the appliance by inserting the “INSERT” mark,
which is located next to the hot water shower r, into the appliance and then
turning it clockwise until the handle of the sieve holder i is facing the front
(“LOCK” mark).
4) Place a cup under the sieve holder i.
5) Close the steam control 7 (turn it as far as it will go in the direction of the “
symbol).
6) Switch the appliance on using the On/Off switch 1. The red operating
lamp z lights up. The “Espresso” control lamp t flashes green.
The appliance starts to heat up.
▯
“
SEM 1100 C3
GB│IE
│
11 ■

7) As soon as the green “Espresso” control lamp t lights up continuously,
press the “Espresso” button 3. Let the water run through for about 1
minute.
NOTE
►
You may need to empty the cup in between. Interrupt the process by pressing
the "Espresso" button
3 again so that water flows through the appliance.
8) After about 1 minute, stop the pump by pressing the “Espresso” button
again.
9) Wait until the “Espresso” control lamp t lights up continuously (if it is not
already lit). The warming-up is concluded. You can now prepare espresso.
3. Empty the cup and press the "Espresso" button
Heating up before every use
Before you can prepare an espresso or cappuccino, the appliance must be
heated up.
1) Switch the appliance on using the On/Off switch 1. The red operating
lamp z lights up. The “Espresso” control lamp t flashes green. Make sure
that the steam control 7 is turned in the direction of the
stop.
2) Place the sieve holder i in the appliance by inserting the “INSERT” mark,
which is located next to the hot water shower r, into the appliance and then
turning it clockwise until the handle of the sieve holder i is facing the front
(“LOCK” mark).
3) Press the “Espresso” button
the water tank 9. As soon as water starts exiting the openings in the sieve
holder, press the “Espresso” button 3 again to stop the pump.
4) Wait until the “Espresso” control lamp t lights up continuously.
5) Press the “Espresso” button
through for 20 seconds before stopping the pump again.
The preheating process is completed. You can now make an espresso/cappuccino.
3
“▯”
as far as the
3 so that the appliance draws water from
3 again and allow hot water to flow
Preparing espresso
NOTE
► Always ensure that the espresso sieve o p is clean and free of coffee
powder residues.
1) When the appliance is heated up:
To prepare an espresso, place the small espresso sieve p into the sieve
holder i.
To prepare two espressos, place the large espresso sieve o into the sieve
holder i.
■ 12 │ GB
│
IE
SEM 1100 C3

2) Fill the small espresso sieve p with espresso powder up to the Max marking.
This corresponds to approx. 7 g of powder or a level measuring spoon a.
Or...
Fill the large espresso sieve o with espresso powder up to the Max marking.
This equates to about 7g + 7g of powder or two level measuring spoons a.
3) Tamp down the espresso powder using the compactor on the measuring spoon a.
Add more espresso powder, if required, until the espresso sieve o p is full
up to the Max marking. Tamp the coffee powder down once again.
NOTE
► Compaction of the coffee powder is an essential process for the prepar-
ation of an espresso. If the espresso powder is compacted very strongly,
the espresso runs through more slowly and more crema is generated. If the
espresso powder is not so strongly compacted, the espresso runs through
more quickly and it creates very little crema.
4) Place the sieve holder i in the appliance at the “INSERT” mark, then
turn it clockwise until the handle of the sieve holder i is facing the front
(“LOCK” mark).
5) Place one (or two) cup(s) under the sieve holder openings. We recommend
that you rinse the cups out with hot water beforehand, so that the espresso
does not cool so quickly. You can place the cups onto the storage space 6.
6) As soon as the “Espresso” control lamp t lights up continuously, press the
“Espresso” button
WARNING
Never remove the sieve holder i while the espresso is coming
out!
The resulting spray of hot espresso would lead to injury!
► Always press the “Espresso” button
output before removing the portafilter i
7) Once the cups are filled up to the required amount (about 20 ml per cup),
press the “Espresso” button
You can now drink the espresso.
8) Switch the appliance off with the on/off switch 1.
3. The espresso flows into the cup(s).
3 again to stop the espresso
3 to stop the water being pumped through.
NOTE
SEM 1100 C3
► If the “Espresso”
about 30 minutes, the appliance switches off automatically.
3 or “Steam” 4 buttons are not pressed for
GB│IE
│
13 ■

9) After every use, remove the used espresso powder from the espresso sieve o p.
Remove the sieve holder i from the appliance. To do this, fold the sieve
blocker u upwards so that the espresso sieve o p cannot fall out of the
sieve carrier i. Now empty the espresso sieve o p by turning the sieve
holder i and the blocked espresso sieve o p over and knocking the
espresso powder out. Always dispose of the espresso powder in an environmentally friendly manner, e.g. with the organic waste.
NOTE
► Clean the hot water shower r (the hot water comes out of this) after each
use. See also the section "Cleaning and Care".
NOTE
► Empty the drip tray w regularly, at the latest when the red float e is visible
in the hole of the drip grille q.
Preparing cappuccino
WARNING
Be careful when working with steam for the milk froth production!
The hot steam or hot splashes can lead to injuries!
► Always operate the steam control 7 slowly.
1) Fill a container for frothing (preferably made of stainless steel) to one third
with cold milk.
2) Ensure that the steam control 7 is closed (turn it as far as it will go in the
direction “
3) Push the milk frother 0 out to the side. Always hold it by the handle 8.
▯
“).
■ 14 │ GB
4) Press the “Steam” button
lights up continuously.
5) Hold an empty container under the milk frother 0. Slowly turn the steam
control 7 in the direction “
the nozzle. This cleans the nozzle and the water circuit inside the appliance.
6) Wait 15 seconds and turn the steam control 7 towards “
steam comes out of the nozzle. Pour the water in the container away.
│
IE
4. Wait until the “Steam” control lamp 5
“. Pressurised water/spray comes from
▯
“ until no more
SEM 1100 C3

7) Now hold the frothing container in your hand to feel the milk temperature
and guide the nozzle of the milk frother 0 gently into the milk. Hold the
frothing container at a slight angle.
8) Slowly turn the steam control 7 in the direction “
9) Move the frothing container around in a circular motion while keeping the tip
of the nozzle under the surface of the milk: deep enough that the milk does
not spray out, but shallow enough to create a thick froth. Done properly,
a deep buzzing sound is audible.
10) As the milk froth rises, push the nozzle deeper into the milk to froth up the
next “layer” and to avoid a burnt taste in the froth.
11) Finally, insert the nozzle completely and close the steam control 7 approxi-
mately halfway, so that the milk is heated. Hold the frothing container at a
slight angle, so that the milk gently swirls around while it is being stirred with
the nozzle.
12) Once the milk froth has reached the desired consistency and temperature,
turn the steam control 7 to off (up to the stop in the direction of the “
13) Now you can remove the nozzle from the milk.
14) Proceed as described in the section “Cleaning the milk frother”.
NOTE
► For cappuccino, always use bigger cups than for espresso because frothed
milk will be added.
15) To prepare cappuccino, proceed exactly as you would for espresso (see
section “Preparing espresso”; preheating is no longer necessary). Allow the
water to flow through for about twice as long as an espresso (about 40 ml).
“.
▯
“).
NOTE
16) Switch the appliance off with the On/Off switch 1.
NOTE
17) Now add the frothed milk into the previously prepared espresso. The cap-
SEM 1100 C3
► The "Espresso" control lamp t may flash rapidly, if you press the "Espresso"
button
appliance is too hot to prepare a perfect espresso. You can either continue
making an espresso anyway or allow the appliance to cool down.
As soon as the "Espresso" control lamp t lights up continuously, the
optimum temperature range for espresso has been reached again.
► If the “Espresso”
about 30 minutes, the appliance switches off automatically.
puccino is now ready. You can add sugar or sprinkle it with cocoa powder
according to taste.
3 directly after preparing frothed milk. This means that the
3 or “Steam” 4 buttons are not pressed for
GB│IE
│
15 ■

NOTE
► Always clean the milk frother 0 after every use. See also the section
"Cleaning and Care".
Tips for the milk froth
■ Generally, any type of milk can be frothed, including soy and rice milk.
However, some types of milk can only be frothed to a certain extent.
■ Low fat or skimmed milk does not burn as easily as whole milk, however,
a too low fat content adds to the risk that the milk will not be well frothed.
Therefore use a milk with a fat content of 3.5% or 1.5%, if possible.
■ Well-cooled milk can be better frothed than less cold. For the best results,
use milk at a temperature of about 7°C.
■ Do not froth the milk a second time, otherwise it may burn.
■ Allow frothed milk to stand for about 30 seconds before you pour it onto the
espresso. This allows the larger bubbles to burst; the still liquid milk sinks to
the bottom. You can then pour the fine froth onto the espresso.
Drawing hot water
You can also use the milk frother 0 to draw hot water; for example, to dilute
a coffee (café americano) or prepare tea.
1) Switch the appliance on using the On/Off switch 1. The red operating
lamp z lights up. The “Espresso” control lamp t flashes green.Make sure
that the steam control 7 is turned in the direction of the
stop.
Wait until the pointer of the temperature indicator 2 is approximately half
way between 80°C and “
continuously.
2) Hold a heat-resistant container under the milk frother 0.
3) Turn the steam control 7 at least half way towards “
4) Press the “Espresso” button
frother 0.
5) Press the “Espresso” button
“▯”
as far as the
” and the “Espresso” control lamp t lights up
”.
3. Hot water will come out of the milk
3 again to stop the flow of hot water.
■ 16 │ GB
│
IE
SEM 1100 C3

Cleaning and care
WARNING! RISK OF INJURY!
► Always remove the plug from the mains power socket before you clean the
appliance. Risk of electric shock!
► Always allow the appliance to cool down before cleaning it. Risk of burns!
Never immerse the appliance in water or other liquids! Risk of electric
shock!
CAUTION! PROPERTY DAMAGE!
► To avoid damage, never use abrasive, aggressive or chemical cleaning
agents to clean the surfaces of the appliance.
Cleaning the milk frother
1) Place an empty container under the milk frother 0.
2) Immediately after use, turn the steam control 7 to the “
and allow the steam to escape for a few seconds.
3) Turn the steam control 7 off (as far as it will go in the direction “
the appliance off and remove the plug from the mains power socket.
4) Allow the nozzle to cool down.
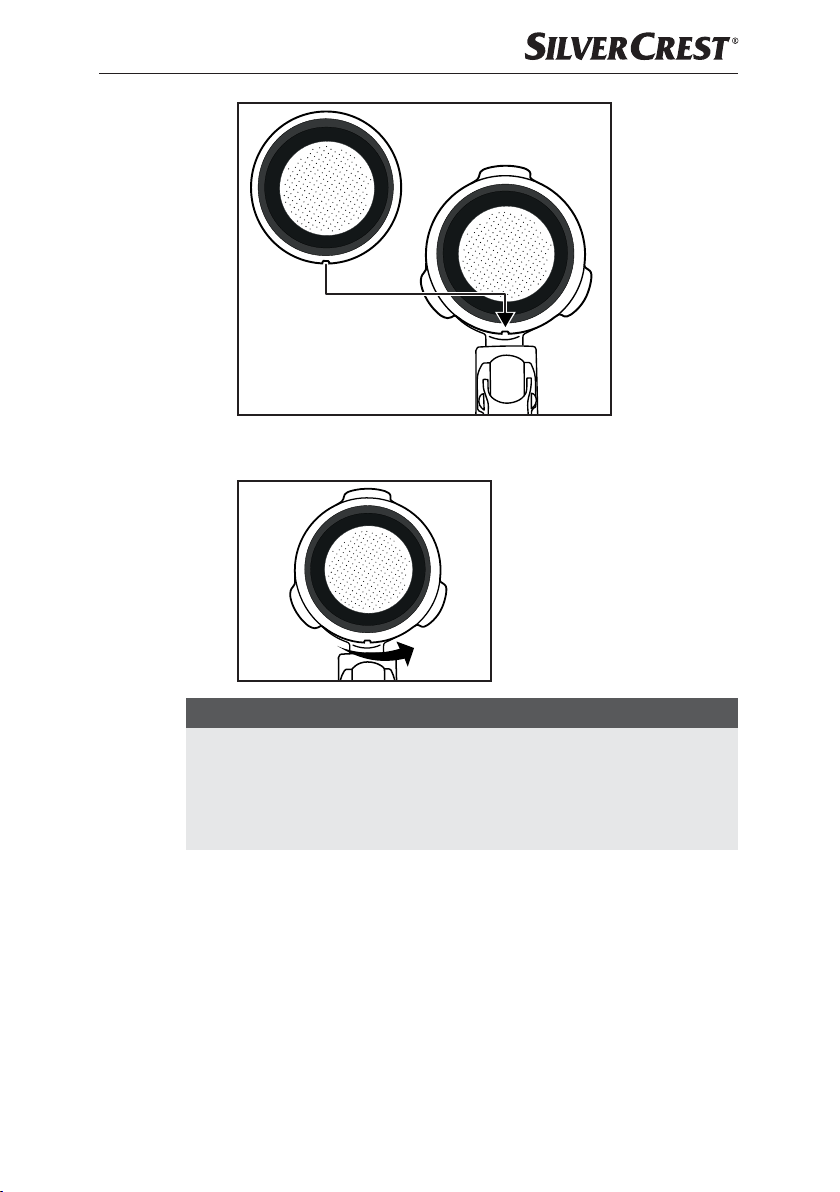
5) Pull the casing of the milk frother 0 off (Figure 1) and clean it thoroughly in
warm water.
6) Wipe the nozzle under the casing with a damp cloth. If necessary, add a little
mild detergent onto the cloth. After cleaning with detergent, always wipe off
with a cloth moistened with clean water. Ensure that there is no detergent
residue left on the nozzle.
7) Push the casing back onto the nozzle (Figure 1).
“ position
▯
“), switch
SEM 1100 C3
GB│IE
│
17 ■

Figure 1
Cleaning the hot water shower
Clean the hot water shower r after each use:
1) After you have prepared the espresso/cappuccino and removed the sieve
holder i, wipe the entire surface of the hot water shower r with a moistened cloth to remove all powder residues.
2) Replace the sieve holder i without the espresso filters o p.
3) Place an empty cup under the portafilter i and press the “Espresso” button
3. Water flows out of the hot water shower r rinsing out the remaining
powder residue.
4) After about 20 seconds, press the “Espresso” button
switch the appliance off with the On/Off switch 1.
5) Remove the sieve holder i again.
Cleaning the accessories
1) Clean the sieve holder i, the two espresso sieves o p, water tank 9, the
measuring spoon a and the drip grille q in warm water.
NOTE
► If you put detergent into the water, it may effect the taste of the espresso.
If the stains can only be removed with detergent, always rinse the items
afterwards with lots of clean water.
2) Dry all parts well.
3 again and
■ 18 │ GB
│
IE
SEM 1100 C3

NOTE
►
The two espresso sieves o p, the measuring spoon a and the
drip tray q are dishwasher-safe.
Cleaning the appliance
Clean the appliance with a moist cloth. If necessary, use a little detergent on the cloth.
Ensure that the appliance is completely dry before the next use.
Descaling the appliance
CAUTION! PROPERTY DAMAGE!
► Do not generate steam when the descaler solution is in the water tank 9!
Descale the appliance regularly. The appliance should be descaled after about
1–2 months (if used to make approx. 4 espressos per day). This value can vary
depending on the hardness of the water in your region.
Proceed as follows to use the descaler s supplied with the appliance:
1) Add the descaler s (125 ml) to the water tank 9.
2) Fill the water tank 9 up to the Max mark with water and replace the tank
in the appliance.
3) Switch on the appliance using the On/Off switch 1. Make sure the steam
control 7 is shut off.
4) Insert the sieve holder i without any espresso sieve o p into the appliance.
5) Place 2 cups or a container capable of holding at least 250 ml under the
sieve holder openings.
6) As soon as the “Espresso” control lamp t lights up continuously, press the
“Espresso” button
Allow around 250 ml (around 2 cups) of descaler solution to run through
and then stop the process by pressing the “Espresso” button
Carefully pour out the used descaler solution.
7) Allow the descaler s to act for approx. 1 minute.
8) Repeat steps 6 to 7 three more times. Empty the water tank 9 completely
the last time.
9) Place a sufficiently large container (at least 1 litre) under the sieve holder
openings.
10) Rinse out the water tank 9 with fresh water and fill it with fresh water up to
the Max mark.
11) As soon as the “Espresso” control lamp t lights up continuously, press the
“Espresso” button
Allow the water to run through completely. Carefully pour out this water.
3.
3.
3 again.
SEM 1100 C3
GB│IE
│
19 ■

12) Repeat steps 10 to 11 once and then turn off the appliance.
13) After descaling, wipe off the appliance with a damp cloth to remove any
splashes of the descaler solution. Ensure that the appliance is completely dry
before the next use.
You can order more descaler s via our customer service (see section “Ordering
replacement parts”).
We recommend using the descaler s supplied with the appliance. You can
also use other commercially available descaling agents for espresso machines.
If you do so, proceed as described in the operating instructions of the respective
descaler.
Ordering replacement parts
You can order the following replacement parts for the product SEM 1100 C3:
▯ Descaler s (125 ml)
Order the product via our service hotline (see section Service) or comfortably
on our web page under www.kompernass.com.
■ 20
NOTE
► Please note that online ordering of replacement parts may not be possible
in all countries.
► Have the IAN number of the appliance ready (can be found on the cover
of these operating instructions) when you place your order.
│GB│
IE
SEM 1100 C3

Troubleshooting
Malfunction Cause Solution
• Re-prepare the espresso
without compressing the
powder as firmly; if necessary, use new powder.
• Fill the water tank 9
with water.
• Clean the sieve holder i.
The espresso no longer
flows out.
• The espresso powder is too
moist and/or compressed
too tightly.
• No water in the water tank 9.
• The holes of the sieve holder
openings are blocked.
The espresso drips over
the edges of the sieve
holder i, not from the
openings.
The espresso is cold.
The pump is unusually
noisy.
The crema is too light
(the espresso runs out
of the sieve holder i
quickly).
The crema is too dark
(the espresso runs out
of the sieve carrier i
slowly).
The milk does not froth.
• The sieve holder i is not
correctly inserted.
• The sieve holder openings are
blocked.
• There are espresso powder
residues on the edges of the
sieve holder i.
• The appliance was not
preheated.
• The "Espresso" control
lamp t has not yet lit up
continuously.
• The cups were not pre-warmed. • Pre-warm the cups.
• The water tank 9 is empty.
• Not enough espresso powder.
• The espresso powder is too
coarsely ground.
• Too much espresso powder. • Use less espresso powder.
• The powder is too finely ground
or moist.
• The sieve o p is blocked. • Clean the sieve o p.
• The milk is not cold enough.
• The milk frother 0
is dirty. • Clean the milk frother 0.
• Insert the sieve holder i
correctly.
• Clean the sieve holder i.
• Clean the espresso powder
residues from the edges of
the sieve holder i.
• Preheat the appliance.
• Wait until the "Espresso"
control lamp t lights up
continuously.
• Fill the water tank 9
with water.
• Use more espresso
powder.
• Use only espresso
powder specially manufactured for espresso.
• Use only espresso
powder specially manufactured for espresso.
• Use milk from the
refrigerator.
SEM 1100 C3
GB│IE
│
21 ■

Malfunction Cause Solution
The pump stops during
operation, the "Espresso" control lamp t
flashes.
All lamps 5 t z flash
simultaneously.
• The pump stops after about 3
minutes of operation to prevent
overheating.
• The appliance has over heated
or short-circuited.
• Allow the appliance to
cool down before you
use it again.
• Unplug the mains plug
from the mains socket and
contact Customer Service.
Disposal
Disposal of the appliance
Do not dispose of the appliance in your normal domestic waste.
This product is subject to the provisions of the European WEEE
(Waste Electrical and Electronic Equipment) Directive 2012/19/EU.
Dispose of the appliance via an approved waste disposal company or your
municipal waste disposal facility. Please comply with all applicable regulations.
Please contact your waste disposal facility if you are in any doubt.
Your local community or municipal authorities can provide information on how to
dispose of the worn-out product.
The product is recyclable, subject to extended producer responsibility and is
collected separately.
■ 22 │ GB
│
IE
SEM 1100 C3

Kompernass Handels GmbH warranty
Dear Customer,
This appliance has a 3-year warranty valid from the date of purchase. If this product
has any faults, you, the buyer, have certain statutory rights. Your statutory rights
are not restricted in any way by the warranty described below.
Warranty conditions
The warranty period starts on the date of purchase. Please keep your receipt in a
safe place. This will be required as proof of purchase.
If any material or manufacturing fault occurs within three years of the date of
purchase of the product, we will either repair or replace the product for you or
refund the purchase price (at our discretion). This warranty service requires that
you present the defective appliance and the proof of purchase (receipt) within
the three-year warranty period, along with a brief written description of the fault
and of when it occurred.
If the defect is covered by the warranty, your product will either be repaired
or replaced by us. The repair or replacement of a product does not signify the
beginning of a new warranty period.
Warranty period and statutory claims for defects
The warranty period is not prolonged by repairs effected under the warranty.
This also applies to replaced and repaired components. Any damage and
defects present at the time of purchase must be reported immediately after unpacking. Repairs carried out after expiry of the warranty period shall be subject
to a fee.
Scope of the warranty
This appliance has been manufactured in accordance with strict quality guidelines and inspected meticulously prior to delivery.
The warranty covers material faults or production faults. The warranty does not
extend to product parts subject to normal wear and tear or to fragile parts which
could be considered as consumable parts such as switches, batteries or parts
made of glass.
The warranty does not apply if the product has been damaged, improperly used
or improperly maintained. The directions in the operating instructions for the
product regarding proper use of the product are to be strictly followed. Uses and
actions that are discouraged in the operating instructions or which are warned
against must be avoided.
This product is intended solely for private use and not for commercial purposes.
The warranty shall be deemed void in cases of misuse or improper handling, use
of force and modifications / repairs which have not been carried out by one of
our authorised Service centres.
SEM 1100 C3
GB│IE
│
23 ■

Warranty claim procedure
To ensure quick processing of your case, please observe the following instructions:
■ Please have the till receipt and the item number (e.g.IAN123456_7890)
available as proof of purchase.
■ You will find the item number on the type plate on the product, an engraving
on the product, on the front page of the operating instructions (below left) or
on the sticker on the rear or bottom of the product.
■ If functional or other defects occur, please contact the service department
listed either by telephone or by e-mail.
■ You can return a defective product to us free of charge to the service address
that will be provided to you. Ensure that you enclose the proof of purchase
(till receipt) and information about what the defect is and when it occurred.
You can download these instructions along with many other manuals, product
videos and installation software at www.lidl-service.com.
This QR code will take you directly to the Lidl service page
(www.lidl-service.com) where you can open your operating instructions
by entering the item number (IAN) 353468_2007.
Service
Service Great Britain
Tel.: 0800 404 7657
E-Mail: kompernass@lidl.co.uk
Service Ireland
Tel.: 1890 930 034
(0,08EUR / Min.,(peak))
(0,06EUR / Min.,(off peak))
E-Mail: kompernass@lidl.ie
IAN 353468_2007
Importer
■ 24 │ GB
Please note that the following address is not the service address. Please use the
service address provided in the operating instructions.
KOMPERNASS HANDELS GMBH
BURGSTRASSE 21
44867 BOCHUM
GERMANY
www.kompernass.com
│
IE
SEM 1100 C3

Inhaltsverzeichnis
Einführung ...............................................26
Urheberrecht. . . . . . . . . . . . . . . . . . . . . . . . . . . . . . . . . . . . . . . . . . . . . . . . . . . . . . .26
Haftungsbeschränkung ...............................................26
Warnhinweise ......................................................26
Bestimmungsgemäße Verwendung .....................................27
Lieferumfang / Transportinspektion .....................................28
Entsorgung der Verpackung ...........................................28
Sicherheitshinweise .......................................29
Geräteelemente ..........................................32
Technische Daten .........................................33
Die Temperaturanzeige ....................................33
Erste Inbetriebnahme ......................................34
Bedienung ...............................................34
Wassertank befüllen .................................................34
Aufheizen nach längerer Standzeit / bei erster Inbetriebnahme ................35
Aufheizen vor jedem Gebrauch ........................................36
Espresso zubereiten .................................................37
Cappuccino zubereiten ..............................................38
Tipps für den Milchschaum ............................................40
Heißes Wasser beziehen .............................................41
Reinigen und Pflegen ......................................41
Milchaufschäumer reinigen ...........................................41
Heißwasserdusche reinigen ...........................................42
Zubehörteile reinigen ................................................43
Gerät reinigen .....................................................43
Gerät entkalken ....................................................43
Ersatzteile bestellen .......................................45
Fehlerbehebung ..........................................46
Entsorgung ..............................................47
Gerät entsorgen ....................................................47
Garantie der Kompernaß Handels GmbH .....................48
Service ...........................................................49
Importeur .........................................................49
SEM 1100 C3
DE│AT│CH
│
25 ■

Einführung
Herzlichen Glückwunsch zum Kauf Ihres neuen Gerätes.
Sie haben sich damit für ein hochwertiges Produkt entschieden. Die Bedie-
nungsanleitung ist Bestandteil dieses Produkts. Sie enthält wichtige Hinweise für
Sicherheit, Gebrauch und Entsorgung. Machen Sie sich vor der Benutzung des
Produkts mit allen Bedien- und Sicherheitshinweisen vertraut. Benutzen Sie das
Produkt nur wie beschrieben und für die angegebenen Einsatzbereiche. Händigen Sie alle Unterlagen bei Weitergabe des Produkts an Dritte mit aus.
Urheberrecht
Diese Dokumentation ist urheberrechtlich geschützt.
Jede Vervielfältigung bzw. jeder Nachdruck, auch auszugsweise, sowie die Wie-
dergabe der Abbildungen, auch im veränderten Zustand, ist nur mit schriftlicher
Zustimmung des Herstellers gestattet.
Haftungsbeschränkung
Alle in dieser Bedienungsanleitung enthaltenen technischen Informationen, Daten
und Hinweise für die Bedienung entsprechen dem letzten Stand bei Drucklegung
und erfolgen unter Berücksichtigung unserer bisherigen Erfahrungen und Erkenntnisse nach bestem Wissen.
Aus den Angaben, Abbildungen und Beschreibungen in dieser Anleitung können
keine Ansprüche hergeleitet werden.
Der Hersteller übernimmt keine Haftung für Schäden aufgrund von Nichtbeachtung der Anleitung, nicht bestimmungsgemäßer Verwendung, unsachgemäßen
Reparaturen, unerlaubt vorgenommenen Veränderungen oder Verwendung nicht
zugelassener Ersatzteile.
Warnhinweise
In der vorliegenden Bedienungsanleitung werden folgende Warnhinweise verwendet:
WARNUNG
Ein Warnhinweis dieser Gefahrenstufe kennzeichnet eine
mögliche gefährliche Situation.
Falls die gefährliche Situation nicht vermieden wird, kann dies zu Verletzungen
führen.
► Die Anweisungen in diesem Warnhinweis befolgen, um Verletzungen von
Personen zu vermeiden.
■ 26 │ DE
│AT│
CH
SEM 1100 C3

ACHTUNG
Ein Warnhinweis dieser Gefahrenstufe kennzeichnet einen
möglichen Sachschaden.
Falls die Situation nicht vermieden wird, kann dies zu Sachschäden führen.
► Die Anweisungen in diesem Warnhinweis befolgen, um Sachschäden zu
vermeiden.
HINWEIS
► Ein Hinweis kennzeichnet zusätzliche Informationen, die den Umgang mit
dem Gerät erleichtern.
Bestimmungsgemäße Verwendung
Dieses Gerät dient ausschließlich dem Zubereiten von Espresso/Cappuccino und
dem Aufschäumen von Milch. Es ist ausschließlich für die Nutzung in privaten
Haushalten bestimmt. Nutzen Sie es nicht gewerblich.
Eine andere oder darüber hinausgehende Benutzung gilt als nicht bestimmungsgemäß.
WARNUNG
Gefahr durch nicht bestimmungsgemäße Verwendung!
Von dem Gerät können bei nicht bestimmungsgemäßer Verwendung und/
oder andersartiger Nutzung Gefahren ausgehen.
► Das Gerät ausschließlich bestimmungsgemäß verwenden.
► Die in dieser Bedienungsanleitung beschriebenen Vorgehensweisen
einhalten.
Ansprüche jeglicher Art wegen Schäden aus nicht bestimmungsgemäßer
Verwendung sind ausgeschlossen.
Das Risiko trägt allein der Benutzer.
SEM 1100 C3
DE│AT│CH
│
27 ■

Lieferumfang / Transportinspektion
WARNUNG
Erstickungsgefahr!
► Verpackungsmaterialien dürfen nicht zum Spielen verwendet werden.
Es besteht Erstickungsgefahr.
Das Gerät wird standardmäßig mit folgenden Komponenten geliefert:
▯ Espressomaschine
▯ Siebträger
▯ großes Espressosieb
▯ kleines Espressosieb
▯ Messlöffel mit Stopfer
▯ Entkalker (125 ml)
▯ Kurzanleitung
▯ Bedienungsanleitung
HINWEIS
► Prüfen Sie die Lieferung auf Vollständigkeit und auf sichtbare Schäden.
► Bei einer unvollständigen Lieferung oder Schäden infolge mangelhafter
Verpackung oder durch Transport wenden Sie sich an die Service-Hotline.
Entsorgung der Verpackung
Die Verpackung schützt das Gerät vor Transportschäden. Die Verpackungsmaterialien sind nach umweltverträglichen und entsorgungstechnischen Gesichtspunkten ausgewählt und deshalb recyclebar.
Die Rückführung der Verpackung in den Materialkreislauf spart Rohstoffe und
verringert das Abfallaufkommen. Entsorgen Sie nicht mehr benötigte Verpackungsmaterialien gemäß den örtlich geltenden Vorschriften.
Beachten Sie die Kennzeichnung auf den verschiedenen Verpackungsmaterialien
und trennen Sie diese gegebenenfalls gesondert. Die Verpackungsmaterialien
sind gekennzeichnet mit Abkürzungen (a) und Ziffern (b) mit folgender Bedeutung:
1–7: Kunststoffe,
20–22: Papier und Pappe,
80–98: Verbundstoffe.
■ 28 │ DE
HINWEIS
► Heben Sie, wenn möglich, die Originalverpackung während der Garan-
tiezeit des Gerätes auf, um das Gerät im Garantiefall ordnungsgemäß
ver packen zu können.
│AT│
CH
SEM 1100 C3

Sicherheitshinweise
Beachten Sie für einen sicheren Umgang mit dem Gerät die
folgenden Sicherheitshinweise:
WARNUNG! VERLETZUNGSGEFAHR!
► Kontrollieren Sie das Gerät vor der Verwendung auf äuße-
re, sichtbare Schäden. Nehmen Sie ein beschädigtes oder
heruntergefallenes Gerät nicht in Betrieb.
► Das Gerät und seine Anschlussleitung sind von Kindern
jünger als 8 Jahren fernzuhalten.
► Das Gerät kann von Kindern ab 8 Jahren benutzt werden,
wenn sie beaufsichtigt oder bezüglich des sicheren Gebrauchs des Gerätes unterwiesen wurden und die daraus
resultierenden Gefahren verstanden haben.
► Das Gerät kann von Personen mit reduzierten physischen,
sensorischen oder mentalen Fähigkeiten oder Mangel an
Erfahrung und/oder Wissen benutzt werden, wenn sie
beaufsichtigt oder bezüglich des sicheren Gebrauchs des
Gerätes unterwiesen wurden und die daraus resultierenden
Gefahren verstanden haben.
► Reinigung und Benutzer-Wartung dürfen nicht von Kindern
durchgeführt werden, es sei denn, sie sind 8 Jahre oder
älter und beaufsichtigt.
► Kinder dürfen nicht mit dem Gerät spielen.
► Lassen Sie Reparaturen am Gerät nur von autorisierten
Fachbetrieben oder dem Kundenservice durchführen. Durch
unsachgemäße Reparaturen können erhebliche Gefahren
für den Benutzer entstehen. Zudem erlischt der Garantieanspruch.
Tauchen Sie das Gerät nicht in Wasser oder andere
Flüssigkeiten. Gefahr eines elektrischen Schlages!
SEM 1100 C3
DE│AT│CH
│
29 ■

WARNUNG! VERLETZUNGSGEFAHR!
► Fassen Sie das Gerät niemals mit nassen oder feuchten
Händen an.
► Wenn die Netzanschlussleitung dieses Gerätes beschädigt
wird, muss sie durch den Hersteller oder seinen Kundendienst oder eine ähnlich qualifizierte Person ersetzt werden,
um Gefährdungen zu vermeiden.
► Verbrennungsgefahr! Einige Teile werden während der
Benutzung sehr heiß!
► Bei der Benutzung des Gerätes entstehen heiße Dampf-
schwaden. Achten Sie darauf, dass Sie sich nicht daran
verbrühen! Halten Sie ausreichenden Abstand zum Dampf.
► Schließen Sie das Gerät nur an eine vorschriftsmäßig instal-
lierte und geerdete Netzsteckdose an.
► Nach der Anwendung verfügt die Oberfläche des Heizele-
ments noch über Restwärme.
► Es darf keine Flüssigkeit auf die Gerätesteckverbindung
laufen.
► Benutzen Sie das Gerät nur bestimmungsgemäß. Fehlan-
wendungen können zu Verletzungen führen.
ACHTUNG! SACHSCHADEN!
► Defekte Bauteile dürfen nur gegen Original-Ersatzteile aus-
getauscht werden. Nur bei diesen Teilen ist gewährleistet,
dass sie die Sicherheitsanforderungen erfüllen werden.
► Schützen Sie das Gerät vor Feuchtigkeit und dem Eindrin-
gen von Flüssigkeiten.
► Schützen Sie das Gerät vor Stößen, Staub, Chemikalien,
starken Temperaturschwankungen und zu nahen Wärmequellen (Öfen, Heizkörper).
■ 30 │ DE
│AT│
CH
SEM 1100 C3

ACHTUNG! SACHSCHADEN!
► Tauchen Sie das Gerät niemals in Wasser oder andere
Flüssig keiten.
► Ziehen Sie immer den Netzstecker aus der Netzsteckdose;
ziehen Sie niemals am Kabel.
► Lassen Sie das Gerät während des Betriebes niemals unbe-
aufsichtigt.
► Benutzen Sie keine externe Zeitschaltuhr oder ein separates
Fernwirksystem, um das Gerät zu betreiben.
► Betreiben Sie das Gerät niemals in Räumen, in denen
Temperaturen unter oder um 0°C herrschen. Bei Gefrieren
des Wassers in den Leitungen oder im Wassertank kann das
Gerät beschädigt werden.
► Betreiben Sie das Gerät niemals im Freien. Dieses Gerät ist
nur für die Verwendung in Innenräumen vorgesehen.
► Erzeugen Sie keinen Dampf, wenn sich Entkalkungslösung
im Wassertank befindet!
HINWEIS
► Eine Reparatur des Gerätes während der Garantiezeit darf
nur von einem vom Hersteller autorisierten Kundendienst
vorgenommen werden, sonst besteht bei nachfolgenden
Schäden kein Garantieanspruch mehr.
SEM 1100 C3
DE│AT│CH
│
31 ■

Geräteelemente
Abbildung A:
1 Ein-/Aus-Schalter „ON / OFF“
2 Temperaturanzeige
3 Taste „Espresso“
4 Taste „Dampf“
5 grüne Kontrollleuchte „Dampf“
6 Stellfläche
7 Dampfregler
8 Griff des Milchaufschäumers
9 Wassertank
0 Milchaufschäumer
q Abtropfgitter
w Tropfenauffangschale
e Aussparung für den roten Schwimmer
r Heißwasserdusche
t grüne Kontrollleuchte „Espresso“
z rote Betriebsleuchte
Abbildung B:
u Siebblockierer
i Siebträger
o großes Espressosieb
p kleines Espressosieb
a Messlöffel mit Stopfer
s Entkalker
■ 32 │ DE
│AT│
CH
SEM 1100 C3

Technische Daten
Netzspannung
Nennleistung 1100 W
Pumpendruck ca. 1,5 MPa (15 bar)
Die Temperaturanzeige
Die Temperaturanzeige 2 zeigt an, wie hoch das Gerät aufgeheizt hat.
220‒240 V ∼ (Wechselstrom),
50‒60 Hz
lebensmittelecht
Sobald Sie das Gerät einschalten, beginnt das Gerät aufzuheizen, bis der Zeiger
ungefähr in der Mitte zwischen 80°C und „ “ steht. Die rote Betriebsleuchte
z leuchtet. Die Kontrollleuchte „Espresso“ t blinkt grün.
Erreicht der Zeiger den roten Teil der Skala, ist die Temperatur hoch genug, um
einen Espresso zuzubereiten. Die Kontrollleuchte „Espresso“ t leuchtet durchgehend.
Wenn Sie die Taste „Dampf“
5 grün. Das Gerät heizt nun weiter auf und der Zeiger steigt höher bis in den
Bereich der Skala zwischen „
Erreicht der Zeiger den Bereich zwischen „
hoch genug, um Dampf zu erzeugen. Die Kontrollleuchte „Dampf“ 5 leuchtet
durchgehend.
SEM 1100 C3
4 drücken, blinkt die Kontrollleuchte „Dampf“
“ und „ “.
“ und „ “, ist die Temperatur
DE│AT│CH
│
33 ■

Erste Inbetriebnahme
1) Entnehmen Sie den Wassertank 9 und entfernen Sie die
2) Reinigen Sie den Siebträger i, den Messlöffel a, die Espressosiebe o p,
das Abtropfgitter q und den Wassertank 9 wie im Kapitel „Reinigen und
Pflegen“ beschrieben.
3) Stellen Sie das Gerät auf eine ebene und hitzebeständige Unterlage. Achten
Sie darauf, dass die Netzsteckdose in erreichbarer Nähe ist.
4) Setzen Sie das Abtropfgitter q so ein, dass der rote Schwimmer durch die
Aussparung e im Abtropfgitter q ragen kann.
5) Setzen Sie den Siebträger i in das Gerät ein, indem Sie ihn an der Markierung „INSERT“, die seitlich neben der Heißwasserdusche r angebracht ist,
am Gerät einsetzen und dann gegen den Uhrzeigersinn drehen, bis der Griff
des Siebträgers i nach vorne weist (Markierung „LOCK“).
6) Stecken Sie den Netzstecker in eine Netzsteckdose.
7) Gehen Sie vor der ersten Verwendung folgendermaßen vor, um die internen
Leitungen zu reinigen:
Lassen Sie Wasser für ca. 5 Tassen Espresso (etwa 100 ml) durch das Gerät
laufen. Lesen Sie hierzu das Kapitel „Bedienung“.
8) Lassen Sie für ca. 30 Sekunden Dampf erzeugen. Lesen Sie hierzu das
Kapitel „Bedienung“.
HINWEIS
► Bei der ersten Benutzung kann es sein, dass die Pumpe schon hörbar arbei-
tet, Geräusche entstehen, jedoch noch kein Wasser aus dem Gerät kommt.
In diesem Fall drehen Sie den Dampfregler 7 in Richtung „
dass die Luft aus den Leitungen des Gerätes entweichen kann (die Taste
„Dampf“
chen, die Geräusche verschwinden und Wasser tritt aus dem Gerät aus.
orangene Transportsicherung vom Wasserauslass.
4 ist gedrückt). Nach etwa 20 Sekunden ist die Luft entwi-
“, so
Bedienung
Wassertank befüllen
HINWEIS
► Verwenden Sie für die Zubereitung von Espresso/Cappuccino ausschließ-
lich frisches Trinkwasser.
1) Nehmen Sie den Wassertank 9 ab und füllen Sie ihn mit Wasser:
Füllen Sie mindestens Wasser bis zur Min-Markierung ein.
Füllen Sie nie mehr Wasser als bis zur Max-Markierung ein.
2) Setzen Sie den Wassertank 9 wieder in das Gerät ein.
■ 34 │ DE
│AT│
CH
SEM 1100 C3

Aufheizen nach längerer Standzeit / bei erster
Inbetriebnahme
Heizen Sie das Gerät, wenn Sie es längere Zeit nicht benutzt haben, folgendermaßen auf:
1) Füllen Sie Wasser in den Wassertank 9.
2) Legen Sie das große o oder das kleine Espressosieb p in den Siebträger i:
– Achten Sie darauf, dass die kleine Einkerbung am großen o oder kleinen
Espressosieb p beim Einsetzen über der Einkerbung am Siebträger i
liegt.
– Drehen Sie dann das große o oder kleine Espressosieb p etwas, so
dass dieses nicht mehr herausfallen kann.
HINWEIS
SEM 1100 C3
► Entfernen Sie das eingesetzte Espressosieb o p erst, wenn es sich abge-
kühlt hat!
► Um die Espressosiebe o p wieder aus dem Siebträger i herauszuneh-
men, drehen Sie das eingesetzte Espressosieb o p so weit, bis sich die
Einkerbung am Espressosieb o p über der Einkerbung am Siebträger i
befindet. Sie können das Espressosieb o p nun herausnehmen.
DE│AT│CH
│
35 ■

3) Setzen Sie den Siebträger i in das Gerät ein, indem Sie ihn an der Markierung „INSERT“, die seitlich neben der Heißwasserdusche r angebracht ist,
am Gerät einsetzen und dann gegen den Uhrzeigersinn drehen, bis der Griff
des Siebträgers i nach vorne weist (Markierung „LOCK“).
4) Stellen Sie eine Tasse unter den Siebträger i.
5) Drehen Sie den Dampfregler 7 zu (bis zum Anschlag in Richtung „▯“ drehen)
6) Schalten Sie das Gerät am Ein-/Aus-Schalter 1 an. Die rote Betriebsleuchte
z leuchtet. Die Kontrollleuchte „Espresso“ t blinkt grün. Das Gerät beginnt
aufzuheizen.
7) Sobald die grüne Kontrollleuchte „Espresso“ t durchgehend leuchtet, drücken Sie die Taste „Espresso“
durchlaufen.
HINWEIS
► Es kann sein, dass Sie zwischendurch die Tasse leeren müssen. Stoppen Sie
dafür kurz den Vorgang, indem Sie die Taste „Espresso“
Leeren Sie die Tasse und drücken Sie erneut die Taste „Espresso“ 3,
damit das Wasser weiter durch das Gerät läuft.
8) Nach ca. 1 Minute stoppen Sie die Pumpe, indem Sie die Taste „Espresso“
3 noch einmal drücken.
9) Warten Sie ggf., bis die Kontrollleuchte „Espresso“ t wieder dauerhaft
leuchtet. Das Aufheizen ist abgeschlossen. Sie können nun Espresso zubereiten.
Aufheizen vor jedem Gebrauch
Bevor Sie einen Espresso oder Cappuccino zubereiten können, muss das Gerät
aufheizen.
1) Schalten Sie das Gerät am Ein-/Aus-Schalter 1 an. Die rote Betriebsleuchte
z leuchtet. Die Kontrollleuchte „Espresso“ t blinkt grün. Stellen Sie sicher,
dass der Dampfregler 7 bis zum Anschlag auf
2) Setzen Sie den Siebträger i in das Gerät ein, indem Sie ihn an der Markierung „INSERT“, die seitlich neben der Heißwasserdusche r angebracht ist,
am Gerät einsetzen und dann gegen den Uhrzeigersinn drehen, bis der Griff
des Siebträgers i nach vorne weist (Markierung „LOCK“).
3) Drücken Sie die Taste „Espresso“
Wassertank 9 zieht. Sobald Wasser aus den Siebträger-Öffnungen tritt, drü-
cken Sie die Taste „Espresso“ 3 noch einmal, so dass die Pumpe stoppt.
4) Warten Sie, bis die Kontrollleuchte „Espresso“ t durchgehend leuchtet.
5) Drücken Sie erneut die Taste „Espresso“
heißes Wasser austreten, bevor Sie die Pumpe wieder stoppen.
Das Vorheizen ist abgeschlossen. Sie können nun einen Espresso/Cappuccino
zubereiten.
3. Lassen Sie das Wasser ca. 1 Minute
3 drücken.
„▯“
gedreht ist.
3, damit das Gerät Wasser aus dem
3 und lassen Sie 20 Sekunden
.
■ 36 │ DE
│AT│
CH
SEM 1100 C3

Espresso zubereiten
HINWEIS
► Stellen Sie immer sicher, dass das Espressosieb o p sauber und von
Espressopulver-Resten befreit ist.
1) Wenn das Gerät aufgeheizt ist:
Um einen Espresso zuzubereiten, setzen Sie das kleine Espressosieb p in
den Siebträger i ein.
Um zwei Espressi zuzubereiten, setzen Sie das große Espressosieb o in den
Siebträger i ein.
2) Füllen Sie das kleine Espressosieb p bis zur Max-Markierung mit Espressopulver. Dies entspricht ca. 7g Pulver oder einem gestrichenem Messlöffel a.
Oder...
Füllen Sie das große Espressosieb o bis zur Max-Markierung mit Espressopulver. Das entspricht ca. 7g + 7g Pulver oder zwei gestrichenen Messlöffeln a.
3) Verdichten Sie das Espressopulver mit Hilfe des Stopfers am Messlöffel a.
Füllen Sie danach, falls nötig, weiteres Espressopulver nach, so dass das
Espressosieb o p bis zur Max-Markierung gefüllt ist. Verdichten Sie das
Espressopulver danach erneut.
HINWEIS
► Das Verdichten des Espressopulvers ist ein wesentlicher Vorgang bei der
Zubereitung eines Espressos. Wird das Espressopulver sehr stark gepresst,
so läuft der Espresso langsam durch und es gibt mehr Crema. Ist das
Espressopulver nicht so stark verdichtet, läuft der Espresso schnell durch,
es entsteht nur wenig Crema.
4) Setzen Sie den Siebträger i in das Gerät ein, indem Sie ihn an der Markierung
„INSERT“ am Gerät einsetzen und dann gegen den Uhrzeigersinn drehen, bis der
Griff des Siebträgers i nach vorne weist (Markierung „LOCK“).
5) Stellen Sie eine (oder zwei) Tasse(n) unter die Siebträger-Öffnungen. Wir
empfehlen, die Tassen vorher mit heißem Wasser auszuspülen, damit der
Espresso nicht so schnell abkühlt. Die Tassen können Sie zur Aufbewahrung
auf der Stellfläche 6 abstellen.
6) Sobald die Kontrollleuchte „Espresso“ t durchgehend leuchtet, drücken Sie
die Taste „Espresso“
3. Der Espresso läuft in die Tasse(n).
WARNUNG
Entnehmen Sie niemals den Siebträger i während der
Espressoausgabe!
Die entstehenden Spritzer des heißen Espressos führen zu Verletzungen!
SEM 1100 C3
► Drücken Sie immer erst erneut die Taste „Espresso“
soausgabe zu beenden, bevor Sie den Siebträger i entfernen.
3, um die Espres-
DE│AT│CH
│
37 ■

7) Wenn die Tasse(n) bis zur gewünschten Menge gefüllt sind (ca. 20 ml je
Tasse), drücken Sie erneut die Taste „Espresso“ 3, so dass kein weiteres
Wasser gepumpt wird.
Sie können den Espresso nun trinken.
8) Stellen Sie das Gerät am Ein-/Aus-Schalter 1 aus.
HINWEIS
► Wenn die Tasten „Espresso“
ten nicht gedrückt werden, schaltet sich das Gerät automatisch aus.
9) Entfernen Sie nach jedem Gebrauch das Espressopulver aus dem Espressosieb o p. Entnehmen Sie den Siebträger i aus dem Gerät. Klappen Sie
den Siebblockierer u nach oben, so dass das Espressosieb o p nicht aus
dem Siebträger i herausfallen kann. Entleeren Sie nun das Espressosieb o
p, indem Sie den Siebträger i mit blockiertem Espressosieb o p umdrehen und das Espressopulver herausklopfen. Entsorgen Sie das Espressopulver immer umweltgerecht, zum Beispiel im Bioabfall.
HINWEIS
► Reinigen Sie die Heißwasserdusche r (aus dieser tritt das heiße Wasser
aus) unbedingt nach jedem Gebrauch. Lesen Sie hierzu das Kapitel „Reini-
gen und Pflegen“.
HINWEIS
► Entleeren Sie regelmäßig die Tropfenauffangschale w, spätestens jedoch,
wenn der rote Schwimmer in der Aussparung e des Abtropfgitters q zu
sehen ist.
Cappuccino zubereiten
WARNUNG
Seien Sie vorsichtig im Umgang mit dem Dampf zur Milch-
schaumerzeugung!
Der heiße Dampf oder heiße Spritzer führen zu Verletzungen!
► Bedienen Sie den Dampfregler 7 immer langsam.
3 oder „Dampf“ 4 für ca. 30 Minu-
■ 38 │ DE
1) Füllen Sie einen Aufschäumbehälter (vorzugsweise aus rostfreiem Stahl) zu
einem Drittel mit kalter Milch.
2) Stellen Sie sicher, dass der Dampfregler 7 zugedreht ist (bis zum Anschlag
in Richtung
3) Schieben Sie den Milchaufschäumer 0 zur Seite heraus. Fassen Sie ihn
dabei nur am Griff 8 an.
│AT│
CH
„▯“
drehen).
SEM 1100 C3

4) Drücken Sie die Taste „Dampf“ 4. Warten Sie, bis die Kontrollleuchte
„Dampf“ 5 durchgehend leuchtet.
5) Halten Sie ein leeres Gefäß unter den Milchaufschäumer 0. Drehen Sie
langsam den Dampfregler 7 in Richtung „
kommen aus der Düse. So wird die Düse und der Wasserkreislauf im Inneren
des Gerätes gereinigt.
6) Warten Sie 15 Sekunden und drehen Sie dann den Dampfregler 7 in
Richtung
Wasser aus dem Gefäß weg.
7) Halten Sie nun den Aufschäumbehälter in der Hand, um die Milchtemperatur
zu fühlen und führen Sie die Düse des Milchaufschäumers 0 leicht in die
Milch. Halten Sie den Aufschäumbehälter dabei ein wenig schräg.
8) Drehen Sie langsam den Dampfregler 7 in Richtung „
9) Bewegen Sie den Aufschäumbehälter kreisförmig und halten Sie dabei die
Spitze der Düse knapp unter die Milchoberfläche: tief genug, dass die Milch
nicht in alle Richtungen spritzt und hoch genug, dass ein dicker Schaum
erzeugt wird. Machen Sie es richtig, ist dabei ein tiefes Brummgeräusch zu
hören.
10) Wenn der Milchschaum hochsteigt, führen Sie die Düse tiefer ein, um die
nächste „Schicht“ aufzuschäumen und ein Anbrennen des Schaums zu
vermeiden.
11) Tauchen Sie schließlich die Düse vollständig ein und drehen Sie den Dampfregler 7 etwa bis zur Hälfte zu, so dass die Milch erhitzt wird. Halten Sie
den Aufschäumbehälter leicht schräg, so dass die Milch sanft herumwirbelt,
während sie mit der Düse umgerührt wird.
12) Wenn der Milchschaum die gewünschte Konsistenz und Temperatur hat, drehen Sie den Dampfregler 7 zu (bis zum Anschlag in Richtung
13) Ziehen Sie erst dann die Düse aus der Milch.
14) Gehen Sie vor, wie im Kapitel „Milchaufschäumer reinigen“ beschrieben.
„▯“
, bis kein Dampf mehr aus der Düse kommt. Schütten Sie das
“. Kondenswasser/Spritzer
“.
„▯“
drehen).
HINWEIS
15) Gehen Sie für die Zubereitung des Cappuccinos genauso vor, als würden
SEM 1100 C3
► Benutzen Sie zur Zubereitung von Cappuccino immer größere Tassen als
für Espresso, da noch aufgeschäumte Milch hinzugefügt wird.
Sie einen Espresso zubereiten (siehe Kapitel „Espresso zubereiten“/das
Aufheizen ist nicht mehr nötig). Lassen Sie das Wasser jedoch ca. doppelt so
lange durchlaufen, wie bei einem Espresso (ca. 40 ml).
DE│AT│CH
│
39 ■

HINWEIS
► Die Kontrollleuchte „Espresso“ t blinkt ggf. schnell, wenn Sie die Taste
„Espresso“
cken. Dies bedeutet, dass das Gerät für die Zubereitung eines optimalen
Espressos zu stark aufgeheizt ist. Sie können entweder dennoch mit der
Zubereitung eines Espressos fortfahren oder das Gerät abkühlen lassen.
Sobald die Kontrollleuchte „Espresso“ t durchgehend leuchtet, ist der für
Espresso optimale Temperaturbereich wieder erreicht.
16) Stellen Sie das Gerät am Ein-/Aus-Schalter 1 aus.
HINWEIS
3 direkt nach der Herstellung von Milchschaum drü-
► Wenn die Tasten „Espresso“
ten nicht gedrückt werden, schaltet sich das Gerät automatisch aus.
17) Geben Sie nun die aufgeschäumte Milch in den zuvor vorbereiteten Espresso. Der Cappuccino ist nun fertig. Sie können ihn nach Belieben zuckern
oder ihn mit Kakaopulver bestreuen.
HINWEIS
► Reinigen Sie den Milchaufschäumer 0 unbedingt nach jedem Gebrauch.
Lesen Sie hierzu das Kapitel „Reinigen und Pflegen“.
Tipps für den Milchschaum
■ Jede Art von Milch lässt sich prinzipiell aufschäumen, auch Soja- und
Reismilch. Einige Milchsorten lassen sich allerdings nur mit Einschränkungen
aufschäumen.
■ Entrahmte Milch (Magermilch) brennt nicht so leicht an wie Vollmilch, bei zu
geringem Fettgehalt besteht allerdings das Risiko, dass sich die Milch nicht
gut aufschäumen lässt. Benutzen Sie daher möglichst eine Milch mit 3,5 %
oder 1,5 % Fettanteil.
■ Gut gekühlte Milch lässt sich besser aufschäumen als weniger kalte. Beste
Ergebnisse erzielen Sie bei einer Temperatur von ca. 7 °C.
■ Schäumen Sie die Milch kein zweites Mal auf, da sie sonst anbrennt.
■ Lassen Sie aufgeschäumte Milch ca. 30 Sekunden lang stehen, bevor Sie
den Schaum auf den Espresso geben. So platzen größere Blasen und noch
flüssige Milch sinkt nach unten. Sie können dann den feinen Schaum auf den
Espresso geben.
3 oder „Dampf“ 4 für ca. 30 Minu-
■ 40 │ DE
│AT│
CH
SEM 1100 C3

Heißes Wasser beziehen
Sie können mit Hilfe des Milchaufschäumers 0 auch heißes Wasser beziehen,
um z. B. einen Kaffee zu verdünnen (Café Americano) oder Tee zuzubereiten.
1) Schalten Sie das Gerät am Ein-/Aus-Schalter 1 an. Die rote Betriebsleuchte
z leuchtet. Die Kontrollleuchte „Espresso“ t blinkt grün. Stellen Sie sicher,
dass der Dampfregler 7 bis zum Anschlag auf
Warten Sie, bis der Zeiger der Temperaturanzeige 2 ungefähr in der Mitte
zwischen 80°C und „
durchgehend leuchtet.
2) Stellen Sie ein hitzebeständiges Gefäß unter den Milchaufschäumer 0.
3) Drehen Sie den Dampfregler 7 mindestens bis zur Hälfte Richtung „
4) Drücken Sie die Taste „Espresso“
Milchaufschäumer 0 aus.
5) Drücken Sie erneut die Taste „Espresso“
zu stoppen.
“ steht und die Kontrollleuchte „Espresso“ t
Reinigen und Pflegen
WARNUNG! VERLETZUNGSGEFAHR!
► Ziehen Sie immer den Netzstecker aus der Netzsteckdose, bevor Sie das
Gerät reinigen. Gefahr eines elektrischen Schlages!
► Lassen Sie das Gerät immer erst abkühlen, bevor Sie das Gerät reinigen.
Verbrennungsgefahr!
Tauchen Sie das Gerät niemals in Wasser oder andere Flüssigkeiten.
Gefahr eines elektrischen Schlages!
„▯“
gedreht ist.
3. Heißes Wasser tritt aus dem
3, um den Heißwasserbezug
“.
ACHTUNG! SACHSCHADEN!
► Benutzen Sie niemals scheuernde, aggressive oder chemische Reinigungs-
mittel zur Reinigung der Geräteoberflächen, um Beschädigungen zu
vermeiden.
Milchaufschäumer reinigen
1) Stellen Sie einen leeren Behälter unter den Milchaufschäumer 0.
2) Drehen Sie den Dampfregler 7 direkt nach dem Gebrauch auf „
und lassen Sie einige Sekunden Dampf entweichen.
3) Drehen Sie den Dampfregler 7 zu (bis zum Anschlag in Richtung
hen), schalten Sie das Gerät aus und ziehen Sie den Netzstecker.
4) Lassen Sie die Düse abkühlen.
5) Ziehen Sie die Hülle des Milchaufschäumers 0 ab (Abbildung 1) und reini-
gen Sie diese sorgfältig im warmen Wasser.
SEM 1100 C3
DE│AT│CH
„▯“
│
“
dre-
41 ■

6) Wischen Sie die Düse, die sich unter der Hülle befindet, mit einem feuchten
Tuch ab. Geben Sie gegebenenfalls ein mildes Spülmittel auf das Tuch.
Wischen Sie jedoch nach der Reinigung mit Spülmittel mit einem mit klarem
Wasser befeuchteten Tuch nach. Stellen Sie sicher, dass sich keine Spülmittelreste an der Düse befinden.
7) Schieben Sie die Hülle wieder auf die Düse (Abbildung 1).
Abbildung 1
Heißwasserdusche reinigen
Reinigen Sie die Heißwasserdusche r nach jedem Gebrauch:
1) Nachdem Sie den Espresso/Cappuccino zubereitet haben und den Siebträger i abgenommen haben, wischen Sie die gesamte Fläche der Heißwasserdusche r mit einem feuchten Tuch ab, so dass alle Pulverreste entfernt
werden.
2) Setzen Sie den Siebträger i ohne eingesetzte Espressosiebe o p wieder
ein.
3) Stellen Sie dann eine leere Tasse unter den Siebträger i und drücken Sie
die Taste „Espresso“
und spült letzte Pulverreste heraus.
4) Drücken Sie nach ca. 20 Sekunden erneut die Taste „Espresso“
schalten Sie das Gerät am Ein-/Aus-Schalter 1 aus.
5) Nehmen Sie den Siebträger i wieder ab.
3. Wasser tritt aus der Heißwasserdusche r aus,
3 und
■ 42 │ DE
│AT│
CH
SEM 1100 C3

Zubehörteile reinigen
1) Reinigen Sie den Siebträger i, die beiden Espressosiebe o p, den Wassertank 9, den Messlöffel a und das Abtropfgitter q in warmen Wasser.
HINWEIS
► Wenn Sie Spülmittel in das Wasser geben, kann es sein, dass der Ge-
schmack des Espressos beeinflusst wird. Falls die Verschmutzungen sich nur
mit Spülmittel beseitigen lassen, spülen Sie die Teile hinterher immer mit viel
klarem Wasser ab.
2) Trocknen Sie alle Teile.
HINWEIS
►
Die beiden Espressosiebe o p, der Messlöffel a und das
Abtropfgitter q sind auch für die Reinigung in der Spülmaschine
geeignet.
Gerät reinigen
Reinigen Sie das Gerät mit einem feuchten Tuch. Geben Sie gegebenenfalls
etwas Spülmittel auf das Tuch.
Stellen Sie sicher, dass das Gerät vor einer erneuten Benutzung vollständig
getrocknet ist.
Gerät entkalken
ACHTUNG! SACHSCHADEN!
► Erzeugen Sie keinen Dampf, wenn sich Entkalkungslösung im Wassertank 9
befindet!
Entkalken Sie das Gerät regelmäßig. Nach ca. 1–2 Monaten (bei ca. 4 Espressozubereitungen pro Tag) sollte das Gerät entkalkt werden. Je nach Härtegrad
des Wassers in Ihrer Region kann dieser Wert abweichen.
Gehen Sie wie folgt vor, um den im Lieferumfang enthaltenen Entkalker s zu
verwenden:
1) Geben Sie den Entkalker s (125 ml) in den Wassertank 9.
2) Füllen Sie den Wassertank 9 bis zur Max-Markierung mit Wasser auf und
setzen Sie ihn in das Gerät ein.
3) Schalten Sie das Gerät am Ein-/Aus-Schalter 1 ein. Der Dampfregler 7 ist
zugedreht.
4) Setzen Sie den Siebträger i ohne Espressosieb o p in das Gerät ein.
5) Stellen Sie 2 Tassen oder ein Gefäß, das mindestens 250 ml fasst, unter die
Siebträger-Öffnungen.
SEM 1100 C3
DE│AT│CH
│
43 ■

6) Sobald die Kontrollleuchte „Espresso“ t durchgehend leuchtet, drücken Sie
die Taste „Espresso“ 3.
Lassen Sie ca. 250 ml (ca. 2 Tassen) Entkalkungslösung durchlaufen und
stoppen Sie dann den Vorgang durch erneutes Drücken der Taste „Espresso“
3. Kippen Sie die gebrauchte Entkalkungslösung ggf. vorsichtig weg.
7) Lassen Sie den Entkalker s für ca. 1 Minute einwirken.
8) Wiederholen Sie die Schritte 6 bis 7 noch dreimal. Entleeren Sie den Wassertank 9 beim letzten Mal vollständig.
9) Stellen Sie ein ausreichend großes Gefäß (min. 1 Liter) unter die SiebträgerÖffnungen.
10) Spülen Sie den Wassertank 9 mit klarem Wasser aus und füllen Sie klares
Wasser bis zur Max-Markierung ein.
11) Sobald die Kontrollleuchte „Espresso“ t durchgehend leuchtet, drücken Sie
die Taste „Espresso“
Lassen Sie das Wasser komplett durchlaufen. Kippen Sie dieses Wasser
vorsichtig weg.
12) Wiederholen Sie die Schritte 10 bis 11 einmal und schalten Sie das Gerät
anschließend aus.
13) Reinigen Sie das Gerät nach der Entkalkung mit einem feuchten Tuch, um
mögliche Spritzer der Entkalkungslösung zu entfernen. Stellen Sie sicher,
dass das Gerät vor einer erneuten Benutzung vollständig getrocknet ist.
Neuen Entkalker s können Sie über unseren Kundenservice bestellen (siehe
Kapitel „Ersatzteile bestellen“).
Wir empfehlen, den im Lieferumfang enthaltenen Entkalker s zu verwenden.
Sie können auch anderen, handelsüblichen Entkalker für Espressomaschinen zum
Entkalken nutzen. Gehen Sie dann so vor, wie in der Bedienungsanleitung des
jeweiligen Entkalkers beschrieben.
3.
■ 44 │ DE
│AT│
CH
SEM 1100 C3

Ersatzteile bestellen
Folgende Ersatzteile können Sie zum Produkt SEM 1100 C3 bestellen:
▯ Entkalker s (125 ml)
Bestellen Sie das Produkt über unsere Service-Hotline (siehe Kapitel „Service“)
oder bequem auf unserer Webseite unter www.kompernass.com.
HINWEIS
► Bitte beachten Sie, dass ggf. nicht für alle Lieferländer eine Online-Bestel-
lung von Ersatzteilen möglich ist.
► Halten Sie die Artikelnummer (IAN), die Sie auf dem Umschlag dieser
Bedienungsanleitung fi nden, für Ihre Bestellung bereit.
SEM 1100 C3
DE│AT│CH
│
45 ■

Fehlerbehebung
Störung Ursache Lösung
• Den Espresso neu
• Das Espressopulver ist zu
feucht und/oder zu fest
Der Espresso läuft nicht
mehr heraus.
Der Espresso tropft über
die Ränder des Siebträgers i anstatt aus den
Öffnungen.
gepresst.
• Kein Wasser im Wassertank 9.
• Die Löcher der SiebträgerÖffnungen sind verstopft.
• Der Siebträger i wurde
nicht korrekt eingesetzt.
• Die Siebträger-Öffnungen
sind verstopft.
• Es befinden sich Espressopulverreste auf dem Rand des
Siebträgers i.
• Wasser in den Wasser-
• Siebträger i reinigen.
• Siebträger i richtig
• Siebträger i reinigen.
• Rand des Siebträgers i
zubereiten, dabei das Espressopulver jedoch nicht
so fest verdichten oder es
ganz austauschen.
tank 9 füllen.
einsetzen.
von Espressopulverresten
befreien.
Der Espresso ist kalt.
Geräuschvoller Betrieb
der Pumpe.
Die Crema ist zu hell (der
Espresso läuft schnell aus
dem Siebträger i).
■ 46 │ DE
│AT│
CH
• Das Gerät wurde nicht
vorgeheizt.
• Die Kontrollleuchte „Espresso“ t hat noch nicht
durchgehend geleuchtet.
• Die Tassen wurden nicht
vorgewärmt.
• Kein Wasser im Wassertank 9.
• Zu wenig Espressopulver.
• Das Espressopulver ist zu
grob gemahlen.
• Gerät vorheizen.
• Warten, bis die Kontrollleuchte „Espresso“ t
durchgehend leuchtet.
• Tassen vorwärmen.
• Wasser in den Wassertank 9 füllen.
• Mehr Espressopulver
verwenden.
• Nur speziell für Espresso
hergestelltes Espressopulver verwenden.
SEM 1100 C3

Störung Ursache Lösung
• Weniger Espressopulver
• Nur speziell für Espresso
• Verwenden Sie Milch aus
• Reinigen Sie den
• Lassen Sie das Gerät
• Ziehen Sie den Netzste-
Die Crema ist zu
dunkel (der Espresso
läuft langsam aus dem
Siebträger i).
Die Milch schäumt
nicht auf.
Die Pumpe stoppt während des Betriebs, die
Kontrollleuchte „Espresso“ t blinkt.
Alle Leuchten 5 t z
blinken gleichzeitig.
• Zu viel Espressopulver.
• Das Pulver ist zu fein gemahlen oder feucht.
• Das Sieb o p ist verstopft. • Sieb o p reinigen.
• Die Milch ist nicht kalt genug.
• Der Milchaufschäumer 0 ist
verschmutzt.
• Die Pumpe stoppt nach ca.
3 Minuten Betrieb, um eine
Überhitzung zu vermeiden.
• Das Gerät ist überhitzt oder
hatte einen Kurzschluss.
Entsorgung
Gerät entsorgen
Werfen Sie das Gerät keinesfalls in den normalen Hausmüll.
Dieses Produkt unterliegt der europäischen Richtlinie
2012/19/EU-WEEE (Waste Electrical and Electronic Equipment).
Entsorgen Sie das Gerät über einen zugelassenen Entsorgungsbetrieb oder über
Ihre kommunale Entsorgungseinrichtung. Beachten Sie die aktuell geltenden
Vorschriften. Setzen Sie sich im Zweifelsfall mit Ihrer Entsorgungseinrichtung in
Verbindung.
verwenden.
hergestelltes Espressopulver verwenden.
dem Kühlschrank.
Milchaufschäumer 0.
abkühlen, bevor Sie es
erneut in Betrieb nehmen.
cker aus der Netzsteckdose und wenden Sie sich
an den Kunden-Service.
Möglichkeiten zur Entsorgung des ausgedienten Produkts erfahren Sie bei Ihrer
Gemeinde- oder Stadtverwaltung.
Das Produkt ist recycelbar, unterliegt einer erweiterten Herstellerverantwortung
und wird getrennt gesammelt.
SEM 1100 C3
DE│AT│CH
│
47 ■

Garantie der Kompernaß Handels GmbH
Sehr geehrte Kundin, sehr geehrter Kunde,
Sie erhalten auf dieses Gerät 3 Jahre Garantie ab Kaufdatum. Im Falle von
Mängeln dieses Produkts stehen Ihnen gegen den Verkäufer des Produkts gesetzliche Rechte zu. Diese gesetzlichen Rechte werden durch unsere im Folgenden
dargestellte Garantie nicht eingeschränkt.
Garantiebedingungen
Die Garantiefrist beginnt mit dem Kaufdatum. Bitte bewahren Sie den Kassenbon
gut auf. Dieser wird als Nachweis für den Kauf benötigt.
Tritt innerhalb von drei Jahren ab dem Kaufdatum dieses Produkts ein Materialoder Fabrikationsfehler auf, wird das Produkt von uns – nach unserer Wahl – für
Sie kostenlos repariert, ersetzt oder der Kaufpreis erstattet. Diese Garantieleistung setzt voraus, dass innerhalb der Dreijahresfrist das defekte Gerät und der
Kaufbeleg (Kassenbon) vorgelegt und schriftlich kurz beschrieben wird, worin
der Mangel besteht und wann er aufgetreten ist.
Wenn der Defekt von unserer Garantie gedeckt ist, erhalten Sie das reparierte
oder ein neues Produkt zurück. Mit Reparatur oder Austausch des Produkts
beginnt kein neuer Garantiezeitraum.
Garantiezeit und gesetzliche Mängelansprüche
Die Garantiezeit wird durch die Gewährleistung nicht verlängert. Dies gilt auch
für ersetzte und reparierte Teile. Eventuell schon beim Kauf vorhandene Schäden
und Mängel müssen sofort nach dem Auspacken gemeldet werden. Nach Ablauf
der Garantiezeit anfallende Reparaturen sind kostenpflichtig.
Garantieumfang
Das Gerät wurde nach strengen Qualitätsrichtlinien sorgfältig produziert und vor
Auslieferung gewissenhaft geprüft.
Die Garantieleistung gilt für Material- oder Fabrikationsfehler. Diese Garantie
erstreckt sich nicht auf Produktteile, die normaler Abnutzung ausgesetzt sind und
daher als Verschleißteile angesehen werden können oder für Beschädigungen an
zerbrechlichen Teilen, z. B. Schalter, Akkus oder Teile, die aus Glas gefertigt sind.
Diese Garantie verfällt, wenn das Produkt beschädigt, nicht sachgemäß benutzt
oder gewartet wurde. Für eine sachgemäße Benutzung des Produkts sind alle
in der Bedienungsanleitung aufgeführten Anweisungen genau einzuhalten.
Verwendungszwecke und Handlungen, von denen in der Bedienungsanleitung
abgeraten oder vor denen gewarnt wird, sind unbedingt zu vermeiden.
Das Produkt ist nur für den privaten und nicht für den gewerblichen Gebrauch
bestimmt. Bei missbräuchlicher und unsachgemäßer Behandlung, Gewaltanwendung und bei Eingriffen, die nicht von unserer autorisierten Serviceniederlassung
vorgenommen wurden, erlischt die Garantie.
■ 48 │ DE
│AT│
CH
SEM 1100 C3

Abwicklung im Garantiefall
Um eine schnelle Bearbeitung Ihres Anliegens zu gewährleisten, folgen Sie bitte
den folgenden Hinweisen:
■ Bitte halten Sie für alle Anfragen den Kassenbon und die Artikelnummer
(z.B.IAN123456_7890) als Nachweis für den Kauf bereit.
■ Die Artikelnummer entnehmen Sie bitte dem Typenschild am Produkt, einer
Gravur am Produkt, dem Titelblatt der Bedienungsanleitung (unten links) oder
dem Aufkleber auf der Rück- oder Unterseite des Produktes.
■ Sollten Funktionsfehler oder sonstige Mängel auftreten, kontaktieren Sie
zunächst die nachfolgend benannte Serviceabteilung telefonisch oder
perE-Mail.
■ Ein als defekt erfasstes Produkt können Sie dann unter Beifügung des Kaufbelegs
(Kassenbon) und der Angabe, worin der Mangel besteht und wann er aufgetreten ist, für Sie portofrei an die Ihnen mitgeteilte Serviceanschrift übersenden.
Auf www.lidl-service.com können Sie diese und viele weitere Handbücher,
Produktvideos und Installationssoftware herunterladen.
Mit diesem QR-Code gelangen Sie direkt auf die Lidl-Service-Seite
(www.lidl-service.com) und können mittels der Eingabe der Artikelnummer
(IAN) 353468_2007 Ihre Bedienungsanleitung öffnen.
Service
Service Deutschland
Tel.: 0800 5435 111 (kostenfreiausdemdt.Festnetz / Mobilfunknetz)
E-Mail: kompernass@lidl.de
Service Österreich
Tel.: 0820 201 222 (0,15 EUR / Min.)
E-Mail: kompernass@lidl.at
Service Schweiz
Tel.: 0842 665566 (0,08CHF / Min.,Mobilfunkmax.0,40CHF / Min.)
E-Mail: kompernass@lidl.ch
IAN 353468_2007
Importeur
Bitte beachten Sie, dass die folgende Anschrift keine Serviceanschrift ist.
Kontaktieren Sie zunächst die benannte Servicestelle.
KOMPERNASS HANDELS GMBH
BURGSTRASSE 21
44867 BOCHUM
DEUTSCHLAND
www.kompernass.com
SEM 1100 C3
DE│AT│CH
│
49 ■

■ 50 │ DE
│AT│
CH
SEM 1100 C3

Table des matières
Introduction .............................................52
Droits d’auteur .....................................................52
Limitation de responsabilité ...........................................52
Avertissements .....................................................52
Usage conforme ....................................................53
Matériels fournis / Inspection après transport ..............................54
Élimination de l’emballage ............................................54
Consignes de sécurité ......................................55
Éléments de l’appareil .....................................58
Caractéristiques techniques .................................59
L’affichage de température .................................59
Première mise en service ...................................60
Utilisation ...............................................60
Remplissage du réservoir à eau ........................................60
Mise en chauffe après un temps de repos prolongé /
lors de la première mise en service .....................................61
Mise en chauffe avant chaque utilisation ................................62
Préparation d’un expresso ............................................63
Préparation d’un cappuccino ..........................................64
Conseils pour la mousse de lait ........................................66
Prélever de l’eau chaude .............................................67
Nettoyage et entretien ....................................67
Nettoyage du mousseur à lait .........................................67
Nettoyage de la sortie d’eau chaude ...................................68
Nettoyage des accessoires ...........................................69
Nettoyage de l’appareil ..............................................69
Détartrage de l’appareil ..............................................69
Commander des pièces de rechange .........................70
Dépannage ..............................................71
Mise au rebut ............................................72
Mise au rebut de l'appareil ...........................................72
Garantie pour Kompernass Handels GmbH pour la Belgique .....73
Garantie pour Kompernass Handels GmbH pour la France .......75
Service après-vente .......................................78
Importateur .............................................78
SEM 1100 C3
FR
│
BE
│
51 ■

Introduction
Toutes nos félicitations pour l’achat de votre nouvel appareil.
Vous venez ainsi d’opter pour un produit de grande qualité. Le mode d’emploi
fait partie intégrante de ce produit. Il contient des remarques importantes concernant la sécurité, l’usage et la mise au rebut. Avant d’utiliser le produit, veuillez vous
familiariser avec toutes les consignes d’utilisation et de sécurité. N’utilisez le produit
que conformément aux consignes et pour les domaines d’utilisation prévus. Si vous
cédez le produit à un tiers, remettez-lui également tous les documents.
Droits d’auteur
Cette documentation est protégée par des droits d’auteur.
Toute reproduction ou réimpression, même partielle, y compris la reproduction
des illustrations, même sous une forme modifiée, suppose l’accord écrit du fabricant.
Limitation de responsabilité
L’ensemble des informations, données et remarques techniques concernant l’utilisation
de cet appareil données dans le présent mode d’emploi sont conformes à l’état du
matériel à la date d’impression, cette notice a été élaborée avec tout le soin requis.
Les indications, photos et descriptions contenues dans le présent mode d’emploi
ne peuvent donner lieu à aucune réclamation.
Le fabricant n’assume aucune responsabilité pour les dommages résultant du
non-respect du mode d’emploi, d’un usage non conforme, de réparations inadéquates, de modifications faites sans autorisation ou de l’usage de pièces de
rechange non agréées.
Avertissements
Les avertissements suivants sont utilisés dans le présent mode d’emploi:
ATTENTION
Un avertissement à ce niveau de danger signale une situation
potentiellement dangereuse.
Si la situation dangereuse ne peut être écartée, elle peut entraîner des blessures.
► Les consignes de cet avertissement doivent être suivies pour éviter de
blesser des personnes.
■ 52 │ FR
│
BE
SEM 1100 C3

ATTENTION
Un avertissement à ce niveau de danger signale un risque de
dégâts matériels.
Si la situation ne peut pas être écartée, elle risque d'entraîner des dégâts
matériels.
► Les instructions stipulées dans cet avertissement doivent être suivies pour
éviter tous dégâts matériels.
REMARQUE
► Une remarque contient des informations supplémentaires facilitant le
maniement de l'appareil.
Usage conforme
Cet appareil est destiné exclusivement à la préparation d’expresso ou de
cappuccino et à la préparation de mousse de lait. Cet appareil est exclusivement
réservé à l’usage dans le cadre domestique privé. Évitez de l’utiliser à des fins
professionnelles.
Tout usage autre ou dépassant ce cadre est réputé non conforme.
ATTENTION
Danger résultant d'un usage non conforme!
L'appareil peut présenter un danger en cas d'utilisation non conforme et / ou
d'usage différent.
► Utilisez l'appareil exclusivement de manière conforme à sa destination.
► Respectez les procédures décrites dans ce mode d'emploi.
Toute réclamation visant des dommages issus d’un usage non conforme sera
rejetée.
L’utilisateur assume seul la responsabilité des risques encourus.
SEM 1100 C3
FR
│
BE
│
53 ■

Matériels fournis / Inspection après transpor t
ATTENTION
Risque d'étouffement!
► Les matériaux d'emballage ne sont pas des jouets.
Il y a un risque d'étouffement.
L’appareil est équipé en série des composants suivants:
▯ Machine à expresso
▯ Porte-filtre
▯ Grand filtre expresso
▯ Petit filtre expresso
▯ Mesurette avec tasseur
▯ Détartrant (125 ml)
▯ Guide de démarrage rapide
▯ Mode d’emploi
REMARQUE
► Vérifiez si la livraison est au complet et ne présente aucun dégât apparent.
► En cas de livraison incomplète ou de dommages résultant d'un emballage
défectueux ou du transport, veuillez vous adresser à la hotline du service
après-vente.
Élimination de l’emballage
L’emballage protège l’appareil de tous dommages éventuels au cours du transport.
Les matériaux d’emballage ont été sélectionnés selon des critères de respect de
l’environnement et de recyclage permettant une élimination écologique de ceux-ci.
Le recyclage de l’emballage en filière de revalorisation permet d’économiser des
matières premières et de réduire le volume de déchets. Veuillez éliminer les matériaux
d’emballage qui ne servent plus en respectant la réglementation locale.
■ 54 │ FR
Éliminez l‘emballage d‘une manière respectueuse de l‘environnement.
Observez le marquage sur les différents matériaux d‘emballage et triez-les
séparé ment si nécessaire. Les matériaux d‘emballage sont repérés par des
abréviations (a) et des numéros (b) qui ont la signification suivante :
1–7 : Plastiques,
20–22 : Papier et carton,
80–98 : Matériaux composites.
REMARQUE
► Si possible, conservez l'emballage d'origine pendant la période de garantie
de l'appareil afin de pouvoir emballer ce dernier en bonne et due forme
en cas de recours en garantie.
│
BE
SEM 1100 C3

Consignes de sécurité
Veuillez vous conformer aux consignes de sécurité ci-dessous afin
de garantir une utilisation en toute sécurité de l’appareil:
AVERTISSEMENT ! RISQUE DE BLESSURES!
► Avant d’utiliser l’appareil, vérifiez que celui-ci ne présente
aucun dégât extérieur visible. Ne mettez pas en service un
appareil endommagé ou qui a chuté.
► Maintenir l’appareil et son cordon hors de portée des
enfants de moins de 8 ans.
► Cet appareil peut être utilisé par des enfants à partir de
8ans et plus, à condition qu’ils soient sous la surveillance
d’une personne responsable de leur sécurité ou qu’ils aient
reçu de cette personne des directives concernant l’utilisation
de l’appareil et qu’ils comprennent les dangers pouvant en
résulter.
► Cet appareil peut être utilisé par des personnes ayant des
capacités physiques, sensorielles ou mentales réduites ou
un manque d’expérience et de connaissances à condition
qu’elles soient sous la surveillance d’une personne responsable de leur sécurité ou qu’elles aient reçu de cette personne des directives concernant l’utilisation de l’appareil et
qu’elles comprennent les dangers pouvant en résulter.
► Ne pas laisser un enfant effectuer un nettoyage ou une
opération d’entretien sans surveillance, sauf s’il est âgé d’au
moins 8ans et qu’il effectue ces opérations sous surveillance.
► Ne pas laisser les enfants jouer avec l’appareil.
► Confiez les réparations de l’appareil exclusivement à des
entreprises agréées ou au service après-vente. Toute réparation non conforme peut entraîner des risques importants
pour l’utilisateur. À cela s’ajoute l’annulation de la garantie.
│
FR
SEM 1100 C3
BE
│
55 ■

AVERTISSEMENT ! RISQUE DE BLESSURES!
N’immergez jamais l’appareil dans de l’eau ou d’autres
liquides. Risque d’électrocution!
► Ne jamais saisir l’appareil avec des mains mouillées.
► Faites immédiatement remplacer les fiches secteur ou les
cordons d’alimentation endommagés par du personnel agréé
ou par le service clientèle, pour éviter tout risque.
► Risque de brûlure! Certaines pièces deviennent très
chaudes en cours d’utilisation !
► Le fonctionnement de l’appareil s’accompagne de formation
de vapeurs d’eau. Prendre garde aux risques de brûlures !
Maintenir une distance de sécurité suffisante par rapport à
la vapeur.
► Ne raccordez l’appareil qu’à une prise secteur correcte-
ment installée et relié e à la terre.
► Suite à l'utilisation, la surface de l'élément chauffant pré-
sente encore une chaleur résiduelle.
► Aucun liquide ne doit couler sur la fiche de raccordement
de l'appareil.
► N'utilisez l'appareil que conformément à sa destination.
Les utilisations erronées risquent d'entraîner des blessures.
ATTENTION! DOMMAGES MATÉRIELS !
► Les pièces défectueuses doivent impérativement être rem-
placées par des pièces de rechange d’origine. Seules ces
pièces permettent de répondre aux critères de sécurité requis.
► Protégez l’appareil de l’humidité et de la pénétration de
liquides.
► Éviter les chocs sur l’appareil, le tenir éloigné des poussières,
des produits chimiques, éviter les fortes variations de température ou la proximité de sources de chaleur (fours, radiateurs).
■ 56 │ FR
│
BE
SEM 1100 C3

ATTENTION! DOMMAGES MATÉRIELS !
► Ne jamais plonger l’appareil dans de l’eau ou dans
d’autres liquides.
► Débranchez toujours la fiche secteur de la prise secteur, ne
jamais tirer sur le cordon d’alimentation.
► Ne laissez jamais l’appareil sans surveillance lorsque vous
l’utilisez.
► N’utilisez pas de minuterie externe ni de dispositif de com-
mande à distance séparé pour faire fonctionner l’appareil.
► Ne jamais utiliser l’appareil dans des locaux où la tempé-
rature est inférieure ou égale à 0°C. L’appareil peut être
endommagé par le gel de l’eau dans le réservoir ou les
conduites.
► Ne jamais utiliser l’appareil en extérieur. Cet appareil a été
uniquement conçu pour une utilisation en intérieur.
► Ne générez pas de vapeur lorsque la solution de détar-
trage se trouve dans le réservoir à eau!
REMARQUE
► Toute réparation de l'appareil pendant la période de garantie
doit être confiée exclusivement à un service clientèle agréé
par le fabricant, sinon les dommages consécutifs ne seront
pas couverts par la garantie.
│
│
FR
SEM 1100 C3
BE
57 ■

Éléments de l’appareil
Figure A:
1 Interrupteur marche/arrêt „ON / OFF“
2 Indicateur de température
3 Touche «Expresso»
4 Touche «Vapeur»
5 Voyant de contrôle vert «Vapeur»
6 Surface de dépose
7 Régulateur de vapeur
8 Poignée
9 Réservoir à eau
0 Mousseur à lait
q Grille égouttoir
w Bac collecteur de gouttes
e Passage pour le flotteur rouge
r Sortie d’eau chaude
t Voyant de contrôle vert «Expresso»
z Témoin de fonctionnement rouge
Figure B:
u Bloqueur de filtre
i Porte-filtre
o Grand filtre expresso
p Petit filtre expresso
a Mesurette avec tasseur
s Détartrant
■ 58 │ FR
│
BE
SEM 1100 C3

Caractéristiques techniques
Tension secteur
Puissance nominale 1100 W
Pression de la pompe env. 1,5 MPa (15 bars)
220 – 240 V ∼ (courant
alternatif), 50‒60 Hz
approuvé pour
le contact alimentaire
L’affichage de température
L’affichage de température 2 indique le niveau de préchauffe de l’appareil.
Dès que vous allumez l’appareil, ce dernier se met à chauffer jusqu’à ce que
l’aiguille se situe environ au milieu entre 80°C et « ». Le témoin de fonctionnement rouge z s’allume. Le voyant de contrôle «Expresso» t clignote en vert.
Lorsque l’aiguille arrive sur la zone rouge de la graduation, la température est
alors suffisamment élevée pour préparer un expresso. Le voyant de contrôle
«Expresso» t reste allumé.
Lorsque vous appuyez sur la touche «Vapeur»
«Vapeur» 5 clignote en vert. L’appareil continue de chauffer et l’aiguille
grimpe jusqu’à la zone de la graduation située entre «
Lorsque l’aiguille arrive sur la zone entre «
suffisamment élevée pour produire de la vapeur. Le voyant de contrôle «Vapeur»
5 reste allumé.
SEM 1100 C3
4, le voyant de contrôle
» et « ».
» et « », la température est alors
│
│
FR
BE
59 ■

Première mise en service
1) Sortez le réservoir à eau 9 et retirez la sécurité de transport
orange de l’orifice de sortie de l’eau.
2) Nettoyez le porte-filtre i, la mesurette avec tasseur a, le filtre expresso
o p, la grille d’égouttage q et le réservoir à eau 9 comme indiqué au
chapitre «Nettoyage et entretien».
3) Disposer l’appareil sur une assise plane, résistante à la chaleur. Vérifier qu’il
y a une prise de tension secteur à proximité.
4) Positionnez la grille d’égouttage q en vérifiant que le flotteur rouge e
passe bien dans l’évidement de la grille d’égouttage q.
5) Placez le porte-filtre i dans l’appareil en le positionnant dans l’appareil
au niveau du repère «INSERT» qui se trouve latéralement à côté de la sortie
d’eau chaude r et en tournant dans le sens contraire aux aiguilles d’une
montre jusqu’à ce que la poignée du porte-filtre i pointe vers l’avant (au
niveau du repère «LOCK»).
6) Branchez la fiche secteur dans une prise secteur.
7) Procédez comme suit avant la première utilisation, pour nettoyer les circuits à
l’intérieur de l’appareil :
Faire couler de l’eau dans l’appareil, l’équivalent de 5 tasses d’expresso
(env. 100 ml). Reportez-vous au chapitre «Utilisation».
8) Laissez l’appareil produire de la vapeur pendant env. 30 secondes.
Reportez-vous au chapitre «Utilisation».
REMARQUE
► Lors de la première utilisation, il se peut que la pompe se fasse entendre en
émettant des bruits, sans pour autant que de l'eau sorte de l'appareil. Dans
ce cas tournez le régulateur de vapeur 7 dans le sens «
chasser l'air des conduites de l'appareil (la touche «Vapeur»
enfoncée). Au bout de 20 secondes environ, l'air s'est échappé, les bruits
disparaissent et l'eau sort de l'appareil.
», pour
4 est
Utilisation
Remplissage du réservoir à eau
REMARQUE
► Utilisez uniquement de l'eau potable fraîche pour la préparation d'expresso
ou de cappuccino.
1) Retirez le réservoir à eau 9 et remplissez-le d’eau:
remplissez d’eau au moins jusqu’au repère Min.
ne jamais remplir d’eau au delà du repère Max.
2) Placez à nouveau le réservoir à eau 9 dans l’appareil.
■ 60 │ FR
│
BE
SEM 1100 C3

Mise en chauffe après un temps de repos prolongé /
lors de la première mise en service
Faites chauffer l’appareil comme suit si vous ne l’avez pas utilisé pendant longtemps:
1) Remplissez d’eau le réservoir à eau 9.
2) Placez le grand filtre o ou le petit filtre expresso p dans le porte-filtre i.
– Veillez à ce que la petite encoche sur le grand filtre à espresso o ou sur
le petit filtre à espresso p soit placée lors du positionnement au-dessus
de l’encoche sur le porte-filtre i.
– Tournez ensuite légèrement le grand filtre à espresso o ou le petit filtre
à espresso p de manière à ce qu’il ne puisse plus tomber.
REMARQUE
SEM 1100 C3
► Ne retirez le filtre à espresso o p mis en place qu‘une fois refroidi !
► Pour retirer à nouveau le filtre à espresso o p du porte-filtre i, tournez
le filtre à espresso o p en place jusqu‘à ce que l‘encoche située sur le
filtre à espresso o p se retrouve au-dessus de l‘encoche sur le porte-filtre i.
Vous pouvez maintenant retirer le filtre à espresso o p.
│
│
FR
BE
61 ■

3) Placez le porte-filtre i dans l’appareil en le positionnant dans l’appareil
au niveau du repère «INSERT» qui se trouve latéralement à côté de la sortie
d’eau chaude r et en tournant dans le sens contraire aux aiguilles d’une
montre jusqu’à ce que la poignée du porte-filtre i pointe vers l’avant (au
niveau du repère «LOCK»).
4) Mettez une tasse sous le porte-filtre i.
5) Fermez le régulateur de vapeur 7 (tourner jusqu’en butée dans le sens «
6) Mettez en marche l’appareil avec l’interrupteur marche/arrêt 1. Le témoin
de fonctionnement rouge z s’allume. Le voyant de contrôle «Expresso» t
clignote en vert. L’appareil se met à chauffer.
7) Dès que le voyant de contrôle vert «Expresso» t reste allumé, appuyez sur la
touche «Expresso»
REMARQUE
► Videz entre-temps la tasse si nécessaire. Pour cela, stoppez brièvement
l'opération en appuyant sur la touche «Expresso»
et appuyez à nouveau sur la touche «Expresso» 3, pour que l'eau
traverse l'appareil.
8) Au bout d’1 minute environ, arrêtez la pompe en appuyant à nouveau sur
la touche «Expresso»
9) Patientez si nécessaire jusqu’à ce que le voyant de contrôle «Expresso» t
s’allume à nouveau en permanence.
La phase de mise en chauffe est terminée. Vous pouvez maintenant préparer
un expresso.
3. Faites circuler l’eau pendant env. 1 minute.
3.
Mise en chauffe avant chaque utilisation
L’appareil doit être mis en chauffe avant de préparer un expresso ou un cappuccino.
1) Mettez en marche l’appareil avec l’interrupteur marche/arrêt 1. Le témoin
de fonctionnement rouge z s’allume. Le voyant de contrôle «Expresso» t
clignote en vert. Assurez-vous que le régulateur de vapeur 7 est entièrement
tourné jusqu’en butée sur
2) Placez le porte-filtre i dans l’appareil en le positionnant dans l’appareil
au niveau du repère «INSERT» qui se trouve latéralement à côté de la sortie
d’eau chaude r et en tournant dans le sens contraire aux aiguilles d’une
montre jusqu’à ce que la poignée du porte-filtre i pointe vers l’avant (au
niveau du repère «LOCK»).
3) Appuyez sur la touche «Expresso»
l’eau dans le réservoir à eau 9. Dès que l’eau sort des orifices du porte-filtre,
appuyez à nouveau sur la touche «Expresso» 3 pour que la pompe s’arrête.
4) Patientez jusqu’à ce que le voyant de contrôle «Expresso» t reste allumé.
5) Appuyez à nouveau sur la touche «Expresso»
chaude pendant 20 secondes avant d’arrêter à nouveau la pompe.
Le préchauffage est maintenant terminé. La préparation d’un expresso ou d’un
cappuccino peut alors commencer.
«▯»
.
3, pour que l’appsareil prenne de
▯
3. Videz la tasse
3 et laissez couler l’eau
»).
■ 62 │ FR
│
BE
SEM 1100 C3

Préparation d’un expresso
REMARQUE
► Assurez-vous toujours que le filtre expresso o p est propre et sans reste
de poudre d'expresso.
1) Lorsque l’appareil est chaud :
Pour préparer un expresso, placez le petit filtre expresso p dans le portefiltre i.
Pour préparer deux expressos, disposez le grand filtre expresso o dans le
porte-filtre i.
2) Remplissez de poudre expresso le petit filtre expresso p jusqu’au repère
Max. Cela correspond à env. 7g de poudre ou une mesurette a rase.
ou...
Remplissez de poudre expresso le grand filtre expresso o jusqu’au repère
Max. Ce qui correspond à env. 7g + 7 g de poudre ou deux mesurettes a
rases.
3) Tassez la poudre expresso à l’aide de la mesurette avec tasseur a.
Faites un ajout de poudre expresso si nécessaire jusqu’à ce que le filtre
expresso o p soit rempli jusqu’au repère Max. Puis retassez la poudre
expresso.
REMARQUE
► Le fait de tasser la poudre expresso est une opération importante dans la
préparation d'un expresso. Si la poudre expresso est bien tassée, l'expresso
coule lentement et présente un caractère plus crémeux. Si la poudre n'est pas
très tassée, l'expresso passe rapidement et la crème est moins abondante.
4) Placez le porte-filtre i dans l’appareil en le positionnant au niveau du
repère «INSERT» sur l’appareil et en tournant dans le sens contraire aux
aiguilles d’une montre jusqu’à ce que la poignée du porte-filtre i pointe
vers l’avant (au niveau du repère «LOCK»).
5) Mettez une ou deux tasses sous les orifices du porte-filtre. Il est recommandé
de rincer auparavant les tasses à l’eau chaude pour empêcher l’expresso de
se refroidir trop rapidement. Vous pouvez poser les tasses sur la surface de
dépose 6.
6) Dès que le voyant de contrôle «Expresso» t reste allumé, appuyez sur la
touche «Expresso»
3.
ATTENTION
Ne retirez jamais le porte-filtre i pendant que l'expresso coule !
Risque d'accident avec des projections très chaudes d'expresso !
SEM 1100 C3
► Assurez-vous toujours que la touche «Expresso»
avant de retirer le porte-filtre i.
3 ne soit pas enfoncée
│
│
FR
BE
63 ■

7) Une fois la ou les tasses remplies avec la quantité souhaitée (env. 20 ml par
tasse), appuyez à nouveau sur la touche «Expresso» 3, de manière à
ce que l’eau ne soit plus pompée.
Vous pouvez maintenant boire l’expresso.
8) Mettre l’appareil à l’arrêt avec l’interrupteur marche/arrêt 1.
REMARQUE
► Si la touche «Expresso»
pendant 30 minutes env., l’appareil s’éteint automatiquement.
9) Enlevez la poudre expresso du filtre expresso o p après chaque utilisation.
Ne retirez jamais le porte-filtre i de l’appareil. Basculez vers le haut le
bloqueur de filtre u pour empêcher le filtre expresso o p de tomber du
porte-filtre i. Videz maintenant le filtre expresso o p, en retournant le
porte-filtre i avec le filtre expresso bloqué o p et en tapotant pour faire
tomber la poudre expresso. Mettez toujours la poudre expresso à la poubelle
en respectant la réglementation, par ex. dans les déchets bio-dégradables.
REMARQUE
► Il est impératif de nettoyer la sortie d'eau chaude r (l'eau chaude en sort)
après chaque utilisation. Reportez-vous au chapitre «Nettoyage et entretien».
REMARQUE
► Videz à intervalles réguliers le bac collecteur de gouttes w, au plus tard
cependant lorsque le flotteur rouge e devient visible dans l'évidement de
la grille d'égouttage q.
3 ou «Vapeur»
Préparation d’un cappuccino
ATTENTION
Soyez prudent en manipulant la vapeur pour préparer de la
mousse de lait !
Risque d'accident avec la vapeur ou les projections d'eau chaude !
► Actionnez toujours lentement le régulateur de vapeur 7.
1) Remplir le récipient du mousseur à lait (de préférence en acier inoxydable)
jusqu’au tiers avec du lait froid.
2) Assurez-vous que le régulateur de vapeur 7 est bien fermé (tourner jusqu’à
la butée dans le sens «
3) Retirez le mousseur à lait 0 sur le côté. Utiliser exclusivement la poignée 8
pour le manipuler.
▯
» ).
4 n’est pas actionnée
■ 64 │ FR
4) Appuyez sur la touche «Vapeur»
de contrôle «Vapeur» 5 reste allumé.
│
BE
4. Patientez jusqu’à ce que le voyant
SEM 1100 C3

5) Tenez un récipient vide sous le mousseur à lait 0. Tournez lentement le
régulateur de vapeur 7 dans le sens « ». Des condensats et des
projections sortent de la buse. La buse et les circuits internes dans l’appareil
sont ainsi nettoyés.
6) Patientez 15 secondes et tournez ensuite le régulateur de vapeur 7 dans
le sens «
l’eau du récipient.
7) Prenez maintenant dans la main le récipient du mousseur pour apprécier la
température du lait et introduisez légèrement la buse du mousseur à lait 0
dans le lait. Maintenir légèrement penché le récipient de mousseur à lait.
8) Tournez lentement le régulateur de vapeur 7 dans le sens «
9) Déplacez le récipient du mousseur à lait en un mouvement circulaire et tenez
la pointe de la buse juste en dessous de la surface du lait : suffisamment en
profondeur pour que le lait ne gicle pas dans toutes les directions, et suffisamment haut pour créer une mousse épaisse. Si vous le faites correctement,
on doit entendre un bruit comme une sorte de bourdonnement sourd.
10) Lorsque la mousse de lait monte, plonger un peu plus la buse pour faire
mousser la «couche» suivante et éviter de brûler la mousse.
11) Enfin, plongez complètement la buse et tournez le régulateur de vapeur 7
à peu près jusqu’à la moitié pour réchauffer le lait. Maintenez le récipient
légèrement penché pour que le lait tourbillonne doucement tout en remuant
avec la buse.
12) Lorsque la mousse de lait a la consistance et la température souhaitées,
tournez le régulateur de vapeur 7 (jusqu’à la butée, dans le sens «
13) Alors seulement, retirez la buse du lait.
14) Procédez comme décrit au chapitre «Nettoyer le mousseur à lait».
▯
» jusqu’à ce que plus aucune vapeur ne sorte de la buse. Vider
».
▯
»).
REMARQUE
15) Pour préparer le cappuccino, procédez exactement comme si vous étiez en
SEM 1100 C3
► Pour préparer le cappuccino, utilisez toujours de plus grandes tasses que
pour l'expresso vu que du lait moussé va être ajouté.
train de préparer un expresso (voir le chapitre «Préparer un expresso»/
plus de chauffe nécessaire). Laissez toutefois l’eau circuler env. deux fois
plus longtemps que pour l’expresso (env. 40ml).
│
│
FR
BE
65 ■

REMARQUE
► Le voyant de contrôle "Expresso" t clignote rapidement le cas échéant si
vous appuyez sur la touche "Expresso"
mousser du lait. Cela signifie que l'appareil a trop chauffé pour préparer
un expresso optimal. Cependant, vous pouvez soit poursuivre la préparation d'un expresso, soit laisser l'appareil refroidir. Dès que le voyant de
contrôle "Expresso" t reste constamment allumé, la plage de température
optimale pour l'expresso est à nouveau atteinte.
16) Mettre l’appareil à l’arrêt avec l’interrupteur marche/arrêt 1.
REMARQUE
3 directement après avoir fait
► Si la touche «Expresso»
pendant 30 minutes env., l’appareil s’éteint automatiquement.
17) Ajouter maintenant le lait moussé dans l’expresso préparé précédemment.
Le cappuccino est maintenant prêt. Vous pouvez sucrer ou saupoudrer de
cacao à votre convenance.
REMARQUE
► Il est impératif de nettoyer le mousseur à lait 0 après chaque utilisation.
Reportez-vous au chapitre «Nettoyage et entretien».
3 ou «Vapeur»
Conseils pour la mousse de lait
■ Chaque variété de lait peut être moussée en principe, y compris les laits de
soja ou de riz. Toutefois, certaines variétés de lait ne se prêtent au moussage
que sous certaines conditions.
■ Le lait écrémé n’attache pas aussi facilement que le lait entier, en cas de teneur
trop faible en matières grasses, il existe toutefois le risque que le lait ne se
laisse pas bien mousser. Voilà pourquoi, dans la mesure du possible, il faut
utiliser un lait présentant une teneur en matières grasses de 3,5% ou 1,5%.
■ Un lait bien réfrigéré est plus facile à faire mousser qu’un lait plus tiède.
Vous obtiendrez les meilleurs résultats à une température d’env. 7°C.
■ Ne faites pas mousser le lait une deuxième fois, car il risque d’attacher.
■ Laisser reposer le lait en mousse env. 30 secondes avant de mettre la
mousse sur l’expresso. C’est ainsi que les bulles plus grandes éclatent et
le lait encore liquide se dépose au fond. Vous pouvez ensuite ajouter la
mousse fine sur l’expresso.
4 n’est pas actionnée
■ 66 │ FR
│
BE
SEM 1100 C3

Prélever de l’eau chaude
Vous pouvez également prélever de l’eau chaude à l’aide du mousseur à lait 0,
pour allonger par ex. un café (Café Americano) ou préparer du thé.
1) Mettez en marche l’appareil avec l’interrupteur marche/arrêt 1. Le témoin
de fonctionnement rouge z s’allume. Le voyant de contrôle «Expresso» t
clignote en vert. Assurez-vous que le régulateur de vapeur 7 est entièrement
tourné jusqu’en butée sur
Attendez que l’aiguille de l’indicateur de température 2 se trouve à peu
près au milieu entre 80°C et «
t treste allumé.
2) Placez un récipient résistant à la chaleur sous le mousseur à lait 0.
3) Tournez le régulateur de vapeur 7 au moins à moitié en direction «
4) Appuyez sur la touche «Expresso»
mousseur à lait 0.
5) Appuyez à nouveau sur la touche «Expresso»
ment d’eau chaude.
«▯»
.
Nettoyage et entretien
AVERTISSEMENT! RISQUE DE BLESSURES!
► Avant de nettoyer l’appareil, débranchez toujours la fiche secteur de la
prise secteur. Risque d’électrocution!
► Laissez toujours refroidir l’appareil avant de le nettoyer. Risque de brûlure!
N’immergez jamais l’appareil dans de l’eau ou dans d’autres liquides.
Risque d’électrocution!
» et que le voyant de contrôle «Expresso»
».
3. De l’eau chaude s’écoule du
3 pour couper le prélève-
ATTENTION! RISQUE DE DÉGÂTS MATÉRIELS!
Nettoyage du mousseur à lait
1) Tenez un récipient vide sous le mousseur à lait 0.
2) Juste après utilisation, tournez le régulateur de vapeur 7 sur «
3) Fermez le régulateur de vapeur 7 (tournez jusqu’à la butée dans le sens «
4) Laisser la buse refroidir.
5) Retirez la gaine du mousseur à lait 0 (figure1) et la nettoyer soigneusement
SEM 1100 C3
► N’utilisez jamais de produits de nettoyage abrasifs, corrosifs ou chimiques
pour nettoyer les surfaces de l’appareil afin d’éviter les détériorations.
» et
laissez s’échapper la vapeur quelques secondes.
▯
arrêtez l’appareil et débranchez la fiche secteur.
à l’eau chaude.
│
│
FR
BE
67 ■
»),

6) Essuyez la buse qui se trouve sous la gaine avec un chiffon humide. Si nécessaire, ajoutez un produit vaisselle doux sur le chiffon. Après le nettoyage
avec un détergent, essuyez encore avec un chiffon imprégné d’eau claire.
Assurez-vous qu’aucun reste de produit vaisselle ne se trouve sur la buse.
7) Glissez à nouveau la gaine sur la buse (figure 1).
Figure 1
Nettoyage de la sortie d’eau chaude
Nettoyez la sortie d’eau chaude r après chaque utilisation :
1) Une fois l’expresso ou le cappuccino préparés et le porte-filtre enlevé i,
essuyez toute la surface de la sortie d’eau chaude r avec un chiffon
humide pour enlever toute trace de poudre.
2) Remettez le porte-filtre i en place sans que les filtres à expresso o p
ne soient installés.
3) Placez ensuite une tasse vide sous le porte-filtre i et appuyez sur la touche
«Expresso»
derniers restes de poudre.
4) Appuyez au bout de 20 secondes environ la touche «Expresso»
éteignez l’appareil avec l’interrupteur marche/arrêt 1.
5) Retirez à nouveau le porte-filtre i.
3. De l’eau sort de la sortie d’eau chaude r, et évacue les
3 et
■ 68 │ FR
│
BE
SEM 1100 C3

Nettoyage des accessoires
1) Nettoyez le porte-filtre i, les deux filtres expresso o p, le réservoir à eau 9,
la mesurette a et la grille d’égouttage q dans de l’eau chaude.
REMARQUE
► Il se peut que le liquide vaisselle entraîne une dénaturation du goût de
l'expresso. Si un liquide vaisselle s'avère indispensable pour le nettoyage,
faire alors un rinçage abondant à l'eau claire des pièces.
2) Séchez toutes les pièces.
REMARQUE
►
Les deux filtres expresso o p, la mesurette a et la grille
égouttoir q peuvent également être lavés au lave-vaisselle.
Nettoyage de l’appareil
Nettoyez l’appareil à l’aide d’un chiffon humide. Mettez un peu de liquide à
vaisselle sur le chiffon.
Avant une nouvelle utilisation, assurez-vous que l’appareil ait entièrement séché.
Détartrage de l’appareil
ATTENTION! RISQUE DE DÉGÂTS MATÉRIELS!
► Ne générez pas de vapeur lorsque la solution de détartrage se trouve dans
le réservoir à eau 9!
Détartrez régulièrement l’appareil. Au bout de 1 à 2 mois env. (pour 4 préparations env. d’expresso par jour), l’appareil devrait être détartré. Selon la dureté de
l’eau dans votre région, cette valeur peut être différente.
Procédez comme suitpour utiliser le détartrant s fourni à la livraison:
1) Versez le détartrant s (125 ml) dans le réservoir à eau 9.
2) Versez de l’eau dans le réservoir à eau 9 jusqu’au repère Max. et placez-le
dans l’appareil.
3) Allumez l’appareil avec l’interrupteur marche/arrêt 1. Le régulateur de
vapeur 7 est fermé.
4) Placez le porte-filtre i sans filtre expresso o p dans l’appareil.
5) Placez 2 tasses ou un récipient d’une contenance minimale de 250 ml sous
les orifices du porte-filtre.
6) Dès que le voyant de contrôle «Expresso» t reste allumé, appuyez sur
la touche «Expresso»
Laissez env. 250 ml (env. 2 tasses) de solution de détartrage s’écouler et arrêtez ensuite le processus en appuyant à nouveau sur la touche «Expresso»
3. Jetez prudemment le cas échéant la solution de détartrage usagée.
3.
SEM 1100 C3
FR
│
BE
│
69 ■

7) Laissez agir le détartrant s pendant env. 1 minute.
8) Répétez trois fois les étapes 6 à 7. La dernière fois, videz entièrement le
réservoir à eau 9.
9) Placez un récipient suffi samment grand (1 litre minimum) sous les orifi ces
du porte-fi ltre.
10) Rincez le réservoir à eau 9 à l’eau claire et versez de l’eau propre jusqu’au
repère Max.
11) Dès que le voyant de contrôle «Expresso» t reste allumé, appuyez sur
la touche «Expresso»
Laissez l’eau s’écouler entièrement. Jetez cette eau avec précaution.
12) Répétez une fois les étapes 10 à 11 et éteignez ensuite l’appareil.
13) Après le détartrage, nettoyez l’appareil à l’aide d’un chiff on humide pour
retirer les éventuelles éclaboussures de la solution de détartrage.
Assurez-vous que l’appareil est entièrement sec avant de le réutiliser.
Vous pouvez commander du détartrant s supplémentaire auprès de notre
service après-vente (voir le chapitre «Commander des pièces de rechange»).
Nous recommandons d’utiliser le détartrant s fourni à la livraison. Pour le détartrage, vous pouvez également utiliser un autre détartrant du commerce
réservé aux machines à expresso. Dans ce cas, respectez les consignes
d’utilisation du détartrant correspondant.
3.
Commander des pièces de rechange
Les pièces de rechange suivantes peuvent être commandées pour le produit
SEM 1100 C3:
■ 70
▯ Détartrant s (125ml)
Commandez le produit via notre ligne téléphonique de service après-vente
(voir le chapitre «Service après-vente») ou tout simplement sur notre site
web www.kompernass.com.
│FR│
BE
SEM 1100 C3

REMARQUE
► Veuillez noter qu’une commande en ligne de pièces de rechange n’est le
cas échéant pas possible pour tous les pays de livraison.
► Tenez le numéro IAN, que vous trouverez sur la couverture de ce mode
d'emploi, prêt pour passer votre commande.
Dépannage
Panne Cause Remède
• refaire une préparation
• la poudre expresso est trop
humide ou trop comprimée.
L'expresso
ne s'écoule plus.
L'expresso coule pardessus les bords du
porte-filtre i au lieu de
passer par les orifices.
• absence d'eau dans le
réservoir à eau 9.
• les orifices du porte-filtre
sont bouchés.
• le porte-filtre i n'a pas été
correctement mis en place.
• les orifices du porte-filtre sont
bouchés.
• présence de restes de poudre
expresso sur le bord du portefiltre i.
• mettre de l'eau dans
• nettoyer le porte-filtre i.
• remettre en place correc-
• nettoyer le porte-filtre i.
• enlever les restes de
expresso, ne pas trop
tasser la poudre expresso,
ou la remplacer complètement.
le réservoir à eau 9.
tement le porte-filtre i.
poudre expresso du
bord du porte-filtre i.
L'expresso est froid.
fonctionnement bruyant
de la pompe.
SEM 1100 C3
• l'appareil n'a pas été mis en
chauffe.
• Le voyant de contrôle
"Expresso" t n'est pas encore
resté allumé.
• les tasses n'ont pas été
préchauffées.
• le réservoir à eau 9 est vide.
• mettre l'appareil en
chauffe.
• Patientez jusqu'à ce que
le voyant de contrôle
"Expresso" t reste
allumé.
• préchauffer les tasses.
• mettre de l'eau dans le
réservoir à eau 9.
│
│
FR
BE
71 ■

Panne Cause Remède
La crème est trop claire
(écoulement rapide
de l'expresso par le
porte-filtre i).
La crème est trop
sombre (écoulement
lent de l'expresso
par le porte-filtre i).
Le lait ne mousse pas.
La pompe s'arrête pendant le fonctionnement,
le voyant de contrôle
"Expresso" t clignote.
Tous les voyants 5 t
z clignotent en même
temps.
• trop peu de poudre expresso.
• la poudre expresso n'est pas
broyée assez finement.
• trop de poudre expresso.
• la poudre est broyée trop
finement ou humide.
• le filtre o p est bouché. • nettoyer le filtre o p.
• le lait n'est pas assez froid.
• le mousseur à lait 0 est
encrassé.
• La pompe s'arrête au bout de
3 minutes de fonctionnement
environ, pour éviter toute
surchauffe.
• L'appareil est en surchauffe ou
a un court-circuit.
• utiliser plus de poudre
expresso.
• n'utiliser que des poudres
spécialement fabriquées
pour expresso.
• utiliser moins de poudre
expresso.
• n'utiliser que des poudres
spécialement fabriquées
pour expresso.
• utiliser un lait sortant
du réfrigérateur.
• nettoyez le mousseur
à lait 0.
• Laissez l'appareil refroidir
avant de le mettre à
nouveau en service.
• Débranchez la fiche
secteur de la prise secteur
et contactez le service
après-vente.
Mise au rebut
Mise au rebut de l'appareil
Ne jetez jamais l’appareil avec les ordures ménagères.
Ce produit est assujetti à la directive européenne
2012/19/EU-DEEE (déchets d’équipements électriques et
électroniques).
Éliminez l’appareil par l’intermédiaire d’une entreprise de traitement des déchets
autorisée ou via le service de recyclage de votre commune. Respectez la réglementation en vigueur. En cas de doute, veuillez contacter votre centre de recyclage.
Renseignez-vous auprès de votre commune pour connaître les possibilités de
mise au rebut de votre appareil usagé.
Le produit récyclable doit être trié ou rapporté dans un point de collecte pour
être recycle.
■ 72 │ FR
│
BE
SEM 1100 C3

Garantie pour Kompernass
Handels GmbH pour la Belgique
Chère cliente, cher client,
Cet appareil est garanti 3 ans à partir de la date d’achat. Si ce produit venait
à présenter des vices, vous disposez de droits légaux face au vendeur de ce
produit. Vos droits légaux ne sont pas restreints par notre garantie présentée
ci-dessous.
Conditions de garantie
La période de garantie débute à la date d’achat. Veuillez bien conserver le ticket
de caisse. Celui-ci servira de preuve d’achat.
Si dans un délai de trois ans suivant la date d’achat de ce produit, un vice de
matériel ou de fabrication venait à apparaître, le produit sera réparé, remplacé
gratuitement par nos soins ou le prix d’achat remboursé, selon notre choix. Cette
prestation sous garantie nécessite, dans le délai de trois ans, la présentation
de l’appareil défectueux et du justificatif d’achat (ticket de caisse) ainsi que la
description brève du vice et du moment de son apparition.
Si le vice est couvert par notre garantie, vous recevrez le produit réparé ou un
nouveau produit en retour. Aucune nouvelle période de garantie ne débute avec
la réparation ou l’échange du produit.
Période de garantie et réclamation légale pour vices cachés
L’exercice de la garantie ne prolonge pas la période de garantie. Cette disposition s’applique également aux pièces remplacées ou réparées. Les dommages et
vices éventuellement déjà présents à l’achat doivent être signalés immédiatement
après le déballage. Toute réparation survenant après la période sous garantie
fera l’objet d’une facturation.
Étendue de la garantie
L’appareil a été fabriqué avec soin conformément à des directives de qualité
strictes et consciencieusement contrôlé avant sa livraison.
La prestation de la garantie s’applique aux vices de matériel et de fabrication.
Cette garantie ne s’étend pas aux pièces du produit qui sont exposées à une usure
normale et peuvent de ce fait être considérées comme pièces d’usure, ni aux détériorations de pièces fragiles, par ex. interrupteurs, batteries ou pièces en verre.
Cette garantie devient caduque si le produit est détérioré, utilisé ou entretenu de
manière non conforme. Toutes les instructions listées dans le manuel d’utilisation
doivent être exactement respectées pour une utilisation conforme du produit. Des
buts d’utilisation et actions qui sont déconseillés dans le manuel d’utilisation, ou
dont vous êtes avertis doivent également être évités.
SEM 1100 C3
FR
│
BE
│
73 ■

Le produit est uniquement destiné à un usage privé et ne convient pas à un
usage professionnel. La garantie est annulée en cas d’entretien incorrect et
inapproprié, d’usage de la force et en cas d’intervention non réalisée par notre
centre de service après-vente agréé.
Procédure en cas de garantie
Afin de garantir un traitement rapide de votre demande, veuillez suivre les indications suivantes :
■ Veuillez avoir à portée de main pour toutes questions le ticket de caisse et
la référence article (par ex.IAN123456_7890) en tant que justificatif de
votre achat.
■ Vous trouverez la référence sur la plaque signalétique sur le produit, une
gravure sur le produit, sur la page de garde du mode d’emploi (en bas à
gauche) ou sur l’autocollant au dos ou sur le dessous du produit.
■ Si des erreurs de fonctionnement ou d’autres vices venaient à apparaître,
veuillez d’abord contacter le département service clientèle cité ci-dessous
par téléphone ou par e-mail.
■ Vous pouvez ensuite retourner un produit enregistré comme étant défectueux
en joignant le ticket de caisse et en indiquant en quoi consiste le vice et
quand il est survenu, sans devoir l’affranchir à l’adresse de service aprèsvente communiquée.
Sur www.lidl-service.com, vous pourrez télécharger ce mode d’emploi et de
nombreux autres manuels, vidéos produit et logiciels d’installation.
Grâce à ce code QR, vous arriverez directement sur le site Lidl service aprèsvente (www.lidl-service.com) et vous pourrez ouvrir votre mode d’emploi en
saisissant votre référence (IAN) 353468_2007.
■ 74 │ FR
│
BE
SEM 1100 C3

Garantie pour Kompernass
Handels GmbH pour la France
Chère cliente, cher client,
Cet appareil est garanti 3 ans à partir de la date d’achat. Si ce produit venait
à présenter des vices, vous disposez de droits légaux face au vendeur de ce
produit. Vos droits légaux ne sont pas restreints par notre garantie présentée
ci-dessous.
Conditions de garantie
La période de garantie débute à la date d’achat. Veuillez bien conserver le ticket
de caisse. Celui-ci servira de preuve d’achat.
Si dans un délai de trois ans suivant la date d’achat de ce produit, un vice de
matériel ou de fabrication venait à apparaître, le produit sera réparé, remplacé
gratuitement par nos soins ou le prix d’achat remboursé, selon notre choix. Cette
prestation sous garantie nécessite, dans le délai de trois ans, la présentation
de l’appareil défectueux et du justificatif d’achat (ticket de caisse) ainsi que la
description brève du vice et du moment de son apparition.
Si le vice est couvert par notre garantie, vous recevrez le produit réparé ou un
nouveau produit en retour. Aucune nouvelle période de garantie ne débute avec
la réparation ou l’échange du produit.
Période de garantie et réclamation légale pour vices cachés
L’exercice de la garantie ne prolonge pas la période de garantie. Cette disposition s’applique également aux pièces remplacées ou réparées. Les dommages et
vices éventuellement déjà présents à l’achat doivent être signalés immédiatement
après le déballage. Toute réparation survenant après la période sous garantie
fera l’objet d’une facturation.
Étendue de la garantie
L’appareil a été fabriqué avec soin conformément à des directives de qualité
strictes et consciencieusement contrôlé avant sa livraison.
La prestation de la garantie s’applique aux vices de matériel et de fabrication.
Cette garantie ne s’étend pas aux pièces du produit qui sont exposées à une usure
normale et peuvent de ce fait être considérées comme pièces d’usure, ni aux détériorations de pièces fragiles, par ex. interrupteurs, batteries ou pièces en verre.
Cette garantie devient caduque si le produit est détérioré, utilisé ou entretenu de
manière non conforme. Toutes les instructions listées dans le manuel d’utilisation
doivent être exactement respectées pour une utilisation conforme du produit. Des
buts d’utilisation et actions qui sont déconseillés dans le manuel d’utilisation, ou
dont vous êtes avertis doivent également être évités.
SEM 1100 C3
FR
│
BE
│
75 ■

Le produit est uniquement destiné à un usage privé et ne convient pas à un
usage professionnel. La garantie est annulée en cas d’entretien incorrect et
inapproprié, d’usage de la force et en cas d’intervention non réalisée par notre
centre de service après-vente agréé.
Article L217-16 du Code de la consommation
Lorsque l‘acheteur demande au vendeur, pendant le cours de la garantie commerciale qui lui a été consentie lors de l‘acquisition ou de la réparation d‘un bien
meuble, une remise en état couverte par la garantie, toute période d‘immobilisation d‘au moins sept jours vient s‘ajouter à la durée de la garantie qui restait à
courir. Cette période court à compter de la demande d‘intervention de l‘acheteur
ou de la mise à disposition pour réparation du bien en cause, si cette mise à
disposition est postérieure à la demande d‘intervention.
Indépendamment de la garantie commerciale souscrite, le vendeur reste tenu
des défauts de conformité du bien et des vices rédhibitoires dans les conditions
prévues aux articles L217-4 à L217-13 du Code de la consommation et aux
articles 1641 à 1648 et 2232 du Code Civil.
Article L217-4 du Code de la consommation
Le vendeur livre un bien conforme au contrat et répond des défauts de
conformité existant lors de la délivrance. Il répond également des défauts de
conformité résultant de l‘emballage, des instructions de montage ou de l‘installation lorsque celle-ci a été mise à sa charge par le contrat ou a été réalisée sous
sa responsabilité.
Article L217-5 du Code de la consommation
Le bien est conforme au contrat :
1° S´il est propre à l‘usage habituellement attendu d‘un bien semblable et, le
cas échéant :
– s‘il correspond à la description donnée par le vendeur et posséder les
qualités que celui-ci a présentées à l‘acheteur sous forme d‘échantillon
ou de modèle ;
– s‘il présente les qualités qu‘un acheteur peut légitimement attendre eu
égard aux déclarations publiques faites par le vendeur, par le producteur ou par son représentant, notamment dans la publicité ou l‘étiquetage ;
2° Ou s‘il présente les caractéristiques définies d‘un commun accord par les
parties ou être propre à tout usage spécial recherché par l‘acheteur, porté à
la connaissance du vendeur et que ce dernier a accepté.
■ 76 │ FR
│
BE
SEM 1100 C3

Article L217-12 du Code de la consommation
L‘action résultant du défaut de conformité se prescrit par deux ans à compter de
la délivrance du bien.
Article 1641 du Code civil
Le vendeur est tenu de la garantie à raison des défauts cachés de la chose
vendue qui la rendent impropre à l‘usage auquel on la destine, ou qui diminuent
tellement cet usage que l‘acheteur ne l‘aurait pas acquise, ou n‘en aurait donné
qu‘un moindre prix, s‘il les avait connus.
Article 1648 1er alinéa du Code civil
L‘action résultant des vices rédhibitoires doit être intentée par l‘acquéreur dans
un délai de deux ans à compter de la découverte du vice.
Les pièces détachées indispensables à l’utilisation du produit sont disponibles
pendant la durée de la garantie du produit.
Procédure en cas de garantie
Afin de garantir un traitement rapide de votre demande, veuillez suivre les indications suivantes :
■ Veuillez avoir à portée de main pour toutes questions le ticket de caisse et
la référence article (par ex. IAN 123456_7890) en tant que justificatif de
votre achat.
■ Vous trouverez la référence sur la plaque signalétique sur le produit, une
gravure sur le produit, sur la page de garde du mode d’emploi (en bas à
gauche) ou sur l’autocollant au dos ou sur le dessous du produit.
■ Si des erreurs de fonctionnement ou d’autres vices venaient à apparaître,
veuillez d’abord contacter le département service clientèle cité ci-dessous
par téléphone ou par e-mail.
■ Vous pouvez ensuite retourner un produit enregistré comme étant défectueux
en joignant le ticket de caisse et en indiquant en quoi consiste le vice et
quand il est survenu, sans devoir l’affranchir à l’adresse de service aprèsvente communiquée.
Sur www.lidl-service.com, vous pourrez télécharger ce mode d’emploi et de
nombreux autres manuels, vidéos produit et logiciels d’installation.
Grâce à ce code QR, vous arriverez directement sur le site Lidl service aprèsvente (www.lidl-service.com) et vous pourrez ouvrir votre mode d’emploi en
saisissant votre référence (IAN) 353468_2007.
SEM 1100 C3
FR
│
BE
│
77 ■

Service après-vente
Service France
Tel.: 0800 919270
E-Mail: kompernass@lidl.fr
Service Belgique
Tel.: 070 270 171 (0,15 EUR/Min.)
E-Mail: kompernass@lidl.be
IAN 353468_2007
Importateur
Veuillez tenir compte du fait que l’adresse suivante n’est pas une adresse de
service après-vente. Veuillez d’abord contacter le service mentionné.
KOMPERNASS HANDELS GMBH
BURGSTRASSE 21
44867 BOCHUM
ALLEMAGNE
www.kompernass.com
■ 78 │ FR
│
BE
SEM 1100 C3

Inhoud
Inleiding ................................................80
Auteursrecht .......................................................80
Beperking van aansprakelijkheid .......................................80
Waarschuwingen ...................................................80
Gebruik in overeenstemming met bestemming .............................81
Inhoud van het pakket / inspectie na transport ............................82
De verpakking afvoeren ..............................................82
Veiligheidsvoorschriften ...................................83
Elementen van het apparaat ................................86
Technische gegevens ......................................86
De temperatuurindicatie ...................................87
Ingebruikname ...........................................87
Bediening ...............................................88
Waterreservoir vullen ................................................88
Opwarmen na langer niet-gebruik / bij eerste ingebruikname ................88
Opwarmen vóór ieder gebruik .........................................90
Espresso bereiden ..................................................90
Cappuccino bereiden ................................................92
Tips voor het melkschuim .............................................94
Heet water tappen ..................................................94
Reiniging en onderhoud ...................................95
Melkopschuimer reinigen .............................................95
Heetwaterkop reinigen ...............................................96
Accessoires reinigen .................................................96
Apparaat reinigen ..................................................97
Apparaat ontkalken .................................................97
Vervangingsonderdelen bestellen ...........................98
Problemen oplossen .......................................99
Afvoeren ...............................................100
Apparaat afvoeren .................................................100
Garantie van Kompernaß Handels GmbH ....................101
Service ..........................................................102
Importeur ........................................................102
SEM 1100 C3
NL│BE
│
79 ■

Inleiding
Hartelijk gefeliciteerd met de aankoop van uw nieuwe apparaat.
U hebt hiermee gekozen voor een hoogwaardig product. De gebruiksaanwijzing
maakt deel uit van dit product. Deze bevat belangrijke aanwijzingen voor veiligheid, gebruik en afvoer. Lees alle bedienings- en veiligheidsaanwijzingen voordat
u het product in gebruik neemt. Gebruik het product uitsluitend op de voorgeschreven wijze en voor de aangegeven doeleinden. Geef alle documenten mee
als u het product doorgeeft aan een derde.
Auteursrecht
Deze documentatie is auteursrechtelijk beschermd.
Iedere reproductie, resp. iedere herdruk, ook die van delen van het document,
evenals de weergave van afbeeldingen, ook in gewijzigde toestand, is uitsluitend
toegestaan met schriftelijke toestemming van de fabrikant.
Beperking van aansprakelijkheid
Alle technische informatie, gegevens en aanwijzingen voor de bediening in
deze gebruiksaanwijzing voldoen aan de laatste stand bij het ter perse gaan en
worden naar ons beste weten verstrekt, met inachtneming van onze bestaande
ervaringen en inzichten.
Er kunnen geen aanspraken worden gedaan op basis van de gegevens, afbeeldingen en beschrijvingen in deze gebruiksaanwijzing.
De fabrikant is niet aansprakelijk voor schade als gevolg van het niet in acht
nemen van de gebruiksaanwijzing, gebruik dat niet volgens de bestemming is,
ondeskundige reparaties, ongeoorloofd uitgevoerde veranderingen of gebruik
van niet toegelaten vervangingsonderdelen.
Waarschuwingen
In deze gebruiksaanwijzing worden de volgende waarschuwingen gebruikt:
WAARSCHUWING
Een waarschuwing op dit niveau van gevaar duidt op een
mogelijk gevaarlijke situatie.
Als de gevaarlijke situatie niet wordt vermeden, kan dit letsel tot gevolg hebben.
► Neem de aanwijzingen in deze waarschuwing in acht om persoonlijk letsel
te voorkomen.
■ 80 │ NL
│
BE
SEM 1100 C3

LET OP
Een waarschuwing op dit niveau van gevaar duidt op mogelijke
materiële schade.
Als de situatie niet wordt vermeden, kan dit materiële schade tot gevolg hebben.
► Neem de aanwijzingen in deze waarschuwing in acht om materiële
schade te voorkomen.
OPMERKING
► Een opmerking bevat extra informatie die de omgang met het apparaat
vergemakkelijkt.
Gebruik in overeenstemming met bestemming
Dit apparaat is uitsluitend bestemd voor het bereiden van espresso/cappuccino en
het opschuimen van melk. Het is uitsluitend bestemd voor het gebruik in privéhuishoudens. Gebruik het apparaat niet bedrijfsmatig.
Een ander of verdergaand gebruik geldt als niet in overeenstemming met de
bestemming.
WAARSCHUWING
Gevaar door gebruik dat niet in overeenstemming is met de
bestemming!
Er kan gevaar van het apparaat uitgaan bij gebruik dat niet in overeenstemming
is met de bestemming en/of andersoortig gebruik.
► Gebruik het apparaat uitsluitend conform de bestemming.
► Volg de in deze gebruiksaanwijzing beschreven procedures op.
Alle mogelijke claims wegens schade door gebruik dat niet volgens de bestemming
is, zijn uitgesloten.
Het risico is uitsluitend voor de gebruiker.
SEM 1100 C3
NL│BE
│
81 ■

Inhoud van het pakket / inspectie na transport
WAARSCHUWING
Verstikkingsgevaar!
► Verpakkingsmateriaal mag niet als speelgoed worden gebruikt.
Er bestaat verstikkingsgevaar.
Het apparaat wordt standaard met de volgende componenten geleverd:
▯ Espressomachine
▯ Zeefhouder
▯ Grote espressozeef
▯ Kleine espressozeef
▯ Maatlepel met stamper
▯ Ontkalker (125 ml)
▯ Beknopte gebruiksaanwijzing
▯ Gebruiksaanwijzing
OPMERKING
► Controleer of het pakket compleet is en of er sprake is van zichtbare schade.
► Neem contact op met de service-Hotline als de levering niet compleet is
of indien er sprake is van schade door gebrekkige verpakking of door
transport.
De verpakking afvoeren
De verpakking beschermt het apparaat tegen transportschade. De verpakkingsmaterialen zijn niet schadelijk voor het milieu. Ze zijn gekozen op grond van
milieuvriendelijkheid en daarom recyclebaar.
Het terugvoeren van de verpakking in de materiaalkringloop is een besparing op
grondstoffen en reduceert het ontstaan van afval. Voer niet meer benodigde
verpakkingsmaterialen af conform de plaatselijk geldende voorschriften.
Voer de verpakking af conform de milieuvoorschriften.
Let op de aanduiding op de verschillende verpakkingsmaterialen en voer ze zo
nodig gescheiden af. De verpakkingsmaterialen zijn voorzien van afkortingen (a)
en cijfers (b) met de volgende betekenis:
1–7: kunststoffen,
20–22: papier en karton,
80–98: composietmaterialen.
■ 82 │ NL
OPMERKING
► Bewaar, indien mogelijk, de originele verpakking gedurende de garantie-
periode van het apparaat, om het apparaat bij een garantiekwestie volgens
de voorschriften te kunnen verpakken.
│
BE
SEM 1100 C3

Veiligheidsvoorschriften
Neem de volgende veiligheidsvoorschriften in acht voor een
veilige omgang met het apparaat:
WAARSCHUWING! LETSELGEVAAR!
► Controleer het apparaat vóór gebruik op zichtbare schade
aan de buitenzijde. Gebruik geen apparaat dat beschadigd of gevallen is.
► Houd het apparaat en het bijbehorende snoer buiten be-
reik van kinderen jonger dan 8 jaar.
► Het apparaat mag worden gebruikt door kinderen vanaf
8jaar, mits ze onder toezicht staan of over het veilige
gebruik van het apparaat zijn geïnstrueerd en de daaruit
resulterende gevaren hebben begrepen.
► Het apparaat mag worden gebruikt door personen met
beperkte fysieke, zintuiglijke of geestelijke vermogens of
gebrek aan ervaring en/of kennis, mits ze onder toezicht
staan of over het veilige gebruik van het apparaat zijn
geïnstrueerd en de daaruit resulterende gevaren hebben
begrepen.
► Reiniging en onderhoud door de gebruiker mogen niet
worden uitgevoerd door kinderen, tenzij ze 8 jaar of ouder
zijn en onder toezicht staan.
► Kinderen mogen niet met het apparaat spelen.
► Laat reparaties aan het apparaat alleen uitvoeren door
geautoriseerde vakbedrijven of door de klantenservice.
Ondeskundige reparaties kunnen resulteren in aanzienlijke gevaren voor de gebruiker. Bovendien vervalt dan de
garantie.
Dompel het apparaat nooit onder in water of in andere
vloeistoffen. Gevaar voor een elektrische schok!
SEM 1100 C3
NL│BE
│
83 ■

WAARSCHUWING! LETSELGEVAAR!
► Pak het apparaat nooit vast met natte of vochtige handen.
► Laat beschadigde stekkers en snoeren onmiddellijk door
geautoriseerd en vakkundig personeel of door de klantenservice vervangen, om risico’s te vermijden.
► Verbrandingsgevaar! Sommige delen worden tijdens het
gebruik erg heet!
► Bij het gebruik van het apparaat ontstaan hete stoom-
wolken. Let erop, dat u zich daaraan niet brandt! Neem
voldoende afstand tot de stoom in acht.
► Sluit het apparaat uitsluitend aan op een volgens de voor-
schriften geïnstalleerd en geaard stopcontact.
► Na gebruik bevat het oppervlak van het verwarmings-
element nog restwarmte.
► Er mag geen vloeistof op de stekkerverbinding van het
apparaat terechtkomen.
► Gebruik het apparaat uitsluitend voor die doeleinden
waarvoor het bestemd is. Een verkeerd gebruik kan tot
verwondingen leiden.
LET OP! MATERIËLE SCHADE!
► Defecte onderdelen mogen alleen worden vervangen door
originele vervangingsonderdelen. Alleen bij deze onderde
len is gewaarborgd dat ze voldoen aan de veiligheidseisen.
► Bescherm het apparaat tegen vocht en het binnendringen
van vloeistoffen.
► Bescherm het apparaat tegen stoten, stof, chemicaliën,
sterke temperatuurschommelingen en warmtebronnen die te
dichtbij zijn (ovens, verwarmingen).
► Dompel het apparaat nooit onder in water of in andere
vloeistoffen.
■ 84 │ NL
│
BE
SEM 1100 C3
-

LET OP! MATERIËLE SCHADE!
► Trek altijd de stekker uit het stopcontact, trek nooit aan het
snoer.
► Laat het apparaat nooit onbeheerd als het is ingeschakeld.
► Gebruik geen externe timer of een apart afstandsbedie-
ningssysteem om het apparaat aan te sturen.
► Gebruik het apparaat nooit in ruimtes, waarin temperaturen
heersen lager dan of rond 0°C. Als het water in de leidingen of in het waterreservoir bevriest, kan het apparaat
beschadigd worden.
► Gebruik het apparaat nooit in de openlucht. Dit apparaat
is alleen bestemd voor het gebruik in binnenruimtes.
► Produceer geen stoom wanneer zich ontkalkingsmiddel in
het waterreservoir bevindt!
OPMERKING
► Een reparatie van het apparaat tijdens de garantieperiode
mag alleen worden uitgevoerd door een klantenservice die
door de fabrikant is geautoriseerd, anders vervalt de garantie
bij volgende schadegevallen.
SEM 1100 C3
NL│BE
│
85 ■

Elementen van het apparaat
Afbeelding A:
1 Aan-/uitknop „ON / OFF“
2 Temperatuurindicatie
3 Toets “Espresso”
4 Toets “Stoom”
5 Groen indicatielampje “Stoom”
6 Plateau
7 Stoomregelaar
8 Handgreep
9 Waterreservoir
0 Melkopschuimer
q Afdruiprooster
w Druppelopvangschaal
e Uitsparing voor de rode vlotter
r Heetwaterkop
t Groen indicatielampje “Espresso”
z Rood indicatielampje
Afbeelding B:
u Zeefvergrendeling
i Zeefdrager
o Grote espressozeef
p Kleine espressozeef
a Maatlepel met stamper
s Ontkalker
Technische gegevens
Netspanning
Nominaal vermogen 1100 W
Pompdruk ca. 1,5 MPa (15 bar)
■ 86 │ NL
│
BE
220 – 240 V ∼ (wisselstroom),
50‒60 Hz
Levensmiddelveilig
SEM 1100 C3

De temperatuurindicatie
De temperatuurindicatie 2 geeft aan tot welke temperatuur het apparaat is
opgewarmd.
Zodra u het apparaat inschakelt, begint het met opwarmen, tot de wijzer ongeveer in het midden tussen 80 °C en “ ” staat. Het rode indicatielampje z
brandt. Het indicatielampje “Espresso” t knippert groen.
Wanneer de wijzer het rode deel van de schaalverdeling bereikt, is de temperatuur hoog genoeg om een espresso te maken. Het indicatielampje “Espresso” t
brandt continu.
Wanneer u op de toets “Stoom” 4 drukt, knippert het indicatielampje
“Stoom” 5 groen. Het apparaat warmt nu verder op en de wijzer stijgt
verder tot in het schaalverdelingsbereik tussen “
Als de wijzer het bereik tussen “
hoog genoeg om stoom te produceren. Het indicatielampje “Stoom” 5 brandt
continu.
” en “ ” heeft bereikt, is de temperatuur
” en “ ”.
Ingebruikname
1) Verwijder het waterreservoir 9 en haal de oranje transportbeveiliging van de wateruitlaat.
2) Reinig de zeefhouder i, de maatlepel a, de espressozeef o p, het
afdruiprooster q en het waterreservoir 9 zoals beschreven in het hoofdstuk
“Reiniging en onderhoud”.
3) Plaats het apparaat op een ondergrond die egaal en hittebestendig is.
Zorg ervoor dat het stopcontact binnen bereik is.
4) Plaats het afdruiprooster q zodanig, dat de rode vlotter door de uitsparing e
in het afdruiprooster q kan steken.
SEM 1100 C3
NL│BE
│
87 ■

5) Plaats de zeefhouder i in het apparaat door deze bij de markering “INSERT”,
die aan de zijkant naast de heetwaterkop r is aangebracht, op het apparaat
te plaatsen en dan tegen de wijzers van de klok in te draaien, totdat de
handgreep van de zeefhouder i naar voren wijst (markering „LOCK“).
6) Steek de stekker in een stopcontact.
7) Ga vóór het eerste gebruik als volgt te werk, om de interne leidingen te
reinigen:
Laat water voor ca. 5 kopjes espresso (ongeveer 100 ml) door het apparaat
lopen. Lees hiervoor het hoofdstuk “Bediening”.
8) Laat gedurende ca. 30 seconden stoom produceren. Lees hiervoor het
hoofdstuk “Bediening”.
OPMERKING
► Bij het eerste gebruik kan het voorkomen dat de pomp al hoorbaar werkt
en dat er geluiden optreden maar nog geen water uit het apparaat komt.
In dat geval draait u de stoomregelaar 7 in de richting van de “
zodat de lucht uit de leidingen van het apparaat kan ontsnappen (de toets
“Stoom”
geluiden verdwijnen en er komt water uit het apparaat.
4 is ingedrukt). De lucht is na ca. 20 seconden ontsnapt, de
Bediening
Waterreservoir vullen
OPMERKING
► Gebruik uitsluitend vers drinkwater om espresso/cappuccino te maken.
1) Verwijder het waterreservoir 9 en vul het met water:
Vul minstens met water tot aan de min-markering.
Vul nooit met meer water dan tot aan de max-markering.
2) Zet het waterreservoir 9 weer in het apparaat.
”,
Opwarmen na langer niet-gebruik / bij eerste
ingebruikname
Verwarm het apparaat, als u het langere tijd niet heeft gebruikt, als volgt:
1) Doe water in het waterreservoir 9.
2) Leg de grote o of de kleine espressozeef p in de zeefhouder i.
– Let erop dat de kleine inkeping op de grote o of kleine espressozeef p
bij plaatsing boven de inkeping op de zeefhouder i ligt.
■ 88 │ NL
│
BE
SEM 1100 C3

– Draai daarna de grote o of kleine espressozeef p een klein beetje,
zodat die er niet meer uit kan vallen.
OPMERKING
► Verwijder de geplaatste espressozeef o p pas wanneer die is afgekoeld!
► Draai, om de espressozeef o p weer uit de zeefhouder i te halen, de
geplaatste espressozeef o p zo ver tot de inkeping op de espressozeef
o p zich boven de inkeping op de zeefhouder i bevindt. U kunt de
espressozeef o p nu uitnemen.
3) Plaats de zeefhouder i in het apparaat door deze bij de markering “INSERT”,
die aan de zijkant naast de heetwaterkop r is aangebracht, op het apparaat te plaatsen en dan tegen de wijzers van de klok in te draaien, totdat de
handgreep van de zeefhouder i naar voren wijst (markering „LOCK“).
4) Plaats een kopje onder de zeefhouder i.
5) Draai de stoomregelaar 7 dicht (tot aan de aanslag in de richting van de
“
▯
” draaien).
6) Zet het apparaat aan met de aan-/uitknop 1. Het rode indicatielampje z
brandt. Het indicatielampje “Espresso” t knippert groen. Het apparaat
begint met opwarmen.
SEM 1100 C3
NL│BE
│
89 ■

7) Zodra het groene indicatielampje “Espresso” t continu brandt, drukt u op
de toets “Espresso” 3. Laat het water ca. 1 minuut doorlopen.
OPMERKING
►
Het kan zijn dat u tussendoor het kopje moet legen. Stop de procedure
daarvoor even door op de toets “Espresso”
kopje leeg en druk opnieuw op de toets “Espresso” 3, zodat het
water verder door het apparaat loopt.
8) Stop na ca. 1 minuut de pomp door nogmaals op de toets “Espresso”
te drukken.
9) Wacht zo nodig tot het indicatielampje “Espresso” t weer continu brandt.
Het opwarmen is beëindigd. U kunt nu espresso bereiden.
Opwarmen vóór ieder gebruik
Voordat u espresso of cappuccino kunt klaarmaken, moet het apparaat opwarmen.
1) Zet het apparaat aan met de aan-/uitknop 1. Het rode indicatielampje z
brandt. Het indicatielampje “Espresso” t knippert groen. Vergewis u ervan
dat de stoomregelaar 7 tot aan de aanslag op
2) Plaats de zeefhouder i in het apparaat door deze bij de markering “INSERT”,
die aan de zijkant naast de heetwaterkop r is aangebracht, op het apparaat te plaatsen en dan tegen de wijzers van de klok in te draaien, totdat de
handgreep van de zeefhouder i naar voren wijst (markering „LOCK“).
3) Druk op de toets “Espresso”
reservoir 9 haalt. Zodra er water uit de openingen van de zeefhouder loopt,
drukt u nogmaals op de toets “Espresso”
4) Wacht tot het indicatielampje “Espresso” t continu brandt.
5) Druk nogmaals op de toets “Espresso”
heet water doorlopen, voordat u de pomp weer stopt.
Het voorverwarmen is nu beëindigd. U kunt nu een espresso/cappuccino klaarmaken.
3 te drukken. Maak het
3
“▯”
gedraaid is.
3, zodat het apparaat water uit het water-
3, zodat de pomp stopt.
3 en laat 20 seconden lang
Espresso bereiden
OPMERKING
► Vergewis u er altijd van dat de espressozeef o p schoon is en vrij is van
resten espressopoeder.
1) Als het apparaat opgewarmd is:
Zet de kleine espressozeef p in de zeefhouder i om een espresso te
bereiden.
Zet de grote espressozeef o in de zeefhouder i om twee espresso’s te
bereiden.
■ 90 │ NL
│
BE
SEM 1100 C3

2) Vul de kleine espressozeef p tot aan de max-markering met espressopoeder.
Dit komt overeen met ca. 7 gram poeder, of een afgestreken maatlepel a.
Of...
Vul de grote espressozeef o tot aan de max-markering met espressopoeder.
Dat komt overeen met ca. 7 + 7 gram poeder, of twee afgestreken maatlepels a.
3) Druk het espressopoeder aan met behulp van de stamper op de maatlepel a.
Voeg daarna zo nodig nog meer espressopoeder toe, zodat de espressozeef
o p tot aan de max-markering is gevuld. Druk het espressopoeder daarna
opnieuw aan.
OPMERKING
► Het aandrukken van het espressopoeder is een wezenlijk onderdeel van
het bereiden van een espresso. Als u het espressopoeder erg sterk aandrukt, loopt de espresso langzaam door en ontstaat er meer crema. Als u
het espressopoeder niet zo sterk aandrukt, loopt de espresso snel door en
ontstaat er maar weinig crema.
4) Plaats de zeefhouder i in het apparaat door deze bij de markering “INSERT”
op het apparaat te plaatsen en dan tegen de wijzers van de klok in te draaien,
totdat de handgreep van de zeefhouder i naar voren wijst (markering
„LOCK“).
5) Zet één of twee kopjes onder de openingen van de zeefhouder. Het verdient
aanbeveling om de kopjes eerst met heet water om te spoelen, zodat de espresso niet te snel afkoelt. De kopjes kunt u zo lang op het plateau 6 zetten.
6) Zodra het indicatielampje “Espresso” t continu brandt, drukt u op de toets
“Espresso”
3. De espresso loopt in het kopje/de kopjes.
WAARSCHUWING
Neem nooit de zeefhouder i uit het apparaat tijdens de berei-
ding van de espresso!
Rondspattende hete espresso veroorzaakt letsel!
7) Wanneer de kopjes tot de gewenste hoeveelheid zijn gevuld (ca. 20 ml
U kunt de espresso nu drinken.
8) Zet het apparaat uit met de aan-/uitknop 1.
OPMERKING
SEM 1100 C3
► Druk altijd eerst opnieuw op de toets “Espresso”
espresso te stoppen voordat u de zeefdrager i verwijdert.
per kopje), drukt u nogmaals op de toets “Espresso”
water meer wordt gepompt.
► Wanneer de toets “Espresso”
30 minuten niet wordt ingedrukt, gaat het apparaat automatisch uit.
3 of “Stoom” 4 gedurende ca.
3 om de afgifte van
3, zodat er geen
NL│BE
│
91 ■

9) Haal na ieder gebruik het espressopoeder uit de espressozeef o p. Haal
de zeefhouder i uit het apparaat. Klap de zeefblokkade u omhoog, zodat
de espressozeef o p niet uit de zeefhouder i kan vallen. Leeg nu de
espressozeef o p, door de zeefhouder i met geblokkeerde espressozeef o p om te draaien en het espressopoeder eruit te kloppen. Voer het
espressopoeder altijd milieuvriendelijk af, bijvoorbeeld bij het bioafval.
OPMERKING
► Reinig de heetwaterkop r (hier loopt het hete water uit) beslist na elk
gebruik. Lees hiervoor het hoofdstuk “Reiniging en onderhoud”.
OPMERKING
► Leeg de druppelopvangschaal w regelmatig, uiterlijk echter als de rode
vlotter in de uitsparing e van het afdruiprooster q te zien is.
Cappuccino bereiden
WAARSCHUWING
Wees voorzichtig in de omgang met de stoom voor het produceren
van melkschuim!
De hete stoom of hete spatten resulteren in letsel!
► Bedien de stoomregelaar 7 altijd langzaam.
1) Vul een beker (bij voorkeur van RVS) voor het opschuimen tot een derde met
koude melk.
2) Vergewis u ervan dat de stoomregelaar 7 dichtgedraaid is (tot aan de
aanslag in de richting van de “
3) Schuif de melkopschuimer 0 zijwaarts uit. Pak hem daarbij alleen bij de
handgreep 8 vast.
▯
” draaien).
■ 92 │ NL
4) Druk op de toets “Stoom”
continu brandt.
5) Houd een lege beker onder de melkopschuimer 0. Draai nu langzaam de
stoomregelaar 7 in de richting van de “
spatwater uit de kop. Zo worden de kop en de leidingen in het apparaat
gereinigd.
6) Wacht 15 seconden en draai dan de stoomregelaar 7 in de richting van de
“
▯
”, tot er geen stoom meer uit de kop komt. Giet het water uit de beker weg.
7) Houd nu de opschuimbeker in de hand om de melktemperatuur te voelen en
steek de kop van de melkopschuimer 0 een klein eindje in de melk. Houd
de opschuimbeker daarbij een beetje schuin.
8) Draai nu langzaam de stoomregelaar 7 in de richting van de “
│
BE
4. Wacht tot het indicatielampje “Stoom” 5
”. Er komt condenswater/
”.
SEM 1100 C3

9) Beweeg de opschuimbeker in cirkels en houd daarbij de punt van de kop net
onder het melkoppervlak: diep genoeg om de melk niet in alle richtingen te
laten spatten en hoog genoeg om een dik schuim te produceren. Doet u het
goed, dan is daarbij een diep brommend geluid te horen.
10) Als het melkschuim omhoogkomt, steekt u de kop er dieper in, om de vol-
gende “laag” op te schuimen en aanbranden van het schuim te voorkomen.
11) Dompel uiteindelijke de kop helemaal onder en draai de stoomregelaar 7
ongeveer tot de helft dicht, zodat de melk wordt verhit. Houd de opschuimbeker een beetje schuin, zodat de melk zachtjes ronddraait, terwijl deze met
de kop wordt omgeroerd.
12) Als het melkschuim de gewenste consistentie en temperatuur heeft, draait u
de stoomregelaar 7 dicht (tot aan de aanslag in de richting van de “
draaien).
13) Trek pas dan de kop uit de melk.
14) Ga te werk zoals beschreven in het hoofdstuk “Melkopschuimer reinigen”.
OPMERKING
► Gebruik voor het maken van cappuccino altijd grotere kopjes dan voor
espresso, omdat er nog opgeschuimde melk wordt toegevoegd.
15) Ga voor het maken van cappuccino net zo te werk als bij het maken van een
espresso (zie het hoofdstuk “Espresso bereiden”/ opwarmen is niet meer
nodig). Laat het water echter ongeveer twee keer zo lang doorlopen als bij
een espresso (ca. 40 ml).
OPMERKING
► Het indicatielampje “Espresso” t knippert mogelijk snel wanneer u direct
na het maken van melkschuim op de toets “Espresso”
Dit betekent dat het apparaat te heet is om een optimale espresso te
maken. U kunt toch doorgaan met het maken van een espresso of het
apparaat laten afkoelen. Zodra het indicatielampje “Espresso” t continu
brandt, is het voor espresso optimale temperatuurbereik weer bereikt.
16) Zet het apparaat uit met de aan-/uitknop 1.
3 drukt.
▯
”
OPMERKING
17) Doe nu de opgeschuimde melk in de eerste klaargemaakte espresso. De
SEM 1100 C3
► Wanneer de toets “Espresso”
minuten niet wordt ingedrukt, gaat het apparaat automatisch uit.
cappuccino is nu klaar. U kunt er desgewenst suiker aan toevoegen of hem
met cacaopoeder bestrooien.
3 of “Stoom” 4 gedurende ca. 30
NL│BE
│
93 ■

OPMERKING
► Reinig de melkopschuimer 0 in ieder geval na ieder gebruik. Lees hiervoor
het hoofdstuk “Reiniging en onderhoud”.
Tips voor het melkschuim
■ In principe kan iedere soort melk opgeschuimd worden, ook soja- en
rijstmelk. Sommige soorten melk kunnen echter alleen met beperkingen
opgeschuimd worden.
■ Magere melk brandt niet zo gemakkelijk aan als volle melk, maar bij een
te laag vetgehalte bestaat wel het risico dat de melk zich niet goed laat opschuimen. Gebruik daarom liefst melk met een vetgehalte van 3,5% of 1,5%.
■ Goed gekoelde melk kan beter opgeschuimd worden dan minder koude.
De beste resultaten bereikt u bij een temperatuur van ca. 7 °C.
■ Schuim de melk niet een tweede keer op, omdat de melk dan aanbrandt.
■ Laat de opgeschuimde melk ca. 30 seconden lang staan, voordat u het schuim
op de espresso doet. Zo spatten grotere bellen uiteen en nog vloeibare melk
zakt omlaag. U kunt dan het fijne schuim op de espresso doen.
Heet water tappen
U kunt met behulp van de melkschuimer 0 ook heet water tappen om bijvoorbeeld koffie te verdunnen (voor een “café americano”) of om thee te zetten.
1) Zet het apparaat aan met de aan-/uitknop 1. Het rode indicatielampje z
brandt. Het indicatielampje “Espresso” t knippert groen.Vergewis u ervan
dat de stoomregelaar 7 tot aan de aanslag op
Wacht tot de wijzer van de temperatuurindicatie 2 ongeveer in het midden
tussen 80°C en “
brandt.
2) Plaats een hittebestendige beker onder de melkschuimer 0.
3) Draai de stoomregelaar 7 minstens tot de helft in de richting van “
4) Druk op de toets “Espresso”
0.
5) Druk opnieuw op de knop “Espresso”
te stoppen.
” staat en het indicatielampje “Espresso” t continu
“▯”
gedraaid is.
”.
3. Er loopt heet water uit de melkschuimer
3 om het tappen van heet water
■ 94 │ NL
│
BE
SEM 1100 C3

Reiniging en onderhoud
WAARSCHUWING! LETSELGEVAAR!
► Trek altijd de stekker uit het stopcontact voordat u het apparaat reinigt.
Gevaar voor een elektrische schok!
► Laat het apparaat na gebruik altijd afkoelen alvorens het te reinigen.
Verbrandingsgevaar!
Dompel het apparaat nooit onder in water of in andere vloeistoffen.
Gevaar voor een elektrische schok!
LET OP! MATERIËLE SCHADE!
► Gebruik nooit schurende, agressieve of chemische schoonmaakmiddelen voor
het reinigen van de oppervlakken van het apparaat, om beschadigingen te
voorkomen.
Melkopschuimer reinigen
1) Plaats een lege beker onder de melkopschuimer 0.
2) Draai de stoomregelaar 7 direct na gebruik naar “
paar seconden stoom ontsnappen.
3) Draai de stoomregelaar 7 dicht (tot aan de aanslag in de richting van de
“
▯
” draaien), zet het apparaat uit en haal de stekker uit het stopcontact.
4) Laat de kop afkoelen.
5) Trek de koker van de melkopschuimer 0 van de spuitkop (afbeelding 1) en
reinig deze zorgvuldig in warm water.
6) Veeg de spuitkop, die zich onder de koker bevindt, af met een vochtige
doek. Doe desgewenst een beetje afwasmiddel op de doek. Veeg de
spuitkop na reiniging met afwasmiddel nog eens af met een doek die is
bevochtigd met schoon water. Vergewis u ervan dat zich geen afwasmiddelresten meer op de kop bevinden.
7) Schuif de koker weer op de kop (afbeelding 1).
” en laat een
SEM 1100 C3
NL│BE
│
95 ■

Afbeelding 1
Heetwaterkop reinigen
Reinig de heetwaterkop r na elk gebruik:
1) Nadat u de espresso/cappuccino hebt klaargemaakt en de zeefhouder i
hebt afgenomen, veegt u het hele oppervlak van de heetwaterkop r met
een vochtige doek af, zodat alle poederresten worden verwijderd.
2) Plaatst de zeefhouder i zonder espressozeef o p terug.
3) Zet vervolgens een leeg kopje onder de zeefdrager i en druk op de toets
“Espresso”
waarmee de laatste poederresten worden weggespoeld.
4) Druk na ca. 20 seconden nogmaals op de toets “Espresso”
het apparaat uit met de aan-/uitknop 1.
5) Neem de zeefhouder i weer uit het apparaat.
3. Er komt water uit de heetwaterkop r,
Accessoires reinigen
1) Reinig de zeefhouder i, de twee espressozeven o p, het waterreservoir 9,
de maatlepel a en het afdruiprooster q in warm water.
OPMERKING
► Als u afwasmiddel aan het water toevoegt, kan het zijn dat de smaak van
de espresso wordt beïnvloed. Als het vuil alleen met afwasmiddel verwijderd
kan worden, spoelt u de onderdelen achteraf met veel schoon water af.
2) Droog alle onderdelen af.
3 en zet
■ 96 │ NL
│
BE
SEM 1100 C3

OPMERKING
►
De beide espressozeven o p, de maatlepel a en het afdruiprooster q zijn ook geschikt voor reiniging in de vaatwasser.
Apparaat reinigen
Reinig het apparaat met een vochtige doek. Doe desnoods een beetje afwasmiddel op de doek.
Vergewis u ervan dat het apparaat voor het volgende gebruik volledig gedroogd is.
Apparaat ontkalken
LET OP! MATERIËLE SCHADE!
► Produceer geen stoom wanneer zich ontkalkingsmiddel in het waterreser-
voir 9 bevindt!
Ontkalk het apparaat regelmatig. Na ca. 1 – 2 maanden (bij de bereiding van
ca. 4 kopjes espresso per dag) moet het apparaat worden ontkalkt. Al naar
gelang de hardheid van het water in uw regio kan deze waarde afwijken.
Ga als volgt te werk om de meegeleverde ontkalker s te gebruiken:
1) Doe de ontkalker s (125 ml) in het waterreservoir 9.
2) Vul het waterreservoir 9 tot aan de Max-markering met water en plaats het
in het apparaat.
3) Schakel het apparaat in met de aan-/uitknop 1. De stoomregelaar 7
is dichtgedraaid.
4) Plaats de zeefhouder i zonder espressozeef o p in het apparaat.
5) Plaats 2 kopjes of een bakje met een inhoud van minstens 250 ml onder de
openingen van de zeefhouder.
6) Zodra het indicatielampje “Espresso” t continu brandt, drukt u op de toets
“Espresso”
Laat ca. 250 ml (ca. 2 kopjes) ontkalkingsmiddel doorlopen en stop de
procedure dan door opnieuw op de toets “Espresso” 3 te drukken.
Gooi het gebruikte ontkalkingsmiddel eventueel voorzichtig weg.
7) Laat de ontkalker s ca. 1 minuut inwerken.
8) Herhaal stap 6 en 7 nog driemaal. Maak het waterreservoir 9 na de
laatste keer volledig leeg.
9) Plaats een voldoende grote opvangbak (min. 1 liter) onder de openingen
van de zeefhouder.
10) Spoel het waterreservoir 9 uit met schoon water en vul het tot aan de Maxmarkering met schoon water.
3.
SEM 1100 C3
NL│BE
│
97 ■
 Loading...