

ESPRESSO MACHINE SEM 1100 B3
ESPRESSO MACHINE
Operating instructions
ESPRESSOMASCHINE
Bedienungsanleitung
IAN 282260
ΕΣΠΡΕΣΙΕΡΑ
Οδηүίες χρήσης

Before reading, unfold the page containing the illustrations and familiarise yourself with all functions of
the device.
Πριν ξεκινήσετε την ανάγνωση, ανοίξτε τις δυο σελίδες με τις εικόνες και εξοικειωθείτε με όλες τις
λειτουργίες της συσκευής.
Klappen Sie vor dem Lesen die Seite mit den Abbildungen aus und machen Sie sich anschließend mit allen
Funktionen des Gerätes vertraut.
GB / IE / NI / CY Operating instructions Page 1
GR / CY Οδηүίες χρήσης Σελίδα 25
DE / AT / CH Bedienungsanleitung Seite 49
A
B
0
.
!
-
3
6 1 % +
,

Contents
Introduction ..............................................2
Copyright ..........................................................2
Limitation of liability ..................................................2
Warnings ..........................................................2
Intended use ........................................................3
Package contents/Transport inspection ...................................4
Disposal of the packaging .............................................4
Safety instructions .........................................5
Appliance elements ........................................8
Technical data .............................................8
Temperature display .......................................9
First use ..................................................9
Operation ...............................................10
Filling the water tank. . . . . . . . . . . . . . . . . . . . . . . . . . . . . . . . . . . . . . . . . . . . . . . . .10
Heating after a long time of inactivity / during first use ......................11
Heating up before every use ..........................................12
Preparing espresso ..................................................13
Preparing cappuccino ...............................................14
Tips for the milk froth ................................................16
Cleaning and care ........................................16
Cleaning the milk frother .............................................17
Cleaning the hot water shower .........................................18
Cleaning the accessories .............................................18
Cleaning the appliance ..............................................18
Descaling the appliance ..............................................19
Troubleshooting ..........................................20
Disposal .................................................21
Disposal of the appliance .............................................21
Kompernass Handels GmbH warranty .......................22
Service ...........................................................23
Importer ..........................................................23
SEM 1100 B3
GB│IE│NI│CY
│
1 ■

Introduction
Congratulations on the purchase of your new appliance.
You have selected a high-quality product. The operating instructions are part of
this product. They contain important information on safety, usage and disposal.
Before using the product, familiarise yourself with all operating and safety instructions. Use the product only as described and for the specified areas of application.
Please also pass on these operating instructions to any future owner.
Copyright
This documentation is protected by copyright.
Any copying or reproduction, including in the form of extracts, or any reproduction
of images (even in a modified state), is permitted only with the written authorisation
of the manufacturer.
Limitation of liability
All technical information, data and information for installation and operation
contained in these operating instructions corresponds to the latest version(s) at
the time of printing and, to the best of our knowledge, takes into account our
previous experience and know-how.
No claims can be derived from the details, illustrations and descriptions in these
instructions.
The manufacturer assumes no responsibility for damage caused by failure to
observe these instructions, improper use, incompetent repairs, unauthorised
modifications or for the use of non-approved replacement parts.
Warnings
The following warning notice types are used in these operating instructions:
■ 2 │ GB
│IE│NI│
WARNING
A warning notice at this hazard level indicates a potentially
hazardous situation.
Failure to avoid this hazardous situation could result in injury.
► Follow the instructions in this warning notice to prevent injury.
CY
SEM 1100 B3

CAUTION
A warning notice at this hazard level indicates a potential for
property damage.
Failure to avoid this situation could result in property damage.
► Follow the instructions in this warning notice to prevent property damage.
NOTE
► A note provides additional information that will assist you in using the
appliance.
Intended use
The device is designed exclusively for the preparation of espresso/cappuccino
and for frothing milk. It is exclusively intended for use in private households.
Do not use it for commercial applications.
The appliance is not intended for any other purpose, nor for use beyond the
scope described.
WARNING
Danger if not used for intended purpose!
Failure to use the appliance for its intended purpose and/or any other type
of use can be hazardous.
► Use the appliance only for its intended purpose.
► Observe the procedures described in these operating instructions.
No claims of any kind will be accepted for damage arising as a result of incorrect use.
The risk shall be borne solely by the user.
SEM 1100 B3
GB│IE│NI│CY
│
3 ■
Package contents/Transport inspection
WARNING
Risk of suffocation!
► Do not allow children to play with packaging materials.
There is a risk of suffocation.
The appliance is supplied with the following components as standard:
▯ Espresso Machine
▯ Sieve holder
▯ Large espresso sieve
▯ Small espresso sieve
▯ Measuring spoon with compactor
▯ Short operating instructions
▯ Operating instructions
NOTE
► Check the package for completeness and for signs of visible damage.
► If the contents are incomplete or damaged due to defective packaging
or through transportation, contact the Service Hotline.
Disposal of the packaging
The packaging protects the appliance from damage during transport.
The packaging materials have been selected for their environmental friendliness
and ease of disposal, and are therefore recyclable.
Returning the packaging into the material cycle conserves raw materials and
reduces the amount of waste generated. Dispose of packaging materials that
are no longer needed in accordance with applicable local regulations.
■ 4 │ GB
NOTE
► If possible, keep the appliance's original packaging during the warranty
period so that the appliance can be packed properly for return shipment
in the event of a warranty claim.
│IE│NI│
CY
SEM 1100 B3

Safety instructions
To ensure safe operation of the appliance, follow the safety
guidelines set out below:
WARNING – RISK OF INJURY!
■ Prior to use, check the appliance for visible external damage.
Do not operate an appliance that has been damaged or
dropped.
■ The appliance and its connecting cable must be kept away
from children younger than 8 years old.
■ This appliance may be used by children aged 8 years or over
if they are supervised or have been instructed how to use the
appliance safely and have understood the potential risks.
■ This appliance may be used by people with reduced physical,
sensory or mental capabilities or lack of experience and/or
knowledge if they are supervised and have been instructed
in how to use the appliance safely and have understood the
potential risks.
■ Cleaning and user maintenance must not be carried out by
children, unless they are aged 8 or over and are supervised.
■ Children must not use the appliance as a plaything.
■ All repairs must be carried out by authorised specialist compa-
nies or by the Customer Service department. Improper repairs
can pose significant risks to the user. It will also invalidate any
warranty claims.
Never submerge the appliance in water or other liquids!
Danger of electric shock!
SEM 1100 B3
GB│IE│NI│CY
│
5 ■

■ Never touch the appliance with wet or moist hands.
■ To avoid risks, arrange for defective plugs and/or power cables
to be replaced at once by qualified technicians or our Customer
Service Department.
■ Risk of burns! During use, some parts become very hot!
■ Hot vapour plumes are formed when the product is in use.
Take care to ensure that you do not scald yourself! Keep a
safe distance away from the steam.
■ The appliance should only be connected to correctly installed
and earthed mains power sockets.
CAUTION – PROPERTY DAMAGE
■ Defective components must always be replaced with original
replacement parts. Compliance with safety requirements can
only be guaranteed if original replacement parts are used.
■ Protect the appliance from penetration by moisture and liquids.
■ Protect the appliance against knocks, dust, chemicals, extreme
temperatures, etc. and keep it away from sources of heat
(ovens, radiators).
■ 6 │ GB
│IE│NI│
CY
SEM 1100 B3

■ NEVER submerse the appliance in water or other liquids!
■ Always remove the mains adapter from the mains outlet;
never pull on the power cable.
■ Never leave the appliance unattended during operation.
■ Do not use an external timer switch or a separate remote control
system to operate the appliance.
■ Do not operate the appliance in rooms where the temperatures
are below or around 0°C. If the water in the pipes or the water
tank freezes, the appliance could be damaged.
■ Never operate the appliance outdoors. This appliance is
intended for indoor use only.
NOTE
► Repairs to the appliance during the warranty period may only
be carried out by a customer service department authorised
by the manufacturer, otherwise no warranty claims can be
considered for subsequent damage.
SEM 1100 B3
GB│IE│NI│CY
│
7 ■

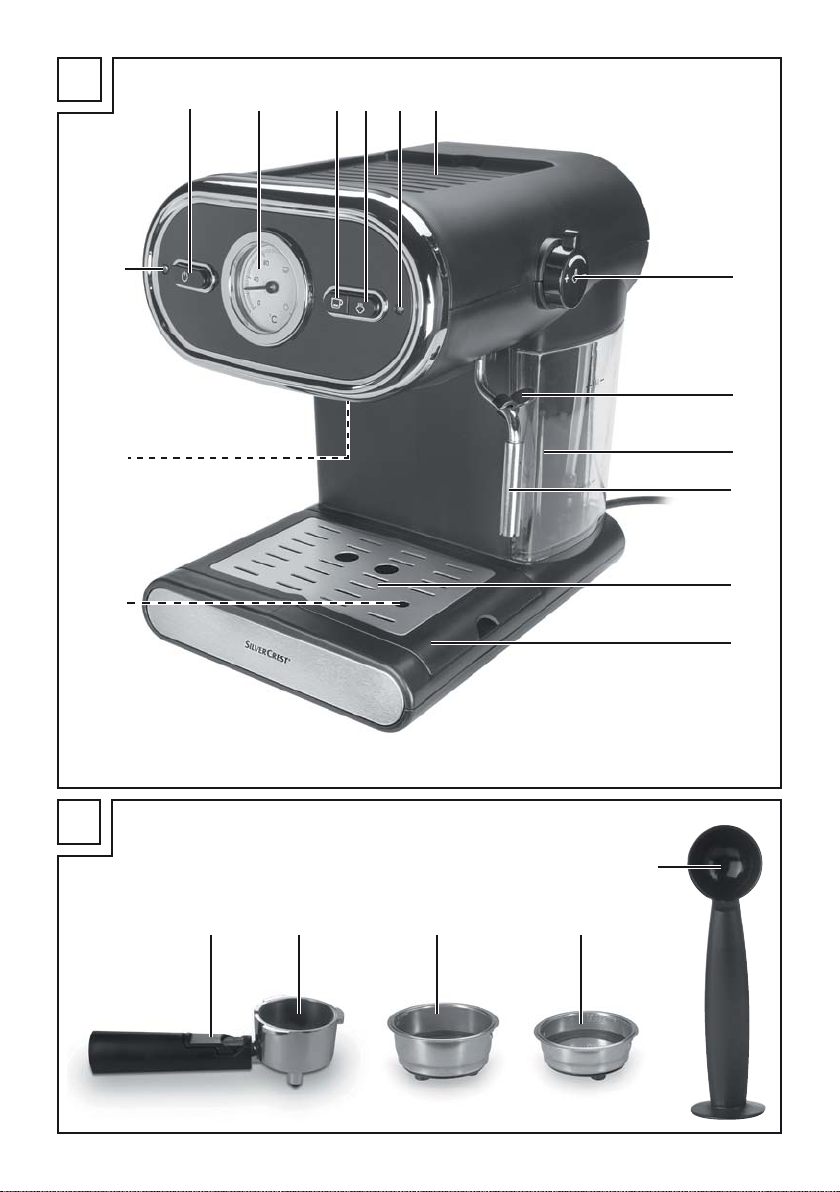
Appliance elements
Figure A:
On/Off switch
Temperature indicator
“Espresso” button
“Steam” button
Green heating-up control lamp
Storage space
Steam control
Handle
Water tank
Milk frother
- Drip grille
3 Drip tray
! Opening for the red float
. Hot water shower
0 Red control lamp
Figure B:
6 Sieve block
1 Sieve holder
% Large espresso sieve
+ Small espresso sieve
, Measuring spoon with compactor
Technical data
Mains voltage 220 - 240 V ~ / 50 Hz
Rated power 1100 W
Pump pressure approx. 1.5 MPa (15 bar)
■ 8 │ GB
│IE│NI│
CY
Food-safe
SEM 1100 B3

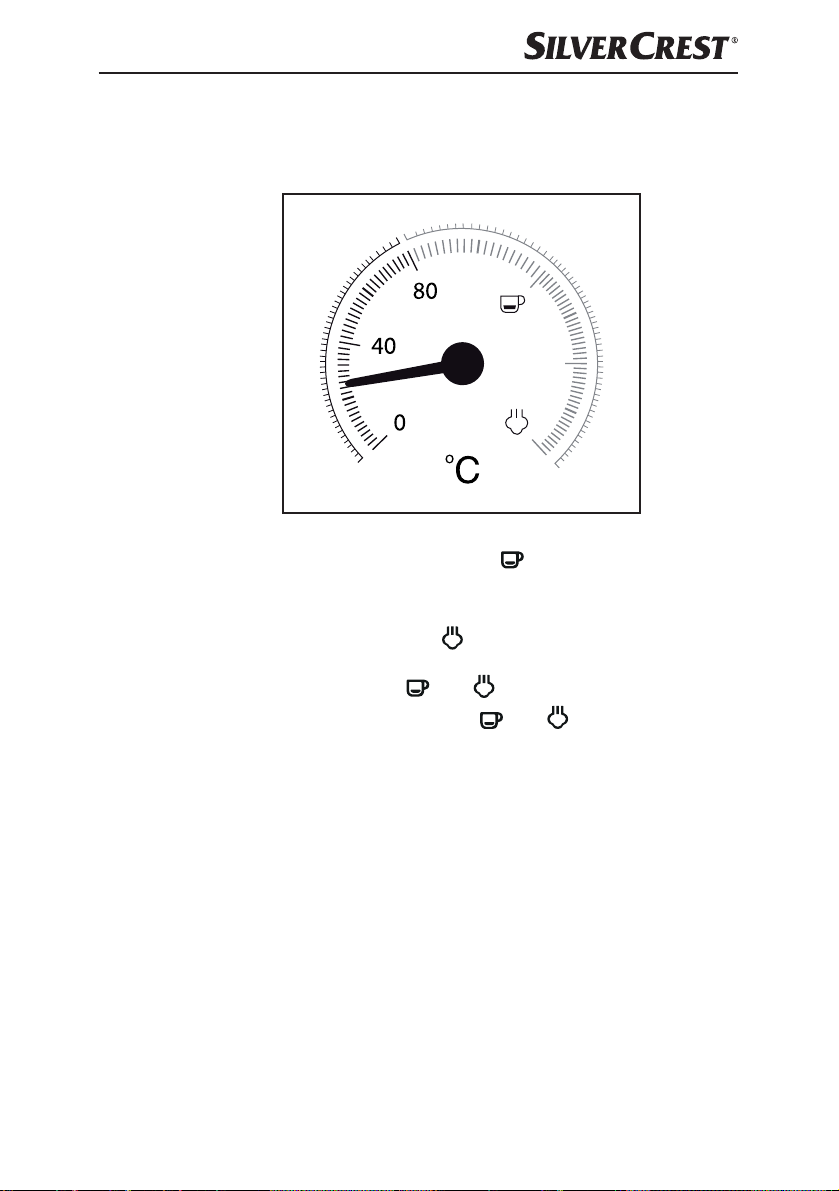
Temperature display
The temperature indicator indicates how far the appliance has heated up.
As soon as you switch the appliance on, it starts heating up until the pointer is
approximately in the middle between 80°C and “ ”.
When the pointer reaches the red portion of the scale, the temperature is high
enough to prepare an espresso. The green heating-up control lamp lights up.
If you press the “Steam” button
goes out, and the appliance continues heating up until it reaches the range on the
scale between “
Once the pointer reaches the range between “
is high enough to produce steam. The green heating-up control lamp lights up.
First use
1) Clean the sieve holder 1, the measuring spoon ,, the espresso sieve %+,
2) Place the appliance on a level and heat-resistant surface. Ensure that a mains
3) Insert the drip grille - so that the red float ! can protrude through the hole
4) Place the sieve holder 1 in the appliance by inserting the “INSERT” mark,
SEM 1100 B3
the green heating-up control lamp
” and “ ”.
” and “ ”, the temperature
the drip grille - and the water tank as described in the section “Cleaning
and Care”.
power socket is in the vicinity.
in the drip grille -.
which is located next to the hot water shower ., into the appliance and then
turning it clockwise until the handle of the sieve holder 1 is facing the front.
GB│IE│NI│CY
│
9 ■

5) Insert the plug into a mains power socket.
6) Proceed as follows before the first use, so as to clean the internal pipelines:
Allow sufficient water for about 5 cups of espresso (about 100 ml) to flow
through the appliance. Refer to the section “Operation”.
7) Let the appliance generate steam for about 30 seconds. Refer to the section
“Operation”.
NOTE
► When using the appliance for the first time, it is possible that you can hear
the pump working, even though no water comes out of the appliance. If this
is the case, turn the steam control in the direction of the "+", so that the
air can escape from the pipes of the appliance (the "Steam" button
is pressed). After approx. 20 seconds the air will have escaped, the noises
disappear and water flows from the appliance.
Operation
NOTE
► Both the "Espresso"
pressed in. If the button is pressed again, it is released.
Filling the water tank
NOTE
► Use only fresh drinking water for making espresso/cappuccino.
1) Pull out the water tank out and fill it with water:
Fill it with water to at least the Min marking.
Never fill it past the Max marking.
2) Push the water tank back into the appliance. Ensure that the hose is inside
the water tank .
and the "Steam" buttons engage when
■ 10 │ GB
│IE│NI│
CY
SEM 1100 B3

Heating after a long time of inactivity / during first use
If you have not used it for some time, preheat the appliance as follows:
1) Fill the water tank with tap water.
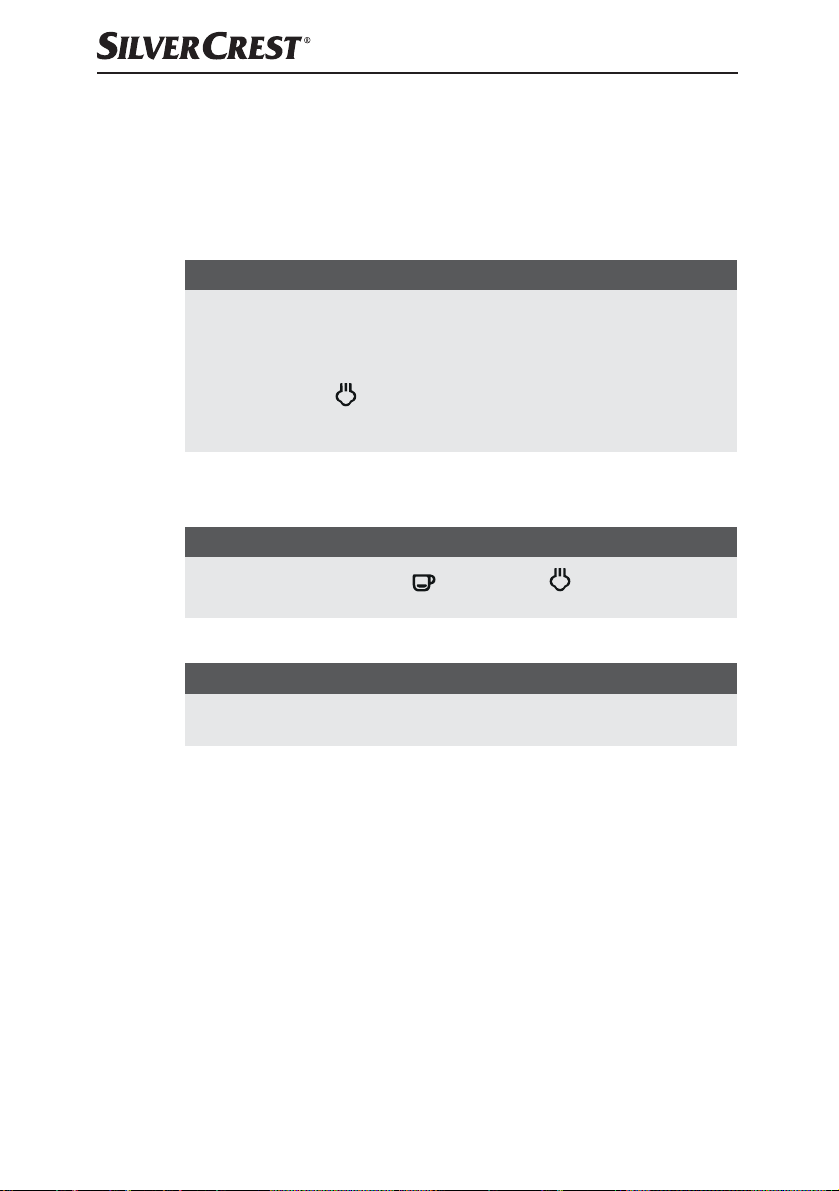
2) Place either the large % or the small espresso sieve + in the sieve holder 1:
– Make sure that the small indentation on the large %or small espresso
sieve + is located above the indentation on the sieve holder 1 when
inserted.
– Then turn the large % or small espresso sieve + slightly to ensure it
cannot fall out.
NOTE
SEM 1100 B3
► Wait until the espresso sieve % +has cooled down before taking it out!
► In order to remove the espresso sieves % + from the sieve holder 1,
turn the inserted espresso sieve % + until the indentation on the espresso
sieve % + is located directly above the indentation on the sieve holder 1.
You can now remove the espresso sieve % +.
GB│IE│NI│CY
│
11 ■

3) Place the sieve holder 1 in the appliance by inserting the “INSERT” mark,
which is located next to the hot water shower ., into the appliance and then
turning it clockwise until the handle of the sieve holder 1 is facing the front.
4) Place a cup under the sieve holder 1.
5) Close the steam control (turn it as far as it will go in the direction of the “-“
symbol).
6) Switch the appliance on with the on/off switch .
7) The red control lamp 0 lights up. After a short time, the pointer in the tem-
perature indicator will begin to rise.
8) As soon as the green heating-up control lamp lights up, press the “Espres-
so” button
NOTE
► You may need to empty the cup in between. Interrupt the process by pressing
the "Espresso" button
again so that water flows through the appliance.
9) After about 1 minute, stop the pump by pressing the “Espresso” button
again.
10) Wait until the green heating-up control lamp lights up again.
The warming-up is concluded. You can now prepare espresso.
. Allow the water to flow for about 1 minute.
. Empty the cup and press the "Espresso" button
Heating up before every use
Before you can prepare an espresso or cappuccino, the appliance must be
heated up.
1) Switch the appliance on using the on/off switch . The red control lamp 0
lights up. Neither the “Espresso”
be pressed in. Ensure that the steam control is turned towards “-“ as far
as possible.
2) Place the sieve holder 1 in the appliance by inserting the “INSERT” mark,
which is located next to the hot water shower ., into the appliance and then
turning it clockwise until the handle of the sieve holder 1 is facing the front.
3) Press the “Espresso” button
the water tank . As soon as water starts exiting the openings in the sieve
holder, press the “Espresso” button again to stop the pump.
4) Wait until the green heating-up control lamp lights up.
5) Press the “Espresso” button
through for 20 seconds before stopping the pump again.
The preheating process is completed. You can now make an espresso/cappuccino.
nor the “Steam” buttons should
so that the appliance draws water from
again and allow hot water to flow
■ 12 │ GB
│IE│NI│
CY
SEM 1100 B3

Preparing espresso
NOTE
► Always ensure that the espresso sieve %+ is clean and free of coffee
powder residues
1) When t
2) F
3) Tamp down the espresso powder using the compactor on the measuring spoon ,.
NOTE
4) Place the sieve holder 1 in the appliance at the “INSERT” mark, then turn it
5) Place one (or two) cup(s) under the sieve holder openings. We recommend
6) As soon as the green heating-up control lamp lights up, you can press
he appliance is heated up:
To prepare an espresso, place the small espresso sieve + into the sieve
holder 1.
To prepare two espressos, place the large espresso sieve % into the sieve
holder 1
This corresponds to approx. 7 g of powder or a level measuring spoon ,.
Or...
Fill the large espresso sieve % with espresso powder up to the Max marking.
This eq
Add more espresso powder, if required, until the espresso sieve %
up to the Max marking. Tamp the coffee powder down once again.
► Compaction of the coffee powder is an essential process for the prepar-
ation of an espresso. If the espresso powder is compacted very strongly,
the espresso runs through more slowly and more crema is generated. If the
espresso powder is not so strongly compacted, the espresso runs through
more quickly and it creates very little crema.
clockwise until the handle of the sieve holder 1 is facing the front.
that you rinse the cups out with hot water beforehand, so that the espresso
does not cool so quickly. You can place the cups onto the storage space .
down the “Espresso” button
.
ill the small espresso sieve + with espresso powder up to the Max marking.
uates to about 7g + 7g of powder or two level measuring spoons ,
.
.
+ is full
. The espresso flows into the cup(s).
WARNING
Never remove the sieve holder 1 while the espresso is coming
out!
The resulting spray of hot espresso would lead to injury!
SEM 1100 B3
► Always check to make sure that the "Espresso" button
in before removing the sieve holder 1.
GB│IE│NI│CY
is not pressed
│
13 ■

7) Once the cups are filled up to the required amount (about 20 ml per cup),
press the “Espresso” button
You can now drink the espresso.
8) Switch the appliance off with the on/off switch .
NOTE
► If no button is pressed, the appliance turns off automatically after 30 minutes.
9) After every use, remove the used espresso powder from the espresso sieve %+.
Remove the sieve holder 1 from the appliance. To do this, fold the sieve
blocker 6 upwards so that the espresso sieve %+ cannot fall out of the
sieve carrier 1. Now empty the espresso sieve %+ by turning the sieve
holder 1 and the blocked espresso sieve %+ over and knocking the
espresso powder out. Always dispose of the espresso powder in an environmentally friendly manner, e.g. with the organic waste.
NOTE
► Clean the hot water shower . (the hot water comes out of this) after each
use. See also the section "Cleaning and Care".
NOTE
► Empty the drip tray 3 regularly, at the latest when the red float !is visible
in the hole of the drip grille -.
Preparing cappuccino
to stop the water being pumped through.
■ 14 │ GB
WARNING
Be careful when working with steam for the milk froth production!
The hot steam or hot splashes can lead to injuries!
► Always operate the steam control slowly.
1) Fill a container for frothing (preferably made of stainless steel) to one third
with cold milk.
2) Ensure that the steam control is closed (turn it as far as it will go in the
direction “-“).
3) Push the milk frother out to the side. Always hold it by the handle .
│IE│NI│
CY
SEM 1100 B3
4) Press the “Steam” button down. Wait until the green heating-up
control lamp lights up.
5) Hold an empty container under the milk frother . Slowly turn the steam
control in the direction “+“. Pressurised water/spray comes from the
nozzle. This cleans the nozzle and the water circuit inside the appliance.
6) Wait 15 seconds and turn the steam control towards “-“ until no more
steam comes out of the nozzle. Pour the water in the container away.
7) Now hold the frothing container in your hand to feel the milk temperature
and guide the nozzle of the milk frother gently into the milk. Hold the
frothing container at a slight angle.
8) Slowly turn the steam control in the direction “+“.
9) Move the frothing container around in a circular motion while keeping the tip
of the nozzle under the surface of the milk: deep enough that the milk does
not spray out, but shallow enough to create a thick froth. Done properly,
a deep buzzing sound is audible.
10) As the milk froth rises, push the nozzle deeper into the milk to froth up the
next “layer” and to avoid a burnt taste in the froth.
11) Finally, insert the nozzle completely and close the steam control approximately halfway, so that the milk is heated. Hold the frothing container at a
slight angle, so that the milk gently swirls around while it is being stirred with
the nozzle.
12) Once the milk froth has reached the desired consistency and temperature,
turn the steam control to off (up to the stop in the direction of the “-“).
13) Now you can remove the nozzle from the milk.
14) Press the “Steam” button
.
NOTE
15) When preparing cappuccino, proceed exactly as you would for an espresso
16) Switch the appliance off with the On/Off switch .
SEM 1100 B3
► For the preparation of cappuccino, always use bigger cups than for
espresso to leave space for the frothed milk.
(see section “Preparing espresso”: the preheating is no longer necessary).
Allow the water to flow through for about twice as long as an espresso
(about 40 ml).
GB│IE│NI│CY
│
15 ■

NOTE
► If no button is pressed, the appliance turns off automatically after
30 minutes.
17) Now add the frothed milk into the previously prepared espresso. The cappuccino is now ready. You can add sugar or sprinkle it with cocoa powder
according to taste.
NOTE
► Always clean the milk frother after every use. See also the section
"Cleaning and Care".
Tips for the milk froth
■ Generally, any type of milk can be frothed, including soy and rice milk.
However, some types of milk can only be frothed to a certain extent.
■ Low fat or skimmed milk does not burn as easily as whole milk, however,
a too low fat content adds to the risk that the milk will not be well frothed.
Therefore use a milk with a fat content of 3.5% or 1.5%, if possible.
■ Well-cooled milk can be better frothed than less cold. For the best results,
use milk at a temperature of about 7°C.
■ Do not froth the milk a second time, otherwise it may burn.
■ Allow frothed milk to stand for about 30 seconds before you pour it onto the
espresso. This allows the larger bubbles to burst; the still liquid milk sinks to
the bottom. You can then pour the fine froth onto the espresso.
Cleaning and care
WARNING – RISK OF INJURY!
■ Always remove the plug from the mains power socket before you clean the
appliance. Danger of electric shock!
■ Always allow the appliance to cool down before you start to clean it.
Risk of burns!
■ NEVER submerse the appliance in water or other liquids! Danger of electric
shock!
■ 16 │ GB
│IE│NI│
CY
SEM 1100 B3
Cleaning the milk frother
CAUTION – PROPERTY DAMAGE
■ NEVER use abrasive, corrosive or chemical agents to clean the appliance.
These could damage the outer surfaces of the appliance
.
1) Place an em
2) Immediately af
allow the steam to escape for a few seconds.
3) T
urn the steam control off (as far as it will go in the direction “-“), switch
the appliance off and remove the plug from the mains power socket.
4) Allo
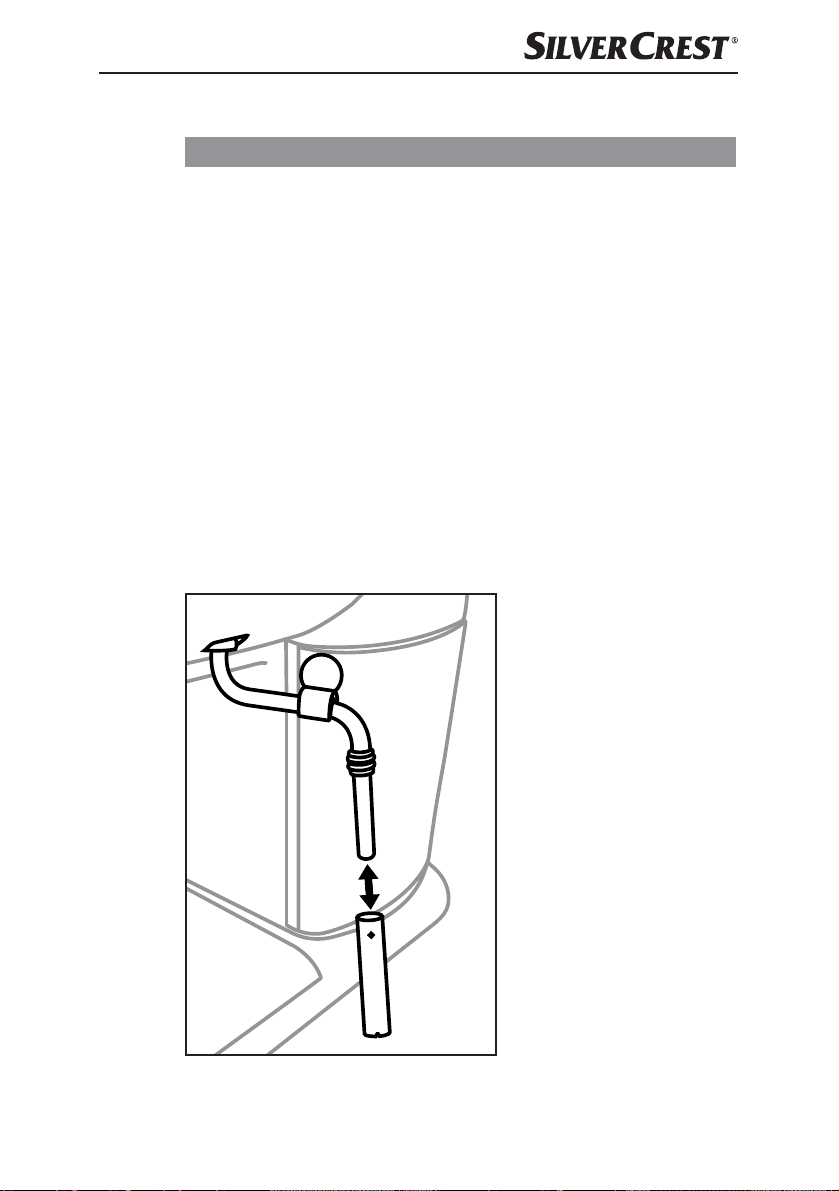
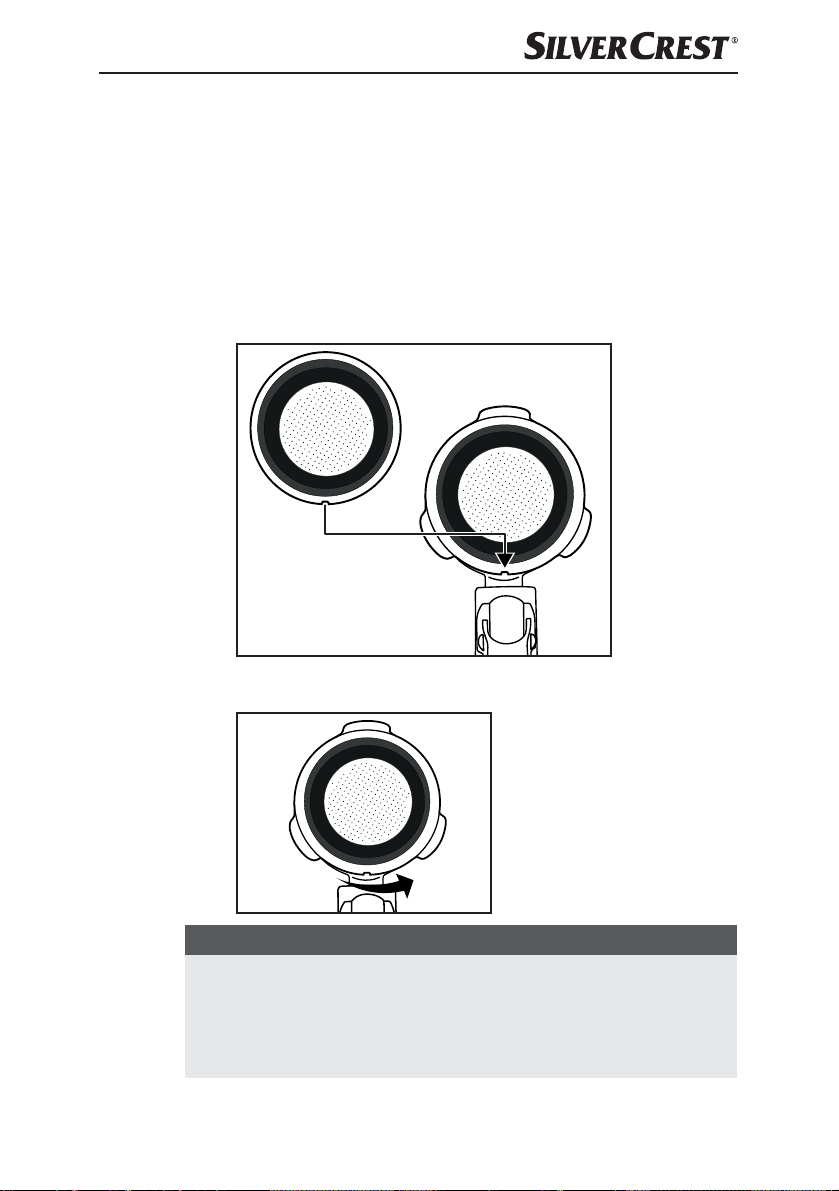
5) Pull the casing of the milk frother off (Figure 1) and clean it thoroughly in
warm water.
6) W
ipe the nozzle under the casing with a damp cloth. If necessary, add a little
mild detergent onto the cloth. After cleaning with detergent, always wipe off
with a cloth moistened with clean water. Ensure that there is no detergent
residue left on the nozzle
7) Push t
pty container under the milk frother .
ter use, turn the steam control to the “+“ position and
w the nozzle to cool down.
.
he casing back onto the nozzle (Figure 1).
Figure 1
SEM 1100 B3
GB│IE│NI│CY
│
17 ■

Cleaning the hot water shower
Clean the hot water shower . after each use:
1) After you have prepared the espresso/cappuccino and removed the sieve
holder 1, wipe the entire surface of the hot water shower . with a moistened cloth to remove all powder residues.
2) Replace the sieve holder 1 without the espresso filters %+.
3) Place an empty cup under the sieve holder 1 and press the “Espresso”
button
rinsing out the remaining powder residue.
4) After about 20 seconds, press the “Espresso” button
switch the appliance off with the On/Off switch .
5) Remove the sieve holder 1 again.
down until it clicks in. Water flows out of the hot water shower .
Cleaning the accessories
1) Clean the sieve holder 1, the two espresso sieves %+, water tank , the
measuring spoon , and the drip grille - in warm water.
NOTE
► If you put detergent into the water, it may effect the taste of the espresso.
If the stains can only be removed with detergent, always rinse the items
afterwards with lots of clean water.
2) Dry all parts well.
3) The drip tray 3 is suitable for cleaning in the dishwasher. However, always
remove the red float from the drip tray 3 before cleaning:
– To do this, remove the stoppers attached to the two retaining bars to the
side of the float.
– Pull the float from the retaining bars.
– Clean the float and stoppers.
– After cleaning the drip tray 3, push the cleaned float back onto the
retaining bars and replace the stoppers.
again and
Cleaning the appliance
Clean the appliance with a moist cloth. If necessary, use a little detergent on the cloth.
Ensure that the appliance is completely dry before the next use.
■ 18 │ GB
│IE│NI│
CY
SEM 1100 B3
Descaling the appliance
Descale the appliance regularly. The appliance should be descaled after about
1- 2 months (at approx. 4 espresso preparations per day). Depending on the
hardness of the water in your area, this figure may differ.
For descaling, use a commercially available descaler for espresso machines.
Proceed as described in the instructions for usage of the descaler.
If you do not have any descaling products, you can use citric acid and proceed
as follows:
1) Fill the water tank to the marking MAX.
2) Dissolve 2 tablespoons (about 30 grams) of citric acid (available in drugstores
or chemists) into the water.
3) Replace the water tank into the appliance.
4) Switch on the appliance using the On/Off switch . The steam control
is closed.
5) Insert the sieve holder 1 without the espresso sieves %+ back into the
appliance and place a cup under the sieve holder 1.
6) As soon as the green heat-up indicator lamp lights up, press the “Espresso”
button
7) Allow around 2 cups (approx. 250 ml) of water to run through and then stop
the process by pressing the “Espresso” button again.
8) Hold a container under the milk frother .
9) Press the “Steam” button
until the green heat-up indicator lamp lights up. Slowly turn the steam
control to the position “+“. Allow the appliance to create steam for
about 2 minutes.
10) After 2 minutes, close the steam control , then press the “Steam” button
again so that no more steam is generated.
11) Let the scaling agent take effect for about 15 minutes.
12) Repeat steps 6 - 11 three times.
13) Then press the “Espresso” button
water run through until the water tank is empty.
14) Rinse the water tank with clean water and then fill it with clean water up
to the Max marking.
15) Press the “Espresso” button down so that it clicks into place and wait
until the green heat-up indicator lamp lights up.
16) Allow the water to run through.
17) Repeat steps 14 - 16 three times.
18) Refill the water tank with water.
so that it clicks in.
down so that it clicks into place and wait
down so that it clicks in, let the
SEM 1100 B3
GB│IE│NI│CY
│
19 ■
19) Push in the “Steam” button so that it clicks into place.
20) Hold a container under the milk frother and slowly turn the steam control
button to the position “+ “ as soon as the green heating-up control lamp
lights up.
21) After about 1 minute, close the steam control (turn it in the direction of the
“-“ as far as the stop), press the “Steam” button
the appliance.
NOTE
► If no button is pressed, the appliance turns off automatically after
30 minutes.
again and switch off
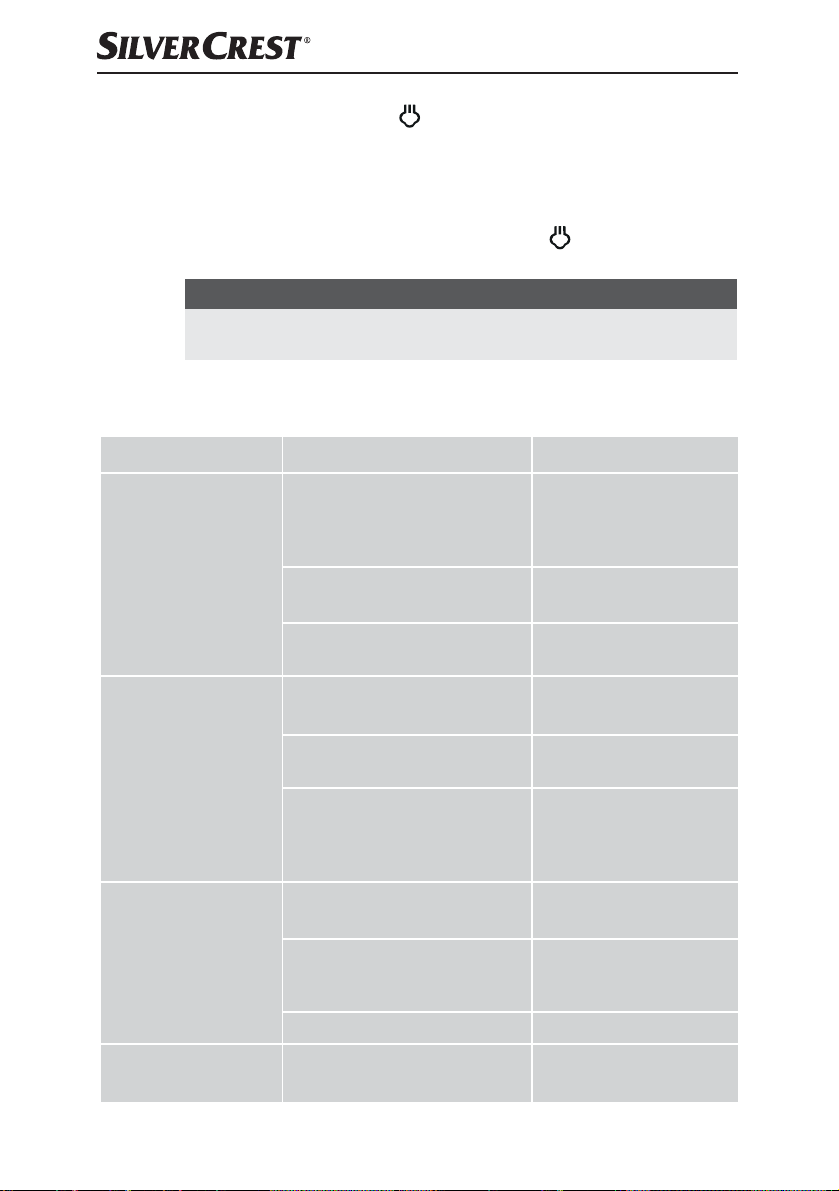
Troubleshooting
Malfunction Cause Solution
• Re-prepare the espresso
without compressing the
powder as firmly; if necessary, use new powder.
• Fill the water tank
with water.
• Clean the sieve holder 1.
The espresso no longer
flows out.
• The espresso powder is too
moist and/or compressed
too tightly.
• No water in the water tank .
• The holes of the sieve holder
openings are blocked.
The espresso drips over
the edges of the sieve
holder 1, not from the
openings.
The espresso is cold.
The pump is unusually
noisy.
■ 20 │ GB
│IE│NI│
• The sieve holder 1 is not
correctly inserted.
• The sieve holder openings are
blocked.
• There are espresso powder
residues on the edges of the
sieve holder 1.
• The appliance was not
preheated.
• The green heating-up control
lamp has not yet glowed.
• The cups were not pre-warmed. • Pre-warm the cups.
• The water tank is empty.
CY
• Insert the sieve holder 1
correctly.
• Clean the sieve holder 1.
• Clean the espresso
powder residues from
the edges of the sieve
holder 1.
• Preheat the appliance.
• Wait until the green
heating-up control
lamp lights up.
• Fill the water tank
with water.
SEM 1100 B3
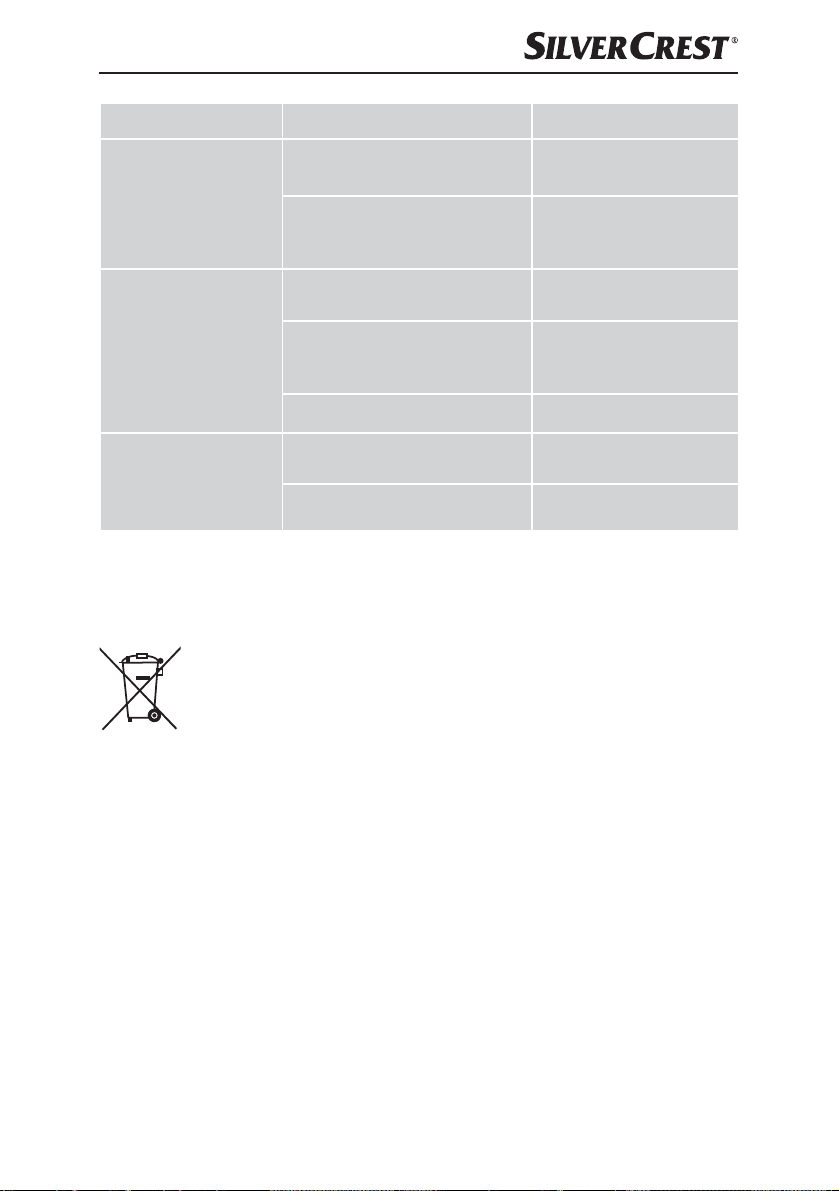
Malfunction Cause Solution
The crema is too light
(the espresso runs out
of the sieve holder 1
quickly).
The crema is too dark
(the espresso runs out
of the sieve carrier 1
slowly).
• Not enough espresso powder.
• The espresso powder is too
coarsely ground.
• Too much espresso powder.
• The powder is too finely ground
or moist.
• The sieve is blocked. • Clean the sieve.
• Use more espresso
powder.
• Use only espresso
powder specially manufactured for espresso.
• Use less espresso
powder.
• Use only espresso
powder specially manufactured for espresso.
• The milk is not cold enough.
The milk does not froth.
• The milk frother is dirty. • Clean the milk frother .
Disposal
Disposal of the appliance
Do not dispose of the appliance in your normal domestic waste.
This product is subject to the provisions of the European WEEE
(Waste Electrical and Electronic Equipment) Directive 2012/19/EU.
Dispose of the appliance via an approved waste disposal company or your
municipal waste disposal facility. Please comply with all applicable regulations.
Please contact your waste disposal facility if you are in any doubt.
• Use milk from the
refrigerator.
SEM 1100 B3
GB│IE│NI│CY
│
21 ■

Kompernass Handels GmbH warranty
Dear Customer,
This appliance has a 3-year warranty valid from the date of purchase. If this product
has any faults, you, the buyer, have certain statutory rights. Your statutory rights
are not restricted in any way by the warranty described below.
Warranty conditions
The validity period of the warranty starts from the date of purchase. Please keep
your original receipt in a safe place. This document will be required as proof of
purchase.
If any material or production fault occurs within three years of the date of purchase
of the product, we will either repair or replace the product for you at our discretion.
This warranty service is dependent on you presenting the defective appliance
and the proof of purchase (receipt) and a short written description of the fault
and its time of occurrence.
If the defect is covered by the warranty, your product will either be repaired or
replaced by us. The repair or replacement of a product does not signify the beginning of a new warranty period.
Warranty period and statutory claims for defects
The warranty period is not prolonged by repairs effected under the warranty.
This also applies to replaced and repaired components. Any damage and defects
present at the time of purchase must be reported immediately after unpacking.
Repairs carried out after expiry of the warranty period shall be subject to a fee.
Scope of the warranty
This appliance has been manufactured in accordance with strict quality guidelines
and inspected meticulously prior to delivery.
The warranty covers material faults or production faults. The warranty does not
extend to product parts subject to normal wear and tear or fragile parts such as
switches, batteries, baking moulds or parts made of glass.
The warranty does not apply if the product has been damaged, improperly used
or improperly maintained. The directions in the operating instructions for the product
regarding proper use of the product are to be strictly followed. Uses and actions
that are discouraged in the operating instructions or which are warned against
must be avoided.
This product is intended solely for private use and not for commercial purposes.
The warranty shall be deemed void in cases of misuse or improper handling, use
of force and modifications / repairs which have not been carried out by one of
our authorised Service centres.
■ 22 │ GB
│IE│NI│
CY
SEM 1100 B3

Warranty claim procedure
To ensure quick processing of your case, please observe the following instructions:
■ Please have the till receipt and the item number (e.g. IAN 12345) available
as proof of purchase.
■ You will find the item number on the type plate, an engraving on the front
page of the instructions (bottom left), or as a sticker on the rear or bottom of
the appliance.
■ If functional or other defects occur, please contact the service department
listed either by telephone or by e-mail.
■ You can return a defective product to us free of charge to the service address
that will be provided to you. Ensure that you enclose the proof of purchase
(till receipt) and information about what the defect is and when it occurred.
You can download these instructions along with many other manuals,
product videos and software on www.lidl-service.com.
Service
Service Great Britain
Tel.: 0871 5000 720 (£ 0.10/Min.)
E-Mail: kompernass@lidl.co.uk
Service Ireland
Tel.: 1890 930 034
(0,08 EUR/Min., (peak))
(0,06 EUR/Min., (off peak))
E-Mail: kompernass@lidl.ie
CY
Service Cyprus
Tel.: 8009 4409
E-Mail: kompernass@lidl.com.cy
IAN 282260
Importer
Please note that the following address is not the service address. Please use the
service address provided in the operating instructions.
KOMPERNASS HANDELS GMBH
BURGSTRASSE 21
44867 BOCHUM
GERMANY
www.kompernass.com
SEM 1100 B3
GB│IE│NI│CY
│
23 ■

■ 24 │ GB
│IE│NI│
CY
SEM 1100 B3

Περιεχόμενα
Εισαγωγή ................................................26
Πνευματικά δικαιώματα ..............................................26
Περιορισμός ευθύνης ...............................................26
Υποδείξεις προειδοποίησης ..........................................26
Προβλεπόμενη χρήση ...............................................27
Παραδοτέος εξοπλισμός / Έλεγχος μεταφοράς ...........................28
Απόρριψη της συσκευασίας ..........................................28
Υποδείξεις ασφαλείας ......................................29
Στοιχεία συσκευής ........................................32
Τεχνικά χαρακτηριστικά ...................................32
Η ένδειξη θερμοκρασίας ...................................33
Πρώτη θέση σε λειτουργία ..................................33
Χειρισμός ................................................34
Πλήρωση δοχείου νερού .............................................34
Θέρμανση μετά από μεγάλο χρόνο αδράνειας /
κατά την πρώτη θέση σε λειτουργία .....................................35
Ζέσταμα πριν από κάθε χρήση ........................................36
Προετοιμασία καφέ εσπρέσο ..........................................37
Προετοιμασία καπουτσίνο ............................................38
Υποδείξεις για το αφρόγαλα ..........................................40
Καθαρισμός και φροντίδα ..................................40
Καθαρισμός διάταξης για το αφρόγαλα .................................41
Καθαρισμός της διάταξης καυτού νερού ................................42
Καθαρισμός εξαρτημάτων ............................................42
Καθαρισμός συσκευής ...............................................42
Αφαίρεση αλάτων από τη συσκευή .....................................43
Διόρθωση σφαλμάτων .....................................44
Απόρριψη ...............................................45
Απόρριψη συσκευής ................................................45
Εγγύηση της Kompernass Handels GmbH .....................46
Σέρβις ...........................................................47
Εισαγωγέας .......................................................47
SEM 1100 B3
GR│CY
│
25 ■

Εισαγωγή
Συγχαρητήρια για την αγορά της νέας σας συσκευής.
Αποφασίσατε έτσι για την απόκτηση ενός προϊόντος υψηλής ποιότητας.
Οι οδηγίες χρήσης είναι τμήμα αυτού του προϊόντος. Περιέχουν σημαντικές
υποδείξεις για την ασφάλεια, τη χρήση και την απόρριψη. Πριν από τη χρήση
του προϊόντος, εξοικειωθείτε με όλες τις υποδείξεις χειρισμού και ασφάλειας.
Χρησιμοποιείτε το προϊόν μόνο όπως περιγράφεται και για τους αναφερόμενους
τομείς χρήσης. Παραδώστε όλα τα έγγραφα σε περίπτωση παράδοσης του
προϊόντος σε τρίτους.
Πνευματικά δικαιώματα
Αυτές οι οδηγίες έχουν προστασία πνευματικών δικαιωμάτων.
Κάθε ανατύπωση ή επανέκδοση, ακόμη και αποσπασματική, καθώς και η αναπα-
ραγωγή των εικόνων, ακόμα και σε τροποποιημένη κατάσταση, επιτρέπεται μόνο
με γραπτή έγκριση του κατασκευαστή.
Περιορισμός ευθύνης
Όλες οι περιεχόμενες στις παρούσες οδηγίες χρήσης τεχνικές πληροφορίες,
τα δεδομένα και οι υποδείξεις χειρισμού αντιστοιχούν στην τελευταία λέξη της
τεχνολογίας κατά τη στιγμή της εκτύπωσης και πραγματοποιούνται λαμβάνοντας υπόψη τις μέχρι τώρα εμπειρίες και γνώσεις μας στο ανώτερο επίπεδο.
Από τα στοιχεία, τις εικόνες και τις περιγραφές σε αυτές τις οδηγίες δεν μπορούν να εγερθούν απαιτήσεις.
Ο κατασκευαστής δεν αναλαμβάνει καμία ευθύνη για βλάβες από μη τήρηση
των οδηγιών, από μη σύμφωνη με τους κανονισμούς χρήση, από εσφαλμένες
επισκευές, από μη εγκεκριμένες διεξαχθείσες τροποποιήσεις ή χρήση μη επιτρεπόμενων εξαρτημάτων.
Υποδείξεις προειδοποίησης
Στις παρούσες οδηγίες χρήσης χρησιμοποιούνται οι εξής υποδείξεις προειδοποίησης:
ΠΡΟΕΙΔΟΠΟΙΗΣΗ
Μία υπόδειξη προειδοποίησης αυτού του βαθμού κινδύνου
χαρακτηρίζει μία πιθανή επικίνδυνη κατάσταση.
Στην περίπτωση που δεν μπορεί να αποφευχθεί αυτή η επικίνδυνη κατάσταση,
μπορεί να προκληθούν τραυματισμοί.
► Οι οδηγίες σε αυτή την υπόδειξη προειδοποίησης γίνονται ώστε να απο-
φεύγονται σωματικοί τραυματισμοί.
■ 26 │ GR
│
CY
SEM 1100 B3

ΠΡΟΣΟΧΗ
Μία υπόδειξη προειδοποίησης αυτού του βαθμού κινδύνου
χαρακτηρίζει μία πιθανή υλική ζημιά.
Στην περίπτωση που δεν μπορεί να αποφευχθεί αυτή η κατάσταση, μπορεί να
προκληθούν υλικές ζημιές.
► Τηρείτε τις οδηγίες σε αυτή την υπόδειξη προειδοποίησης ώστε να απο-
φεύγονται υλικές ζημιές.
ΥΠΟΔΕΙΞΗ
► Μία υπόδειξη επισημαίνει επιπλέον πληροφορίες που διευκολύνουν το
χειρισμό της συσκευής.
Προβλεπόμενη χρήση
Αυτή η συσκευή εξυπηρετεί αποκλειστικά στην ετοιμασία εσπρέσο/καπουτσίνο
και για να ετοιμάζετε αφρόγαλα. Προορίζεται αποκλειστικά για ιδιωτική οικιακή
χρήση. Μην τη χρησιμοποιείτε για επαγγελματικό σκοπό.
Μία άλλη ή διαφορετική χρήση από τα ανωτέρω αναφερόμενα ισχύει ως μη
σύμφωνη με τους κανονισμούς.
ΠΡΟΕΙΔΟΠΟΙΗΣΗ
Κίνδυνος λόγω μη προβλεπόμενης χρήσης!
Μπορεί να προκύψουν κίνδυνοι από τη συσκευή λόγω μη σύμφωνης με τους
κανονισμούς χρήσης και/ή άλλου είδους χρήσης.
► Χρησιμοποιείτε τη συσκευή αποκλειστικά με τρόπο σύμφωνο με τους
κανονισμούς.
► Τηρείτε τις διαδικασίες που περιγράφονται σε αυτές τις οδηγίες χρήσης.
Απαιτήσεις οποιουδήποτε είδους λόγω φθορών από μη προβλεπόμενη χρήση
αποκλείονται.
Την ευθύνη φέρει αποκλειστικά ο χρήστης.
SEM 1100 B3
GR│CY
│
27 ■

Παραδοτέος εξοπλισμός / Έλεγχος μεταφοράς
ΠΡΟΕΙΔΟΠΟΙΗΣΗ
Κίνδυνος ασφυξίας!
► Τα υλικά συσκευασίας δεν επιτρέπεται να χρησιμοποιούνται για παιχνίδι.
Υπάρχει κίνδυνος ασφυξίας.
Η συσκευή παραδίδεται κανονικά με τα εξής στοιχεία:
▯ Εσπρεσιέρα
▯ Φορέας φίλτρου
▯ Μεγάλο φίλτρο καφέ εσπρέσο
▯ Μικρό φίλτρο καφέ εσπρέσο
▯ Κουτάλι δοσομέτρησης με πώμα
▯ Σύντομες οδηγίες
▯ Οδηγίες χρήσης
ΥΠΟΔΕΙΞΗ
► Ελέγξτε τον παραδοτέο εξοπλισμό ως προς την πληρότητα και για εμφανείς
φθορές.
► Σε περίπτωση ελλιπούς παραδοτέου εξοπλισμού ή ζημιών λόγω ελλιπούς
συσκευασίας ή λόγω μεταφοράς, απευθυνθείτε στην ανοικτή τηλεφωνική
γραμμή εξυπηρέτησης.
Απόρριψη της συσκευασίας
Η συσκευασία προστατεύει τη συσκευή από φθορές κατά τη μεταφορά. Τα υλικά
συσκευασίας έχουν επιλεγεί σύμφωνα με τους οικολογικούς παράγοντες και τους
παράγοντες της τεχνικής απόρριψης και για το λόγο αυτό είναι ανακυκλώσιμα.
Η επιστροφή της συσκευασίας στην ανακύκλωση υλικών εξοικονομεί πρώτες ύλες
και μειώνει την ποσότητα των απορριμμάτων. Απορρίπτετε τα υλικά συσκευασίας
που δεν χρησιμοποιούνται πλέον σύμφωνα με τις τοπικές ισχύουσες προδιαγραφές.
■ 28 │ GR
ΥΠΟΔΕΙΞΗ
► Εάν είναι δυνατόν, φυλάξτε τη γνήσια συσκευασία κατά τη διάρκεια της
εγγύησης, για να μπορείτε σε περίπτωση εγγύησης να συσκευάσετε τη
συσκευή σωστά.
│
CY
SEM 1100 B3
Υποδείξεις ασφαλείας
Τηρείτε τις κάτωθι υποδείξεις ασφαλείας για έναν ασφαλή χειρισμό της συσκευής:
ΠΡΟΕΙΔΟΠΟΙΗΣΗ - ΚΙΝΔΥΝΟΣ ΤΡΑΥΜΑΤΙΣΜΟΥ!
■ Πριν από τη χρήση ελέγχετε τη συσκευή ως προς εξωτερικές
εμφανείς φθορές. Μη θέτετε σε λειτουργία μία συσκευή που
έχει υποστεί φθορές ή έχει πέσει κάτω.
■ Η συσκευή και το καλώδιο σύνδεσής της πρέπει να φυλάσσο-
νται μακριά από παιδιά κάτω των 8 ετών.
■ Μπορεί να γίνεται χρήση της συσκευής από παιδιά άνω των
8 ετών, εφόσον επιτηρούνται ή έχουν εκπαιδευτεί αναφορικά
με την ασφαλή χρήση της συσκευής και έχουν κατανοήσει
τους επακόλουθους κινδύνους.
■ Μπορεί να γίνεται χρήση αυτής της συσκευής από άτομα με
μειωμένες φυσικές, αισθητηριακές ή νοητικές ικανότητες ή με
έλλειψη εμπειρίας και/ή γνώσεων, εφόσον επιτηρούνται ή έχουν
εκπαιδευτεί αναφορικά με την ασφαλή χρήση της συσκευής
και έχουν κατανοήσει τους επακόλουθους κινδύνους.
■ Ο καθαρισμός και η συντήρηση χρήστη δεν επιτρέπεται να
διεξάγονται από παιδιά εκτός εάν είναι 8 ετών και άνω και
επιτηρούνται.
■ Τα παιδιά δεν επιτρέπεται να παίζουν με τη συσκευή.
■ Επισκευές στη συσκευή επιτρέπεται να πραγματοποιούνται
μόνο από εξουσιοδοτημένα και εξειδικευμένα συνεργεία ή
από το τμήμα εξυπηρέτησης πελατών. Εξαιτίας ακατάλληλων
επισκευών μπορεί να προκύψουν σημαντικοί κίνδυνοι για το
χρήστη. Επίσης ακυρώνεται η αξίωση εγγύησης.
Μη βυθίζετε τη συσκευή σε νερό ή σε άλλα υγρά.
Κίνδυνος ηλεκτροπληξίας!
SEM 1100 B3
GR│CY
│
29 ■

■ Μην πιάνετε ποτέ τη συσκευή με βρεγμένα ή υγρά χέρια.
■ Τα βύσματα ή τα καλώδια που έχουν υποστεί βλάβη πρέπει να
αντικαθίστανται αμέσως από εξουσιοδοτημένο εξειδικευμένο
προσωπικό ή από το τμήμα εξυπηρέτησης πελατών, ώστε να
αποφεύγονται κίνδυνοι.
■ Κίνδυνος εγκαύματος! Ορισμένα μέρη γίνονται πολύ καυτά
κατά τη χρήση!
■ Κατά τη χρήση της συσκευής, δημιουργούνται καυτοί ατμοί.
Προσέξτε ώστε να μην καείτε από αυτούς! Διατηρείτε επαρκή
απόσταση από τους ατμούς.
■ Συνδέετε τη συσκευή μόνο σε μια σύμφωνα με τις προδιαγραφές
εγκατεστημένη και γειωμένη πρίζα.
ΠΡΟΣΟΧΗ - ΥΛΙΚΕΣ ΖΗΜΙΕΣ
■ Τα ελαττωματικά μέρη κατασκευής επιτρέπεται να αντικαθίστανται
μόνο με γνήσια ανταλλακτικά. Μόνο με αυτά τα ανταλλακτικά
εξασφαλίζεται η πλήρωση των απαιτήσεων ασφαλείας.
■ Προστατεύετε τη συσκευή από την υγρασία και την εισχώρηση
υγρών.
■ Προστατεύετε τη συσκευή από κρούσεις, σκόνη, χημικές ουσίες,
εξαιρετικές διακυμάνσεις θερμοκρασίας και πολύ κοντινές
πηγές θερμότητας (φούρνοι, θερμαντικά σώματα).
■ 30 │ GR
│
CY
SEM 1100 B3

■ Ποτέ μη βυθίζετε τη συσκευή σε νερό ή σε άλλα υγρά.
■ Αποσυνδέετε πάντα το βύσμα από την πρίζα και μην τραβάτε
ποτέ το καλώδιο.
■ Ποτέ μην αφήνετε τη συσκευή ανεπιτήρητη κατά τη διάρκεια
της λειτουργίας.
■ Μη χρησιμοποιείτε εξωτερικό χρονοδιακόπτη ή ξεχωριστό
τηλεχειριστήριο για να θέσετε σε λειτουργία τη συσκευή.
■ Ποτέ μη λειτουργείτε τη συσκευή σε χώρους, στους οποίους
υπάρχουν θερμοκρασίες κάτω του 0°C. Εάν παγώσει το νερό
στους αγωγούς ή στο δοχείο νερού, μπορεί η συσκευή να
πάθει ζημιά.
■ Ποτέ μη λειτουργείτε τη συσκευή σε εξωτερικό χώρο. Αυτή η
συσκευή προορίζεται μόνο για χρήση σε εσωτερικούς χώρους.
ΥΠΟΔΕΙΞΗ
► Επισκευή της συσκευής κατά το χρόνο της εγγύησης επι-
τρέπεται να γίνεται μόνο από ένα εξουσιοδοτημένο από τον
κατασκευαστή τμήμα εξυπηρέτησης πελατών, αλλιώς δεν
ισχύει η αξίωση εγγύησης σε επακόλουθες φθορές.
SEM 1100 B3
GR│CY
│
31 ■

Στοιχεία συσκευής
Εικόνα A:
Διακόπτης On/Off
Ένδειξη θερμοκρασίας
Πλήκτρο „Εσπρέσο“
Πλήκτρο „Ατμός“
Πράσινη λυχνία ελέγχου θέρμανσης
Επιφάνεια τοποθέτησης
Ρυθμιστής ατμού
Λαβή
Δοχείο νερού
Διάταξη για αφρόγαλα
- Σχάρα στραγγίσματος
3 Υποδοχή συλλογής σταγόνων
! Εσοχή για τον κόκκινο πλωτήρα
. Έξοδος καυτού νερού
0 Κόκκινη λυχνία ελέγχου
Εικόνα B:
6 Διάταξη μπλοκαρίσματος του φίλτρου
1 Φορέας φίλτρου
% Μεγάλο φίλτρο καφέ εσπρέσο
+ Μικρό φίλτρο καφέ εσπρέσο
, Κουτάλι δοσομέτρησης με πώμα
Τεχνικά χαρακτηριστικά
Τάση δικτύου 220 - 240 V ∼ / 50 Hz
Ονομαστική ισχύς 1100 W
Πίεση αντλίας περ. 1,5 MPa (15 bar)
■ 32 │ GR
│
CY
ασφαλές για τρόφιμα
SEM 1100 B3
Η ένδειξη θερμοκρασίας
Η ένδειξη θερμοκρασίας υποδηλώνει μέχρι ποια θερμοκρασία ζεστάθηκε η
συσκευή.
Μόλις ενεργοποιήσετε τη συσκευή, αρχίζει να ζεσταίνεται, έως ότου ο δείκτης
βρεθεί περίπου στο κέντρο μεταξύ 80°C και „ “.
Μόλις ο δείκτης φτάσει στο κόκκινο τμήμα της κλίμακας, η θερμοκρασία είναι αρκετή
για την ετοιμασία ενός εσπρέσο. Η πράσινη λυχνία ελέγχου θέρμανσης ανάβει.
Μόλις πατήσετε το πλήκτρο „Ατμός“
θέρμανσης , η συσκευή συνεχίζει να θερμαίνεται και ο δείκτης ανεβαίνει έως
τον τομέα της κλίμακας μεταξύ „
Όταν ο δείκτης φτάσει στον τομέα μεταξύ „
αρκετά υψηλή ώστε να δημιουργηθεί ατμός. Η πράσινη λυχνία ελέγχου θέρμανσης ανάβει.
“ και „ “.
, σβήνει η πράσινη λυχνία ελέγχου
“ και „ “, η θερμοκρασία είναι
Πρώτη θέση σε λειτουργία
1) Καθαρίστε το φορέα φίλτρου 1, το κουτάλι δοσομέτρησης ,, τα φίλτρα
καφέ εσπρέσο %+, τη σχάρα στραγγίσματος - και το δοχείο νερού
όπως περιγράφεται στο κεφάλαιο „Καθαρισμός και φροντίδα“.
2) Τοποθετήστε τη συσκευή σε μια επίπεδη και θερμανθεκτική βάση. Φροντίστε
ώστε η πρίζα δικτύου να είναι προσβάσιμη.
3) Τοποθετήστε τη σχάρα στραγγίσματος - κατά τέτοιο τρόπο, ώστε ο
κόκκινος πλωτήρας να μπορεί να προεξέχει από την εσοχή ! στη σχάρα
στραγγίσματος -.
4) Τοποθετήστε το φορέα φίλτρου 1 στη συσκευή τοποθετώντας τον στη συσκευή στη σήμανση „INSERT“, που βρίσκεται στα πλάγια δίπλα στην έξοδο
καυτού νερού ., και κατόπιν γυρίστε αριστερόστροφα, έως ότου η λαβή
του φορέα φίλτρου 1 δείχνει προς τα εμπρός.
SEM 1100 B3
GR│CY
│
33 ■
5) Συνδέστε το βύσμα σε μια πρίζα.
6) Πριν από την πρώτη χρήση, ακολουθήστε την εξής διαδικασία για τον
καθαρισμό των εσωτερικών αγωγών:
Αφήστε να περάσει νερό περ. για 5 φλιτζάνια εσπρέσο (περίπου 100 ml)
μέσα από τη συσκευή. Διαβάστε για αυτό το Κεφάλαιο „Χειρισμός“.
7) Αφήστε να δημιουργηθεί ατμός περ. για 30 δευτερόλεπτα. Διαβάστε για
αυτό το Κεφάλαιο „Χειρισμός“.
ΥΠΟΔΕΙΞΗ
► Κατά την πρώτη χρήση, μπορεί να ακούγεται η αντλία που λειτουργεί, να
δημιουργούνται θόρυβοι, αλλά ωστόσο να μην εξέρχεται νερό από τη
συσκευή. Σε αυτή την περίπτωση γυρίστε το ρυθμιστή ατμού στην κατεύθυνση „+“, έτσι ώστε ο αέρας να μπορεί να εκφύγει από τους αγωγούς (το
πλήκτρο „Ατμός“ έχει πατηθεί). Μετά από περίπου 20 δευτερόλεπτα
έχει εκφύγει ο αέρας, οι θόρυβοι εξαφανίζονται και εξέρχεται νερό από τη
συσκευή.
Χειρισμός
ΥΠΟΔΕΙΞΗ
► Τα δύο πλήκτρα „Εσπρέσο“
την πίεση. Εάν πατηθεί εκ νέου το πλήκτρο, αποδεσμεύεται.
Πλήρωση δοχείου νερού
ΥΠΟΔΕΙΞΗ
► Για την παρασκευή καφέ εσπρέσο/καπουτσίνο χρησιμοποιείτε αποκλειστι-
κά καθαρό πόσιμο νερό.
1) Βγάλτε το δοχείο νερού προς τα έξω και γεμίστε με νερό:
Γεμίζετε με νερό τουλάχιστον έως το σύμβολο Min (ελάχιστο).
Ποτέ μη γεμίζετε με περισσότερο νερό, παρά μόνο έως το σύμβολο Max
(μέγιστο).
2) Ωθήστε πάλι το δοχείο νερού στη συσκευή. Προσέξτε ώστε να τοποθετήσετε τον εύκαμπτο σωλήνα μαζί στο δοχείο νερού .
■ 34 │ GR
│
CY
και „Ατμός“ ασφαλίζουν κατά
SEM 1100 B3
Θέρμανση μετά από μεγάλο χρόνο αδράνειας / κατά την
πρώτη θέση σε λειτουργία
Προθερμάνετε τη συσκευή ως ακολούθως, εάν δεν την έχετε χρησιμοποιήσει για
μεγάλο χρονικό διάστημα:
1) Γεμίστε το δοχείο νερού με νερό.
2) Τοποθετήστε το μεγάλο % ή το μικρό φίλτρο καφέ εσπρέσο + στο φορέα
φίλτρου 1.
– Προσέξτε ώστε κατά την τοποθέτηση η μικρή εσοχή στη μεγάλη % ή
μικρή σήτα εσπρέσο + να εδράζεται πάνω από την εσοχή στο φορέα
σήτας 1.
– Κατόπιν γυρίστε λίγο τη μεγάλη % ή τη μικρή σήτα εσπρέσο +, έτσι
ώστε να μην μπορεί να πέσει έξω.
ΥΠΟΔΕΙΞΗ
SEM 1100 B3
► Απομακρύνετε την τοποθετημένη σήτα εσπρέσο %+ μόνο όταν κρυώσει!
► Για να βγάλετε πάλι τη σήτα εσπρέσο %+ έξω από το φορέα σήτας 1,
γυρίστε την τοποθετημένη σήτα εσπρέσο %+ τόσο, έως ότου η εσοχή
στη σήτα εσπρέσο %+ να βρίσκεται πάνω από την εσοχή στο φορέα
σήτας 1. Τώρα μπορείτε να βγάλετε έξω τη σήτα εσπρέσο %+.
GR│CY
│
35 ■
3) Τοποθετήστε το φορέα φίλτρου 1 στη συσκευή τοποθετώντας τον στη συσκευή
στη σήμανση „INSERT“, που βρίσκεται στα πλάγια δίπλα στην έξοδο καυτού
νερού ., και κατόπιν γυρίστε αριστερόστροφα, έως ότου η λαβή του φορέα
φίλτρου 1 δείχνει προς τα εμπρός.
4) Τοποθετήστε ένα φλιτζάνι κάτω από το φορέα φίλτρου 1.
5) Κλείστε με περιστροφή το ρυθμιστή ατμού (έως τον αναστολέα στην
κατεύθυνση „-“).
6) Ενεργοποιήστε τη συσκευή από το διακόπτη on/off .
7) Η κόκκινη λυχνία ελέγχου 0 ανάβει. Μετά από σύντομο χρόνο αρχίζει να
ανεβαίνει ο δείκτης στην ένδειξη θερμοκρασίας .
8) Μόλις ανάψει η πράσινη λυχνία ελέγχου θέρμανσης , πιέστε το πλήκτρο
„Εσπρέσο“
ΥΠΟΔΕΙΞΗ
► Μπορεί στο ενδιάμεσο να πρέπει να αδειάσετε το φλιτζάνι. Για αυτό στα-
ματήστε για λίγο τη διαδικασία, πατώντας το πλήκτρο „Εσπρέσο“
Αδειάστε το φλιτζάνι και πιέστε ξανά το πλήκτρο „Εσπρέσο“ , ώστε
το νερό να τρέχει μέσα από τη συσκευή.
9) Μετά από περ. 1 λεπτό σταματήστε την αντλία πατώντας άλλη μια φορά το
πλήκτρο „Εσπρέσο“
10) Περιμένετε έως ότου ανάψει πάλι η πράσινη λυχνία ελέγχου θέρμανσης Η
θέρμανση έχει ολοκληρωθεί. Τώρα μπορείτε να προετοιμάσετε καφέ εσπρέσο.
. Αφήστε το νερό να περάσει για περ. 1 λεπτό.
.
Ζέσταμα πριν από κάθε χρήση
Προτού ετοιμάσετε καφέ εσπρέσο ή καπουτσίνο, η συσκευή πρέπει να ζεσταθεί.
1) Ενεργοποιήστε τη συσκευή από το διακόπτη on/off . Η κόκκινη λυχνία
ελέγχου 0 ανάβει. Τα δύο πλήκτρα „Εσπρέσο“
δεν επιτρέπεται να πατηθούν. Βεβαιωθείτε ότι ο ρυθμιστής ατμού έχει
περιστραφεί έως τον αναστολέα „-“.
2) Τοποθετήστε το φορέα φίλτρου 1 στη συσκευή τοποθετώντας τον στη συσκευή στη σήμανση „INSERT“, που βρίσκεται στα πλάγια δίπλα στην έξοδο
καυτού νερού ., και κατόπιν γυρίστε αριστερόστροφα, έως ότου η λαβή
του φορέα φίλτρου 1 δείχνει προς τα εμπρός.
3) Πατήστε το πλήκτρο „Εσπρέσο“
από το δοχείο νερού . Μόλις εξέλθει νερό από τα ανοίγματα του φορέα
φίλτρου, πατήστε το πλήκτρο „Εσπρέσο“ άλλη μια φορά, έτσι ώστε
να σταματήσει η αντλία.
4) Περιμένετε έως ότου ανάψει η πράσινη λυχνία ελέγχου θέρμανσης
5) Πατήστε εκ νέου το πλήκτρο „Εσπρέσο“
νερό για 20 δευτερόλεπτα, προτού σταματήσετε πάλι την αντλία.
Η προθέρμανση έχει τώρα ολοκληρωθεί. Τώρα μπορείτε να ετοιμάσετε καφέ
εσπρέσο/καπουτσίνο.
.
και „Ατμός“
, ώστε η συσκευή να τραβήξει νερό
και αφήστε να εξέλθει καυτό
■ 36 │ GR
│
CY
SEM 1100 B3

Προετοιμασία καφέ εσπρέσο
ΥΠΟΔΕΙΞΗ
► Εξασφαλίζετε πάντα ότι το φίλτρο καφέ εσπρέσο %+ είναι καθαρό και
δεν έχει υπολείμματα από σκόνη καφέ εσπρέσο.
1) Όταν έχει ζεσταθεί η συσκευή:
Για να προετοιμάσετε έναν καφέ εσπρέσο, τοποθετήστε το μικρό φίλτρο καφέ
εσπρέσο + στο φορέα φίλτρου 1.
Για να προετοιμάσετε δύο εσπρέσο, τοποθετήστε το μεγάλο φίλτρο καφέ
εσπρέσο % στο φορέα φίλτρου 1.
2) Γεμίστε το μικρό φίλτρο καφέ εσπρέσο + έως το σύμβολο Max με σκόνη
καφέ εσπρέσο. Αυτό αντιστοιχεί περ σε 7 γρ. σκόνη ή σε ένα κοφτό κουτάλι
δοσομέτρησης ,.
Η...
Γεμίστε το μεγάλο φίλτρο καφέ εσπρέσο % έως το σύμβολο Max με σκόνη
καφέ εσπρέσο. Αυτό αντιστοιχεί περ σε 7 γρ. + 7 γρ. σκόνη ή σε δύο κοφτά
κουτάλια δοσομέτρησης ,.
3) Συμπιέστε τη σκόνη του καφέ εσπρέσο με τη βοήθεια του εξαρτήματος ώθησης
στο κουτάλι δοσομέτρησης ,. Στη συνέχεια γεμίστε, εάν απαιτείται, και με
άλλη σκόνη καφέ εσπρέσο, έως ότου το φίλτρο εσπρέσο %+ γεμίσει έως
το σύμβολο Max. Συμπιέστε στη συνέχεια εκ νέου τη σκόνη καφέ εσπρέσο.
ΥΠΟΔΕΙΞΗ
► Η συμπίεση της σκόνης εσπρέσο είναι μια σημαντική διαδικασία κατά
την προετοιμασία ενός καφέ εσπρέσο. Εάν η σκόνη καφέ εσπρέσο πιεστεί
πάρα πολύ, τότε ο καφές εσπρέσο τρέχει αργά και δίνει περισσότερη κρέμα. Εάν η σκόνη εσπρέσο δεν συμπιεστεί τόσο δυνατά, ο εσπρέσο τρέχει
γρήγορα και δημιουργείται μόνο λίγη κρέμα.
4) Εγκαταστήστε το φορέα φίλτρου 1 στη συσκευή τοποθετώντας τον στη
συσκευή στη σήμανση „INSERT“ και κατόπιν περιστρέψτε αριστερόστροφα,
έως ότου η λαβή του φορέα φίλτρου 1 δείχνει προς τα εμπρός.
5) Τοποθετήστε ένα (ή δύο) φλιτζάνι(α) κάτω από τα ανοίγματα φορέα φίλτρου.
Προτείνουμε να ξεπλύνετε προηγουμένως τα φλιτζάνια με καυτό νερό, ώστε
ο εσπρέσο να μην κρυώσει τόσο γρήγορα. Μπορείτε να αποθέσετε τα φλιτζάνια για τη φύλαξή τους στην επιφάνεια τοποθέτησης .
6) Όταν ανάψει η πράσινη λυχνία ελέγχου θέρμανσης , μπορείτε να πατήσετε
το πλήκτρο „Εσπρέσο“
φλιτζάνι(α).
προς τα κάτω. Ο εσπρέσο τρέχει στο(στα)
ΠΡΟΕΙΔΟΠΟΙΗΣΗ
Ποτέ μην απομακρύνετε το φορέα φίλτρου 1 κατά την έξοδο
του καφέ εσπρέσο!
Τα πιτσιλίσματα του καυτού εσπρέσο προκαλούν τραυματισμούς!
SEM 1100 B3
► Εξασφαλίζετε πάντα ότι το πλήκτρο „Εσπρέσο“
κάτω, προτού απομακρύνετε το φορέα φίλτρου 1.
δεν έχει πατηθεί
GR│CY
│
37 ■

7) Όταν το(τα) φλιτζάνι(-ια) γεμίσει(-ουν) έως την επιθυμητή ποσότητα (περ.
20 ml σε κάθε φλιτζάνι), πατήστε ξανά το πλήκτρο „Εσπρέσο“
ώστε να μην αντλείται άλλο νερό.
Τώρα μπορείτε να πιείτε τον καφέ εσπρέσο.
8) Απενεργοποιήστε τη συσκευή από το διακόπτη on/off .
ΥΠΟΔΕΙΞΗ
► Μετά από 30 λεπτά η συσκευή απενεργοποιείται αυτόματα, εάν δεν πατη-
θεί κανένα πλήκτρο.
9) Απομακρύνετε μετά από κάθε χρήση τη σκόνη εσπρέσο από το φίλτρο
εσπρέσο %+. Απομακρύνετε το φορέα φίλτρου 1 από τη συσκευή. Σηκώστε επάνω τη διάταξη μπλοκαρίσματος του φίλτρου 6 έτσι ώστε το φίλτρο
καφέ εσπρέσο %+ να μην μπορεί να πέσει έξω από το φορέα φίλτρου 1.
Αδειάστε τώρα το φίλτρο καφέ εσπρέσο %+ γυρίζοντας από την άλλη
το φορέα φίλτρου 1 με μπλοκαρισμένο φίλτρο καφέ εσπρέσο %+ και
χτυπώντας τη σκόνη καφέ εσπρέσο για να πέσει έξω. Απορρίπτετε τη σκόνη
καφέ εσπρέσο πάντα με φιλικό προς το περιβάλλον τρόπο, για παράδειγμα
στα βιολογικά απορρίμματα.
ΥΠΟΔΕΙΞΗ
► Καθαρίζετε απαραίτητα την έξοδο καυτού νερού . (από αυτήν εξέρχεται
το καυτό νερό) μετά από κάθε χρήση. Διαβάστε σχετικά το Κεφάλαιο
„Καθαρισμός και φροντίδα“.
ΥΠΟΔΕΙΞΗ
► Αδειάζετε τακτικά την υποδοχή συλλογής σταγόνων 3, το αργότερο
ωστόσο όταν ο κόκκινος πλωτήρας φαίνεται στην εσοχή ! της σχάρας
σταξίματος -.
, έτσι
Προετοιμασία καπουτσίνο
ΠΡΟΕΙΔΟΠΟΙΗΣΗ
Να είστε προσεκτικοί κατά την αντιμετώπιση του ατμού όταν
φτιάχνετε αφρόγαλα!
Ο καυτός ατμός ή οι καυτές πιτσιλιές οδηγούν σε τραυματισμούς!
► Χειρίζεστε το ρυθμιστή ατμού πάντα αργά.
1) Γεμίστε ένα δοχείο για αφρόγαλα (κατά προτίμηση από ανοξείδωτο ατσάλι)
έως το ένα τρίτο με κρύο γάλα.
2) Βεβαιωθείτε ότι ο ρυθμιστής ατμού έχει κλείσει (περιστρέψτε έως τον
αναστολέα στην κατεύθυνση „-“).
3) Ωθήστε τη διάταξη για αφρόγαλα στα πλάγια προς τα έξω. Πιάνετέ την
μόνο από τη λαβή .
■ 38 │ GR
│
CY
SEM 1100 B3

4) Πατήστε κάτω το πλήκτρο „Ατμός“ . Περιμένετε έως ότου ανάψει η
πράσινη λυχνία ελέγχου θέρμανσης
5) Κρατήστε ένα άδειο δοχείο κάτω από τη διάταξη για αφρόγαλα .
Περιστρέψτε αργά το ρυθμιστή ατμού προς την κατεύθυνση „+“. Από
το ακροφύσιο εξέρχονται συμπυκνωμένο νερό/πιτσιλιές. Έτσι καθαρίζεται
το ακροφύσιο και το κύκλωμα νερού στο εσωτερικό της συσκευής.
6) Περιμένετε 15 δευτερόλεπτα και περιστρέψτε κατόπιν το ρυθμιστή ατμού
στην κατεύθυνση „-“, έως ότου δεν περνάει άλλος ατμός από το ακροφύσιο. Πετάξτε το νερό από το δοχείο.
7) Κρατήστε τώρα το δοχείο για το αφρόγαλα στο χέρι, ώστε να αισθανθείτε
τη θερμοκρασία του γάλακτος, και οδηγήστε το ακροφύσιο της διάταξης
για το αφρόγαλα ελαφρώς μέσα στο γάλα. Κρατήστε το δοχείο για το
αφρόγαλα λίγο λοξά.
8) Περιστρέψτε αργά το ρυθμιστή ατμού προς την κατεύθυνση „+“.
9) Μετακινήστε το δοχείο για το αφρόγαλα κυκλικά κρατώντας παράλληλα
την άκρη του ακροφυσίου λίγο κάτω από την επιφάνεια γάλακτος: τόσο
βαθιά, ώστε το γάλα να μην πιτσιλάει προς όλες τις κατευθύνσεις, και τόσο
ψηλά, ώστε να δημιουργείται ένας παχύς αφρός. Εάν αυτή η εργασία γίνεται
σωστά, ακούγεται ένας βαθύς θόρυβος γουργουρίσματος.
10) Όταν ανεβαίνει ο αφρός γάλακτος, οδηγήστε το ακροφύσιο πιο βαθιά,
ώστε να δημιουργήσετε αφρό στην επόμενη „στρώση“ και να αποφύγετε
κάψιμο του αφρού.
11) Τέλος βυθίστε το ακροφύσιο πλήρως και περιστρέψτε το ρυθμιστή ατμού
σχεδόν έως το ήμισυ, ώστε να ζεσταθεί το γάλα. Κρατήστε το δοχείο για
αφρόγαλα λίγο λοξά, έτσι ώστε το γάλα να στροβιλίζεται αργά, ενώ ανακατεύεται με το ακροφύσιο.
12) Όταν ο αφρός γάλακτος έχει την επιθυμητή πυκνότητα και θερμοκρασία,
κλείστε το ρυθμιστή ατμού (περιστρέψτε έως τον αναστολέα στην κατεύθυνση „-“).
13) Μόνο μετά τραβήξτε το ακροφύσιο από το γάλα.
14) Πατήστε το πλήκτρο „Ατμός“
.
ΥΠΟΔΕΙΞΗ
15) Για την προετοιμασία του καπουτσίνο ακολουθήστε την ίδια διαδικασία σαν να
16) Απενεργοποιήστε τη συσκευή από το διακόπτη on/off .
SEM 1100 B3
► Για την προετοιμασία καπουτσίνο χρησιμοποιείτε πάντα μεγαλύτερα φλι-
τζάνια από ότι για εσπρέσο, διότι προστίθεται και γάλα.
επρόκειτο να προετοιμάσετε έναν εσπρέσο (βλέπε Κεφάλαιο „Προετοιμασία
εσπρέσο“/το ζέσταμα δεν είναι πλέον απαραίτητο). Αφήστε ωστόσο το νερό
να τρέξει περ. δύο φορές περισσότερο από ότι στον εσπρέσο (περ. 40 ml).
GR│CY
│
39 ■

ΥΠΟΔΕΙΞΗ
► Μετά από 30 λεπτά η συσκευή απενεργοποιείται αυτόματα, εάν δεν πατη-
θεί κανένα πλήκτρο.
17) Βάλτε τώρα το αφρόγαλα στον προετοιμασμένο εσπρέσο. Ο καπουτσίνο
είναι τώρα έτοιμος. Μπορείτε να βάλετε όση ζάχαρη θέλετε ή να πασπαλίσετε σκόνη κακάο.
ΥΠΟΔΕΙΞΗ
► Καθαρίζετε τη διάταξη για αφρόγαλα απαραίτητα μετά από κάθε χρήση.
Διαβάστε σχετικά το Κεφάλαιο „Καθαρισμός και φροντίδα“.
Υποδείξεις για το αφρόγαλα
■ Κάθε είδος γάλακτος μπορεί να γίνει κατά βάση αφρόγαλα, ακόμα και
το γάλα σόγιας και ρυζιού. Ορισμένα είδη γάλακτος μπορούν να γίνουν
ωστόσο αφρόγαλα μόνο υπό περιορισμούς.
■ Το αποβουτυρωμένο (άπαχο γάλα) δεν καίγεται τόσο εύκολα όπως το πλήρες
γάλα, σε πολύ μικρές ποσότητες λίπους υπάρχει ωστόσο ο κίνδυνος το
γάλα να μη γίνει σωστό αφρόγαλα. Για το λόγο αυτό χρησιμοποιείτε το
δυνατόν γάλα με αναλογία λίπους 3,5% ή 1,5%.
■ Το γάλα που έχει κρυώσει καλά μπορεί να γίνει καλύτερο αφρόγαλα από ότι
το γάλα που δεν είναι τόσο κρύο. Επιτυγχάνετε τα καλύτερα αποτελέσματα
σε μια θερμοκρασία περ. 7°C.
■ Μην χτυπάτε το γάλα δεύτερη φορά, διότι αλλιώς καίγεται.
■ Αφήστε το αφρόγαλα να κάτσει για περ. 30 δευτερόλεπτα, προτού βάλετε
τον αφρό στον εσπρέσο. Έτσι σπάνε οι μεγάλες φυσαλίδες και το ακόμα
υγρό γάλα πέφτει προς τα κάτω. Στη συνέχεια μπορείτε να βάλετε τον απαλό
αφρό επάνω στον εσπρέσο.
Καθαρισμός και φροντίδα
ΠΡΟΕΙΔΟΠΟΙΗΣΗ - ΚΙΝΔΥΝΟΣ ΤΡΑΥΜΑΤΙΣΜΟΥ!
■ Αποσυνδέετε πάντα το βύσμα από την πρίζα, προτού καθαρίσετε τη συ-
σκευή. Κίνδυνος ηλεκτροπληξίας!
■ Αφήνετε πάντα τη συσκευή να κρυώνει, προτού την καθαρίσετε. Κίνδυνος
εγκαύματος!
■ Ποτέ μη βυθίζετε τη συσκευή σε νερό ή σε άλλα υγρά. Κίνδυνος ηλεκτροπληξίας!
■ 40 │ GR
│
CY
SEM 1100 B3

Καθαρισμός διάταξης για το αφρόγαλα
ΠΡΟΣΟΧΗ - ΥΛΙΚΕΣ ΖΗΜΙΕΣ
■ Ποτέ μη χρησιμοποιείτε τριβικά, επιθετικά ή χημικά καθαριστικά μέσα για τον
καθαρισμό της συσκευής
. Αυτά προσβάλλουν την επιφάνεια της συσκευής.
1) Τοποθετήστε ένα άδειο δοχείο κάτω από τη διάταξη για αφρόγαλα
2) Στρέψτε το ρυθμιστή ατμού
για ορισμένα δευτερόλεπτα να εκφύγει ο ατμός.
3) Κλείστε το ρυθμιστή ατμού
θυνση „-“), απενεργοποιήστε τη συσκευή και τραβήξτε το βύσμα δικτύου.
4) Αφήστε το ακροφύσιο να κρυώσει
5) Αφαιρέστε το κάλυμμα της διάταξης για αφρόγαλα (Εικόνα 1) και καθαρίστε το προσεκτικά στο ζεστό νερό.
6) Σκουπίστε το ακροφύσιο, το οποίο βρίσκεται κάτω από το κάλυμμα, με ένα
νωπό πανί
Ωστόσο, μετά από τον καθαρισμό με απορρυπαντικό, σκουπίζετε με ένα
βρεγμένο με καθαρό νερό πανί
απορρυπαντικού στο ακροφύσιο.
7) Ωθήστε πάλι το κάλυμμα στο ακροφύσιο (Εικόνα 1)
. Εάν απαιτείται, προσθέτετε λίγο ήπιο απορρυπαντικό στο πανί.
κατευθείαν μετά τη χρήση στο „+“ και αφήστε
(στρέψτε έως τον αναστολέα προς την κατεύ-
.
. Βεβαιωθείτε ότι δεν υπάρχουν υπολείμματα
.
.
Εικόνα 1
SEM 1100 B3
GR│CY
│
41 ■

Καθαρισμός της διάταξης καυτού νερού
Καθαρίζετε την έξοδο καυτού νερού . μετά από κάθε χρήση:
1) Αφού ετοιμάσετε τον εσπρέσο/καπουτσίνο και αφαιρέσετε το φορέα φίλτρου 1,
σκουπίστε ολόκληρη την επιφάνεια της εξόδου καυτού νερού . με ένα νωπό
πανί, έτσι ώστε να απομακρυνθούν όλα τα υπολείμματα σκόνης καφέ.
2) Τοποθετήστε πάλι το φορέα φίλτρου 1 χωρίς τοποθετημένα τα φίλτρα καφέ
εσπρέσο %+.
3) Κατόπιν, τοποθετήστε ένα άδειο φλιτζάνι κάτω από το φορέα φίλτρου 1 και
πιέστε κάτω το πλήκτρο „Εσπρέσο“
νερό από την έξοδο καυτού νερού ., το οποίο ξεπλένει τα τελευταία υπολείμματα σκόνης.
4) Μετά από περ. 20 δευτερόλεπτα πατήστε ξανά το πλήκτρο „Εσπρέσο“
και απενεργοποιήστε τη συσκευή από το διακόπτη on/off .
5) Αφαιρέστε πάλι το φορέα φίλτρου 1.
, ώστε να κουμπώσει. Εξέρχεται
Καθαρισμός εξαρτημάτων
1) Καθαρίζετε το φορέα φίλτρου 1, τα δύο φίλτρα καφέ εσπρέσο %+, το
δοχείο νερού , το κουτάλι δοσομέτρησης , και τη σχάρα σταξίματος σε ζεστό νερό.
ΥΠΟΔΕΙΞΗ
► Εάν προσθέσετε απορρυπαντικό στο νερό, μπορεί να επηρεαστεί η γεύση
του καφέ εσπρέσο. Στην περίπτωση που οι ακαθαρσίες απομακρύνονται
μόνο με απορρυπαντικό, ξεπλένετε στη συνέχεια τα εξαρτήματα πάντα με
πολύ καθαρό νερό.
2) Στεγνώνετε όλα τα εξαρτήματα.
3) Η υποδοχή συλλογής σταγόνων 3 ενδείκνυται για καθαρισμό στο πλυντήριο
πιάτων. Ωστόσο, πριν τον καθαρισμό στο πλυντήριο πιάτων, απομακρύνετε
τον κόκκινο πλωτήρα από την υποδοχή συλλογής σταγόνων 3:
– Για αυτό, απομακρύνετε τους τοποθετημένους αναστολείς στις δύο
ράβδους συγκράτησης στα πλάγια του πλωτήρα.
– Τραβήξτε τον πλωτήρα από τις ράβδους συγκράτησης.
– Καθαρίστε τον πλωτήρα και τους αναστολείς σε ζεστό νερό.
– Μετά τον καθαρισμό της υποδοχής συλλογής σταγόνων 3, ωθήστε
τον καθαρό πλωτήρα πάλι στις ράβδους συγκράτησης και εισάγετε
τους αναστολείς.
Καθαρισμός συσκευής
Καθαρίζετε τη συσκευή με ένα νωπό πανί. Εάν απαιτείται, προσθέτετε λίγο απορρυπαντικό στο πανί.
Βεβαιωθείτε ότι η συσκευή έχει στεγνώσει πλήρως πριν από την επόμενη χρήση.
■ 42 │ GR
│
CY
SEM 1100 B3

Αφαίρεση αλάτων από τη συσκευή
Απομακρύνετε τα άλατα από τη συσκευή τακτικά. Μετά από περ. 1 - 2 μήνες
(περ. σε 4 παρασκευές καφέ εσπρέσο την ημέρα) πρέπει να αφαιρούνται τα άλατα από τη συσκευή. Ανάλογα με το βαθμό σκληρότητας του νερού στην περιοχή
σας, αυτή η τιμή μπορεί να αποκλίνει.
Για την απομάκρυνση των αλάτων χρησιμοποιείτε τα προϊόντα του εμπορίου για
μηχανές εσπρέσο. Ακολουθείτε τις διαδικασίες που περιγράφονται στις οδηγίες
χρήσης του προϊόντος αφαίρεσης αλάτων.
Εάν δεν έχετε τέτοιο προϊόν, μπορείτε εναλλακτικά να ακολουθήσετε την εξής
διαδικασία με κιτρικό οξύ:
1) Γεμίστε το δοχείο νερού έως το σύμβολο Max.
2) Διαλύστε εκεί μέσα 2 κουτάλια (περ. 30 γρ.) κιτρικό οξύ (διατίθεται σε
φαρμακεία).
3) Τοποθετήστε το δοχείο νερού στη συσκευή.
4) Ενεργοποιήστε τη συσκευή από το διακόπτη on/off . Ο ρυθμιστής ατμού
είναι κλειστός.
5) Τοποθετήστε το φορέα φίλτρου 1 χωρίς φίλτρο καφέ εσπρέσο %+ μέσα
στη συσκευή και τοποθετήστε ένα φλιτζάνι κάτω από το φορέα φίλτρου 1.
6) Μόλις ανάψει η πράσινη λυχνία ελέγχου θέρμανσης , πιέστε κάτω το
πλήκτρο „Εσπρέσο“
7) Αφήστε να τρέξουν περ. 2 φλιτζάνια (περ. 250 ml) νερό και κατόπιν σταματήστε τη διαδικασία πιέζοντας ξανά το πλήκτρο „Εσπρέσο“ .
8) Κρατήστε ένα δοχείο κάτω από τη διάταξη για αφρόγαλα .
9) Πιέστε κάτω το πλήκτρο „Ατμός“
μένετε, έως ότου ανάψει η πράσινη λυχνία ελέγχου θέρμανσης . Γυρίστε
αργά το ρυθμιστή ατμού στο „+“. Αφήστε τη συσκευή να δημιουργήσει
ατμό για περ. 2 λεπτά.
10) Μετά από 2 λεπτά περιστρέψτε το ρυθμιστή ατμού για να κλείσει, πιέστε εκ
νέου το πλήκτρο „Ατμός“
11) Αφήστε το προϊόν αφαίρεσης αλάτων να δράσει για περ. 15 λεπτά.
12) Επαναλάβετε τα βήματα 6 - 11 τρεις φορές.
13) Κατόπιν, πατήστε κάτω το πλήκτρο „Εσπρέσο“
και αφήστε το νερό να τρέξει, έως ότου αδειάσει το δοχείο νερού .
14) Ξεπλύνετε το δοχείο νερού με καθαρό νερό και γεμίστε με καθαρό νερό
έως το σύμβολο Max.
15) Πιέστε κάτω το πλήκτρο „Εσπρέσο“ , έτσι ώστε να ασφαλίσει, μόλις
ανάψει η πράσινη λυχνία ελέγχου θέρμανσης .
16) Αφήστε το νερό να τρέξει.
17) Επαναλάβετε τα βήματα 14 - 16 τρεις φορές.
18) Γεμίστε ξανά το δοχείο νερού με νερό.
, έτσι ώστε να ασφαλίσει.
, έτσι ώστε να ασφαλίσει, και περι-
, έτσι ώστε να μην παράγεται πλέον ατμός.
, ώστε να ασφαλίσει,
SEM 1100 B3
GR│CY
│
43 ■

19) Πιέστε το πλήκτρο „Ατμός“ , έτσι ώστε να ασφαλίσει.
20) Κρατήστε ένα δοχείο κάτω από τη διάταξη για αφρόγαλα και στρέψτε
αργά το ρυθμιστή ατμού στο „+“ , μόλις ανάψει η πράσινη λυχνία
ελέγχου θέρμανσης .
21) Μετά από περ. 1 λεπτό περιστρέψτε το ρυθμιστή ατμού για να κλείσει
(περιστρέψτε έως τον αναστολέα στην κατεύθυνση „-“), πατήστε εκ νέου το
πλήκτρο „Ατμός“
ΥΠΟΔΕΙΞΗ
► Μετά από 30 λεπτά η συσκευή απενεργοποιείται αυτόματα, εάν δεν
πατηθεί κανένα πλήκτρο.
και απενεργοποιήστε τη συσκευή.
Διόρθωση σφαλμάτων
Βλάβη Αιτία
• Η σκόνη εσπρέσο είναι πολύ
υγρή και/ή έχει πιεστεί πολύ.
Ο καφές εσπρέσο δεν
τρέχει πλέον έξω.
Ο καφές εσπρέσο τρέχει πάνω από τα άκρα
του φορέα φίλτρου 1
αντί από τα ανοίγματα.
Ο καφές εσπρέσο είναι
κρύος.
• Δεν υπάρχει νερό στο δοχείο
νερού .
• Οι οπές των ανοιγμάτων φορέα
φίλτρου έχουν φράξει.
• Ο φορέας φίλτρου 1 δεν έχει
τοποθετηθεί σωστά.
• Τα ανοίγματα φορέα φίλτρου
έχουν φράξει.
• Υπάρχουν υπολείμματα
σκόνης εσπρέσο στα άκρα του
φορέα φίλτρου 1.
• Δεν έγινε προθέρμανση της
συσκευής.
• Η πράσινη λυχνία ελέγχου
θέρμανσης δεν έχει ανάψει
ακόμα.
• Τα φλιτζάνια δεν έχουν
προθερμανθεί.
Διορθωτική
ενέργεια
• Ετοιμάστε νέο εσπρέσο,
μην πιέσετε όμως πολύ
δυνατά τη σκόνη εσπρέσο ή βάλτε νέο καφέ.
• Γεμίστε με νερό το δοχείο
νερού .
• Καθαρίστε το φορέα
φίλτρου 1.
• Τοποθετήστε το φορέα
φίλτρου 1 σωστά.
• Καθαρίστε το φορέα
φίλτρου 1.
• Απελευθερώστε τα άκρα
του φορέα φίλτρου 1
από υπολείμματα σκόνης
εσπρέσο.
• Προθερμάνετε τη
συσκευή.
• Περιμένετε, έως ότου
ανάψει η πράσινη λυχνία
ελέγχου θέρμανσης
• Προθερμάνετε τα
φλιτζάνια.
■ 44 │ GR
│
CY
SEM 1100 B3
Βλάβη Αιτία
Θορυβώδης λειτουργία
της αντλίας.
Η κρέμα είναι πολύ
ανοιχτόχρωμη (ο καφές
τρέχει γρήγορα από το
φορέα φίλτρου 1).
Η κρέμα είναι πολύ
σκουρόχρωμη (ο καφές
τρέχει αργά από το
φορέα φίλτρου 1).
Το γάλα δεν αφρίζει.
• Το δοχείο νερού είναι άδειο.
• Πολύ λίγη σκόνη εσπρέσο.
• Η σκόνη εσπρέσο είναι πολύ
χονδρά αλεσμένη.
• Πολύ σκόνη καφέ εσπρέσο.
• Η σκόνη έχει πολύ λεπτό άλεσμα ή είναι νωπή.
• Το φίλτρο έχει φράξει. • Καθαρίστε το φίλτρο.
• Το γάλα δεν είναι αρκετά κρύο.
• Η διάταξη για αφρόγαλα
έχει ακαθαρσίες.
Απόρριψη
Απόρριψη συσκευής
Σε καμία περίπτωση μην απορρίπτετε τη συσκευή στα οικιακά
απορρίμματα.
Αυτό το προϊόν υπόκειται στην Ευρωπαϊκή Οδηγία 2012/19/EU-
WEEE (Waste Electrical and Electronic Equipment - Απόρριψη
ηλεκτρικών και ηλεκτρονικών συσκευών).
Απορρίπτετε τη συσκευή μέσω μιας εγκεκριμένης επιχείρησης απόρριψης ή μέσω
της κοινοτικής επιχείρησης απόρριψης. Τηρείτε τις ισχύουσες προδιαγραφές.
Σε περίπτωση αμφιβολιών επικοινωνείτε με την αρμόδια επιχείρηση απόρριψης.
Διορθωτική
ενέργεια
• Γεμίστε με νερό το δοχείο
νερού .
• Χρησιμοποιήστε περισσότερη σκόνη εσπρέσο.
• Χρησιμοποιείτε μόνο
ειδικά για καφέ εσπρέσο
παρασκευασμένη σκόνη.
• Χρησιμοποιήστε λιγότερη
σκόνη εσπρέσο.
• Χρησιμοποιείτε μόνο
ειδικά για καφέ εσπρέσο
παρασκευασμένη σκόνη.
• Χρησιμοποιήστε γάλα
από το ψυγείο.
• Καθαρίστε τη διάταξη
για το αφρόγαλα .
SEM 1100 B3
GR│CY
│
45 ■

Εγγύηση της Kompernass Handels GmbH
Αξιότιμη πελάτισσα, αξιότιμε πελάτη,
Η παρούσα συσκευή διαθέτει 3 χρόνια εγγύηση από την ημερομηνία αγοράς.
Στην περίπτωση ελλείψεων στο προϊόν έχετε νομικά δικαιώματα έναντι του πωλητή
του προϊόντος. Αυτά τα νομικά δικαιώματα δεν περιορίζονται μέσω της κατωτέρω
αναφερόμενης εγγύησης.
Προϋποθέσεις εγγύησης
Η περίοδος εγγύησης ξεκινάει κατά την ημερομηνία αγοράς. Φυλάξτε καλά την
πρωτότυπη απόδειξη ταμείου. Αυτό το έγγραφο απαιτείται ως απόδειξη για την
αγορά.
Εάν, εντός τριών ετών από την ημερομηνία αγοράς, προκύψει στο προϊόν αυτό
σφάλμα υλικού ή κατασκευής, κατόπιν κρίσης μας, επισκευάζουμε ή αντικαθιστούμε
το προϊόν για εσάς δωρεάν. Η παρούσα εγγύηση προϋποθέτει ότι εντός της
περιόδου τριών ετών η ελαττωματική συσκευή και η απόδειξη αγοράς (απόδειξη
ταμείου) θα υποβληθούν μαζί με σύντομη περιγραφή σχετικά με το που βρίσκεται
η έλλειψη και πότε προέκυψε.
Εάν το ελάττωμα καλύπτεται από την εγγύησή μας, θα λάβετε το επισκευασμένο
ή ένα νέο προϊόν.
Περίοδος εγγύησης και νομικές απαιτήσεις λόγω ελλείψεων
Ο χρόνος εγγύησης δεν παρατείνεται μέσω της παροχής εγγύησης. Αυτό ισχύει
και για εξαρτήματα, τα οποία έχουν αντικατασταθεί και επισκευαστεί. Ενδεχόμενες
ήδη υπάρχουσες ζημιές και ελλείψεις κατά την αγορά πρέπει να γνωστοποιούνται
αμέσως μετά την αποσυσκευασία. Μετά τη λήξη του χρόνου εγγύησης, τυχόν
εμφανιζόμενες επισκευές χρεώνονται.
Εύρος εγγύησης
Η συσκευή κατασκευάστηκε σύμφωνα με αυστηρές οδηγίες ποιότητας και ελέγχθηκε
προσεκτικά πριν από την αποστολή.
Η απόδοση εγγύησης ισχύει για σφάλματα υλικού ή κατασκευής. Η παρούσα
εγγύηση δεν εκτείνεται σε τμήματα του προϊόντος, τα οποία εκτίθενται σε φυσιολογική φθορά και έτσι μπορεί να θεωρούνται εξαρτήματα φθοράς ή για ζημιές
σε εύθραυστα εξαρτήματα, π.χ. διακόπτες, συσσωρευτές, ταψιά ή εξαρτήματα
που είναι κατασκευασμένα από γυαλί.
Η παρούσα εγγύηση ακυρώνεται εάν προκληθεί ζημιά στο προϊόν, εάν δεν
γίνεται σωστή χρήση ή συντήρηση. Για μια σωστή χρήση του προϊόντος πρέπει
να τηρούνται επακριβώς οι αναφερόμενες υποδείξεις στις οδηγίες χειρισμού.
Σκοποί χρήσης και χειρισμοί που δεν συνιστώνται ή για τους οποίους υπάρχει
προειδοποίηση πρέπει απαραίτητα να αποφεύγονται.
Το προϊόν προορίζεται μόνο για ιδιωτική και όχι για επαγγελματική χρήση.
Σε περίπτωση κακής μεταχείρισης και ακατάλληλης χρήσης, χρήσης βίας και
παρεμβάσεων, οι οποίες δεν διεξήχθησαν από το εξουσιοδοτημένο μας τμήμα
σέρβις, η εγγύηση παύει να ισχύει.
■ 46 │ GR
│
CY
SEM 1100 B3
Διαδικασία σε περίπτωση εγγύησης
Για την εξασφάλιση γρήγορης επεξεργασίας του ζητήματός σας, τηρείτε τις ακόλουθες υποδείξεις:
■ Για όλες τις ερωτήσεις έχετε έτοιμη την απόδειξη αγοράς και τον κωδικό προ-
ϊόντος (π.χ. ΙΑΝ 12345) ως απόδειξη για την αγορά.
■ Μπορείτε να βρείτε τον κωδικό προϊόντος στην πινακίδα τύπου, χαραγμένο,
στην πρώτη σελίδα των οδηγιών σας (κάτω αριστερά) ή σε αυτοκόλλητο
στην πίσω ή κάτω πλευρά.
■ Εάν προκύψουν σφάλματα λειτουργίας ή άλλες ελλείψεις, επικοινωνήστε
κατ’ αρχήν με το ακόλουθο αναφερόμενο τμήμα σέρβις τηλεφωνικά ή με
E-Mail.
■ Ένα προϊόν που θεωρείται ελαττωματικό μπορείτε να το αποστείλετε ατελώς
στην αναφερόμενη διεύθυνση του σέρβις επισυνάπτοντας την απόδειξη
αγοράς (απόδειξη ταμείου) και αναφέροντας που βρίσκεται η έλλειψη και
πότε εμφανίστηκε.
Στην ιστοσελίδα www.lidl-service.com μπορείτε να κατεβάσετε το παρόν και
πολλά άλλα εγχειρίδια, βίντεο προϊόντων και λογισμικό.
Σέρβις
Σέρβις Ελλάδα
Tel.: 801 5000 019 (0,03 EUR/Min.)
E-Mail: kompernass@lidl.gr
CY
Σέρβις Κύπρος
Tel.: 8009 4409
E-Mail: kompernass@lidl.com.cy
IAN 282260
Εισαγωγέας
Η ακόλουθη διεύθυνση δεν είναι διεύθυνση σέρβις. Επικοινωνήστε, κατ’ αρχήν,
με την αναφερόμενη υπηρεσία σέρβις.
KOMPERNASS HANDELS GMBH
BURGSTRASSE 21
44867 BOCHUM
GERMANY
www.kompernass.com
SEM 1100 B3
GR│CY
│
47 ■

■ 48 │ GR
│
CY
SEM 1100 B3

Inhaltsverzeichnis
Einführung ...............................................50
Urheberrecht. . . . . . . . . . . . . . . . . . . . . . . . . . . . . . . . . . . . . . . . . . . . . . . . . . . . . . .50
Haftungsbeschränkung ...............................................50
Warnhinweise ......................................................50
Bestimmungsgemäße Verwendung .....................................51
Lieferumfang / Transportinspektion .....................................52
Entsorgung der Verpackung ...........................................52
Sicherheitshinweise .......................................53
Geräteelemente ..........................................56
Technische Daten .........................................56
Die Temperaturanzeige ....................................57
Erste Inbetriebnahme ......................................57
Bedienung ...............................................58
Wassertank befüllen .................................................58
Aufheizen nach längerer Standzeit / bei erster Inbetriebnahme ................59
Aufheizen vor jedem Gebrauch ........................................60
Espresso zubereiten .................................................61
Cappuccino zubereiten ..............................................62
Tipps für den Milchschaum ............................................64
Reinigen und Pflegen ......................................64
Milchaufschäumer reinigen ...........................................65
Heißwasserdusche reinigen ...........................................66
Zubehörteile reinigen ................................................66
Gerät reinigen .....................................................66
Gerät entkalken ....................................................67
Fehlerbehebung ..........................................68
Entsorgung ..............................................69
Gerät entsorgen ....................................................69
Garantie der Kompernaß Handels GmbH .....................70
Service ...........................................................71
Importeur .........................................................71
SEM 1100 B3
DE│AT│CH
│
49 ■

Einführung
Herzlichen Glückwunsch zum Kauf Ihres neuen Gerätes.
Sie haben sich damit für ein hochwertiges Produkt entschieden. Die Bedie-
nungsanleitung ist Bestandteil dieses Produkts. Sie enthält wichtige Hinweise für
Sicherheit, Gebrauch und Entsorgung. Machen Sie sich vor der Benutzung des
Produkts mit allen Bedien- und Sicherheitshinweisen vertraut. Benutzen Sie das
Produkt nur wie beschrieben und für die angegebenen Einsatzbereiche. Händigen Sie alle Unterlagen bei Weitergabe des Produkts an Dritte mit aus.
Urheberrecht
Diese Dokumentation ist urheberrechtlich geschützt.
Jede Vervielfältigung, bzw. jeder Nachdruck, auch auszugsweise, sowie die
Wiedergabe der Abbildungen, auch im veränderten Zustand, ist nur mit schriftlicher Zustimmung des Herstellers gestattet.
Haftungsbeschränkung
Alle in dieser Bedienungsanleitung enthaltenen technischen Informationen, Daten
und Hinweise für die Bedienung entsprechen dem letzten Stand bei Drucklegung
und erfolgen unter Berücksichtigung unserer bisherigen Erfahrungen und Erkenntnisse nach bestem Wissen.
Aus den Angaben, Abbildungen und Beschreibungen in dieser Anleitung können
keine Ansprüche hergeleitet werden.
Der Hersteller übernimmt keine Haftung für Schäden aufgrund von Nichtbeachtung der Anleitung, nicht bestimmungsgemäßer Verwendung, unsachgemäßen
Reparaturen, unerlaubt vorgenommener Veränderungen oder Verwendung nicht
zugelassener Ersatzteile.
Warnhinweise
In der vorliegenden Bedienungsanleitung werden folgende Warnhinweise verwendet:
WARNUNG
Ein Warnhinweis dieser Gefahrenstufe kennzeichnet eine
mögliche gefährliche Situation.
Falls die gefährliche Situation nicht vermieden wird, kann dies zu Verletzungen
führen.
► Die Anweisungen in diesem Warnhinweis befolgen, um Verletzungen von
Personen zu vermeiden.
■ 50 │ DE
│AT│
CH
SEM 1100 B3

ACHTUNG
Ein Warnhinweis dieser Gefahrenstufe kennzeichnet einen
möglichen Sachschaden.
Falls die Situation nicht vermieden wird, kann dies zu Sachschäden führen.
► Die Anweisungen in diesem Warnhinweis befolgen, um Sachschäden zu
vermeiden.
HINWEIS
► Ein Hinweis kennzeichnet zusätzliche Informationen, die den Umgang mit
dem Gerät erleichtern.
Bestimmungsgemäße Verwendung
Dieses Gerät dient ausschließlich dem Zubereiten von Espresso/Cappuccino und
dem Aufschäumen von Milch. Es ist ausschließlich für die Nutzung in privaten
Haushalten bestimmt. Nutzen Sie es nicht gewerblich.
Eine andere oder darüber hinausgehende Benutzung gilt als nicht bestimmungsgemäß.
WARNUNG
Gefahr durch nicht bestimmungsgemäße Verwendung!
Von dem Gerät können bei nicht bestimmungsgemäßer Verwendung und/
oder andersartiger Nutzung Gefahren ausgehen.
► Das Gerät ausschließlich bestimmungsgemäß verwenden.
► Die in dieser Bedienungsanleitung beschriebenen Vorgehensweisen
einhalten.
Ansprüche jeglicher Art wegen Schäden aus nicht bestimmungsgemäßer Verwendung sind ausgeschlossen.
Das Risiko trägt allein der Benutzer.
SEM 1100 B3
DE│AT│CH
│
51 ■

Lieferumfang / Transportinspektion
WARNUNG
Erstickungsgefahr!
► Verpackungsmaterialien dürfen nicht zum Spielen verwendet werden.
Es besteht Erstickungsgefahr.
Das Gerät wird standardmäßig mit folgenden Komponenten geliefert:
▯ Espressomaschine
▯ Siebträger
▯ großes Espressosieb
▯ kleines Espressosieb
▯ Messlöffel mit Stopfer
▯ Kurzanleitung
▯ Bedienungsanleitung
HINWEIS
► Prüfen Sie die Lieferung auf Vollständigkeit und auf sichtbare Schäden.
► Bei einer unvollständigen Lieferung oder Schäden infolge mangelhafter
Verpackung oder durch Transport wenden Sie sich an die Service-Hotline.
Entsorgung der Verpackung
Die Verpackung schützt das Gerät vor Transportschäden. Die Verpackungsmaterialien sind nach umweltverträglichen und entsorgungstechnischen Gesichtspunkten ausgewählt und deshalb recyclebar.
Die Rückführung der Verpackung in den Materialkreislauf spart Rohstoffe und
verringert das Abfallaufkommen. Entsorgen Sie nicht mehr benötigte Verpackungsmaterialien gemäß den örtlich geltenden Vorschriften.
■ 52 │ DE
HINWEIS
► Heben Sie wenn möglich die Originalverpackung während der Garan-
tiezeit des Gerätes auf, um das Gerät im Garantiefall ordnungsgemäß
verpacken zu können.
│AT│
CH
SEM 1100 B3

Sicherheitshinweise
Beachten Sie für einen sicheren Umgang mit dem Gerät die
folgenden Sicherheitshinweise:
WARNUNG - VERLETZUNGSGEFAHR!
■ Kontrollieren Sie das Gerät vor der Verwendung auf äußere,
sichtbare Schäden. Nehmen Sie ein beschädigtes oder heruntergefallenes Gerät nicht in Betrieb.
■ Das Gerät und seine Anschlussleitung sind von Kindern jünger
als 8 Jahren fernzuhalten.
■ Das Gerät kann von Kindern ab 8 Jahren benutzt werden,
wenn sie beaufsichtigt oder bezüglich des sicheren Gebrauchs
des Gerätes unterwiesen wurden und die daraus resultierenden
Gefahren verstanden haben.
■ Das Gerät kann von Personen mit reduzierten physischen,
sensorischen oder mentalen Fähigkeiten oder Mangel an
Erfahrung und/oder Wissen benutzt werden, wenn sie beaufsichtigt oder bezüglich des sicheren Gebrauchs des Gerätes
unterwiesen wurden und die daraus resultierenden Gefahren
verstanden haben.
■ Reinigung und Benutzer-Wartung dürfen nicht von Kindern
durchgeführt werden, es sei denn, sie sind 8 Jahre oder älter
und beaufsichtigt.
■ Kinder dürfen nicht mit dem Gerät spielen.
■ Lassen Sie Reparaturen am Gerät nur von autorisierten Fach-
betrieben oder dem Kundenservice durchführen. Durch unsachgemäße Reparaturen können erhebliche Gefahren für
den Benutzer entstehen. Zudem erlischt der Garantieanspruch.
Tauchen Sie das Gerät nicht in Wasser oder andere Flüs-
sigkeiten. Gefahr eines elektrischen Schlages!
SEM 1100 B3
DE│AT│CH
│
53 ■

■ Fassen Sie das Gerät niemals mit nassen oder feuchten Hän-
den an.
■ Lassen Sie beschädigte Netzstecker oder Netzkabel sofort
von autorisiertem Fachpersonal oder dem Kundenservice austauschen, um Gefährdungen zu vermeiden.
■ Verbrennungsgefahr! Einige Teile werden während der Benut-
zung sehr heiß!
■ Bei der Benutzung des Gerätes entstehen heiße Dampfschwa-
den. Achten Sie darauf, dass Sie sich nicht daran verbrühen!
Halten Sie ausreichenden Abstand zum Dampf.
■ Schließen Sie das Gerät nur an eine vorschriftsmäßig installierte
und geerdete Netzsteckdose an.
ACHTUNG - SACHSCHÄDEN
■ Defekte Bauteile dürfen nur gegen Original-Ersatzteile ausge-
tauscht werden. Nur bei diesen Teilen ist gewährleistet, dass
sie die Sicherheitsanforderungen erfüllen werden.
■ Schützen Sie das Gerät vor Feuchtigkeit und dem Eindringen
von Flüssigkeiten.
■ Schützen Sie das Gerät vor Stößen, Staub, Chemikalien, star-
ken Temperaturschwankungen und zu nahen Wärmequellen
(Öfen, Heizkörper).
■ 54 │ DE
│AT│
CH
SEM 1100 B3

■ Tauchen Sie das Gerät niemals in Wasser oder andere Flüs-
sigkeiten.
■ Ziehen Sie immer den Netzstecker aus der Netzsteckdose;
ziehen Sie niemals am Kabel.
■ Lassen Sie das Gerät während des Betriebes niemals unbeauf-
sichtigt.
■ Benutzen Sie keine externe Zeitschaltuhr oder ein separates
Fernwirksystem, um das Gerät zu betreiben.
■ Betreiben Sie das Gerät niemals in Räumen, in denen sich
Temperaturen unter oder um 0°C befinden. Bei Gefrieren
des Wassers in den Leitungen oder im Wassertank, kann das
Gerät beschädigt werden.
■ Betreiben Sie das Gerät niemals im Freien. Dieses Gerät ist
nur für die Verwendung in Innenräumen vorgesehen.
HINWEIS
► Eine Reparatur des Gerätes während der Garantiezeit darf
nur von einem vom Hersteller autorisierten Kundendienst
vorgenommen werden, sonst besteht bei nachfolgenden
Schäden kein Garantieanspruch mehr.
SEM 1100 B3
DE│AT│CH
│
55 ■

Geräteelemente
Abbildung A:
Ein-/Aus-Schalter
Temperaturanzeige
Taste „Espresso“
Taste „Dampf“
grüne Aufheizkontrollleuchte
Stellfläche
Dampfregler
Griff
Wassertank
Milchaufschäumer
- Abtropfgitter
3 Tropfenauffangschale
! Aussparung für den roten Schwimmer
. Heißwasserdusche
0 rote Kontrollleuchte
Abbildung B:
6 Siebblockierer
1 Siebträger
% großes Espressosieb
+ kleines Espressosieb
, Messlöffel mit Stopfer
Technische Daten
Netzspannung 220 - 240 V ∼ / 50 Hz
Nennleistung 1100 W
Pumpendruck ca. 1,5 MPa (15 bar)
■ 56 │ DE
│AT│
CH
lebensmittelecht
SEM 1100 B3

Die Temperaturanzeige
Die Temperaturanzeige zeigt an, wie hoch das Gerät aufgeheizt hat.
Sobald Sie das Gerät einschalten, beginnt das Gerät aufzuheizen, bis der Zeiger
ungefähr in der Mitte zwischen 80°C und „
Erreicht der Zeiger den roten Teil der Skala, ist die Temperatur hoch genug, um
einen Espresso zuzubereiten. Die grüne Aufheizkontrollleuchte leuchtet.
“ steht.
Wenn Sie die Taste „Dampf“
leuchte , das Gerät heizt weiter auf und der Zeiger steigt höher bis in den
Bereich der Skala zwischen „
Erreicht der Zeiger den Bereich zwischen „
hoch genug, um Dampf zu erzeugen. Die grüne Aufheizkontrollleuchte
leuchtet.
Erste Inbetriebnahme
1) Reinigen Sie den Siebträger 1, den Messlöffel ,, die Espressosiebe %+,
das Abtropfgitter - und den Wassertank wie im Kapitel „Reinigen und
Pflegen“ beschrieben.
2) Stellen Sie das Gerät auf eine ebene und hitzebeständige Unterlage. Achten
Sie darauf, dass die Netzsteckdose in erreichbarer Nähe ist.
3) Setzen Sie das Abtropfgitter - so ein, dass der rote Schwimmer durch die
Aussparung ! im Abtropfgitter - ragen kann.
4) Setzen Sie den Siebträger 1 in das Gerät ein, indem Sie ihn an der Markierung „INSERT“, die seitlich neben der Heißwasserdusche . angebracht
ist, am Gerät einsetzen und dann gegen den Uhrzeigersinn, bis der Griff des
Siebträgers 1 nach vorne weist, drehen.
SEM 1100 B3
drücken, erlischt die grüne Aufheizkontroll-
“ und „ “.
“ und „ “, ist die Temperatur
DE│AT│CH
│
57 ■

5) Stecken Sie den Netzstecker in eine Netzsteckdose.
6) Gehen Sie vor der ersten Verwendung folgendermaßen vor, um die internen
Leitungen zu reinigen:
Lassen Sie Wasser für ca. 5 Tassen Espresso (etwa 100 ml) durch das Gerät
laufen. Lesen Sie hierzu das Kapitel „Bedienung“.
7) Lassen Sie für ca. 30 Sekunden Dampf erzeugen. Lesen Sie hierzu das
Kapitel „Bedienung“.
HINWEIS
► Bei der ersten Benutzung kann es sein, dass die Pumpe schon hörbar arbeitet,
Geräusche entstehen, jedoch noch kein Wasser aus dem Gerät kommt. In
diesem Fall drehen Sie den Dampfregler in Richtung „+“, so dass die
Luft aus den Leitungen des Gerätes entweichen kann (die Taste „Dampf“
ist gedrückt). Nach etwa 20 Sekunden ist die Luft entwichen, die
Geräusche verschwinden und Wasser tritt aus dem Gerät aus.
Bedienung
HINWEIS
► Die beiden Tasten „Espresso“
Drücken ein. Wird die Taste erneut gedrückt, wird die Taste gelöst.
Wassertank befüllen
HINWEIS
► Verwenden Sie für die Zubereitung von Espresso/Cappuccino ausschließlich
frisches Trinkwasser.
1) Ziehen Sie den Wassertank heraus und füllen Sie ihn mit Wasser:
Füllen Sie mindestens Wasser bis zur Min-Markierung ein.
Füllen Sie nie mehr Wasser als bis zur Max-Markierung ein.
2) Schieben Sie den Wassertank wieder in das Gerät. Achten Sie darauf,
den Schlauch mit in den Wassertank zu legen.
■ 58 │ DE
│AT│
CH
und „Dampf“ rasten beim
SEM 1100 B3

Aufheizen nach längerer Standzeit /
bei erster Inbetriebnahme
Heizen Sie das Gerät, wenn Sie es längere Zeit nicht benutzt haben, folgendermaßen auf:
1) Füllen Sie Wasser in den Wassertank .
2) Legen Sie das große % oder das kleine Espressosieb + in den Siebträger 1:
– Achten Sie darauf, dass die kleine Einkerbung am großen % oder
kleinem Espressosieb + beim Einsetzen über der Einkerbung am
Siebträger 1 liegt.
– Drehen Sie dann das große % oder kleine Espressosieb +etwas, so
dass dieses nicht mehr herausfallen kann.
HINWEIS
SEM 1100 B3
► Entfernen Sie das eingesetzte Espressosieb %+ erst, wenn es sich abge-
kühlt hat!
► Um die Espressosiebe %+ wieder aus dem Siebträger 1 herauszuneh-
men, drehen Sie das eingesetzte Espressosieb %+ so weit, bis sich die
Einkerbung am Espressosieb %+ über der Einkerbung am Siebträger 1
befindet. Sie können das Espressosieb %+ nun herausnehmen.
DE│AT│CH
│
59 ■

3) Setzen Sie den Siebträger 1 in das Gerät ein, indem Sie ihn an der Markierung
„INSERT“, die seitlich neben der Heißwasserdusche . angebracht ist, am
Gerät einsetzen und dann gegen den Uhrzeigersinn, bis der Griff des Siebträgers 1 nach vorne weist, drehen.
4) Stellen Sie eine Tasse unter den Siebträger 1.
5) Drehen Sie den Dampfregler zu (bis zum Anschlag in Richtung „ - “
drehen).
6) Schalten Sie das Gerät am Ein-/Aus-Schalter an.
7) Die rote Kontrollleuchte 0 leuchtet. Nach kurzer Zeit beginnt der Zeiger in
der Temperaturanzeige zu steigen.
8) Sobald die grüne Aufheizkontrollleuchte leuchtet, drücken Sie die Taste
„Espresso“
HINWEIS
► Es kann sein, dass Sie zwischendurch die Tasse leeren müssen. Stoppen Sie
dafür kurz den Vorgang, indem Sie die Taste „Espresso“
Leeren Sie die Tasse und drücken Sie erneut die Taste „Espresso“ ,
damit das Wasser weiter durch das Gerät läuft.
9) Nach ca. 1 Minute stoppen Sie die Pumpe, indem Sie die Taste „Espresso“
noch einmal drücken.
10) Warten Sie, bis die grüne Aufheizkontrollleuchte wieder leuchtet. Das
Aufheizen ist abgeschlossen. Sie können nun Espresso zubereiten.
. Lassen Sie das Wasser ca. 1 Minute durchlaufen.
Aufheizen vor jedem Gebrauch
Bevor Sie einen Espresso oder Cappuccino zubereiten können, muss das Gerät aufheizen.
1) Schalten Sie das Gerät am Ein-/Aus-Schalter an. Die rote Kontrollleuchte
0 leuchtet. Die beiden Tasten „Espresso“ und „Dampf“ dürfen
dabei nicht gedrückt sein. Stellen Sie sicher, dass der Dampfregler bis zum
Anschlag auf „-“ gedreht ist.
2) Setzen Sie den Siebträger 1 in das Gerät ein, indem Sie ihn an der Markierung „INSERT“, die seitlich neben der Heißwasserdusche . angebracht
ist, am Gerät einsetzen und dann gegen den Uhrzeigersinn, bis der Griff des
Siebträgers 1 nach vorne weist, drehen.
3) Drücken Sie die Taste „Espresso“
Wassertank zieht. Sobald Wasser aus den Siebträger-Öffnungen tritt, drü-
cken Sie die Taste „Espresso“ noch einmal, so dass die Pumpe stoppt.
4) Warten Sie, bis die grüne Aufheizkontrollleuchte leuchtet.
5) Drücken Sie erneut die Taste „Espresso“
heißes Wasser austreten, bevor Sie die Pumpe wieder stoppen.
Das Vorheizen ist nun abgeschlossen. Sie können nun einen Espresso/Cappuccino zubereiten.
drücken.
, damit das Gerät Wasser aus dem
und lassen Sie 20 Sekunden
■ 60 │ DE
│AT│
CH
SEM 1100 B3

Espresso zubereiten
HINWEIS
► Stellen Sie immer sicher, dass das Espressosieb %+ sauber und von
Espressopulver-Resten befreit ist
1) W
enn das Gerät aufgeheizt ist:
Um einen Espresso zuzubereiten, setzen Sie das kleine Espressosieb + in
den Siebträger 1 ein.
Um zwei Espressi zuzubereiten, setzen Sie das große Espressosieb % in den
Siebträger 1 ein
2) Füllen Sie das kleine Es
pulver. Dies entspricht ca. 7g Pulver, oder einem gestrichenem Messlöffel ,.
Oder...
Füllen Sie das große Espressosieb % bis zur Max-Markierung mit Espressopulver.
Das entspricht ca. 7g + 7g Pulver, oder zwei gestrichenen Messlöffeln ,
3) Verdichten Sie das Espressopulver mit Hilfe des Stopfers am Messlöffel ,.
Füllen Sie danach, falls nötig, weiteres Espressopulver nach, so dass das
Espressosieb %+ bis zur Max-Markierung gefüllt ist. Verdichten Sie das
Espressopulver danach erneut
HINWEIS
► Das Verdichten des Espressopulvers ist ein wesentlicher Vorgang bei der
Zubereitung eines Espressos. Wird das Espressopulver sehr stark gepresst,
so läuft der Espresso langsam durch und es gibt mehr Crema. Ist das
Espressopulver nicht so stark verdichtet, läuft der Espresso schnell durch, es
entsteht nur wenig Crema.
4) Setzen Sie den Siebträger 1 in das Gerät ein, indem Sie ihn an der Markierung „INSERT“ am Gerät einsetzen und dann gegen den Uhrzeigersinn, bis
der Griff des Siebträgers 1 nach vorne weist, drehen.
5) Stellen Sie eine (oder zwei) Tasse(n) unter die Siebträger-Öffnungen. Wir
empfehlen, die Tassen vorher mit heißem Wasser auszuspülen, damit der
Espresso nicht so schnell abkühlt. Die Tassen können Sie zur Aufbewahrung
auf der Stellfläche abstellen.
6) Wenn die grüne Aufheizkontrollleuchte leuchtet, können Sie nun die Taste
„Espresso“
.
.
pressosieb + bis zur Max-Markierung mit Espresso-
.
.
herunter drücken. Der Espresso läuft in die Tasse(n).
WARNUNG
Entnehmen Sie niemals den Siebträger 1 während der
Espressoausgabe!
Die entstehenden Spritzer des heißen Espressos führen zu Verletzungen!
SEM 1100 B3
► Stellen Sie immer sicher, dass die Taste „Espresso“
gedrückt ist, bevor Sie den Siebträger 1 entfernen.
nicht herunter
DE│AT│CH
│
61 ■

7) Wenn die Tasse(n) bis zur gewünschten Menge gefüllt sind (ca. 20 ml je
Tasse), drücken Sie erneut die Taste „Espresso“
Wasser gepumpt wird.
Sie können den Espresso nun trinken.
8) Stellen Sie das Gerät am Ein-/Aus-Schalter aus.
HINWEIS
► Nach 30 Minuten schaltet sich das Gerät automatisch aus, wenn keine
Taste gedrückt wird.
9) Entfernen Sie nach jedem Gebrauch das Espressopulver aus dem Espressosieb %+. Entnehmen Sie den Siebträger 1 aus dem Gerät. Klappen Sie
den Siebblockierer 6 nach oben, so dass das Espressosieb %+ nicht aus
dem Siebträger 1 herausfallen kann. Entleeren Sie nun das Espressosieb %+,
indem Sie den Siebträger 1 mit blockiertem Espressosieb %+ umdrehen und
das Espressopulver herausklopfen. Entsorgen Sie das Espressopulver immer
umweltgerecht, zum Beispiel im Bioabfall.
HINWEIS
► Reinigen Sie die Heißwasserdusche . (aus dieser tritt das heiße Wasser
aus) unbedingt nach jedem Gebrauch. Lesen Sie hierzu das Kapitel „Reinigen und Pflegen“.
HINWEIS
► Entleeren Sie regelmäßig die Tropfenauffangschale 3, spätestens jedoch,
wenn der rote Schwimmer in der Aussparung ! des Abtropfgitters - zu
sehen ist.
, so dass kein weiteres
Cappuccino zubereiten
WARNUNG
Seien Sie vorsichtig im Umgang mit dem Dampf zur
Milchschaumerzeugung!
Der heiße Dampf oder heiße Spritzer führen zu Verletzungen!
► Bedienen Sie den Dampfregler immer langsam.
1) Füllen Sie einen Aufschäumbehälter (vorzugsweise aus rostfreiem Stahl) zu
einem Drittel mit kalter Milch.
2) Stellen Sie sicher, dass der Dampfregler zugedreht ist (bis zum Anschlag
in Richtung „ - “ drehen).
3) Schieben Sie den Milchaufschäumer zur Seite heraus. Fassen Sie ihn
dabei nur am Griff an.
■ 62 │ DE
│AT│
CH
SEM 1100 B3

4) Drücken Sie die Taste „Dampf“ herunter. Warten Sie, bis die grüne
Aufheizkontrollleuchte leuchtet.
5) Halten Sie ein leeres Gefäß unter den Milchaufschäumer . Drehen Sie
langsam den Dampfregler in Richtung „+“. Kondenswasser/Spritzer
kommen aus der Düse. So wird die Düse und der Wasserkreislauf im Inneren
des Gerätes gereinigt.
6) Warten Sie 15 Sekunden und drehen Sie dann den Dampfregler in
Richtung „ - “, bis kein Dampf mehr aus der Düse kommt. Schütten Sie das
Wasser aus dem Gefäß weg.
7) Halten Sie nun den Aufschäumbehälter in der Hand, um die Milchtemperatur
zu fühlen, und führen Sie die Düse des Milchaufschäumers leicht in die
Milch. Halten Sie den Aufschäumbehälter dabei ein wenig schräg.
8) Drehen Sie langsam den Dampfregler in Richtung „+“.
9) Bewegen Sie den Aufschäumbehälter kreisförmig und halten Sie dabei die
Spitze der Düse knapp unter die Milchoberfläche: tief genug, dass die Milch
nicht in alle Richtungen spritzt und hoch genug, dass ein dicker Schaum
erzeugt wird. Machen Sie es richtig, ist dabei ein tiefes Brummgeräusch zu
hören.
10) Wenn der Milchschaum hochsteigt, führen Sie die Düse tiefer ein, um die
nächste „Schicht“ aufzuschäumen und ein Anbrennen des Schaums zu
vermeiden.
11) Tauchen Sie schließlich die Düse vollständig ein und drehen Sie den Dampfregler etwa bis zur Hälfte zu, so dass die Milch erhitzt wird. Halten Sie
den Aufschäumbehälter leicht schräg, so dass die Milch sanft herumwirbelt,
während sie mit der Düse umgerührt wird.
12) Wenn der Milchschaum die gewünschte Konsistenz und Temperatur hat, drehen Sie den Dampfregler zu (bis zum Anschlag in Richtung „ - “ drehen).
13) Ziehen Sie erst dann die Düse aus der Milch.
14) Drücken Sie die Taste „Dampf“
HINWEIS
15) Gehen Sie für die Zubereitung des Cappuccinos genauso vor, als würden
16) Stellen Sie das Gerät am Ein-/Aus-Schalter aus.
SEM 1100 B3
.
► Benutzen Sie zur Zubereitung von Cappuccino immer größere Tassen als
für Espresso, da noch aufgeschäumte Milch hinzugefügt wird.
Sie einen Espresso zubereiten (siehe Kapitel „Espresso zubereiten“/das
Aufheizen ist nicht mehr nötig). Lassen Sie das Wasser jedoch ca. doppelt so
lange durchlaufen, wie bei einem Espresso (ca. 40 ml).
DE│AT│CH
│
63 ■
HINWEIS
► Nach 30 Minuten schaltet sich das Gerät automatisch aus, wenn keine
Taste gedrückt wird.
17) Geben Sie nun die aufgeschäumte Milch in den zuvor vorbereiteten Espresso. Der Cappuccino ist nun fertig. Sie können ihn nach Belieben zuckern
oder ihn mit Kakaopulver bestreuen.
HINWEIS
► Reinigen Sie den Milchaufschäumer unbedingt nach jedem Gebrauch.
Lesen Sie hierzu das Kapitel „Reinigen und Pflegen“.
Tipps für den Milchschaum
■ Jede Art von Milch lässt sich prinzipiell aufschäumen, auch Soja- und
Reismilch. Einige Milchsorten lassen sich allerdings nur mit Einschränkungen
aufschäumen.
■ Entrahmte Milch (Magermilch) brennt nicht so leicht an wie Vollmilch, bei zu
geringem Fettgehalt besteht allerdings das Risiko, dass sich die Milch nicht
gut aufschäumen lässt. Benutzen Sie daher möglichst eine Milch mit 3,5%
oder 1,5% Fettanteil.
■ Gut gekühlte Milch lässt sich besser aufschäumen als weniger kalte. Beste
Ergebnisse erzielen Sie bei einer Temperatur von ca. 7°C.
■ Schäumen Sie die Milch kein zweites Mal auf, da sie sonst anbrennt.
■ Lassen Sie aufgeschäumte Milch ca. 30 Sekunden lang stehen, bevor Sie
den Schaum auf den Espresso geben. So platzen größere Blasen und noch
flüssige Milch sinkt nach unten. Sie können dann den feinen Schaum auf den
Espresso geben.
Reinigen und Pflegen
WARNUNG - VERLETZUNGSGEFAHR!
■ Ziehen Sie immer den Netzstecker aus der Netzsteckdose, bevor Sie das
Gerät reinigen. Gefahr eines elektrischen Schlages!
■ Lassen Sie das Gerät immer erst abkühlen, bevor Sie das Gerät reinigen.
Verbrennungsgefahr!
■ Tauchen Sie das Gerät niemals in Wasser oder andere Flüssigkeiten. Gefahr
eines elektrischen Schlages!
■ 64 │ DE
│AT│
CH
SEM 1100 B3
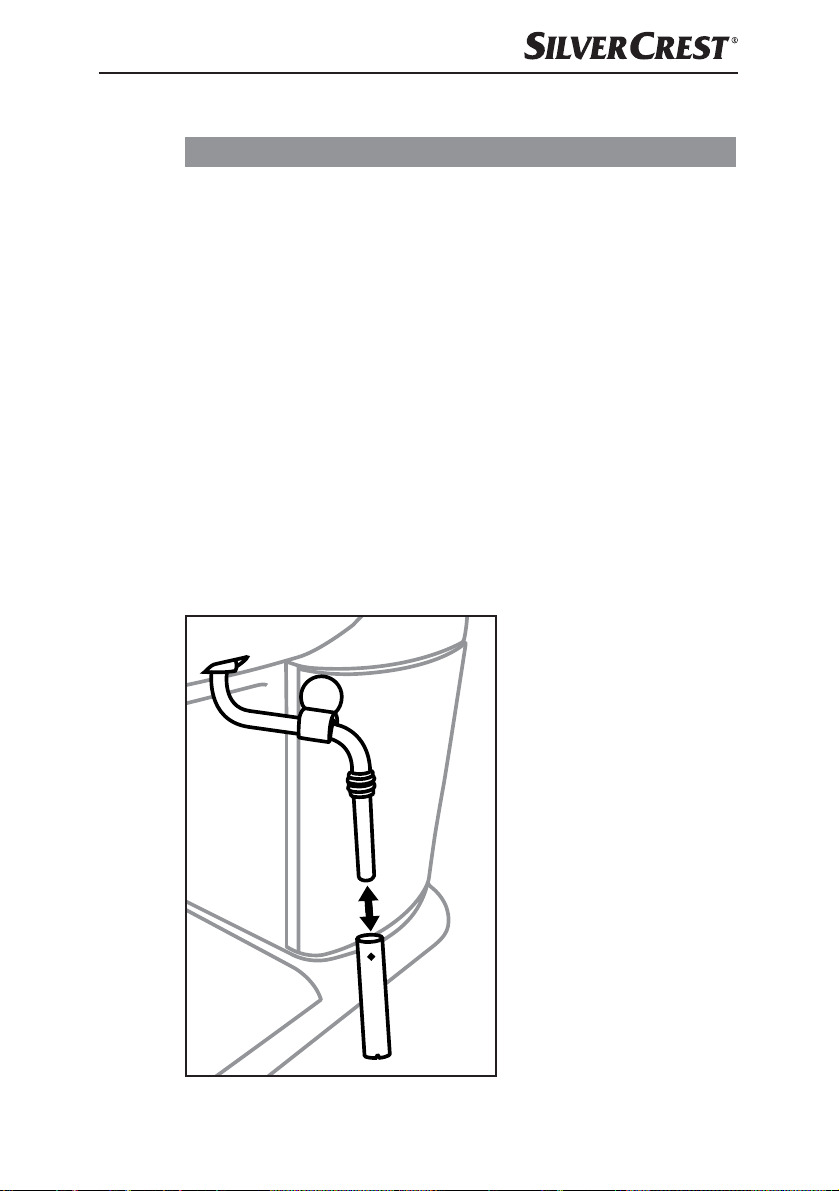
Milchaufschäumer reinigen
ACHTUNG - SACHSCHÄDEN
■ Benutzen Sie niemals scheuernde, aggressive oder chemische Reinigungsmit-
tel zur Reinigung des Gerätes
1) S
tellen Sie einen leeren Behälter unter den Milchaufschäumer .
2) Dr
ehen Sie den Dampfregler direkt nach dem Gebrauch auf
„ + “ und lassen Sie einige Sekunden Dampf entweichen.
3) Dr
ehen Sie den Dampfregler zu (bis zum Anschlag in Richtung „ - “
drehen), schalten Sie das Gerät aus und ziehen Sie den Netzstecker.
4) Lassen Sie die Düse abk
5) Ziehen Sie die Hülle des Milchaufschäumers ab (Abbildung 1) und reini-
gen Sie diese sorgfältig im warmen Wasser.
6) W
ischen Sie die Düse, die sich unter der Hülle befindet, mit einem feuchten
Tuch ab. Geben Sie gegebenenfalls ein mildes Spülmittel auf das Tuch.
Wischen Sie jedoch nach der Reinigung mit Spülmittel mit einem mit klarem
Wasser befeuchteten Tuch nach
reste an der Düse befinden.
7) Sc
hieben Sie die Hülle wieder auf die Düse (Abbildung 1).
ühlen.
. Diese greifen die Oberfläche des Gerätes an.
. Stellen Sie sicher, dass sich keine Spülmittel-
Abbildung 1
SEM 1100 B3
DE│AT│CH
│
65 ■

Heißwasserdusche reinigen
Reinigen Sie die Heißwasserdusche . nach jedem Gebrauch:
1) Nachdem Sie den Espresso/Cappuccino zubereitet haben und den Siebträger 1
abgenommen haben, wischen Sie die gesamte Fläche der Heißwasserdusche . mit einem feuchten Tuch ab, so dass alle Pulverreste entfernt werden.
2) Setzen Sie den Siebträger 1 ohne eingesetzte Espressosiebe %+ wieder ein.
3) Stellen Sie dann eine leere Tasse unter den Siebträger 1 und drücken Sie
die Taste „Espresso“
der Heißwasserdusche . aus, und spült letzte Pulverreste heraus.
4) Drücken Sie nach ca. 20 Sekunden erneut die Taste „Espresso“
schalten Sie das Gerät am Ein-/Aus-Schalter aus.
5) Nehmen Sie den Siebträger 1 wieder ab.
herunter, so dass diese einrastet. Wasser tritt aus
Zubehörteile reinigen
1) Reinigen Sie den Siebträger 1, die beiden Espressosiebe %+, den Wassertank , den Messlöffel , und das Abtropfgitter - in warmen Wasser.
HINWEIS
► Wenn Sie Spülmittel in das Wasser geben, kann es sein, dass der Ge-
schmack des Espressos beeinflusst wird. Falls die Verschmutzungen sich nur
mit Spülmittel beseitigen lassen, spülen Sie die Teile hinterher immer mit viel
klarem Wasser ab.
2) Trocknen Sie alle Teile.
3) Die Tropfenauffangschale 3 ist zur Reinigung in der Spülmaschine geeignet.
Nehmen Sie jedoch vor dem Reinigen in der Spülmaschine den roten
Schwimmer aus der Tropfenauffangschale 3:
– Entfernen Sie dazu an beiden Haltestäben seitlich des Schwimmers die
aufgesteckten Stopper.
– Ziehen Sie den Schwimmer von den Haltestäben.
– Reinigen Sie Schwimmer und Stopper in warmem Wasser.
– Nach der Reinigung der Tropfenauffangschale 3, schieben Sie den
gereinigten Schwimmer wieder auf die Haltestäbe und stecken die
Stopper auf.
und
Gerät reinigen
Reinigen Sie das Gerät mit einem feuchten Tuch. Geben Sie gegebenenfalls
etwas Spülmittel auf das Tuch.
Stellen Sie sicher, dass das Gerät vor einer erneuten Benutzung vollständig
getrocknet ist.
■ 66 │ DE
│AT│
CH
SEM 1100 B3

Gerät entkalken
Entkalken Sie das Gerät regelmäßig. Nach ca. 1 - 2 Monaten (bei ca. 4 Espressozubereitungen pro Tag) sollte das Gerät entkalkt werden. Je nach Härtegrad des
Wassers in Ihrer Region kann dieser Wert abweichen.
Verwenden Sie zum Entkalken handelsüblichen Entkalker für Espressomaschinen.
Gehen Sie so vor, wie in der Bedienungsanleitung des Entkalkers beschrieben.
Wenn Sie keinen Entkalker haben, können Sie alternativ mit Zitronensäure entkalken
und wie folgt vorgehen:
1) Füllen Sie den Wassertank bis zur Max-Markierung.
2) Lösen Sie darin 2 Löffel (ca. 30 Gramm) Zitronensäure (erhältlich in Drogerien oder Apotheken) auf.
3) Setzen Sie den Wassertank in das Gerät ein.
4) Schalten Sie das Gerät am Ein-/Aus-Schalter ein. Der Dampfregler ist
zugedreht.
5) Setzen Sie den Siebträger 1 ohne Espressosieb %+in das Gerät ein und
stellen Sie eine Tasse unter den Siebträger 1.
6) Sobald die grüne Aufheizkontrollleuchte leuchtet, drücken Sie die Taste
„Espresso“
7) Lassen Sie ca. 2 Tassen (ca. 250 ml) Wasser durchlaufen und stoppen Sie
dann den Vorgang durch erneutes Drücken der Taste „Espresso“ .
8) Halten Sie ein Gefäß unter den Milchaufschäumer .
9) Drücken Sie die Taste „Dampf“
und warten Sie, bis die grüne Aufheizkontrollleuchte leuchtet. Drehen
Sie langsam den Dampfregler auf „ + “. Lassen Sie das Gerät für ca. 2
Minuten Dampf erzeugen.
10) Drehen Sie nach 2 Minuten den Dampfregler zu, drücken Sie erneut die
Taste „Dampf“
11) Lassen Sie den Entkalker für ca. 15 Minuten einwirken.
12) Wiederholen Sie die Schritte 6 - 11 dreimal.
13) Drücken Sie dann die Taste „Espresso“
und lassen Sie das Wasser solange durchlaufen, bis der Wassertank leer
ist.
14) Spülen Sie den Wassertank mit klarem Wasser aus und füllen Sie klares
Wasser bis zur Max-Markierung ein.
15) Drücken Sie die Taste „Espresso“ herunter, so dass diese einrastet,
sobald die grüne Aufheizkontrollleuchte leuchtet.
16) Lassen Sie das Wasser durchlaufen.
17) Wiederholen Sie die Schritte 14 - 16 dreimal.
18) Füllen Sie noch einmal Wasser in den Wassertank .
herunter, so dass diese einrastet.
herunter, so dass diese einrastet
, so dass kein Dampf mehr erzeugt wird.
herunter, so dass diese einrastet
SEM 1100 B3
DE│AT│CH
│
67 ■
19) Drücken Sie die Taste „Dampf“ , so dass diese einrastet.
20) Halten Sie ein Gefäß unter den Milchaufschäumer und drehen Sie langsam
den Dampfregler auf „ + “, sobald die grüne Aufheizkontrollleuchte
leuchtet.
21) Drehen Sie nach ca. 1 Minute den Dampfregler zu (bis zum Anschlag
in Richtung „ - “ drehen), drücken Sie erneut die Taste „Dampf“
schalten Sie das Gerät aus.
HINWEIS
► Nach 30 Minuten schaltet sich das Gerät automatisch aus, wenn keine
Taste gedrückt wird.
Fehlerbehebung
Störung Ursache Abhilfe
• Den Espresso neu
• Das Espressopulver ist zu feucht
und/oder zu fest gepresst.
Der Espresso läuft nicht
mehr heraus.
• Kein Wasser im Wassertank .
• Die Löcher der SiebträgerÖffnungen sind verstopft.
• Wasser in den Wasser-
• Siebträger 1 reinigen.
und
zubereiten, dabei das
Espressopulver jedoch
nicht so fest verdichten,
oder es ganz austauschen.
tank füllen.
Der Espresso tropft über
die Ränder des Siebträgers 1 anstatt aus den
Öffnungen.
Der Espresso ist kalt.
■ 68 │ DE
│AT│
• Der Siebträger 1 wurde nicht
korrekt eingesetzt.
• Die Siebträger-Öffnungen sind
verstopft.
• Es befinden sich Espressopulverreste auf dem Rand des
Siebträgers 1.
• Das Gerät wurde nicht vorgeheizt.
• Die grüne Aufheizkontrollleuchte hat noch nicht geleuchtet.
• Die Tassen wurden nicht vorgewärmt.
CH
• Siebträger 1 richtig
einsetzen.
• Siebträger 1reinigen.
• Rand des Siebträgers 1
von Espressopulverresten
befreien.
• Gerät vorheizen.
• Warten, bis die grüne
Aufheizkontrollleuchte
leuchtet.
• Tassen vorwärmen.
SEM 1100 B3

Störung Ursache Abhilfe
Geräuschvoller Betrieb
der Pumpe.
Die Crema ist zu hell
(der Espresso läuft
schnell aus dem
Siebträger 1).
Die Crema ist zu
dunkel (der Espresso
läuft langsam aus dem
Siebträger 1).
Die Milch schäumt
nicht auf.
Entsorgung
Gerät entsorgen
Werfen Sie das Gerät keinesfalls in den normalen Hausmüll.
Dieses Produkt unterliegt der europäischen Richtlinie
2012/19/EU-WEEE (Waste Electrical and Electronic Equipment).
Entsorgen Sie das Gerät über einen zugelassenen Entsorgungsbetrieb oder über
Ihre kommunale Entsorgungseinrichtung. Beachten Sie die aktuell geltenden
Vorschriften. Setzen Sie sich im Zweifelsfall mit Ihrer Entsorgungseinrichtung in
Verbindung.
• Der Wassertank ist leer.
• zu wenig Espressopulver.
• Das Espressopulver ist zu grob
gemahlen.
• zu viel Espressopulver.
• Das Pulver ist zu fein gemahlen
oder feucht.
• Das Sieb ist verstopft. • Sieb reinigen.
• Die Milch ist nicht kalt genug.
• Der Milchaufschäumer ist
verschmutzt.
• Wasser in den Wassertank füllen.
• Mehr Espressopulver
verwenden.
• Nur speziell für Espresso
hergestelltes Espressopulver verwenden.
• Weniger Espressopulver
verwenden.
• Nur speziell für Espresso
hergestelltes Espressopulver verwenden.
• Verwenden Sie Milch aus
dem Kühlschrank.
• Reinigen Sie den
Milchaufschäumer .
SEM 1100 B3
DE│AT│CH
│
69 ■

Garantie der Kompernaß Handels GmbH
Sehr geehrte Kundin, sehr geehrter Kunde,
Sie erhalten auf dieses Gerät 3 Jahre Garantie ab Kaufdatum. Im Falle von
Mängeln dieses Produkts stehen Ihnen gegen den Verkäufer des Produkts gesetzliche Rechte zu. Diese gesetzlichen Rechte werden durch unsere im Folgenden
dargestellte Garantie nicht eingeschränkt.
Garantiebedingungen
Die Garantiefrist beginnt mit dem Kaufdatum. Bitte bewahren Sie den OriginalKassenbon gut auf. Diese Unterlage wird als Nachweis für den Kauf benötigt.
Tritt innerhalb von drei Jahren ab dem Kaufdatum dieses Produkts ein Materialoder Fabrikationsfehler auf, wird das Produkt von uns – nach unserer Wahl – für
Sie kostenlos repariert oder ersetzt. Diese Garantieleistung setzt voraus, dass
innerhalb der Drei-Jahres-Frist das defekte Gerät und der Kaufbeleg (Kassenbon)
vorgelegt und schriftlich kurz beschrieben wird, worin der Mangel besteht und
wann er aufgetreten ist.
Wenn der Defekt von unserer Garantie gedeckt ist, erhalten Sie das reparierte
oder ein neues Produkt zurück. Mit Reparatur oder Austausch des Produkts
beginnt kein neuer Garantiezeitraum.
Garantiezeit und gesetzliche Mängelansprüche
Die Garantiezeit wird durch die Gewährleistung nicht verlängert. Dies gilt auch
für ersetzte und reparierte Teile. Eventuell schon beim Kauf vorhandene Schäden
und Mängel müssen sofort nach dem Auspacken gemeldet werden. Nach Ablauf
der Garantiezeit anfallende Reparaturen sind kostenpflichtig.
Garantieumfang
Das Gerät wurde nach strengen Qualitätsrichtlinien sorgfältig produziert und vor
Auslieferung gewissenhaft geprüft.
Die Garantieleistung gilt für Material- oder Fabrikationsfehler. Diese Garantie
erstreckt sich nicht auf Produktteile, die normaler Abnutzung ausgesetzt sind und
daher als Verschleißteile angesehen werden können oder für Beschädigungen
an zerbrechlichen Teilen, z. B. Schalter, Akkus, Backformen oder Teile die aus
Glas gefertigt sind.
Diese Garantie verfällt, wenn das Produkt beschädigt, nicht sachgemäß benutzt
oder gewartet wurde. Für eine sachgemäße Benutzung des Produkts sind alle
in der Bedienungsanleitung aufgeführten Anweisungen genau einzuhalten.
Verwendungszwecke und Handlungen, von denen in der Bedienungsanleitung
abgeraten oder vor denen gewarnt wird, sind unbedingt zu vermeiden.
Das Produkt ist nur für den privaten und nicht für den gewerblichen Gebrauch
bestimmt. Bei missbräuchlicher und unsachgemäßer Behandlung, Gewaltanwendung und bei Eingriffen, die nicht von unserer autorisierten Service-Niederlassung
vorgenommen wurden, erlischt die Garantie.
■ 70 │ DE
│AT│
CH
SEM 1100 B3

Abwicklung im Garantiefall
Um eine schnelle Bearbeitung ihres Anliegens zu gewährleisten, folgen Sie bitte
den folgenden Hinweisen:
■ Bitte halten Sie für alle Anfragen den Kassenbon und die Artikelnummer (z. B.
IAN 12345) als Nachweis für den Kauf bereit.
■ Die Artikelnummer entnehmen Sie bitte dem Typenschild, einer Gravur, auf
dem Titelblatt ihrer Anleitung (unten links) oder als Aufkleber auf der Rückoder Unterseite.
■ Sollten Funktionsfehler oder sonstige Mängel auftreten kontaktieren Sie zunächst
die nachfolgend benannte Serviceabteilung telefonisch oder per E-Mail.
■ Ein als defekt erfasstes Produkt können Sie dann unter Beifügung des Kauf-
belegs (Kassenbon) und der Angabe, worin der Mangel besteht und wann
er aufgetreten ist, für Sie portofrei an die Ihnen mitgeteilte Service-Anschrift
übersenden.
Auf www.lidl-service.com können Sie diese und viele weitere Handbücher,
Produktvideos und Software herunterladen.
Service
Service Deutschland
Tel.: 0800 5435 111 (Kostenfrei aus dem dt. Festnetz/Mobilfunknetz)
E-Mail: kompernass@lidl.de
Service Österreich
Tel.: 0820 201 222 (0,15 EUR/Min.)
E-Mail: kompernass@lidl.at
Service Schweiz
Tel.: 0842 665566 (0,08 CHF/Min., Mobilfunk max. 0,40 CHF/Min.)
E-Mail: kompernass@lidl.ch
IAN 282260
Importeur
Bitte beachten Sie, dass die folgende Anschrift keine Serviceanschrift ist. Kontaktieren Sie zunächst die benannte Servicestelle.
KOMPERNASS HANDELS GMBH
BURGSTRASSE 21
44867 BOCHUM
GERMANY
www.kompernass.com
SEM 1100 B3
DE│AT│CH
│
71 ■

■ 72 │ DE
│AT│
CH
SEM 1100 B3

KOMPERNASS HANDELS GMBH
BURGSTRASSE 21
44867 BOCHUM
DEUTSCHLAND / GERMANY
www.kompernass.com
Last Information Update · Έκδοση των πληροφοριών
Stand der Informationen:
10 / 2016 · Ident.-No.: SEM1100B3-092016-1
IAN 282260
 Loading...