

Retro Wooden Radio KH 2322
Operating instructions
SilverCrest KH 2322
List of Contents Page
Intended use 4
Technical data 4
Package contents 4
Safety instructions 4
Operating elements 5
Connections 5
Setting the clock 6
Radio reception 6
Setting the alarm 7
Switching the alarm ON 7
Switching the alarm OFF 7
Sleep-Timer 7
External audio sources 8
Using headphones 8
Cleaning and care 8
Disposal 9
Important Warranty Notices 9
- 3 -

SilverCrest KH 2322
Retro Wooden Radio KH 2322
Intended use
This appliance is intended for the reception of FM / AM radio transmissions and
for use as an alarm clock, using either
signal tones or the radio itself. This
appliance is intended for use in domestic
settings only. It is not suitable for use in
commercial or industrial applications.
Technical data
Mains voltage: 230 V AC / 50 Hz
Batteries : 2x1,5V Mignon
(R6 / LR6 / AA)
(Not supplied)
Power consumption : 15 W
Frequency ranges:
AM (MW) : 530 – 1600 KHz
FM (USW) : 87.5 - 108 MHZ
Alarm functions : Radio,
alarm signal
Operating
temperature range : +5°... +40°C
Delivery Contents
Retro Wooden Radio KH2322
Operating instructions
Safety instructions
To avoid fatal injury through electric
shock:
• Ensure that the power cable never
becomes wet or damp during operation. Lay the cable such that it cannot
be pinched or otherwise damaged.
Should the power cable become damaged, have it repaired by customer
service before continuing to use the
appliance.
• Do not place candles or other open
fire sources on the appliance.
• Use the appliance only in dry rooms.
• Never allow fluids or objects of any
kind to enter into the appliance.
• Do not place water-filled receptacles
(e.g. flower vases) on the appliance.
• Position the appliance close to an
electrical wall socket. Make sure that
the wall socket is easily accessible
• Do not use an extension cable. In cases of danger, the plug must be quickly
and easily accessible.
• You may not open the casing or repair the appliance yourself. Should
you do so, appliance safety can no
longer be assured and the warranty
will become void. Repairs are to be
carried out exclusively by a specialist
firm or the service centre.
To avoid burn and other injuries:
• Place the appliance in an open and
well-ventilated area so that heat
pockets cannot be created inside the
appliance.
- 4 -

SilverCrest KH 2322
• Never cover the ventilation openings!
• Avoid close proximity to heat sources,
e.g. direct solar radiation, heaters and
other appliances etc.!
• Do not allow children or elderly persons to use the appliance unsupervised,
they are not always able to correctly
assess the potential dangers.
Electro-magnetic fields
This appliance lies below the maximum
legal limits for electric smog, even within
the casing! However, should you still have
doubts about installing it in the bedroom:
• You will be quite safe if you place the
appliance about half a meter from
the bed. At this distance the fields are
no longer extant, even for those who
are electro-magnetic sensitive.
Notice: Check the batteries of the
power failure protection system at
least once per year and replace them
if necessary.
This appliance is fitted with anti-slip
rubber pads. As furniture upper surfaces comprise of various materials
and are cleaned with various types
of polishes and/or cleaning agents,
it cannot be completely excluded
that some of these substances contain components that could attack
the rubber pads and soften them.
If necessary, place an anti-slip mat
under the rubber pads of the appliance.
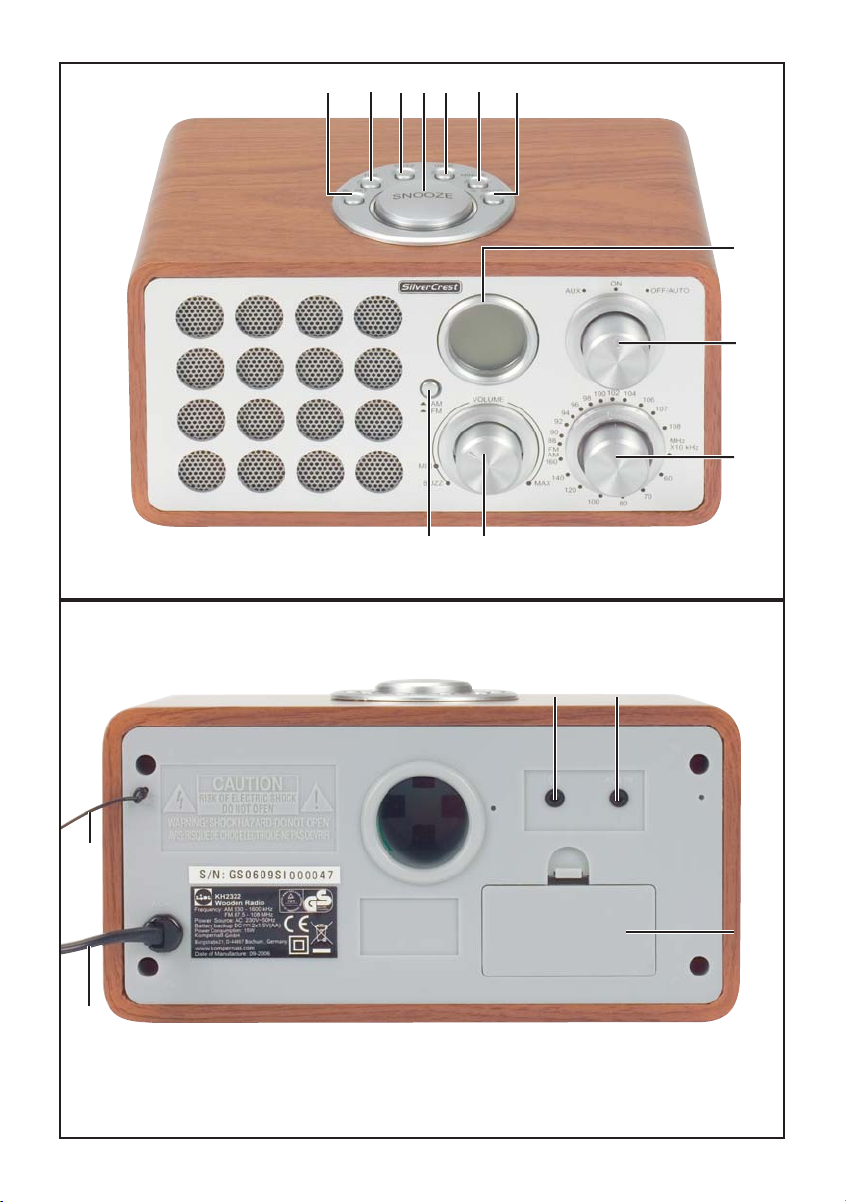
Operating elements
Button AL. SET
Button TIME
Button SLEEP
Button SNOOZE
Button HOUR
Button MINUTE
Button AL. ON/OFF
Display
Rotating switch (AUX, ON, OFF/AUTO)
TUNING adjuster
Volume adjuster VOLUME
Waveband selector (FM / AM)
Headphone connection 3,5mm
AUX IN connection
Battery compartment
Power cable
Wire aerial
Connection
Before operating the appliance, satisfy
yourself that it appears to be in good
working condition. If not, it may not be
used.
Power failure protection
By the insertion of two 1,5V batteries
Type Mignon (R6/LR6/AA) you can avoid
the loss of time and alarm setting in the
event of a mains power failure. On the
return of mains power the correct time
will automatically appear in the Display .
Notice: The alarm, radio and display
do not function with battery-power
only.
- 5 -

SilverCrest KH 2322
➪ Open the battery compartment at
the rear of the appliance and insert
two 1,5V batteries Typ Mignon
(R6/LR6/AA).
➪ Insert the power plug into the power
socket. Select a wall power socket
that is at all times easily accessible so
that the plug can be immediately withdrawn in the event of a malfunction.
Notice: Rechargable batteries cannot
be charged via the battery connection. In the event of an extended
power failure (several hours), the
clock and alarm times must be
checked and possibly re-adjusted.
Setting the clock
When you first take the appliance into
use, or the time must be adjusted, proceed as follows:
NOTE: The time and alarm settings
can be made without the insertion
of batteries, however, the appliance
then needs to be connected to mains
power. The power failure protection
is not in effect.
➪ Whilst you hold the button TIME
pressed down:
➪ Press several times in succession, or
simply hold down, the button HOUR
to adjust the hours.
➪ Release the button HOUR when
the desired hour setting is shown in
the Display .
➪ Press several times in succession,
or simply hold down, the button
MINUTE to adjust the minutes.
➪ Release the button MINUTE when
the desired minute setting is shown
in the Display .
The adjusted time is automatically taken
over as soon as the button TIME is released.
Radio Reception
➪ Turn the rotating switch to the
position ON.
➪ Turn the volume adjuster VOLUME
to a middle position.
➪ Select the desired wavelength
(FM/AM) with the Waveband selector
.
➪ Now tune in to the desired radio station,
by turning the TUNING adjuster .
NOTE: To improve the reception of
radio stations transmitting in FM frequencies, move the end of the wire
aerial slowly in various directions.
When you have found the best reception from the desired transmitter, fix
the wire aerial into this position e.g.
with adhesive tape. An aerial is built
into the appliance for the reception
of AM transmitters . For improved
reception, alter the actual position
of the appliance in radio operation.
- 6 -

SilverCrest KH 2322
Adjusting Alarm Settings
If the clock is set correctly, as described
above:
NOTE: The time and alarm settings
can be made without the insertion
of batteries, however, the appliance
then needs to be connected to mains
power. The power failure protection
is not in effect.
➪ Whilst holding down the button AL.
SET :
➪ Press several times in succession, or
simply hold down, the button HOUR
to adjust the hours.
➪ Release the button HOUR when
the desired hour setting is shown in
the Display .
➪ Press several times in succession, or
simply hold down, the button MINUTE
, to adjust the minutes.
➪ Release the button MINUTE when
the desired hour setting is shown in
the Display .
You will be awakened by the radio if ...
➪ the volume adjuster VOLUME is set
at a volume level that will wake you.
You will be awakened by the signal tone
if...
➪ the volume adjuster VOLUME is
turned so far down that it has switched
itself off with an audible click, i.e. it
is in the position BUZZ.
Switching the Alarm OFF
➪ Press the button SNOOZE , and the
alarm will repeat itself after 5 minutes.
➪ Shortly press the button AL. ON/OFF
to activate the alarm function for
the next day. In the Display ALARM
is still to be seen.
➪ Press the button AL. ON/OFF twice
to completely deactivate the alarm
function.
In the Display the ALARM sign
disappears.
The adjusted alarm time is automatically
taken over as soon as the button AL. SET
is released.
Switching the Alarm ON
If the clock and alarm time are set
correctly, as described above:
➪ Set the rotating switch into the
position OFF/AUTO.
➪ Press the button AL. ON/OFF to
switch on the alarm function. In the
Display appears ALARM.
Sleep Timer
If you would like to listen to the radio
for a while before going to sleep and
would like the radio to switch itself off:
➪ Place the rotating switch into the
positionOFF/AUTO.
➪ Press the button SLEEP . The radio
switches itself on after ca. 2-3 seconds
and plays for 90 minutes.
In the Display , SLEEP blinks for
several seconds.
- 7 -

SilverCrest KH 2322
➪ For as long as the notification SLEEP
is blinking in the Display you can,
through repeated pressing of the button SLEEP , shorten the switch-off
time to 60, 30 or 10 minutes.
➪ Through once again pressing the button
SLEEP the notification SLEEP disappears from the Display and the
switch-off period is deactivated. The
radio continues to play.
➪ Place the rotating switch into the
position ON ,and then back again to
the position OFF/AUTO, to switch the
radio off.
External audio sources
You can connect external audio sources
to this appliance with a 3,5 mm jack
plug.
• Connect the audio output of the
external audio source to the AUX IN
connection .
• Adjust the rotary switch to the
position AUX.
• The signals from the external audio
source will now be reproduced over
the loudspeakers.
Using headphones
You can connect headphones to the
appliance with a 3,5 mm jack plug. The
headphone connection socket is located at the rear of the appliance. When
headphones are connected, the loudspeakers are deactivated and sounds
can only be heard over the headphones.
➩ Insert the 3,5 mm jack plug into the
headphone connection socket .
Warning!: To avoid hearing damage
when using headphones do not set the
volume level too high.
Cleaning and Care
Attention - Danger of an electric
shock:
Before cleaning the appliance:
➪ Remove the power plug from the
power socket.
➪ Never open the housing. There are
no user-servicable elements inside.
➪ Clean the applicance only with a
lightly moistened cloth.
➪ Do not use detergents or solvents.
These could damage the plastic surfaces.
- 8 -

SilverCrest KH 2322
Disposal
Do not dispose of the appliance in
your normal domestic waste.
Dispose of the appliance through an
approved disposal centre or at your community waste facility. Observe the currently applicable regulations. In case of
doubt, consult your local disposal facility.
First of all, remove the batteries before
disposing of the appliance. Old batteries
should not be disposed of with the household waste. Return old batteries to your
dealer, or take them to the nearest recycling point.
Important Warranty Notices
This appliance entitles you to a warranty
of 3 years from the date of purchase.
Should you have cause for complaint,
despite our high quality standards, please
contact our Service-Hotline. If it is not
possible to resolve your complaint over
the telephone, you will receive from there:
• a processing number (RMA-Number)
as well as
• an address to which you can send
your appliance for repair under warranty.
Please include a copy of your purchase
receipt with all postal submissions. The
device should be packed in a manner
that is safe for transportation and the
RMA number should be directly visible.
Products sent in without the RMA number
cannot be processed.
Note: Warranty claims are only valid
for material or manufacturing defects . Warranty claims are not valid
• for parts subject to wear and tear.
• for damages to breakable parts such
as switches and batteries.
This product is intended solely for private
use, not for commercial applications. In
cases of mis-use and improper handling,
use of force and for modifications or
repairs not carried out by our customer
service affiliates, the warranty becomes
void. Your statutory rights of warranty
are not affected by the provisions of this
warranty.
- 9 -

SilverCrest KH 2322
- 10 -

SilverCrest KH 2328
KH XXX
Warranty
Retro Wooden Radio
KH 2322
In order to ensure free repair, please
contact the service hotline Keep
your purchase receipt ready for this
purpose.
Please write the sender's address clearly:
Last name
First name
Street
Postcode/Place
Country
Telephone
Fill in this section and submit it with the appliance!
Date/Signature
DES Ltd
Tel.: 0870/787-6177
e-mail: support.uk@kompernass.com
www.mysilvercrest.de
Kompernass Service Ireland
Tel: 087-99 62 077
e-mail: support.ie@kompernass.com
www.mysilvercrest.de
Defect description:
✄

IE
Kompernaß GmbH · Burgstr. 21 · D-44867 Bochum
www.kompernass.com
ID no.: KH2322-07/06-V2
 Loading...