


 Loading...
User Guide
SANYO Vero™ by KYOCERA
www.sprint.com
©2010 Sprint. SPRINT and the logo are trademarks of Sprint. Other marks are the property of their respective owners. “SANYO”isa registeredtrademark ofSANYO Electric Co.,Ltd. and is used under license. KYOCERA is a registered trademark of Kyocera Corporation. Kyocera manufactures and markets the SANYO line of wireless products.
9/16/10

Consejo: Para encontrar esta guía para usuarios en español, por favor visita a www.sprint.com y haz clic en
Support > Devices.
To find this user guide in Spanish, please visit www.sprint.com and click Support > Devices.
Important Privacy Message – Sprint’s policies often do not apply to third-party applications. Third-party applications may access your personal information or require Sprint to disclose your customer information to the third-party application provider. To find out how a third-party application will collect, access, use, or disclose your personal information, check the application provider’s policies, which can usually be found on their website. If you aren’t comfortable with the third-party application’s policies, don’t use the application.
Sprint UG_10a_9/16/10

Table of Contents
Tip: Looking for something? If you don’t see it in the headings listed here, try the Index on page 126.
Introduction . . . . . . . . . . . . . . . . . . . . . . . . . . . . . . . i
Your Phone’s Menu . . . . . . . . . . . . . . . . . . . . . . . . i
Section 1: Getting Started . . . . . . . . . . . . . . . . . 1
1A. Setting Up Service . . . . . . . . . . . . . . . . . . . 2
Setting Up Your Phone . . . . . . . . . . . . . . . . . . . . . . 2
Activating Your Phone . . . . . . . . . . . . . . . . . . . . . . . 3
Setting Up Your Voicemail . . . . . . . . . . . . . . . . . . . 4
Sprint Account Passwords . . . . . . . . . . . . . . . . . . . 4
Getting Help . . . . . . . . . . . . . . . . . . . . . . . . . . . . . . . 5
Section 2: Your Phone . . . . . . . . . . . . . . . . . . . . 7
2A. Phone Basics . . . . . . . . . . . . . . . . . . . . . . . . 8
Your Phone . . . . . . . . . . . . . . . . . . . . . . . . . . . . . . . . 8
Viewing the Display Screen . . . . . . . . . . . . . . . . . 10
Turning Your Phone On and Off . . . . . . . . . . . . . 13
Battery and Charger . . . . . . . . . . . . . . . . . . . . . . . 13
Navigating Through the Menus . . . . . . . . . . . . . . 15
Displaying Your Phone Number . . . . . . . . . . . . . 16
Making and Answering Calls . . . . . . . . . . . . . . . 16
Entering Text . . . . . . . . . . . . . . . . . . . . . . . . . . . . . . 23
Simple Data Exchange . . . . . . . . . . . . . . . . . . . . 26
2B. Settings . . . . . . . . . . . . . . . . . . . . . . . . . . . . 28
Display Settings . . . . . . . . . . . . . . . . . . . . . . . . . . . 28
Volume Settings . . . . . . . . . . . . . . . . . . . . . . . . . . 31
Ringer Settings . . . . . . . . . . . . . . . . . . . . . . . . . . . 32
Messaging Settings . . . . . . . . . . . . . . . . . . . . . . . 34
Airplane Mode . . . . . . . . . . . . . . . . . . . . . . . . . . . . 36
TTY Use With Sprint Service . . . . . . . . . . . . . . . . 36
Using the Hearing Aid Device Compatibility
Function . . . . . . . . . . . . . . . . . . . . . . . . . . . . . . . . . 38
Phone Setup Options . . . . . . . . . . . . . . . . . . . . . . 38
Security Settings . . . . . . . . . . . . . . . . . . . . . . . . . . 40
2C. History . . . . . . . . . . . . . . . . . . . . . . . . . . . . . 45
Viewing History . . . . . . . . . . . . . . . . . . . . . . . . . . . 45
History Thread . . . . . . . . . . . . . . . . . . . . . . . . . . . . 46
History Details . . . . . . . . . . . . . . . . . . . . . . . . . . . . 46
History Options . . . . . . . . . . . . . . . . . . . . . . . . . . . 46
Making a Call From History . . . . . . . . . . . . . . . . . 47
Saving a Number From History . . . . . . . . . . . . . 47
Making a New Group Entry From History . . . . . 47
Deleting History . . . . . . . . . . . . . . . . . . . . . . . . . . . 48
2D. Contacts . . . . . . . . . . . . . . . . . . . . . . . . . . . 49
About Contacts . . . . . . . . . . . . . . . . . . . . . . . . . . . 49 Displaying Contacts Entries . . . . . . . . . . . . . . . . 49 Adding a New Contacts Entry . . . . . . . . . . . . . . 50 Editing a Contacts Entry . . . . . . . . . . . . . . . . . . . 50 Adding a Number to a Contacts Entry . . . . . . . . 51 Creating a Group . . . . . . . . . . . . . . . . . . . . . . . . . . 51 Editing Groups . . . . . . . . . . . . . . . . . . . . . . . . . . . . 51 Finding Contacts Entries . . . . . . . . . . . . . . . . . . . . 52
Using Contacts Information in Other Applications . . . . . . . . . . . . . . . . . . . . . . . . . . . . . . 53
Assigning Speed Dial Numbers . . . . . . . . . . . . 53 Selecting a Ringer Type for an Entry . . . . . . . . 54 Assigning a Picture to an Entry . . . . . . . . . . . . . 54 Secret Contacts Entries . . . . . . . . . . . . . . . . . . . . 55 My Name Card . . . . . . . . . . . . . . . . . . . . . . . . . . . 55 Dialing Sprint Services . . . . . . . . . . . . . . . . . . . . 56
2E. Calendar & Tools . . . . . . . . . . . . . . . . . . . . 57
Calendar . . . . . . . . . . . . . . . . . . . . . . . . . . . . . . . . . |
57 |
Alarm . . . . . . . . . . . . . . . . . . . . . . . . . . . . . . . . . . . |
60 |
Calculator . . . . . . . . . . . . . . . . . . . . . . . . . . . . . . . . |
61 |
World Clock . . . . . . . . . . . . . . . . . . . . . . . . . . . . . . |
61 |
Countdown Timer . . . . . . . . . . . . . . . . . . . . . . . . . |
61 |
Stopwatch . . . . . . . . . . . . . . . . . . . . . . . . . . . . . . . . |
62 |
2F. Voice Services . . . . . . . . . . . . . . . . . . . . . 63
Automatic Speech Recognition (ASR) . . . . . . . . 63
Managing Voice Memos . . . . . . . . . . . . . . . . . . . 66
2G. Camera . . . . . . . . . . . . . . . . . . . . . . . . . . . . 68
Taking Pictures . . . . . . . . . . . . . . . . . . . . . . . . . . . . 68
Storing Pictures . . . . . . . . . . . . . . . . . . . . . . . . . . . 72
Sending Pictures From Your Phone . . . . . . . . . . 73
Printing Pictures From Your Phone . . . . . . . . . . . 74
2H. Bluetooth . . . . . . . . . . . . . . . . . . . . . . . . . . . 76
About Bluetooth . . . . . . . . . . . . . . . . . . . . . . . . . . . 76 Turning Bluetooth On and Off . . . . . . . . . . . . . . . 76 Making Your Phone Discoverable . . . . . . . . . . . 76 Bluetooth Menu . . . . . . . . . . . . . . . . . . . . . . . . . . . 77 Pairing Bluetooth Devices . . . . . . . . . . . . . . . . . . 78 Viewing the Trusted Devices List . . . . . . . . . . . . . 78 Sending Data via Bluetooth . . . . . . . . . . . . . . . . . 79 Printing Pictures via Bluetooth . . . . . . . . . . . . . . . 80
Section 3: Sprint Service. . . . . . . . . . . . . . . . . 83
3A. Sprint Service: The Basics . . . . . . . . . . . 84
Voicemail . . . . . . . . . . . . . . . . . . . . . . . . . . . . . . . . . 84
Messaging . . . . . . . . . . . . . . . . . . . . . . . . . . . . . . . 86
Caller ID . . . . . . . . . . . . . . . . . . . . . . . . . . . . . . . . . . 89
Call Waiting . . . . . . . . . . . . . . . . . . . . . . . . . . . . . . . 90
Making a 3-Way Call . . . . . . . . . . . . . . . . . . . . . . . 90
Call Forwarding . . . . . . . . . . . . . . . . . . . . . . . . . . . 91
Roaming . . . . . . . . . . . . . . . . . . . . . . . . . . . . . . . . . 91
3B. Web and Data Services . . . . . . . . . . . . . . 94
Getting Started With Data Services . . . . . . . . . . 94
Accessing Messages . . . . . . . . . . . . . . . . . . . . . . 97
Downloading Games, Ringers, and More . . . . . 99
ScanLife . . . . . . . . . . . . . . . . . . . . . . . . . . . . . . . . . 101
Browser Menu . . . . . . . . . . . . . . . . . . . . . . . . . . . 102
Data Services FAQs . . . . . . . . . . . . . . . . . . . . . . . 105
3C. GPS Navigation . . . . . . . . . . . . . . . . . . . . 106
GPS Services . . . . . . . . . . . . . . . . . . . . . . . . . . . . 106
Sprint Family Locator . . . . . . . . . . . . . . . . . . . . . 107
Section 4: Safety and Warranty
Information . . . . . . . . . . . . . . . . . . . . . . . . . . . . 109
4A. Important Safety Information . . . . . . . . 110
General Precautions . . . . . . . . . . . . . . . . . . . . . . 110
Maintaining Safe Use of and Access to Your Phone . . . . . . . . . . . . . . . . . . . . . . . . . . . . . . . . . . . 111
Using Your Phone With a Hearing Aid
Device . . . . . . . . . . . . . . . . . . . . . . . . . . . . . . . . . . 112 Caring for the Battery . . . . . . . . . . . . . . . . . . . . . 114 Radio Frequency (RF) Energy . . . . . . . . . . . . . 115 Owner’s Record . . . . . . . . . . . . . . . . . . . . . . . . . . 117 User Guide Proprietary Notice . . . . . . . . . . . . . 117
4B. Manufacturer’s Warranty . . . . . . . . . . . . 118
Manufacturer’s Warranty . . . . . . . . . . . . . . . . . . 118
4C. End User License Agreement . . . . . . . 121
End User License Agreement . . . . . . . . . . . . . . 121
Index. . . . . . . . . . . . . . . . . . . . . . . . . . . . . . . . . . . 126

Introduction |
|
Your Phone’s Menu |
This User Guide introduces you to Sprint® service and all the features of your new phone. It’s divided into four sections:
Section1: GettingStarted
Section2: YourPhone
Section3: Sprint Service
Section4: Safetyand Warranty Information
WARNING: Please refer to the ImportantSafetyInformation section on page 110 to learn about information that will help you safely use your phone. Failure to read and follow the Important Safety Information in this phone guide may result in serious bodily injury, death, or property damage.
The following table outlines your phone’s main menu structure. For more information about using your phone’s menus, see “Navigating Through the Menus” on page 15.
Web
Contacts
Sprint Family Locator
History
Missed Alerts
Messaging
1:Voicemail
2:Send Message
3:Messages
i

Photos
1: Camera
Press the right softkey to view the following options:
1: Picture Mode |
2: Zoom |
3: Self-Timer |
4: Fun Tools |
5: Image Controls |
6: CameraSettings |
7: Review Media |
8: Key Guidance |
9:User Settings
2:My Photos
3:Other Settings
1: Location |
2: |
Status Bar |
3: Slideshow Interval |
4: |
Help |
My Stuff
1:Application Manager
2:Games
3:Ringers
4:Screen Savers
5:Applications
6:IM & Email
7:Call Tones
My Account
1: Account Details
2: Hear Minutes
3: Hear Balance
Settings
1: Display
1: Screensaver |
2: Brightness |
3: Backlight |
4: Notification |
5: Picture ID |
6: Power Save Mode |
7: Clock/Calendar |
8: Greeting |
|
|
2: Volume |
|
1: Incoming Ringer |
2: Playback Volume |
3: Power Up/Down |
4: Key Beeps |
|
|
3: Ringers |
|
1: Incoming Calls |
2: Voicemail |
3: Messages |
4: Calendar |
5: Power Up/Down |
|
ii

4: Text Entry
1: Word Complete |
2: Next Word Complete |
3: Phrase Complete |
4: Word Scan |
5: Word Choice List |
6: Input Language |
7: My Words |
8: Help |
|
|
5: Phone Info |
|
1: Phone#/User ID |
2: Memory Status |
3: Icon Glossary |
4: Version |
5: Advanced |
6: My Account |
|
|
6: Lock Phone |
|
1: Lock Now |
2: Change Lock Code |
3: Lock Code Hint |
|
|
|
7: Parental Controls |
|
8: Reset/Delete |
|
1: Reset Settings |
2: Reset Phone |
3: Delete Stuff |
4: Change Lock Code |
|
|
9: Others |
|
1: Accessibility |
|
1: Voice Services |
2: TTY |
3: Font Size |
4: Vibrate Type |
5: Hearing Aid |
|
2:Airplane Mode
3:Alerts
1:Beep Each Minute 2: Out of Service
3:Connect
4:Call Setup
1: Abbrev. Dial |
2: Call Answer |
3:Auto-Answer
5:Data
1: Data On/Data Off 2: Net Guard
3:Update Data Profile
6:Headset Mode
1: Normal |
2: Headset Only |
7: Language |
|
1: English |
2: Español |
|
|
8: Location |
|
1: On/Off |
2: NMEA Output |
|
|
9: Roaming |
|
1: Set Mode |
2: Call Guard |
3: Data Roam Guard |
|
iii

0: Navigation Keys
1: Left Navigation |
2: Right Navigation |
(Calendar) |
(Web) |
3: Up Navigation |
4: Down Navigation |
(Send Message) |
(My Stuff) |
|
|
Tools |
|
1: Device Self Service |
|
2: Alarm |
|
3: Calendar |
|
4: Bluetooth |
|
1: On/Off |
2: Visibility |
3: Add New |
4: Trusted Devices |
5: My Bluetooth Info |
|
|
|
5: Update Phone |
|
1: Update Firmware |
2: Update PRL |
|
|
6: Voice Services |
|
1: Voice Recognition |
2: Voice Memo |
|
|
7: Assigned Media |
|
8: Calculator |
|
9: Countdown |
|
|
|
0: Stopwatch
*: World Clock
Shopping
In Use Menu
Press OPTIONS (right softkey) to display the following options:
1: Save/Contact Details |
2: Main Menu |
|
3: |
3-Way Call |
4: Contacts |
5: |
Voice Memo |
6: Phone Info |
iv
Section 1
Getting Started
1A. Setting Up Service
SettingUpYourPhone (page2)
Activating Your Phone (page3)
SettingUpYourVoicemail(page4)
SprintAccountPasswords (page4)
GettingHelp(page5)
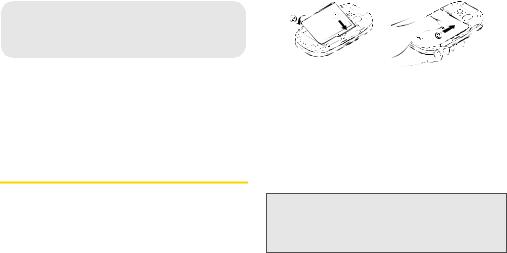
Setting Up Your Phone
1.Install the battery.
Insert the battery into the opening in the back of
the phone, making sure the connectors align ( ), and gently press down to secure the battery (
 ).
).
Position the battery cover over the battery compartment and slide it up until it snaps into place ( ).
).
21A. Setting Up Service
2.Press  to turn the phone on.
If your phone is activated, it will turn on, search for Sprint service, and enter standby mode.
If your phone is not yet activated, see “Activating Your Phone” on page 3 for more information.
3.Make your first call.
Use your keypad to enter a phone number.
Press  .
.
Note: Your phone’s battery should have enough charge for your phone to turn on and find a signal, set up your voicemail, and make a call. You should fully charge your battery as soon as possible. See “Charging the Battery” on page 15 for details.

Activating Your Phone
If you purchased your phone at a Sprint Store, it is probably activated and ready to use.
If you received your phone in the mail and it is for a new Sprintaccountoranewlineofservice, it is designed to activate automatically. To confirm your activation, make a phone call.
If you received your phone in the mail and it is going to be activated on an existing number on your account (you’re swapping phones), you can activate on your computer online or directly on your phone.
Activateonyourcomputer:
Go to www.sprint.com/activate and follow the instructions.
Activateonyourphone:
Note: You will need your Sprint PIN to use this activation method.
1.Turn on your new phone. (Make sure the old one is turned off.) Your phone will attempt Hands-Free Activation automatically.
2.Press ACTIVATE (left softkey) to override auto-activation and start the manual activation wizard.
Note: If you don’t override Hands-Free Activation, your phone will attempt to auto-activate five times, and then the manual activation wizard will start automatically.
3.Use your navigation key, your keypad, or both to complete each screen of the wizard, and press NEXT (left softkey) to advance through the screens.
4.Continue until you get to a confirmation screen telling you that your phone is now active, and then press  to return to your phone’s main menu.
When you have finished, make a phone call to confirm your activation. If your phone is still not activated, contact Sprint Customer Service at 1-888-211-4727 for assistance.
Tip: Do not press  while the phone is being activated. Pressing
  cancels the activation process.
Note: If you are having difficulty with activation, contact Sprint Customer Service by dialing 1-888-211-4727 from any other phone.
Setting Up Service
1A. Setting Up Service |
3 |

Setting Up Your Voicemail
Your phone automatically transfers all unanswered calls to your voicemail, even if your phone is in use or turned off. You should set up your Sprint Voicemail and personal greeting as soon as your phone is activated. Always use a password to protect against unauthorized access.
1.From standby mode, press and hold  .
.
2.Follow the system prompts to:
Create your password.
Record your name announcement.
Record your greeting.
Note: Voicemail Password
Sprint strongly recommends that you create a password when setting up your voicemail to protect against unauthorized access. Without a password, anyone who has access to your phone is able to access your voicemail messages.
For more information about using your voicemail, see “Voicemail” on page 84.
Sprint Account Passwords
As a Sprint customer, you enjoy unlimited access to your personal account information, your voicemail account, and your data services account. To ensure that no one else has access to your information, you will need to create passwords to protect your privacy.
Account UserNameandPassword
If you are the account owner, you will create an account user name and password when you sign on to www.sprint.com. (Click Needtoregisterforaccess? to get started.) If you are not the account owner (if someone else receives the bill for your Sprint service), you can get a sub-account password at www.sprint.com.
VoicemailPassword
You will create your voicemail password when you set up your voicemail. See “Setting Up Your Voicemail” on this page for more information on your voicemail password.
41A. Setting Up Service

DataServicesPassword
With your Sprint phone, you may elect to set up an optional data services password to control data (Web) access and authorize Premium Service purchases.
For more information, or to change your passwords, sign on to www.sprint.com or call Sprint Customer Service at 1-888-211-4727.
Getting Help
Managing Your Account
Online: www.sprint.com
Access your account information.
Check your minutes used (depending on your Sprint service plan).
View and pay your bill.
Enroll in Sprint online billing and automatic payment.
Purchase accessories.
Shop for the latest Sprint phones.
View available Sprint service plans and options.
Learn more about data services and other products like games, ringers, screen savers, and more.
From YourSprintPhone
Press 

 to check minute usage and account balance.
Press 

 to make a payment.
Press 

 to access a summary of your Sprint service plan or get answers to other questions.
FromAnyOther Phone
Sprint Customer Service: 1-888-211-4727.
Business Customer Service: 1-800-927-2199.
Sprint 411
Sprint 411 gives you access to a variety of services and information through your phone, including residential, business, and government listings; movie listings or showtimes; driving directions, restaurant reservations, and major local event information. You can get up to three pieces of information per call, and the operator can automatically connect your call at no additional charge.
There is a per-call charge to use Sprint 411, and you will be billed for airtime.
Press 


 .
.
Setting Up Service
1A. Setting Up Service |
5 |
Sprint Operator Services
Sprint Operator Services provides assistance when placing collect calls or when placing calls billed to a local telephone calling card or third party.
Press 
 .
.
For more information or to see the latest in products and services, visit us online at www.sprint.com.
61A. Setting Up Service

Section 2
Your Phone

2A. Phone Basics
Your Phone(page8)
Viewing theDisplayScreen(page10)
TurningYourPhoneOnandOff(page13)
Batteryand Charger (page 13)
NavigatingThroughtheMenus(page15)
Displaying YourPhoneNumber(page16)
Making andAnswering Calls(page16)
EnteringText(page23)
SimpleDataExchange(page26)
Tip: Phone Firmware Upgrades – Updates to your phone’s firmware (software) may become available from time to time. Sprint will automatically upload critical updates to your phone. You can also use the menu to check for and download updates. Press  > Tools>UpdatePhone> Update Firmware to search for and download available updates.
Your Phone
1. Earpiece |
|
|
|
|
|
|
|
|
|
|
14. LED Indicator |
||||||||||
|
|
|
|
|
|
|
|
|
|
||||||||||||
2. Main Screen |
|
|
|
|
|
|
|
|
|||||||||||||
|
|
|
|
|
|||||||||||||||||
|
|
|
|
|
|
|
|
|
|
|
|
|
|
13. Softkeys |
|||||||
3. MENU/OK Key |
|
|
|
|
|
|
|
|
|
|
|
|
|
|
|||||||
|
|
|
|
|
|
|
|
|
|
|
|
|
|
||||||||
|
|
|
|
|
|
12. Headset Jack |
|||||||||||||||
|
|
|
|
|
|
|
|
|
|
|
|
|
|
||||||||
4. Camera Key |
|
|
|
|
|
|
|
|
|
|
11. Navigation Key |
||||||||||
5. TALK Key |
|
|
|
|
|
|
|
|
|
|
|
10. BACK Key |
|||||||||
|
|
|
|
||||||||||||||||||
6. SPEAKER Key |
|
|
|
|
|
|
9. END/POWER Key |
||||||||||||||
7. Microphone |
|
|
|
|
|
|
|
|
|
|
|
8. Keypad |
|||||||||
|
|
|
|
|
|
|
|
|
|
|
|||||||||||
|
|
|
|
|
|
|
|
|
|
|
|
|
|
15. Outer Screen |
|||||||
16. Speaker |
|
|
|
|
|
|
|
|
|
|
|
|
|
|
|||||||
17. Camera Lens |
|
|
|
|
|
|
|
19. Volume Button |
|
|
|
|
|||||||||
|
|
|
|
|
|
|
|
|
|
||||||||||||
18. Battery |
|
|
|
|
|
|
|
|
|
|
|
|
|
|
|||||||
Release Tab |
|
|
|
|
|
|
|
|
|
|
|
|
|
|
|||||||
|
|
|
|
|
|
|
|
|
|
|
|
|
|
20. Charger/Accessory Jack |
|
|
|
||||
|
|
|
|
|
|
|
|
|
|
|
|
|
|||||||||
|
|
|
|
|
|
|
|
|
|
|
|
|
|
21. Internal Antenna |
|
|
|||||
|
|
|
|
|
|
|
|
|
|
|
|
|
|||||||||
82A. Phone Basics

Key Functions
1.Earpiece lets you hear the caller and automated prompts.
2.Main Screen displays all the information needed to operate your phone, such as the call status, the Contacts list, the date and time, and the signal and battery strength.
3.MENU/OK Key lets you access the phone’s menus and select the highlighted choice when navigating through a menu.
4.Camera Key lets you access the Photos menu. Press and hold to activate the camera mode and take pictures.
5.TALK Key allows you to place or receive calls, answer Call Waiting, use 3-Way Calling, or activate Automatic Speech Recognition (ASR).
6.SPEAKER Key lets you place or receive voice calls, activate ASR in speakerphone mode, and turn the speakerphone on or off during a call.
7.Microphone allows other callers to hear you clearly when you are speaking to them.
8.Keypad lets you enter numbers, letters, and characters and navigate within menus. You can use the numeric keypad for speed dialing (see “Speed Dialing” on page 22).
9.END/POWER Key lets you turn the phone on or off, end a call, or cancel your input and return to idle mode (standby mode or service search mode).
10.BACKKey deletes characters from the display in text input mode. When in a menu, pressing it returns you to the previous menu. This key also allows you to return to the previous screen in a data session.
11.Navigation Key scrolls through the phone’s menu options and acts as a shortcut key from standby mode. These keys can be reassigned to create customized shortcuts. See “Navigation Key Shortcuts” on page 38.
12.Headset Jack allows you to plug in an optional headset for convenient, hands-free conversations. CAUTION! Inserting an accessory into the incorrect jack may damage the phone.
13.Softkeys let you select softkey actions or menu items corresponding to the bottom left and right lines on the main screen.
14.LED Indicator shows the status of your phone and charging at a glance.
Phone Basics
2A. Phone Basics |
9 |

15.Outer Screen lets you monitor the phone’s status and see who is calling without opening the phone.
16.Speaker lets you hear the different ringers and sounds. The speaker also lets you hear the caller’s voice in speakerphone mode.
17.Camera Lens, as part of the built-in camera, lets you take pictures.
18.Battery Release Tab lets you open the battery cover to replace the battery.
19.Volume Button allows you to adjust the ringer volume whenever your phone is turned on or adjust the voice volume during a call.
20.Charger/Accessory Jack allows you to connect a compatible charging cable or USB data cable (not included). CAUTION! Inserting an accessory into the incorrect jack may damage the phone.
21.Internal Antenna facilitates reception and transmission. To maximize performance, do not touch the bottom portion of your phone where the internal antenna is located while using the phone.
Viewing the Display Screen
The status bar at the top of your phone’s display screen providesinformation aboutyour phone’sstatus and options. These tables identify the major symbols you’ll see on the status bar or other positions of your phone’s display screen.
Tip: To view a list of your phone’s icons and descriptions, press  > Settings > Phone Info > Icon Glossary. For the camera function icons, see “Camera Icons” on page 72.
Service Icons
Signal Strength – Your phone’s current signal strength. (More bars = stronger signal.)
No Service – Your phone cannot find a usable signal.
Roaming – Your phone is “roaming” off the
Nationwide Sprint Network.
Data Service – Sprint 1xRTT data service is available. When active, the icon is animated.
Data Service Dormant – Data service is currently dormant.
Data Service Unavailable – Data service is currently unavailable.
10 2A. Phone Basics
, SCP-3820 (Sprint) User Guide")
Status Icons
Battery – Your phone’s current battery charge level. (The icon to the left shows the battery is fully charged.) The icon is animated while the battery is charging.
Location On – Your phone’s location feature is on and available for location-based services such as GPS Navigation.
Location Off – Your phone’s location feature is off. Your location is available only for 911.
Silence All – Your phone’s sound is turned off.
Vibrate All – Your phone’s sound is turned off but vibrate is turned on.
Ringer Off – Your phone’s ringer is turned off.
1 Beep – A beep sounds when you receive an incoming call, a message, etc.
1 Beep and Vibrate – 1 Beep and vibrate are set.
Ringer and Vibrate – The volume level is set to between 1 and 8 and vibrate is turned on.
Speaker Mode – Your phone is in speaker mode.
Messaging and Alert Icons
New Messages – You have one or more new messages waiting.
New Voicemail – You have one or more new voicemail messages waiting.
Urgent Messages – You have one or more new urgent messages (including Commercial Mobile
Alert System [CMAS] alert message) waiting.
MultipleAlerts - You have different kinds of alerts waiting.
Urgent Multiple Alerts - You have different kinds of alerts (including urgent message) waiting.
Application Alerts - You have alert messages from Java applications activated in the background.
Phone Basics
2A. Phone Basics |
11 |

Bluetooth Icons
Visible – Your phone is discoverable by (visible to) other Bluetooth devices.
Connected – Your phone is connected to a Bluetooth device.
Enabled – Your phone’s Bluetooth feature is enabled.
Tip: The above icons will blink while your phone is communicating with a Bluetooth device.
Voice Call Icons
Missed Call – You have one or more missed voice calls.
Bluetooth Device – A call is in progress using a Bluetooth device.
Headset – A call is in progress using an optional wired headset.
Car Kit – A call is in progress using an optional car kit device.
Other Icons
TTY – Your phone is connected to a TTY device.
Alarm – An alarm or countdown is set.
Notification – You have event notifications.
HAC Enabled – Your phone’s HAC (hearing aid compatibility) setting is enabled.
Multitasking Virtual Machine – Indicates Java applications are running. The number next to the plus sign indicates the number of running applications.
12 2A. Phone Basics

Turning Your Phone On and Off
Turning Your Phone On
Press  .
.
Once your phone is on and finds a signal, it automatically enters standby mode – the phone’s idle state. At this point, you are ready to begin making and receiving calls.
If your phone is unable to find a signal after five minutes of searching, a Power Save feature is automatically activated. When a signal is found, your phone automatically returns to standby mode.
In Power Save mode, your phone searches for a signal periodically without your intervention. You can also initiate a search for Sprint service by pressing any key except numbered keys.
Tip: The Power Save feature conserves your battery power when you are in an area where there is no signal.
Turning Your Phone Off
Press and hold  for two seconds until you see the powering-down animation on the display screen.
Your screen remains blank while your phone is off unless the battery is charging.
Battery and Charger
WARNING: Use only Sprint-approved or Kyocera-approved batteries and chargers with your phone. The failure to use a Sprint-approved or Kyoceraapproved battery and charger may increase the risk that your phone will overheat, catch fire, or explode, resulting in serious bodily injury, death, or property damage.
Sprint-approved or Kyocera-approved batteries and accessories can be found at Sprint Stores or through Kyocera; or call 1-866-866-7509 to order. They’re also available at www.sprint.com.
Phone Basics
2A. Phone Basics |
13 |

BatteryCapacity
Your phone is equipped with a Lithium Ion (Li-Ion) battery. It allows you to recharge your battery before it is fully drained. The battery provides up to 5.2 hours of continuous digital talk time.
For a quick check of your battery level, glance at the battery charge indicator located in the upper right corner of your phone’s display screen. When there are approximately five minutes of talk time left, the battery icon ( ) turns red and the phone sounds a warning tone.
After an additional five minutes or so, the phone sounds a warning tone three times and then turns off.
Note: Long backlight settings, searching for service, vibrate mode, browser use, and other variables may reduce the battery’s talk and standby times.
Tip: Watch your phone’s battery level indicator and charge the
battery before it runs out of power.
InstallingtheBattery
See “Setting Up Your Phone” on page 2.
RemovingtheBattery
1.Make sure the power is off so that you don’t lose any stored numbers or messages.
2.Press the release tab, and apply light pressure while sliding the cover down.
3.Lift the battery up and remove it from the phone.
WARNING: Do not handle a damaged or leaking Li-Ion battery as you can be burned.
14 2A. Phone Basics

ChargingtheBattery
Keeping track of your battery’s charge is important. If your battery level becomes too low, your phone automatically turns off, and you will lose any information you were just working on.
Always use a Sprint-approved or Kyocera-approved desktop charger, travel charger, or vehicle power adapter to charge your battery.
1.Plug the phone charger into an electrical outlet.
2.Plug the other end of the phone charger into the charger/accessory jack located on the lower left side of your phone.
With the Sprint-approved Li-Ion battery, you can recharge the battery before it becomes completely run down.
Navigating Through the Menus
The navigation key on your phone lets you scroll through menus quickly and easily. Many menus feature a scroll bar on the right to help you keep track of your position in the menu.
To navigate through a menu, press the navigation key up or down.
For a diagram of your phone’s menu, please see “Your Phone’s Menu” on page i.
SelectingMenuItems
As you navigate through the menu, menu options are highlighted. Select any option by highlighting it and pressing  . If the option is numbered, you can select it by pressing the corresponding number on the phone’s keypad.
For example, to open the alarm setting screen:
1.Press  to access the main menu.
2.Select Tools by highlighting it and pressing  .
.
3.Select Alarm by highlighting it and pressing  .
.
For the purposes of this guide, the above steps condense into:
Press  > Tools > Alarm.
Phone Basics
2A. Phone Basics |
15 |

BackingUpWithinaMenu
Press  to go to the previous menu.
Press  to return to standby mode.
Displaying Your Phone Number
Press  > Settings > Phone Info > Phone#/User ID.
Your phone number and other information about your phone and account will be displayed.
2.Press  or
or  . (To make a call when you are roaming and Call Guard is enabled, see “Call Guard” on page 92.)
3.Press  when you are finished.
Note: If Parental Controls is on and Voice Calls are restricted, you can only place calls to or receive calls from a limited set of phone numbers. (See page 41.)
Tip: To redial your last outgoing call, press  , highlight the call, and then press
  again.
When making calls off the Nationwide Sprint Network, always dial using 11 digits (1 + area code + phone number).
Making and Answering Calls
Making Calls
1.Enter a phone number from standby mode. (If you
make a mistake while dialing, press  to erase the numbers.)
You can also place calls from your phone by speed dialing (page 22), by using Automatic Speech Recognition (page 63), and by using your History listings (page 47).
16 2A. Phone Basics

Dialing Options
When you enter numbers in standby mode, you can see available dialing options by pressing OPTIONS (right softkey). To select an option, highlight it and press  .
.
Save to save a phone number in your Contacts. (See “Saving a Phone Number” on page 20.)
Contact Details to view the detailed information of a Contacts entry when the number you have entered is already saved in your Contacts.
 Hard Pause to insert a hard pause. (See “Dialing and Saving Phone Numbers With Pauses” on page 21.)
 2-Sec. Pause to insert a two-second pause. (See “Dialing and Saving Phone Numbers With Pauses” on page 21.)
Tip: When the left softkey displays SEND MESSAGE, press it to send a message.
Answering Calls
1.Make sure your phone is on. (If your phone is off, incoming calls go to voicemail.)
2.Press  to answer an incoming call. (Depending on your settings, you may also answer incoming calls by pressing other keys. See “Call Answer Mode” on page 39.)
Your phone notifies you of incoming calls in the following ways:
The phone rings or vibrates.
The backlight illuminates.
The screen displays an incoming call message.
If the incoming call is from a number stored in your Contacts, the entry’s name is displayed. The caller’s phone number may also be displayed, if available.
For other actions when receiving a call, you can select an onscreen menu or press a key:
Press 

 to answer the call in speaker mode.
Answer to answer the call.
When connecting via Bluetooth, select Answer with <Bluetooth device name> or Answer with Phone to answer a call with your selected device.
Phone Basics
2A. Phone Basics |
17 |

Silence to mute the ringer and stop the vibration.
Pressing  or the volume button has the same effect.
Send to Voicemail to ignore the call and transfer it to your voicemail.
Ignore with Text to ignore the call and send a message to the caller.
Press  to ignore the call.
Note: Ignore with Text may not be displayed when calls are from entries identified as No Caller ID, Private (Restricted ID), or Unavailable ID.
AnsweringaRoamCallWithCall GuardEnabled
Call Guard is an option that helps you manage your roaming charges when making or receiving calls while outside the Nationwide Sprint Network. Please see “Roaming” on page 91 for more information about roaming.
Press  , and then press
  to answer the call. (See “Call Guard” on page 92 for additional information.)
EndingaCall
Press  .
.
Missed Call Notification
When an incoming call is not answered, your screen displays the Missed Call log. Press  to dial the phone number.
TodisplayaMissedAlerts entryfromstandbymode:
1.Press  > Missed Alerts.
2.Highlight the entry you wish to view and press  .
.
Calling Emergency Numbers
You can always place calls to 911 (dial 


 ), even if your phone is locked or your account is
restricted.
Note: After you have placed an emergency call, your phone automatically enters Emergency mode.
During an emergency call, press OPTIONS (right softkey) to display your options. Highlight an option and press  .
.
18 2A. Phone Basics

TransferAudio to switch the call to a Bluetooth device (if applicable).
Contacts to display your Contacts list.
Voice Memo to record the other party’s voice.
Phone Info to display information about your phone.
Tip: Press MY PHONE# (left softkey) to display your phone number during an emergency call.
To exitEmergencymode:
1.Press  to end a 911 call.
2.Press 
 to exit emergency mode.
Enhanced911(E911)Information
This phone features an embedded Global Positioning System (GPS) chip necessary for utilizing E911 emergency location services where available.
When you place an emergency 911 call, the GPS feature of your phone seeks information to calculate your approximate location. Depending on several variables, including availability and access to satellite signals, it may take up to 30 seconds or more to determine and report your approximate location.
Important: Always report your location to the 911 operator when placing an emergency call. Some designated emergency call takers, known as Public Safety Answering Points (PSAPs) may not be equipped to receive GPS location information from your phone.
In-Call Options
Pressing OPTIONS (right softkey) during a call displays a list of available in-call features.
TransferAudio to switch the call to a Bluetooth device (if applicable).
Save to save the current call’s phone number in your Contacts.
ContactDetails to display information about the caller stored in your Contacts.
Main Menu to display the phone’s main menu.
3-Way Call to open a call with two other parties.
Contacts to display your Contacts list.
Voice Memo to record the other party’s voice.
Phone Info to display information about your phone.
Phone Basics
2A. Phone Basics |
19 |

Press the volume button up or down to adjust the receiver volume.
Press MUTE or UNMUTE (left softkey) to switch between the mute or unmute mode. (Muting applies to your voice, not the other party’s.)
Press  to turn the speaker on. Press again to turn it off.
WARNING: Because of higher volume levels, do not place the
phone near your ear during speakerphone use.
End-of-Call Options
After you have finished your call, the phone will display an end-of-call message in the Recent History screen (see page 45). “Call ended” and the duration of the call will alternately flash beneath the caller’s name (if already in your Contacts) or the caller’s number (if available). Press any of the following keys to select an option.
Press  to call a highlighted entry.
Press  to display all history for a highlighted entry.
Press OPTIONS (right softkey) to display the Recent History options. (See “History Options” on page 46 for details.)
Press SEND MESSAGE (left softkey) to send a message.
Press  to return to standby mode.
Press  or simply wait 10 seconds to return to where you were before the call (if applicable).
Saving a Phone Number
Your phone can store up to 600 Contacts entries and each entry can contain up to seven phone numbers. (See “2D. Contacts” on page 49.)
1.From standby mode, enter a phone number and press OPTIONS (right softkey) > Save. (If this is the first time you are saving an entry to Contacts, skip to step 3.)
2.Select New Entry or Existing Entry.
3.If you chose New Entry, select a number type, and then enter the new entry name.
– or –
If you chose Existing Entry, select an entry to which you want to save the number, and then highlight a number type and press  .
.
4. Press DONE (left softkey) to save the entry.
20 2A. Phone Basics
Loading...