Sanyo VCC-ZM300PA Instruction Manual

INSTRUCTION MANUAL BEDIENUNGSANLEITUNG MANUEL D’INSTRUCTIONS
COLOUR CCD ZOOM camera CCD-Farb-Zoomkamera
Caméra CCD COULEURS avec ZOOM
 CCD
CCD


VCC-ZM300PA
About this manual |
A propos de ce manuel |
Before installing and using the camera, please read this manual carefully. Be sure to keep it handy for later reference.
Avant d’installer et d’utiliser la caméra, veuillez lire ce manuel attentivement. Gardez-le à portée de main pour toute référence ultérieure.
Über diese Bedienungsanleitung
Lesen Sie bitte vor der Montage und dem Inbetriebnehmen der Kamera zuerst diese Bedienungsanleitung sorgfältig durch und bewahren Sie sie zum späteren Nachschlagen auf.
English
1
CONTENTS
MAIN FEATURES...................................................................... |
2 |
ACCESSORIES........................................................................... |
2 |
PRECAUTIONS.......................................................................... |
3 |
PARTS NAMES AND FUNCTIONS ........................................... |
4 |
CONNECTIONS ......................................................................... |
6 |
Basic connection for monitoring or recording......................... |
6 |
Connection of peripheral equipment and controller |
|
terminal ...................................................................................... |
7 |
DISPLAYING/CLOSING THE MENU SCREEN .......................... |
8 |
MENU ITEM FLOW AND MENU OPERATION ........................ |
9 |
LANGUAGE SETTING ............................................................... |
10 |
CAMERA ID SETTING............................................................... |
11 |
Camera ID setting...................................................................... |
11 |
SYNC SETTING (SYNC) ............................................................ |
12 |
Power source synchronization (L-L) setting ............................ |
12 |
PRIVACY MASK SETTING (PRIVACY MASK) ......................... |
13 |
Mask setting .............................................................................. |
13 |
PASSWORD setting ................................................................... |
15 |
PASSWORD LOCK cancellation................................................. |
16 |
PASSWORD changes ................................................................. |
16 |
LENS SETTING (LENS).............................................................. |
17 |
FOCUS setting............................................................................ |
17 |
ZOOM setting ............................................................................ |
20 |
MIRROR SETTING..................................................................... |
21 |
VIEW SETTING ITEM FLOW..................................................... |
22 |
VIEW SETTING.......................................................................... |
24 |
IRIS setting ....................................................................................... |
24 |
Autoiris setting (AUTO) ............................................................ |
24 |
SENSE UP setting....................................................................... |
29 |
LEVEL setting............................................................................. |
29 |
Manual iris setting .................................................................... |
30 |
WHITE BALANCE adjustment ......................................................... |
31 |
MWB setting ............................................................................. |
32 |
ATW setting............................................................................... |
32 |
AWC setting .............................................................................. |
34 |
Electronic SHUTTER setting ............................................................ |
35 |
Fast shutter speed (SHORT) mode setting.............................. |
35 |
Slow shutter speed (LONG) mode setting .............................. |
36 |
MOTION detector setting ............................................................... |
37 |
MOTION MASKING setting ...................................................... |
39 |
SENSITIVITY setting.................................................................. |
40 |
ZOOM setting............................................................................ |
41 |
INTERVAL setting...................................................................... |
41 |
ALARM SIGN setting................................................................. |
42 |
Profile compensation setting (APERTURE) .................................... |
43 |
Automatic gain control (AGC) setting ........................................... |
44 |
GAMMA correction setting............................................................. |
45 |
OPTION SETTING ..................................................................... |
46 |
CONTROL setting ...................................................................... |
46 |
ADDRESS setting....................................................................... |
47 |
ALARM setting .......................................................................... |
47 |
AAlarm input setting (ALARM IN) ............................................. |
47 |
BAlarm output setting (ALARM OUT) ....................................... |
50 |
COperation of alarm signal output to the System |
|
Controller setting (LINE OUT) .................................................. |
51 |
MENU FLOW............................................................................. |
52 |
SPECIFICATIONS ...................................................................... |
54 |

MAIN FEATURES
•Built in Interline transfer method 1/4” CCD, approx. 470,000 picture elements.
•High sensitivity, minimum required illumination is 2.0 lux. (F1.6, gain max)
•More than 520 TV lines of horizontal resolution.
•Equipped with intelligent Backlight compensation.
•Special Gamma mode (contrast up)
•Built in high speed electronic shutter and slow shutter.
•32X Electronic sensitivity
•Built in Digital Motion Detection
•Built in Privacy masking function
•12VDC/24V AC dual operation(electrically isolate) .
•Internal sync. / Line Lock.
•22x optical zoom and 16x electronic zoom.
•Coaxial control or RS485, operation via SSP.
•Zoom in function synchronized with external alarm
•For use with Camera Control Unit (VAC-60, VAC-70)
ACCESSORIES
Clamping core .......................................................................... |
1 pc. |
English
2
English
3
PRECAUTIONS
|
In case of problem |
|
Protect from high temperatures |
Do not use the camera if smoke or a strange odour comes from the unit, or if it seems not to function correctly. Disconnect the power cord immediately, and consult your dealer (or a Sanyo Authorized Service Centre).
Do not open or modify
Do not open the cabinet, as it may be dangerous and cause damage to the unit. For internal settings and repairs, consult your dealer (or a Sanyo Authorized Service Centre).
Do not put objects inside the unit
Make sure that no metal objects or flammable substance get inside the camera. If used with a foreign object inside, it could cause a fire, short-circuits or damages.
If water or a liquid gets inside the camera, disconnect the power cord immediately, and consult your dealer (or a Sanyo Authorized Service Centre). Be careful to protect the camera from rain, sea water, etc.
Be careful when handling the unit
To prevent damages, do not drop the camera or subject it to strong shock or vibration.
Install away from electric or magnetic fields
If installed close to a TV, radio transmitter, magnet, electric motor, transformer, audio speakers the magnetic field they generate will distort the image.
Protect from humidity and dust
Do not install close to stoves, or other heat generating devices, such as spotlights, etc., or where it could be subject to direct sunlight, as that could cause deformation, discoloration or other damages.
Be careful when installing close to the ceiling, in a kitchen or boiler room, as the temperature may raise to high levels.
Install where the temperature range will stay between –10°C and 50°C. (no condensation)
Cleaning
•Dirt can be removed from the cabinet by wiping it with a soft cloth. To remove stains, wipe with a soft cloth moistened with a soft detergent solution and wrung dry, then wipe dry with a dry soft cloth.
•Do not use benzine, thinner or other chemical product on the cabinet, as that may cause deformation and paint peeling. Before using a chemical cloth, make sure to read all accompanying instructions. Make sure that no plastic or rubber material comes in contact with the cabinet for a long period of time, as that may cause damage or paint peeling.
To prevent damages to the camera, do not install it where there is greasy smoke or steam, where the dampness may get too high, or where there is a lot of dust.

PARTS NAMES AND FUNCTIONS
Control |
|
4 Menu setting button (SET) (See p8) |
|
3 |
Connect the camera to the monitor, then press the SET |
||
terminals |
button for about 3 seconds to display the on-screen menu.
SET |
|
5 RS-485 control push-lock terminals (RS485, A, B, G) |
|
4 |
|
|
|
2 |
ZOOM |
COM |
IN |
|
|
|
|
|
Use a cable thicker than AWG22. |
|
FOCUS |
ALARM OUT |
|
|
RS485 |
|
|
|
|||
|
VIDEO OUT |
|
POWER |
|
|
|
|
A: Twisted-pair cable terminal |
G: Ground terminal |
|
1 |
|
|
|
|
|
|
|
5 |
B: Twisted-pair cable terminal |
|
|
|
|
AC24V |
A |
B |
G |
|
|
||
|
|
|
|
|
GND |
|
|
|
|
|
6
DC12V |
CLASS 2 WIRING |
1 Video output connector (VIDEO OUT: BNC type)
Connect this connector to a device such as a time lapse VCR or monitor with a VIDEO IN connector.
2 Power indicator (POWER)
Comes on when the power to the camera is on.
Note: After connecting the power supply the POWER indicator will blink for 5 seconds. During this time no adjustments using the menus or any other operation are possible.
3 Cursor button (See p8)
j: Press this button to move the cursor up.
c: Press this button to move the cursor to the right, or to turn the settings ON/OFF etc.
d: Press this button to move the cursor to the left, or to turn the settings ON/OFF etc.
l: Press this button to move the cursor down.
Note: If the MAIN MENU is not displayed, the zoom and the focus can be adjusted by the cursor button (c: Tele, d: Wide, j: Far, l: Near).
6 24 V AC or 12 V DC input terminals (AC 24 V, DC 12 V, GND)
Lens cap
The cap is installed to protect the lens section. Remove the cap when using the camera.
English
4

English
PARTS NAMES AND FUNCTIONS
Camera installation bracket
The bracket can be fixed at the top or bottom of the camera. When fixing the bracket, be sure to use the longer screws and install the shorter screws on the opposite side to seal the openings.
CAUTION: When installing the camera bracket, select a location that can support the total weight of the camera and accessories.
Control terminals
1 Zoom terminal (ZOOM)
Sets the zoom to wide angle or telescoping.
2 Focus terminal (FOCUS)
Sets the focus to infinite or close range.
3 Grounding terminal (COM)
4Alarm output terminal (ALARM OUT)
A detection alarm based on the motion sensor is sent to connected equipment such as a buzzer or lamp or a time lapse VCR device.
Output rating: max. 18V, 25mA
(open collector, emitter grounded)
5Alarm input terminal (ALARM IN)
Used for detection of intruders through a connected external alarm switch.
12345
ZOOM COM IN FOCUS ALARM OUT
5
CONNECTIONS
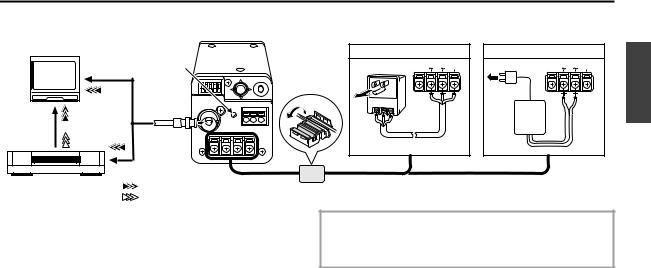
 Basic connection for monitoring or recording
TV monitor (sold separately)
AC 24 V connection |
DC 12 V connection |
|
|
(A) |
AC24V |
AC24V |
GND |
|
GND |
|
|
DC12V |
CLASS 2 WIR |
DC12V |
CLASS 2 WIR |
AA |
|
|
|
Fig. 1 |
|
Fig. 2 |
|
(Video signal connections)
Time lapse VCR or |
: VIDEO IN |
|
Digital video recorder |
||
: VIDEO OUT |
||
(sold separately) |
||
|
The peripheral devices (VCR, monitor, lens, etc.) and cables are sold separately.
1Make the video signal connection between the camera and the monitor or time lapse VCR.
When using this unit, the supplied clamping core AA must be installed on the power cord, in order to prevent electromagnetic interference to the other devices connected.
2Power supply choices
•Use a commercially available 24 V AC adaptor. Make sure to use a cable with an earth line (22AWG or more) to connect to the grouding terminal. (Fig.1.)
•When using a DC 12 V power supply, make the connections as indicated in Fig. 2.
CAUTION:
To prevent camera and/or power supply failure, pay close attention to polarity when making the connections.
3Insert the plug of this power supply into a wall outlet.
The POWER indicator (A) will light. Adjust the picture on the monitor using the Brightness and Contrast controls.
English
6
English
CONNECTIONS
Coaxial cable type and maximum length
•Cable type RG-59U (3C-2V), 250 m maximum.
•Cable type RG-6U (5C-2V), 500 m maximum.
•Cable type RG-11U (7C-2V), 600 m maximum.
CAUTION:
•The RG-59U type cable should not be run through electrical conduits or through the air.
•Using CCTV/Video-grade coaxial cable.
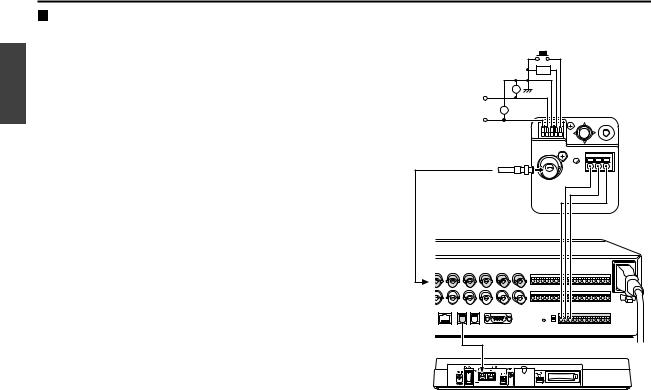
 Connection of peripheral equipment and controller terminal
|
External alarm |
|
switch |
• Focus adjustment |
Buzzer or lamp |
DC+6V – 12V: Infinite |
|
DC–6V – 12V: Close range |
|
• Zoom adjustment |
|
DC+6V – 12V: Wide angle |
|
DC–6V – 12V: Telescoping |
|
A B G |
CAMERA IN |
terminal |
Multiplexer |
(sold separately) |
G AB
RS-485 connector
System controller (sold separately)
7

DISPLAYING/CLOSING THE MENU SCREEN
|
|
|
|
|
MAIN MENU screen |
|
|
|
Sub-menu screen |
|||
|
|
|
|
|
MAIN MENU |
|
|
|
|
|
LANGUAGE |
|
|
|
|
SET |
LANGUAGE |
SET |
‚ |
|
|
LANGUAGE |
ENGLISH |
||
|
|
|
CAMERA ID |
OFF |
|
|
|
LANGUE |
FRENCH |
|||
|
|
|
|
|
SYNC |
INT |
|
|
|
SPRACHE |
GERMANY |
|
|
|
|
|
|
PRIVACY MASK |
SET |
‚ |
|
|
|
|
|
|
|
|
|
|
LENS |
SET |
‚ |
|
|
|
|
|
|
|
|
|
|
MIRROR |
OFF |
|
|
|
|
|
|
|
|
|
|
|
VIEW SETTING |
1 |
|
‚ |
|
|
|
|
|
|
|
|
|
OPTION |
SET |
‚ |
|
|
|
|
|
|
|
|
|
|
PRESET |
OFF |
|
|
|
|
|
|
|
|
|
|
|
MENU |
END |
|
|
|
MENU |
BACK |
|
|
Cursor button SET button |
|
|
|
||||||||
|
|
|
|
|
|
|
|
|
||||
1 Press the SET button for about 3 seconds. |
|
|
4 Closing a settings screen |
|
||||||||
The MAIN MENU screen will appear. |
|
|
|
• To return to the previous screen, use the cursor button (l) |
||||||||
2 Using the cursor button |
|
|
|
|
to select BACK for MENU, then press the SET button. |
|||||||
|
|
|
• To return to the normal screen, use the cursor button (d or |
|||||||||
1 Use the cursor button (l) to move the cursor down. |
|
|
||||||||||
|
|
|
c) to select END for MENU, then press the SET button. |
|||||||||
|
|
When the cursor reaches the bottom of the screen, it goes |
|
|
|
|||||||
|
|
|
|
Returning to the default setting |
|
|||||||
|
|
back up to the top of the screen. |
|
|
|
|
||||||
2 Use the cursor button (j) to move the cursor up. When |
|
|
Use cursor button (l, then d or c) to change the PRESET |
|||||||||
|
|
the cursor reaches the top of the screen, it goes back |
|
|
setting to ON, then press the SET button. |
|||||||
|
|
down to the bottom of the screen. |
|
|
|
Simple camera address confirmation |
|
|||||
|
|
|
|
|||||||||
|
|
|
|
|
|
|
|
|
||||
3 Use the cursor button (c) to move the cursor to the right. |
When connecting the power cord to an outlet, the camera |
|
This button is also used to change ON/OFF settings etc. |
||
address (See p47) is displayed on the monitor for 5 – 15 seconds. |
||
4 Use the cursor button (d) to move the cursor to the left. |
||
|
||
This button is also used to change ON/OFF settings etc. |
|
|
3 Switching to sub-menu screens |
|
|
Use the cursor button (j l d c) until an item with a “y” |
CAMERA ADDRESS |
|
000 |
||
next to it is flashing, then press the SET button. |
||
|
English
8
English
MENU ITEM FLOW AND MENU OPERATION
MAIN MENU |
|
|
1 |
|
2 |
|
3 |
|
4 |
|
5 |
|
6 |
|
7 |
|
8 |
|||||||||
LANGUAGE |
SET |
‚ |
|
|
|
|
|
|
|
|
|
|
|
|
|
|
|
|
|
|
|
|
|
|
|
|
|
|
|||||||||||||||||||||||||
CAMERA ID |
OFF |
|
|
|
|
|
|
|
|
|
|
|
|
|
|
|
|
|
|
|
|
|
|
|
|
|
|
|
|
|
|
|
|
|
|
|
|
|
|
|
|
|
|
|
|
|
|
|
|
|
|
||
SYNC |
INT |
|
|
|
|
|
|
|
|
|
|
|
|
|
|
|
|
|
|
|
|
|
|
|
|
|
|
|
|
|
|
|
|
|
|
|
|
|
|
|
|
|
|
|
|
|
|
|
|
|
|
||
PRIVACY MASK |
SET |
‚ |
|
|
|
|
|
|
|
|
|
|
|
|
|
|
|
|
|
|
|
|
|
|||
|
|
|
|
|
|
|
|
|||||||||||||||||||
LENS |
SET |
‚ |
|
|
|
|
|
|
|
|
|
|
|
|
|
|
|
|
|
|
|
|
||||
|
|
|
|
|
|
|
|
|
|
|||||||||||||||||
MIRROR |
OFF |
|
|
|
|
|
|
|
|
|
|
|
|
|
|
|
|
|
|
|
|
|
|
|
|
|
|
|
|
|
|
|
|
|
|
|
|
|
|
|
|
|
|
|
|
|
|
|
|
|
|
||
VIEW SETTING |
1 |
‚ |
|
|
|
|
|
|
|
|
|
|
|
|
|
|
|
|
|
|
||||||
|
|
|
|
|
|
|
|
|
|
|
|
|
|
|||||||||||||
OPTION |
SET |
‚ |
|
|
|
|
|
|
|
|
|
|
|
|
|
|
|
|
|
|||||||
|
|
|
|
|
|
|
|
|
|
|
|
|
|
|
|
|||||||||||
PRESET |
OFF |
|
|
|
|
|
|
|
|
|
|
|
|
|
|
|
|
|
|
|
|
|
|
|
|
|
MENU |
END |
|
|
|
|
|
|
|
|
|
|
|
|
|
|
|
|
|
|
|
|
|
|
|
|
|
1 LANGUAGE setting (See p10)
Choose from among English, French and German.
2 CAMERA ID setting (See p11)
3 SYNC setting (See p12)
Sets camera to internal synchronization (INT) or power source synchronization (L-L).
Power source synchronization, the vertical synchronization phase as adjusted on a sub-menu screen.
4 PRIVACY MASK setting (See p13)
This covers an area of the screen with a gray pattern for areas that may infringe on privacy.
Gray patterns can be placed on up to 4 areas.
5 LENS setting (See p17)
Sets camera to automatic focus or manual focus. Zoom speed and magnification is also set here.
6 MIRROR setting (See p21)
The image can be rotated horizontally then vertically or vertically then horizontally.
7 VIEW SETTING (See p22)
Different detailed settings can be made for each camera (9 screens). After they are set, these are linked to “VIEW SETTING (0 – 8)” settings for preset positions.
8 OPTION setting (See p46)
For setting communications conditions and alarms.
9

LANGUAGE SETTING
Select one of the languages shown on the menu screen (English, French, German).
1 |
MAIN MENU |
|
|
2 |
LANGUAGE |
|
|
LANGUAGE |
SET |
‚ |
|
LANGUAGE |
ENGLISH |
|
CAMERA ID |
OFF |
|
|
LANGUE |
FRENCH |
|
SYNC |
INT |
|
|
SPRACHE |
GERMANY |
|
PRIVACY MASK |
SET |
‚ |
|
|
|
|
LENS |
SET |
‚ |
|
|
|
|
MIRROR |
OFF |
|
3 |
|
|
|
VIEW SETTING |
1 |
‚ |
|
LANGUE |
|
|
OPTION |
SET |
‚ |
|
|
|
|
PRESET |
OFF |
|
|
LANGUAGE |
ANGLAIS |
|
MENU |
END |
|
|
LANGUE |
FRANCAIS |
|
|
|
|
|
SPRACHE |
ALLEMAND |
|
|
|
|
|
MENU |
RETOUR |
1In the MAIN MENU, use the cursor button (j or l) to select SET for LANGUAGE, then press the SET button.
The LANGUAGE screen will appear.
2Use the cursor button (j or l) to move the cursor to language (example: “FRENCH”) then press the SET button.
The interface language becomes French.
3Use the cursor button (j or l) to select RETUOR for
MENU, then press the SET button.
The MENU PRINCIPAL screen will reappear.
Information in the MAIN MENU screen will appear in the selected language.
Use the cursor button (l) to select FIN, then press the
SET button. The display will return to the normal monitor screen.
English
10
CAMERA ID SETTING
Camera ID setting
Example: Setting the Camera ID to “CAM 1”
English |
1 |
MAIN MENU |
|
2 |
CAMERA ID SETTING |
|
|
PRIVACY MASK |
SET |
‚ |
ABCDEFGHIJKLM |
|
|
|
|
LANGUAGE |
SET |
‚ |
|
|
|
|
CAMERA ID |
ON |
‚ |
NOPQRSTUVWXYZ |
|
|
|
SYNC |
INT |
|
0123456789 :-‚ |
|
|
|
LENS |
SET |
‚ |
ID ???????????????? |
|
|
|
MIRROR |
OFF |
|
- |
|
|
|
VIEW SETTING |
1 |
‚ |
POSITION |
SET ‚ |
|
|
OPTION |
SET |
‚ |
PRESET |
OFF |
|
|
PRESET |
OFF |
|
||
|
|
MENU |
END |
|
MENU |
BACK |
1Use the cursor button (j or l) to move the cursor to CAMERA ID, and then use the cursor button (d or c) to change the setting to ON. Then press the SET button.
The CAMERA ID SETTING screen will appear.
2Use the cursor button (j l d c) to move the cursor to the letter “C” in the character selection palette, then press the SET button.
After at least one character is displayed in the ID field, the carriage return mark (y) will appear at the lower right corner of the character selection palette. Selecting this mark between the characters of the field will create a new line at that place.
3Use the same steps to select “A”, “M” and “1” from the palette, then press the SET button.
The characters “CAM1” appear in the ID field.
|
ID CAM1???????????? |
11 |
- |
|
Camera ID screen
|
|
CAMERA ID SETTING |
|||
1 |
|
|
|
ABCDEFGHIJKLM |
|
|
|
|
|
||
|
|
|
NOPQRSTUVWXYZ |
|
|
|
|
|
|
||
|
|
|
|
0123456789 :-‚ |
|
2 |
|
ID ???????????????? |
|||
|
|
- |
|
||
3 |
|
POSITION |
SET ‚ |
||
|
|||||
4 |
|
PRESET |
OFF |
||
|
|||||
|
|
MENU |
BACK |
||
1Character selection palette:
By moving the cursor to letters or numbers in this palette, you can select characters.
Selected characters will appear in the corresponding field under ID.
2ID:
The ID entry field shows 16 question marks (?). The ID will not be displayed on the screen.
3POSITION:
After characters are displayed in the ID field, moving the cursor to the POSITION field with the cursor button and pressing the SET button will display the camera ID on the normal screen.
4PRESET:
When this item is turned to ON, the ID fields are cleared (question marks appear). Use this function when you want to change the ID.

CAMERA ID SETTING
4Use the cursor button (j or l) to move the cursor to
POSITION, and then press the SET button.
The camera ID will be displayed on one line.
CAMERA ID SETTING |
CAM1 |
||
ABCDEFGHIJKLM |
|
|
|
NOPQRSTUVWXYZ |
|
|
|
0123456789 :-‚ |
|
|
|
ID CAM1???????????? |
Camera ID |
||
|
|
||
POSITION |
SET |
‚ |
|
PRESET |
OFF |
|
|
MENU |
BACK |
|
|
(Displaying the ID on 2 lines.)
1Use the cursor button (d or c) to move the cursor to the location in the ID field where the carriage return is wanted.
2Use the cursor button (j l d c) to move the cursor to the carriage return mark (y) at the lower right corner of the character selection palette, and then press the SET button.
5Moving the on-screen title display position
Use the cursor button (j l d c) to move the title display to the preferred position on the screen, then press the SET button.
The CAMERA ID SETTING screen will reappear.
SYNC SETTING (SYNC)
Initial setting is internal synchronization (INT), so it does not need to be set again. Follow the steps below to change the setting to power source synchronization (L-L).
Power source synchronization (L-L) setting
1 |
MAIN MENU |
|
2 |
L-L SETTING |
|
|
LANGUAGE |
SET |
‚ |
(V SYNC PHASE) |
|
|
CAMERA ID |
OFF |
ú------+------ü 0 |
||
|
SYNC |
INT |
|||
|
PRIVACY MASK |
SET |
‚ |
|
|
|
LENS |
SET |
‚ |
|
|
|
MIRROR |
OFF |
|
|
|
|
VIEW SETTING |
1 |
‚ |
|
|
|
OPTION |
SET |
‚ |
|
|
|
PRESET |
OFF |
PRESET |
OFF |
|
|
MENU |
END |
MENU |
|
BACK |
1Use the cursor button (j l d c) to select L-L for
SYNC, then press the SET button.
The L-L SETTING screen will appear.
2Use the cursor button (d or c) to adjust the position of the vertical synchronization indicator shown on the screen.
The numerical value will change, allowing adjustment of vertical synchronization.
To close the menu screen or return to the previous screen, select BACK or END for MENU and press the SET button.
English
12

English
PRIVACY MASK SETTING (PRIVACY MASK)
Mask setting
1 |
MAIN MENU |
|
2 |
PRIVACY MASK SETTING |
||
|
LANGUAGE |
SET |
‚ |
PASSWORD LOCK |
ON ‚ |
|
|
CAMERA ID |
OFF |
|
PASSWORD CHANGE |
SET ‚ |
|
|
SYNC |
INT |
|
MASK SET |
SET ‚ |
|
|
PRIVACY MASK |
SET |
‚ |
|
|
|
|
LENS |
SET |
‚ |
|
|
|
|
MIRROR |
OFF |
|
|
|
|
|
VIEW SETTING |
1 |
‚ |
|
MASK NO.SELECT |
|
|
OPTION |
SET |
‚ |
|
|
|
|
PRESET |
OFF |
|
|
|
|
|
MENU |
END |
|
MASK |
1 |
OFF |
|
|
|
|
MASK |
2 |
OFF |
|
|
|
|
MASK |
3 |
OFF |
|
|
|
|
MASK |
4 |
OFF |
1Use the cursor button (j or l) to select SET for
PRIVACY MASK, then press the SET button.
The PRIVACY MASK SETTING screen will appear.
2Use the cursor button (j or l) to move the cursor to
SET for MASK SET and press the SET button.
The MASK NO. SELECT screen will appear.
Note: When PASSWORD LOCK is ON, moving the cursor to MASK SET and press the SET button to bring up a password access screen. The password must be entered in this screen.
3 |
MASK NO.SELECT |
|
MASK 3 SET |
||||
MASK |
1 |
OFF |
|
(POSITION) |
|||
|
|
|
|
|
|||
MASK |
2 |
OFF |
|
|
|
|
|
MASK |
3 |
SET |
‚ |
|
|
|
|
MASK |
4 |
OFF |
|
|
|
|
|
PRESET |
OFF |
|
|
|
SET ‚ |
||
MENU |
|
BACK |
|
|
|
|
|
3Use the cursor button (j or l) to move the cursor to a mask number (Ex: MASK 3), and then use the cursor button (c) to change the setting to SET. Then press the
SET button.
The MASK 3 SET (POSITION) screen will appear, and SETy will be blinking. The gray mask will appear in the center of the screen.
Cursor button operation
OFF: to c side (ON appears), to c side again (SET appears)
•SET: Mask POSITION and SIZE can be set
•ON: Masks can be displayed
•OFF: Masks can be deleted
13

PRIVACY MASK SETTING (PRIVACY MASK)
(About the POSITION screen)
It is possible to set as many as 4 masks on the same POSITION screen.
MASK 1 2
3 4
4 |
MASK 3 SET |
5 |
MASK 3 SET |
|
(SIZE) |
|
|
|
SET ‚ |
PRESET |
OFF |
|
|
MENU |
BACK |
4Use the cursor button (j l d c) to move the gray mask, then press the SET button.
The SIZE screen will appear, and the mask that was positioned in the POSITION screen will be displayed.
5Use the cursor button (j l d c) to adjust the size of the gray mask, then press the SET button.
PRESET and MENU will appear at the bottom of the screen. Move the cursor to BACK for MENU and press the SET button. The screen will return to MASK NO. SELECT.
To close the menu screen or return to the previous screen, select BACK or END for MENU and press the SET button.
English
14

English
PRIVACY MASK SETTING (PRIVACY MASK)
PASSWORD setting
You can lock the privacy masks in place as gray patterns after they have been set. The password requirement is initially set to OFF, but to begin using it, you must enter the factory set password “1234”.
1 |
PRIVACY |
MASK SETTING |
PASSWORD |
|
3 |
PASSWORD |
|
PRIVACY |
MASK SETTING |
||
|
PASSWORD |
LOCK |
OFF ‚ |
|
|
|
|
|
PASSWORD |
LOCK |
ON ‚ |
|
PASSWORD |
CHANGE |
SET ‚ |
|
|
|
|
|
PASSWORD |
CHANGE |
SET ‚ |
|
MASK SET |
|
SET ‚ |
¤¤¤¤ |
SET ‚ |
|
1234 |
SET ‚ |
MASK SET |
|
SET ‚ |
|
|
|
|
|
|
|
|
||||
|
|
|
|
- |
|
|
- |
|
|
|
|
|
|
|
|
|
|
|
OK |
|
|
|
|
|
MENU |
|
BACK |
MENU |
BACK |
|
MENU |
BACK |
MENU |
|
BACK |
1Use the cursor button (j or l) to move the cursor to
OFF for PASSWORD LOCK in the PRIVACY MASK SETTING screen. Then press the SET button.
The PASSWORD screen will appear.
2Enter the factory set password “1234”.
Use the cursor button (j or l) to select “1”, then use the cursor button (c).
To move the cursor to the next “*” digit.
3Use the same steps to enter “2,” “3,” and “4,” then press the SET button.
“OK” will appear and BACK for MENU will be blinking. Press the SET button again. The PRIVACY MASK SETTING screen will reappear and “ON” will be blinking for PASSWORD LOCK.
Note: If a different password is required, “NG” will appear. Please carefully maintain the password so that it will not be forgotten.
1¤¤¤
15

PRIVACY MASK SETTING (PRIVACY MASK)
PASSWORD LOCK cancellation
For use when PASSWORD LOCK is ON
1 |
PASSWORD |
3 |
PASSWORD |
|
|
¤¤¤¤ |
SET ‚ |
1234 |
SET ‚ |
|
- |
|
- |
|
|
|
|
OK |
|
|
MENU |
BACK |
|
|
|
|
|
PRIVACY MASK SETTING |
|
|
|
|
PASSWORD LOCK |
OFF ‚ |
|
|
|
PASSWORD CHANGE |
SET ‚ |
|
|
|
MASK SET |
SET ‚ |
1Press the SET button.
The PASSWORD screen will appear.
2Enter the factory set password “1234”.
Use the cursor button (j or l) to select “1”, then use the cursor button (c).
To move the cursor to the next “*” digit.
3Use the same steps to enter “2,” “3,” and “4,” then press the SET button.
“OK” will appear and BACK for MENU will be blinking. Press the SET button again. The PRIVACY MASK SETTING screen will reappear and “OFF” will be blinking for PASSWORD LOCK.
PASSWORD changes
You can change the password with PASSWORD LOCK in either the ON or OFF setting.
1 |
PRIVACY |
MASK SETTING |
2 |
PASSWORD |
|
|
|
PASSWORD |
LOCK |
ON |
‚ |
|
|
|
PASSWORD CHANGE |
SET ‚ |
(NOW PASSWORD) |
|||
|
MASK SET |
|
SET ‚ |
1234 |
SET ‚ |
|
|
|
|
|
|
||
|
|
|
|
|
- |
|
|
PASSWORD |
|
|
PASSWORD |
|
|
|
(NOW PASSWORD) |
|
(NEW PASSWORD) |
|||
|
**** |
SET ‚ |
**** |
SET ‚ |
||
|
- |
|
|
|
- |
|
1Use the cursor button (j or l) to move the cursor to
SET for PASSWORD CHANGE and press the SET button.
The PASSWORD (NOW PASSWORD) screen will appear.
2Use the cursor button (d or c, j) to enter the current password (Ex: 1234), then press the SET button.
The PASSWORD (NEW PASSWORD) screen will appear.
3Use the cursor button (d or c, j) to enter a new password (Ex: 4321), then press the SET button.
“OK” will appear and BACK for MENU will be blinking. Press the SET button again.
The PRIVACY MASK SETTING screen will reappear.
English
16
 Loading...