


INSTRUCTION MANUAL
Digital Movie Camera
VPC-C40EX VPC-C40E VPC-C40 VPC-C40GX
Important note
This manual explains how to safely operate the VPC-C40EX, VPC-C40E, VPC-C40 and VPC-C40GX.
Any information regarding only one of these products will be labeled as such.
Please read these instructions carefully before using the camera.
Make sure to read and understand the separate booklet “SAFETY MANUAL”. Keep this manual in a safe place for later reference.

Warning
TO PREVENT THE RISK OF FIRE OR ELECTRIC SHOCK, DO NOT EXPOSE THIS APPLIANCE TO RAIN OR MOISTURE
FOR AMERICAN USERS
The following advisory is included in accordance with the laws of the State of California (USA):
WARNING:
This product contains chemicals, including lead, known to the State of California to cause cancer, birth defects or other reproductive harm. Wash hands after handling.
i This equipment has been tested and found to comply with the limits for a Class B digital device, pursuant to Part 15 of the FCC Rules. These limits are designed to provide reasonable protection against harmful interference in a residential installation. This equipment generates, uses and can radiate radio frequency energy and, if not installed and used in accordance with the instructions, may cause harmful interference to radio communications. However, there is no guarantee that interference will not occur in a particular installation. If this equipment does cause harmful interference to radio or television reception, which can be determined by turning the equipment off and on, the user is encouraged to try to correct the interference by one or more of the following measures:
h Reorient or relocate the receiving antenna.
h Increase the separation between the equipment and receiver.
hConnect the equipment into an outlet on a circuit different from that to which the receiver is connected.
h Consult the dealer or an experienced radio/TV technician for help.
iChanges or modifications not expressly approved by the party responsible for compliance could void the user’s authority to operate the equipment.
Declaration of Conformity
Model number: VPC-C40 Trade Name: SANYO
Responsible party: SANYO FISHER COMPANY
Address: 21605 Plummer Street, Chatsworth, California 91311 Telephone No.: (818) 998-7322
This device complies with Part 15 of the FCC Rules. Operation is subject to the following two conditions:
(1)this device may not cause harmful interference, and
(2)this device must accept any interference received, including interference that may cause undesired operation.
iEnglish

FOR CANADIAN USERS
i This Class B digital apparatus complies with Canadian ICES-003.
FOR EU USERS
Note:
iThis symbol mark and recycle system apply only to EU countries and do not apply to countries in other areas of the world.
Your SANYO product is designed and manufactured with high quality materials and components which can be recycled and reused.
This symbol means that electrical and electronic equipment, at their end-of-life, should be disposed of separately from your household waste.
Please dispose of this equipment at your local community waste collection/recycling centre.
In the European Union there are separate collection systems for used electrical and electronic products. Please help us to conserve the environment we live in!
Symbols used in this manual
HINT |
Points giving some extended instructions or special points to pay |
CAUTION |
attention to. |
Points that require special attention. |
|
(page xx) |
Refer to the page indicated for detailed information. |
You may find the answers to questions or problems concerning camera operation in the sections “COMMONLY ASKED QUESTIONS” (page 139) and “TROUBLESHOOTING” (page 146).
English ii

GETTING UP AND RUNNING
Install the card
1 Insert the card.
3 Close
1 Open
2 Insert
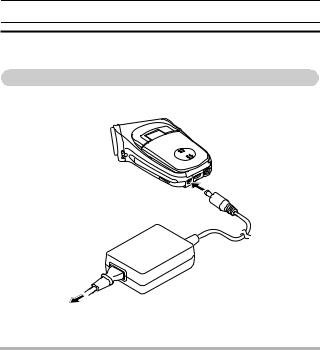
2 Connect the AC adaptor to the camera.
To power outlet
DC IN terminal
Supplied AC adaptor
Supplied power cord
iii English

Shooting
kVideo clip recording
1 Open the monitor unit, and |
Main switch |
ON/OFF button |
|
press the ON/OFF button |
|
for at least 1 second to turn |
|
the camera on. |
|
2 Set the main switch to REC.
3 Press the video clip recording button [ 
 ].
].
|
h Recording begins. |
|
|
|
|
h To stop recording, press |
|
|
|
|
the video clip recording |
|
|
|
|
button again. |
|
|
|
|
|
Still image |
|
|
|
|
shooting button |
|
|
kStill image |
[ |
] |
|
|
|
|
|
||
|
photography |
Video clip |
|
|
|
|
|
|
|
1 |
|
recording button |
|
|
Open the monitor unit, and |
[ |
] |
||
|
press the ON/OFF button |
|
|
|
|
for at least 1 second to turn |
|
|
|
|
the camera on. |
|
|
|
2 |
|
31 |
1:10:15 |
|
Set the main switch to REC. |
|
|
||
3 Press the still image |
|
|
|
|
|
shooting button [ |
]. |
|
|
|
h The image is captured. |
|
|
|
English iv
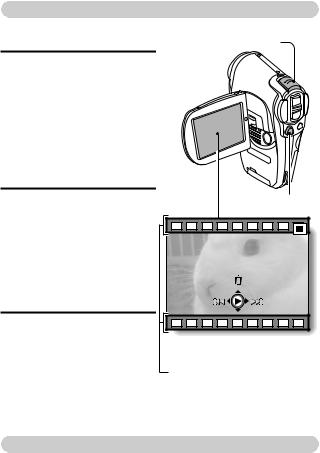
Playback
kVideo clip playback
1 Set the main switch to PLAY. h The display switches to the
Playback Screen.
hToggle the SET button to the left or right to display the
video clip you wish to play back.
hVideo clips are indicated by a video clip pattern along the top and bottom of the screen.
2 Press the SET button.
hPlayback of the selected video clip begins.
hWhen the main switch is moved to REC, the display changes to the Shooting Screen.
kStill image playback
1 Set the main switch to PLAY.
hThe display switches to the Playback Screen.
hTo view other images, toggle the SET button to the left or right.
hWhen the main switch is moved to REC, the display changes to the Shooting Screen.
Main switch
SET button
<Example: After recording a video clip>
Video clip pattern
When you are finished using the camera...
Press the ON/OFF button to turn the camera off.
v English

QUICK SEARCH BY OPERATION
Your camera has an abundance of convenient features and functions. From creating precisely the photo you want, to viewing images using various techniques, you can locate the exact operation for your purposes in the following table.
Shooting/recording
|
Basic operation |
Convenient |
Additional functions |
|
functions |
||
|
|
|
|
Getting started |
Log the date and |
For more accurate |
|
shooting/recording |
time of your photos |
focus |
|
• |
“Recording video clips” |
• “DATE AND TIME |
• “FOCUS RANGE” |
|
on page 30 |
SETTING” on page 103 |
(manual focus) page 62 |
• |
“Capturing still images” |
Zoom in on the |
Set the focus to a |
• |
on page 32 |
subject |
narrow range |
“Shoot a still image |
• “Using the zoom” on |
• “FOCUS AREA |
|
|
while recording a video |
||
|
page 35 |
SETTING” on page 64 |
|
|
clip” on page 34 |
||
|
Take vertical |
|
|
• “MAKE AN AUDIO |
(portrait) format |
|
|
|
RECORDING” on |
|
|
|
photos |
|
|
|
page 37 |
|
|
|
• “Still image resolution |
|
|
|
|
|
|
|
|
setting” on page 52 |
|
|
|
Close-up |
|
|
|
photography |
|
|
|
• “FOCUS RANGE” |
|
|
|
(super macro mode) on |
|
|
|
page 62 |
|
|
|
|
|
Optimize the photo |
Reduce video clip flicker |
||
quality |
• “FLICKER-REDUCTION” on page 113 |
||
• |
“Video clip image |
Set the camera’s color/contrast |
|
|
quality setting” on |
characteristics |
|
|
page 51 |
• “ADJUST THE IMAGE QUALITY” on page 112 |
|
• |
“Still image resolution |
|
|
|
setting” on page 52 |
|
|
|
|
|
|
1 English

Shooting/recording
Convenient
Basic operation Additional functions functions
Capture fast-moving subjects
• “SCENE SELECT” (sports mode) on page 53
Shoot in bright conditions
•“Exposure correction” on page 36
•“FLASH SETTING” on page 56
•“SCENE SELECT” (night view mode/fireworks mode/lamp mode) on page 53
Increase the camera’s sensitivity
• “ISO SENSITIVITY” on page 66
Photographing people
•“SCENE SELECT” (portrait mode/night view mode) on page 53
•“FILTERS” (cosmetic filter) on page 55
Photographing landscapes
• “SCENE SELECT” (landscape mode) on page 53
Take a self-photo
• “SELF-TIMER” on page 58
|
Make images lighter |
Measure the |
|
or darker |
brightness of a |
|
• “Exposure correction” |
specific area |
|
on page 36 |
• “LIGHT-MEASURING |
|
|
MODE SETTING” on |
|
|
page 65 |
|
|
Adjust the camera’s |
|
|
sensitivity |
|
|
• “ISO SENSITIVITY” on |
|
|
page 66 |
|
|
|
|
Change the color of |
Make white appear |
|
the images |
natural |
|
• “FILTERS” |
• “WHITE BALANCE” on |
|
(monochrome filter/ |
page 67 |
|
sepia filter) on page 55 |
|
|
|
|
English 2

QUICK SEARCH BY OPERATION
|
Basic operation |
Convenient |
Additional functions |
|
|
functions |
|||
|
|
|
||
|
Getting started |
Adjust the speaker |
Smooth out video |
|
|
viewing images |
volume |
clip playback |
|
|
• “Playing back a video |
• “PLAYBACK VOLUME” |
• “SMOOTH PLAYBACK” |
|
|
clip” on page 42 |
on page 74 |
on page 98 |
|
|
|
|
|
|
|
• “VIEWING IMAGES” on |
Search for image/ |
Change the angle of |
|
|
page 39 |
audio data |
view |
|
|
|
• “9-image display |
• “ROTATE IMAGE” on |
|
|
|
playback” on page 40 |
page 86 |
|
|
|
Magnify an image |
|
|
Playback |
• “PLAYING BACK |
• “Magnifying (zooming |
|
|
Adjust the speaker volume |
||||
|
|
in) the image” on |
|
|
|
|
page 41 |
|
|
|
AUDIO DATA” on |
• “PLAYBACK VOLUME” on page 74 |
||
|
page 44 |
|
|
|
|
Slideshow playback |
|
|
|
|
• “PLAYBACK MODE” on page 73 |
|
||
|
|
|
||
|
Adjust the LCD monitor brightness |
|
||
|
• “LCD MONITOR BRIGHTNESS” on page 115 |
|
||
|
|
|
|
|
|
Playback on a TV |
|
Set the TV system |
|
|
• “CONNECTING TO A TV” on page 129 |
• “TV SYSTEM |
||
|
|
|
SETTING” on page 117 |
|
|
Search for image/audio data |
|
||
|
• “9-image display playback” on page 40 |
|
||
managing/processing |
|
|
|
|
Delete data |
Protect images from accidental erasure |
|||
|
||||
|
• “ERASING DATA” on |
• “IMAGE PROTECT” on page 75 |
||
|
page 77 |
Format a card |
|
|
|
|
• “FORMATTING A CARD” on page 123 |
||
|
|
|
|
|
|
Edit the red-eye phenomenon in photos |
|
||
|
• “RED-EYE CORRECTION” on page 88 |
|
||
|
|
|||
|
Delete a part of a video clip and join video clips |
|||
|
• “EDITING VIDEO CLIPS” on page 91 |
|
||
|
|
|||
Data |
Specify the number of prints, index print, and date imprint |
|||
• “PRINT SETTINGS” on page 79 |
|
|||
|
|
|||
|
|
|||
|
View the settings that were in effect when the image/audio data |
|||
|
was recorded |
|
|
|
|
• “DISPLAYING IMAGE PROPERTIES (INFORMATION SCREEN)” on page 99 |
|||
|
|
|
|
|
3 English

CONTENTS |
|
QUICK SEARCH BY OPERATION ........................................................ |
1 |
CONTENTS ............................................................................................ |
4 |
CHECKING THE INCLUDED ACCESSORIES ...................................... |
7 |
GETTING THE MOST OUT OF YOUR CAMERA ................................ |
11 |
SYSTEM MAP ...................................................................................... |
14 |
SETUP |
|
PARTS NAMES .................................................................................... |
15 |
INSTALLING THE BATTERY PACK AND CARD ................................ |
17 |
POWER FOR THE CAMERA ............................................................... |
20 |
TURNING THE CAMERA ON AND OFF .............................................. |
22 |
OPERATION BUTTONS ...................................................................... |
24 |
BASIC OPERATION |
|
BEFORE TAKING PICTURES ............................................................. |
26 |
CAPTURING IMAGES .......................................................................... |
30 |
BASIC SHOOTING FUNCTIONS ......................................................... |
35 |
MAKE AN AUDIO RECORDING .......................................................... |
37 |
VIEWING IMAGES ............................................................................... |
39 |
VIEWING VIDEO CLIPS ....................................................................... |
42 |
PLAYING BACK AUDIO DATA ............................................................ |
44 |
SHOOTING |
|
DISPLAYING THE SHOOTING SETTING SCREENS ......................... |
45 |
IMAGE QUALITY .................................................................................. |
51 |
SCENE SELECT .................................................................................. |
53 |
FILTERS ............................................................................................... |
55 |
FLASH SETTING .................................................................................. |
56 |
SELF-TIMER ........................................................................................ |
58 |
MOTION COMPENSATION (IMAGE STABILIZER) ............................. |
60 |
FOCUS RANGE ................................................................................... |
62 |
FOCUS AREA SETTING ...................................................................... |
64 |
LIGHT-MEASURING MODE SETTING ................................................ |
65 |
ISO SENSITIVITY ................................................................................. |
66 |
WHITE BALANCE ................................................................................ |
67 |
English 4
CONTENTS |
|
PLAYBACK |
|
DISPLAYING THE PLAYBACK SETTING SCREENS ........................ |
69 |
PLAYBACK MODE .............................................................................. |
73 |
PLAYBACK VOLUME .......................................................................... |
74 |
IMAGE PROTECT ............................................................................... |
75 |
ERASING DATA .................................................................................. |
77 |
PRINT SETTINGS ............................................................................... |
79 |
ROTATE IMAGE .................................................................................. |
86 |
CHANGING IMAGE SIZE (RESIZE) .................................................... |
87 |
RED-EYE CORRECTION .................................................................... |
88 |
EXTRACTING A STILL IMAGE FROM A VIDEO CLIP ....................... |
90 |
EDITING VIDEO CLIPS ....................................................................... |
91 |
SMOOTH PLAYBACK ......................................................................... |
98 |
DISPLAYING IMAGE PROPERTIES (INFORMATION SCREEN) ...... |
99 |
OPTION SETTINGS |
|
DISPLAYING THE OPTION SCREEN ............................................... |
100 |
DATE AND TIME SETTING ............................................................... |
103 |
OPERATION SOUNDS ..................................................................... |
106 |
HELP DISPLAY ................................................................................. |
108 |
POST-VIEW SETTING ...................................................................... |
109 |
WIND NOISE REDUCTION ............................................................... |
110 |
NOISE-REDUCTION FUNCTION ...................................................... |
111 |
ADJUST THE IMAGE QUALITY ........................................................ |
112 |
FLICKER-REDUCTION ..................................................................... |
113 |
DIGITAL ZOOM SETTING ................................................................. |
114 |
LCD MONITOR BRIGHTNESS .......................................................... |
115 |
SCREEN LANGUAGE ....................................................................... |
116 |
TV SYSTEM SETTING ...................................................................... |
117 |
POWER SAVE FUNCTION ............................................................... |
118 |
FILE NO. RESET FUNCTION ............................................................ |
120 |
FORMATTING A CARD ..................................................................... |
123 |
RESETTING THE CAMERA SETTINGS ........................................... |
125 |
CHECKING THE REMAINING CARD MEMORY .............................. |
126 |
CHECKING THE REMAINING BATTERY PACK CHARGE .............. |
127 |
5 English
OTHER DEVICES AND CONNECTIONS |
|
CONNECTING TO A TV ..................................................................... |
129 |
DIRECT PRINTING ............................................................................ |
130 |
APPENDICES |
|
COMMONLY ASKED QUESTIONS ................................................... |
139 |
TROUBLESHOOTING ........................................................................ |
146 |
SPECIFICATIONS .............................................................................. |
153 |
HINTS FOR TAKING PICTURES ....................................................... |
162 |
English 6

CHECKING THE INCLUDED ACCESSORIES
i Handstrap: 1 |
i SANYO Software Pack |
|
(CD-ROM): 2 |
i Li-ion battery pack: 1 |
i Dedicated AV interface cable: 1 |
i Dedicated USB interface |
i Lens cap: 1 |
cable: 1 |
|
7 English

i AC adaptor and power cord: 1
i “SAFETY MANUAL” |
i Quick Guide |
(safety precautions booklet) |
|
Please read this booklet |
|
carefully before using the |
|
digital camera. |
|
English 8

CHECKING THE INCLUDED ACCESSORIES
How to use the accessories
k Handstrap
k Lens cap
Before using the lens cap, remove the protective film.
9 English

Media cards that can be used with this camera
The type of card that can be inserted into and used with this camera is: i SD Memory Card
English 10

GETTING THE MOST OUT OF YOUR CAMERA
Your movie camera can not only record video clips, you can also take still photos and make audio recordings. For example, you can snap a still image while recording a video clip, or make just an audio recording.
Twin menus for easy operation (pages 46 and 70)
The novice photographer will have no problem taking beautiful pictures using the easy settings on the PAGE 1 menu.
Of course, the PAGE 2 menu for the experienced photographer provides full control over detailed camera settings.
VIDEO CLIP MPEG4 |
640x480 30fps HQ |
<Example: Shooting
Setting Screen: PAGE 1>
IMAGE STABILIZER |
VIDEO VIEW |
<Example: Shooting
Setting Screen: PAGE 2>
Shooting video clips (page 30)
You expect your camera to record great quality still photos, but you can record 640 × 480-pixel video clips as well. The maximum 30-frames-per- second shooting speed guarantees beautiful, flowing movies for you to enjoy. Another bonus is the capability to record small file sizes that are perfect for uploading to Internet websites.
11 English

Capture still shots while recording a video clip (page 34)
Suppose that while you’re recording a video clip, there’s a scene you’d like to keep as a still photo. Your camera makes it possible to record the still photo without interrupting the video clip recording.
31 |
01:10:15 |
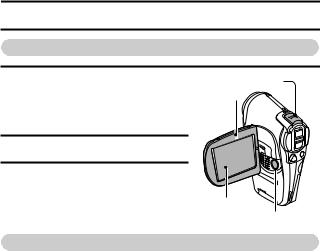
Movable monitor for any shooting angle
The movable LCD monitor lets you shoot from any angle. Hold the camera high to get a great view of a parade, or swivel the monitor around to snap a photo of yourself.
English 12

GETTING THE MOST OUT OF YOUR CAMERA
Smooth out the motion during video clip playback: Smooth playback (page 98)
If a video clip was recording while the camera was moving fast, you might see a distracting video flicker when it is played back. For a playback that is comfortably even, you can use the “smooth playback function” to suppress the video flicker.


 SMOOTH PLAYBACK
ON
OFF
13 English

SYSTEM MAP
You can connect the camera to various devices to expand its capabilities.
Computer
Dedicated
USB interface Printer cable
Dedicated AV
interface cable
TV
AC adaptor (Supplied)
Separately sold or commercially available SD Memory Card
Internet
Battery charger (Optional)
i Card reader i DPOF-
compatible printer
i Photo shop
English 14
PARTS NAMES
Camera
Front
Lens
Flash 


Monitor unit
Stereo microphone 

<To open the monitor unit>
15 English
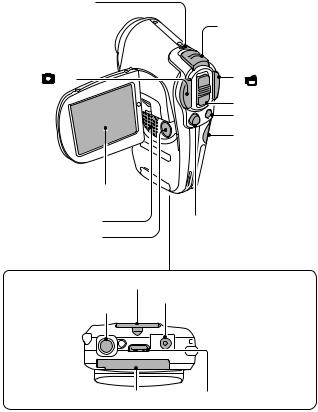
Rear
Multi-indicator
|
Main switch |
Still image shooting |
Video clip |
recording button |
|
button [ ] |
[ ] |
|
Zoom switch |
|
MENU button |
|
Battery cover |
LCD monitor |
|
Speaker |
SET button |
ON/OFF button |
|
Bottom |
Strap holder |
DC IN terminal
Tripod stand hole • Use only the SANYO-specified AC adaptor.
Card cover |
USB/AV terminal |
English 16
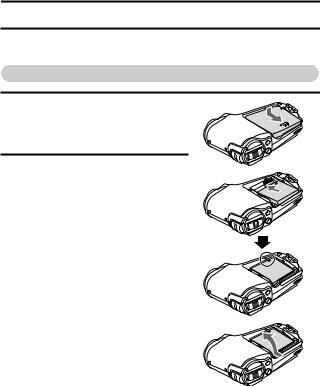
INSTALLING THE BATTERY PACK AND CARD
The card can be used after it has been formatted with the camera (page 123). Make sure that the battery pack and the card orientation are correct.
Install the battery pack
1 Open the battery cover on the side. h Open the battery cover by lightly
pressing it and sliding it towards the rear.
2 Insert the battery pack.
h Firmly push it all the way in.
h Match the [I] mark on the battery pack with the [I] mark on the camera.
<To remove the battery pack...> h Raise the battery pack and pull it
out.
17 English

3 Close the battery cover.
h Match the [I] marks, and slide the cover towards the front to close it. h At the time of purchase the battery
pack is not charged. Be sure to install a fully charged battery pack in the camera (page 20).
Install the card
1 Open the monitor unit, and then |
|
|
open the card cover on the bottom |
|
|
of the camera. |
ON/OFF |
|
h If the camera is on, press the ON/ |
||
button |
||
OFF button for at least 1 second to |
||
|
||
turn off the camera. |
|
2 Insert the card.
hFirmly insert the card until it clicks into place.
English 18

INSTALLING THE BATTERY PACK AND CARD
3 Close the card cover.
<When removing the card...>
hTo remove the card, press it down, and then release. The card will protrude slightly, and you can then pull it out.
2 Push
3Pull out
1 Open
CAUTION
Do not attempt to forcibly remove the card.
i Never remove the card when the multi-indicator is flashing red. In doing so, you risk losing the data stored in the card.
HINT
When not using the camera for a long time, remove the battery pack. i A small amount of power is still used even if the camera is turned off, and it
is therefore recommended that the battery pack be removed from the camera if it is not going to be used for a long time. Note that when the battery pack is removed for a long period, the time and date settings may be cleared. Before using your camera again, be sure to confirm that the camera settings are correct.
19 English
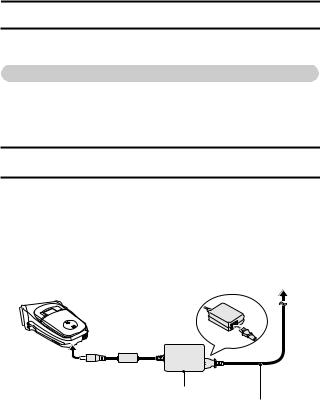
POWER FOR THE CAMERA
The supplied AC adaptor is used not only as the camera’s AC adaptor, but also to charge the battery installed in the camera.
Using the battery pack
At the time of purchase, the battery pack is not charged. The battery pack must be charged before it can be used in the camera. Also, if the battery power becomes depleted when the camera is being used (see “CHECKING THE REMAINING BATTERY PACK CHARGE” on page 127), it should be recharged as soon as possible.
1 Install the battery pack.
2 Turn the camera off, and connect the AC adaptor to the camera.
hCharging begins as soon as the AC adaptor is connected to the camera. However, the camera does not charge when it is set to the
shooting mode or PC camera mode.
h The camera’s multi-indicator lights red during charging. h Charging will take approximately 90 minutes.
h The multi-indicator will turn off when the battery pack is fully charged.
To power outlet
DC IN
 terminal
Supplied AC adaptor
Supplied power cord
English 20
POWER FOR THE CAMERA
3 Disconnect the AC adaptor after charging is completed.
Using a power outlet
When the supplied AC adaptor is connected to the camera, power can be supplied from a power outlet.
To power outlet
HINT
About the internal backup battery
i This camera’s internal battery serves to maintain the date and time settings, as well as the shooting settings. The backup battery will be fully charged when the battery pack is kept in the camera continuously for about 2 days. In the fully charged state, the backup battery will maintain the camera settings for about 7 days.
21 English
TURNING THE CAMERA ON AND OFF
Turning on the camera
1 |
Set the main switch. |
Main switch |
|
To shoot pictures: |
Monitor unit |
|
Set to REC |
|
|
|
|
|
To play back images: |
|
|
Set to PLAY |
|
2 |
Open the monitor unit. |
|
3 |
Press the ON/OFF button for about 1 |
|
|
second. |
|
|
h The camera turns on, and an image |
LCD monitor |
|
appears on the LCD monitor. |
|
|
|
|
|
|
ON/OFF button |
Turning on the camera when the power save (sleep) function is active
In order to preserve battery pack power, the power save (sleep) function will automatically turn off the camera after one minute of no use during shooting, or five minutes of no use during playback (factory-preset setting).
i When the power save function is active, you can restore the power by any of the following methods:
h Move the main switch.
h Press the ON/OFF button.
h Press the Still image shooting/Video clip recording button. h Press the SET or MENU button.
h Press the zoom switch.
i After the power save function has been active for about 1 hour, the camera will switch to the standby mode. In this case, you can restore the power by pressing the ON/OFF button, or by closing and then opening the monitor unit.
i When the AC adaptor is connected, the power save function will become active about 10 minutes after the camera is turned on (factory-preset setting).
i The user can specify the time elapsed before the power save function is activated (page 118).
i When the camera is connected to a computer or printer using the dedicated USB interface cable, the power save function is disabled, and the camera turns off after about 12 hours.
English 22

TURNING THE CAMERA ON AND OFF
Turning off the camera
1 Press the ON/OFF button for about 2 seconds. h The camera turns off.
HINT
To immediately activate the power save function
i Press the ON/OFF button briefly to active the power save function.
About the standby mode
i To turn off the camera only briefly, you can close the monitor unit to put the camera in the standby mode. The standby mode uses almost no power. When the monitor unit is opened again, the camera turns on immediately and you are ready to shoot or view images without any delay.
If the K icon appears...
i When a picture is taken, the date and time it was captured is recorded with it. When the date and time cannot be recorded with the image because the date and time have not yet been set (page 103), the K icon appears. To have the date and time recorded with images, please make this setting before capturing images.
23 English
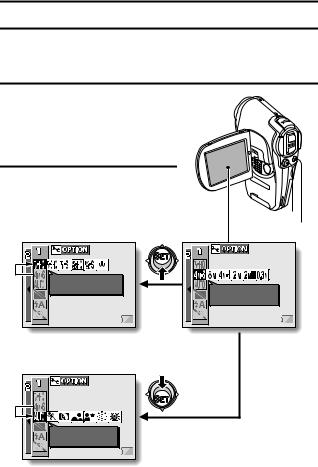
OPERATION BUTTONS
The procedures to change the camera settings, choose images, etc., are performed by using the SET button to control the LCD monitor display. This operation is used very frequently, so it is best to become familiar with it right away.
1 Turn on the camera (page 22).
2 Press the MENU button.
h The Menu Screen appears.
<Select the icon above or below>
To select the icon above, toggle the SET button up.
VIDEO CLIP MPEG4 |
640x480 30fps HQ |
SET button
MENU button
PHOTO RESOLUTION |
2288x1712 (4M-S) |
To select the icon below, toggle the SET button down.
SCENE SELECT |
FULL AUTO |
English 24
 Loading...