


INSTRUCTION MANUAL
Video cassette recorder
Before connecting, operating or adjusting this product, please read this instruction booklet carefully and completely.
VHR-H793E
PAL
Precaution & |
Plug wiring |
Information |
Used batteries: The batteries in the remote control of your VCR do not contain
mercury. However, SANYO recommends that you do not dispose of used batteries with domestic refuse. Please, contact your dealer or your local authorities for information regarding the disposal of used batteries or take them to your nearest collection point.
Ensure that your VCR is placed in a position to allow a free flow of air.
DANGER:
This VCR contains live parts. Do not remove the cabinet.
WARNING:
To prevent fire or shock hazard, do not expose this product to rain or moisture.
Do not drop the tying band of the mains lead into the unit. Doing so might cause a fire or an electrical shock. (See page 6.)
CAUTION:
Do not put your hand or other objects in the cassette loading slot because of the risk of injury or an accident. Keep small children away from the VCR.
The apparatus shall not be exposed to dripping or splashing from liquids, and no objects filled with liquids, such as vases, shall be placed on the apparatus.
Position your VCR so that no bright light or sunlight falls directly onto it.
Care should be taken not to expose your VCR to any unnecessary vibration, moisture, dust or heat. During electrical storms it is advisable to unplug both the aerial cable and mains plug to prevent accidental damage to your VCR and TV.
Do not operate your VCR if it is damaged.
Your VCR should not be repaired by anyone except qualified service personnel.
Never remove the cover of your VCR as this can expose you to very high voltage and other hazards. If your VCR does not operate properly, please check the Troubleshooting Check List (see p. 34). If your VCR still does not operate properly, unplug it and call your dealer.
This appliance is supplied with BS 1363 approved 13 Amp fused mains plug. When replacing the fuse always use a 5 Amp BS 1362 approved type. Never use this plug with the fuse cover omitted.
To obtain a replacement fuse cover contact your supplying dealer.
If the mains sockets in your home differ, or are not suitable for the type of plug supplied then the plug should be removed and a suitable type fitted.
If the mains plug becomes severed from the mains lead it must be destroyed. A mains plug with bared wires is hazardous if engaged in a mains output line socket.
If a 13 Amp BS 1363 plug is not suitable or any other type of plug used, then this appliance must be protected by a 5 Amp fuse.
Should you need to change the plug
The wires in this mains lead are coloured in accordance with the following codes
BLUE ~ Neutral
BROWN ~ Live
As the colours of the wires in the mains lead of this appliance may not correspond with the coloured markings identifying the terminals in your plug proceed as follows : The wire which is coloured BLUE must be connected to the terminal which is marked with the letter N or coloured BLUE or BLACK.
The wire which is coloured BROWN must be connected to the terminal which is marked with the letter L or coloured BROWN or RED.
DO NOT connect either wire to the EARTH terminal.
2

Just to name a few examples of the extraordinary features:
• Programmable 88 |
• Video System |
channel memory with |
- PAL(I) |
Frequency synthesised |
- MESECAM |
tuner |
- NTSC playback on |
• ACMS (Automatic |
PAL TV |
Channel Memory |
• Auto Power on and |
System) |
Play |
• 7 events/1 month |
• Shuttle Controls |
programmable timer |
• Auto Tracking System |
• Long Play (LP) - |
• Auto Head Cleaner |
recording & playback |
• Logic & Picture Search |
• Extended Play (EP) - |
• Wide Screen (16:9) - |
playback |
recording & playback |
• DPC (Digital Picture |
• Child Lock |
Control) |
• Real Time Counter |
• Friendly User Guide |
• Quick Set Recording |
• Save Energy Mode |
• ICON OSD (On |
|
Screen Display) |
|
• Hi-Fi Stereo Audio |
|
System |
Beware of moisture condensation
Moisture in the air will condense on the VCR when you move it from a cold place to a warm place, or under extremely humid conditions — just as water droplets form on the surface of a glass filled with cold liquid. Moisture condensation on the head drum will cause damage to the tape. In conditions where condensation may occur, keep the VCR’s power turned on for a few hours to let the moisture dry.
Features
3

Table of Contents
Welcome to SANYO
Thank you for buying this SANYO video cassette recorder(VCR) Model VHR-H793E.
Description |
2 - 6 |
|
Precaution & Plug wiring information |
2 |
|
Features |
3 |
|
Remote Control Location & functions |
5 |
|
Your VCR’s Controls |
6 |
|
Setting Up |
7 - 17 |
|
Connecting to a TV & Satellite Receiver 7 |
||
Connecting to a Hi-Fi |
8 |
|
Tuning in a Video channel On your TV 9 - 10 |
||
Using your VCR for the very first time |
11 |
|
How to Use the main menu |
12 |
|
Tuning in TV Stations Automatically |
13 |
|
Tuning in TV Stations Manually |
14 - 15 |
|
Changing the order of TV Stations |
16 |
|
Deleting TV Stations |
17 |
|
Basic Operations |
18 - 25 |
|
Playback a tape |
18 - 19 |
|
Other Playback features |
20 |
|
h |
CM (Commercial Message) CUT |
20 |
h |
DPC (Digital Picture Control) |
20 |
To set the Colour System |
21 |
|
Recording TV programmes |
22 - 23 |
|
Setting the Clock Manually |
24 |
|
Hi-Fi Stereo Sound System |
25 |
|
Advanced Operations |
26 - 31 |
Timer Recording Using On Screen |
|
Display |
26 - 27 |
Save Energy |
28 |
On Screen Display |
28 |
Tape Counter Memory Stop |
29 |
Child Lock |
29 |
Wide Screen Compatibility (16:9) |
30 |
Automatic Shut-Off |
31 |
Friendly User Guide (Video Doctor) |
31 |
Helpful Hints |
32 - 34 |
Tape Copying |
32 |
Specifications |
33 |
Troubleshooting Check List |
34 |
GUARANTEE TO CUSTOMER |
Back cover |
4
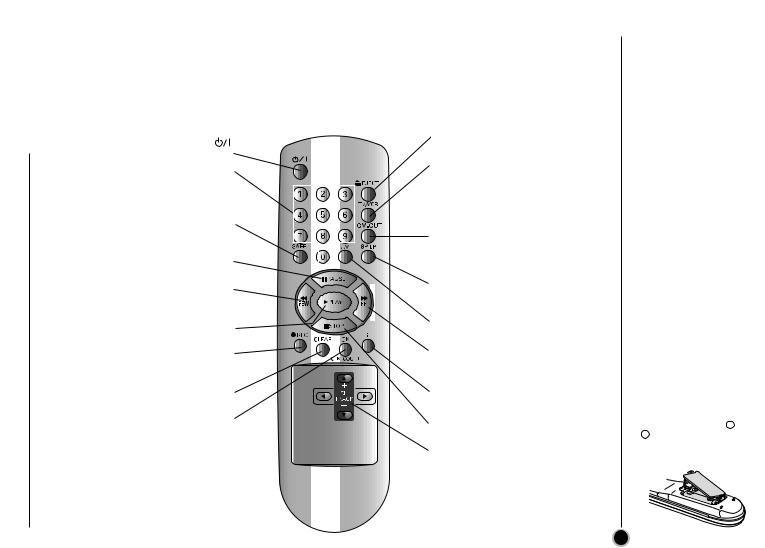
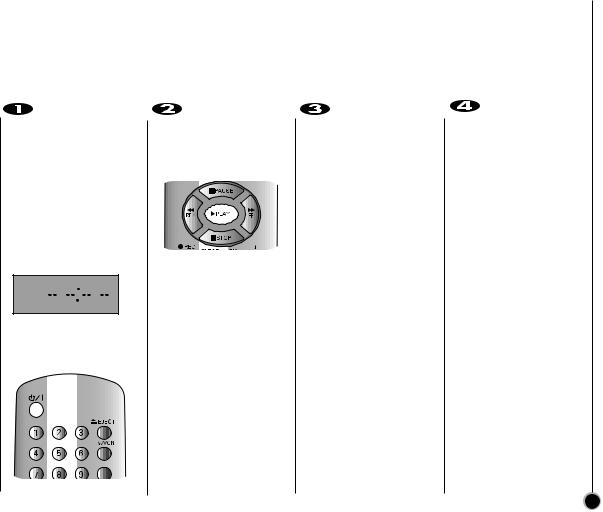
Your VCR is designed so that almost all of its features can be controlled from the REMOTE CONTROL HANDSET. Some features can also be controlled from the FRONT PANEL of the VCR.
The maximum operating distance that you may control your VCR is about 7 metres (23 feet). It must also be within an angle of 30 degrees either side of the REMOTE SENSOR on the front of your VCR.
To avoid damage from possible battery leakage, remove the batteries if you do not plan to use the remote control handset for an extended period of time. Do not use batteries of differing age or type. Always discard batteries safely.
|
EJECT |
|
To switch the VCR on or standby |
Ejects tape |
|
TV/VCR |
||
Numbered buttons |
||
VCR; to monitor, view playback |
||
|
||
To select channels. |
or view the VCR’s tuner |
|
Programme number information on |
TV; to watch TV or view another |
|
screen |
programme while recording |
|
SAFE |
another programme (see p. 23) |
|
|
||
Switches the Child Lock on and off |
CM-CUT |
|
(see p. 29) |
To fast forward picture search |
|
PAUSE |
through 30 seconds of a |
|
recording (see p. 20) |
||
Switches to a still picture |
||
SP/LP |
||
REW |
||
To select the recording speed of |
||
Rewinds the tape |
||
the tape |
||
Reverse high speed picture play |
||
AV |
||
PLAY |
||
Select input source for recording |
||
To play the tape |
||
|
||
REC |
FF |
|
Starts quick recording (see p. 22 |
Winds the tape forwards |
|
to 23) |
Forward high speed picture play |
|
CLEAR |
i |
|
Reset tape counter to zero |
Displays on screen menu |
|
OK/CLK/COUNT |
STOP |
|
Calls the on screen display. |
||
To stop the tape |
||
(see p. 28 to 29) |
||
CURSORS |
||
|
||
|
To adjust tracking |
|
|
To reduce vertical tremble |
|
|
To adjust the playback speed |
|
|
To control on screen display |
|
|
information, channel up & down |
|
|
selection |
& Location |
Remote |
functions |
Control |
To install batteries:
Your REMOTE CONTROL HANDSET is powered by two AA type batteries.
1.To insert them, push the tab backwards and lift off the cover of the handset.
2.Put the two batteries into the compartment
making sure the + and - are correctly
positioned.
3. Replace the cover.
5
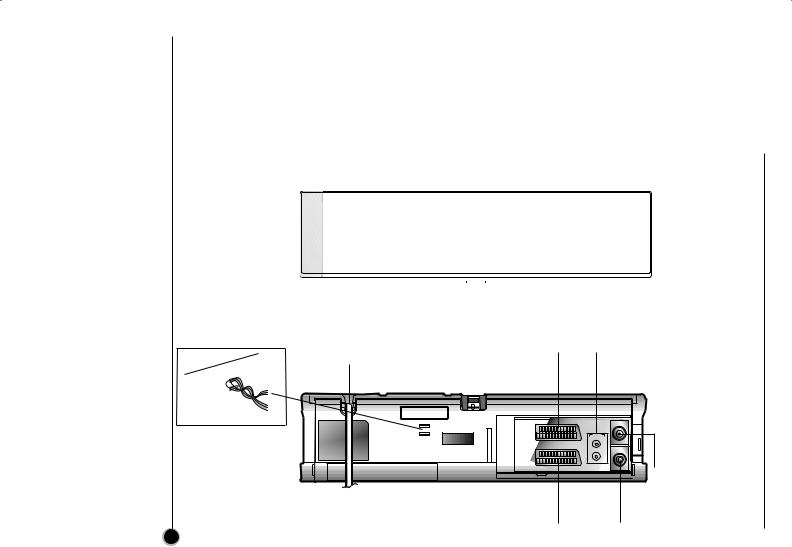
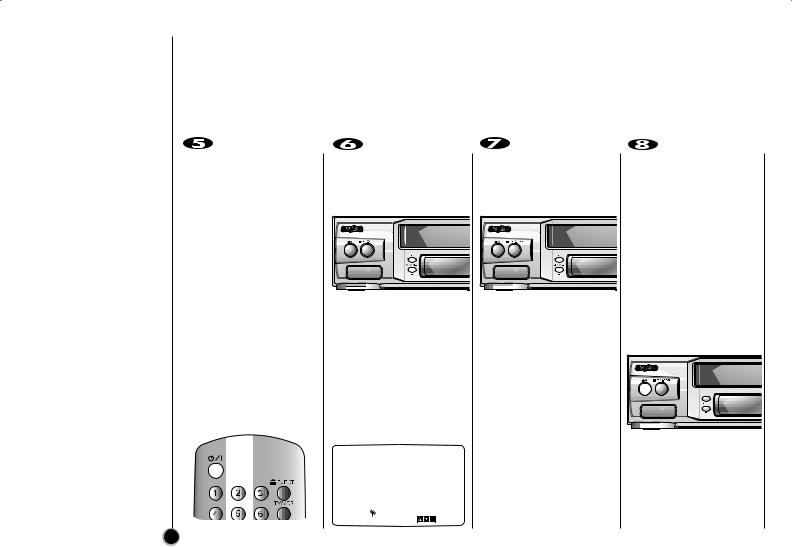
VCR’s |
Controls |
Your |
|
ABOUT  BUTTON
When you press  on the
VCR and remote control while the VCR is in power on mode, each button works differently.
Power on mode
VCR
On the VCR
When you press  , the
, the
VCR enters Save Energy mode.
Save Energy mode
On the Remote control
When you press  , the VCR enters Standby mode.
Standby mode (dimmer)
Each button on your VCR has the same function as its corresponding button on the remote control handset.
NOTE:
The EURO AV2 socket is used for signal input/output only. DECODER is shown but this unit does not have it.
|
|
|
|
STOP/EJECT |
Cassette |
PAUSE/ |
REW |
|
|
PLAY |
FF |
||||||||||
(On/Save Energy) |
|
|
|
|
|
|
|
Compartment |
STILL |
|
|
|
|
|
|
|
|
||||
|
|
|
|
|
|
|
|
|
|
|
|
|
|
|
|
|
|
|
|
|
|
|
|
|
|
|
|
|
|
|
|
|
|
|
|
|
|
|
|
|
|
|
|
|
|
|
|
|
|
|
|
|
|
|
|
|
|
|
|
|
|
|
|
|
|
|
|
|
|
|
|
|
|
|
|
|
|
|
|
|
|
|
|
|
|
|
|
|
|
|
|
|
|
|
|
|
|
|
|
|
|
|
|
|
|
|
|
|
|
|
|
|
|
|
|
|
|
|
|
|
|
|
|
|
|
|
|
|
|
|
|
|
|
|
|
|
|
|
|
|
|
|
|
|
|
|
|
|
|
|
|
|
|
|
|
|
|
|
|
|
|
|
|
|
|
|
|
|
|
|
|
|
|
|
|
|
|
|
|
|
|
|
|
|
|
|
|
|
|
|
|
|
|
|
|
|
|
|
|
|
|
|
|
|
|
|
|
|
|
|
|
|
|
|
|
|
|
|
|
CHANNEL |
VCR |
Remote |
REC |
(-/+) |
Display |
Control |
|
|
|
sensor |
(instant record) |
WARNING:
Do not drop the tying band of the mains lead into the unit. Doing so might cause a fire or an electrical shock.
Mains Lead |
EURO AV2 |
|
AUDIO OUT (L/R) |
||
|
(Connect to your TV set |
|
sockets |
|
|
|
or another video recorder) |
|
(Connect to your Hi-Fi) |
||
|
|
|
|
ENTREE |
|
|
|
|
|
ANTENNE |
|
|
EURO AV2 |
|
|
|
|
|
DECODER |
|
AUDIO |
|
AERIAL |
|
|
G |
L |
|
|
|
|
SORTIE OUT |
|
|
|
|
|
|
|
AERIAL |
(Connect the aerial |
|
AUDIO/ |
D |
R |
SORTIE |
|
|
|
|
|
ANTENNE |
|
|
EURO AV1 |
|
|
|
using this socket) |
|
VIDEO |
|
|
RF.OUT |
|
EURO AV1 |
RF.OUT |
(Connect to your TV set or |
(Connect to your TV |
another video recorder) |
using this socket) |
6
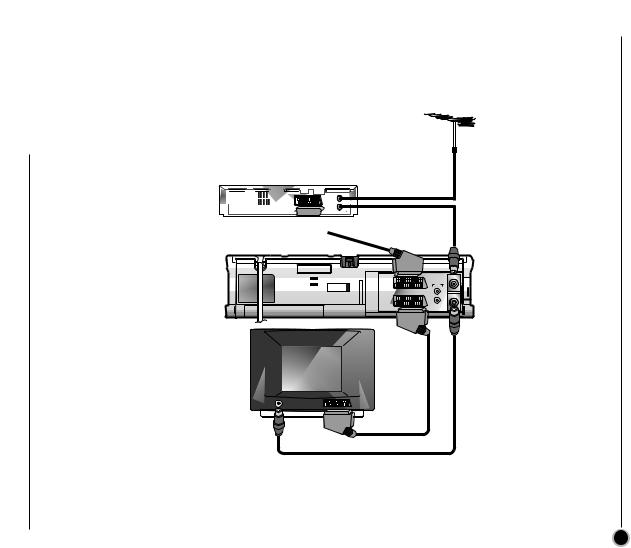
The guidance given on this page is for the most common form of connection. However please check with your manufacturer’s instruction books for specific information. Make sure all connections are made with both your VCR and additional appliance unplugged from the mains to avoid damaging your equipment. Connecting a VCR using a SCART lead is one of the best ways to achieve optimum sound and picture quality from
video tape playback.
Aerial
Satellite, Cable or Digital set top box
Back view of your VCR
The quality of the sound and picture can be greatly influenced by the positioning, quality and state of repair of your external aerial.
Aerial Connection
 Cable (not supplied)
All connections must be made with all appliances unplugged from the mains.
|
|
|
|
ENTREE |
|
|
|
|
ANTENNE |
EURO AV2 |
|
|
|
|
DECODER |
|
AUDIO |
|
|
|
SORTIE |
OUT |
|
|
|
G |
|
L |
AERIAL |
|
|
|
|
SORTIE |
|
|
|
|
ANTENNE |
EURO AV1 |
|
|
|
|
AUDIO/ |
D |
|
R |
|
VIDEO |
|
|
|
|
|
|
|
|
RF.OUT |
Aerial Connection
Cable (75 Ohms, supplied)
Do not try and force the
Television |
connector into place, it |
|
|
|
should plug in easily. |
SCART Lead
(not supplied)
If you use a SCART lead picture quality will be improved.
MAINS LEAD
Do not forget that even in the power off state there is an electrical voltage inside the VCR as long as it is connected to a wall socket. Disconnect the mains lead from the wall socket if the VCR is not to be used for a long time.
Satellite & TV a To |
Connecting |
Receiver |
|
|
|
7

To a Hi-Fi
Connecting
An audio system can be connected to the AUDIO OUT sockets on the back of your VCR.
Please remember to turn the volume to minimum on your Hi-Fi, then gradually increase the volume; this will prevent damaging your speakers and save you from an extremely noisy shock!
Hi-Fi
|
Audio Left & |
Back view of your |
Right Lead |
VCR |
|
|
|
|
|
ENTREE |
|
|
|
|
ANTENNE |
EURO AV2 |
|
|
|
|
DECODER |
|
AUDIO |
|
|
|
SORTIE |
OUT |
|
|
|
G |
|
L |
AERIAL |
|
|
|
|
SORTIE |
|
|
|
|
ANTENNE |
EURO AV1 |
D |
|
R |
|
AUDIO/ |
|
|
||
VIDEO |
|
|
|
|
|
|
|
|
RF.OUT |
Audio out sockets & Phono Leads
The phono sockets for connecting your VCR to your Hi-Fi are on the back of the VCR;
L = Left sound output, R = Right sound output. You normally have to select the AUX function on your Hi-Fi.
8
Your TV receives signals from the VCR like another TV station.
You have to select a channel number on your TV and tune it in so that you may watch video tapes.
If you have used a SCART lead then your TV should already have a dedicated video channel built into it, usually called AV.
Make sure that you have correctly installed your VCR as described earlier in this book.
Press  to turn on your VCR.
The VCR and --:-- will appear on the VCR’s display.
VCR
Turn on your TV.
Insert a pre-recorded video tape into your VCR and press PLAY on the remote control.
Select a TV channel number on which you wish to watch video’s.
Don’t worry if you don’t have a video-tape to play at this stage!
If you switch your VCR on and continue stages 3 ~ 4, instead of seeing video playback tune your TV until you see a bright blue screen.
Tune this channel until the video picture is sharp and the sound is clear on your TV.
If you have used a SCART lead you will not have to tune your TV, simply select the AV channel. The AV channel will provide optimum video playback on your TV.
Store this channel on your TV.
You will need to look at the TV instruction book if you do not know how to do this.
CM-CUT
a in Tuning
channel Video
TV your On
The output frequency of this VCR is set at UHF channel 22.
If channel 22 is already used by another TV station, or if the picture is distorted, you can change the transmitter channel of your VCR. Stages 5 ~ 8 will show you how to change the output frequency of your VCR.
9
Make sure that you have correctly installed your VCR and successfully tuned in a dedicated video channel on your TV. If you do not tune in a dedicated video channel on your TV you will be unable to view video tapes!
carry out stages if you cannot
clear video playas described in
1 ~ 4.
a TV channel on which you watch video’s.
Make sure that your VCR is in STANDBY by pressing  on the remote control. (The clock indicator will be dimmed and VCR indicator will disappear on the VCR’s display.)
Hold down CHANNEL - or + on the front of your VCR for more than 4 seconds.
RF 22 will appear in the VCR display.
The following picture will be displayed on the TV screen.
RF CHANNEL |
22 |
PSET |
i |
R |
|
Press CHANNEL - or + to select another video channel.
You may select any channel number between 22 and 68.
Select a TV channel number on which you wish to watch video’s.
Tune this channel so that a bright blue screen appears.
Store this channel on your TV.
Press  on the front of your VCR when you have finished.
10
For the following steps we assume that you have just connected your video recorder for the very first time. To make tuning TV stations an easy task your VCR incorporates the Automatic Channel Memory System (ACMS).
Make sure that you have correctly installed your VCR.
Press  to turn on your VCR.
If the initial Menu Screen doesn’t appear on screen, make sure that you have tuned your TV to a video channel. Or if this is correct it may mean that your VCR is already tuned.
D
ACMS
Pr-12 |
OK i |
ACMS |
Press OK to start the |
The TV STATION TABLE |
||||||||
automatic tuning |
will appear when tuning |
||||||||
process. |
is completed. |
||||||||
|
|
|
|
|
Press i to remove the |
||||
|
|
|
|
|
menus from the TV |
||||
|
|
|
|
|
screen. |
||||
|
|
|
|
|
|
|
|
|
|
|
|
|
|
|
|
|
|
|
|
|
|
|
|
|
|
|
|
|
|
|
|
|
|
|
|
|
|
|
|
|
|
|
|
|
|
|
|
|
|
|
|
|
|
|
|
|
|
|
|
|
|
|
|
|
|
|
|
|
|
01 |
C23 |
00 |
PR-01 |
02 |
C26 |
00 |
PR-02 |
03 |
C30 |
00 |
PR-03 |
S |
E |
Pr-12 |
i |
ACMS |
|
01 |
C23 |
00 |
PR-01 |
|
|
|
||
02 |
C26 |
00 |
PR-02 |
|
|
|
|||
03 |
C30 |
00 |
PR-03 |
|
|
|
|||
04 |
C33 |
00 |
PR-04 |
|
|
|
|||
05 |
C35 |
00 |
PR-05 |
|
|
|
|||
06 |
- - |
- - |
- - - - - |
|
|
|
|||
07 |
- - |
- - |
- - - - - |
|
|
|
|||
08 |
- - |
- - |
- - - - - |
|
|
|
|||
P |
|
MOVE : |
|
|
|
|
|
|
|
|
|
|
|
|
|
|
|||
|
DELETE : |
|
, |
|
|
|
|
||
RSET |
|
|
|
|
OK |
i |
|||
|
|
|
|
|
|
|
|
||
your Using
the for VCR
time first Very
To manually tune in and name a TV station, see page 14 to 15.
To change the order, see page 16.
To delete a TV station, see page 17.
11
 Loading...