


Contact SAMSUNG WORLD WIDE
If you have any questions or comments relating to Samsung products, please contact the SAMSUNG customer care centre.
Country |
Customer Care Centre |
Web Site |
AUSTRIA |
0800 - SAMSUNG (0800 - 7267864) |
www.samsung.com/at/support |
BELGIUM |
02-201-24-18 |
www.samsung.com/be/support (Dutch) |
|
|
www.samsung.com/be_fr/support (French) |
BOSNIA |
051 331 999 |
www.samsung.com/support |
BULGARIA |
800 111 31 , Безплатна телефонна линия |
www.samsung.com/bg/support |
CROATIA |
072 726 786 |
www.samsung.com/hr/support |
|
|
|
CZECH |
800 - SAMSUNG (800-726786) |
www.samsung.com/cz/support |
|
Samsung Electronics Czech and Slovak, s.r.o. V Parku 2343/24, 148 00 - Praha 4 |
|
DENMARK |
70 70 19 70 |
www.samsung.com/dk/support |
FINLAND |
030-6227 515 |
www.samsung.com/fi/support |
FRANCE |
01 48 63 00 00 |
www.samsung.com/fr/support |
GERMANY |
0180 6 SAMSUNG bzw. |
www.samsung.com/de/support |
|
0180 6 7267864* |
|
|
(*0,20 €/Anruf aus dem dt. Festnetz, aus dem Mobilfunk max. |
|
|
0,60 €/Anruf) |
|
CYPRUS |
8009 4000 only from landline, toll free |
www.samsung.com/gr/support |
GREECE |
80111-SAMSUNG (80111 726 7864) only from land line |
|
|
(+30) 210 6897691 from mobile and land line |
|
HUNGARY |
0680SAMSUNG (0680-726-786) |
http://www.samsung.com/hu/support |
|
0680PREMIUM (0680-773-648) |
|
ITALIA |
800-SAMSUNG (726-7864) |
www.samsung.com/it/support |
LUXEMBURG |
261 03 710 |
www.samsung.com/support |
MONTENEGRO |
020 405 888 |
www.samsung.com/support |
SLOVENIA |
080 697 267 |
www.samsung.com/si/support |
|
090 726 786 |
|
NETHERLANDS |
0900-SAMSUNG (0900-7267864) (€ 0,10/Min) |
www.samsung.com/nl/support |
NORWAY |
815 56480 |
www.samsung.com/no/support |
POLAND |
0 801-172-678* lub +48 22 607-93-33 * |
www.samsung.com/pl/support |
|
* (koszt połączenia według taryfy operatora) |
|
|
|
|
PORTUGAL |
808 20 7267 |
www.samsung.com/pt/support |
ROMANIA |
08008 726 78 64 (08008 SAMSUNG) |
www.samsung.com/ro/support |
|
Apel GRATUIT |
|
SERBIA |
011 321 6899 |
www.samsung.com/rs/support |
SLOVAKIA |
0800 - SAMSUNG (0800-726 786) |
www.samsung.com/sk/support |
SPAIN |
0034902172678 |
www.samsung.com/es/support |
SWEDEN |
0771 726 7864 (SAMSUNG) |
www.samsung.com/se/support |
SWITZERLAND |
0800 726 78 64 (0800-SAMSUNG) |
www.samsung.com/ch/support (German) |
|
|
www.samsung.com/ch_fr/support (French) |
|
|
|
UK |
0330 SAMSUNG (7267864) |
www.samsung.com/uk/support |
EIRE |
0818 717100 |
www.samsung.com/ie/support |
LITHUANIA |
8-800-77777 |
www.samsung.com/lt/support |
LATVIA |
8000-7267 |
www.samsung.com/lv/support |
ESTONIA |
800-7267 |
www.samsung.com/ee/support |
TURKEY |
444 77 11 |
www.samsung.com/tr/support |
LED TV
user manual
Thank you for purchasing this Samsung product.
To receive more complete service, please register your product at
www.samsung.com/register
Model _____________ Serial No. _____________
© 2014 Samsung Electronics Co., Ltd. All rights reserved. |
BN68-06876C-00 |
|
Warning! Important Safety Instructions
(Please read the appropriate section that corresponds to the marking on your Samsung product before attempting to install the product.)
CAUTION
RISK OF ELECTRIC SHOCK DO NOT OPEN
CAUTION: TO REDUCE THE RISK OF ELECTRIC SHOCK, DO NOT REMOVE COVER (OR BACK). THERE ARE NO USER SERVICEABLE PARTS INSIDE. REFER ALL SERVICING TO QUALIFIED PERSONNEL.
This symbol indicates that high voltage is present inside. It is dangerous to make any kind of contact with any internal part of this product.
This symbol alerts you that important literature concerning operation and maintenance has been included with this product.
The slots and openings in the cabinet and in the back or bottom are provided for necessary ventilation. To ensure reliable operation of this apparatus, and to protect it from overheating, these slots and openings must never be blocked or covered.
-- Do not cover this apparatus in a confined space, such as a bookcase or built-in cabinet, unless proper ventilation is provided. -- Do not place this apparatus near or over a radiator or heat resistor, or where it is exposed to direct sunlight.
-- Do not place a vessel containing water (vases etc.) on this apparatus, as this can result in a risk of fire or electric shock.
Do not expose this apparatus to rain or place it near water (near a bathtub, washbowl, kitchen sink, or laundry tub, in a wet basement, or near a swimming pool etc.). If this apparatus accidentally gets wet, unplug it and contact an authorised dealer immediately. Make sure to pull out the power cord from the outlet before cleaning.
This apparatus use batteries. In your community there might be regulations that require you to dispose of these batteries properly under environmental considerations. Please contact your local authorities for disposal or recycling information.
Do not overload wall outlets, extension cords or adaptors beyond their capacity, since this can result in fire or electric shock.
Power-supply cords should be routed so that they are not likely to be walked on or pinched by items placed upon or against them, paying particular attention to cords at plug end, adaptors and the point where they exit from the appliance.
To protect this apparatus from a lightning storm, or when it is left unattended and unused for long periods of time, unplug it from the wall outlet and disconnect the antenna or cable system. This will prevent damage to the set due to lightning and power line surges.
Before connecting the AC power cord to the DC adaptor outlet, make sure the voltage designation of the DC adaptor corresponds to the local electrical supply.
Never insert anything metallic into the open parts of this apparatus. Doing so may create a danger of electric shock.
To avoid electric shock, never touch the inside of this apparatus. Only a qualified technician should open this apparatus.
Make sure to plug the power cord in until it is firmly inserted. When removing the power cord, make sure to hold the power plug when pulling the plug from the outlet. Do not touch the power cord with wet hands.
If this apparatus does not operate normally - in particular, if there are any unusual sounds or smells coming from it - unplug it immediately and contact an authorised dealer or service centre.
Be sure to pull the power plug out of the outlet if the TV is to remain unused or if you are to leave the house for an extended period of time (especially when children, elderly or disabled people will be left alone in the house).
-- Accumulated dust can cause an electric shock, an electric leakage or a fire by causing the power cord to generate sparks and heat or the insulation to deteriorate.
Be sure to contact an authorised service centre, when installing your set in a location with heavy dust, high or low temperatures, high humidity, chemical substances and where it operates for 24 hours such as the airport, the train station etc. Failure to do so may cause serious damage to your set.
Use only a properly grounded plug and receptacle.
-- An improper ground may cause electric shock or equipment damage. (Class l Equipment only.)
To disconnect the apparatus from the mains, the plug must be pulled out from the mains socket, therefore the mains plug shall be readily operable.
Do not allow children to hang onto the product.
Store the accessories (battery, etc.) in a location safely out of the reach of children.
Do not install the product in an unstable location such as a shaky self, a slanted floor or a location exposed to vibration.
Do not drop or impart any shock to the product. If the product is damaged, disconnect the power cord and contact a service centre.
Unplug the power cord from the power outlet and wipe the product using a soft, dry cloth. Do not use any chemicals such as wax, benzene, alcohol, thinners, insecticide, aerial freshener, lubricant or detergent. This may damage the appearance or erase the printing on the product.
Apparatus shall not be exposed to dripping or splashing. Do not dispose of batteries in a fire.
Do not short circuit, disassemble or overheat the batteries.
Danger of explosion if battery is incorrectly replaced. Replace only with the same or equivalent type.
WARNING - TO PREVENT THE SPREAD OF FIRE, KEEP CANDLES OR OTHER OPEN FLAMES AWAY FROM THIS PRODUCT AT ALL TIMES.
* Figures and illustrations in this User Manual are provided for reference only and may differ from the actual product appearance. Product design and specifications may change without notice.
CIS languages (Russian, Ukrainian, Kazakhs) are not available for this product, since this is manufactured for customers in EU region.
English - 2
What's in the Box?
|
English |
Remote Control & Batteries (AAA x 2) |
Regulatory Guide |
User Manual |
Power Cord |
Warranty Card (Not available in some locations) |
|
|
|
|
|
|
|
|
|
|
Ferrite Core (2EA) |
|
|
|
|
|
|
|
|
|
|
||
|
|
|
|
|
|
|
|
|
||
CI Card Adapter |
IR Extender Cable |
Cable Holder |
||||||||
(Depending on the model) |
||||||||||
|
|
|
|
|
|
|
|
|
||
-- Please make sure the following items are included with your TV. If any items are missing, contact your dealer. -- The items’ colours and shapes may vary depending on the models.
-- Cables not included can be purchased separately.
-- Check for any accessories hidden behind or in the packing materials when opening the box.
An administration fee may be charged if either
(a)an engineer is called out at your request and there is no defect with the product (i.e. where the user manual has not been read).
(b)you bring the unit to a repair centre and there is no defect with the product (i.e. where the user manual has not been read).
You will be informed of the administration fee amount before a technician visits.
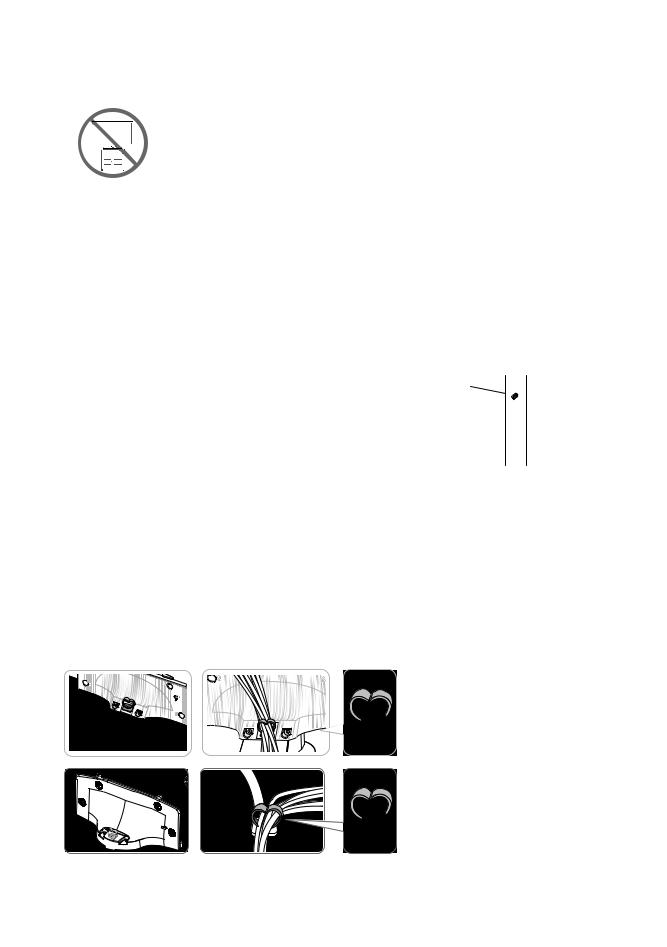
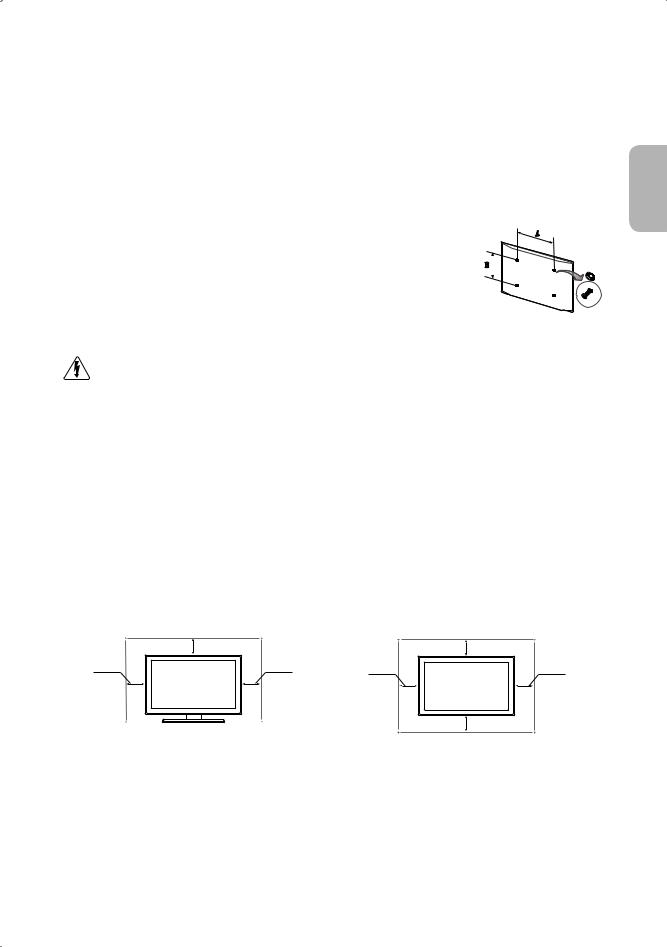
Warning: Screens can be damaged from direct pressure when |
|
handled incorrectly. We recommend lifting the TV at the edges, as |
Don't Touch |
shown. |
This Screen! |
Ferrite Core (Depending on the model): The ferrite cores are used to shield the cables from interference. When connecting a cable, open the ferrite core and clip it around the cable near the plug as shown in the figure.
<Power Cord> |
<LAN Cable> |
English - 3
Attaching the TV to the Stand
Make sure you have all the accessories shown, and that you assemble the stand following the provided assembly instructions.
Mounting the TV on the Wall Using the Wall Mount Kit (Optional)
If you mount this product on a wall, it should be mounted only as recommended by the manufacturer. Unless it is correctly mounted, the product may slide or fall, causing serious injury to a child or adult, and serious damage to the product.
Installing the Wall Mount Kit
The wall mount kit (sold separately) lets you mount the TV on the wall.
For detailed information about installing the wall mount, refer to the instructions provided with the wall mount. We recommend that you contact a technician for assistance when installing the wall mount bracket. We do not advise you to do it yourself. Samsung Electronics is not responsible for any damage to the product or injury to yourself or others if you select to install the wall mount on your own.
Wall mount |
TV |
|
Bracket |
||
|
C
Wall Mount Kit Specifications (VESA)
The wall mount kit is not supplied, but is sold separately. Install your wall mount on a solid wall perpendicular to the floor. When attaching the wall mount to other building materials, please contact your nearest dealer. If the product is installed on a ceiling or slanted wall, it may fall and result in severe personal injury.
-- Standard dimensions for wall mount kits are shown in the table below.
-- When purchasing our wall mount kit, a detailed installation manual and all parts necessary for assembly are provided. -- Do not use screws that do not comply with the VESA standard screw specifications.
-- Do not use screws that are longer than the standard dimension or do not comply with the VESA standard screw specifications. Screws that are too long may cause damage to the inside of the TV set.
English - 4
-- For wall mounts that do not comply with the VESA standard screw specifications, the length of the screws may differ depending on the wall mount specifications.
-- Do not fasten the screws that are too strongly; this may damage the product or cause the product to fall, leading to personal injury. Samsung is not liable for these kinds of accidents.
-- Samsung is not liable for product damage or personal injury when a non-VESA or non-specified wall mount is used or the consumer fails to follow the product installation instructions.
-- Do not mount the TV at more than a 15 degree tilt.
When using a third-party wall mount, note that the assembling screw length(C) is shown below.
Product |
Inches |
VESA Spec.(A * B) |
C (mm) |
Standard |
Quantity |
|
|
|
Family |
Screw |
|
|
|
||||
|
|
|
|
|
|
|
||
|
|
|
|
|
|
|
|
|
|
32 |
200 X 200 |
21.7 ~ 22.7 |
|
|
|
|
|
|
|
|
|
|
|
|||
|
|
|
|
|
|
|
|
|
LED-TV |
40 |
20.2 ~ 21.2 |
M8 |
4 |
|
|
|
|
|
|
|
|
|||||
|
|
|
|
|
|
|||
48 |
400 X 400 |
20.2 ~ 21.2 |
|
|
|
|||
|
|
|
|
|
|
|||
|
|
|
|
|
|
|
||
|
50 |
|
|
|
|
|
||
|
|
|
|
|
|
|
|
|
|
|
|
|
|
|
|
|
|
Do not install your Wall Mount Kit while your TV is turned on. It may result in personal injury due to electric shock.
Providing Proper Ventilation for Your TV
When you install your TV, maintain a distance of at least 10 cm between the TV and other objects (walls, cabinet sides, etc.) to ensure proper ventilation. Failing to maintain proper ventilation may result in a fire or a problem with the product caused by an increase in its internal temperature.
If you use parts provided by another manufacturer, it may cause difficulties with the product or result in injury caused by the product falling.
-- |
Whether you install your TV using a stand or a wall-mount, we strongly recommend you use parts provided by Samsung |
|||||||||||||
|
Electronics only. |
|
|
|
|
|
|
|
||||||
|
|
Installation with a stand. |
|
|
Installation with a wall-mount. |
|||||||||
|
|
|
|
|
10 cm |
|
|
|
|
10 cm |
||||
|
|
|
|
|
|
|
|
|
||||||
|
10 cm |
10 cm |
10 cm |
|
|
|
|
10 cm |
||||||
|
|
|
|
|
|
|
|
|
|
|
|
|
|
|
|
|
|
|
|
|
|
|
|
|
|
|
|
|
|
|
|
|
|
|
|
|
|
|
|
|
|
10 cm |
||
|
|
|
|
|
|
|
|
|
|
|
|
|||
|
|
|
|
|
|
|
|
|
|
|
|
|||
Other Cautions |
|
|
||||||||||||
|
|
|
|
|
|
|
||||||||
-- |
The actual appearance of the TV may differ from the images in this manual, depending on the model. |
|||||||||||||
-- |
Be careful when you touch the TV. Some parts can be somewhat hot. |
|
|
|
|
|
||||||||
English
English - 5
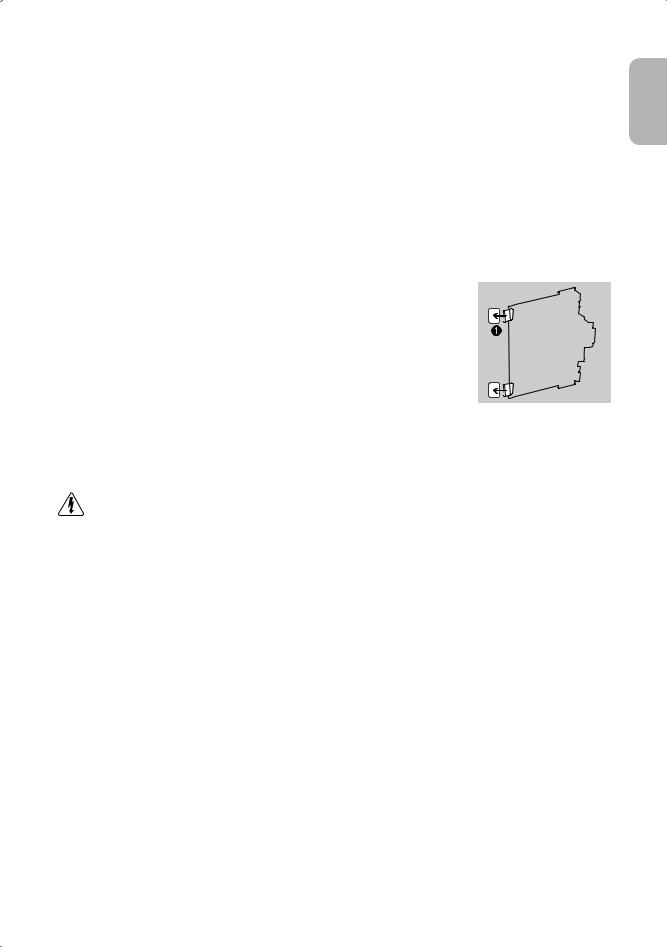
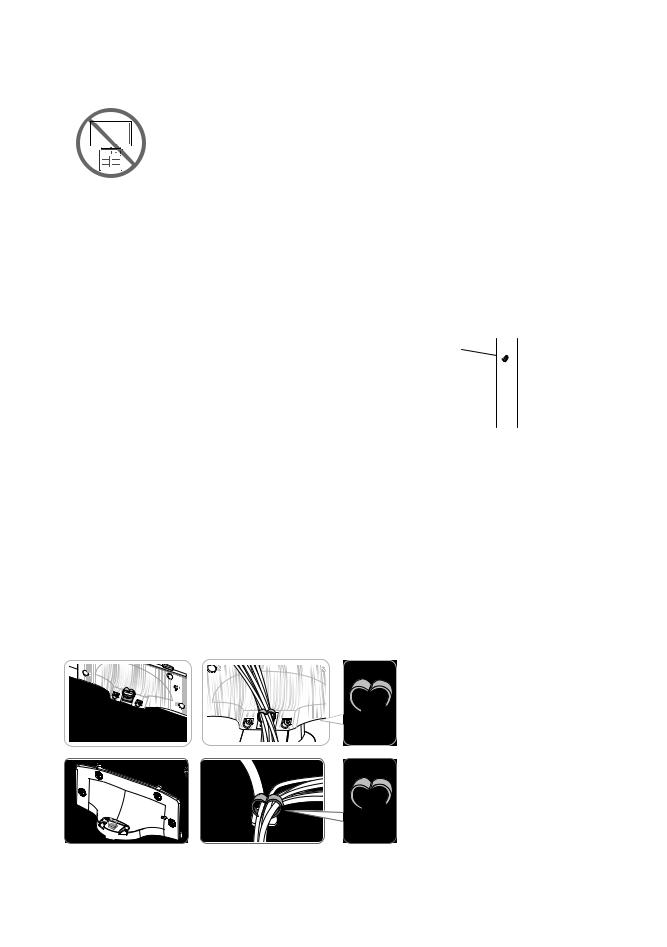
Securing the TV to the Wall
Caution: Pulling, pushing, or climbing on the TV may cause the TV to fall. In particular, ensure that your children do not hang on to or destabilize the TV. Doing so may cause the TV to tip over, resulting in serious injuries or death. Follow all safety precautions provided in the Safety Flyer included with your TV. For added stability and safety, you can purchase and install the anti-fall device as described below.
To Avoid the TV from Falling
1. Put the screws into the clamps and firmly fasten them into the wall. Confirm that the screws have been firmly installed into the wall.
-- You may need additional material such as anchors depending on the type of wall.
-- Since the necessary clamps, screws, and string are not supplied, please purchase these additionally.
2.Remove the screws from the centre back of the TV, put the screws into the clamps, and then fasten the screws into the TV again.
-- Screws may not be supplied with the product. In this case, please purchase screws of the following specifications.
-- Screw Specifications: For a 32 ~ 50 inches: M8
3.Connect the clamps fixed into the TV and the clamps fixed onto the wall with a strong cable and then tie the string tightly.
-- Install the TV close to the wall so that it does not fall backwards. |
wall |
|
|
||
-- |
It is safe connecting the string so that the clamps fixed onto the wall are equal |
-- The product colour and shape may |
|
to or lower than the clamps fixed on the TV. |
vary depending on the model. |
-- |
Untie the string before moving the TV. |
|
4.Verify that all connections are properly secured. Periodically check connections for any sign of damage. If you have any doubt about the security of your connections, contact a professional installer.
Arrange the cables using the Cable Holder
-- The method for using the cable holder may vary depending on the specific model.
English - 6
Connecting devices to your TV
You can connect various external devices using the connectors located at the back of the product. Check the connectors and then refer to the assembly instructions provided for more information on supported external devices.
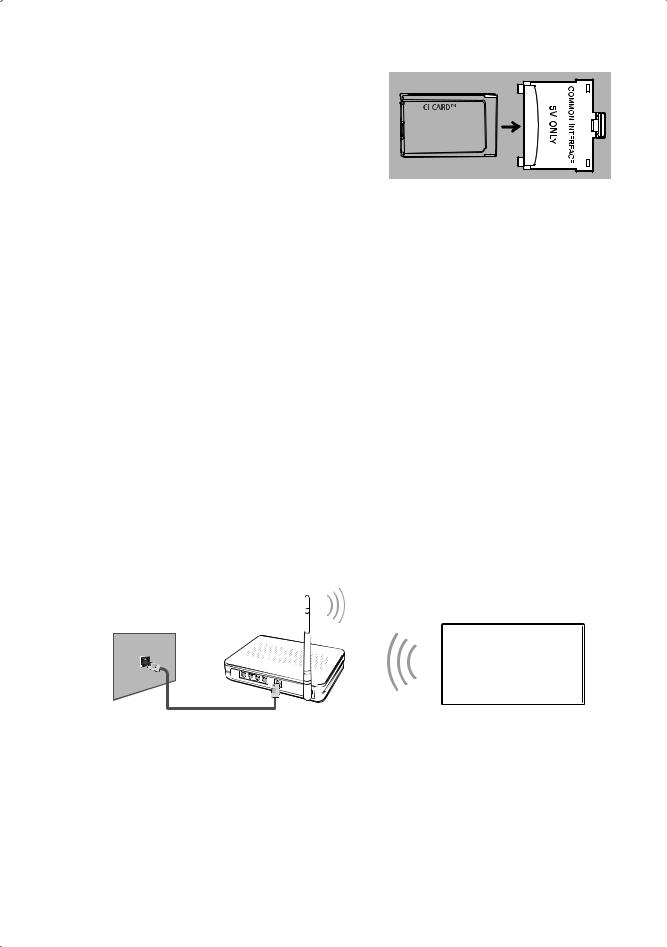
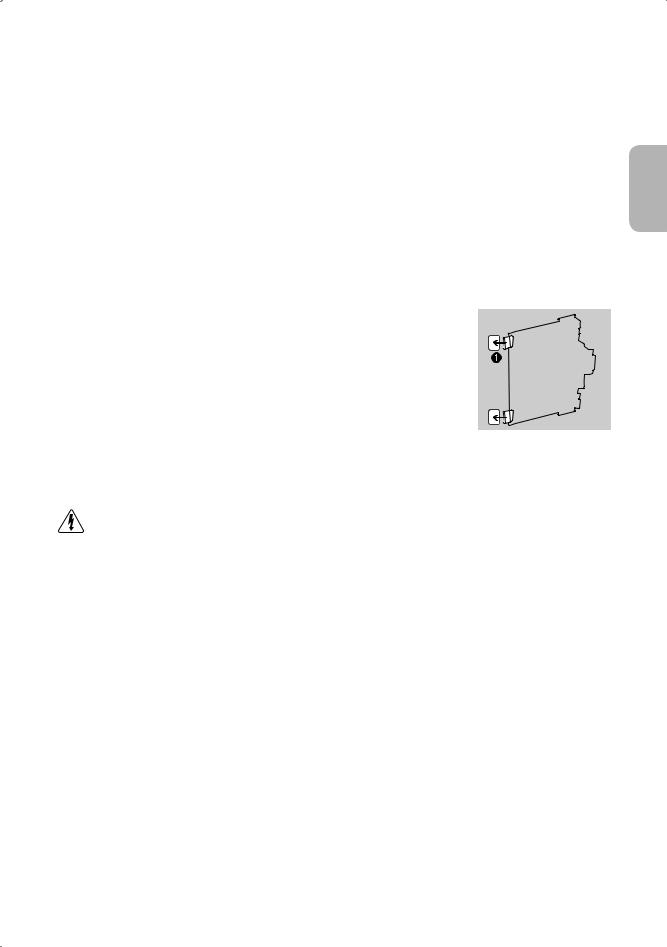
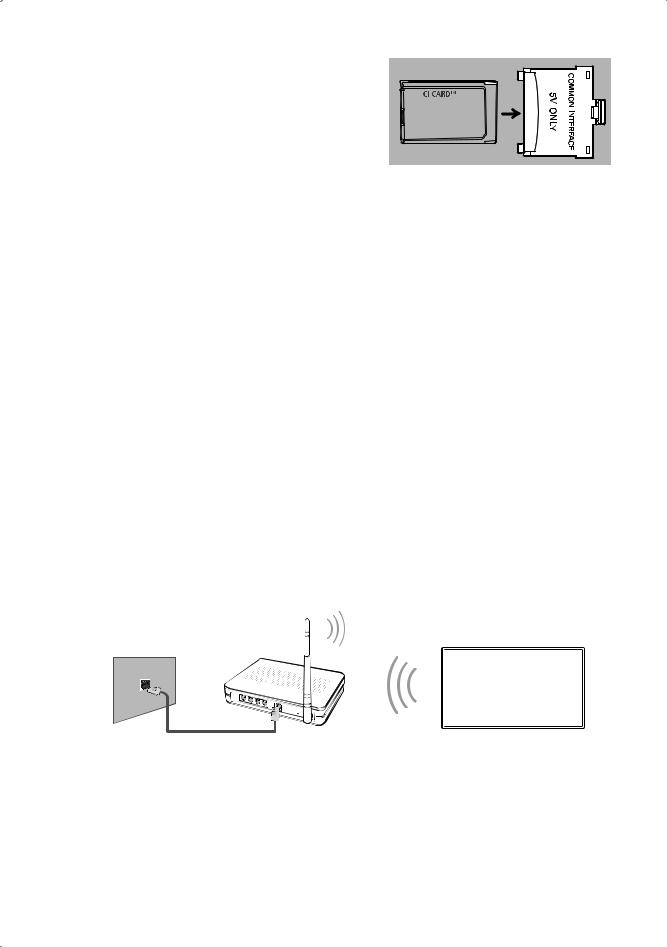
Connecting to a COMMON INTERFACE slot (Your TV viewing Card Slot)
-- Turn the TV off to connect or disconnect a CI card or CI card adapter.
Attaching the CI Card Adapter
Attach the adapter as shown.
-- To install the CI CARD Adapter, please remove the sticker attached to the TV. To connect the CI CARD Adapter, follow these steps.
-- We recommend attaching the adapter before installing the wall mount, or inserting the “CI or CI+ CARD”.
1. Insert the CI CARD Adapter into the two holes on the product 1.
-- Please locate the two holes at the back of the TV next to the COMMON INTERFACE port.
2.Connect the CI CARD Adapter to the COMMON INTERFACE port on the product 2.
3.Insert the “CI or CI+ CARD”.
We recommend that you attach the CI Card adapter and insert the CI card (viewing card) before you mount the TV on the wall because it may be difficult and dangerous to do this when it is on the wall.
English
English - 7
Using the “CI or CI+ CARD”
To watch paid channels, the “CI or CI+ CARD” must be inserted.
-- If you don’t insert the “CI or CI+ CARD”, some channels will display the “Scrambled Signal” message.
-- The pairing information containing a telephone number, the “CI or CI+ CARD” ID, the Host ID, and other information will be displayed in about 2~3 minutes. If an error message is displayed, please contact your service provider.
-- When the configuration of channel information has finished, the message “Updating Completed” is displayed, indicating the channel list is updated.
NOTE
-- You must obtain a “CI or CI+ CARD” from a local cable service provider.
-- When removing the “CI or CI+ CARD”, carefully pull it out as dropping the “CI or CI+ CARD” may damage it. -- Insert the “CI or CI+ CARD” in the direction marked on the card.
-- The location of the COMMON INTERFACE slot may differ depending on the model.
-- A “CI or CI+ CARD” is not supported in some countries and regions, therefore, check with your authorised dealer. -- If you have any problems, please contact a service provider.
-- Insert the “CI or CI+ CARD” that supports the current aerial settings. The screen will be distorted or will not be visible.
Connecting to a Network
Connecting the TV to a network gives you access to online services such as the Smart Hub, as well as software updates.
Network Connection - Wireless
Connect the TV to the Internet using a standard router or modem.
Wireless IP Router or Modem with a DHCP Server
The LAN Port on the Wall
LAN Cable (Not Supplied)
English - 8
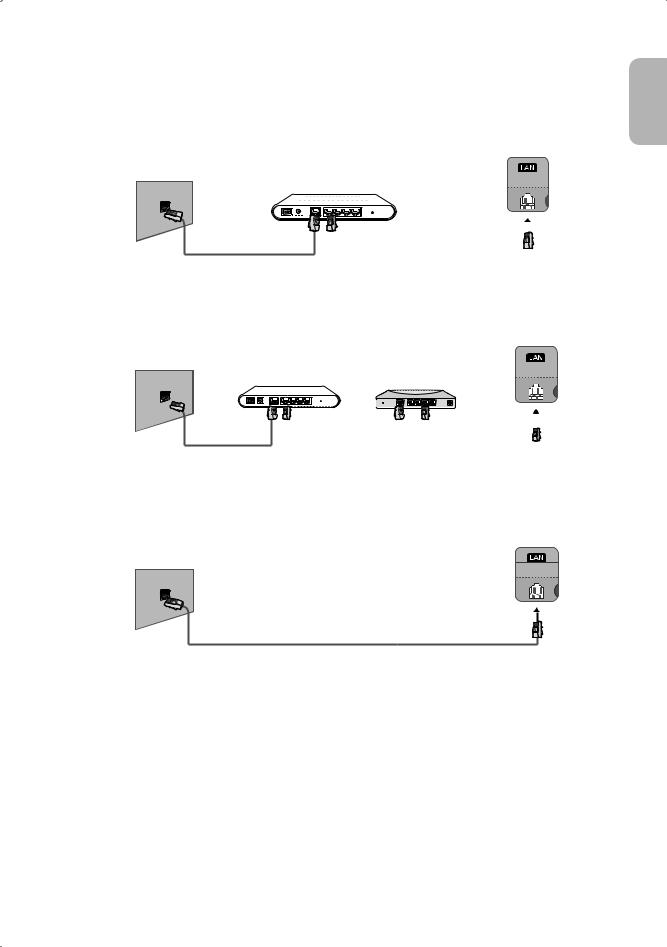
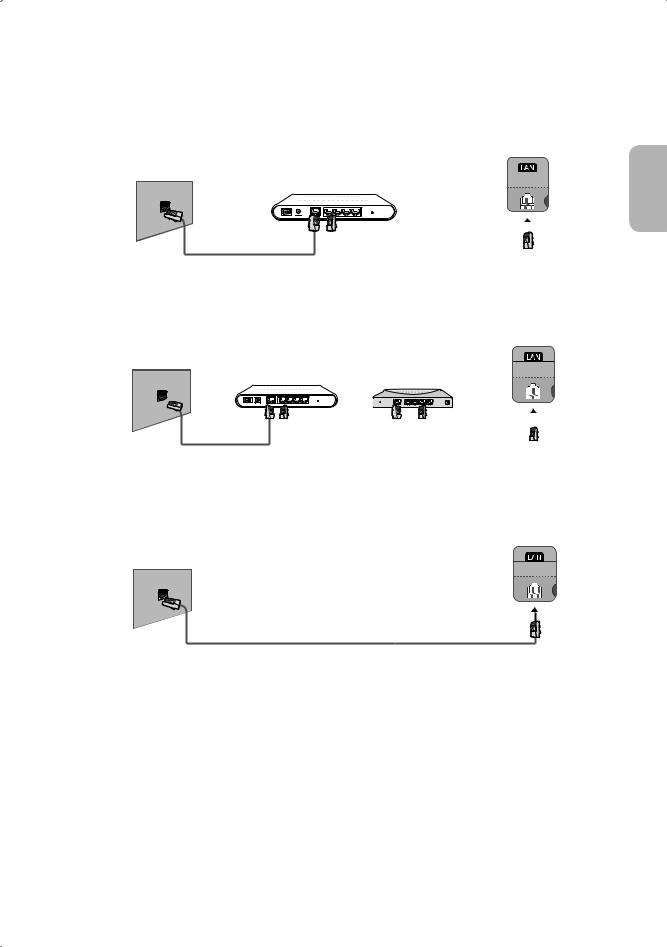
Network Connection - Wired
There are three main ways to connect your TV to your network using cable, depending on your network setup. They are illustrated starting below:
TV Rear Panel
The Modem Port on the Wall |
|
|
External Modem |
|
|||||||||||||
|
|
|
|
||||||||||||||
|
(ADSL / VDSL / Cable TV) |
|
|
||||||||||||||
|
|
|
|
|
|
|
|
|
|
|
|
|
|
|
|
|
|
|
|
|
|
|
|
|
|
|
|
|
|
|
|
|
|
|
|
|
|
|
|
|
|
|
|
|
|
|
|
|
|
|
|
|
|
|
|
|
|
|
|
|
|
|
|
|
|
|
|
|
|
|
|
|
|
|
|
|
|
|
|
|
|
|
|
|
|
|
|
|
|
Modem Cable (Not Supplied) |
LAN Cable (Not Supplied) |
TV Rear Panel
The Modem Port on the Wall |
|
External Modem |
IP Router with a DHCP |
|
|||||||||
|
(ADSL / VDSL / Cable TV) |
|
Server |
|
|
||||||||
|
|
|
|
||||||||||
|
|
|
|
|
|
|
|
|
|
|
|
|
|
|
|
|
|
|
|
|
|
|
|
|
|
|
|
|
|
|
|
|
|
|
|
|
|
|
|
|
|
|
|
|
|
|
|
|
|
|
|
|
|
|
|
|
|
|
|
|
|
|
|
|
|
|
|
|
|
|
|
|
|
|
|
|
|
|
|
|
|
|
|
|
|
|
|
|
|
|
|
|
|
|
|
|
|
Modem Cable |
LAN Cable |
LAN Cable |
(Not Supplied) |
(Not Supplied) |
(Not Supplied) |
TV Rear Panel
The LAN Port on the Wall
LAN Cable (Not Supplied)
-- The TV does not support network speeds less than or equal to 10Mbps. -- Use Cat 7 cable for the connection.
English
English - 9
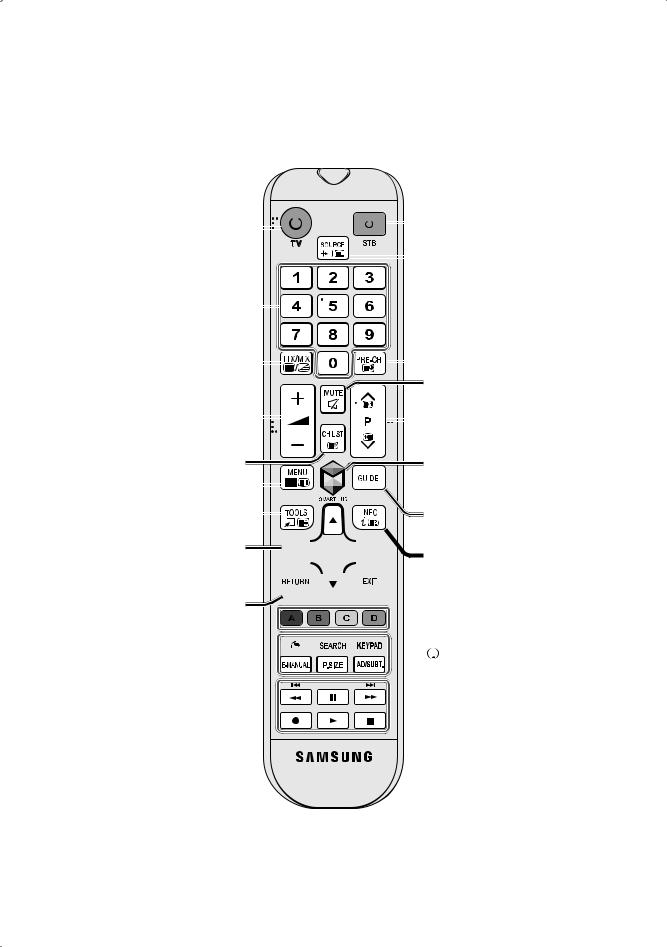
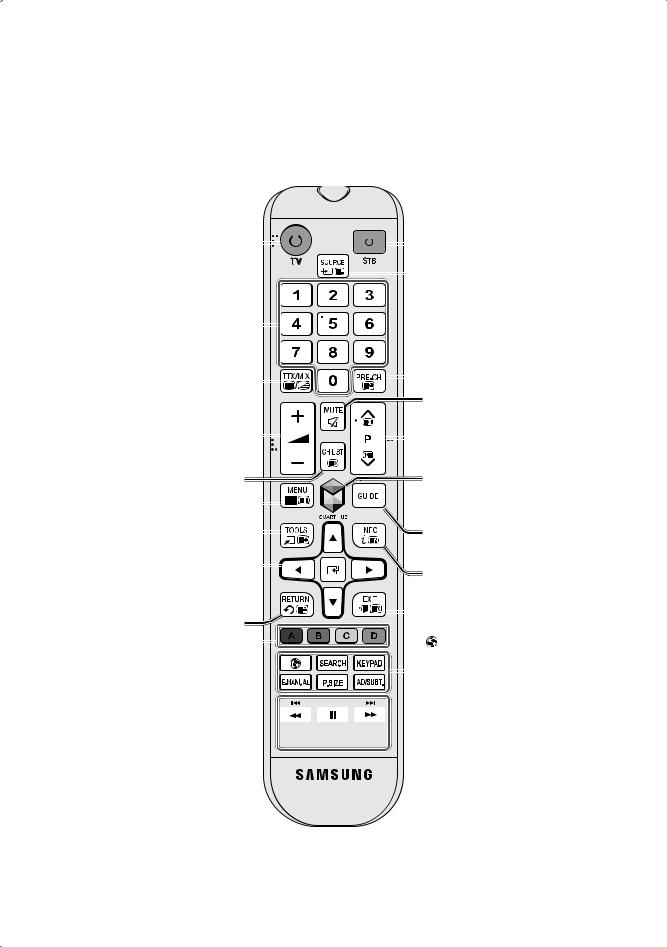
Remote Control
Learn where the function buttons are on your remote, such as: SOURCE, MUTE, Y, <P >, MENU, TOOLS, E,
INFO, CH LIST, RETURN, GUIDE and EXIT.
-- This remote control has Braille points on the Power, Channel, and Volume buttons and can be used by visually impaired persons.
Turns the TV on and off. |
|
|
|
|
|
|
|
|
|
|
|
|
|
|
|
|
|
Turns the Set-top box on and off. |
||
|
|
|
|
|
|
|
|
|
|
|
|
|
Displays and selects available video |
|||||||
|
|
|
|
|
|
|
|
|
|
|
|
|
|
|
|
|
|
|
|
|
|
|
|
|
|
|
|
|
|
|
|
|
|
|
|
|
|
|
|
|
|
|
|
|
|
|
|
|
|
|
|
|
|
|
|
|
|
|
|
|
|
|
|
|
|
|
|
|
|
|
|
|
|
|
|
|
|
|
|
|
|
|
|
|
|
|
|
|
|
|
|
|
|
|
|
|
|
|
|
|
|
|
|
sources. |
Gives direct access to channels. |
|
|
|
|
|
|
|
|
|
|
|
|
|
Returns to the previous channel. |
||||||
|
|
|
|
|
|
|
|
|
|
|
||||||||||
Alternately selects Teletext ON, Double, |
|
|
|
|
|
|
|
|
|
|
|
|
||||||||
|
|
|
|
|
|
|
|
|
|
|
|
|||||||||
Mix or OFF. |
|
|
|
|
|
|
|
|
|
|
Cuts off the sound temporarily. |
|||||||||
|
|
|
|
|
|
|
|
|
|
|
|
|
|
|
|
|
|
|
|
|
Adjusts the volume. |
|
|
|
|
|
|
|
|
|
|
|
|
Changes channels. |
|||||||
|
|
|
|
|
|
|
|
|
|
|
||||||||||
|
|
|
|
|
|
|
|
|
|
|
||||||||||
|
|
|
|
|
|
|
|
|
|
|
|
|
|
|
|
|
|
|
|
Brings up Smart Hub applications. Refer |
|
|
|
|
|
|
|
|
|
|
|
|
|
|
|
|
|
|
|
|
|
|
|
|
|
|
|
|
|
|
|
|
|
|
|
|
|
|
|
|
|
|
Displays channel lists. |
|
|
|
|
|
|
|
|
|
|
to the e-Manual chapter, Smart Features |
|||||||||
Opens the OSD (Menu). |
|
|
|
|
|
|
|
|
|
|
|
|
|
|
|
|
|
|
|
> Smart Hub. |
|
|
|
|
|
|
|
|
|
|
|
|
|
|
|
|
|||||
|
|
|
|
|
|
|
|
|
|
|
|
|
|
|
|
|||||
Quickly selects frequently used functions. |
|
|
|
|
|
|
|
|
|
|
|
|
Displays the EPG (Electronic Programme |
|||||||
|
|
|
|
|
|
|
|
|
|
|
||||||||||
|
|
|
|
|
|
|
|
|
|
|
|
|
|
|
|
|
|
|
|
Guide). |
Moves the cursor, selects the on-screen menu items, and changes the values seen on the TV's menu.
Returns to the previous menu.
Use these buttons according to the  directions on the TV screen.
Use these buttons with specific features.  Use these buttons according to the
directions on the TV screen.


 Displays information on the TV screen.


 Exits the menu.


 : Enable Football Mode for an optimal
sports viewing experience.
SEARCH: Press this button to use the
search window.
KEYPAD: With the virtual remote control on the screen, you can easily enter digits, control content, and use functions.
E-MANUAL: Displays the e-Manual.
P.SIZE: Change the picture size.
AD/SUBT.: Displays the Accessibility Shortcuts.
English - 10
Installing the batteries (Battery size: AAA)
Match the polarities of the batteries to the symbols in the battery compartment.
 1 2
1 2
3
-- Use the remote control within 7m of the TV.
-- Bright lights may affect the performance of the remote control. Avoid using the remote control near special fluorescent lights or neon signs.
-- The colour and shape may vary depending on the model.
Turning on the TV
Turn on the TV using the Pbutton on the remote control or TV panel. -- The product colour and shape may vary depending on the model.
-- The TV’s Controller, a small joystick-like button at the right back of the TV, lets you control the TV without the remote control.
Function menu m R
P
TV Controller
Remote control sensor
English
English - 11

Initial setup
The initial setup dialogue box appears when the TV is first activated. Follow the on-screen instructions to finish the initial setup process, including the selecting the menu language, scanning channels, connecting to the network, and more. During each step, either make a choice or skip the step.
You can manually perform this process at a later time in the
System > Setup menu.
-- If you connect any device to HDMI1 before starting the installation, the Channel Source will be changed to Settop box automatically.
-- If you do not want to select Set-top box, please select
Aerial.
Password Change
System > Change PIN
Changing the TV’s password.
1.Run Change PIN and then enter the current password in the password field. The default password is “0-0-0-0”.
2.Enter a new password and then enter it again to confirm it. The password change is complete.
-- If you forgot your PIN code, press the buttons in the following sequence to reset the PIN to “0-0-0-0”:
In Standby mode: MUTE → 8 → 2 → 4 → POWER (On)
Selecting the video source
You can select a connected external device using the SOURCE button.
For example, to switch to a gaming console connected to the second HDMI connector, press SOURCE. From the
Source list, select HDMI2 to change the input signal to HDMI mode. Connector names may vary depending on the model.
The following options are available in the Source screen:
Alternatively, simply designate a computer connected to the TV via an HDMI cable as PC.
You can also designate an AV device connected to the TV via an HDMI-DVI cable as DVI Devices.
Information
View detailed information about the connected devices.
TOOLS Button
Select a port connected to an external device, and press and hold the Enter button. The following functions are available:
-- Available options for each connector may vary.
Edit Name
Rename devices connected to the TV for easier identification of external sources.
For example, you can designate a computer connected to the TV via an HDMI-DVI cable as DVI PC.
Anynet+ (HDMI-CEC)
Displays a list of Anynet+ (HDMI-CEC)-compliant devices that are connected to the TV.
-- This option is only available when Anynet+ (HDMICEC) is On.
Disconnect USB Device
Used to safely remove a USB device connected to the TV. This option is only available when a USB device has been selected.
English - 12
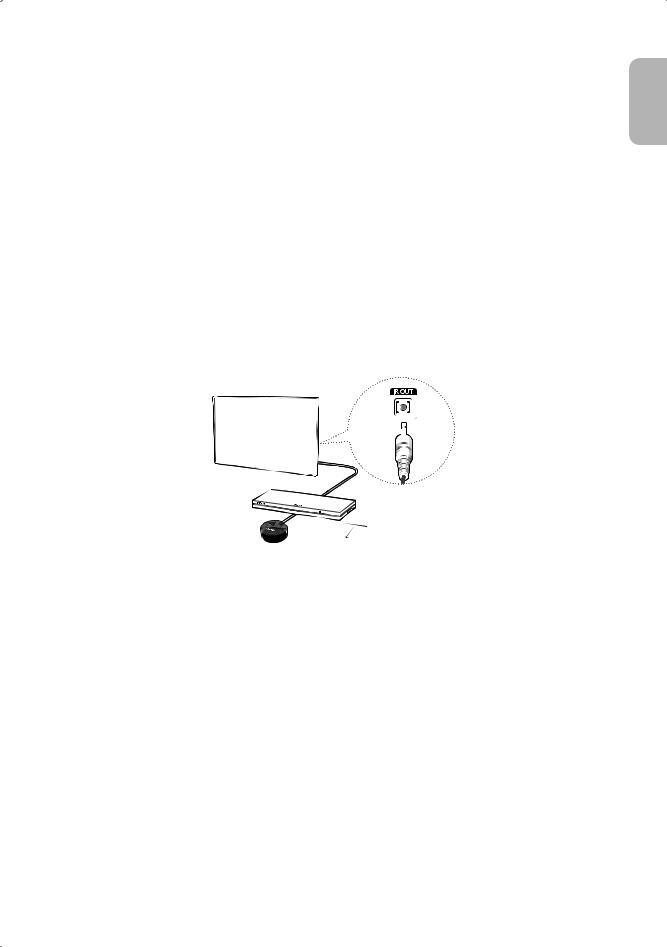
Controlling External Devices with the TV Remote (Universal Remote Setup)
System > Universal Remote Setup
-- Availability depends on the specific model and area.
The universal remote control feature lets you control cable boxes, Blu-ray players, home theatres, and other external devices connected to the TV using the TV's remote control. In order to use the TV's remote control as a universal remote, you must first connect the IR extender cable (included).
-- You can also use the Anynet+ (HDMI-CEC) function to operate some external Samsung devices with your TV's remote control without any additional setup. For more information, refer to the e-Manual.
-- Certain external devices connected to the TV may not support the universal remote feature.
Setting Up the Universal Remote Control
Connect the IR extender cable to the TV's IR output connector as shown in the diagram and place the transmitter end within 10 cm of the external device's receiver pointing in the direction of the remote receiver. However, there must be no obstacles between the IR extender cable and the external device. The presence of obstacles interferes with the transmission of the remote control signal.
10 cm
Controlling External Devices with the TV Remote
1.Turn on the external device to set up the universal remote function for, and bring up the Source screen.
2.Select  Universal remote setup from the top of the screen. This initiates the universal remote setup process.
3.Follow the on-screen instructions and register the external device.
English
English - 13
Viewing more TV features
The e-Manual contains more detailed information on the TV features. Refer to the embedded e-Manual (Support > e-Manual).
Launching the e-Manual
The embedded e-Manual contains information.
-You can also download a copy of the e-Manual from Samsung's website, and read it on your computer or print it out.
-Yellow words indicate a menu item; white bold words indicate remote control buttons. Arrows are used to indicate the menu path. (Example: Picture > Picture Mode)
1.Select e-Manual. The e-Manual loads.
2.Select a category from the side of the screen. Once a selection has been made, the contents of the selected category appear.
3.Select an item from the list. This opens the e-Manual on the corresponding page.
If a description doesn't fit on a single screen...
You can scroll pages in one of the following ways.
• Position the focus on the page to display |
/ |
on the screen. Press <, >button. |
Additional e-Manual Features
Loading Pages using Keywords
Select Search from the side of the screen to bring up the search screen. Enter a search term and then select Done. Select an item from the search results to load the corresponding page.
English - 14

Loading Pages from the Index Page
Select Index from the side of the screen to bring up the index screen. Select a keyword from the list to navigate to the relevant page.
Using the History to Load Previously Read Pages
Select Recent pages from the side of the screen. A list of previously read pages is shown. Select a page. The e-Manual jumps to the selected page.
Accessing the Menu from the e-Manual (Try Now)
Select  (Try Now) on a feature-description to directly move to the corresponding menu and try out the feature. If you want to read an e-Manual entry on a specific screen menu feature, Press the E-MANUAL button.
- Certain menu options cannot be used.
Loading Reference Pages
Select  (Link) from the side of a feature-description page to access the corresponding reference page.
Updating the e-Manual to the Latest Version
You can update the e-Manual in the same way as updating apps.
1.Select the e-Manual item in the SAMSUNG APPS screen.
2.Press and hold the Enter button. The Options menu appears.
3.From the Options menu on the screen, select Update apps. A popup window appears.
-Update apps is shown on the screen only when an update is required.
4.Select e-Manual in the popup window and then select Update. You can update the e-Manual to the latest version.
English
English - 15

Troubleshooting
If you have any questions about the TV, first refer to the Troubleshooting list below. If none of these troubleshooting tips apply, please visit “www.samsung.com” and click on Support, or contact the call centre listed on the back cover of this manual.
Issues |
Solutions and Explanations |
|
|
The TV won’t turn on. |
Make sure the AC power cord is securely plugged into the wall outlet and the TV. |
|
Make sure the wall outlet is working. |
|
Try pressing the Pbutton on the TV to make sure the problem is not the remote. If the TV |
|
turns on, refer to the “Remote control does not work” item below. |
|
|
There is no picture/video. |
Check the cable connections. Remove and reconnect all cables connected to the TV |
|
and external devices. |
|
Set the video outputs of your external devices (Cable/Sat Box, DVD, Blu-ray etc) to |
|
match the TV's input connections. For example, if the output of an external device is |
|
HDMI, it should be connected to an HDMI input on the TV. |
|
Make sure your connected devices are powered on. |
|
Be sure to select the correct input source. |
|
Reboot the connected device by unplugging it, and then reconnecting the device’s |
|
power cable. |
|
|
The remote control does not |
Replace the remote control batteries. Make sure the batteries are installed with their |
work. |
polarities (+/–) in the correct direction. |
|
Clean the sensor’s transmission window on the remote. |
|
Try pointing the remote directly at the TV from 1.5 ~ 1.8 m away. |
|
|
The remote control of the cable/ |
Programme the Cable/Set remote control to operate the TV. Refer to the Cable/Set- |
set top box doesn’t turn the TV |
Top-Box user manual for the SAMSUNG TV code. |
on or off or adjust the volume. |
|
|
|
-- This TFT LED panel uses a panel consisting of sub pixels which require sophisticated technology to produce. There may, however be a few bright or dark pixels. These pixels will have no impact on the performance of the product.
-- To keep your TV running optimally upgrade to the latest firmware on the Samsung website via the USB device USB (Samsung.com > Support > Downloads).
-- Some of the pictures and functions above are available for specific models only.
English - 16
Cautions about the Eco Sensor and Screen Brightness
The Eco Sensor measures the light in the room and optimises the brightness of the TV automatically to reduce power consumption. This causes the TV to brighten and dim automatically. To turn this function off, go to System > Eco Solution >
Eco Sensor.
Do not block the sensor with any material. This may decrease the picture brightness.
1.Eco Sensor: This power-saving feature automatically adjusts the screen brightness of the TV according to the ambient light detected by the Light Sensor.
2.To enable or disable the Eco Sensor, go to System > Eco Solution > Eco Sensor and select On or Off.
3.Please note: If the screen is too dark while watching TV in a dark environment, this may be due to the Eco Sensor.
English
English - 17

What is Remote Support?
Samsung's Remote Support service offers you one-on-one support with a Samsung Technician who can remotely:
••
••
••
••
Diagnose your TV
Adjust your TV settings
Perform a factory reset for your TV Install recommended firmware updates
How Does it Work?
Having a Samsung Tech remotely service your TV is really pretty simple
1. Call the Samsung |
2. Open the menu on |
3. Select Remote |
4. The agent will then |
Contact Centre and ask |
your TV and go to the |
Management and |
access your TV. That's |
for remote support. |
Support section. |
Provide the Pin# to the |
it! |
|
|
agent. |
|
Storage and Maintenance
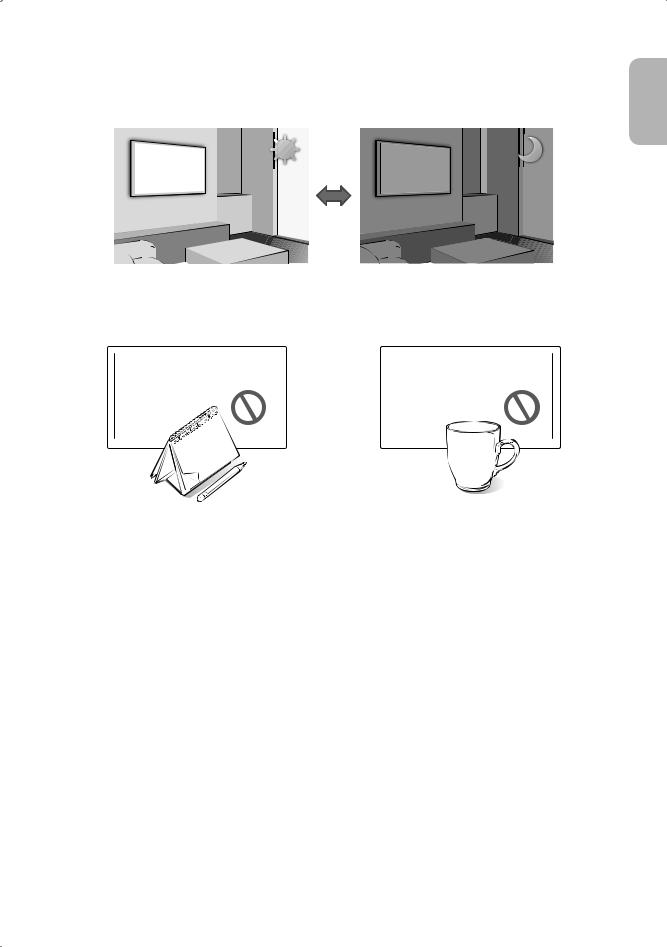
-- If a sticker was attached to the TV screen, some debris may remain after you remove the sticker. Please clean the debris off before watching TV.
-- The exterior and screen of the product can get scratched while cleaning it. Be sure to wipe the exterior and screen carefully using a soft cloth to prevent scratches.
Do not spray water directly onto the product. Any liquid that enters the product may result in product failure, fire, or electric shock.
Clean the product with a soft damp cloth using a small amount of water. Do not use a flammable liquid (e.g. benzene, thinners) or a cleaning agent.
English - 18

TV Specifications
Display Resolution |
|
1920 x 1080 |
||
|
|
|
|
|
Environmental Considerations |
|
|
|
|
Operating Temperature |
10°C to 40°C (50°F to 104°F) |
|||
Operating Humidity |
||||
10% to 80%, non-condensing |
||||
Storage Temperature |
-20°C to 45°C (-4°F to 113°F ) |
|||
Storage Humidity |
5% to 95%, non-condensing |
|||
|
|
|
|
|
Sound (Output) |
|
10W x 2 |
||
|
|
|
|
|
Model Name |
UE32H5500 / UE32H5570 |
|
UE40H5500 / UE40H5570 |
|
|
|
|
|
|
Screen Size (Diagonal) |
32 inches |
|
40 inches |
|
|
|
|
|
|
Stand Swivel (Left / Right) |
|
0˚ |
||
|
|
|
|
|
Dimensions (W x H x D) |
|
|
|
|
Body |
721.4 x 428.5 x 64.9 mm |
|
906.6 x 532.9 x 65.1 mm |
|
With stand |
721.4 x 465.1 x 163.4 mm |
|
906.6 x 578.2 x 196.4 mm |
|
|
|
|
|
|
Weight |
|
|
|
|
Without Stand |
4.9 kg |
|
7.7 kg |
|
With Stand |
5.3 kg |
|
8.6 kg |
|
|
|
|
|
|
Model Name |
UE48H5500 / UE48H5570 |
|
UE50H5500 / UE50H5570 |
|
|
|
|
|
|
Screen Size (Diagonal) |
48 inches |
|
50 inches |
|
|
|
|
|
|
Stand Swivel (Left / Right) |
|
0˚ |
||
|
|
|
|
|
Dimensions (W x H x D) |
|
|
|
|
Body |
1075.1 x 627.6 x 65.5 mm |
|
1116.8 x 651.1 x 65.7 mm |
|
With stand |
1075.1 x 673.8 x 203.9 mm |
|
1116.8 x 696.4 x 203.9 mm |
|
|
|
|
|
|
Weight |
|
|
|
|
Without Stand |
11.1 kg |
|
13.0 kg |
|
With Stand |
12.4 kg |
|
14.0 kg |
|
|
|
|
|
|
Model Name |
UE40H5510 |
|
UE48H5510 |
|
|
|
|
|
|
Screen Size (Diagonal) |
40 inches |
|
48 inches |
|
|
|
|
|
|
Stand Swivel (Left / Right) |
|
-20˚ ~ 20 |
||
|
|
|
|
|
Dimensions (W x H x D) |
|
|
|
|
Body |
906.6 x 525.4 x 63.1 mm |
|
1075.1 x 620.1 x 63.5 mm |
|
With stand |
906.6 x 604.9 x 264.8 mm |
|
1075.1 x 711.2 x 306.9 mm |
|
|
|
|
|
|
Weight |
|
|
|
|
Without Stand |
7.7 kg |
|
11.1 kg |
|
With Stand |
8.8 kg |
|
12.6 kg |
|
|
|
|
|
|
-- The design and specifications are subject to change without prior notice.
-- For information about the power supply, and about power consumption, refer to the label attached to the product. -- Typical power consumption is measured according to IEC 62087 Ed.2
Standby mode
To decrease power consumption, unplug the power cord when the TV will not be used for a long time.
English
English - 19
Licences
The terms HDMI and HDMI High-Definition Multimedia Interface, and the HDMI Logo are trademarks or registered trademarks of HDMI Licensing LLC in the United States and other countries.
Still image warning
Avoid displaying still images (such as jpeg picture files), still image elements (such as TV channel logos, stock or news bars at the bottom of the screen etc.), or programmes in panorama or 4:3 image format. Constantly displaying still pictures can cause image burn-in on the LED screen, which will affect the image quality. To reduce risk of this occurring please follow the recommendations below:
••
••
••
••
Avoid displaying the same TV channel for long periods.
Always try to display any image in full screen. Use the TV set’s picture format menu for the best possible match. Reduce brightness and contrast to avoid the appearance of after-images.
Use all TV features designed to reduce image retention and screen burn. Refer to the e-Manual for more details.
Recommendation - EU Only
Hereby, Samsung Electronics, declares that this TV is in compliance with the essential requirements and other relevant provisions of Directive 1999/5/EC.
The official Declaration of Conformity may be found at http://www.samsung.com, go to Support > Search Product Support and enter the model name.
This equipment may only be used indoors.
This equipment may be operated in all EU countries.
Correct Disposal of This Product (Waste Electrical & Electronic Equipment) (Applicable in countries with separate collection systems)
This marking on the product, accessories or literature indicates that the product and its electronic accessories (e.g. charger, headset, USB cable) should not be disposed of with other household waste at the end of their working life. To prevent possible harm to the environment or human health from uncontrolled waste disposal, please separate these items from other types of waste and recycle them responsibly to promote the sustainable reuse of material resources.
Household users should contact either the retailer where they purchased this product, or their local government office, for details of where and how they can take these items for environmentally safe recycling.
Business users should contact their supplier and check the terms and conditions of the purchase contract. This product and its electronic accessories should not be mixed with other commercial wastes for disposal.
Correct disposal of the batteries in this product (Applicable in countries with separate collection systems)
This marking on battery, manual or packaging indicates that the batteries in this product should not be disposed of with other household waste at the end of their working life. Where marked, the chemical symbols Hg, Cd or Pb indicate that the battery contains mercury, cadmium or lead above the reference levels in EC Directive 2006/66. If batteries are not properly disposed of, these substances can cause harm to human health or the environment.
To protect natural resources and to promote material reuse, please separate batteries from other types of waste and recycle them through your local, free battery return system.
English - 20
This page is intentionally left blank.
Figyelmeztetés! Fontos biztonsági utasítások
(A készülék üzembe helyezése előtt olvassa el a Samsung készüléken látható jelzésnek megfelelő részt.)
VIGYÁZAT!
ÁRAMÜTÉSVESZÉLY! NE NYISSA KI!
VIGYÁZAT! AZ ÁRAMÜTÉS KOCKÁZATÁNAK CSÖKKENTÉSE ÉRDEKÉBEN NE TÁVOLÍTSA EL A BURKOLATOT (VAGY HÁTLAPOT). A KÉSZÜLÉK NEM TARTALMAZ A FELHASZNÁLÓ ÁLTAL JAVÍTHATÓ ALKATRÉSZEKET. A JAVÍTÁST BÍZZA KÉPZETT SZAKEMBERRE.
Ez a jel a készülék belsejében uralkodó magasfeszültségre figyelmeztet. Semmiképpen ne érjen a készülék belsejében található alkatrészekhez, mert az veszélyes.
Ez a jel a készülék működésével és karbantartásával kapcsolatos fontos tudnivalókra hívja fel a figyelmet.
A készülékházon, valamint a készülék hátulján vagy alján található nyílások a megfelelő szellőzést szolgálják. A készülék megbízható működése, valamint a túlmelegedés megelőzése érdekében ezeket a nyílásokat nem szabad elzárni vagy lefedni.
-- Ne tartsa a készüléket zárt helyen, például vitrinben vagy szekrényben, ha a megfelelő szellőzés nem biztosított.
-- Ne helyezze a készüléket radiátor vagy fűtőberendezés mellé vagy fölé, illetve olyan helyre, ahol közvetlen napfénynek van kitéve. -- Ne helyezzen a készülékre vízzel teli edényt (vázát stb.), mivel ez tűz vagy áramütés veszélyét okozhatja.
Ne tegye a készüléket olyan helyre, ahol eső vagy víz érheti (pl. fürdőszobába, mosdókagyló, mosogató vagy kád mellé, illetve nedves pincehelyiségbe, úszómedence közelébe stb.). Ha a készülék véletlenül vizes lesz, húzza ki a konnektorból, és azonnal forduljon a márkakereskedéshez. Tisztítás előtt szüntesse meg a készülék tápellátását.
A készülék elemmel működik. Bizonyos országokban előírások vonatkoznak az elemek környezetbarát módon történő leselejtezésére. A hulladék elhelyezésével és újrahasznosításával kapcsolatos információkért forduljon a helyi hatóságokhoz.
Ne terhelje a kapacitásán túl a fali aljzatot, a hosszabbítókábelt vagy az adaptert, mivel ez tüzet vagy áramütést okozhat.
A tápkábelt úgy vezesse el, hogy arra ne lehessen rálépni, nehéz tárgyakat ráhelyezni, továbbá ne lehessen összenyomni. Különösen ügyeljen a dugaszra, az adapterre és arra a pontra, ahol a vezeték kilép a készülékből.
A készülék védelme érdekében vihar idején, vagy ha hosszabb időn keresztül felügyelet nélkül hagyja, és nem használja a készüléket, húzza ki a tápkábelt a fali aljzatból, és szüntesse meg az antenna, illetve a kábeltévé csatlakozását. Így a készülékben nem keletkezhet kár a villámlás és a túlfeszültség miatt.
Mielőtt a váltakozó áramú tápkábelt egyenáramú aljzathoz csatlakoztatja, ellenőrizze, hogy az egyenáramú adapter névleges teljesítménye megfelel-e a helyi elektromos ellátásnak.
Soha ne helyezzen fémtárgyat a készülék nyílásaiba. Ez ugyanis áramütést okozhat.
Az áramütés elkerülése érdekében ne érjen a készülék belsejéhez. A készüléket csak képzett szakember nyithatja ki.
A tápkábelt stabilan csatlakoztassa a fali aljzathoz. A tápellátás megszüntetése esetén a kábelt a dugasznál fogva húzza ki a fali aljzatból. Nedves kézzel ne érjen hozzá a tápkábelhez.
Ha a készülék nem működik megfelelően – főként, ha szokatlan hang vagy szag tapasztalható –, azonnal szüntesse meg a tápellátást, és forduljon a márkakereskedéshez vagy a szervizközponthoz.
Ha hosszabb időn keresztül nem használja a TV-készüléket, vagy ha hosszabb időre elmegy otthonról (főként ha gyermekek, idősek vagy fogyatékkal élők maradnak magukra a lakásban), mindenképpen húzza ki a TV-készülék tápkábelét az aljzatból.
-- A felgyülemlett por áramütést, elektromos szivárgást vagy tüzet okozhat a tápkábelben okozott szikra vagy túlmelegedés, illetve a szigetelés megrongálódása által.
Ha olyan helyen helyezik üzembe a készüléket, ahol szokatlanul poros, meleg vagy hideg, párás vagy vegyszerekkel telített a levegő, illetve ahol napi 24 órán keresztül üzemel, például reptéren, pályaudvaron stb., vegye fel a kapcsolatot a márkaszervizzel.
Csak megfelelően földelt dugót és aljzatot használjon.
-- A nem megfelelő földelés áramütést okozhat, illetve a készülék károsodásához vezethet. (Csak I. osztályú termékek esetén) A készülék tápellátásának megszüntetéséhez ki kell húzni a dugaszt a fali aljzatból, ezért a fali aljzatnak elérhető helyen kell lennie. Ne hagyja, hogy a gyermekek felkapaszkodjanak a termékre.
A tartozékokat (elem stb.) olyan helyen tárolja, ahol a gyermekek nem férhetnek hozzájuk.
Ne helyezze a készüléket instabil helyre, például rozoga polcra, ferde padlóra vagy rázkódásnak kitett helyre.
Ne ejtse le, illetve ne tegye ki rázkódásnak a készüléket. Ha a készülék megrongálódik, szüntesse meg a tápellátást, és forduljon a szervizközponthoz.
Húzza ki a tápkábelt a fali aljzatból, és puha, száraz ruhával törölje le a készüléket. Ne használjon vegyszereket, például viaszt, benzolt, alkoholt, oldószert, rovarirtót, légfrissítőt, kenőanyagot vagy tisztítószert. Ez a készülék megrongálódását vagy a terméken található feliratok sérülését okozhatja.
A készüléket nem érheti víz. Az elemeket ne dobja tűzbe.
Az elemeket ne szedje szét, ne hevítse túl, és ne okozzon bennük rövidzárlatot.
Az elem nem megfelelően végzett cseréje robbanást okozhat. Csak azonos vagy egyenértékű típusúra cserélje.
FIGYELMEZTETÉS – A TŰZ TERJEDÉSÉNEK MEGAKADÁLYOZÁSA ÉRDEKÉBEN SOHA NE HELYEZZEN GYERTYÁT VAGY NYÍLT LÁNGOT A KÉSZÜLÉK KÖZELÉBE.
* A jelen Felhasználói kézikönyvben szereplő ábrák és rajzok kizárólag referenciául szolgálnak, és eltérhetnek a termék tényleges megjelenésétől. A termék kialakítása és jellemzői előzetes értesítés nélkül megváltozhatnak. A FÁK országaiban beszélt nyelvek (orosz, ukrán, kazah) ehhez a termékhez nem állnak rendelkezésre, mivel a termék az EU-régióban élő fogyasztók számára készül.
Magyar - 2

A doboz tartalma
Távvezérlő és elemek (2 db AAA) |
Szabályozási útmutató |
|||||||
Használati útmutató |
Tápkábel |
|||||||
Jótállási jegy (egyes helyeken nem érhető el) |
|
|||||||
|
|
|
|
|
|
|
|
|
|
|
|
|
|
|
|
|
|
|
|
|
|
|
|
|
|
|
|
|
|
|
|
|
|
|
|
|
|
|
|
|
|
|
|
|
|
|
|
|
|
|
|
|
|
Magyar
CI-kártyaadapter |
Infra-hosszabbítókábel |
Kábeltartó |
Ferritgyűrű (2EA) |
|
(Modellenként változó) |
||||
|
|
|
-- Ellenőrizze, hogy az alábbi elemek mellékelve vannak-e a TV-készülékhez. Ha bármelyik tartozék hiányzik, forduljon a márkakereskedőhöz.
-- Az elemek színe és alakja típusonként változhat.
-- A csomagban nem mellékelt kábelek külön szerezhetők be.
-- A doboz kicsomagolásakor ellenőrizze, hogy a csomagolóanyagok mögött vagy között nem található-e további tartozék.
Előfordulhat, hogy adminisztrációs díjat kell fizetnie, ha
(a)szerelőt hív, de a termék nem hibás (azaz abban az esetben, ha Ön nem olvasta el a használati útmutatót);
(b)szervizbe viszi a terméket, de a termék nem hibás (azaz abban az esetben, ha Ön nem olvasta el a használati útmutatót).
Tájékoztatni fogjuk az adminisztrációs díjról a szerelő látogatása előtt.
Figyelmeztetés: A képernyő a helytelen kezeléskor fellépő |
|
közvetlen nyomástól megsérülhet. Azt javasoljuk, hogy a TV- |
Ne érjen |
készüléket az ábrán látható módon a szélénél fogva emelje fel. |
a képernyőhöz! |
Ferritgyűrű (Modellenként változó): A ferritgyűrű célja, hogy megóvja a kábelt az interferenciától. A kábel csatlakoztatásakor nyissa fel a ferritgyűrűt, és az ábrán látható módon kapcsolja a kábel köré, közel a csatlakozóhoz.
<Tápkábel> <LAN-kábel>
Magyar - 3

A TV-készülék állványra szerelése
Győződjön meg arról, hogy az ábrán látható minden tartozék a rendelkezésére áll, és az állványt az itt leírt módon szerelje össze.
A TV-készülék rögzítése falra a fali rögzítőkészlettel (opcionális)
Ha a készüléket falra szereli fel, ezt kizárólag a gyártó által javasolt módon tegye. A nem megfelelően felszerelt készülék lecsúszhat vagy leeshet, súlyos személyi sérülést okozva ezzel gyermekeknek és felnőtteknek egyaránt, és a készülék is komolyan megsérülhet.
A fali rögzítőkészlet felszerelése
A (külön kapható) fali rögzítőkészlettel a falra szerelheti fel a TV-készüléket.
A fali konzol felszerelésének részletes adatait a fali konzolhoz kapott utasításokban találhatja. Javasoljuk, hogy a fali konzol felszerelésekor kérjen segítséget egy szerelőtől. Nem tanácsoljuk, hogy a felszerelést egyedül végezze. A Samsung Electronics nem vállal felelősséget a készülékben keletkezett károkért, illetve az Ön vagy mások sérüléseiért, ha úgy dönt, hogy saját maga szereli fel a fali konzolt.
A fali konzol |
TV |
tartóeleme |
|
C
A fali rögzítőkészlet jellemzői (VESA)
A fali rögzítőkészlet nem képezi a csomag részét, azt külön kell megvásárolni. A fali konzolt a padlóval párhuzamosan egy szilárd falra szerelje fel. A fali konzol más építőanyagokra történő felszerelése esetén lépjen kapcsolatba a legközelebbi márkakereskedővel. Mennyezetre vagy ferde falra történő felszerelés esetén a konzol leeshet, és súlyos személyi sérülést okozhat.
-- A lenti táblázatban a normál méretű fali rögzítőkészletek találhatók.
-- Fali rögzítőkészletünk vásárlásakor részletes telepítési útmutatót és a felszereléshez szükséges összes alkatrészt megkapja.
-- Ne használjon olyan csavarokat, amelyek nem felelnek meg a normál csavarokkal szemben előírt VESA követelményeknek.
-- Ne használjon olyan csavarokat, amelyek hosszabbak a normál méretnél, illetve amelyek nem felelnek meg a normál csavarokkal szemben előírt VESA követelményeknek. A túl hosszú csavarok sérülést okozhatnak a TV-készülék belsejében.
Magyar - 4
-- A normál csavarokkal szemben előírt VESA követelményeknek nem megfelelő fali konzoloknál a csavarok hossza a fali konzol jellemzőitől függően eltérő lehet.
-- Ne húzza meg túl erősen a csavarokat, mert a termék megsérülhet, illetve a termék leeshet, ami személyi sérülést okozhat. A Samsung nem vállal felelősséget az ilyen jellegű balesetekért.
-- A Samsung nem vállal felelősséget a termék károsodásáért vagy a személyi sérülésért nem VESA, vagy a megadottól eltérő fali konzol használata esetén, illetve ha a vásárló nem tartja be a termék telepítésére vonatkozó utasításokat.
-- Ne szerelje fel a TV-készüléket 15 foknál nagyobb dőlésszöggel.
Amikor más gyártmányú fali rögzítőelemet használ, vegye figyelembe az összeszereléshez használt csavar alább feltüntetett hosszát (C).
Termékcsalád |
Hüvelyk |
VESA méret |
C (mm) |
Normál |
Mennyiség |
|
|
|
(A * B) |
csavar |
|
|
|
||||
|
|
|
|
|
|
|
||
|
|
|
|
|
|
|
|
|
|
32 |
200 X 200 |
21,7 ~ 22,7 |
|
|
|
|
|
|
|
|
|
|
|
|||
|
|
|
|
|
|
|
|
|
LED-TV |
40 |
20,2 ~ 21,2 |
M8 |
4 |
|
|
|
|
|
|
|
|
|||||
|
|
|
|
|
|
|||
48 |
400 X 400 |
20,2 ~ 21,2 |
|
|
|
|||
|
|
|
|
|
|
|||
|
|
|
|
|
|
|
||
|
50 |
|
|
|
|
|
||
|
|
|
|
|
|
|
|
|
|
|
|
|
|
|
|
|
|
Ne szerelje fel a fali rögzítőkészletet a TV bekapcsolt állapotában, mert ez személyi sérülést okozhat az áramütés veszélye miatt.
Megfelelő szellőzés biztosítása a TV-készülék számára
A TV-készülék üzembe helyezésekor a megfelelő szellőzés biztosítása érdekében hagyjon legalább 10 cm távolságot a TVkészülék és más tárgyak (fal, szekrény stb.) között. Ennek elmulasztása tüzet okozhat, vagy a készülék meghibásodását eredményezheti a belső hőmérséklet megemelkedése miatt.
Más gyártó alkatrészeinek használata a készülékkel kapcsolatos problémákhoz vagy a készülék leesésének következtében személyi sérüléshez vezethet.
-- Ha állványra vagy fali konzolra szereli a TV-készüléket, csak a Samsung Electronics termékeit használja.
|
Felszerelés állványra. |
|
Felszerelés fali konzolra. |
|
10 cm |
|
10 cm |
10 cm |
10 cm |
10 cm |
10 cm |
|
|
|
10 cm |
Egyéb figyelmeztetések
-- Típustól függően a TV-készülék megjelenése eltérhet az útmutatóban látható illusztrációktól. -- Óvatosan érjen hozzá a TV-készülékhez. Egyes részek forrók lehetnek.
Magyar
Magyar - 5
A TV-készülék biztonságos rögzítése a falon
Vigyázat: A TV leeshet, ha elhúzzák, eltolják, vagy felmásznak a tetejére. Különösen arra ügyeljen, hogy gyermekei ne borítsák fel a TV-t, mert ez súlyos sérülést, sőt, akár halált is okozhat. Tartsa be a TV-hez mellékelt biztonsági tájékoztatóban foglalt összes biztonsági előírást. A még nagyobb stabilitás és biztonság érdekében az alábbiak szerint szerelje fel a leesés elleni eszközt.
A TV leesésének megakadályozása
1. Illessze a csavarokat a kapcsokba, és szorosan rögzítse a falhoz. Ellenőrizze a csavarok szoros illeszkedését a falban.
-- A fal típusától függően más anyag, például tipli használata is
szükséges lehet. |
|
|
-- A szükséges kapcsok, csavarok és zsineg nincs a készülékhez |
|
|
mellékelve, ezért azokat külön kell beszerezni. |
|
|
2. Távolítsa el a csavarokat a TV hátoldalának közepéről, helyezze a |
|
|
csavarokat a kapcsokba, majd erősítse a csavarokat ismét a TV-hez. |
|
|
-- Előfordulhat, hogy a csavarok nincsenek mellékelve a termékhez. |
|
|
Ebben az esetben az alábbiaknak megfelelő csavarokat vásároljon. |
|
|
-- A csavarok jellemzői: 32 – 50 hüvelykes modell esetén: M8 |
|
|
3. A TV-hez és a falhoz rögzített kapcsokat kösse össze erős zsineggel, majd |
fal |
|
húzza meg szorosan a zsineget. |
-- A termék színe és formája típustól |
|
-- Helyezze a TV-készüléket a fal közelébe, nehogy hátrabillenjen. |
||
függően különbözhet. |
||
|
||
-- A zsineg akkor köthető meg biztonságosan, ha a falhoz rögzített kapcsok |
|
|
a TV-hez rögzített kapcsokkal egyforma magasságban vagy azoknál |
|
|
alacsonyabban vannak. |
|
|
-- A TV elmozdítása előtt oldja ki a zsineget. |
|
4.Ellenőrizze, hogy biztonságosak-e a csatlakozások. Időnként ellenőrizze, hogy megfelelőek-e a csatlakozások. Ha kétsége támad a csatlakozások biztonságát illetően, forduljon szakemberhez.
Rendezze el a kábeleket a kábeltartó segítségével.
-- A kábeltartó használatára vonatkozó módszer az adott modelltől függően eltérő lehet.
Magyar - 6
Eszközök csatlakoztatása a TV-készülékhez
Többféle külső eszközt csatlakoztat a készülék hátulján lévő csatlakozók segítségével. Ellenőrizze a csatlakozókat, majd nézze át a kapott összeszerelési utasításokat a támogatott külső eszközökkel kapcsolatban.
Csatlakozás a KÖZÖS ILLESZTŐFELÜLET (CI) foglalatához (a tévénézéshez használt kártyafoglalathoz)
-- CI-kártya vagy CI-kártyaadapter csatlakoztatásához vagy lecsatlakoztatásához kapcsolja ki a TV-készüléket.
A CI-kártyaadapter csatlakoztatása
Csatlakoztassa az adaptert a képen látható módon.
-- A CI-kártyaadapter behelyezéséhez távolítsa el a TV-n lévő matricát. A CI-kártyaadapter csatlakoztatásához kövesse az alábbi lépéseket.
-- Azt javasoljuk, hogy a TV falra való felszerelése előtt rögzítse az adaptert, illetve helyezze be a CI vagy a CI+ kártyát.
1. Illessze a CI-kártyaadaptert az 1. terméken lévő két nyílásba.
-- Keresse meg a két nyílást a TV hátulján a COMMON INTERFACE csatlakozó mellett.
2.Csatlakoztassa a CI-kártyaadaptert a 2. termék COMMON INTERFACE csatlakozójához.
3.Helyezze be a CI vagy a CI+ kártyát.
Javasoljuk, hogy a TV falra szerelése előtt rögzítse a CI-kártyaadaptert és helyezze be a CI-kártyát (a tévénézéshez használt kártyát), mert az nehézkes és veszélyes lehet, amikor a TV már a falon van.
Magyar
Magyar - 7
A CI vagy CI+ kártya használata
Fizetős csatornák megtekintéséhez be kell helyezni a CI vagy a CI+ kártyát.
-- Ha nem helyezi be a CI vagy CI+ kártyát, bizonyos csatornáknál a „Kódolt jel” üzenet jelenik meg a képernyőn.
-- Körülbelül 2-3 perc múlva megjelenik a telefonszámot, a CI vagy CI+ kártya azonosítóját, a készülék azonosítóját és egyéb adatokat
tartalmazó párosítási információ. Ha hibaüzenet jelenik meg, forduljon a szolgáltatóhoz.
-- Ha a csatornaadatok konfigurálása befejeződött, megjelenik a csatornalista frissítésének végrehajtását jelző „Frissítés kész” üzenet.
MEGJEGYZÉS
-- A CI vagy a CI+ kártyát a helyi kábeltelevíziós szolgáltatójától szerezheti be.
-- Eltávolításkor óvatosan húzza ki a CI vagy a CI+ kártyát, mivel az megsérülhet, ha leejti. -- Helyezze be a CI vagy a CI+ kártyát a rajta jelölt irány szerint.
-- A KÖZÖS ILLESZTŐFELÜLET (CI) nyílásának elhelyezkedése a készülék modelljétől függően eltérő lehet.
-- Néhány országban és régióban a CI vagy a CI+ kártya funkció nem érhető el, ezért forduljon a hivatalos forgalmazóhoz. -- Ha bármilyen probléma lép fel, forduljon a szolgáltatóhoz.
-- Helyezze be a CI vagy a CI+ kártyát, amely támogatja a jelenlegi antennabeállításokat. Előfordulhat, hogy a kép torz, vagy nem jelenik meg.
Csatlakozás egy hálózathoz
A TV-készülék hálózatra történő csatlakoztatásával olyan online szolgáltatásokat vehet használatba, mint a Smart Hub, valamint szoftverfrissítéseket is végrehajthat.
Vezeték nélküli hálózati kapcsolat
Csatlakoztassa a TV-készüléket az internethez szabványos útválasztó vagy modem segítségével.
Vezeték nélküli IP-útválasztó vagy modem, amely DHCP-kiszolgálóval rendelkezik
Fali LAN-csatlakozó
LAN-kábel (nem tartozék)
Magyar - 8
Vezetékes hálózati kapcsolat
A TV-készüléket háromféleképpen csatlakoztathatja a hálózathoz kábel segítségével, a hálózati beállításoktól függően. Az egyes módszereket az alábbi ábrák szemléltetik:
A TV hátlapja
A modem fali csatlakozója |
|
|
|
Külső modem |
|
|||||||||||
|
(ADSL/VDSL/Kábeltévé) |
|
|
|||||||||||||
|
|
|
|
|
|
|
|
|
|
|
|
|
|
|
|
|
|
|
|
|
|
|
|
|
|
|
|
|
|
|
|
|
|
|
|
|
|
|
|
|
|
|
|
|
|
|
|
|
|
|
|
|
|
|
|
|
|
|
|
|
|
|
|
|
|
|
|
|
|
|
|
|
|
|
|
|
|
|
|
|
|
|
|
|
Modemkábel (nem tartozék) |
LAN-kábel (nem tartozék) |
A TV hátlapja
A modem fali csatlakozója |
|
|
|
Külső modem |
IP-útválasztó DHCP- |
|
|||||||
|
(ADSL/VDSL/Kábeltévé) |
|
kiszolgálóval |
|
|
||||||||
|
|
|
|
||||||||||
|
|
|
|
|
|
|
|
|
|
|
|
|
|
|
|
|
|
|
|
|
|
|
|
|
|
|
|
|
|
|
|
|
|
|
|
|
|
|
|
|
|
|
|
|
|
|
|
|
|
|
|
|
|
|
|
|
|
|
|
|
|
|
|
|
|
|
|
|
|
|
|
|
|
|
|
|
|
|
|
|
|
|
|
|
|
|
|
|
|
|
|
|
|
|
|
|
|
Modemkábel |
LAN-kábel |
LAN-kábel |
(nem tartozék) |
(nem tartozék) |
(nem tartozék) |
A TV hátlapja
Fali LAN-csatlakozó
LAN-kábel (nem tartozék)
-- A TV-készülék nem támogatja a 10 MB/s-nál lassabb hálózati sebességet. -- A csatlakozáshoz Cat 7-es kábelt használjon.
Magyar
Magyar - 9
Távvezérlő
Ismerje meg a funkciógombok helyét a távvezérlőn: SOURCE, MUTE, Y, <P >, MENU, TOOLS, E, INFO, CH LIST,
RETURN, GUIDE és EXIT.
-- A távirányítón Braille-pontok találhatók a Power, a Channel, és a Volume gombokon, így ezeket gyengénlátók is használhatják.
A televízió beés kikapcsolása. |
|
|
|
|
|
|
|
|
|
|
|
|
|
|
|
|
|
|
|
A beltéri egység beés kikapcsolása. |
||||||
|
|
|
|
|
|
|
|
|
|
|
|
|
|
|
|
|
|
|
|
|
|
|||||
|
|
|
|
|
|
|
|
|
|
|
|
|
|
|
|
|
|
|
|
|
|
|
|
|
|
Az elérhető videoforrások megjelenítése |
|
|
|
|
|
|
|
|
|
|
|
|
|
|
|
|
|
|
|
|
|
|
|
|
|
|
|
|
|
|
|
|
|
|
|
|
|
|
|
|
|
|
|
|
|
|
|
|
|
|
|
|
|
|
|
|
|
|
|
|
|
|
|
|
|
|
|
|
|
|
|
|
|
|
|
|
|
|
|
|
|
|
|
|
|
|
|
|
|
|
|
|
|
|
|
|
|
|
|
|
|
|
|
|
|
|
|
és kiválasztása. |
A csatornák közvetlen elérése. |
|
|
|
|
|
|
|
|
|
|
|
|
|
|
|
|
|
|
|
Visszalépés az előző csatornára. |
||||||
|
|
|
|
|
|
|
|
|
|
|
|
|
|
|
|
|||||||||||
Váltás a Teletext, BE, Double, Mix és a KI |
|
|
|
|
|
|
|
|
|
|
|
|
|
|
|
|
|
|
|
|
|
|
||||
|
|
|
|
|
|
|
|
|
|
|
|
|
|
|
|
|
|
|
||||||||
beállítás között. |
|
|
|
|
|
|
|
|
|
|
|
|
|
|
A hang ideiglenes kikapcsolása. |
|||||||||||
|
|
|
|
|
|
|
|
|
|
|
|
|
|
|
|
|
|
|
|
|
|
|
|
|
|
|
A hangerő beállítása. |
|
|
|
|
|
|
|
|
|
|
|
|
|
|
|
|
|
|
Csatornaváltás. |
|||||||
|
|
|
|
|
|
|
|
|
|
|
|
|
|
|||||||||||||
|
|
|
|
|
|
|
|
|
|
|
|
|
|
|||||||||||||
|
|
|
|
|
|
|
|
|
|
|
|
|
|
|
|
|
|
|
|
|
|
|
|
|
|
A Smart Hub alkalmazások előhívása. |
|
|
|
|
|
|
|
|
|
|
|
|
|
|
|
|
|
|
|
|
|
|
|
|
|
|
|
|
|
|
|
|
|
|
|
|
|
|
|
|
|
|
|
|
|
|
|
|
|
|
|
|
|
|
Csatornalista megjelenítése. |
|
|
|
|
|
|
|
|
|
|
|
|
|
|
Lásd az e-Manual következő fejezetét: |
|||||||||||
Az OSD (Menü) megnyitása. |
|
|
|
|
|
|
|
|
|
|
|
|
|
|
|
|
|
|
|
|
|
|
|
|
Smart funkciók > Smart Hub. |
|
|
|
|
|
|
|
|
|
|
|
|
|
|
|
|
|
|
||||||||||
|
|
|
|
|
|
|
|
|
|
|
|
|
|
|
|
|
|
|
|
|
||||||
A gyakran használt műveletek gyors |
|
|
|
|
|
|
|
|
|
|
|
|
|
|
|
|
|
|
Az EPG (Elektronikus műsorújság) |
|||||||
|
|
|
|
|
|
|
|
|
|
|
|
|
|
|
||||||||||||
kiválasztása. |
|
|
|
|
|
|
|
|
|
|
|
|
|
|
|
|
megjelenítése. |
|||||||||
A kurzor mozgatása, a képernyőn |
|
|
|
|
|
|
|
|
|
|
|
|
|
|
|
|
Információk megjelenítése a TV- |
|||||||||
megjelenő menüelemek kiválasztása, és a |
|
|
|
|
|
|
|
|
|
|
|
|
|
|
||||||||||||
|
|
|
|
|
|
|
|
|
|
|
|
|
|
képernyőn. |
||||||||||||
menüben látható értékek módosítása. |
|
|
|
|
|
|
|
|
|
|
|
|
|
|
||||||||||||
|
|
|
|
|
|
|
|
|
|
|
|
|
|
Kilépés a menüből. |
||||||||||||
Visszatérés az előző menübe. |
|
|
|
|
|
|
|
|
|
|
|
|
|
|
||||||||||||
|
|
|
|
|
|
|
|
|
|
|
|
|||||||||||||||
|
|
|
|
|
|
|
|
|
|
|
|
|
|
|
||||||||||||
Ezeket a gombokat a TV-képernyőn |
|
|
|
|
|
|
|
|
|
|
|
|
|
|
|
|
|
: A Futball üzemmód (Sport mód) a |
||||||||
|
|
|
|
|
|
|
|
|
|
|
|
|
|
|||||||||||||
megjelenő utasításoknak megfelelően |
|
|
|
|
|
|
|
|
|
|
|
|
|
|
sportprogramok optimális megjelenítését |
|||||||||||
használja. |
|
|
|
|
|
|
|
|
|
|
|
|
|
|
biztosítja. |
|||||||||||
|
|
|
|
|
|
|
|
|
|
|
|
|
||||||||||||||
Ezeket a gombokat speciális funkciókra 


 használja. Ezeket a gombokat a TV-

 képernyőn megjelenő utasításoknak
megfelelően használja.
SEARCH: A keresőablak használatához nyomja meg ezt a gombot.
KEYPAD: A képernyőn megjelenő virtuális távvezérlővel számjegyeket írhat be, tartalmakat vezérelhet és különböző funkciókat használhat.
E-MANUAL: Az e-Manual megtekintése.
P.SIZE: A képméret módosítása.
AD/SUBT.: A Kisegítő lehetőségek parancsikonjai megtekintése.
Magyar - 10
 Loading...