


Samsung AM18A1C09, AM26A1C13, AM27A1C07, AM27A1C13, UM27A1C3 User Manual
...OWNER’S INSTRUCTIONS &
INSTALLATION MANUAL
MANUAL DE INSTRUCCIONES &
MANUAL DE INSTALACIÓN
MANUEL D’UTILISATION &
MANUEL D’INSTALLATION
Indoor Unit |
Outdoor Unit |
|
AM18A1C09 |
UM18A1C2 |
|
AM26A1C13 |
UM26A1C2 |
|
AM27A1C13 |
UM27A1C3 |
|
AM27A1C07 |
||
|
MULTI-SPLIT TYPE ROOM AIR CONDITIONER (Cool)
ACONDICIONADOR DE AIRE DOMÉSTICO SISTEMA MULTI SPLIT (Refrigeración)
CLIMATISEUR DE TYPE MULTIPLE (Refroidissement)
ENGLISH
ESPAÑOL
FRANÇAIS
E S F DB68-01957A(1)

Safety Precautions
The following safety precautions must be taken when using your air conditioner.
1Make sure that the indoor unit is correctly ventilated at all times; do NOT place clothing or other materials over it.
2NEVER spill liquid of any kind into the indoor unit. Should this happen, switch off the breaker used for your air conditioner and contact your installation specialist.
3Do NOT insert anything between the air flow blades, as the inner fan may be damaged and you may be hurt. Keep children away from the indoor unit.
4Do NOT place any obstacles in front of the outdoor unit.
5If the remote control will not be used for a long time, remove the batteries.
6Users of this product are cautioned not to attempt repair of this product at their own discretion. Instead, they are requested to directly contact a designated service center or the outlet at which the product was purchased.
7If the supply cord is damaged, it must be replaced by a special cord or assembly available from the manufacturer or its service agent.
E- 2

ENGLISH
|
|
|
|
|
|
|
|
Contents |
|
P |
REPARING |
Y |
OUR |
A IR |
C |
ONDITIONER |
|
||
|
|
■ |
Safety Precautions ........................................................................................ |
|
|
|
2 |
||
|
|
■ |
View of the Indoor Unit.................................................................................. |
|
|
|
4 |
||
|
|
■ |
View of the Outdoor Unit ............................................................................... |
|
|
4 |
|||
|
|
■ |
Remote Control - Buttons and Display.......................................................... |
5 |
|||||
|
|
■ |
Getting Started .............................................................................................. |
|
|
|
6 |
||
|
|
■ |
Installing the Remote Control Holder on the Wall ......................................... |
7 |
|||||
|
|
■ |
Inserting the Remote Control Batteries ......................................................... |
7 |
|||||
|
|
■ |
Setting the Time ............................................................................................ |
|
|
|
8 |
||
O |
PERATING |
Y |
OUR |
A IR |
C |
ONDITIONER |
|
||
|
|
■ |
Selecting the Automatic Operating Mode...................................................... |
9 |
|||||
|
|
■ |
Cooling Your Room ....................................................................................... |
|
|
|
10 |
||
|
|
■ |
Changing the Room Temperature Quickly .................................................... |
11 |
|||||
|
|
■ |
Removing Excess Humidity........................................................................... |
|
12 |
||||
|
|
■ |
Airing Your Room .......................................................................................... |
|
|
|
13 |
||
|
|
■ |
Adjusting the Air Flow Direction Vertically..................................................... |
14 |
|||||
|
|
■ |
Adjusting the Air Flow Direction Horizontally ................................................ |
14 |
|||||
P |
ROGRAMMING |
|
|
Y OUR |
A |
IR |
C ONDITIONER |
|
|
|
|
■ |
Switching the Unit On and Off Automatically (On/Off Timer) ........................ |
15 |
|||||
|
|
■ |
Setting the Sleep Timer................................................................................. |
|
|
16 |
|||
|
|
■ |
Setting the Quick Timer................................................................................. |
|
|
16 |
|||
|
|
■ |
Cancelling the On/Off Timer .......................................................................... |
17 |
|||||
|
|
■ |
Cancelling the Sleep Timer ........................................................................... |
17 |
|||||
|
|
■ |
Cancelling the Quick Timer ........................................................................... |
17 |
|||||
R |
ECOMMENDATIONS |
|
FOR |
U |
SE |
|
|||
|
|
■ |
Operating Recommendation |
......................................................................... |
|
18 |
|||
|
|
■ |
Temperature and Humidity Ranges............................................................... |
18 |
|||||
|
|
■ |
Cleaning Your Air Conditioner ....................................................................... |
19 |
|||||
|
|
■ |
Solving Common Problems........................................................................... |
20 |
|||||
|
|
■ |
Operating Your Air Conditioner Without the Remote Control........................ |
21 |
|||||
|
T |
ECHNICAL |
S |
PECIFICATIONS |
|
|
.................................................................................... |
22 |
|
|
INSTALLATION |
M |
ANUAL |
............................................................................................. |
|
|
24 |
||
E- 3

View of the Indoor Unit
ON/OFF switch (operation without remote control)
Air Filter |
|
|
|
|
Air flow blades (outlet) |
(under the grille) |
|
|
|
|
|
|
|
|
|
Remote control sensor |
|
|
|
|
|
|
Air Inlet |
OPERATION |
TIMER |
|
FAN |
TURBO |
|
|
|
|
|
|
|
|
|
|
|
|
|
|
|
|
|
|
|
OPERATION indicator |
|
|
|
|
TURBO indicator |
- GREEN |
|
|
|
|
- RED |
|
|
|
|
|
FAN indicator |
TIMER indicator |
|
|
|
|
|
- YELLOW |
|
|
|
|
- GREEN |
View of the Outdoor Unit
Air Inlet
UM26A1C2
UM18A1C2
Air Outlet
Connection Valve
UM27A1C3
E- 4
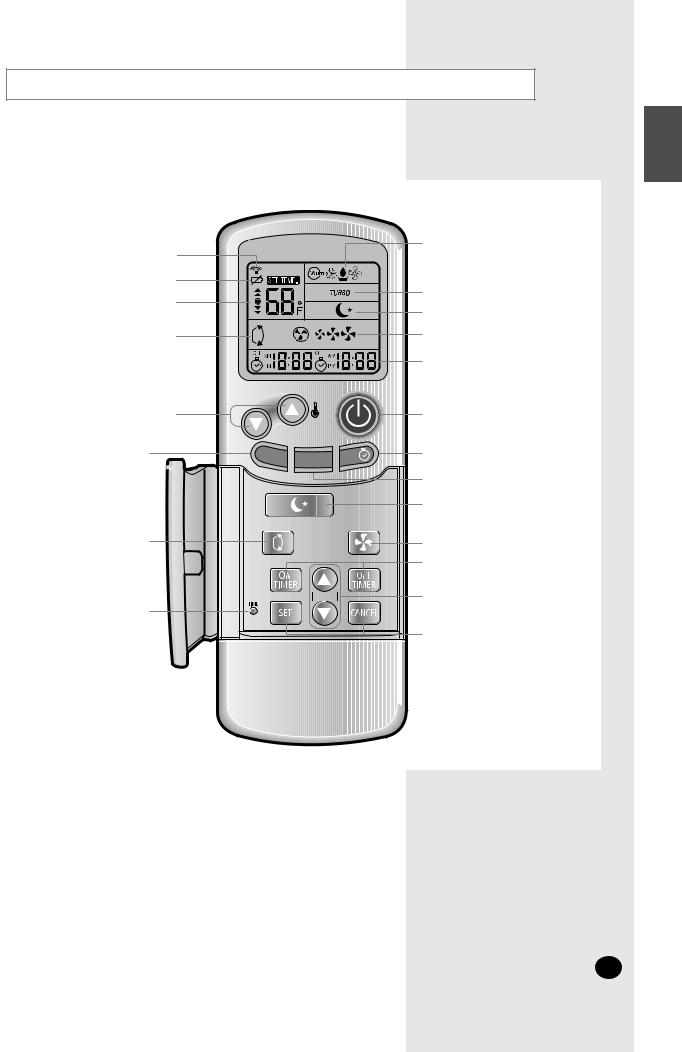
Remote control - Buttons and Display
ENGLISH
Remote control transmission indicator |
|
|
|
|
|
|
|
|
Battery discharge indicator |
|
|
|
|
|
|
|
|
Temperature settings |
|
|
|
|
|
|
|
|
Air flow direction |
|
|
|
|
|
|
|
|
Temperature adjustment buttons |
|
|
|
|
|
|
|
|
Mode selection button |
M |
O |
D |
E |
T U |
R |
B O |
F |
(AUTO, COOL, DRY, FAN) |
|
|
|
O F |
||||
|
|
|
|
|
|
|
|
|
Air flow swing button |
|
|
|
|
|
|
|
|
Time setting Button |
|
|
|
|
|
|
|
|
Operating mode
(AUTO, COOL, DRY, FAN)
Turbo mode
Sleep mode
Fan speed
(AUTO, LOW, MEDIUM, HIGH)
Time/Timer settings
On/Off button
Off Timer adjustment button
Turbo mode button
Sleep timer button
Fan speed adjustment button
Timer on/off buttons
Time adjustment buttons
Timer setting/cancellation buttons
E- 5
Getting Started
You have just purchased a multi-split type room air conditioner and it has been installed by your installation specialist.
Your Owner’s Instructions contain much valuable information on using your air conditioner. Please take the time to read them as they will help you take full advantage of the unit’s features.
The booklet is organized as follows.
T he following figures are shown on pages 4 and 5:
-Indoor and outdoor units
-Remote control (buttons and display)
They will help you find the buttons and understand the symbols displayed.
In the main part of the document, you will find a series of step-by-step procedures for each function available.
The illustrations in the step-by-step procedures use three different symbols:
PRESS |
PUSH |
HOLD DOWN |
|
|
|
E- 6

Installing the Remote Control Holder on the Wall
The remote control is supplied with a plastic holder that can be fitted to the wall to hold the remote control when you are not using it.
To attach the holder to the wall, proceed as follows.
1With a pencil, mark the positions of the two holes on the wall where the holder is to be installed.
2Drill the two holes and insert plugs as required for the type of wall on which the holder is being installed.
3Screw the holder into position.
Result: |
You can now slide the remote control in and out of the |
|
holder as required. |
|
|
Inserting the Remote Control Batteries
You must insert or replace the remote control batteries when:
Y ou purchase the air conditioner
The remote control does not work correctly
Note |
Use two LR03 1 |
1 |
V batteries. Do not use old batteries or |
2 |
|||
|
different kinds of batteries together. Batteries may be |
||
|
completely discharged after 12 months, even if they have |
||
|
not actually been used. |
||
1Slide the remote control out of its holder.
2Push the battery cover on the rear of the remote control with your thumb in the direction of the arrow and remove it.
3Insert the two batteries, taking care to respect the polarities:
+ on the battery with + on the remote control
- on the battery with - on the remote control
4Close the cover by sliding it back until it clicks into place.
ENGLISH
E- 7
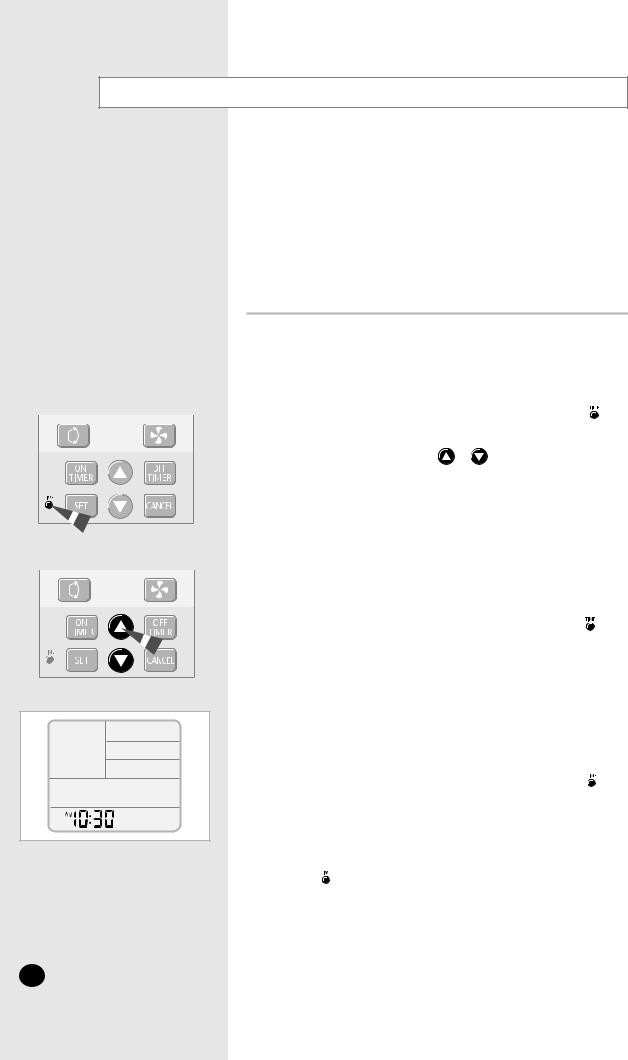
Setting the Time
Your air conditioner contains a clock used to start and stop the unit automatically at a given time.
You must set the time when you:
Purchase the air conditioner
Replace the batteries
Note |
Be sure to reset the time when you change clocks from |
|
standard todaylight savings time and vice versa. |
Setting the Time for the First Time
1Insert the batteries.
Push the battery cover on the rear of the remote control with your thumb and remove it.
|
|
|
|
|
|
|
Result : |
The clock starts. |
|
|
|
|
|
|
|
|
|
|
|
|
|
|
|
|
|||
|
|
|
|
|
2 |
Using a small pointed tool (ball-point pen for example), Press the |
but ton. |
||||||
|
|
|
|
|
|||||||||
|
|
|
|
|
|
|
Result : |
The AM indication flashes. |
|
|
|
|
|
|
|
|
|
|
|
|
|
|
|
|
|
||
|
|
|
|
|
3 |
To set the current time, press the |
or |
b uttons under the cover on |
|||||
|
|
|
|
|
|||||||||
|
|
|
|
|
|
|
the remote control. |
|
|
|
|
||
|
|
|
|
|
|
|
To... |
|
|
Then... |
|
|
|
|
|
|
|
|
|
|
Increase the time in one-minute intervals |
Press the ( |
|
)button. |
|||
|
|
|
|
|
|
|
|
|
|
Hold down the ( |
)button. |
||
|
|
|
|
|
|
|
|
|
|
Press the ( |
|
)button. |
|
|
|
|
|
|
|
|
Decrease the time in ten-minute intervals |
Hold down the ( |
)button. |
||||
|
|
|
|
|
|
|
|||||||
|
|
|
|
|
|
|
Result : |
AM or PM is displayed to indicate whether the setting |
|
|
|||
|
|
|
|
|
|
|
|
|
|||||
|
|
|
|
|
|
|
|
|
corresponds to a time before or after midday. |
|
|
|
|
|
|
|
|
|
|
|
|
||||||
|
|
|
4 |
When you are satisfied with your setting, confirm the time. To do so: |
|
|
|||||||
|
|
|
|
|
|
|
using a small pointed tool (ball-point pen for example), press the |
button. |
|||||
|
|
|
|
|
|
|
Result : |
The AM or PM indication stops flashing. |
|
|
|
||
|
|
|
|
|
|
|
|
|
The clock starts. |
|
|
|
|
|
|
|
|
|
|
|
|
|
|
|
|
|
|
|
|
|
|
|
|
|
|
|
|
|
|
|
|
|
|
|
|
|
|
|
|
|
|
|
|
|
|
|
|
|
|
|
|
|
|
|
|
|
|
|
|
Resetting the Time
If you have already set the time but wish to change it, proceed as follow.
1 |
Using a small pointed tool (ball-point pen for example), press the |
button |
||||
|
under the remote control flap. |
|
|
|
||
|
Result : |
The AM or PM indication flashes. |
|
|
||
|
|
|
|
|
||
2 |
Set the time, following the instructions in Step |
3 in the procedure above. |
|
|||
|
|
|
||||
3 |
When you are satisfied with your setting, confirm the time. To do so, |
|
||||
|
press the |
button, using a |
small pointed tool (ball-point pen for |
|
||
|
example). |
|
|
|
|
|
|
Result : |
The AM or PM indication stops flashing. |
|
|
||
|
|
|
The clock starts. |
|
|
|
|
|
|
|
|
|
|
E- 8

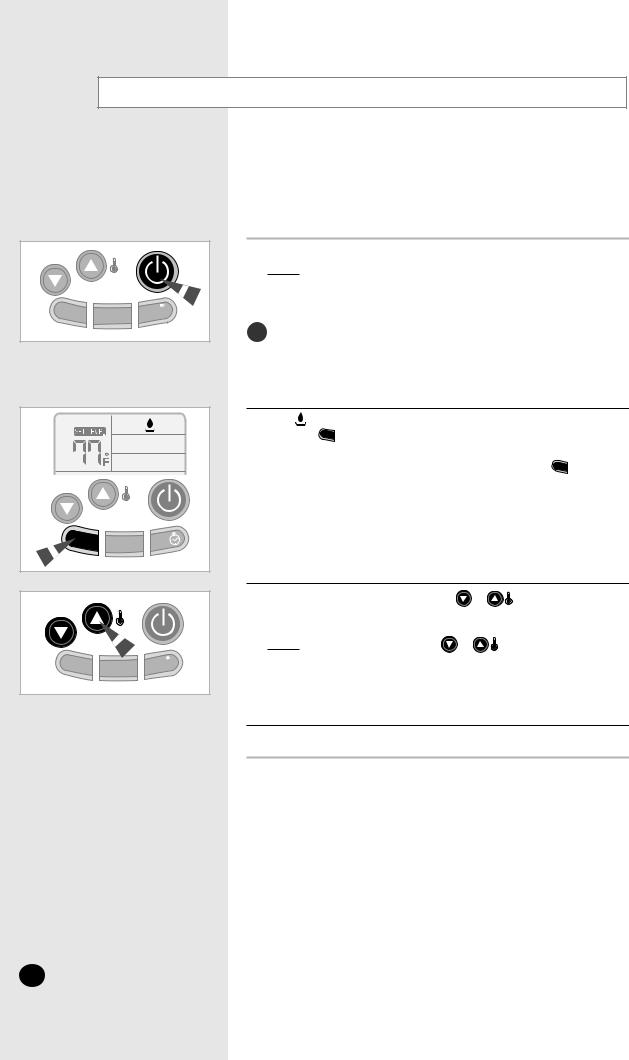
Selecting the Automatic Operating Mode
You can start the air conditioner in Automatic mode from your remote control. In the Automatic mode, the standard temperature and the optimum fan speed is selected automatically. You can adjust the standard temperature but not the fan speed.
1 If necessary, press the  (On/Off) button. Result : The OPERATION indicator on the indoor unit comes on.
The air conditioner starts up in the mode selected when the unit was last used.
The indoor unit beeps.
IMPORTANT |
The air conditioner is fitted with a protection mechanism to |
||
prevent the unit from being damaged when it is started |
|||
|
|||
|
immediately after being: |
||
|
|
Plugged in |
|
|
|
Stopped |
|
It will start up normally after a three-minute.
2 If the |
indication is not displ |
ayed at the top of the remote control, |
|
|
|
|||||||||
|
press the |
|
M |
O D E |
button on the r |
emote control one or more times until it |
|
|
||||||
|
|
|
|
|
|
|
|
|
|
|
|
|
|
|
|
appears. |
|
|
|
|
|
|
|
|
|
|
|
|
|
|
Result |
: |
The indoor unit beeps each time you press |
|
M O D |
E . |
|
|
||||||
|
|
|
|
The air conditioner starts up in AUTO mode. |
|
|
|
|
||||||
|
N o |
te |
|
You can change modes at any time. |
|
|
|
|
|
|
||||
|
|
|
|
|
||||||||||
3 To adjust the standard temperature (The air conditioner automatically |
|
|
|
|
||||||||||
|
set the standard temperature by the current room temperature.), press |
|
|
|
|
|||||||||
|
the |
|
or |
|
|
buttons |
one or more times. |
|
|
|
|
|
|
|
SET TEMP. |
SET TEMP. |
|
|
- |
|
SET TEMP. |
SET TEMP. |
|
|
|
|
|||
-2°C/-4°F |
-1°C/-2°F |
Standard temperature |
+1°C/2°F |
+2°C/4°F |
|
|
||||||||
( |
|
) |
|
|
( |
) |
|
( |
) |
( |
) |
|
( |
) |
< When you feel hot > |
|
|
|
< When you feel chilly > |
|
|
||||||||
|
|
|
|
|
|
|
|
|
|
|
|
|
|
|
ENGLISH
M |
O |
D E |
T U R |
B O |
O FF |
|
|||||
|
|
O |
D |
E |
T U R |
B O |
F |
|
|
O F |
M |
O |
D |
E |
T U R |
B O |
F |
|
|
|
O F |
E- 9
Cooling Your Room
M |
O |
D E |
|
|
T U R B O |
|
O FF |
|
|
|
|
|
|
||||
|
|
|
|
|
|
|||
|
|
O |
D |
E |
T U R |
B O |
O |
F |
|
|
|
|
F |
M |
O |
D |
E |
T U R B O |
F |
|
|
|
O F |
You must select the Cool mode if you wish to adjust the:
Cooling temperature
Fan speed when cooling
1 |
If necessary, press the |
(On/Off) |
button. |
Result : The OPERATION indicator on the indoor unit comes on.
The air conditioner starts up in the mode selected when the unit was last used.
The indoor unit beeps.
The air conditioner is fitted with a protection mechanism to prevent the unit from being damaged when it is started immediately after being:
Plugged in
Stopped
It will start up normally after a three-minute.
2 |
If the |
indi cation is not displayed at the top of the remote control, |
|
|||||
|
press the |
|
M |
O D E |
button on the r |
emote control one or more times until it |
|
|
|
|
|
|
|
|
|
|
|
|
appears. |
|
|
|
|
|
|
|
|
Result |
: |
The indoor unit beeps each time you press |
M O D |
E . |
|||
|
|
|
The air conditioner starts up in Cool mode. |
|
|
|||
|
N o te |
You can change modes at any time. |
|
|
||||
|
|
|
|
|||||
3 |
To adjust the temperature, press the |
or |
butt ons one or more |
|||||
|
times until the required temperature is displayed. |
|
|
|||||
|
Possible temperatures are between 18°C(65°F) and 30°C(86°F) inclusive. |
|
||||||
|
Result |
: |
Each time you press |
or |
: |
|
||
-The temperature is adjusted by 1°C(1°F)
-The indoor unit beeps
The air conditioner starts cooling, provided that the room temperature is higher than the selected temperature; the fan will, however, operate.
4 |
Select the fan speed by pressing the |
button one or more times |
||
|
until the required setting is displayed: |
|
||
|
|
|
Low |
|
|
|
|
Medium |
|
|
|
|
High |
|
|
|
|
Automatic |
|
|
Result : |
Each time you press |
, the indoor unit beeps. |
|
|
|
|
||
5 |
To control the direction of the air flow, refer to page 14. |
|||
|
|
|
|
|
E- 10
Changing the Room Temperature Quickly
ENGLISH
The Turbo cooling function is used to cool your room as quickly as possible.
Example: |
You have just come home and find that the room is very |
|
hot. You wish to cool it down as quickly as possible. |
The Turbo function operates for 30 minutes with the maximum settings before returning automatically to the mode and temperature previously selected.
1
2
3
If necessary, press the |
(On/Off) button. |
|
|
|
|
|
|
|||||
Result |
: |
The OPERATION indicator on the indoor unit comes on. |
|
|
|
|
|
|
||||
|
|
The air conditioner starts up in the mode selected when the unit |
|
|
|
|
|
|||||
|
|
|
was last used. |
|
|
|
|
|
|
|
|
|
|
|
The indoor unit beeps. |
|
|
|
|
|
|
|
|
||
Press the |
|
T U R B O |
button. |
|
|
|
|
|
|
|
|
|
Result |
: |
The temperature and fan settings are adjusted automatically. |
|
|
|
|
|
|||||
|
|
The TURBO indicator on the indoor unit lights up. |
|
|
|
|
|
|
||||
|
|
The air conditioner cool the room as quickly as possible |
|
|
|
|
|
|||||
|
|
After 30 minutes, the air conditioner is reset automatically |
|
|
|
|
||||||
|
|
|
previous mode, temperature and fan settings. |
|
M |
O |
R |
B O |
O F |
|||
|
|
|
or |
mode that is |
||||||||
|
|
|
but, if you press the |
T U R B O |
button in |
|
|
|
|
|||
|
|
|
changed with |
|
mode automatically. |
|
|
|
|
|
|
|
If you wish to stop the Turbo function before the end of the 30-minute period,
press the |
T U R B O |
button again. |
|
|
|
|
|
Result : |
The air conditioner is reset automatically to the previous mode, |
||||||
|
|
temperature and fan settings. |
|
button in |
or |
mode that is |
|
|
|
but, if you press the |
T U R B O |
||||
|
|
changed with |
mode automatically. |
|
|
||
4 To control the direction of the air flow, refer to page 14.
E- 11
M
O
D
E
T
U
Removing Excess Humidity
R
B
O
O
FF
If the atmosphere in your room is very humid or damp, you can remove excess humidity without lowering the room temperature too much.
1 If necessary, press the  (On/Off) button. Result : The OPERATION indicator on the indoor unit comes on.
The air conditioner starts up in the mode selected when the unit was last used.
The indoor unit beeps.
IMPORTANT |
The air conditioner is fitted with a protection mechanism |
|
to prevent the unit from being damaged when it is started |
||
|
||
|
immediately after being: |
|
|
Plugged in |
|
|
Stopped |
|
|
It will start up normally after a three-minute. |
2 |
If the |
indication is not displ |
ayed at the top of the remote control, |
|
|
|||
|
press the |
M |
O D E |
button on the r |
emote control one or more times until it |
|||
|
|
|
|
|
|
|
|
|
|
appears. |
|
|
|
|
|
|
|
|
Result |
: The indoor unit beeps each time you press |
M |
O D |
E . |
|||
|
|
The air conditioner starts up in Dry mode. |
|
|
|
|||
|
N o te |
You can change modes at any time. |
|
|
|
|||
D
E
T
U
R
B
O
O
FF
3 To adjust the temperature, press the |
or |
buttons |
one or more |
times until the required temperature is displayed. |
|
|
|
Possible temperatures are between 18°C(65°F) and 30°C(86°F) inclusive. |
|
||
Result : Each time you press |
or |
: |
|
-The temperature is adjusted by 1°C(1°F)
-The indoor unit beeps
The air conditioner starts removing the excess humidity; the quantity of air is adjusted automatically.
4 To control the direction of the air flow, refer to page 14.
E- 12
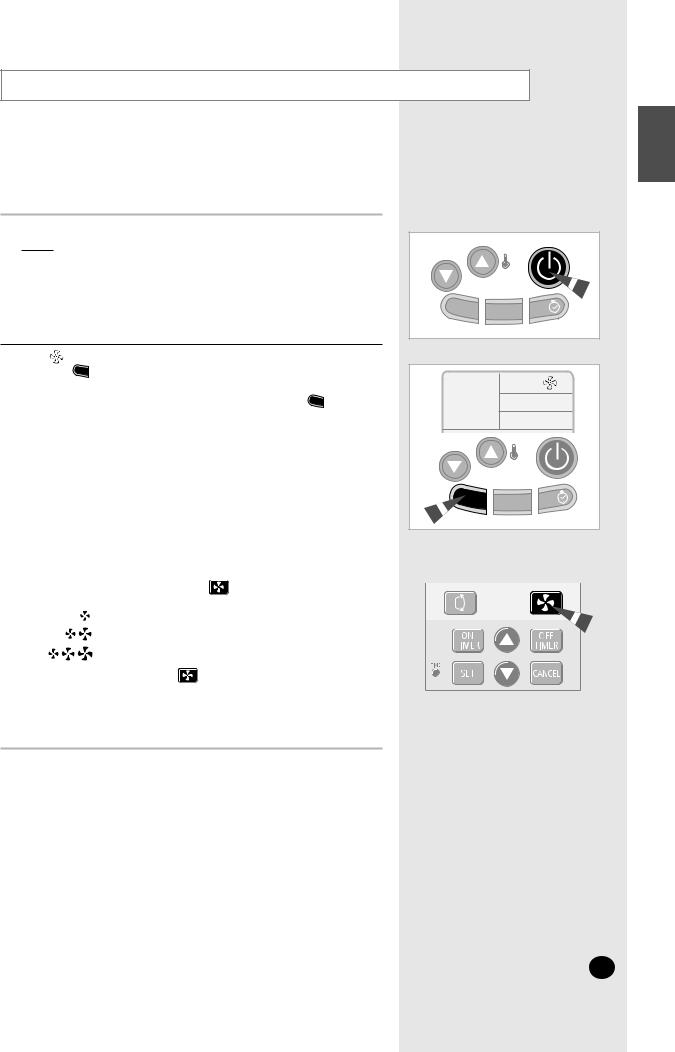
Airing Your Room
ENGLISH
If the atmosphere in your room is stale, you can air the room using the Fan feature.
1 If necessary, press the  (On/Off) button. Result : The OPERATION indicator on the indoor unit comes on.
The air conditioner starts up in the mode selected when the unit was last used.
The indoor unit beeps.
2 |
If the |
indication is not displ |
ayed at the top of the remote control, |
|
|
|
|||
|
press the |
M |
O D E |
button on the r |
emote control one or more times until it |
|
|
||
|
|
|
|
|
|
|
|
|
|
|
appears. |
|
|
|
|
|
|
|
|
|
Result |
: The indoor unit beeps each time you press |
M |
O D |
E |
. |
|||
|
The FAN indicator on the indoor unit lights up. |
|
The air conditioner starts up in Fan mode. |
|
The temperature is set automatically. |
N o te |
You can change modes at any time. |
M |
O |
D E |
T U R |
B |
O |
O FF |
|
||||||
|
|
|||||
|
|
D |
T |
U R |
B O |
O |
|
|
E |
3 |
Select the fan speed by pressing the |
button one or more times |
|
|
|
|
|
|
||
|
until the required setting is displayed: |
|
|
|
|
|
|
|
||
|
|
|
Low |
|
|
|
|
|
|
|
|
|
|
Medium |
|
|
|
|
|
|
|
|
|
|
High |
|
|
|
|
|
|
|
|
Result : |
Each time you press |
, the indoor unit beeps. |
|
|
|
|
|
||
|
|
|
|
|
|
|||||
|
|
|
|
|
|
|
|
|
|
|
|
|
|
|
|
|
|
|
|
|
|
|
|
|
|
|
|
|
|
|
|
|
4 To control the direction of the air flow, refer to page 14.
E- 13

Adjusting the Air Flow Direction Vertically
Depending on the position of the indoor unit on the wall of your room, you can adjust the position of the outer air flow blade on the bottom of the unit, thus increasing the efficiency of the air conditioner.
|
|
|
|
|
|
1 |
|
Press the |
button under the remote control flap one or more times |
|||
|
|
|
|
|
|
|
|
as required. |
|
|
||
|
|
|
|
|
|
|
|
|
|
|
is adjusted vertically. |
|
|
|
|
|
|
|
|
|
|
|
|
When... |
Adjust the blade to face... |
|
|
|
|
|
|
|
|
|
|
|
Cooling |
Upwards. |
|
|
|
|
|
|
|
|
|
||||
|
|
|
|
|
2 |
|
If you want the blade to move up and down automatically when the air |
|||||
|
|
|
|
|
||||||||
|
|
|
|
|
|
|
|
conditioner is operating, press the |
button. |
|||
|
|
|
|
|
|
|
||||||
|
|
|
|
|
|
|
|
Result |
|
: |
The blade move up and down, around the base position set. |
|
|
|
|
|
|
|
|
||||||
|
|
|
|
|
||||||||
3 |
|
To stop the blade moving up and down, press the |
button again. |
|||||||||
|
|
|
|
|
|
N |
o te |
If you switch the air conditioner... Then the blade is... |
||||
|
|
|
|
|
|
|
|
|
Off |
|
Closed completely. |
|
|
|
|
|
|
|
|
|
|
On again |
Reset to the position that you |
||
|
|
|
|
|
|
|
|
|
|
|
|
previously selected. |
|
|
|
|
|
|
|
|
|
|
|
|
|
Adjusting the Air Flow Direction Horizontally
There are two sets of inner air flow blades. Just as the outer air flow blade can be adjusted vertically, the inner blades can be adjusted horizontally.
1 |
Open the air flow blade along the bottom of the indoor unit, by |
|
|
|
pressing the |
button. |
|
|
|
|
|
2 |
To stop the blade moving up and down, press the |
button again. |
|
3Adjust each set of inner blades to the required position, by pushing or pulling them sideways.
E- 14
 Loading...