

Page 1

Allen-Bradley
Dataliner DL40 Plus
Offline Programming
User
Software
(Cat. No.2706-LSW)
Manual
Page 2

Important User
Information
Because of the variety of uses for the products described in this
publication, those responsible for the application and use of this
control equipment must satisfy themselves that all necessary steps
have been taken to assure that each application and use meets all
performance and safety requirements, including any applicable laws,
regulations, codes and standards.
The illustrations, charts, sample programs and layout examples
shown in this guide are intended solely for purposes of example.
Since there are many variables and requirements associated with any
particular installation, Allen-Bradley does not assume responsibility
or liability (to include intellectual property liability) for actual use
based upon the examples shown in this publication.
Allen-Bradley publication SGI-1.1, Safety Guidelines for the
Application, Installation, and Maintenance of Solid-State Control
(available from your local Allen-Bradley office), describes some
important differences between solid-state equipment and
electromechanical devices that should be taken into consideration
when applying products such as those described in this publication.
Reproduction of the contents of this copyrighted publication, in
whole or in part, without written permission of Allen-Bradley
Company, Inc., is prohibited.
Throughout this manual we use notes to make you aware of safety
considerations:
ATTENTION: Identifies information about practices
or circumstances that can lead to personal injury or
!
Attention statements help you to:
death, property damage or economic loss.
• identify a hazard
• avoid the hazard
• recognize the consequences
Important: Identifies information that is critical for successful
PLC and PLC–5 are registered trademarks of Allen–Bradley Co.
SLC is a trademark ofAllen–Bradley Co.
Windows, MS–DOS, and Windows NT are a trademarks of Microsoft Corporation.
Page 3

Using this Manual
Overview of the DL40 Plus
Installing the Software
Preface
What You Need to Know P–1. . . . . . . . . . . . . . . . . . . . . . . . . . . . . . .
Contents of this Manual P–1. . . . . . . . . . . . . . . . . . . . . . . . . . . . . . . .
Conventions Used P–2. . . . . . . . . . . . . . . . . . . . . . . . . . . . . . . . . . . .
Related Publications P–2. . . . . . . . . . . . . . . . . . . . . . . . . . . . . . . . . .
Chapter 1
Chapter Objectives 1–1. . . . . . . . . . . . . . . . . . . . . . . . . . . . . . . . . . .
Available Configurations 1–1. . . . . . . . . . . . . . . . . . . . . . . . . . . . . . . .
Message Support 1–3. . . . . . . . . . . . . . . . . . . . . . . . . . . . . . . . . . . .
Programming Features 1–4. . . . . . . . . . . . . . . . . . . . . . . . . . . . . . . . .
Operating Modes 1–1 1. . . . . . . . . . . . . . . . . . . . . . . . . . . . . . . . . . . . .
Special Messages 1–12. . . . . . . . . . . . . . . . . . . . . . . . . . . . . . . . . . . .
Controller Support for Remote I/O 1–13. . . . . . . . . . . . . . . . . . . . . . . . .
Available Catalog Numbers 1–15. . . . . . . . . . . . . . . . . . . . . . . . . . . . .
Chapter 2
Chapter Objectives 2–1. . . . . . . . . . . . . . . . . . . . . . . . . . . . . . . . . . .
Personal Computer Requirements 2–1. . . . . . . . . . . . . . . . . . . . . . . . .
Package Contents 2–1. . . . . . . . . . . . . . . . . . . . . . . . . . . . . . . . . . . .
Installed Files 2–2. . . . . . . . . . . . . . . . . . . . . . . . . . . . . . . . . . . . . . .
Memory Requirements 2–2. . . . . . . . . . . . . . . . . . . . . . . . . . . . . . . . .
Memory Management 2–3. . . . . . . . . . . . . . . . . . . . . . . . . . . . . . . . .
Installation 2–3. . . . . . . . . . . . . . . . . . . . . . . . . . . . . . . . . . . . . . . . .
Basic Installation (without PassThrough) 2–4. . . . . . . . . . . . . . . . . . . .
Software Installation for DH+ PLC PassThrough 2–5. . . . . . . . . . . . . . .
Software Installation for Ethernet PLC PassThrough 2–1 1. . . . . . . . . . . .
Starting the Program 2–13. . . . . . . . . . . . . . . . . . . . . . . . . . . . . . . . . .
Establishing Initial Non–networked Communications 2–13. . . . . . . . . . . .
Publication 2706-6.2
Page 4

Table of Contentstoc–ii
Navigating the Software
Offline Operating Modes
Chapter 3
Starting the Software 3–1. . . . . . . . . . . . . . . . . . . . . . . . . . . . . . . . . .
Title Screen and Main Menu 3–2. . . . . . . . . . . . . . . . . . . . . . . . . . . . .
Getting Help 3–3. . . . . . . . . . . . . . . . . . . . . . . . . . . . . . . . . . . . . . . .
Setup Menu 3–4. . . . . . . . . . . . . . . . . . . . . . . . . . . . . . . . . . . . . . . .
Menu Control Keys 3–6. . . . . . . . . . . . . . . . . . . . . . . . . . . . . . . . . . .
Shortcut Keys 3–6. . . . . . . . . . . . . . . . . . . . . . . . . . . . . . . . . . . . . . .
Exiting the Software 3–7. . . . . . . . . . . . . . . . . . . . . . . . . . . . . . . . . . .
Chapter 4
Develop Menu 4–2. . . . . . . . . . . . . . . . . . . . . . . . . . . . . . . . . . . . . . .
File Selection Screen 4–4. . . . . . . . . . . . . . . . . . . . . . . . . . . . . . . . . .
Create New File Window 4–5. . . . . . . . . . . . . . . . . . . . . . . . . . . . . . .
Data Path Directory Window 4–6. . . . . . . . . . . . . . . . . . . . . . . . . . . . .
Develop Screen 4–7. . . . . . . . . . . . . . . . . . . . . . . . . . . . . . . . . . . . . .
Messages Menu 4–8. . . . . . . . . . . . . . . . . . . . . . . . . . . . . . . . . . . . .
Edit Message Screen 4–9. . . . . . . . . . . . . . . . . . . . . . . . . . . . . . . . . .
Message Text Window 4–10. . . . . . . . . . . . . . . . . . . . . . . . . . . . . . . . .
Create New Message Screen 4–16. . . . . . . . . . . . . . . . . . . . . . . . . . . .
Copy Messages Screen 4–17. . . . . . . . . . . . . . . . . . . . . . . . . . . . . . . .
Delete Message Screen 4–19. . . . . . . . . . . . . . . . . . . . . . . . . . . . . . . .
Renumber Messages Screen 4–20. . . . . . . . . . . . . . . . . . . . . . . . . . . .
Text Search Screen 4–22. . . . . . . . . . . . . . . . . . . . . . . . . . . . . . . . . . .
Modify Message Attributes Screen 4–24. . . . . . . . . . . . . . . . . . . . . . . .
Message Attribute Default Screen 4–32. . . . . . . . . . . . . . . . . . . . . . . . .
Options Menu 4–34. . . . . . . . . . . . . . . . . . . . . . . . . . . . . . . . . . . . . . .
Ports Menu 4–36. . . . . . . . . . . . . . . . . . . . . . . . . . . . . . . . . . . . . . . . .
Verify Menu 4–39. . . . . . . . . . . . . . . . . . . . . . . . . . . . . . . . . . . . . . . . .
Device Menu 4–44. . . . . . . . . . . . . . . . . . . . . . . . . . . . . . . . . . . . . . . .
Downloading/Uploading Message Files
Publication 2706-6.2
Chapter 5
Transfer Menu 5–2. . . . . . . . . . . . . . . . . . . . . . . . . . . . . . . . . . . . . . .
Downloading a File using RS-232 or RS-485 5–3. . . . . . . . . . . . . . . . .
Uploading a File using RS-232 or RS-485 5–6. . . . . . . . . . . . . . . . . . .
Downloading a File using Remote I/O (PassThrough) 5–8. . . . . . . . . . .
Uploading a File using Remote I/O (PassThrough) 5–10. . . . . . . . . . . . .
Creating a New Communications File 5–12. . . . . . . . . . . . . . . . . . . . . .
Modifying an Existing Communications File 5–16. . . . . . . . . . . . . . . . . .
Sending the Time and Date Using RS-232 or RS–485 5–17. . . . . . . . . .
Writing a File to Tape 5–18. . . . . . . . . . . . . . . . . . . . . . . . . . . . . . . . . .
Reading a File from Tape 5–20. . . . . . . . . . . . . . . . . . . . . . . . . . . . . . .
Page 5

Table of Contents toc–iii
Getting Reports
Managing Message Files
Chapter 6
Reports Menu 6–1. . . . . . . . . . . . . . . . . . . . . . . . . . . . . . . . . . . . . . .
Select File Submenu 6–1. . . . . . . . . . . . . . . . . . . . . . . . . . . . . . . . . .
Configure Ports Submenu 6–2. . . . . . . . . . . . . . . . . . . . . . . . . . . . . .
Starting the Print Job 6–3. . . . . . . . . . . . . . . . . . . . . . . . . . . . . . . . . .
Chapter 7
Files Menu 7–2. . . . . . . . . . . . . . . . . . . . . . . . . . . . . . . . . . . . . . . . .
Select Files Menu 7–3. . . . . . . . . . . . . . . . . . . . . . . . . . . . . . . . . . . .
File Selections/File Picks Window 7–4. . . . . . . . . . . . . . . . . . . . . . . . .
Copy File(s) 7–4. . . . . . . . . . . . . . . . . . . . . . . . . . . . . . . . . . . . . . . .
Delete File(s) 7–6. . . . . . . . . . . . . . . . . . . . . . . . . . . . . . . . . . . . . . . .
Rename File(s) 7–7. . . . . . . . . . . . . . . . . . . . . . . . . . . . . . . . . . . . . .
Convert DL20 File(s) 7–10. . . . . . . . . . . . . . . . . . . . . . . . . . . . . . . . . .
Appendix A – Message Display Worksheets
Appendix B – Cables
Appendix C – ASCII Character Sets
Appendix D – PLC-5 Data Pass-Through
Index
Publication 2706-6.2
Page 6

Contents of this Manual
Using this Manual
This preface provides an overview of the Dataliner DL40 Plus
Offline Programming Software. The topics it covers include:
• What you need to know
• Contents of the manual
• Conventions used throughout the manual
• Related publications
What You Need to Know
No special knowledge is required to read this manual or use the
DL40 Plus Offline Programming Software (Catalog No. 2706-LSW).
However, you should be familiar with the operation of the DL40
Plus and how it will be integrated into your control system before
trying to use the Offline Programming Software.
This manual describes how to install and use the DL40 Plus Offline
Programming Software. The manual is organized as follows:
Chapter Title Purpose
1 Overview of the DL40 Plus Provides an overview of the DL40 Plus
2 Installing the Software Describes how to install the DL40 Plus
3 Navigating the Software Provides a description of the menus
4 Creating Message Files Describes how to create and manage
5 Downloading/Uploading
Message Files
6 Getting Reports Describes the contents and use of the
7 Managing Message Files Describes the contents and use of the
Appendix A Message Display
Worksheets
Appendix B Cables Cable pinout diagrams
Appendix C ASCII Character Sets Summary of ASCII characters and their
Appendix D PLC-5 Pass-Through Provides an application example of using
Message Display.
Offline Programming Software.
along with instructions for setting up and
exiting the software.
message application files.
Describes the contents and use of the
Transfer menu.
Reports menu.
Files menu.
Convenient forms for recording message
contents.
keyboard codes.
PLC-5 data Pass-Through.
Publication 2706-6.2
Page 7

Using this ManualP–2
Conventions Used
Related Publications
The following conventions are used in this manual:
• All menus and screens reproduced in this manual approximate
what you see when using the software.
• A symbol or word in brackets represents a single key that you
press. These include keys such as [A] or [Del]. Since the
Dataliner can be programmed with a variety of keyboards or
terminals, the printing on your keyboard may be different from
the symbol or word indicated in brackets.
• This manual uses ↵ to specify the carriage return function of a
keyboard. On your keyboard this may correspond to an
[ENTER], ↵ , or [Rtrn] key.
• The up caret, ^, is the symbol for a control character. For
example:
computers this character is entered by pressing [Ctrl] and [W]
simultaneously.
^W is the symbol for a Control W character. On most
• In the following chapters, we refer to the Dataliner DL40 Plus
Message Display as the DL40.
Other publications to which you may want to refer include:
• Dataliner DL40 Plus Message Display User Manual,
(Publication 2706-6.1)
• Dataliner DL40 Plus Message Displays Release Note (provided
with DL40 Plus display) is helpful if you are replacing an existing
DL40 display with a DL40 Plus display.
Publication 2706-6.2
Page 8

Overview of the DL40 Plus
Chapter Objectives
Available Configurations
This chapter describes key features and capabilities of the DL40
Plus. Understanding the capabilities allows you to use the Offline
Programming Software more effectively. For more information,
refer to the DL40 Plus user manual (Publication 2706-6.1).
Section Page
Available Configurations 1–1
Message Support 1–3
Programming Features 1–4
Operating Modes 1–11
Special Messages 1–12
Controller Support for Remote I/O 1–13
Available Catalog Numbers 1–15
The DL40 Plus is available in a 2- or 4-line configuration (capable of
displaying 20 characters per line) with either Remote I/O or Parallel
port communication options.
Remote I/O Version
The Remote I/O version enables two-way communications with the
Allen-Bradley family of PLCs and SLCs. A remote I/O version of
the DL40 Plus can appear to the PLC or SLC as any size I/O rack
1
1
(
/
/2, 3/4, or full).
4,
Parallel Port Version
The Parallel Port version receives message number triggers, slave
addresses, and variable data from a PLC or SLC output module via
16 data lines and 4 strobe lines (indicating the type of data).
Page 9
1–2 Overview of the DL40 Plus
ConfigurationsDescription
Plus Port
line Programmin
1
line Programmin
R
line Programmin
R
line Programmin
R
line Programmin
R
line Programmin
R
line Programmin
R
line Programmin
R
lave Communications
R
lave Communications
R
line Programmin
R
line Programmin
R
ssa
rin
R
ssa
rin
RS-485/RS-232 Communications
Both the Remote I/O and Parallel Port versions have RS-485 and
RS-232 ports. You can configure these ports for Programmer, DL
Slave or Open Protocol communications (see table below). Port
settings are modified through the Ports menu in the Offline
Programming software or the Onboard Editor. You select a
communication option under the Port Use submenu.
The RS-232 port always communicates with the Offline
Programming Software regardless of the configured mode. Open
Protocol or DL Slave operation can occur on either the RS-232 or
RS-485 port.
If the RS-485 port is configured for Open protocol or DL Slave
operation, you cannot configure the RS-232 port for the same
protocol. Instead, an information message reports an invalid port
configuration (Incompatible Port Usage).
DL40
Off
Off
and Serial Printing
S-232 Off
2
3
4
5
6
7
S-232 Off
and RS-485 Message Triggering
S-232 Off
S-232 Off
RS-485 Slave Communications
S-485 Off
S-485 Off
RS-232 Message Triggering
S-485 S
S-485 S
RS-232 Message Triggering
S-485 Off
S-485 Off
RS-232 Slave Communications
S-485 Me
S-485 Me
RS-232 Slave Communications
ge Trigge
ge Trigge
g
g
g
g
g
g
g
g
g
g
g
g
RS–485
RS–232
RS–485
RS–232
RS–485
RS–232
RS–485
RS–232
RS–485
RS–232
RS–485
RS–232
RS–485
RS–232
Programmer Open Protocol Slave Printing
√
√ √
√ √
√ √
√
√
Communication/Printing Options
√
√
√
√
√
√
√
√
Note: Open protocol is a serial ASCII based format for triggering
messages stored in the DL40 Plus displays. Open protocol supports
message triggers with or without variable data over the RS-232 or
RS-485 serial ports.
Publication 2706-6.2
Page 10

1–3Overview of the DL40 Plus
Message Support
The DL40 Plus stores messages of varying length. Each message is
identified by a unique message number from 1 to 9999. Messages
are placed in an internal memory queue when triggered by a
command from your control system. They are then run according to
attributes selected in the DL40 Plus.
The DL40 Plus can display a wide variety of characters and symbols,
including:
• Uppercase letters
• Lowercase letters
• Punctuation
• Special characters from the English extended ASCII character set
• English character set (default)
• International character set ISO 8859–1
• Cyrillic character set (Russian)
Note: English characters are also available with both the
International an Cyrillic character sets.
A person with normal vision can easily read the display from a
distance of up to 25 feet.
Publication 2706-6.2
Page 11

1–4 Overview of the DL40 Plus
Programming Features
The DL40 Plus is a versatile status, prompt and diagnostic display
tool, equipped with a full range of high-end programming and
performance features.
DL40 Plus Capabilities
Supports offline programming software Yes Yes
PLC-5 Remote I/O PassThrough via DH+ Yes No
PLC-5E Remote I/O PassThrough via Ethernet Yes No
International and Cyrillic character sets Yes Yes
Onboard editing with PC keyboard Yes Yes
Send ASCII data to a PLC via a Remote I/O link Yes No
Send ASCII data to a device via an RS-485 link Yes Yes
Communicates with any programmable controller No Yes
Customizable historical events stack Yes Yes
Real-time clock operations Yes Yes
RS-232 and RS-485 ports Yes Yes
Debug Mode No Yes
Support for auxiliary devices such as slave displays
and printers
Background messages Yes Yes
Remote I/O
Version
Yes Yes
Parallel Port
Version
Hidden messages Yes Yes
Embedded variables Yes Yes
Data mode selection Yes Yes
Message chaining Yes Yes
Adjustable parameters for serial communications Yes Yes
Adjustable display brightness Yes Yes
Publication 2706-6.2
Page 12
Offline Programming Software
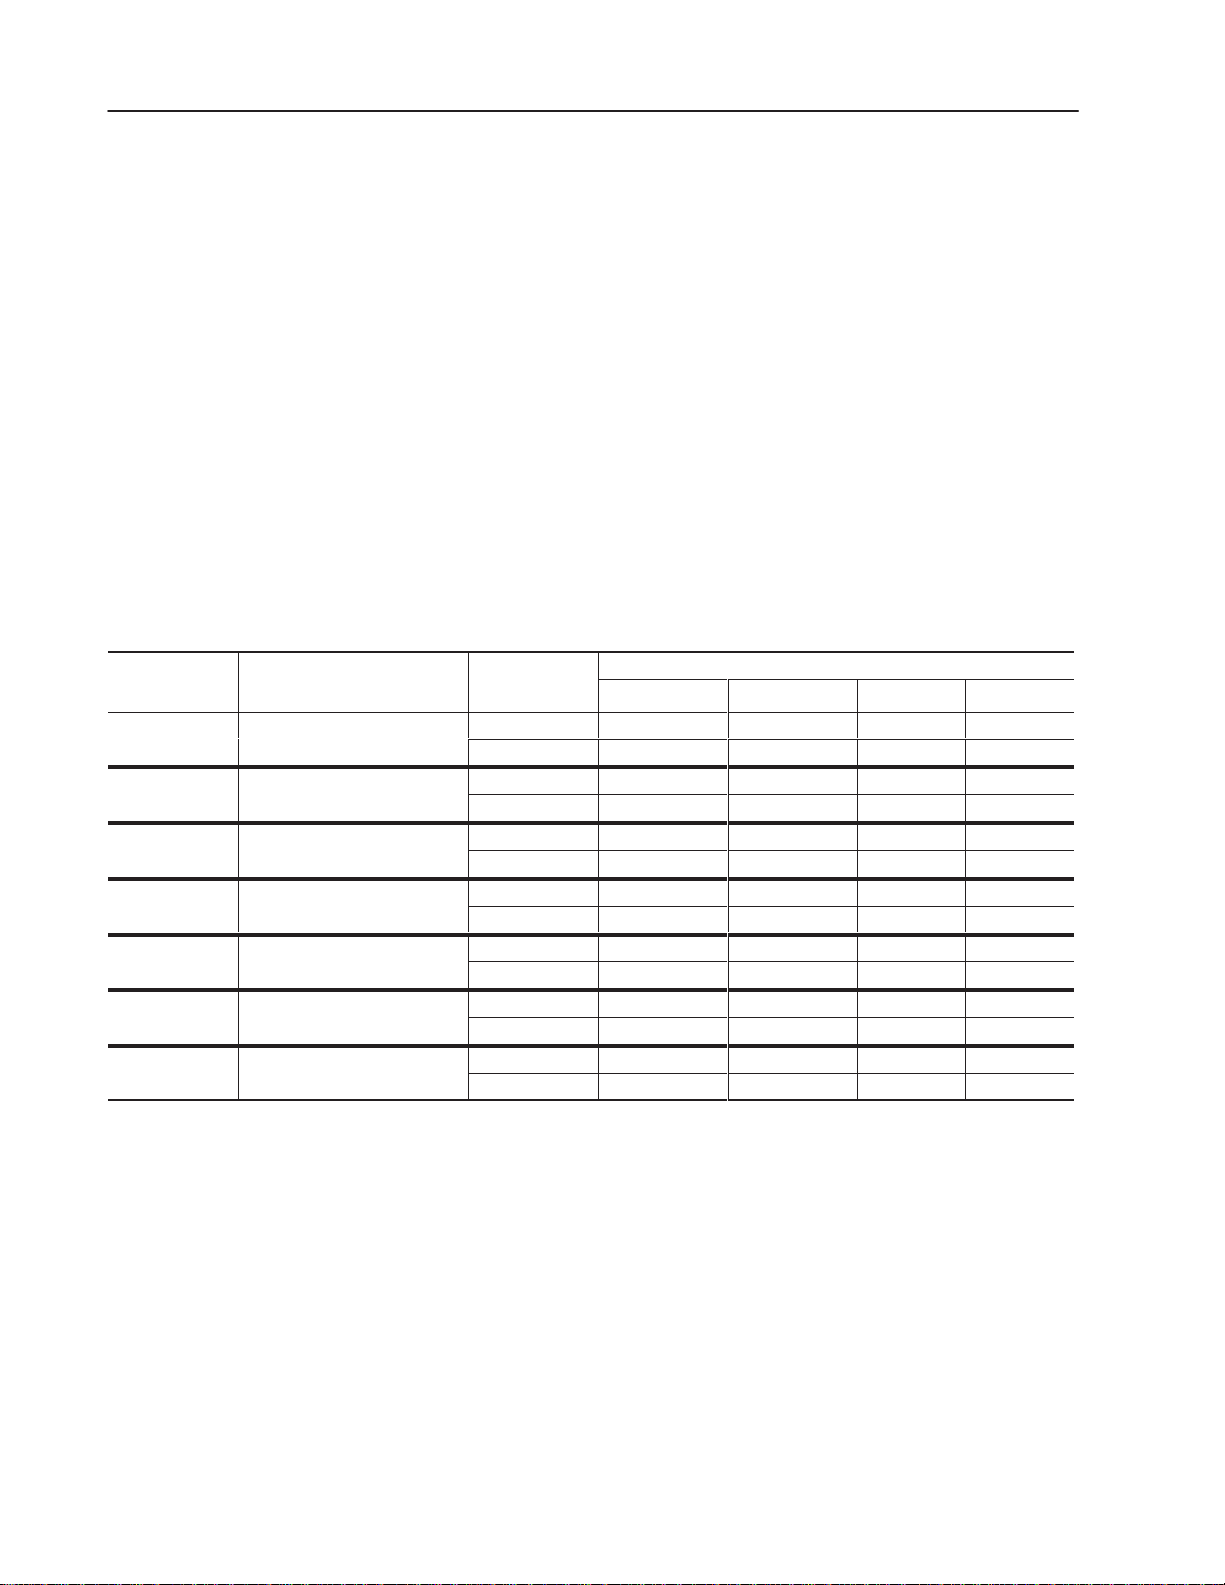
Create and edit application files using the Offline Programming
Software (Catalog No. 2706-LSW) on a personal computer. With
interactive menus you can quickly create messages, set message
attributes, and download messages to one or more DL40 Plus
displays.
1–5Overview of the DL40 Plus
Create Message editing screen Set Message Attributes window
Download Message Files screen
Convert DL20 files for use with a DL40 Plus
The offline programming cable (Catalog No. 2706-NC13) provides a
direct connection between a personal computer running the Offline
Programming Software and a DL40 Plus. This 3-meter cable has a
9-pin, D-shell connector on each end.
Publication 2706-6.2
Page 13

1–6 Overview of the DL40 Plus
International and Cyrillic Character Sets
The local language character sets let you create and display messages
in other languages such as French, German, Italian, and Spanish with
the Offline Programming Software with:
• English (default)
• International character set ISO 8859–1
• Cyrillic (Russian)
English characters are also available with both the International and
Cyrillic character sets.
Onboard Editor
With the Onboard Editor you can create or edit messages, select
message attributes, and set options and variable formats using a
standard IBM PC keyboard. The Keyboard port is located on the rear
panel of the DL40 Plus.
Send ASCII Data to a PLC via Remote I/O Link
Using Remote I/O communications, you can send ASCII data to a
PLC. Attach an IBM compatible keyboard to the DL40 Plus and you
can enter part numbers, badge numbers, passwords, and similar
information as required. The DL40 Plus processes and displays the
information, and then sends it to the controller.
You can establish similar communications over an RS-232 or
RS-485 link.
Communicate with any Programmable Controller
(Parallel Port Version)
The DL40 Plus accepts information from any programmable
controller over a total of 20 input lines (16 data and 4 strobe lines).
Parallel Port versions of the DL40 Plus have an isolated 12 VDC
supply output that can be used to power outputs that pull data and
strobe lines high.
Publication 2706-6.2
Backup Operations
Archive DL40 Plus application files in the Offline Programming
Software (Catalog No. 2706-LSW) by uploading or downloading
files between a computer and DL40 Plus displays.
Page 14

1–7Overview of the DL40 Plus
Historical Events Stack
The Historical Events Stack records the occurrence and sequence of
some or all messages and logs variable data values that have been
triggered and/or displayed. The 16K bytes of stack memory holds
about 1,000 events. You can view information in chronological order
or by frequency of occurrence, or print the record.
Clock Operations
A real-time battery-backed clock keeps accurate time even when
power is removed from the unit. The DL40 Plus can display the
current time and/or date in either AM/PM or 24-hour military
format.
Note: The date function is year 2000 compliant.
Date and time information can be displayed as part of any triggered
message, and passed on to a PLC. You can also date- or time-stamp
events as they are recorded in the Historical Events Stack.
Set the DL40 Plus internal clock using the front panel menus, a
keyboard connected to the Onboard Editor, a PLC/SLC, or the
Offline Programming Software.
RS-232 and RS-485 Ports
The DL40 Plus has both an RS-232 and RS-485 port.
Use the RS-232 port to:
• upload or download message files from a computer
• trigger messages via Open protocol (ASCII triggering)
• send messages to a single slave message display
• print messages and/or the contents of the Historical Event Stack
Use the RS-485 port to:
• multi-drop upload or download message files from a computer
• trigger messages via Open protocol (ASCII triggering)
• send messages to one or more slave message displays
• input ASCII data via bar code
Publication 2706-6.2
Page 15

1–8 Overview of the DL40 Plus
Keyboard Port
Use the Keyboard port on the DL40 Plus to:
• edit options, messages, communication port settings
• input ASCII data to a host controller, PLC, or computer
• trigger messages using Open protocol (ASCII triggering)
Debug Mode (Parallel Port Version)
Use Debug mode to display the binary status (1 or 0 value) of the
data lines and the state of the strobe lines. This mode is useful for
checking the output of a programmable controller.
Auxiliary Devices
Connect a variety of useful auxiliary devices to the DL40 Plus
display.
Slave Displays
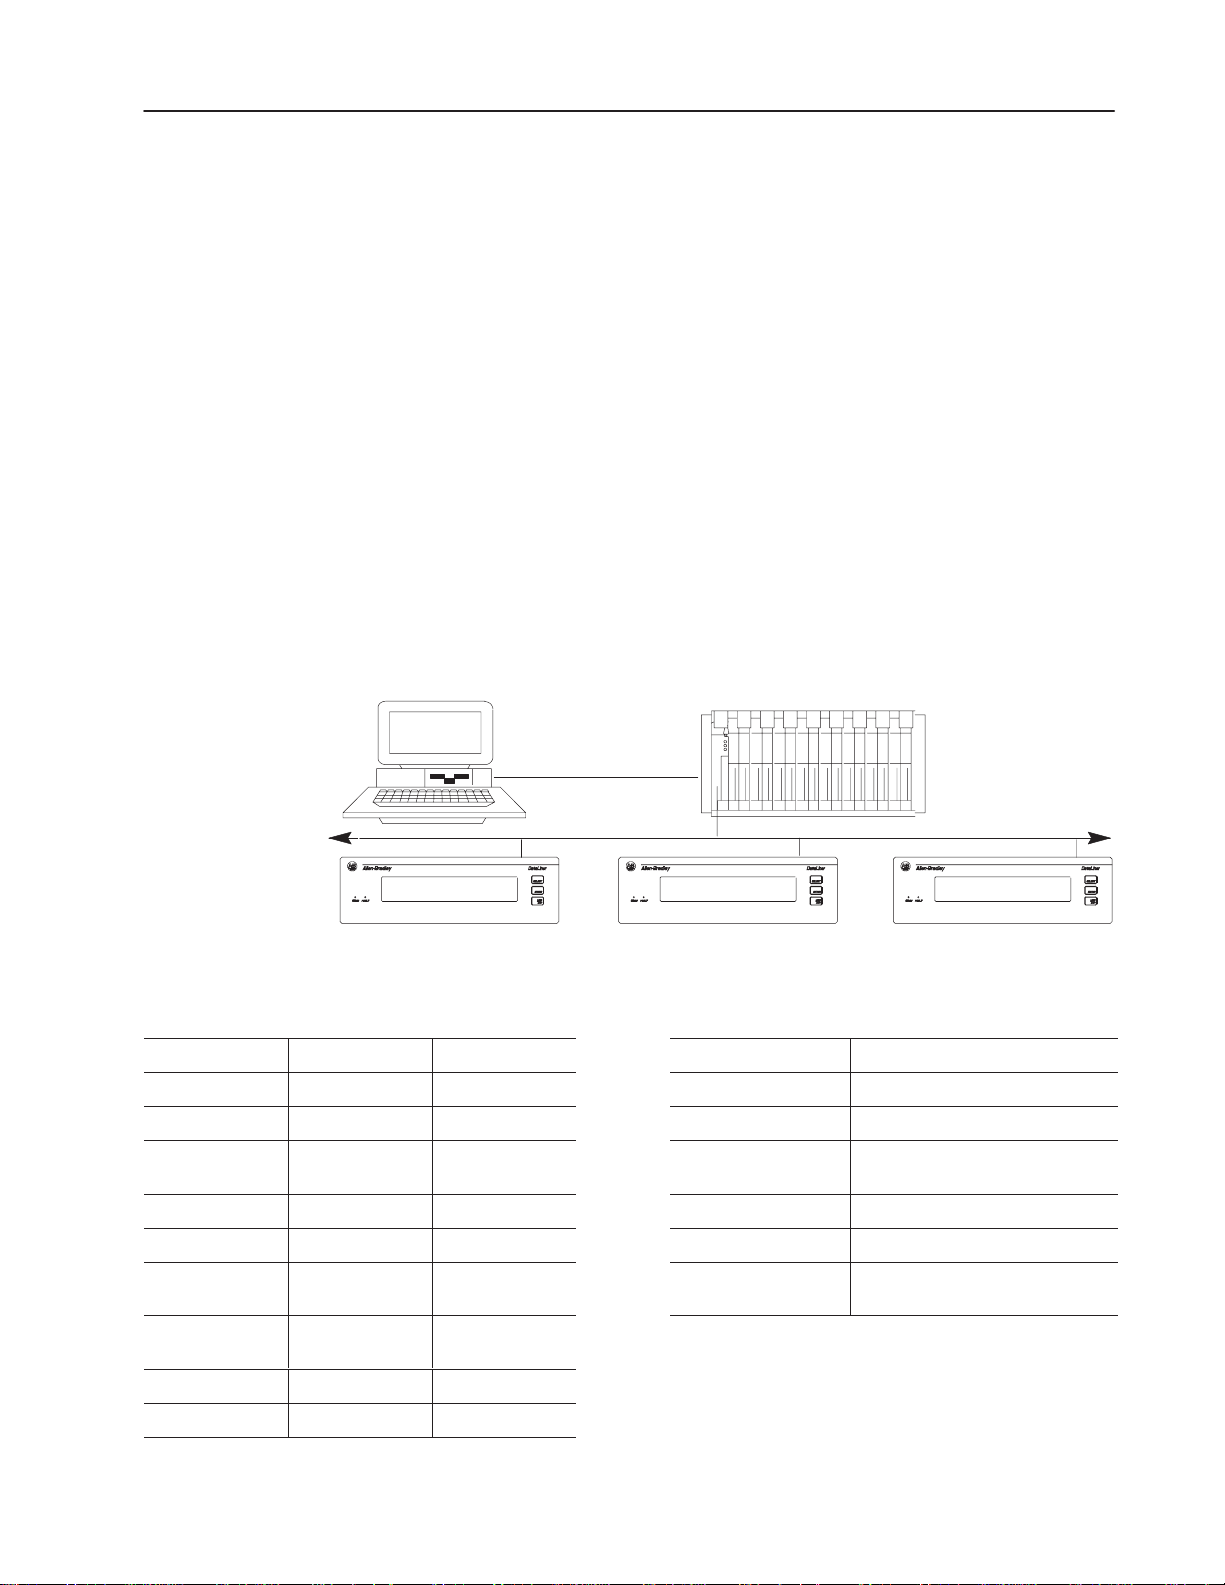
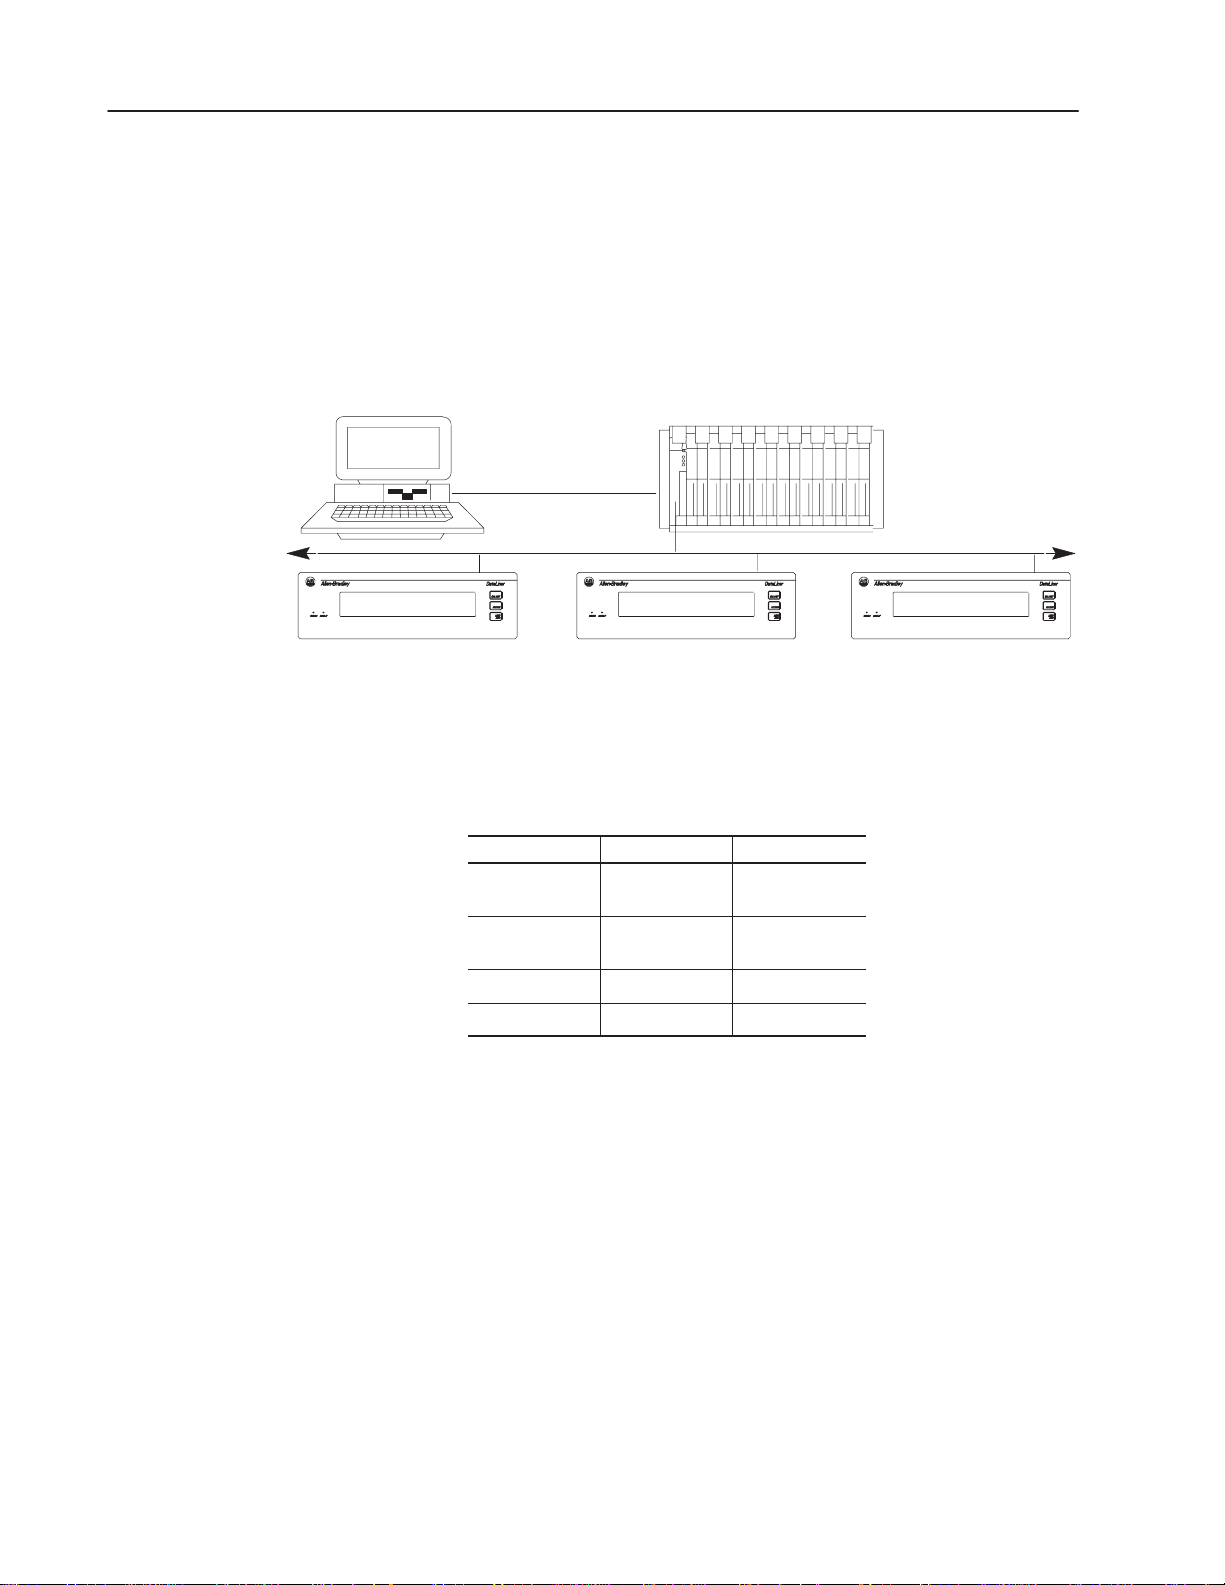
Address up to 126 DL40 Plus or DL50 slave displays over an
RS-485 network at distances up to 4,000 feet (1200 m) from the
originating DL40 Plus. You can also control the annunciation relay
on remote DL40 Plus or DL50 Series slave displays. By assigning a
specific address to each slave display, you can control which slaves
receive and display a given message.
Printers
Connect a serial printer to print the Historical Events Stack or a
listing of the internal application file. The time and date a message
was triggered can be included on the stack printout. You can also set
message attributes such as sending triggered messages to a printer
through the RS-232 port.
Alarms
The alarm relay activates or deactivates an external remote alarm or
warning light. Individual message attributes can be set to energize or
de-energize the alarm relay contacts on DL40 Plus or slave displays.
ATTENTION: Use the DL40 Plus alarm relay for
annunciation purposes only. Do not use the alarm relay
!
for control applications.
Publication 2706-6.2
Page 16

1–9Overview of the DL40 Plus
Background Messages
Specify a background message that will display whenever the DL40
Plus has no other triggered messages in the queue.
Hidden Messages
Hidden messages do not appear on the DL40 Plus display or have
any affect on what is being displayed. Hidden messages can be sent
to a slave display, printed, or stored on the Historical Events Stack.
Embedded Variables
Messages can contain variable data. Variable values are received
when the message is triggered. Incoming variable data can be binary,
BCD (binary coded decimal), and/or ASCII. You can also embed
time and date information in a message from the battery-backed
real-time clock of the DL40 Plus.
Data Mode Selection
When using the DL40 Plus with Remote I/O or parallel input for
communication, you can select two data modes:
• Binary
• Binary Coded Decimal (BCD) either signed or unsigned
Within any application, triggers and variable data can be in either
form. For example, message triggers can be in a binary format, while
variable data can be BCD.
Note: When using serial RS-232 or RS-485 communications, all
data is in ASCII character format.
Message Chaining
Chain messages together for display in sequence. Only the first
message in the chain is triggered from the host controller. Then each
message in the chain can trigger the next until the complete sequence
has run.
Publication 2706-6.2
Page 17
1–10 Overview of the DL40 Plus
Adjustable Parameters for Serial Communications
With the DL40 Plus, you can configure RS-232 or RS-485 port
parameters as needed for compatibility with PLCs/SLCs, printers,
slave displays, or control computers.
Serial Communication Parameters Settings
Baud Rate 300, 1200, 2400, 4800, 9600, 19200
Parity Odd, Even, No Parity
Handshake Software, Hardware, None
Data Bits per Character 7 or 8
0 to 255
Null Count
Page With
Allows you send a string of nulls to the printer
between characters. Useful with slow printers
that drop characters because they can’t keep
up with normal DL40 Plus output.
20 –132 characters
Useful for narrow width printer devices.
Publication 2706-6.2
Page 18

1–11Overview of the DL40 Plus
Operating Modes
The DL40 Plus has a number of operating modes. Each mode
provides tools to perform a different set of functions. The following
sections provide a brief overview of the operating modes.
Run Mode
Run mode is the normal operating mode for the DL40 Plus. In Run
mode, messages are triggered for display on the DL40 Plus and slave
message displays (if desired).
The Remote I/O version of the DL40 Plus comes up in Run mode
after a reset. The Parallel port version also comes up in Run mode,
except when the Run Mode/Debug DIP switch is set to Debug on the
DL40 Plus.
The Remote I/O version of the DL40 Plus has 4 Run modes.
• Message/Variable/Slave Mode triggers a message with variables
containing up to 20 ASCII or 40 BCD characters in any
combination as long as the total does not exceed 10 words. This
mode allows you to override the slave address attribute.
• Message/Variable Mode is similar to the Message/Variable/Slave
mode but you cannot override the slave address attribute.
• Message List Mode triggers a message list of up to 20 messages
in round robin order.
• Bit Trigger Mode triggers a priority message and up to 496
messages in priority and/or round robin order.
The Parallel port version of the DL40 Plus has 2 Run modes.
• Message/Variable/Slave Mode triggers a message with variables
containing up to 20 ASCII or 40 BCD characters in any
combination as long as the total does not exceed 10 words.
• Message List Mode triggers a message list of up to 20 messages
in round robin order.
To select Run mode, use the Onboard Editor or the Offline
Programming Software.
Publication 2706-6.2
Page 19
1–12 Overview of the DL40 Plus
Serial Triggering (RS–232/RS–485)
Both the Remote I/O and the Parallel port versions of the DL40 Plus
support serial triggering. The RS-232, RS-485, or Keyboard port
can control message triggering and variable data communications.
Serial triggering uses Open protocol, which communicates using
ASCII characters in a serial data stream.
Open protocol is available in the following run modes:
• Message/variable/slave mode
• Message/variable
• Message list
Offline Modes
The DL40 Plus offers the following offline operating modes:
• Help mode
• Historical Recall mode
• Remote Program mode (for Offline Programming Software)
• RS-232/RS-485 Port Configuration mode
• Clock mode
• Print mode
• Debug mode (on Parallel port versions only)
Special Messages
Special messages let you monitor and control certain functions of the
DL40 Plus without leaving Run Mode. Special messages normally
occupy message numbers 901 through 916. You can move special
messages to message numbers 1 to 16, or disable them with the
Offline Programming Software or Onboard Editor.
Message Number Content Message Number Content
901 (or 01) Terminate Message – Clear Display 909 (or 09) Clear Historical Events Stack
902 (or 02) Clear Queue 910 (or 10) Set Interactive Clock
903 (or 03)
904 (or 04) Reset Unit 912 (or 12)
905 (or 05) Test Display 913 (or 13)
906 (or 06)
907 (or 07)
908 (or 08) View Historical Events Stack 916 (or 16) Set Display Intensity
➀
Remote I/O versions only
Terminate Message – Clear Display and
Queue
Print Historical Events Stack –
Chronological Order
Print Historical Events Stack – Frequency
of Occurrence
911 (or 11) Set Clock with Variable Data
Send Time to PLC
Send Date to PLC
914 (or 14) View Display Parameters
915 (or 15)
Stop Special Messages/Resume Run
Mode
➀
➀
Publication 2706-6.2
Page 20
1–13Overview of the DL40 Plus
Controller Support for Remote I/O
Computer
The following PLCs and SLCs support Remote I/O communications
with the DL40 Plus.
• PLC-5/11, 5/15
➀
, 5/20, 5/25, 5/30, 5/40, 5/60, 5/80, 5/250
• PLC-2, PLC-5/10, 5/12 with Catalog Number 1771-SN Scanner
• SLC-5/02, 5/03, 5/04 with Catalog Number 1747-SN Scanner
➀
If you are using a PLC-5/15 with partial rack addressing and block transfers, you must use Series
B, Rev. J or later.
➁
Block Transfer requires a Series B or later Scanner.
➁
PassThrough Support over a DH+ Link
PLC-5 Remote I/O PassThrough lets you upload and download
message files between a computer and a DL40 Plus connected by
Remote I/O to a PLC on the DH+ link. Refer to Appendix D for an
example application. Separate wiring from the computer to the
DL40 Plus is not required. For a list of supported controllers, see
table below. Refer to Appendix D for additional instructions.
DH+ Network
Remote I/O LinkRemote I/O Link
DL40 Plus
PLCs supporting PassThrough over a DH+ link
PLC Types
PLC-5/11 All All 1784-KT
PLC-5/15 B N or later 1784-KTX
PLC 5/20 All All 1784-KL
PLC 5/25 A J or later 1784-KT2 Interface module for IBM PS2
PLC 5/30 A B or later 1770-KF2 Serial to DH+ interface module
PLC 5/40
PLC 5/60
PLC 5/80 All All
Series Revision Catalog No. Description
A
B
A
B
E or later 1784-PCMK PCMCIA interface board
B or later
DL40 Plus DL40 Plus
Computer interface boards for PassThrough
1
/2-slot interface board
1
/2-slot interface board
Interface board for Allen-Bradley
1784-T45 or -T47
PLC 5/250 All All
Publication 2706-6.2
Page 21
1–14 Overview of the DL40 Plus
Computer
PassThrough Support over an Ethernet Link
PLC-5E Remote I/O PassThrough lets you upload and download
message files between a computer and a DL40 Plus connected by
Remote I/O to a PLC on the Ethernet link. Refer to Appendix E for
an application example. Separate wiring from the computer to the
DL40 Plus is not required. For a list of supported controllers, see
table below.
Ethernet Network
Remote I/O LinkRemote I/O Link
DL40 Plus
DL40 Plus DL40 Plus
The following table lists the Allen-Bradley PLCs that support
PassThrough file transfers with the DL40 Plus message display over
an Ethernet link as of this printing.
PLC Types Series Revision
PLC 5/40E
PLC 5/60E
PLC 5/80E All All
PLC 5/250 All All
A
B
A
B
E or later
B or later
Use one of the Allen-Bradley Ethernet computer interface boards (or
its equivalent) for PassThrough file transfers.
• Catalog Number 6628-A5: Ethernet adapter module for IBM PC
compatible computers
• Catalog Number 6628-A7: Ethernet adapter module for IBM
MicroChannel bus compatible computers
Publication 2706-6.2
Page 22

1–15Overview of the DL40 Plus
Available Catalog Numbers
DL40 Plus displays are available with 128K bytes of memory in
either 2- or 4-line versions with two communication options.
2706–LV2R
Display Type:
2 – Two–line
4 – Four–line
The table below shows the standard catalog numbers for the DL40
Plus and how they equate to previous versions of the DL40 displays.
DL40 Plus
Catalog Number
2706–LV2P Two–line display, AC supply
2706–LV4P Four–line display, AC supply
2706–LV2R Two–line display, AC supply
2706–LV4R Four–line display, AC supply
Description
with parallel port
with parallel port
with remote I/O
with remote I/O
Communication Options:
R – RIO
P – Parallel Port
S – Slave
Equivalent Catalog Numbers for
Previous Versions of the DL40
2706–E23J16, 2706–E23C16
2706–E23J32, 2706–E23C32
2706–E43J32, 2706–E43C32
2706–E43J64, 2706–E43C64
2706–E43J128, 2706–E43C128
2706–E23J16B1, E23C16B1
2706–E23J32B1, 2706–E23C32B1
2706–E43J32B1, 2706–E43C32B1
2706–E43J64B1, 2706–E43C64B1
2706–E43J128B1, 2706–E43C128B1
Publication 2706-6.2
Page 23

Installing the Software
Chapter Objectives
Personal Computer Requirements
This chapter describes how to install the DL40 Offline Programming
Software on your computer. It also explains the basic steps required
to configure your system for use with PassThrough on systems
equipped with an Allen-Bradley PLC capable of Remote I/O
PassThrough file transfers.
Section Page
Personal Computer Requirements 2–1
Package Contents 2–1
Installed Files 2–2
Memory Requirements 2–2
Memory Management 2–3
Installation 2–3
Basic Installation (without PassThrough file transfers) 2–4
Installing Software for DH+ PLC PassThrough 2–5
Installing Software for Ethernet PLC PassThrough 2–11
Starting the Program 2–13
Establishing Initial Non–network Communications 2–13
The minimum equipment required to install and run the Offline
Programming Software consists of an IBM compatible personal
computer (PC) with:
Package Contents
• a 386 (or higher) processor
• 640K RAM
• one 3
1
/2 inch micro diskette drive
• a hard disk with at least 1 Megabyte of available space
• one open serial port (COM1 or COM2)
• one open printer port (LPT1, LPT2, LPT3, LPT4, COM1, or
COM2) for printing messages
• a printer
In addition to this manual, the Offline Programming Software
package consists of three disks and a number of documents.
They include:
• DL40 Plus Offline Programmer
• DL40 Plus PASSTHROUGH Drivers
• DL40 Plus INTERCHANGE Software
Publication 2706-6.2
Page 24

2–2 Installing the Software
Installed Files
Memory Requirements
After installing the software, your computer will contain a
DL40.EXE as well as a PS.HLP file containing online help. If you
install the PassThrough capability, you will also have the
PassThrough files and their companion TSR (Terminate and Stay
Resident) server files.
Important: For the Offline Programming Software to operate
without generating warning messages about memory limitations,
your computer needs a minimum available memory of 570K RAM.
Editing a 128K message file requires the full 570K. Smaller
message files require less computer memory.
With DOS versions prior to 5.0, use the CHKDSK↵ command at
the DOS prompt to determine the available conventional RAM on
your system. The available conventional RAM will be reported in
bytes. Your system must have 583,680 or more free bytes RAM to
run the Offline Programming Software and edit large application
files.
With DOS versions 5.0 or higher, use CHKDSK ↵ or the MEM↵
command to accomplish the same task. (The MEM ↵ commands
reports more quickly and in greater detail than does CHKDSK ↵ .)
The value reported for free conventional memory must be at least
570K.
The following table provides RAM recommendations for creating
and editing message files and requirements for using PassThrough.
If your computer has less than the required bytes free, reduce the
number of memory resident programs (communications programs,
mouse drivers, etc.) your computer is running. For additional
information on increasing the amount of available memory, refer to
the configuration section of your computer’s DOS manual.
PC memory requirements for typical activities
Function
Create and edit message files
PLC–5 PassThrough w/DH+
PLC–5 PassThrough w/Ethernet
For a
DL40 Plus, 128Kbyte
message memory
PLC–5 with a DH+
Communications Interface Card
PLC–5 with an Ethernet
Communications Interface Card &
FTP’s PC/TCP Software
CHKDSK
bytes free
580,000 bytes
(recommended)
515,000 bytes
(required)
515,000 bytes
(required)
Publication 2706-6.2
Page 25

2–3Installing the Software
Memory Management
Your computer system configuration at startup can affect the amount
of RAM available for use by the Offline Programming Software.
DOS offers a number of options that can help increase the amount of
RAM available to programs.
With DOS versions 5.0 or earlier you can maximize available RAM
by editing your CONFIG.SYS file. Your CONFIG.SYS should
contain text lines similar the following:
DOS=HIGH, UMB
DEVICE=C:\DOS\HIMEM.SYS
BUFFERS=10
FILES=10
STACKS=9,128
In the example above, the BUFFERS, FILES, and STACKS values
are set to low values to conserve RAM for program operation.
Important: The line DOS=HIGH,UMB should be used only with
DOS versions 5.0 or higher.
DOS version 6.0 introduced the MEMMAKER command, which
automates memory management and can often free large amounts of
RAM. DOS 6.0 and higher versions also allow you to create multiple
configuration files from which to choose at startup. This feature can
prove useful on PCs used for programming the DL40 as well as other
activities.
Installation
Refer to your DOS user manuals for information on creating and
editing CONFIG.SYS files, techniques for optimizing memory, and
using multiple configuration files on a single PC.
The Offline Programming Software can be installed and run in any
of three distinct environments:
• without PassThrough file transfers
• with PassThrough file transfers over a DH+ link
• with PassThrough file transfers over an Ethernet link
Installation of the basic Offline Programming Software is the same
for all three environments. You will have to perform additional steps
to install PassThrough capability on either a DH+ or Ethernet link.
Publication 2706-6.2
Page 26

2–4 Installing the Software
Basic Installation (without PassThrough)
Use the following procedure to install the basic Offline Programming
Software files on an IBM PC. Note that prompts appearing here
represent a typical PC. The prompts you see on your computer may
vary slightly from those shown here.
Note: Do not automatically install all of the program disks. First
determine the type of installation you require and install just the
programs required.
1. If running in a Windows environment, restart your computer in
DOS mode. Windows NT users need to restart their computers
with a Windows 95 or less operating system.
2. Start your computer and log on to the hard disk (normally you
will see the DOS prompt C:>).
Note: Depending on your installation, your DOS prompt may be
different.
3. Insert the DL40 Offline Programmer disk into the micro drive.
Most often this will be the A: drive.
4. At the DOS prompt (C:>), type:
A:INSTALL↵
5. Follow the onscreen installation prompts until installation is
complete and the C:> prompt reappears. Note: If the Offline
Programming Software program is already on disk, you will be
able to overwrite the program during installation.
6. The installation procedure automatically creates a default
sub–directory which contains the Offline Programming Software
program. By default that directory is DL40. Change to that
directory by typing:
CD\DL40↵
Publication 2706-6.2
Page 27

2–5Installing the Software
Software Installation for DH+ PLC PassThrough
If you are using a DH+ link and want to enable PLC PassThrough
file transfers, you must perform the following additional steps after
completing the basic installation described above.
The following paragraphs outline only the most essential information
required to install and use PassThrough file transfers on a DH+ link.
Refer to the instructions that came with your DH+ add-in board.
Install and Configure Your DH+ Communication Interface Card
Install and configure your DH+ communication interface card. Refer
to the instructions that came with the card for information on how to
install and configure it. Currently the following DH+ cards are
supported by the Offline Programming Software:
– 1784-PCMK – 1784-KL
– 1770-KF2 – 1784-KT
– 1784-KT2 – 1784-KTX
Important: Be sure to record the IRQ and Card address for each
interface card. You will need to know them later in the
configuration process.
Install the Offline Programming Software
Perform the basic installation procedure described earlier in this
chapter to install the Offline Programming Software on your
personal computer.
Publication 2706-6.2
Page 28

2–6 Installing the Software
Install and Configure INTERCHANGE
Your Offline Programming Software package contains a runtime
version of Allen-Bradley’s INTERCHANGE software and a number
of other files. You must install this package to perform
PassThroughs over a DH+ network device.
INTERCHANGE software is an Application-Programming Interface
(API) that provides a host computer running the MS-DOS operating
system with a library of executable commands. INTERCHANGE
software lets multiple applications share a single common interface
module to communicate with various devices on DH+ and/or
DH-485 networks. Use the following procedure for installation:
1. Insert the INTERCHANGE disk into your 3
1
/2 inch drive.
2. Start the automated installation procedure by typing:
A:INSTALL↵
This program copies all required INTERCHANGE files to the
directory \ABIC\BIN on your hard disk. Those files include the
executable INTERCHANGE servers listed below:
DTL_KT.EXE – CFG_DF1.EXE
–
– DTL_DF1.EXE – RNASTR.EXE
– CFG_KT.EXE – RNA.EXE
Important The next part of the installation and configuration
process depends on how you use your PC. If you use your PC for
other activities in addition to offline programming, then you
should create a new batch file as described in step 3. If you use
your computer solely for the Offline Programming Software, then
modify your AUTOEXEC.BAT file as described in step 4 below.
3. If you use your PC for other activities in addition to offline
programming, then create a new batch file containing the
INTERCHANGE server files listed above. You can name the file
anything you want, but it must end with the extension .BAT.
Assume you call the file ABICRUN.BAT, and your hard drive is
drive C:
Publication 2706-6.2
a. Create the file with any ASCII text editor. If you use the DOS
text editor, type:
EDIT C:\ABICRUN.BAT↵
b. Type in the names of the INTERCHANGE server files.
Put each file name on its own line followed by a hard return:
DTL_KT.EXE
DTL_DF1.EXE
CFG_KT.EXE
CFG_DF1.EXE
RNASTR.EXE
RNA.EXE
Page 29

2–7Installing the Software
c. Save the file. If you are using the DOS text editor, type:
[ALT]FXY
d. Skip step 4 and go on to step 5.
4. If you use your PC solely for the Offline Programming Software,
you need not create a new batch file. Instead, you should modify
your AUTOEXEC.BAT file to load the INTERCHANGE server
files whenever you start your system.
a. Open the AUTOEXEC.BAT file with any ASCII text editor. If
you use the DOS text editor, type:
EDIT C:\AUTOEXEC.BAT↵
Your AUTOEXEC.BAT file contents will appear in the editing
window.
b. Move the cursor to the end of the file.
c. Type in the names of the INTERCHANGE server files. Put
each file name on its own line followed by a hard return:
DTL_KT.EXE
DTL_DF1.EXE
CFG_KT.EXE
CFG_DF1.EXE
RNASTR.EXE
RNA.EXE
Do not close the file at this time.
5. If your AUTOEXEC.BAT is not open in your ASCII text editor,
then open it now. If you use the DOS text editor, type:
EDIT C:\AUTOEXEC.BAT↵
Your AUTOEXEC.BAT file contents will appear in the editing
window.
6. Locate the line in your AUTOEXEC.BAT file that begins with
the word PATH. This is your system’s “Path Statement”, which
tells DOS where to look for executable files when no specific
path is otherwise specified.
7. Move to the end of the Path line and insert the complete name for
the directory in which the INTERCHANGE server files were
stored. In a standard installation they are located in
C:\ABIC\BIN. When you have finished editing it, your Path
Statement will look like this:
PATH=C:\DOS;C:\APP1;C\APP2;C:\ABIC\BIN
Publication 2706-6.2
Page 30

2–8 Installing the Software
Create CFG_KT.INI File
INTERCHANGE needs to know exactly what hardware you are
using, and how it is configured. This information is provided by a
configuration file (CFG_KT.INI) modified to match your own
installation.
1. Edit the file with any ASCII text editor. If you use the DOS text
editor, type:
EDIT C:\ABIC\BIN\CFG_KT.INI↵
The CFG.INI file that installs with INTERCHANGE includes
configurations for numerous cards. Lines preceded by a
semicolon (;) have been commented out. To activate your
interface card, edit and uncomment the appropriate options by
removing the semicolon at the beginning of the line.
If you are using a card other than the 1770-KF2 go to step 2
below. If you are using the 1770-KF2 communications interface
card, skip step 2 and go directly to step 3.
2. If you are using a card other than the 1770-KF2, the contents of
the CFG_KT.INI file should be similar to the format shown in the
sample file below. This sample is for a 1784-KT board:
[DTL_KT.Options] ①
PATH=C:\ABIC\BIN ②
③
[DTL_KT.1] ④
DEVICE=KT ⑤
MEMORY=C800 ⑥
PROTOCOL=DHPLUS ⑦
IRQ=5 ⑧
STATION=77 ⑨
NAME=DTL_KT 1 ⑩
In this file:
① This line identifies the file and prefaces a section of the file used to record
information common to all the communications interface cards on your system.
② PATH line that designates the directory where the INTERCHANGE server
programs are located. This will be the same value for all interface cards on your
system.
③ Blank line to separate sections and improve readability.
④ This line identifies the general class of hardware device (in this case a KT
device) and a logical pushwheel identifier of 1. Note: The DL40 Offline
Programming Software assumes that pushwheel 1 is used. Only use pushwheel
1 when communicating with the DL40 Offline Programming Software.
⑤ DEVICE line that specifies the exact communication interface card used.
Acceptable values include KT, KTX, KL, KT2, or PCMK.
⑥ MEMORY line that matches the dip switch settings on the interface card.
⑦ PROTOCOL line that identifies the protocol in use.
⑧ IRQ line that matches the dip switch settings on the interface card.
⑨ STATION line designates the octal station address on the communications link.
⑩ NAME is a unique string you define to specify to this configuration.
Publication 2706-6.2
Page 31

2–9Installing the Software
Models for other interface cards appear below. Note that some of
the values in these files vary depending on the installation.
1784-KT2
[DTL_KT.Options]
PATH=C:\ABIC\BIN
[DTL_KT.1]
DEVICE=KT2
MEMORY=C400
PROTOCOL=DHPLUS
IRQ=5
STATION=77
NAME=DTL_KT2
1784-KL
[DTL_KT.Options]
PATH=C:\ABIC\BIN
[DTL_KT.1]
DEVICE=KL
MEMORY=E000
PROTOCOL=DHPLUS
IRQ=2
STATION=77
NAME=DTL_KL 1
1784-KTX
1784-PCMK
[DTL_KT.Options]
PATH=C:\ABIC\BIN
[DTL_KT.1]
DEVICE=KTX
MEMORY=D400
PROTOCOL=DHPLUS
IRQ=10
STATION=77
NAME=DTL_KTX1
[DTL_KT.Options]
PATH=C:\ABIC\BIN
[DTL_KT.1]
DEVICE=PCMK
MEMORY=CF00
PROTOCOL=DHPLUS
IRQ=7
STATION=77
NAME=DTL_PCMK
Publication 2706-6.2
Page 32

2–10 Installing the Software
3. If you are using the 1770-KF2 communications interface card, the
contents of the CFG_KT.INI file should be similar to the format:
[DTL_KT.Options]
PATH=C:\ABIC\BIN
[DTL_DF1.1]
DEVICE=DF1
BAUD=9600
IRQ=4
COM_PORT=2
NAME=DTL_DF1
ERROR=1 ①
PARITY=0 ②
DUPLEX=1 ③
① 0=BCC,1=CRC
② 0=No Parity, 1=Even Parity
③ 0=Half Duplex, 1=Full Duplex
4. Save the file. If you are using the DOS text editor, type:
[ALT]FXY
Publication 2706-6.2
Page 33

2–11Installing the Software
Installing the Software for Ethernet PLC PassThrough
If you are using an Ethernet link and want to enable PLC
PassThrough file transfers, you must first modify your
CONFIG.SYS and AUTOEXEC.BAT files, and install and configure
the following products on your computer:
• Allen-Bradley Ethernet communications interface card (Cat. Nos.
6628-A5 or -A7) or equivalent
• FTP’s PC/TCP Software for DOS/Windows (FTP Cat. No.
PC-210)
Install Ethernet Card
Follow the instructions that came with your Allen-Bradley Ethernet
communications interface card to install and configure it on your
personal computer.
Install the PC/TCP Software
Follow the instructions that came with FTP’s PC/TCP Software to
install it on your personal computer.
Install the Offline Programming Software
Perform the basic installation procedure described earlier in this
chapter to install the Offline Programming Software on your
personal computer.
Modify CONFIG.SYS & AUTOEXEC.BAT Files
The following steps show a sample network setup. Consult with
your network administrator to determine if this setup applies in your
environment.
1. Change to the directory containing the PC/TCP drivers. Type:
CD \PCTCP↵
2. At the C:\PCTCP> prompt, type:
RENAME FTP22DOS.INI PROTOCOL.INI
3. Open the CONFIG.SYS file with any ASCII text editor. If you
use the DOS text editor, type:
EDIT C:\CONFIG.SYS↵
Your CONFIG.SYS file contents will appear in the editing
window.
4. Move the cursor to the end of the file.
Publication 2706-6.2
Page 34

2–12 Installing the Software
5. Assuming you have installed the Ethernet Board drivers in the
directory C:\PCTCP (the default), be sure the following lines
appear in your CONFIG.SYS file.
DEVICE=C:\PCTCP\PROTMAN.DOS /I:C:\PCTCP
DEVICE=C:\PCTCP\SMC8000.DOS
DEVICE=C:\PCTCP\DIS_PKT.GUP
6. Save the file. If you are using the DOS text editor, type:
[ALT]FXY
7. Open the AUTOEXEC.BAT file with any ASCII text editor. If
you use the DOS text editor, type:
EDIT C:\AUTOEXEC.BAT↵
Your AUTOEXEC.BAT file contents appears in the editing
window.
8. Move the cursor to the end of the file.
9. The following lines should appear in the AUTOEXEC.BAT file.
If they are not there, add them now.
SET PCTCP=C:\PCTCP\PCTCP.INI
C:\PCTCP\NETBIND.COM
C:\PCTCP\ETHDRV.EXE
For additional information regarding installation of your PC/TCP
software, refer to the section on installing an NDIS driver in the
PC/TCP Software Installation Guide.
Restart Your PC
When installation is complete, remove the installation diskette from
1
/2 inch micro drive and store all installation software in a safe
the 3
place. Finally, restart your PC to activate your changes to the
CONFIG.SYS and AUTOEXEC.BAT files.
Configure Your PLC
Use Allen-Bradley’s 6200 Series PLC-5 programming software or
the EIBOOT utility to set the PLC’s IP address. Refer to the
documentation that came with your PLC for additional configuration
information.
Publication 2706-6.2
Page 35

2–13Installing the Software
Starting the Program
Establishing Initial
Non–networked
Communications
If you have installed the Offline Programming Software without
PassThrough processing, your computer will return to the DOS
prompt, C:\DL40>. If you have installed PassThrough processing,
your computer returns to the directory it displayed when you began
the PassThrough processing installation.
If you do not return to the C:\DL40> directory, change directories by
typing:
CD C:\DL40↵
You may then start the the Offline Programming Software program
by typing:
DL40↵
The communication port settings on your computer and the DL40
must be the same in order to communicate.
• the port usage on the RS-485 port must be set to PRGMR to
perform message file transfers via the RS-485 port.
• the DL40 RS-232 port will always communicate with the DL40
Offline Programming Software regardless of the port
configuration.
• set your computer’s serial communication port to the following:
– baud rate 9600
– data bits 8
– parity none
– handshaking none
• Use the [SELECT] and [ENTER] push buttons on the front panel
of the DL40 to select SET RS232PORT?– PGMR/PRNTER
SETUP or SET RS-485 PORT?–PRGMR and set the parameters
to match the setting of your computer’s serial communication
port.
Note: Select Enable DIP switch (SW2-9) must be ON.
• You can also change the settings of the DL40’s serial ports with
the [CTRL][R] command using the DL40’s Onboard Editor and
an IBM compatible keyboard connected to the rear keyboard port
of the DL40 display.
Publication 2706-6.2
Page 36

Navigating the Software
Chapter Objectives
Starting the Software
This chapter provides a basic understanding of how to move around
in the DL40 Offline Programming Software. The information in this
chapter will help you:
• start the program
• move around within the program
• exit the program
This chapter contains the following topics:
Topic Page
Starting the Software 3–1
Title Screen and Main Menu 3–2
Getting Help 3–3
Setup Menu 3–4
Menu Control Keys 3–6
Shortcut Keys 3–6
Exiting the Software 3–7
After you have installed and set up the Offline Programming
Software on your computer, you can run the program at any time.
The most basic way to do so is to:
1. Start your computer.
2. Make sure you are logged on to the C: drive by typing:
C:↵
3. Go to the directory C:\DL40 by typing:
CD C:\DL40↵
4. Start the program by typing:
DL40↵
Publication 2706-6.2
Page 37

3–2 Navigating the Software
Title Screen & Main Menu Bar
The program opens with the Title screen shown below. The screen
identifies the product, and indicates the revision number and date of
the software. Close this screen and open the Main Menu screen by
pressing any key.
Opening title screen
Main Menu screen
Menu Title
Cursor
Menu Bar
Menu Item
Date & Time
Publication 2706-6.2
Page 38

3–3Navigating the Software
Getting Help
The Offline Programming Software offers context-sensitive online
Help at any time. To use Help:
• press [F1] to access a Help screen offering information about the
highlighted menu item.
• press [F1] again to replace the current Help screen with the Menu
Key Control Help screen.
• press [ESC] to close the Menu Key Control Help screen and
return to the context-sensitive Help screen
• press [ESC] to close the context-sensitive Help screen and return
to the Main screen
Sample Help Screen
Use the [ ] and [ ] keys
to scroll through the help text.
Publication 2706-6.2
Page 39

3–4 Navigating the Software
Setup Menu
Use the Setup menu to match the software to your color or
monochrome monitor, and to set the date and time. Access the Setup
menu by using the right and left arrow keys to move to Setup and
pressing [
Setup Menu
↵], or by pressing [S] at the Main menu.
Configuring the Program to Match Your Monitor
The Offline Programming Software supports both color and
monochrome displays. To change the display type, move the cursor
to Setup on the Main menu and press [↵ ]. Select Colors, and then
select either Color or Monochrome. Select Yes to confirm your
choice, then press [↵]. A message appears in the center of the screen
to indicate that the software is saving your selection to its setup file.
Press [Q] or [ESC] repeatedly to return to the Main menu.
Setup→Colors Screen
Publication 2706-6.2
Page 40

3–5Navigating the Software
Setting Time & Date
You can set the time and date by selecting Setup→Time & Date or by
pressing [S][T] from the the Main menu bar. The Date & Time
window appear showing the current date and time setting of the
personal computer. The cursor will highlight Time when the window
first opens. Press [↵] and input the desired time using military style
(24-hour) format. Press [↵] to record your changes and move the
cursor to Date. Press [↵] and input the desired date. Press [↵] to
record your changes and move the cursor to Quit.
Setup→Time & Date Screen
Publication 2706-6.2
Page 41

3–6 Navigating the Software
Menu Control Keys
Use the following keys to navigate through the Offline Programming
Software menus. These keys have the same effect wherever they are
used in the software. Individual screens may use additional
keystroke commands. These additional commands are described
immediately below the sample screens that appear throughout this
manual.
Help. Pressing F1 when Help is open will open the Menu Key
Control help screen
Toggle Help screen between partial and full screen view.
Return to the previous menu.
Select highlighted menu item.
↵
Highlight previous menu item.
↑
Highlight next menu item
↓
→
Move the cursor to the right
Shortcut Keys
←
Move the cursor to the left
Highlight first menu item.
Highlight last menu item.
You can also select most menu items by typing their initial letter.
For example, to exit the program you can type [E][Y]. [E] is the
initial letter in the Exit Main menu item, and [Y] is the initial letter
of the Yes Exit menu item.
Publication 2706-6.2
Page 42

3–7Navigating the Software
Exiting the Software
You can exit the Offline Programming Software at any time by
repeatedly pressing [ESC] until the Exit Confirmation menu appears.
Press [↵] to confirm your intention to exit the program.
Exiting the Offline Programming Software
You can also exit the program by typing the shortcut keys [E][Y]
from the Main menu.
Publication 2706-6.2
Page 43

Creating Message Files
This chapter describes the functions available to you from the
Develop menu. As its name implies, the options available from this
menu provide the tools needed to create and manage your application
files for the DL40 message display. This chapter contains the
following topics:
Page
Develop Menu 4–2
File Selection Screen 4–4
Create New File Window 4–5
Data Path Directory Window 4–6
Develop Screen 4–7
Messages Menu 4–8
Edit Message Screen 4–9
Message Text Window 4–10
Create New Message Screen 4–16
Copy Messages Screen 4–17
Delete Message Screen 4–19
Renumber Messages Screen 4–20
Text Search Screen 4–22
Modify Message Attributes Screen 4–24
Message Attribute Default Screen 4–32
Options Menu 4–34
Ports Menu 4–36
Verify Menu 4–39
Device Menu 4–44
Publication 2706-6.2
Page 44

4–2 Creating Message Files
Develop Menu
To open the Develop menu, use the right and left arrow keys to
highlight Develop on the Main menu bar, then press [↵ ].
Develop Menu
Special keys
You may use the following special keys on the Develop menu.
↓ ↑
↵
Move the cursor to the desired function
Move the cursor directly to the first menu item (Select)
Move the cursor directly to the last menu item (Quit)
Selects the item highlighted by the cursor
Closes the Develop menu and returns cursor to Main menu
Get Online Help
Publication 2706-6.2
Page 45

4–3Creating Message Files
Notes
From the Develop menu you can choose from the following:
• Select File to modify an existing data file.
• Create New File to create a new data file.
• Directory to specify a data path
The Offline Programming Software supports both color and
monochrome monitors. Make sure your monitor type matches the
type selected in the Setup menu. Refer to Chapter 3 for instructions
on changing your monitor type.
You cannot Select a file unless that file is located on the current DOS
path. If necessary, use the Directory menu item to change
directories. The window that opens when you pick DevelopSelect
File shows the current directory in the upper left.
Publication 2706-6.2
Page 46

4–4 Creating Message Files
File Selections Screen
When Select File is selected, a window appears with the default path
in the upper left corner and a list of the files found in that path.
If you want to edit files under a different path, press [ESC], highlight
Directory, and press [↵ ]. You can then edit the program’s data path
in the window show below.
File Selections screen showing typical application file list
Path
Time file was created
or last edited
Date file was created
or last edited
File length in bytes
Special Keys
Use the following special keys on the File Selections screen.
↓ ↑
Move the cursor to the desired file
Move the cursor directly to the first file
Move the cursor directly to the last file
Selects the item highlighted by the cursor (Opens Develop Screen)
↵
Returns to the top level of the Develop menu
Get Online Help
Notes
Use the arrow keys to move to the file you want to edit and press
[↵ ]. If the name of the file you want to edit does not appear here,
you may be using the wrong data path. Change the data path by
backing up and selecting Directory on the Develop menu.
Publication 2706-6.2
Page 47

4–5Creating Message Files
Create New File Window
When Create New File is selected on the Develop menu, a window
opens in which you can enter a new file name. Type in the file name
and press [↵ ]. You can type a drive and directory path as well if you
do not want to store the file on the current data path.
Create New File Window
If the default path is to be used, enter only the file
name. If a path other than the default path is to be
used, enter the path in the form: Drive:\Directory\File.
Flashing cursor
Special keys
You may use the following special keys on this window.
← →
Moves the cursor forward or backward through the file name to
allow editing
Accepts the file name (and path, if applicable).
↵
Opens Develop Screen
Returns to the top level of the Develop menu
Get Online Help
Notes
When creating a new file you will be asked to specify a path and
filename in the format:
Drive:\Directory\File
If you do not specify a path, then the currently active path will be
used.
When you press [↵ ] to accept the file name in the Create a New File
window, the Device menu opens.
Publication 2706-6.2
Page 48

4–6 Creating Message Files
Data Path Directory Window
Change data path directories by selecting Develop→Directory from
the Main menu bar. When you enter a complete directory path in the
Directory window the Offline Programming Software will use that
path as a default for all file activities. Override the Directory setting
by typing another complete data path when naming files.
Data Path Directory window
Special Keys
Use the following special keys on this window.
← →
Moves the cursor forward or backward through the data path
description to allow editing
Accepts the data path directory you have entered in the window
↵
Returns to the top level of the Develop menu
Get Online Help
Notes
When creating a new data path, specify the path in the format:
Drive:\Directory1\Directory2\Directory3
You can change the selected data path directory at any time the
Message menu is displayed. The change becomes effective
immediately.
Publication 2706-6.2
Page 49

4–7Creating Message Files
Develop Screen Menu
Editing an existing file and creating a new file use the same screen.
After entering the name and data path of a file to create or change,
the screen shown below appears. Notice that the Main Menu bar has
been replaced by a the Develop Menu bar. Use this menu bar as you
would use the Main menu bar.
Develop Screen menu after selecting or creating a file
Remaining (free) memory
Special Keys
Use the following special keys on this menu.
← →
or
Moves the cursor to the desired function
Moves the cursor directly to the desired
function: Messages, Options, Ports,
Verify, or Exit.
Moves cursor directly to the first function
(Messages)
Moves cursor directly to the last function
(Exit)
Selects the function highlighted by the cursor
↵
Get Online Help
Notes
The Messages, Options, Ports, Verify, and Device branch menus
control every aspect of your message file. Work through each of
these menus in turn to avoid omissions and mistakes.
Specify a selection for every item on the Develop menu bar branch
menus. If you have not edited every selection, a System Attribute
Warning message appears when you save the file.
Publication 2706-6.2
Page 50

4–8 Creating Message Files
Messages Menu
Use the selections on the Messages menu to create, edit, and control
the display format of messages intended for display on the DL40.
Messages menu
Special keys
Use the following special keys on this menu.
↓ ↑
↵
Moves the cursor to the desired function
Moves the cursor directly to the first menu item
Moves the cursor directly to the last menu item (Quit)
Selects the item highlighted by the cursor
Closes the Develop menu and returns cursor to Main menu
Get Online Help
Publication 2706-6.2
Page 51

4–9Creating Message Files
Edit Message Screen
After you have selected Edit Message, the Message Selections
window shown below opens. Select the message you want to edit,
then press [↵ ] to open the Message Text window
Message Selections after selecting Edit Message
Special keys
You may use the following special keys on this window.
↑ ↓
↵
Moves the cursor to the desired message.
Moves cursor directly to the first message.
Moves cursor directly to the last message.
Selects the message highlighted by the cursor and
opens the Message text window.
Closes the window and returns to the Messages menu.
Get Online Help.
Publication 2706-6.2
Page 52

4–10 Creating Message Files
Message Text Window
After you have selected a message from the Message Selections
window by highlighting it and pressing [↵ ], a window opens
showing the text of the selected message. In this window you can
edit the message as required.
Note that the Message Text window also appears when you select
Create New Message from the Messages menu as described on
page 4–8.
Message Text window
Message Text
Messages can contain up to
20 characters (including
spaces) per line.
Insert or Overstrike Mode
Column cursor is currently in
Row cursor is currently in. Note that the cursor row
does not necessarily correspond to the display line on
the DL40 if Line Usage is other than All Lines.
Publication 2706-6.2
Page 53

Special Keys and Editing Rules
You may use the following keys to move through and edit your
message text.
Moves the cursor up or down one line at a time
↑
4–11Creating Message Files
Any alphabetic or numeric key
V F W X T Y
plus
← →
or
or
ALT
or
Moves the cursor right or left without changing the underlying text
Moves cursor directly to the beginning or end of the message
Moves cursor exactly 1 display window forward or backward through the
message (except when Scroll attribute is set as described on page 4–26
Toggles between insert and overstrike. If there is a character at the position
of the cursor, then the insert mode inserts a character immediately to the
left of the cursor. In overstrike mode the character at the cursor position is
replaced by any new character you type.
Deletes the character to the left of the cursor
Deletes the character at the cursor position
Inserts a return to start a new line
↵
Press the [ALT] key while entering a number from the numeric keypad
inserts an ASCII or Extended ASCII character. See Appendix A.
Inserts that character at the position of the cursor.
Add or modify variables (see below)
B
E
N
F10
Lets you set Message Attributes for only the message being created or
A
edited.
Start and end marker for blinking characters. Must be used in pairs.
The text between the markers will blink on the message display.
Erases message text, but leaves message number intact.
You will be asked to confirm this action before it takes effect.
Centers or un-centers the active message in the Edit Message window.
Returns to Messages menu. Note that the Abort Message Edit confirmation
window appears if you have changed the message in any way.
The window asks if you want to discard your changes.
Get Online Help
Toggles size of Message Text window between 40 and 200 characters
Saves changes and returns to the Messages menu
Publication 2706-6.2
Page 54

4–12 Creating Message Files
More About Variables
You can send variables to the DL40 from a PLC or via the Parallel
Input Port. Variables can be sent to message only in the
Message/Variable/Slave or Message/Variable Run Modes. Insert
variables using the [CTRL] key in combination with a letter.
Commands to add or modify variables include:
Command Function
[CTRL][V] Insert a BCD or binary variable
[CTRL][F] Change the formatting parameters of a variable
[CTRL]W] Insert ASCII or BCD variable data
[CTRL][X] Insert request for ASCII input data
[CTRL][T] Insert the system time into a message
[CTRL][Y] Insert the system date into a message
The number of variables you can insert in any one message depends
upon your hardware and the selected Run Mode.
Insert Formatted Variable With [CTRL][V]
Use [CTRL][V] to insert a BCD or binary variable into a message.
Specify the variable type.
When you press [CTRL][V], the software will ask you to enter 3
parameters:
Parameter Acceptable values
Variable Size 1 to 7 (including decimal point)
Decimal Point Position
(number of placed after the
decimal point)
Suppress Zeroes
(appearing in front of the
first significant digit)
0 to 6 (the maximum value is one less
than the variable size selected above)
Yes or No
The variable symbol _________ appears in the message at the
variable’s location.
The difference between a formatted variable entered with
[CTRL][V] and an unformatted variable entered with [CTRL][W] is
the flexibility to modify the parameters shown above.
Publication 2706-6.2
Note that neither AutoRun Messages or Background Messages
support inserted variable data.
Page 55

4–13Creating Message Files
Change Formatted Variable With [CTRL][F]
Use [CTRL][F] to change the formatting parameters of a variable.
Place the cursor under the symbol for the variable you want to
change, then press [CTRL][F]. The software will ask you to modify
any one or more of the 3 formatting parameters:
Parameter Acceptable values
Variable Size 1 to 7 (including decimal point)
Decimal Point Position
(number of placed after the
decimal point)
Suppress Zeroes
(appearing in front of the
first significant digit)
0 to 6 (the maximum value is one less
than the variable size selected above)
Yes or No
Insert ASCII or BCD Variable With [CTRL][W]
Send a single word ASCII or BCD variable for insertion into a
message. Use [CTRL][W] to specify the insertion position.
The software will prompt you to specify either ASCII or BCD.
The software inserts the symbol for an ASCII or BCD variable (↕).
Note: BCD data consists of 4 digits per word, and ASCII data
consists of 2 characters per word.
Note: Variables can be strung together to form compound variables
up to 20 ASCII or 40 BCD characters long in any combination as
long as the total does not exceed 10 words.
Publication 2706-6.2
Page 56

4–14 Creating Message Files
Insert Request for ASCII Input Data With [CTRL][X]
A data request requires that ASCII Input Data, an 8-bit ASCII
character, be entered through the keyboard port into the message
being displayed.
• When returning ASCII Input Data via RS-485 Port, the message
requesting the data must be triggered via the RS-485 Port. This is
true for both Parallel Port and Remote I/O units. Data is
automatically entered when you press [↵ ].
Note: Data is returned to the triggering device without
solicitation by the device and without checking that data was
received by the device.
• With Remote I/O units, the ASCII input data will be sent via
Remote I/O Port to your PLC as part of the Return Message
Number Being Displayed (described in the DL40 Plus Dataliner
Message Display User Manual, Publication 2706-6.1). Data can
be returned to your PLC in:
– Message/Variable/Slave Run Mode
– Message/Variable Run Mode
– Message List Run Mode
User requested data is sent to the PLC as part of the I/O scan. Up
to 20 ASCII characters can be sent with Block Transfer. Up to 12
ASCII characters can be sent with Discrete, depending on rack
size.
The Enter bit will be set only after all ASCII data requested has
been put into the message. Data should not be considered valid
until the Enter bit is set.
Important: If more ASCII data is requested than can be returned to
the PLC, the excess data will be lost.
To enter a data request, place the cursor just after the point where
you want to insert the request. Use [CTRL][X] to specify the
insertion position. The software inserts the symbol for a single byte
data request (↑).
Publication 2706-6.2
Page 57

4–15Creating Message Files
Insert Time Into a Message With [CTRL][T]
To enter the time into a message, place the cursor just after the point
where you want the time inserted. Use [CTRL][T] to specify the
insertion position. The software will insert the symbol for a time
variable (HH:MM:SS).
Note: The time variable occupies 8 of the available 20 characters on
a display line.
You can use the time variable in any Run Mode.
Insert Date Into a Message With [CTRL][Y]
To enter the date into a message, place the cursor just after the point
where you want the date to appear, and then press [CTRL][Y]. The
software will insert the date symbol (DAY MON DT).
Note: The date variable occupies 10 of the available 20 characters
on a display line.
You can use one date variable in any message in any Run Mode.
Notes
We recommend setting individual message attributes such as Display
Message on What Line and Scroll Message before typing in the
words of the message. This allows you to verify the placement of
characters as you type them.
If Line Usage is other than All Lines, then the display line on the
DL40 does not necessarily correspond to the cursor row value shown
on the message editing window during editing.
Publication 2706-6.2
Page 58

4–16 Creating Message Files
Create New Message
After you have pressed [↵ ] to select Create New Message from the
Messages menu, the message number field (to the right of the menu
item) opens. Enter the message number you want to assign to the
new message and press [↵ ] again. The Message Text window
(shown below) opens. You can use the Message Text window to
develop and format your message text.
Create New Message screen and Message Text window
Notes
We recommend setting individual message attributes such as Display
Message on What Line and Scroll Message before typing in the
words of the message. This allows you to verify the placement of
characters as you type them.
If Line Usage is other than All Lines, then the display line on the
DL40 does not necessarily correspond to the cursor row value shown
on the message editing window during editing.
If the message number you have assigned is already being used for
an existing message, the software will display a warning message.
You can then choose between cancelling the creation or editing the
existing message.
If adding new messages would exceed the capacity of your DL40,
the software will display a warning message and automatically
cancel the create function.
Publication 2706-6.2
Page 59

4–17Creating Message Files
Copy Messages Screen
When you select Copy from the Messages menu, the Message
Selections/Message Picks window opens. All message numbers in
the current file will appear in the Message Selections column.
After you have moved all the messages to be copied into the
Message Picks column, press [F10] and the Start/Increment window
appears. When it does, press [↵ ] to open the Starting Message
Location field. Input the new message number you want to assign to
the first message on your list. Insert a value in the Increment field if
you are copying multiple messages.
For example, suppose you want to copy message numbers 1, 2, and 3
to a starting number of 10 and an increment of 5. As a result:
Message 1 is copied as message number 10.
Message 2 is copied as message number 15.
Message 3 is copied as message number 20.
When you press [F10] to accept your Message Picks, the Copy
Message confirmation window appears. Use the arrow keys to
highlight your choice and press [↵ ].
Copy (Messages) screen showing Message Selections, Start/Increment and
Confirmation windows.
Publication 2706-6.2
Page 60

4–18 Creating Message Files
Special Keys
Use the following special keys on this screen.
← →
↑ ↓
Moves the Message Select cursor to the Message Selections or
Message Picks column
Moves the Message Select cursor up or down within a column
Moves the highlighted message number from one column to the
↵
other
Get Online Help
Accept message picks
Closes the Message Selections/Message Picks window without
taking action
Notes
To copy a block of messages, move the cursor to the first message on
the block and press [CTRL][B] to mark the beginning of the block.
Then move the cursor to the last message in the block and press [↵ ].
The entire block moves to the opposite column.
If you leave the increment set to 0, the spacing between messages is
retained. For example, copying message numbers 1, 3, and 7 to
message number 10 with an increment of 0 results in new copies
with message numbers 10, 12, and 16.
Publication 2706-6.2
If any of the assigned destination message numbers are already used
for an existing message, a warning message is displayed. You can
cancel the copy, continue and overwrite the selected existing
message, skip the message, or continue and overwrite all existing
messages.
Messages are copied with the following conditions:
• Messages selected for copying appear on the Message Picks list
in the order they were selected. They do not need to be listed in
numeric order. The message with the lowest number will always
be copied to the Start number, the message with the next lowest
number will be copied to the first Increment number, and so on.
• In any of the destination message numbers are already in use by
an existing message, a warning appears allowing you to cancel
the operation, continue the copy and overwrite the existing
message, or continue and overwrite all existing messages.
• If adding new messages exceeds the capacity of your DL40, a
warning message is displayed and the copy function cancelled.
Page 61

4–19Creating Message Files
Delete Message Screen
When you select Delete from the Messages menu, the Message
Selections/Message Picks window opens. All message numbers in
the current file appear in the Message Selections column.
Press [F10] to accept your Message Picks, the Delete Message
confirmation window appears. Use the arrow keys to highlight your
choice and press [↵ ].
Delete (Message) screen with Delete Message confirmation window
Special Keys
You may use the following special keys on this screen.
← →
↑ ↓
Moves the Message Select cursor to the Message Selections or
Message Picks column
Moves the Message Select cursor up or down within a column
Moves the highlighted message number from one column to the
↵
other
Get Online Help
Accept message picks
Closes the Message Selections/Message Picks without changes
Notes
To select a block of messages, move the cursor to the first message
on the block and press [CTRL][B] to mark the beginning of the
block. Then move the cursor to the last message in the block and
press [↵ ]. The entire block will be moved to the opposite column.
Publication 2706-6.2
Page 62

4–20 Creating Message Files
Renumber Messages Screen
When you select Renumber from the Messages menu, the Message
Selections/Message Picks window opens. All message numbers in
the current file appear in the Message Selections column. Move a
message from the Message Selections column to the Message Picks
column, press [↵ ].
After you have moved the messages to be renumbered into the
Message Picks column, press [F10] and the Start/Increment window
appears. When it does, press [↵ ] to open the Starting Message
Location field. Input the new message number you want to assign to
the first message on your list. Insert a value in the Increment field if
you are renumbering multiple messages.
For example, suppose you want to renumber message numbers 1, 2,
and 3 to a starting number of 10 and an increment of 5. As a result:
Message 1 becomes message number 10.
Message 2 becomes message number 15.
Message 3 becomes message number 20.
Press [F10] to accept your Message Picks, the Renumber Message
confirmation window appears. Use the arrow keys to highlight your
choice and press [↵ ].
Renumber (Messages) – Message Selections/Message Picks
Publication 2706-6.2
Page 63

Use the following special keys on this screen.
4–21Creating Message Files
← →
↑ ↓
Moves the Message Select cursor to the Message Selections or Message
Picks column
Moves the Message Select cursor up or down within a column
Moves the highlighted message number from one column to the other
↵
Get Online Help
Accept message picks
Closes the Message Selections/Message Picks window without taking
action
Notes
To select a block of messages, move the cursor to the first message
on the block and press [CTRL][B] to mark the beginning of the
block. Then move the cursor to the last message in the block and
press [↵ ]. The entire block will be moved to the opposite column.
If you leave the increment set to 0, the spacing between messages
will be retained. For example, renumbering message numbers 1, 3,
and 7 to message number 10 with an increment of 0 will result in
new copies with message numbers 10, 12, and 16.
Messages will be renumbered with the following condition:
• Messages selected for renumbering appear on the Message Picks
list in the order they were selected. They do not need to be listed
in numeric order. The message with the lowest number is always
assigned the Start number, the message with the next lowest
number is assigned the first Increment number, and so on.
Publication 2706-6.2
Page 64

4–22 Creating Message Files
Text Search Screen
Text Search is a message editing aid that helps you edit a string of
characters that appears in several messages. Text Search finds the
first occurrence of a string, let you edit the string, and then continues
on to the next occurrence.
Strings can consist of combinations of:
• alphabetic characters • numeric characters
• spaces
• control characters for
variables
• ASCII input data • time
• date • blinking character delimiter
• [CTRL][V] • [CTRL][W]
• [CTRL][X] • [CTRL][T]
• [CTRL][Y] • [CTRL][B]
Highlight Text Search on the Messages menu, then press [↵ ]. The
Search Text window opens. Enter the string you want to edit and
press [↵ ]. A second window, the Found in Message window opens.
Across the top of this window appears the message number of the
first message in which the string was found. Inside the window is
the message text with the search string text highlighted. You can edit
the message text or search for the next occurrence of the string.
Text Search Screen - Search Text and Found in Message windows
Publication 2706-6.2
Page 65

4–23Creating Message Files
Any alphabetic or numeric ke
Special Keys and Editing Rules
Use the following keys to move through and edit your message text.
↑ ↓
← →
or
or
ALT
Moves the cursor up or down one line at a time
Moves the cursor right or left without changing the underlying text
Moves cursor directly to the beginning or end of the message
Moves cursor exactly 1 display window forward or backward
through the message (except when Scroll attribute is set)
Toggles between insert and overstrike. If there is a character at the
position of the cursor, then the insert mode inserts a character
immediately to the left of the cursor. In overstrike mode the
character at the cursor position is replaced by any new character
you type.
Deletes the character to the left of the cursor
Deletes the character at the cursor position
Inserts a return to start a new line
↵
Press the [ALT] key while entering a number from the numeric
keypad to insert an ASCII or Extended ASCII character.
Inserts that character at the position of the cursor.
y
V F W X T Y
plus
or
Adds or modify variables (see page 4–12).
Lets you set Message Attributes for only the message being created
A
or edited.
Start and end marker for blinking characters. Must be used in pairs.
B
The text between the markers will blink on the message display.
Erases message text, but leaves message number intact. You will
E
be asked to confirm this action before it takes effect.
Centers or un-centers the active message in the Edit Message
N
window.
Returns to Messages menu. Note that the Abort Message Edit
confirmation window appears if you have changed the message in
any way. The window asks if you want to discard your changes.
Opens Online Help
Toggles size of Message Text window between 40 and 200
characters
Saves changes and returns to the Messages menu
F10
Publication 2706-6.2
Page 66

4–24 Creating Message Files
Modify Message Attributes Screen
Attributes define how a message appears when triggered in the Run
Mode. Message Attribute Defaults are automatically assigned to a
message when it is created. Using the Offline Programming
Software, change the Message Attribute Defaults (as described later
in this chapter), or change the attributes for individual messages after
they are created.
Use Messages→Modify Message Attributes to change the message
attributes for one or more existing messages. Current attributes can
be default message attributes or message attributes selected with
[CTRL][A].
When you select Modify Message Attributes, the Message
Selection/Message Picks window opens. All message numbers in
the current file will appear in the Message Selections column. To
move a message from the Message Selections column to the
Message Picks column, press [↵ ].
After you accept your message picks, the Message Attribute window
opens. Use the arrow keys to highlight the attribute you want to
change and press [↵ ]. You will be able to select the new attribute
value from a list, or enter a number. Press [↵ ] apply the new
attribute. An explanation of each message attribute is provided on
the next page.
When you have finished choosing attribute settings, move the cursor
to Quit and press [↵ ].
Modify Message Attribute screens
Publication 2706-6.2
Page 67

Special Keys
You may use the following special keys on this screen.
4–25Creating Message Files
← →
↑ ↓
↵
More About Attributes
Moves the Message Select cursor to the Message
Selections or Message Picks column
Moves the Message Select cursor up or down
within a column; in the Message Attributes window
moves cursor up or down the attribute list
Moves the highlighted message number from one
column to the other; in the Message Attributes
window lists or accepts attribute choices
Moves cursor to first attribute
Moves cursor directly to Quit
Get Online Help
Accept message picks
Closes the Message Selections/Message Picks
window without taking action; exits the Message
Attribute window without taking action.
The modifiable message attributes you can control from the Message
Attributes menu appear below:
• Display message on what line
• Scroll message
• Print message
• Send message to Slave number
• Wait Time for message
• Clear message automatically
• Repeat message automatically
• Chain message to another
• Energize relay
• Send message to the stack
• Send message time to the stack
• Hide message on display
• Acknowledge message
• Slave message color
• Slave message length
• Echo relay to slave
Publication 2706-6.2
Page 68

4–26 Creating Message Files
Display message on what line
Controls where on the DL40 Plus display the message appears.
Options are different for 2 and 4 line versions.
With 2 line units, choose from With 4 line units, choose from
All Lines All Lines
Line 1 Only Line 1 Only
Line 2 Only Line 2 Only
Line 3 Only
Line 4 Only
Scroll message
This message attribute determines whether the message will scroll
across the DL40 Message Display. You can activate scrolling only if
the Line Usage attribute (described above) has been set to use a
single line. Select Yes to activate or No to deactivate.
Print message
If the Print message attribute is set to Yes, then the DL40 Message
Display will send any triggered message to a printer through the
DL40 RS-232 Port. The message is printed only once (even if the
Repeat Message Automatically attribute is active) unless the
message contains changed variable data. If new variable data is
received while the message is running, then the message is printed
again with the new data. Select Yes to activate or No to deactivate.
Send message to Slave (address) number
If you enter a slave number here and a message is triggered via the
Remote I/O or Parallel or Keyboard ports, the message will be sent
to the slave with the specified address. This attribute is valid for all
Run Modes. However, the slave address set when operating in the
Message/Variable/Slave Run Mode overrides this attribute.
Important: To send any message to a slave, Ports→RS-485
Port→Port Use must be set to DL Slaves.
If the Repeat message automatically attribute is active, the message
is sent to the slave each time it repeats. If the message has embedded
variables, it is sent to the slave each time new variable values are
received during the message wait time. Possible values for this field
include:
Entry: Which means:
0 Don’t send to slave
1 through 126
(addresses 13 & 18 are not valid)
127 Send to all slaves
Send to the single identified
slave address
Publication 2706-6.2
Page 69

4–27Creating Message Files
Wait time for message
To the message display, this setting
can mean either:
• If you have activated Scroll message, the value here represents
the scrolling rate in tenths of a second. For example, a value of 8
here will result in display of the next new character in a message
every 0.8 seconds.
• If Scroll message is not active, then the value here represents the
number of seconds a message will appear on the message display.
For example, a value of 5 here will assure that the message will
appear on screen for 5 seconds whenever it runs.
A value of zero (0) allows the message to remain displayed until the
next message trigger is received. This allows the PLC or SLC to
control messaging times.
Acceptable values for this field can range from 0 through 31.
Clear message automatically
Sometimes referred to as AutoClear, activating this menu item
instructs the DL40 to clear the message from the display after the
Wait Time for message has expired even if no other messages have
been triggered.
This value applies only to the lines used by a single message. For
example, if this message uses only lines 2 and 3, then only lines 2
and 3 will be cleared. Lines 1 and 4 will remain unchanged.
Important: AutoClear de-energizes the alarm relay only if the
message which was cleared had energized the relay. A DL50
message display must always be sent a message that de-energizes the
relay.
Select Yes to activate or No to deactivate.
Repeat message automatically
This attribute (also referred to as AutoRepeat) causes the display to
repeat a message continuously as long as no other messages are in
the queue waiting to run. This attribute only functions if the DL40
message display is operating in the Message/Variable/Slave or
Message/Variable Run Mode.
Use this attribute when you need to update variables repeatedly
within a message.
Select Yes to activate or No to deactivate.
Publication 2706-6.2
Page 70

4–28 Creating Message Files
Chain message to another
With this attribute you can link two messages together so that the
second message runs automatically after the Wait Time for the
message has expired. The second message requires no additional
triggering and no special modification of its attributes to respond.
Also, the link is independent of the second message, which means
that the second message can also run independently under other
circumstances.
The second message will have its own attributes, which may be
different from those of the first message. There is no limit to the
number of messages that can be chained together, and messages can
be chained to Special Messages.
Note: The Chain Message to Another attribute is disabled if
AutoRepeat is active.
Activate this attribute by entering a valid message number.
Energize relay
Activating this attribute will display the message and energize the
DL40 message display’s alarm relay whenever the message is
triggered.
Important: The alarm relay will not de-energize even after the Wait
Time for message has expired. The relay will de-energize when:
• a message is run for which the Energize relay attribute is not
activated
• any Special Message runs
• the DL40 message display leaves the Run Mode
Important: AutoClear de-energizes the alarm relay only if the
message which is cleared has the Energize relay enabled.
ATTENTION: Use the relay for annunciator purposes
only. Do not use it for control.
!
Select Yes to activate or No to deactivate.
Publication 2706-6.2
Page 71

4–29Creating Message Files
Send message to the stack
When a message is triggered, enabling this attribute places the
message number along with any variables on the Historical Events
Stack. Stacked messages can also be time stamped with the time the
message was triggered and/or run.
Important: Even if AutoRepeat is enabled, the message number
(and time) is placed on the Historical Events Stack only once each
time the message is triggered and/or run rather than each time it
repeats. The message number, variables, and time (if applicable) is
placed on the Historical Events Stack while the message is running
or repeating only when updates to variables are received by the
DL40.
For more information on the Historical Events Stack and time
stamping, refer to the DL40 Plus user manual (Publication 2706-6.1).
Select Yes to activate or No to deactivate.
Send message time to the stack
Enabling this attribute allows for time and date stamping of
messages sent to the Historical Events Stack.
Select Yes to activate or No to deactivate.
Hide message on display
When activated, the message does not appear on the DL40 Plus, but
is sent to a slave display, printer, tape recorder, or placed on the
Historical Events Stack. The other attribute settings for the message
determine its destination(s).
For example, assume Hide Message On Display is enabled, as are
Print Message and Send Message to Slave Number 2. There will be
no change on the DL40 display when the message runs, although a
copy of the message will be printed and it will be displayed on the
slave addressed as 2.
Note: When used with [CTRL][X] (ASCII Input Data), the
underscore prompt for this data will still be displayed on the DL40
message display even when Hide Message On Display is active.
Select Yes to activate or No to deactivate.
Acknowledge message
Enabling this attribute instructs the DL40 message display to hold
the message until you press the [MSG ACK] button on the front of
the DL40 display. The next message is displayed only after the
[MSG ACK] button has been pressed.
Publication 2706-6.2
Page 72

4–30 Creating Message Files
Note: We recommend that you enable message queueing (from the
Options menu) when using the Acknowledge Message attribute.
Select Yes to activate or No to deactivate.
Slave message color
This attribute allows you to control the color of a message sent to a
color-capable slave display such as the Dataliner DL50 Tri-Color
Marquee Display. The setting options available to you include:
For DL10 or DL20 For red DL50 For color DL50
Default Default Default
Red
Green
Amber
Important: The factory setting for this attribute in the Message
Attribute Defaults menu is Default. We recommend leaving that
value unchanged. Do not use any selection other than Default for
DL10, DL20, or Red DL50 slave displays.
Note: This attribute is not available from the DL40 message display
onboard editor. It is only accessible through the Offline
Programming Software.
Slave message length
Use the Slave Message Length attribute only with DL50 slave
displays. Its purpose is to allow display of 10-character messages on
“short” DL50 displays operating in large text mode. Large text
mode displays characters that are 4.8 in. (12.2 cm) tall. Applicable
displays include Catalog No. 2706-F11J (Red DL50 Message
Display) and 2706-F11JC (Tri–color DL50 Message Display).
Acceptable values for this attribute include:
For DL10 or DL20 For DL50
20 20
10
The factory setting for the Slave Message Length attribute is 20,
which means the slave message length will always be set to 20 when
you create a message unless you have specified a new setting on the
Message Attribute Defaults menu.
Publication 2706-6.2
Note: This attribute is not available from the DL40 message display
onboard editor. It is only accessible through the Offline
Programming Software.
Page 73

4–31Creating Message Files
Echo relay to slave
The Echo Relay to Slave attribute sends the energize or de-energize
relay commands to the DL50 slave addressed in the Send Message to
Slave Number attribute. These commands are sent in addition to any
specified message text.
After this attribute sends a relay command to the slave, the slave
relay will not de-energize until another message is sent to the slave
that meets both of the following conditions:
• Energize Relay is set to No (to de-energize the relay)
• Echo Relay to Slave is set to Yes (to send a de-energize command
to the slave display)
Acceptable values for this attribute include:
For DL10 or DL20 For DL50
No No
Yes
The factory setting for the Echo Relay to Slave attribute is No.
ATTENTION: Use the slave relay for annunciator
purposes only. Do not use it for control.
!
Note: This attribute is not available from the DL40 message display
onboard editor. It is only accessible through the Offline
Programming Software.
Notes
The attributes shown on the Message Attributes window are those
assigned to the message with the lowest message number currently in
the Message Picks list.
If Line Usage is other than All Lines, then the display line on the
DL40 does not necessarily correspond to the cursor row value shown
on the message editing window during editing.
To select a block of messages, move the cursor to the first message
on the block and press [CTRL][B] to mark the beginning of the
block. Then move the cursor to the last message in the block and
press [↵ ]. The entire block will be moved to the opposite column.
The Slave Message Color, Slave Message Length, and Echo Relay to
Slave message attribute selections are only available through the
Offline Programming Software. You cannot change those attributes
with the DL40 Onboard Editor.
Publication 2706-6.2
Page 74

4–32 Creating Message Files
Message Attribute Default Screen
Message Attribute Defaults are the attributes assigned to all
messages in a file when they are created.
After you have selected Message Attribute Defaults, the Message
Attribute Defaults window opens. Use the arrow keys to highlight
the attribute you want to change and press [↵ ]. Select the new
attribute value from a list, or enter a number. Press [↵ ] apply the
new attribute.
When you have finished setting attributes, move the cursor to Quit
and press [↵ ].
Message Attribute Default screen
Special Keys
You can use the following special keys on this screen.
↑ ↓
Moves the cursor up or down the attribute list
Lists or accepts attribute choices
↵
Moves cursor to first attribute
Moves cursor directly to Quit
Get Online Help
Closes the Message Attribute Defaults window without taking
action.
Publication 2706-6.2
Page 75

4–33Creating Message Files
Notes
Refer to the previous section for descriptions of each message
attribute.
If Line Usage is other than All Lines, then the display line on the
DL40 does not necessarily correspond to the cursor row value shown
on the message editing window during editing.
To select a block of messages, move the cursor to the first message
on the block and press [CTRL][B] to mark the beginning of the
block. Then move the cursor to the last message in the block and
press [↵ ]. The entire block will be moved to the opposite column.
The Slave Message Color, Slave Message Length, and Echo Relay to
slave message attribute selections are only available through the
Offline Programming Software. You cannot change those attributes
with the DL40 Onboard Editor.
Publication 2706-6.2
Page 76

4–34 Creating Message Files
Options Menu
The items on the Options menu allow you to control a variety of
hardware and display options. Contents of this menu include:
• Run Mode – Highlighting Run Mode and pressing [↵ ] opens a
window for choosing a run mode. Refer to Chapter 1 of this
manual for additional information on run modes.
• Newest Message on Line 1 – Selecting Yes displays the newest
message to be triggered on line 1, and shifts previously triggered
messages down. The message on the bottom line is shifted off
the display. This supersedes the message attribute Message on
Line # Only. Messages are still displayed in 20–character pieces.
This setting is effective with all run modes.
• Auto Run Message # – An Auto Run Message is a message that
will be displayed when your DL40 is powered up. It can be any
message, including a message in the Message List. The Auto
Run Message does not support inserted variable data. Specify a
message number, or enter 0 for no Auto Run Message.
Note for Remote I/O units only: If communications between a
DL40 and a PLC are not established at startup, the Auto Run
Message displays only if Switch 8 on Switch Bank #2 (Last State)
is ON.
• Background Message Number – The Background Message runs
for a minimum of 2 seconds after the last message triggered has
finished its display wait time. This message is displayed until a
valid message is triggered or until the Run Mode is exited.
The Background Message does not support inserted variable data.
Specify a message number, or enter 0 for no Background
Message.
• Special Message Start Number – Special messages provide the
ability to monitor and control certain functions of the DL40.
These messages can occupy message numbers 1 through 16, 901
through 916, or be disabled. Specify your choice.
• Message Queueing Enabled – Choosing Yes allows you to put
up to 20 messages in the Queue. These messages are displayed in
the order they are received as soon as the previous message has
completed running.
Note: If Message Queueing is turned Off, the queue size is set to
1, which permits only one (1) additional message trigger to be
received while the current message is being run or displayed.
• Time Format – Choose between AM/PM or 24Hr (military style)
time display.
• Language – Choose between English, International, or Cyrillic
text (DL40 Plus only). Refer to Appendix C.
Publication 2706-6.2
Page 77

Options Menu
Special Keys
Use the following special keys on this screen.
4–35Creating Message Files
↑ ↓
Moves the cursor up or down the attribute list
Lists or accepts attribute choices
↵
Moves cursor to first attribute
Moves cursor directly to Quit
Get Online Help
Closes the Message Attribute Defaults window without taking action.
Publication 2706-6.2
Page 78

4–36 Creating Message Files
Ports Menu
The Ports menu allows you to control the communication settings for
DL40 Message Display. Select from RS-232, RS-485, or the
currently selected trigger port settings active file.
After you have selected Ports, the Ports menu opens. Use the arrow
keys to highlight a menu item and press [↵ ]. You can select a new
value from a list, or enter a number. Press [↵ ] to apply any changes.
The Ports menu
Special Keys
Use the following special keys on this menu.
↑ ↓
↵
Moves the cursor up or down the menu
Lists or accepts choices
Moves cursor to first menu item
Moves cursor directly to Quit
Get Online Help
Closes the Ports menu without taking action.
Publication 2706-6.2
Page 79

4–37Creating Message Files
Notes
Important: The communications parameter settings selected here
must match the communications settings of the device that is
connected to the DL40 Message Display.
The following lists communications parameters and the choices
available for each. Refer to the DL40 Plus user manual (Publication
2706-6.1) for more information on setting RS-232 or RS-485 ports.
RS-232 Port Settings
The following settings are available from this menu item.
The default value appears in bold.
Parameter Available choices
Baud Rate 300, 1200, 2400, 4800, 9600, 19200
Data Bits 7 or 8
Parity None, Odd, Even
Handshaking None, Software, Hardware
Port Use
DL40 Programmer, DL Slaves, Devices
Using Open Protocol
RS-485 Port Settings
The following settings are available from this menu item. The
default value appears in bold.
Parameter Available choices
Baud Rate 300, 1200, 2400, 4800, 9600, 19200
Data Bits
Parity
Port Use
➀ This setting should always be 8 if Port Use is set to Programmer.
➁ This setting should always be None if Port Use is set to Programmer.
➀
7 or 8
None, Odd, Even
DL40 Programmer, DL Slaves, Devices
Using Open Protocol
➁
Important: Do not set Port Usage to DL Slaves or Devices Using
Open Protocol if downloading message files to the DL40 through the
RS-485 Port.
RS-232 Printer Settings
These are the settings of the RS-232 Port when the Print Stack or
Print Mode function is active. The following settings are available
from this menu.
Parameter Available choices
Null Count 0 to 255
Width 20 to 132
Publication 2706-6.2
Page 80

4–38 Creating Message Files
RS-232 Tape Recorder Settings
Note that RS-232 Tape Recorder Settings are valid only when
writing to or reading from a tape drive, and that communications to a
tape recorder can be made only via the RS-232 port.
Baud rate is the only modifiable parameter applicable while using a
tape recorder. Your choices are listed below. The default value
appears in bold.
Parameter Available choices
Baud Rate 300, 1200, 2400, 4800, 9600
This setting will revert to normal RS-232 Port settings (described
above) when the Tape function is finished.
Triggering Port Settings
The parameters presented here will differ between Remote I/O and
Parallel Port versions of the DL40 Message Display. The following
settings are available from this menu item on Remote I/O units. The
default value appears in bold.
Parameter Available choices
Message Format Binary, BCD
Variable Format Binary, BCD
Control-W Format BCD, ASCII
Bit Trigger Priority Section
Size
Always Send Clock Data
➀ If selection is Yes, only clock data will be returned to a PLC no matter what
attributes are set or what data is requested.
0 to 31 words
Yes or No
➀
The following settings are available from this menu item on Parallel
Port units. The default value appears in bold.
Parameter Available choices
Message Format Binary, BCD
Variable Format Binary, BCD
Control-W Format BCD, ASCII
High True Logic Yes or No
Using AC/DC Converter Yes or No
Data Hold Time
➀ If using AC/DC Converter
➁ If not using AC/DC Converter
40 to 255 msec
➀
or 10 to 255 msec
➁
Publication 2706-6.2
Page 81

4–39Creating Message Files
Verify Menu
After you have finished with the Messages, Options, and Ports
menus, you can use the Verify menu to display individual messages
on the DL40 to be sure their format is correct. You can even insert
binary, BCD, and ASCII variables into the message you are testing.
Important: The file for the message you want to test must exactly
match the Internal Application Memory of the DL40 Message
Display. To assure that is the case, you must download the file to the
DL40 before testing any message in that file.
Depending on whether you select RS-485 or RS-232
communications, you will follow one of two different paths through
the Verify menu. The basic steps for each communications protocol
appear below.
Verify
Path
Default/
Temporary
DL40 Port
Selection
RS–232 RS–485
COM Port
Selection/
Configuration
Download
to DL40
Message
Selection
Test
Message
Download
to DL40
Address
Selection
COM Port
Selection/
Configuration
Message
Selection
Test
Message
Highlight Verify, then press [↵ ]. To change communications
method, highlight DL40 Port and press [↵ ]. Select RS–232 or
RS–485 and press [↵ ]. Highlight Download to DL40 and press [↵ ].
Publication 2706-6.2
Page 82

4–40 Creating Message Files
Verify Menu
Special Keys
Use the following special keys on the Verify menus.
↑ ↓
Moves the cursor up or down the menu
↵
Lists or accepts choices
Moves cursor to first menu item
Moves cursor directly to Quit
Get Online Help
Closes the menu without taking action.
Publication 2706-6.2
Page 83

4–41Creating Message Files
Communications via RS–485
Test Message Selections (for RS-485 communications)
If communicating via RS-485, the Address Selections window
opens. Select the DL40 address; then press [↵ ]. If you need to
change your computer’s communications port parameters, highlight
Configure Port, and press [↵ ]. Select COM1 or COM2; press [↵ ].
The window opens. Set Computer Address and
Baud Rate. Note: To change Parity or Data Bits, return to Ports
menu.
Highlight Download (filename) and press [↵ ]. After file is
downloaded, you will return to the Verify window. Highlight Test
Message(s) on DL40; press [↵ ].
The Message Selections window opens. Highlight number of the
message you want to display and press [↵ ]. Answer Yes to Start
Testing Messages Now? Message is displayed on DL40. Press
[ESC] to end an Autorepeat message.
Publication 2706-6.2
Page 84

4–42 Creating Message Files
Communications via RS–232
Test Message Selection Window (for RS-232 communications)
Communicating via RS–232, no Address Selection window opens.
To change your computer’s communications port parameters,
highlight Configure Port; press [↵ ]. Select COM1 or COM2; press
[↵ ]. The Configure Port window opens. Set the Baud Rate.
Note: To change Parity or Data Bits, return to the Ports menu.
Highlight Download (filename) and press [↵ ]. After file is
downloaded, you will return to the Verify window. Highlight Test
Message(s) on DL40 and press [↵ ]. Note: Handshake must be set to
None. See page 5–4.
The Message Selections window opens. Highlight the number of the
message you want to display and press [↵ ]. Answer Yes to Start
Testing Messages Now? The message will be displayed on the
DL40. Press [ESC] to end an Autorepeat message.
If your message contains variables, you must put in a value for the
variables when testing the message. When you answer Yes to Start
Testing Messages Now?, a message text window and an Enter
variable window for the first variable opens. Enter value for your
first variable; press [↵ ]. The window for your second variable
opens. Continue to enter values for all [CTRL][V] and [CTRL][W]
variables.
Note: Values for [CTRL][X] variables are entered into a message
using a keyboard while the message is displayed.
Message Text Window
Publication 2706-6.2
When you answer Yes to Start Testing Messages Now? the message
text window shown opens and displays the message contents.
Page 85

Message Verification Window
To test message on a
slave, enter address
Test messages contain the following symbols:
• """ indicates a [Ctrl][X] data request
• ∼ ∼ indicates a [Ctrl] [V] inserted formatted variable
• indicates a [Ctrl] [W] inserted ASCII or BCD variable
$
4–43Creating Message Files
Publication 2706-6.2
Page 86

4–44 Creating Message Files
Device Menu
The Device menu allows you to configure the Offline Programming
Software to match the type of DL40 receiving downloaded message
files. You can change the selected device at any time the Develop
Menu bar appears.
When selecting a new device for an existing file, you will receive
error messages if the new device is incompatible with the messages
in the file. For example, if a message in the file requires 4 display
lines, you will not be able to select a two-line DL40.
This menu automatically pops up after you create a new file, so you
need access this menu from the Develop Menu bar only if you need
to change the type of DL40 selected.
The variables making up a device specification include:
Variable Available choices
DL40 Type Remote I/O or Parallel Port
Number of Display Lines 2 or 4
Application Memory Size 16k, 32k, 64k, or 128k
Device Menu
Publication 2706-6.2
Page 87

Special Keys
Use the following special keys on this menu.
4–45Creating Message Files
↑ ↓
Moves the cursor up or down the menu
↵
Lists or accepts choices
Moves cursor to first menu item
Moves cursor directly to Quit
Get Online Help
Closes the menu without taking action.
Publication 2706-6.2
Page 88

Downloading/Uploading Message
Files
This chapter describes the functions available to you from the
Transfer menu. The options available from this menu provide the
tools needed to move files and data between the Offline
Programming Software and the devices to which it is connected.
To open the Transfer menu, use the right and left arrow keys to
highlight Transfer on the Main menu bar, then press [↵ ]
Section Page
Transfer Menu 5–2
Downloading a File using RS-232 or RS-485 5–3
Uploading a File using RS-232 or RS-485 5–6
Downloading a File using Remote I/O (PassThrough) 5–8
Uploading a File using Remote I/O (Passthrough) 5–10
Creating a New Communications File 5–12
Modifying an Existing Communications File 5–16
Sending the Time and Date using RS-232 or RS-485 5–17
Writing a File to Tape 5–18
Reading a File From Tape 5–20
Publication 2706-6.2
Page 89

5–2 Downloading/Uploading Message Files
Transfer Menu
Selecting Transfer on the Main menu bar displays the Transfer menu.
Transfer Menu
Special Keys
Use the following special keys on the Transfer menu or on any of the
submenus described in this chapter.
↓ ↑
Move the cursor to the desired function
Move the cursor directly to the first menu item
Move the cursor directly to the last menu item (Quit)
Selects the item highlighted by the cursor, opens the next
↵
menu, or selects from a list of options
Closes the menu or screen and returns cursor to the previous
menu
Get Online Help
Notes
From the Transfer menu you can perform the following activities:
• upload or download a file using RS-232 or RS-485
• upload or download a file using Remote I/O via DH+ or Ethernet
PassThrough
• send the time to a DL40 using RS-232 or RS-485
• write or write a file to a tape recorder
Publication 2706-6.2
You can transfer one file at a time to or from a DL40 or tape
recorder.
Page 90

5–3Downloading/Uploading Message Files
Downloading a File using RS-232 or RS-485
You can download one file at a time from the Offline Programming
Software to the DL40. When you select Download to DL40
(RS-232/RS-485), the Download window opens. Move the cursor to
DL40 Port and press [↵ ]. Select RS-232 or RS-485 from the
window and press [↵ ]. A message flashes briefly to indicate that the
Offline Programming Software is saving the setup file.
Download to DL40 screen (using RS-232 or RS-485)
Next move the cursor to Select File and press [↵ ]. A window opens
with the default directory in the upper left corner and a list of the
files found in that directory.
Use the arrow keys to move the cursor to the file you want to
download and press [↵ ]. If the name of the file you want to
download does not appear here, you may be using the wrong data
directory. Change the data directory by backing up and selecting
Directory on the Download to DL40 window. When you enter a
complete directory path in the Directory window the Offline
Programming Software uses that directory as a default for all file
activities. Override the Directory setting by typing another complete
data directory when naming files. Enter the directory in the format:
Drive:\Root\Subdir
When you have selected a file, the file name will appear in the Select
File field on the Download to DL40 menu.
If downloading via RS-485, the Address Selections/Address Picks
window opens after you have selected a file. All message addresses
in the selected file will appear in the Address Selections column.
Use the up and down arrow keys to highlight an address, then press
[↵ ] to move the address to the Address Picks column. After you
have moved all the addresses to be downloaded into the Address
Picks column, press [F10].
Publication 2706-6.2
Page 91

5–4 Downloading/Uploading Message Files
To select a block of addresses, move the cursor to the first address on
the block and press [CTRL][B] to mark the beginning of the block.
Then move the cursor to the last address in the block and press [↵ ].
The entire block will be moved to the opposite column.
RS-485 Address Selections/Address Picks window
Use the following special keys on the Address Selections/Address
Picks window.
← →
↑ ↓
↵
Moves the cursor to the Address Selections or Address
Picks column
Moves the cursor up or down within a column
Moves the highlighted address from one column to the
other
Move the cursor directly to the first item
Move the cursor directly to the last item
Get Online Help
Accept address picks
Closes the Address Selections/Address Picks window
without taking action
Publication 2706-6.2
When you have specified a file and (in the case of an RS-485
download) your desired addresses, the Select File window opens.
Page 92

5–5Downloading/Uploading Message Files
The Offline Programming Software allows you to download a
complete message file or only the currently selected file’s
parameters. Specify which you want by selecting All or Parameters
in the Select Download Type field of the Download to DL40 menu.
Note: To use Verify you must select All in the Select Download
Type field.
To configure your computer’s communication port, select Configure
Port on the Download to DL40 menu, then press [↵ ]. Select COM1
or COM2, press [↵ ], and select a baud rate in the Configure Port
window.
Note: To change parity or data bits, return to the Develop→Ports
menu.
Important: The software warns you if the configuration of the
DL40 to which you are writing is different than the configuration of
the file you are downloading. Device type, number of lines, and
memory size must all match.
Select File screen
Currently
selected
filename
To use Verify you must select All
When you have finished with the Select File menu, move the cursor
to the line containing the currently selected file name and press [↵ ].
The Download confirmation appears. Select Yes to begin
downloading, or No or Quit to cancel the download and return to the
Select File menu.
Publication 2706-6.2
Page 93

5–6 Downloading/Uploading Message Files
Uploading a File using RS-232 or RS-485
You can upload one file at a time from a DL40 to the Offline
Programming Software. When you select Upload from DL40
(RS-232/RS-485), the Upload File from DL40 window appear.
Move the cursor to DL40 Port and press [↵ ]. Select RS-232 or
RS-485 from the window and press [↵ ]. A message will flash
briefly to indicate that the Offline Programming Software is saving
the setup file.
Upload File (via RS-232)
To configure your computer’s communication port, select Configure
Port on the Upload to DL40 menu, then press [↵ ]. Select COM1 or
COM2, press [↵ ], specify your computer’s address (if using
RS-485), and select a baud rate in the Configure Port window.
Note: To change parity or data bits, return to the Develop→Ports
menu.
If necessary, you can select Directory to change the currently
selected data directory for the uploaded files.
Publication 2706-6.2
Page 94

5–7Downloading/Uploading Message Files
Address Selections Screen when uploading via RS-485
If uploading via RS-485, the Address Selections window opens when
you select Upload File. Use the up and down arrow keys to highlight
an address, then press [↵ ] to select the highlighted address and
return to the Upload File from DL40 menu.
When you have finished making changes on the Upload File from
DL40 menu, move the cursor to the line containing the words
Upload File and press [↵ ]. The Upload confirmation appears.
Select Yes to begin uploading, or No or Quit to cancel the upload and
return to the Upload File from DL40 menu.
Publication 2706-6.2
Page 95

5–8 Downloading/Uploading Message Files
Downloading a File using Remote I/O (PassThrough)
You can download one file at a time from the Offline Programming
Software to the DL40. When you select Download to DL40 (Remote
I/O) and press [↵ ], the Download (Remote I/O) window appears.
Important: The DL40 must be operating in Block Transfer mode to
use Remote I/O PassThrough.
Download (Remote I/O) file selection screen
Move the cursor to Select File and press [↵ ]. The program displays
a brief message indicating it is searching for data files, then displays
the File Selections window. Use the cursor keys to highlight a file
name and press [↵ ]. When you do so, the Message Selections
window is replaced by an expanded version of the Download
(Remote I/O) window. Included in this window are the address
parameters of the currently selected communication (.UDU) file,
including DL40 Rack (address), DL40 Group (number), and PLC
Address. In addition, the window includes the Download
FILENAME item and menu choices allowing you to modify an
existing Communication File or create a new one.
Note: There is no default Communication File. You must create at
least one file to upload or download over Remote I/O via DH+ or
Ethernet.
Publication 2706-6.2
Page 96

Download (Remote I/O) screen – expanded
When the settings on the expanded Download (Remote I/O) screen
are configured, move the cursor to the Download FILENAME line
and press [↵ ]. Answer Yes when asked if you want to start
downloading now. Before you download you will get one of the
following warnings, depending on the type and access settings of
your DH+ hardware device.
5–9Downloading/Uploading Message Files
ATTENTION: Before the download begins, you will see
one of the following warnings. Which one you see depends
!
on the type and access settings of your DH+ or Ethernet
hardware device.
WARNING: Incorrect address selection could corrupt data
in a non-DL40 device. Verify that the correct
Communication File is selected.
WARNING: Incorrect address selection could corrupt data
in a non-DL40 device. Verify that the correct
Communication File is selected.
DH+ Network Access is set to Local.
WARNING: Incorrect address selection could corrupt data
in a non-DL40 device. Verify that the correct
Communication File is selected.
DH+ Network Access is set to Remote (Bridge)
– Local Address is __.
– Remote Bridge Address is __.
Be sure the selected communication file has the correct
address parameters, and change them if necessary before
continuing.
Note: When downloading via Remote I/O, Download Type is
automatically set to All. You can’t transfer Parameters only.
Publication 2706-6.2
Page 97

5–10 Downloading/Uploading Message Files
Uploading a File using Remote I/O (PassThrough)
You can upload one file at a time from the DL40 to the Offline
Programming Software. When you select Upload to DL40 (Remote
I/O), the Upload (Remote I/O) window appears.
Upload via Remote I/O screen
Included in this window are the address parameters of the currently
selected communication (.UDU) file, including DL40 Rack
(address), DL40 Group (number), and PLC Address. In addition, the
window includes the Upload File item and menu choices allowing
you to modify an existing Communication File or create a new one.
Note: There is no default Communication File. You must create at
least one file to upload or download over Remote I/O via DH+ or
Ethernet PassThrough.
When the settings on the Upload (Remote I/O) screen are as you
want, move the cursor to the Upload File line and press [↵ ].
Answer Yes when asked if you want to start uploading now. Before
you upload, one of the following warnings is displayed, depending
on the type and access settings of your DH+ hardware device.
Publication 2706-6.2
Page 98

5–11Downloading/Uploading Message Files
ATTENTION:Before the upload begins, you will see one of
the following warnings. Which one you see depends on the
!
type and access settings of your DH+ or Ethernet hardware
device.
WARNING: Incorrect address selection could corrupt data
in a non-DL40 device. Verify that the correct
Communication File is selected.
WARNING: Incorrect address selection could corrupt data
in a non-DL40 device. Verify that the correct
Communication File is selected.
DH+ Network Access is set to Local.
WARNING: Incorrect address selection could corrupt data
in a non-DL40 device. Verify that the correct
Communication File is selected.
DH+ Network Access is set to Remote (Bridge)
– Local Address is __.
– Remote Bridge Address is __.
Note: Be sure the selected communication file has the
correct address parameters, and change them if
necessary before continuing.
Publication 2706-6.2
Page 99

5–12 Downloading/Uploading Message Files
Creating a New Communications File
To specify a new Communication File, highlight Create
Communication File in either the Download (Remote I/O) or Upload
(Remote I/O) menus and press [↵ ]. You will be asked to specify a
file name. To create a file in another directory, highlight Directory
and press [↵ ] and the Program Data directory window will open.
Enter the directory in the form:
Drive:\Root\Subdir
Press [↵ ]. The Communication File window opens. Highlight the
parameter you want to set and press [↵ ]. Select parameter setting
and press [↵ ]. When you highlight Hardware Device and press [↵ ],
a window opens from which you can select the hardware device you
are using. Set device parameters.
Communications File screen
Publication 2706-6.2
Note: For information on PLC and interface board types required
for PassThrough file transfers, refer to Chapter 2.
When you highlight an address parameter (DL40 Rack, DL40
Group, PLC Address), you will get the following warning:
ATTENTION: Incorrect address selection could corrupt
data in a non-DL40 device. Verify that the correct
!
Communication File is selected.
Parameter Acceptable values
DL40 Rack 0 to 76 (octal)
DL40 Group 0, 2, 4, or 6
PLC Address 0 to 77 (octal)
PLC Type PLC–5/15/25/40/60
PLC-5/250
Page 100

5–13Downloading/Uploading Message Files
The DL40 Rack is the address assigned to the DL40 using DIP
Switch Bank #1 on the back of the DL40. Refer to the DL40 Plus
user manual (Publication 2706-6.1) for additional information.
The DL40 Group is the First I/O Group Number assigned to the
DL40 using DIP Switch Bank #1 on the back of the DL40
The PLC Address is the station number of the PLC-5 on the DH+
link to which the DL40 is attached. This address must match the
DIP switch settings on the PLC.
The PLC Type is the type of Allen-Bradley PLC-5 on the DH+ link
to which the DL40 is attached. Use the PLC-5/250 choice for a PLC
mounted in a Pyramid Integrator chassis.
Selecting a Hardware Device
As shown below, you can select from a number of hardware devices:
Hardware Device window
Your hardware device choices appear in a list.
Parameter Acceptable values
Hardware Device
① DH+ Device
② DH+ Device, Serial Interface
③ DH+ Device, Microchannel Bus
1784-KL①
1784-KT, KTX, PCMK①
1770-KF2②
1784-KT2③
ETHERNET
Publication 2706-6.2
 Loading...